
Applies ToWindows 8.1 Windows 8.1 Enterprise Windows 8.1 Pro Windows 8 Windows 8 Enterprise Windows 8 Pro Windows 7 Enterprise Windows 7 Home Basic Windows 7 Home Premium Windows 7 Professional Windows 7 Starter Windows 7 Ultimate Windows Vista Enterprise 64-bit Edition Windows Vista Ultimate 64-bit Edition Windows Vista Business Windows Vista Business 64-bit Edition Windows Vista Enterprise Windows Vista Ultimate Windows 10 Windows 11
When critical Windows system files are missing or corrupted, some Windows features may stop working correctly or Windows may stop responding altogether. If this happens, you can use the Deployment Image Servicing and Management tool (DISM) and the System File Checker tool (SFC) to scan your system files and restore any corrupted or missing files.
Step 1: Run DISM
DISM provides the files required to repair your corrupted files. You should run DISM prior to running the System File Checker. To do this:
-
Open an elevated command prompt.
-
Type cmd in the Search box.
-
In the search results, right-click Command Prompt, and then select Run as administrator.
-
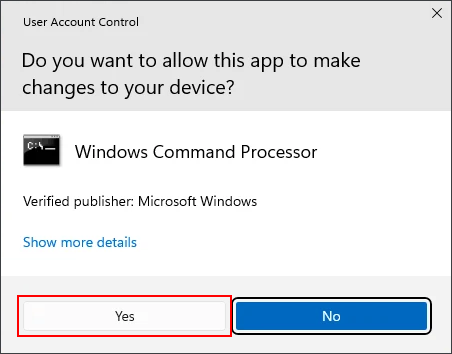
If you are prompted for confirmation or an administrator password, type the password, or click Allow.
-
-
In the Command Prompt window, type the following command and press Enter. It may take several minutes for the command operation to be completed.
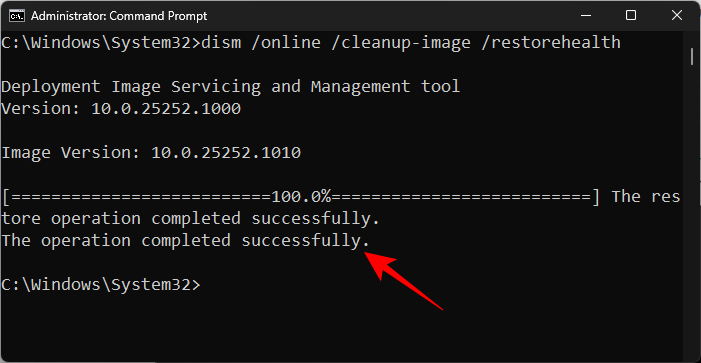
DISM.exe /Online /Cleanup-image /Restorehealth
Tips:
-
DISM uses Windows Update as the source to provide the necessary files. However, if your Windows Update client is broken, you can use a running Windows installation, or a Windows side-by-side folder from a network share or removable media, such as the Windows DVD, as the source of the files. To do this, run the following command instead:
-
DISM.exe /Online /Cleanup-Image /RestoreHealth /Source:C:\RepairSource\Windows /LimitAccess
-
In the above command, replace the C:\RepairSource\Windows placeholder with the location of your repair source. For more information about using the DISM tool to repair Windows, see Repair a Windows Image.
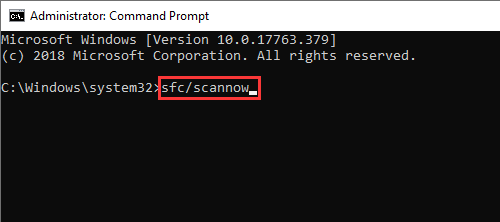
Step 2: Run System File Checker
In the Command Prompt window, type the following command, and press ENTER:
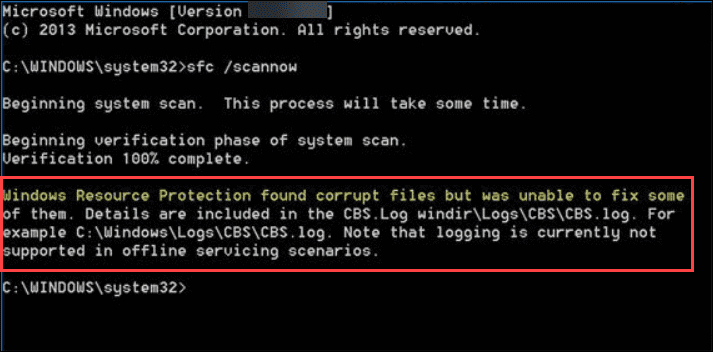
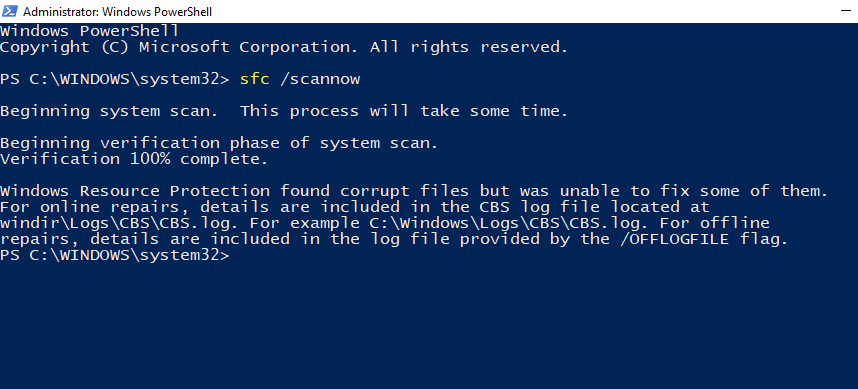
sfc /scannow
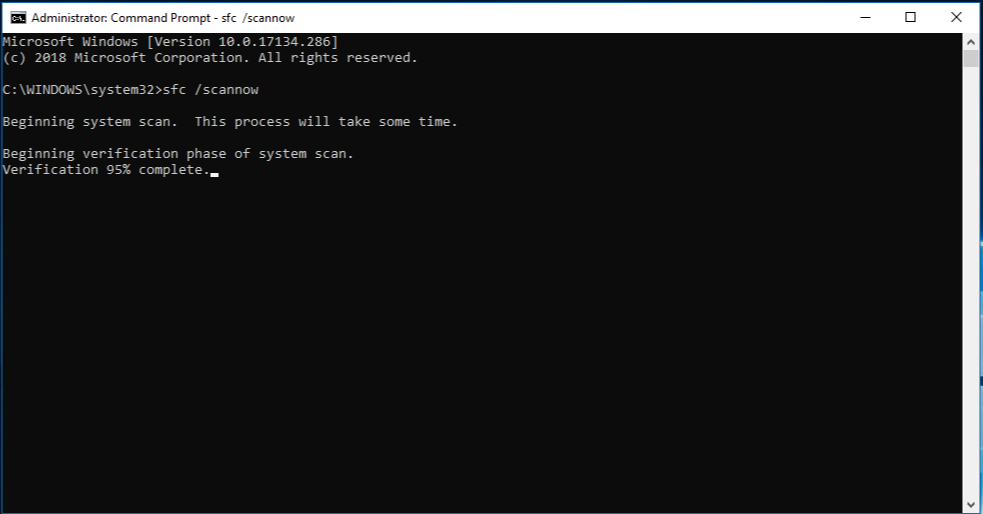
Warning: Do not close this Command Prompt window until the verification is 100% complete.
The sfc /scannow command will scan all protected system files and replace corrupted files with a cached copy. The scan results will be shown after this process is finished. You may receive one of the following messages:
|
Scan result message |
Corresponding action |
|---|---|
|
Windows Resource Protection did not find any integrity violations. |
You do not have any missing or corrupted system files. |
|
Windows Resource Protection could not perform the requested operation. |
To resolve this problem, perform the System File Checker scan in safe mode. Make sure that the PendingDeletes and PendingRenames folders exist under %WinDir%\WinSxS\Temp. The %WinDir% placeholder represents the Windows operating system folder, such as, C:\Windows. |
|
Windows Resource Protection found corrupt files and successfully repaired them. |
The operation was successful. To view detailed information about the system file scan and restoration, go to How to view details of the System File Checker process. |
|
Windows Resource Protection found corrupt files but was unable to fix some of them. |
To repair the corrupted files manually, view details of the System File Checker process to find the corrupted file, and then manually replace the corrupted file with a known good copy of the file. |
More Information
To view the details included in the CBS.Log file, follow these steps to copy the information in the log to a viewable text file on your desktop:
-
Open an elevated command prompt, as described previously.
-
In the Command Prompt window, type the following command (on one line), and then press ENTER:
findstr /c:"[SR]" %windir%\Logs\CBS\CBS.log >"%userprofile%\Desktop\sfcdetails.txt"
Note: The Sfcdetails.txt file contains details from every time that the System File Checker tool has been run on the computer. The file includes information about files that were not repaired by the System File Checker tool. Verify the date and time entries to determine the problem files that were found the last time that you ran the System File Checker tool.
-
Open the Sfcdetails.txt file from your desktop.
-
The Sfcdetails.txt file uses the following format:
Date/Time SFC detail The following sample log file contains an entry for a file that could not be repaired: 2007-01-12 12:10:42, Info CSI 00000008 [SR] Cannot repair member file [l:34{17}]»Accessibility.dll» of Accessibility, Version = 6.0.6000.16386, pA = PROCESSOR_ARCHITECTURE_MSIL (8), Culture neutral, VersionScope neutral, PublicKeyToken = {l:8 b:b03f5f7f11d50a3a}, Type neutral, TypeName neutral, PublicKey neutral in the store, file is missing
After reviewing the log file to determine which system file was corrupted and could not be repaired, find where the corrupted file is located, and then manually replace the corrupted file with a known good copy of the file.
To do this, follow the instructions below. In the following commands, the <Path_And_File_Name> placeholder represents the path and the file name of the corrupted file.
Note: You may be able to get a known good copy of the system file from another computer that is running the same version of Windows as your computer. You may wish to perform a System File Checker process on that computer to make sure the system file that you intend to copy is a good copy.
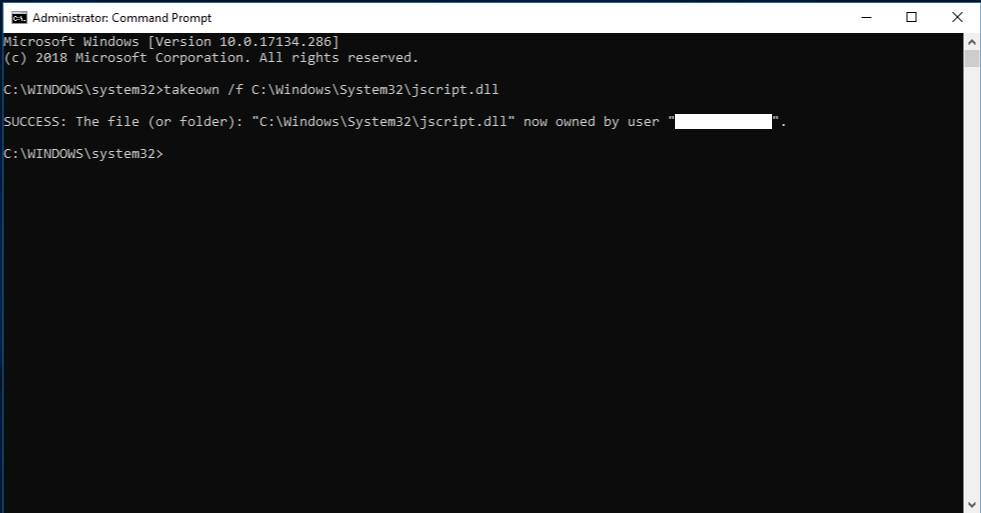
Step 1: Take administrative ownership of the corrupted system file.
Type the following command in the elevated command prompt and then press ENTER:
takeown /f <Path_And_File_Name>
Example:
takeown /f C:\windows\system32\jscript.dll.
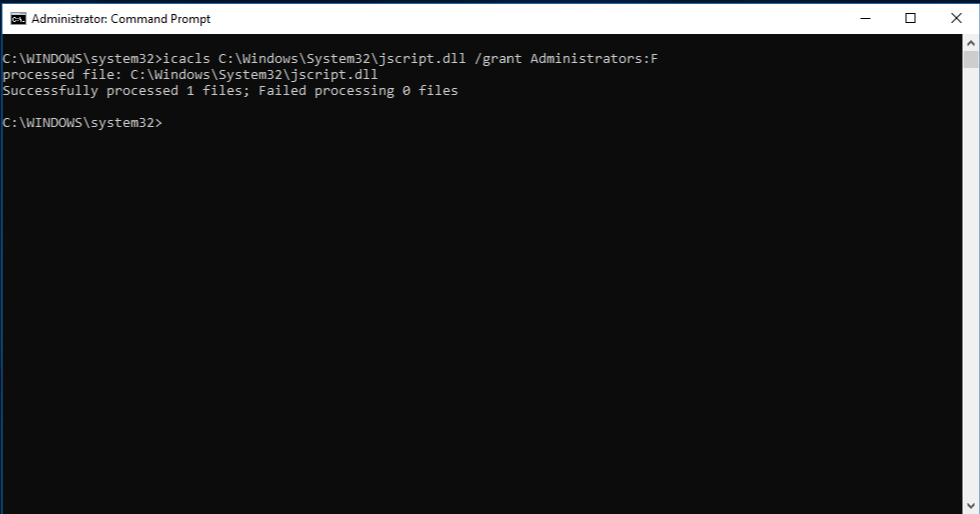
Step 2: Grant administrators full access to the corrupted system file.
Type the following command, and then press ENTER:
icacls <Path_And_File_Name> /grant administrators:F
Example:
icacls C:\windows\system32\jscript.dll /grant administrators:F
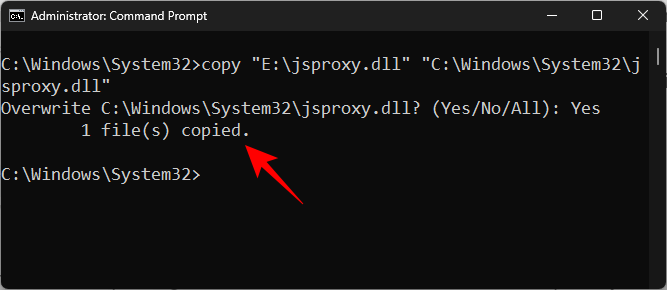
Step 3: Replace the corrupted system file with a known good copy of the file.
Type the following command, and then press ENTER:
Copy <Source_File> <Destination>
In the above command, replace the <Source_File> placeholder with the path and file name of the known good copy of the file on your computer, and replace the <Destination> placeholder with the path and file name of the corrupted file.
Example:
copy E:\temp\jscript.dll C:\windows\system32\jscript.dll
If the steps above don’t work, you may need to reinstall Windows. For more info, see Recovery options in Windows.
Need more help?
Want more options?
Explore subscription benefits, browse training courses, learn how to secure your device, and more.
While running the SFC (System File Checker) scan on Windows, you often receive an error “Windows resource protection found corrupt files”. This error message usually indicates that your SFC tool has detected some corrupted or missing system files that are essential for the proper functioning of system. It can happen due to several reasons like – software conflicts, hardware failures and malware infections.
If you are getting this error and wondering about how to fix this error, continue reading this post. Here, you’ll find the 5 most effective ways to fix Windows resource protection found corrupt files.
The “Windows Resource Protection found corrupt files” is an error message that usually occurs when your SFC tool fails to scan your protected system files.
Generally, it is integrated within a SFC scan & works to safeguard your important system files as well as registry keys. Since it protects your essential components, some of its resources become inaccessible to the administrators also.
When you receive this error message, it simply means that your SFC utility has found corrupted or missing system files but was unable to repair them by replacing them with cached copies.
It can happen when the cached files, that have been used to replace the corrupted files become corrupt themselves. This error can take place on your system due to multiple reasons. To know them, you need to scroll down to the next section.
What Causes “Windows Resource Protection Found Corrupt Files” Error?
- Due to the corrupt system files
- Interference of third-party apps or operating system processes.
- SFC has insufficient resources to solve the issue.
- Some of the Nvidia files (.dll) are corrupted
How To Fix Windows Resource Protection Found Corrupt Files
Before executing any of the methods, make sure to save the backup copy of your essential data. This is because this error might corrupt your Window’s data.
Please Note – If you forgot to create the backup of your vital data, use professional Data recovery software to retrieve your lost data again.
List of Solutions:
- Run DISM From The Command Prompt
- Run CHKDSK Utility
- Run SFC Scan In Safe Mode
- Run SFC in Windows Recovery Environment
- Uninstall the Latest Updates
- Perform an In-place Upgrade
#1: Run DISM From The Command Prompt
The DISM (Deployment Image Servicing and Management) is a powerful Windows utility that can be used to check and repair Windows images.
If the SFC scan fails to resolve certain issues, run the DISM utility, it may be able to fix the problem.
Here’s how to do so:
- Go to the Start menu and type cmd in the Windows search box.
- Then, right-click on the Command Prompt & select Run as administrator.
- In the command prompt window, you need to type a command: dism /online /cleanup-image /restorehealth

- At last, press Enter and wait till the process gets completed.
#2: Run CHKDSK Utility
CHKDSK is another native utility that helps to identify and repair disk errors or issues. If your hard disk is corrupted or has some errors, the check disk scan will find and repair the issue.
And hence, the system file checker can continue the process of fixing system files.
Here’s what you need to do:
- Open Command Prompt as an administrator & click Yes when prompted.
- In the command prompt window, type chkdsk f:/r/f and press Enter.
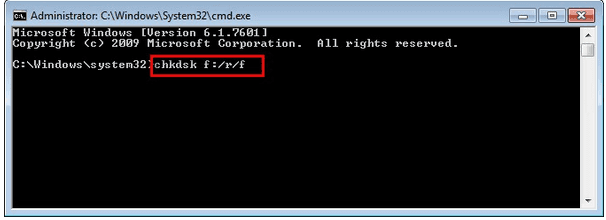
- When it asked to schedule the disk scan, press Y & press Enter
- That’s it, close the command prompt window, and restart your computer.
- Now, it’ll start scanning your disk and fix the issue automatically if detected.
Once done! Run sfc /scannow again to check if it works.
#3: Run SFC Scan In Safe Mode
Whenever you suspect that third-party apps, services, drivers, or startup programs interfere with your system files, run SFC in safe mode to bypass such issues.
Safe Mode launches Windows only with essential drivers, software, and services, which makes it easier for the SFC to identify & repair the corrupted system files.
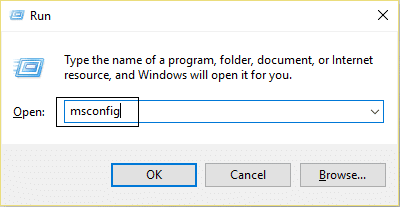
Here’s how you can run an SFC scan in Safe Mode:
- Launch the Run dialog box by pressing Win + R
- Then, type msconfig in the search box & press Enter to open the System Configuration.
- In the System Configuration windows, navigate to the Boot tab
- Under the boot option, you need to check out the Safe Mode option > Minimal.
- Once done! Click on Apply then > OK to boot your system in Safe Mode.
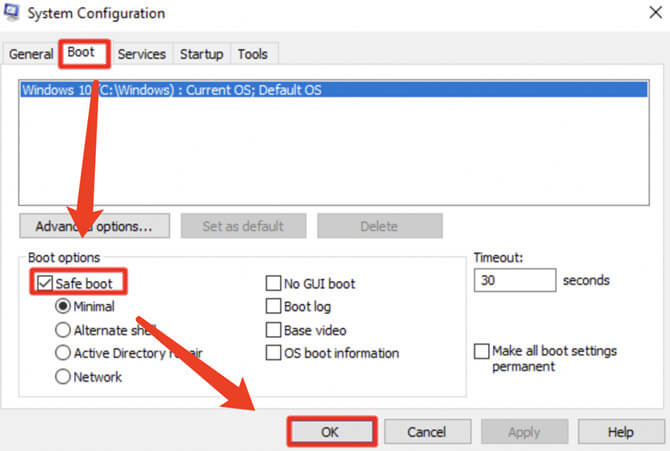
- Now, open a command prompt window & type the following command to run SFC scan into Safe Mode
sfc/scannow

After finishing the steps, if Windows Resource Protection found corrupt files is fixed successfully in safe mode, it simply means that the issue is caused due to software conflict.
Now, you can uninstall the recently installed programs that might cause the issue.
Also Read – 6 Fixes For “Windows Detected A Hard Disk Problem” Error
#4: Run SFC in Windows Recovery Environment
The Windows Recovery Environment (WinRE) is a diagnostic environment that can be used when your Windows system encounters any critical errors or can’t boot properly.
Running SFC utility in Windows Recovery Environment can help you repair the corrupted or missing system files by verifying & repairing the integrity of a system files.
So, if you find that the system file checker can’t finish its work, try to run it Windows recovery environment.
Here’s how to run SFC in Windows Recovery Environment:
- Boot your system from the Windows installation DVD.
- Then, select “Repair Your Computer” & choose your target system
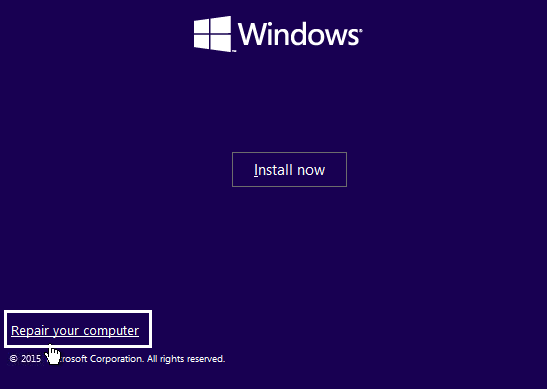
- Next, choose Command Prompt in the recovery tool panel,
- Under the command prompt window, simply type sfc scannow & press Enter.
#5: Uninstall the Latest Updates
If you are noticing the SFC scan error just after the Windows update, try uninstalling the latest update to fix the issue.
It may happen that the recent updates have introduced some corrupted elements to the system files due to which your SFC scan fails to fix the system files.
How to uninstall the latest Windows updates:
- Open Windows settings by pressing Windows + I keys.
- Then, choose Windows Update from the left pane & scroll down to Update history.
- From here, you can uninstall the latest updates by clicking on the Uninstall option
- After uninstalling the updates successfully, run the SFC scan again & check if the problem is solved.
#6: Perform an In-place Upgrade
If you can’t fix “Windows resource protection found corrupt files” with the above methods, it simply indicates that the issue is quite serious and can’t be fixed with the basic strategies.
In such a situation, you need to perform an In-place Upgrade that will rewrite the system files and is almost guaranteed to fix any corruption in the system OS.
In-place upgrade refers to the process of upgrading an existing OS to a newer version without reinstalling them completely.
Also Read – 5 Ways to Fix “The Drive Where Windows Is Installed Is Locked”
FAQs [Frequently Asked Questions]
Why Does Windows Resource Protection Keep Finding Corrupt Files?
If Windows Resource Protection (WRP) keeps finding the corrupt files, it might be due to hardware issues, software conflicts, malware infection, OS process or background running services.
Does SFC Scannow Fix Corrupt Files?
Yes, the sfc/scannow command helps to repair the corrupted or missing system files in the Windows OS. When you run the ‘sfc /scannow’ in Command Prompt, it checks for the integrity of system files and replace the corrupted files with the cached copy located in the compressed folder at %WinDir%System32dllcache.
What Is The Difference Between Sfc And CHKDSK?
SFC analysis your system files and attempt to repair the corrupted or missing system files which are essential for proper functioning of Windows OS. While the CHKDSK is primarily used to check and repair the issues related to file system. It scans for the disk, such as bad sectors, faulty drive, directory errors etc and attempts to fix them.
Time to Wrap Up
This article completely aims to troubleshoot Windows resource protection found corrupt files error using 5 possible methods. So, whenever you encounter this error, you must try the above-mentioned fixes to eliminate this Windows error.
However, if you face a data loss situation after fixing this error successfully then you can try an advanced data recovery software to rescue your missing files with ease.
Hope you found this post helpful!
Taposhi is an expert technical writer with 5+ years of experience. Her in-depth knowledge about data recovery and fascination to explore new DIY tools & technologies have helped many. She has a great interest in photography and loves to share photography tips and tricks with others.
Read time: 5 minutes
Sometimes you may encounter the error, “ Windows Resource Protection Found Corrupt Files, But was Unable to Fix Some of Them.” and you may experience slow performance or Windows crashes. Also, some Windows functions do not work due to corruption of system files too. In the present blog, we shall discuss how to fix this problem.
Understanding Windows Resource Protection (WRP)
Windows Resource Protection is a feature in Windows Vista & later Windows versions that replaced Windows File Protection. Its main function is to protect registry keys and folders besides the critical system files. WRP does not allow, essential system files, folders, registry keys installed as part of the operating system to be replaced and disable autorun apps in Windows 10 too.
System File Check (sfc.exe) is integrated with Windows Resource Protection which can be invoked through Windows Command Prompt. System File Checker tool (sfc.exe) is used to repair missing or corrupted system files by running the command ’sfc /scannow.’ This command will scan the entire protected system files and will replace corrupted files with cached copy, which is placed in a compressed folder at location, %WinDir%\System32\dllcache. The %WinDir% placeholder refers to the Windows operating system folder.
When do you face the error, “windows resource protection found corrupt files?”
To repair missing or corrupted system files, we run System File Checker Tool (sfc.exe) and use sfc/scannow command. After the process has been completed, any one of the messages given below will be shown:
- Windows Resource Protection did not find any integrity violations.
- Windows Resource Protection found corrupt files and successfully repaired them. Details are included in the CBS.Log %WinDir%\Logs\CBS\CBS.log
- Windows Resource Protection could not perform the requested operation.
- Windows Resource Protection found corrupt files but was unable to fix some of them. Details are included in the CBS.Log %WinDir%\Logs\CBS\CBS.log
The last message in the above list appears when the sfc/scannow command was not successul in fixign the issue. So, you need to fix it manually.
How to fix the error, “Windows resource protection found corrupt files but unable to fix some of them?”
Some easy methods to troubleshoot this error are given below:
METHOD 1: Run DISM Command to Repair Corrupt Files
DISM i.e. Deployment Image Servicing and Management takes the help of Windows Update to get files necessary to fix corruptions. Thus, while you do this make sure your internet connection is regular and smooth. Use the RestoreHealth command of DISM to scan Windows for corruption and repair the same automatically. To do so follow the steps given below:
- Type cmd in the search box next to the start button.
- Right-click Command Prompt and select ‘Run as Administrator.’
- Type command, dism /Online /Cleanup-Image /RestoreHealth. Press ‘Enter.’

- This will scan for corruption and repair it.
- If you are in repair mode of Windows DVD/USB, use the command
Dism /Image:C:\/Cleanup-Image /RestoreHealth. Press ‘Enter.’ - Wait till the process is complete. A message will appear stating file corruption has been resolved. Restart your computer.
- Run SFC scan in Administrative Command Prompt again and see if the error persists. If it is still present then follow the next method. The same process can be used to recover data from pen drives saved in logical drives. You can scan your drive using sfc command too.
METHOD 2: Remove Remnants of A Third-Party Antivirus Security Solution
This error may also occur due to false alerts. Generally, remnants of improperly uninstalled antivirus/security solutions may cause this error. Remove these remnants and restart your computer. Run SFC scan again to check if the issue persists.
METHOD 3: Performing SFC/DISM Scan In A Clean Boot State
If methods 1 & 2 do not work then, most probably either a third-party application is interfering or there is some system file error is not being detected by SFC & DISM. To fix the first issue, we need to perform a clean boot and run both utilities once again.
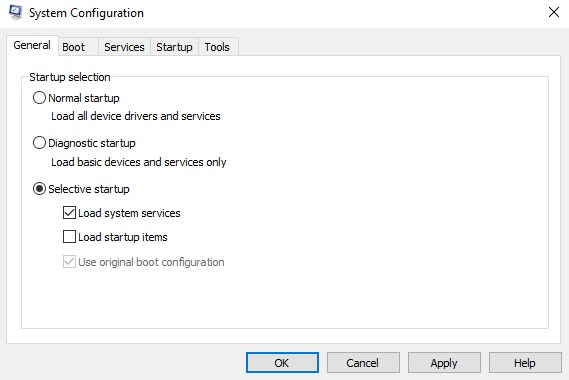
To perform a clean boot, follow the steps given below:
- Press keys Win+R. Runbox will open.
- Type msconfig. Press Enter
- System Configuration will open. The User Account Control will open and ask for permission to administrative privileges press Yes.
- Press the General tab and choose Selective Startup.
- Uncheck Load Startup times under Selective Startup.

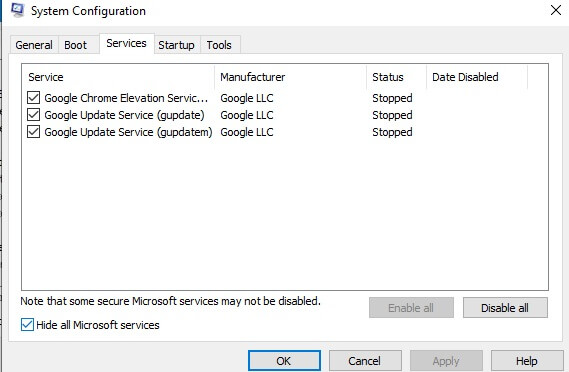
- Move to the Services tab. Check Hide all Microsoft Services. Press Apply.

- Restart your computer in a clean boot state.
- Repeat steps 1 to 5 of method 1.
- Repeat steps 1 to 5 of method 1 with the SFC scan command (sfc /scannow in step 3).
METHOD 4: Repair the Hard Disk
Any problem with a hard drive can lead to this error which has to be fixed. Use Kernel for Windows Data Recovery to fix Windows corruption errors in logical and physical devices. It helps to recover data from corrupt FAT16, FAT32, NTFS & NTFS5 partitions. It works in three simple steps viz; Select>>View>>Recover in which it scans Windows system Drives, shows a preview of the recovered and, and saves the data selected by you. Kernel for Windows Recovery can recover data from PEN drives, ZIP drives. Mobile drives, external HDD, etc.
Conclusion
In the present blog, we discussed Windows Resource Protection files and different methods to fix corruption of these files when the system itself is unable to fix such corruption. We further discussed Kernel for Windows Recovery and how it is helpful in the recovery of data from the Windows system. It is a strong and efficient tool to recover lost, deleted, and inaccessible data from corrupt FAT16, FAT32, NTFS & NTFS5 partitions of Windows systems. It has the ability to recover from removable drives as well. It can recover data may it be audios, images, documents, etc., permanently deleted files and folders irrespective of size and corruption of the same. You can try the Demo Version for free to preview your precious files and folders.
Fix: Windows Resource Protection Found Corrupt Files but was Unable to Fix
Windows operating systems are known for their versatility, offering a wide range of features for users. However, they are not without their issues. One of the more frustrating problems users encounter is the error message indicating that «Windows Resource Protection found corrupt files but was unable to fix some of them.» This article aims to provide a detailed guide on understanding what this error means, why it occurs, and how to effectively resolve it.
Understanding the Error
When you encounter the message that Windows Resource Protection (WRP) has found corrupt files but could not fix them, it usually indicates issues with the integrity of the System files in your Windows installation. These corrupt files can lead to various problems, ranging from software malfunctions to system instability. The Windows File Protection feature is designed to keep your system files safe from unauthorized changes, but when issues arise, it can become a headache for users.
The System File Checker (SFC) tool is a built-in Windows utility that scans for these corruptions and attempts to repair them. If SFC successfully identifies issues but is unable to fix everything, it may leave users in a frustrating situation. The root causes for this error can vary widely, but they commonly include hardware failures, malware infections, system updates gone wrong, or the installation of unreliable third-party software.
How to Use the SFC Tool
Before delving into more complex solutions, it’s advisable to start with the basics. Here’s how to run the System File Checker:
-
Open Command Prompt as Administrator:
- Press
Windows Key + S, typecmd, and right-click on Command Prompt. - Select «Run as administrator».
- Press
-
Run SFC Command:
- In the Command Prompt window, type
sfc /scannowand hit Enter. - The tool will start scanning your system files. This can take some time, so be patient.
- In the Command Prompt window, type
-
Review the Results:
- Once the scan finishes, you’ll receive one of the following messages:
- «Windows Resource Protection did not find any integrity violations.»
- «Windows Resource Protection found corrupt files and successfully repaired them.»
- «Windows Resource Protection found corrupt files but was unable to fix some of them.»
- Once the scan finishes, you’ll receive one of the following messages:
If the last message appeared, it’s time to explore other methods to resolve the issue.
Using the DISM Tool
If SFC was unable to fix the corrupt files, you can escalate the repair process by using the Deployment Imaging Service and Management Tool (DISM). Code-wise, DISM is more powerful and can fix issues that SFC cannot handle because it operates at a lower level than SFC.
-
Open Command Prompt as Administrator.
-
Run DISM Command:
- Type the following command and hit Enter:
DISM /Online /Cleanup-Image /RestoreHealth - This command checks for corruption in the Windows image and attempts to repair it.
- Type the following command and hit Enter:
-
Run SFC Again:
- After the DISM scan is finished, rerun the SFC command (
sfc /scannow) to ensure that all corrupt files are fixed.
- After the DISM scan is finished, rerun the SFC command (
Check for Windows Updates
An outdated system can lead to errors that compromise stability and file integrity. Keeping your system updated can help:
-
Open Settings:
- Press
Windows Key + Ito access Settings.
- Press
-
Go to Update & Security:
- Click on “Windows Update”.
-
Check for Updates:
- Click “Check for updates” and install any available updates. This can include system patches that may fix bugs causing your file corruption.
Malware Scan
Corrupted files can often result from malware infections. Conducting a thorough system scan can help eliminate malicious software that may be interfering with your system:
-
Using Windows Defender:
- Open Windows Security by searching for “Windows Security” in the start menu.
- Navigate to “Virus & threat protection”.
- Click on “Quick scan” or “Scan now” to initiate a scan.
-
Using Third-Party Tools:
- Consider using reputable third-party antivirus solutions to conduct a more comprehensive scan.
Check Your Hard Drive
Hard drive issues can also result in corrupted system files. Here’s how to check your hard drive for problems:
- Open Command Prompt as Administrator.
- Run Check Disk:
- Type the following command and press Enter:
chkdsk /f /r - This command will check for and repair file system errors. You may need to restart your computer for the changes to take effect.
- Type the following command and press Enter:
Perform a System Restore
If the issue is recent and you have a restore point established, you can roll back your system to a previous state. This action may eliminate files causing the corruption.
-
Open Control Panel:
- Search for “Control Panel” from the Start menu.
-
Navigate to Recovery:
- Click on “System and Security” and then select “System”.
- On the left panel, select “System protection”.
-
Choose System Restore:
- Click “System Restore…” and follow the prompts to choose a restore point.
Reset Windows
If none of the above methods work, you might consider resetting your Windows installation. A reset can help to refresh your system and eliminate persistent corruption. However, ensure you back up vital data beforehand.
-
Open Settings:
- Press
Windows Key + I.
- Press
-
Navigate to Update & Security:
- Click on “Recovery”.
-
Select Reset This PC:
- Click “Get started” under the “Reset this PC” section.
- Choose either “Keep my files” or “Remove everything” based on your needs.
Backup Your Data
Before you begin performing any repairs, it’s crucial to back up your data. While the above procedures are generally safe, unexpected issues can arise. Use an external hard drive or a cloud solution to keep your documents, photos, and any other crucial files secure.
Conclusion
Facing the «Windows Resource Protection found corrupt files but was unable to fix some of them» error can be daunting. However, with the aforementioned steps—from running System File Checker and DISM to checking for malware and even considering a system reset—you have multiple avenues to resolve this issue effectively.
It’s important to remain patient, as some of these processes can be time-consuming. In many cases, regular maintenance, such as keeping your system updated, performing regular malware checks, and backing up your data, can prevent these issues from arising in the future.
Every user may eventually run into system issues, but knowing how to address them can save time and frustration. If you continually encounter issues despite your best efforts, consider professional assistance. A clean installation might be the best route to ensure your system is running smoothly and efficiently.
Invest time in maintaining your system, and it will reward you with stability and peace of mind. A healthy operating system is the foundation of a productive computing experience, so treat it with care and attention.
There are a few Windows in-built diagnostic and repair tools that help repair system issues that creep up now and then. One such tool is the System File Checker (SFC) which is used via terminal apps like the Command Prompt and PowerShell and helps to repair corrupted system files.
However, the SFC scan may not always be able to do its job fully. In some cases, instead of fixing the files, it will throw up the error message that “Windows Resource Protection found corrupt files but was unable to fix some of them“. Why does this happen, and how can you fix SFC so that it can continue fixing the corrupt files? Read on to know more.
What is the SFC scan?
The System File Checker is a Windows utility that helps to fix corrupt system files and registry keys. The scan is launched from a terminal app and can check file authenticity and repair corrupted files by replacing them with functional files from a source.
The SFC utility does the job without much fuss. All you have to do is open the command prompt, type in the SFC /scannow command, and let the utility fix the issues itself.
In most cases, this is a quick and easy process. However, there are some cases in which the corrupted system files cannot be repaired. In these scenarios, you may see the error message “Windows Resource Protection found corrupt files but was unable to fix some of them“.
Related: How to Repair Windows 11 [15 Ways]
What does the “Windows Resource Protection found corrupt files” error mean?
Windows Resource Protection (WRP) is integrated within the SFC scan and works to protect important system files and registry keys. And since it safeguards such critical components, some of its resources can be inaccessible even to administrators.
So when you get the Windows Resource Protection error message, it means that the SFC utility and WRP scanned and found corrupted system files but were unable to fix them by replacing them with the cached files. This can happen if cached files that are used to replace the corrupted files are corrupt themselves. Apart from system file corruption, there are also other possible causes why you may be receiving the “Windows Resource Protection found corrupt files…” error. Let’s take a look at a few of them:
- SFC doesn’t have the available resources to fix the problem.
- Background processes or third-party applications interfering with the SFC utility.
- Corrupt cached copies of system files.
- Some problematic .dll Nvidia files, that are known to trigger a false-positive and mark some files as corrupted.
Of course, you may not be able to find out exactly which of these is the cause of the SFC scan error. Nevertheless, the CBS.log file that logs the details about the scans can prove useful in finding out which corrupt files could not be fixed.
Related: How to turn on Windows Defender in Windows 11
How to check the CBS.log file
The CBS.log file that is mentioned in the error contains information about every time that SFC was run on the computer, including information about corrupt files that could not be fixed.
The CBS log file is found in the following folder:
C:\Windows\Logs\CBS\CBS.log
Open File Explorer by pressing Win+E and navigate to the file location mentioned above.

To read the log, simply double-click on the file. The file will open in Notepad.

Here, verify the date and time of the error with the last time SFC found corrupt files. To know about manually replacing corrupted system files with good copies, refer to Fix #5 below.
Related: How to back up Registry on Windows
Now that you know the jargon behind the error and what it means, let’s take a look at how to fix it.
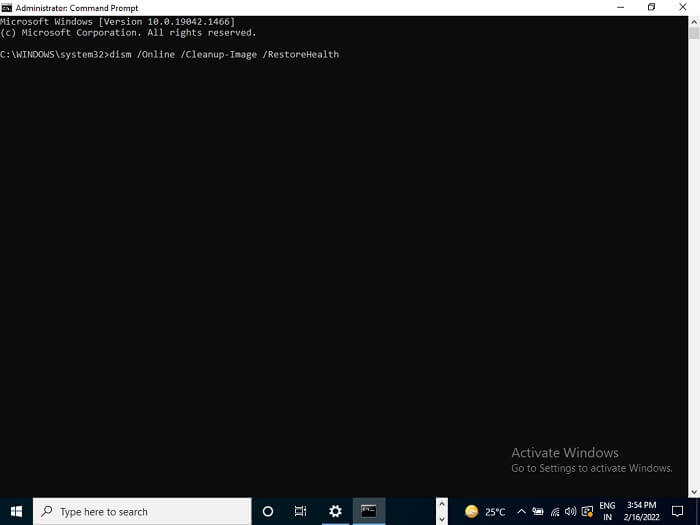
Fix 1: Run the DISM tool from the Command Prompt (CMD)
The Deployment Image Servicing and Management (DISM) is another native utility that checks and repairs Windows images. There is a good chance that the errors that weren’t fixed by SFC could be easily fixed by DISM’s system image repair commands. Here’s how to run them:
Press Start, type CMD, then right-click on Command Prompt and select Run as administrator.

Now, type the following command:
dism /online /cleanup-image /restorehealth

Then hit Enter. Wait for the process to finish.
Once the scan is finished, restart your system and try running the SFC command to check if the error persists.
Related: 3 Best Ways to Enable or Disable Hibernate on Windows 11
Fix 2: Run the Check Disk utility
Check Disk is a native utility designed to check and repair disk errors. If the corruption is in your disk, the system files are on a bad sector and can still throw up such errors. Running the CHKDSK scan proves useful if disk errors are found and repaired, so that the SFC scan can continue fixing the system files.
Open the Command Prompt as shown above. Then type the following command to run the Check Disk utility:
CHKDSK /C /f
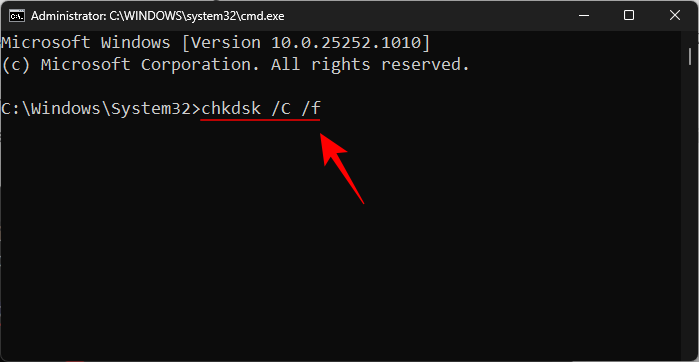
To schedule the scan at the next startup, press Y.

Then hit Enter.

Restart your computer and wait for the Check Disk utility to finish fixing disk errors. Once done, run the SFC scan command to see if the issue persists.
Another way to check the C: drive is from File Explorer. To do so, press Win+E and open File Explorer. On the “This PC” window, right-click on the C drive and select Properties.

Click on the Tools tab.
Then click on Check under “Error checking”.
When prompted, just click on Scan drive.

Wait for the scan to finish. Once done, restart your computer as before and check if the issue is resolved.
Fix 3: Run SFC and DISM scans in Safe Mode
Besides corrupt system files, one of the most common reasons for the SFC error is when other applications, services, or processes start interfering with system files. To bypass them, run the SFC scan in Safe mode with the minimum number of drivers and services needed to boot. This is how to go about it:
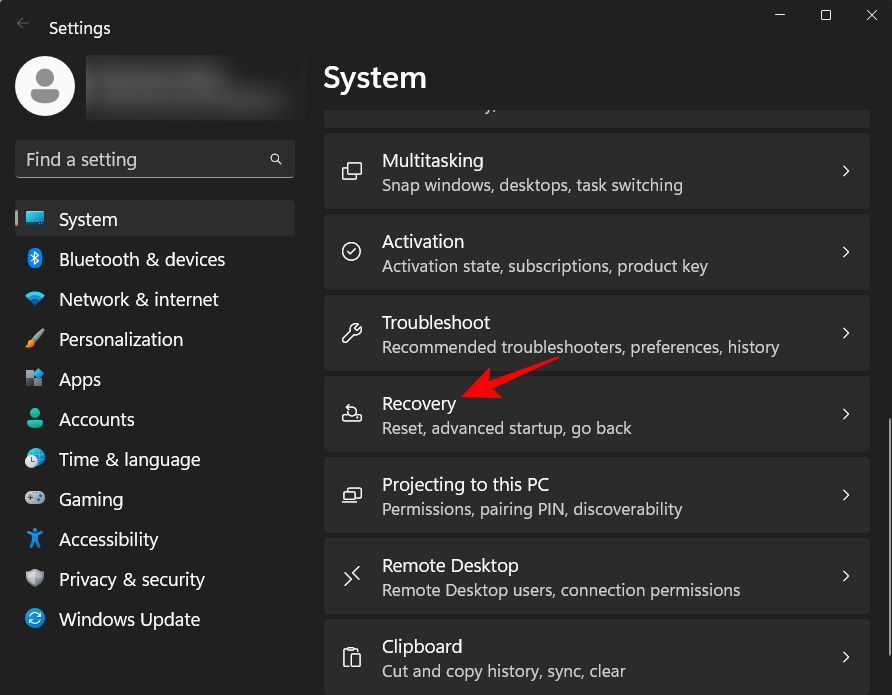
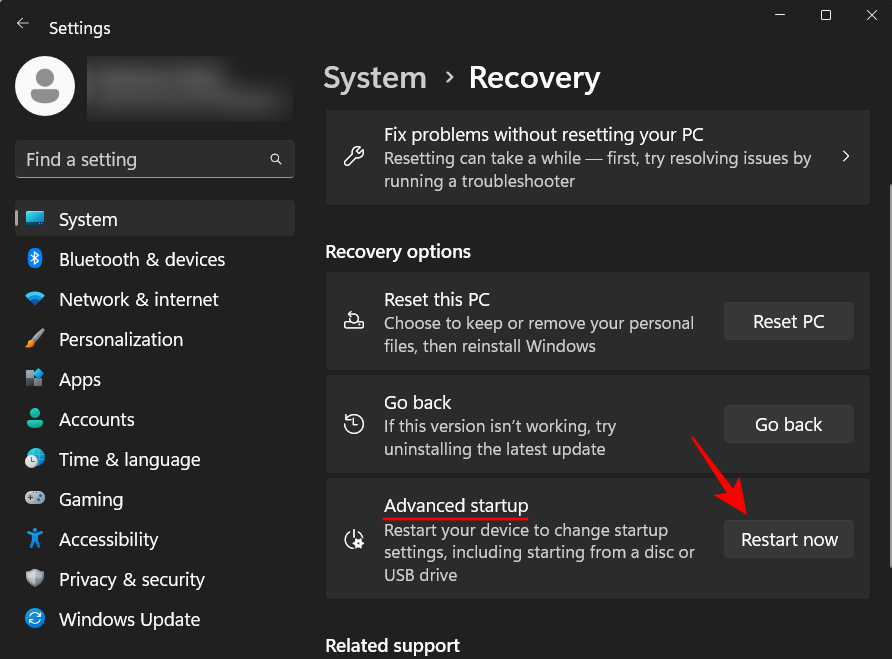
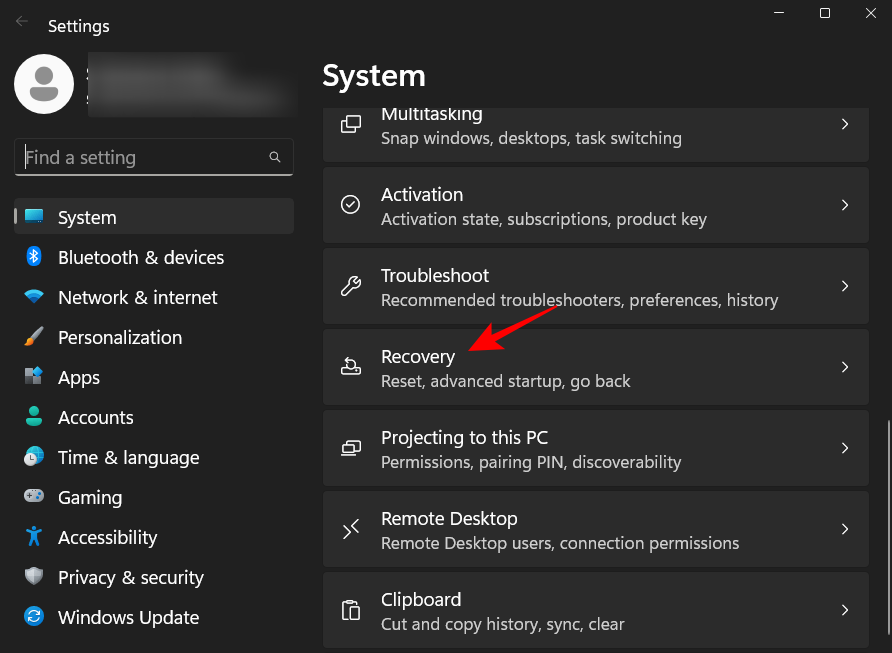
Press Win+I to open Settings. Then scroll down on the right and click on Recovery.
Click on Restart now next to “Advanced startup”.
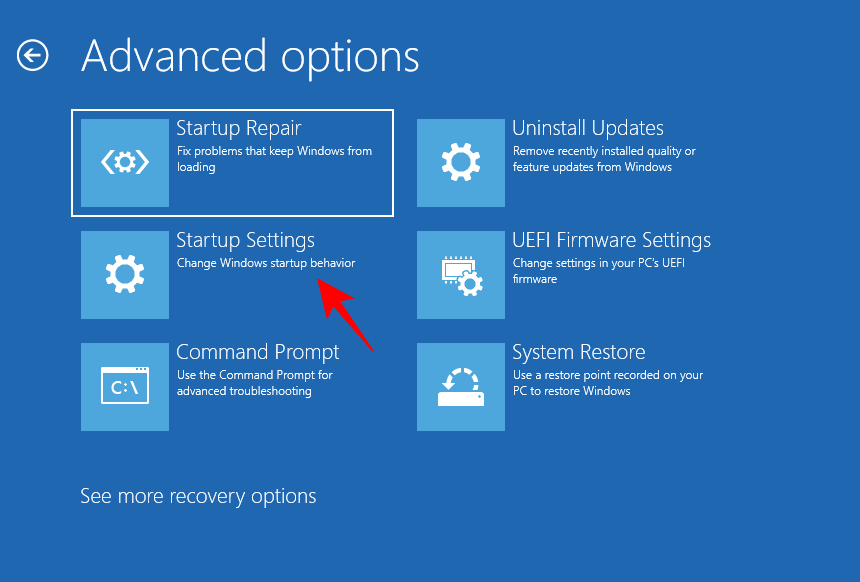
Once you restart to the Windows Recovery Environment (WinRE), click on Troubleshoot.

Then click Advanced options.

Click on Startup Settings.
Click on Restart.

On the selection screen, press 6 and choose Enable Safe Mode with Command Prompt.
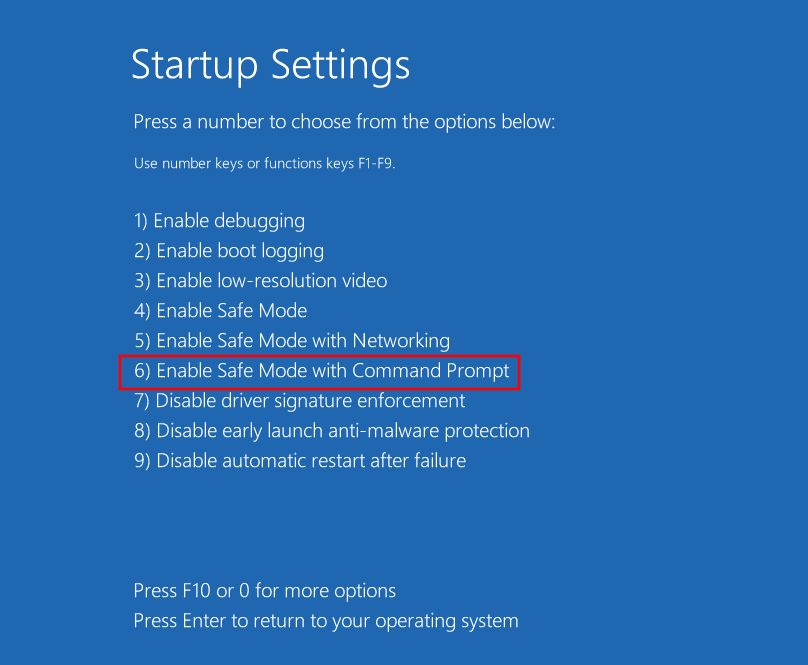
Once you boot into Safe Mode, run the DISM utility as shown earlier and then run the SFC /scannow command in the command prompt.

If the issue persists, move on to the next few fixes.
Fix 4: Run the SFC scan in the Windows Recovery Environment (WinRE)
WinRE is another environment that can host the SFC scan. Since WinRE operates in the pre-boot environment, it functions with minimal resources, and it may perhaps be a better contender for SFC scanning. Here’s how to go about it:
Get to the WinRE environment as shown earlier. Or press Start, click on the Power button, then hold down the Shift key and click on Restart.
Once in WinRE, click on Troubleshoot.
Then Advanced options.
Select Command Prompt.

Then run the sfc /scannow command.
Hit Enter. Then wait for the scan to finish. If the error persists, move on to the next solutions.
FIX 5: Manually replace corrupt files
If the aforementioned methods have borne no fruit, then replacing the corrupt files with their good copies yourself is one of the only viable avenues left. But before that, you will need to find exactly which files are corrupt. To do this, check the CBS.log file in the folder C:\Windows\Logs\CBS as shown earlier.
Double-click on the cbs.log file to access its contents.

Note down the names of the corrupted files and verify the date and time with the time when you last run the SFC scan with the error.
Now, since your own file copies are corrupted, you have to get a hold of those files from another computer running the same Windows version as you. On this second computer, run the SFC scan first to ensure that all files are in good order.
Next, you will need to take ownership of the good files on the second computer. To do so, type the following command in the command prompt:
takeown /f "File_path_and_name"
Replace “File_path_and_name” with the actual file location.

Then hit Enter.

Copy this file to a portable drive and then plug it into the first computer.
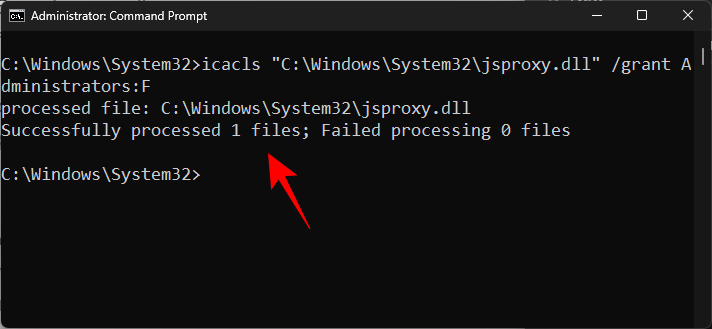
Then, on the first computer, give administrators full access to the corrupted system file. Type the following command:
icacls "File_path_and_name" /grant Administrators:F
Replace “File_path_and_name” with the actual file location
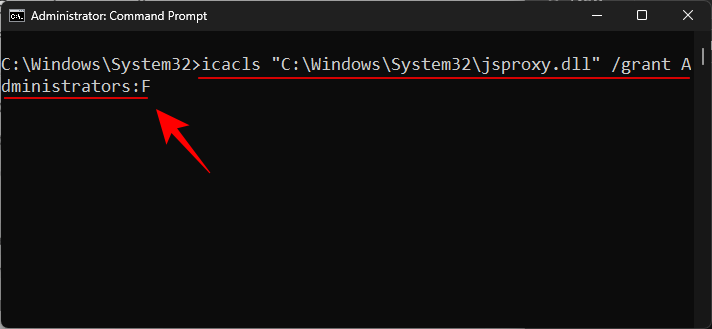
Then hit Enter.
Finally, type the following command to replace the good copy with the corrupted one:
Copy "Source_file_location" "Destination_file_location"
Replace both “Source_file_location” and “Destination_file_location” with the actual locations of the source file and the destination file. Refer to the example below to know better.
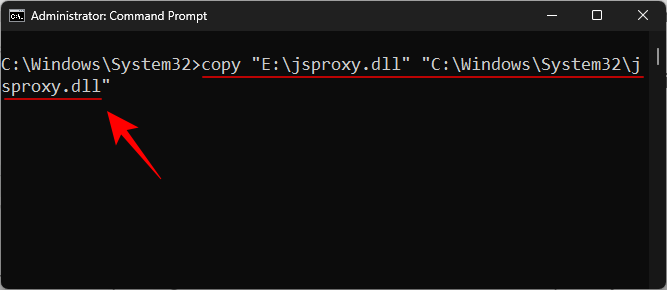
When prompted, type Yes.

Then hit Enter.
Do so for all the unfixed corrupt files that are logged in the CBS.log file.
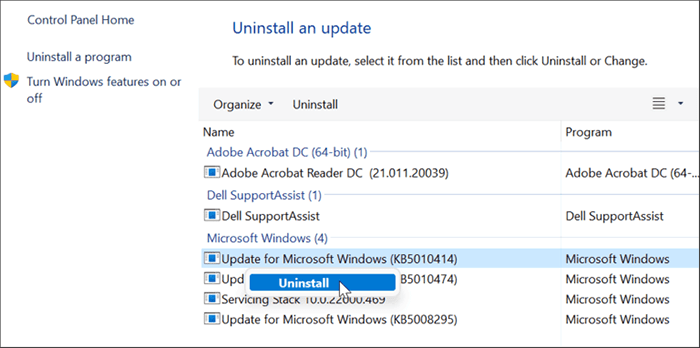
Fix 6: Uninstall the latest updates
There is also the possibility that recent updates have introduced corrupt elements to system files. If you first encountered the SFC scan error after a Windows update, uninstalling these may work to fix the issue. Here’s how to uninstall the latest Windows updates:
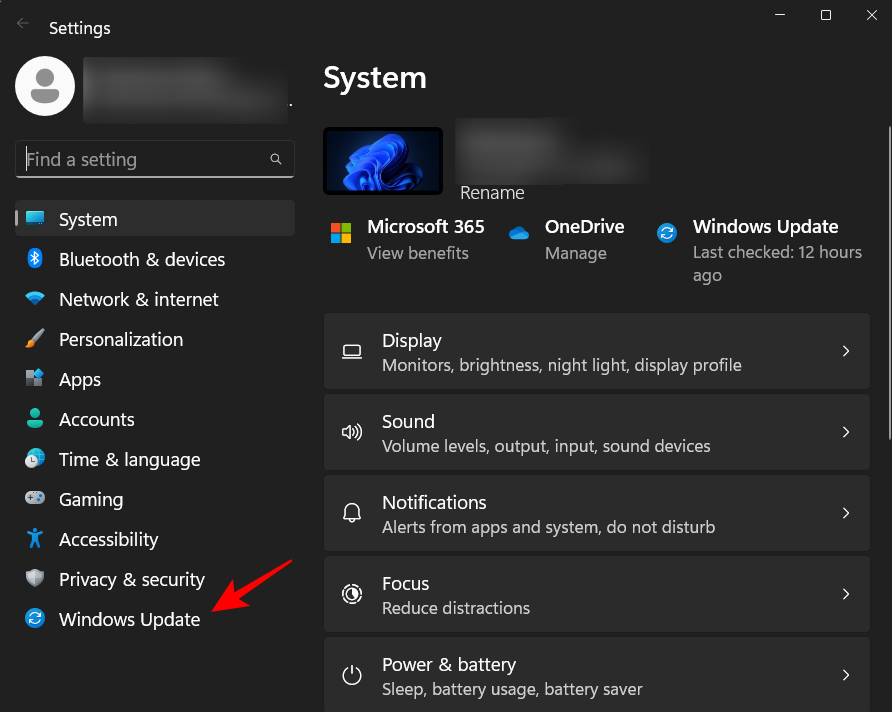
Press Win+I and open Settings. Then click on Windows Update in the left pane.
Click on Update history.
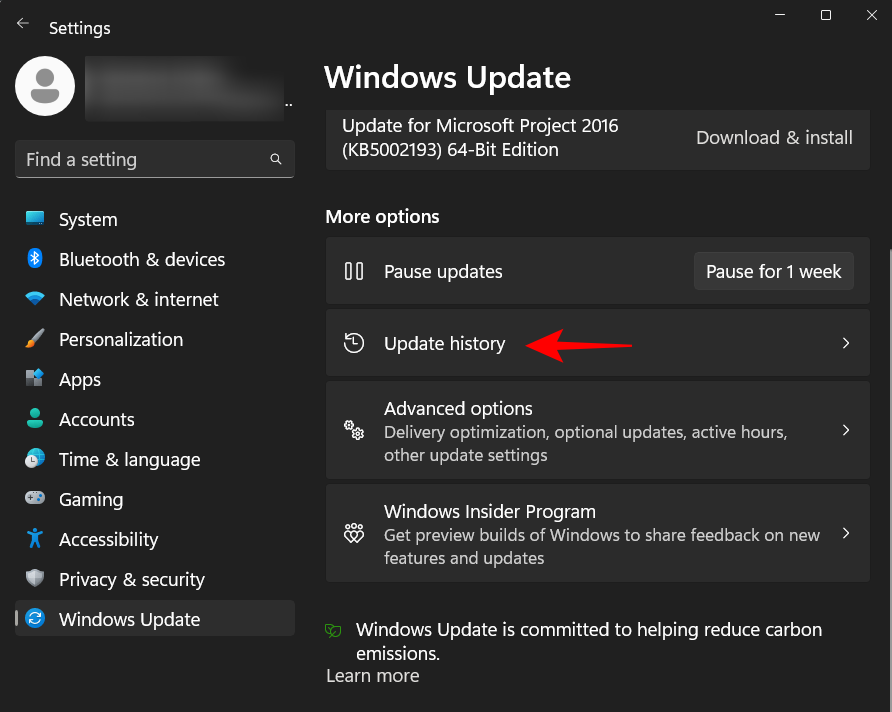
Scroll down and click on Uninstall updates.

Then uninstall the latest update after which you started receiving the error.

When prompted, click on Uninstall again.

Once the updates are uninstalled, give the SFC scan another go and check if the issue is resolved.
Fix 7: Do a System Restore
If rolling back Windows Update doesn’t help, a system restore is the next best thing to do. This will restore your system to a previous point in time when system files weren’t corrupt. Here’s how to do so:
Press Start, type restore, and then click on Create a restore point.

In the “System Properties” window, click on System Restore.

This will open the System Restore window. You can either go with the recommended restore and click Next.
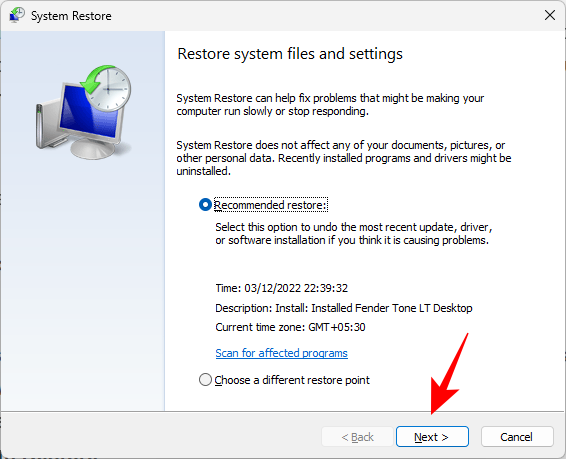
Or click on Choose a different restore point and click Next.

Click on Show more restore points.

Then select your restore point and click Next.

Finally, click on Finish to begin system restore.

Once complete, run the SFC scan command to check if the issue is resolved.
Fix 8: Reset your PC
If all else has failed, resetting your PC may be the only option left for you. Resetting the PC doesn’t take too long and in a few minutes, you can be up and running with all good copies of system files. Here’s how to reset your PC:
Press Win+I and open Settings. Then scroll down on the right and click on Recovery.
Then click on Reset PC.

Click on Keep my files.

Then follow the on-screen instructions to reset your PC. Once it’s finished, the problem should disappear since all the system files are now replaced.
FAQs
In this section, we answer a few commonly asked questions about the SFC scan error and related queries.
What to do if SFC Scannow is unable to fix corrupt files?
If the SFC scannow command is unable to fix corrupt files, there are a few avenues that you can turn to for help. You may want to run the DISM and CHKDSK scans, run the SFC scan in Safe Mode, manually replace the corrupted files, or restore/reset your PC. To know more about the fixes, refer to the guide above.
Why does Windows Resource Protection keep finding corrupt files?
If Windows Resource Protection keeps finding corrupt files during SFC scan and isn’t able to fix them, you may have malware or virus running amok on your computer. Another possibility could be the corruption of critical system files or disk errors. To know how to fix corrupt system files and repair bad disk sectors, refer to the guide above.
How do I fix SFC Scannow Windows Resource Protection could not perform?
The SFC Scannow Windows Resrouce Protection could not perform error message is generated whenever WRP isn’t able to replace corrupted system files with any good copies. But the issue can also have other potential causes which is why it is good to try multiple solutions and cast a wider net when it comes to applying fixes. Refer to the guide above to know which fixes to apply.
The error message “Windows resource protection found corrupt files but was unable to fix some of them” doesn’t always lead to a system-wide failure, although it can lead up to that. It is good to not only scan system files with the SFC utility but also to prepare the grounds and get rid of the roadblocks that come in the way of repairing them. We hope you now know what to do when you receive this error message.
RELATED
- Windows 11: How to Remove the “System requirements not met” Watermark
- 3 Latest Ways to Bypass Windows 11 Requirements (With or Without Registry Hack)
- Windows 11: How To Get Back the Windows 10 Start Menu
- How to Hide, Disable or Uninstall Widgets on Windows 11 (and Disable Windows+W Shortcut)
- How to show seconds in Windows 11 taskbar clock using settings (and 4 other ways)
- How to change the Start Menu layout in Windows 11