
Обычно сброс сетевых настроек в Windows это последнее средство, которое стоит попробовать для решения сложных проблем с доступом к локальной сети или Интернету. При этом на компьютере сбрасываются настройки сетевых адаптеров, настройки стека TCP/IP до стандартных настроек в чистой Windows, удаляются и переустанавливаются все сетевые адаптеры компьютера. В этой статье мы рассмотрим особенности сброса сетевых настроек в Windows из графического интерфейса и с помощью командной строки.
Прежде чем прибегать к сбросу сетевых настроек, убедитесь, что вы попробовали все стандартные средства диагностики работы с сетью: проверили настройки IP, работу маршрутизатора/роутера/провайдера, обновили драйвера сетевых адаптеров, перезагружали компьютер, воспользовались встроенным Windows Network Troubleshooter (команда
msdt.exe /id NetworkDiagnosticsNetworkAdapter
) и т.д. Если ни один инструментов не помог исправить сетевую проблему, можно попробовать сбросить сетевые настройки.
Содержание:
- Сохраните текущие сетевые настройки Windows
- Сброс сетевых настроек из панели управления Windows
- Сброс сетевых настроек из командной строки Windows
Сохраните текущие сетевые настройки Windows
При сбросе сети в Windows будут потеряны все настройки, которые вы задали вручную: IP адреса, DNS сервера, статические маршруты, настройки сетевых драйверов, очищены сохраненные Wi-Fi сети и т.д. Поэтому перед сбросом важно сохранить текущие настройки.
Выведите список сетевых адаптеров:
Get-NetAdapter|select name,InterfaceIndex,InterfaceDescription,InterfaceOperationalStatus,MediaConnectionState,DriverInformation|ft

Для всех подключенных сетевых адаптеров проверьте, получают ли они настройки автоматически (через DHCP) или вручную:
Get-NetIPInterface -InterfaceIndex 7

Если для интерфейса значение
Dhcp=Disabled
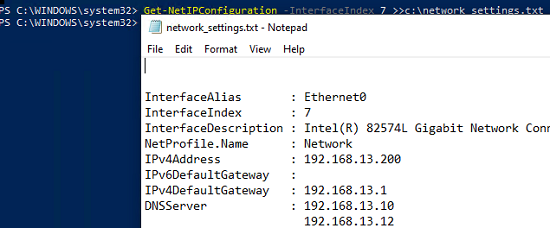
, значит для адаптера настройки IP заданы вручную и вам нужно сохранить текущие настройки в файл:
Get-NetIPConfiguration -InterfaceIndex 7 >>c:\network_settings.txt
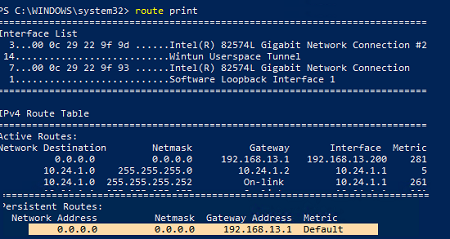
Выведите и запишите все статические маршруты в таблице маршрутизации (из секции Persistent Routes):
Route print
С помощью PowerShell выведите список VPN подключений, запишите их настройки:
Get-VpnConnection
В моем случае настройки сохраненных VPN подключений не были сброшены. Также не был удален виртуальный адаптер OpenVPN Wintun (адаптер для подключения к OpenVPN серверу).
Выведите WLAN профили и сохраните настройки беспроводных сетей в файл:
netsh wlan show profile
netsh wlan export profile name="Xiaomi_20F5" key=clear folder=c:\ps
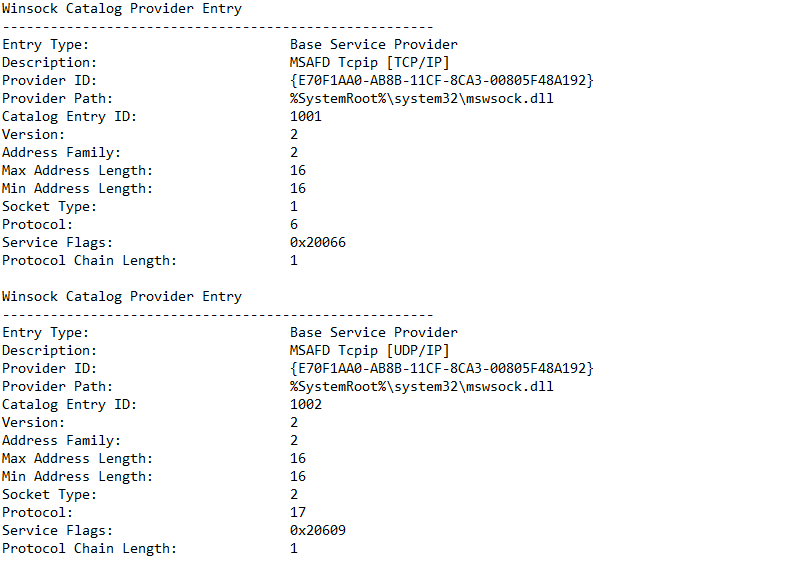
Сохраните настройки Winsock:
netsh winsock show catalog > c:\winsock-backup.txt
После сброса сети сохраненная информация поможет вам восстановить все сетевые настройки, заданные вручную.
Сброс сетевых настроек из панели управления Windows
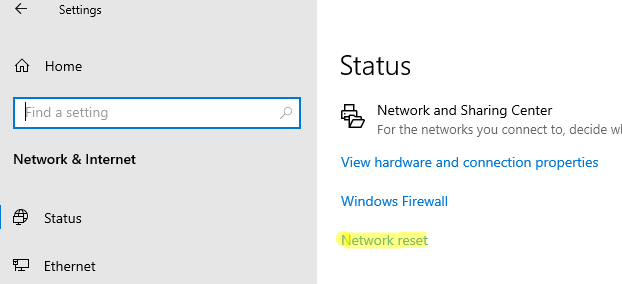
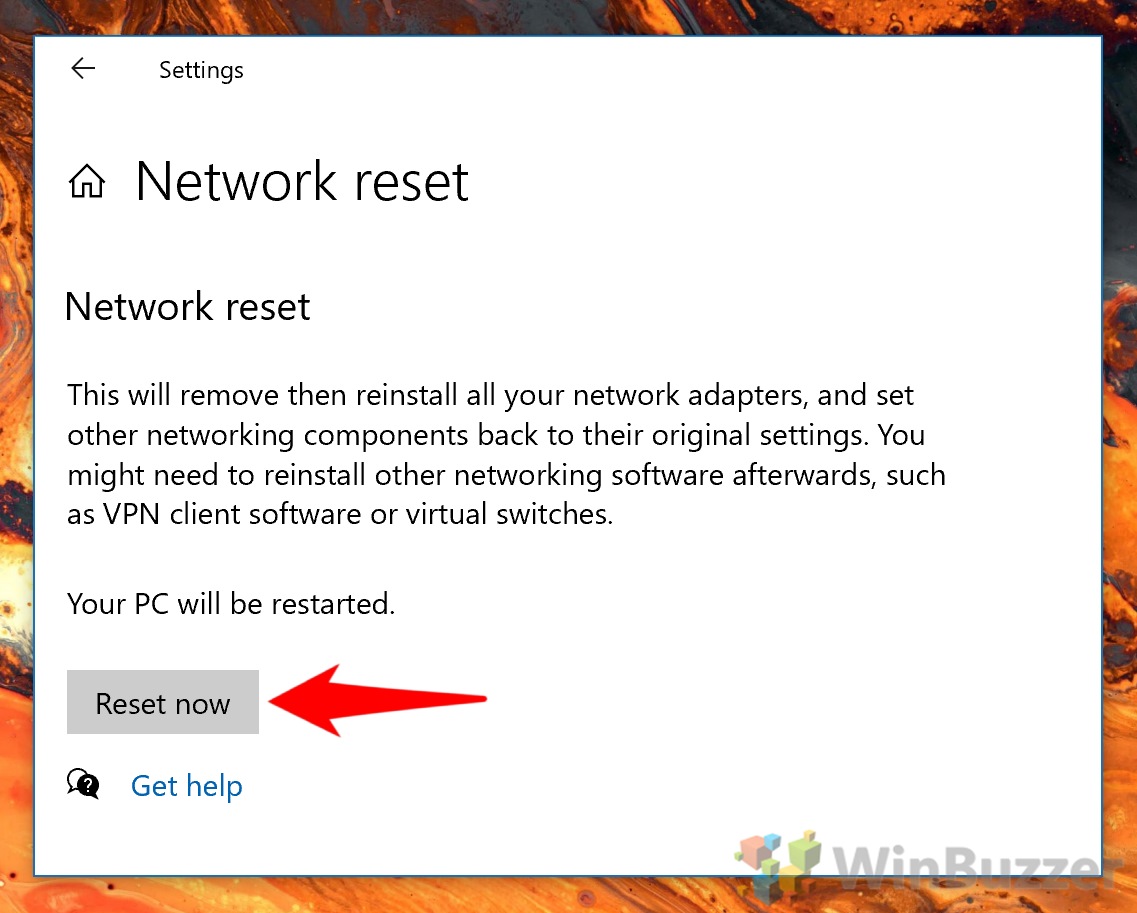
В Windows 10 (1607+), Windows 11 и Windows Server 2019/2022 можно сбросить сетевые настройки из панели Параметры (Settings). Перейдите в раздел Settings -> Network (или выполните команду быстрого доступа к ms-settings: ms-settings:network). Нажмите кнопку Network reset -> Reset now.
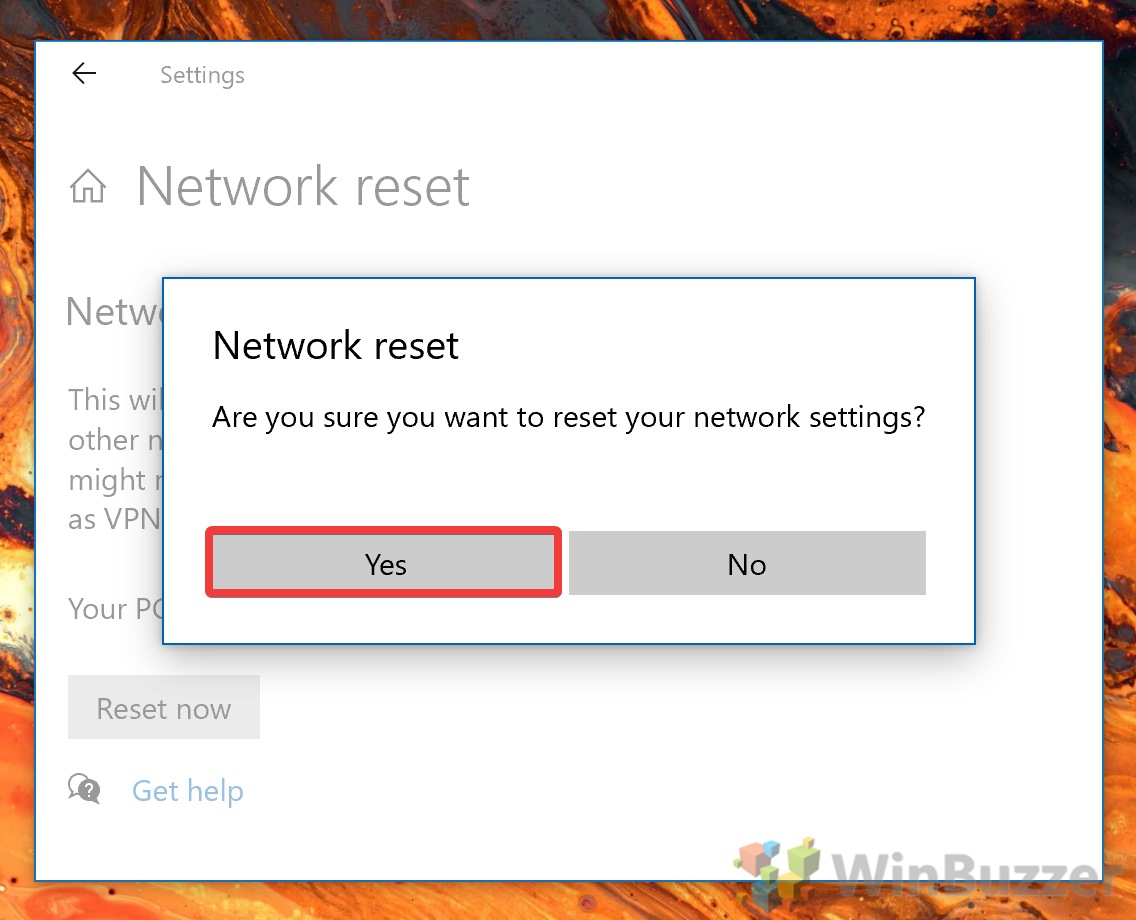
Подтвердите сброс сетевых настроек. Windows очистит все сетевые настройки и удалит сетевые карты (сетевые адаптеры не будут отображаться в Панели Управления). Настройки сети будут сброшены до заводских. Windows автоматически перезагрузится через 5 минут.
После загрузки Windows обнаружит все подключенные сетевые адаптеры и устанвит драйвера. Останется настроить параметры сетевых подключение и проверить, исправлена ли проблема.
Сброс сетевых настроек из командной строки Windows
Все те же действия, которая выполнила процедура сброса сети из панели Settings можно выполнить из командной строки.
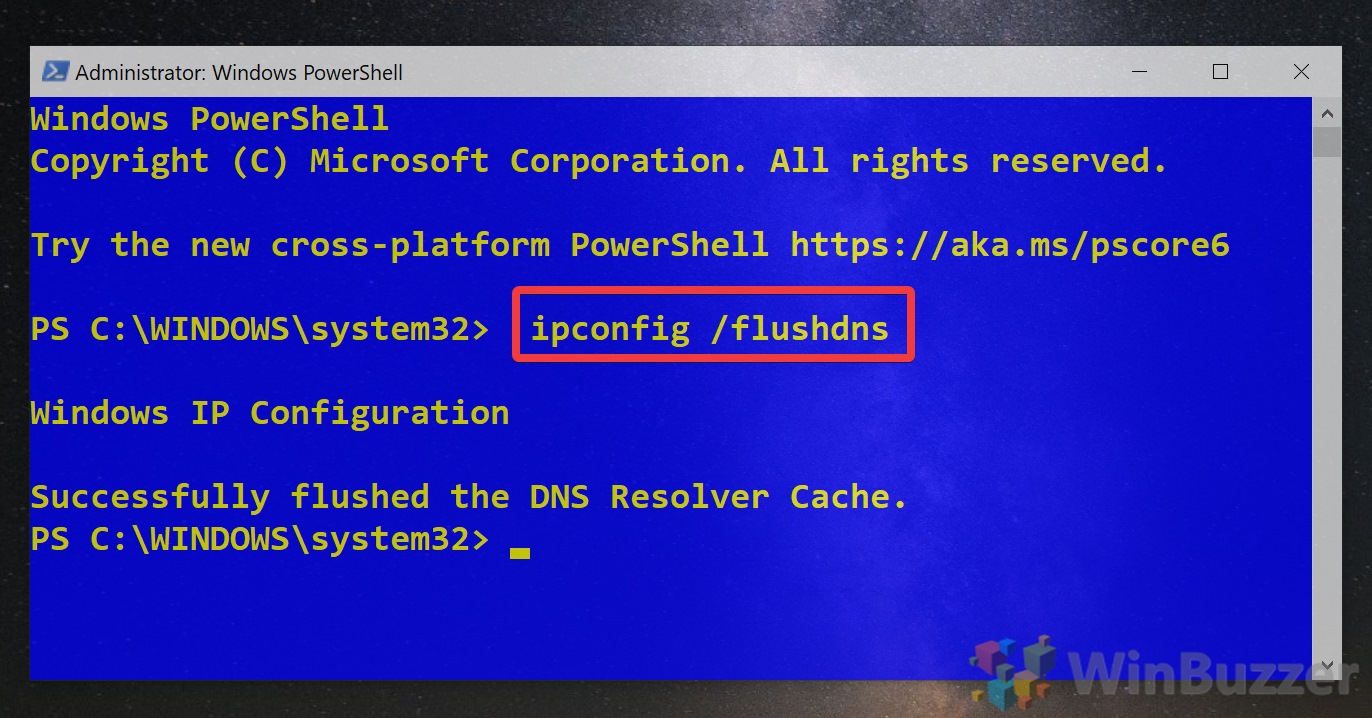
Сбросьте кэш DNS:
ipconfig /flushdns
Сбросьте настройки WinSock:
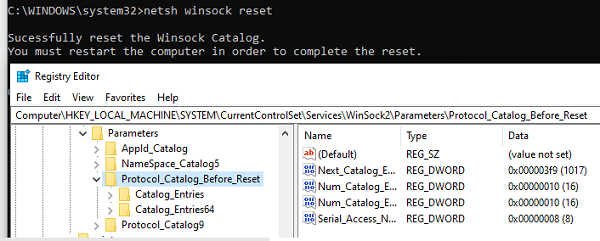
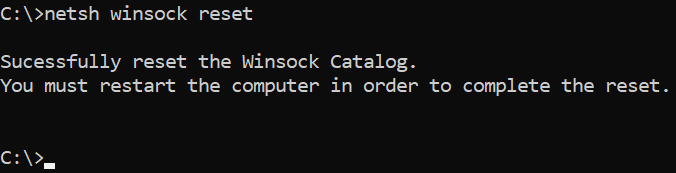
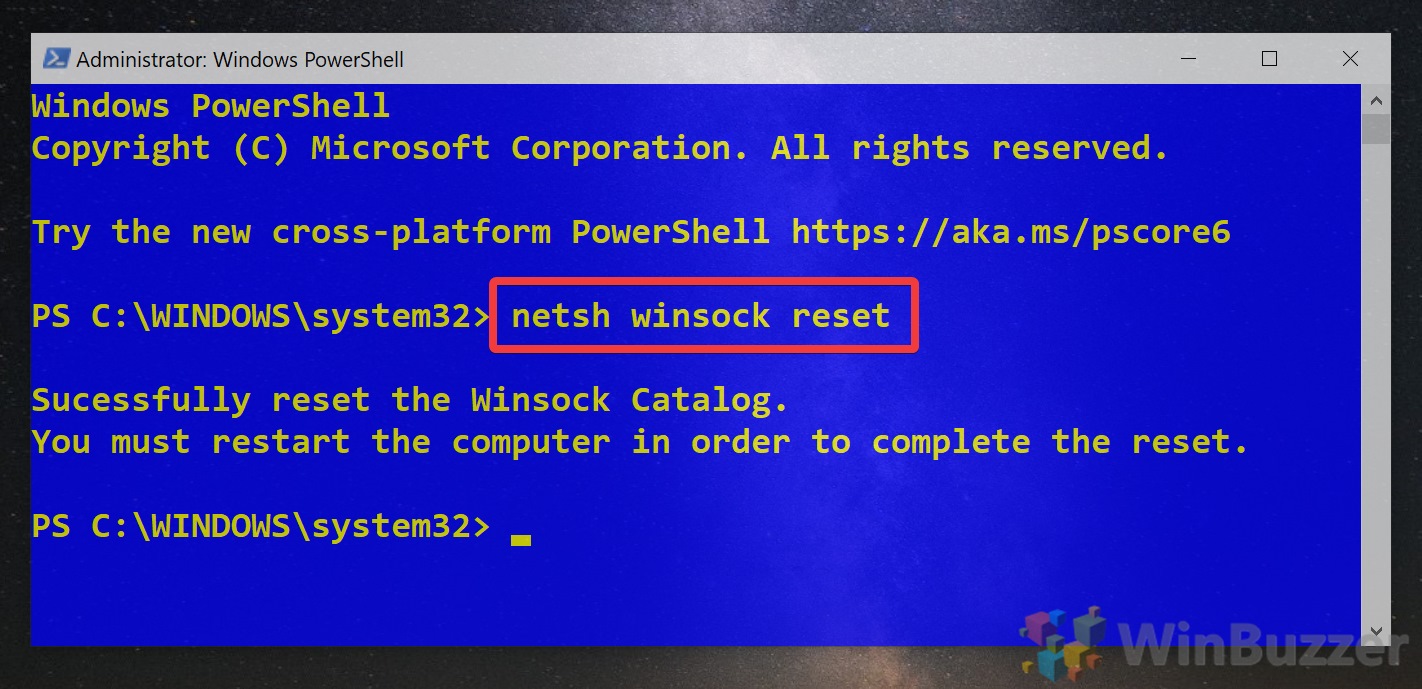
netsh winsock reset
Sucessfully reset the Winsock Catalog.
You must restart the computer in order to complete the reset.
Команда сбрасывает настройки в ветке реестра HKEY_LOCAL_MACHINE\SYSTEM\CurrentControlSet\Services\WinSock2\Parameters . При этом старые настройки сохраняются в ветку Protocol_Catalog_Before_Reset.
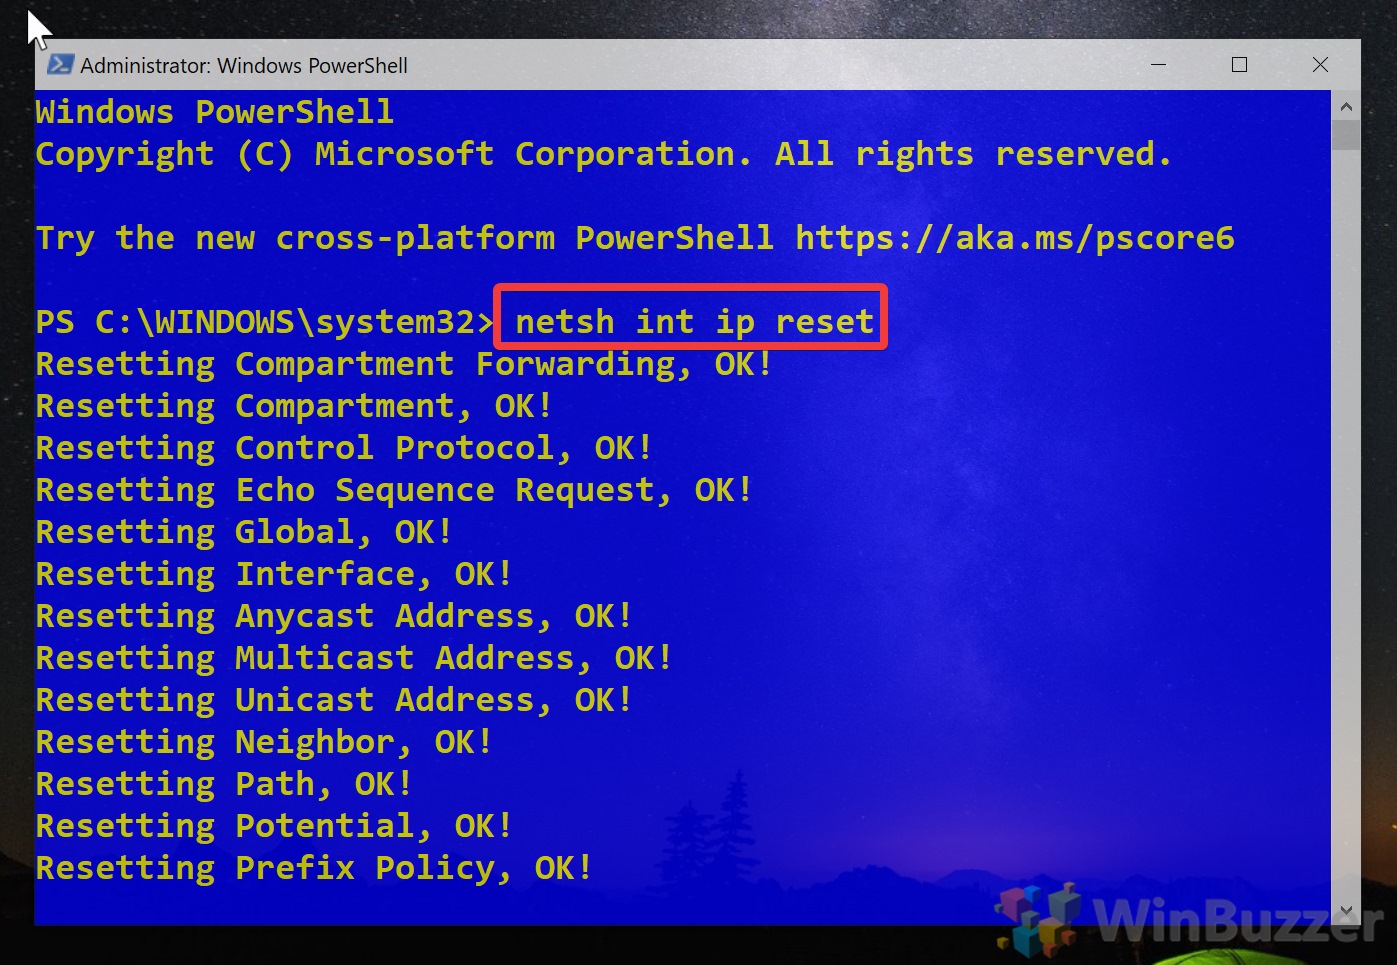
Сброс настроек стека TCP/IP:
netsh int ip reset
Для сброса настроек TCP/IPv6:
netsh int ipv6 reset
Resetting Compartment Forwarding, OK!
Resetting Compartment, OK!
Resetting Control Protocol, OK!
Resetting Echo Sequence Request, OK!
Resetting Global, OK!
Resetting Interface, OK!
Resetting Anycast Address, OK!
Resetting Multicast Address, OK!
Resetting Unicast Address, OK!
 Resetting Neighbor, OK!
Resetting Path, OK!
Resetting Potential, OK!
Resetting Prefix Policy, OK!
Resetting Proxy Neighbor, OK!
Resetting Route, OK!
Resetting Site Prefix, OK!
Resetting Subinterface, OK!
Resetting Wakeup Pattern, OK!
Resetting Resolve Neighbor, OK!
Resetting , OK!
Restart the computer to complete this action.
Сбрасываются настройки в ветках реестра HKLM\SYSTEM\CurrentControlSet\Services\Tcpip\Parameters и \SYSTEM\CurrentControlSet\Services\DHCP\Parameters.
Удалите все сетевые адаптеры:
netcfg -d
Successfully removed all MUX Objects.
Removing device "Intel(R) 82574L Gigabit Network Connection"
Removing device "WAN Miniport (PPPOE)"
Skipping the removal of "Wintun Userspace Tunnel"
Removing device "WAN Miniport (PPTP)"
Removing device "WAN Miniport (IKEv2)"
Check to see if the "Microsoft Kernel Debug Network Adapter" bindings should be reset
"Microsoft Kernel Debug Network Adapter" binding check complete
Removing device "WAN Miniport (Network Monitor)"
Removing device "WAN Miniport (IP)"
Removing device "WAN Miniport (SSTP)"
Removing device "WAN Miniport (IPv6)"
Removing device "WAN Miniport (L2TP)"
Please reboot the computer...
Сброс всех правил Windows Defender Firewall:
netsh advfirewall reset
В PowerShell также есть отдельная команда для сброса расширенных настроек конкретного сетевого адаптера. Сначала вы можете получить текущие настройки адаптера:
Get-NetAdapterAdvancedProperty -Name Ethernet0|ft -AutoSize
Name DisplayName DisplayValue RegistryKeyword RegistryValue
---- ----------- ------------ --------------- -------------
Ethernet0 Flow Control Rx & Tx Enabled *FlowControl {3}
Ethernet0 Interrupt Moderation Enabled *InterruptModeration {1}
Ethernet0 IPv4 Checksum Offload Rx & Tx Enabled *IPChecksumOffloadIPv4 {3}
Ethernet0 Jumbo Packet Disabled *JumboPacket {1514}
Ethernet0 Large Send Offload V2 (IPv4) Enabled *LsoV2IPv4 {1}
Ethernet0 Large Send Offload V2 (IPv6) Enabled *LsoV2IPv6 {1}
Ethernet0 Maximum Number of RSS Queues 2 Queues *NumRssQueues {2}
Ethernet0 Packet Priority & VLAN Packet Priority & VLAN Enabled *PriorityVLANTag {3}
Ethernet0 Receive Buffers 256 *ReceiveBuffers {256}
Ethernet0 Receive Side Scaling Enabled *RSS {1}
Ethernet0 Speed & Duplex Auto Negotiation *SpeedDuplex {0}
Ethernet0 TCP Checksum Offload (IPv4) Rx & Tx Enabled *TCPChecksumOffloadIPv4 {3}
Ethernet0 TCP Checksum Offload (IPv6) Rx & Tx Enabled *TCPChecksumOffloadIPv6 {3}
Ethernet0 Transmit Buffers 512 *TransmitBuffers {512}
Ethernet0 UDP Checksum Offload (IPv4) Rx & Tx Enabled *UDPChecksumOffloadIPv4 {3}
Ethernet0 UDP Checksum Offload (IPv6) Rx & Tx Enabled *UDPChecksumOffloadIPv6 {3}
Ethernet0 Adaptive Inter-Frame Spacing Disabled AdaptiveIFS {0}
Ethernet0 Interrupt Moderation Rate Adaptive ITR {65535}
Ethernet0 Log Link State Event Enabled LogLinkStateEvent {51}
Ethernet0 Gigabit Master Slave Mode Auto Detect MasterSlave {0}
Ethernet0 Locally Administered Address -- NetworkAddress {--}
Ethernet0 Wait for Link Auto Detect WaitAutoNegComplete {2}
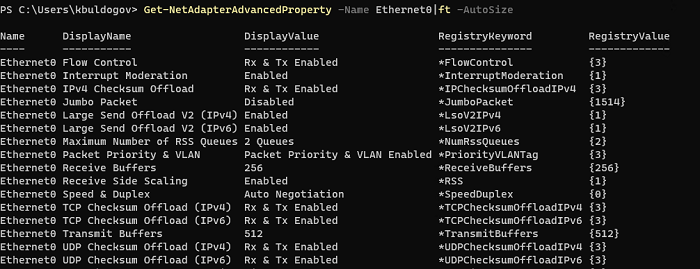
Здесь можно вывести настройки Jumbo Packet, VLAN, настройки буферов и т.д.
Для сброса этих параметров, выполните:
Reset-NetAdapterAdvancedProperty -Name Ethernet0
Перезагрузите компьютер и задайте все сетевые настройки заново. Если компьютер настроен на автоматическое получение IP адреса и настроек сети от DHCP сервера, ничего дополнительно настраивать не придется.
Как сбросить сетевые настройки в Windows
Статья обновлена: 15 июля 2024
ID: 12378
Если у вас возникли проблемы с подключением к сети, сбросьте сетевые настройки в Windows. При этом будут сброшены также настройки прокси-сервера.
Как сбросить сетевые настройки с помощью командной строки
Как сбросить сетевые настройки в параметрах Windows 10 и Windows 11
Спасибо за ваш отзыв, вы помогаете нам становиться лучше!
Спасибо за ваш отзыв, вы помогаете нам становиться лучше!
-
сервер
php, mysql, nginx, centos -
клиент
js, jquery, react -
клиент-сервер
ajax, fetch, node.js -
вёрстка
css, html
Команды производят ряд сетевых операций, которые приводят к сбросу настроек сетевого интерфейса, что может помочь при решении проблем с сетью.
ipconfig /release
ipconfig /flushdns
ipconfig /renew
netsh winsock reset
netsh interface ipv4 reset
netsh interface ipv6 reset
netsh interface ip delete destinationcache
netsh winsock reset catalog
netsh int ipv4 reset reset.log
netsh int ipv6 reset reset.log
ipconfig /release — команда освобождает IP-адрес, который был назначен вашему компьютеру. Если у вас есть активное сетевое соединение, это приведет к его отключению.
ipconfig /flushdns — команда очищает DNS кэш на вашем компьютере. DNS кэш — это временное хранилище информации о недавно посещенных веб-сайтах и их IP-адресах. Очистка DNS может быть полезной, если у вас возникли проблемы с соединением или доступом к определенным сайтам.
ipconfig /renew — команда просит DHCP сервер назначить новый IP-адрес вашему компьютеру. Обычно это полезно после выполнения ipconfig /release.
netsh winsock reset — команда сбрасывает конфигурацию Winsock, которая управляет входящими и исходящими соединениями в Windows. Это может быть полезно при решении проблем с подключением к интернету.
netsh interface ipv4 reset и netsh interface ipv6 reset — команды сбрасывают все параметры IPv4 и IPv6 соединений до значений по умолчанию.
netsh interface ip delete destinationcache — команда удаляет кэш пунктов назначения IP.
netsh winsock reset catalog — команда для сброса настроек Winsock, но она включает в себя сброс каталога Winsock.
netsh int ipv4 reset reset.log и netsh int ipv6 reset reset.log — команды сбрасывают все параметры TCP/IP для выбранного протокола (IPv4 или IPv6) до значений по умолчанию. Файлы reset.log используются для записи всех событий и операций, связанных с процессом сброса.
Сеть Windows
up:
Просмотров: 4.9k
- Сниппеты
- —
- Сервер
- —
- Сброс настроек сети в Windows
Are you having Windows network connectivity issues with software such as email clients and web browsers? Sometimes, these issues stem from a corrupt network configuration. The netsh winsock reset command will set important network settings to their defaults, often fixing these network problems!
In this article, you will learn how to reset the Winsock catalog which is a database of network settings, where incorrect configurations and malware affect your network connectivity. Read on to learn practical tips on fixing your network connection and what this cryptic Winsock term is all about!
Prerequisites
This article will be a tutorial. If you plan on following along step-by-step, use any supported version of Windows along with local administrative rights.
What is Winsock?
Based on the Berkeley UNIX Sockets interface, Winsock is an application programming interface (API) that orchestrates different network protocols communication between applications, such as a web browser, and actual network devices.
Included below is a great diagram to demonstrate where exactly the Winsock wsock32.dll library sits in the Windows networking stack.
Besides acting as an API, Winsock stores its settings in a database known as the Winsock catalog. In Windows 10 the catalog stores both namespace providers, providing a map between Winsock and a service such as DNS, and base service providers which provides detail on network protocols, such as TCP/IP.
Why “Resetting” Winsock is Necessary
Sometimes the Winsock catalog contains incorrect entries or becomes corrupt. Performing a Winsock reset via the netsh winsock reset in the Windows command prompt will set the Winsock catalog and associated registry settings to their defaults. The relevant registry settings are located in the below path.
HKEY_LOCAL_MACHINE\SYSTEM\CurrentControlSet\Services\WinSock2\Parameters\Protocol_Catalog9Why would you want to perform Winsock reset after all?
- Malware or adware that uses Winsock to get in between the user and the internet.
- A network device is incorrectly installed or removed.
- Registry or file system issues corrupt the Winsock catalog.
A real-life example of Winsock malware is HackTool.Win32.Proxifier.A, from the Trend Micro Threat Encyclopedia. Don’t worry, this won’t download any malware!
Prior to Windows Server 2012 and Windows Vista, incorrect settings and malware often existed as Layered Service Providers (LSP) in the Winsock catalog, as described in further detail later in the article. In recent versions of Windows, LSPs were deprecated with functionality moved into the Windows filtering platform.
Winsock problems do not crop up as often anymore, but they still can! Learn to fix incorrectly installed network devices or corrupted Winsock catalogs by reading on.
How to Reset Winsock with netsh winsock reset
Resetting Winsock is best done through the Windows command-line tool netsh. The netsh command displays and modifies the running computer’s network configuration, along with resetting the Winsock catalog.
When performing any Winsock change, you should first save a before and after snapshot of the changed settings, as shown in the below steps.
- Open a Command Prompt as an administrator.
2. Copy and run the command shown below to save the results of the Winsock catalog to the file C:\winsock-before.txt prior to resetting the Winsock catalog.
The command below assumes you are in the C:\ directory, otherwise the file will save to the directory your command prompt is currently in.
netsh winsock show catalog > winsock-before.txtAn example of the saved Winsock catalog is shown below. Yours will look similar to this, reflecting your network devices and entries.
3. Next, reset the Winsock catalog by running the following command.
netsh winsock reset command.Upon performing the reset command, the
Protocol_Catalog9registry entry is saved to:HKEY_LOCAL_MACHINE\SYSTEM\CurrentControlSet\Services\WinSock2\Parameters\Protocol_Catalog_Before_Reset. These entries are binary encoded, so it is much easier to read in plaintext.
4. Now take another snapshot of the Winsock Catalog again to document the changes just made.
netsh winsock show catalog > winsock-after.txt5. Restart the computer to complete the network reset.
Not all network issues can be solved using the netsh winsock reset command, and in those cases, the netsh int ip reset command comes in handy! Read on to learn when and where to use this command.
Reset TCP/IP Settings with netsh int ip reset
The Winsock catalog is not the only set of network settings that can cause problems. As mentioned earlier, malware and incorrect settings often existed as Winsock LSPs, which are not as prevalent anymore due to their deprecation in newer versions of Windows.
More commonly, network issues exist with TCP/IP configurations. If you have any of the following network problems, then read on to learn how to reset your TCP/IP settings.
- DNS lookup issues, provided that DNS is configured correctly.
- DHCP IP address assignment problems, perhaps
ipconfig /renewis not working correctly.
- Limited or no connectivity in your web browser or email client.
In the same local administrator command-prompt, follow the below steps to reset your TCP/IP settings.
- Before resetting your IP settings, run the following command to see a snapshot of your current IP settings. In case the reset fails, it is helpful to have a record of your prior network settings.
2. Run the following command in the command prompt to reset your IP settings.
To save the output of the reset command, redirect the output to a file using a command such as:
netsh int ip reset > log.txt.
When you reset the TCP/IP settings using the netsh int ip reset command, the following registry settings are overwritten.
SYSTEM\CurrentControlSet\Services\Tcpip\Parameters
 SYSTEM\CurrentControlSet\Services\DHCP\Parameters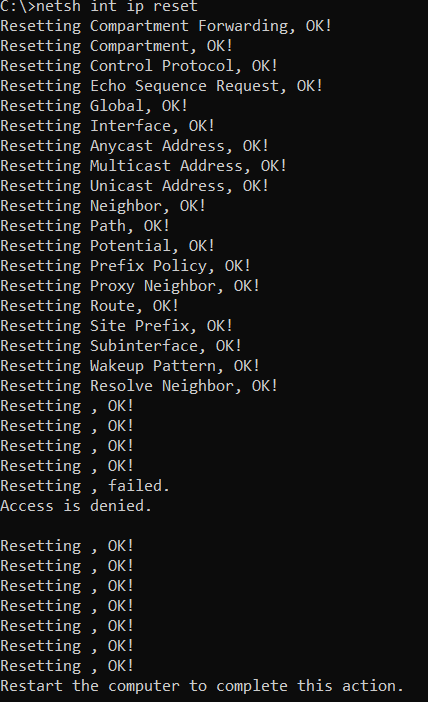
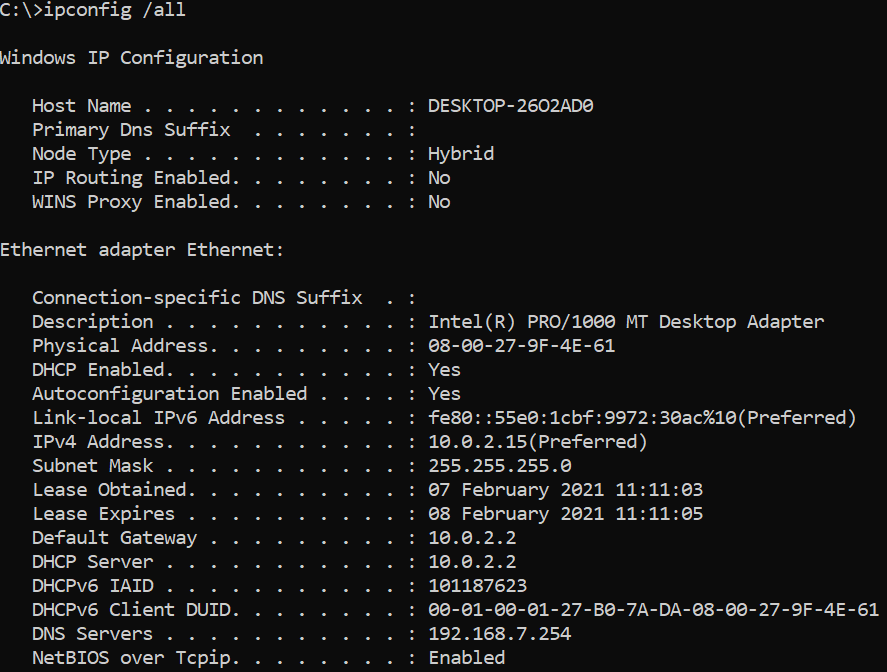
3. Verify your network settings with the ipconfig /all command again, such as IP addresses, default gateways, and DNS settings.
Further Reading & Next Steps
Networking is a complicated topic with many potential issues, but two additional resources that may help are linked below.
- Fix Wi-Fi connection issues in Windows
- Fix network connection issues in Windows 10
Although not all networking issues may be resolved by performing a netsh winsock reset or netsh int ip reset command, both commands provide a great starting point!
We’ve all run into the dreaded taskbar icon that denotes Windows 10 internet connection issues. There are various reasons this can happen, but if you’re really struggling, the quickest fix is to perform a full Windows 10 network reset.
From the Anniversary Update onwards, Microsoft offers an easy way to reset Windows 10 network settings to their defaults. While you should always try other fixes first, such as running Windows network diagnostics, it’s a handy last resort.
This network fix will reset your WiFi adapter, WiFi passwords, Ethernet adapter, VPN connections, and virtual switches. It can solve most software-based issues as a result, but if you don’t know your WiFi password you’ll want to look elsewhere for a remedy.
With that warning, here’s how to perform a Windows 10 network reset, both via the network and internet settings menu and the netsh winsock reset command.
How to Reset Your Windows 10 Network via Settings
As mentioned, recent versions of Windows now let you perform a full Windows 10 Network reset via the settings interface. This greatly simplifies things and is the recommended route for most people.
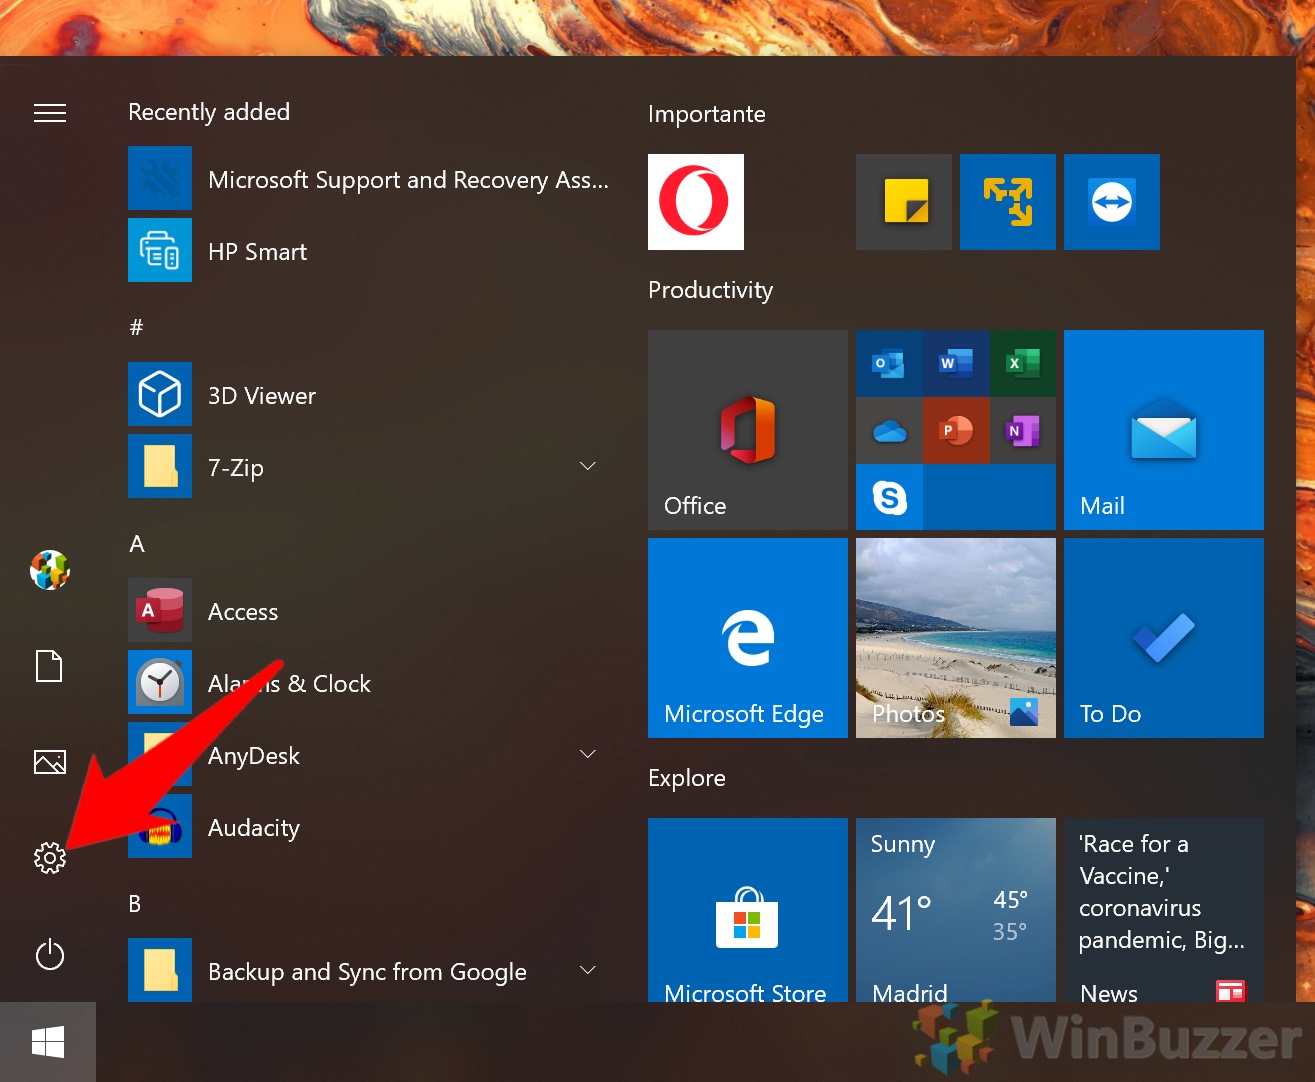
- Open settings
Press the “Start” button, then click the setting cog in the bottom-left corner, above the power menu.

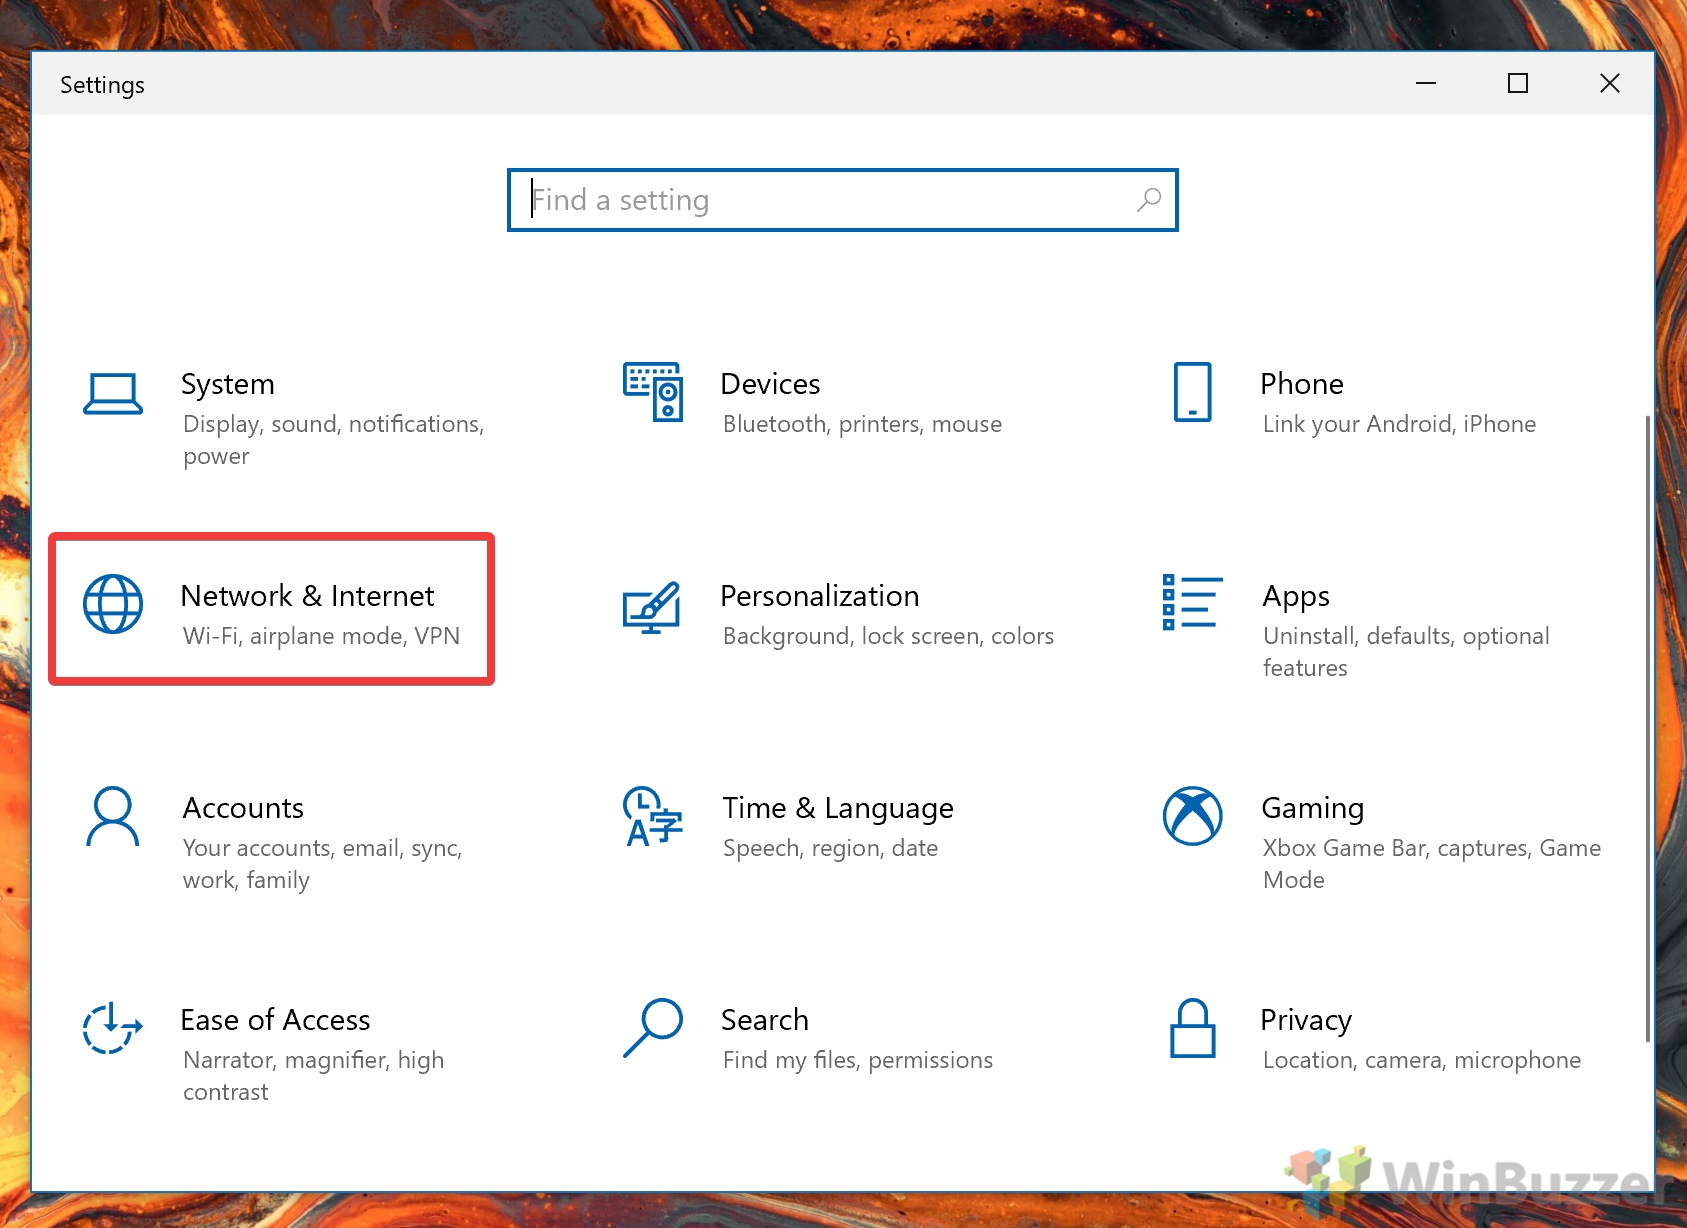
- Go to Network and Internet settings
This may be stylized as “Network & Internet” in your Windows 10 settings app.

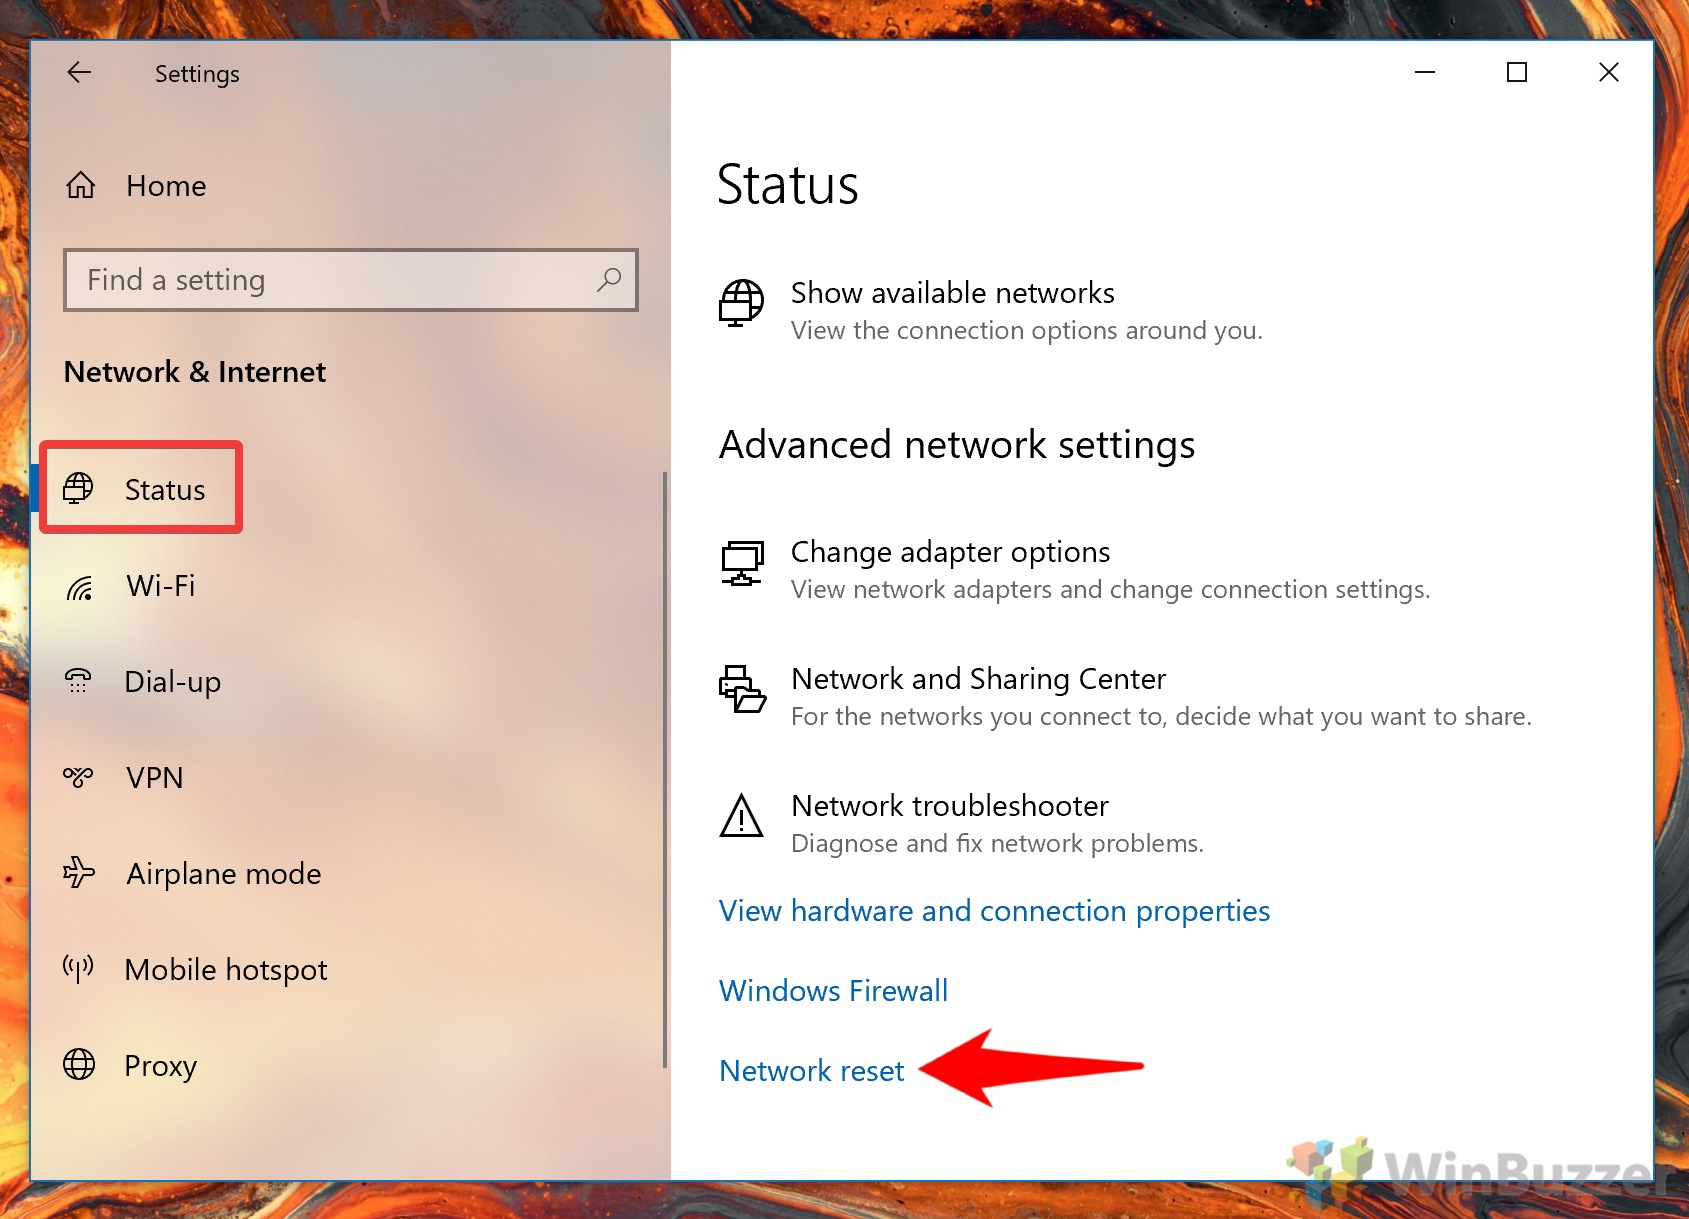
- Click “Network reset”
Making sure you’re in the “Status” tab in the left sidebar, scroll until you see the “Network reset” text. Click it to begin the process.

- Press “Reset now” when ready
Before you do so, make sure you have saved content you were writing on any websites and are aware of what will be changed. This network fix will reset WiFi adapters and remove your VPNs, WiFi passwords, and virtual switches.

- Click “Yes” to the confirmation dialog

How to Reset Network Settings with the “netsh winsock reset” command
If you need to reset network settings on Windows 7 or Windows 8.1, or are getting an error, you may need to use PowerShell to get the desired results. If you’re a power user, this can also be faster.
Though netsh winsock reset is the main command we’ll be using, we’ll also use netsh int IP reset to reset the TCP/IP stack.
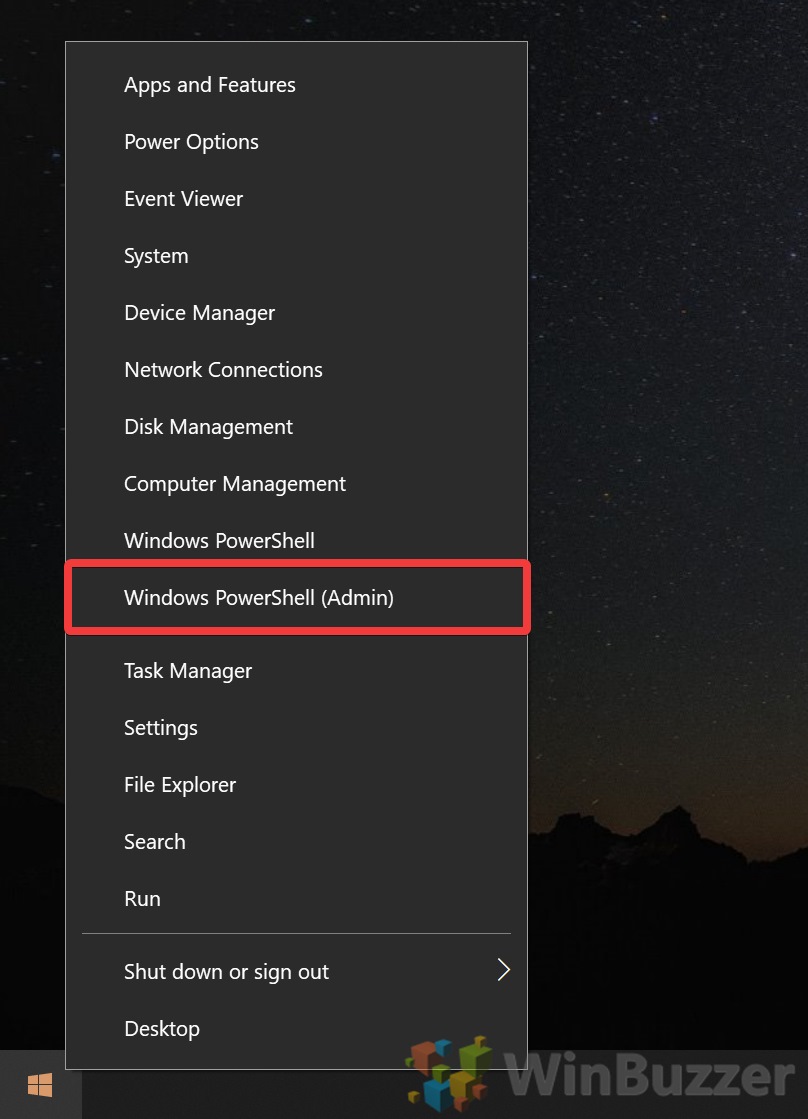
- Run PowerShell as an administrator
Press “Ctrl + X” to open the Quick Link menu, then click “Windows PowerShell (Admin)”. Note that it is necessary to use the administrator version to run this command.

- Run the “netsh winsock reset” commandThe
netsh winsock resetcommand is the first step of a full Windows 10 network reset. It helps to recover the computer from any socket errors that may have arisen from settings corruption or malware.Type
netsh winsock resetin your PowerShell window when ready and press Enter to run it. It will return a success message and a restart prompt. Do not restart your PC quite yet.
- Reset your TCP/IP settings
To perform a full Windows 10 or Windows 7 network reset, we should also reset TCP/IP. The command for this is
netsh int ip reset. Type it in the same PowerShell window and press Enter on your keyboard.
- Reset your IP configuration
We can now renew Windows’ IP address configuration. Run the following command:
ipconfig /renew
- Flush your DNSIt can also be useful to flush your PC’s DNS settings. This is particularly true if you have modified your DNS at any point, for example via faulty VPN software or by pointing it to Cloudflare or Google DNS. Type
ipconfig /flushdnsand press Enter.
- Run a full network device cleanup
You may also want to perform a full network device cleanup. This will remove all of your networking devices, VPN client software, and virtual switches. Make sure you have your network drivers downloaded locally just in case you can’t connect to the internet to download them afterwards.
In PowerShell, enter
netcfg -d. You can now restart your PC to apply the changes.


Now that your network has been reset, you may want to read our guide on how to set up a VPN in Windows 10. If you have a bandwidth cap, don’t forget to set up your metered connection.
Last Updated on February 26, 2021 10:09 am CET
Ryan Maskellhttps://ryanmaskell.co.uk
Ryan has had a passion for gaming and technology since early childhood. Fusing the skills from his Creative Writing and Publishing degree with profound technical knowledge, he enjoys covering news about Microsoft. As an avid writer, he is also working on his debut novel.