
Одно из частых действий, необходимых при решении проблем с работой Интернета (таких как ошибка ERR_NAME_NOT_RESOLVED и других) или при смене адресов DNS серверов в Windows 10, 8 или Windows 7 — очистка кэша DNS (кэш DNS содержит соответствия между адресами сайтов в «человеческом формате» и их фактическим IP-адресом в интернете).
В этой инструкции подробно о том, как очистить (сбросить) кэш DNS в Windows, а также некоторые дополнительные сведения по очистке данных DNS, которые могут оказаться полезными.
Очистка (сброс) кэша DNS в командной строке
Стандартный и очень простой способ сброса кэша DNS в Windows — использовать соответствующие команды в командной строке.
Шаги, чтобы очистить кэш DNS при этом будут следующими.
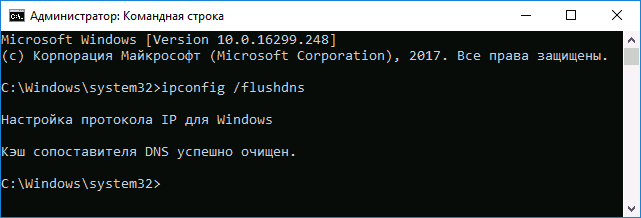
- Запустите командную строку от имени администратора (в Windows 10 для этого можно начать набирать «Командная строка» в поиске на панели задач, затем нажать правой кнопкой мыши по найденному результату и выбрать «Запуск от имени администратора» в контекстном меню (см. Как запустить командную строку от имени администратора в Windows).
- Введите простую команду ipconfig /flushdns и нажмите Enter.
- Если всё прошло успешно, в результате вы увидите сообщение о том, что «Кэш сопоставителя DNS успешно очищен».

- В Windows 7 дополнительно можно выполнить перезапуск службы DNS-клиент, для этого там же в командной строке по порядку выполните следующие команды
- net stop dnscache
- net start dnscache
После выполнения описанных действий сброс кэша DNS Windows будет завершена, однако в некоторых случаях могут возникнуть проблемы, вызванные тем, что и у браузеров есть собственная база данных соответствий адресов, которую также можно очистить.
Очистка внутреннего кэша DNS Google Chrome, Яндекс Браузера, Opera
В браузерах на базе Chromium — Google Chrome, Opera, Яндекс Браузер присутствует собственный кэш DNS, который также можно очистить.
Для этого в браузере введите в адресную строку:
- chrome://net-internals/#dns — для Google Chrome
- browser://net-internals/#dns — для Яндекс Браузера
- opera://net-internals/#dns — для Оперы
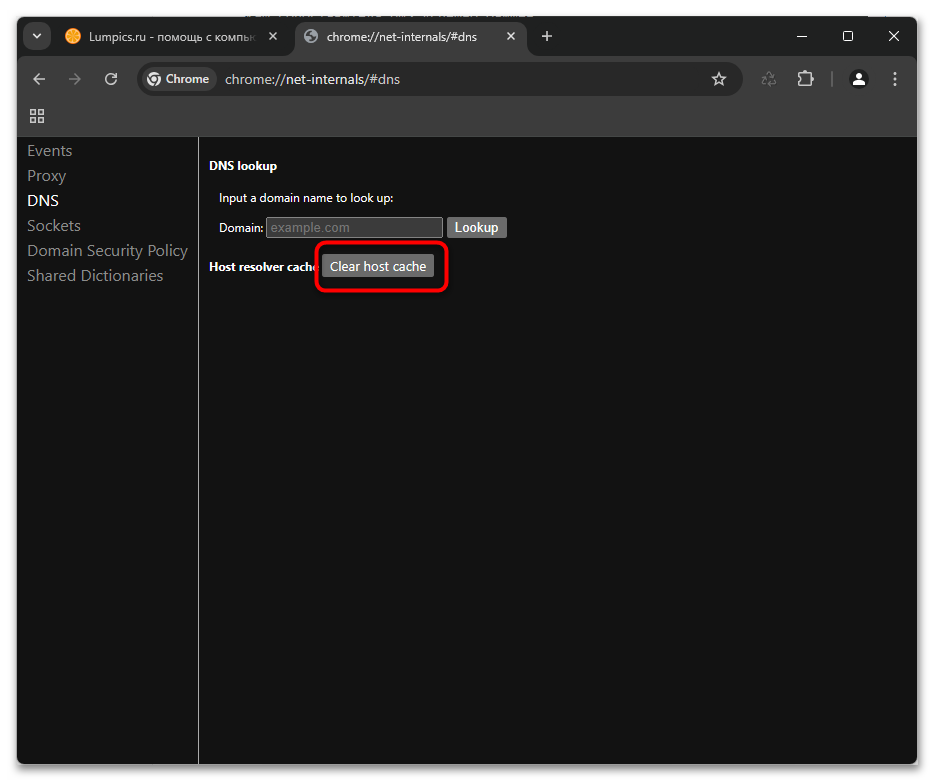
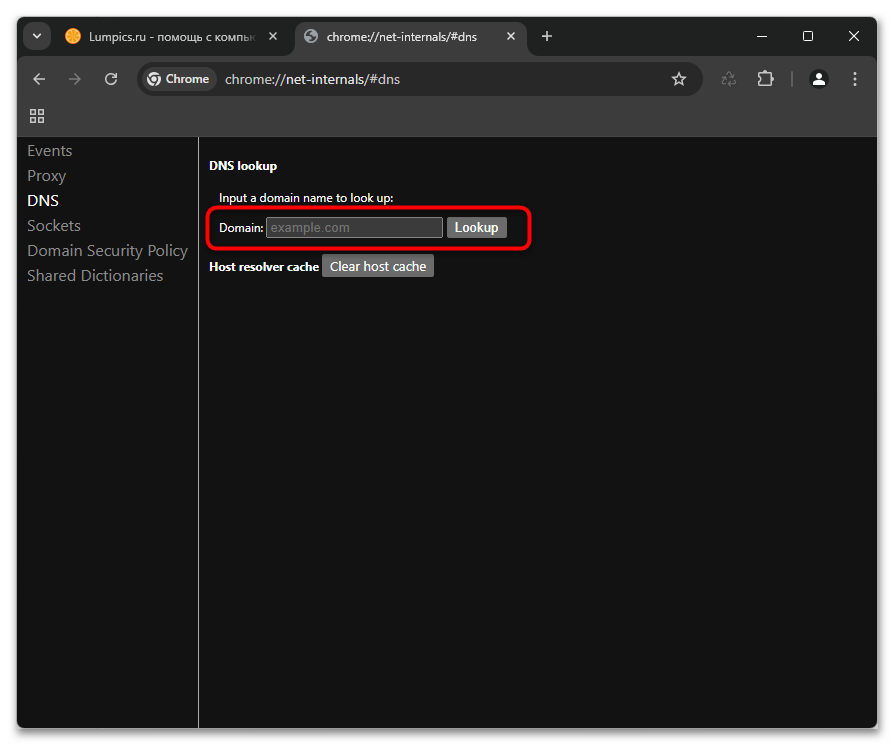
На открывшейся странице вы можете посмотреть содержимое кэша DNS браузера и очистить его, нажав кнопку «Clear host cache».
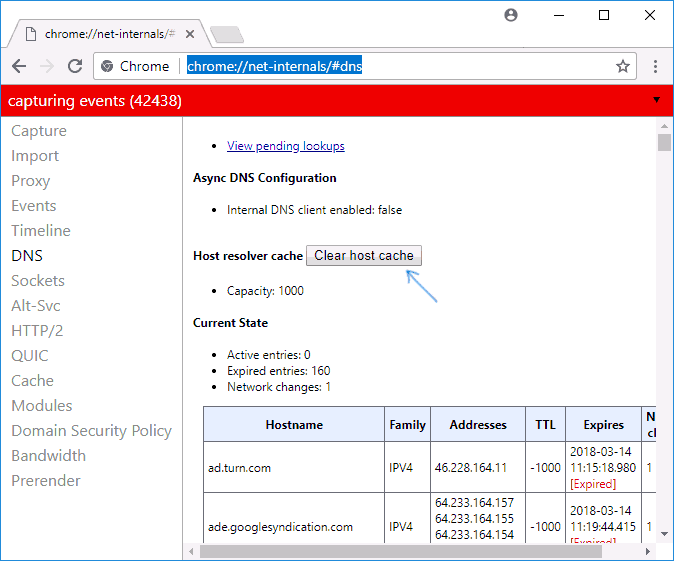
Дополнительно (при проблемах с соединениями в конкретном браузере) может помочь очистка сокетов в разделе Sockets (кнопка Flush socket pools).
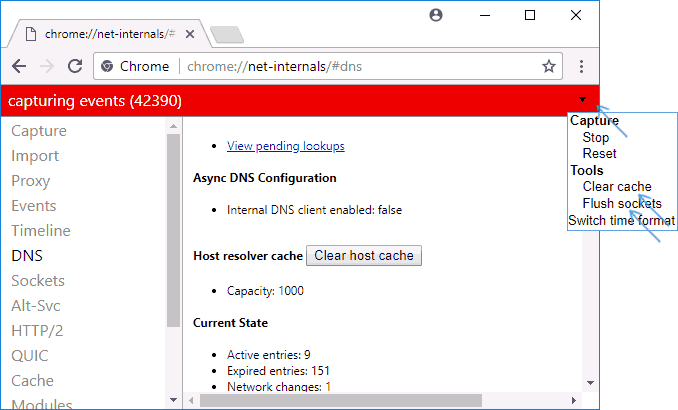
Также, оба этих действия — сброс кэша DNS и очистку сокетов можно быстро выполнить, открыв меню действий в правом верхнем углу страницы, как на скриншоте ниже.
Дополнительная информация
Существуют и дополнительные способы сброса кэша DNS в Windows, например,
- В Windows 10 присутствует опция автоматического сброса всех параметров подключений, см. Как сбросить настройки сети и Интернета в Windows 10.
- Многие программы для исправления ошибок Windows имеют встроенные функции для очистки кэша DNS, одна из таких программ, направленная именно на решение проблем с сетевыми подключениями — NetAdapter Repair All In One (в программе присутствует отдельная кнопка Flush DNS Cache для сброса кэша DNS).


Если простая очистка не срабатывает в вашем случае, при этом вы уверены, что сайт, к которому вы пробуете получить доступ работает, попробуйте описать ситуацию в комментариях, возможно, у меня получится вам помочь.
-
Modern browsers, OS, and DNS clients store cache of IP addresses and other DNS information automatically. When a computer visits a website for the first time, it stores the website’s DNS information in the cache, and on the next visit of the same website, it looks in the cache to see if the web site’s information is present to use. An old version of a site opens if the website’s DNS information has changed since the computer’s last visit.
Flushing the cache removes all the data stored in the cache, forcing the computer to find the new DNS information for the website. It is usually done to speed up the process and minimize requests for the same hostnames. When IP addresses are changed, or bad results are cached, its necessary to clear the DNS cache. DNS cache can be cleared via command line or from browsers also. Steps to flush DNS Cache for major operating systems and browsers are as below.
Contents:
- Windows
- Windows 10
- Windows 8 & Windows 8.1
- Windows 7
- Windows XP/NT/2000/98
- MAC OS X
- macOS 11 (Big Sur)
- macOS 10.15 (Catalina)
- macOS 10.14 (Mojave)
- macOS 10.13 (High Sierra)
- macOS 10.12 (Sierra) and OS X 10.11 (El Capitan)
- OS X 10.10 (Yosemite)
- OS X 10.9 (Mavericks)
- OS X 10.7 (Lion) and 10.8 (Mountain Lion)
- OS X 10.5 (Leopard) and 10.6 (Snow Leopard)
- OS X 10.4 (Tiger)
- Linux
- Ubuntu & Debian
- Others
- Mobile Devices
- iPhone
- Android
- iOS
- TV
- Google Chrome Browser
- For Webmasters/Developers/SysAdmin
- Google DNS Cache
- Cloudflare DNS Cache
- OpenDNS Cache
Windows
How to Flush DNS in Windows 10?
Command Prompt and Windows Powershell, which is a new addition to Windows, can be used to clear DNS cache.
Option 1 – Command Prompt
To reset the DNS resolver cache, perform the following steps:
- Click the
Startbutton, then typecmd - Right-click
Command Prompt, then chooseRun as Administrator. - Type
ipconfig /flushdnsthen pressEnter. (be sure there is a space before the slash)
A command box will flash on the screen for a split second, and the DNS Resolver cache is cleared.
Besides, there are some other related commands that you might be interested in:
- ipconfig /displaydns: It displays your current DNS cache under Windows IP configuration.
- ipconfig /registerdns: To register your DNS cache recorded in the Hosts file.
- ipconfig /release: To release the current IP address settings.
- ipconfig /renew: To reset and request a new IP address.
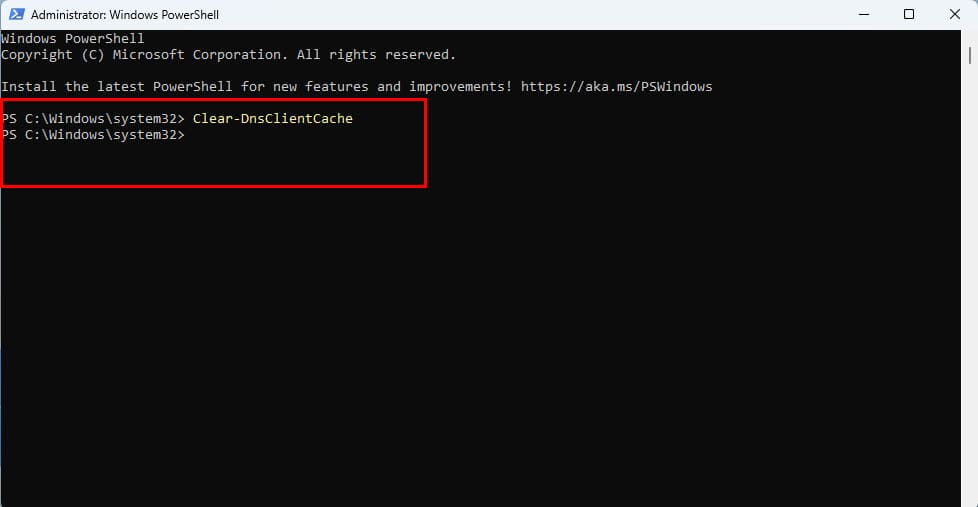
Option 2 – Windows PowerShell
- Select the
Startbutton, then typepowershell - Select
Windows PowerShell - Type the following command, then press Enter:
Clear-DnsClientCache
How to Flush DNS in Windows 8 and 8.1?
Because of the system security policies run cmd as administrator user and follow below steps to flush DNS cache.
- Press
Windows key + Xand select the Command Prompt (Admin) option from the Power User menu. - Type in the command
ipconfig /flushdnsand pressEnter
How to Flush DNS in Windows 7 and Windows Vista?
To flush DNS on an upgraded version of Windows is almost as easy as it is in the previous versions but due to Microsoft’s upgraded security system requirements, you must run the command prompt with administrator privileges.
- To flush DNS through the
command prompt, navigate as shown (Start > All Programs > Accessories > Command Prompt) - to have
administrator privileges, you must doright click on the command promptapplication and chooseRun as Administrator. - Type in the command
ipconfig /flushdnsand pressEnter
Shortcut
Type in
cmdinto the Windows Vista / Windows 7 start menu search field and thenright clickon thecmd.exeresult instead of navigating through the various sub-menus.Windows 98/NT/2000/XP Flush DNS
Given below steps will help you to clear your windows DNS cache.
- To access command prompt (
Start > Run >). - Type the
cmdand hitEnter - In the CMD window that you just opened, Type in the command
ipconfig /flushdns
Mac OS
Flushing the DNS in Mac OS X is an easy process, but the steps taken will depend on which version of OS X is running as your operating system. First, make sure you open the
Terminalon your computer. Once opened, run the command below that corresponds to your version of OS X.macOS 11 (Big Sur)
sudo dscacheutil -flushcache; sudo killall -HUP mDNSRespondermacOS 10.15 (Catalina)
sudo killall -HUP mDNSRespondermacOS 10.14 (Mojave)
sudo killall -HUP mDNSRespondermacOS 10.13 (High Sierra)
sudo killall -HUP mDNSResponderOS X 12 (Sierra) and later
sudo killall -HUP mDNSResponder;sudo killall mDNSResponderHelper;sudo dscacheutil -flushcacheOS X 11 (El Capitan) and OS X 12 (Sierra)
sudo killall -HUP mDNSResponderOS X 10.10 (Yosemite)
Versions 10.10.4+
sudo dscacheutil -flushcache;sudo killall -HUP mDNSResponderVersions 10.10.1, 10.10.2, 10.10.3
sudo discoveryutil udnsflushcachesOS X 10.9 (Mavericks)
dscacheutil -flushcache; sudo killall -HUP mDNSResponderOS X 10.7 (Lion) and 10.8 (Mountain Lion)
sudo killall -HUP mDNSResponderOS X 10.5 (Leopard) and 10.6 (Snow Leopard)
dscacheutil -flushcacheOS X 10.4 (Tiger)
lookupd -flushcacheLinux Flush DNS
Ubuntu & Debian
Most Ubuntu and Debian systems run a system that uses systemd-resolve daemon; you will need to do the following.
- Open up a command terminal (either as root or run with sudo)
- Run the command in the terminal:
systemd-resolve --flush-caches - Optional. You can verify that this ran correctly by running the command:
systemd-resolve --statistics
Others
If you are running the nscd Name Service Cache Daemon, then you will need to do the following.
- Open up a
command terminal(either as root or run step 2 withsudo) - Run the command in the terminal:
/etc/init.d/nscd restart
Mobile Devices
iPhone
There are three options available to flush DNS cache in iPhone.
Toggle the Airplane mode
The easiest solution is to toggle the Airplane mode in iPhone. For this
- Open the «Settings».
- You will see the icon of an airplane. Click that to toggle on.
- Again click that icon to toggle off.
Reboot your iPhone
- Rebooting your device also clears your DNS cache.
Dump Network Settings
That will clear your DNS cache but will also immediately disable your Wi-Fi connection.
- Open the «Settings».
- Click on «General».
- Click «Reset», then «Reset Network Settings».
- Your device is then rebooted.
iOS Devices
- Press and hold both the Sleep/Wake and Home buttons for at least 10 seconds, until you see the Apple logo.
Android
Flush DNS cache in Chrome
Open the Chrome browser
- In the URL bar, type in chrome://net-internals/#dns
- In the left pane, click «DNS».
- In the right pane, click the «Clear host cache» button.
Clear the cache of your browser
In your android phone
- Go to Settings > Apps.
- Select the browser app you are using.
- Here go to «Storage» and tap on «Clear Cache».
Use Wi-Fi to Remove DNS Cache
- Settings on your Android device.
- Open Wi-Fi and then long-press the network you want to modify DNS for.
- Tap on «Modify network».
- A pop-up will appear, and you need to tap on «Advanced options».
- Select IP settings as «Static». By default, it should be DHCP.
- Go to DNS settings and manually enter the DNS servers. It is better to use Google DNS.
- In DNS 1: enter the primary DNS server, and in DNS 2: enter the secondary DNS server.
- Save your settings.
TV Devices
- Step 1.
Close apps:Close the app completely. Make sure it is not running in the background as well. - Step 2.
Open App:Open the app again. DNS Cache should is cleared.
Google Chrome Browser
This method can be used for the Chrome browser regardless of the operating system.
- Start
Google Chrome. - In the address bar, type
chrome://net-internals/#dns. Google Chrome displays a list of hosts in itsinternal DNS cache. - Click
Clear host cache. - In the address bar, type
chrome://net-internals/#sockets. - Click
Close idle sockets, and then clickFlush socket pools.
For Webmasters/ Developers
DNS cache can be cleared on the client-side, but the same can be done on DNS Serves aswell to speed up the DNS Propagation process. It can be achieved in the following ways:
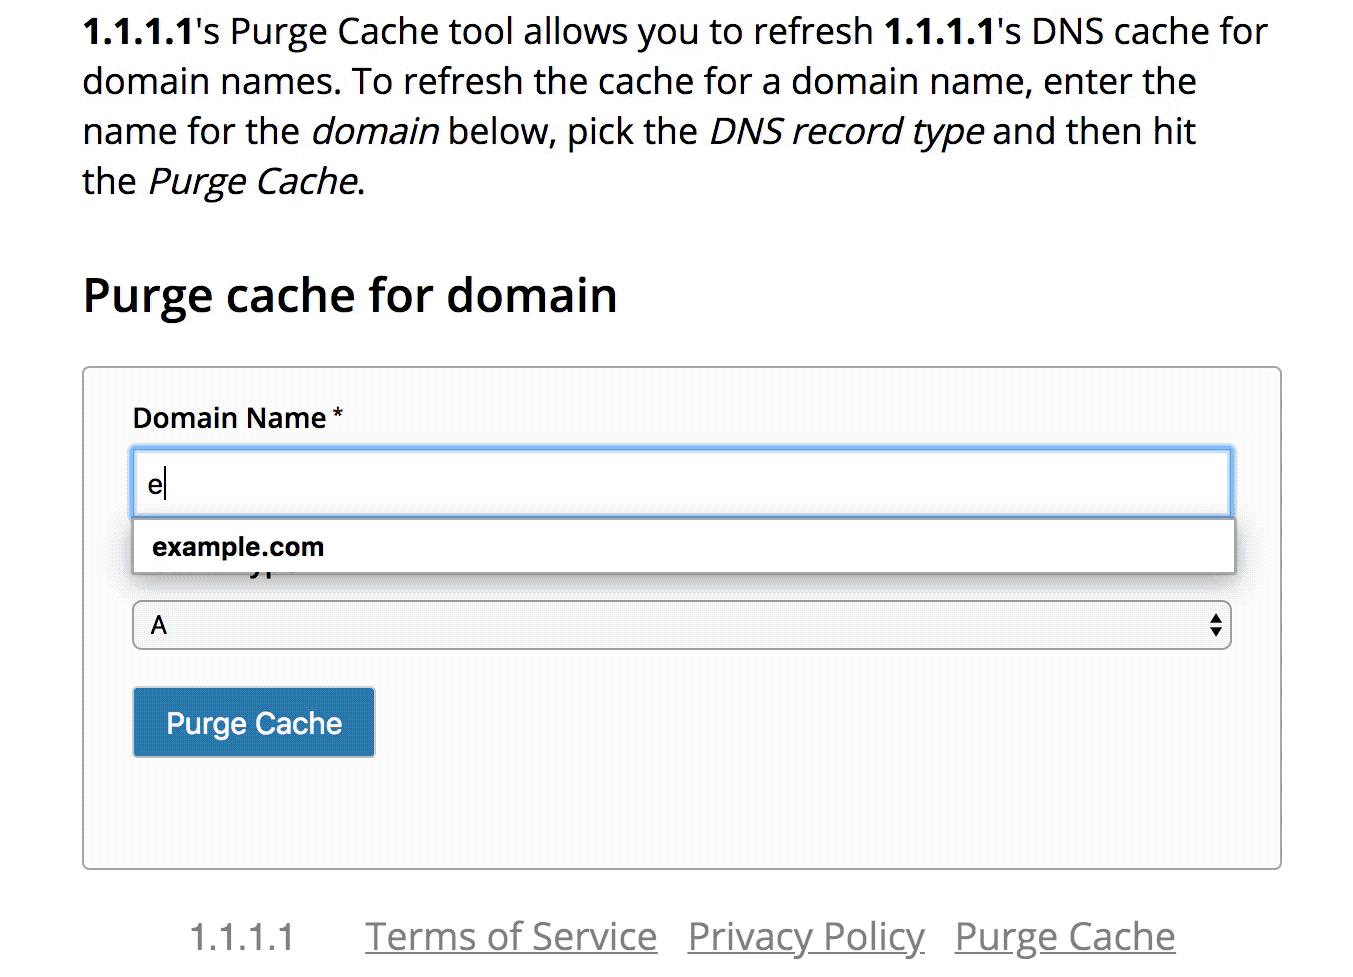
Public DNS services like Google, Cloudflare, OpenDNS, VeriSign enable users to request a DNS flush for specific domains.
Google Public DNS:
- Visit Google’s Public DNS Flush Cache page.
- You’ll see a page with content similar to this:
Cloudflare Public DNS
- Visit the Cloudflare purge Cache page.
- You’ll see a page with content similar to this:
-

OpenDNS PublicDNS
- Visit the OpenDNS Cache check page.
- It will display DNS results from its multiple server locations. At the bottom, press the
Refresh The Cachebutton to clear the DNS cache.
Reduce TTL
- TTL can be defined in your DNS settings. DNS servers respect TTL and reducing TTL can speed up the process of DNS propagation when changing servers IP’s of a web application.
- Windows
Все способы:
- Способ 1: Использование консольных команд
- Способ 2: Очистка через настройки браузеров
- Способ 3: Сброс через программу NetAdapter Repair
- Способ 4: Сброс сети
- Вопросы и ответы: 0
Способ 1: Использование консольных команд
Использование «Командной строки» Windows представляет собой наиболее быстрый и эффективный метод очистки DNS-кеша, доступный каждому пользователю без установки дополнительного программного обеспечения. Этот способ позволяет не только очистить кеш, но и получить подробную информацию о текущем состоянии DNS-записей в системе. Важным преимуществом метода является возможность автоматизации процесса через создание батч-файлов для регулярной очистки. Консольные команды работают одинаково эффективно во всех версиях Windows, начиная с Windows 7, что делает их универсальным решением. При этом использование «Командной строки» дает полный контроль над процессом и позволяет убедиться в успешном выполнении операции благодаря подробным системным сообщениям.
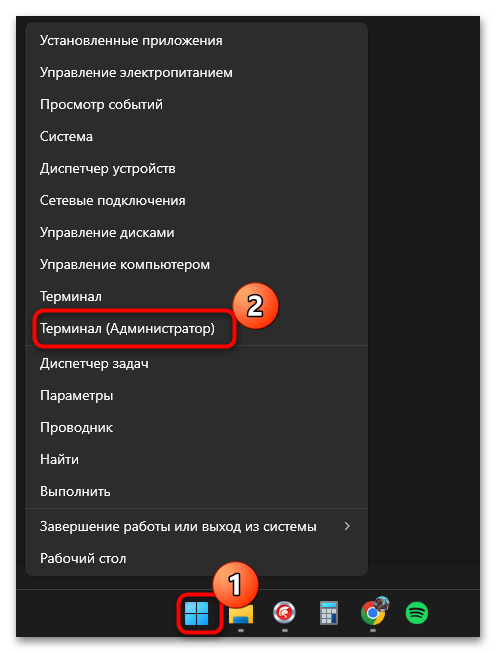
- Щелкните правой кнопкой мыши по «Пуску» и из появившегося контекстного меню выберите пункт «Терминал (Администратор)».
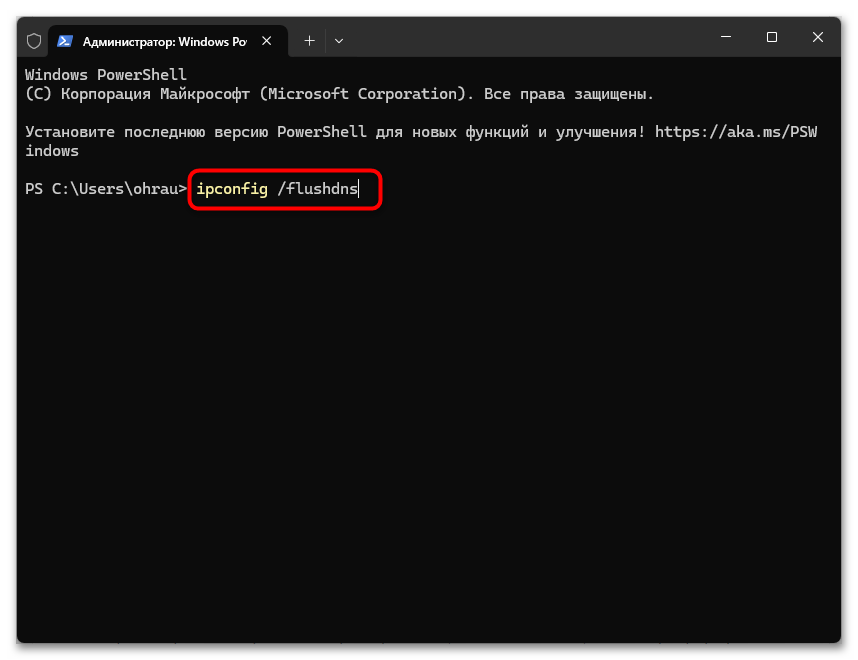
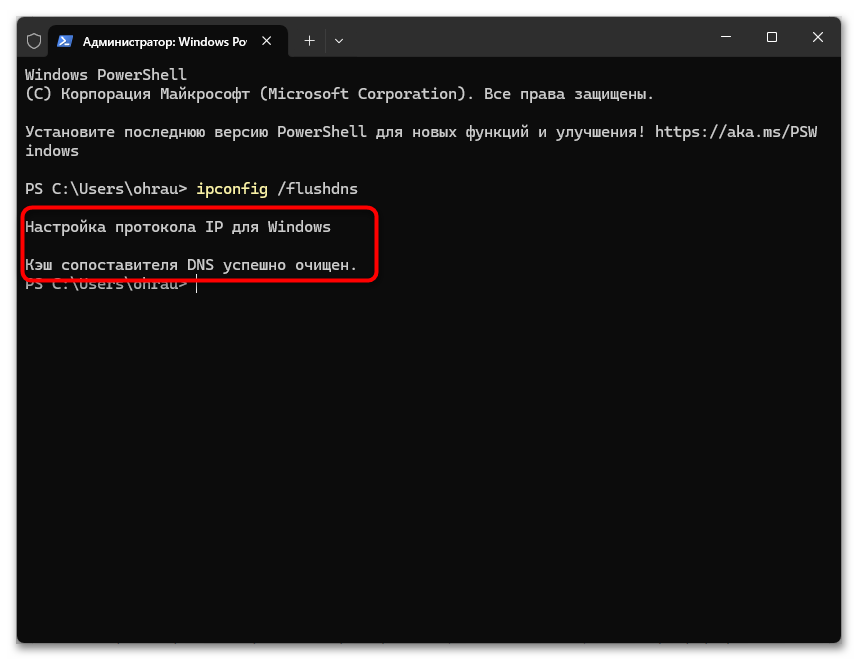
- Введите и активируйте команду
ipconfig /flushdns, которая как раз и отвечает за сброс DNS-кеша. - Вы должны получить уведомление о том, что кеш сопоставителя DNS успешно очищен.
- Обычно достаточно перезагрузить роутер или просто сразу начать использовать сеть. Однако для надежности можете перезагрузить службу DNS, находясь тут же — в консоли. Для этого сначала введите
net stop dnscache, после получения уведомления об остановке службы используйте вторую команду —net start dnscache.

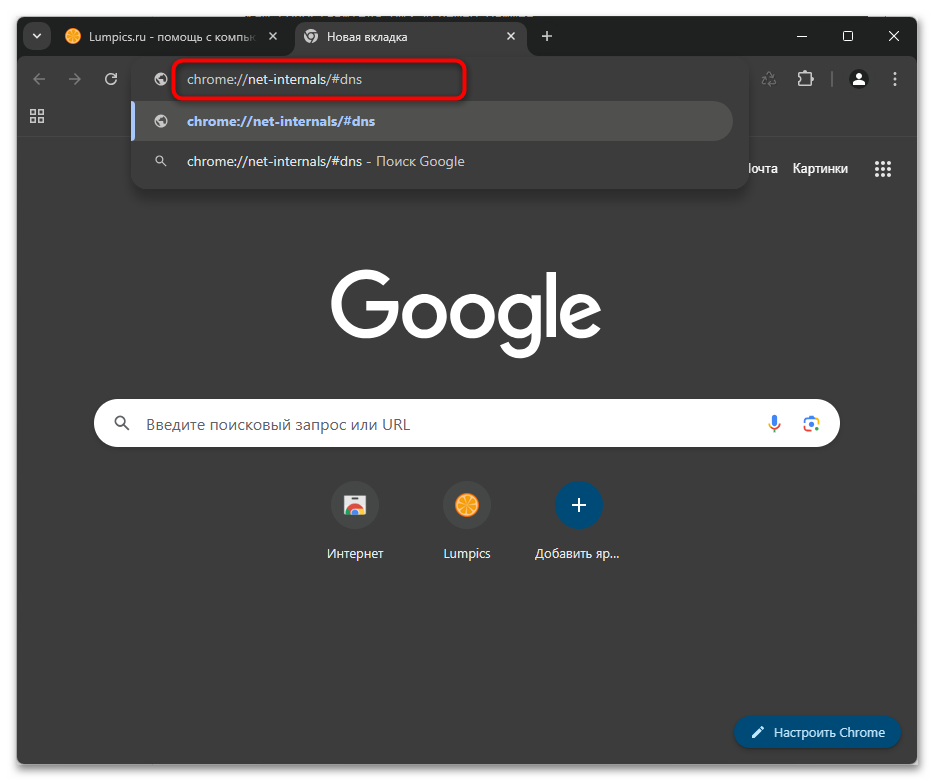
Способ 2: Очистка через настройки браузеров
Очистка DNS-кеша через браузер — удобное решение для пользователей, которые сталкиваются с проблемами доступа к конкретным веб-сайтам или некорректным отображением обновленного контента. Этот метод особенно эффективен, когда проблема локализована в рамках определенного браузера и не затрагивает работу всей системы. Современные браузеры предоставляют удобный графический интерфейс для выполнения этой операции, что делает процесс интуитивно понятным даже для неопытных пользователей.
- Откройте веб-обозреватель, в адресную строку вставьте ссылку
chrome://net-internals/#dnsдля Google Chrome,opera://net-internals/#dns— для Opera,browser://net-internals/#dns— для Яндекс Браузера илиedge://net-internals/#dns— для стандартного Microsoft Edge. - Перейдя к странице, используйте кнопку «Clear host cache», чтобы удалить все сохраненные ранее файлы кеша.
- Дополнительно можете ввести любой адрес сайта, чтобы проверить текущий домен и присвоение ему IP. После этого снова можете нажать упомянутую выше кнопку, чтобы удалить кеш для отдельного домена.
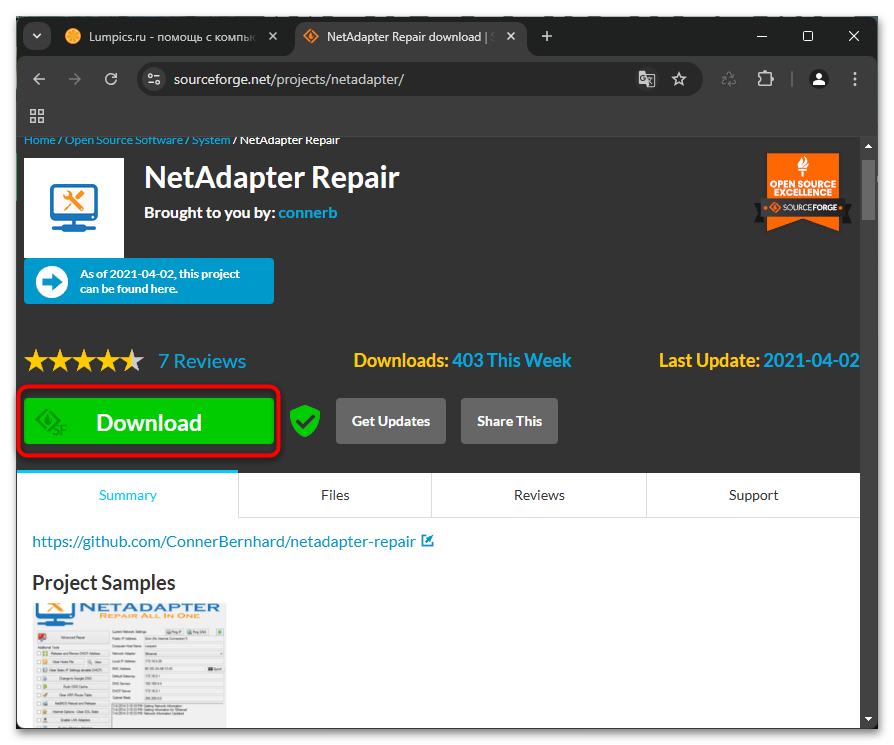
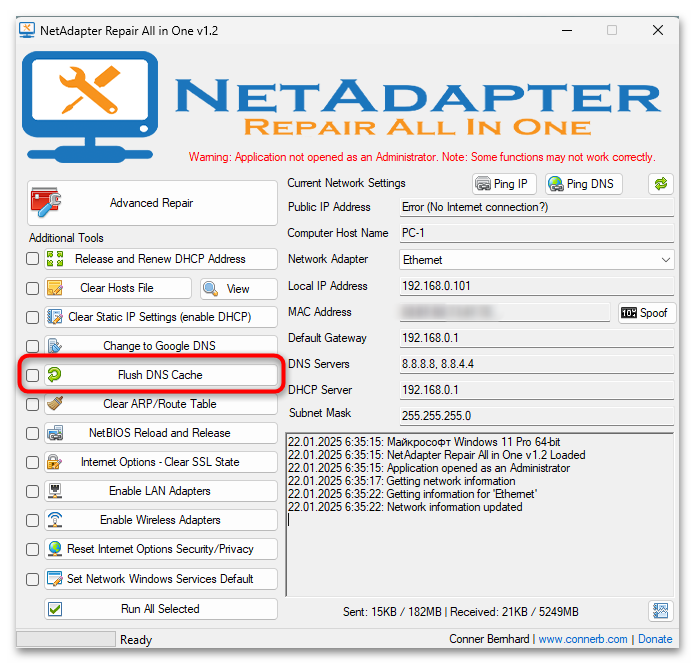
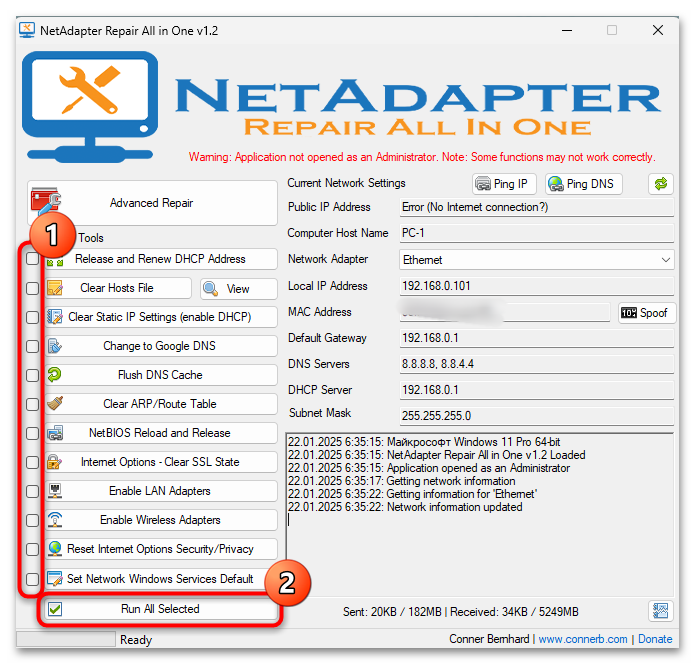
Способ 3: Сброс через программу NetAdapter Repair
NetAdapter Repair — это специальная программа, которая предлагает комплексное решение для диагностики и устранения проблем с сетевыми адаптерами, включая очистку DNS-кеша. Программа выгодно отличается от других методов наличием автоматизированных процессов восстановления сетевых настроек и возможностью создания точек восстановления перед внесением изменений. Этот инструмент особенно полезен в ситуациях, когда стандартные методы очистки не дают желаемого результата или требуется более глубокая диагностика сетевых проблем. NetAdapter Repair предоставляет удобный графический интерфейс, что делает процесс очистки DNS-кеша доступным для пользователей любого уровня подготовки. При этом программа способна не только очистить кеш, но и автоматически восстановить оптимальные настройки сетевого подключения.
Скачать NetAdapter Repair с официального сайта
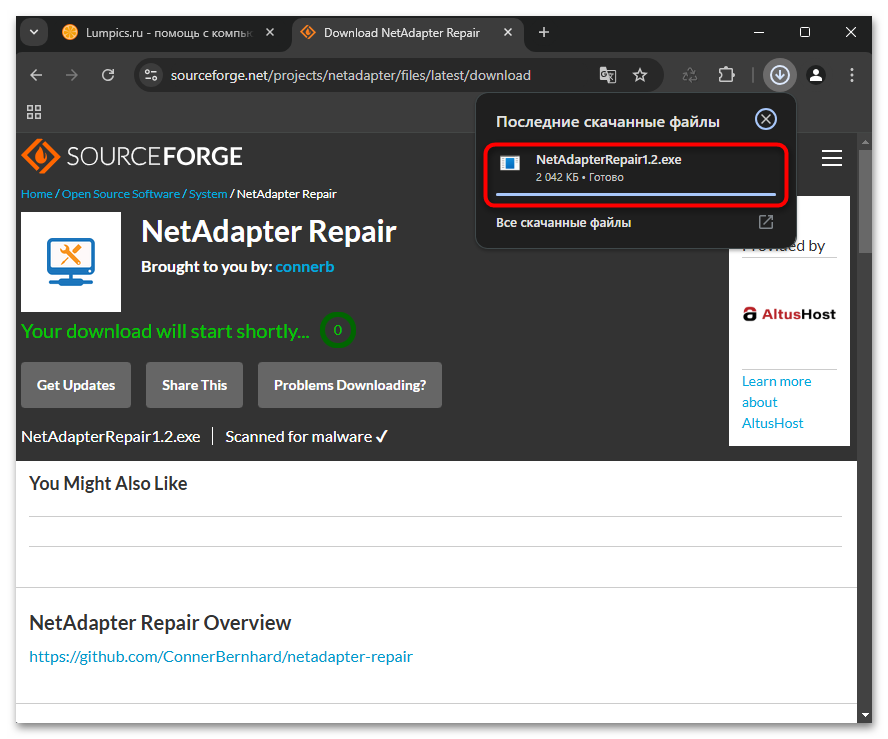
- Щелкните по ссылке выше и нажмите кнопку «Download», чтобы начать скачивание программы.
- Она распространяется в портативном виде, поэтому после загрузки EXE-файла его можно просто запустить, чтобы начать работу с софтом.
- Приложение предлагает большое количество различных инструментов для работы с сетью. Вас же интересует кнопка «Flush DNS Cache», отвечающая за сброс кеша сопоставителя DNS.
- Если нужно, можете отметить несколько разных действий галочками и запустить их одновременно.
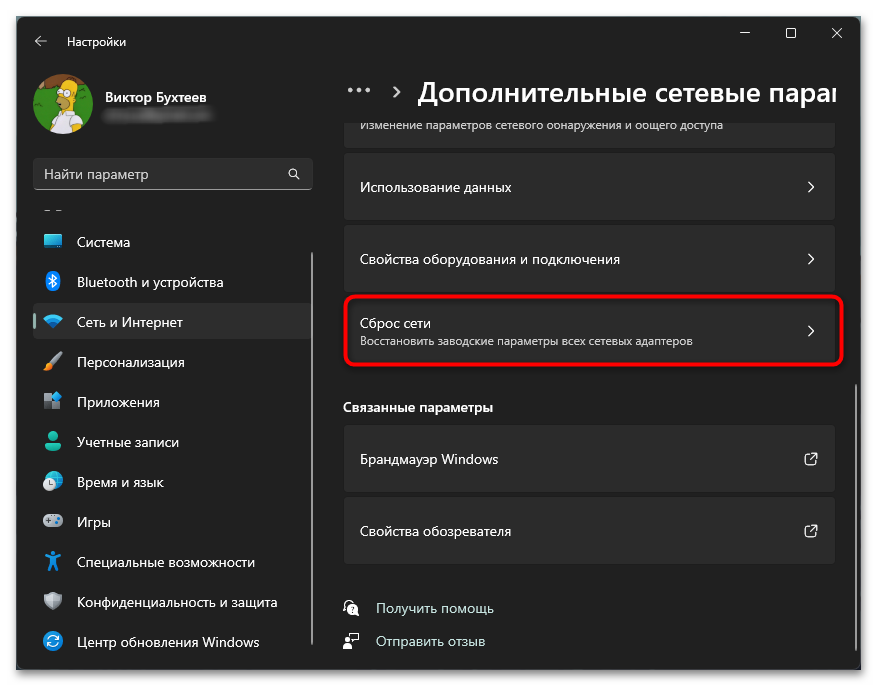
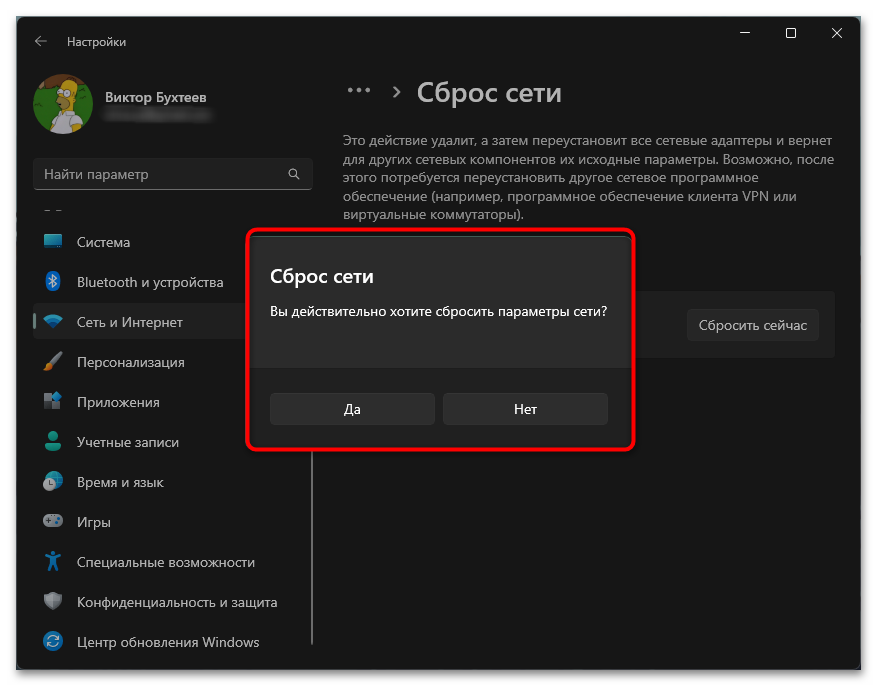
Способ 4: Сброс сети
Полный сброс сетевых настроек через «Параметры» тоже может помочь с очисткой DNS-кеша, так как эта операция возвращает все сетевые компоненты, включая стек протоколов TCP/IP, в исходное состояние. Этот метод является наиболее радикальным решением и рекомендуется использовать его в случаях, когда другие способы не помогли устранить проблемы с сетевым подключением. Сброс сети затрагивает все аспекты сетевой конфигурации, включая DNS-кеш, что гарантирует полное очищение всех накопленных записей. Однако важно помнить, что этот способ требует повторной настройки сетевых параметров и переустановки некоторых сетевых компонентов. Это делает его своеобразным «последним средством» в решении проблем с DNS-кешем и сетевым подключением в целом.
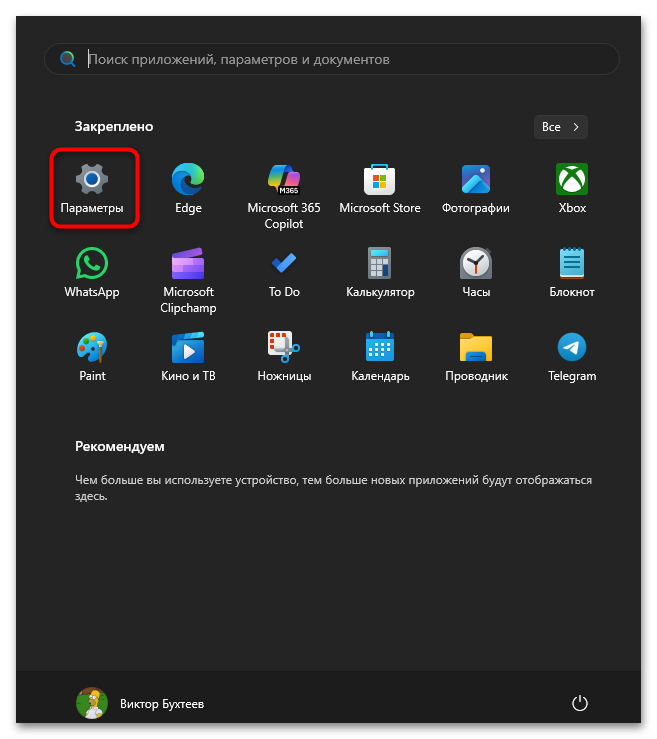
- Откройте «Пуск» и перейдите в «Параметры», нажав по значку с шестеренкой.
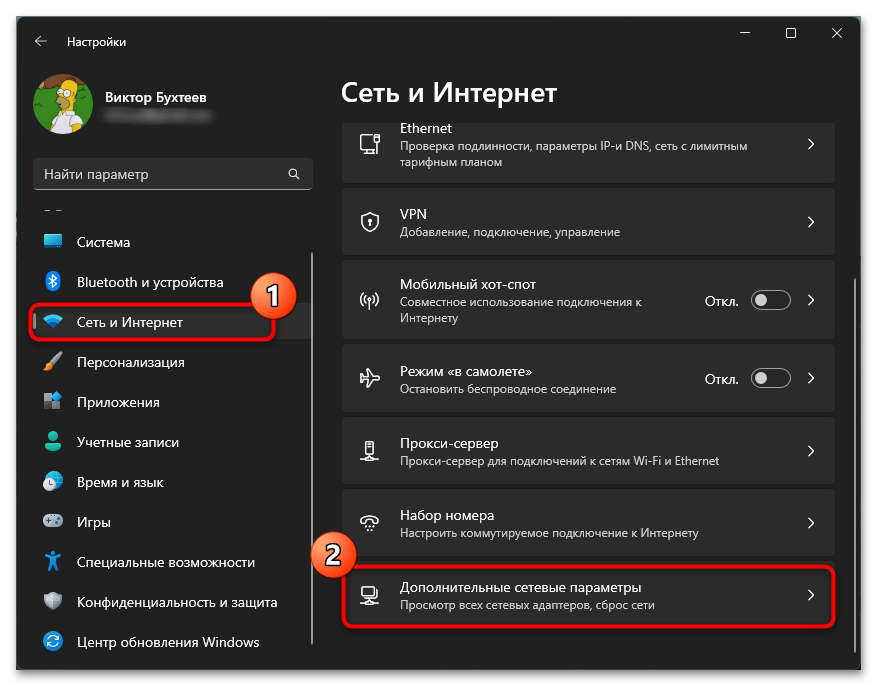
- На панели слева выберите раздел «Сеть и Интернет», затем справа — категорию «Дополнительные сетевые параметры».
- Перейдите к «Сброс сети».
- Нажмите кнопку «Сбросить сейчас», предварительно прочитав уведомление сверху, чтобы точно понимать, к чему приводит данное действие.
- Подтвердите операцию и ожидайте, пока доступ к сети будет восстановлен. По необходимости настройте интернет под свои нужды и продолжайте его использование.

Наша группа в TelegramПолезные советы и помощь
Are you facing website loading issues or worried about data privacy offline and online? You must know how to flush and reset the DNS cache in your Windows 11 or earlier PCs!
When you browse websites, the Windows 11 PC plays a major role in helping your web browser load the queried pages faster by caching the Domain Name System (DNS) addresses of the websites you visit. Problems in this DNS cache file can stop you from visiting an updated website, cloud app, or other online resources that rely on DNS addresses.
Flushing the DNS resolver cache can help resolve DNS-related problems in Microsoft Windows 11 and previous versions. Issues would include website not found errors or not being able to view certain web pages that have changed. Read on to learn the methods to flush and reset the DNS resolver cache in Windows 11.
Contents
- 1 What Is DNS Cache?
- 2 What Is Flush DNS and What Does It Do?
- 3 Reasons to Flush DNS on Your Computer
- 4 How to Flush and Reset the DNS Resolver Cache
- 4.1 Option 1: Using Windows Command Prompt
- 4.2 Option 2 – Windows PowerShell Terminal
- 4.3 Option 3 – Using Run Command Dialog Box
- 4.4 Option 4 – Using a Batch File for Flush DNS
- 5 How to Flush and Reset the DNS Resolver Cache in Web Browsers
- 6 FAQ
- 6.1 What is the DNS Resolver Cache?
- 6.2 Why would flushing the DNS Resolver Cache fix anything?
- 6.3 Can I view the data in the DNS Resolver Cache?
- 7 Conclusion
What Is DNS Cache?
While you recognize a website by its URL like technipages.com, the web browser or computer recognizes the same website using its IP address, which is 172.67.69.195. Now, all these IP addresses for billions of websites are available in various DNS servers around the world. Your Internet Service Provider (ISP) also maintains a secondary DNS server cache as a backup to the primary DNS servers.
When you type an URL in the address bar of Chrome or Mozilla web browser for the first time, it requests the IP address from a nearby DNS server to open the web page. The Windows 11 PC copies the resolved IP from the first query and saves it in a DNS resolver cache.
The next time you open the same web page, the web browser no longer requests a DNS server to translate the URL to an IP address. It takes help from the DNS resolver cache in your operating system. This is known as a DNS cache of a local computer like Windows 11. Similar to Windows PCs, macOS, Linux, etc., computers also maintain a local cache copy of all the websites that you visit.
Also read: What Is a DNS Record?
What Is Flush DNS and What Does It Do?
Flush DNS is a common Command Prompt code for all modern Windows operating systems since Windows 2000. You can use this code to force the Windows PC to clear the records in its DNS resolver cache. Operating system developers allow the users to do this manually to avoid data security issues, website loading problems, and other DNS address-related issues.
After you use the Flush DNS command, Windows wipes the entire DNS cache that it built since the recent clean installation of Windows 11 or any other Windows operating system. The web browsers from now on need to send a DNS resolver query to the nearest DNS server to get the latest IP of the URL you’re trying to access. Soon, Windows 11 will record these resolved IPs in the local DNS resolver cache.
Also read: How to Reinstall Windows 11 for Free: 3 Easy Methods for Everyone
Reasons to Flush DNS on Your Computer

If you’re unable to clear or reset the data in the local DNS cache then you’ll be in serious trouble when trying to access websites or use apps that fetch data from the internet using the operating system. Thus, most operating systems let you flush the DNS resolver cache so that it can update itself. Here are the reasons why you might want to use the Flush DNS command on your Windows 11 PC:
- When you try to access a website you know exists but repeatedly get the 404 error, you can reset the local DNS cache.
- You’re trying to access a website and the browser is taking you to the dated version of it. In this situation, you must flush and reset the DNS cache.
- The local copy of the DNS resolver cache is also a privacy concern. If you browse websites, online apps, internet banking portals, and run business apps from a public or third-party Windows PC, you may want to flush the DNS before leaving. It helps you to wipe clean your online activities on a public PC.
- If you think you have become a victim of DNS spoofing or DNS cache poisoning, you must flush the DNS resolver cache of your computer.
- You use business apps like enterprise resource planning (ERP), customer relationship management (CRM), online SQL database, etc., and these apps are unable to fetch the latest data from the cloud or on-site server.
Find below the simple and quick methods to flush the DNS resolver cache and push Windows 11 to build a new DNS cache for future online activities. You can perform most of these methods on earlier Windows PCs that run on Windows 10, 8, 7, XP, 2008, and 2003.
Option 1: Using Windows Command Prompt
To reset the DNS resolver cache, perform the following steps on a Windows 11 PC:
- Select the Start button, then type CMD on your keyboard.
- Right-click Command Prompt and choose Run as Administrator.
- Alternatively, you can click the Run as administrator hyperlink on the right-side panel of the Start Menu that show the Command Prompt app.
- Copy and paste the following command into the Command Prompt and hit Enter:
ipconfig /flushdns
- You must include the space before the forward slash.
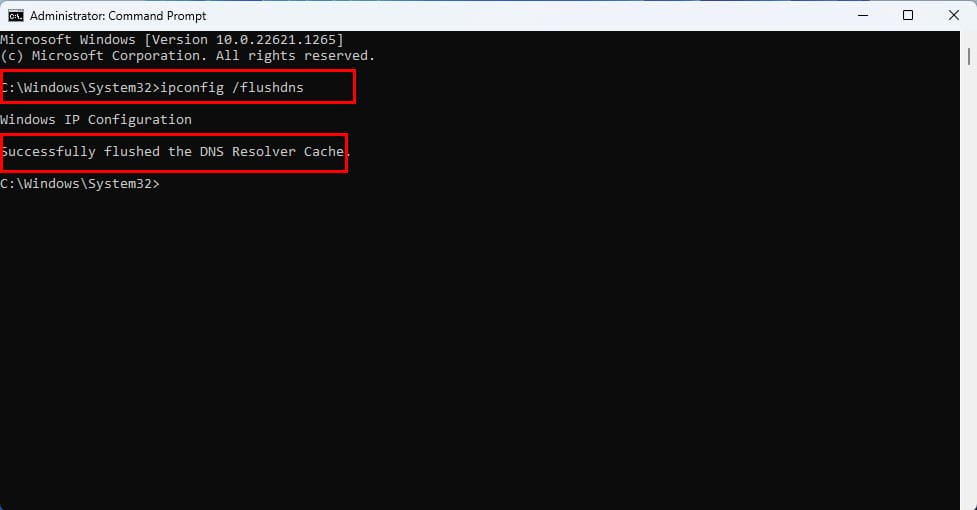
- The command line interface will show the message: Successfully flushed the DNS Resolver Cache.
This method is also valid for Windows 10, 8, 7, Vista, XP, etc.
Option 2 – Windows PowerShell Terminal
- Select the Start button, then type PowerShell.
- Select the Windows PowerShell app from the list of apps.
- Type the following command, then press Enter:
Clear-DnsClientCache
- It’ll erase the DNS resolver cache but won’t show any confirmation message.
- Alternatively, you can use the following command on PowerShell to see a confirmation message:
ipconfig /flushdns
Also read: Flush and reset a client resolver cache using the ipconfig command – from Microsoft
Option 3 – Using Run Command Dialog Box
- Hit the Windows + R keys simultaneously on your keyboard.
- The Run command dialog box will show up in the bottom left corner of the screen.
- There, you should see the Open field.
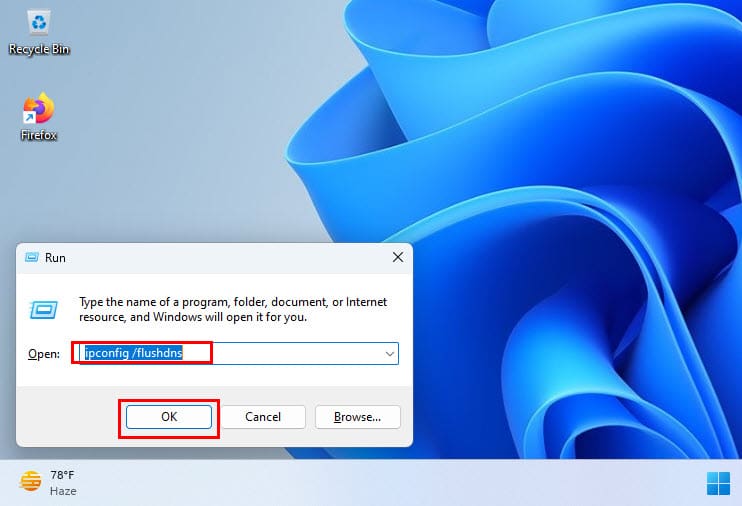
- Type the following command in that field and hit Enter to erase the local DNS cache on your Windows 11 PC:
ipconfig /flushdns
- You’ll see a silhouette of the Command Prompt and this confirms that Windows 11 cleared the DNS resolver cache.
Option 4 – Using a Batch File for Flush DNS
If you need to run the flush DNS command repeatedly for website and mobile app development purposes on your Windows 11 PC, you may want to create a batch file for the codes. Then, double-clicking the batch file will automatically clear the local DNS cache. Here are the batch file creation steps you can follow:
- Open the Notepad application.
- Copy and paste the following batch file command in it:
cmd.exe /k ipconfig /flushdns
- Now, save the Notepad as a batch file. To do this, simply hit Ctrl + S and then rename the file as flushDNS.bat.
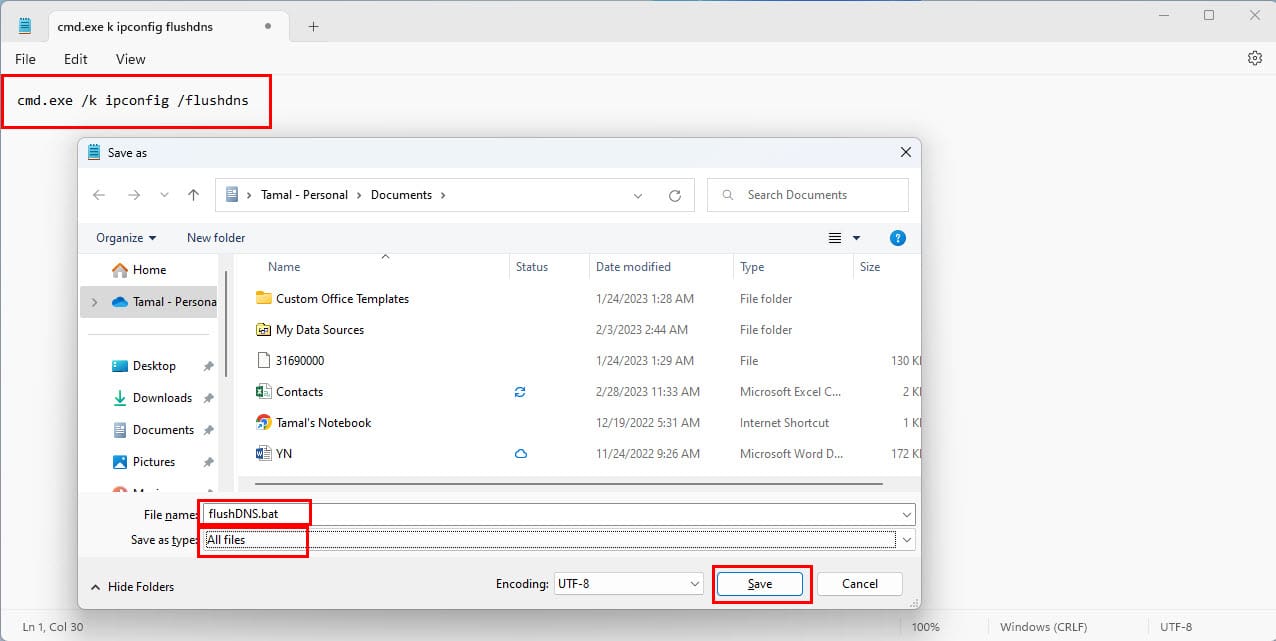
- In the Save as type drop-down list, select All files.
- Click Save to create the batch file.
- Now, go to the folder where you saved the batch file and double-click it.
- The Command Prompt will show up with the confirmation message that Windows deleted the local DNS cache copy.
How to Flush and Reset the DNS Resolver Cache in Web Browsers
You might also want to clear the DNS cache copy of the web browser in case you’re facing website loading issues or suspect hackers targeted your computer for DNS cache poisoning. Here’s how you can accomplish this for Chrome, Mozilla, and Edge web browsers:
- Open the Google Chrome browser and type in the following destination in its address bar:
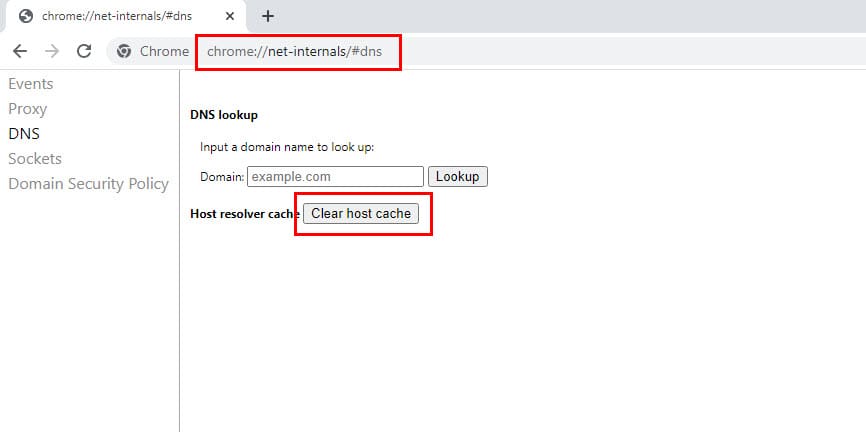
chrome://net-internals/#dns
- Now hit Enter to access the DNS cache copy of the Chrome browser.
- Beside the Host resolver cache text, click the Clear host cache button.
- For the Firefox web browser, simply use the following destination, and the rest of the steps are the same as Chrome:
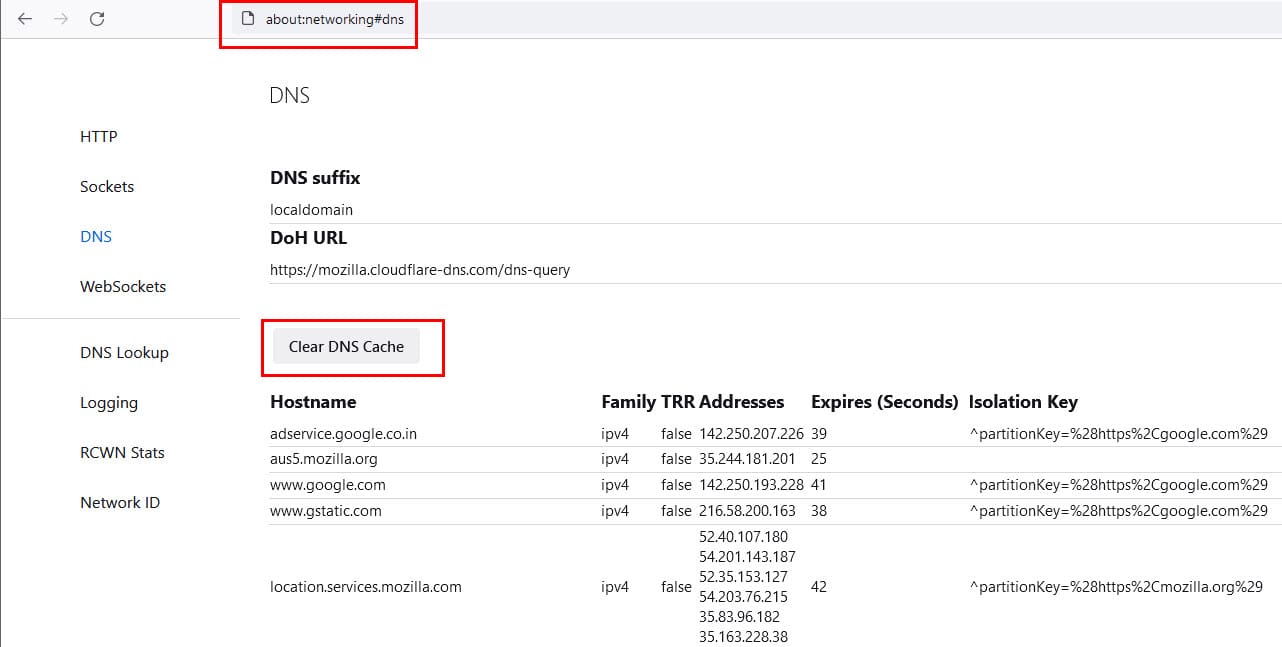
about:networking#dns
- If you’re on Microsoft Edge, then you can use the following code:
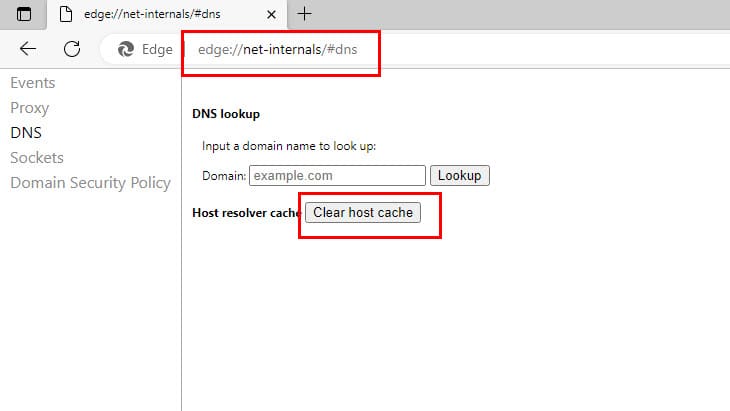
edge://net-internals/#dns
FAQ
What is the DNS Resolver Cache?
Whenever you visit a website using its domain name (i.e. microsoft.com), your browser is directed to a DNS server where it learns the IP address of that website. You are then directed to that website. A record of the IP address that the domain name points to is created within Windows so that if you visit that same website again, the information is accessed quicker. These records that get created make up the DNS Resolver Cache.
Why would flushing the DNS Resolver Cache fix anything?
Sometimes an IP address to a site may change. If the DNS Resolver Cache has the old IP address record, it may result in your computer not being able to reach the site. Cached data can also become corrupt. Therefore, clearing it is a step you can take whenever you cannot connect to a site.
Can I view the data in the DNS Resolver Cache?
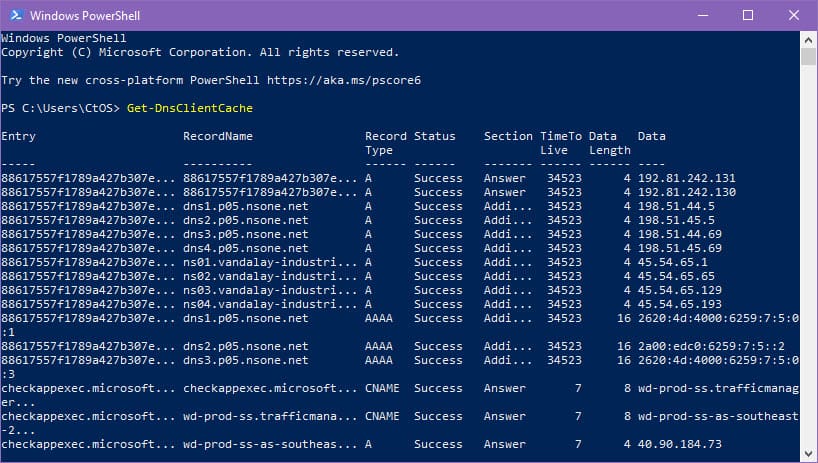
Yes, you can. From a Command Prompt, you can use the following command to view the data in the DNS resolver cache:
ipconfig /displaydns

Alternatively, you can use the Microsoft PowerShell terminal on Windows 11 or 10 computer and execute the following code in it to view the data stored in your Windows PC’s DNS resolver cache:
Get-DnsClientCache
Conclusion
So, now you know how to flush and reset the DNS resolver cache in a Windows 11 PC. You also learned how to delete the local cache copy of DNS using Command Prompt and Run command dialog box in earlier versions of Windows like Windows 8, 7, Vista, XP, etc. Give the above methods a try when you face internet connectivity issues with a specific website or app. Don’t forget to comment below if I missed any other steps to flush and reset the DNS resolver cache in Windows PCs.
Next up, Why Is It Important to Route DNS Traffic Over Your VPN?
The Domain Name System (DNS) translates human-readable domain names (like www.example.com) into machine-readable IP addresses (like 192.0.2.1). And DNS cache is a temporary database maintained by your computer that stores recently accessed domain names and their corresponding IP addresses. DNS cache helps speed up the process of resolving domain names to IP addresses, thus improving your internet browsing experience. However, sometimes the DNS cache can become outdated or corrupted, leading to various connectivity issues. In such cases, you can run Flush DNS command to remove this stored cache and forces your device to retrieve the information from the DNS again. If you are experiencing internet connectivity problems, Here is how to flush DNS cache on Windows 11 to fix such problems.
Post Contents :-
- 1 How to Flush DNS Cache in Windows 11
- 1.1 Using Command Prompt
- 1.2 Using Windows PowerShell
- 1.3 Using Windows Settings
- 1.4 View DNS Cache in Windows 11
- 1.5 How to Disable DNS Cache in Windows 11
- 1.6 Flush and Reset the DNS Resolver Cache on web browsers
The DNS cache (also known as DNS Resolver Cache) stores recently accessed domain names and their corresponding IP addresses for a specified period. The next time you open the same web page, the web browser no longer requests a DNS server to translate the URL to an IP address. It takes help from the DNS resolver cache in your operating system.
The DNS cache improves the performance and efficiency of your internet browsing experience. However, over time, the information in the cache can become outdated or corrupted, leading to potential connectivity issues, such as trouble accessing certain websites, slow-loading web pages and more. In such situations, you need flush DNS cache to allow your Windows computer to communicate with the host correctly.
Using Command Prompt
- First Open Command Prompt with Administrative Privileges
- Press Windows key + S and type cmd, Right-click on “Command Prompt” and Select “Run as administrator.”
- In the Command Prompt window, type the following command and press Enter:
ipconfig /flushdns
Now, the DNS cache will be flushed and you will see a confirmation message saying “Windows IP Configuration. Successfully flushed the DNS Resolver Cache.” That’s it!
The older DNS cache files have been removed from your Windows 11 computer, which might have been causing the errors (like this website is not available or unable to load particular websites) while loading a webpage.
Using Windows PowerShell
- Right-click on the start menu and select Windows PowerShell (Admin) to Open Windows PowerShell with Administrative Privileges
- Type the command Clear-DnsClientCache and press enter key,
- Once the command is executed, you should see no output if it was successful.
Using Windows Settings
- Press the Windows key + I on your keyboard to open Windows Settings.
- Select “Network & Internet.” Scroll down to find the “Network reset” option and click on it.
- Click on the “Reset now” button to initiate the reset process.
- This action will clear the DNS cache along with other network-related settings.
After the reset process is complete, you’ll need to restart your computer for the changes to take effect.
View DNS Cache in Windows 11
After flushing the DNS cache, if you want to confirm whether DNS cache has been cleared or not then you can apply the following command to view DNS cache on Windows 10 PC.
ipconfig /displaydns
How to Disable DNS Cache in Windows 11
For any reason, if you wish to disable DNS Cache for a while and enable it again, then use the following commands.
net stop dnscache
To turn on DNS caching, run the following command
net start dnscache
One thing you need to keep in your mind is that this disabling DNS cache command is applicable for a particular session only and when you will restart your computer, the DNS caching will be enabled automatically.
Flush and Reset the DNS Resolver Cache on web browsers
We do a lot of internet browsing. Our browser web pages and other information in the browser’s cache so that it would be faster for it to fetch the webpage or website next time. It sure helps in faster browsing but over a period of a few months, it accumulates a lot of data that is no longer required. So, in order to speed up the internet browsing and overall performance of Windows, it’s a good idea to clear the browser cache from time to time.
First to Flush and Reset the DNS Resolver Cache on web browsers
- Open Chrome, type chrome://net-internals/#dns and press enter key
- If you are Microsoft Edge user, type edge://net-internals/#dns and press enter key
- Beside the Host resolver cache text, click the Clear host cache button.
Mozilla Firefox users type about:networking#dns and press enter, then click on Clear DNS cache option.
To Clear the Browser cache
If you are Microsoft Edge or Google Chrome user:
- Open the browser and press Shift + Ctrl + Del to open the Clear browsing data pop-up,
- Check mark on cached images and files, (You can select other options as well) select time range and click Clear Data.
Clear Cache Data on the Firefox browser is a little different,
- Open the Firefox browser, at the address bar type about:preferences#privacy and press the enter key
- Checkmark next to cached web content and click on clear.
What is DNS resolver cache?
- DNS resolver cache is a temporary storage that stores DNS information on your device to speed up future DNS queries.
Why would I need to flush DNS resolver cache?
- Flushing the DNS resolver cache is necessary to resolve domain name resolution issues, clear outdated or corrupted entries, and fetch the latest DNS information.
How do I flush DNS resolver cache on Windows?
- Open Command Prompt as an administrator and type “ipconfig /flushdns.”
How do I flush DNS resolver cache on macOS?
- Open Terminal, type “sudo dscacheutil -flushcache; sudo killall -HUP mDNSResponder,” and enter your admin password.
How do I flush DNS resolver cache on Linux?
- Open a terminal and type “sudo systemd-resolve –flush-caches.”
Can I flush DNS resolver cache on my router?
- Yes, but the process varies by router brand and model. Check the documentation for specific instructions.
Are there any downsides to flushing the DNS resolver cache?
- No significant downsides. It might take a bit longer to resolve domain names temporarily after flushing.