
Applies ToWindows 11 Windows 10
Support for Windows 10 will end in October 2025
After October 14, 2025, Microsoft will no longer provide free software updates from Windows Update, technical assistance, or security fixes for Windows 10. Your PC will still work, but we recommend moving to Windows 11.
Learn more
The Recovery Drive utility in Windows is a valuable tool designed to back up essential system files needed to restore a PC to its original state. This utility creates a USB recovery media that can help you restore your Windows device to its factory settings, even if you replace the hard drive or completely wipe the drive. The recovery media includes built-in Windows files, any updates installed at the time of media creation, and any customizations from the PC manufacturer, ensuring a reliable backup solution for bare metal recovery scenarios.
Creating a recovery media is a proactive measure to ensure that you can quickly and efficiently restore your system in case of major issues such as hardware failure. This media can be used for bare metal recovery on the device it was created for, ensuring a smooth and efficient restoration process.
It’s recommended to recreate the recovery media annually to include the latest Windows updates and improvements. Additionally, it’s important to note that the recovery media doesn’t include your personal files. Therefore, you should use a different backup method, such as Windows Backup or File History, to back up your personal data separately.
Create a recovery drive
Warning: Use an empty USB drive because this process will erase any data that’s already stored on the drive.
-
To open Recovery Drive you can use one of the following methods:
-
From Start, search for Recovery Drive and select it
-
Use the command recoverydrive.exe
-
-
When the tool opens, make sure Back up system files to the recovery drive is selected and then select Next
-
Connect a USB drive to your PC, select it, and then select Next
-
Select Create. Many files need to be copied to the recovery media, so this might take a while
Reinstall Windows with a recovery drive
Follow these steps to reinstall Windows using the recovery media:
-
Start your device from the USB drive that was created with Recovery Drive. The process to boot from a USB drive may vary by manufacturer, so refer to your device’s manual if needed
-
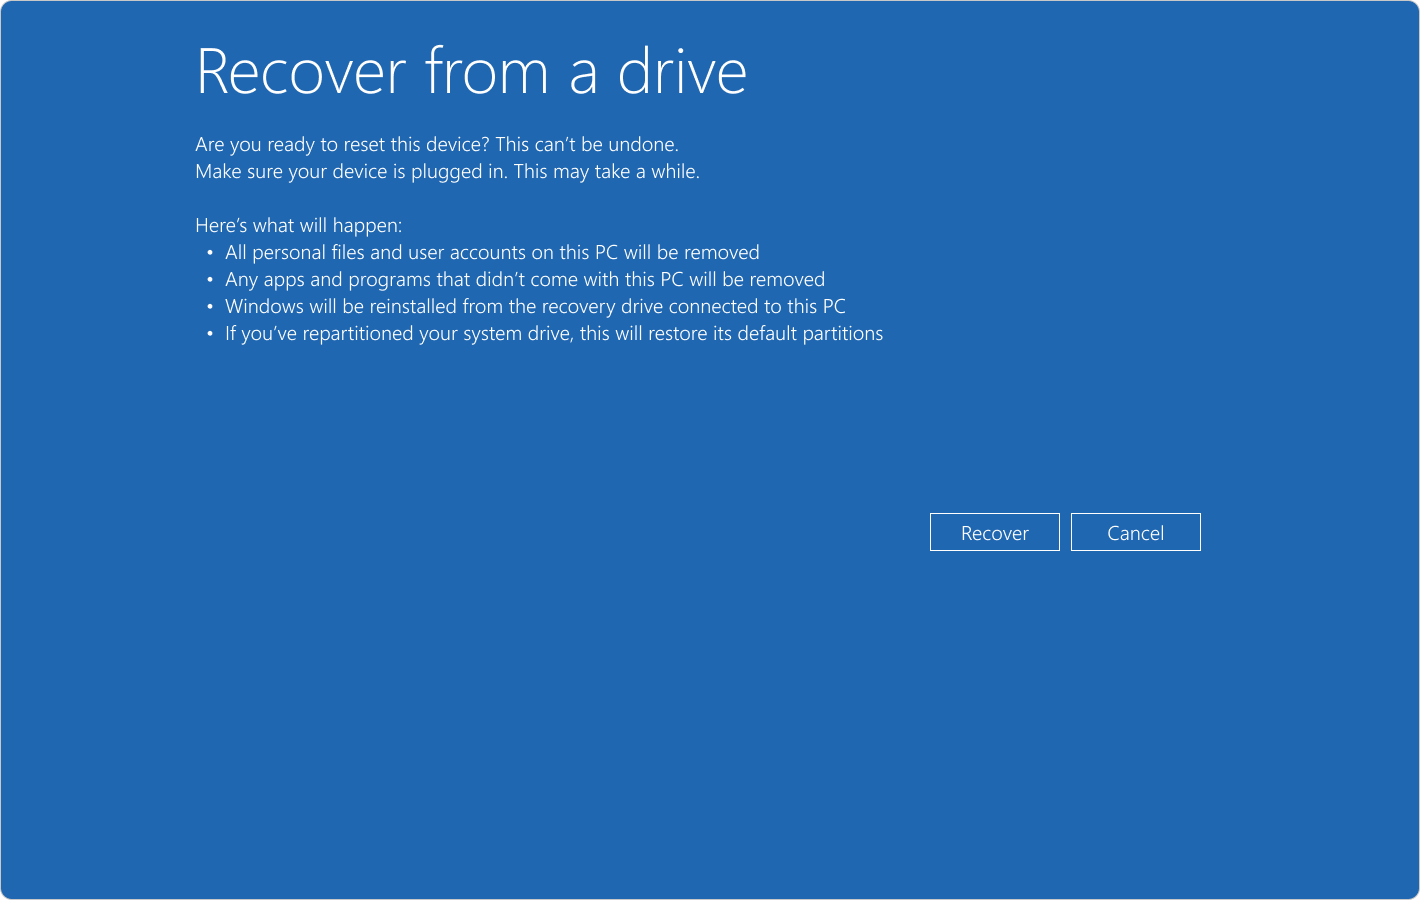
Once Windows Recovery Environment (Windows RE) loads, select Recover from a drive
-
Choose either Just remove my files of Fully clean the drive, depending on your preference
-
Select Recover to confirm and start the recovery process

Need more help?
Want more options?
Explore subscription benefits, browse training courses, learn how to secure your device, and more.
Updated on Apr 28, 2025
If you’re a Windows 11 user, having a recovery USB can be a lifesaver in case your operating system goes wrong. Whether your computer won’t boot up or you’re experiencing frequent crashes, a recovery USB can help you troubleshoot and fix the issue.
In addition, creating a Windows 11 recovery USB is an essential task for users who want to ensure they can troubleshoot and restore their system in case of critical failures. In this article, EaseUS will guide you through creating and using a recovery USB for Windows 11 using built-in tools and third-party applications, ensuring you have a reliable backup solution.
How to Create Windows 11 Recovery USB — 3 Methods
In this section, you will discover three valid ways to make a recovery USB for Windows 11. Check the comprehensive information table below to know what you need to prepare before proceeding:
| ⏱️Duration | 10-15 minutes |
| 🎯Goal | Create Windows 11 Repair/Recovery USB |
| 💻Required Tools | Windows 11 PC, a USB, EaseUS Partition Mater |
| ⚓Tools |
Way 1. Using EaseUS WinRescuer Way 2. Using the Built-in Windows 11 Recovery Drive Tool Way 3. Using Command Prompt |
🔔Note: If your USB is not brand new or empty, you should fully back up the important data since this process will erase data on your USB before creating a recovery USB.
Way 1. Using EaseUS WinRescuer for Bootable Recovery USB
Have you ever encountered blue/black/white/yellow screens of death, boot failures, and boot loops in Windows 11? Don’t worry. EaseUS Rescuer can help you create a recovery USB that is capable of automatically identifying and resolving startup problems.
Step 1. Connect the USB drive/external drive to a working computer, open EaseUS WinRescuer, and click «Create Bootable Media.»
Step 2. Select EaseUS Boot Toolkits and other components you need. Then, click «Next.»

Step 3. Select your movable device and click «Go» to create an image on your USB drive/external drive. You can also burn the Windows ISO file to the storage media.
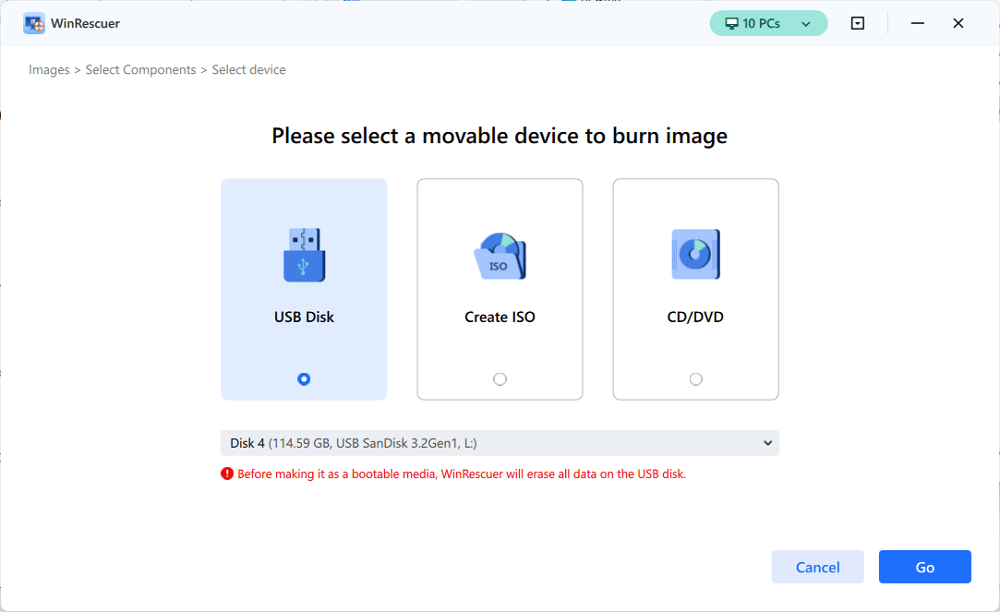
Step 4. Confirm the warning message and then wait for the creation process to complete.
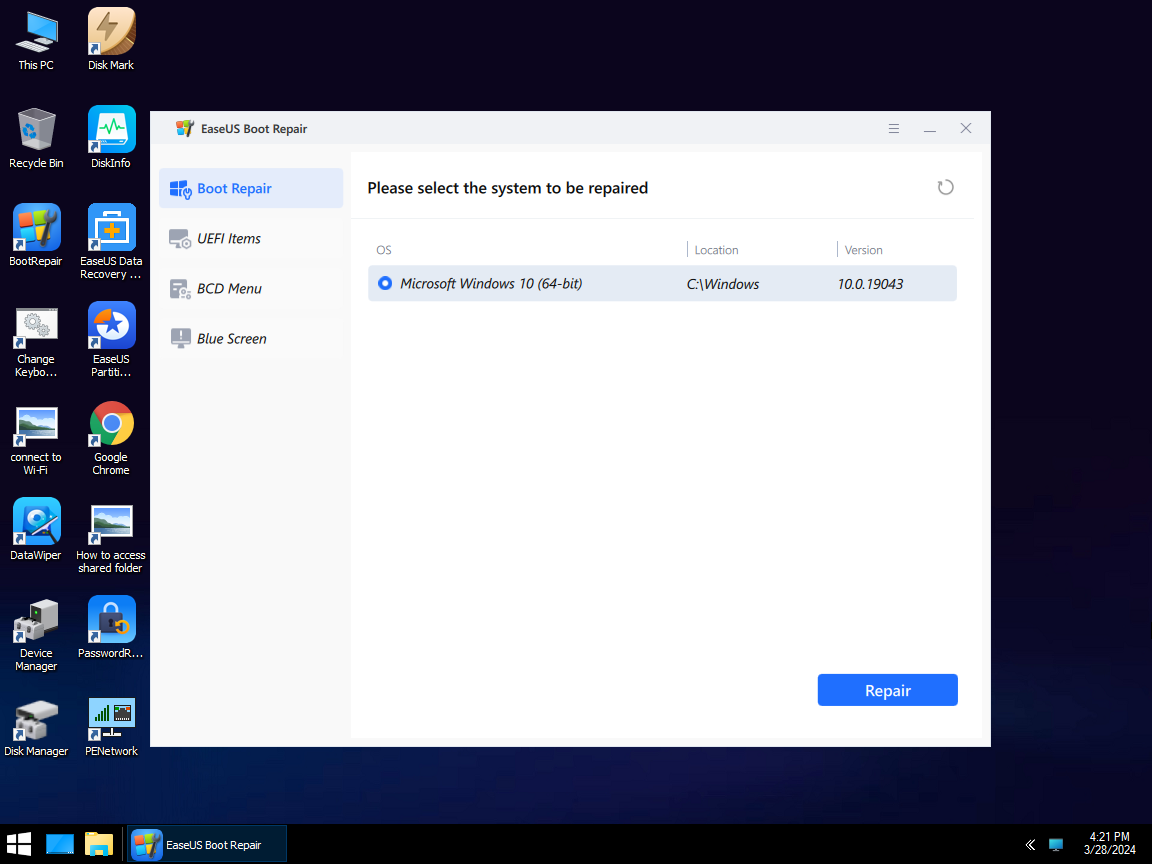
Step 5. Connect the created bootable drive to the faulty computer and reboot it by pressing and holding «F2″/»Del» to enter the BIOS. Then, set the WinPE bootable drive as the boot disk and press «F10» to exit.

Step 6. Then, the computer will enter WinPE desktop. Open BootRepair, select the system you want to repair, and click «Repair.»
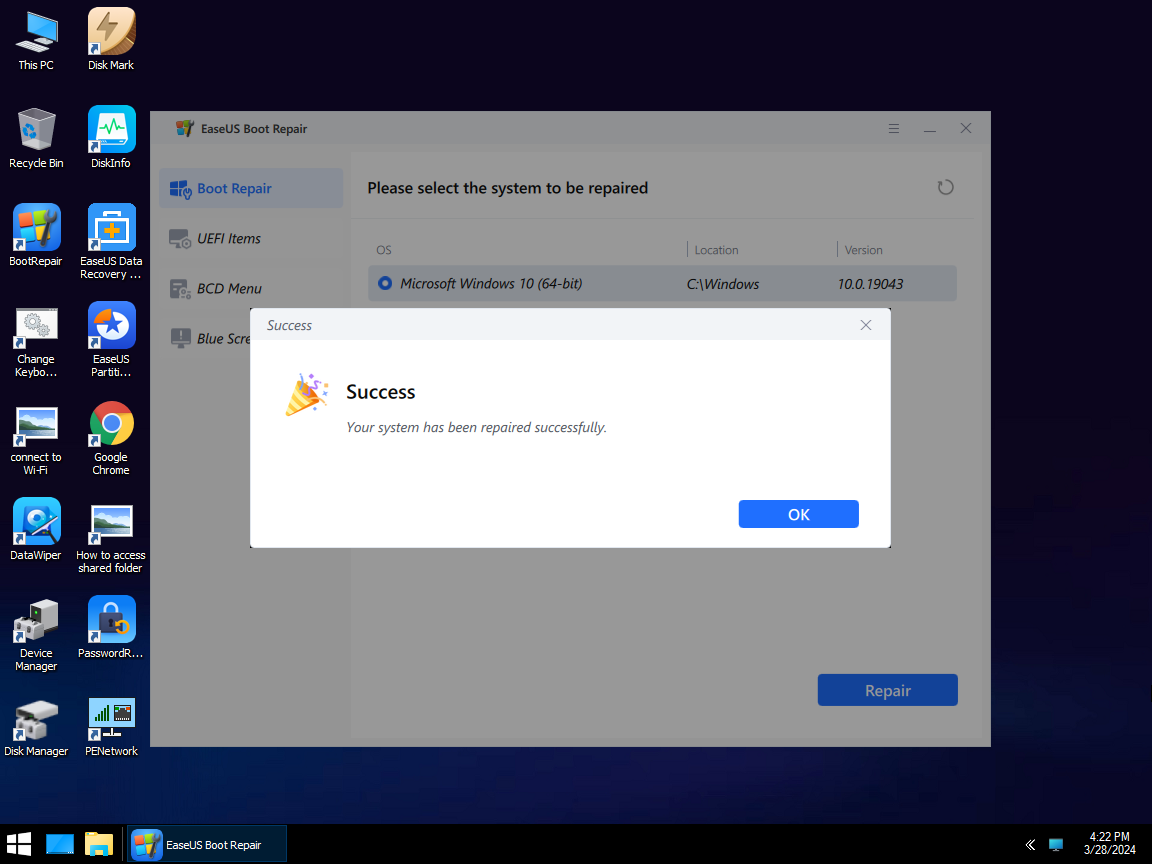
Step 7. Wait a moment, and you will receive an alert that the system has been successfully repaired. Click «OK» to complete the boot repair process.
More Features to Explore
- Windows won’t boot after BIOS update
- Fix Windows 11 Startup Repair Not Working
- Repair Windows 10 From USB
Way 2. Using the Built-in Windows 11 Recovery Drive Tool
Step 1. Insert your USB flash drive into an available USB port on your computer.
Step 2. Click on the Start menu and type «Create a recovery drive» in the search bar.
Step 3. Select the option that appears in the search results. If prompted by User Account Control, click Yes to allow the application to run.
Step 4. In the Recovery Drive window, check the box «Back up system files to the recovery drive.» This option ensures that essential system files are included, which can help restore your system more effectively.
Step 5. Click Next, and your computer will search for connected drives.
Step 6. Select your USB flash drive from the list and click Next.
Step 7. You will see a warning that all data on the selected USB drive will be deleted. Make sure you have backed up any important files before proceeding.
Step 8. Click «Create» to start the process.
Way 3. Using Command Prompt
🔔Note: Before starting, you need to back up your USB and format it to FAT32 in Windows 11.
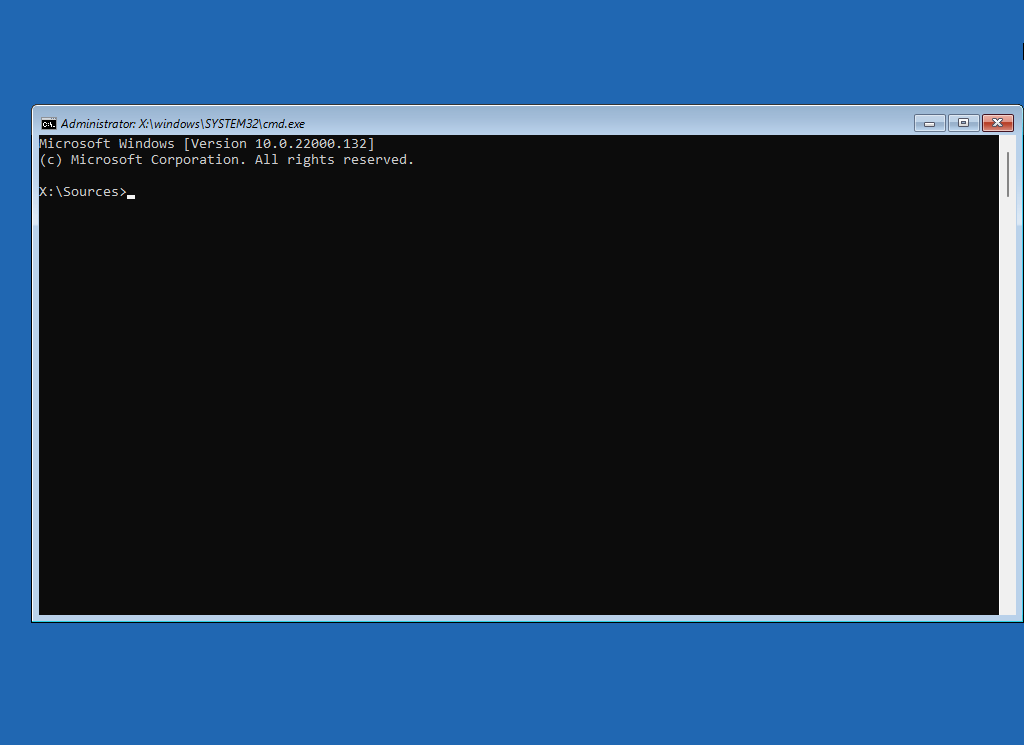
Step 1. Open Command Prompt as an administrator by searching for cmd in the Start menu and selecting «Run as administrator.»
Step 2. Type the following command and press Enter: reagentc /info, Note down the Recovery Image Location path.
Step 3. Type the following command and press Enter, replacing with the path you noted down:
reagentc /setreimage /path
Now, share this comprehensive post with more Windows 11 users:
Why Create a Windows 11 Repair USB (Potential Benefits)
Creating a Windows 11 recovery USB can provide many benefits for users. Here are a few potential uses of having a recovery USB on hand:
1️⃣System Restore: A recovery USB allows you to easily access the system restore feature, which can help you revert your computer to a previous state before encountering issues.
2️⃣Repair Windows Installation: If your Windows 11 operating system becomes corrupted or damaged, a recovery USB can repair the installation without losing your files and data.
3️⃣Access Advanced Recovery Options: A recovery USB allows you to access the Windows Recovery Environment (WinRE), which provides various troubleshooting tools to fix issues such as boot failures, system crashes, or corrupted files.
4️⃣Reinstall Windows: In case of a major system failure or malware infection, a recovery USB can perform a clean reinstall of Windows 11, ensuring a fresh start for your computer.
Overall, Windows 11 repair USB can provide peace of mind and a quick solution to resolve software-related issues that may arise on your computer.
Conclusion
In conclusion, creating and using a recovery USB for Windows 11 is a crucial step in ensuring the safety and stability of your operating system. By utilizing built-in tools, command prompt, and third-party software like EaseUS Partition Master, you can easily create a recovery USB that will be useful in times of need.
Whether you need to perform a system restore, repair a corrupted Windows installation, or reinstall the operating system entirely, having a recovery USB at your disposal can save you time and frustration. Make sure to follow the step-by-step instructions in this article to create and use a recovery USB effectively, and always keep it in a safe place for quick access when you need it the most. With a recovery USB for Windows 11, you can rest assured that your computer is prepared for any unexpected issues.
FAQs: How to Create A Windows 11 Repair USB
For your information, we also collected some additional queries about creating and using recovery USB for Windows 11:
1. Can I download the Windows 11 recovery disk?
Yes, you can download a Windows 11 recovery USB. This USB drive contains the system files and tools for reinstalling Windows 11 in the event of a significant problem, such as hardware breakdown. You can construct a recovery drive with Windows 11’s built-in utility or obtain the installation media from Microsoft.
2. How do I repair corrupted files in Windows 11?
The System File Checker (SFC) utility can check and repair the integrity of Windows system files. Follow this guide to learn how to use this tool:
3. How do I troubleshoot Windows 11 startup issues?
Basically, you can run Windows Startup Repair, rebuild BCD files, restore the system, run the CHKDSK/SFC utility, reinstall the system, and repair the MBR to fix Windows 11 boot problems. Check the tutorial below to learn more details:
🧰Related Readings: Full Guide to Apply Windows 11 Boot Repair
A Windows installation USB medium can not only help you install Windows on your computer but also repair Windows if your device can’t boot normally. In this MiniTool post, we will show you how to repair Windows from USB. No matter you are using Windows 10 or Windows 11, you can try this way.
When Do You Need to Repair Windows 10/11 from USB?
Windows has many built-in tools like Command Prompt, System Restore, and Startup Repair for you to repair your computer issues. However, if your Windows 10/11 computer can’t boot normally or corrupts, you will be unable to use the universal methods to open and use these tools. Well then, what should you do next? You can create a Windows 10/11 installation USB medium and repair Windows from USB using these tools.
Some users may not know how to repair Windows using the installation USB medium. We will show you a full guide on how to do this. In addition, if you lose your files due to some issues, you can try the best free data recovery software: MiniTool Power Data Recovery.
Preparation before Repairing Windows 10/11: Rescue Your Data
If your Windows computer won’t boot normally and you want to repair it, you’d better recover your files in advance to keep them safe. You can use the bootable edition of MiniTool Power Data Recovery, a professional data recovery software, to retrieve your files.
This software is specially designed to recover all kinds of files from different data storage devices like computer internal hard drives, external hard drives, USB flash drives, memory cards, SD cards, and more.
This software has a trial edition, which allows you to scan your drive to find your files on your computer. You can first try this free data recovery tool on a normal working device to see whether it works to find the data on it.
MiniTool Power Data Recovery TrialClick to Download100%Clean & Safe
However, if your computer is unbootable, you need to use the bootable edition of this software to recover your data.
Step 1: Get a Suitable Edition of MiniTool Power Data Recovery
You can’t directly get a bootable edition of this software. You need to go to the MiniTool official site to select a suitable edition. If you are a personal user, the Personal Ultimate can fully meet your needs.
Next, you can use the software download link you get to download this secure data recovery software to a normal working computer and use the license key you receive to register the software.
Step 2: Create a Bootable MiniTool USB Drive
1. Connect a USB drive that has at least 8 GB of space to your computer. There should be no important files on that USB drive. Otherwise, you need to back up the files in it.
2. Open the software to enter its main interface.
3. Click the disc icon from the top toolbar.
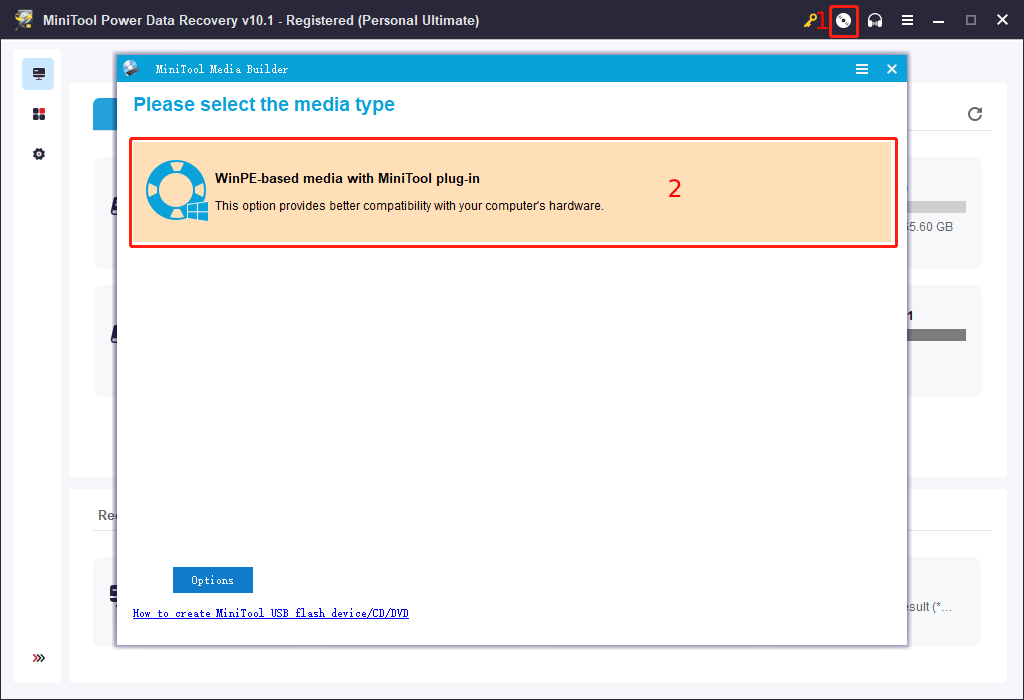
4. On the pop-up interface, select WinPE-based media with MiniTool plug-in to continue.
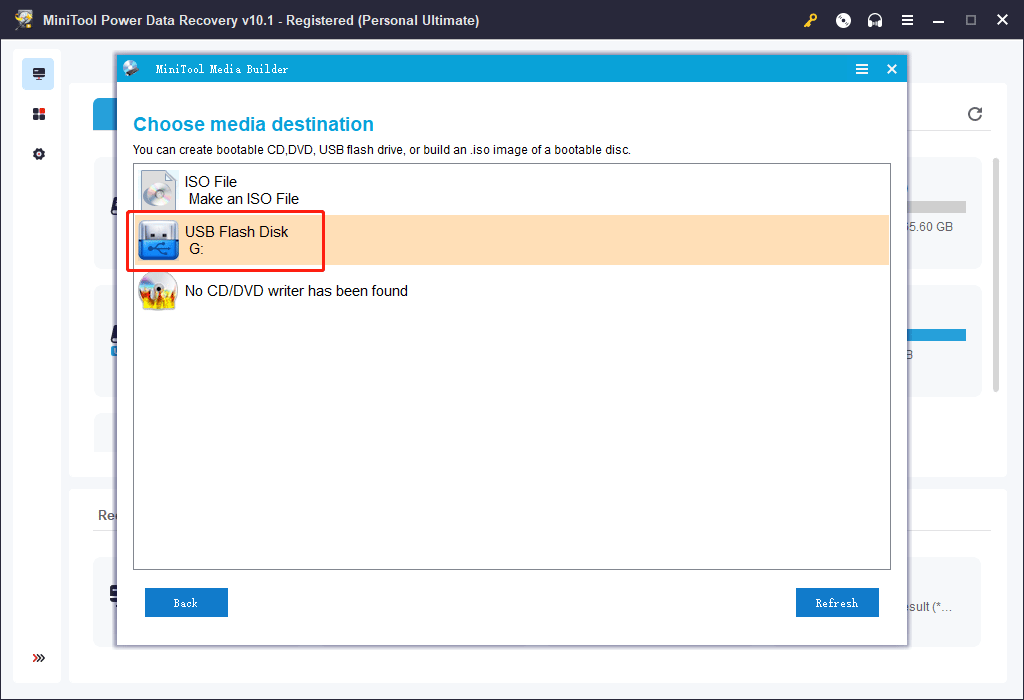
5. Select the connected USB on the next page.
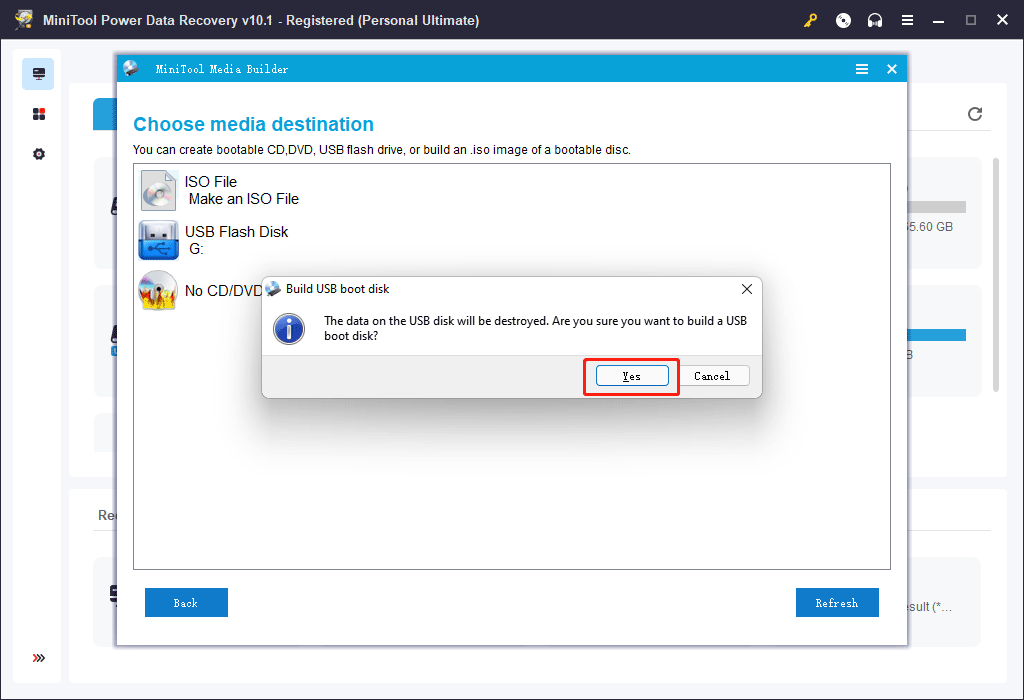
6. A warning pops up to remind you of the risk of data loss. Click Yes to continue.
7. The MiniTool Media Builder begins to create a bootable MiniTool USB drive. You should wait until the whole process ends successfully. Then, click Finish and unplug the USB drive.
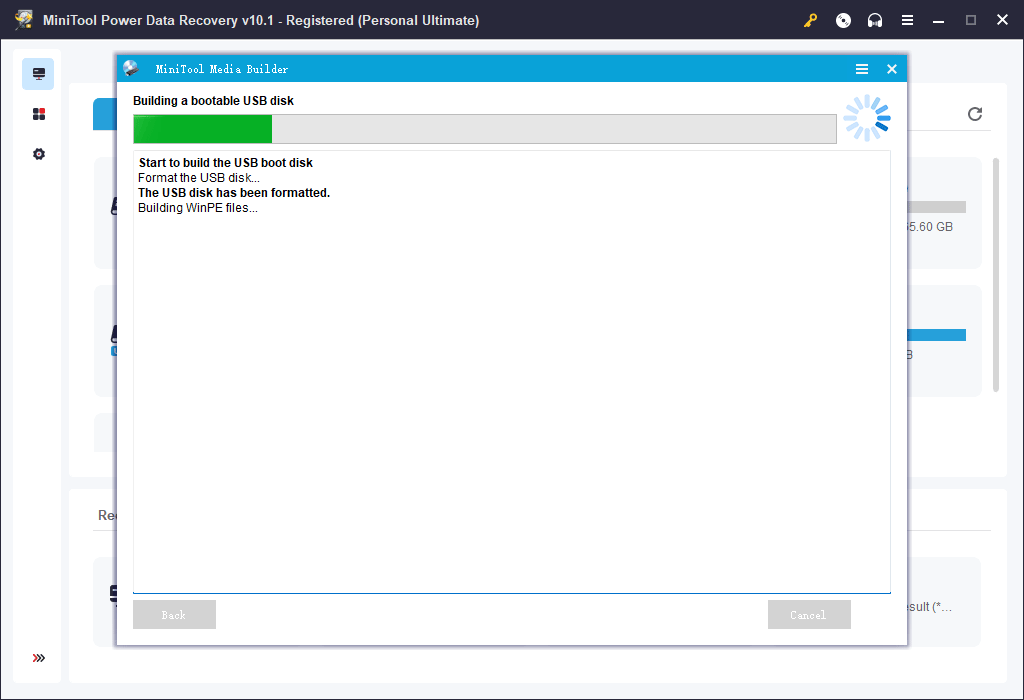
The MiniTool bootable USB drive is prepared.
Step 3: Boot Your Computer from the USB Drive and Recover Data
1. In this step, you also need to prepare an external hard drive that has enough free space to save the files you want to rescue and connect the external drive to your computer.
2. Connect the MiniTool bootable USB drive you have created to your computer that won’t boot.
3. Boot your computer into BIOS and set your device to boot from the bootable USB drive.
4. After a few seconds, your computer will automatically boot into the software. Under Logical Drives, you can see all the partitions on your computer. Select the drive you want to scan and click Scan.
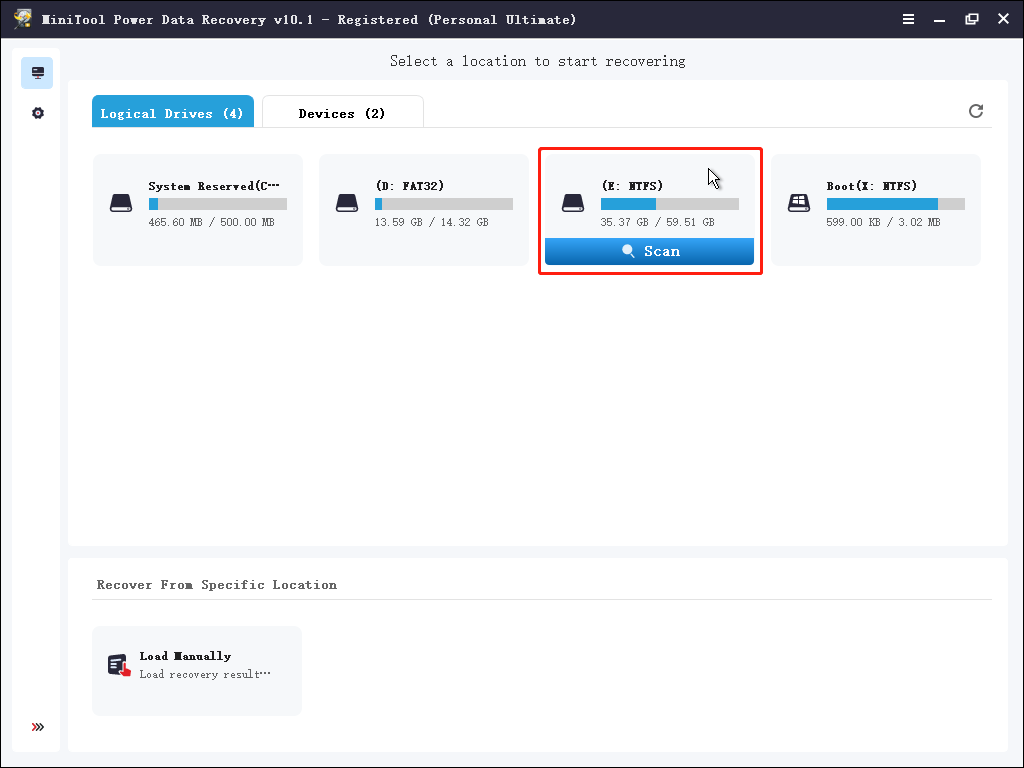
5. After scanning, you can see the scan results including existing and deleted files on the selected drive. These scan results are listed by path by default. You can also click Type to make the software show the scan results by type. If you still remember the name of the file you want to restore, you can click Find, type the file name, and click Find to directly locate the file.
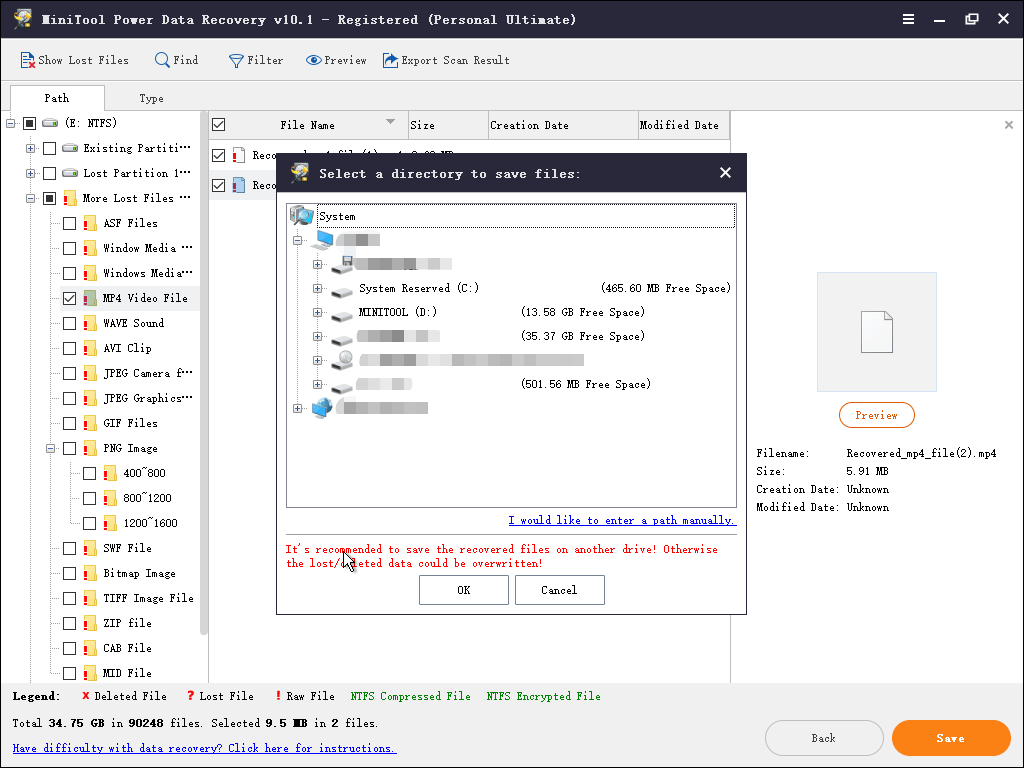
6. Select the files or folders you want to recover and click Save.
7. On the pop-up interface, select the connected external data storage drive to save the selected files.
Now, your important files are saved in a safe place. You can feel free to repair your Windows 10/11 computer from USB.
If your Windows corrupts or fails to boot, you’d better rescue your data using MiniTool Power Data Recovery Bootable Edition and then take measures to fix the system issue.Click to tweet
How to Repair Windows with USB?
It is not a single step to complete the whole process. It contains the following steps:
- Step 1: Create a Windows 10/11 installation USB drive
- Step 2: Boot your computer from the installation USB drive
- Step 3: Select a suitable tool to repair your Windows computer
Step 1: Create a Windows 10/11 Installation USB Drive
If you want to repair Windows from USB, the first thing you need to do is to create a Windows installation USB drive. The Windows installation USB drive is not just a tool to help you install Windows 10/11 on your computer. You can also use it to repair your computer’s boot issues via Advanced Options. So, you can also call it a Windows repair USB.
You also need to create the Windows repair USB drive on a computer that can work normally.
Tip: In theory, you can also create a Windows 10/11 installation CD/DVD drive and repair your computer with CD/DVD.
Create a Windows 10 Installation USB Drive
1. You need to have a USB drive that has at least 8 GB of space. There should be no important files in it because the creation process will erase all files in the USB drive. Then, connect it to your computer.
2. Go to the software download page for Windows 10.
3. Click the Download tool now button under Create Windows 10 installation media.
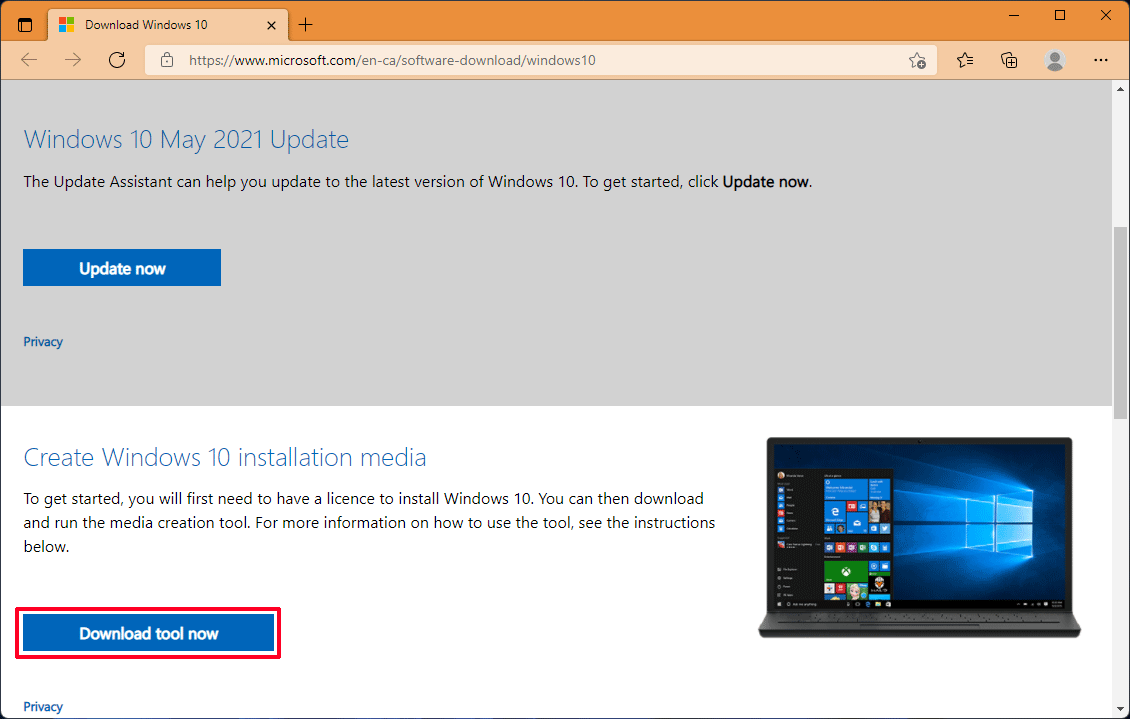
4. Double-click the downloaded Windows 10 media creation tool (it is a .exe file) to open it. Then, follow the on-screen guide to create a Windows 10 installation USB drive.
Create a Windows 11 Installation USB Drive
- Likewise, you also need to prepare a USB drive that has 8 GB or more storage space and connect it to your computer.
- Since Windows 11 is not officially released to everyone, you need to download a Windows 11 Insider preview ISO file and use Rufus to burn the ISO file to your USB drive. After the release of Windows 11, there should be a Windows 11 Media Creation Tool. At that time, you can use the tool to create a Windows 11 installation medium.
Now, the Windows installation USB drive is prepared.
Step 2: Boot Your Computer from the Installation USB Drive
- Start your computer into BIOS.
- Change the boot order and set your computer to boot from the connected Windows installation USB drive.
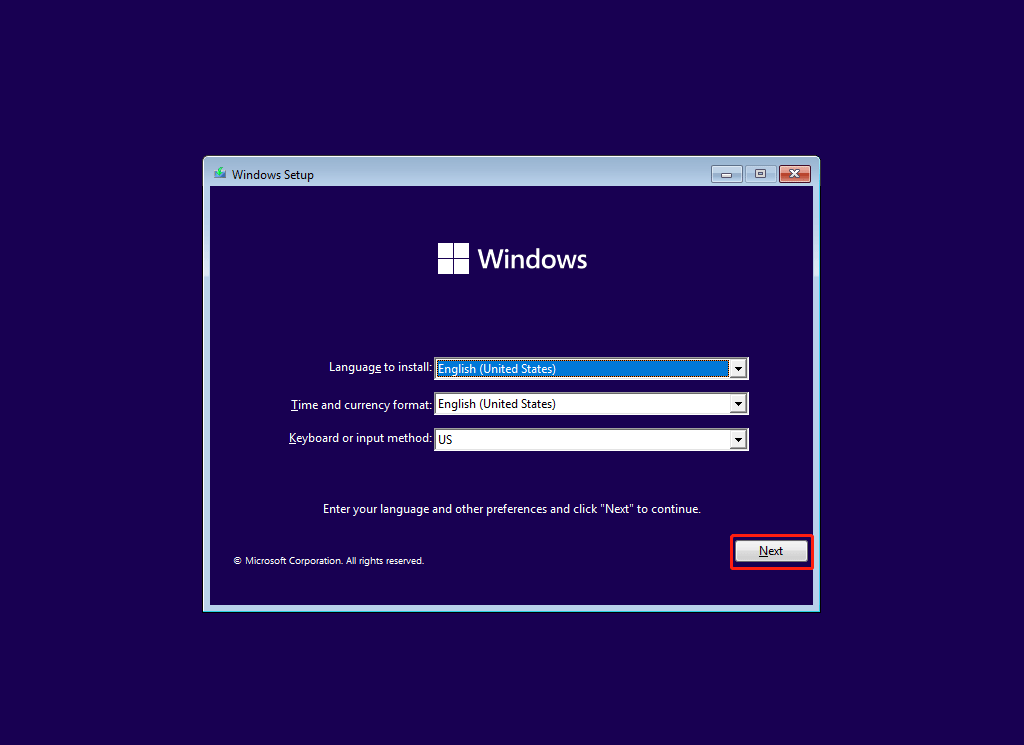
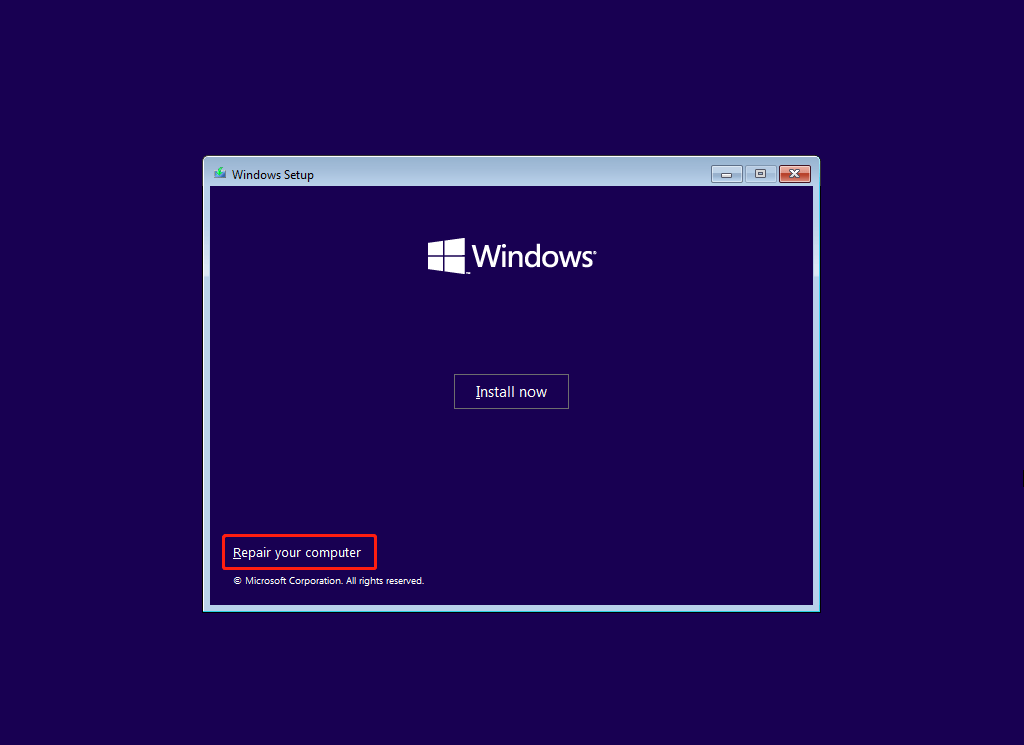
- When you see the following Windows Setup interface, it means that your device successfully boots from the Windows installation USB drive.
Step 3: Select a Suitable Tool to Repair Your Windows Computer
1. Click Next on the Windows Setup interface to continue.
2. On the next page, click Repair your computer.
3. Click Troubleshoot.
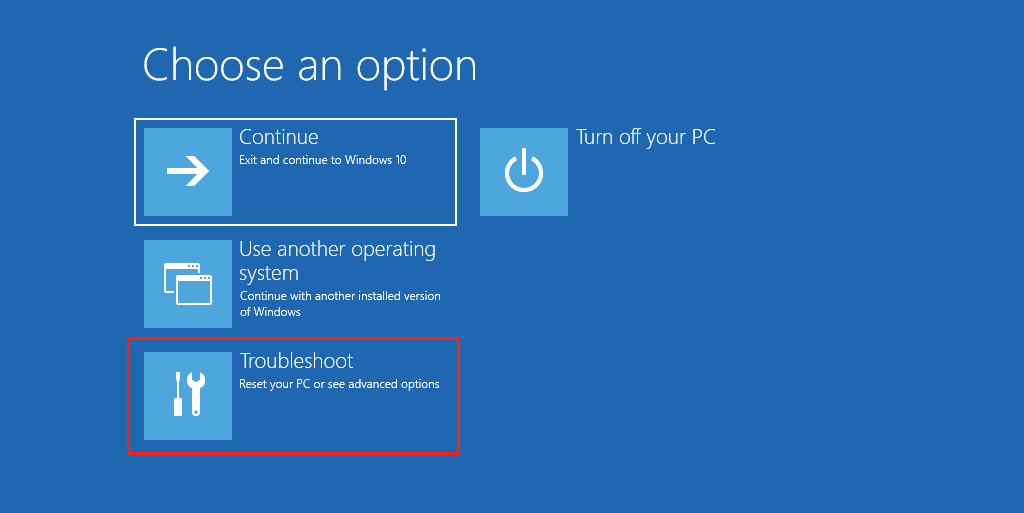
4. You will enter the Advanced options interface, on which you can see the following options:
- Startup Repair
- Command Prompt
- Uninstall updates
- System Restore
- System Image Recovery
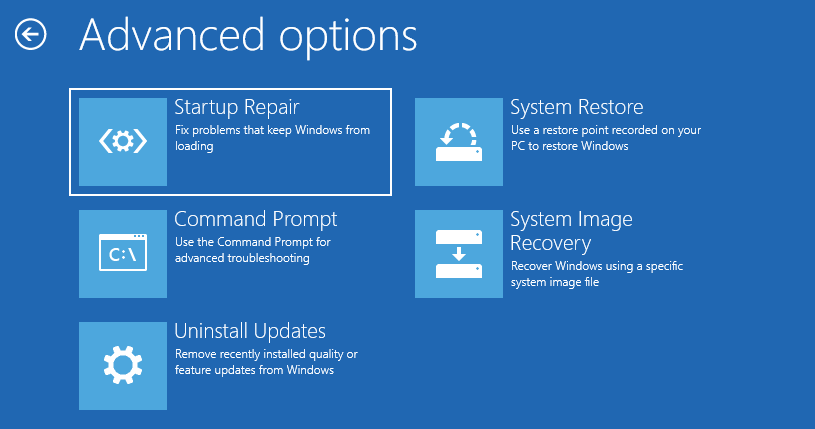
Which tool should you use to solve your Windows issue? It depends on.
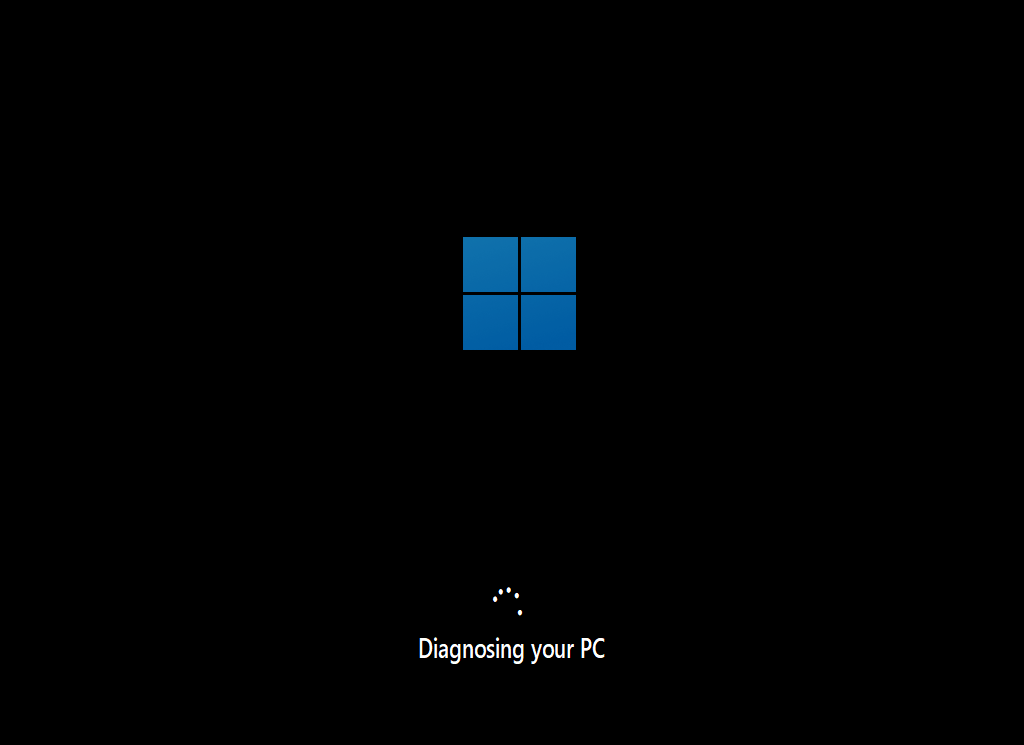
Startup Repair
If you can’t start up your Windows computer properly, you can use this Startup Repair tool to fix the problem.
This tool can scan your computer for issues like missing or corrupt system files. If problems are found, Windows Startup Repair can automatically fix them. During the repairing process, your computer may restart several times.
Note: This tool can’t fix hardware issues and Windows installation issues.
Command Prompt
Command Prompt is a very powerful Windows tool. It is a command-line application that is available on most versions of Windows. By using this tool, you need to enter corresponding commands.
The most commonly-used commands are CHKDSK, BCDBoot, CHKNTFS, DISM, SFC, and more.
For example, you can use the CHKDSK command to check the file system of a volume for logical and physical errors. If you use the CHKDSK command without any parameter, this tool will only show you the status of the volume but not fix any errors. If you use the CHKDSK command with the /f, /r, /x, or /b parameters, it will fix the found errors on the volume.
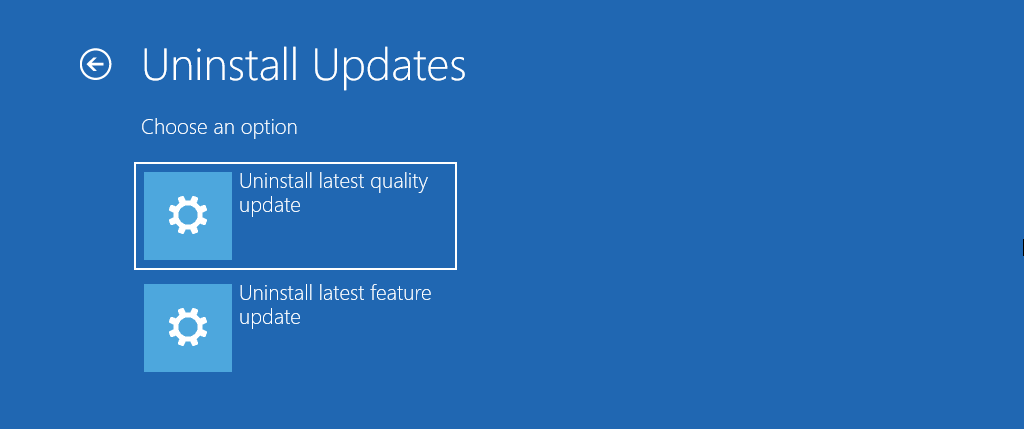
Uninstall Updates
If your computer issue happens after you install a quality update or a feature update, this latest update could be the cause. You can uninstall the latest update to have a try. In this case, Uninstall Updates is useful.
After clicking Uninstall Updates, you can see two options: Uninstall latest quality update and Uninstall latest feature update. Just select one to uninstall the update according to your situation.
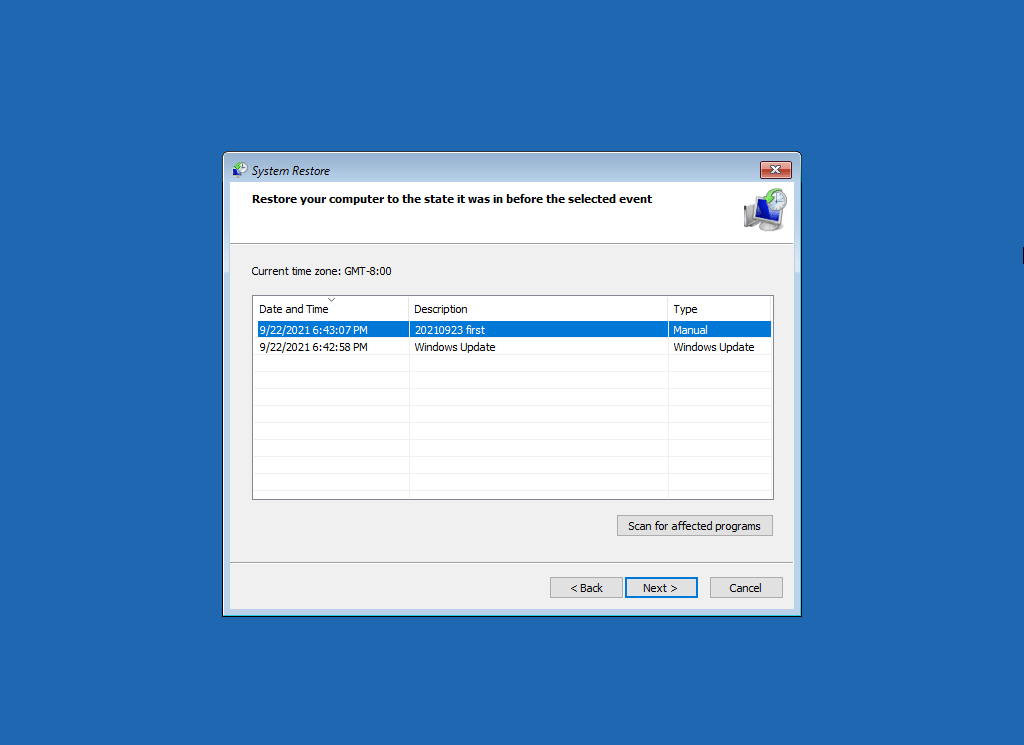
System Restore
If you have ever created a system restore point when your computer was still running, this system restore point is very useful when your Windows fails to load. You can restore your computer from a previous restore point. This can help you make your Windows go back to a normal working state, allowing you to use your computer as usual again.
System Image Recovery
A system image backup is a copy of the drives required for Windows to run. If you have made a system image, you can use it to restore your computer if the hard drive or device stops working.
After clicking System Image Recovery in Advanced options, you will enter the Re-image your computer interface, in which the latest available system image is selected by default. You can also check Select a system image instead and click Next to select another system image.

Those are the tools you can use to fix your Windows 10/11 issues via a Windows repair USB drive. Hope the above contents can help you select a suitable tool to solve the issue you are facing.
Bottom Line
Want to repair Windows from USB but don’t know what to do? Don’t worry! Just read this article to learn what you should do before a Windows repair with USB and how to repair your Windows 11/10 from USB. There are many available tools. If you don’t still know which one matches the case, you can search for the issue on the internet to help you make a decision.
If you are looking for a data restore tool, you can try MiniTool Power Data Recovery. You can use this software to perform SSD data recovery, SD card data recovery, Seagate data recovery, Samsung data recovery, RAID data recovery, and more.
Should you have any other related issues, you can let us know in the comments. You can also contact us via [email protected].
-
Home
-
News
- Windows Repair (All In One): Download, Install, Uninstall Guide
Windows Repair (All In One): Download, Install, Uninstall Guide
By Amy | Follow |
Last Updated
Windows Repair (All In One) is a tool that enables you to fix common issues with the Windows PC. If you need it, download and install it by following the instructions offered by Partition Magic. If you don’t need it later, uninstall it manually.
Windows Repair (All In One) is developed by Tweaking.com. It contains dozens of min-fixes for Windows, allowing you to repair various common Windows issues. For instance, you can fix Registry errors and issues with Windows Updates, Internet Explorer, Windows Firewall, etc.
Malware and poorly installed programs on the computer can change the default settings, which leads to PC malfunction, slows down the computer, or causes other issues. Fortunately, you can restore Windows settings to their factory states by using Windows Repair. With Windows Repair (All In One) free version, you can perform the following tasks.
Tips:
MiniTool Partition Wizard is a multifunctional partition manager that enables you to find what’s taking up your hard drive space, benchmark hard drives, increase disk space, recover missing data/partitions, etc. Importantly, it helps you make a bootable USB to boot an unbootable PC and then fix it.
MiniTool Partition Wizard DemoClick to Download100%Clean & Safe
- Reset Registry permissions
- Reset file permissions
- Register system files
- Repair WMI
- Repair Windows Firewall
- Repair Internet Explorer
- Repair MDAC & MS Jet
- Repair host file
- Remove policies set by infections
- Repair icons
- Repair Winsock & DNS cache
- Remove temp files
- Repair Proxy settings
- Unhide non-system files
- Repair Windows Updates
- Repair CD/DVD missing/not working
If you buy the pro version, you can get the following additional features and optimizations.
- Automatic updates
- Enhanced Windows drive cleaner
- Memory cleaner
- Windows quick link menu
- Run your custom scripts after repairs,
- Run speed tweaks after repairs
- Performance enhancements, and more.
Where to download Windows Repair (All In One)? The next section offers you download links. You can get Windows Repair (All In One) downloads by clicking the given links.
Download Windows Repair (All In One) and Install It
Windows Repair (All In One) comes with desktop and portable versions. It means that you can use the program on your computers or portable devices like a USB flash drive. According to your needs, download the desired version by clicking the corresponding link.
Tips:
This program can run on Windows XP/Vista/7/8/10 (both 32-bit and 64-bit).
Download the desktop version
Download the portable version
After you get Windows Repair (All In One) downloaded, follow the steps below to install it.
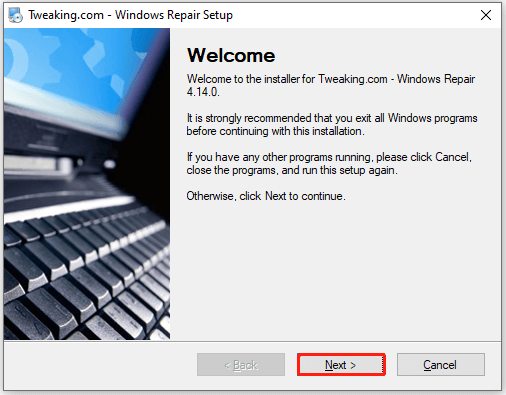
Step 1: Double-click on the downloaded setup file to run it. Then click Next in the elevated window to continue.
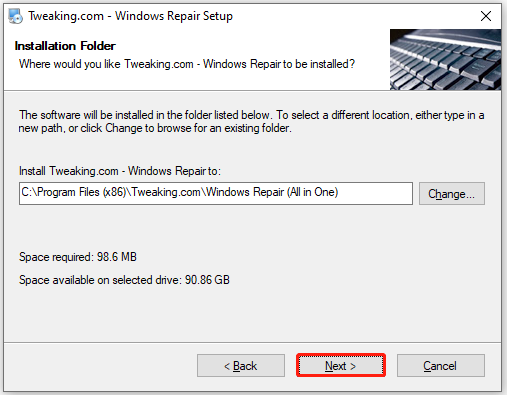
Step 2: Configure the installation location by clicking the Change button and selecting the directory in the pop-up window. Then click Next. If you don’t have a specific requirement, follow the default setting and click Next.
Step 3: Select the shortcut folder in the next window and click Next to move on.
Step 4: View the settings you have made and click Next.
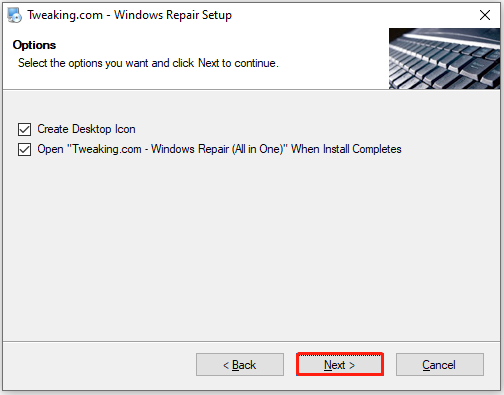
Step 5: Wait until the installation process ends and pick options based on your needs. After that, hit the Next button.
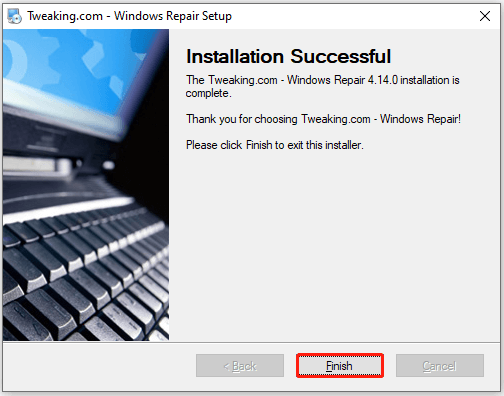
Step 6: Finally, click Finish to end the process.
After the installation process ends, it will automatically run on the computer. The prerequisite is that you have ticked the Open “Tweak.com – Windows Repair (All in One)” When Install Completes option during the installation process.
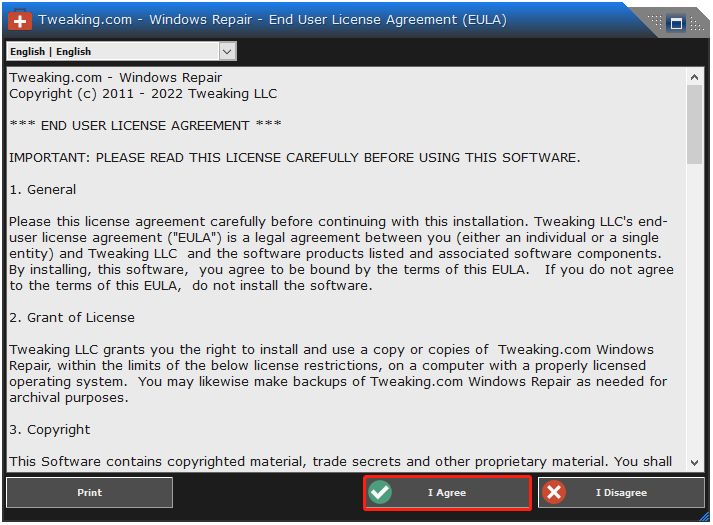
On the main interface of the program, click I Agree to accept the terms of the license. Then follow the on-screen instructions to perform the tasks.
Uninstall Windows Repair (All In One)
If you don’t need the program, you can uninstall it manually. How to uninstall Windows Repair (All In One)? Here’s the tutorial for you.
Step 1: Press the Windows and I keys to open the Settings app.
Step 2: In the Settings app, click Apps.
Step 3: Move to the Apps & features section on the right side of the prompted window and then find Tweaking.com Windows Repair (All In One) by scrolling down the list.
Step 4: Then click on the program and click Uninstall.
Step 5: Follow the prompted instructions to finish the uninstallation.
How to repair Windows 11/10 after you uninstall Windows Repair (All In One)? Well, you can perform the task by using Windows-embedded functions like Command Prompt, Startup Repair, Reset PC, and System Restore.
Conclusion
This post offers an introduction to Windows Repair (All In One), including its basic information and features. Then it shows the steps to download, install, and uninstall Windows Repair (All In One).
About The Author
Position: Columnist
Having writing articles about computer tech for a long time, I am rather experienced especially on the aspect of computer optimization, PC enhancement, as well as tech terms explanation. The habit of looking through tech forums makes me a great computer issues collector. And then, many articles related to these issues are released, which benefit plenty of users. Professional, effective, and innovative are always the pursuit of an editing worker.
Fix your PC now. Guaranteed.
Say goodbye to the blue screens because we’ve created the ultimate system recovery CD, painstakingly engineered to automatically find and fix problems preventing your PC from starting up or working correctly.
Download Now
Watch Demo
Complete diagnostics & repair in 3 easy steps
Download a copy of EasyRE to any PC or Mac, burning it to a USB or CD. We even have video tutorials showing you how!
Start the PC that needs fixing from the EasyRE USB or CD (which will work even if you normally can’t start your PC).
Watch as EasyRE scans your PC and displays a list of recovery options. All you have to do is click ‘begin’.
EasyRE automatically searches for problems and fixes them. When it’s done, just reboot your PC and you’re good to go!
15 years of research and development
We’ve been working on system utilities, backup solutions, and disaster recovery for the past 15 years, and we have no intention of stopping anytime soon. 10 years ago, we realized that the traditional approaches to system recovery just weren’t good enough, and set about trying to come up with something better.
With Easy Recovery Essentials for Windows, we’ve created something different: a recovery solution that first understands your computer, then fixes it. Unlike other products, EasyRE methodically tests and validates each component in your system, simulating the boot process and identifying where things go wrong.
A scientific approach to system recovery
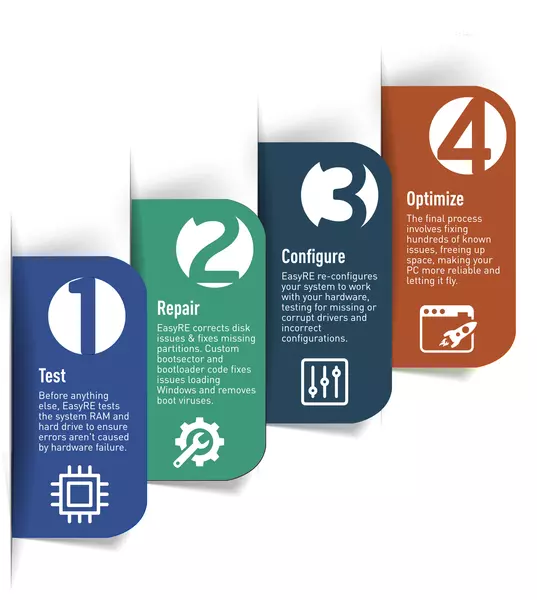
Click to view expanded image
It’s not possible to fix something without first understanding how it works – and the way a PC works is vastly more complicated than most people realize. In the process of developing Easy Recovery Essentials, we’ve published a number of articles and research papers covering the details of the system boot process.
As a result of this research, we’ve developed a patented method of system recovery that starts by testing each stage of the PC boot process and simulating the results, starting with your hardware and making its way up. At each point, EasyRE verifies that the software or hardware components are functioning correctly and working as intended. Anything that isn’t working as intended is logged and reported, and a number of different approaches for repair and recovery are attempted.
By understanding not just each, individual component but also how they all fit together as a whole, EasyRE is even able to implement workarounds and fallbacks, which is why EasyRE can repair computers that other software can’t.
Your data comes first. Always.
Dropping your PC off at the Geek Squad® or your local PC repair store before you leave for work and picking it up on your way home may seem like a good idea — but our research shows that over 85% of PC repairs result in a complete format and restore. We know your data is valuable and that you’d do anything to keep it safe — that’s why EasyRE is explicitly designed with non-destructive repair in mind. Fix your PC, don’t nuke it.
One-click repair like never before
It’s our opinion that there’s no point in having the best and most-capable repair software ever created if it’s not easily accessible or too difficult to use. All you need to use EasyRE is access to a working PC or Mac, from where you can copy EasyRE to a USB or CD. The EasyRE CD/USB is plugged into the PC that doesn’t work, and the rest happens virtually automatically.
Once your damaged PC is booted from the EasyRE USB or CD, it automatically starts looking for Microsoft Windows® installations and presents you with a menu featuring a list of possible recovery actions. You have the option of performing a patented one-click repair™ or scanning for viruses, as well as access to advanced system recovery tools and utilities.
The EasyRE recovery environment lets you access your files and documents for backup to make sure your data is safe, and even gives you access to a web browser if you need to email yourself a file or look something up.
A trusted name in PC repair
NeoSmart Technologies’ software is used and recommended by the most respected names in the industry, and has had the distinct honor of helping fix the world’s PCs for the past decade.
Feature Comparison
Pick a version and start downloading
Unsure what version of Windows you’re running? Have a look at our mini-guide.
The Technician Edition of EasyRE can repair all OSes from a single USB and is the only edition licensed for use by repair shops or IT departments.