
(Image credit: Mauro Huculak)
Renaming a single file on Windows 10 is simple. The challenge comes when you need to rename multiple files in a folder, but don’t worry since there are easy ways to complete this task.
If you have to rename a long list of files, you can speed up the process using File Explorer, PowerShell, Command Prompt, or even the Microsoft PowerToys app.
In this how-to guide, I’ll explain several ways to bulk rename files, including changing the extension.
Recent updates
These instructions has been updated to ensure accuracy and reflect changes to the process in the operating system.
How to rename multiple files using File Explorer
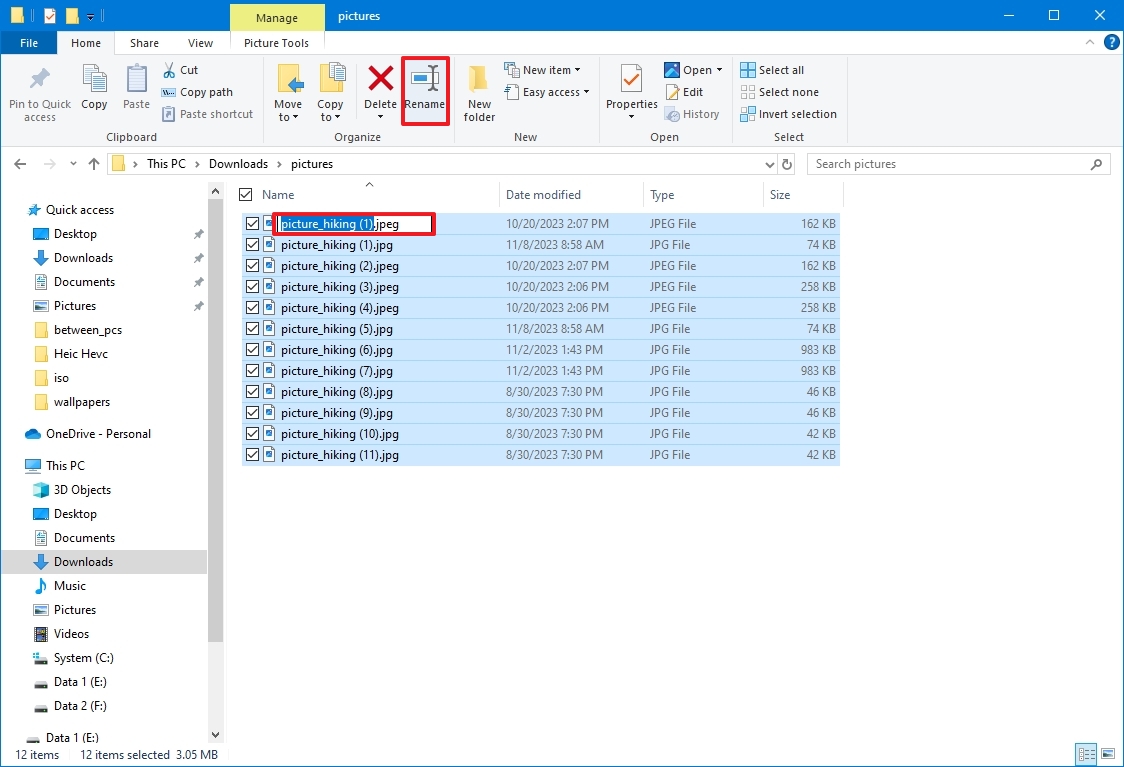
The simplest way to rename one or multiple files on Windows 10 is through File Explorer.
Rename multiple files one at a time
To rename multiple files with the «Tab» key, use these steps:
- Open File Explorer.
- Quick tip: You can quickly open File Explorer with the icon in the taskbar, the «Windows key + E» keyboard shortcut, or by clicking the File Explorer icon from the left pane in the Start menu.
- Open the folder with the files to rename.
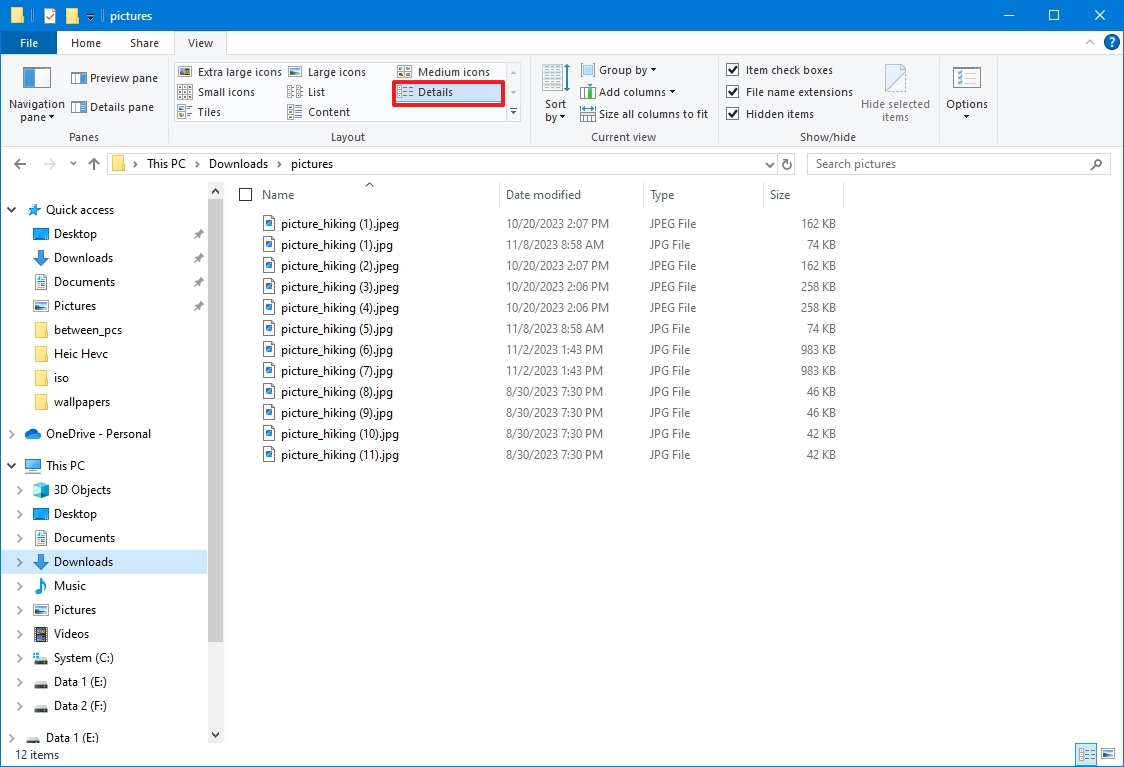
- Click the View tab.
- Select the Details view.
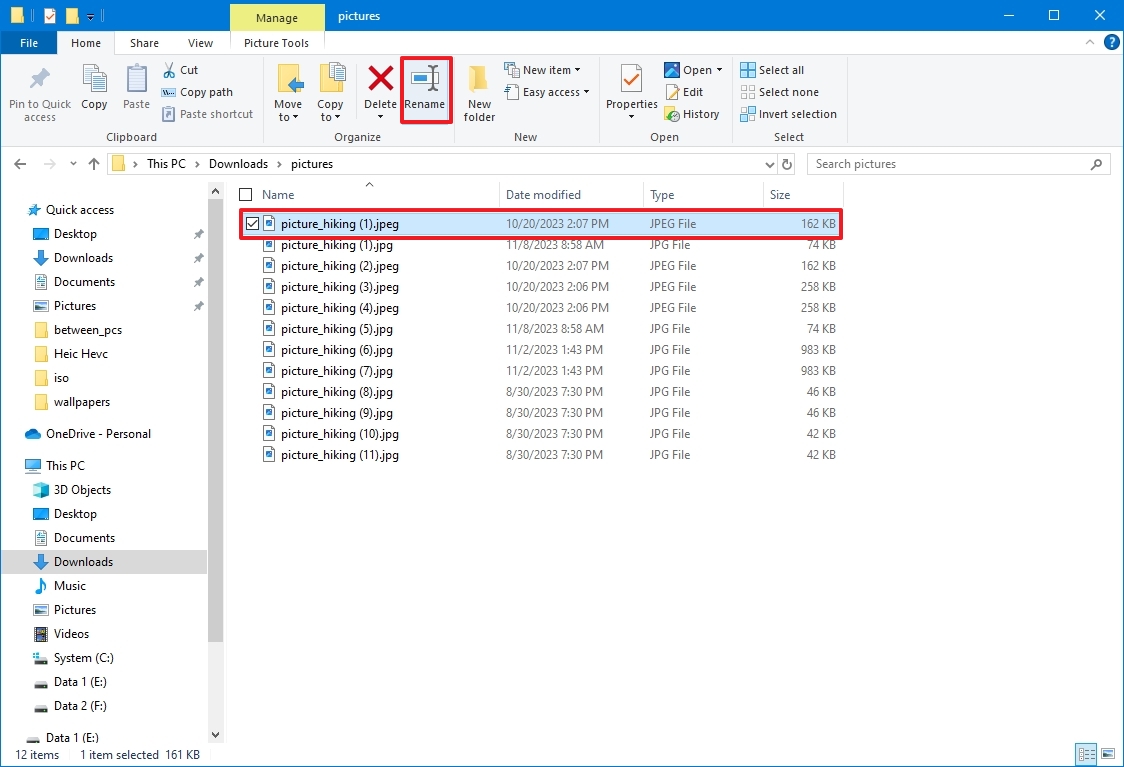
- Select the first file in the folder.
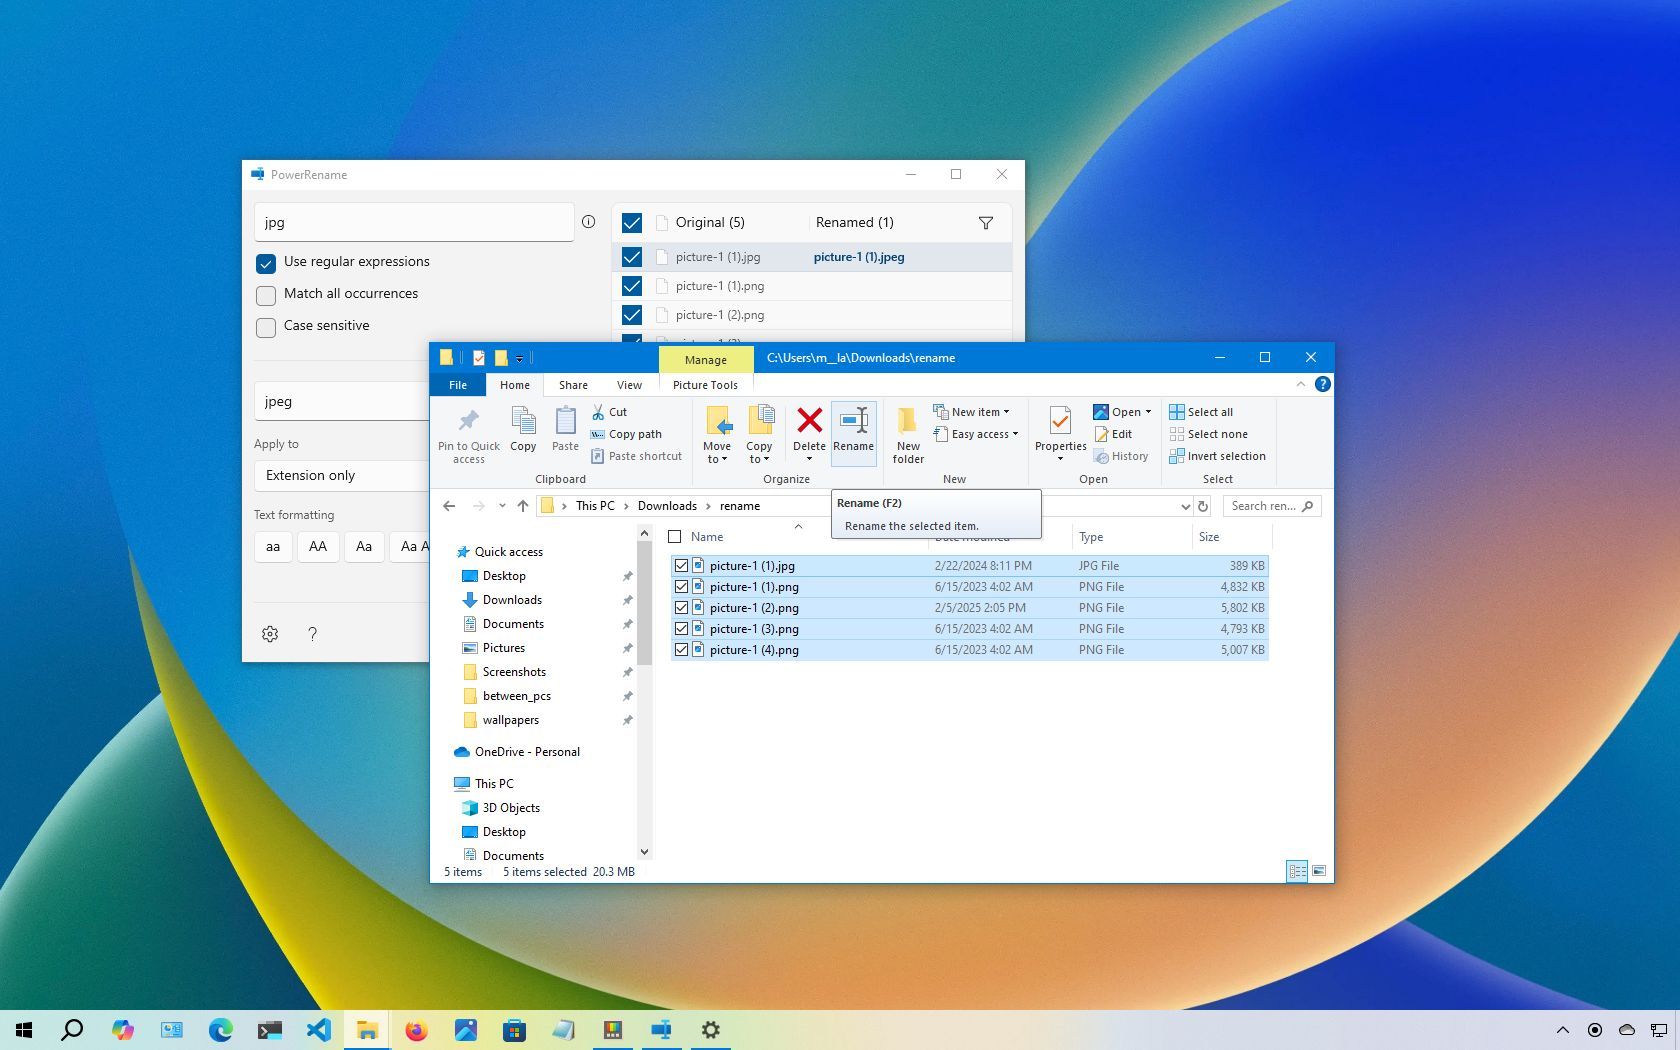
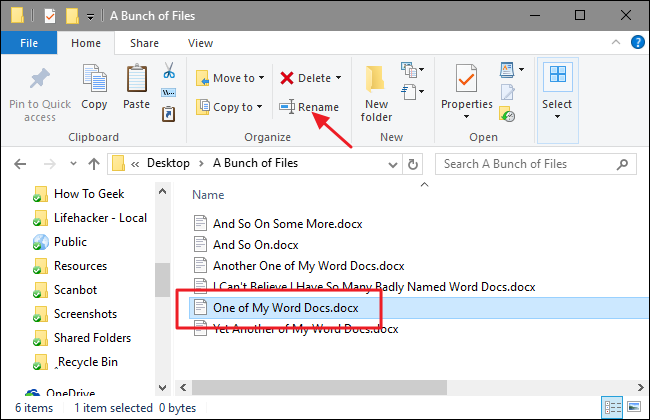
- Click the Home tab.
- Click the Rename button.
- Quick tip: Alternatively, you can press the «F2» button. Right-click the file and select the «Rename» option from the context menu. Or, you can click the file once and slowly click the name again to trigger the rename action.
- Confirm a new name for the file.
- Press the Tab key to jump and trigger the rename action for the next file down the list.
- Confirm the new file name.
- Press the Tab key again to jump and trigger the next rename.
- Quick tip: You can keep pressing the «Tab» key to skip the file and continue renaming other files.
- Continue repeating steps 9 and 10 to rename all the files.
Once you complete these steps, keep pressing the «Tab» key to continue renaming files in the location.
Rename multiple files at once
To rename multiple files in bulk with the same name structure on Windows 10, use these steps:
All the latest news, reviews, and guides for Windows and Xbox diehards.
- Open File Explorer.
- Open the folder with the files to change their names.
- Click the View tab.
- Select the Details view.
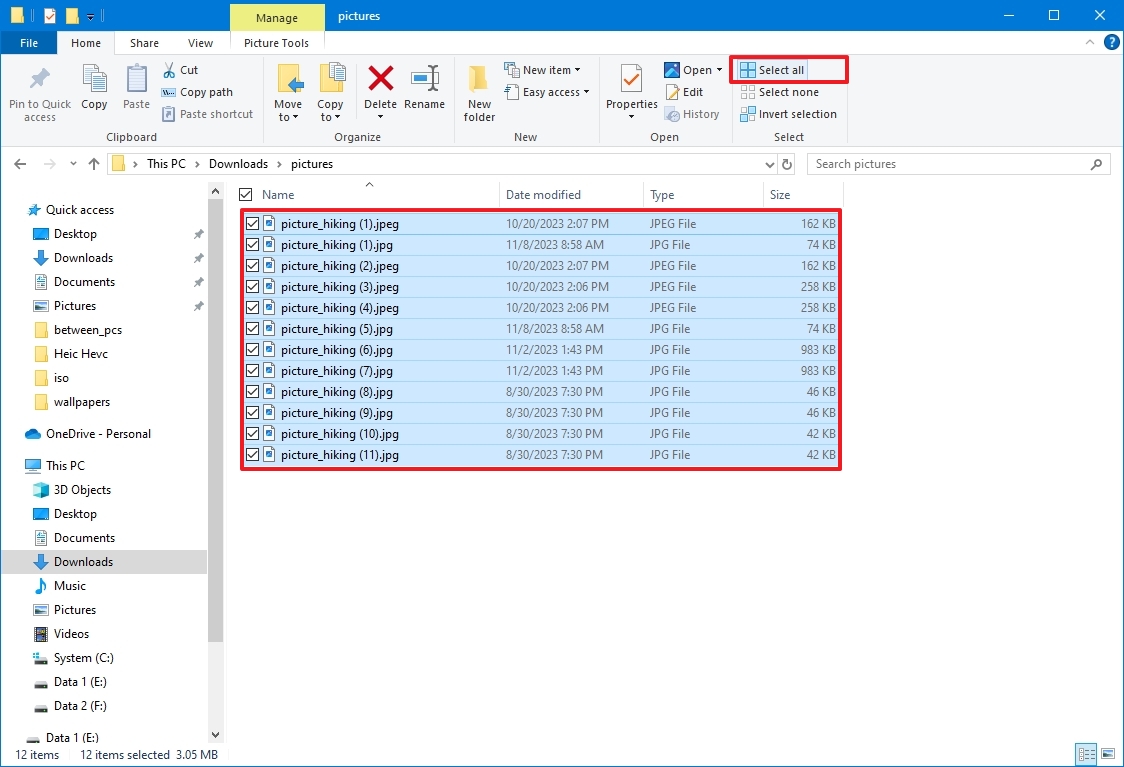
- Click the Home tab.
- Click the Select all button.
- Quick tip: Alternatively, you can select all files using the «Ctrl + A» keyboard shortcut. You can press and hold the «Ctrl» key and then click each file to rename. Or you can choose the first file, press and hold the «Shift» key, and then click the last file to select a group.
- Click the Rename button from the «Home» tab.
- Confirm the new file name base and press Enter.
After you complete the steps, the selected files will be renamed using the same naming structure you specified, with a count number in parentheses to make each file name different. For example, «summer_trip_2023 (1).jpg» and «summer_trip_2023 (2).jpg.»
If you make a mistake, you can use the «Ctrl + Z» keyboard shortcut to undo the changes, or you can click the menu button in the title bar and select the «Undo» button.
How to rename multiple files using Command Prompt
Command Prompt also offers multiple ways to change the name of multiple files in bulk on Windows 10.
Rename single file
To rename one file with Command Prompt on Windows 10, use these steps:
- Open Start.
- Search for Command Prompt and click the top result to open the app.
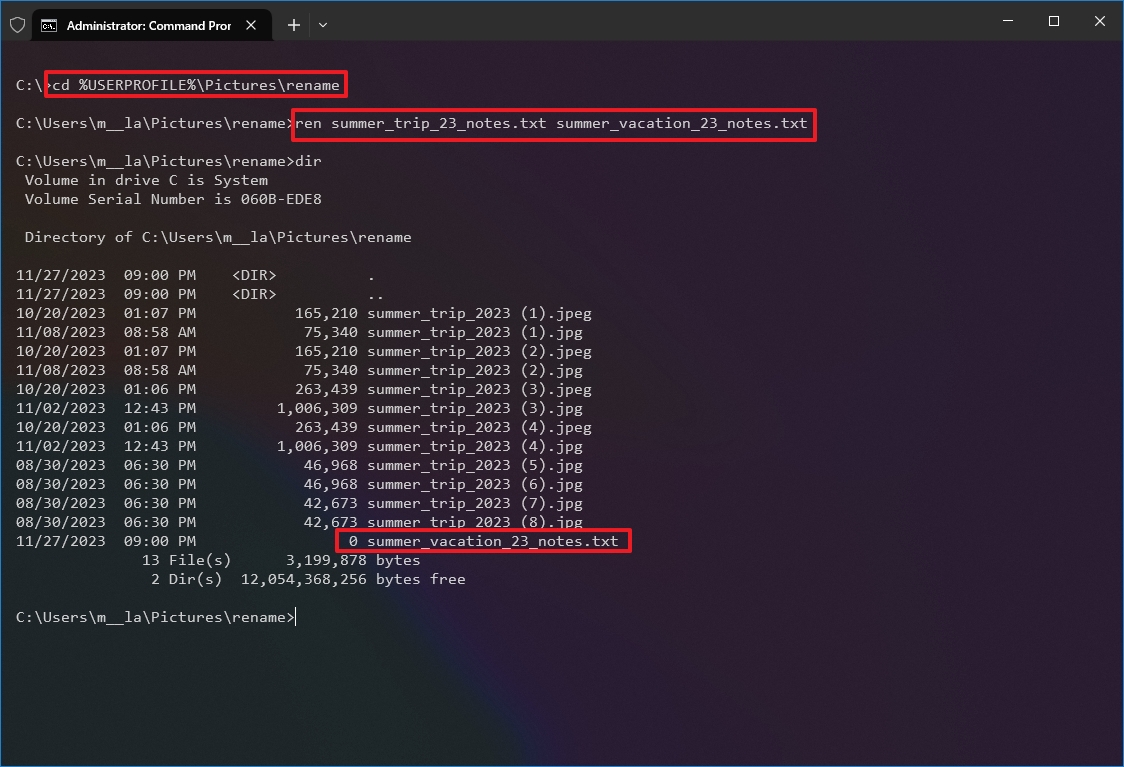
- Type the following command example to navigate to the folder with the files to rename, and press Enter: cd c:\PATH\TO\FILES
For instance, this example opens the «rename» folder inside «Pictures»: cd %USERPROFILE%\Pictures\rename
- Type the following command to view the files in the location and press Enter: dir
- Type the following command to rename the file and press Enter: ren «OLD-FILENAME.EXTENSION» «NEW-FILENAME.EXTENSION»
In the command, replace «OLD-FILENAME.EXTENSION» and «NEW-FILENAME.EXTENSION» with the old and new file names. The quotation marks are only necessary if the title includes spaces. For instance, this command renames the file to «summer_trip_23_notes.txt»: ren summer_trip_23_notes.txt summer_vacation_23_notes.txt
- Repeat step 5 to change the name of the remaining files.
Once you complete these steps, Command Prompt will rename the file with the new name.
Rename multiple files
To rename multiple files in bulk with the same name structure with Command Prompt, use these steps:
- Open Start.
- Search for Command Prompt and click the top result to open the app.
- Type the following command example to navigate to the folder with the files to rename, and press Enter: cd c:\PATH\TO\FILES
For example, this example opens the «rename» folder inside «Pictures»: cd %USERPROFILE%\Pictures\rename
- (Optional) Type the following command to view the files in the location and press Enter: dir
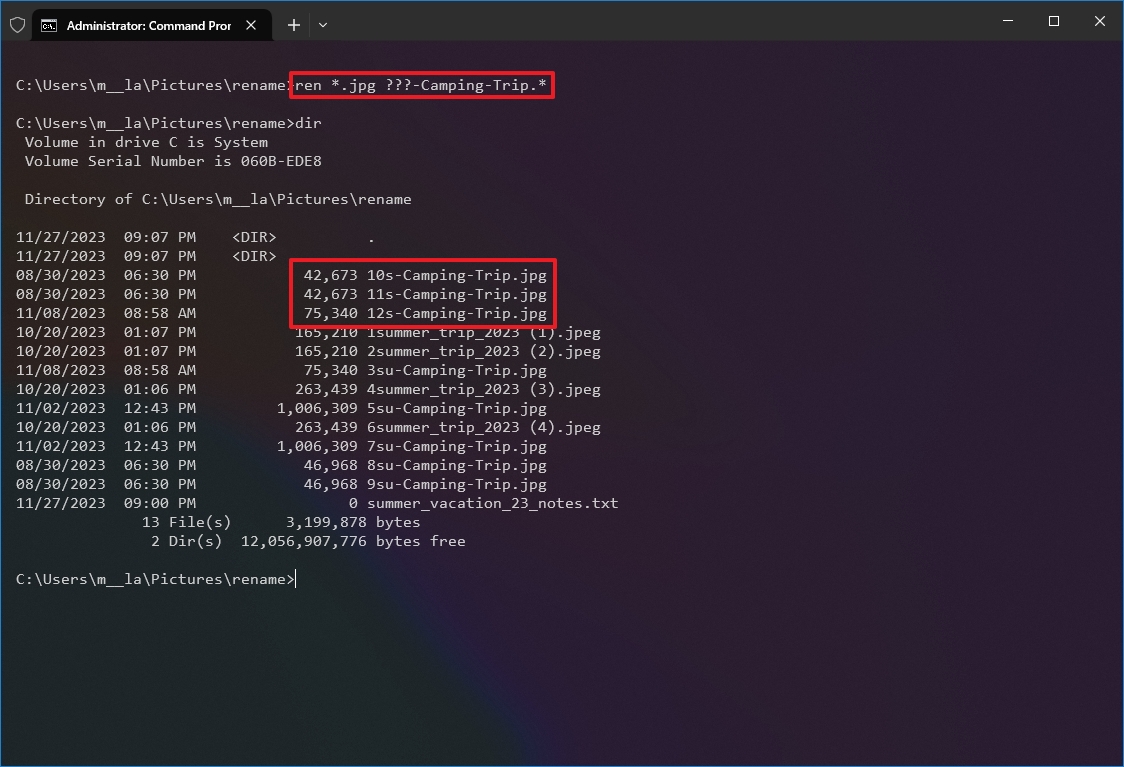
- Type the following command to rename the files in bulk and press Enter: ren *.FILE-EXTENSION ???-FILE-NAME.*
In the command, replace «FILE-EXTENSION» with the extension to change and «FILE-NAME» with part of the name to add to the files. The asterisk (*) is a wildcard that tells the ren command to rename everything with a specific extension. The question mark (?) is also a wildcard, but it represents a character of the original name you want to keep as part of the new name. For example, this command renames all «.jpg» files, leaving the first three characters (which works as a unique identifier to avoid duplication), and appends «-Camping-Trip» to the name: ren *.jpg ???-Camping-Trip.*
- Quick tip: When renaming files, the «ren» command sees a period (.) as the end of the filename. The command may produce unexpected results if you have files with a period as part of the name.
After you complete the steps, the files will be renamed using the settings you specified.
Trim multiple file names
To make file names shorter with Command Prompt on Windows 10, use these steps:
- Open Start.
- Search for Command Prompt and click the top result to open the app.
- Type the following command example to navigate to the folder with the files to rename, and press Enter: cd c:\PATH\TO\FILES
This example opens the «rename» folder inside «Pictures»: cd %USERPROFILE%\Pictures\rename
- (Optional) Type the following command to view the files in the location and press Enter: dir
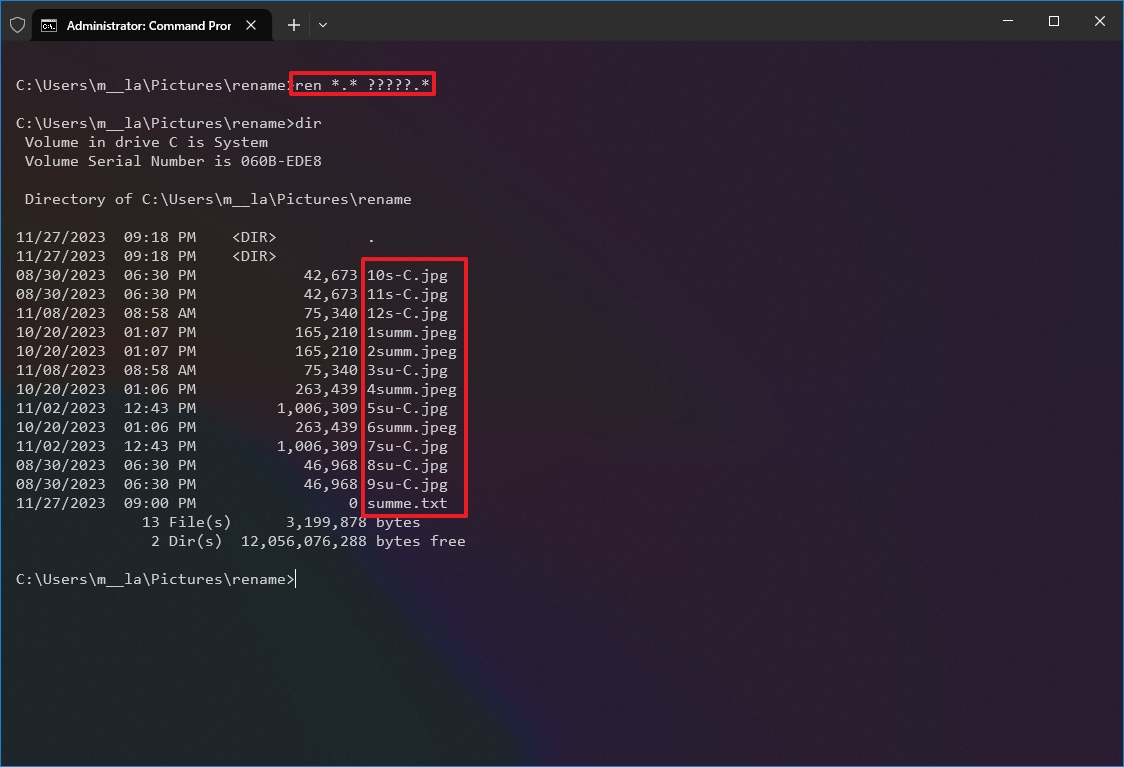
- Type the following command to make file names shorter and press Enter: ren *.* ?????.*
In the command, the asterisk (*) matches all the file names and extensions in the folder, and the question marks (?) indicate how many characters to use for the new file name. For instance, this command trims the file names longer than five characters: ren *.* ?????.*
- Quick note: If the file name has fewer than five characters, the name will not change. (If you want to shorten the file name, add extra question marks in the syntax.)
Once you complete these steps, the command will run and shorten the file name, depending on the question marks (?) available in the command.
Modify multiple file names
To rename part of the name on similar files on Windows 10, use these steps:
- Open Start.
- Search for Command Prompt and click the top result to open the app.
- Type the following command example to navigate to the folder with the files to rename, and press Enter: cd c:\PATH\TO\FILES
This example opens the «rename» folder inside «Pictures»: cd %USERPROFILE%\Pictures\rename
- (Optional) Type the following command to view the files in the location and press Enter: dir
- Type the following command to rename the part of the file name and press Enter: ren OLD-FILE-NAME-PART*.* NEW-FILENAME-PART*.*
In the command, replace «OLD-FILE-NAME-PART» and «NEW-FILENAME-PART» with the old and new parts of the filename. The asterisk (*) is a wildcard that will match the rest of the filename and file extension to append the new part of the name. For instance, this command renames files that start with «summer_trip_23» to «vacation_2023»: ren summer_trip_23*.* vacation_2023*.*
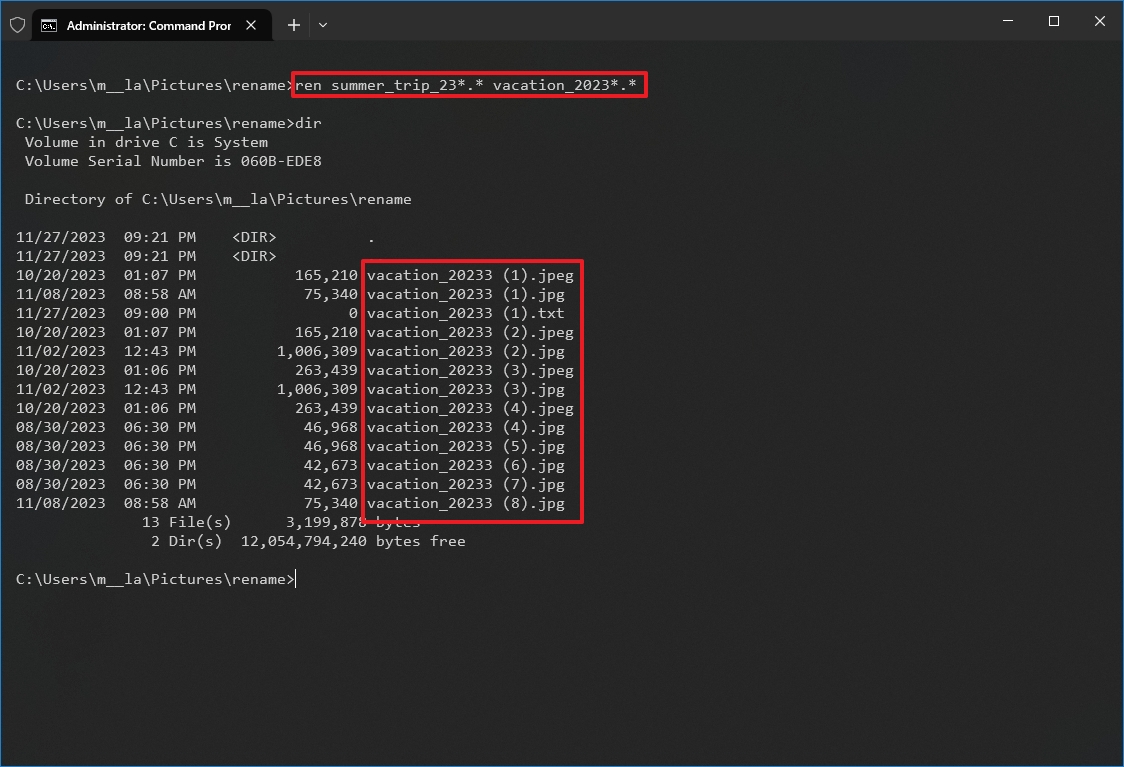
After you complete the steps, the command will modify those files like the new name structure available in the command.
Change file extension
To change the file extension to another, use these steps:
- Open Start.
- Search for Command Prompt and click the top result to open the app.
- Type the following command example to navigate to the folder with the files you want to rename and press Enter: cd c:\PATH\TO\FILES
This example opens the «rename» folder inside «Pictures»: cd %USERPROFILE%\Pictures\rename
- (Optional) Type the following command to view a listing of the files in the location and press Enter: dir
- Type the following command to change the file extension and press Enter: ren *.OLD-EXTENSION *.NEW-EXTENSION
In the command, change «OLD-EXTENSION» and «NEW-EXTENSION» with the old and new file extensions. For example, this command changes the extension from «.txt» to «.doc» compatible with Microsoft Word for the files in the location: ren *.txt *.doc
This example without wildcards (*) changes the only extension of a single file from «.txt» to «.doc»: ren vacation_2023_notes.txt vacation_2023_notes.doc
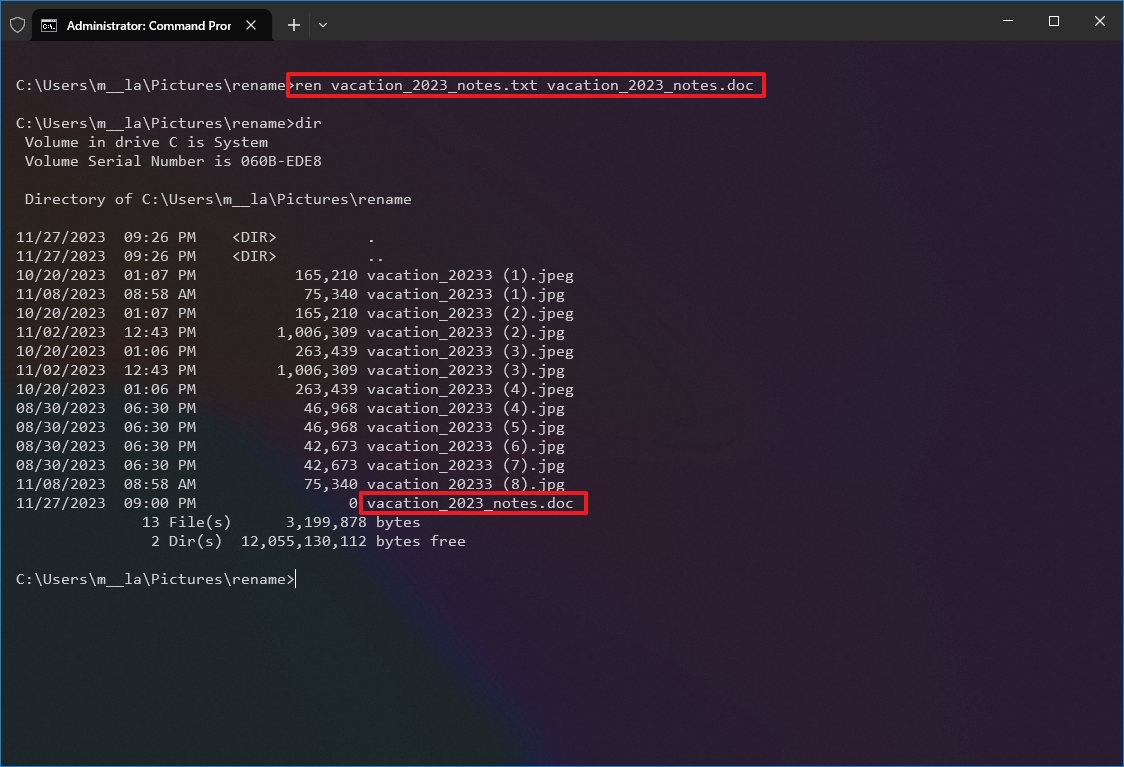
Once you complete the steps, the file extension will be changed to the new extension in the command.
Rename files with specific extensions
The previous steps rename every file within the location. However, if you want to rename only a group of files with a specific format, you must omit the asterisk (*) and specify the command’s target extension.
To rename files with a specific file extension with Command Prompt, use these steps:
- Open Start.
- Search for Command Prompt and click the top result to open the app.
- Type the following command example to navigate to the folder with the files to rename, and press Enter: cd c:\PATH\TO\FILES
This example opens the «rename» folder inside «Pictures»: cd %USERPROFILE%\Pictures\rename
- (Optional) Type the following command to view the files in the location and press Enter: dir
- Type the following command to change the file extension in the location and press Enter: ren OLD-FILE-NAME*.EXTENSION NEW-FILE-NAME*.EXTENSION
In the command, change «OLD-FILE-NAME,» «NEW-FILE-NAME,» and «EXTENSION» with the old and new file name and extension. For instance, this command only renames images with a «.jpg» extension: ren picture-*.jpg vacation*.jpg
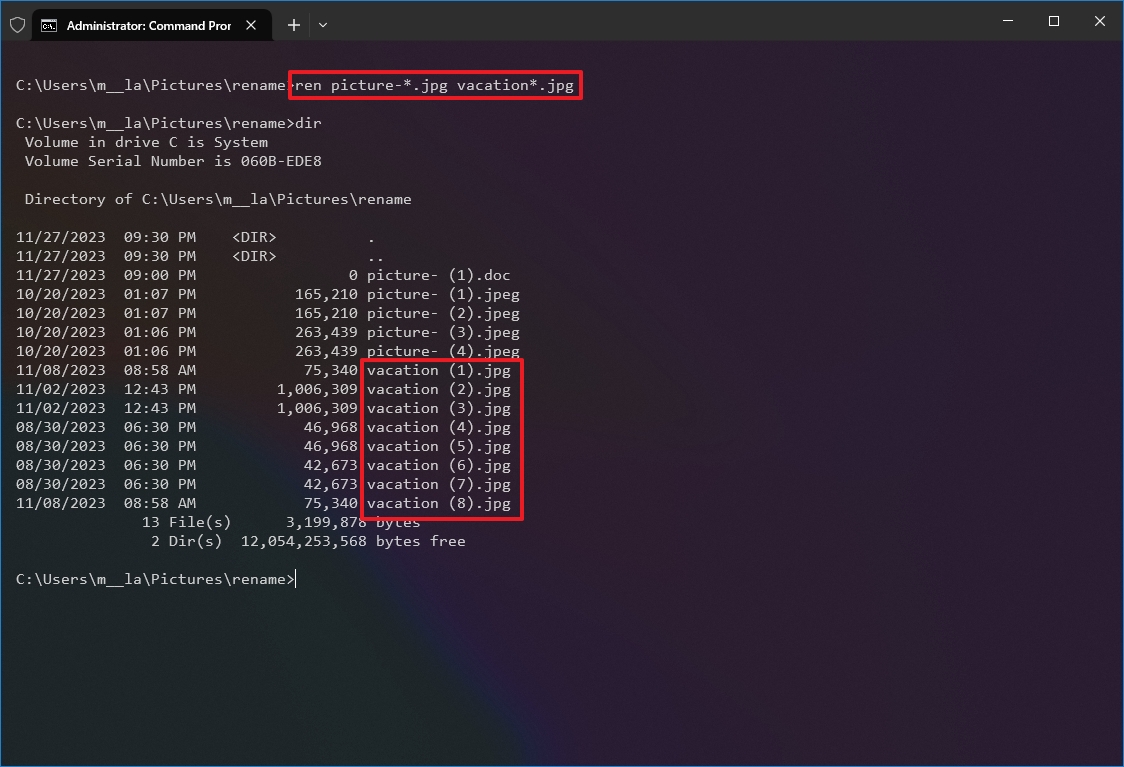
After you complete the steps, Command Prompt will rename the files using the specified options.
How to rename multiple files using PowerShell
On Windows 10, you can also use PowerShell to rename multiple files. Although you have many ways to manipulate files using this tool, the instructions in this guide are only meant to get started with the most common scenarios.
Rename single file
To rename only one file with a PowerShell command, use these steps:
- Open Start.
- Search for PowerShell and click the top result to open the app.
- Type the following command example to navigate the folder with the files to rename and press Enter: cd PATH\TO\FOLDER
In the command, replace «PATH\TO\FOLDER» with the actual path to the location. For example, this command navigates the «rename» folder inside «Pictures»: cd C:\Users\USERNAME\Pictures\rename
- (Optional) Type the following command to view the files in the location and press Enter: ls
- Type the following command to change the name of a single file and press Enter: Rename-Item «OLD-FILE-NAME.EXTENSION» «NEW-FILE-NAME.EXTENSION»
In the command, specify the old and new file names and extensions. The quotation marks are only required if the name includes spaces. For instance, this command renames the file to «hiking_trip_2023_notes.txt»: Rename-Item summer_trip_23_notes.txt hiking_trip_2023_notes.txt
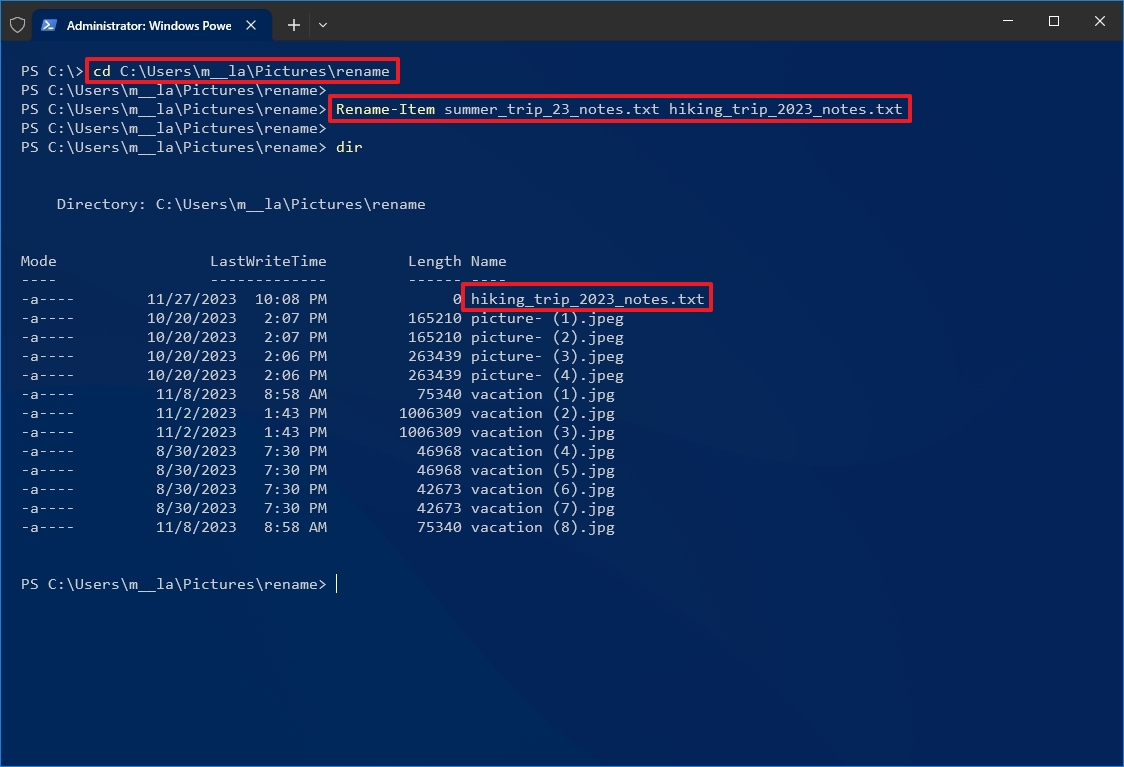
- Repeat step 5 to continue renaming other files.
Once you complete the steps, the command will change the specified file name.
Rename multiple files in bulk
To rename multiple files in bulk when the name structure is not important, use these steps:
- Open Start.
- Search for PowerShell and click the top result to open the app.
- Type the following command example to navigate to the folder with the files to rename and press Enter: cd PATH\TO\FOLDER
In the command, replace «PATH\TO\FOLDER» with the actual path to the location. For example, this command navigates the «rename» folder inside «Pictures»: cd C:\Users\USERNAME\Pictures\rename
- (Optional) Type the following command to view a listing of the files in the location and press Enter: ls
- Type the following command to rename multiple files in bulk and press Enter: ls | %{Rename-Item $_ -NewName («NEW-FILE-NAME-{0}.EXTENSION» -f $nr++)}
In the command, replace «NEW-FILE-NAME» with the structure name you want to use. For example, this command renames images with a «.jpg» extension using the same («beach-trip-2023-«) naming structure and appends a different number at the end of the name: ls | %{Rename-Item $_ -NewName («beach-trip-2023-{0}.jpg» -f $nr++)}
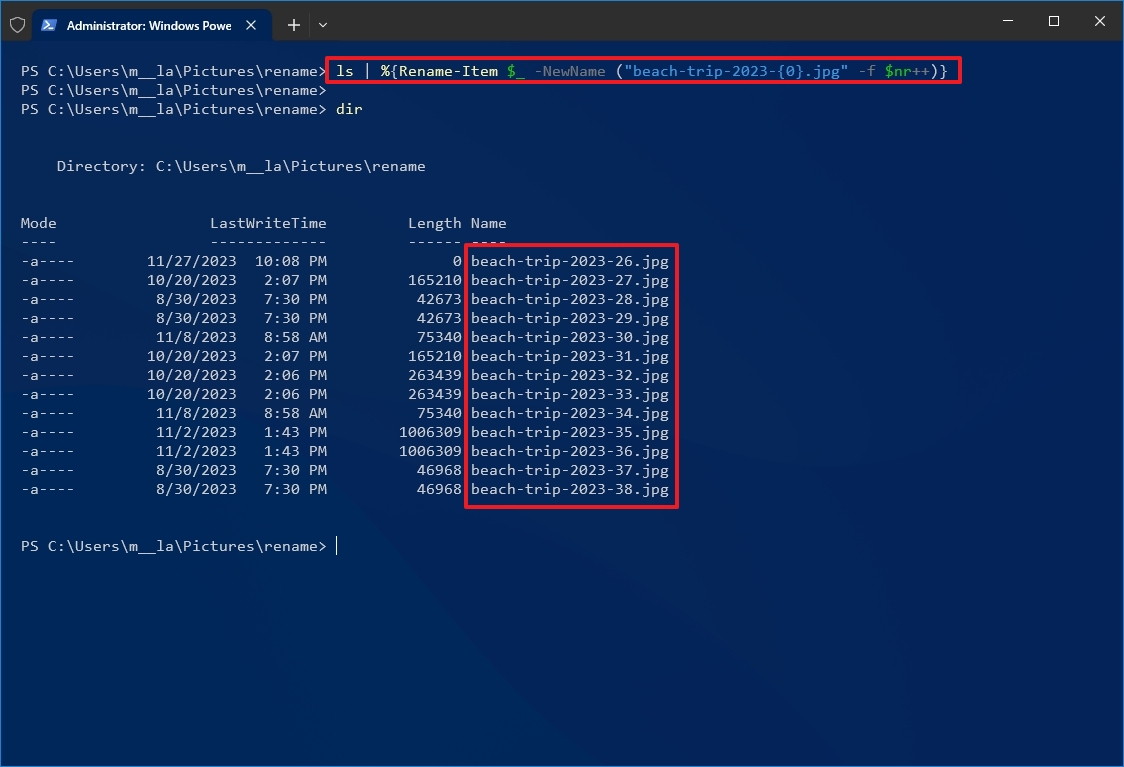
After you complete these steps, the files with the specified format will be renamed using the structure available with the command.
Trim multiple file names
To make file names shorter or trim part of the names by an «N» number of characters, use these steps:
- Open Start.
- Search for PowerShell and click the top result to open the app.
- Type the following command example to navigate the folder with the files to rename and press Enter: cd PATH\TO\FOLDER
In the command, replace «PATH\TO\FOLDER» with the actual path to the location. For example, this command navigates the «rename» folder inside «Pictures»: cd C:\Users\USERNAME\Pictures\rename
- (Optional) Type the following command to view the files in the location and press Enter: ls
- Type the following command to rename files using shorter names and press Enter: ls | Rename-Item -NewName {$_.name.substring(0,$_.BaseName.length-N) + $_.Extension}
In the command, inside «$_.BaseName.length-N» update the value of «N» to specify the number of characters to remove. For instance, this command trims the name of your files by eight characters: ls | Rename-Item -NewName {$_.name.substring(0,$_.BaseName.length-8) + $_.Extension}
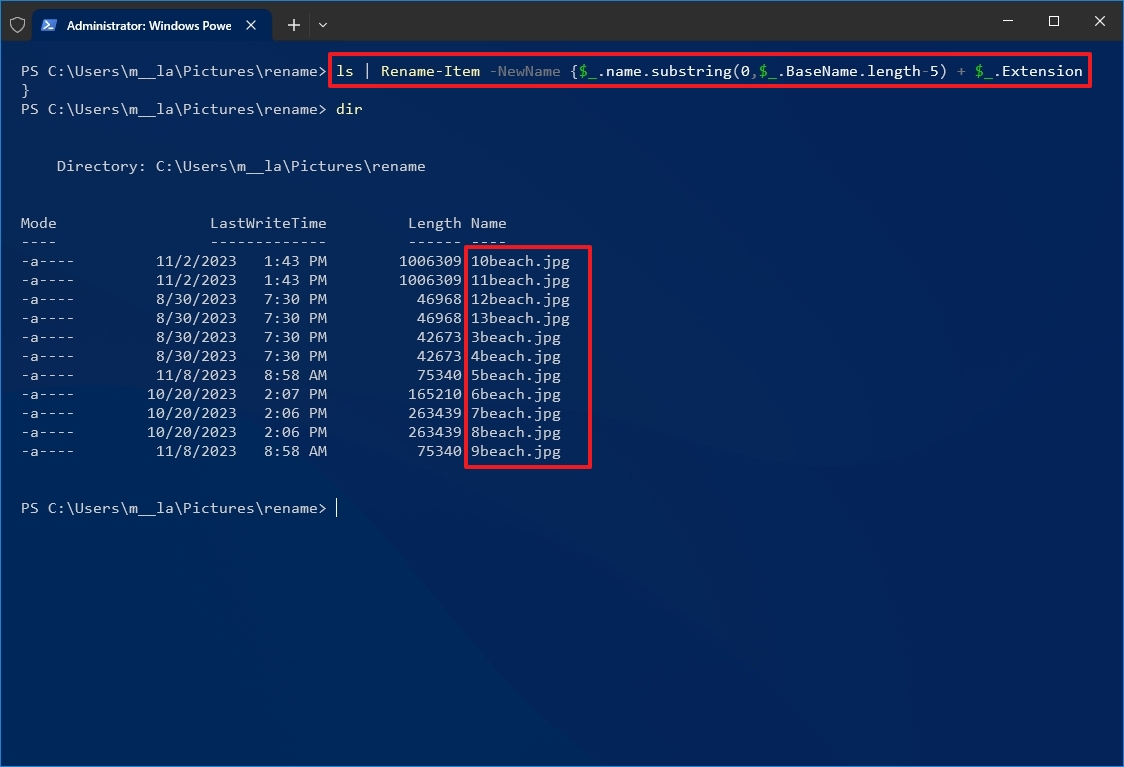
Once you complete these steps, the files in the location will have shorter names (right to left), depending on the specified length.
Delete part of the name from multiple files
To remove part of the file name on multiple files with PowerShell commands, use these steps:
- Open Start.
- Search for PowerShell and click the top result to open the app.
- Type the following command example to navigate to the files to rename and press Enter: cd PATH\TO\FOLDER
In the command, replace «PATH\TO\FOLDER» with the actual path to the location. For example, this command navigates the «rename» folder inside «Pictures»: cd C:\Users\USERNAME\Pictures\rename
- (Optional) Type the following command to view the files in the location and press Enter: ls
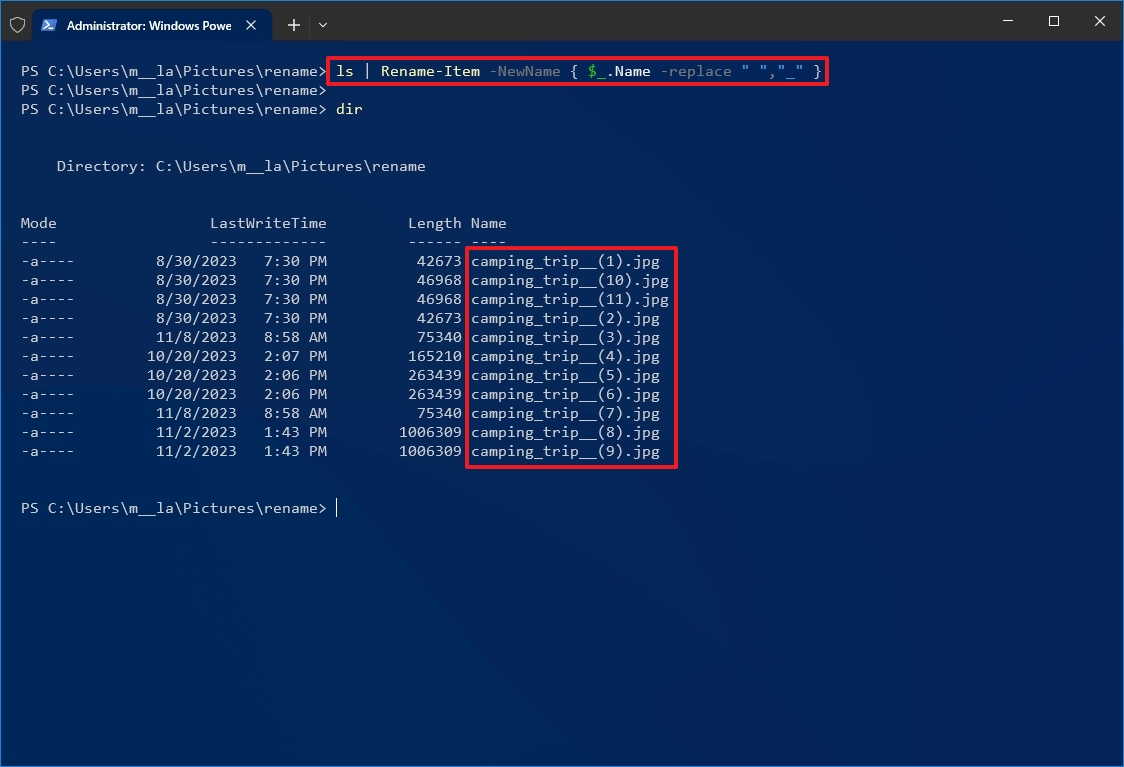
- Type the following command to remove part of the file name and press Enter: ls | Rename-Item -NewName {$_.name -replace «OLD-FILE-NAME-PART»,»»}
In the command, replace «OLD-FILE-NAME-PART» with the actual part of the name you want to replace. For instance, this command removes the word «trip» from the name of all files in the folder: ls | Rename-Item -NewName {$_.name -replace «beach»,»»}
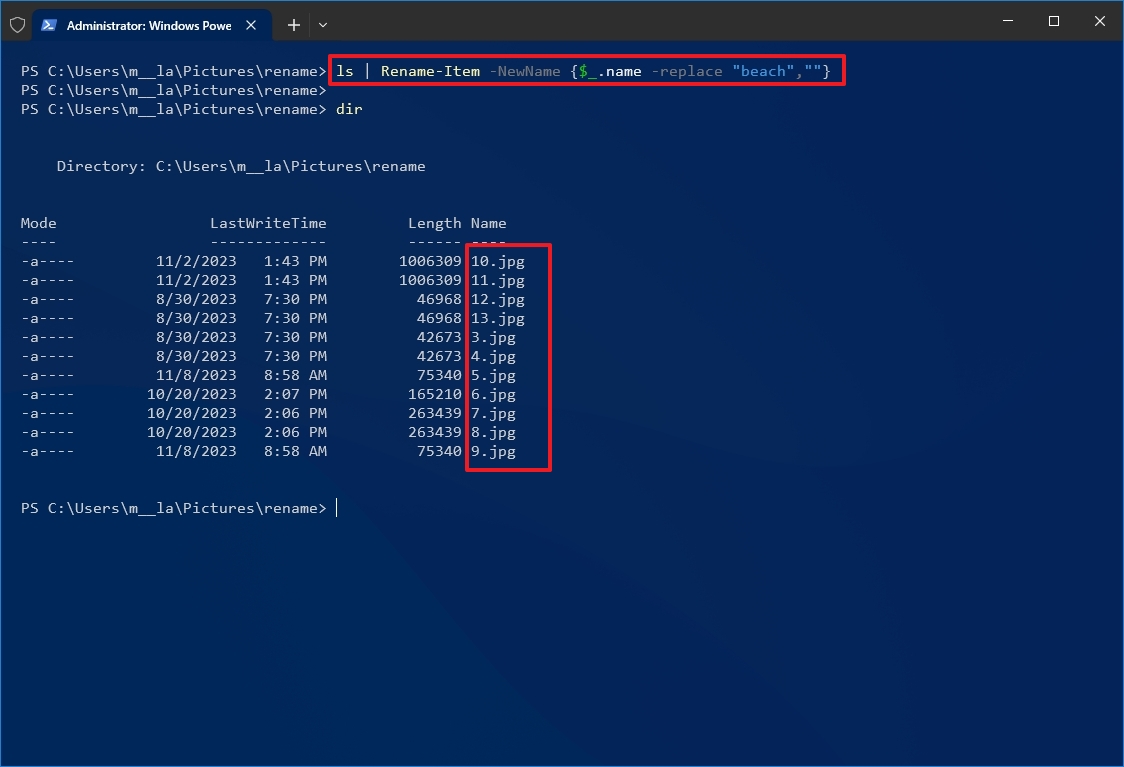
After you complete the steps, the command will remove the file name part as specified in the command.
Replace part of the name from multiple files
To rename the same part of the file name, use these steps:
- Open Start.
- Search for PowerShell and click the top result to open the app.
- Type the following command example to navigate to the folder with the files to rename and press Enter: cd PATH\TO\FOLDER
In the command, replace «PATH\TO\FOLDER» with the actual path to the location. For example, this command navigates the «rename» folder inside «Pictures»: cd C:\Users\USERNAME\Pictures\rename
- (Optional) Type the following command to view a listing of the files in the location and press Enter: ls
- Type the following command to replace part of file name and press Enter: ls | Rename-Item -NewName {$_.name -replace «OLD-FILE-NAME-PART»,»NEW-FILE-NAME-PART»}
In the command, replace «OLD-FILE-NAME-PART» and «NEW-FILE-NAME-PART» with the old and new parts of the file name. For example, this command replaces the word «vacation_» for «camping_trip_» in the file name: ls | Rename-Item -NewName {$_.name -replace «vacation_«,»camping_trip_»}
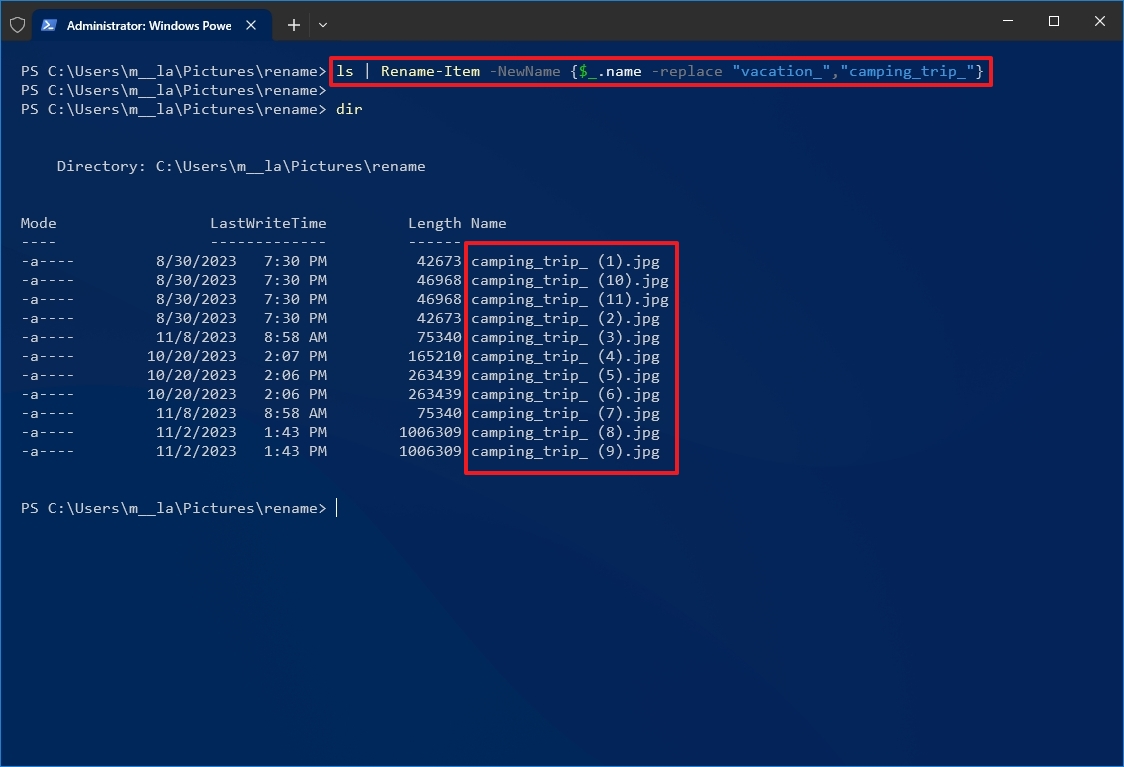
Once you complete these steps, the command will modify the file names with the replacement you specified in the command.
Remove spaces from multiple files
The space character as part of the file name can sometimes cause problems, even more so when using commands. If you have files with spaces in their names, you can use PowerShell to replace the character for a visual separator, such as a dash or underscore symbol.
To remove and replace spaces with underscores in filenames with PowerShell, use these steps:
- Open Start.
- Search for PowerShell and click the top result to open the app.
- Type the following command example to navigate to the folder with the files to rename and press Enter: cd PATH\TO\FOLDER
In the command, replace «PATH\TO\FOLDER» with the actual path to the location. For example, this command navigates the «rename» folder inside «Pictures»: cd C:\Users\USERNAME\Pictures\rename
- (Optional) Type the following command to view the files in the location and press Enter: ls
- Type the following command to remove spaces from file name and press Enter: ls | Rename-Item -NewName { $_.Name -replace » «,»SEPARATOR» }
In the command, make sure to replace «SEPARATOR» with the symbol instead of a space. For instance, this command replaces spaces with underscores in the files: ls | Rename-Item -NewName { $_.Name -replace » «,»_» }
After you complete the steps, the spaces will be replaced with the separator indicated in the command.
Change file extension
To change the file extension for a bunch of files with PowerShell, use these steps:
- Open Start.
- Search for PowerShell and click the top result to open the app.
- Type the following command example to navigate to the folder with the files to rename and press Enter: cd PATH\TO\FOLDER
In the command, replace «PATH\TO\FOLDER» with the actual path to the location. For example, this command navigates the «rename» folder inside «Pictures»: cd C:\Users\USERNAME\Pictures\rename
- (Optional) Type the following command to view the files in the location and press Enter: ls
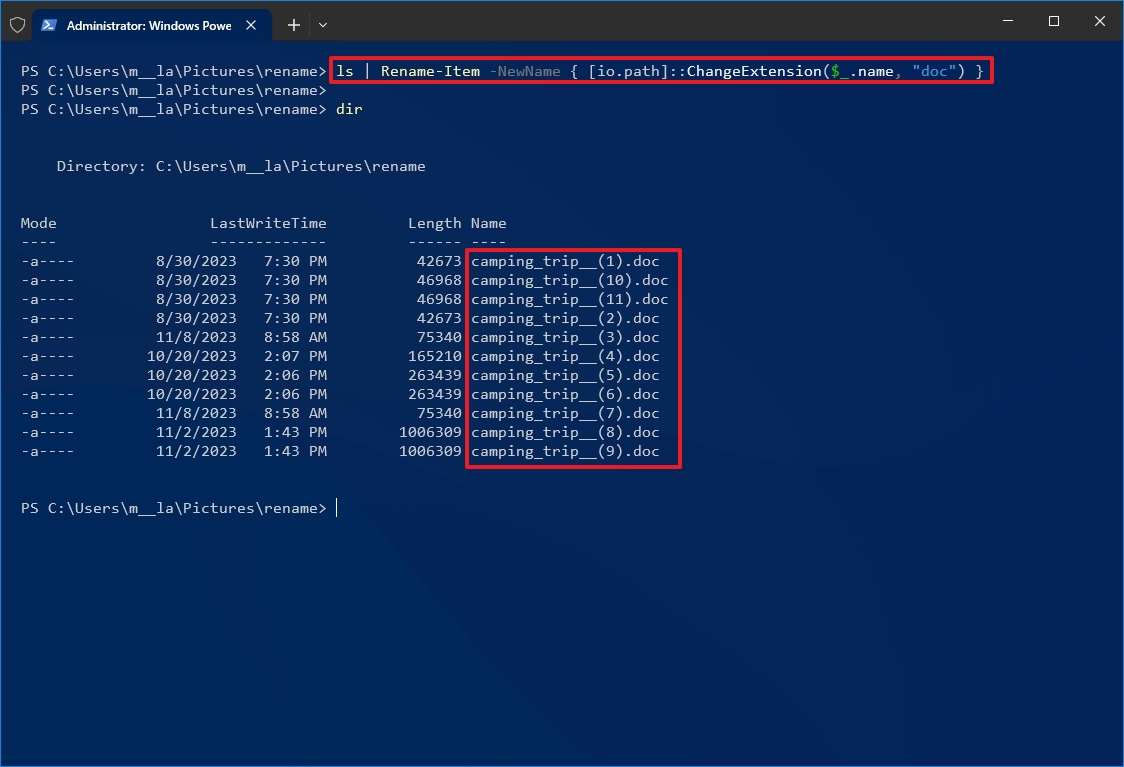
- Type the following command to change the extension on files and press Enter: ls | Rename-Item -NewName { [io.path]::ChangeExtension($_.name, «.NEW-EXTENSION») }
In the command, replace «.NEW-EXTENSION» with a new file extension. For instance, this command changes any file extension to «.doc»: ls | Rename-Item -NewName { [io.path]::ChangeExtension($_.name, «doc») }
Once you complete the steps, PowerShell will change the extension for the files in the folder location.
Rename specific extension file names
The above instructions will rename every file within the folder. However, if you want to change the name of a specific file format, such as documents, pictures, or videos, you can use the «-filter» option.
To change the names of a specific file format with PowerShell commands on Windows 10, use these steps:
- Open Start.
- Search for PowerShell and click the top result to open the app.
- Type the following command example to navigate to the folder with the files to rename and press Enter: cd PATH\TO\FOLDER
In the command, replace «PATH\TO\FOLDER» with the actual path to the location. For example, this command navigates the «rename» folder inside «Pictures»: cd C:\Users\USERNAME\Pictures\rename
- (Optional) Type the following command to view the files in the location and press Enter: ls
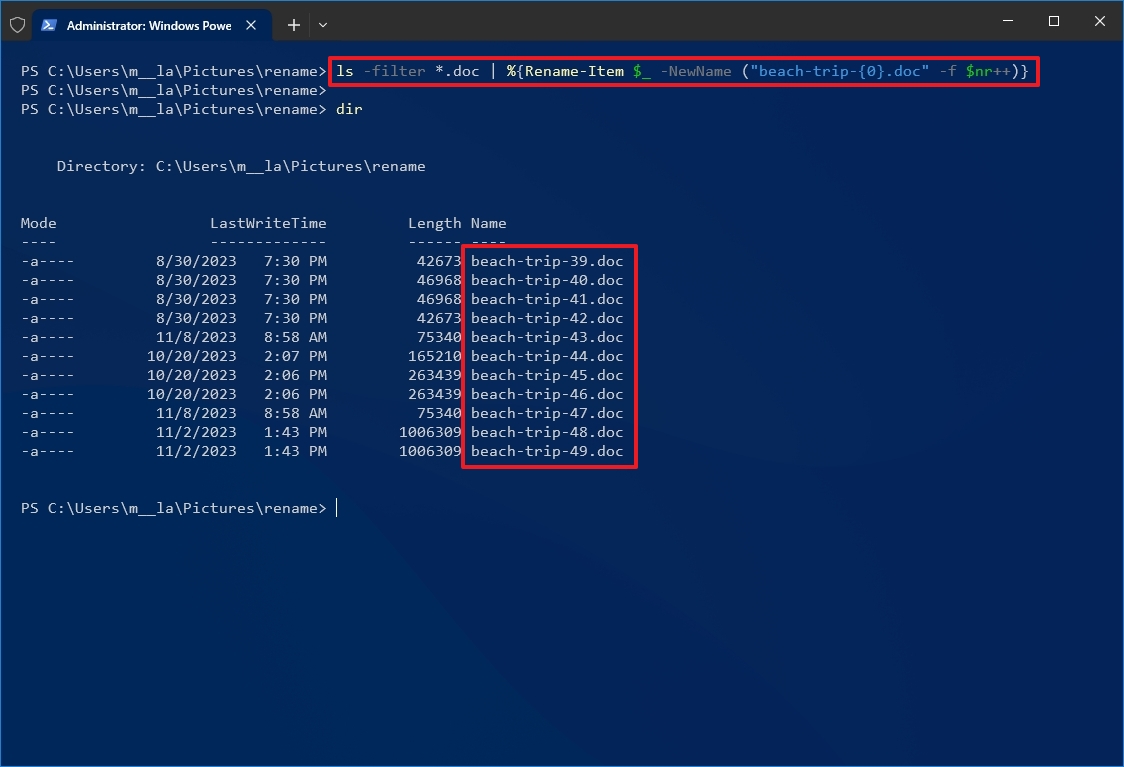
- Type the following command to rename files with a specific extension and press Enter: ls -filter *.EXTENSION | %{Rename-Item $_ -NewName («NEW-FILE-NAME-{0}.EXTENSION» -f $nr++)}
In the command, replace «NEW-FILE-NAME» and «EXTENSION» with the new parameter. For instance, this command renames only files that include the «.doc» extension: ls -filter *.doc | %{Rename-Item $_ -NewName («beach-trip-{0}.doc» -f $nr++)}
Once you complete the steps, PowerShell will rename the files with a specific extension specified in the command.
While these commands have been tested to work as expected, it is always recommended that you perform a test run before renaming the original files on your computer.
How to rename multiple files using PowerToys
On Windows 10, PowerToys is an advanced tool that adds many helpful productivity tools, including PowerRename, which makes it easier to rename files in bulk without using commands.
Install PowerToys
To install PowerToys on Windows 10, use these steps:
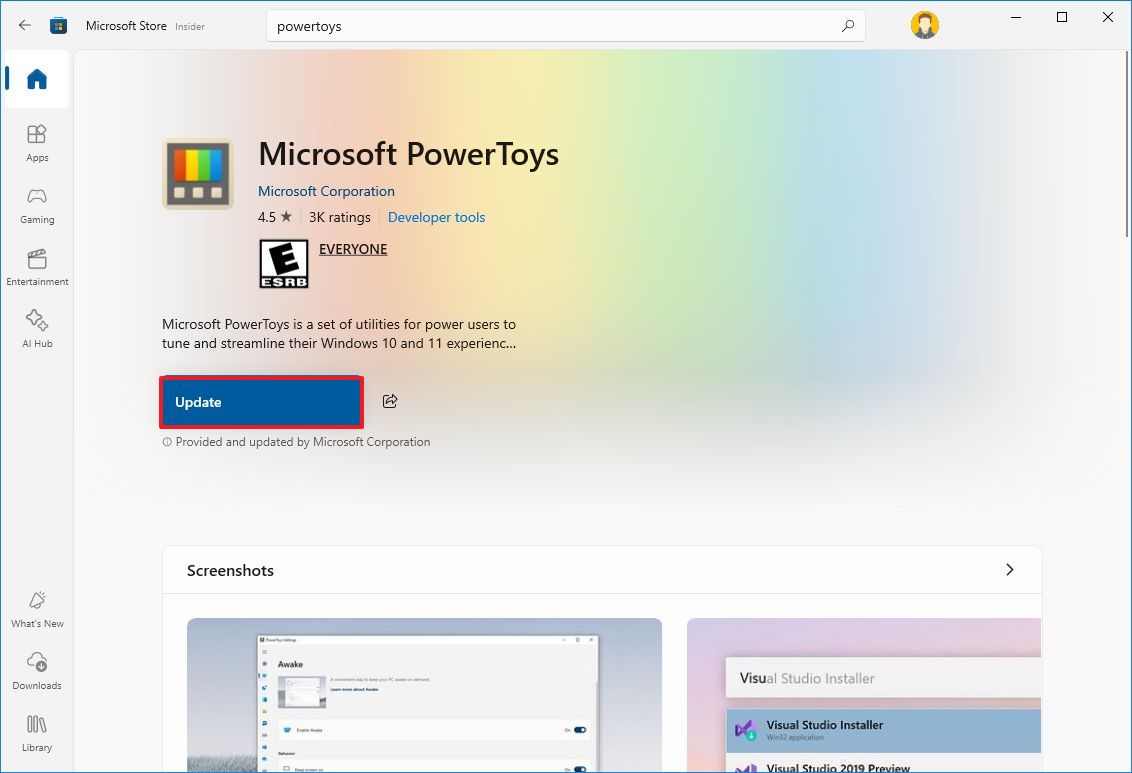
- Open the PowerToys app page.
- Click the View in Store button.
- Click the Install button.
- Open the PowerToys app.
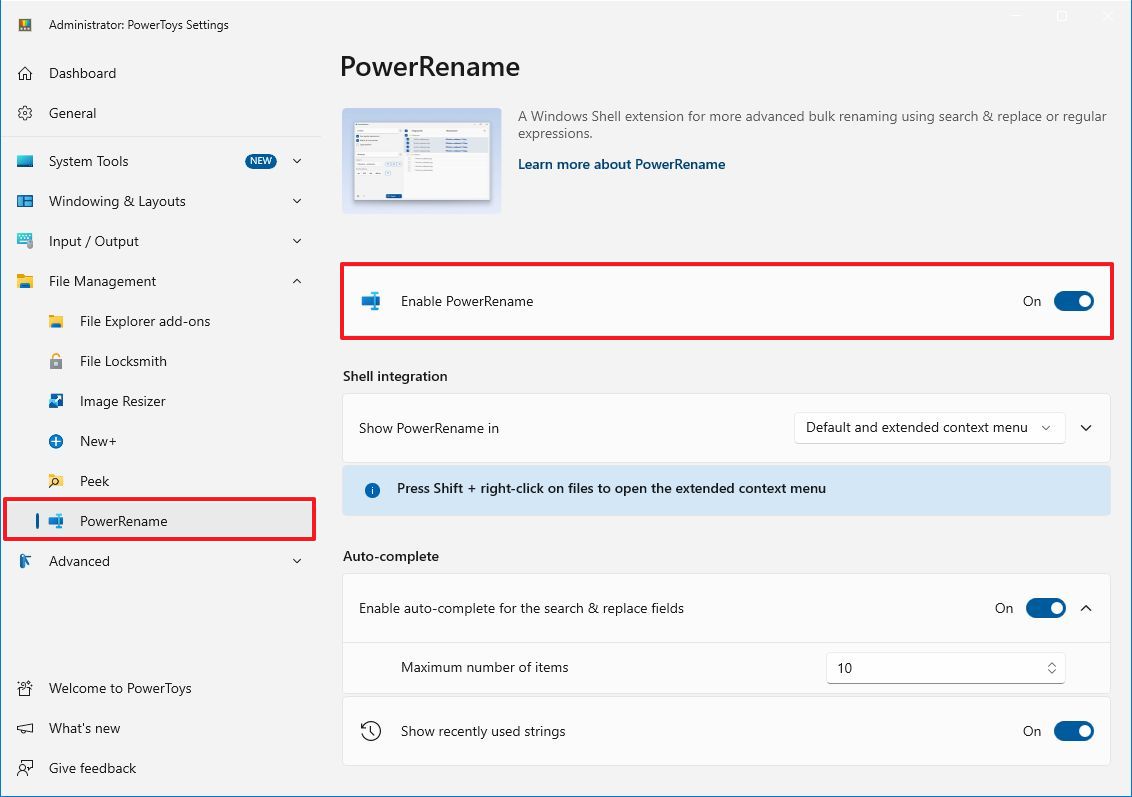
- Click on File Management on the left navigation pane.
- Click on PowerRename.
- Turn on the «Enable PowerRename» toggle switch (if applicable).
After you complete the steps, you can start using the tool to rename multiple files.
Rename files by matching partial name
To rename or replace part of the name of multiple files, use these steps:
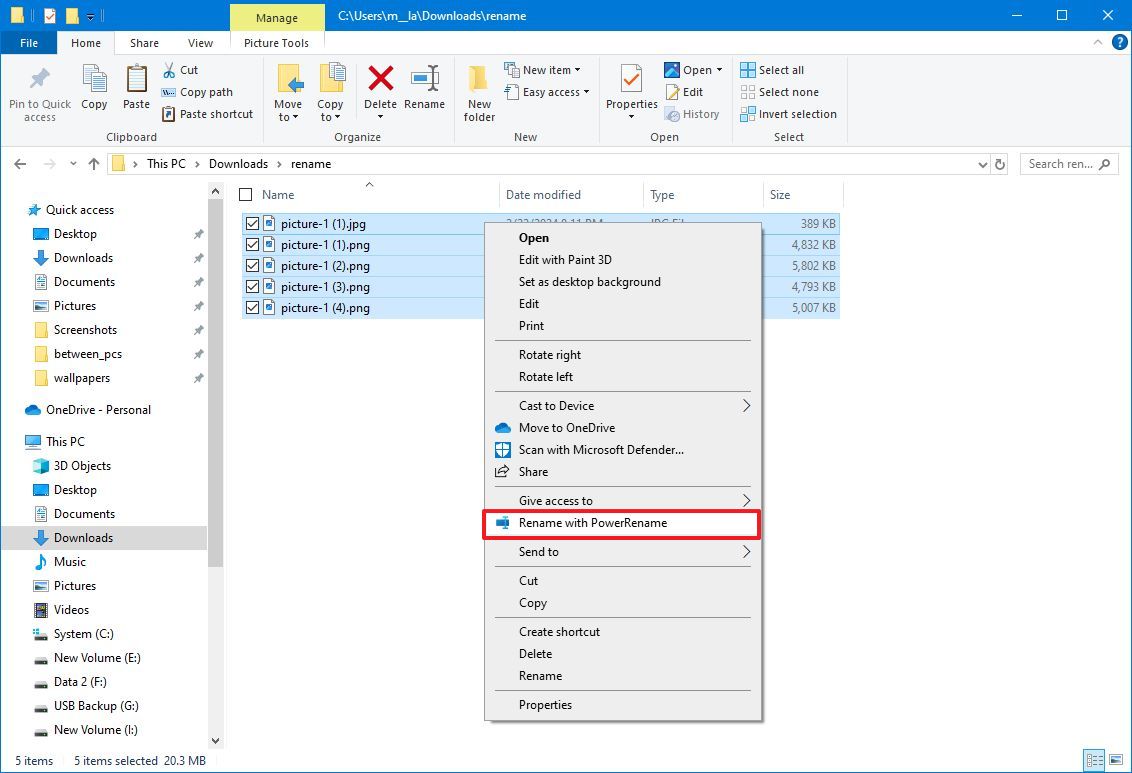
- Open File Explorer.
- Open the folder with the files to rename.
- Select the files to rename.
- Right-click the selection and choose the «Rename with PowerRename» option.
- In the «Search for» box, define the part to rename.
- In the «Replace with» box, specify the name structure you want to use for the files.
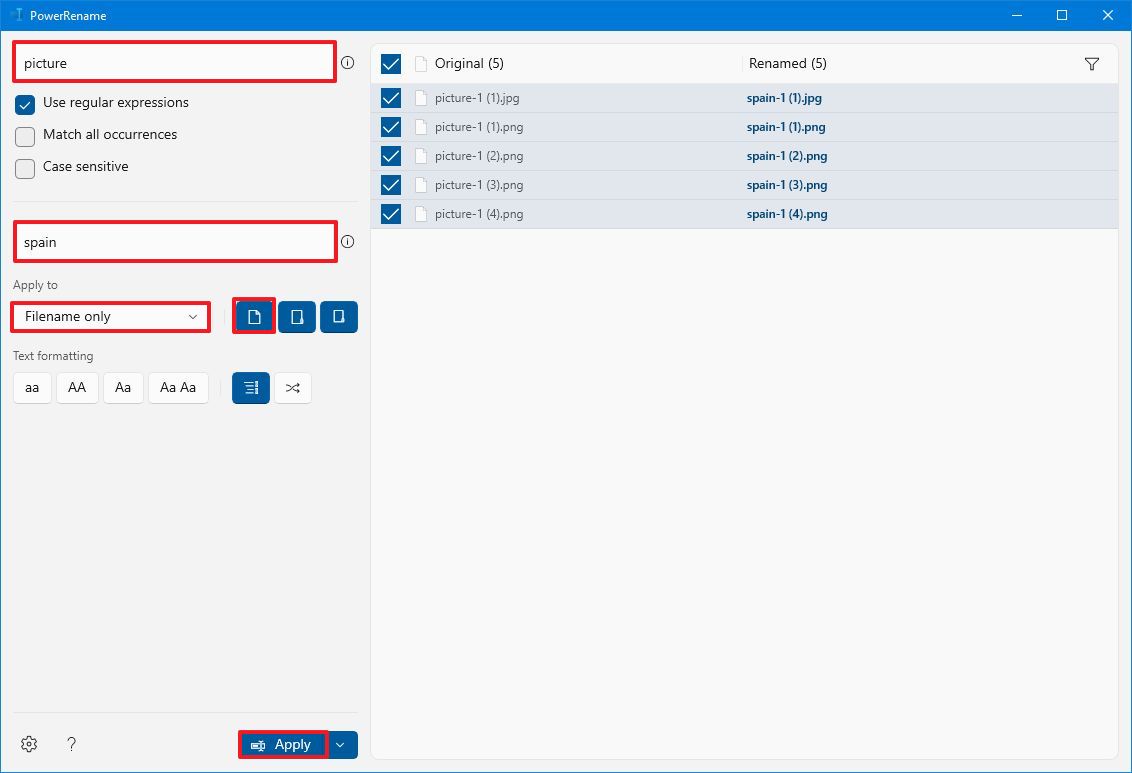
- Use the «Apply to» menu to confirm the part of the file name to change — for example, filename, extension, or both.
- Choose the content to rename, including files, folders, and subfolders, with the buttons on the right side.
- (Optional) Choose the text formatting, including lowercase, uppercase, and title case, or capitalize every word.
- (Optional) Choose the «Enumerate items» option to allow the files to have the same name but with a different number at the end.
- Confirm the preview on the right side.
- Click the Apply button.
Once you complete the steps, the files will be renamed according to your configuration.
Rename files by matching any name
To rename all the files without a common structure, use the steps:
- Open File Explorer.
- Open the folder with the files to rename.
- Select the files to rename.
- Right-click the selection and choose the «Rename with PowerRename» option.
- In the «Search for» box, use the (.*) regular expression to match all the files.
- Check the «Use regular expressions» option.
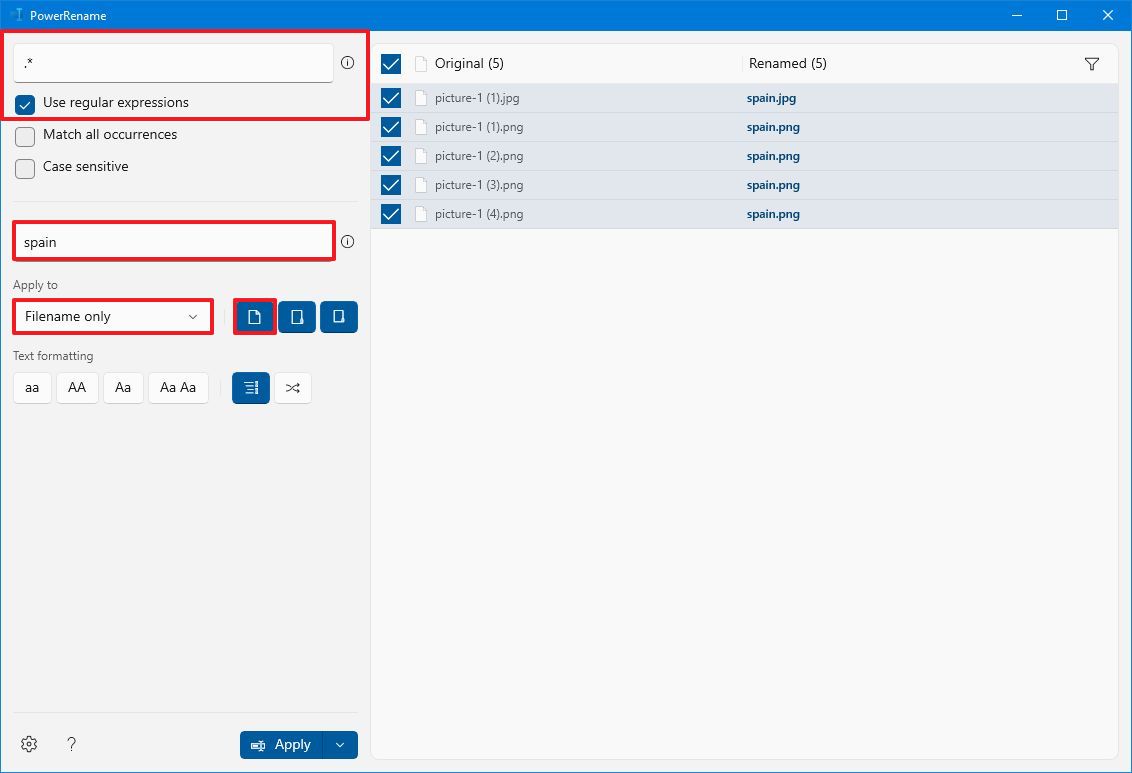
- In the «Replace with» box, specify the name structure you want to use for the files.
- Click the «File creation date and time help» button on the right side and select help to enumerate the files, since they will have the same base name – for example, «$ff» to add two-millisecond digits.
- Use the «Apply to» menu to select the Filename only option.
- Choose the content to rename, including files, folders, and subfolders, with the buttons on the right side.
- (Optional) Choose the text formatting, including lowercase, uppercase, and title case, or capitalize every word.
- (Optional) Choose the «Enumerate items» option to allow the files to have the same name but with a different number at the end.
- Confirm the preview on the right side.
- Click the Apply button.
After you complete the steps, all the files in the list will be renamed to the base name you assigned them.
Rename files by appending description
To append a description to the file name, use the steps:
- Open File Explorer.
- Open the folder with the files to rename.
- Select the files to rename.
- Right-click the selection and choose the «Rename with PowerRename» option.
- In the «Search for» box, use the (\.) regular expression to match all the files.
- Check the «Use regular expressions» option.
- In the «Replace with» box, specify the description you want to add to files — for example, «spain.»
- Quick note: If you use this option, remember the period at the end of the description to prevent breaking the file extension.
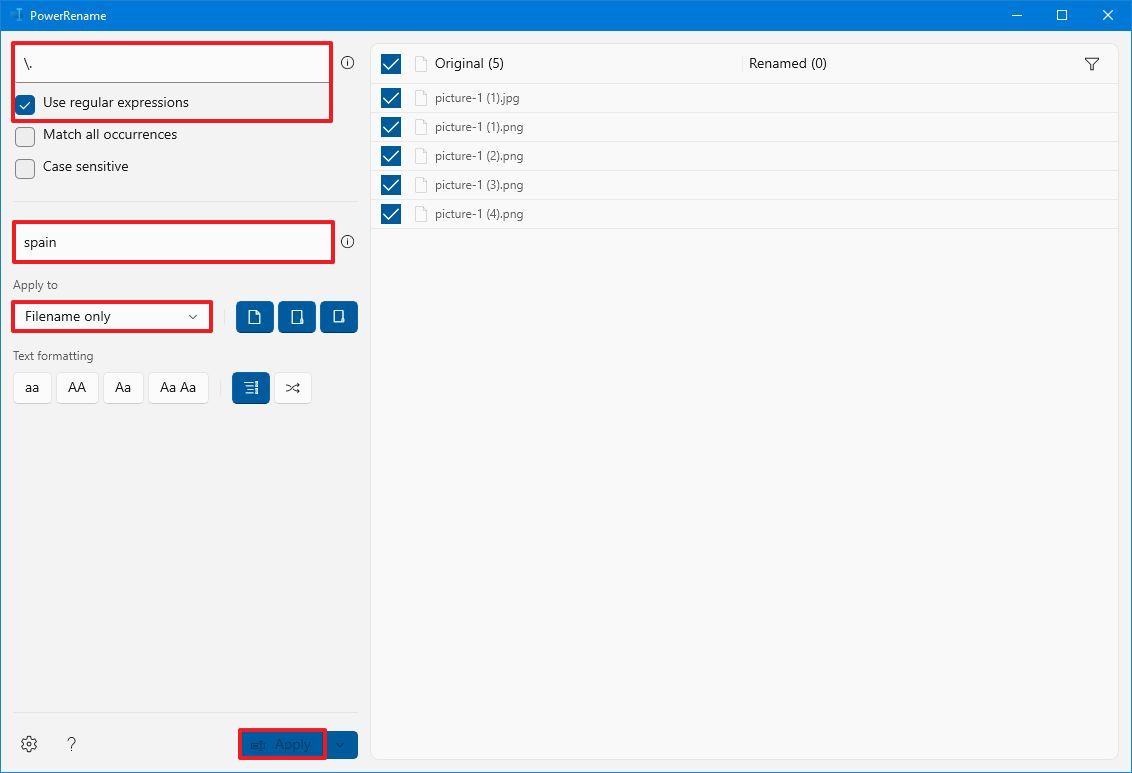
- Use the «Apply to» menu to the Filename + extension option.
- Choose the content to rename, including files, folders, and subfolders, with the buttons on the right side.
- (Optional) Choose the text formatting, including lowercase, uppercase, and title case, or capitalize every word.
- (Optional) Choose the «Enumerate items» option to allow the files to have the same name but with a different number at the end.
- Confirm the preview on the right side.
- Click the Apply button.
Change file extension
To change the file extension of multiple files with PowerToys, use these steps:
- Open File Explorer.
- Navigate to the folder with the files to rename.
- Select the files to rename.
- Right-click the selection and choose the «Rename with PowerRename» option.
- In the «Search for» box, confirm the extension to replace — for example, jpg.
- In the «Replace with» box, confirm the new compatible extension — for example, jpeg.
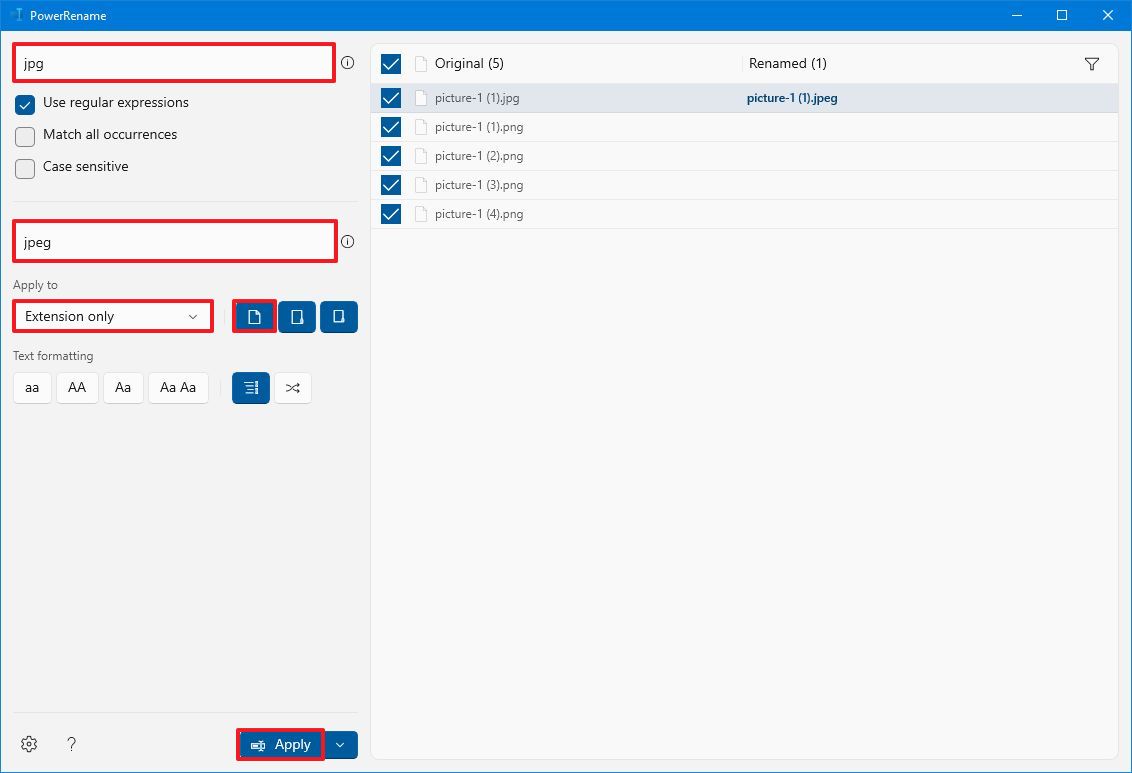
- Use the «Apply to» menu to select the «Extension only» option.
- Choose only the Include files option with the buttons on the right side.
- Click the Apply button.
Once you complete the steps, the file extension will change to the one you specified.
PowerToys PowerRename is a powerful tool that lets you manipulate file names virtually in any way you want using regular expressions. This Microsoft documentation page explains the options available for creating patterns to rename files.
More resources
For more helpful articles, coverage, and answers to common questions about Windows 10 and Windows 11, visit the following resources:
- Windows 11 on Windows Central — All you need to know
- Windows 10 on Windows Central — All you need to know
Mauro Huculak has been a Windows How-To Expert contributor for WindowsCentral.com for nearly a decade and has over 15 years of experience writing comprehensive guides. He also has an IT background and has achieved different professional certifications from Microsoft, Cisco, VMware, and CompTIA. He has been recognized as a Microsoft MVP for many years.
You can rename files on Windows 11 by using the Rename function. Right-click on any file or folder you want to rename and select Rename. You can also use the F2 key for the same. What if you have to rename bulk files? Renaming multiple files by using the F2 key or right-click is time-consuming. In this article, I will show you how to rename multiple files or folders at once in Windows 11.

Here, I will discuss the following scenarios to rename multiple files or folders at once in Windows 11:
- Add text to the beginning of the file or folder name
- Add text at the end of the file or folder name
- Rename multiple files or folders at once with sequential numbers
- Rename multiple files or folders at once with different names
Let’s start. Before proceeding, back up all your files or folders you want to rename. All the methods explained below apply to both files and folders.
1] Adding text to the beginning of a file or a folder name
Sometimes we need to rename multiple files with the same name in the beginning. Suppose you downloaded all episodes of your favorite series and saved all of them with the names, such as Episode 1, Episode 2, and so on. Now, you want to add the name of the series, say The Windows Club at the beginning so that the final names will be as such:
- The Windows Club Episode 1,
- The Windows Club Episode 2, etc.

You can do this by using two easy methods. Select all the files and right-click on the first file. In this case, the first file is Episode 1. Select Rename from the right-click context menu. Type the text you want to add to the beginning with space and hit Enter. The same trick will work for folders.
Alternatively, you can use the following PowerShell script:
DIR|rename-item -newname {"The Windows Club " +$_.name}

Open the directory where the files or folders you want to rename are located. Click on the Address Bar of File Explorer, type PowerShell, and hit Enter. This will launch PowerShell targeted to that directory. Now, type the above command. In this command, replace the text The Windows Club with the text you want.
Read: How to create multiple folders at once with different names in Windows 11
2] Adding text at the end of multiple files or folders
If you want to add the same text at the end of multiple files or folders, follow the steps provided below:

- Select all the files or folders you want to rename by adding the same text at the end.
- Right-click on any of those files or folders and select the Rename option.
- Type the required text at the end and press Enter.
All the files or folders will be renamed containing the same text in the end. This will not work if your files or folders have different names. In this case, you can use PowerToys.
You can use the PowerRename feature of Microsoft PowerToys to add the same text at the end of files or folders. The following instructions will guide you on this:

- Select all the files or folders you want to rename by adding a text at the end.
- Right-click and select the Rename with PowerRename option. This will launch the PowerRename app of PowerToys.
- You will see all the selected files or folders on the right side of PowerRename. Type $ in the first field.
- Select the Use regular expressions checkbox and Filename only in the Apply to drop-down.
- Type the required name in the second field.
- Click Apply.
3] Rename bulk folders or files at once with sequential numbers

To rename multiple files or folders with sequential numbers, select all the files or folders, right-click on any one of them, and type a new name, say The Windows Club. All the files or folders will be renamed to The Windows Club containing sequential numbers in the end. Do note that this method will rename all your files with the same name.
4] Rename multiple files or folders at once with different name
If you want to rename files or folders with different names, use the following command:
ren "old name" "new name"
The above command can be used to rename only one file or folder. Therefore, you have to create a batch file to use this command to rename multiple files or folders at once. You can easily do this with the help of Microsoft Excel. Open the directory where the files or folders you want to rename are located and copy its path.

Now, open your web browser and paste the copied path into its address bar. Hit Enter. This will open the directory in the web browser (as shown in the above image).

Copy the names from your web browser and paste them into Excel. The names will contain hyperlinks. Select all the cells, right-click, and select Remove Hyperlinks. Now, enter new names for each file with the same file extension or folder (refer to the above image). Now, make a new column for Quotation Marks and type one quotation mark in all cells of that column. Make a new column for the Rename command. Type ren in all cells of that column. Create one more column for space and type one space in all cells of that column.
To type the above command, you need to enter old and new names under quotation marks and enter one space between ren, old name, and new name. To combine values in different cells, the & function is used in Excel. Hence, the formula will be:
=<cell address of the quotation mark>&<cell address of old or new name>&<cell address of the quotation mark>

In this formula, write the correct cell address (refer to the above image). The above formula will give the output of old names and new names with quotation marks.
The complete command is:
ren "old name" "new name"

Create this command in Excel for each cell by selecting the correct cell number. For example, in my case, the command for the first name is:
=F2&G2&D2&G2&E2
In your case, the cell addresses may be different. Use the Fill Handle to fill the formula in all remaining empty cells.

Now, select all the cells of the complete command column and copy them. Open Notepad and paste the copied data. Save the Notepad file with the .bat extension. For example, rename.bat.

Run the .bat file by double-clicking on it. All the files or folders will be renamed as defined in the .bat file. You can use the same method to create a batch file to rename multiple folders at once.
Rename multiple files or folders by using free software
You can also use free bulk file renamer software to rename bulk files or folders.
Can you rename multiple folders at once?
Renaming multiple folders at once is possible on a Windows PC. You can do this via the right-click context menu or dedicated software. However, these methods will assign the same name with serial numbers. If you want to set different names for all folders at once, you need to create a batch script.
What is the shortcut key for renaming files in Windows 11?
The shortcut key to rename files or folders in Windows 11 is F2. Select the file or folder you want to rename and press the F2 function key. Now, type the required name and press Enter.
Read next: How to batch rename files and file extensions in Windows.
Normally, you can rename a file inside a folder in Windows 10 by following these steps:
- Right-click on the file you want to rename.
- Click on the Rename option.
- Type the new file name.
- Hit the Enter button and the file name will get changed.
However, the above method can be applied to rename only one or two files inside a folder. But what if you want to rename multiple files in a folder? Using the above method will consume lots of time as you will have to manually rename each file. It is also possible that the files you need to rename maybe thousands in number. So, it is not feasible to use the above method for renaming multiple files.
So, to solve the above problem and save time, Windows 10 comes with different ways by which you can make the renaming process easier.
For this, there are various third-party apps available in Windows 10. But, Windows 10 also provides several built-in methods for the same process if you do not prefer those third-party apps. There are basically three in-built ways available in Windows 10 by which you can do so and these are:
- Rename multiple files using the File Explorer.
- Rename multiple files using the Command Prompt.
- Rename multiple files with PowerShell.

Table of Contents
So, let us discuss each of them in detail. In the end, we have also discussed two third-party applications for the renaming purpose.
Method 1: Rename multiple files using the Tab key
File Explorer (previously known as the Windows Explorer) is a place where you can find all the folders and files that are available at different locations on your PC.
To rename multiple files using the Tab Key, follow these steps:
1. Open the File Explorer either from the taskbar or the desktop.
2. Open the folder whose files you want to rename.

3. Select the first file.

4. Press the F2 key to rename it. Your file name will be selected.
Note: If your F2 key performs some other function also, then press the combination of the Fn + F2 key.

Note: You can also perform the above step by right-clicking on the first file and selecting the rename option. The file name will be selected.

5. Type the new name you want to give to that file.
6. Click on the Tab button so that the new name will be saved and the cursor will automatically move to the next file to rename.
So, by following the above method, you just have to type a new name for the file and press the Tab button and all the files will be renamed with their new names.
Method 2: Rename Multiple Files using Windows 10 File Explorer
To rename multiple files in bulk on Windows 10 PC, follow these steps:
Note: This method is applicable if you want the same file name structure for every file.
1. Open the File Explorer either from the taskbar or the desktop.
2. Open the folder whose files you want to rename.
3. Select all the files you want to rename.
4. If you want to rename all the files available in the folder, press the Ctrl + A key.
5. If you want to rename random files, click on the file you want to rename and press and hold the Ctrl key. Then, one by one, select the other files you want to rename and when all the files are selected, release the Ctrl button.
6. If you want to rename the files present inside a range, click on the first file of that range and press and hold the Shift key and then, select the last file of that range and when all files are selected, release the Shift key.
7. Press the F2 key to rename the files.
Note: If your F2 key performs some other function also, then press the combination of the Fn + F2 key.

8. Type the new name of your choice.

9. Hit the Enter key.
All the selected files will be renamed and all the files will have the same structure and name. However, to differentiate between these files, as now, all the files will have the same name, you will notice a number inside the parentheses after the name of the file. This number is different for each file which will help you in differentiating between these files. Example: New Image (1), New Image (2), etc.
Also Read: Rename User Profile Folder in Windows 10
Method 3: Rename Multiple Files in Bulk using the Command Prompt
Command Prompt can also be used to rename multiple files in bulk in Windows 10. It is faster as compared to the other methods.
1. Simply, open the Command Prompt and then reach the folder containing the files you want to rename.

2. Now, reach the folder containing the files you want to rename using the cd command.

3. Alternatively, you can also navigate to the folder containing the files you want to rename and then, open the Command Prompt by typing cmd in the address bar.
4. Now, once the Command Prompt is open, you can use the ren command (the rename command) to rename multiple files:
Ren “Old-filename.ext” “New-filename.ext”
Note: Quotation marks are necessary if your file name has space. Otherwise, ignore them.

5. Press Enter and then you will see that the files have now been renamed to the new name.

Note: The above method will rename the files one by one.
6. If you want to rename multiple files at once with the same structure, type the below command in the Command Prompt:
ren *.ext ???-Newfilename.*

Note: Here, the three question marks (???) show that all the files will be renamed as three characters of the old name+new filename which you will give. All the files will have some part of the old name and new name which will be the same for all the files. So in this way, you can distinguish between them.
Example: Two files are named as hello.jpg and sunset.jpg. You want to rename them as new. So, the new filename will be hel-new.jpg and sun-new.jpg
7. If the files you want to rename have long names and you want to shorten their name, then you can do so by using the below command in the Command Prompt:
ren *.* ?????.*

Note: Here, the question marks show how many alphabets of the old name need to be used to rename the file. A minimum of five characters should be used. Then only the file will be renamed.
8. If you want to change the file name but not the whole name, just some part of it, then use the below command in the Command Prompt:
ren old_part_of_file*.* new_part_of_file*.*

Method 4: Rename Multiple Files in Bulk with Powershell
PowerShell is a command-line tool in Windows 10 that provides more flexibility while renaming multiple files and thus, is more powerful than the Command Prompt. It allows manipulating the file names in several ways out of which the two most important ones are the commands Dir (which lists the files in the current directory) and Rename-Item (which renames an item that is the file).
To use this PowerShell, first, you need to open it by following these steps:
1. Open the File Explorer either from the taskbar or the desktop.
2. Open the folder where the files you wish to rename reside.
3. Press the Shift button and right-click on the empty space inside the folder.

4. Click on the Open PowerShell windows here option.
5. The Windows PowerShell will appear.
6. Now to rename the files, type the below command in the Windows PowerShell:
Rename-Item “OldFileName.ext” “NewFileName.ext”
Note: You can also type the above command without the quotation marks only if the file name does not contain any space(s).

7. Hit the Enter button. Your existing file name will change to the new one.

Note: By using the above method, you can only rename each file one by one.
8. If you want to rename all the files of the folder by the same name structure, type the below command in the Windows PowerShell.
Dir | %{Rename-Item $_ -NewName (“new_filename{0}.ext” –f $nr++)
Example if the new file name should be New_Image{0} and the extension is jpg then use the following command:
Dir | %{Rename-Item $_ -NewName (“New_Image{0}.jpg” –f $nr++)

9. Once done, hit the Enter button.
10. Now, all the files in the folder having the .jpg extension will be renamed. You will notice that all the file names will end with different numbers so that you can differentiate between each file.
11. If you want to rename the files by making their existing name shorter, then run the below command in the Windows PowerShell and hit the Enter button:
Dir | Rename-Item –NewName {$_.name.substring(0,$_.BaseName.Length-N) + $_.Extension }
In the above command, ($_.BaseNmae.Length-N) command contains N which indicates how many characters you need to remove or trim from the old name to rename the file. You need to change N with a numerical value.

12. If you want to rename the files by removing some parts from the file names, then type the below command in the Windows PowerShell and hit the Enter button:
Dir | Rename-Item –NewName {$_.name –replace “old_filename_part” , “”}
The characters you will enter at the place of the olf_filename_part will be removed from the names of all the files and your files will be renamed.

Rename Multiple Files in Bulk using Third-party Applications
You can also use third-party applications for renaming multiple files at once. Generally, two third-party applications, the Bulk Rename Utility and AdvancedRenamer are beneficial for renaming files in bulk.
Let us learn more about these apps in detail.
1. Using the Bulk Rename Utility application
Bulk Rename Utility tool is free for personal and non-commercial use. To use this tool, first, you need to install it. After installing, open it and reach the files whose names are to be changed and select them.
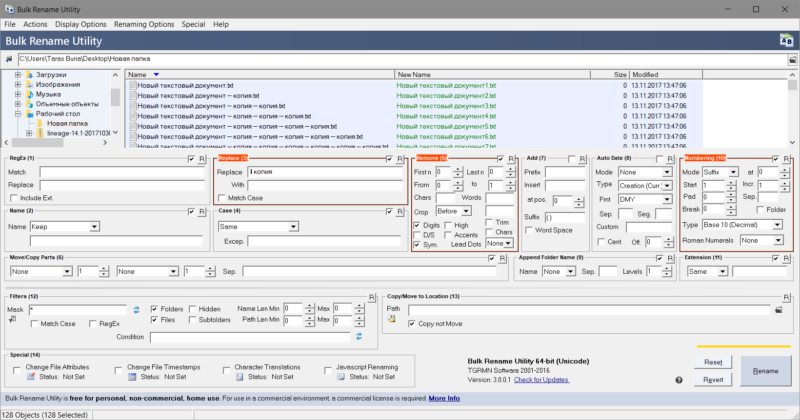
Now, change the options in one or more of the many available panels and all these will be highlighted in the orange colour. The preview of your changes will appear in the New Name column where all your files are listed.
We made changes in four panels so they are now appearing in the orange shade. After you are satisfied with the new names, hit the Rename option to rename the file names.

2. Using the AdvancedRenamer application
The AdvancedRenamer application is much simpler, has a simplified interface with various options to rename multiple files easily, and is more flexible.

To use this application to rename multiple files at once, follow these steps.
a. First, install the application, launch it, and select the files to be renamed.
b. In the File Name field, enter the syntax you want to be followed for renaming each file:
Word File_<Year>_<Month>_<Day>_(<Inc Nr:1>).
c. The application will rename all the files using the above syntax.
Recommended:
- 4 Ways To Remove ByteFence Redirect Completely
- How To Start Microsoft Word In Safe Mode
- 3 Ways to Set Alarm on an Android Phone
So, using the above methods you can rename multiple files in bulk at once without moving to each filename individually. But if you still have any questions regarding this tutorial then feel free to ask them in the comment section.
Quick Links
-
Rename Multiple Files in Windows Explorer
-
Rename Multiple Files from the Command Prompt
-
Rename Multiple Files with PowerShell
-
Rename Multiple Files Using a Third Party App
Got a bunch of files you want to rename, but don’t want to go through them each one by one? Windows provides more ways to do this than you may realize.
You can easily rename one or more files just with Windows Explorer, but you can do even more with the Command Prompt or PowerShell. Add in third-party renaming utilities, and the possibilities are endless. Let’s take a look at each option and how it works.
Rename Multiple Files in Windows Explorer
Windows Explorer (known as File Explorer in Windows 10) is surprisingly powerful. You probably know how to rename a single file, but let’s start with the basics, since the advanced tricks build off them.
If you’re using your mouse, you have no less than three ways to select a file’s name and rename it. You can:
- Click to select the file and then click the «Rename» button on the Home menu.
- Click to select file and then click the name of the selected file.
- Right-click the file and then select «Rename» on the context menu.
And if you prefer sticking with your keyboard, you can just use your arrow keys (or start typing the file name) to select a file and then hit F2 to select the file name.
Once you’ve got the file name selected—and you’ll notice only the file name itself is selected, not the extension—you can type a new file name.
When you’re done typing the file name, you can press Enter (or just click somewhere else) to save the new name.
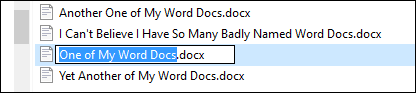
Here’s where things get interesting: you can also hit the Tab key to automatically select the next file name in the folder so that you can immediately begin typing a new name for it. Keep hitting Tab and typing names this way and you can easily rename all the files in a folder if you’re so inclined.
If you’re renaming a bunch of files in the same folder and those files don’t need completely different names from one another, Windows provides an easier way to rename those files in batch. Start by selecting a bunch of files—you can hold down the Ctrl key to select multiple files at once, or Shift to select a range of files. When you’ve got the files selected, use one of the rename commands—the button on the Home menu, the command on the context menu, or just press F2. You’ll see that all the files remain selected, but the first one in the group gets its name highlighted so you can type a new name.

Type a new name for the file and then hit Enter or click somewhere else in the window. All the selected files are renamed using the name you just typed, and are appended with a number in parentheses to differentiate them.

Rename Multiple Files from the Command Prompt
If you need more power than that, you can use the
rename
or ren command in a Command Prompt window to one or more files. The command accepts wildcard characters like * and ? for matching multiple files, which can be helpful if you only want to rename a certain selection of files in a folder full of many.
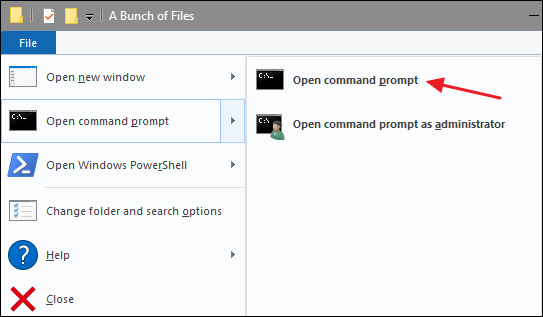
The quickest way to open a Command Prompt window at your desired location is to first open the folder in File Explorer. From the «File» menu, point to «Open command prompt,» and then select «Open command prompt.»
To rename a single file, you can use the following command syntax:
ren "current_filename.ext" "new_filename.ext"
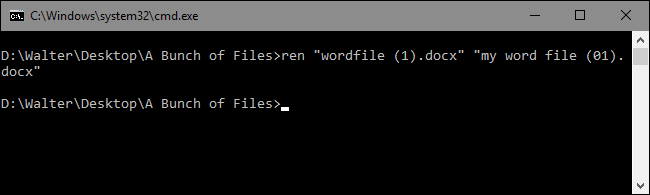
The quotes are important if your file names contain any spaces. If they don’t, you won’t need the quotes. So, for example, to rename a file from «wordfile (1).docx» to «my word file (01).docx» you would use the following command:
ren "wordfile (1).docx" "my word file (01).docx"
Since the ren command can address extensions, you can also use it to change the extensions of multiple files at once. Say, for example, you had a selection of .txt files that you wanted to turn into .html files. You could use the following command along with the * wildcard (which basically tells Windows that text of any length should be considered a match):
ren *.txt *.html
And while we’re on the subject of wildcards, you can also do some interesting things with the ? wildcard, which is used to stand in for any single character. Say, for example, you had a bunch of .html files that you wanted to turn into .htm files instead. You could use the following command to make the change:
ren *.html *.???
This tells Windows to rename all files with the .html extension to use the same file name and same first three letters only of the file extension, which ends up cutting the «l» off of all the extensions in the folder.
And this only begins to address the kinds of command line wizardy you can get into if you want to build more complicated commands—or even batch scripts—by weaving other commands and conditionals into things. If you’re interested, the folks over at the Lagmonster forums have an excellent writeup on the subject.
Rename Multiple Files with PowerShell
PowerShell offers even more flexibility for renaming files in a command-line environment. Using PowerShell, you can pipe the output of one command—known as a «commandlet» in PowerShell terms—to another command, just like you can on Linux and other UNIX-like systems. The two important commands you’ll need are Dir, which lists the files in the current directory, and Rename-Item, which renames an item (a file, in this case). Pipe the output of Dir to Rename-Item and you’re in business.
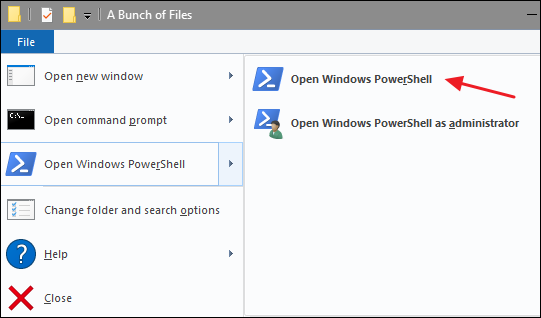
The quickest way to open a PowerShell window at your desired location is to first open the folder in File Explorer. From the «File» menu, point to «Open Windows PowerShell,» and then select «Open Windows Powershell.»
First, let’s look at renaming a single file. For that, you would use the following syntax:
rename-item "current_filename.ext" "new_filename.ext"
So, for example, to rename a file from «wordfile.docx» to «My Word File.docx» you would use the following commandlet:
rename-item "wordfile.docx" "My Word File.docx"

Easy enough. But the real power in PowerShell comes from the ability to pipe commandlets together and some of the conditional switches supported by the rename-item commandlet. Say, for example, we had a bunch of files named «wordfile (1).docx», «wordfile (2).docx», and so on.
Say we wanted to replace the space in those file names with an underscore so that the file names contain no spaces. We could use the following commandlet:
dir | rename-item -NewName {$_.name -replace " ","_"}
The dir part of that commandlet lists all the files in the folder and pipes them (that’s the | symbol) to the rename-item commandlet. The $_.name part stands in for each of the files getting piped. The -replace switch indicates that a replacement is going to happen. The rest of the commandlet just signifies that any space ( " " ) should be replaced by an underscore ( "_" ).
And now, our files look the way we want.
As you might expect, PowerShell offers tremendous power when it comes to naming your files and we’re only scratching the surface here. For example, the rename-item commandlet also offers features like a -recurse switch that can apply the commandlet to files in a folder and all folders nested inside that folder, a -force switch that can force renaming for files that are locked or otherwise unavailable, and even a -whatif switch that describes what would happen if the commandlet was executed (without actually executing it). And, of course, you can also build more complicated commandlet structures that even include IF/THEN logic. You can learn more about PowerShell in general from our Geek School guide, and learn more about the rename-item commandlet from Microsoft’s TechNet Library.
Rename Multiple Files Using a Third Party App
If you need a powerful way to rename multiple files at once and you’re just not up for mastering the Command Prompt or PowerShell commands, you can always turn to a third-party utility.
There are countless renaming apps out there—and many of them are good—but we have two clear favorites: Bulk Rename Utility and AdvancedRenamer. (Update: Be sure to try Microsoft’s free PowerRename tool, which works very well and has a user-friendly interface.)
How to Use Bulk Rename Utility
Bulk Rename Utility has a cluttered and somewhat intimidating interface, but it exposes the huge number of options you’d normally only get with regular expressions and complicated command-line options.
After installing the tool, launch it, navigate to the files you want to rename, and select them.
Change options in one or more of the many available panels, and you’ll see a preview of your changes appear in the «New Name» column where your files are listed. In this example, I’ve made changes to four panels, which are now highlighted in orange so it’s easier to tell what I’ve changed. I’ve told the utility to change the name of all files to «Word File» and to use title case. I’ve appended the date the file was created in the YMD format. And I’ve also added an automatic file number that appears at the end of the file name, starts at one, increments by one, and is separated from the file name by an underscore. And that’s only a tiny bit of what you can do with the Bulk Rename Utility. When you’re satisfied with how your new file names will look, all you have to do is click the «Rename» button.
And as you can see, the utility handled my simple requests with ease.
How to Use AdvancedRenamer
Our other favorite renaming tool, AdvancedRenamer, also exposes a huge number of renaming methods, but instead of presenting them all as panels in the interface, it asks that you use a pretty simple but powerful syntax to create renaming methods. It’s not hard to learn and they have good support, along with examples. The tool does sport a much friendlier interface and supports setting up advanced batch jobs so you can combine multiple renaming methods and apply them to large numbers of files. You can also save renaming methods you create for later use.
In the example below, I’ve created a renaming method using the following syntax:
Word File_<Year>_<Month>_<Day>_(<Inc Nr:1>)
This tells AdvancedRenamer to name all my files «Word File» and to add the creation date in the YMD format (separating each portion by an underscore). It also adds an incremental file number in parentheses and separated by an additional underscore.
And as you can see, my files have been renamed just the way I want. AdvancedRenamer has a bit steeper learning curve than Bulk File Renamer, but the reward for that is that you get much finer control over your file names.
Have other ways to rename files in Windows we haven’t covered? Be sure to leave us a comment and let us know about it.
Можно с уверенностью на 100% сказать, что каждый пользователь сталкивался с ситуацией, когда ему надо было переименовать несколько файлов одновременно. Изменять имя каждого файла по отдельности – дело далеко не самое интересное и уж точно не самое быстрое. В таких случаях возникает необходимость узнать, как переименовать несколько файлов одновременно и сделать это как можно быстрее и качественнее. Эта инструкция расскажет вам, как можно сделать это несколькими методами. Она описывает как встроенные системные методы, так и приложения от сторонних разработчиков.
Как переименовать несколько файлов одновременно в Проводнике
Начнем из самого простого и самого очевидного способа. Он делается через Проводник и окажется эффективным для подавляющего большинства пользователей.
- Откройте Проводник (это можно сделать с помощью комбинации клавиш Win + E) и найдите нужные вам файлы.
- Выделите те объекты, которые надо переименовать. Сделайте это с помощью кнопок Ctrl + A, либо выделите мышью часть файлов.
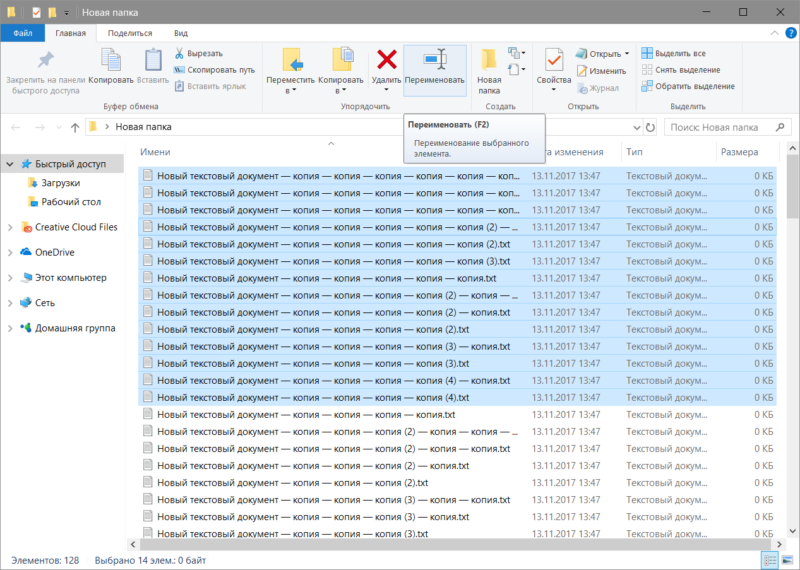
- Теперь нажмите F2, либо кликните правой кнопкой мыши по любому из файлов и выберите Переименовать. Как вариант, можно еще нажать на кнопку переименования на панели Проводника. Сами решайте, какой вариант для вас удобнее.

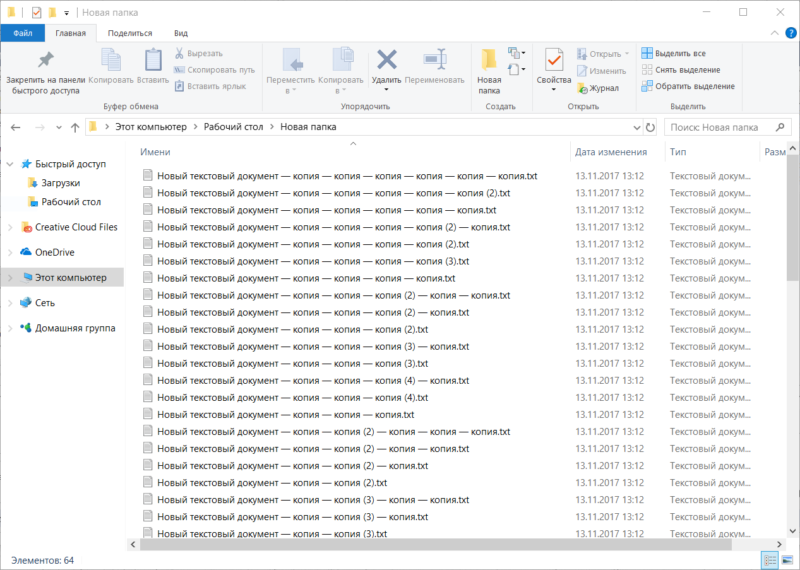
- Укажите новое имя для файла и нажмите Enter. После этого система переименует все выделенные файлы и отметит их порядковыми номерами. Название будет одно для всех, только появится цифровое обозначение. К примеру, Файл, Файл (1), Файл (2), Файл (3) и так далее. Поскольку в одной папке не может быть два файла с одинаковым названием, Windows добавляет номер в конце названия.
Подсказка: после выделения нескольких файлов можно достаточно быстро переименовать их вручную (если речь идет лишь о нескольких объектах). Нажмите F2, а после этого используйте Tab для перемещения к следующему файлу.
Как переименовать несколько файлов за один раз через Командную строку
Следующий метод будет выполняться через Командную строку и соответствующую команду ren. Нажмите Win + R и введите cmd. Нажмите Enter. После открытия командной строки введите путь к папке с нужными вам файлами. К примеру, чтобы перейти в папку Photos на диске D, надо ввести следующую команду:
CD D:\Photos.
Чтобы переименовать один файл, вы можете использовать эту команду:
ren “file (1).txt” “new file.txt”
Обратите внимание: если файл содержит в имени пробелы, его название надо брать в кавычки. Если нет, кавычки можно не использовать.
Лучше всего использовать Командную строку для быстрой смены расширения большого количества файлов. К примеру, у вас есть список из txt-файлов, которые надо превратить в html. Для этого используйте команду:
ren *.txt *.html
Звездочка в этом случае служит указанием, что файл с любым названием должен быть переименован.
Кроме того, можно использовать знак ? для других указаний. Команда ren *html *.??? удалит последнюю букву расширения из всех HTML-файлов. Таким образом HTML-файлы превратятся в HTM-файлы. Этот принцип можно использовать не только для расширений, но и названий файлов. Используйте его по своему усмотрению.
Как переименовать несколько файлов сразу с помощью PowerShell
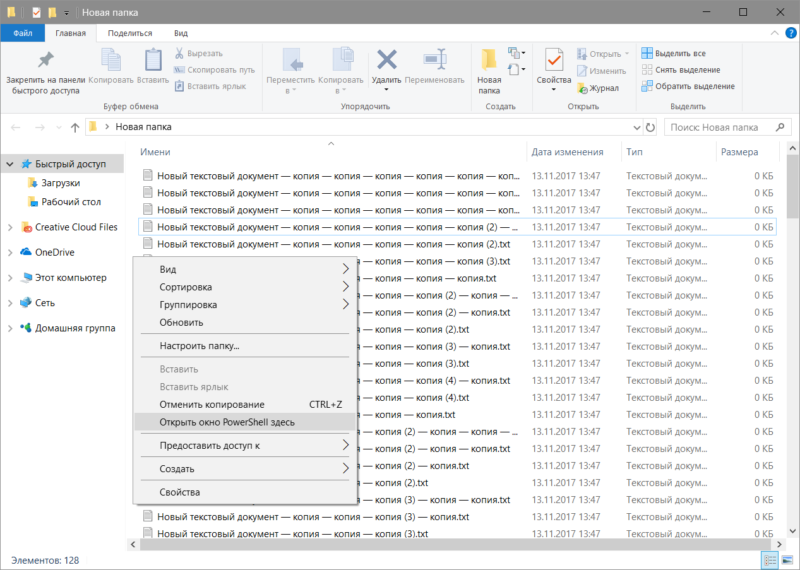
По сравнению с Командной строкой, PowerShell предоставляет куда больше возможностей при переименовании большого количества файлов. Откройте папку, в которой содержатся ваши файлы, зажмите кнопку Shift и выберите Открыть окно PowerShell здесь.
Для начала рассмотрим процесс переименования одного файла на следующем примере:
rename-item “файл.расширение” “новое имя.расширение”
Достаточно легко, но переименовывать один файл через PowerShell – дело весьма странное, поэтому переходим к групповому переименованию. Рассмотрим на примере вот этой команды:
dir | rename-item -NewName {$_.name -replace “ ”,”_”}
Команда dir собирает все файлы в папке и «прикрепляет» их к общей команде переименования rename-item. Далее $_.name обозначает, что надо сменить имя для каждого файла в директории. —replace указывает системе, что одну часть названия надо сменить на другую. Текст в первых кавычках – это то, что надо убрать, а то, что вы поместите во вторые кавычки, появится вместо удаленного текста.
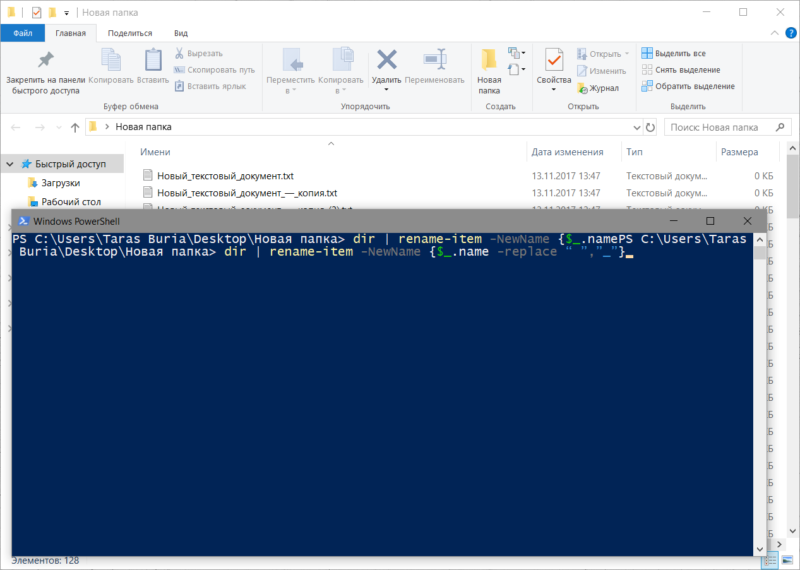
Конкретно эта команда удаляет из названий файлов пробелы и заменяет их на подчеркивание. Изучив принцип работы этой команды, вы сможете легко изменять названия файлов пачками, без необходимости играться с каждым файлом отдельно. Разумеется, можно дописать дополнительные аргументы, которые усложнят переименование и сделают его более специфичным, но для этого вам надо будет изучить подробнее список существующих команд в PowerShell. Если вы их знаете, тогда скорее всего, в этой инструкции вам делать нечего.
Как переименовать несколько файлов одновременно с помощью сторонних программ
PowerShell подойдет не каждому, поскольку не у всех есть желание изучать команды и принципы их строения. В этом случае на помощь спешат сторонние утилиты, которые предлагают переименовать несколько файлов одновременно с использованием графически понятных интерфейсов. Рассмотрим на примере Bulk Rename Utility.
Как использовать Bulk Rename Utility
Надо признать, что неподготовленного пользователя может напугать внешний вид этого приложения, которое больше напоминает консоль сложного оборудования, нежели утилитки для смены имени нескольких файлов одновременно. Все жеж Bulk Rename Utility предлагает в буквальном смысле тонны различных опций, которые в PowerShell можно использовать лишь в том случае, если у вас хорошо прокачаны навыки текстовых команд консоли Windows.
С первого взгляда кажется, что здесь без поллитры не разобаться. Но на самом деле все не так уж и страшно.
Да, интерфейс у этой утилиты очень сложный, но ее прелесть в том, что все внесенные вами изменения сразу же отображаются в столбце предварительного просмотра. Благодаря этому вы можете в буквальном смысле изучать приложение «методом тыка» и смотреть, как тот или иной параметр влияет на именf файлов. Надо также сказать, что усвоить базовые принципы использования этого приложения и его интерфейса можно буквально за несколько минут.
Для начала работы перейдите на официальный сайт приложения (оно полностью бесплатное), скачайте его и установите. Если вы не хотите его устанавливать, можете воспользоваться «портативной версией», но в этом случае вы не сможете интегрировать приложение в контекстное меню, а также использовать ассоциации BRU-файлов. Выбирайте то, что вам удобнее и предпочтительнее.
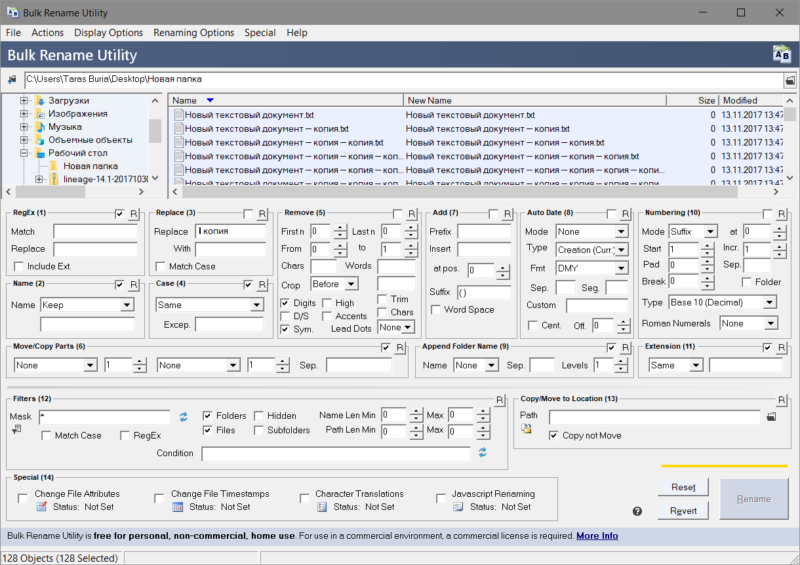
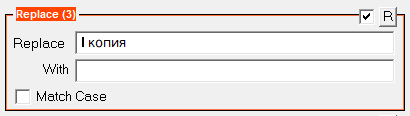
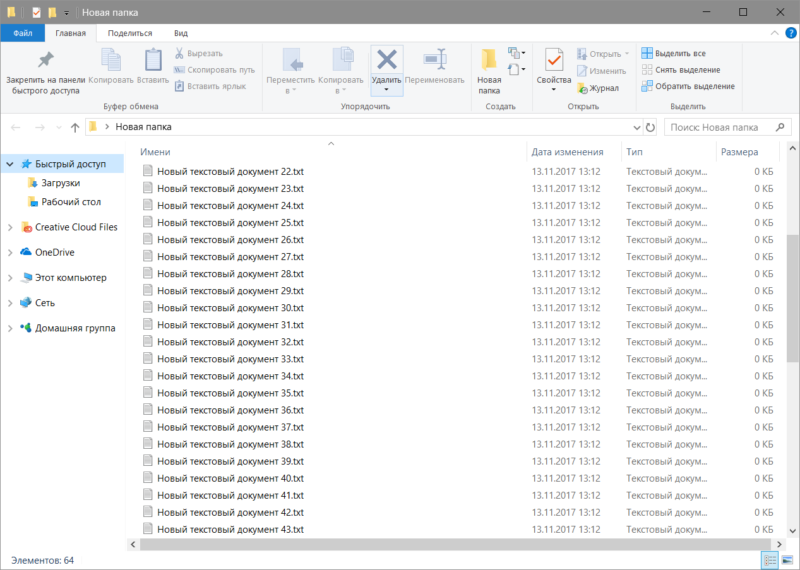
На скриншоте выше вы можете увидеть, что надо переименовать большое количество текстовых файлов, в названиях которых много слов «-копия». Сначала надо указать, какой текст надо удалить. Для этого в секцию Replace (3) вводим необходимы текст. В данном случае *пробел*- копия. Поле with остается пустым. Таким образом все файлы получают имя Новый текстовый документ.txt.
Некоторые файлы остались со скобками и цифрами. Чтобы их убрать, активируем панель Remove (5) и ставим отметку Digits. Она отвечает за удаление цифр из названия. Чтобы удалить скобки, отметьте Sym. Она удалит любые символы в названии, будь то тире, скобки, точки и так далее. Можно также дать указание на удаление отдельных знаков или слов. Это полезно, если надо удалить лишь определенные знаки, цифры, буквы или слова Их надо вводить в поля Chars и Words. Кстати, с помощью этого же раздела можно удалить слова «копия» из названий.
Теперь осталось добавить порядковые суффиксы, поскольку в одной папке не могут находиться файлы одного имени и расширения. Устанавливаем отметку возле Numbering (10) и указываем Mode – Suffix. После этого каждый файл получит свой аккуратно оформленный номер.
В конечном итоге окно приложения выглядит следующим образом:
Осталось лишь нажать на большую кнопку Rename, после чего хаотичный набор файлов будет приведет в порядок. Приложение предупредит о необходимости проверить все файлы перед применением изменений, поскольку у вас не будет возможности откатить внесенные изменения. Единственный вариант – это использовать историю файлов. Хотя при переименовании файлов стандартными средствами системы у пользователя есть возможность отменить переименование, использование Bulk Rename Utility не предусматривает откат внесенных изменений.
Гораздо лучше.
Чтобы использовать приложение максимально эффективно, вам надо будет провести некоторое время за его исследованием и изучением опций, которые мы не затрагивали в этой статье. Да, на это уйдет как время, так и силы, но это определенно стоит того, особенно, если вам часто приходится выполнять подобные задачи. Если вам не нравится это приложение, можете также воспользоваться услугами программ Advanced Renamer или Total Commander. Да, последняя – это такой привет из нулевых, но в состав этого файлового менеджера входит достаточно мощные инструменты по массовому переименованию, поэтому Total Commander может пригодиться и в современных реалиях.