
В этой статье мы рассмотрим, как централизованно включить и настроить службу удаленного управления Windows Remote Management (WinRM) на компьютерах домена с помощью групповых политик. Напомню, что Windows Remote Management это реализация протокола WS-Management Protocol для удаленного управления клиентскими и серверными ОС Windows. WinRM позволяет удаленно управлять компьютерами через:
- Server Manager (Windows Server);
- PowerShell Remoting (PSSession);
- Windows Admin Center.
Как включить WinRM в Windows вручную?
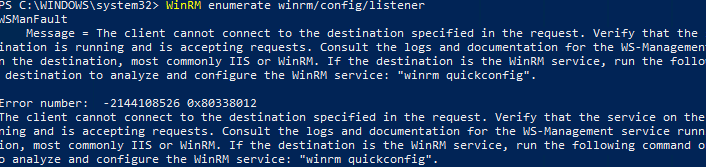
Служба WinRM установлена во всех современных версиях Windows. В Windows Server она включена по умолчанию, и отключена в десктопных редакциях Windows 11/10/8.1). По умолчанию слушатель службы WinRM listener не принимает подключения. Чтобы проверить это, выполните на клиенте команду:
WinRM enumerate winrm/config/listener
Появится ошибка, которая говорит, что служба WinRM не настроена:
WSManFault Message = The client cannot connect to the destination specified in the request. Verify that the service on the destination is running and is accepting requests. Consult the logs and documentation for the WS-Management service running on the destination, most commonly IIS or WinRM. If the destination is the WinRM service, run the following command on the destination to analyze and configure the WinRM service: "winrm quickconfig".
Error number: -2144108526 0x80338012
Чтобы включить и настроить службу WinRM в Windows, достаточно выполнить команду:
winrm quickconfig
или
Enable-PSRemoting –Force
WinRM has been updated to receive requests.
WinRM service type changed successfully.
WinRM service started.
Данная команда изменит тип запуска службы WinRM на автоматический, задаст стандартные настройки WinRM и добавить исключения для WinRM портов (5985 и 5986) в список исключений Windows Defender Firewall.
Настройка WinRM с помощью групповых политик
Вы можете автоматически включить и настроить WinRM на компьютерах домена с помощью групповых политик Windows.
- Откройте консоль редактора Group Policy Management Console (gpmc.msc), выберите контейнер с компьютерами на которых вы хотите включить WinRM и создайте новую политику corpEnableWinRM;
- Откройте политику на редактирование;
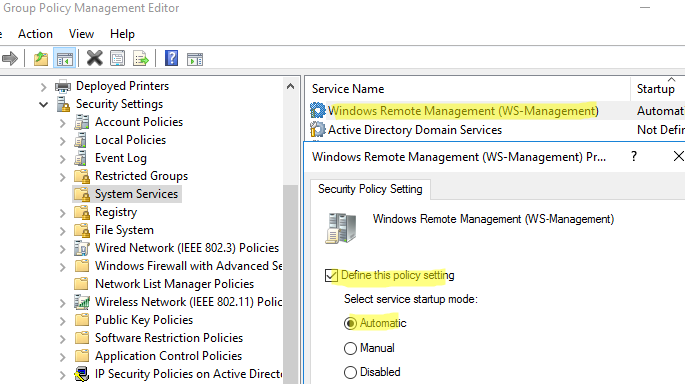
- Перейдите в раздел Computer Configuration -> Policies -> Windows Settings -> Security Settings -> System Services. Найдите службу Windows Remote Service (WS-Management) и настройте ее на автоматический запуск;

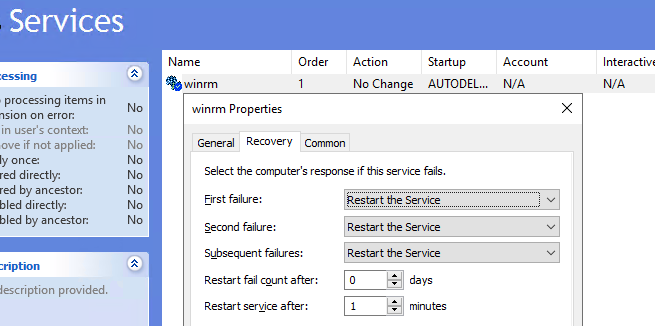
- Теперь перейдите в раздел Computer Policies -> Preferences -> Control Panel Settings -> Services и выберите New -> Service. Укажите имя службы WinRM и на вкладке Recovery задайте действие Restart the Service;
- Перейдите в раздел Computer Configuration -> Policies -> Administrative Templates -> Windows Components -> Windows Remote Management (WinRM) -> WinRM Service. Включите параметр Allow remote server management through WinRM. В поле фильтр IPv4/IPv6 можно указать IP адреса или подсети, на которых нужно слушать удаленные подключения через WinRM. Если вы хотите разрешать принимать WinRM подключения на всех IP адресах, оставьте здесь *;
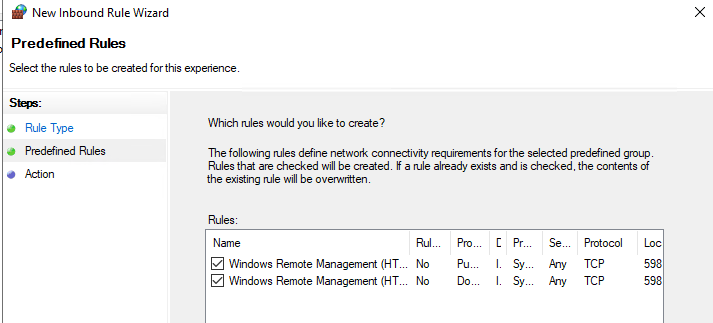
- Откройте в Windows Defender Firewall правила, разрешающие подключаться к WinRM по стандартным портам 5985 и 5986. Перейдите в Computer Configuration -> Policies -> Windows Settings -> Security Settings -> Windows Firewall with Advanced Security -> Windows Firewall with Advanced Security -> Inbound Rules. Выберите predefined rule Windows Remote Management;
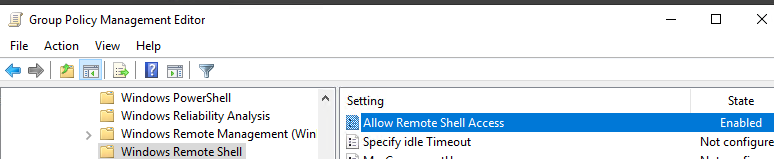
- Перейдите в раздел Computer Configuration -> Policies -> Windows Components -> Windows Remote Shell и включите параметр Allow Remote Shell Access.

Обновите настройки GPO на клиентах и проверьте, что служба WinRM настроилась автоматически. Для диагностики применения групповой политики на клиенте можно использовать утилиту gpresult.
Проверка настроек WinRM
Чтобы проверить, что настройки WinRM на компьютере заданы через групповые политики, выполните команду:
winrm e winrm/config/listener
Команда выведет текущие настройки WinRM листенера. Обратите внимание на строку
Listener [Source="GPO"]
. Она означает, что настройки получены через групповые политики.

Полную конфигурацию службы WinRM можно вывести с помощью команды:
winrm get winrm/config
Теперь нужно попробовать удаленно подключиться к компьютеру через WinRM. Запустите на удаленном компьютере консоль PowerShell с учетной записью с правами администратора на обоих компьютерах и выполните команду:
Test-WsMan YourCompName1
Если WinRM включен, появится такой ответ:
wsmid : http://schemas.dmtf.org/wbem/wsman/identity/1/wsmanidentity.xsd
ProtocolVersion : http://schemas.dmtf.org/wbem/wsman/1/wsman.xsd
ProductVendor : Microsoft Corporation
ProductVersion : OS: 0.0.0 SP: 0.0 Stack: 3.0

Проверить доступность порта 5985 на удаленном компьютере можно так:
Test-NetConnection -ComputerName YourCompName1 -Port 5985
Теперь можно попробовать выполнить интерактивное подключение к удаленному компьютеру через PSRemoting с помощью командлета Enter-PSSession:
Enter-PSSession CompNameHere1
В данном случае подключение было успешно установлено и перед вами открылась консоль удаленного сервера.
По аналогии через PSRemoting на удаленном компьютере команду можно выполнить произвольную команду с помощью Invoke-Command:
Invoke-Command -ComputerName YourCompName1 -ScriptBlock {ipconfig /all}
Если соединение работает, вы увидите на экране вывод команды
ipconfig
.
Также можно выполнить команду на удаленном хосте так:
winrs -r:wsk-w10BO1 dir
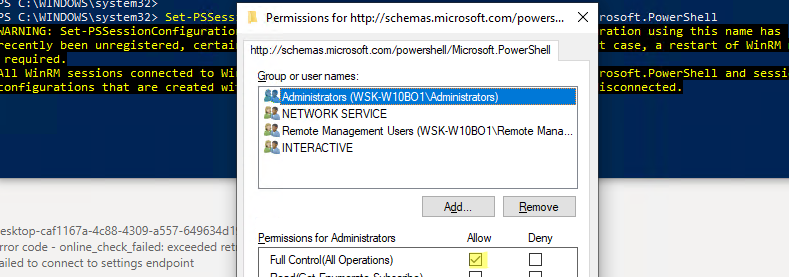
В некоторых случаях при подключении через PSSession может появится ошибка:
Enter-PSSession : Connecting to remote server wsk-w10BO1 failed with the following error message : Access is denied.
CategoryInfo : InvalidArgument: (wsk-w10BO1:String) [Enter-PSSession], PSRemotingTransportException FullyQualifiedErrorId : CreateRemoteRunspaceFailed
В этом случае проверьте настройки разрешения для подключения к WinRM на удаленном компьютере:
Set-PSSessionConfiguration -ShowSecurityDescriptorUI -Name Microsoft.PowerShell
Убедитесь, что ваша учетная запись входит в группу Administrators или Remote Management Users (см. статью об удаленном доступе через WinRM без прав администратора) и им предоставлены права FullControl. Также проверьте, нет ли Deny правил.
Для настройки WinRM и PSRemoting в рабочей группе (без домена AD) рекомендуем использовать эту инструкцию.
From Wikipedia, the free encyclopedia
| Developer(s) | Microsoft |
|---|---|
| Operating system | Microsoft Windows |
| Type | Application programming interface |
| License | Proprietary commercial software |
| Website | docs |
Windows Remote Management (WinRM) is the Microsoft implementation of the DMTF-standard WS-Management. It allows accessing or exchanging management information across a common network. Utilizing scripting objects or the built-in command-line tool, WinRM can be used with any remote computers that may have baseboard management controllers (BMCs) to acquire data. On Windows-based computers including WinRM, certain data supplied by Windows Management Instrumentation (WMI) can also be obtained.[1]
winrs
| Developer(s) | Microsoft |
|---|---|
| Operating system | Microsoft Windows |
| Type | Command |
| License | Proprietary commercial software |
| Website | docs |
- WinRM Scripting API: Provides an Application programming interface enabling scripts to remotely acquire data from computers that perform WS-Management operations.
- winrm.cmd: Built-in systems management command line tool allowing a machine operator to configure WinRM. Implementation consists of a Visual Basic Scripting (VBS) Edition file (Winrm.vbs) which is written using the aforementioned WinRM scripting API.
- winrs.exe: Another command line tool allowing the remote execution of most Cmd.exe commands. This tool utilizes the WS-Management protocol.
- Intelligent Platform Management Interface (IPMI) driver: Provides hardware management and facilitates control of remote server hardware through BMCs. IPMI is most useful when the operating system is not running or deployed as it allows for continued remote operations of the bare metal hardware/software.
- WMI plug-in: Allows WMI data to be made available to WinRM clients.[2]
- WMI service: Leverages the WMI plug-in to provide requested data or control and can also be used to acquire data from most WMI classes. Examples include the Win32_Process, in addition to any IPMI-supplied data.
- WS-Management protocol: Web Services Management is a DMTF open standard defining a SOAP-based protocol for the management of servers, devices, applications and various Web services. WS-Management provides a common way for systems to access and exchange management information across the IT infrastructure.[3]
- Ports: By default WinRM HTTPS used 5986 port, and HTTP uses 5985 port. By default, port 5985 is in listening mode, but port 5986 has to be enabled.
Ansible communicates with Windows servers over WinRM using the Python pywinrm package and can remotely run PowerShell scripts and commands.[4]
Thycotic’s Secret Server also leverages WinRM to enable PowerShell remoting.[5]
SolarWinds Server and Application Monitoring software (SAM) utilizes a WinRM server on monitored servers for its PowerShell integration.[6]
CloudBolt leverages WinRM as part of Blueprints, Server Actions, and CB Plugins to execute remote scripts on Windows servers using the python pywinrm module.[7]
WinRM uses Kerberos for initial authentication by default. This ensures that actual credentials are never sent in client-server communications, instead relying on features such as hashing and tickets to connect.[8] Although WinRM listeners can be configured to encrypt all communications using HTTPS, with the use of Kerberos, even if unencrypted HTTP is used, all communication is still encrypted using a symmetric 256-bit key after the authentication phase completes. Using HTTPS with WinRM allows for additional security by ensuring server identity via SSL/TLS certificates thereby preventing an attacker from impersonating it.[9]
- ^ windows-sdk-content. «Windows Remote Management — Windows applications». docs.microsoft.com. Retrieved 2019-02-21.
- ^ windows-sdk-content. «Windows Remote Management Glossary — Windows applications». docs.microsoft.com. Retrieved 2019-02-21.
- ^ windows-sdk-content. «About Windows Remote Management — Windows applications». docs.microsoft.com. Retrieved 2019-02-21.
- ^ «Windows Remote Management — Ansible Documentation». docs.ansible.com. Retrieved 2019-02-21.
- ^ «Thycotic Support». thycotic.force.com. Retrieved 2019-02-21.
- ^ «Create a WinRM HTTPS listener». SolarWinds Worldwide, LLC. Help and Support. 2016-03-24. Retrieved 2019-02-24.
- ^ «Remote Scripts — CloudBolt 8.7 Documentation». docs.cloudbolt.io. Retrieved 2019-06-04.
- ^ «How To: Configure WINRM for HTTPS». support.microsoft.com. Retrieved 2019-02-24.
- ^ FoxDeploy (2017-02-08). «Is WinRM Secure or do I need HTTPs?». FoxDeploy.com. Retrieved 2019-02-24.
- Windows Remote Management — Windows applications | Microsoft Docs
Эффективное управление ИТ начинается с наличия правильных инструментов для контроля за системами и устройствами, независимо от их местонахождения. Windows Remote Management (WinRM) — это инструмент, который помогает ИТ-администраторам выполнять важные задачи, такие как устранение неполадок, настройка и автоматизация, без физического присутствия.
WinRM встроен в системы Windows, что делает его доступным и мощным вариантом для организаций по поддержанию своей ИТ-инфраструктуры. Обеспечивая безопасную связь и удаленные операции, он играет важную роль в повышении производительности ИТ-команд и обеспечении бесперебойной работы.

В этом блоге объясняются ключевые аспекты WinRM: от его функций и настройки до возникающих проблем.
Что такое удаленное управление Windows (WinRM)?
Windows Remote Management (WinRM) — это протокол на базе Windows, разработанный для упрощения удаленного управления и автоматизации. Он построен на протоколе WS-Management — общедоступном стандарте для удаленного обмена данными управления с любым компьютерным устройством, реализующим этот протокол.
Протокол WS-Management обеспечивает совместимость между устройствами и системами. Он полезен в сочетании с удаленным управлением PowerShell, что позволяет администраторам управлять несколькими устройствами с помощью скриптов и команд.
Цель WinRM
WinRM обеспечивает связь между устройствами, позволяя администраторам взаимодействовать с удаленными системами, удаленно выполнять команды, извлекать данные и управлять конфигурациями системы. Он широко используется для таких задач, как устранение неполадок, развертывание программного обеспечения и мониторинг производительности.
Совместимость
WinRM изначально поддерживается в операционных системах Windows и оптимизирован для управления серверами и рабочими станциями Windows. Хотя его можно расширить для управления не-Windows-устройствами, его функциональность наиболее эффективна в средах Windows.
Почему важен протокол WinRM?
Протокол WinRM играет решающую роль в установлении удаленных соединений между компьютерами или серверами, обеспечивая бесперебойные удаленные операции. Он позволяет администраторам получать доступ к данным и управлять ресурсами на удаленных машинах так же легко, как и на локальных компьютерах.
Использование WinRM для подключения к удаленному компьютеру в сценарии удаленного управления Windows очень похоже на создание локального подключения. WinRM предназначен для улучшения управления оборудованием в различных сетевых средах.
WinRM — это инструмент командной строки, встроенный в операционные системы Windows, который использует .NET и PowerShell. Это позволяет выполнять удаленные команды и скрипты PowerShell как на отдельных машинах Windows, так и на больших наборах удаленных систем без необходимости использования RDP или прямого входа.
WinRM упрощает административные задачи, обеспечивая удаленное управление с помощью скриптов и командлетов, что упрощает администраторам Windows следующие задачи:
- Удаленный мониторинг, управление и настройка серверов, операционных систем и клиентских машин.
- Общайтесь и взаимодействуйте с хостами по всей сети, включая рабочие станции, серверы и любые операционные системы, поддерживающие WinRM.
- Выполнять команды в системах, доступных через сеть, без физического присутствия.
Основные компоненты удаленного управления Windows (WinRM)
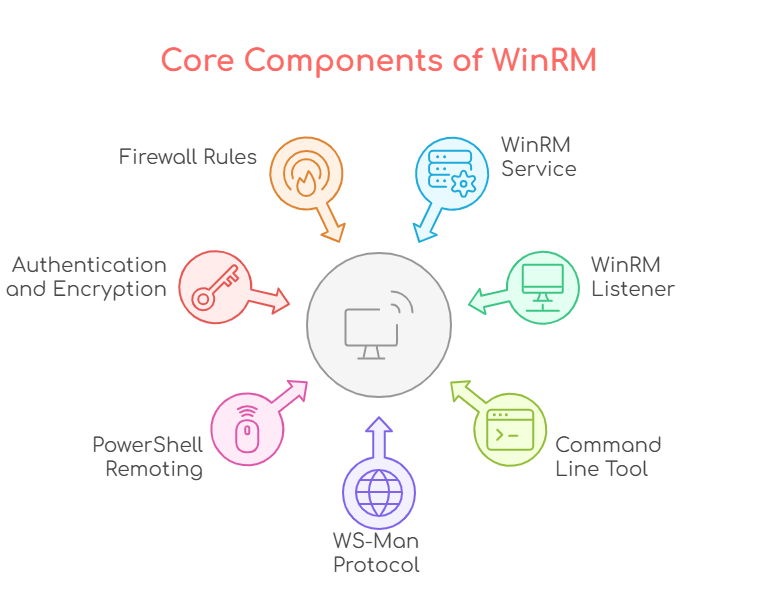
Основа WinRM основана на следующих основных компонентах. Эти компоненты работают вместе, чтобы обеспечить удаленное управление системами Windows, облегчить задачи автоматизации и обеспечить безопасное удаленное выполнение команд.
1. Служба WinRM (winrm.exe)
Это основная служба, которая работает на устройствах Windows, позволяя им принимать и отвечать на запросы удаленного управления. Она прослушивает входящие запросы на определенных портах (по умолчанию 5985 для HTTP и 5986 для HTTPS).
2. Прослушиватель WinRM
Прослушиватель отвечает за прием и обработку входящих запросов на удаленное управление. Он прослушивает указанный сетевой порт (5985 для HTTP или 5986 для HTTPS). Каждый прослушиватель привязан к определенному сетевому интерфейсу и протоколу.
3. Инструмент командной строки WinRM (winrm.exe)
Это утилита командной строки, используемая для настройки и управления службой WinRM. Она позволяет администраторам запускать, останавливать или настраивать прослушиватели WinRM, устанавливать политики аутентификации и устранять неполадки в настройках WinRM.
4. Протокол WS-Man (веб-сервисы для управления)
Windows Remote Management основан на протоколе WS-Man, который является стандартом для веб-служб, используемых для управления устройствами. Он позволяет обмениваться данными управления независимо от платформы, обеспечивая связь между компьютерами, устройствами и приложениями независимо от операционных систем.
5. Удаленное взаимодействие PowerShell
PowerShell Remoting построен на WinRM и позволяет администраторам выполнять команды PowerShell на удаленных системах. Он обеспечивает безопасный канал для удаленного выполнения скриптов и команд как на Windows, так и на не-Windows системах (с помощью сторонних инструментов).
6. Аутентификация и шифрование
WinRM поддерживает несколько механизмов аутентификации, включая базовую аутентификацию, Kerberos и NTLM. Он также поддерживает шифрование для безопасного обмена данными между клиентом и сервером, гарантируя защиту конфиденциальных данных во время процесса удаленного управления.
7. Правила брандмауэра
Для правильной работы WinRM необходимо настроить необходимые правила брандмауэра. По умолчанию брандмауэр Windows может блокировать трафик WinRM, поэтому администраторам необходимо разрешить входящий трафик на портах 5985 и 5986 для обеспечения подключения.
Как работает WinRM?

Процесс взаимодействия между клиентом и сервером через удаленное управление Windows обычно состоит из следующих этапов:
Этап 1 — Клиент инициирует запрос: процесс начинается, когда клиент WinRM (например, скрипт PowerShell) отправляет запрос на сервер WinRM. Этот запрос может включать выполнение команды или получение системной информации.
Этап 2 — Аутентификация и авторизация: Сервер должен аутентифицировать клиента перед выполнением любого действия. WinRM поддерживает несколько механизмов аутентификации, включая:
- Согласование аутентификации (Kerberos или NTLM)
- Базовая аутентификация (учетные данные отправляются в виде обычного текста)
- Аутентификация на основе сертификатов (с использованием SSL-сертификатов)
После аутентификации сервер проверяет, есть ли у клиента соответствующие разрешения для выполнения запрошенного действия.
Этап 3 — Обмен данными: Клиент отправляет фактическую команду или запрос после успешной аутентификации. Сервер WinRM обрабатывает этот запрос и возвращает результаты. Данные передаются в формате XML, который понимают как клиент, так и сервер.
Этап 4 — Выполнение команд: Если запрос включает выполнение команды, сервер выполнит команду на удаленной машине. Это может включать вызов скрипта, сбор системной информации или изменение конфигураций.
Этап 5 — Response Sent Back: После завершения задачи сервер отправляет ответ обратно клиенту с результатом операции. Это может включать стандартный вывод выполненных команд, коды ошибок или подтверждение внесенных изменений.
Варианты использования WinRM
1. Удаленное выполнение команд: Системные администраторы могут запускать команды на нескольких удаленных машинах одновременно, что снижает необходимость в физическом доступе.
2. Автоматизированное написание сценариев: WinRM обычно используется в скриптах для автоматизации задач на нескольких компьютерах, таких как установка программного обеспечения, обновления или настройка системы.
3. Управление серверными фермами: WinRM необходим для управления большим количеством серверов в центрах обработки данных, делая управление серверами более эффективным.
4. Аудит безопасности: WinRM можно использовать для сбора данных в целях аудита, например, для проверки системных журналов или просмотра параметров конфигурации.
Преимущества удаленного управления Windows (WinRM)
Удаленное управление Windows (WinRM) обеспечивает ряд существенных преимуществ для ИТ-операций, повышая эффективность, диагностику, экономичность и масштабируемость, особенно в корпоративных средах.
1. Повышенная эффективность
WinRM обеспечивает удаленный доступ к системам, устраняя необходимость в устранении неполадок на месте. Это позволяет ИТ-отделам быстро решать проблемы, сокращая время простоя устройств.
2. Лучшая диагностика
Благодаря подробным возможностям регистрации и мониторинга WinRM помогает быстрее выявлять и решать проблемы. Диагностика в реальном времени минимизирует время простоя, предоставляя ИТ-отделам информацию, необходимую для эффективного устранения неполадок из любого места.
3. Экономически эффективным
WinRM является экономически эффективным решением, сокращая расходы на поездки и оборудование. Удаленная диагностика неисправностей позволяет ИТ-персоналу обрабатывать больше систем с меньшими ресурсами, что сокращает эксплуатационные расходы.
4. Масштабируемость для предприятий
WinRM обладает высокой масштабируемостью, что делает его идеальным для корпоративных сред. Он может управлять несколькими системами в сетях, позволяя ИТ-отделам эффективно контролировать и обслуживать большие распределенные инфраструктуры.
Проблемы использования удаленного управления Windows (WinRM)
1. Сложная конфигурация
Настройка WinRM может быть сложной, поскольку она включает в себя настройку правил брандмауэра, включение службы как на локальных, так и на удаленных машинах и обеспечение надлежащих механизмов аутентификации. Эта сложность может стать проблемой для администраторов, у которых нет опыта работы с инструментами удаленного управления, что приводит к ошибкам конфигурации или задержкам в развертывании.
2. Вопросы безопасности
WinRM представляет потенциальные риски безопасности, если не настроен должным образом. Слабые настройки шифрования, неправильная аутентификация или открытые порты могут подвергнуть систему киберугрозам. В ноябре 2024 года Microsoft устранила критические уязвимости в системах Windows, включая те, которые связаны с NTLM и планировщиком заданий. Хотя не все они были напрямую связаны с WinRM, они подчеркивают проблему небезопасных служб удаленного управления.
3. Ограниченная совместимость
WinRM оптимизирован для управления средами Windows, что означает, что он менее эффективен в гетерогенных ИТ-экосистемах, где используются macOS, Linux или мобильные устройства. Хотя существуют обходные пути, такие как использование удаленного PowerShell, они часто добавляют сложности и по-прежнему не полностью решают кросс-платформенное управление, что ограничивает область применения утилиты WinRM.
4. Расходы на устранение неполадок
При возникновении проблем сообщения об ошибках WinRM могут быть неопределенными и сложными для понимания, требуя технических знаний для устранения неполадок. Неправильные конфигурации, сетевые проблемы или сбои аутентификации часто имеют неясные симптомы, что затрудняет администраторам быструю диагностику и устранение проблем. Это увеличивает время и усилия, необходимые для устранения неполадок.
5. Проблемы масштабируемости
В более крупных средах с разнообразными конечными точками или гибридными экосистемами WinRM может столкнуться с проблемами производительности. Управление сотнями или тысячами устройств может привести к замедлению времени выполнения, более высокому потреблению ресурсов и трудностям в координации задач удаленного управления в различных системах. В результате WinRM может не масштабироваться эффективно в крупных многоплатформенных средах.
Scalefusion UEM как лучшая альтернатива — почему?
Хотя Windows Remote Management (WinRM) служит надежным инструментом для управления средами на базе Windows, современные ИТ-технологии требуют более универсальных, масштабируемых и кроссплатформенных решений.
Именно здесь в игру вступает Scalefusion UEM как превосходная альтернатива для управления разнообразными устройствами и операционными системами, а также для решения некоторых ключевых проблем, с которыми сталкивается WinRM.
1. Кроссплатформенная совместимость
Одним из самых существенных недостатков WinRM является его ограниченная область применения при управлении не-Windows-устройствами. Хотя его можно расширить на некоторые не-Windows-системы с помощью сторонних решений, настройка и управление могут быстро стать громоздкими.
Scalefusion UEM, с другой стороны, предназначен для управления всеми конечными точками, включая Windows, macOS iOS, Android, Linux и ChromeOS с одной платформы. Это делает его гораздо более универсальным решением, особенно в организациях с гетерогенной ИТ-экосистемой.
2. Упрощенная настройка и управление
Настройка WinRM требует сложной конфигурации, включая настройки брандмауэра, активацию службы и обеспечение правильных настроек аутентификации. Эта сложность может привести к ошибкам, задержкам или уязвимостям безопасности.
Scalefusion UEM упрощает настройку и предоставляет централизованный и логически организованный интерфейс для управления устройствами, пользователями и политиками. Администраторы могут настраивать политики в одном профиле устройства и применять их к устройствам оптом, что делает управление более эффективным и безошибочным.
3. Повышенная безопасность
Безопасность WinRM во многом зависит от правильной настройки, обеспечивающей безопасную связь и контроль доступа, что может быть связано с человеческими ошибками.
В отличие от этого, Scalefusion UEM предоставляет расширенные функции безопасности, такие как управление приложениями, настройка шифрования BitLocker, Управление обновлениями и исправлениями ОС, управление браузером, отслеживание местоположения и Geofencing. Он также обеспечивает интеграцию с решениями IAM, такими как OneIdP, и решениями безопасности конечных точек, такими как Veltar. Эти функции гарантируют, что конфиденциальные корпоративные данные и устройства остаются в безопасности на всех устройствах, снижая риск несанкционированного доступа и утечки данных.
4. Масштабируемость для современных предприятий
WinRM изначально был разработан для управления системами на базе Windows, и в результате он может испытывать трудности с масштабированием в больших, разнообразных средах. По мере роста организаций и внедрения различных типов устройств производительность WinRM может снижаться, особенно при управлении тысячами конечных точек в нескольких операционных системах.
Однако Scalefusion UEM создан для масштабирования, позволяя ИТ-отделам эффективно управлять большим количеством устройств, независимо от операционной системы. Эта масштабируемость имеет решающее значение для организаций, желающих расширить свой парк устройств или поддержать удаленную работу.
5. Эффективное устранение неполадок и удаленная поддержка
Сообщения об ошибках WinRM могут быть зашифрованными, требующими высокого уровня технической экспертизы для диагностики и решения проблем. Это может замедлить время отклика и увеличить операционные издержки.
Scalefusion UEM, с другой стороны, предлагает мощные удаленное устранение неполадок Возможности, такие как удаленная трансляция и управление, вызовы VoIP, передача файлов и подробная информация об устройстве, все в удобном интерфейсе. ИТ-отделы могут быстро выявлять и устранять проблемы с устройством, минимизируя время простоя и повышая общую производительность.
6. Перспективное управление ИТ
Поскольку компании продолжают внедрять новые технологии, Scalefusion UEM предлагает перспективное решение, обеспечивая постоянную поддержку новых устройств и платформ. В отличие от WinRM, который привязан к системам Windows и требует дополнительных настроек для других платформ, Scalefusion UEM изначально разработан для поддержки широкого спектра устройств и технологий. Это делает Scalefusion UEM идеальным выбором для организаций, стремящихся оставаться гибкими и готовыми к будущему в мире все более цифровых технологий.
Вам нужна защищенная и полностью управляемая экосистема Windows?
Здесь ваш поиск заканчивается. Scalefusion UEM для Windows, вы получаете доступ к современным функциям управления, которые делают удаленное управление устройствами более эффективным и быстрым. От управления приложениями до исправления сервера — мы вас обеспечим. Сосредоточьтесь на самом важном — вашем бизнесе — и позвольте нам заняться всем остальным. Управляйте умнее, защищайте лучше и развивайтесь быстрее с ScalefusionUEM!
Свяжитесь с нашими экспертами по продуктам и закажите демонстрацию, чтобы узнать больше о том, как Scalefusion UEM может преобразовать ваше управление конечными точками. Принять участие 14-дневная бесплатная пробная версия Cегодня!
Unlike Linux/Unix hosts, which use SSH by default, Windows hosts are
configured with WinRM. This topic covers how to configure and use WinRM with Ansible.
What is WinRM?
WinRM is a management protocol used by Windows to remotely communicate with
another server. It is a SOAP-based protocol that communicates over HTTP/HTTPS and is
included in all recent Windows operating systems. Since Windows
Server 2012, WinRM has been enabled by default, but in some cases, extra
configuration is required to use WinRM with Ansible.
Ansible can use WinRM through the psrp or winrm connection plugins. These plugins have their own Python requirements that are not included in the Ansible package and must be installed separately.
If you chose the pipx install instructions, you can install those requirements by running the following:
pipx inject "pypsrp<=1.0.0"  # for psrp
pipx inject "pywinrm>=0.4.0"  # for winrm
Or, if you chose the pip install instructions:
pip3 install "pypsrp<=1.0.0"  # for psrp
pip3 install "pywinrm>=0.4.0"  # for winrm
Warning
Using the winrm or psrp connection plugins in Ansible on MacOS in the latest releases typically fails. This is a known problem that occurs deep within the Python stack and cannot be changed by Ansible. The only workaround today is to set the environment variable OBJC_DISABLE_INITIALIZE_FORK_SAFETY=yes, no_proxy=* and avoid using Kerberos auth.
WinRM Setup
Before Ansible can connect using WinRM, the Windows host must have a WinRM listener configured. This listener will listen on the configured port and accept incoming WinRM requests.
While this guide covers more details on how to enumerate, add, and remove listeners, you can run the following PowerShell snippet to setup the HTTP listener with the defaults:
# Enables the WinRM service and sets up the HTTP listener
Enable-PSRemoting -Force

# Opens port 5985 for all profiles
$firewallParams = @{
    Action      = 'Allow'
    Description = 'Inbound rule for Windows Remote Management via WS-Management. [TCP 5985]'
    Direction   = 'Inbound'
    DisplayName = 'Windows Remote Management (HTTP-In)'
    LocalPort   = 5985
    Profile     = 'Any'
    Protocol    = 'TCP'
}
New-NetFirewallRule @firewallParams

# Allows local user accounts to be used with WinRM
# This can be ignored if using domain accounts
$tokenFilterParams = @{
    Path         = 'HKLM:\SOFTWARE\Microsoft\Windows\CurrentVersion\Policies\System'
    Name         = 'LocalAccountTokenFilterPolicy'
    Value        = 1
    PropertyType = 'DWORD'
    Force        = $true
}
New-ItemProperty @tokenFilterParams
To also add a HTTPS listener with a self signed certificate we can run the following:
# Create self signed certificate
$certParams = @{
    CertStoreLocation = 'Cert:\LocalMachine\My'
    DnsName           = $env:COMPUTERNAME
    NotAfter          = (Get-Date).AddYears(1)
    Provider          = 'Microsoft Software Key Storage Provider'
    Subject           = "CN=$env:COMPUTERNAME"
}
$cert = New-SelfSignedCertificate @certParams

# Create HTTPS listener
$httpsParams = @{
    ResourceURI = 'winrm/config/listener'
    SelectorSet = @{
        Transport = "HTTPS"
        Address   = "*"
    }
    ValueSet = @{
        CertificateThumbprint = $cert.Thumbprint
        Enabled               = $true
    }
}
New-WSManInstance @httpsParams

# Opens port 5986 for all profiles
$firewallParams = @{
    Action      = 'Allow'
    Description = 'Inbound rule for Windows Remote Management via WS-Management. [TCP 5986]'
    Direction   = 'Inbound'
    DisplayName = 'Windows Remote Management (HTTPS-In)'
    LocalPort   = 5986
    Profile     = 'Any'
    Protocol    = 'TCP'
}
New-NetFirewallRule @firewallParams
Warning
The above scripts are for demonstration purposes only and should be reviewed before running in a production environment. Some changes, like opening the firewall port for all incoming connections, allowing local accounts to be used with WinRM, self signed certificates, may not be suitable for all environments.
Enumerate Listeners
To view the current listeners that are running on the WinRM service:
winrm enumerate winrm/config/Listener
This will output something like:
Listener
    Address = *
    Transport = HTTP
    Port = 5985
    Hostname
    Enabled = true
    URLPrefix = wsman
    CertificateThumbprint
    ListeningOn = 10.0.2.15, 127.0.0.1, 192.168.56.155, ::1, fe80::5efe:10.0.2.15%6, fe80::5efe:192.168.56.155%8, fe80::
ffff:ffff:fffe%2, fe80::203d:7d97:c2ed:ec78%3, fe80::e8ea:d765:2c69:7756%7

Listener
    Address = *
    Transport = HTTPS
    Port = 5986
    Hostname = SERVER2016
    Enabled = true
    URLPrefix = wsman
    CertificateThumbprint = E6CDAA82EEAF2ECE8546E05DB7F3E01AA47D76CE
    ListeningOn = 10.0.2.15, 127.0.0.1, 192.168.56.155, ::1, fe80::5efe:10.0.2.15%6, fe80::5efe:192.168.56.155%8, fe80::
ffff:ffff:fffe%2, fe80::203d:7d97:c2ed:ec78%3, fe80::e8ea:d765:2c69:7756%7
In the example above there are two WinRM listeners configured. One is listening on port 5985 over HTTP and the other is listening on port 5986 over HTTPS. Some of the key options that are useful to understand are:
-
Transport: Whether the listener is run over HTTP or HTTPS -
Port: The port the to listen on, default for HTTP is5985and HTTPS is5986 -
CertificateThumbprint: For HTTPS, this is the thumbprint of the certificate used for the TLS connection
To view the certificate details that is specified by the CertificateThumbprint you can run the following PowerShell command:
$thumbprint = "E6CDAA82EEAF2ECE8546E05DB7F3E01AA47D76CE"
Get-Item -Path "Cert:\LocalMachine\My\$thumbprint" | Select-Object *
Create Listener
Creating a HTTP listener can be done through the Enable-PSRemoting cmdlet but you can also use the following PowerShell code to manually create the HTTP listener.
$listenerParams = @{
    ResourceURI = 'winrm/config/listener'
    SelectorSet = @{
        Transport = "HTTP"
        Address   = "*"
    }
    ValueSet    = @{
        Enabled = $true
        Port    = 5985
    }
}
New-WSManInstance @listenerParams
Creating a HTTPS listener is similar but the Port is now 5985 and the CertificateThumbprint value must be set. The certificate can either be a self signed certificate or a certificate from a certificate authority. How to generate a certificate is outside the scope of this section.
$listenerParams = @{
    ResourceURI = 'winrm/config/listener'
    SelectorSet = @{
        Transport = "HTTP"
        Address   = "*"
    }
    ValueSet    = @{
        CertificateThumbprint = 'E6CDAA82EEAF2ECE8546E05DB7F3E01AA47D76CE'
        Enabled               = $true
        Port                  = 5985
    }
}
New-WSManInstance @listenerParams
The CertificateThumbprint value must be set to the thumbprint of a certificate that is installed in the LocalMachine\My certificate store.
The Address selector value can be set to one of three values:
-
*— binds to all addresses -
IP:...— binds to the IPv4 or IPv6 address specified by... -
MAC:32-a3-58-90-be-cc— binds to the adapter with the MAC address specified
Remove Listener
The following code can remove all listeners or a specific one:
 # Removes all listeners
 Remove-Item -Path WSMan:\localhost\Listener\* -Recurse -Force

 # Removes only HTTP listeners
 Get-ChildItem -Path WSMan:\localhost\Listener |
     Where-Object Keys -contains "Transport=HTTP" |
     Remove-Item -Recurse -Force

# Removes only HTTPS listeners
 Get-ChildItem -Path WSMan:\localhost\Listener |
     Where-Object Keys -contains "Transport=HTTPS" |
     Remove-Item -Recurse -Force
WinRM Authentication
WinRM has several different authentication options that can be used to authenticate a user with a Windows host. Each option has their own advantages and disadvantages so it is important to understand when to use each one and when to not.
The following matrix is a high-level overview of the options:
|
Option |
Local Accounts |
Active Directory Accounts |
Credential Delegation |
HTTP Encryption |
|---|---|---|---|---|
|
Basic |
Yes |
No |
No |
No |
|
Certificate |
Yes |
No |
No |
No |
|
Kerberos |
No |
Yes |
Yes |
Yes |
|
NTLM |
Yes |
Yes |
No |
Yes |
|
CredSSP |
Yes |
Yes |
Yes |
Yes |
The Basic and NTLM authentication options should not be used over a HTTP listener as they either offer no encryption or very weak encryption. The psrp connection plugin also offers the Negotiate authentication option which will attempt to use Kerberos before falling back to NTLM. The winrm connection plugin must either specify kerberos or ntlm.
To specify the authentication protocol you can use the following variables:
# For psrp
ansible_psrp_auth: basic|certificate|negotiate|kerberos|ntlm|credssp

# For winrm
ansible_winrm_transport: basic|certificate|kerberos|ntlm|credssp
The recommendations for WinRM would be to use Kerberos auth over HTTP if in a domain environment or Basic/NTLM over HTTPS for local accounts. CredSSP should only be used when absolutely necessary as it can be a security risk due to its use of unconstrained delegation.
Basic
Basic authentication is one of the simplest authentication options to use but is
also the most insecure. This is because the username and password are simply
base64 encoded, and if a secure channel is not in use (eg, HTTPS) then it can be
decoded by anyone. Basic authentication can only be used for local accounts (not domain accounts).
The following example shows host vars configured for basic authentication:
ansible_user: LocalUsername
ansible_password: Password

# psrp
ansible_connection: psrp
ansible_psrp_auth: basic

# winrm
ansible_connection: winrm
ansible_winrm_transport: basic
Basic authentication is not enabled by default on a Windows host but can be
enabled by running the following in PowerShell:
Set-Item -Path WSMan:\localhost\Service\Auth\Basic -Value $true
Certificate
See WinRM Certificate Authentication for more information on how to configure and use certificate authentication.
NTLM
NTLM is an older authentication mechanism used by Microsoft that can support
both local and domain accounts. NTLM is enabled by default on the WinRM
service, so no setup is required before using it.
NTLM is the easiest authentication protocol to use and is more secure than
Basic authentication. If running in a domain environment, Kerberos should be used
instead of NTLM.
Kerberos has several advantages over using NTLM:
-
NTLM is an older protocol and does not support newer encryption
protocols. -
NTLM is slower to authenticate because it requires more round trips to the host in
the authentication stage. -
Unlike Kerberos, NTLM does not allow credential delegation.
This example shows host variables configured to use NTLM authentication:
ansible_user: LocalUsername
ansible_password: Password

# psrp
ansible_connection: psrp
ansible_psrp_auth: negotiate  # or ntlm to only use NTLM

# winrm
ansible_connection: winrm
ansible_winrm_transport: ntlm
Kerberos and Negotiate
Kerberos is the recommended authentication option to use when running in a
domain environment. Kerberos supports features like credential delegation and
message encryption over HTTP and is one of the more secure options that
is available through WinRM.
Kerberos does require some additional setup work on the Ansible host before it can be used properly. See Kerberos Authentication for more information on how to configure, use, and troubleshoot Kerberos authentication.
The following example shows host vars configured for Kerberos authentication:
ansible_user: [email protected]
ansible_password: Password

# psrp
ansible_connection: psrp
ansible_psrp_auth: negotiate  # or kerberos to disable ntlm fallback

# winrm
ansible_connection: winrm
ansible_winrm_transport: kerberos
CredSSP
CredSSP authentication is a newer authentication protocol that allows
credential delegation. This is achieved by encrypting the username and password
after authentication has succeeded and sending that to the server using the
CredSSP protocol.
Because the username and password are sent to the server to be used for double
hop authentication, ensure that the hosts that the Windows host communicates with are
not compromised and are trusted.
CredSSP can be used for both local and domain accounts and also supports
message encryption over HTTP.
To use CredSSP authentication, the host vars are configured like so:
ansible_user: Username
ansible_password: Password

# psrp
ansible_connection: psrp
ansible_psrp_auth: credssp

# winrm
ansible_connection: winrm
ansible_winrm_transport: credssp
CredSSP authentication is not enabled by default on a Windows host, but can
be enabled by running the following in PowerShell:
Enable-WSManCredSSP -Role Server -Force
CredSSP requires optional Python libraries to be installed and can be done with pipx:
pipx inject "pypsrp[credssp]<=1.0.0"  # for psrp
pipx inject "pywinrm[credssp]>=0.4.0"  # for winrm
Or, if you chose the pip install instructions:
pip3 install "pypsrp[credssp]<=1.0.0"  # for psrp
pip3 install "pywinrm[credssp]>=0.4.0"  # for winrm
CredSSP works by using a TLS connection to wrap the authentication tokens and subsequent messages sent over the connection. By default it will use a self-signed certificate automatically generated by Windows. While using CredSSP over a HTTPS connection will still need to validate the HTTPS certificate used by the WinRM listener, there is no validation done on the CredSSP certificate. It is possible to configure CredSSP to use a different certificate by setting the CertificateThumbprint option under the WinRM service configuration.
# Note the value $thumprint will be different in each situation, this needs
# to be set based on the cert that is used.
$thumbprint = "7C8DCBD5427AFEE6560F4AF524E325915F51172C"

# Set the thumbprint value
Set-Item -Path WSMan:\localhost\Service\CertificateThumbprint -Value $thumbprint
Non-Administrator Accounts
WinRM is configured by default to only allow connections from accounts in the local
Administrators group. This can be changed by running:
This will display an ACL editor, where new users or groups may be added. To run commands
over WinRM, users and groups must have at least the Read and Execute permissions
enabled.
While non-administrative accounts can be used with WinRM, most typical server administration
tasks require some level of administrative access, so the utility is usually limited.
WinRM Encryption
By default, WinRM will fail to work when running over an unencrypted channel.
The WinRM protocol considers the channel to be encrypted if using TLS over HTTP
(HTTPS) or using message-level encryption. Using WinRM with TLS is the
recommended option as it works with all authentication options, but requires
a certificate to be created and used on the WinRM listener.
If in a domain environment, ADCS can create a certificate for the host that
is issued by the domain itself.
If using HTTPS is not an option, then HTTP can be used when the authentication
option is NTLM, Kerberos or CredSSP. These protocols will encrypt
the WinRM payload with their own encryption method before sending it to the
server. The message-level encryption is not used when running over HTTPS because the
encryption uses the more secure TLS protocol instead. If both transport and
message encryption is required, the following hostvars can be set:
# psrp
ansible_psrp_message_encryption: always

# winrm
ansible_winrm_message_encryption: always
Note
Message encryption over HTTP requires pywinrm>=0.3.0.
A last resort is to disable the encryption requirement on the Windows host. This
should only be used for development and debugging purposes, as anything sent
from Ansible can be viewed or manipulated, and the remote session can
be completely taken over by anyone on the same network. To disable the encryption
requirement:
Set-Item -Path WSMan:\localhost\Service\AllowUnencrypted -Value $true
Note
Do not disable the encryption check unless it is
absolutely required. Doing so could allow sensitive information like
credentials and files to be intercepted by others on the network.
HTTPS Certificate Validation
As part of the TLS protocol, the certificate is validated to ensure the host matches the subject and the client trusts the issuer of the server certificate. If using a self-signed certificate, the certificate will not be trusted by the client and the connection will fail. To bypass this, set the following hostvars depending on the connection plugin used:
-
ansible_psrp_cert_validation: ignore -
ansible_winrm_server_cert_validation: ignore
One of the more common ways of setting up an HTTPS listener in a domain
environment is to use Active Directory Certificate Service (AD CS). AD CS is
used to generate signed certificates from a Certificate Signing Request (CSR).
If the WinRM HTTPS listener is using a certificate that has been signed by
another authority, like AD CS, then Ansible can be set up to trust that
issuer as part of the TLS handshake.
To get Ansible to trust a Certificate Authority (CA) like AD CS, the issuer
certificate of the CA can be exported as a PEM-encoded certificate. This
certificate can then be copied locally to the Ansible control node and used as a
source of certificate validation, otherwise known as a CA chain.
The CA chain can contain a single or multiple issuer certificates and each entry is contained on a new line. To then use the custom CA chain as part of the validation process, set the following hostvar depending on the connection plugin used to the path of the CA PEM formatted file:
-
ansible_psrp_ca_cert -
ansible_winrm_ca_trust_path
If this variable is not set, the default CA chain is used instead which is located in the install path of the Python package certifi. Some Linux distributions may have configured the underlying Python requests library that the psrp and winrm connection plugins use to use the system’s certificate store rather than certifi. If this is the case, the CA chain will be the same as the system’s certificate store.
WinRM limitations
Due to the design of the WinRM protocol, there are a few limitations
when using WinRM which can cause issues when creating playbooks for Ansible.
These include:
-
Credentials are not delegated for most authentication types, which causes
authentication errors when accessing network resources or installing certain
programs. -
Many calls to the Windows Update API are blocked when running over WinRM.
-
Some programs fail to install with WinRM due to no credential delegation or
because they access forbidden Windows APIs like WUA over WinRM. -
Commands under WinRM are done under a non-interactive session, which can prevent
certain commands or executables from running. -
You cannot run a process that interacts with
DPAPI, which is used by some
installers (like Microsoft SQL Server).
Some of these limitations can be mitigated by doing one of the following:
-
Set the authentication method to use
credssporkerberoswith credential delegation enabled -
Use
becometo bypass all WinRM restrictions and run a command as it would
locally. Unlike using an authentication transport likecredssp, this will
also remove the non-interactive restriction and API restrictions like WUA and
DPAPI -
Use a scheduled task to run a command that can be created with the
win_scheduled_taskmodule. Likebecome, this bypasses all WinRM
restrictions but can only run a command and not modules.
WinRM Troubleshooting
WinRM has a wide range of configuration options, which makes its configuration complex. As a result, errors that Ansible displays could in fact be problems with the host setup instead.
To identify a host issue, run the following command from another Windows host to test out a connection to the target Windows host.
-
To test HTTP:
# winrm
winrs -r:http://server:5985/wsman -u:Username -p:Password ipconfig

# psrp
Invoke-Command -ComputerName server { ipconfig } -Credential username
-
To test HTTPS:
# winrm
winrs -r:https://server:5986/wsman -u:Username -p:Password -ssl ipconfig

# psrp
Invoke-Command -UseSSL -ComputerName server { ipconfig } -Credential username

# psrp ignoring certs
$sessionOption = New-PSSessionOption -SkipCACheck -SkipCNCheck -SkipRevocationCheck
Invoke-Command -UseSSL -ComputerName server { ipconfig } -Credential username -SessionOption $sessionOption
To verify that the target hostname is resolvable on the Ansible control node, run one of the following commands:
dig +search server

# May fail if the Windows firewall is set to block ICMP pings
# but will show the hostname if resolvable.
ping server
To verify that the WinRM service is listening and a firewall is not blocking the connection you can use nc to test the connection over the WinRM port:
# HTTP port
> nc -zv server 5985
Connection to server port 5985 [tcp/wsman] succeeded!

# HTTPS port
> nc -zv server 5986
Connection to server port 5986 [tcp/wsmans] succeeded!
To verify that WinRM has a HTTPS listener and is working you can use openssl s_client to test the connection and view the certificate details with:
echo '' | openssl s_client -connect server:5986
Note
The openssl s_client command will use the system trust store to validate the certificate which may not align with the trust store used in Ansible. See HTTPS Certificate Validation for more information.
Discover what WinRM protocol is all about and gain insight on how you can use it to manage your network
Technology Advisor | Cybersecurity Evangelist
Updated: November 19, 2024
Windows Remote Management (WinRM) is Microsoft’s implementation of the Web Services-Management (WS-Management) protocol, which provides a standardized method for systems, both hardware and software, from various vendors to communicate
This protocol facilitates the exchange of management data across an organization’s IT infrastructure, enabling seamless interoperability between diverse systems. By providing a unified framework, WinRM is especially beneficial for IT administrators who need to oversee extensive Windows-based network environments.
WinRM plays a crucial role in simplifying remote management tasks, such as system configuration, monitoring, and troubleshooting, making it an indispensable tool for network administrators. Microsoft first introduced this protocol with WinRM 1.1, which was compatible with Windows XP, Windows Server 2003, Windows Vista, and Windows Server 2008. This initial version laid the groundwork for the more advanced functionalities that followed.
The release of WinRM 2.0 brought significant enhancements, including the ability to execute PowerShell 2.0 scripts and cmdlets on remote systems. This version was included with Windows 7 and Windows Server 2008 R2, further streamlining administrative tasks across multiple machines. In 2012, Microsoft introduced WinRM 3.0, which came pre-installed with Windows 8 and Windows Server 2012. This version featured improved performance and deeper integration, cementing WinRM as a vital component of modern Windows infrastructure management.
Why is the WinRM protocol important?
Why is the WinRM protocol important and why do we need it? With WinRM protocol, the connection between computers or servers can be easily established, so that remote operations can be performed. You can obtain data or manage resources on remote computers as well as the local computer. Connecting to a remote computer in a Windows Remote Management script is very similar to making a local connection. The WinRM protocol is intended to improve hardware management in a network environment with various devices running a variety of operating systems.
As a command-line tool, WinRM is built into Windows operating systems and based on .NET and PowerShell, which allows scripts and remote PowerShell commands to be invoked on Windows-based machines or a large set of remote machines without RDP or log into the remote machine. This method makes it easier for Windows Administrators to manage multiple machines using scripts and cmdlet, and perform tasks such as:
- Monitor, manage and configure servers, operating systems, and client machines from a remote location.
- Remotely communicate and interface with hosts through readily available channels/ports within your network, including workstations, servers, and any operating system that supports it.
- Execute commands remotely on systems that you are not local to you but are network accessible
The Windows Remote Shell (WinRS) command-line tool relies on WinRM to execute remote commands. It leverages WinRM to let you launch processes on remote machines. WinRM is the server component of this remote management application and WinRS is the client component for WinRM, which runs on the remote computer attempting to remotely manage the WinRM server. However, both computers must have WinRM installed and enabled on them for WinRS to work and retrieve information from the remote system.
WinRM architecture and components
The WinRM architecture consists of components on the client and server computers. The diagram in Figure 1.0 below shows the components on both the requesting client and responding server computers, and how they interact with each other, including the protocol that is used to communicate between them.
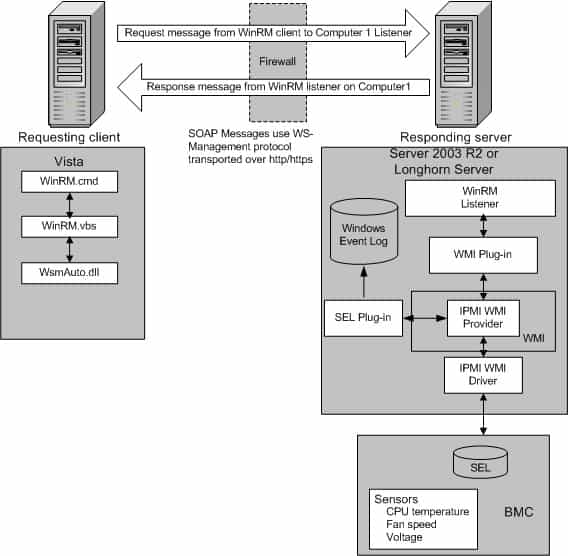
Table 1.0 below is a breakdown of the various WinRM components and where they reside.
| Component | Description | Residence |
|---|---|---|
| WinRM application | WinRM command-line tool that uses the WinRM scripting API to make calls to request data or to execute methods | Client-side |
| WSMAuto.dll | The Automation layer that provides scripting support | Client and server-side |
| WsmCL.dl | API layer within the OS | Client and server-side |
| HTTP API | Provides support for HTTP and HTTPS transport | Client and server-side |
| WsmSvc.dll | WinRM listener service | Server-side |
| WsmProv.dll | Provider subsystem | Server-side |
| WsmRes.dll | Resource file | Server-side |
| WsmWmiPl.dll | WMI plug-in that allows you to obtain WMI data through WinRM | Server-side |
| IPMI driver and WMI IPMI provider | Supply any hardware data that is requested using the IPMI (Intelligent Platform Management Interface) classes | Server-side |
Table 1.0 | WinRM components and description
WinRM configuration and commands
For the WinRM command-line tool and scripts to run, and perform data operations effectively, Windows Remote Management (WinRM) must be installed and configured. However, the good news is that WinRM is automatically installed with all currently-supported versions of the Windows operating system, including IPMI (Intelligent Platform Management Interface) WMI (Windows Management Instrumentation) provider components.
By default, WinRM is enabled on Windows Server OS since Windows Server 2012, but not on Windows 10 operating system. This means that you need to enable it on Windows 10 machines. To enable WinRM on a Windows 10 machine, open PowerShell and run the following cmdlet:
Enable-PSRemoting -force
If you have a single Windows 10 machine that is not part of an Active Directory domain network, you may need to add the machine you are going to connect from to the trusted host of the Windows 10 machine. The reason we need to add trusted hosts is to be able to connect to a Windows machine using WinRM.
However, in situations where you have 100+ Windows 10 machines in an Active Directory domain network, you may need to use a Group Policy (GPO) to get it working with minimal effort. To use a GPO, create a new one or edit an existing one and modify the following settings and set WinRM to “Enabled”:
- Computer Configuration > Policies > Administrative Templates > Windows Components > Windows Remote Management (WinRM) > WinRM Service > Allow remote server management through WinRM
Remember to apply the GPO to the Organizational Units (OU) that have all your Windows 10 machines. Within a few minutes after applying the GPO to the OU, all your hosts will get the policy update. In this case, there is no need to modify the trusted hosts’ list.
The table below is a collection of some WinRM commands you can use to execute remote operations. Please note that these commands work best when you are on an Active Directory domain network. For workgroup machines, the WinRM service may require additional configuration such as modifying the trusted hosts’ list.
| Description | Command | Remark |
|---|---|---|
| Locate listeners and the addresses | winrm e winrm/config/listener | |
| Check the state of configuration settings | winrm get winrm/config | |
| Quickly configure the WS-Man service | winrm QuickConfig | Run from an Elevated Command prompt |
| Quickly delete the WS-Man listener | winrm invoke Restore winrm/Config @{} | Run from an Elevated Command prompt |
| Display your machine’s basic hardware info | winrm enumerate wmicimv2/Win32_ComputerSystem | Run from an Elevated Command prompt |
| Display your operating system properties | winrm get wmicimv2/Win32_OperatingSystem | Run from an Elevated Command prompt |
| Output your OS info in XML | winrm get wmicimv2/Win32_OperatingSystem -format:pretty | Run from an Elevated Command prompt |
| Test WS-Man access to a remote machine | winrm id -remote: | Run from an Elevated Command prompt |
| Grab a remote machine’s WS-Man config | winrm get winrm/Config -r: | Run from an Elevated Command prompt |
| Grab a remote machine’s CPU load | winrm g wmicimv2/Win32_Processor?DeviceID=CPU0 -fragment:LoadPercentage -r: | Run from an Elevated Command prompt |
| Grab a remote machine’s free memory | winrm g wmicimv2/Win32_OperatingSystem -fragment:FreePhysicalMemory -r: | Run from an Elevated Command prompt |
| Stop a service on a remote machine | winrm invoke stopservice wmicimv2/Win32_Service?name=w32time -r: | Run from an Elevated Command prompt |
| Start a service on a remote machine | winrm invoke startservice wmicimv2/Win32_Service?name=w32time -r: | Run from an Elevated Command prompt |
| Reboot a remote machine | winrm invoke reboot wmicimv2/Win32_OperatingSystem -r: | Run from an Elevated Command prompt |
| Run a command on a remote machine (this uses winrS, not winrM) | winrs -r: ipconfig /all | Run from an Elevated Command prompt |
| Use PowerShell to grab the WS-Man Win32_OperatingSystem XML output | [xml]$osInfo = winrm get wmicimv2/Win32_OperatingSystem /format:pretty | Run from PowerShell |
| Display the OS version property | $osInfo.Win32_OperatingSystem.Version | Run from PowerShell |
| Display the last boot time | $osInfo.Win32_OperatingSystem.LastBootupTime.DateTime | Run from PowerShell |
| Put free memory metric into an XML variable | [xml]$freemem = cmd /c “winrm get wmicimv2/Win32_OperatingSystem -fragment:FreePhysicalMemory -f:pretty -r:” | Run from PowerShell |
| Display the free memory value | $freemem.XMLFragment.FreePhysicalMemory | Run from PowerShell |
Table 2.0 | Common WinRM commands and description
WinRM security
By default, WinRM uses Kerberos for authentication. This means that Windows never sends the actual credentials to the system requesting validation instead of relying on features such as hashing and tickets to connect.
WinRM listens on TCP port 80 (HTTP) by default, it doesn’t mean traffic is unencrypted. Traffic by default is only accepted by WinRM when it is encrypted using the Negotiate or Kerberos SSP. WinRM also includes helper code that lets the WinRM listener share port 80 with the Microsoft IIS web server or any other application that may need to use that port. Although WinRM listeners can be configured to encrypt all communications using HTTPS, with the use of Kerberos, even if unencrypted HTTP is used, all communication is still encrypted using a symmetric 256-bit key after the authentication phase completes.
You can manually configure WinRM to use HTTPS. The purpose of configuring WinRM for HTTPS is to encrypt the data being sent across the network. This allows for additional security by ensuring server identity via SSL/TLS certificates thereby preventing an attacker from impersonating it. To configure WinRM to use HTTPS, a local computer Server Authentication certificate with a CNAME matching the hostname is required to be installed. To install certificates for the local computer, follow the steps below:
- Select Start and then select Run (or using keyboard combination press Windows key+R)
- Type MMC and then press Enter
- Select File from menu options and then select Add or Remove Snap-ins
- Select Certificates and select Add
- Go through the wizard selecting the Computer account
- Install or view the certificates under Certificates (Local computer) >> Personal >> Certificates.
Once the certificate is successfully installed, use the following command to configure WRM to listen on HTTPS: winrm quickconfig -transport:https
Notable applications of WinRM
- SolarWinds Server & Application Monitor software (SAM) enables remote access for PowerShell with WinRM. It utilizes a WinRM server on monitored servers for its PowerShell integration.
- Thycotic Secret Server—privileged access management (PAM) solution, relies on WinRM components to run PowerShell scripts.
- Ansible—an agentless open-source software provisioning and deployment tool, leverages WinRM to communicate with Windows servers and run PowerShell scripts and commands. Ansible is agentless because of its ability to remotely connect via WinRM, thereby allowing remote PowerShell execution to do its tasks.
- CloudBolt—a hybrid cloud management platform, leverages WinRM as part of Blueprints, Server Actions, and CB Plugins to execute remote scripts on Windows servers using the python pywinrm module.
Windows Remote Management FAQs
Is WinRM the same as RDP?
WinRM and RDP are two different systems, although both were developed by Microsoft. WinRM is designed for the remote management of Windows computers. RDP stands for Remote Desktop Protocol and it provides a view of the Desktop of a remote Windows computer. There are also RDP clients available for Linux, Unix, macOS, Android, and iOS.
What is the difference between WinRM and WMI?
WinRM is the Windows Remote Management system. WMI is the Windows Management Instrumentation system. WMI collects status reports on the services that are integrated into the Windows system. WinRM is a remote protocol. In truth, WinRM extracts WMI data from remote computers, so it uses WMI as a local agent.
Is WinRM enabled by default?
WinRM isn’t enabled by default in Windows Server versions up to 2012. From Windows Server 2012 R2, WinRM is enabled by default.