
This page looks best with JavaScript enabled
At the time of writing (2017-07-18) the latest PowerShell available is PowerShell 5.1 which is a part of Windows 10 1607 and Windows Server 2016.
To find which version of PowerShell you have, type this command into PowerShell:
|
|
To upgrade PowerShell, you’ll need the latest Windows Remote Management for your version of Windows. You might also need to upgrade WinRM to remotely manage servers using the Server Manager tool, which comes with Windows Server and is a part of RSAT for Windows 10 version 1607 and later.
At the time of writing the latest version is 5.1 and it is available to download for Windows 7 Service Pack 1, Windows 8.1, Windows Server 2008 R2, Windows Server 2012, Windows Server 2012 R2.
You can download Windows Remote Management 5.1 here.
In order to install WinRM 5.1 you’ll also need Microsoft .NET Framework 4.5 or above. At the time of writing the latest version is 4.7.
You can download the Microsoft .NET Framework 4.7 Offline installer here.
Hope this helps make some sense of the upgrade path.
If you have any questions or comments, please leave them below.
-Mike
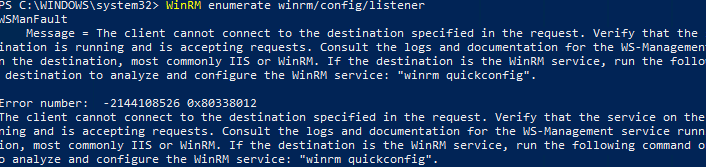
WinRM enumerate winrm/config/listenerYou will see an error saying that the WinRM is not configured:
Note
WSManFault
Message = The client cannot connect to the destination specified in the request. Verify that the service on the destination is running and is accepting requests. Consult the logs and documentation for the WS-Management service running on the destination, most commonly IIS or WinRM. If the destination is the WinRM service, run the following command on the destination to analyze and configure the WinRM service: «winrm quickconfig».Error number: -2144108526 0x80338012
Enable Windows Remote Management WinRM
1. Right click on the Windows Start icon then select Windows PowerShell Admin or Windows Terminal Admin in Windows 11.
2. To enable and configure the WinRM service on Windows, let’s run this command:
PS C:\Windows\system32> winrm quickconfig
WinRM is not set up to receive requests on this machine.
The following changes must be made:

Start the WinRM service.
Set the WinRM service type to delayed auto start.

Make these changes [y/n]? y

WinRM has been updated to receive requests.

WinRM service type changed successfully.
WinRM service started.
WinRM is not set up to allow remote access to this machine for management.
The following changes must be made:

Enable the WinRM firewall exception.
Configure LocalAccountTokenFilterPolicy to grant administrative rights remotely to local users.

Make these changes [y/n]? y

WinRM has been updated for remote management.

WinRM firewall exception enabled.
Configured LocalAccountTokenFilterPolicy to grant administrative rights remotely to local users.
This command will change the WinRM service startup type to automatic, apply default WinRM settings, and add exceptions for WinRM ports (TCP 5985 and 5986) to the list of exceptions in the Microsoft Defender Firewall.
PS C:\Users\admin> WinRM enumerate winrm/config/listener
Listener
    Address = *
    Transport = HTTP
    Port = 5985
    Hostname
    Enabled = true
    URLPrefix = wsman
    CertificateThumbprint
    ListeningOn = 10.10.230.10, 127.0.0.1
Alternatively, you can use the following command to enable WinRM using PowerShell.
PS C:\Windows\system32> Enable-PSRemoting -Force
WinRM has been updated to receive requests.
WinRM service type changed successfully.
WinRM service started.

WinRM has been updated for remote management.
WinRM firewall exception enabled.
Configured LocalAccountTokenFilterPolicy to grant administrative rights remotely to local users.
Enable WinRM via Group Policy
You can automatically enable and configure WinRM on domain computers using Windows GPO.
1. Open the Group Policy Management Console gpmc.msc, select an Active Directory container with the computers you want to enable WinRM on, and create a new GPO.
Open the policy to edit it
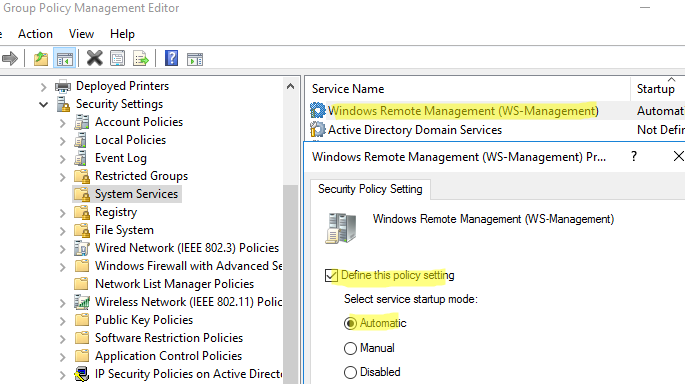
Go to Computer Configuration -> Policies -> Windows Settings -> Security Settings -> System Services. Find the Windows Remote Service (WS-Management) service and enable automatic startup for it
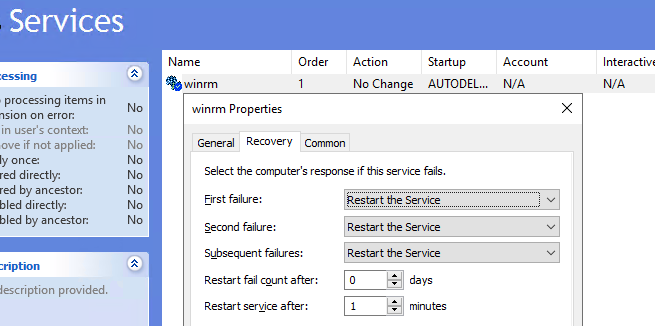
Then go to Computer Policies -> Preferences -> Control Panel Settings -> Services. Select New -> Service. Enter the service name WinRM, and select the Restart the Service action on the Recovery tab.
Go to Computer Configuration -> Policies -> Administrative Templates -> Windows Components -> Windows Remote Management (WinRM) -> WinRM Service. Enable Allow remote server management through WinRM. In the Ipv4/IPv6 filter box, you can specify IP addresses or subnetworks, on which WinRM connections must be listened to. If you want to allow WinRM connections on all IP addresses, leave * here.
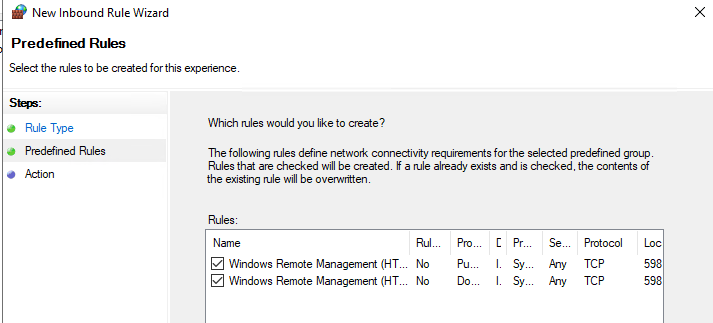
Create Windows Defender Firewall rules allowing WinRM connections on the default ports TCP/5985 and TCP/5986. Go to Computer Configuration -> Policies -> Windows Settings -> Security Settings -> Windows Firewall with Advanced Security -> Windows Firewall with Advanced Security -> Inbound Rules. Select Windows Remote Management predefined rule.
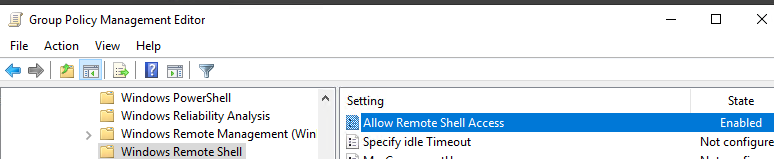
Go to Computer Configuration -> Policies -> Windows Components -> Windows Remote Shell and enable Allow Remote Shell Access.
Update GPO settings on your clients and make sure that WinRM has been configured automatically. You can use the gpresult tool to troubleshoot Group Policy settings on client computers.
Checking WinRM Settings and PowerShell Connectivity
You may list the complete configuration of your WinRM service using this command:
PS C:\Users\admin> Test-NetConnection -ComputerName 10.10.5.56 -Port 5985

ComputerName     : 10.10.5.56
RemoteAddress    : 10.10.5.56
RemotePort       : 5985
InterfaceAlias   : Ethernet
SourceAddress    : 10.10.5.52
TcpTestSucceeded : True
Then try to connect to a remote computer via WinRM. Open the PowerShell console and run the command below. If WinRM is enabled, the following response will appear:
PS C:\Users\admin> Test-WsMan 10.10.5.56

wsmid           : http://schemas.dmtf.org/wbem/wsman/identity/1/wsmanidentity.xsd
ProtocolVersion : http://schemas.dmtf.org/wbem/wsman/1/wsman.xsd
ProductVendor   : Microsoft Corporation
ProductVersion  : OS: 0.0.0 SP: 0.0 Stack: 3.0
You can check for an open WinRM port (TCP/5985) on the remote computer with PowerShell:
PS C:\Users\admin> Test-NetConnection -ComputerName 10.10.5.56 -Port 5985

ComputerName     : 10.10.5.56
RemoteAddress    : 10.10.5.56
RemotePort       : 5985
InterfaceAlias   : Ethernet
SourceAddress    : 10.10.5.52
TcpTestSucceeded : True
Then you may try to connect to a remote computer interactively using PSRemoting and the cmdlet. In this case, the connection is successfully established, and the PS console of the remote host appears.
PS C:\Users\admin> Enter-PSSession 10.10.5.56 -Credential (Get-Credential)

cmdlet Get-Credential at command pipeline position 1
Supply values for the following parameters:
Credential
[10.10.5.56]: PS C:\Users\admin\Documents>
Besides PSRemoting, you can use the to execute commands and scripts on a remote computer:
PS C:\> Invoke-Command -ComputerName 10.10.5.56 -ScriptBlock {ipconfig /all} -Credential (Get-Credential)

cmdlet Get-Credential at command pipeline position 1
Supply values for the following parameters:
Credential

Windows IP Configuration

   Host Name . . . . . . . . . . . . : DESKTOP-9FDRHRJ
   Primary Dns Suffix  . . . . . . . :
   Node Type . . . . . . . . . . . . : Hybrid
   IP Routing Enabled. . . . . . . . : No
   WINS Proxy Enabled. . . . . . . . : No

Ethernet adapter Ethernet0:

   Connection-specific DNS Suffix  . :
   Description . . . . . . . . . . . : Intel(R) 82574L Gigabit Network Connection
   Physical Address. . . . . . . . . : 00-0C-29-48-AA-0B
   DHCP Enabled. . . . . . . . . . . : No
   Autoconfiguration Enabled . . . . : Yes
   Link-local IPv6 Address . . . . . : fe80::2539:e0f:b335:1987%8(Preferred)
   IPv4 Address. . . . . . . . . . . : 10.10.5.56(Preferred)
   Subnet Mask . . . . . . . . . . . : 255.255.0.0
   Default Gateway . . . . . . . . . : 10.10.0.1
   DHCPv6 IAID . . . . . . . . . . . : 100666409
   DHCPv6 Client DUID. . . . . . . . : 00-01-00-01-29-D7-F4-C4-00-0C-29-48-AA-0B
   DNS Servers . . . . . . . . . . . : 1.1.1.1
                                       8.8.8.8
NetBIOS over Tcpip. . . . . . . . : EnabledВ этой статье мы рассмотрим, как централизованно включить и настроить службу удаленного управления Windows Remote Management (WinRM) на компьютерах домена с помощью групповых политик. Напомню, что Windows Remote Management это реализация протокола WS-Management Protocol для удаленного управления клиентскими и серверными ОС Windows. WinRM позволяет удаленно управлять компьютерами через:
- Server Manager (Windows Server);
- PowerShell Remoting (PSSession);
- Windows Admin Center.
Как включить WinRM в Windows вручную?
Служба WinRM установлена во всех современных версиях Windows. В Windows Server она включена по умолчанию, и отключена в десктопных редакциях Windows 11/10/8.1). По умолчанию слушатель службы WinRM listener не принимает подключения. Чтобы проверить это, выполните на клиенте команду:
WinRM enumerate winrm/config/listener
Появится ошибка, которая говорит, что служба WinRM не настроена:
WSManFault Message = The client cannot connect to the destination specified in the request. Verify that the service on the destination is running and is accepting requests. Consult the logs and documentation for the WS-Management service running on the destination, most commonly IIS or WinRM. If the destination is the WinRM service, run the following command on the destination to analyze and configure the WinRM service: "winrm quickconfig".
Error number: -2144108526 0x80338012
Чтобы включить и настроить службу WinRM в Windows, достаточно выполнить команду:
winrm quickconfig
или
Enable-PSRemoting –Force
WinRM has been updated to receive requests.
WinRM service type changed successfully.
WinRM service started.
Данная команда изменит тип запуска службы WinRM на автоматический, задаст стандартные настройки WinRM и добавить исключения для WinRM портов (5985 и 5986) в список исключений Windows Defender Firewall.
Настройка WinRM с помощью групповых политик
Вы можете автоматически включить и настроить WinRM на компьютерах домена с помощью групповых политик Windows.
- Откройте консоль редактора Group Policy Management Console (gpmc.msc), выберите контейнер с компьютерами на которых вы хотите включить WinRM и создайте новую политику corpEnableWinRM;
- Откройте политику на редактирование;
- Перейдите в раздел Computer Configuration -> Policies -> Windows Settings -> Security Settings -> System Services. Найдите службу Windows Remote Service (WS-Management) и настройте ее на автоматический запуск;

- Теперь перейдите в раздел Computer Policies -> Preferences -> Control Panel Settings -> Services и выберите New -> Service. Укажите имя службы WinRM и на вкладке Recovery задайте действие Restart the Service;
- Перейдите в раздел Computer Configuration -> Policies -> Administrative Templates -> Windows Components -> Windows Remote Management (WinRM) -> WinRM Service. Включите параметр Allow remote server management through WinRM. В поле фильтр IPv4/IPv6 можно указать IP адреса или подсети, на которых нужно слушать удаленные подключения через WinRM. Если вы хотите разрешать принимать WinRM подключения на всех IP адресах, оставьте здесь *;
- Откройте в Windows Defender Firewall правила, разрешающие подключаться к WinRM по стандартным портам 5985 и 5986. Перейдите в Computer Configuration -> Policies -> Windows Settings -> Security Settings -> Windows Firewall with Advanced Security -> Windows Firewall with Advanced Security -> Inbound Rules. Выберите predefined rule Windows Remote Management;
- Перейдите в раздел Computer Configuration -> Policies -> Windows Components -> Windows Remote Shell и включите параметр Allow Remote Shell Access.

Обновите настройки GPO на клиентах и проверьте, что служба WinRM настроилась автоматически. Для диагностики применения групповой политики на клиенте можно использовать утилиту gpresult.
Проверка настроек WinRM
Чтобы проверить, что настройки WinRM на компьютере заданы через групповые политики, выполните команду:
winrm e winrm/config/listener
Команда выведет текущие настройки WinRM листенера. Обратите внимание на строку
Listener [Source="GPO"]
. Она означает, что настройки получены через групповые политики.

Полную конфигурацию службы WinRM можно вывести с помощью команды:
winrm get winrm/config
Теперь нужно попробовать удаленно подключиться к компьютеру через WinRM. Запустите на удаленном компьютере консоль PowerShell с учетной записью с правами администратора на обоих компьютерах и выполните команду:
Test-WsMan YourCompName1
Если WinRM включен, появится такой ответ:
wsmid : http://schemas.dmtf.org/wbem/wsman/identity/1/wsmanidentity.xsd
ProtocolVersion : http://schemas.dmtf.org/wbem/wsman/1/wsman.xsd
ProductVendor : Microsoft Corporation
ProductVersion : OS: 0.0.0 SP: 0.0 Stack: 3.0

Проверить доступность порта 5985 на удаленном компьютере можно так:
Test-NetConnection -ComputerName YourCompName1 -Port 5985
Теперь можно попробовать выполнить интерактивное подключение к удаленному компьютеру через PSRemoting с помощью командлета Enter-PSSession:
Enter-PSSession CompNameHere1
В данном случае подключение было успешно установлено и перед вами открылась консоль удаленного сервера.
По аналогии через PSRemoting на удаленном компьютере команду можно выполнить произвольную команду с помощью Invoke-Command:
Invoke-Command -ComputerName YourCompName1 -ScriptBlock {ipconfig /all}
Если соединение работает, вы увидите на экране вывод команды
ipconfig
.
Также можно выполнить команду на удаленном хосте так:
winrs -r:wsk-w10BO1 dir
В некоторых случаях при подключении через PSSession может появится ошибка:
Enter-PSSession : Connecting to remote server wsk-w10BO1 failed with the following error message : Access is denied.
CategoryInfo : InvalidArgument: (wsk-w10BO1:String) [Enter-PSSession], PSRemotingTransportException FullyQualifiedErrorId : CreateRemoteRunspaceFailed
В этом случае проверьте настройки разрешения для подключения к WinRM на удаленном компьютере:
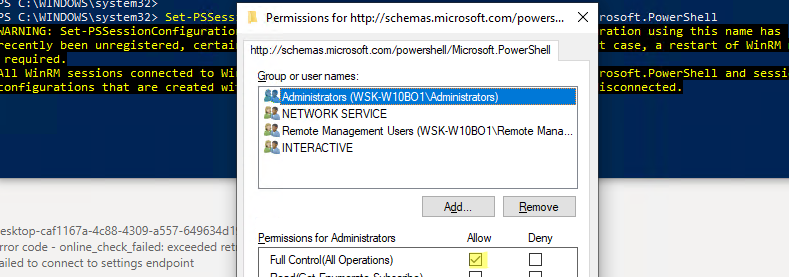
Set-PSSessionConfiguration -ShowSecurityDescriptorUI -Name Microsoft.PowerShell
Убедитесь, что ваша учетная запись входит в группу Administrators или Remote Management Users (см. статью об удаленном доступе через WinRM без прав администратора) и им предоставлены права FullControl. Также проверьте, нет ли Deny правил.
Для настройки WinRM и PSRemoting в рабочей группе (без домена AD) рекомендуем использовать эту инструкцию.
Содержание страницы
- Первоначальная настройка
- Удаление настроек
- Исправление ошибок
- Код события:10154 Источник: Microsoft-Windows-WinRM
Первоначальная настройка
Для включения и первоначальной настроики службы WinRM в Windows, есть несколько вариантов
- CMD
winrm quickconfig
winrm e winrm/config/listener
- PowerShell
Enable-PSRemoting –Force
Enable-WSManCredSSP -Role server –Force
Удаление настроек
Disable-PSRemoting -Force
Исправление ошибок
Код события:10154 Источник: Microsoft-Windows-WinRM
Event ID: 10154, Source: Microsoft-Windows-WinRM, Type: Warning
Службе WinRM не удалось создать следующие имена участников-служб: WSMAN/dc1.notdev.local, WSMAN/dc1
Дополнительные данные
Была получена ошибка “8344”: %%8344.
Проблема чаще всего возникает с серверами Hyper-V и AD DC, проблема существует очень давно и до сих пор не решена, либо MS не желает объяснять почему эту процедуру нужно выполнять самостоятельно либо просто игнорируют данную ошибку, которая редко когда мешает работе служб.
Исправить данную ошибку проще всего используя командную строку
dsacls "CN=DC1,OU=Domain Controllers,DC=notdev,DC=local" /G "S-1-5-20:WS;Validated write to service principal name"
dsacls "CN=DC2,OU=Domain Controllers,DC=notdev,DC=local" /G "S-1-5-20:WS;Validated write to service principal name"
dsacls "CN=HVS1,OU=Hyper-V,DC=notdev,DC=local" /G "S-1-5-20:WS;Validated write to service principal name"
dsacls "CN=HVS2,OU=Hyper-V,DC=notdev,DC=local" /G "S-1-5-20:WS;Validated write to service principal name"
dsacls "CN=HVS3,OU=Hyper-V,DC=notdev,DC=local" /G "S-1-5-20:WS;Validated write to service principal name"
dsacls "CN=HVS4,OU=Hyper-V,DC=notdev,DC=local" /G "S-1-5-20:WS;Validated write to service principal name"
CN=DC1,OU=Domain Controllers,DC=notdev,DC=local – путь до указанного сервера
S-1-5-20 – это учетная запись Сетевая служба / NETWORK SERVICE
Validated write to service principal name /в русской локализации Удостоверенная запись на узел с именем участника службы или Удостоверенная запись на узел с именем субъекта-службы
Решение через графический интерфейс
Вариант через оснастку Редактирование ADSI (ADSIEDIT)
- Запустите adsiedit.msc
- Подключитесь к домену
- Перейдите к DC=notdev,DC=local далее OU=Domain Controllers и выберите узел CN=DC1
- Щелкните правой кнопкой мыши CN=DC1, нажмите Свойства
- Перейдите на вкладку Безопасность
- Добавьте учетную запись сетевой службы NETWORK SERVICE
- Затем установите флажок (X), чтобы разрешить доступ Validated write to service principal name, в русской локализации Удостоверенная запись на узел с именем участника службы или Удостоверенная запись на узел с именем субъекта-службы
- Нажмите ОК
- Перезапустите службу Удаленное управление Windows (WS-Management)
- Проверьте журнал событий на наличие ошибок
Вариант через оснастку Active Directory Пользователи и Компьютеры (ADUC)
- Запустите dsa.msc
- Подключитесь к домену
- Включите отображение дополнительных компонентов, Вид -> Дополнительные компоненты
- Перейдите в OU=Domain Controllers и выберите узел DC1
- Щелкните правой кнопкой мыши DC1, нажмите Свойства
- Перейдите на вкладку Безопасность
- Добавьте учетную запись сетевой службы NETWORK SERVICE
- Затем установите флажок (X), чтобы разрешить доступ Validated write to service principal name, в русской локализации Удостоверенная запись на узел с именем участника службы или Удостоверенная запись на узел с именем субъекта-службы
- Нажмите ОК
- Перезапустите службу Удаленное управление Windows (WS-Management)
- Проверьте журнал событий на наличие ошибок
–
Дополнительные материалы
- Идентификаторы безопасности
Enabling Windows Remote Management (WinRM) on Windows 10 is a simple process that involves tweaking a few settings. This will allow you to manage and configure your Windows machine remotely. Here’s a quick overview: open a command prompt with administrative privileges, and run the command: winrm quickconfig. This will enable the WinRM service and set it up for basic remote management.
Let’s get into the nitty-gritty of enabling WinRM on your Windows 10 machine. Follow these steps to ensure your computer is set up for remote management.
Step 1: Open Command Prompt as Administrator
Press Win + X, then choose «Command Prompt (Admin)» from the menu.
Opening Command Prompt as an administrator ensures you have the necessary permissions to make system changes. This step is crucial because without admin privileges, the commands won’t work.
Step 2: Run the Command
Type winrm quickconfig and press Enter.
Running this command will check the WinRM service, and if it’s not already running, it will prompt you to start and configure it. Simply follow the prompts.
Step 3: Confirm Prompts
Type y and press Enter to confirm any prompts that appear.
You may be asked if you want to make changes to the firewall or start the WinRM service. Typing y and pressing Enter will confirm these actions and proceed with the setup.
Step 4: Verify the Configuration
Run winrm get winrm/config to verify the configuration.
This command will show you the current WinRM settings, helping you confirm that the service is correctly configured and running.
Step 5: Adjust Firewall Settings (If Necessary)
Open Windows Firewall settings and allow WinRM traffic through.
If you’re having trouble connecting remotely, you might need to manually adjust your firewall settings to allow WinRM traffic. This can be done through the Windows Firewall interface.
Step 6: Run a Test Connection
Test the connection using Test-WSMan in PowerShell.
Running this command will help you ensure that you can connect to the remote computer using WinRM. Replace “ with the actual name of your remote machine.
Once you’ve completed these steps, your Windows 10 machine will be ready for remote management. You can now use tools like PowerShell Remoting or other remote management tools to connect and manage your computer from anywhere.
Tips for Enabling WinRM on Windows 10
- Make sure your Windows is updated to the latest version for compatibility.
- If you encounter issues, check the Event Viewer for detailed error messages.
- Use strong passwords and secure your remote connections to protect your machine.
- Periodically review your WinRM settings to ensure they meet your security needs.
- Familiarize yourself with PowerShell commands for more advanced remote management capabilities.
Frequently Asked Questions
What is WinRM used for?
WinRM is used for remote management of Windows machines, allowing administrators to perform tasks from a remote location.
Is WinRM enabled by default on Windows 10?
No, WinRM is not enabled by default on Windows 10. You need to enable it manually using the steps outlined above.
Can I use WinRM on a home network?
Yes, you can use WinRM on a home network, but ensure your network is secure, as remote management opens up potential security risks.
Do I need PowerShell to use WinRM?
While PowerShell is commonly used with WinRM, you can use other management tools as well. However, PowerShell offers more advanced capabilities.
How do I disable WinRM?
To disable WinRM, open Command Prompt as an administrator and run the command winrm delete winrm/config.
Summary
- Open Command Prompt as Administrator.
- Run
winrm quickconfig. - Confirm prompts.
- Verify the configuration.
- Adjust firewall settings if necessary.
- Run a test connection.
Conclusion
Enabling WinRM on Windows 10 can open up a world of possibilities for remote management and troubleshooting. Whether you’re a seasoned IT professional or just someone looking to manage your home network more effectively, knowing how to enable and configure WinRM is an invaluable skill.
By following the steps laid out in this guide, you’ll find the process straightforward and easy to execute. Remember to keep security in mind as you configure your settings and to periodically review your configurations. If you’re interested in learning more, consider diving into advanced PowerShell commands or exploring other remote management tools that integrate with WinRM.
Feel free to drop any questions or experiences you have in the comments. Happy managing!
Matt Jacobs has been working as an IT consultant for small businesses since receiving his Master’s degree in 2003. While he still does some consulting work, his primary focus now is on creating technology support content for SupportYourTech.com.
His work can be found on many websites and focuses on topics such as Microsoft Office, Apple devices, Android devices, Photoshop, and more.