

Microsoft сообщила, что с 27 мая 2025 года компания прекратит поддержку Remote Desktop App и удалит приложение из Microsoft Store ради продвижения своего нового решения Windows App. Если клиентам нужно просто подключаться к удалённым ПК, то Microsoft рекомендует перейти на встроенное в Windows приложение Remote Desktop Connection.
Всем пользователям и системным администраторам настоятельно рекомендуется перейти с приложения Remote Desktop на Windows App, если они хотят продолжить использовать Windows 365, Azure Virtual Desktop и Microsoft Dev Box. После 27 мая 2025 года доступ к этим функциям через Remote Desktop App будет прекращён.

Microsoft заявила, что Windows App по сравнению со старым приложением Remote Desktop имеет ряд преимуществ:
-
единый доступ к нескольким службам Windows, включая облачные ПК и виртуальные рабочие столы, из одного оптимизированного интерфейса;
-
настраиваемые домашние экраны, поддержка нескольких мониторов и динамические разрешения экрана;
-
расширенные возможности удалённой работы с такими функциями, как перенаправление устройств, оптимизация Microsoft Teams и простое переключение учётных записей;
-
доступ к Windows 365, Azure Virtual Desktop и Microsoft Dev Box.
Microsoft также напомнила пользователям, что у Windows App есть свои ограничения в работе и список известных ошибок на всех поддерживаемых платформах, таких как невозможность использования в определённых средах с прокси‑аутентификацией.
В сентябре 2024 года Microsoft официально выпустила стабильную версию приложения Windows App для Windows, macOS, iOS, iPadOS и веб‑браузеров. Это обновлённая версия Remote Desktop для подключения к удалённым рабочим столам Windows.

В Microsoft пояснили, что приложение Windows App было разработано, чтобы предоставить как конечным пользователям, так и системным администраторам более унифицированный интерфейс для любой платформы. Это решение позволяет пользователям подключаться к удалённым, локальным и облачным службам ПК, таким как Windows 365, Azure Virtual Desktop, Remote Desktop, Remote Desktop Services, Microsoft Dev Box и другим.
Microsoft заявила, что Windows App позволяет пользователям настраивать домашний экран и использовать такие функции, как перенаправление устройств, оптимизация Microsoft Teams, поддержку настроек с несколькими мониторами и динамические разрешения экрана. Также предполагается, что приложение предоставит пользователям быстрый способ переключения своих учётных записей в Windows.
The Microsoft Remote Desktop client is a free app for Windows 11 and Windows 10, available through the Microsoft Store, useful when you need remote access to another Windows computer or device. This universal remote desktop client works both with devices available in your network and devices with public IP addresses that are accessible through the internet. For example, you can use it to connect to a Windows computer from your office while you are working from home. Here’s how to use the Microsoft Remote Desktop client in Windows to work with remote computers and devices:
How to install the Microsoft Remote Desktop client app
The Microsoft Remote Desktop app is not present by default in Windows 11 and Windows 10, so you need to install it manually. To get it, click or tap on this link or open the Microsoft Store, search for “remote desktop,” and click or tap on the Microsoft Remote Desktop app in the results list.
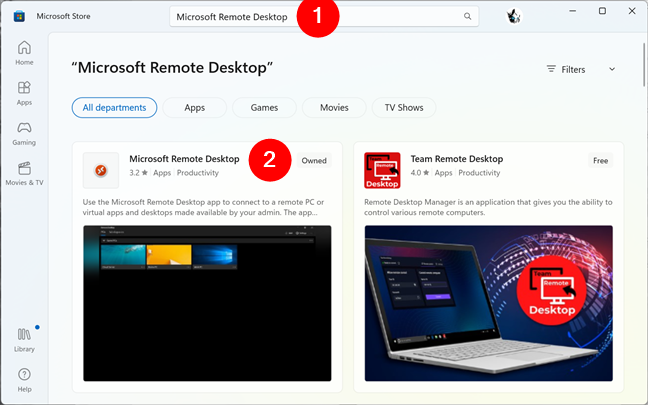
Search Microsoft Remote Desktop in the Store
TIP: Did you know you can use the Microsoft Store even without a Microsoft account?
Click or tap Get or Install and wait for the remote desktop client to install.

Installing the Microsoft Remote Desktop client
How to start the Microsoft Remote Desktop app on Windows
The fastest way to open anything in Windows 11 is to use the search. That goes for the Microsoft Remote Desktop app, too: type “remote desktop” in the search box on your taskbar, select the Remote Desktop app, and then click or tap on Open.
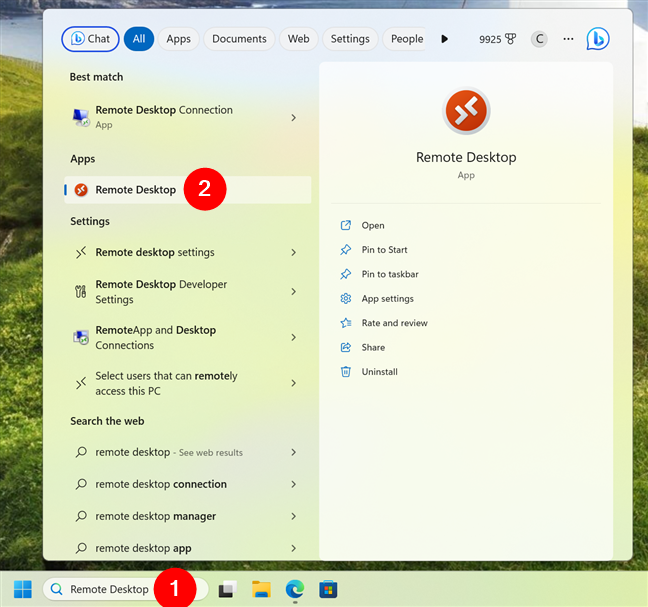
Search and open the Remote Desktop app in Windows 11
Similarly, you can use the search in Windows 10 too. Click or tap on the search box next to the Start Menu, type “remote desktop,” and select Remote Desktop in the apps results list.
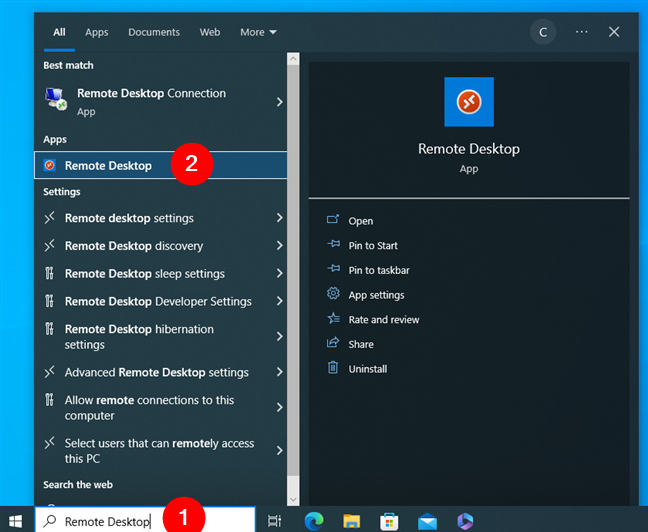
Search and open the Remote Desktop app in Windows 10
Alternatively, another method that works the same in both Windows 11 and Windows 10 is to open the Start Menu and click or tap the Remote Desktop shortcut in the list of apps.
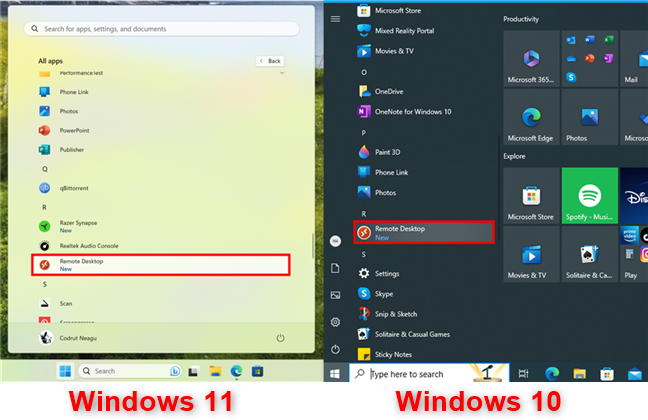
The Remote Desktop shortcut in the Start Menu
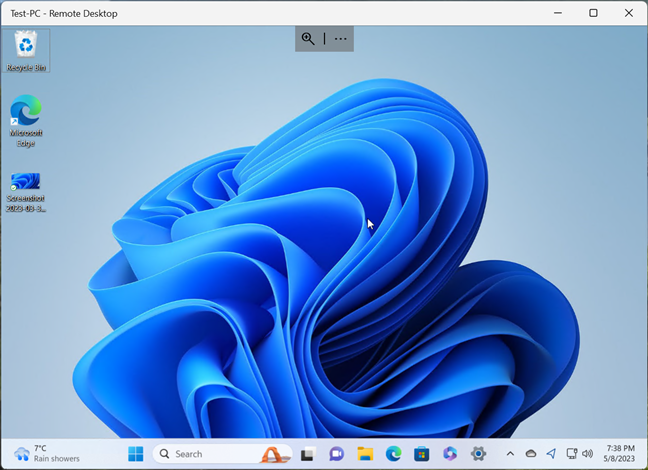
When you first launch the app, you get to see a screen letting you know what you can do with it.

The Microsoft Remote Desktop window
How to add a computer to the Microsoft Remote Desktop client
You can initiate a remote connection from devices running any edition of Windows 11 and Windows 10, including the Home edition. However, you can connect remotely only to computers or devices that are running Windows 11 and Windows 10 Pro and Enterprise. Older versions of Windows can also be remotely controlled: Windows 8.1 and 8 Enterprise and Pro, Windows 7 Professional, Enterprise, and Ultimate, and Windows Server versions newer than Windows Server 2008. However, you can’t connect to Mac OS X or Linux computers using this app.
To connect to a remote computer using Microsoft Remote Desktop, you must first set up that computer to allow remote connections. For detailed instructions on how to do this, read: How to enable Remote Desktop in Windows.
To connect to the remote computer, click or tap on + Add in the top-right corner of the Microsoft Remote Desktop client.
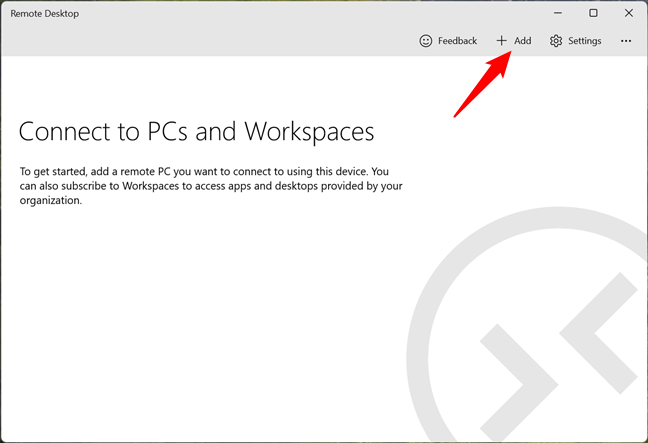
The Add button from the Microsoft Remote Desktop app
In the menu that shows up in the remote desktop client, choose PCs.
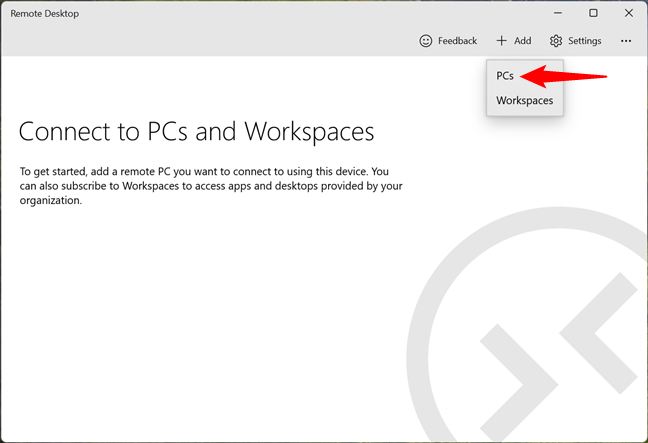
Choosing to add a remote Desktop computer
Enter the name of the target computer (in my case, Test-PC) or its IP address into the PC name text field. Note that you can also specify the port to use, like, for example, OfficePC:37770. That’s all you need to configure a remote desktop connection to another Windows computer, so you can simply click or tap Save.
If you leave everything else as is, when you initiate the remote desktop connection, you are asked to authenticate with a user account that has remote desktop access. However, there are a few additional configuration options that you might want to adjust first: read the next sections of this guide to find out what they are.
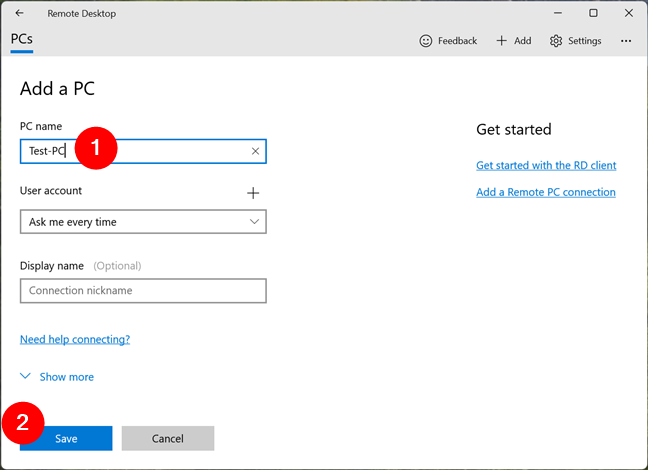
The name of the remote desktop computer
How to configure a remote desktop connection to a Windows computer
To make things easier and configure the remote desktop connection as you want, you can also adjust the following settings:
User account: click or tap on the + (plus) sign to the right of the field to enter the name of the user account that you want to use.
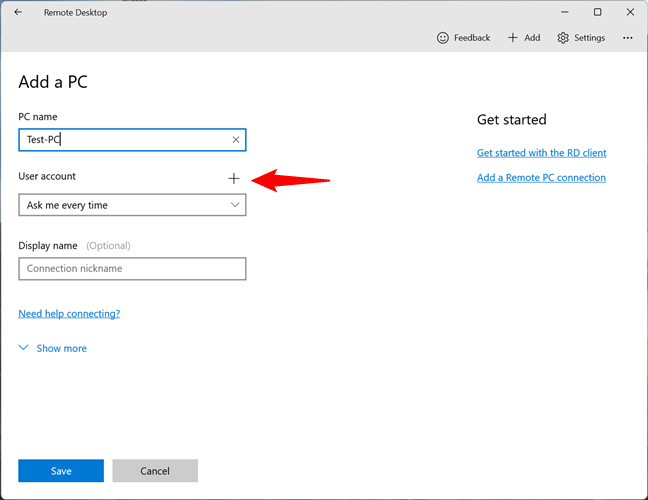
Press the plus sign next to User account
You can enter the name of the user account in the following formats: username, domain\username, or [email protected]. If you want to connect even faster, you can also specify the user’s password in the Password field. Furthermore, for a friendlier experience, you can type a nickname for that user account in the Display name field.
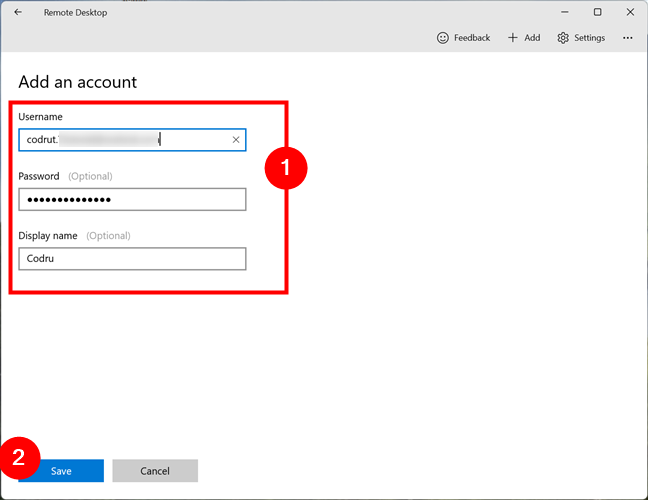
Adding a user account for the remote desktop computer
In the Display name field, enter a friendly name for the Windows computer to which you’re going to connect, to help you identify it more easily. If you leave this field empty, the name of that computer is used instead.
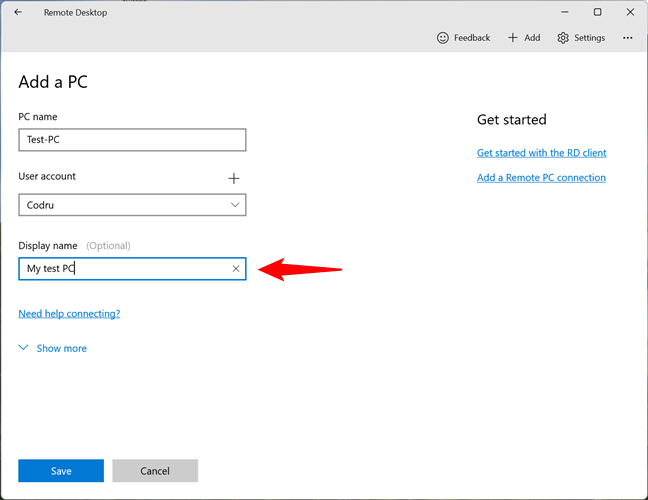
Choosing a display name for the remote desktop connection
Click or tap on Show More at the end of the “Add a PC” pane.
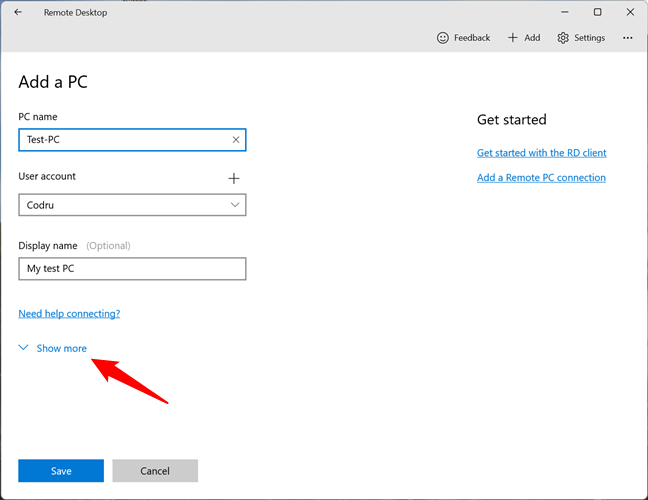
Click or tap on Show more
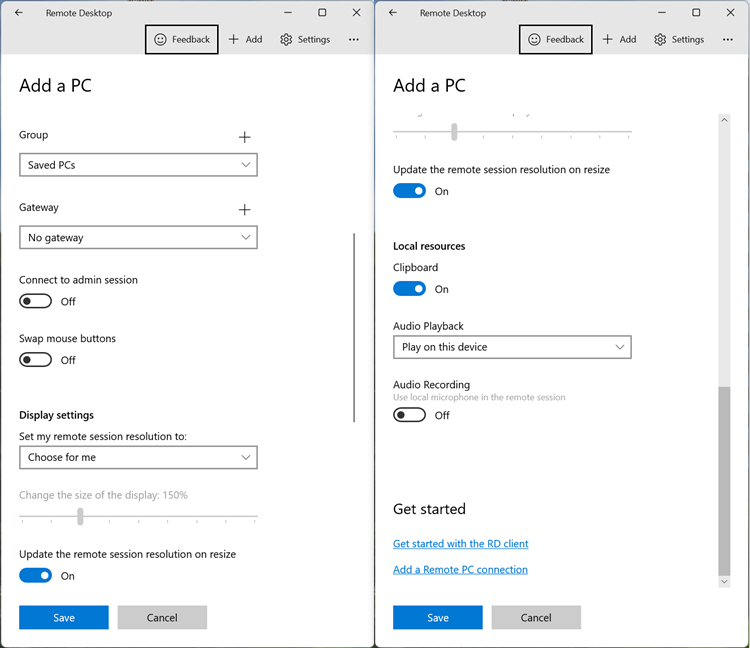
Then, you can change the following settings for the remote desktop connection:
- Group: includes the remote desktop connection in the group of connections you specify. This can be useful if you use many remote Windows computers.
- Gateway: you need this information if you are going to connect to a Windows computer inside a corporate network, and you can get the gateway details from your network administrator. For home networks, you don’t need it.
- Connect to admin session: enable this setting if you want to connect to a console session on a Windows server.
- Swap mouse buttons: swaps the left and right-click mouse buttons. Enable this option if the remote computer you’re connecting to is configured for a left-handed user and you want the opposite (or the other way around).
- Display settings:
- Set my remote session resolution to: select the display resolution you want to use for the remote computer. If you leave the default setting, the remote desktop resolution is adjusted to that of your Microsoft Remote Desktop client window.
- Change the size of the display: If you’ve selected a high resolution for the remote computer, this setting adjusts the size of the items on the screen.
- Update the remote session resolution on resize: If enabled, changing the size of the Microsoft Remote Desktop client window automatically changes the resolution of the remote desktop computer.
- Local resources:
- Clipboard: if enabled, you can copy and paste items between the remote PC and your Windows 11 and Windows 10 computer.
- Audio Playback: lets you choose the audio device used when a remote connection session is on. You can choose to play sounds from the remote computer on your Windows 11/Windows 10 PC, on the remote computer, or on neither of them.
- Audio Recording: if you activate this setting, you can use the microphone on your Windows 11 and Windows 10 computer on the remote PC.
The configuration options available for a remote computer
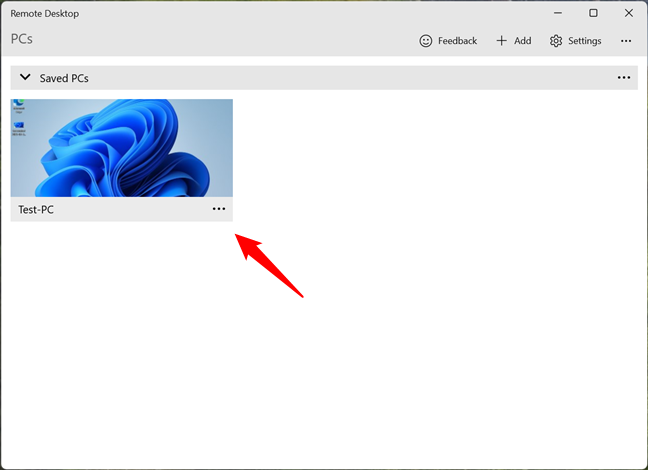
When you are done setting up everything, click or tap on Save. Then, you see your remote computer displayed as an option in your chosen Group. If you didn’t specify a Group, the default one is Saved PCs.
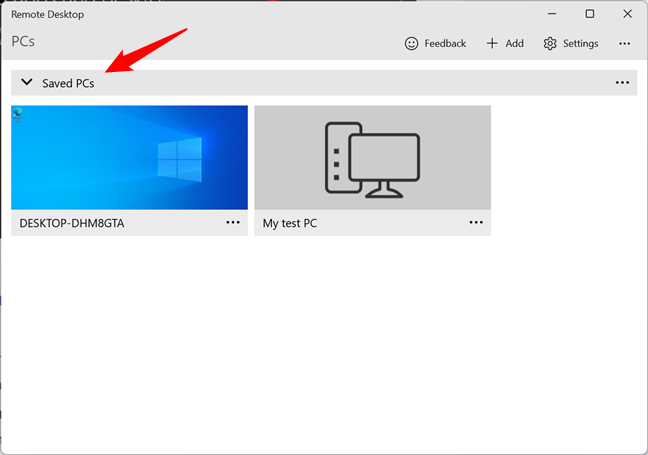
Saved PCs is the default group in Microsoft Remote Desktop
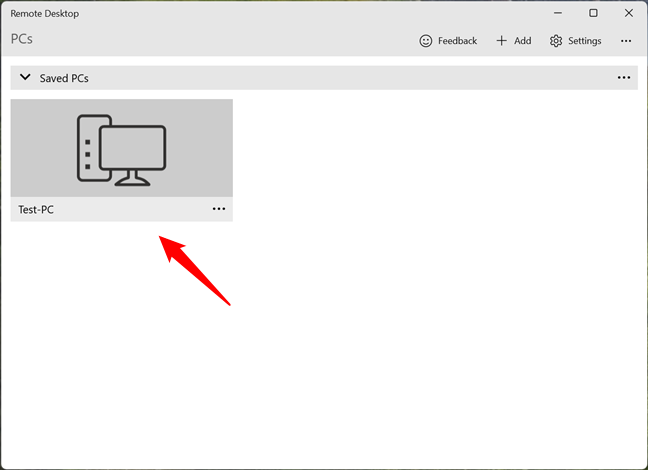
How to connect to a remote Windows computer with Microsoft Remote Desktop
In Microsoft Remote Desktop’s window, click or tap on the remote computer you want to connect to.
Connect to a remote computer with Microsoft Remote Desktop
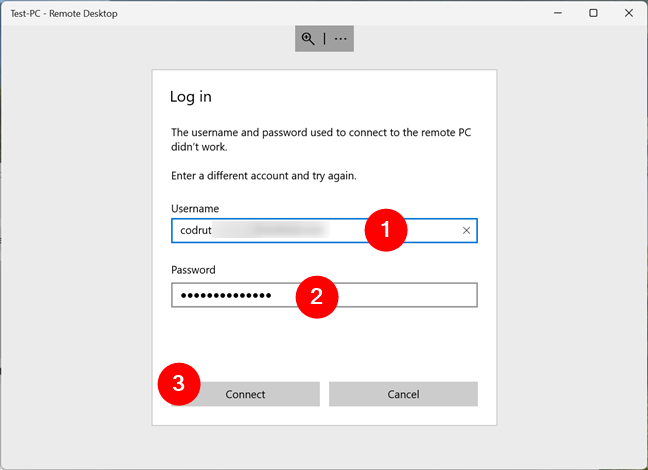
Then, the app connects to it and, unless you already configured the user account for it, asks you for the credentials. Type the credentials of the device you are connecting to and press Connect.
Connecting to a remote desktop computer
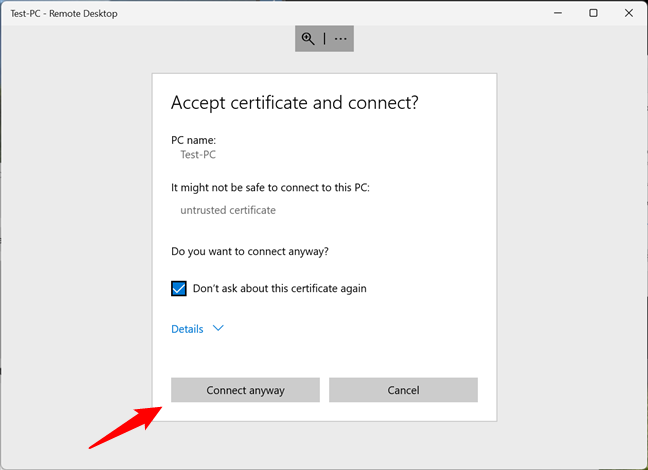
Next, unless your network administrator configured certificates for remote connections, you are informed that the connection is not certified by a trusted authority.
If you don’t want to see this warning each time you remote connect, check the option that says “Don’t ask about this certificate again.” Then, to start the remote connection, click or tap Connect anyway.
Accept certificate and connect
Finally, you connect to the remote Windows computer or device. You can now see its desktop, and you can start working as if you were in front of it.
Established remote desktop connection
How to use the options available in the Remote Desktop app
When you connect to a remote Windows computer or device, at the top of the window, you get two buttons: Zoom and More.
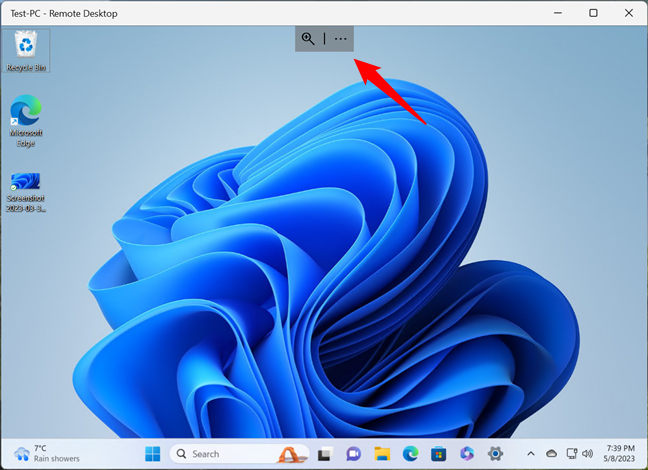
The options available for an active remote desktop connection
Clicking or tapping on Zoom enlarges the remote screen for better readability. Pressing it again restores the display to the full remote desktop view.

Zoom in and out on a remote desktop
The More (…) button shows you two options on the right side of the window: Disconnect, which closes the remote desktop connection, and Full-screen, which switches your Microsoft Remote Desktop client window between full-screen and windowed mode.
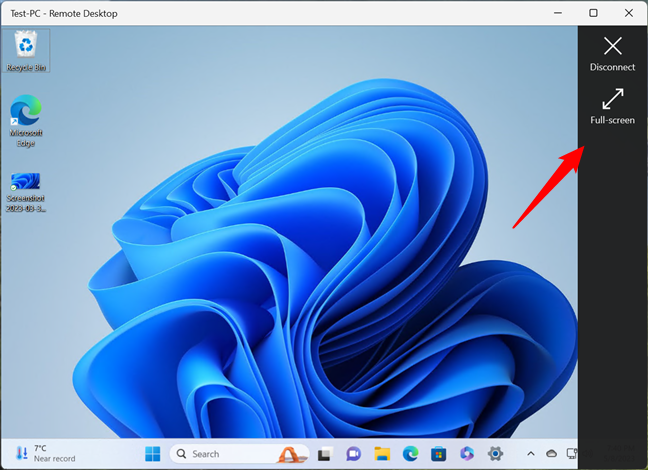
Disconnect or switch to full-screen in a remote desktop connection
How to edit a remote desktop connection in the Microsoft Remote Desktop client
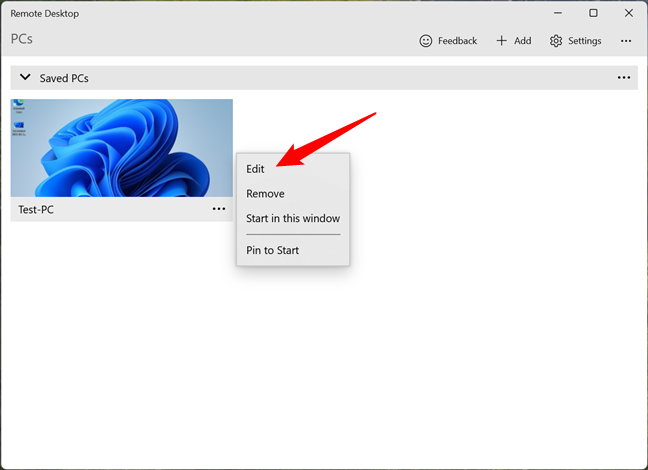
If you want to change the settings of a remote desktop connection after creating it, on the dashboard of the Microsoft Remote Desktop client, click or tap on the three dots button from its bottom-right corner.
The More button of a remote desktop computer
This opens a menu with a few options. The first one is Edit, and it brings up all the settings of that remote desktop connection, which I explained earlier. You can also Remove the remote computer from your list of remote connections, make the remote connection “Start in this window,” or “Pin [it] to Start” so that you can initiate it even faster.
Additional options for a remote desktop connection
How to configure the general settings of the remote desktop connections
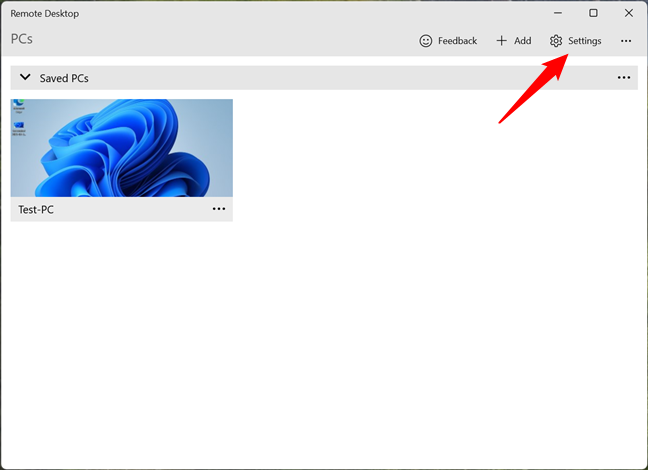
The Microsoft Remote Desktop app also includes a few other useful settings that apply to all your remote connections. To access these connection settings, click or tap on the Settings button from the top-right corner of Microsoft Remote Desktop.
The Settings button from the Microsoft Remote Desktop app
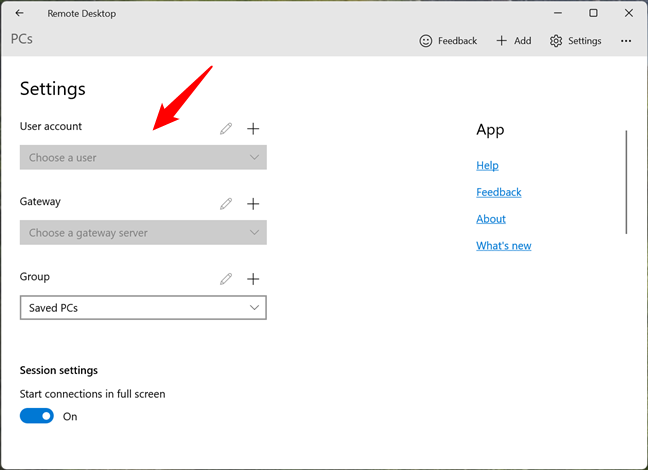
In the Settings pane, you can add a User account that’s going to be available to choose from in all the remote desktop connections you create or have already added, specify a default Gateway and Group, as well as choose whether all your remote connections are initiated in full screen.
Additional Settings for all the remote desktop connections
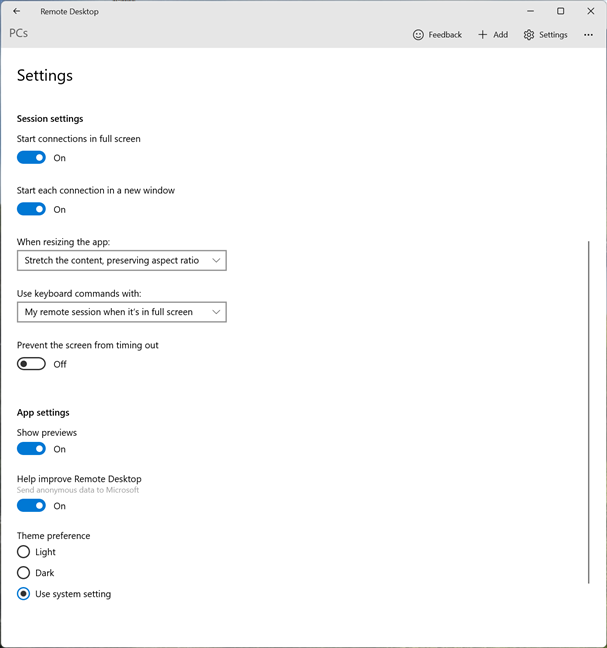
Furthermore, you can also decide how the remote desktop is resized when you adjust the Microsoft Remote Desktop window, choose when the keyboard shortcuts are sent to the remote desktop computer or kept on your local Windows 11 and Windows 10 computer, and “Prevent the screen from timing out” when a remote session is active.
Other options available in the Microsoft Remote Desktop app
Finally, you can make the Microsoft Remote Desktop client “Show desktop previews” (see desktop previews of remote PCs on the app’s dashboard), “Help improve Remote Desktop” (which sends anonymous data to Microsoft about how you use the app), and also select a Theme preference (enable or disable light or dark mode).
TIP: Did you know there is a version of the Microsoft Remote Desktop app available for Mac computers? To learn more about it, read How to remote access Windows from Mac.
Do you use the Microsoft Remote Desktop app?
Now that you’ve learned how to use the Microsoft Remote Desktop app, try it and let me know what you think. Does it offer everything you need? Did you come across any issues while using it? I hope that you’ve encountered no problems, and thanks for reading this guide.
Поддержка RDP — протокола удаленного рабочего стола присутствует в Windows начиная с версии XP, однако далеко не все знают, как пользоваться (и даже о наличии) Microsoft Remote Desktop для удаленного подключения к компьютеру с Windows 10, 8 или Windows 7, в том числе и не используя никаких сторонних программ.
В этой инструкции описывается, как использовать удаленный рабочий стол Microsoft с компьютера на Windows, Mac OS X, а также с мобильных устройств Android, iPhone и iPad. Хотя процесс мало чем отличается для всех этих устройств, за исключением того, что в первом случае все необходимое является частью операционной системы. См. также: Лучшие программы для удаленного доступа к компьютеру.
Примечание: подключение возможно только к компьютерам с редакцией Windows не ниже Pro (при этом подключаться можно и с домашней версии), но в Windows 10 появилась новая очень простая для начинающих пользователей возможность удаленного подключения к рабочему столу, которая подойдет в тех ситуациях, когда она требуется однократно и необходимо подключение через Интернет, см. Удаленное подключение к компьютеру с помощью приложения Быстрая помощь в Windows 10.
Перед использованием удаленного рабочего стола
Удаленный рабочий стол по протоколу RDP по умолчанию предполагает, что вы будете подключаться к одному компьютеру с другого устройства, находящегося в той же локальной сети (В домашних условиях это обычно означает подключенного к тому же роутеру. Есть способы подключения и по Интернету, о чем поговорим в завершении статьи).
Для подключения требуется знать IP адрес компьютера в локальной сети или имя компьютера (второй вариант работает только в случае, если включено сетевое обнаружение), а с учетом того, что в большинстве домашних конфигураций IP-адрес постоянно меняется, прежде чем начать, рекомендую назначить статический IP адрес (только в локальной сети, к вашему провайдеру Интернета этот статический IP не имеет отношения) для компьютера, к которому будет выполняться подключение.
Могу предложить два способа сделать это. Простой: зайдите в панель управления — Центр управления сетями и общим доступом (или правый клик по значку соединения в области уведомлений — Центр управления сетями и общим доступом. В Windows 10 1709 пункт отсутствуют в контекстном меню: открываются параметры сети в новом интерфейсе, внизу которых есть ссылка для открытия Центра управления сетями и общим доступом, подробнее: Как открыть Центр управления сетями и общим доступом в Windows 10). В разделе просмотра активных сетей, кликните по подключению по локальной сети (Ethernet) или Wi-Fi и нажмите кнопку «Сведения» в следующем окне.
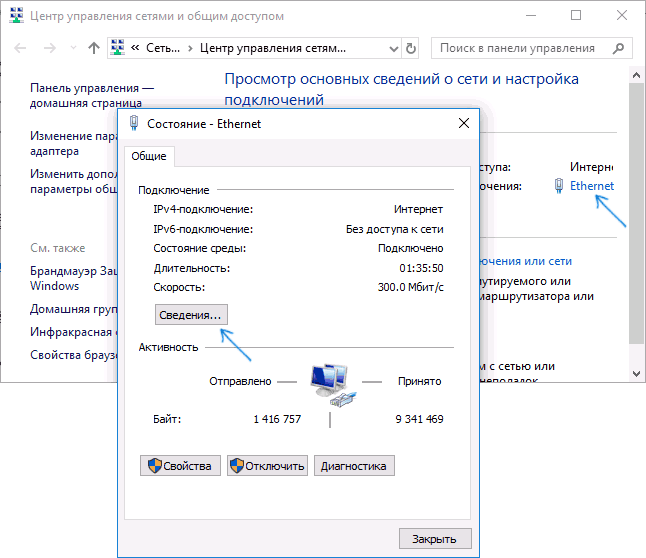
Из этого окна вам потребуется информация об IP-адресе, шлюзе по умолчанию и DNS серверах.
Закройте окно сведений о подключении, и нажмите «Свойства» в окне состояния. В списке используемых подключением компонентов выберите Протокол Интернета версии 4, нажмите кнопку «Свойства», после чего введите параметры, полученные ранее в окно конфигурации и нажмите «Ок», затем еще раз.
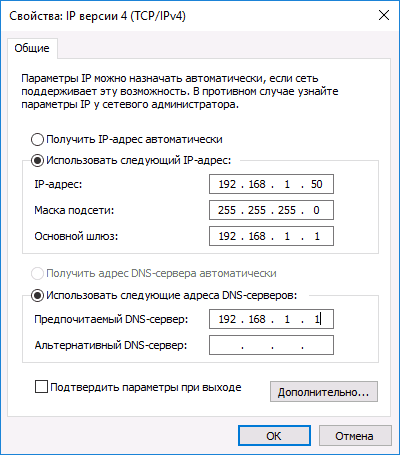
Готово, теперь у вашего компьютера статический IP адрес, который и потребуется для подключения к удаленному рабочему столу. Второй способ назначить статический IP адрес — использовать настройки сервера DHCP вашего роутера. Как правило, там имеется возможность привязки конкретного IP по MAC-адресу. В детали вдаваться не буду, но, если вы умеете самостоятельно настроить роутер, с этим тоже справитесь.
Разрешение подключения к удаленному рабочему столу Windows
Еще один пункт, который следует выполнить — включить возможность подключений RDP на компьютере, к которому вы будете подключаться. В Windows 10 начиная с версии 1709 разрешить удаленное подключение можно в Параметры — Система — Удаленный рабочий стол.
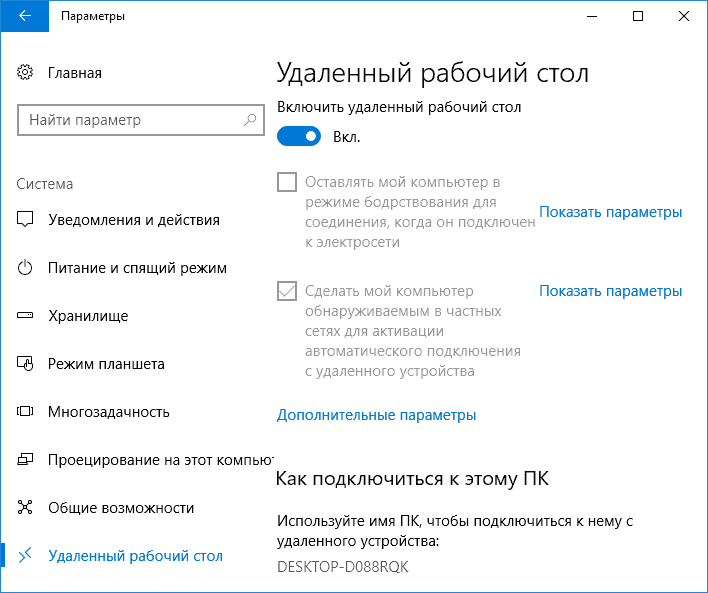
Там же, после включения удаленного рабочего стола отобразится имя компьютера, по которому можно подключиться (вместо IP-адреса), однако для использования подключения по имени вы должны изменить профиль сети на «Частная» вместо «Общедоступная» (см. Как изменить частную сеть на общедоступную и наоборот в Windows 10).
В предыдущих версиях Windows зайдите в панель управления и выберите пункт «Система», а затем в списке слева — «Настройка удаленного доступа». В окне параметров включите «Разрешить подключения удаленного помощника к этому компьютеру» и «Разрешить удаленные подключения к этому компьютеру».
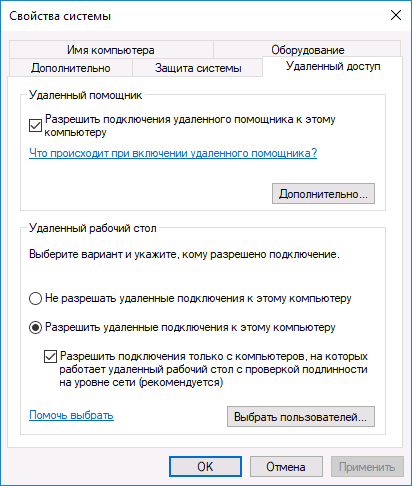
При необходимости, укажите пользователей Windows, которым нужно предоставить доступ, можно создать отдельного пользователя для подключений удаленного рабочего стола (по умолчанию, доступ предоставляется тому аккаунту, под которым вы вошли и всем администраторам системы). Все готово, для того чтобы начать.
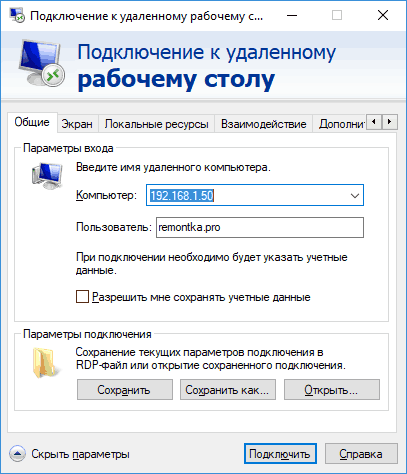
Подключение к удаленному рабочему столу в Windows
Для того, чтобы подключиться к удаленному рабочему столу, вам не требуется устанавливать дополнительные программы. Просто начните вводить в поле поиска (в меню пуск в Windows 7, в панели задач в Windows 10 или на начальном экране Windows 8 и 8.1) «подключение к удаленному рабочему столу», для того чтобы запустить утилиту для подключения. Или нажмите клавиши Win+R, введите mstsc и нажмите Enter.
По умолчанию, вы увидите только окно, в которое следует ввести IP-адрес или имя компьютера, к которому нужно подключиться — вы можете ввести его, нажать «Подключить», ввести имя пользователя и пароль на запрос данных аккаунта (имя и пароль пользователя удаленного компьютера), после чего увидите экран удаленного компьютера.

Можно также настроить параметры изображения, сохранения конфигурации подключения, передачи звука — для этого нажмите «Показать параметры» в окне подключения.
Если все было сделано правильно, то через короткое время вы увидите экран удаленного компьютера в окне подключения удаленного рабочего стола.
Microsoft Remote Desktop в Mac OS X
Для подключения к компьютеру Windows на Mac, вам потребуется скачать приложение Удаленный рабочий стол (Microsoft Remote Desktop) из App Store. Запустив приложение, нажмите кнопку со знаком «Плюс», чтобы добавить удаленный компьютер — дайте ему имя (любое), введите IP-адрес (в поле «PC Name»), имя пользователя и пароль для подключения.
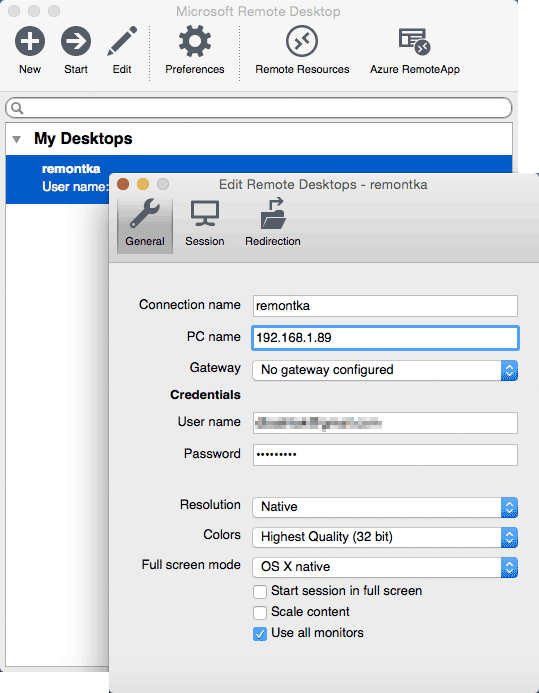
При необходимости, установите параметры экрана и другие детали. После этого, закройте окно настроек и дважды кликните по имени удаленного рабочего стола в списке для подключения. Если все было сделано правильно, вы увидите рабочий стол Windows в окне или на полный экран (зависит от настроек) на вашем Mac.
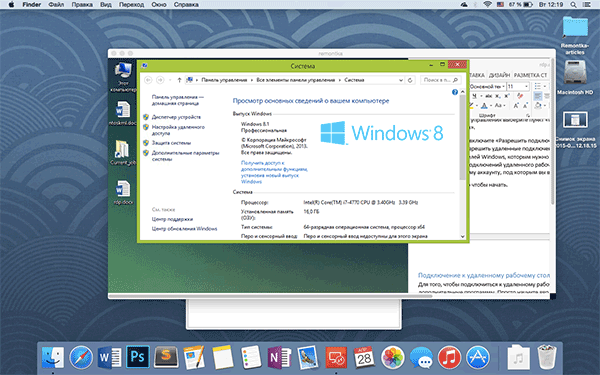
Лично я использую RDP как раз в Apple OS X. На своем MacBook Air я не держу виртуальных машин с Windows и не устанавливаю ее в отдельный раздел — в первом случае система будет тормозить, во втором я значительно сокращу время работы от аккумулятора (плюс неудобство перезагрузок). Поэтому я просто подключаюсь через Microsoft Remote Desktop к своему крутому настольному ПК, если мне требуется Windows.
Android и iOS
Подключение к удаленному рабочему столу Microsoft почти ничем не отличается для телефонов и планшетов Android, устройств iPhone и iPad. Итак, установите приложение Microsoft Remote Desktop для Android или «Удаленный рабочий стол (Майкрософт)» для iOS и запустите его.
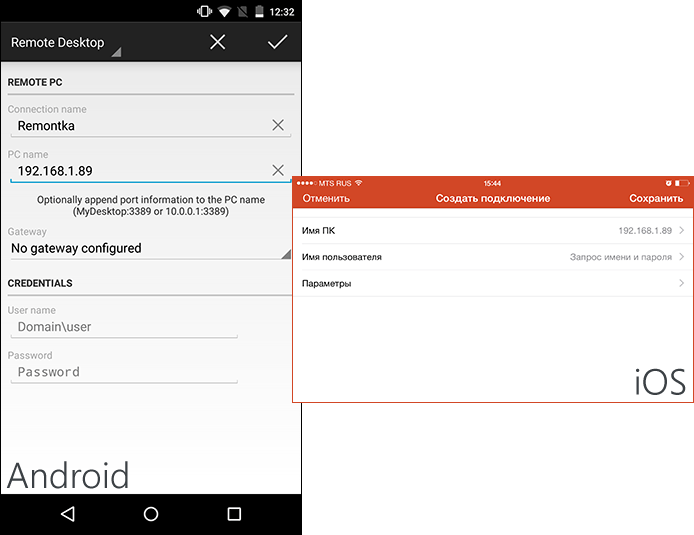
На главном экране нажмите «Добавить» (в версии для iOS далее выберите «Добавить ПК или сервер») и введите параметры подключения — так же, как и в предыдущем варианте это имя подключения (на ваше усмотрение, только в Android), IP-адрес компьютера, логин и пароль для входа в Windows. При необходимости задайте другие параметры.
Готово, можно подключаться и удаленно управлять компьютером с вашего мобильного устройства.
RDP через Интернет
На официальном сайте Microsoft присутствует инструкция о том, как разрешить подключения удаленного рабочего стола через Интернет (только на английском). Заключается она в пробросе на роутере порта 3389 на IP адрес вашего компьютера, а затем — подключение к публичному адресу вашего роутера с указанием данного порта.
На мой взгляд, это не самый оптимальный вариант и безопасней, а может и проще — создать VPN подключение (средствами роутера или Windows) и подключаться по VPN к компьютеру, после чего использовать удаленный рабочий стол так, как если бы вы находились в той же локальной сети (правда, проброс портов все равно потребуется).
This article will serve as an informative guide and give you a clear understanding of how to perform silent or interactive installs and uninstalls of the Microsoft Remote Desktop (Microsoft Store App) using the Powershell App Deployment Toolkit. The PowerShell App Deployment Toolkit can be used to replace your WiseScript, VBScript and Batch wrapper scripts with one versatile, re-usable and extensible tool. This tool is an absolute must for Microsoft Endpoint Manager Configuration Manager (MEMCM) / (SCCM) Administrators or anyone who is responsible for packaging and deploying software.
How to Install the Microsoft Remote Desktop (Microsoft Store App) Using the PowerShell App Deployment Toolkit
- Download the Powershell App Deployment Toolkit 3.8.4:
- https://github.com/PSAppDeployToolkit/PSAppDeployToolkit/releases/download/3.8.4/PSAppDeployToolkit_v3.8.4.zip
- Download the zip file to a folder created at (C:\Downloads)
- Open Windows PowerShell by Right-Clicking on Windows PowerShell and selecting Run as Administrator
- Enter the following command to remove the Zone.Identifier:
Unblock-File -Path C:\Downloads\PSAppDeployToolkit_v3.8.4.zip
- Enter the following command to extract the contents of the zip file:
Expand-Archive -Path C:\Downloads\PSAppDeployToolkit_v3.8.4.zip -DestinationPath C:\Downloads\PADT
- Enter the following commands to copy the AppDeployToolkit & Files folder to “C:\Downloads\MSRemoteDesktopApp“:
Copy-Item -Path "C:\Downloads\PADT\Toolkit\AppDeployToolkit" -Destination "C:\Downloads\MSRemoteDesktopApp\AppDeployToolkit" -RecurseCopy-Item -Path "C:\Downloads\PADT\Toolkit\Files" -Destination "C:\Downloads\MSRemoteDesktopApp\Files"
You should now see the AppDeploymentToolkit folder with files & the empty Files folder at “C:\Downloads\MSRemoteDesktopApp”
Next we’ll want to download the Microsoft Remote Desktop (Microsoft Store App) & dependency files using PowerShell.
- Copy the PowerShell script below to “C:\Downloads” & name it Get_Store_Downloads.ps1
- Script Reference: https://flexxible.com/automating-msix-packaging-with-powershell/
#Requires -version 3
<#
.SYNOPSIS
Get links to Microsoft Store downloads and optionally download packages
.DESCRIPTION
Downloaded packages can be installed via Add-AppxPackage -Path
.PARAMETER packageFamilyName
A list of package family names to download
.PARAMETER name
A regular expression which will select the family package names for existing AppX package names that match
.PARAMETER packageTypeFilter
The types of package to download
.PARAMETER downloadFolder
The folder to download non-excluded files to. Will be created if does not exist. If not specified, files will not be downloaded
.PARAMETER ring
The release ring to download
.PARAMETER proxy
Proxy server to use
.PARAMETER excludeExtensions
List of file extensions to not download
.PARAMETER excluderegex
If download Links match this regular expression they will not be downloaded
.PARAMETER language
The language for downloading files
.PARAMETER force
Overwrite files which already exist
.PARAMETER all
Interrogate all local AppX packages rather than just those available to the user running the script (requires elevation). Use with -name
.EXAMPLE
Powershell.exe -ExecutionPolicy ByPass "&" '.\Get_Store_Downloads.ps1' -packageFamilyName Microsoft.RemoteDesktop_8wekyb3d8bbwe -downloadFolder C:\Downloads\MSRemoteDesktopApp\Files -excludeRegex 'arm' -force
Downloads the resources from the Microsoft Store for the Microsoft Remote Desktop App, excluding files for arm and arm64 architecture and save the files to C:\Downloads\MSRemoteDesktopApp\Files
.NOTES
Modification History:
2022/03/18 @guyrleech Initial public release
2022/03/29 modified by Jason Bergner
#>
<#
Copyright © 2022 Guy Leech
Permission is hereby granted, free of charge, to any person obtaining a copy of this software and associated documentation files (the “Software”), to deal in the Software without restriction,
including without limitation the rights to use, copy, modify, merge, publish, distribute, sublicense, and/or sell copies of the Software, and to permit persons to whom the Software is furnished to do so, subject to the following conditions:
The above copyright notice and this permission notice shall be included in all copies or substantial portions of the Software.
THE SOFTWARE IS PROVIDED “AS IS”, WITHOUT WARRANTY OF ANY KIND, EXPRESS OR IMPLIED, INCLUDING BUT NOT LIMITED TO THE WARRANTIES OF MERCHANTABILITY, FITNESS FOR A PARTICULAR PURPOSE AND NONINFRINGEMENT.
IN NO EVENT SHALL THE AUTHORS OR COPYRIGHT HOLDERS BE LIABLE FOR ANY CLAIM, DAMAGES OR OTHER LIABILITY, WHETHER IN AN ACTION OF CONTRACT, TORT OR OTHERWISE, ARISING FROM, OUT OF OR IN CONNECTION WITH THE SOFTWARE OR THE USE OR OTHER DEALINGS IN THE SOFTWARE.
#>
[CmdletBinding()]
Param
(
[Parameter(Mandatory=$true,ParameterSetName='Family')]
[string[]]$packageFamilyName ,
[Parameter(Mandatory=$true,ParameterSetName='Name')]
[string]$name ,
[Parameter(Mandatory=$false,ParameterSetName='Name')]
[string]$packageTypeFilter = 'All' ,
[string]$downloadFolder ,
[ValidateSet('Slow','Retail','Fast,','RP')]
[string]$ring = 'retail' ,
[string]$proxy ,
[string[]]$excludeExtensions = ('','blockmap','eappx','eappxbundle') ,
[string]$excludeRegex ,
[string]$language = 'en-US' ,
[switch]$force ,
[Parameter(Mandatory=$false,ParameterSetName='Name')]
[switch]$all
)
[hashtable]$proxyParameters = @{}
if( ! [string]::IsNullOrEmpty( $proxy ) )
{
$proxyServer = New-Object -TypeName 'System.Net.WebProxy'
$proxyServer.Address = [uri]$proxy
$proxyServer.UseDefaultCredentials = $true
[System.Net.WebRequest]::DefaultWebProxy = $proxyServer
$proxyParameters.Add( 'Proxy' , $proxy )
$proxyParameters.Add( 'ProxyUseDefaultCredentials' , $true )
Write-Verbose "Proxy set to $proxy"
}
##https://stackoverflow.com/questions/41897114/unexpected-error-occurred-running-a-simple-unauthorized-rest-query?rq=1
Add-Type -TypeDefinition @'
public class SSLHandler
{
public static System.Net.Security.RemoteCertificateValidationCallback GetSSLHandler()
{
return new System.Net.Security.RemoteCertificateValidationCallback((sender, certificate, chain, policyErrors) => { return true; });
}
}
'@
[System.Net.ServicePointManager]::ServerCertificateValidationCallback = [SSLHandler]::GetSSLHandler()
[Net.ServicePointManager]::SecurityProtocol = [Net.ServicePointManager]::SecurityProtocol -bor [System.Net.SecurityProtocolType]::Tls12
if( $PSCmdlet.ParameterSetName -eq 'Name' )
{
Import-Module -Name AppX -Verbose:$false
[array]$packages = @( Get-AppxPackage -AllUsers:$all -PackageTypeFilter $PackageTypeFilter | Where-Object PackageFamilyName -Match $name )
if( $null -eq $packages -or $packages.Count -eq 0 )
{
Throw "No existing AppX packages found matching $name"
}
$packageFamilyName = $packages | Select-Object -ExpandProperty PackageFamilyName -Unique
}
Write-Verbose -Message "Got $($packageFamilyName.Count) packages"
$webclient = $null
if( -Not [string]::IsNullOrEmpty( $downloadFolder ) )
{
if( -Not ( Test-Path -Path $downloadFolder -ErrorAction SilentlyContinue ) )
{
$null = New-Item -Path $downloadFolder -Force -ItemType Directory -ErrorAction Stop
}
if( -Not ( $webClient = New-Object -TypeName System.Net.WebClient ) )
{
Throw "Failed to create a System.Net.WebClient object"
}
}
[int]$count = 0
ForEach( $package in $packageFamilyName )
{
$count++
[string]$requestBody = "type=PackageFamilyName&url=$package&ring=$ring&lang=$language"
$response = $null
$session = $null
$response = Invoke-WebRequest -URI 'https://store.rg-adguard.net/api/GetFiles' -body $requestBody -Method Post -ContentType 'application/x-www-form-urlencoded' -SessionVariable session @proxyParameters
if( $response -and $response.PSObject.Properties[ 'links' ] -and $response.Links.Count -gt 0 )
{
##Write-Verbose -Message "$count / $($packageFamilyName.Count) : Got $($response.Links.Count) links for $requestBody"
ForEach( $link in ($response.Links | Where-Object href -match '^https?://' ))
{
[string]$extension = [System.IO.Path]::GetExtension( $link.innerText ) -replace '^\.'
if( $extension -in $excludeExtensions )
{
Write-Verbose -Message "Ignoring `"$($link.innerText)`" as extension $extension in exclude list"
}
elseif( -Not [string]::IsNullOrEmpty( $excludeRegex ) -and $link.innerText -match $excludeRegex )
{
Write-Verbose -Message "Ignoring `"$($link.innerText)`" as matches $excludeRegex"
}
else
{
$result = [pscustomobject]@{
'PackageFamilyName' = $package
'File' = $link.innertext
'Link' = $link.href
}
if( -Not [string]::IsNullOrEmpty( $downloadFolder ) )
{
[string]$destinationFile = Join-Path -Path $downloadFolder -ChildPath $link.InnerText
if( ( Test-Path -Path $destinationFile -ErrorAction SilentlyContinue) -and -Not $force )
{
Write-Warning -Message "Not downloading to `"$destinationFile`" as already exists - use -force to overwrite"
}
else
{
try
{
$webclient.DownloadFile( ( $link.href -replace '&' , '&' ) , $destinationFile )
if( $properties = Get-ItemProperty -Path $destinationFile )
{
Add-Member -InputObject $result -NotePropertyMembers @{
'Download' = $properties.FullName
'Size (KB)' = [math]::Round( $properties.Length / 1KB , 1 )
}
}
else
{
Write-Warning -Message "Unable to get file properties for $destinationFile"
}
}
catch
{
Write-Warning -Message "Problem downloading $($link.href) - $_"
}
}
}
$result
}
}
}
else
{
## <img src="../img/stop.png">The server returned an empty list.<br>Either you have not entered the link correctly, or this service does not support generation for this product.</p><script type="text/javascript">
Write-Warning -Message "No data or links returned for $requestBody - $($response.Content -split "`n`r?" , 2 -replace '\<[^\>]+\>' | Select-Object -First 1)"
}
}
- Add the following registry key to suppress the “To Allow this website to provide information personalized for you, will you allow it to put a small file (cookie) on your computer?” popup message
REG ADD "HKCU\SOFTWARE\Microsoft\Windows\CurrentVersion\Internet Settings\Zones\3" /t REG_DWORD /v 1A10 /f /d 0
- Open Windows PowerShell by Right-Clicking on Windows PowerShell and selecting Run as Administrator
- Change the directory to “C:\Downloads”
- PS C:\Downloads>
- Enter the following command to download the installation files:
Powershell.exe -ExecutionPolicy ByPass "&" '.\Get_Store_Downloads.ps1' -packageFamilyName Microsoft.RemoteDesktop_8wekyb3d8bbwe -downloadFolder C:\Downloads\MSRemoteDesktopApp\Files -excludeRegex 'arm' -force
- After the download completes, you should see .appx & .appxbundle files inside the “C:\Downloads\MSRemoteDesktopApp\Files” directory
- Copy the PowerShell script below to “C:\Downloads\MSRemoteDesktopApp“ & name it Deploy-MSRemoteDesktopApp.ps1
<#
.SYNOPSIS
	This script performs the installation or uninstallation of the Microsoft Remote Desktop Microsoft Store App.
	# LICENSE #
	PowerShell App Deployment Toolkit - Provides a set of functions to perform common application deployment tasks on Windows.
	Copyright (C) 2017 - Sean Lillis, Dan Cunningham, Muhammad Mashwani, Aman Motazedian.
	This program is free software: you can redistribute it and/or modify it under the terms of the GNU Lesser General Public License as published by the Free Software Foundation, either version 3 of the License, or any later version. This program is distributed in the hope that it will be useful, but WITHOUT ANY WARRANTY; without even the implied warranty of MERCHANTABILITY or FITNESS FOR A PARTICULAR PURPOSE. See the GNU General Public License for more details.
	You should have received a copy of the GNU Lesser General Public License along with this program. If not, see <http://www.gnu.org/licenses/>.
.DESCRIPTION
	The script is provided as a template to perform an install or uninstall of an application(s).
	The script either performs an "Install" deployment type or an "Uninstall" deployment type.
	The install deployment type is broken down into 3 main sections/phases: Pre-Install, Install, and Post-Install.
	The script dot-sources the AppDeployToolkitMain.ps1 script which contains the logic and functions required to install or uninstall an application.
.PARAMETER DeploymentType
	The type of deployment to perform. Default is: Install.
.PARAMETER DeployMode
	Specifies whether the installation should be run in Interactive, Silent, or NonInteractive mode. Default is: Interactive. Options: Interactive = Shows dialogs, Silent = No dialogs, NonInteractive = Very silent, i.e. no blocking apps. NonInteractive mode is automatically set if it is detected that the process is not user interactive.
.PARAMETER AllowRebootPassThru
	Allows the 3010 return code (requires restart) to be passed back to the parent process (e.g. SCCM) if detected from an installation. If 3010 is passed back to SCCM, a reboot prompt will be triggered.
.PARAMETER TerminalServerMode
	Changes to "user install mode" and back to "user execute mode" for installing/uninstalling applications for Remote Destkop Session Hosts/Citrix servers.
.PARAMETER DisableLogging
	Disables logging to file for the script. Default is: $false.
.EXAMPLE
    PowerShell.exe .\Deploy-MSRemoteDesktopApp.ps1 -DeploymentType "Install" -DeployMode "NonInteractive"
.EXAMPLE
    PowerShell.exe .\Deploy-MSRemoteDesktopApp.ps1 -DeploymentType "Install" -DeployMode "Silent"
.EXAMPLE
    PowerShell.exe .\Deploy-MSRemoteDesktopApp.ps1 -DeploymentType "Install" -DeployMode "Interactive"
.EXAMPLE
    PowerShell.exe .\Deploy-MSRemoteDesktopApp.ps1 -DeploymentType "Uninstall" -DeployMode "NonInteractive"
.EXAMPLE
    PowerShell.exe .\Deploy-MSRemoteDesktopApp.ps1 -DeploymentType "Uninstall" -DeployMode "Silent"
.EXAMPLE
    PowerShell.exe .\Deploy-MSRemoteDesktopApp.ps1 -DeploymentType "Uninstall" -DeployMode "Interactive"
.NOTES
	Toolkit Exit Code Ranges:
	60000 - 68999: Reserved for built-in exit codes in Deploy-Application.ps1, Deploy-Application.exe, and AppDeployToolkitMain.ps1
	69000 - 69999: Recommended for user customized exit codes in Deploy-Application.ps1
	70000 - 79999: Recommended for user customized exit codes in AppDeployToolkitExtensions.ps1
.LINK
	http://psappdeploytoolkit.com
#>
[CmdletBinding()]
Param (
	[Parameter(Mandatory=$false)]
	[ValidateSet('Install','Uninstall','Repair')]
	[string]$DeploymentType = 'Install',
	[Parameter(Mandatory=$false)]
	[ValidateSet('Interactive','Silent','NonInteractive')]
	[string]$DeployMode = 'Interactive',
	[Parameter(Mandatory=$false)]
	[switch]$AllowRebootPassThru = $false,
	[Parameter(Mandatory=$false)]
	[switch]$TerminalServerMode = $false,
	[Parameter(Mandatory=$false)]
	[switch]$DisableLogging = $false
)

Try {
	## Set the script execution policy for this process
	Try { Set-ExecutionPolicy -ExecutionPolicy 'ByPass' -Scope 'Process' -Force -ErrorAction 'Stop' } Catch {}

	##*===============================================
	##* VARIABLE DECLARATION
	##*===============================================
	## Variables: Application
	[string]$appVendor = ''
	[string]$appName = 'Microsoft Remote Desktop Microsoft Store App'
	[string]$appVersion = ''
	[string]$appArch = ''
	[string]$appLang = ''
	[string]$appRevision = ''
	[string]$appScriptVersion = '1.0.0'
	[string]$appScriptDate = 'XX/XX/20XX'
	[string]$appScriptAuthor = 'Jason Bergner'
	##*===============================================
	## Variables: Install Titles (Only set here to override defaults set by the toolkit)
	[string]$installName = ''
	[string]$installTitle = 'Microsoft Remote Desktop Microsoft Store App'

	##* Do not modify section below
	#region DoNotModify

	## Variables: Exit Code
	[int32]$mainExitCode = 0

	## Variables: Script
	[string]$deployAppScriptFriendlyName = 'Deploy Application'
	[version]$deployAppScriptVersion = [version]'3.8.4'
	[string]$deployAppScriptDate = '26/01/2021'
	[hashtable]$deployAppScriptParameters = $psBoundParameters

	## Variables: Environment
	If (Test-Path -LiteralPath 'variable:HostInvocation') { $InvocationInfo = $HostInvocation } Else { $InvocationInfo = $MyInvocation }
	[string]$scriptDirectory = Split-Path -Path $InvocationInfo.MyCommand.Definition -Parent

	## Dot source the required App Deploy Toolkit Functions
	Try {
		[string]$moduleAppDeployToolkitMain = "$scriptDirectory\AppDeployToolkit\AppDeployToolkitMain.ps1"
		If (-not (Test-Path -LiteralPath $moduleAppDeployToolkitMain -PathType 'Leaf')) { Throw "Module does not exist at the specified location [$moduleAppDeployToolkitMain]." }
		If ($DisableLogging) { . $moduleAppDeployToolkitMain -DisableLogging } Else { . $moduleAppDeployToolkitMain }
	}
	Catch {
		If ($mainExitCode -eq 0){ [int32]$mainExitCode = 60008 }
		Write-Error -Message "Module [$moduleAppDeployToolkitMain] failed to load: `n$($_.Exception.Message)`n `n$($_.InvocationInfo.PositionMessage)" -ErrorAction 'Continue'
		## Exit the script, returning the exit code to SCCM
		If (Test-Path -LiteralPath 'variable:HostInvocation') { $script:ExitCode = $mainExitCode; Exit } Else { Exit $mainExitCode }
	}

	#endregion
	##* Do not modify section above
	##*===============================================
	##* END VARIABLE DECLARATION
	##*===============================================

	If ($deploymentType -ine 'Uninstall' -and $deploymentType -ine 'Repair') {
		##*===============================================
		##* PRE-INSTALLATION
		##*===============================================
		[string]$installPhase = 'Pre-Installation'

		## Show Welcome Message, Close Microsoft Remote Desktop With a 60 Second Countdown Before Automatically Closing
		Show-InstallationWelcome -CloseApps 'RdClient.Windows' -CloseAppsCountdown 60

		## Show Progress Message (with the default message)
		Show-InstallationProgress

        ## Remove Any Existing Versions of the Microsoft Remote Desktop Microsoft Store App
        $AppPackageNames = @(
        "Microsoft.RemoteDesktop"
        )
        foreach ($AppName in $AppPackageNames) {
        Execute-ProcessAsUser -Path "$PSHOME\powershell.exe" -Parameters "-WindowStyle Hidden Get-AppxPackage -Name $AppName | Remove-AppxPackage" -Wait
        #Execute-ProcessAsUser -Path "$PSHOME\powershell.exe" -Parameters "-WindowStyle Hidden Get-AppxPackage -AllUsers -Name $AppName | Remove-AppxPackage -AllUsers" -Wait

        Execute-ProcessAsUser -Path "$PSHOME\powershell.exe" -Parameters "-WindowStyle Hidden Get-AppXProvisionedPackage -Online | Where-Object DisplayName -eq $AppName | Remove-AppxProvisionedPackage -Online" -Wait
        #Execute-ProcessAsUser -Path "$PSHOME\powershell.exe" -Parameters "-WindowStyle Hidden Get-AppXProvisionedPackage -Online | Where-Object DisplayName -eq $AppName | Remove-AppxProvisionedPackage -AllUsers -Online" -Wait
        }

		##*===============================================
		##* INSTALLATION
		##*===============================================
		[string]$installPhase = 'Installation'

        ## Install Microsoft Remote Desktop Microsoft Store App Dependencies
        $DependencyPath = Get-ChildItem "$dirFiles" -Include *.appx -File -Recurse -ErrorAction SilentlyContinue

        ForEach ($Dependency in $DependencyPath) {
        Show-InstallationProgress "Installing the Microsoft Remote Desktop Microsoft Store App Dependencies. This may take some time. Please wait..."
        Execute-ProcessAsUser -Path "$PSHOME\powershell.exe" -Parameters "-WindowStyle Hidden Add-AppxPackage ""$Dependency""" -Wait
        }

        ## Install Microsoft Remote Desktop Microsoft Store App
        $AppPath = Get-ChildItem "$dirFiles" -Include *.appxbundle -File -Recurse -ErrorAction SilentlyContinue

        ForEach ($App in $AppPath) {
        Show-InstallationProgress "Installing the Microsoft Remote Desktop Microsoft Store App. This may take some time. Please wait..."
        Execute-ProcessAsUser -Path "$PSHOME\powershell.exe" -Parameters "-WindowStyle Hidden Add-AppxPackage ""$App""" -Wait
        }

		##*===============================================
		##* POST-INSTALLATION
		##*===============================================
		[string]$installPhase = 'Post-Installation'

	}
	ElseIf ($deploymentType -ieq 'Uninstall')
	{
		##*===============================================
		##* PRE-UNINSTALLATION
		##*===============================================
		[string]$installPhase = 'Pre-Uninstallation'

		## Show Welcome Message, Close Microsoft Remote Desktop With a 60 Second Countdown Before Automatically Closing
		Show-InstallationWelcome -CloseApps 'RdClient.Windows' -CloseAppsCountdown 60

        ## Show Progress Message (With a Message to Indicate the Application is Being Uninstalled)
        Show-InstallationProgress -StatusMessage "Uninstalling the $installTitle. Please Wait..."


		##*===============================================
		##* UNINSTALLATION
		##*===============================================
		[string]$installPhase = 'Uninstallation'

        ## Uninstall Any Existing Versions of the Microsoft Remote Desktop Microsoft Store App
        $AppPackageNames = @(
        "Microsoft.RemoteDesktop"
        )
        foreach ($AppName in $AppPackageNames) {
        #Execute-ProcessAsUser -Path "$PSHOME\powershell.exe" -Parameters "-WindowStyle Hidden Get-AppxPackage -Name $AppName | Remove-AppxPackage" -Wait
        Execute-ProcessAsUser -Path "$PSHOME\powershell.exe" -Parameters "-WindowStyle Hidden Get-AppxPackage -AllUsers -Name $AppName | Remove-AppxPackage -AllUsers" -Wait

        #Execute-ProcessAsUser -Path "$PSHOME\powershell.exe" -Parameters "-WindowStyle Hidden Get-AppXProvisionedPackage -Online | Where-Object DisplayName -eq $AppName | Remove-AppxProvisionedPackage -Online" -Wait
        Execute-ProcessAsUser -Path "$PSHOME\powershell.exe" -Parameters "-WindowStyle Hidden Get-AppXProvisionedPackage -Online | Where-Object DisplayName -eq $AppName | Remove-AppxProvisionedPackage -AllUsers -Online" -Wait
        }

        ## Add Registry Keys to Prevent Windows Apps from Reinstalling
        Write-Log -Message "Adding Registry Keys to Prevent Windows Apps from Reinstalling."

        [scriptblock]$HKCURegistrySettings = {
        Set-RegistryKey -Key 'HKCU\Software\Microsoft\Windows\CurrentVersion\ContentDeliveryManager' -Name 'ContentDeliveryAllowed' -Value 0 -Type DWord -SID $UserProfile.SID
        Set-RegistryKey -Key 'HKCU\Software\Microsoft\Windows\CurrentVersion\ContentDeliveryManager' -Name 'FeatureManagementEnabled' -Value 0 -Type DWord -SID $UserProfile.SID
        Set-RegistryKey -Key 'HKCU\Software\Microsoft\Windows\CurrentVersion\ContentDeliveryManager' -Name 'OemPreInstalledAppsEnabled' -Value 0 -Type DWord -SID $UserProfile.SID
        Set-RegistryKey -Key 'HKCU\Software\Microsoft\Windows\CurrentVersion\ContentDeliveryManager' -Name 'PreInstalledAppsEnabled' -Value 0 -Type DWord -SID $UserProfile.SID
        Set-RegistryKey -Key 'HKCU\Software\Microsoft\Windows\CurrentVersion\ContentDeliveryManager' -Name 'PreInstalledAppsEverEnabled' -Value 0 -Type DWord -SID $UserProfile.SID
        Set-RegistryKey -Key 'HKCU\Software\Microsoft\Windows\CurrentVersion\ContentDeliveryManager' -Name 'SilentInstalledAppsEnabled' -Value 0 -Type DWord -SID $UserProfile.SID
        Set-RegistryKey -Key 'HKCU\Software\Microsoft\Windows\CurrentVersion\ContentDeliveryManager' -Name 'SubscribedContent-314559Enabled' -Value 0 -Type DWord -SID $UserProfile.SID
        Set-RegistryKey -Key 'HKCU\Software\Microsoft\Windows\CurrentVersion\ContentDeliveryManager' -Name 'SubscribedContent-338387Enabled' -Value 0 -Type DWord -SID $UserProfile.SID
        Set-RegistryKey -Key 'HKCU\Software\Microsoft\Windows\CurrentVersion\ContentDeliveryManager' -Name 'SubscribedContent-338388Enabled' -Value 0 -Type DWord -SID $UserProfile.SID
        Set-RegistryKey -Key 'HKCU\Software\Microsoft\Windows\CurrentVersion\ContentDeliveryManager' -Name 'SubscribedContent-338389Enabled' -Value 0 -Type DWord -SID $UserProfile.SID
        Set-RegistryKey -Key 'HKCU\Software\Microsoft\Windows\CurrentVersion\ContentDeliveryManager' -Name 'SubscribedContent-338393Enabled' -Value 0 -Type DWord -SID $UserProfile.SID
        Set-RegistryKey -Key 'HKCU\Software\Microsoft\Windows\CurrentVersion\ContentDeliveryManager' -Name 'SubscribedContentEnabled' -Value 0 -Type DWord -SID $UserProfile.SID
        Set-RegistryKey -Key 'HKCU\Software\Microsoft\Windows\CurrentVersion\ContentDeliveryManager' -Name 'SystemPaneSuggestionsEnabled' -Value 0 -Type DWord -SID $UserProfile.SID
        }
        Invoke-HKCURegistrySettingsForAllUsers -RegistrySettings $HKCURegistrySettings -ErrorAction SilentlyContinue

        ## Add Registry Key to Disable Auto-Updating of Microsoft Store Apps
        Write-Log -Message "Adding Registry Key to Disable Auto-Updating of Microsoft Store Apps."
        Set-RegistryKey -Key 'HKLM\SOFTWARE\Policies\Microsoft\WindowsStore' -Name 'AutoDownload' -Value 2 -Type DWord

        # Add Registry Key to Prevent Suggested Applications from Returning
        Write-Log -Message "Adding Registry Key to Prevent Suggested Applications from Returning."
        Set-RegistryKey -Key 'HKLM\SOFTWARE\Policies\Microsoft\Windows\CloudContent' -Name 'DisableWindowsConsumerFeatures' -Value 1 -Type DWord

		##*===============================================
		##* POST-UNINSTALLATION
		##*===============================================
		[string]$installPhase = 'Post-Uninstallation'


	}
	ElseIf ($deploymentType -ieq 'Repair')
	{
		##*===============================================
		##* PRE-REPAIR
		##*===============================================
		[string]$installPhase = 'Pre-Repair'


		##*===============================================
		##* REPAIR
		##*===============================================
		[string]$installPhase = 'Repair'


		##*===============================================
		##* POST-REPAIR
		##*===============================================
		[string]$installPhase = 'Post-Repair'


    }
	##*===============================================
	##* END SCRIPT BODY
	##*===============================================

	## Call the Exit-Script function to perform final cleanup operations
	Exit-Script -ExitCode $mainExitCode
}
Catch {
	[int32]$mainExitCode = 60001
	[string]$mainErrorMessage = "$(Resolve-Error)"
	Write-Log -Message $mainErrorMessage -Severity 3 -Source $deployAppScriptFriendlyName
	Show-DialogBox -Text $mainErrorMessage -Icon 'Stop'
	Exit-Script -ExitCode $mainExitCode
}
Ok, all the hard work is done and now you can install or uninstall the Microsoft Remote Desktop (Microsoft Store App) using one single PowerShell script. Simply change the DeploymentType parameter to install or uninstall. Logging functionality is built-in automatically and you can view the log files under “C:\Windows\Logs\Software”.
Microsoft Remote Desktop (Microsoft Store App) NonInteractive Install (PowerShell)
NonInteractive means Very Silent, i.e. no blocking apps. This is automatically set if it is detected that the process is not running in the user session and it is not possible for anyone to provide input using a mouse or keyboard.
- Open Windows PowerShell by Right-Clicking on Windows PowerShell and selecting Run as Administrator
- Change the directory to “C:\Downloads\MSRemoteDesktopApp”
- PS C:\Downloads\MSRemoteDesktopApp>
- Enter the following command:
Powershell.exe -ExecutionPolicy Bypass .\Deploy-MSRemoteDesktopApp.ps1 -DeploymentType "Install" -DeployMode "NonInteractive"
Microsoft Remote Desktop (Microsoft Store App) Silent Install (PowerShell)
Silent means no dialogs (progress and balloon tip notifications are suppressed).
- Open Windows PowerShell by Right-Clicking on Windows PowerShell and selecting Run as Administrator
- Change the directory to “C:\Downloads\MSRemoteDesktopApp“
- PS C:\Downloads\MSRemoteDesktopApp>
- Enter the following command:
Powershell.exe -ExecutionPolicy Bypass .\Deploy-MSRemoteDesktopApp.ps1 -DeploymentType "Install" -DeployMode "Silent"
Microsoft Remote Desktop (Microsoft Store App) Interactive Install (PowerShell)
Interactive means the install will show dialogs including progress and balloon tip notifications.
- Open Windows PowerShell by Right-Clicking on Windows PowerShell and selecting Run as Administrator
- Change the directory to “C:\Downloads\MSRemoteDesktopApp“
- PS C:\Downloads\MSRemoteDesktopApp>
- Enter the following command:
Powershell.exe -ExecutionPolicy Bypass .\Deploy-MSRemoteDesktopApp.ps1 -DeploymentType "Install" -DeployMode "Interactive"
How to Uninstall the Microsoft Remote Desktop (Microsoft Store App) Using the PowerShell App Deployment Toolkit
Microsoft Remote Desktop (Microsoft Store App) NonInteractive Uninstall (PowerShell)
NonInteractive means Very Silent, i.e. no blocking apps. This is automatically set if it is detected that the process is not running in the user session and it is not possible for anyone to provide input using a mouse or keyboard.
- Open Windows PowerShell by Right-Clicking on Windows PowerShell and selecting Run as Administrator
- Change the directory to “C:\Downloads\MSRemoteDesktopApp“
- PS C:\Downloads\MSRemoteDesktopApp>
- Enter the following command:
Powershell.exe -ExecutionPolicy Bypass .\Deploy-MSRemoteDesktopApp.ps1 -DeploymentType "Uninstall" -DeployMode "NonInteractive"
Microsoft Remote Desktop (Microsoft Store App) Silent Uninstall (PowerShell)
Silent means no dialogs (progress and balloon tip notifications are suppressed).
- Open Windows PowerShell by Right-Clicking on Windows PowerShell and selecting Run as Administrator
- Change the directory to “C:\Downloads\MSRemoteDesktopApp“
- PS C:\Downloads\MSRemoteDesktopApp>
- Enter the following command:
Powershell.exe -ExecutionPolicy Bypass .\Deploy-MSRemoteDesktopApp.ps1 -DeploymentType "Uninstall" -DeployMode "Silent"
Microsoft Remote Desktop (Microsoft Store App) Interactive Uninstall (PowerShell)
Interactive means the install will show dialogs including progress and balloon tip notifications.
- Open Windows PowerShell by Right-Clicking on Windows PowerShell and selecting Run as Administrator
- Change the directory to “C:\Downloads\MSRemoteDesktopApp“
- PS C:\Downloads\MSRemoteDesktopApp>
- Enter the following command:
Powershell.exe -ExecutionPolicy Bypass .\Deploy-MSRemoteDesktopApp.ps1 -DeploymentType "Uninstall" -DeployMode "Interactive"
Always make sure to test everything in a development environment prior to implementing anything into production. The information in this article is provided “As Is” without warranty of any kind.
-
Home
-
News
- Microsoft Remote Desktop Download/Connection on Windows 10/11
By Alisa |
Last Updated
This post teaches you how to download and install Microsoft Remote Desktop for Windows 10/11, Mac, Android, or iPhone. Also learn how to use Remote Desktop to connect a remote PC to access the PC anywhere. For more computer tips and useful tools, you may visit MiniTool Software official website.
This post introduces Microsoft Remote Desktop and teaches you how to get Microsoft Remote Desktop downloaded for your Windows 10/11 PC, Mac, iPhone, or Android. Use Microsoft Remote Desktop to easily connect a remote PC and access apps and other content on it.
What Is Microsoft Remote Desktop?
Microsoft develops a propriety protocol named Remote Desktop Protocol (RDP) to help users easily connect to another remote computer. Users can use RDP client software to connect to a remote PC that runs RDP server software. Microsoft provides the official RDP client software – Remote Desktop Connection or Remote Desktop Services – in Windows OS. And the RDP servers are built into Windows OS.
Windows 10/11 comes with a built-in Remote Desktop Connection feature that lets you easily connect to a remote PC or a virtual machine over a network connection. A standalone Remote Desktop app is also available for download. Microsoft Remote Desktop app is available on PC, mobile device, Hub, and HoloLens.
Microsoft Remote Desktop Download and Install on Windows 10/11
If you’d like to download the Microsoft Remote Desktop app on Windows 10/11 and use it to connect a remote PC or virtual apps/desktops, you can easily get it from Microsoft Store.
- Open the Microsoft Store app or go to the Microsoft Store website.
- Search for Microsoft Remote Desktop to get to its download page.
- Click the Get button to get Microsoft Remote Desktop downloaded to your Windows 10/11 PC.
- After that, you can click the downloaded installation file to follow the instructions to install the Remote Desktop app.
The system requirement of Microsoft Remote Desktop is Windows 10 version 16299.0 or higher, Xbox, Windows 8 Mobile, and Windows 8.1.
Download Microsoft Remote Desktop for Mac, iPhone, Android
For Mac users, you can open the Mac App Store, search for Microsoft Remote Desktop to download and install this app on your Mac computer.
To get the Remote Desktop app for Android devices, you can open Google Play Store on your device, search and download the Remote Desktop app.
To install Remote Desktop on iPhone/iPad, you can open App Store on your device to search, download, and install the Remote Desktop app.
To access your computer from your iPhone/iPad or Android, you can open the Remote Desktop app, tap the “+” icon at the top-right corner and select Add PC. Then you can enter your computer name or IP address in the PC Name field. After this, you can access your PC from your iPhone or Android device.
How to Use Microsoft Remote Desktop to Connect a Remote PC
For Windows 10:
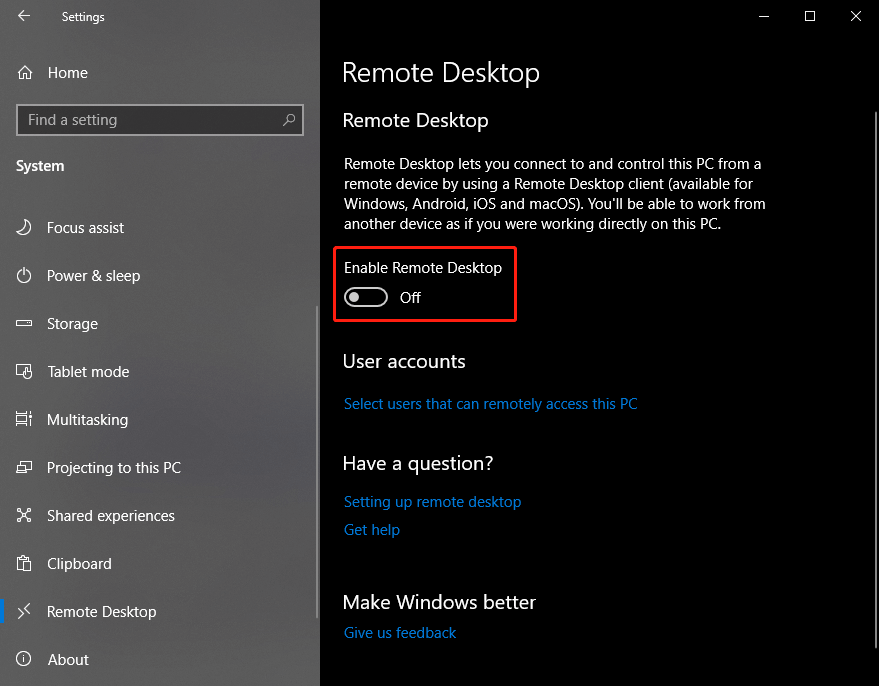
- You need to run Windows 10 Pro. Click Start -> Settings -> System -> Remote Desktop, and turn on the Enable Remote Desktop feature of the computer you want to connect remotely. Click About in the left panel and take down the name of the computer next to Device name.
- Then you can press Windows + S on your local PC, type remote desktop connection in the search box, and select Remote Desktop Connection. In the Remote Desktop Connection window, you can type the name of the PC that you took down above. Click Connect to connect the PC.
For Windows 11:
- You need to run Windows 11 Pro. Click Start -> Settings -> System, and select Remote Desktop. Turn on the Remote Desktop option and click Confirm to enable remote desktop on Windows 11. Still, note down the name of the remote PC.
- Next, on your local PC, you can click Start, type remote desktop connection in the search box, and select Remote Desktop Connection. Type the PC name you noted down in Step 1 and click Connect. Then you can access and work with the remote PC.

Bottom Line
This post teaches you how to download Microsoft Remote Desktop for Windows 10/11, Mac, iPhone, or Android. It also offers a guide for how to enable Remote Desktop on Windows 10/11 and how to connect a remote PC with Remote Desktop Connection. Hope it helps.
About The Author
Position: Columnist
Alisa is a professional English editor with 4-year experience. She loves writing and focuses on sharing detailed solutions and thoughts for computer problems, data recovery & backup, digital gadgets, tech news, etc. Through her articles, users can always easily get related problems solved and find what they want. In spare time, she likes basketball, badminton, tennis, cycling, running, and singing. She is very funny and energetic in life, and always brings friends lots of laughs.