
Applies ToWindows 11
Windows Update can help fix problems with your PC. Fix problems using Windows Update is a recovery tool that can help resolve issues related to updates. Using this tool will reinstall the current version of Windows on your device. This tool preserves all your apps, documents, and settings. Make sure to keep your PC connected to a power source and the internet during reinstallation.
Steps to reinstall Windows
-
In the Settings app on your Windows device, select System > Recovery or use the following shortcut:Open Recovery settings
-
Under Fix problems using Windows Update, select Reinstall now

-
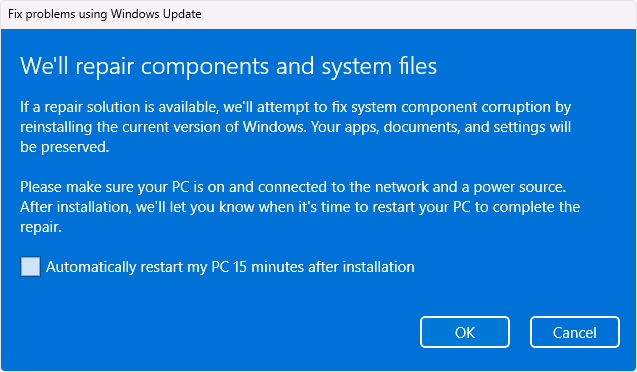
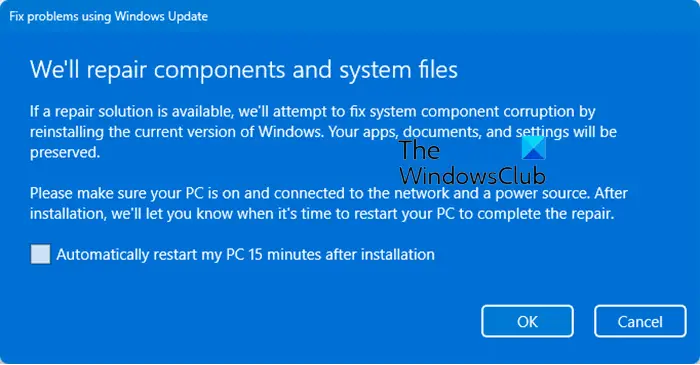
In the Fix problems using Windows Update window, choose if you want to allow the PC to automatically restart 15 minutes after the installation completes

-
Select OK when you’re ready to start the installation
-
The reinstall will take you to the Windows Update page in Settings. It will start downloading a repair version of the last operating system update that was successfully installed on your PC. Once the download is complete, the repair version of the update installs
-
Once the reinstall is complete, restart your PC if you didn’t choose to allow it to restart automatically

Windows Update recommends a reinstall after an update installation fails
If an update fails to install because of problems related to system files or components, you might see the following message in the Windows Update page in Settings:
Reinstall your current version of Windows to repair system files and components.
Selecting the Reinstall now option opens Fix problems using Windows Update. Choose if you want to allow the PC to automatically restart 15 minutes after the installation completes.
Select OK when you’re ready to start the installation. Once the reinstall is complete, restart your PC if you didn’t choose to allow it to restart automatically.
Fix problems using Windows Update isn’t displayed
If your PC is managed by your work or school, Fix problems using Windows Update might be unavailable. The option might also be missing if you’re running a version of Windows that’s earlier than Windows 11 with the 2022 annual update. You’ll also need the February 2024 optional update, or a later update installed on the PC.
Information for IT professionals
Fix problems with Windows Update isn’t available on devices that have their updates managed. Devices won’t have the option if they are enrolled in Autopatch, leverage the deployment service, or have any of the following Windows update policies configured:
MDM
./Device/Vendor/MSFT/Policy/Config/Update/Computer Configuration> Administrative templates > Windows Components > Windows Update > Manage updates offered from Windows Server Update Service > Specify intranet Microsoft update service location
Computer Configuration> Administrative templates > Windows Components > Windows Update > Manage updates offered from Windows Update > Select when Preview Builds and Feature Updates are received
Computer Configuration> Administrative templates > Windows Components > Windows Update > Manage updates offered from Windows Update > Select when Quality Updates are received
Computer Configuration> Administrative templates > Windows Components > Windows Update > Manage updates offered from Windows Update > Select the target Feature Update version
Computer Configuration> Administrative templates > Windows Components > Windows Update > Manage end user experience > Remove access to use all Windows Update features
Need more help?
Want more options?
Explore subscription benefits, browse training courses, learn how to secure your device, and more.
(Image credit: Mauro Huculak)
Microsoft proactively releases new cumulative updates to improve the security and stability of Windows 10 and keep your computer up-to-date with changes, features, and security fixes. However, the problem is that as much as necessary updates are, they can also cause unwanted problems.
We’ve seen cumulative updates cause problems not just on Windows 10 but also in older and newer versions. These range from breaking software and hardware compatibility to freezing issues to network problems. Sometimes, it’s not a problem with the update but an issue that occurred during installation. The solution? Uninstall and reinstall that particular update.
In this how-to guide, I will walk you through the steps to uninstall and reapply an update that may be causing a problem on your computer. You’ll also learn the steps to prevent Windows from trying to install a problematic update. If you have a device running Windows 11, you can use these instructions to uninstall and reinstall an update.
How to uninstall an update on Windows 10
To uninstall an update on Windows 10, use these steps:
- Open Settings.
- Click on Update & security.
- Click on Windows Update.
- Click the View update history option.
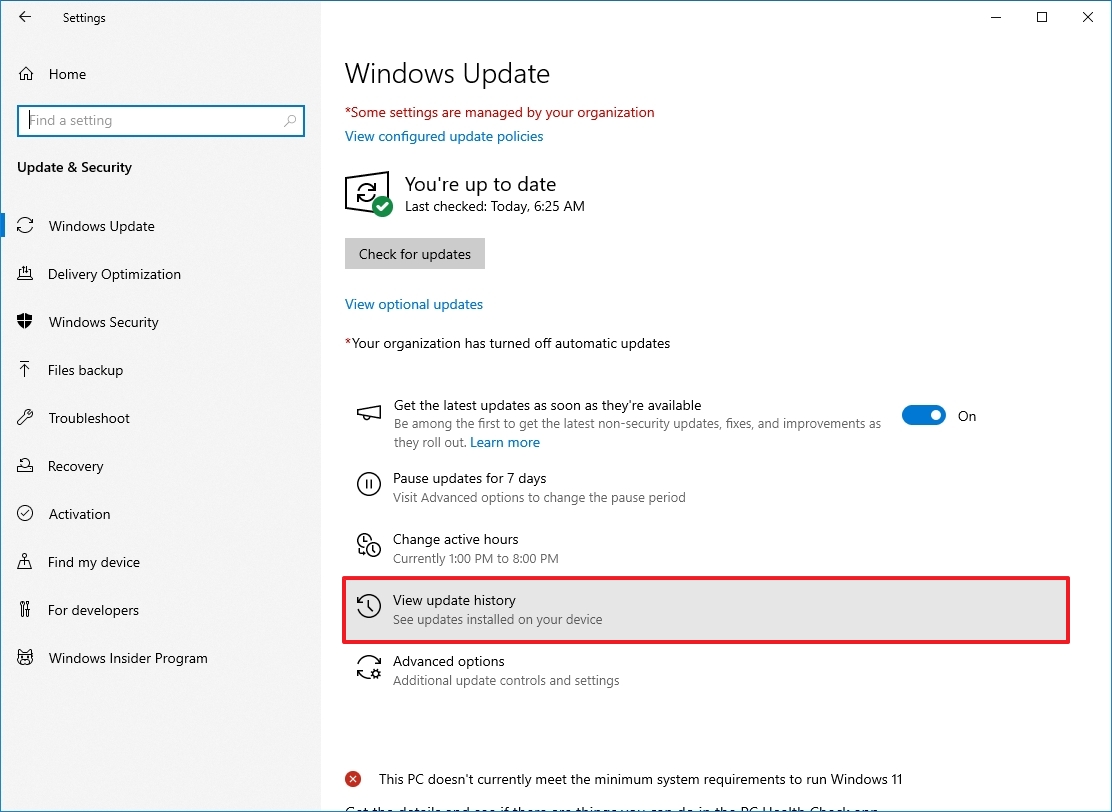
- (Optional) Confirm the updates successfully installed and those that failed with a timestamp to determine which update is causing the problem.
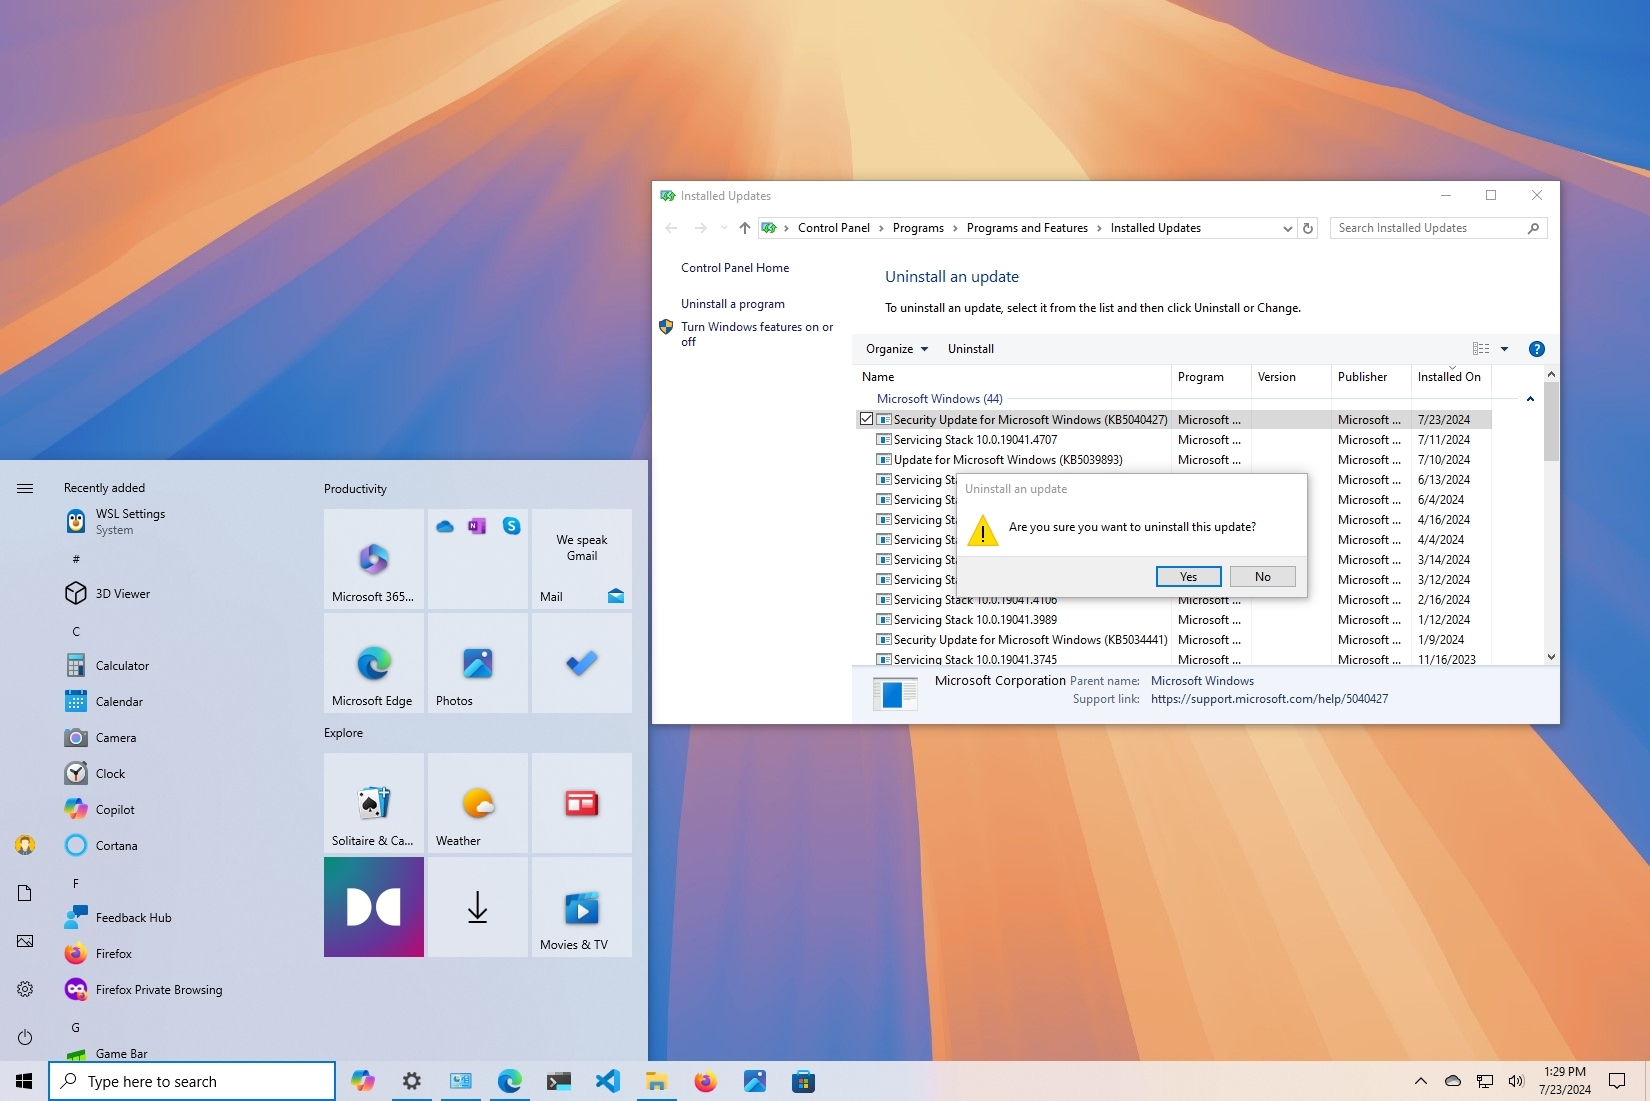
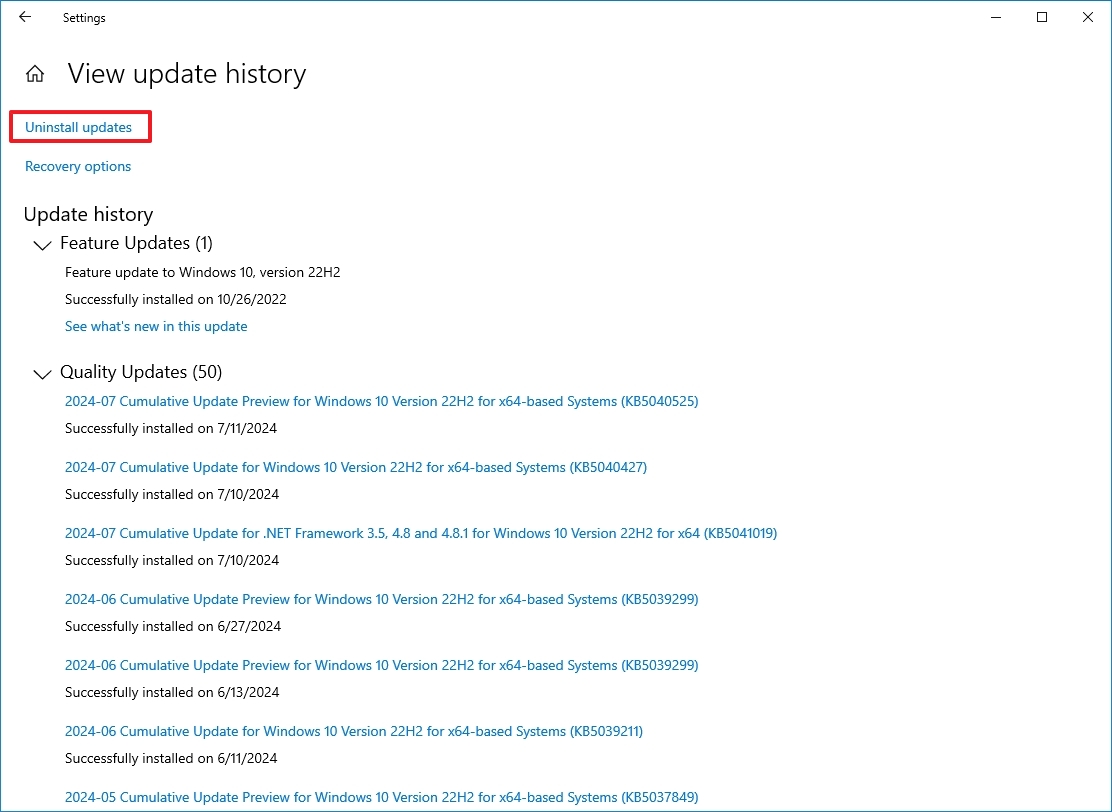
- Click the Uninstall updates option.
- Select the quality update with the issue.
- Click the Uninstall button.
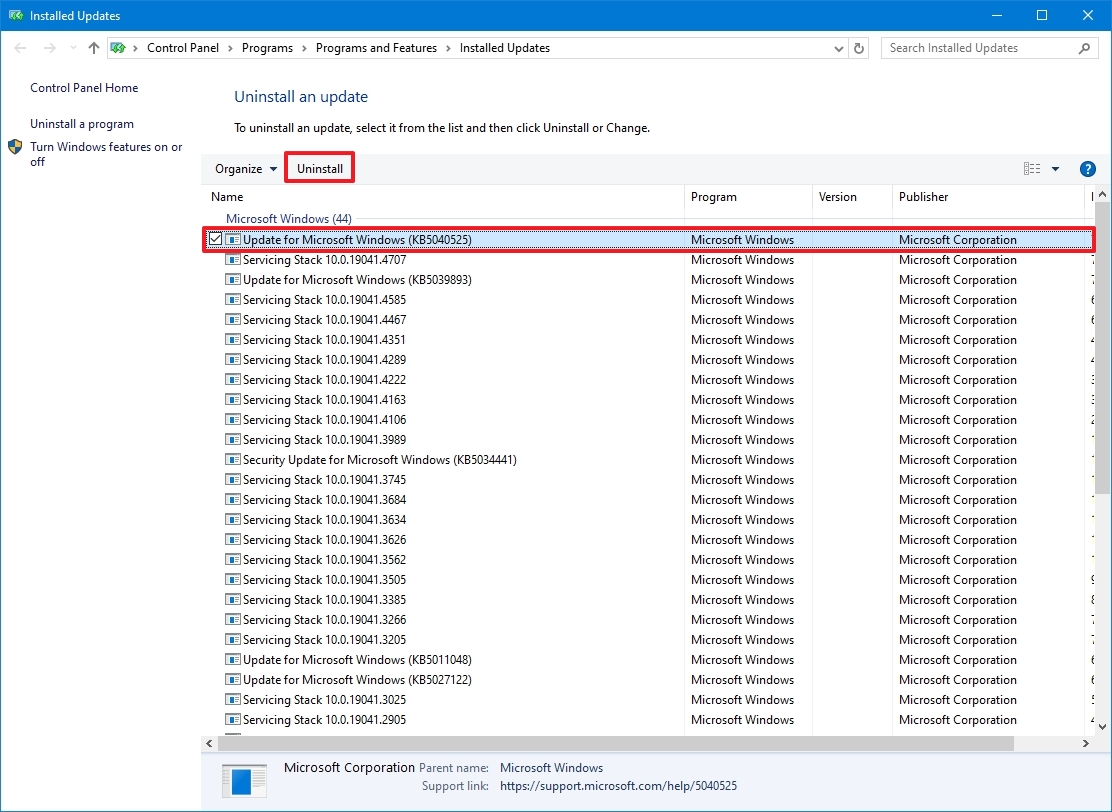
- Click the Yes button.
- Click the Restart Now button.
Once you complete the steps, the system will remove the update from the computer. Depending on the update you’re trying to uninstall, the process may take a few minutes.
How to reinstall an update on Windows 10
To install the same again on Windows 10, use these steps:
- Open Settings.
- Click Update & security.
- Click on Windows Update.
- Click the «Check of updates» button to trigger an update check. The update will be redownloaded and installed automatically.
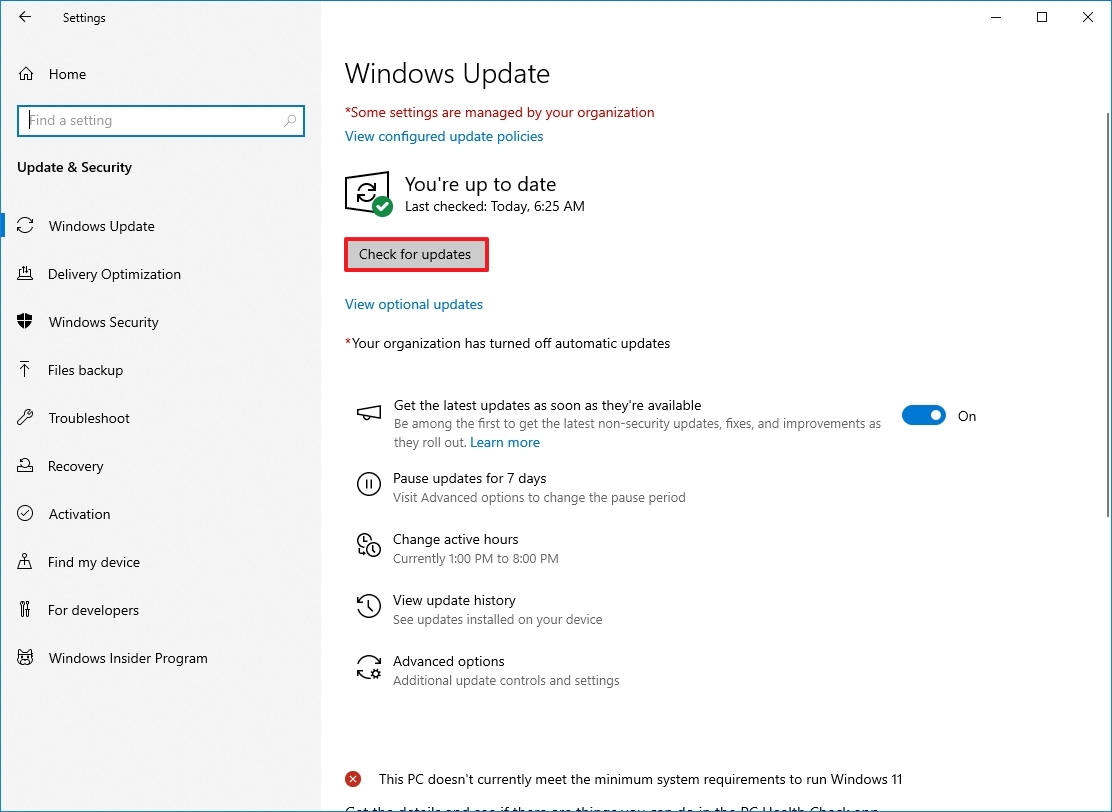
- Click the Restart Now button.
After your computer reboots, the update will be installed correctly, and you can resume being productive with your Windows 10 computer.
All the latest news, reviews, and guides for Windows and Xbox diehards.
How to block updates on Windows 10
If you continue to experience problems on your computer after reinstalling the update, there could be something wrong with the update or compatibility problems for the application or driver. In this case, you can temporarily hide the problematic update to prevent them from trying to re-apply it.
To stop Windows 10 from reinstalling a problematic update, first uninstall the update with the above instructions, and then use these steps:
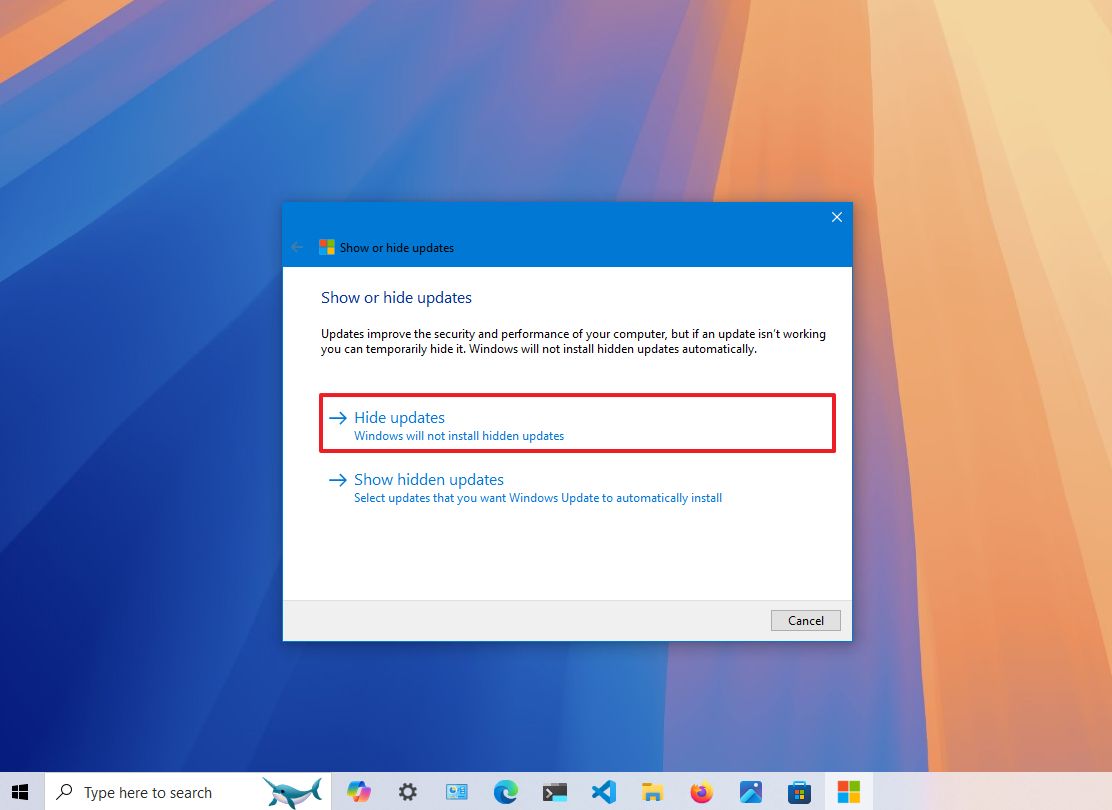
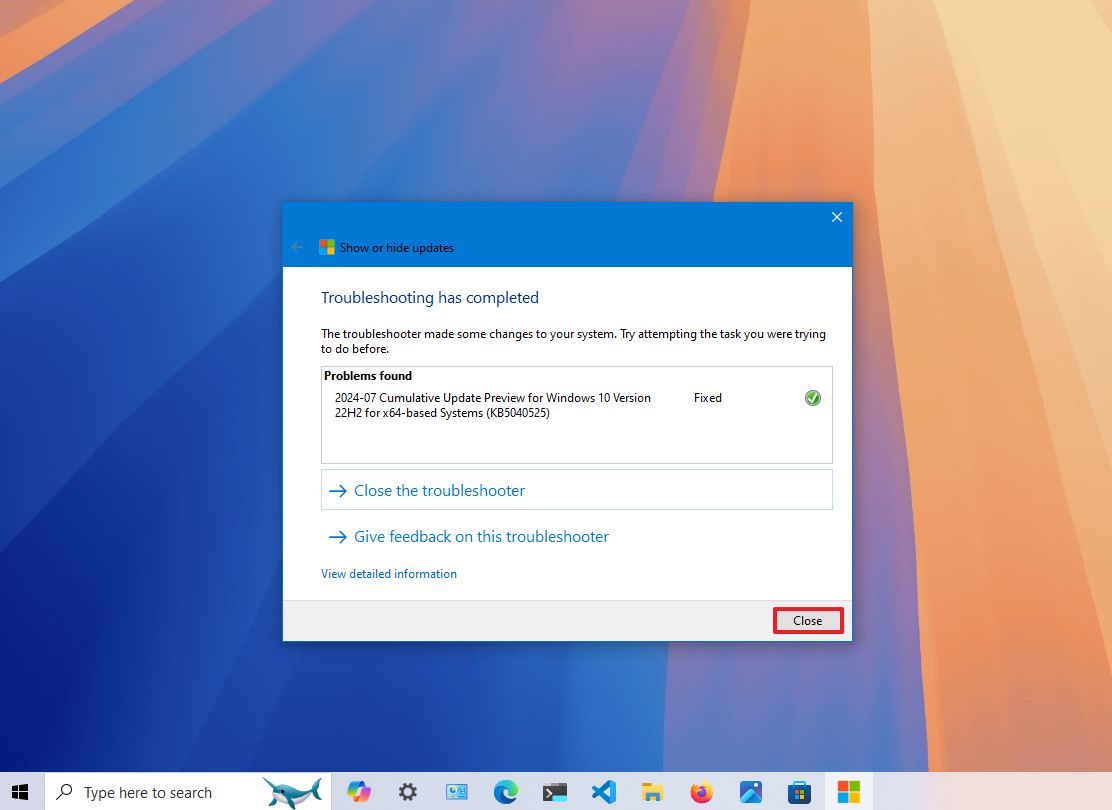
- Download the Show or hide updates troubleshooter from Microsoft.
- Double-click the .diagcab file to launch the tool.
- Click the Next button.
- Click the Hide updates option.
- Check the update causing problems.
- Click the Next button.
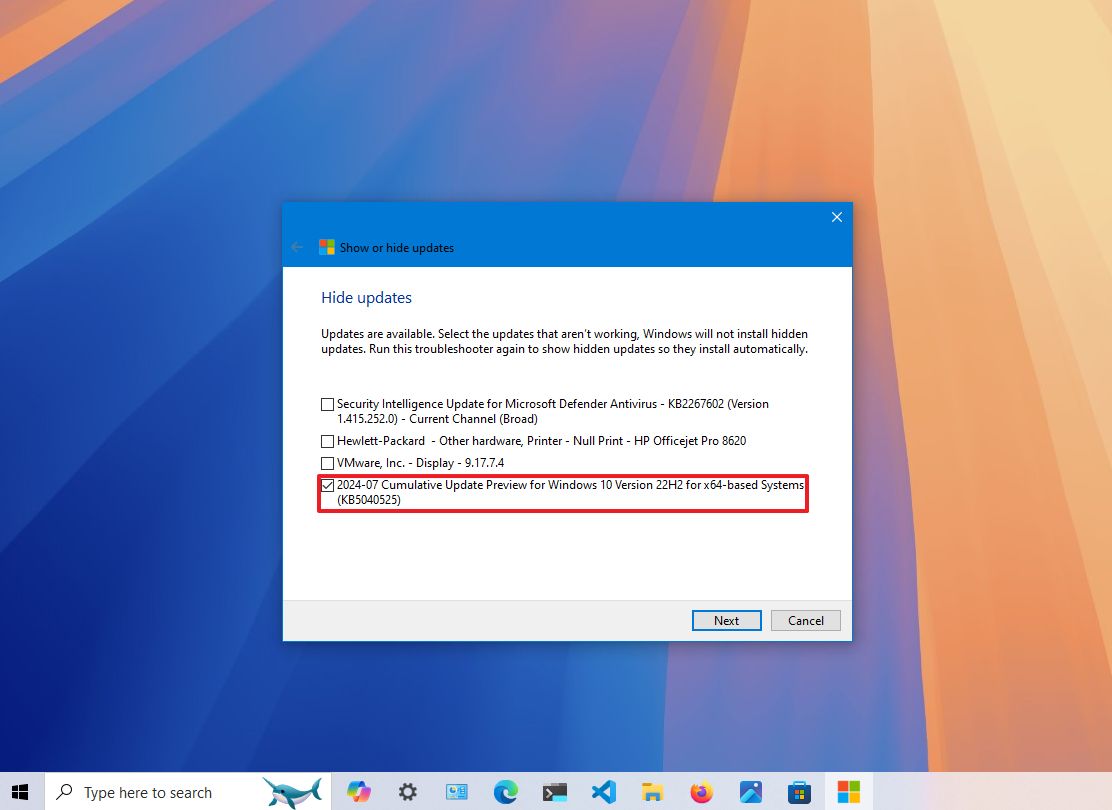
- Click the Close button.
- (Optional) Open Settings on Windows 10.
- Click on Update & Security.
- Click on Windows Update.
- Click the «Pause updates for 7 days» option.
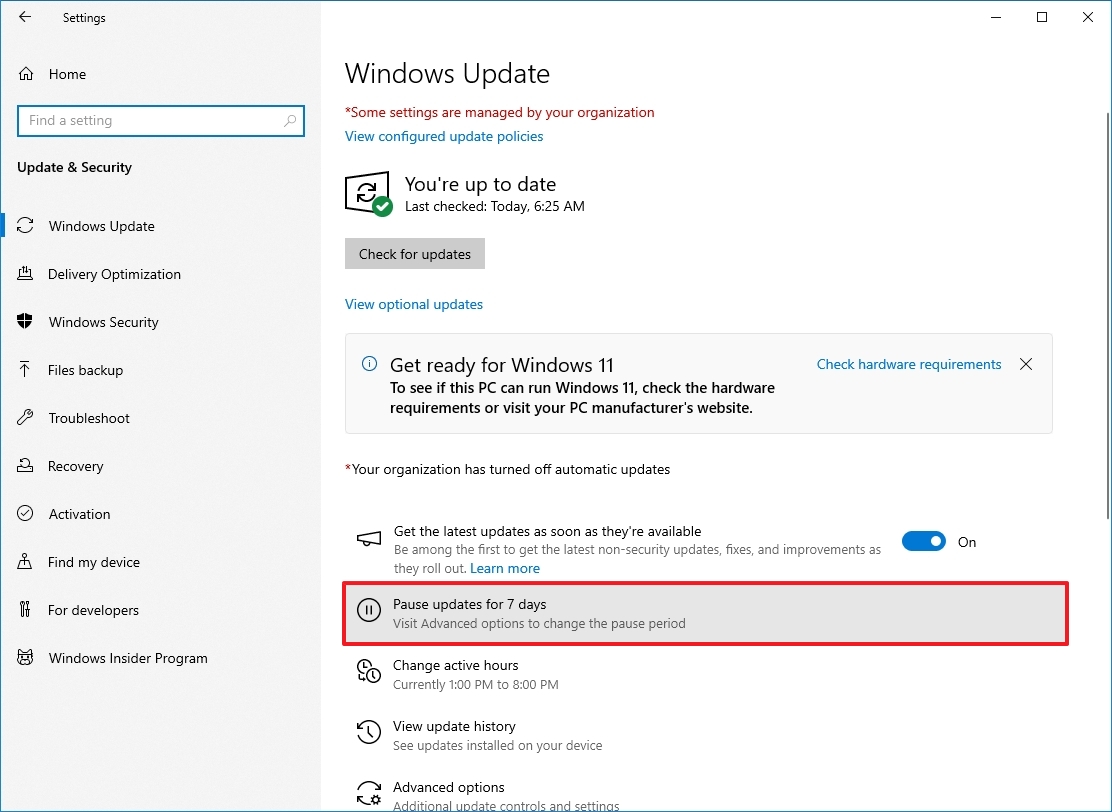
After uninstalling and hiding the update that isn’t working correctly, your Windows 10 device won’t try to download and reinstall it again until a new update replaces the old version. I’m also listing the steps to pause system updates for a week in the rare case that «Windows Update» ignores the block and tries to download the update again.
It’s important to note that not every update can be uninstalled since a newer update can make the previous update permanent. If you’re dealing with an issue, I suggest to remove it as soon as possible.
You can always show the update again by following the same instructions mentioned above. However, in step 5, you have to use the «Show hidden updates» option. Then, you can reinstall the update on your computer.
More resources
For more help articles, coverage, and answers on Windows 10, you can visit the following resources:
- Windows 11 on Windows Central — All you need to know
- Windows 10 on Windows Central — All you need to know
Mauro Huculak has been a Windows How-To Expert contributor for WindowsCentral.com for nearly a decade and has over 15 years of experience writing comprehensive guides. He also has an IT background and has achieved different professional certifications from Microsoft, Cisco, VMware, and CompTIA. He has been recognized as a Microsoft MVP for many years.
Download Windows Speedup Tool to fix errors and make PC run faster
Did you know that you can now use Windows Update to reinstall your current Windows 11 version without losing data? Yes, this new feature lets you reinstall your current Windows 11 version using Windows Update. Your apps, files, and settings will be preserved. Let us see how to do it.
A Windows user has several ways to repair, reinstall or reset the Windows 11/10 OS. One can use Reset this PC feature, use the Cloud download option, repair Windows using Installation media, reset Windows without using the Settings app, and so on. Now let us see how to do it using Windows Update.
Fix problems using Windows Update is a recovery tool that can help resolve updates-related issues. Using this tool will reinstall the current version of Windows on your device. This tool preserves all your apps, documents, and settings. Make sure to keep your PC connected to a power source and the internet during reinstallation.
To reinstall your current Windows 11 versions without losing data using Windows Update:
- Press Win+I to open Windows Settings
- Click on System settings on the left side
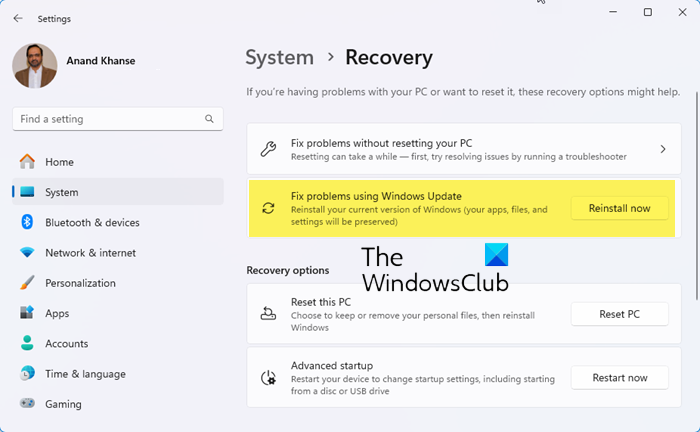
- On the right side, scroll down a bit and select Recovery.
- Locate the Fix problems using Windows Update section
- Click on the Reinstall now button.
- A blue window will appear. You may select the Automatically restart my PC 15 minutes after installation check box and click on OK
- Your PC will start and the repair process will commence.
Using Windows Update to reinstall your Windows 11 is a safe way to repair and reset the OS.
Let us know how it goes for you.
See this post if you see a Reinstall your current version of Windows to repair system files and components message.
How do I reinstall the latest Windows 11 update?
To reinstall a Windows Update, you will have to first see the Update History, then uninstall the Update, and then either use Windows Settings to check for and update Windows, or go to the Microsoft Update Catalog website and search for, download and install that particular KB update.
Read: How to repair Windows 11 without losing data or programs
How do I completely reinstall Windows 11?
To completely reinstall Windows 11, restart your computer while pressing the Shift key to enter Windows Recovery Environment. Then, select your USB drive to boot from it. At the Windows Setup, choose your language and input preferences, click ‘Next,’ and click ‘Install now’ to proceed with reinstallation.
Anand Khanse is the Admin of TheWindowsClub.com, a 10-year Microsoft MVP (2006-16) & a Windows Insider MVP (2016-2022). Please read the entire post & the comments first, create a System Restore Point before making any changes to your system & be careful about any 3rd-party offers while installing freeware.
Did the last Windows update mess up your computer? If you encounter this problem, you may need to uninstall and then reinstall the update. In this post, MiniTool Solution explains how to reinstall updates on Windows 10/11 and some other related information.
Is Reinstalling Windows Updates Possible?
No matter which operating system you use, you’re going to run into some bugs or issues more or less. Microsoft keeps receiving feedback from users and releasing fixes via different types of Windows updates. However, if a Windows update is not installed properly, you may encounter more issues or your system may get corrupt. In a situation like this, you can uninstall and then reinstall that Windows update.
Well then, how to reinstall Windows updates? You need to first uninstall it from your device and then check for updates in Windows Update to get it again. However, if the update continues to cause problems, it should be not compatible with your system. You’d better hide it. Usually, skipping Windows Updates is not a big deal when a Windows version is still in service.
Next, we will show you how to reinstall updates on Windows 10/11 and how to hide a specific update when necessary.
Tips & Tricks: Back up Your Files and Recover Your Data
In theory, a Windows update will not delete your files on your device. But in rare cases, users report that some of their files get lost after a Windows update. So, to protect your files, you’d better use MiniTool ShadowMaker to back up your computer.
If you forget to make a backup and you lose your files after a Windows update, you can try MiniTool Power Data Recovery to get your files back.
In this part, we will introduce these two MiniTool programs separately.
Back up Your Files before Installing a Windows Update
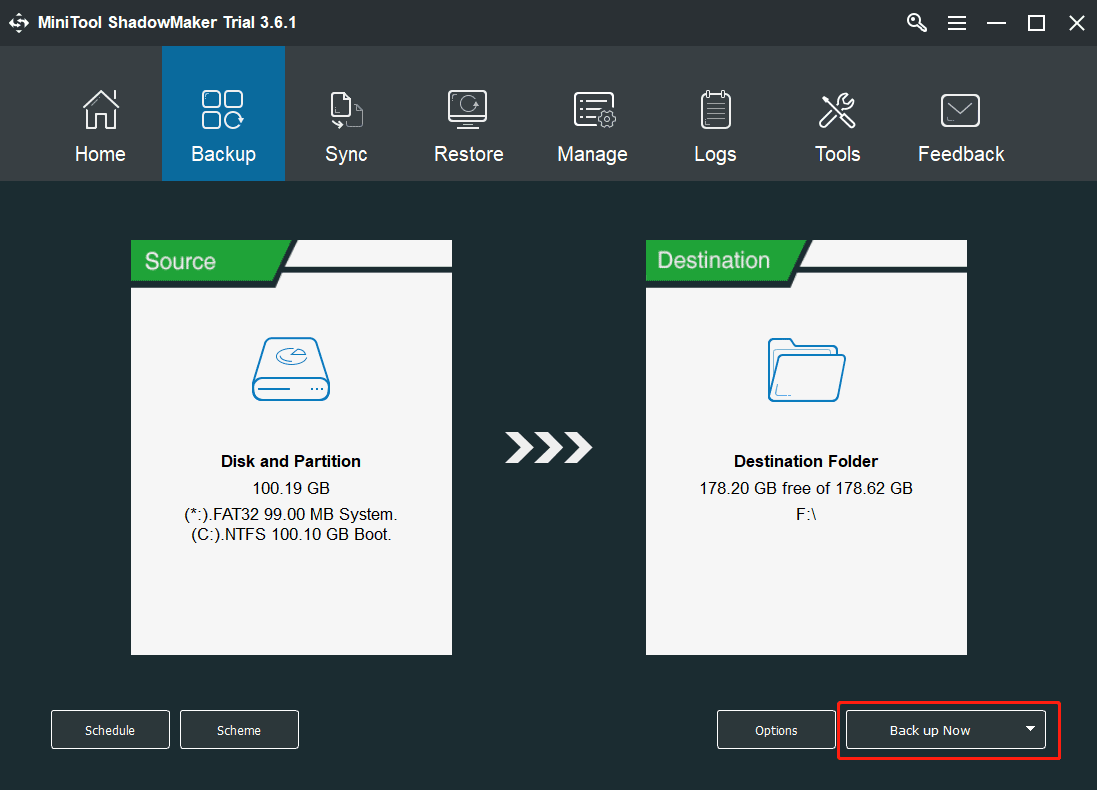
MiniTool ShadowMaker is a professional Windows backup software developed by MiniTool Software. You can use it to back up files, folders, partitions, disks, and systems. It works on all versions of Windows, including Windows 11, Windows 10, Windows 8.1/8, and Windows 7.
If you are not familiar with this software, you can first try the trial edition. You can use it for free within 30 days.
MiniTool ShadowMaker TrialClick to Download100%Clean & Safe
You’d better use this software to make a full backup of your computer to an external hard drive. So, you need to prepare an external hard drive that has enough available space to save your files and system in advance.
After downloading and installing this software on your device, you can open it, then select the source drive and destination drive, and click Back up Now to start backing up your files and system.
If the data loss issue happens or your system is damaged after a Windows update, you can restore your PC from the backup.
Recover Your Lost Files after Installing a Windows Update
If unfortunately you lose your files and there is no available backup, you can use the free file recovery tool: MiniTool Power Data Recovery to get your lost files back.
This data recovery software can rescue your lost and deleted files from all kinds of data storage devices. As long as the lost files are not overwritten, this software can work to recover them.
If you are not sure if this tool can find your needed files, you can use the trial edition to scan the target drive and then check if it can detect these files.
MiniTool Power Data Recovery TrialClick to Download100%Clean & Safe
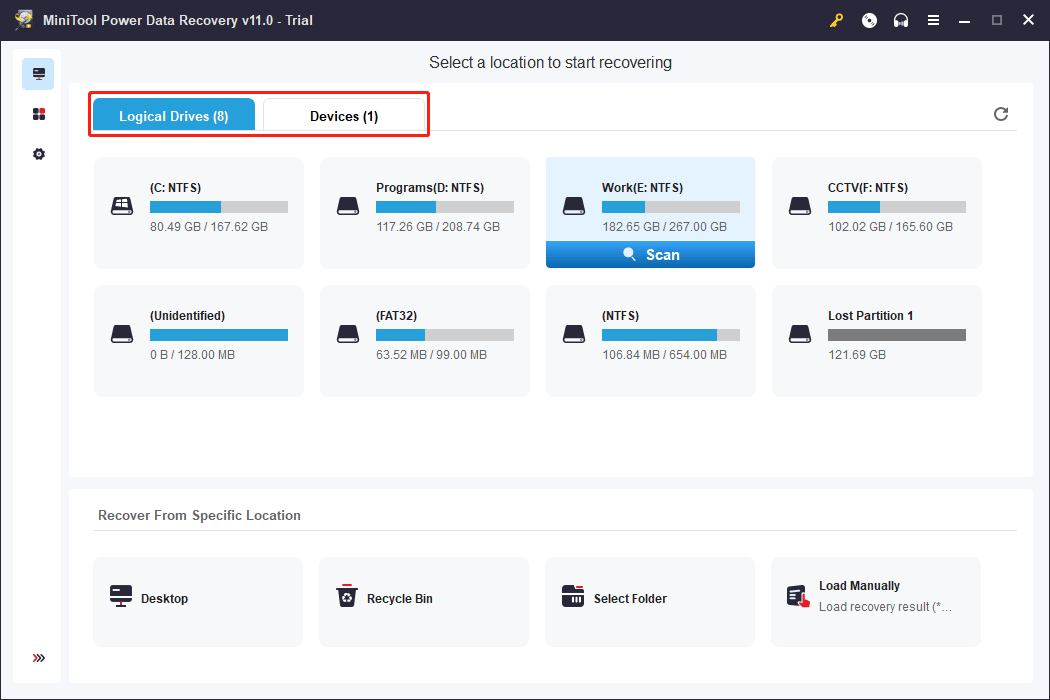
After opening MiniTool Power Data Recovery, you can see two sections: Logical Drives and Devices. If you remember the original location of the lost files, you can select that drive to scan. If you forget the location, you can switch to the Devices section and select the whole disk to scan.
If you want to use this software to recover your lost files, you need to upgrade to a full edition. After that, you can select your needed files at once, click the Save button, and select a suitable location to save these files. The destination location should not be the original folder of the lost files. Otherwise, the lost files may be overwritten and become unrecoverable.
Want to recover your lost and deleted files? You can just try MiniTool Power Data Recovery.Click to Tweet
How to Reinstall Updates on Windows 10?
Here is how to uninstall and reinstall updates on Windows 10:
Action 1: Uninstall Updates on Windows 10
*Case 1: How to uninstall updates on Windows 10 when the system is bootable
Uninstall a Windows 10 cumulative update:
Step 1: Go to Start > Settings > Update & Security > Windows Update.
Step 2: Click View update history from the right panel.
Step 3: On the next page, click Uninstall updates.
Step 4: A new interface will pop up, on which you can see your installed updates. Then, you can right-click the update you want to uninstall and click Uninstall to remove the update from your device.

However, you can’t uninstall Windows 10 feature updates using the above method. But you can go back to the previous version of Windows 10 to uninstall your newly installed major update.
Uninstall a Windows 10 major (feature) update:
Tips:
After you install a new feature update, Windows allows you to go back to the previous version of Windows 10 within 10 days if the new version is not working or you don’t like it. Remember: the validity period is ten days.
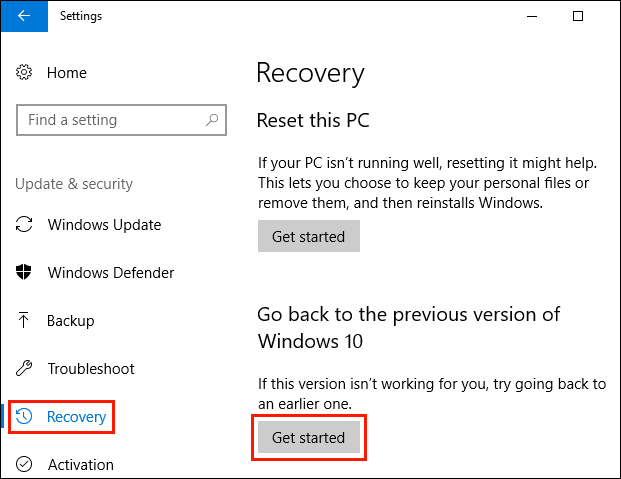
Step 1: Go to Start > Settings > Update & security > Recovery.
Step 2: Click the Get started button under Go back to the previous version of Windows 10.
Step 3: Follow the on-screen instructions to make your system go back to the previous version on which it can run normally.
These two solutions are for Windows that can still boot normally. A failed Windows update can also cause a serious system issue like Windows becoming unbootable. If so, these two methods will not be available. In a situation like this, you will need to access WinRE (Windows Recovery Environment) to uninstall the update or go back to the previous Windows 10 version.
*Case 2: How to uninstall updates on Windows 10 when the system is unbootable
Step 1: Press the power button to start your computer. When you see the logo screen, press and hold the power button for a while to force shut down your device. Repeat this step two more times. Then, you will enter the Automatic Repair interface.
Step 2: Click the Advanced options button to continue.
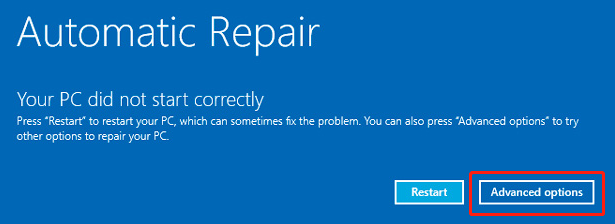
Step 3: You will enter the Advanced options interface. Then, click Uninstall updates and follow the guide to uninstall your newly installed cumulative update from your computer. If you want to uninstall or remove a feature update, you need to click Go back to the previous version. If you can’t find this option, you can click See more recovery options.
Action 2: Reinstall Windows 10 Updates
After uninstalling the failed Windows 10 update, you can go to Windows Update to check for updates, then download & install the latest Windows 10 update on your device. Please make sure that your internet connection is enabled and works well during the process.
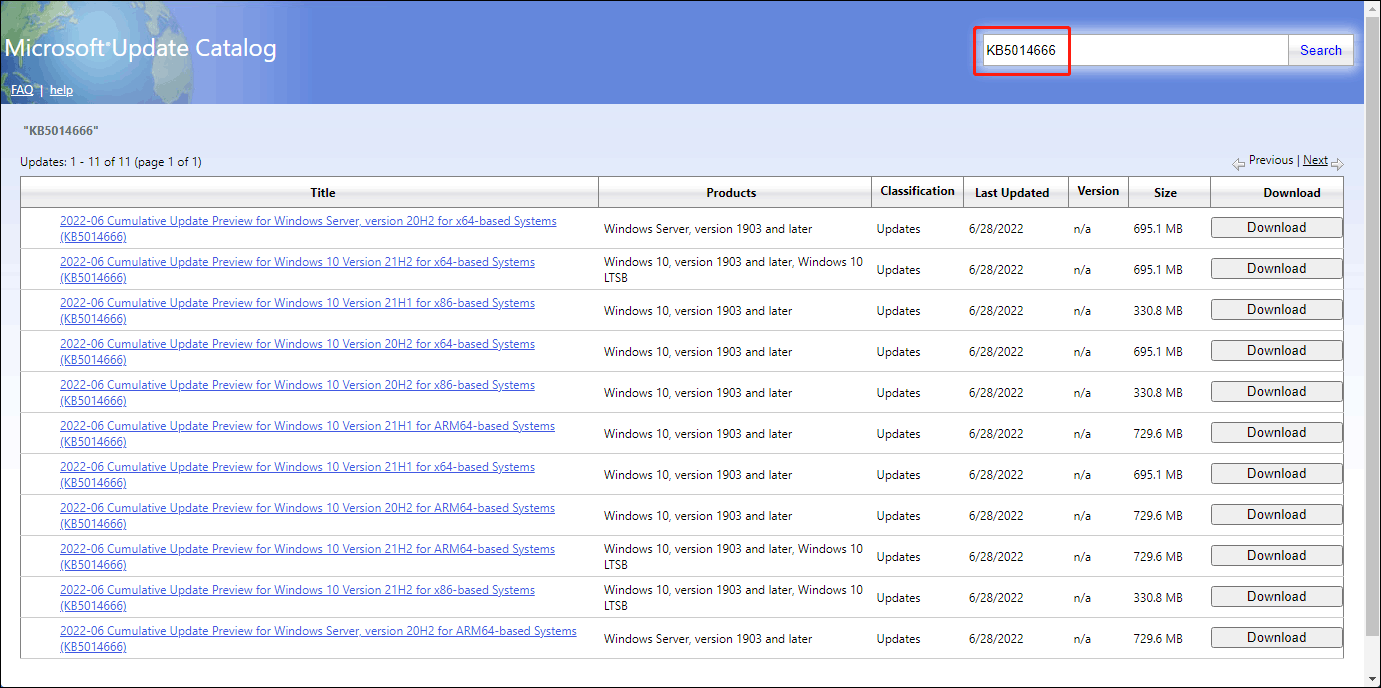
If you have missed the Windows 10 cumulative update you want to install, you can go to the Microsoft Update Catalog page, search for the update, and select a suitable file to download. The following is the Windows 10 KB5014666 download page.
How to Reinstall Updates on Windows 11?
Action 1: Uninstall Updates on Windows 11
*Case 1: How to uninstall updates on Windows 11 when the system is bootable
Uninstall a Windows 11 cumulative update:
Step 1: Press Windows + I to open the Settings app.
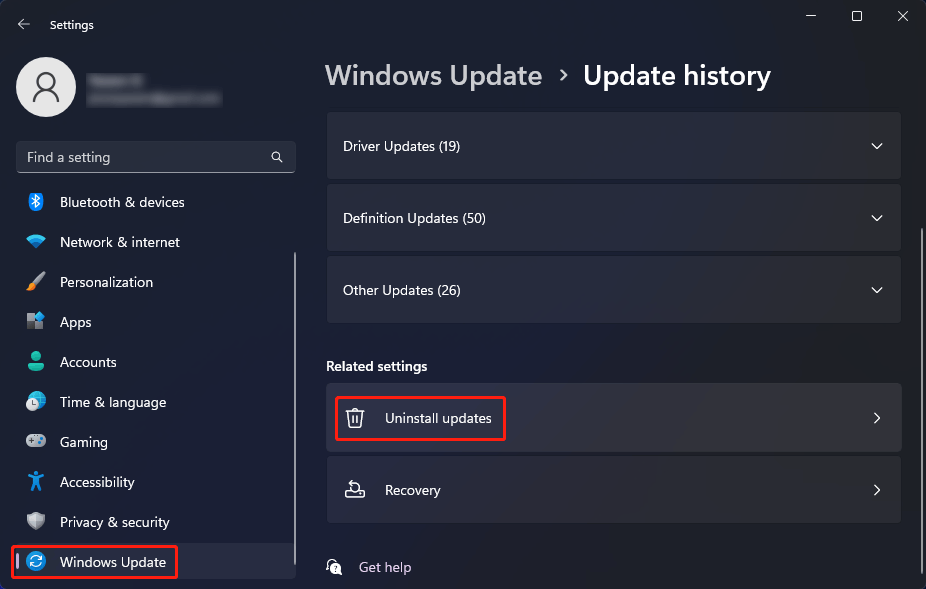
Step 2: Click Windows Update from the left panel.
Step 3: Click Update history from the right panel and then Uninstall updates under Related settings.
Step 4: Find your recently installed update that causes issues and click the Uninstall button next to it to remove it from your device.
Uninstall a Windows 11 major (feature) update:
Likewise, you can only uninstall a Windows 11 feature update within 10 days.
Step 1: Click Windows + I to open the Settings app.
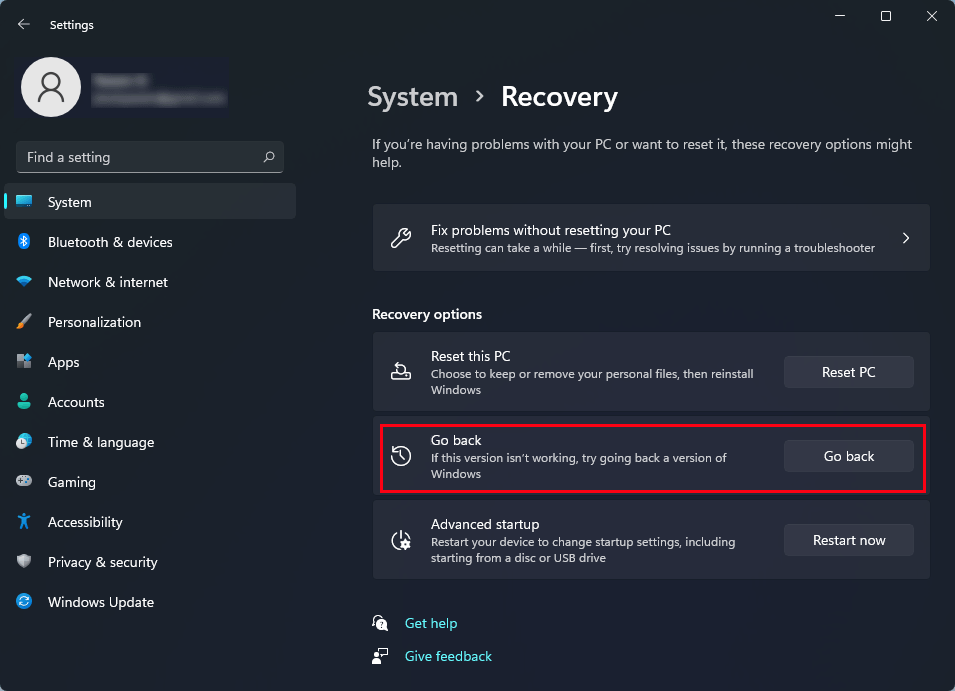
Step 2: Go to System > Recovery.
Step 3: Click the Go back button under Recovery options.
Step 4: Follow the on-screen guides to go back to the previous Windows 11 version.
*Case 2: How to uninstall updates on Windows 11 when the system is unbootable
If your Windows 11 computer is unbootable after installing a failed update, you can also access WinRE to uninstall updates or go back to the previous version of Windows 11.
Step 1: Start your computer. When you see the computer logo screen, press and hold the power button for some seconds to force shut it down. Do this three times, then you will see the Automatic Repair interface.
Step 2: Click Advanced options.
Step 3: On the next interface, click Uninstall updates or Go back to the previous version according to your need.
Action 2: Reinstall Windows 11 Updates
Now, you can reinstall the update again. You can go to Settings > Windows Update to check for updates and install the update on your computer again.
If the Windows 11 cumulative update is no longer available in Windows Update, you can go to Microsoft Update Catalog to download an offline installer for it.
If you want to reinstall updates on Windows 10 or Windows 11, here are the skills you need to know.Click to Tweet
How to Block Specific Updates on Windows 10/11?
If your computer still has problems or has the same problems after installing the update again, this usually means that this update is not suitable or not compatible with your computer. You’d better uninstall it again and block it to avoid problems.
Well then, how to hide or block a specific update on Windows 10/11? You can try Show or hide updates, a Microsoft Windows Update troubleshooter. This tool is not pre-installed on your device. You need to download Show or hide updates and directly open the downloaded file to run it and select the target update to hide.
You can also go to Windows Update to temporarily pause Windows updates:
- How to Block Windows 10 November 2021 Update from Installing?
- Block Windows 11 from Being Installed on Your Computer
Is It OK to Skip a Windows Update?
We know that not all users like the new Windows updates. They think the update may bring issues or they just get used to the current Windows version and don’t want to make changes. But is it safe to skip a Windows update?
If you are using a Windows version that is still in the support of service, it will be OK if you choose to skip a Windows update no matter it is a feature update or a cumulative update.
Microsoft advocates installing the latest Windows 10/11 feature update because it can bring the newest features and protections to your system. The feature updates are also proven to be reliable and secure after a long period of Insiders’ testing.
However, if you refuse to install one feature update, you should not worry about the security problem. Microsoft keeps releasing security updates and cumulative updates to Windows versions that are in service. If your system is facing security issues or other issues, you can install these updates to fix them. However, installing optional updates is not recommended unless they can resolve your serious computer problems.
Wrapping Things up
How to reinstall updates on Windows 10/11? Of course, you need to first uninstall them from your device, then reinstall them to fix issues. This post shows you what you can do to do the job. Here are some notes on Windows updates as well. Should you have other related issues, you can let us know in the comment. You can also contact us via [email protected].
Even though installing updates in Windows is an easy process, the mechanism in the background that manages it all is fairly complicated. There is also a lot of misinformation on the Internet about how to deal with problems relating to Windows Update.
One of the biggest misconceptions is that all Windows updates can be installed at once by simply deleting the SoftwareDistribution folder stored in C:\Windows. This is completely wrong. Yes, you might save some space (anywhere from 500 MB to several GB’s), but deleting the folder will not remove any installed update.
In addition it’s a bad idea to delete the SoftwareDistribution folder unless it is absolutely required. There is a subfolder called DataStore that has a large database of all the Windows Updates available. This database will probably be a couple of hundred MBs in size. Deleting this database simply removes the Windows Update history for the computer.
To prove this to myself, I did a test. I opened Control Panel, clicked on Windows Update and then clicked on View Update History in the left hand menu.

This screen just gives you a full list of installed updates with the Status, Importance and Date Installed. When we delete the SoftwareDistribution folder, this dialog will be completely empty as if you have never installed any updates. Before I show you that, click on the Installed Updates link at the top where it tells you how to remove an update.

As you can see, I have a couple of hundreds updates currently installed for Office, Windows, Silverlight, etc. Now if you follow the instructions below for deleting the folder, you can go back to View Update History dialog and you will see it’s now empty.

However, if you click on Installed Updates again, you will see that all the updates that were listed before and still listed there. This is because we simply deleted the log history of the updates and not the actual updates.
This dialog is where you can actually uninstall an update, but only one at a time. Simply click on an update and then click Uninstall. Unfortunately, there is no way to remove all updates at once unless you use System Restore.

If you use System Restore and restore the computer to a previous restore point, any updates that were installed after that restore point will be gone. To remove all updates, though, you would need a restore point created right after the OS was installed. Even if a restore point was created at that point, older ones normally get deleted over time to make space for newer restore points.
Still, if you have a lot of space allocated to System Restore, you might be able to roll back a couple months worth of updates at once.
Once you delete the contents of the folder, you will need to revisit Windows Update via Control Panel and check for updates. The entire database will be built from scratch and you may notice that Windows shows Checking for updates for a very long time. This is because a list of every update applicable to the OS has to be downloaded again and then compared to the updates currently installed on the system.
Delete SoftwareDistribution Folder
In order to remove this folder, you first have to stop the Windows Update and BITS services in Windows. To do this, click on Start and type in services.msc into the search box.

Next, right-click on the Windows Update service and click on Stop. Do the same thing for the Background Intelligent Transfer Service (BITS) service too.

Now navigate to the following folder shown below and you will see several folders listed there. The main ones that we will talk about are Downloads and DataStore.
C:\Windows\SoftwareDistribution

If you are trying to regain hard drive space only, then you should only delete the contents of the Download folder, though in theory this should not really be necessary. The Download folder actually holds all the updates that have been downloaded, but not yet installed. Once they are installed, the updates are removed within 10 days. So theoretically, that folder should shrink in size soon after you have installed all the Windows updates.
The DataStore folder contains the database with the full Windows update history for the computer. Once it is deleted, the update history dialog will be blank like I had shown above, but all your updates will still remain. You should really never delete the DataStore folder unless you are told to do so or if Windows Update is completely corrupt and misconfigured.
Note that you may not be able to delete certain folders and the ReportingEvents file. In the case where you can’t delete a folder, just open the folder and delete all the contents inside. For me, I got an error when trying to delete the DataStore folder, so I just went inside the folder and deleted the database file and all the other files in the folder.
Check for Windows Updates
If you did remove the SoftwareDistribution folder, you will want to go to Windows Update again to check for updates. It will show that you have never perform a check for updates since the update history is now gone.

Click the Check for updates button and be prepared to wait a while as the database is being recreated.
Conclusion
So the main point here is that you cannot really get rid of all Windows Updates at once unless you have a really old restore point saved on the system. Secondly, you should only delete the Downloads folder in the SoftwareDistribution folder if you are looking to save space or simply install all the latest updates and wait 10 days to see if they are removed automatically.
Thirdly, you should only delete the DataStore folder if something is really wrong with Windows Update like not showing any new updates for several months, etc. Hopefully, this gives you a better understanding of how Windows Update works and how the files are stored. If you have any questions, post a comment. Enjoy!
Related Posts
- How to Fix a “This file does not have an app associated with it” Error on Windows
- How to Fix an Update Error 0x800705b4 on Windows
- How to Resolve “A JavaScript error occured in the main process” Error on Windows
- How to Fix the Network Discovery Is Turned Off Error on Windows
- How to Change Folder Icons in Windows