

Creating your own URL protocol in Windows allows you to define custom behavior when a specific protocol is used in a URL. Here’s how to create one:
Steps to Create a Custom URL Protocol
1. Open the Windows Registry Editor:
* Press Win + R, type `regedit`, and hit Enter.
Enter fullscreen mode
Exit fullscreen mode
2. Navigate to the Protocols Section:
- Go to HKEY_CLASSES_ROOT in the registry.
- Right-click on HKEY_CLASSES_ROOT and select New > Key.

- Name this key after your custom protocol (e.g., myapp).

3. Define the Default Value:
- Double clickon (Defualt).
- Write any thing about you protocol (e.g,. my app protocol)
- press ok.

- Create New string value.
- add value URL Protocol it’s required.
- Now Your app is ready you can check on google chrome but we have add .exe file corresponding to our URL.
4. Create a Shell Subkey:
- Inside your protocol key (e.g., myapp), right-click and create a new key named shell.

- name of the key is shell:

5. Create an open Key Inside the shell Key:
- Right-click the shell key, select New > Key, and name it open.

6. Create a command Key Inside the open Key:
- Right-click the open key, select New > Key, and name it command.
7. Define the Command to Execute:
- Click on the command key, and in the right-hand pane, double-click the (Default) entry. Set the value to the path of the executable you want to run, followed by «\»%1\»» (including the quotes). For example:

- press ok, you protocol created successfully.
8. Creating Test Program
- Creating a program using c to get arguments. you can use any langualge.
«`c
include
include
int main(int argc, char *argv[])
{
printf(«Argument: \n%s», argv[1]);
getch();
return 0;
Enter fullscreen mode
Exit fullscreen mode
}
* Convert Into Exe using `c++ myapp.c -o myapp.exe`;
* now you add this exe into command defualt value.
## 9: Test Your Protocol
* goto chrome and write you *myapp://hello*

* it's open a modal to open url.
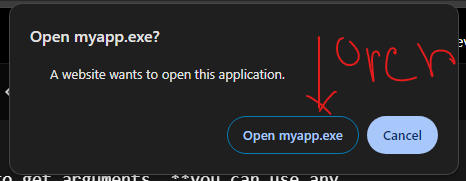
* OUTPUT:-
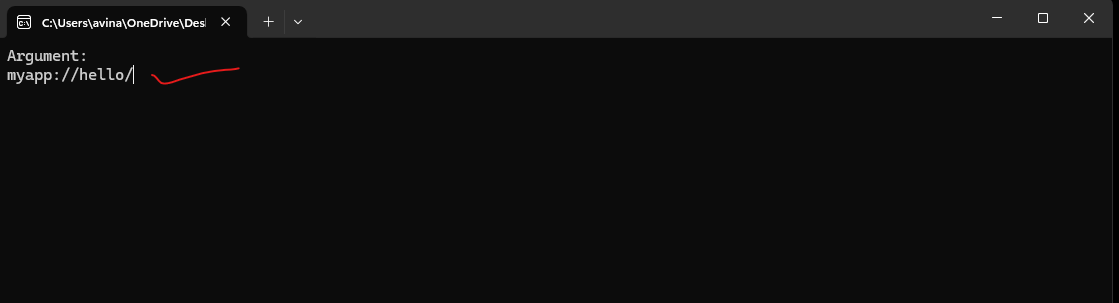
* Now you can parse this url and do anyting what you want.
Follow Me on GitHub [Avinash Tare](http://github.com/avinashtare/)
Enter fullscreen mode
Exit fullscreen mode
Registering an Application to a URI Scheme
- Article
- 07/13/2016
- 5 minutes to read
The About Asynchronous Pluggable Protocols article describes how to develop handlers for Uniform Resource
Identifier (URI) schemes. In some cases, it may be desirable to invoke another application to handle a custom URI scheme. To do so, register the existing application as a URI pluggable protocol handler and associate it with the custom URI scheme. Once the application has successfully launched, it can use command-line parameters to retrieve the URI that launched it. These settings apply to pluggable protocol handlers launched from within Windows Internet Explorer and from Windows Explorer using the Run… command (Windows logo key+R).
| Security Warning: |
|---|
| Applications that handle URI schemes must consider how to respond to malicious data. Because handler applications can receive data from untrusted sources, the URI and other parameter values passed to the application may contain malicious data that attempts to exploit the handling application. |
This topic contains the following sections:
- Registering the Application Handling the Custom URI Scheme
- Launching the Handler
- Security Issues
- Example Pluggable Protocol Handler
- Related topics
Registering the Application Handling the Custom URI Scheme
To register an application to handle a particular URI scheme, add a new key, along with the appropriate subkeys and values, to HKEY_CLASSES_ROOT. The root key must match the URI scheme that is being added. For instance, to add an «alert:» scheme, add an alert key to HKEY_CLASSES_ROOT, as follows:
HKEY_CLASSES_ROOT
   alert
      URL Protocol = ""
Under this new key, the URL Protocol string value indicates that this key declares a custom pluggable protocol handler. Without this key, the handler application will not aunch. The value should be an empty string.
Keys should also be added for DefaultIcon and shell. The Default string value of the DefaultIcon key must be the file name to use as an icon for this new URI scheme. The string takes the form «path, iconindex» with a maximum length of MAX_PATH. The name of the first key under the shell key should be an action verb, such as open. Under this key, a command key or a DDEEXEC key indicate how the handler should be invoked. The values under the command and DDEEXEC keys describe how to launch the application handling the new protocol.
Finally, the Default string value should contain the display name of the new URI scheme. The
following example shows how to register an application, alert.exe in
this case, to handle the alert scheme.
HKEY_CLASSES_ROOT
   alert
      (Default) = "URL:Alert Protocol"
      URL Protocol = ""
      DefaultIcon
         (Default) = "alert.exe,1"
      shell
         open
            command
               (Default) = "C:\Program Files\Alert\alert.exe" "%1"
When a user clicks a link containing your custom URI scheme, Windows Internet Explorer launches the pluggable protocol handler registered for that URI scheme. If the specified open command specified in the registry contains a %1 parameter, Internet Explorer passes the URI to the registered pluggable protocol handler application.
Launching the Handler
By adding the above settings to the registry, navigating to URIs such as alert:Hello%20World would cause an attempt to launch alert.exe with the complete URI on the command line. Internet Explorer percent-decodes the URI, but the Windows Run… command does not. If a URI contains percent-encoded spaces, it may be split across more than one argument on the command line.
For example, if the link above is followed through Internet Explorer, the command line would be:
"C:\Program Files\Alert\alert.exe" "alert:Hello World"
If this link is followed through Windows Explorer, the Windows Run command, or some other application, the command line would be:
"C:\Program Files\Alert\alert.exe" "alert:Hello%20World"
Because Internet Explorer will decode all percent-encoded octets in the URI before passing the resulting string to ShellExecute, URIs such as alert:%3F? will be given to the alert application pluggable protocol handler as alert:??. The handler won’t know that the first question mark was percent-encoded. To avoid this issue, pluggable protocol handlers and their associated URI scheme must not rely on encoding. If encoding is necessary, protocol handlers should use another type of encoding that is compatible with URI syntax, such as Base64 encoding. Double percent-encoding is not a good solution either; if the application protocol URI isn’t processed by Internet Explorer, it will not be decoded.
When ShellExecute executes the pluggable protocol handler with a stringon the command line, any non-encoded spaces, quotes, and backslashes in the URI will be interpreted as part of the command line. This means that if you use C/C++’s argc and argv to determine the arguments passed to your application, the string may be broken across multiple parameters. To mitigate this issue:
- Avoid spaces, quotes, or backslashes in your URI
- Quote the %1 in the registration («%1» as written in the ‘alert’ example registration)
However, avoidance doesn’t completely solve the problem of quotes in the URI or a backslash at the end of the URI.
Security Issues
As noted above, the string that is passed to a pluggable protocol handler might be broken across multiple parameters. Malicious parties could use additional quote or backslash characters to pass additional command line parameters. For this reason, pluggable protocol handlers should assume that any parameters on the command line could come from malicious parties, and carefully validate them. Applications that could initiate dangerous actions based on external data must first confirm those actions with the user. In addition, handling applications should be tested with URIs that are overly long or contain unexpected (or undesirable) character sequences.
For more information, please see Writing Secure Code.
Example Pluggable Protocol Handler
The following sample code contains a simple C# console application demonstrating one way to implement a pluggable protocol handler for the alert URI scheme.
using System;
using System.Collections.Generic;
using System.Text;

namespace Alert
{
  class Program
  {
    static string ProcessInput(string s)
    {
       // TODO Verify and validate the input
       // string as appropriate for your application.
       return s;
    }

    static void Main(string[] args)
    {
      Console.WriteLine("Alert.exe invoked with the following parameters.\r\n");
      Console.WriteLine("Raw command-line: \n\t" + Environment.CommandLine);

      Console.WriteLine("\n\nArguments:\n");
      foreach (string s in args)
      {
        Console.WriteLine("\t" + ProcessInput(s));
      }
      Console.WriteLine("\nPress any key to continue...");
      Console.ReadKey();
    }
  }
}
When invoked with the URI alert:"Hello%20World" (note extra quotes) from Internet Explorer, the program responds with:
Alert.exe invoked with the following parameters.

Raw command-line:
        "C:\Program Files\Alert\alert.exe" "alert:"Hello World""


Arguments:

        alert:Hello
        World

Press any key to continue...
Related topics
Conceptual
About Asynchronous Pluggable Protocols
Debugging Tips
Guide to Creating Your Own URL Protocol (🔗)
Have you ever wondered how websites have their own unique URLs with the «http» or «ftp» prefix? Well, you’re not alone! Many tech enthusiasts are curious about creating their own URL protocols. Imagine having a custom URL like «so://yourwebsite.com» or «myapp://action» — it’s not only cool but also can enhance the user experience of your applications. In this blog post, we will dive into the world of URL protocols, explore common issues, provide easy solutions, and ultimately empower you to create your very own URL protocol. Let’s get started! 😎
Understanding URL Protocols
Before we jump into the technical aspects, let’s start with the basics. The section you see at the beginning of a URL, such as «http://www…» or «ftp://blah.blah…», is called the URL protocol. It defines the communication protocol that the browser or application should use to retrieve the requested resource. Examples you might be familiar with include:
-
http://for Hypertext Transfer Protocol (used for websites) -
ftp://for File Transfer Protocol (used for file transfers) -
file://for accessing local files -
unreal://for gaming purposes -
mailto://for launching email applications
Each of these protocols serves a specific purpose and is associated with its own set of rules. But what if you want to register your own custom protocol? Let’s find out!
Registering Your Own URL Protocol
Yes, you can indeed register your own URL protocol! The process may vary depending on the operating system, so we’ll cover the two most widely used ones: Windows and macOS.
Windows
-
Add Registry Entry: Open the Registry Editor (
regedit) and navigate toHKEY_CLASSES_ROOT. Create a new key with your desired protocol name (e.g.,myprotocol). Inside this key, create a subkey calledshelland another subkey inside it calledopen. Finally, create a subkey namedcommand. The final key path should look like this:HKEY_CLASSES_ROOT\myprotocol\shell\open\command. -
Set the Command: In the
commandsubkey, set the(Default)value to the command or path you want to associate with your protocol. For example, if you want to open a specific webpage, the command could be"C:\Program Files\MyApp\MyApp.exe" "%1".
macOS
-
Create Info.plist: Start by creating an
Info.plistfile for your application. This file contains metadata about your application, including the URL scheme. Add a newCFBundleURLTypeskey, and under it, add a new dictionary item calledCFBundleURLSchemes. WithinCFBundleURLSchemes, add a string item with your desired URL scheme (e.g.myapp). -
Handle Incoming Requests: To handle incoming requests to your URL scheme, you need to implement the appropriate code in your application. This will vary depending on the programming language or framework you’re using. For example, in Swift, you can handle incoming requests by implementing the
application(_:open:options:)method in yourAppDelegate.
Addressing Common Issues
Creating your own URL protocol can sometimes come with its own set of challenges. Let’s address a common issue you might encounter.
Issue: Protocol Not Recognized
Sometimes, when you try to open a URL with your custom protocol, such as myapp://action, the browser or application might not recognize it. This could be due to the lack of proper registration or the application not being installed.
Solution: Check Registration and Application
To resolve this issue, double-check the registration process outlined earlier for your respective operating system. Ensure that the registry entries (Windows) or the Info.plist file (macOS) are properly created. Additionally, make sure that the associated application (if any) is installed and set up correctly. Restart your computer or device to apply any changes if necessary.
Start Creating Your Own URL Protocols Today!
Now that you have a good understanding of URL protocols and how to create your own, it’s time to unleash your creativity! 🚀 Whether you want to create custom links for your website, deep-link into your mobile app, or add a unique touch to your desktop application, the possibilities are endless.
Have fun experimenting with different URL schemes, and don’t forget to share your creations with us. We’d love to see what you come up with! If you have any questions or need further assistance, feel free to leave a comment below. Happy URL protocol crafting! ✨
|
|
|
842 / 473 / 79 Регистрация: 18.05.2016 Сообщений: 1,256 Записей в блоге: 5 |
|
|
19.09.2020, 17:10. Показов 2344. Ответов 7 В Windows есть обработка расширений файлов и URL-протоколов вроде mailto, http и т.д. Так вот мне нужен обработчик конкретного пути https://домен.ру Чтоб при любом браузере по умолчанию, по щелчку по ссылке, содержащей этот url, открывался конкретно IE — «C:\Program Files\internet explorer\iexplore.exe»
0 |
|
159 / 62 / 14 Регистрация: 07.05.2020 Сообщений: 652 Записей в блоге: 1 |
|
|
23.09.2020, 09:54 |
|
|
Не так. Там куча разных движков: например, про осла винда может знать, а как быть с теми, которые появились относительно недавно и винде без перезагрузки отлично пашут. http/https — это указание на протокол. Погуглите в инете инфу про урл. Особенно стандарт от мелкоМягких. А браузер на mailto открывается по другой причине: на mailto стоит забитое приложение по-умолчанию — именно оно открывается с параметром ссылка, а совсем не потому, что там дескать что-то забито в реестре.
1 |
|
Супер-модератор 8828 / 4733 / 572 Регистрация: 13.03.2013 Сообщений: 16,824 Записей в блоге: 16 |
|
|
23.09.2020, 13:10 |
|
|
Сообщение от amd48 Конкретного обработчика нет, но можно заморочиться, и вместо явного пути создать ярлык, с содержимым: Запаковать его в архив и разослать заинтересованным лицам.
0 |
|
842 / 473 / 79 Регистрация: 18.05.2016 Сообщений: 1,256 Записей в блоге: 5 |
|
|
23.09.2020, 13:40 [ТС] |
|
|
Такой ярлык уже есть. Но хотелось бы ещё перехватывать ссылки в письмах аутлука, чтоб один конкретный домен всегда открывался в IE не зависимо от браузера по умолчанию
0 |
|
Maks Супер-модератор 8828 / 4733 / 572 Регистрация: 13.03.2013 Сообщений: 16,824 Записей в блоге: 16 |
||||
|
23.09.2020, 14:44 |
||||
|
Кажется, нашел решение: открываете оутлук, заходите в «Файл=>Управление правилами и оповещениями». Кликните здесь для просмотра всего текста Далее, выбираете «содержащие текст в тексте сообщения» Кликните здесь для просмотра всего текста Создаете батник с содержимым:
В оутлуке на след.окне выбираете «запустить приложение» и указываете путь к этому батнику.
1 |
|
Супер-модератор 8828 / 4733 / 572 Регистрация: 13.03.2013 Сообщений: 16,824 Записей в блоге: 16 |
|
|
24.09.2020, 16:30 |
|
|
Сообщение от Maks Создаете батник с содержимым: Чёт какую-то фигню я написал, вернее написал то правильно, только при получении письма с нужной ссылкой сразу запускается IE с этой самой ссылкой.
0 |
|
842 / 473 / 79 Регистрация: 18.05.2016 Сообщений: 1,256 Записей в блоге: 5 |
|
|
28.09.2020, 14:36 [ТС] |
|
|
В Windows 10 это как-то нереально. Ассоциацию протоколов и браузеров вынесли в область «для юзера» с ручным его подтверждением. Вот сам браузер при установке может заделаться по-умолчанию.
0 |
|
6375 / 2200 / 342 Регистрация: 10.12.2013 Сообщений: 7,558 |
|
|
28.09.2020, 15:15 |
|
|
Сообщение от amd48 зарегистрировать своё приложение под конкретную URL-схему вполне реально. на первый взгляд вполне реализуемо. https://stackoverflow.com/ques… col-e-g-so
0 |
|
inter-admin Эксперт 29715 / 6470 / 2152 Регистрация: 06.03.2009 Сообщений: 28,500 Блог |
28.09.2020, 15:15 |
|
Помогаю со студенческими работами здесь Протокол https Security протокол для сайта что за протокол https ? а star… Яндекс протокол https Протокол httpS. Не шифруются данные Искать еще темы с ответами Или воспользуйтесь поиском по форуму: 8 |
|
Новые блоги и статьи
Все статьи Все блоги / |
||||
|
Как использовать OAuth2 со Spring Security в Java
Javaican 14.05.2025 Протокол OAuth2 часто путают с механизмами аутентификации, хотя по сути это протокол авторизации. Представьте, что вместо передачи ключей от всего дома вашему другу, который пришёл полить цветы, вы. . . |
Анализ текста на Python с NLTK и Spacy
AI_Generated 14.05.2025 NLTK, старожил в мире обработки естественного языка на Python, содержит богатейшую коллекцию алгоритмов и готовых моделей. Эта библиотека отлично подходит для образовательных целей и. . . |
Реализация DI в PHP
Jason-Webb 13.05.2025 Когда я начинал писать свой первый крупный PHP-проект, моя архитектура напоминала запутаный клубок спагетти. Классы создавали другие классы внутри себя, зависимости жостко прописывались в коде, а о. . . |
Обработка изображений в реальном времени на C# с OpenCV
stackOverflow 13.05.2025 Объединение библиотеки компьютерного зрения OpenCV с современным языком программирования C# создаёт симбиоз, который открывает доступ к впечатляющему набору возможностей. Ключевое преимущество этого. . . |
POCO, ACE, Loki и другие продвинутые C++ библиотеки
NullReferenced 13.05.2025 В C++ разработки существует такое обилие библиотек, что порой кажется, будто ты заблудился в дремучем лесу. И среди этого многообразия POCO (Portable Components) – как маяк для тех, кто ищет. . . |
|
Паттерны проектирования GoF на C#
UnmanagedCoder 13.05.2025 Вы наверняка сталкивались с ситуациями, когда код разрастается до неприличных размеров, а его поддержка становится настоящим испытанием. Именно в такие моменты на помощь приходят паттерны Gang of. . . |
Создаем CLI приложение на Python с Prompt Toolkit
py-thonny 13.05.2025 Современные командные интерфейсы давно перестали быть черно-белыми текстовыми программами, которые многие помнят по старым операционным системам. CLI сегодня – это мощные, интуитивные и даже. . . |
Конвейеры ETL с Apache Airflow и Python
AI_Generated 13.05.2025 ETL-конвейеры – это набор процессов, отвечающих за извлечение данных из различных источников (Extract), их преобразование в нужный формат (Transform) и загрузку в целевое хранилище (Load). . . . |
Выполнение асинхронных задач в Python с asyncio
py-thonny 12.05.2025 Современный мир программирования похож на оживлённый мегаполис – тысячи процессов одновременно требуют внимания, ресурсов и времени. В этих джунглях операций возникают ситуации, когда программа. . . |
Работа с gRPC сервисами на C#
UnmanagedCoder 12.05.2025 gRPC (Google Remote Procedure Call) — открытый высокопроизводительный RPC-фреймворк, изначально разработанный компанией Google. Он отличается от традиционых REST-сервисов как минимум тем, что. . . |
Наверх
unit uSI5.StartUp;
interface
uses
Windows,
Messages,
Classes,
SysUtils,
Graphics,
Forms,
Registry,
ShellApi;
type
TInitializer = class
private
FLink: string;
FMutexHandle, FMMFHandle, FWnd: THandle;
FLinkChange: TNotifyEvent;
protected
procedure ActivatePreviosInstance;
function CheckSLinkHandler: Boolean;
procedure RegisterSLinkHandler(CheckIsAdmin: Boolean = True);
function GetOtherInstanceHandle: THandle;
function CheckOneInstance: Boolean;
function NeedReinstallSLinkHandler: Boolean;
procedure InitFileMapping;
procedure ReleaseFileMapping;
procedure CheckSLink;
procedure WndProc(var Message: TMessage);
procedure ProcessCopyData(Msg: TWMCopyData);
procedure DoLinkChange;
…
public
constructor Create;
destructor Destroy; override;
…
procedure ResetSLink;
property SLink: string read FLink;
property OnLinkChange: TNotifyEvent read FLinkChange write FLinkChange;
end;
var
Initializer: TInitializer;
implementation
const
GInfoMutexName = ‘GSI Client’;
GInfoMMF = ‘GSI Client MMF’;
MagicWMCopyID = $4F4B1BE4;
SLinkKeyName = ‘slink’;
DefaultIconKey = SLinkKeyName + ‘\DefaultIcon’;
CommandKey = SLinkKeyName + ‘\shell\open\command’;
ReinstallSLinkCommand = ‘reinstallslink’;
function AllowSetForegroundWindow(dwProcessID: DWORD): BOOL; stdcall; external user32;
{ TInitilizer }
procedure TInitializer.ActivatePreviosInstance;
var
OtherInstanceHandle: THandle;
PID: Cardinal;
CopyDataStruct: TCopyDataStruct;
begin
OtherInstanceHandle := GetOtherInstanceHandle;
if OtherInstanceHandle = INVALID_HANDLE_VALUE then Exit;
GetWindowThreadProcessId(OtherInstanceHandle, PID);
AllowSetForegroundWindow(PID);
CopyDataStruct.dwData := MagicWMCopyID;
CopyDataStruct.cbData := Length(FLink) * SizeOf(Char);
if FLink <> » then
CopyDataStruct.lpData := @FLink[1];
SendMessage(OtherInstanceHandle, WM_COPYDATA, 0, Integer(@CopyDataStruct));
end;
function TInitializer.NeedReinstallSLinkHandler: Boolean;
begin
Result := FindCmdLineSwitch(ReinstallSLinkCommand, [‘-‘, ‘/’], True);
end;
function TInitializer.CheckOneInstance: Boolean;
begin
FMutexHandle := CreateMutex(nil, False, PChar(GInfoMutexName));
Result := GetLastError <> ERROR_ALREADY_EXISTS;
if not Result then
CloseHandle(FMutexHandle);
end;
procedure TInitializer.CheckSLink;
var
I, Len: Integer;
begin
Len := Length(SLinkProtocolPrefix);
for I := 1 to ParamCount do
if LowerCase(Copy(ParamStr(I), 1, Len)) = SLinkProtocolPrefix then
begin
FLink := ParamStr(I);
Break;
end;
end;
function TInitializer.CheckSLinkHandler: Boolean;
begin
Result := True;
with TRegistry.Create do
try
RootKey := HKEY_CLASSES_ROOT;
if OpenKeyReadOnly(SLinkKeyName) then
try
if ReadString(») <> ‘URL:Grand StroyInfo Protocol’ then
begin
Result := False;
Exit;
end;
if not ValueExists(‘URL Protocol’) then
begin
Result := False;
Exit;
end;
if ReadString(‘URL Protocol’) <> » then
begin
Result := False;
Exit;
end;
finally
CloseKey;
end;
if OpenKeyReadOnly(DefaultIconKey) then
try
if AnsiLowerCase(ReadString(»)) <> ‘»‘ + AnsiLowerCase(ParamStr(0)) + ‘», 0’ then
begin
Result := False;
Exit;
end;
finally
CloseKey;
end;
if OpenKeyReadOnly(CommandKey) then
try
if AnsiLowerCase(ReadString(»)) <> ‘»‘ + AnsiLowerCase(ParamStr(0)) + ‘» «%1″‘ then
begin
Result := False;
Exit;
end;
finally
CloseKey;
end;
finally
Free;
end;
end;
constructor TInitializer.Create;
begin
if NeedReinstallSLinkHandler then
begin
RegisterSLinkHandler(False);
TerminateProcess(GetCurrentProcess, NO_ERROR);
end;
CheckSLink;
if not CheckOneInstance then
begin
ActivatePreviosInstance;
TerminateProcess(GetCurrentProcess, ERROR_SERVICE_EXISTS);
end;
if SLink = » then
if not CheckSLinkHandler then
RegisterSLinkHandler;
InitFileMapping;
ShowSplash;
end;
destructor TInitializer.Destroy;
begin
ReleaseFileMapping;
CloseHandle(FMutexHandle);
inherited;
end;
procedure TInitializer.DoLinkChange;
begin
if Assigned(FLinkChange) then
FLinkChange(Self);
end;
…
function TInitializer.GetOtherInstanceHandle: THandle;
function ReadHandle: THandle;
var
MMFHandle: THandle;
Data: Pointer;
begin
Result := INVALID_HANDLE_VALUE;
MMFHandle := OpenFileMapping(FILE_MAP_READ, false, PChar(GInfoMMF));
if MMFHandle = 0 then Exit;
try
Data := MapViewOfFile(MMFHandle, FILE_MAP_READ, 0, 0, 0);
if Data = nil then Exit;
try
Result := PInteger(Data)^;
except
// Другое приложение файл созадло, но еще ничего туда не записало..
on EAccessViolation do ;
end;
finally
CloseHandle(MMFHandle);
end;
end;
var
I: Integer;
begin
for I := 0 to 9 do
begin
Result := ReadHandle;
if Result <> INVALID_HANDLE_VALUE then
Exit;
Sleep(100);
end;
end;
…
procedure TInitializer.InitFileMapping;
var
MMFData: Pointer;
begin
FWnd := Classes.AllocateHWnd(WndProc);
FMMFHandle := CreateFileMapping($FFFFFFFF, nil, PAGE_READWRITE,
0, 4096, PChar(GInfoMMF));
if FMMFHandle <> 0 then
begin
MMFData := MapViewOfFile(FMMFHandle, FILE_MAP_WRITE, 0, 0, 0);
if MMFData <> nil then
begin
PHandle(MMFData)^ := FWnd;
UnmapViewOfFile(MMFData);
end;
end;
end;
procedure TInitializer.ProcessCopyData(Msg: TWMCopyData);
begin
if Msg.CopyDataStruct^.dwData <> MagicWMCopyID then Exit;
SetLength(FLink, Msg.CopyDataStruct.cbData div SizeOf(Char));
CopyMemory(Pointer(FLink), Msg.CopyDataStruct.lpData,
Msg.CopyDataStruct.cbData);
ReplyMessage(0);
SendMessage(Application.Handle, WM_SYSCOMMAND, SC_RESTORE, 0);
SetForegroundWindow(Application.Handle);
DoLinkChange;
end;
procedure TInitializer.RegisterSLinkHandler(CheckIsAdmin: Boolean);
var
SEI: TShellExecuteInfo;
begin
case IsAdmin of
csError:
if CheckIsAdmin then Exit;
csLimitedUser:
begin
if not CheckIsAdmin then Exit;
if MessageBox(0,
‘Служебный протокол ГСИ не зарегистрирован, выполнить регистрацию сейчас?’,
‘ГСИ’, MB_ICONQUESTION or MB_YESNO or MB_DEFBUTTON1) = IDNO then Exit;
SEI.cbSize := SizeOf(TShellExecuteInfo);
SEI.lpFile := PChar(ParamStr(0));
SEI.lpDirectory := PChar(ExtractFilePath(ParamStr(0)));
SEI.lpVerb := PChar(‘runas’);
SEI.fMask := SEE_MASK_NOCLOSEPROCESS;
SEI.nShow := SW_HIDE;
SEI.hInstApp := HInstance;
SEI.lpParameters := PChar(‘-‘ + ReinstallSLinkCommand);
ShellExecuteEx(@SEI);
Exit;
end;
end;
with TRegistry.Create do
try
RootKey := HKEY_CLASSES_ROOT;
if OpenKey(SLinkKeyName, True) then
try
WriteString(», ‘URL:Grand StroyInfo Protocol’);
WriteString(‘URL Protocol’, »);
finally
CloseKey;
end;
if OpenKey(DefaultIconKey, True) then
try
WriteString(», ‘»‘ + ParamStr(0) + ‘», 0’);
finally
CloseKey;
end;
if OpenKey(CommandKey, True) then
try
WriteString(», ‘»‘ + ParamStr(0) + ‘» «%1″‘);
finally
CloseKey;
end;
finally
Free;
end;
end;
procedure TInitializer.ReleaseFileMapping;
begin
Classes.DeallocateHWnd(FWnd);
CloseHandle(FMMFHandle);
end;
procedure TInitializer.ResetSLink;
begin
FLink := »;
end;
…
procedure TInitializer.WndProc(var Message: TMessage);
begin
if Message.Msg = WM_COPYDATA then
ProcessCopyData(TWMCopyData(Message));
inherited;
end;
initialization
Initializer := TInitializer.Create;
finalization
Initializer.Free;
end.