
If Windows Push Notifications User Service is consuming high Memory or CPU usage in Windows 11/10, here is how you can eliminate this problem. It likely happens when you start your computer or connect it to the internet after a long time since all the apps try to show notifications at once.

What is Windows Push Notifications User Service?
Windows Push Notifications User Service is a service that helps you get all the notifications or updates from various apps installed on your computer. If you get a badge, tile, toast, or any other type of app notification, you should know that the Windows Push Notifications User Service is working in the background.
To fix the high Memory or CPU usage issue in Windows Push Notifications User Service on your computer, follow these instructions:
- Stop Windows Push Notifications User Service process
- Restart Windows Push Notifications User Service
- Disable all notifications
- Fix in Clean Boot state
As we mentioned, it could happen if you have connected your PC to the internet after a long time. So at such times, you may ignore it as the issue will go away. But if this happens often, read on.
1] Stop Windows Push Notifications User Service process
To stop the Windows Push Notifications User Service process, you can use Task Manager. The easiest way to open the Task Manager is by using the keyboard shortcut Ctrl+Shift+Esc. Once you open the Task Manager, you can sort the Background processes by Memory usage, or you can also look for the Service Host: Windows Push Notifications User Service process manually.
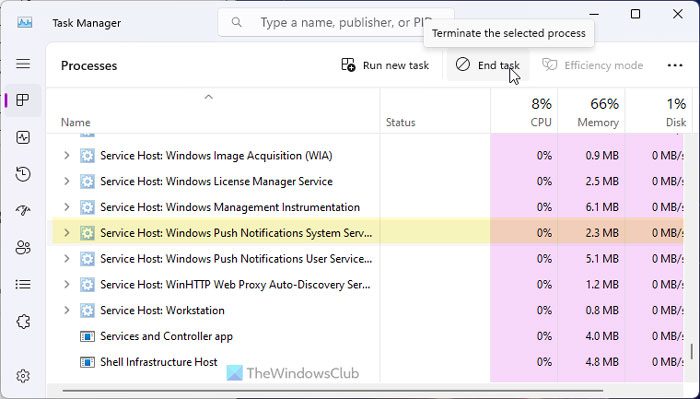
Select this process and click the End task button.
Although it doesn’t solve the problem permanently, you can find some time to work on other things instantly.
2] Restart Windows Push Notifications User Service
The Services panel in Windows 11/10 shows everything, including the Windows Push Notifications User Service process. As per our experience, restarting the service helps you fix the problem when certain background dependencies do not work as they should be.
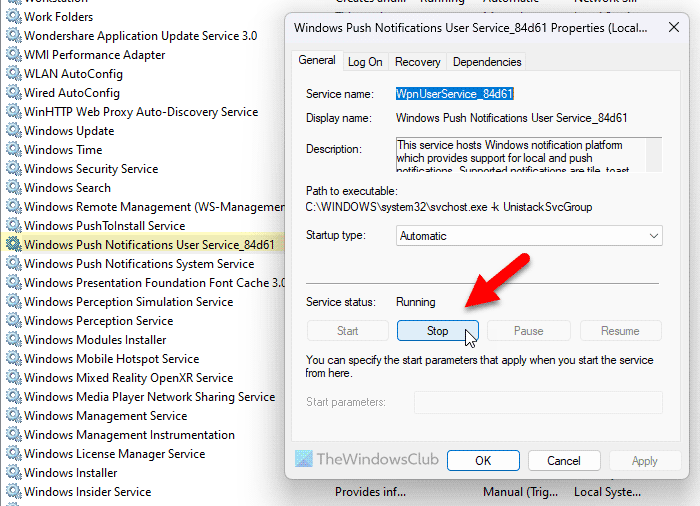
Therefore, search for services in the Taskbar search box and open the Services panel first. Then, search for Windows Push Notifications User Service and double-click on it.
Click on the Stop button and stop it. Once done, click on the Start button.
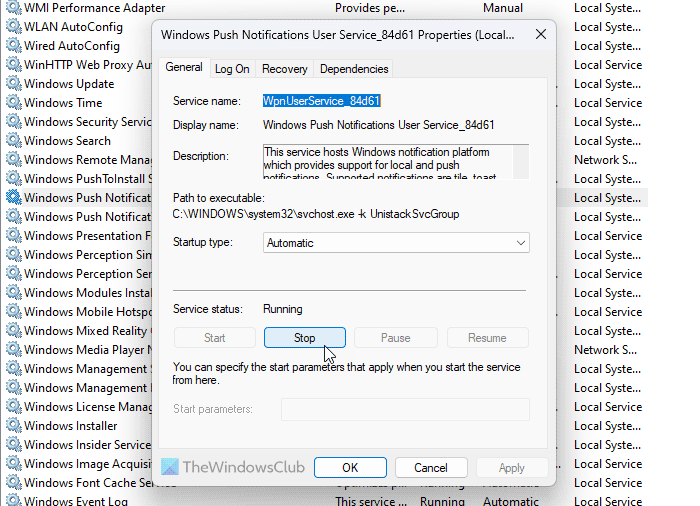
Finally, click on the OK button.
3] Disable all notifications
If notifications are not mandatory for you, this solution works pretty well. As this problem occurs due to having so many notifications from different apps, you can stop receiving notifications to solve this issue.
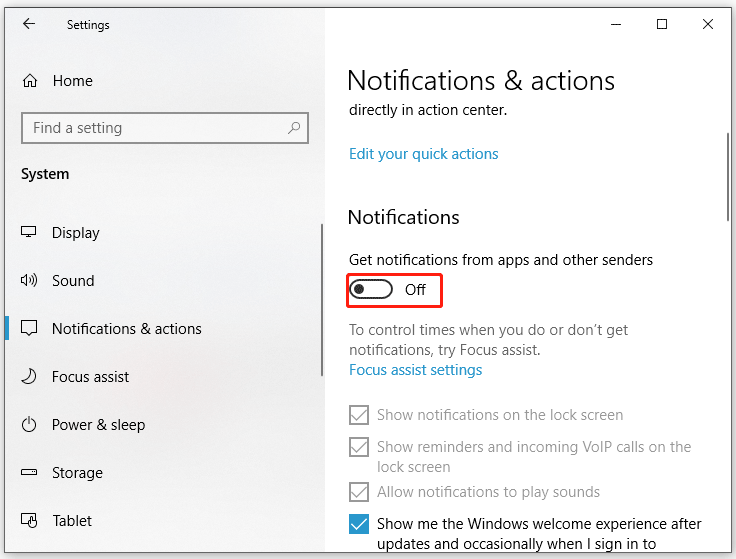
For that, press Win+I to open the Windows Settings panel and go to System > Notifications.
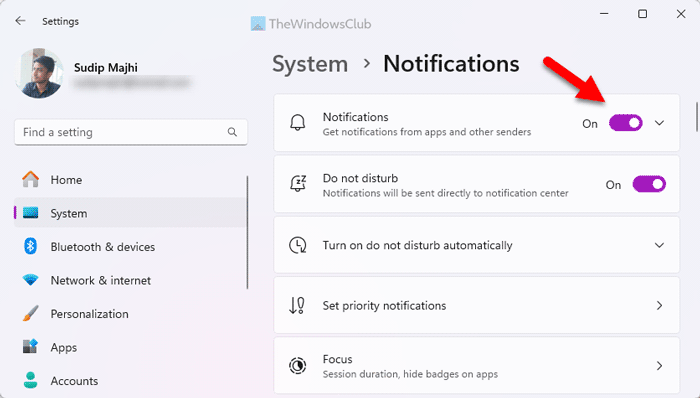
Here, you can find a menu called Notifications. You need to toggle the corresponding button to turn it off.
4] Fix in Clean Boot state
Clean Boot state helps you figure out whether a problem is occurring due to an internal driver or third-party app. Therefore, you can boot your computer into the Clean Boot state first.
Then, check if you are having the same problem or not. If not, you must enable one app at a time and repeat the same thing.
Note: If you use an Insider version of Windows 11, it could be a bug or glitch, too. In that case, check if Microsoft has already recognized it or not. If yes, hopefully, you will receive an update soon.
How to disable Windows Push Notifications User Service?
You can disable Windows Push Notifications User Service in Windows 11/10 using two methods:
1] Using Windows Settings
In order to deactivate Windows Push Notifications User Service, you need to disable the Notifications setting. Having said that, you must disable all the notifications at once. If any app is capable of sending notifications, it won’t work. For that, you need to open the Windows Settings panel and go to System > Notifications.
Find the Notifications menu and toggle the corresponding button.
2] Using Services
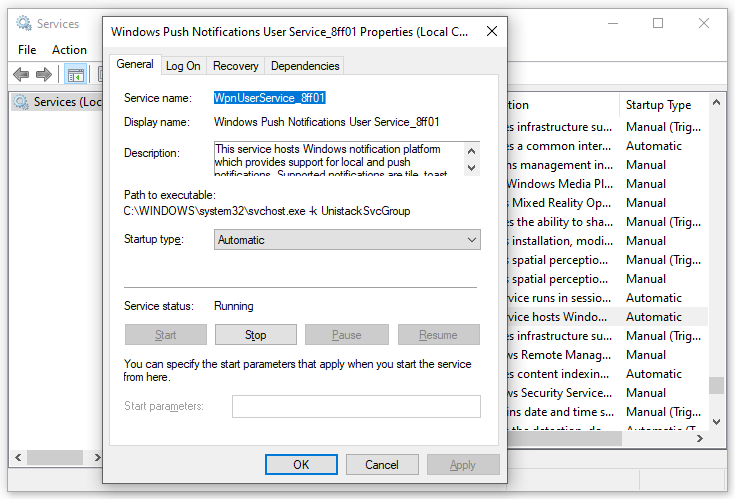
You can disable Windows Push Notifications User Service by disabling the respective background service using the Services panel. For that, search for services in the Taskbar search box and click on the individual search result. Then, find the Windows Push Notifications User Service_[unique-number] and double-click on this service.
Click the Stop button and let it be terminated. Finally, click the OK button.
Windows Push Notifications User Service has stopped working
Windows Push Notifications User Service has stopped working; you need to check the Notifications setting first. You can follow this guide to enable overall Notifications or app-specific notifications in Windows 11/10. Following that, you can check if the respective service is running or not. For that, you can go through the aforementioned guide. If the status is marked as Stopped, you need to click the Start button.
Read: Reduce high Chrome Memory usage & make it use less RAM
Can I disable Windows Push Notifications User Service?
Yes, you can disable Windows Push Notifications User Service in Windows 11 as well as Windows 10. There are mainly two ways to do that – using Windows Settings and Services. Although you can use Task Manager to get the same result, it is temporary.
What happens if I turn off push notifications?
If you turn off push notifications, you won’t get any notification badge, tile, toast, or anything else. Even if the app is running or the internet is working, you cannot receive notifications. However, you can find all the updates once you open the respective app.
Read: Fix 100% Disk, High CPU, Memory or Power usage in Windows.
When you open the Task Manager on your Windows computer, you may come across a process called “Windows Push Notifications User Service” or “WpnUserService.exe.” This process might raise some questions in your mind, such as why it is running and whether it is necessary for your system’s functionality. In this article, we will explore the Windows Push Notifications User Service process, its purpose, and why it is running in Task Manager.

Understanding Windows Push Notifications
Windows Push Notifications is a feature introduced by Microsoft to deliver real-time notifications to users. These notifications can come from various sources, including apps, email clients, messaging services, and system updates. The purpose of push notifications is to keep users informed about important events and updates without the need to constantly check for new information manually.
Windows Push Notifications rely on the Windows Push Notification Service (WNS), which is a cloud-based service provided by Microsoft. The WNS acts as an intermediary between the app or service generating the notification and the user’s device. It ensures that notifications are delivered securely and efficiently to the intended recipients.
The Role of Windows Push Notifications User Service
The Windows Push Notifications User Service process, represented by the executable file “WpnUserService.exe,” is responsible for managing the delivery of push notifications to the user’s device. It runs in the background and handles the communication between the WNS and the user’s apps and services.
Here are some key roles and functions of the Windows Push Notifications User Service:
- Receiving Notifications: The service receives push notifications from various sources, such as apps, email clients, and messaging services.
- Processing Notifications: It processes the received notifications and determines how they should be displayed to the user.
- Displaying Notifications: The service is responsible for displaying the notifications on the user’s device, typically in the form of pop-up messages or banners.
- Managing Notification Settings: It allows users to customize their notification preferences, such as enabling or disabling notifications for specific apps or services.
- Ensuring Security: The service ensures that notifications are delivered securely and that only authorized apps and services can send notifications to the user’s device.
Why Is Windows Push Notifications User Service Running in Task Manager?
Seeing the Windows Push Notifications User Service process running in Task Manager is completely normal and expected. It is a core component of the Windows operating system and is essential for the proper functioning of push notifications on your device.
Here are a few reasons why the Windows Push Notifications User Service process might be running:
- Active Notifications: If you have any active push notifications on your device, the service will be running to handle their display and management.
- Background Tasks: Some apps and services require the Windows Push Notifications User Service to run in the background to deliver important updates and information.
- System Updates: The service may also be running during system updates to ensure that critical notifications related to the update process are delivered to the user.
It is worth noting that the Windows Push Notifications User Service process consumes minimal system resources and should not significantly impact your computer’s performance. However, if you notice any unusual behavior or excessive resource usage, it is recommended to scan your system for viruses or malware using a reliable security software like Malwarebytes Free.
Conclusion
The Windows Push Notifications User Service process plays a crucial role in delivering real-time notifications to Windows users. It ensures that users stay informed about important events and updates without the need for manual checks. The process runs in the background, handling the communication between the Windows Push Notification Service and the user’s apps and services.
If you come across the Windows Push Notifications User Service process in Task Manager, there is no need to worry. It is a normal part of the Windows operating system and is necessary for the proper functioning of push notifications on your device. However, if you experience any performance issues or suspicious behavior, it is always a good idea to scan your system for viruses or malware using a trusted security software like Malwarebytes Free.
How to Stay Safe Online
Here are 10 basic security tips to help you avoid malware and protect your device:
-
Use a good antivirus and keep it up-to-date.
It’s essential to use a good quality antivirus and keep it up-to-date to stay ahead of the latest cyber threats. We are huge fans of Malwarebytes Premium and use it on all of our devices, including Windows and Mac computers as well as our mobile devices. Malwarebytes sits beside your traditional antivirus, filling in any gaps in its defenses, and providing extra protection against sneakier security threats.
-
Keep software and operating systems up-to-date.
Keep your operating system and apps up to date. Whenever an update is released for your device, download and install it right away. These updates often include security fixes, vulnerability patches, and other necessary maintenance.
-
Be careful when installing programs and apps.
Pay close attention to installation screens and license agreements when installing software. Custom or advanced installation options will often disclose any third-party software that is also being installed. Take great care in every stage of the process and make sure you know what it is you’re agreeing to before you click «Next.»
-
Install an ad blocker.
Use a browser-based content blocker, like AdGuard. Content blockers help stop malicious ads, Trojans, phishing, and other undesirable content that an antivirus product alone may not stop.
-
Be careful what you download.
A top goal of cybercriminals is to trick you into downloading malware—programs or apps that carry malware or try to steal information. This malware can be disguised as an app: anything from a popular game to something that checks traffic or the weather.
-
Be alert for people trying to trick you.
Whether it’s your email, phone, messenger, or other applications, always be alert and on guard for someone trying to trick you into clicking on links or replying to messages. Remember that it’s easy to spoof phone numbers, so a familiar name or number doesn’t make messages more trustworthy.
-
Back up your data.
Back up your data frequently and check that your backup data can be restored. You can do this manually on an external HDD/USB stick, or automatically using backup software. This is also the best way to counter ransomware. Never connect the backup drive to a computer if you suspect that the computer is infected with malware.
-
Choose strong passwords.
Use strong and unique passwords for each of your accounts. Avoid using personal information or easily guessable words in your passwords. Enable two-factor authentication (2FA) on your accounts whenever possible.
-
Be careful where you click.
Be cautious when clicking on links or downloading attachments from unknown sources. These could potentially contain malware or phishing scams.
-
Don’t use pirated software.
Avoid using Peer-to-Peer (P2P) file-sharing programs, keygens, cracks, and other pirated software that can often compromise your data, privacy, or both.
To avoid potential dangers on the internet, it’s important to follow these 10 basic safety rules. By doing so, you can protect yourself from many of the unpleasant surprises that can arise when using the web.
Understanding Windows Push Notifications User Service High CPU Usage
Windows Push Notifications User Service is an integral part of the Windows operating system designed to facilitate the delivery of notifications to users. Notifications pop up in the form of alerts, reminders, and updates from applications. While this feature enhances user experience by ensuring timely information delivery, it can sometimes lead to high CPU usage, significantly affecting your computer’s performance. In this article, we will delve into the reasons behind high CPU usage by the Windows Push Notifications User Service, explore potential impacts, and provide actionable solutions.
What is Windows Push Notifications User Service?
The Windows Push Notifications User Service (WPNUserService) is a component of the Windows operating environment that works in conjunction with Universal Windows Platform (UWP) apps to deliver push notifications. Whether it’s a new email alert, social media notification, or reminder for an event, the WPNUserService is responsible for ensuring that these notifications reach the user in real-time. The service connects to Microsoft’s Push Notification Service, which receives and routes notifications to applications installed on the device.
The Consequences of High CPU Usage
High CPU usage often translates to poor system performance. When the WPNUserService consumes unnecessary CPU resources, it can slow down other processes, leading to a sluggish user experience. Here are some common consequences of high CPU usage:
- System Sluggishness: Applications may take longer to respond, and system tasks can lag.
- Increased Fan Noise: Higher CPU load often causes the system’s cooling fan to work overtime, resulting in more noise.
- Battery Drain: On laptops and mobile devices, high CPU usage can also lead to faster battery drain.
- Unresponsive Applications: Some applications may freeze or crash due to excessive resource consumption.
- Longer Boot Times: You may notice an increase in the time it takes for your system to boot up.
Common Causes of High CPU Usage by WPNUserService
Several factors can contribute to the Windows Push Notifications User Service consuming excessive CPU resources:
- Multiple Active Applications: If several applications relying on push notifications are active, it can overwhelm the service, leading to high CPU usage.
- Faulty Application Implementation: Sometimes, the apps themselves can have bugs or inefficient code that lead to abnormal behavior in the WPNUserService.
- Corrupted System Files: Any corruption within the system files that the WPNUserService relies on can lead to erratic behavior and increased CPU consumption.
- Malware or Viruses: Malicious software can disguise itself and interfere with legitimate services like WPNUserService, resulting in high CPU usage.
- Windows Updates: Occasionally, pending updates or failed installations may result in abnormal CPU behavior until the issue is resolved.
- Background Processes and Services: Other background services and processes may interact poorly with WPNUserService, leading to performance bottlenecks.
Diagnosing High CPU Usage
Before delving into solutions, it’s crucial to accurately identify if WPNUserService is indeed the culprit for high CPU usage. Here’s how to diagnose the issue:
-
Task Manager:
- Right-click on the taskbar and select «Task Manager.»
- Go to the «Processes» tab.
- Look for «WpnUserService.exe» and observe the CPU usage. If it is consuming a disproportionate amount of resources (usually over 30-40% is considered high), you may have an issue.
-
Resource Monitor:
- Open Task Manager and navigate to the «Performance» tab.
- Click on «Open Resource Monitor» at the bottom.
- Check the «CPU» tab and look for WPNUserService under the «Processes» section to see its details.
-
Event Viewer:
- Open the Run dialog (Win + R), type «eventvwr», and hit Enter.
- Navigate to «Windows Logs» > «Application» and look for any errors that might relate to WPNUserService.
-
Windows Performance Monitor:
- This tool allows for in-depth performance tracking. It requires more expertise but can provide graphs and reports on CPU usage over time.
Solutions to Mitigate High CPU Usage
After identifying high CPU usage by the WPNUserService, several solutions can be implemented to mitigate the problem. Here is a comprehensive list of potential fixes:
-
Restart WPNUserService:
- Open Task Manager, find WPNUserService, right-click it, and select «End Task.» This will restart the service and might resolve temporary glitches.
-
Update Windows:
- Keeping your Windows operating system up-to-date ensures that any bugs or vulnerabilities are patched. Go to Settings > Update & Security, and check for updates.
-
Check for Malware:
- Run a thorough antivirus and anti-malware scan using Windows Defender or any reputable third-party software. Remove any detected threats that might be cause for concern.
-
Limit Notifications:
- Sometimes reducing the number of applications that can send notifications can alleviate the burden on WPNUserService.
- Go to Settings > System > Notifications & actions, and customize which applications are allowed to send you notifications.
-
Reinstall Problematic Apps:
- If you’ve noted that certain applications are linked to high CPU usage, consider uninstalling and then reinstalling those apps to patch potential issues.
-
Run Windows Troubleshooter:
- Windows offers a built-in troubleshooter to diagnose and fix issues automatically. Go to Settings > Update & Security > Troubleshoot.
-
Repair System Files:
- Use the «System File Checker» tool to repair corrupted files. Open Command Prompt as an administrator and run the command
sfc /scannow.
- Use the «System File Checker» tool to repair corrupted files. Open Command Prompt as an administrator and run the command
-
Disable the Service (if necessary):
- As a last resort, if the service continues to cause issues, you might consider disabling it. However, note that this will turn off push notifications for applications.
- To disable, open Services (type «services.msc» in Run), locate «Windows Push Notifications User Service,» right-click, and choose «Properties.» Set the «Startup type» to «Disabled.»
Preventing Future High CPU Usage
After resolving the current issue with WPNUserService, it’s wise to adopt proactive measures to prevent future occurrences:
-
Routine Maintenance: Regularly clean out unnecessary files and applications. Use disk cleanup tools and defragment your hard drive if necessary.
-
Scheduled Scans and Updates: Set your antivirus to run routine scans periodically. Also, check Windows Update settings to ensure your system is consistently updated.
-
Application Management: Only keep applications you frequently use and monitor their performance. Pay attention to user reviews for updates, as buggy releases can affect system performance.
-
Upgrading Hardware: If the issue persists despite troubleshooting, you might consider upgrading RAM or moving to an SSD for improved performance.
-
Educate Yourself on App Permissions: Be cautious about the permissions you grant applications. Some apps may request permissions that can lead to increased resource usage.
-
System Backups: Regularly backing up your system can save you time and trouble if an issue causes significant performance degradation. Use Windows Backup or reliable third-party solutions.
Conclusion
High CPU usage by the Windows Push Notifications User Service can disrupt your computer’s performance, leading to frustration and productivity loss. By understanding the service, diagnosing the issue accurately, and applying effective solutions, users can mitigate the problem and enhance their overall computing experience. Remember, regular maintenance and system optimization are keys to keeping your computer running smoothly and efficiently. Proper knowledge and practices will help you manage not only WPNUserService-related issues but also maintain the overall health of your Windows environment.
This service hosts Windows notification platform which provides support for local and push notifications. Supported notifications are tile, toast and raw.
This service also exists in Windows 11.
Startup Type
| Windows 10 version | Home | Pro | Education | Enterprise |
|---|---|---|---|---|
| 1507 | not exists | not exists | not exists | not exists |
| 1511 | not exists | not exists | not exists | not exists |
| 1607 | Manual | Manual | Manual | Manual |
| 1703 | Automatic | Automatic | Automatic | Automatic |
| 1709 | Automatic | Automatic | Automatic | Automatic |
| 1803 | Automatic | Automatic | Automatic | Automatic |
| 1809 | Automatic | Automatic | Automatic | Automatic |
| 1903 | Automatic | Automatic | Automatic | Automatic |
| 1909 | Automatic | Automatic | Automatic | Automatic |
| 2004 | Automatic | Automatic | Automatic | Automatic |
| 20H2 | Automatic | Automatic | Automatic | Automatic |
| 21H1 | Automatic | Automatic | Automatic | Automatic |
| 21H2 | Automatic | Automatic | Automatic | Automatic |
| 22H2 | Automatic | Automatic | Automatic | Automatic |
Default Properties
| Display name: | Windows Push Notifications User Service |
| Service name: | WpnUserService |
| Type: | user share process template |
| Path: | %WinDir%\system32\svchost.exe -k UnistackSvcGroup |
| File: | %WinDir%\System32\WpnUserService.dll |
| Error control: | ignore |
| Object: | LocalSystem |
| Privileges: |
|
Default Behavior
If Windows Push Notifications User Service fails to load or initialize, Windows 10 start up proceeds. No warning is displayed, but the error is recorded into the Event Log.
Restore Default Startup Type of Windows Push Notifications User Service
Automated Restore
1. Select your Windows 10 edition and release, and then click on the Download button below.
2. Save the RestoreWindowsPushNotificationsUserServiceWindows10.bat file to any folder on your hard drive.
3. Right-click the downloaded batch file and select Run as administrator.
4. Restart the computer to save changes.
Note. Make sure that the WpnUserService.dll file exists in the %WinDir%\System32 folder. If this file is missing you can try to restore it from your Windows 10 installation media.
Yea, though I walk through the valley of the shadow of death, I will fear no evil: for thou art with me; thy rod and thy staff they comfort me.
-
Home
-
News
- Windows Push Notification User Service High CPU/Memory Usage
By Aurelie | Follow |
Last Updated
What is Windows Push Notification User Service? How to fix Windows Push Notification User Service high CPU or memory usage? Read this post from MiniTool Website carefully, and you will be enlightened.
Windows Push Notifications User Service High CPU Usage
Windows Push Notifications User Service is a background system process that manages push notifications from different services and applications. Usually, it might consume some system resources and the impact is minimal.
However, what should you do if you find this process is using excessive resource usage on Windows 10/11? In this post, we will explore how to fix Windows Push Notification User Service high CPU, disk, or memory usage for you.
Tips:
High CPU issues like Windows Push Notification User Service high CPU usage might slow down your computer, even making your computer freezing and unresponsive. Therefore, it is strongly recommended to create a daily backup when you are using your computer. To do so, MiniTool ShadowMaker is worth trying. This free PC backup software is aimed to provide easy and professional data protection and disaster recovery solutions for individuals and companies. Get the free trial and have a whirl!
MiniTool ShadowMaker TrialClick to Download100%Clean & Safe
How to Fix Windows Push Notifications User Service High CPU Usage on Windows 10/11?
Fix 1: Terminate the Process Manually
Most of the time, a simple restart of this process might help to solve some problems like Windows Push Notification User Service high CPU usage. To do so:
Step 1. Press Ctrl + Shift + Esc to launch Task Manager.
Step 2. In the Details tab, locate Service Host: Windows Push Notification User Service and then right-click on it to choose End task.
Fix 2: Disable All Notifications
If there are so many notifications from different apps, no wonder you will receive Windows Push Notification User Service high CPU usage. In this condition, you can choose to stop receiving all notifications to fix this issue.
Step 1. Press Win + I to open Windows Settings.
Step 2. Go to System > Notification & actions > toggle off all notifications.
Fix 3: Restart Windows Push Notifications User Service
When certain background services or applications can not work properly, you can consider restarting them. Follow these steps:
Step 1. Press Win + R to open the Run box.
Step 2. Type services.msc and hit Enter to launch Services.
Step 3. In the services menu, find Windows Push Notification User Service and right-click on it to choose Properties.
Step 4. If this service is running, hit Stop and then restart it. If it is stopped, hit Start to run it.
Fix 4: Perform a Clean Boot
Third-party programs might be responsible for issues like Windows Push Notification User Service high CPU usage. If this is the case, you can perform a clean boot to exclude their interference. To do so:
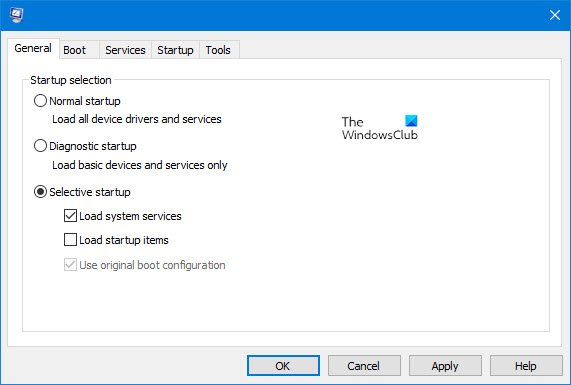
Step 1. Type system configuration in the search bar and hit Enter.
Step 2. In the Services tab, tick Hide all Microsoft services and hit Disable all.
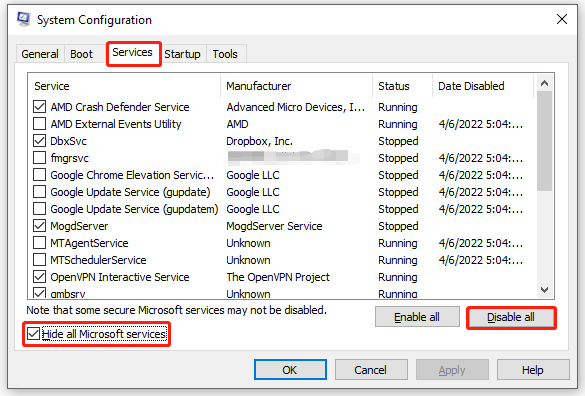
Step 3. Head to the Startup tab, click on Open Task Manager and then disable all third-party apps & programs.
Step 4. Go back to the Services tab and hit Apply & OK to save the changes.
Step 5. Restart your computer to enter the clean boot state to check if Windows Push Notification User Service high memory or CPU usage persists. If not, a third-party could be to blame. Then you need to uninstall all recently installed applications to see if it works.
Fix 5: Run SFC & DISM
Chances are that some system files are corrupted or missing. Therefore, you can run SFC and DISM in sequence to detect and repair these system files. Here’s how to do it:
Step 1. Launch Command Prompt with administrative privilege.
Step 2. In the command window, type sfc /scannow and hit Enter.
Step 3. After completion, restart your computer.
Step 4. Launch an administrative Command Prompt and run the following commands one by one.
DISM /Online /Cleanup-Image /CheckHealth
DISM /Online /Cleanup-Image /ScanHealth
DISM /Online /Cleanup-Image /RestoreHealth
Final Words
After reading through this post, Windows Push Notification User Service high resource consumption will not be a concerning problem and your operating system will run smoothly.
About The Author
Position: Columnist
Aurelie is a passionate soul who always enjoys researching & writing articles and solutions to help others. Her posts mainly cover topics related to games, data backup & recovery, file sync and so on. Apart from writing, her primary interests include reading novels and poems, travelling and listening to country music.