
If Windows Push Notifications User Service is consuming high Memory or CPU usage in Windows 11/10, here is how you can eliminate this problem. It likely happens when you start your computer or connect it to the internet after a long time since all the apps try to show notifications at once.

What is Windows Push Notifications User Service?
Windows Push Notifications User Service is a service that helps you get all the notifications or updates from various apps installed on your computer. If you get a badge, tile, toast, or any other type of app notification, you should know that the Windows Push Notifications User Service is working in the background.
To fix the high Memory or CPU usage issue in Windows Push Notifications User Service on your computer, follow these instructions:
- Stop Windows Push Notifications User Service process
- Restart Windows Push Notifications User Service
- Disable all notifications
- Fix in Clean Boot state
As we mentioned, it could happen if you have connected your PC to the internet after a long time. So at such times, you may ignore it as the issue will go away. But if this happens often, read on.
1] Stop Windows Push Notifications User Service process
To stop the Windows Push Notifications User Service process, you can use Task Manager. The easiest way to open the Task Manager is by using the keyboard shortcut Ctrl+Shift+Esc. Once you open the Task Manager, you can sort the Background processes by Memory usage, or you can also look for the Service Host: Windows Push Notifications User Service process manually.
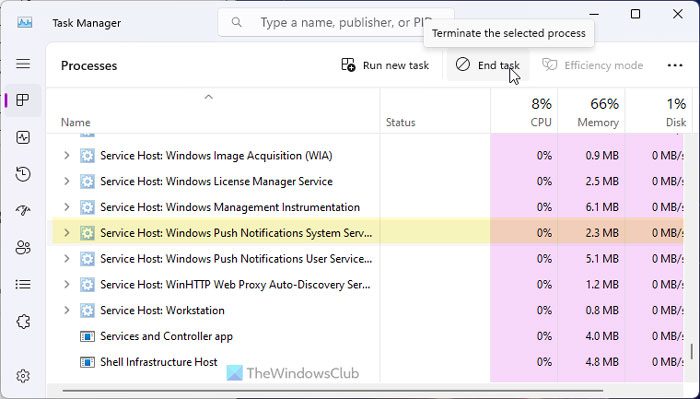
Select this process and click the End task button.
Although it doesn’t solve the problem permanently, you can find some time to work on other things instantly.
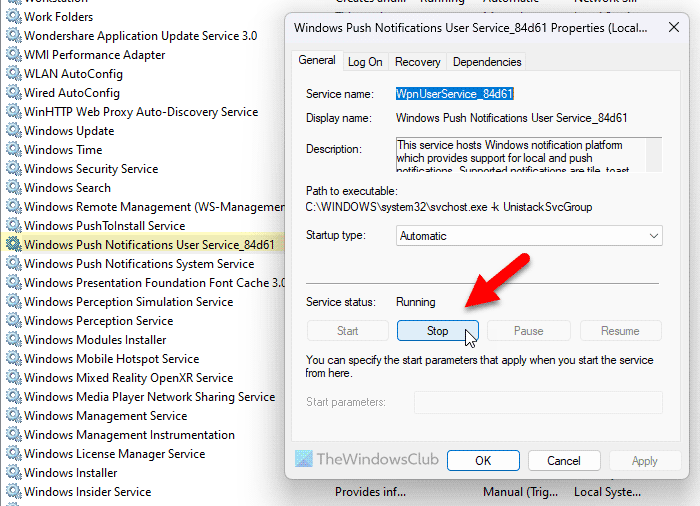
2] Restart Windows Push Notifications User Service
The Services panel in Windows 11/10 shows everything, including the Windows Push Notifications User Service process. As per our experience, restarting the service helps you fix the problem when certain background dependencies do not work as they should be.
Therefore, search for services in the Taskbar search box and open the Services panel first. Then, search for Windows Push Notifications User Service and double-click on it.
Click on the Stop button and stop it. Once done, click on the Start button.
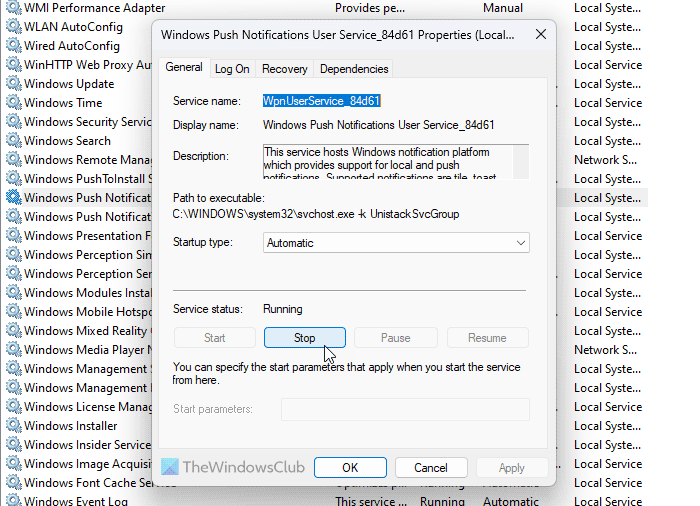
Finally, click on the OK button.
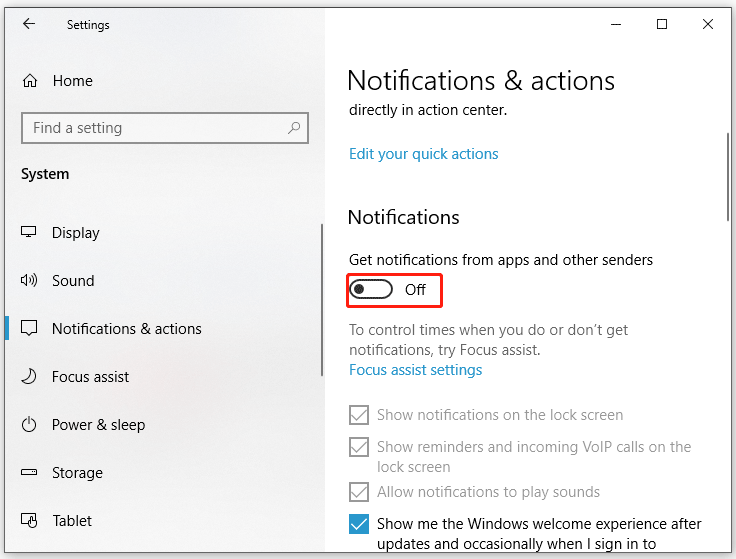
3] Disable all notifications
If notifications are not mandatory for you, this solution works pretty well. As this problem occurs due to having so many notifications from different apps, you can stop receiving notifications to solve this issue.
For that, press Win+I to open the Windows Settings panel and go to System > Notifications.
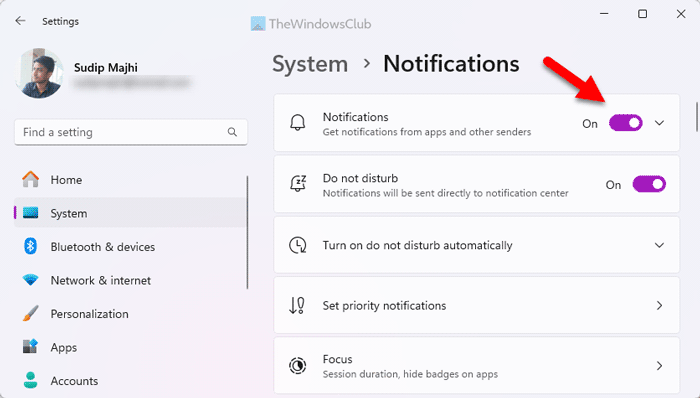
Here, you can find a menu called Notifications. You need to toggle the corresponding button to turn it off.
4] Fix in Clean Boot state
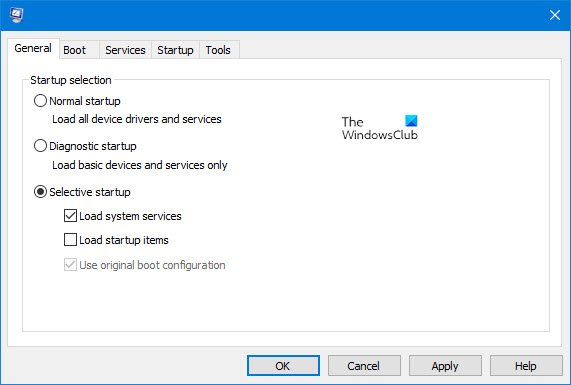
Clean Boot state helps you figure out whether a problem is occurring due to an internal driver or third-party app. Therefore, you can boot your computer into the Clean Boot state first.
Then, check if you are having the same problem or not. If not, you must enable one app at a time and repeat the same thing.
Note: If you use an Insider version of Windows 11, it could be a bug or glitch, too. In that case, check if Microsoft has already recognized it or not. If yes, hopefully, you will receive an update soon.
How to disable Windows Push Notifications User Service?
You can disable Windows Push Notifications User Service in Windows 11/10 using two methods:
1] Using Windows Settings
In order to deactivate Windows Push Notifications User Service, you need to disable the Notifications setting. Having said that, you must disable all the notifications at once. If any app is capable of sending notifications, it won’t work. For that, you need to open the Windows Settings panel and go to System > Notifications.
Find the Notifications menu and toggle the corresponding button.
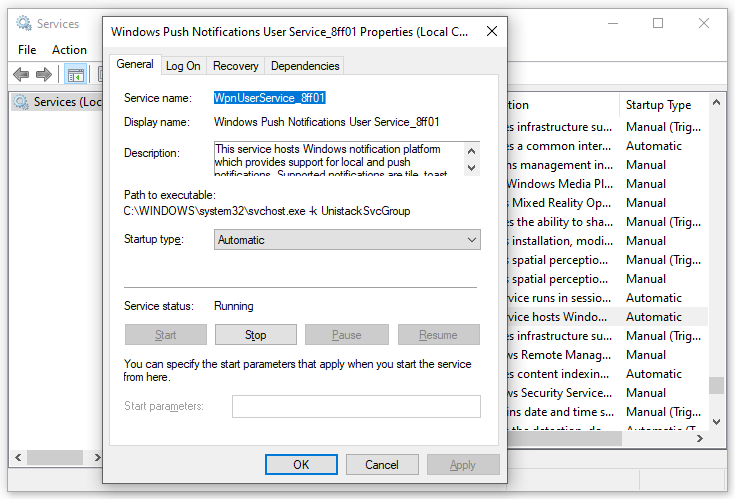
2] Using Services
You can disable Windows Push Notifications User Service by disabling the respective background service using the Services panel. For that, search for services in the Taskbar search box and click on the individual search result. Then, find the Windows Push Notifications User Service_[unique-number] and double-click on this service.
Click the Stop button and let it be terminated. Finally, click the OK button.
Windows Push Notifications User Service has stopped working
Windows Push Notifications User Service has stopped working; you need to check the Notifications setting first. You can follow this guide to enable overall Notifications or app-specific notifications in Windows 11/10. Following that, you can check if the respective service is running or not. For that, you can go through the aforementioned guide. If the status is marked as Stopped, you need to click the Start button.
Read: Reduce high Chrome Memory usage & make it use less RAM
Can I disable Windows Push Notifications User Service?
Yes, you can disable Windows Push Notifications User Service in Windows 11 as well as Windows 10. There are mainly two ways to do that – using Windows Settings and Services. Although you can use Task Manager to get the same result, it is temporary.
What happens if I turn off push notifications?
If you turn off push notifications, you won’t get any notification badge, tile, toast, or anything else. Even if the app is running or the internet is working, you cannot receive notifications. However, you can find all the updates once you open the respective app.
Read: Fix 100% Disk, High CPU, Memory or Power usage in Windows.
When you open the Task Manager on your Windows computer, you may come across a process called “Windows Push Notifications User Service” or “WpnUserService.exe.” This process might raise some questions in your mind, such as why it is running and whether it is necessary for your system’s functionality. In this article, we will explore the Windows Push Notifications User Service process, its purpose, and why it is running in Task Manager.

Understanding Windows Push Notifications
Windows Push Notifications is a feature introduced by Microsoft to deliver real-time notifications to users. These notifications can come from various sources, including apps, email clients, messaging services, and system updates. The purpose of push notifications is to keep users informed about important events and updates without the need to constantly check for new information manually.
Windows Push Notifications rely on the Windows Push Notification Service (WNS), which is a cloud-based service provided by Microsoft. The WNS acts as an intermediary between the app or service generating the notification and the user’s device. It ensures that notifications are delivered securely and efficiently to the intended recipients.
The Role of Windows Push Notifications User Service
The Windows Push Notifications User Service process, represented by the executable file “WpnUserService.exe,” is responsible for managing the delivery of push notifications to the user’s device. It runs in the background and handles the communication between the WNS and the user’s apps and services.
Here are some key roles and functions of the Windows Push Notifications User Service:
- Receiving Notifications: The service receives push notifications from various sources, such as apps, email clients, and messaging services.
- Processing Notifications: It processes the received notifications and determines how they should be displayed to the user.
- Displaying Notifications: The service is responsible for displaying the notifications on the user’s device, typically in the form of pop-up messages or banners.
- Managing Notification Settings: It allows users to customize their notification preferences, such as enabling or disabling notifications for specific apps or services.
- Ensuring Security: The service ensures that notifications are delivered securely and that only authorized apps and services can send notifications to the user’s device.
Why Is Windows Push Notifications User Service Running in Task Manager?
Seeing the Windows Push Notifications User Service process running in Task Manager is completely normal and expected. It is a core component of the Windows operating system and is essential for the proper functioning of push notifications on your device.
Here are a few reasons why the Windows Push Notifications User Service process might be running:
- Active Notifications: If you have any active push notifications on your device, the service will be running to handle their display and management.
- Background Tasks: Some apps and services require the Windows Push Notifications User Service to run in the background to deliver important updates and information.
- System Updates: The service may also be running during system updates to ensure that critical notifications related to the update process are delivered to the user.
It is worth noting that the Windows Push Notifications User Service process consumes minimal system resources and should not significantly impact your computer’s performance. However, if you notice any unusual behavior or excessive resource usage, it is recommended to scan your system for viruses or malware using a reliable security software like Malwarebytes Free.
Conclusion
The Windows Push Notifications User Service process plays a crucial role in delivering real-time notifications to Windows users. It ensures that users stay informed about important events and updates without the need for manual checks. The process runs in the background, handling the communication between the Windows Push Notification Service and the user’s apps and services.
If you come across the Windows Push Notifications User Service process in Task Manager, there is no need to worry. It is a normal part of the Windows operating system and is necessary for the proper functioning of push notifications on your device. However, if you experience any performance issues or suspicious behavior, it is always a good idea to scan your system for viruses or malware using a trusted security software like Malwarebytes Free.
How to Stay Safe Online
Here are 10 basic security tips to help you avoid malware and protect your device:
-
Use a good antivirus and keep it up-to-date.
It’s essential to use a good quality antivirus and keep it up-to-date to stay ahead of the latest cyber threats. We are huge fans of Malwarebytes Premium and use it on all of our devices, including Windows and Mac computers as well as our mobile devices. Malwarebytes sits beside your traditional antivirus, filling in any gaps in its defenses, and providing extra protection against sneakier security threats.
-
Keep software and operating systems up-to-date.
Keep your operating system and apps up to date. Whenever an update is released for your device, download and install it right away. These updates often include security fixes, vulnerability patches, and other necessary maintenance.
-
Be careful when installing programs and apps.
Pay close attention to installation screens and license agreements when installing software. Custom or advanced installation options will often disclose any third-party software that is also being installed. Take great care in every stage of the process and make sure you know what it is you’re agreeing to before you click «Next.»
-
Install an ad blocker.
Use a browser-based content blocker, like AdGuard. Content blockers help stop malicious ads, Trojans, phishing, and other undesirable content that an antivirus product alone may not stop.
-
Be careful what you download.
A top goal of cybercriminals is to trick you into downloading malware—programs or apps that carry malware or try to steal information. This malware can be disguised as an app: anything from a popular game to something that checks traffic or the weather.
-
Be alert for people trying to trick you.
Whether it’s your email, phone, messenger, or other applications, always be alert and on guard for someone trying to trick you into clicking on links or replying to messages. Remember that it’s easy to spoof phone numbers, so a familiar name or number doesn’t make messages more trustworthy.
-
Back up your data.
Back up your data frequently and check that your backup data can be restored. You can do this manually on an external HDD/USB stick, or automatically using backup software. This is also the best way to counter ransomware. Never connect the backup drive to a computer if you suspect that the computer is infected with malware.
-
Choose strong passwords.
Use strong and unique passwords for each of your accounts. Avoid using personal information or easily guessable words in your passwords. Enable two-factor authentication (2FA) on your accounts whenever possible.
-
Be careful where you click.
Be cautious when clicking on links or downloading attachments from unknown sources. These could potentially contain malware or phishing scams.
-
Don’t use pirated software.
Avoid using Peer-to-Peer (P2P) file-sharing programs, keygens, cracks, and other pirated software that can often compromise your data, privacy, or both.
To avoid potential dangers on the internet, it’s important to follow these 10 basic safety rules. By doing so, you can protect yourself from many of the unpleasant surprises that can arise when using the web.
Windows Push Notifications User Service High CPU: An In-Depth Analysis
Introduction
Windows Push Notifications User Service (WPNUserService) is an essential component of the Windows operating system that enables applications to receive real-time notifications. These notifications range from messaging alerts and updates from social media, to reminders from productivity applications. However, a common issue that has garnered attention among users is the high CPU usage attributed to this service. High CPU usage can slow down computer performance, lead to overheating, and ultimately degrade the user experience. This article explores the causes of high CPU usage related to WPNUserService, the implications of this issue, and potential solutions.
Understanding Windows Push Notifications
Before diving into the issue of high CPU usage, it is crucial to understand what Windows Push Notifications are and how they function within the ecosystem of Windows applications.
What are Push Notifications?
Push notifications are messages sent from a server to a client application. They allow apps to inform users about new content, updates, events, or reminders even when the app is not actively in use. This feature is extensively used in various applications, including:
- Messaging applications (WhatsApp, Messenger)
- Social media platforms (Facebook, Twitter)
- Productivity tools (Todoist, Microsoft Outlook)
These notifications are crucial for engaging users and keeping them informed, making it vital for their underlying services to run smoothly.
Role of Windows Push Notifications User Service
WPNUserService manages and facilitates the push notification infrastructure in Windows. It acts as a bridge between the applications and the cloud service that sends out notifications. Essentially, when an application wants to receive notifications, it registers itself with WPNUserService, which communicates with the push notification service.
The Problem: High CPU Usage
While the WPNUserService plays a crucial role in ensuring app notifications reach users, some users have reported that this service consumes an excessive amount of CPU resources. High CPU usage can occur sporadically or be a constant issue for some users, and it can significantly hamper the overall performance of the computer.
Causes of High CPU Usage
Several factors can lead to high CPU utilization by WPNUserService, including:
1. Faulty Applications
Often, the root cause of high CPU usage is a poorly designed or malfunctioning application that relies on push notifications. If an app frequently generates requests for notifications, WPNUserService may attempt to process these requests, leading to increased CPU usage.
2. Notification Backlog
In scenarios where there is a large backlog of notifications, the service may struggle to process and deliver them efficiently. This situation can happen when multiple apps send notifications simultaneously, resulting in resource depletion.
3. Windows Updates
Sometimes, running an outdated version of Windows or pending updates can contribute to high CPU usage. Keeping the system updated ensures that bugs are fixed, and performance improvements are applied.
4. Conflicts with Other Services
Conflicts can occur when WPNUserService interacts with other services or applications. For instance, antivirus software or a system optimization tool may interfere with the operation of the service.
5. Malware or Viruses
In rare cases, malware can disguise itself as legitimate services, including WPNUserService. This issue can lead to high CPU usage and other detrimental effects on system performance.
6. Network Issues
Poor network connectivity may cause the service to retrial sending and receiving notifications, consuming additional CPU resources in the process.
Implications of High CPU Usage
The consequences of high CPU usage by WPNUserService are multi-faceted:
1. Degraded Performance
As the CPU works to handle the increased load, users may experience lagging applications, slow system responsiveness, and overall sluggish performance.
2. Increased Heat
Excessive CPU usage leads to increased heat output, which can ultimately reduce the lifespan of the hardware components.
3. Shortened Battery Life
For laptop users, high CPU usage translates to increased power consumption, consequently reducing battery life.
Troubleshooting High CPU Usage
Addressing the high CPU usage caused by WPNUserService involves a series of troubleshooting steps. Here are some methods to mitigate the problem:
1. Identify the Culprit Application
To determine if a particular application is causing the high CPU usage, you can use the Task Manager. By opening Task Manager (Ctrl + Shift + Esc) and checking the «Processes» tab, one can identify if any application is using an unusually high amount of CPU resources.
- Solution: If you find a specific application responsible for the issue, consider updating, reinstalling, or restricting its permissions.
2. Update Windows
Ensuring that your Windows operating system is up-to-date can resolve many underlying issues, including high CPU utilization.
- Solution: Go to Settings > Update & Security > Windows Update, and click on Check for updates. Install any available updates.
3. Reset or Remove Problematic Applications
If a specific app is consistently causing high CPU usage, you may need to reset or even remove it from your system.
- Solution: Navigate to Settings > Apps, locate the app, select it and choose Advanced Options > Reset. If problems persist, uninstall the app entirely.
4. Disable Notifications for Specific Applications
Limiting the number of applications that can send notifications allows WPNUserService to function more efficiently.
- Solution: Go to Settings > System > Notifications & actions, and customize which apps can send notifications.
5. Scan for Malware
Running a malware scan can eliminate the possibility of malicious software causing high CPU usage.
- Solution: Use Windows Defender or a trusted third-party antivirus program to perform a full system scan.
6. Check Network Settings
Sometimes, network issues can lead WPNUserService to behave erratically. Ensure your internet connection is stable and functioning properly.
- Solution: Reset your router, check the network settings, or switch to a different Wi-Fi network if necessary.
7. Perform System Restart
If high CPU usage persists, a simple restart of the computer can help reset background processes and services.
- Solution: Press Ctrl + Alt + Delete, select Restart.
Advanced Solutions
If the problem remains unresolved, there are more advanced techniques available which might help reduce CPU usage associated with WPNUserService.
1. Modify Registry Settings
Advanced users may choose to modify settings in the Windows Registry, specifically subsets associated with notifications. However, any changes in the Registry should be approached with caution as incorrect modifications can lead to system instability.
- Solution: Open the Registry Editor by typing
regeditin the Run dialog (Win + R). Navigate to HKEY_CURRENT_USERSoftwareMicrosoftPushNotifications and adjust the settings accordingly. Always back up the registry before making changes.
2. Change Service Settings
Another strategy to reduce CPU consumption is to change how WPNUserService operates.
- Solution: Open the Run dialog (Win + R), type
services.msc, and hit Enter. Locate WPNUserService, right-click and choose Properties. You can stop the service temporarily or change its startup type.
Conclusion
Windows Push Notifications User Service is a vital part of the Windows ecosystem, enabling applications to notify users of important updates. However, issues such as high CPU usage can hinder its functionality, leading to a diminished computing experience. By understanding the service’s role, exploring potential causes for excessive CPU consumption, and implementing appropriate troubleshooting measures, users can restore their system’s performance. Regular maintenance, system updates, and being vigilant about installed applications are essential practices in ensuring an optimized user experience. Should issues persist, consulting with technical support or considering professional assistance may be appropriate. The realm of digital notifications is fundamentally beneficial, and a well-functioning WPNUserService is critical in helping keep users informed and engaged effectively.
-
Home
-
News
- Windows Push Notification User Service High CPU/Memory Usage
By Aurelie | Follow |
Last Updated
What is Windows Push Notification User Service? How to fix Windows Push Notification User Service high CPU or memory usage? Read this post from MiniTool Website carefully, and you will be enlightened.
Windows Push Notifications User Service High CPU Usage
Windows Push Notifications User Service is a background system process that manages push notifications from different services and applications. Usually, it might consume some system resources and the impact is minimal.
However, what should you do if you find this process is using excessive resource usage on Windows 10/11? In this post, we will explore how to fix Windows Push Notification User Service high CPU, disk, or memory usage for you.
Tips:
High CPU issues like Windows Push Notification User Service high CPU usage might slow down your computer, even making your computer freezing and unresponsive. Therefore, it is strongly recommended to create a daily backup when you are using your computer. To do so, MiniTool ShadowMaker is worth trying. This free PC backup software is aimed to provide easy and professional data protection and disaster recovery solutions for individuals and companies. Get the free trial and have a whirl!
MiniTool ShadowMaker TrialClick to Download100%Clean & Safe
How to Fix Windows Push Notifications User Service High CPU Usage on Windows 10/11?
Fix 1: Terminate the Process Manually
Most of the time, a simple restart of this process might help to solve some problems like Windows Push Notification User Service high CPU usage. To do so:
Step 1. Press Ctrl + Shift + Esc to launch Task Manager.
Step 2. In the Details tab, locate Service Host: Windows Push Notification User Service and then right-click on it to choose End task.
Fix 2: Disable All Notifications
If there are so many notifications from different apps, no wonder you will receive Windows Push Notification User Service high CPU usage. In this condition, you can choose to stop receiving all notifications to fix this issue.
Step 1. Press Win + I to open Windows Settings.
Step 2. Go to System > Notification & actions > toggle off all notifications.
Fix 3: Restart Windows Push Notifications User Service
When certain background services or applications can not work properly, you can consider restarting them. Follow these steps:
Step 1. Press Win + R to open the Run box.
Step 2. Type services.msc and hit Enter to launch Services.
Step 3. In the services menu, find Windows Push Notification User Service and right-click on it to choose Properties.
Step 4. If this service is running, hit Stop and then restart it. If it is stopped, hit Start to run it.
Fix 4: Perform a Clean Boot
Third-party programs might be responsible for issues like Windows Push Notification User Service high CPU usage. If this is the case, you can perform a clean boot to exclude their interference. To do so:
Step 1. Type system configuration in the search bar and hit Enter.
Step 2. In the Services tab, tick Hide all Microsoft services and hit Disable all.
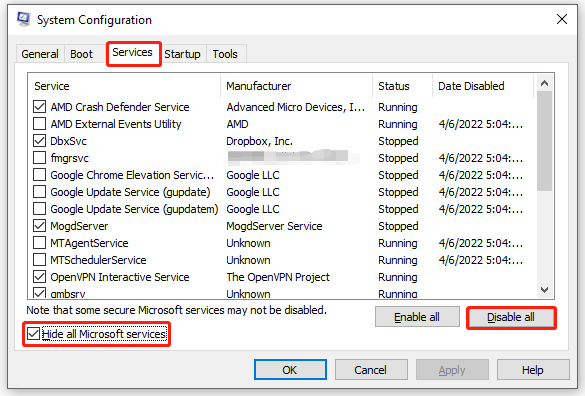
Step 3. Head to the Startup tab, click on Open Task Manager and then disable all third-party apps & programs.
Step 4. Go back to the Services tab and hit Apply & OK to save the changes.
Step 5. Restart your computer to enter the clean boot state to check if Windows Push Notification User Service high memory or CPU usage persists. If not, a third-party could be to blame. Then you need to uninstall all recently installed applications to see if it works.
Fix 5: Run SFC & DISM
Chances are that some system files are corrupted or missing. Therefore, you can run SFC and DISM in sequence to detect and repair these system files. Here’s how to do it:
Step 1. Launch Command Prompt with administrative privilege.
Step 2. In the command window, type sfc /scannow and hit Enter.
Step 3. After completion, restart your computer.
Step 4. Launch an administrative Command Prompt and run the following commands one by one.
DISM /Online /Cleanup-Image /CheckHealth
DISM /Online /Cleanup-Image /ScanHealth
DISM /Online /Cleanup-Image /RestoreHealth
Final Words
After reading through this post, Windows Push Notification User Service high resource consumption will not be a concerning problem and your operating system will run smoothly.
About The Author
Position: Columnist
Aurelie is a passionate soul who always enjoys researching & writing articles and solutions to help others. Her posts mainly cover topics related to games, data backup & recovery, file sync and so on. Apart from writing, her primary interests include reading novels and poems, travelling and listening to country music.
Windows Push Notification User Service is a notification service available on the Windows 10 operating system. It’s a platform which provides support for local or push notifications and, without it, users are not able to receive notifications from the operating system and they have installed.
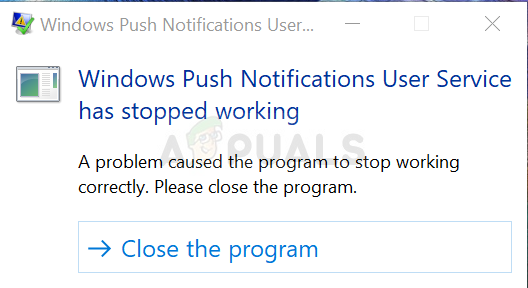
Unfortunately, some users have reported that the service simply keeps crashing on their computers no matter what they do and they fail to receive any notifications as they normally did. We have gathered some working methods and we hope you would be able to benefit and resolve the problem!
What Causes the Windows Push Notification User Service to Stop Working?
Here is a list of the most common causes of this problem. Make sure you check it out in order to deduct the correct scenario for your issue and resolve the problem more easily.
- Memory leaks caused by the service – Huge memory leaks appear as a result of missing or corrupt system files used by the service. Make sure you replace these files using the SFC scanner.
- Notifications database is corrupt – Notifications database is a file located on your computer which may have gone corrupt and which may cause the service to crash. Users have reported that deleting it will cause Windows to recreate it which resolves the problem.
- Avast Antivirus’ Do Not Disturb component – The Do Not Disturb component of Avast prevents users from receiving notifications but it causes this problem even if it’s not turned on. Make sure you uninstall it.
Solution 1: Use SFC to Scan for Memory Leaks
It has been reported that the Windows Push Notification User Service sometimes causes huge memory leaks which result in massive memory consumption and, ultimately, crashes of the service. These problems are rooted deep inside the system files and the only way to try to resolve them is by running the System File Checker (SFC). It will scan your system files for errors and possible repair or replace them. Follow the steps below in order to do so!
- Search for “Command Prompt” by typing it either right in the Start menu or by pressing the search button right next to it. Right-click the first entry which will pop up as a search result and select the “Run as administrator” context menu entry.
- Additionally, you can also use the Windows Logo Key + R key combination in order to bring up the Run dialog box. Type in “cmd” in the dialog box which appears and use the Ctrl + Shift + Enter key combination for admin Command Prompt.
- Type in the following commands in the window and make sure you press Enter after typing each one. Wait for the “Operation completed successfully” message or something similar to know that the method worked.
sfc /scannow
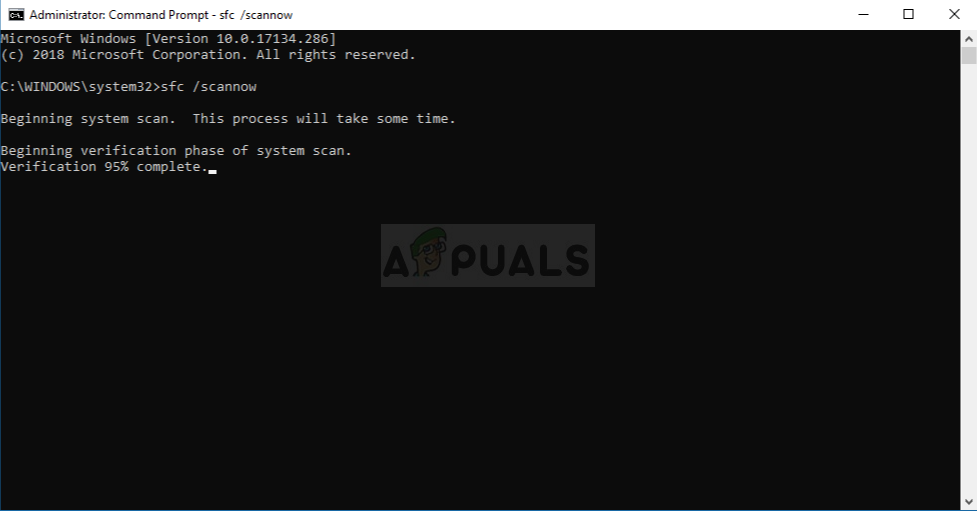
- Try to restart your computer and check to see if the Windows Push Notification User Service continues to crash on your computer.
Solution 2: Rename or Delete the Notifications Folder in Safe Mode
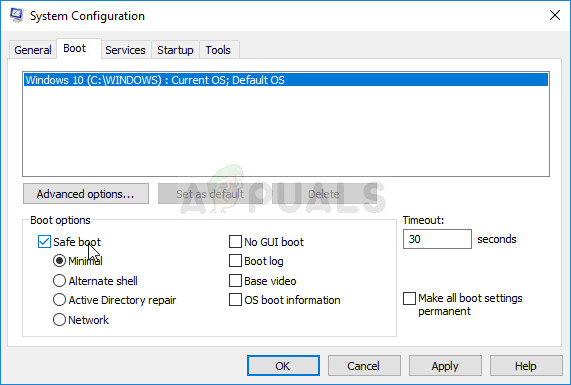
Users who have used this method successfully in order to resolve their occurrence of this problem reported that they believe that the Notifications database (wpndatabase.db) became corrupted after the last Windows 10 update. You can recreate a new database simply by renaming or deleting the Notifications folder on your computer in Safe Mode. It will be recreated automatically and the problem should seize to appear!
- This method is valid for all versions of Windows. Use the Windows + R key combination on your keyboard in order to start the Run dialog box and type in “msconfig” before clicking OK.
- In the System Configuration window, navigate to the Boot tab to the right and check the box next to the Safe Boot Click OK and restart your computer in order to boot into Safe Mode.
- Navigate to the following location on your computer by opening the Windows Explorer and clicking on This PC:
C:\Users\YOURUSERNAME\AppData\Local\Microsoft\Windows
- If you are unable to see the AppData folder, you may need to turn on the option which enables you to view hidden files and folders. Click on the “View” tab on File Explorer’s menu and click on the “Hidden items” checkbox in the Show/hide section. File Explorer will show the hidden files and will remember this option until you change it again.
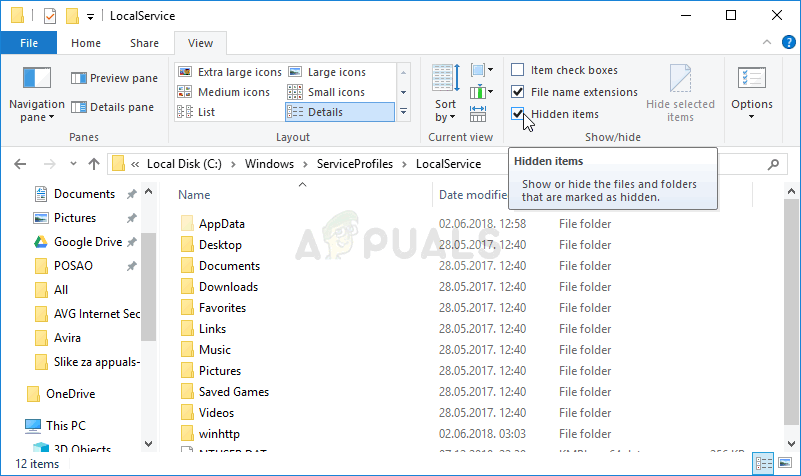
- Locate the Notifications folder inside the Windows folder, right-click on it, and choose Rename from the context menu which will appear. Rename it to something like old and confirm the changes.
- Restart your computer and check to see if the problem persists!
Solution 3: Uninstall the ‘Do Not Disturb’ Component of Avast/AVG
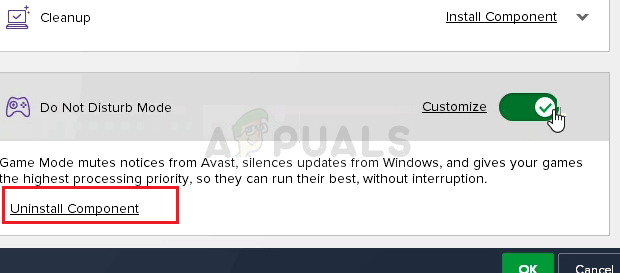
Users have reported that they managed to resolve the problem simply by removing a single component from Avast Antivirus. The ‘Do Not Disturb’ component is not a vital part of the internet security package and it’s only used to prevent notifications from interrupting you.
Apparently, it can prevent the normal functioning of the notifications service even if it’s turned off. Follow the steps below in order to remove it from your Avast installation for good!
- Open the Avast user interface by clicking its icon which is located at the lower right part of your screen at the system tray. You can also do the same by locating it in your Start menu or by double-clicking its icon on the Desktop.
- Navigate to Settings and click the Components tab which should be the second one from the top.
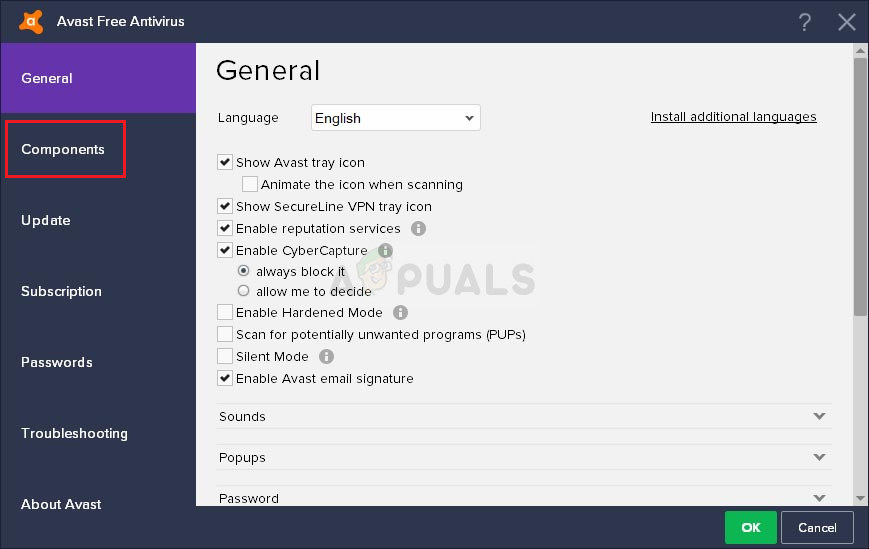
- Click the downward facing arrow next to the component that you want to remove (Do Not Disturb Mode in this particular example), click Uninstall Component, and then click OK to confirm the uninstallation of the component.

Uninstalling the Do Not Disturb Component in Avast - Restart your PC if Avast prompts you with that option in order to confirm the changes. Check to see if the Windows Push Notification User Service continues to crash from now on.
Solution 4: Update Windows 10 to the Latest Version
The latest versions of Windows 10 seem to have resolved this problem for good as long as it wasn’t caused by Avast or other third-party programs. Updating your operating system to the latest version is always helpful when it comes to dealing with similar errors and users have reported that the latest Windows 10 versions actually deal with this problem in specific
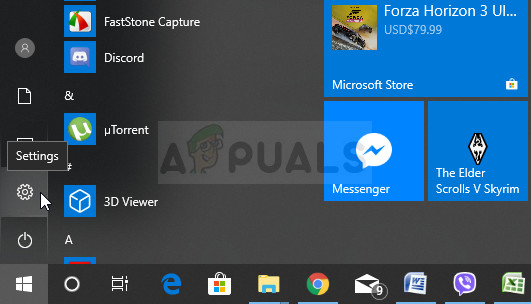
- Use the Windows Key + I key combination in order to open Settings on your Windows PC. Alternatively, you can search for “Settings” by using the search bar located at the taskbar.
- Locate and open the “Update & security” section in the Settings Stay in the Windows Update tab and click on the Check for updates button under the Update status in order to check whether there is a new version of Windows available.
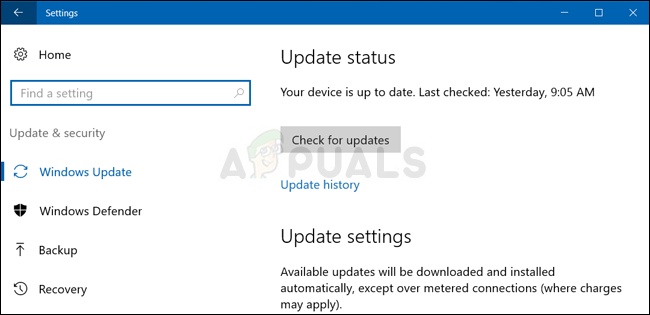
- If there is one, Windows should install the update immediately and you will be prompted to restart your computer afterward.
Solution 5: Replace Your Antivirus
Free antivirus tools can be quite helpful and they can do their job protecting your computer but sometimes they just don’t get along well with other things on your computer. Consider replacing your antivirus if it causes this problem while it’s turned on!
- Click on the Start menu and open Control Panel by searching for it. Alternatively, you can click on the gear icon in order to open settings if you are using Windows 10.
- In Control Panel, select to View as – Category at the top right corner and click on Uninstall a Program under the Programs section.
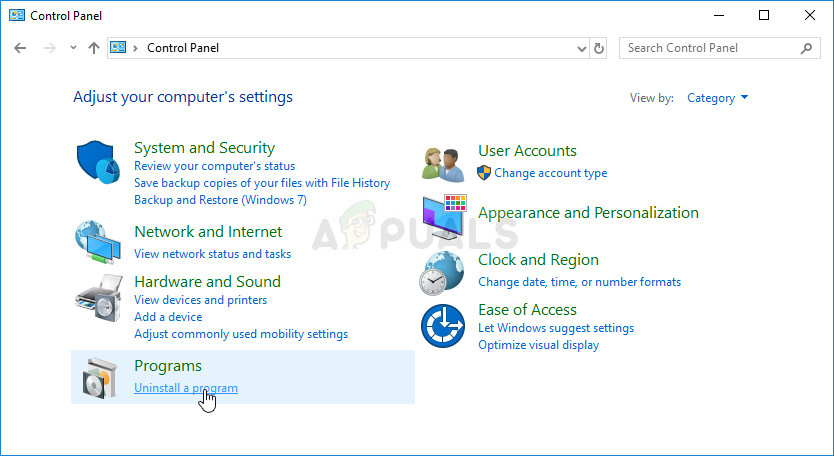
- If you are using the Settings app, clicking on Apps should immediately open a list of all installed programs on your PC.
- Locate your antivirus tool in Control Panel or Settings and click on Uninstall.
- Its uninstall wizard should open so follow the instructions to uninstall it.
- Click Finish when the uninstaller completes the process and restart your computer to see whether errors will still appear. Make sure you choose a better antivirus option.
Kevin Arrows
Kevin Arrows is a highly experienced and knowledgeable technology specialist with over a decade of industry experience. He holds a Microsoft Certified Technology Specialist (MCTS) certification and has a deep passion for staying up-to-date on the latest tech developments. Kevin has written extensively on a wide range of tech-related topics, showcasing his expertise and knowledge in areas such as software development, cybersecurity, and cloud computing. His contributions to the tech field have been widely recognized and respected by his peers, and he is highly regarded for his ability to explain complex technical concepts in a clear and concise manner.