
From Wikipedia, the free encyclopedia
|
|
This article needs to be updated. The reason given is: does the WNS still exist in/has it been changed for Windows 11?. Please help update this article to reflect recent events or newly available information. (March 2025) |
Windows Push Notification Service
|
Overview of the WNS architecture. |
|
| Developer(s) | Microsoft |
|---|---|
| Target platform(s) | Windows Phone 8.1, Windows 8, Windows 8.1, Windows 10, Windows 10 Mobile |
| Programming language(s) | C# |
| Status | Active |
| License | Closed-source |
| Website | dev |
Windows Push Notification Service (commonly referred to as Windows Notification Service or WNS) is a notification service developed by Microsoft for all devices running Microsoft Windows platforms. It allows for developers to send push data («toast» and «tile» updates) to Windows and Universal Windows Platform applications which implement the feature.[1] Designed as a successor to the Microsoft Push Notification Service, it was first supported on Windows 8 and subsequently on Windows Phone 8.1 upon its release.[2]
Design and compatibility
[edit]
The Windows Push Notification Service (WNS) was designed as a successor to the Microsoft Push Notification Service (MPNS), which was only supported natively on the Windows Phone 8 Operating System. Developers can still use the MPNS on apps that are installed on newer versions of Windows Mobile (Windows Phone 8 or Windows Phone 8.1), but only if the Windows application was already registered to use the MPNS and has been converted to a Microsoft Silverlight application and modified to re-target the new platform.[3]
In 2015, Microsoft announced that the WNS would be expanded to utilize the Universal Windows Platform architecture, allowing for push data to be sent to Windows 10, Windows 10 Mobile, Xbox, as well as other supported platforms using universal API calls and POST requests.[4]
During the 2015 Build keynote, Microsoft announced a Universal Windows Platform bridge that would allow Android and iOS software to be ported to Windows 10 Mobile and published to the Windows Store.[5] In August 2015, A version of the Microsoft Android bridge toolset was reported to be leaked and available on the internet along with its documentation.[6] The leaked toolset required developers to register and use the WNS to send notification data to ported applications, and would not allow for Google Cloud Messaging to be used instead. Microsoft later discontinued the Android bridge project in favor of continuing support for iOS application porting instead.[7]
During the 2016 Build keynote, Microsoft announced an update to the WNS and the Windows 10 Operating System that will allow for Android and iOS devices to forward push notifications received to Windows 10 to be viewed and discarded.[8]
The architecture of the Windows Push Notification Service is similar to that of its predecessor, in that it consists of servers and interfaces that generate, maintain, store, and authenticate unique identifiers (called Channel URI Identifiers) for all devices that register to use the service.[2] When a device enrolls to receive data and notification information using the WNS, it first sends a device registration request to the WNS network. The WNS network acknowledges the request, and responds with the device’s unique Channel URI Identifier.[9] Typically, the device will then send its identifier to a server owned by the developer so that it can be stored and used for sending notifications.[1] When the app developer wishes to transmit a notification or other WNS data to the device, it will transmit a POST request to the WNS network.[10] The network will acknowledge and authenticate the request. If the authentication succeeds, the data to be transmitted is enqueued and then sent to the device from the WNS network using the Channel URI Identifier.[citation needed]
- ^ a b «Windows 8 push notifications». June 3, 2012. Archived from the original on October 12, 2016. Retrieved May 28, 2016.
- ^ a b «Windows Push Notification Services (WNS) overview (Windows Runtime apps)». Microsoft. 31 August 2015. Archived from the original on November 15, 2017. Retrieved November 29, 2015.
- ^ «Choosing MPNS or WNS for a Windows Phone Silverlight 8.1 app». Microsoft. Archived from the original on March 4, 2016. Retrieved November 4, 2015.
- ^ Gallo, Kevin (March 2, 2015). «A first look at the Windows 10 universal app platform». Microsoft. Archived from the original on December 30, 2016. Retrieved November 29, 2015.
- ^ Hachman, Mark (August 6, 2015). «Microsoft releases iOS-to-Windows app maker Windows Bridge to open source». PC World. IDG. Archived from the original on July 4, 2017. Retrieved October 9, 2015.
- ^ Saran, Cliff (August 18, 2015). «Android for Windows Mobile tools leaked on web». Computer Weekly. Archived from the original on March 11, 2022. Retrieved May 28, 2016.
- ^ Jo Foley, Mary (February 25, 2016). «Microsoft: Our Android Windows 10 bridge is dead, but iOS, Win32 ones moving ahead». ZDNet. Archived from the original on October 26, 2021. Retrieved February 26, 2016.
- ^ Ligas, Nicola (April 1, 2016). «Windows 10 will support notifications from Android (ah yes, even Windows 10 Mobile)». Smartworld.it. Archived from the original on May 12, 2016. Retrieved May 28, 2016.
- ^ «Windows Push Notification Services (WNS) overview». Microsoft. May 4, 2016. Archived from the original on November 16, 2016. Retrieved May 28, 2016.
- ^ Snoei, Ton. «Windows Phone 8.1 Universal App Push Notifications (WNS) – Part 1». Snoei.net. Archived from the original on May 22, 2016. Retrieved May 28, 2016.
- Official website
Время на прочтение4 мин
Количество просмотров3.2K
Приветствую всех заинтересованных!
В современном мире все привыкли к быстрым коммуникациям через мессенджеры, многозадачности и возможности получать всплывающие на экран уведомления о событиях или сообщениях, не открывая при этом предварительно самого приложения. В Windows по аналогии с другими OS есть свой механизм для доставки уведомлений пользователю — Windows Push Notification Services (WNS). И при расследовании какого‑либо инцидента для форенсик специалиста могут быть полезны сведения из уведомлений Windows. Например представим ситуацию, что злоумышленник использовал мессенджер «WhatsApp», который использует механизм WNS для доставки уведомлений, но после использования удалил приложение и его данные. Как раз в таком случае и будут полезны сведения сохраняемые самой операционной системой и относящие к WNS.
Сведения из Windows Push Notification Services позволяют узнать следующее:
-
На хосте запускалось то или иное приложение, т.к. каждое уведомление связано с конкретным приложением. Можно узнать дату установки этого приложения.
-
Часть сообщений из мессенджеров, имена/никнеймы/почтовые адреса. Эта информация может содержаться в Payload уведомления.
-
Действия, которые были выполнены некоторыми приложениями, т.к. ряд приложений могут выполнять действия в фоне, увеломления оповещают пользователя о результате/необходимости обратить внимание на что‑то. Это может содержаться в Payload уведомления.
Все уведомления в Windows делятся на три типа:
-
Toast — всплывающее прямоугольное уведомление в правом нижнем углу экрана (в Windows 8.1 правый верхний угол).

-
Tile — присутствует только в Windows 10/8.1 представляет собой «живую» плитку (анимации и обновляемая информация на плитке) в меню Пуск.

-
Badge — цифра или символ рядом с иконкой приложения в Taskbar.

Сведения о них хранятся в файле %LOCALAPPDATA%\Microsoft\Windows\Notifications\wpndatabase.db, данный файл представляет собой SQLite базу данных. Внутри этой базы данных основной интерес будут представлять таблицы «Notification» и «NotificationHandler». Стоит отметить, что у уведомлений есть срок жизни и операционная система не сохраняет уведомления в базе данных насовсем. Например, если пользователь смахнул, нажал на уведомление или открыл приложение, которое отправило его, то оно будет удалено из базы. Однако, при удачном стечении обстоятельств недавно убранные системой записи из wpndatabase.db можно восстановить с помощью файла WAL (write‑ahead log), который находится в той же директории и имеет название wpndatabase.db‑wal. WAL представляет собой файл транзакций, все изменения в таблицах сначала будут отображены внутри этого файла. Прошлые изменения перестанут быть видны в файле WAL, когда в нём будет размещено более 1000 страниц (значение по умолчанию, прагма wal_autocheckpoint) (вся база SQLite состоит из страниц, размер страницы равен степени двойки, для wpndatabase.db размер страницы 4096 байт).

Вернёмся к таблицам внутри wpndatabase.db. В таблице «NotificationHandler» нас будет интересовать столбцы:
-
PrimaryID — название приложения, которое может отправлять уведомления.
-
RecordID — числовой идентификатор этого приложения.
-
CreatedTime — соответствует дате установки приложения.
А в таблице «Notification» следующие:
-
HandlerID — соответствует RecordID из «NotificationHandler».
-
Type — тип уведомления.
-
Payload — содержимое уведомления, обычно в XML формате.
-
PayloadType — формат Payload.
-
ArrivalTime — время поступления уведомления в формате Windows Filetime.
Рассмотрим инструменты для работы с этим видом доказательств. Из свободно распостраняемых утилит для форенсики wpndatabase.db хорошо подходит sql сценарий Notifications.sql. Он удобно группирует сведения из двух обозначенных нами таблиц.

Для восстановления уведомлений, которые убраны из основной базы, но которые могут оставаться в WAL подходит утилита walitean в сочетании с следующим sql запросом:
SELECT unknown0 AS Id, unknown1 AS HandlerId, unknown2 AS ActiveId, unknown3 AS Type,
unknown4 AS Payload, unknown5 AS Tag, unknown6 AS 'Group',
datetime((unknown7/10000000)-11644473600, 'unixepoch') AS ExpiryTime,
datetime((unknown8/10000000)-11644473600, 'unixepoch') AS ArrivalTime,
unknown9 AS DataVersion FROM IIBTBTTIIUTIU
Результат также получается достаточно удобный для анализа, за исключением того, что придётся вручную сопоставить HandlerID с именем приложения.

Также отдельно стоит отметить, что walitean написан на устаревшем Python 2, но тем не менее отлично отработал в Windows 11 на тестовом стенде. Подводя итог, артефакты из истории уведомлений могут быть хорошим вспомогательным источником, но учитывая небольшой срок жизни самих уведомлений и малый объём ротируемых данных в WAL, выжать из этого артефакта максимум информации не получится. Продолжение следует…
This service runs in session 0 and hosts the notification platform and connection provider which handles the connection between the device and WNS server.
Default Settings
| Startup type: |
|
||||||||||||||||||||||||||||||||||||||||||||||||||||||||||||||||||||||||||||||||||||||||||||||||||||||||
| Display name: | Windows Push Notifications System Service | ||||||||||||||||||||||||||||||||||||||||||||||||||||||||||||||||||||||||||||||||||||||||||||||||||||||||
| Service name: | WpnService | ||||||||||||||||||||||||||||||||||||||||||||||||||||||||||||||||||||||||||||||||||||||||||||||||||||||||
| Service type: | share | ||||||||||||||||||||||||||||||||||||||||||||||||||||||||||||||||||||||||||||||||||||||||||||||||||||||||
| Error control: | normal | ||||||||||||||||||||||||||||||||||||||||||||||||||||||||||||||||||||||||||||||||||||||||||||||||||||||||
| Object: | LocalSystem | ||||||||||||||||||||||||||||||||||||||||||||||||||||||||||||||||||||||||||||||||||||||||||||||||||||||||
| Path: | %SystemRoot%\system32\svchost.exe -k netsvcs -p | ||||||||||||||||||||||||||||||||||||||||||||||||||||||||||||||||||||||||||||||||||||||||||||||||||||||||
| File: | %SystemRoot%\system32\WpnService.dll | ||||||||||||||||||||||||||||||||||||||||||||||||||||||||||||||||||||||||||||||||||||||||||||||||||||||||
| Registry key: | HKEY_LOCAL_MACHINE\SYSTEM\CurrentControlSet\Services\WpnService | ||||||||||||||||||||||||||||||||||||||||||||||||||||||||||||||||||||||||||||||||||||||||||||||||||||||||
| Privileges: |
|
Default Behavior
Windows Push Notifications System Service is a Win32 service. It is starting only if the user, an application or another service starts it in all editions of Windows 10 1507, Windows 10 1511. This service is starting automatically when the operating system starts in all editions of Windows 10 1607, Windows 10 1703, Windows 10 1709, Windows 10 1803, Windows 10 1809, Windows 10 1903, Windows 10 2004, Windows 10 20H2, Windows 10 21H1, Windows 10 21H2, Windows 10 22H2.
When the Windows Push Notifications System Service is started, it is running as LocalSystem in a shared process of svchost.exe along with other services. If Windows Push Notifications System Service fails to start, the failure details are being recorded into Event Log. Then Windows 10 will start up and notify the user that the WpnService service has failed to start due to the error.
Dependencies
Windows Push Notifications System Service cannot be started under any conditions, if the Remote Procedure Call (RPC) service is disabled.
Restore Default Startup Configuration of Windows Push Notifications System Service
Before you begin doing this, make sure that all the services on which Windows Push Notifications System Service depends are configured by default and function properly. See the list of dependencies above.
1. Run the Command Prompt as an administrator.
2. Depending on the version of your operating system, copy the commands below, paste them into the command window and press ENTER.
For Windows 10 1507 Home, Windows 10 1507 Pro, Windows 10 1507 Education, Windows 10 1507 Enterprise, Windows 10 1511 Home, Windows 10 1511 Pro, Windows 10 1511 Education, Windows 10 1511 Enterprise:
sc config WpnService start= demand
For Windows 10 1607 Home, Windows 10 1607 Pro, Windows 10 1607 Education, Windows 10 1607 Enterprise, Windows 10 1703 Home, Windows 10 1703 Pro, Windows 10 1703 Education, Windows 10 1703 Enterprise, Windows 10 1709 Home, Windows 10 1709 Pro, Windows 10 1709 Education, Windows 10 1709 Enterprise, Windows 10 1803 Home, Windows 10 1803 Pro, Windows 10 1803 Education, Windows 10 1803 Enterprise, Windows 10 1809 Home, Windows 10 1809 Pro, Windows 10 1809 Education, Windows 10 1809 Enterprise, Windows 10 1903 Home, Windows 10 1903 Pro, Windows 10 1903 Education, Windows 10 1903 Enterprise, Windows 10 1909 Home, Windows 10 1909 Pro, Windows 10 1909 Education, Windows 10 1909 Enterprise, Windows 10 2004 Home, Windows 10 2004 Pro, Windows 10 2004 Education, Windows 10 2004 Enterprise, Windows 10 20H2 Home, Windows 10 20H2 Pro, Windows 10 20H2 Education, Windows 10 20H2 Enterprise, Windows 10 21H1 Home, Windows 10 21H1 Pro, Windows 10 21H1 Education, Windows 10 21H1 Enterprise, Windows 10 21H2 Home, Windows 10 21H2 Pro, Windows 10 21H2 Education, Windows 10 21H2 Enterprise, Windows 10 22H2 Home, Windows 10 22H2 Pro, Windows 10 22H2 Education, Windows 10 22H2 Enterprise:
sc config WpnService start= auto
sc start WpnService
3. Close the command window and restart the computer.
The WpnService service is using the WpnService.dll file that is located in the C:\Windows\system32 directory. If the file is removed or corrupted, read this article to restore its original version from Windows 10 installation media.
-
Home
-
News
- Windows Push Notification User Service High CPU/Memory Usage
By Aurelie | Follow |
Last Updated
What is Windows Push Notification User Service? How to fix Windows Push Notification User Service high CPU or memory usage? Read this post from MiniTool Website carefully, and you will be enlightened.
Windows Push Notifications User Service High CPU Usage
Windows Push Notifications User Service is a background system process that manages push notifications from different services and applications. Usually, it might consume some system resources and the impact is minimal.
However, what should you do if you find this process is using excessive resource usage on Windows 10/11? In this post, we will explore how to fix Windows Push Notification User Service high CPU, disk, or memory usage for you.
Tips:
High CPU issues like Windows Push Notification User Service high CPU usage might slow down your computer, even making your computer freezing and unresponsive. Therefore, it is strongly recommended to create a daily backup when you are using your computer. To do so, MiniTool ShadowMaker is worth trying. This free PC backup software is aimed to provide easy and professional data protection and disaster recovery solutions for individuals and companies. Get the free trial and have a whirl!
MiniTool ShadowMaker TrialClick to Download100%Clean & Safe
How to Fix Windows Push Notifications User Service High CPU Usage on Windows 10/11?
Fix 1: Terminate the Process Manually
Most of the time, a simple restart of this process might help to solve some problems like Windows Push Notification User Service high CPU usage. To do so:
Step 1. Press Ctrl + Shift + Esc to launch Task Manager.
Step 2. In the Details tab, locate Service Host: Windows Push Notification User Service and then right-click on it to choose End task.
Fix 2: Disable All Notifications
If there are so many notifications from different apps, no wonder you will receive Windows Push Notification User Service high CPU usage. In this condition, you can choose to stop receiving all notifications to fix this issue.
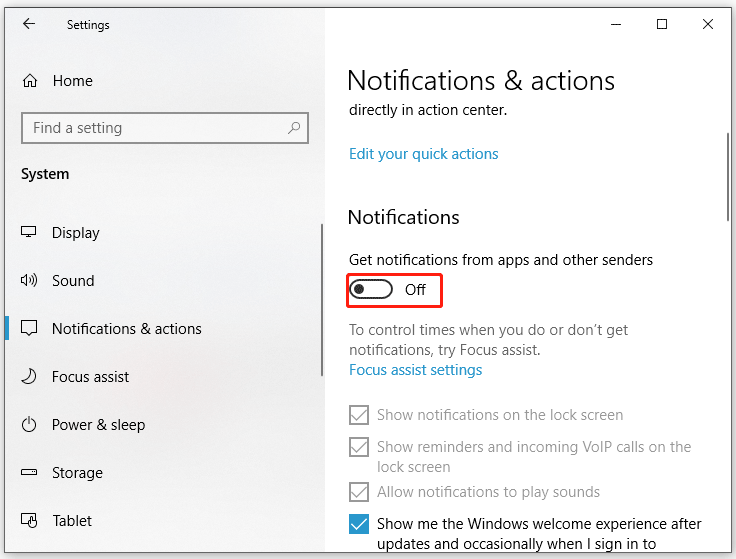
Step 1. Press Win + I to open Windows Settings.
Step 2. Go to System > Notification & actions > toggle off all notifications.
Fix 3: Restart Windows Push Notifications User Service
When certain background services or applications can not work properly, you can consider restarting them. Follow these steps:
Step 1. Press Win + R to open the Run box.
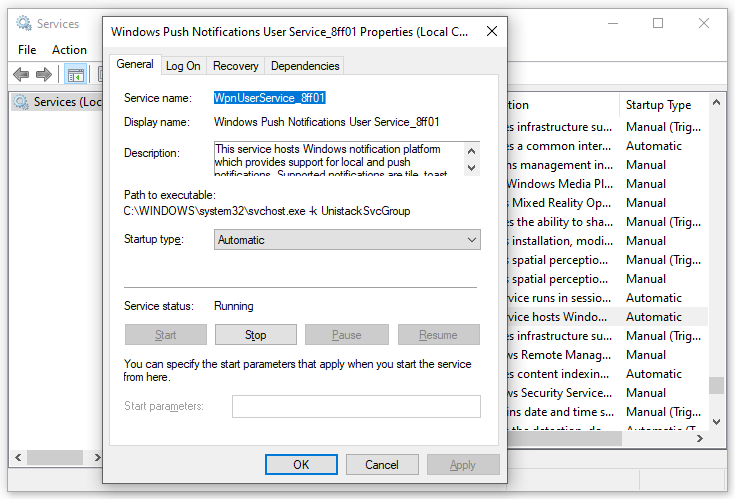
Step 2. Type services.msc and hit Enter to launch Services.
Step 3. In the services menu, find Windows Push Notification User Service and right-click on it to choose Properties.
Step 4. If this service is running, hit Stop and then restart it. If it is stopped, hit Start to run it.
Fix 4: Perform a Clean Boot
Third-party programs might be responsible for issues like Windows Push Notification User Service high CPU usage. If this is the case, you can perform a clean boot to exclude their interference. To do so:
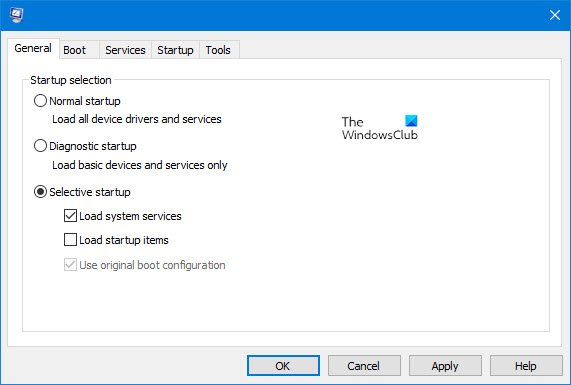
Step 1. Type system configuration in the search bar and hit Enter.
Step 2. In the Services tab, tick Hide all Microsoft services and hit Disable all.
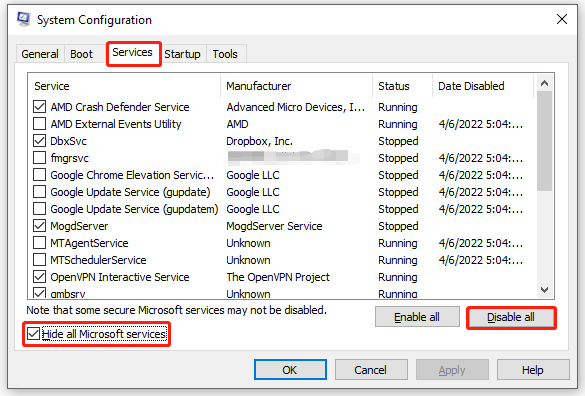
Step 3. Head to the Startup tab, click on Open Task Manager and then disable all third-party apps & programs.
Step 4. Go back to the Services tab and hit Apply & OK to save the changes.
Step 5. Restart your computer to enter the clean boot state to check if Windows Push Notification User Service high memory or CPU usage persists. If not, a third-party could be to blame. Then you need to uninstall all recently installed applications to see if it works.
Fix 5: Run SFC & DISM
Chances are that some system files are corrupted or missing. Therefore, you can run SFC and DISM in sequence to detect and repair these system files. Here’s how to do it:
Step 1. Launch Command Prompt with administrative privilege.
Step 2. In the command window, type sfc /scannow and hit Enter.
Step 3. After completion, restart your computer.
Step 4. Launch an administrative Command Prompt and run the following commands one by one.
DISM /Online /Cleanup-Image /CheckHealth
DISM /Online /Cleanup-Image /ScanHealth
DISM /Online /Cleanup-Image /RestoreHealth
Final Words
After reading through this post, Windows Push Notification User Service high resource consumption will not be a concerning problem and your operating system will run smoothly.
About The Author
Position: Columnist
Aurelie is a passionate soul who always enjoys researching & writing articles and solutions to help others. Her posts mainly cover topics related to games, data backup & recovery, file sync and so on. Apart from writing, her primary interests include reading novels and poems, travelling and listening to country music.
If Windows Push Notifications User Service is consuming high Memory or CPU usage in Windows 11/10, here is how you can eliminate this problem. It likely happens when you start your computer or connect it to the internet after a long time since all the apps try to show notifications at once.

What is Windows Push Notifications User Service?
Windows Push Notifications User Service is a service that helps you get all the notifications or updates from various apps installed on your computer. If you get a badge, tile, toast, or any other type of app notification, you should know that the Windows Push Notifications User Service is working in the background.
To fix the high Memory or CPU usage issue in Windows Push Notifications User Service on your computer, follow these instructions:
- Stop Windows Push Notifications User Service process
- Restart Windows Push Notifications User Service
- Disable all notifications
- Fix in Clean Boot state
As we mentioned, it could happen if you have connected your PC to the internet after a long time. So at such times, you may ignore it as the issue will go away. But if this happens often, read on.
1] Stop Windows Push Notifications User Service process
To stop the Windows Push Notifications User Service process, you can use Task Manager. The easiest way to open the Task Manager is by using the keyboard shortcut Ctrl+Shift+Esc. Once you open the Task Manager, you can sort the Background processes by Memory usage, or you can also look for the Service Host: Windows Push Notifications User Service process manually.
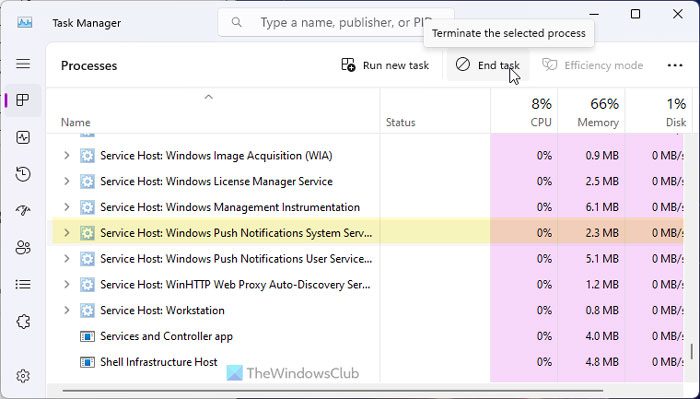
Select this process and click the End task button.
Although it doesn’t solve the problem permanently, you can find some time to work on other things instantly.
2] Restart Windows Push Notifications User Service
The Services panel in Windows 11/10 shows everything, including the Windows Push Notifications User Service process. As per our experience, restarting the service helps you fix the problem when certain background dependencies do not work as they should be.
Therefore, search for services in the Taskbar search box and open the Services panel first. Then, search for Windows Push Notifications User Service and double-click on it.
Click on the Stop button and stop it. Once done, click on the Start button.
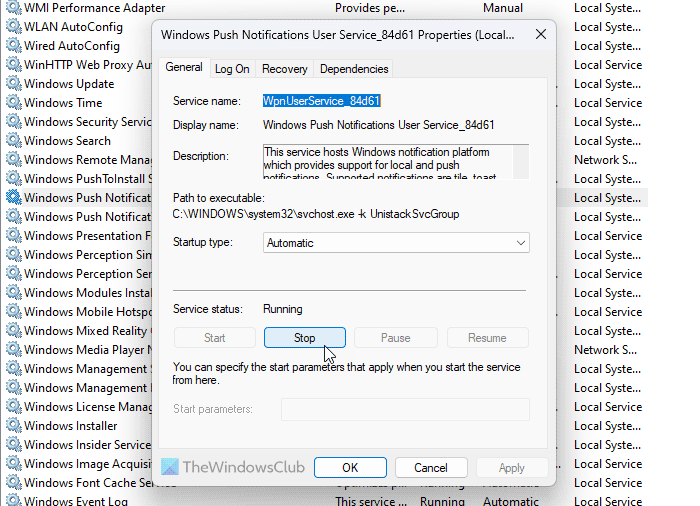
Finally, click on the OK button.
3] Disable all notifications
If notifications are not mandatory for you, this solution works pretty well. As this problem occurs due to having so many notifications from different apps, you can stop receiving notifications to solve this issue.
For that, press Win+I to open the Windows Settings panel and go to System > Notifications.
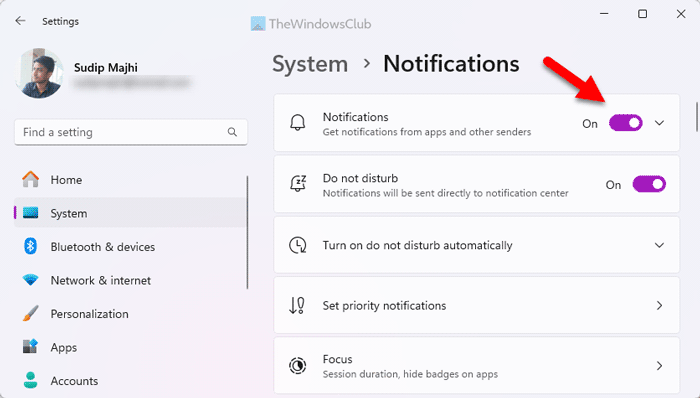
Here, you can find a menu called Notifications. You need to toggle the corresponding button to turn it off.
4] Fix in Clean Boot state
Clean Boot state helps you figure out whether a problem is occurring due to an internal driver or third-party app. Therefore, you can boot your computer into the Clean Boot state first.
Then, check if you are having the same problem or not. If not, you must enable one app at a time and repeat the same thing.
Note: If you use an Insider version of Windows 11, it could be a bug or glitch, too. In that case, check if Microsoft has already recognized it or not. If yes, hopefully, you will receive an update soon.
How to disable Windows Push Notifications User Service?
You can disable Windows Push Notifications User Service in Windows 11/10 using two methods:
1] Using Windows Settings
In order to deactivate Windows Push Notifications User Service, you need to disable the Notifications setting. Having said that, you must disable all the notifications at once. If any app is capable of sending notifications, it won’t work. For that, you need to open the Windows Settings panel and go to System > Notifications.
Find the Notifications menu and toggle the corresponding button.
2] Using Services
You can disable Windows Push Notifications User Service by disabling the respective background service using the Services panel. For that, search for services in the Taskbar search box and click on the individual search result. Then, find the Windows Push Notifications User Service_[unique-number] and double-click on this service.
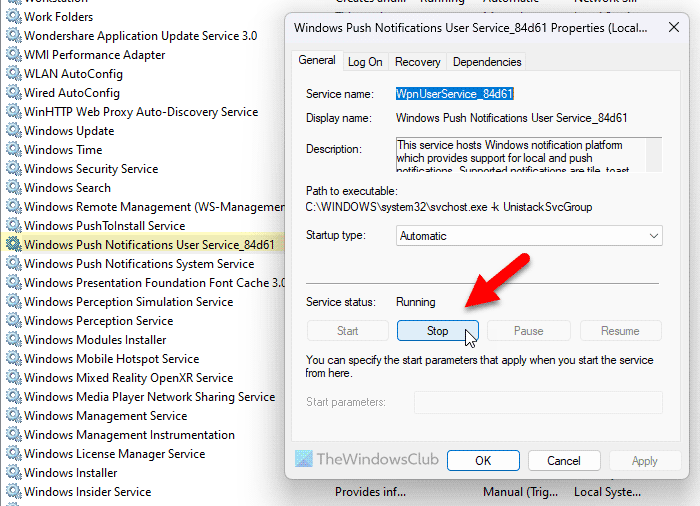
Click the Stop button and let it be terminated. Finally, click the OK button.
Windows Push Notifications User Service has stopped working
Windows Push Notifications User Service has stopped working; you need to check the Notifications setting first. You can follow this guide to enable overall Notifications or app-specific notifications in Windows 11/10. Following that, you can check if the respective service is running or not. For that, you can go through the aforementioned guide. If the status is marked as Stopped, you need to click the Start button.
Read: Reduce high Chrome Memory usage & make it use less RAM
Can I disable Windows Push Notifications User Service?
Yes, you can disable Windows Push Notifications User Service in Windows 11 as well as Windows 10. There are mainly two ways to do that – using Windows Settings and Services. Although you can use Task Manager to get the same result, it is temporary.
What happens if I turn off push notifications?
If you turn off push notifications, you won’t get any notification badge, tile, toast, or anything else. Even if the app is running or the internet is working, you cannot receive notifications. However, you can find all the updates once you open the respective app.
Read: Fix 100% Disk, High CPU, Memory or Power usage in Windows.