
Windows 10 has continually evolved since its original release, constantly expanding its capabilities to enhance user experience and functionality. Among its various features, the Windows Projected File System (ProjFS) stands out as an innovative mechanism that provides an interface for cloud-based file storage and management. This article will guide you through everything you need to know about enabling and using the Windows Projected File System, including its benefits, installation, and practical usage scenarios.
Understanding the Windows Projected File System
Windows Projected File System is a Microsoft feature that allows users to work with files stored in the cloud as if they were local files on their system. This functionality is particularly beneficial to hybrid file storage solutions where local files sync with cloud counterparts, ultimately optimizing performance and efficiency.
ProjFS supports scenarios that involve syncing files on demand and enabling applications to display cloud files in a user-friendly way. By leveraging Projected File System, developers can create applications that provide seamless access to files stored remotely, mirroring the organization and hierarchy usually expected with local files.
Prerequisites for Using ProjFS
Before diving into the enabling process, it’s crucial to ensure that your system meets certain prerequisites:
- Windows 10 Version: Ensure you’re using at least Windows 10 version 1709 (Fall Creators Update). Later versions will offer more stability and support for ProjFS.
- Development Environment: Familiarity with Windows development environments will significantly aid in using ProjFS effectively. Tools like Visual Studio are recommended, especially for developers intending to integrate ProjFS into applications.
- Administrative Privileges: You will need administrative rights on your computer to enable and configure Projected File System.
Steps to Enable Windows Projected File System
Here’s a step-by-step guide to enabling the Windows Projected File System. This process may vary slightly based on your specific Windows installation or updates.
Step 1: Install Windows SDK
- Download the Windows SDK: Go to the official Microsoft website and find the latest version of the Windows SDK (Software Development Kit).
- Run the Installer: Execute the downloaded file and follow the prompts to install the SDK. Make sure to include all components related to the Windows API and development tools.
Step 2: Enable Developer Mode
Enabling Developer Mode in Windows allows for testing applications without the usual restrictions.
- Open Settings: Click on the Start menu and access ‘Settings’ (the gear icon).
- Go to Update & Security: Click on the ‘Update & Security’ option.
- Select For Developers: From the sidebar, select ‘For developers’.
- Choose Developer Mode: Enable Developer Mode by selecting it. This may take a few minutes to apply.
Step 3: Enable Projected File System via PowerShell
- Open PowerShell as Administrator: Search for PowerShell in the Start menu, right-click it, and choose ‘Run as administrator’.
- Run the Command: Input the following command to enable Projected File System.
Enable-WindowsOptionalFeature -Online -FeatureName ProjFS -All - Restart Your Computer: Once the command has executed successfully, restart your system to apply changes.
Step 4: Verify Installation
After rebooting, you want to confirm that the Projected File System is correctly installed and functioning:
- Open File Explorer: Navigate through your directories.
- Inspect for Projected File System: Check for any folders or files that indicate cloud integration, such as OneDrive or other cloud storage solutions that utilize the projected file system.
Implementing Windows Projected File System
With Projected File System enabled on your Windows 10 machine, you can start using it for your applications. Here’s how you can get started:
Integrating ProjFS into Applications
- Setup Your Development Environment: Ensure you are using the appropriate tools like Visual Studio.
- Utilize ProjFS API: The ProjFS API allows developers to create file system filters that integrate directly with the OS.
- File Operations: You can create functions for adding, removing, and updating files dynamically. Use the
CreateFile,ReadFile, andWriteFilefunctions to interact with remote files seamlessly.
Using with OneDrive
Windows Projected File System is particularly useful when working with cloud storage applications like OneDrive:
- Link OneDrive: Ensure OneDrive is set up and synced on your device.
- Accessing Files: Files in OneDrive can be accessed directly through File Explorer, and data can be loaded on-demand when necessary.
- Local vs. Cloud Files: Understand how to differentiate between local files and cloud versions, utilizing ProjFS to manage data seamlessly.
Leveraging ProjFS with Custom Applications
Developers can harness the capabilities of ProjFS to create custom applications tailored to specific needs. Here are some concepts to consider:
- Custom File Storage Solutions: Build an application aimed at providing users with cloud-enabled features, such as backup and restore functionalities.
- On-Demand Syncing: Implement a system that syncs files only when accessed. This can save substantial local storage and reduce access time.
- User Interface Design: Design your application to reflect the structure of cloud storage to provide intuitive browsing experiences akin to local drives.
Debugging Common Issues
While enabling and utilizing ProjFS can often be straightforward, problems may occasionally arise. Here are some common issues and their resolutions:
- Missing Library or API Error: Ensure you have installed the correct SDK and any dependencies.
- Permission Issues: Always ensure you are running applications that interface with ProjFS with the right permissions. Administrative privileges are often required.
- File Not Found Issues: This may occur if the cloud sync has not been completed. Ensure that files intended for access through ProjFS are fully synced to avoid access issues.
Benefits of Using Windows Projected File System
Now that you have enabled ProjFS and understand its integration and implementation, it’s worthwhile to discuss the benefits it brings both to users and developers:
- Efficiency: ProjFS allows users to work efficiently with files without taking up valuable local storage.
- Seamless Integration: Provides a native file browsing experience with cloud data access as if it were local.
- Improved Performance: Reduces load times by syncing files on demand rather than downloading everything upfront.
- Enhanced User Experience: Simplifies file management for end-users and allows for derivative applications that can automate processes.
Conclusion
Enabling and integrating the Windows Projected File System on Windows 10 is a powerful way to enhance your computing capabilities, especially regarding cloud storage and file management. By following the steps outlined above, users and developers alike can take full advantage of this technology, creating dynamic solutions for managing files both locally and in the cloud. As cloud technology continues to proliferate, mastering ProjFS will enable better performance, user engagement, and efficient management of vast amounts of data.
With the transformation of cloud file systems, Windows Projected File System remains a critical feature that exemplifies the integration of local and remote file management, ensuring users can work smarter, not harder. Enabling ProjFS represents a step towards modern computing that leverages the best aspects of cloud technologies while maintaining the organizational structure users expect from traditional file systems.
Readers help support Windows Report. We may get a commission if you buy through our links.
Read our disclosure page to find out how can you help Windows Report sustain the editorial team. Read more
Microsoft recently rolled out a new Windows 10 build to Fast Ring Insiders. So, if you already got bored with the previous build, you can now install build 17604.
This new release adds a very interesting feature to the table, namely the Windows Projected File System.
Insiders can already enable this feature by going to Windows Features > Turn Windows features on and off. All you need to do is check the Windows Projected File System box and that’s it.

Tero Alhonen also noticed this change and shared the screenshot above with the whole world on Twitter.
On the other hand, Walking Cat suggests that Microsoft renamed the GVFS (Git Virtual File System) to ProjF (Windows Projected Filesystem).
Anyway, we’ll dig more into this and update the article as soon as new information is available.
So, if you installed the latest Windows 10 build on your computer and tested the Windows Projected File System feature, tell us more about your experience in the comments below.
UPDATE:
As one of our readers explained, instead of having developers install GVFS, the Redmond giant is now including it as a feature of Windows. This corroborates Walking Cat’s hypothesis.
For more information, you can check out our reader’s comment below. Thank you, Josedolf.
Windows Projected File System is not security-related as Windows Security is focusing on Virtualization-Based Security. Windows Projected Filesystem is likely similar to what they did with OneDrive: the files are on a remote server, and you can see “placeholders”, but they’re not actually on your machine unless you open them (thus a “projected” file system).
UPDATE: Just checked some Windows Insider and other developers’ Twitter accounts, and Windows Projected File System is what powers GVFS, allowing for very large repositories with little performance impact. It is marked “Beta” because there is no documentation yet.
RELATED POSTS TO CHECK OUT:
- 7 best file and folder locker tools and software for Windows 10
- Fix disappearing files and folders in Windows 10 and bring them all back
- Virtualization software: Run different operating systems on Windows 10 with these tools
Madalina Dinita
Networking & Security Specialist
Madalina has been a Windows fan ever since she got her hands on her first Windows XP computer.
She is interested in all things technology, especially emerging technologies — AI and DNA computing in particular.
Prior to joining the WindowsReport team, she worked in the corporate world for a number of years.
A little-known feature in modern Windows is the ability to expose hierarchical data using the file system. This is called Windows Projected File System (ProjFS), available since Windows 10 version 1809. There is even a sample that exposes the Registry hierarchy using this technology. Using the file system as a “projection” mechanism provides a couple of advantages over a custom mechanism:
- Any file viewing tool can present the information such as Explorer, or commands in a terminal.
- “Standard” file APIs are used, which are well-known, and available in any programming language or library.
Let’s see how to build a Projected File System provider from scratch. We’ll expose object manager directories as file system directories, and other types of objects as “files”. Normally, we can see the object manager’s namespace with dedicated tools, such as WinObj from Sysinternals, or my own Object Explorer:
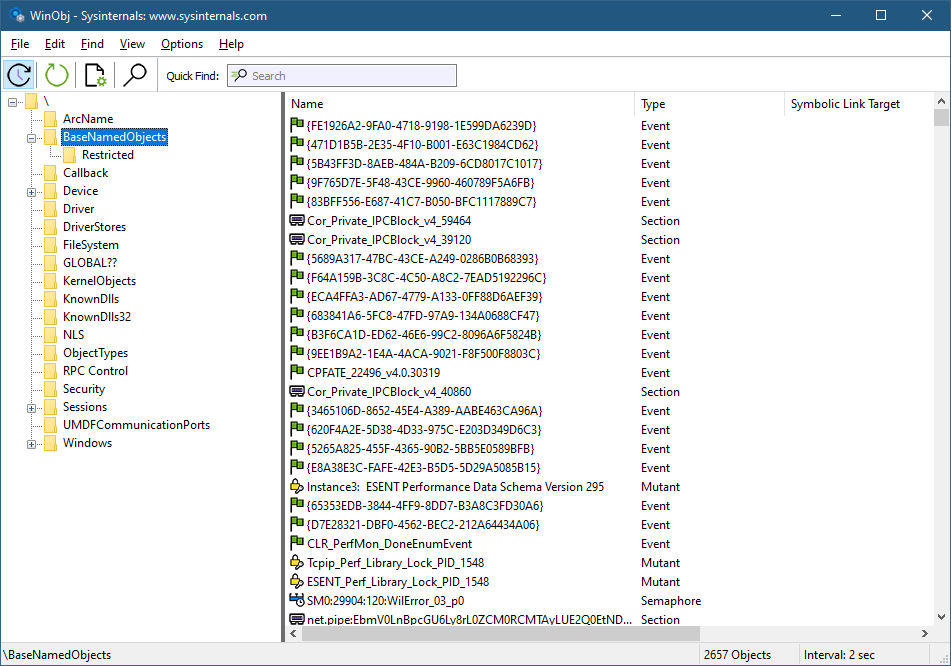
WinObj showing parts of the object manager namespace
Here is an example of what we are aiming for (viewed with Explorer):
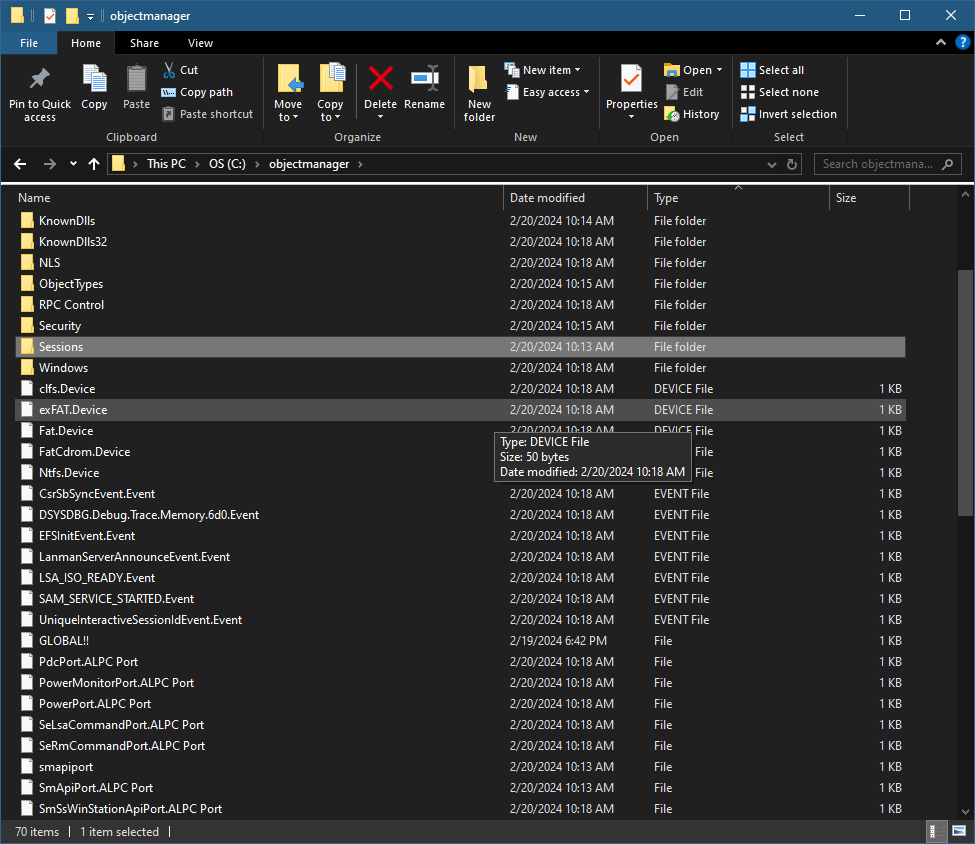
Explorer showing the root of the object manager namespace
First, support for ProjFS must be enabled to be usable. You can enable it with the Windows Features dialog or PowerShell:
Enable-WindowsOptionalFeature -Online -FeatureName Client-ProjFS -NoRestart
We’ll start by creating a C++ console application named ObjMgrProjFS; I’ve used the Windows Desktop Wizard project with a precompiled header (pch.h):
#pragma once

#include <Windows.h>
#include <projectedfslib.h>

#include <string>
#include <vector>
#include <memory>
#include <map>
#include <ranges>
#include <algorithm>
#include <format>
#include <optional>
#include <functional>
projectedfslib.h is where the ProjFS declarations reside. projectedfslib.lib is the import library to link against. In this post, I’ll focus on the main coding aspects, rather than going through every little piece of code. The full code can be found at https://github.com/zodiacon/objmgrprojfs. It’s of course possible to use other languages to implement a ProjFS provider. I’m going to attempt one in Rust in a future post 🙂
The projected file system must be rooted in a folder in the file system. It doesn’t have to be empty, but it makes sense to use such a directory for this purpose only. The main function will take the requested root folder as input and pass it to the ObjectManagerProjection class that is used to manage everything:
int wmain(int argc, const wchar_t* argv[]) {
	if (argc < 2) {
		printf("Usage: ObjMgrProjFS <root_dir>\n");
		return 0;
	}

	ObjectManagerProjection omp;
	if (auto hr = omp.Init(argv[1]); hr != S_OK)
		return Error(hr);

	if (auto hr = omp.Start(); hr != S_OK)
		return Error(hr);

	printf("Virtualizing at %ws. Press ENTER to stop virtualizing...\n", argv[1]);
	char buffer[3];
	gets_s(buffer);

	omp.Term();

	return 0;
}
Let start with the initialization. We want to create the requested directory (if it doesn’t already exist). If it does exist, we’ll use it. In fact, it could exist because of a previous run of the provider, so we can keep track of the instance ID (a GUID) so that the file system itself can use its caching capabilities. We’ll “hide” the GUID in a hidden file within the directory. First, create the directory:
HRESULT ObjectManagerProjection::Init(PCWSTR root) {
	GUID instanceId = GUID_NULL;
	std::wstring instanceFile(root);
	instanceFile += L"\\_obgmgrproj.guid";

	if (!::CreateDirectory(root, nullptr)) {
		//
		// failed, does it exist?
		//
		if (::GetLastError() != ERROR_ALREADY_EXISTS)
			return HRESULT_FROM_WIN32(::GetLastError());
If creation fails not because it exists, bail out with an error. Otherwise, get the instance ID that may be there and use that GUID if present:
	auto hFile = ::CreateFile(instanceFile.c_str(), GENERIC_READ,
		FILE_SHARE_READ, nullptr, OPEN_EXISTING, 0, nullptr);
	if (hFile != INVALID_HANDLE_VALUE && ::GetFileSize(hFile, nullptr) == sizeof(GUID)) {
		DWORD ret;
		::ReadFile(hFile, &instanceId, sizeof(instanceId), &ret, nullptr);
		::CloseHandle(hFile);
	}
}
If we need to generate a new GUID, we’ll do that with CoCreateGuid and write it to the hidden file:
if (instanceId == GUID_NULL) {
	::CoCreateGuid(&instanceId);
	//
	// write instance ID
	//
	auto hFile = ::CreateFile(instanceFile.c_str(), GENERIC_WRITE, 0, nullptr, CREATE_NEW, FILE_ATTRIBUTE_HIDDEN, nullptr);
	if (hFile != INVALID_HANDLE_VALUE) {
		DWORD ret;
		::WriteFile(hFile, &instanceId, sizeof(instanceId), &ret, nullptr);
		::CloseHandle(hFile);
	}
}
Finally, we must register the root with ProjFS:
auto hr = ::PrjMarkDirectoryAsPlaceholder(root, nullptr, nullptr, &instanceId);
if (FAILED(hr))
	return hr;

m_RootDir = root;
return hr;
Once Init succeeds, we need to start the actual virtualization. To that end, a structure of callbacks must be filled so that ProjFS knows what functions to call to get the information requested by the file system. This is the job of the Start method:
HRESULT ObjectManagerProjection::Start() {
	PRJ_CALLBACKS cb{};
	cb.StartDirectoryEnumerationCallback = StartDirectoryEnumerationCallback;
	cb.EndDirectoryEnumerationCallback = EndDirectoryEnumerationCallback;
	cb.GetDirectoryEnumerationCallback = GetDirectoryEnumerationCallback;
	cb.GetPlaceholderInfoCallback = GetPlaceholderInformationCallback;
	cb.GetFileDataCallback = GetFileDataCallback;

	auto hr = ::PrjStartVirtualizing(m_RootDir.c_str(), &cb, this, nullptr, &m_VirtContext);
	return hr;
}
The callbacks specified above are the absolute minimum required for a valid provider. PrjStartVirtualizing returns a virtualization context that identifies our provider, which we need to use (at least) when stopping virtualization. It’s a blocking call, which is convenient in a console app, but for other cases, it’s best put in a separate thread. The this value passed in is a user-defined context. We’ll use that to delegate these static callback functions to member functions. Here is the code for StartDirectoryEnumerationCallback:
HRESULT ObjectManagerProjection::StartDirectoryEnumerationCallback(const PRJ_CALLBACK_DATA* callbackData, const GUID* enumerationId) {
	return ((ObjectManagerProjection*)callbackData->InstanceContext)->DoStartDirectoryEnumerationCallback(callbackData, enumerationId);
}
The same trick is used for the other callbacks, so that we can implement the functionality within our class. The class ObjectManagerProjection itself holds on to the following data members of interest:
struct GUIDComparer {
	bool operator()(const GUID& lhs, const GUID& rhs) const {
		return memcmp(&lhs, &rhs, sizeof(rhs)) < 0;
	}
};

struct EnumInfo {
	std::vector<ObjectNameAndType> Objects;
	int Index{ -1 };
};
std::wstring m_RootDir;
PRJ_NAMESPACE_VIRTUALIZATION_CONTEXT m_VirtContext;
std::map<GUID, EnumInfo, GUIDComparer> m_Enumerations;
EnumInfo is a structure used to keep an object directory’s contents and the current index requested by the file system. A map is used to keep track of all current enumerations. Remember, it’s the file system – multiple directory listings may be happening at the same time. As it happens, each one is identified by a GUID, which is why it’s used as a key to the map. m_VirtContext is the returned value from PrjStartVirtualizing.
ObjectNameAndType is a little structure that stores the details of an object: its name and type:
struct ObjectNameAndType {
	std::wstring Name;
	std::wstring TypeName;
};
The Callbacks
Obviously, the bulk work for the provider is centered in the callbacks. Let’s start with StartDirectoryEnumerationCallback. Its purpose is to let the provider know that a new directory enumeration of some sort is beginning. The provider can make any necessary preparations. In our case, it’s about adding a new enumeration structure to manage based on the provided enumeration GUID:
HRESULT ObjectManagerProjection::DoStartDirectoryEnumerationCallback(const PRJ_CALLBACK_DATA* callbackData, const GUID* enumerationId) {
	EnumInfo info;
	m_Enumerations.insert({ *enumerationId, std::move(info) });
	return S_OK;
}
We just add a new entry to our map, since we must be able to distinguish between multiple enumerations that may be happening concurrently. The complementary callback ends an enumeration which is where we delete the item from the map:
HRESULT ObjectManagerProjection::DoEndDirectoryEnumerationCallback(const PRJ_CALLBACK_DATA* callbackData, const GUID* enumerationId) {
	m_Enumerations.erase(*enumerationId);
	return S_OK;
}
So far, so good. The real work is centered around the GetDirectoryEnumerationCallback callback where actual enumeration must take place. The callback receives the enumeration ID and a search expression – the client may try to search using functions such as FindFirstFile / FindNextFile or similar APIs. The provided PRJ_CALLBACK_DATA contains the basic details of the request such as the relative directory itself (which could be a subdirectory). First, we reject any unknown enumeration IDs:
HRESULT ObjectManagerProjection::DoGetDirectoryEnumerationCallback(
	const PRJ_CALLBACK_DATA* callbackData, const GUID* enumerationId,
	PCWSTR searchExpression, PRJ_DIR_ENTRY_BUFFER_HANDLE dirEntryBufferHandle) {

	auto it = m_Enumerations.find(*enumerationId);
	if(it == m_Enumerations.end())
		return E_INVALIDARG;
    auto& info = it->second;
Next, we need to enumerate the objects in the provided directory, taking into consideration the search expression (that may require returning a subset of the items):
	if (info.Index < 0 || (callbackData->Flags & PRJ_CB_DATA_FLAG_ENUM_RESTART_SCAN)) {
		auto compare = [&](auto name) {
			return ::PrjFileNameMatch(name, searchExpression);
			};
		info.Objects = ObjectManager::EnumDirectoryObjects(callbackData->FilePathName, nullptr, compare);
		std::ranges::sort(info.Objects, [](auto const& item1, auto const& item2) {
			return ::PrjFileNameCompare(item1.Name.c_str(), item2.Name.c_str()) < 0;
			});
		info.Index = 0;
	}
There are quite a few things happening here. ObjectManager::EnumDirectoryObjects is a helper function that does the actual enumeration of objects in the object manager’s namespace given the root directory (callbackData->FilePathName), which is always relative to the virtualization root, which is convenient – we don’t need to care where the actual root is. The compare lambda is passed to EnumDirectoryObjects to provide a filter based on the search expression. ProjFS provides the PrjFileNameMatch function we can use to test if a specific name should be returned or not. It has the logic that caters for wildcards like * and ?.
Once the results return in a vector (info.Objects), we must sort it. The file system expects returned files/directories to be sorted in a case insensitive way, but we don’t actually need to know that. PrjFileNameCompare is provided as a function to use for sorting purposes. We call sort on the returned vector passing this function PrjFileNameCompare as the compare function.
The enumeration must happen if the PRJ_CB_DATA_FLAG_ENUM_RESTART_SCAN is specified. I also enumerate if it’s the first call for this enumeration ID.
Now that we have results (or an empty vector), we can proceed by telling ProjFS about the results. If we have no results, just return success (an empty directory):
if (info.Objects.empty())
	return S_OK;
Otherwise, we must call PrjFillDirEntryBuffer for each entry in the results. However, ProjFS provides a limited buffer to accept data, which means we need to keep track of where we left off because we may be called again (without the PRJ_CB_DATA_FLAG_ENUM_RESTART_SCAN flag) to continue filling in data. This is why we keep track of the index we need to use.
The first step in the loop is to fill in details of the item: is it a subdirectory or a “file”? We can also specify the size of its data and common times like creation time, modify time, etc.:
while (info.Index < info.Objects.size()) {
	PRJ_FILE_BASIC_INFO itemInfo{};
	auto& item = info.Objects[info.Index];
	itemInfo.IsDirectory = item.TypeName == L"Directory";
	itemInfo.FileSize = itemInfo.IsDirectory ? 0 :
		GetObjectSize((callbackData->FilePathName + std::wstring(L"\\") + item.Name).c_str(), item);
We fill in two details: a directory or not, based on the kernel object type being “Directory”, and a file size (in case of another type object). What is the meaning of a “file size”? It can mean whatever we want it to mean, including just specifying a size of zero. However, I decided that the “data” being held in an object would be text that provides the object’s name, type, and target (if it’s a symbolic link). Here are a few example when running the provider and using a command window:
C:\objectmanager>dir p*
Volume in drive C is OS
Volume Serial Number is 18CF-552E Directory of C:\objectmanager
02/20/2024 11:09 AM 60 PdcPort.ALPC Port
02/20/2024 11:09 AM 76 PendingRenameMutex.Mutant
02/20/2024 11:09 AM 78 PowerMonitorPort.ALPC Port
02/20/2024 11:09 AM 64 PowerPort.ALPC Port
02/20/2024 11:09 AM 88 PrjFltPort.FilterConnectionPort
5 File(s) 366 bytes
0 Dir(s) 518,890,110,976 bytes free
C:\objectmanager>type PendingRenameMutex.Mutant
Name: PendingRenameMutex
Type: Mutant
C:\objectmanager>type powerport
Name: PowerPort
Type: ALPC Port
Here is PRJ_FILE_BASIC_INFO:
typedef struct PRJ_FILE_BASIC_INFO {
    BOOLEAN IsDirectory;
    INT64 FileSize;
    LARGE_INTEGER CreationTime;
    LARGE_INTEGER LastAccessTime;
    LARGE_INTEGER LastWriteTime;
    LARGE_INTEGER ChangeTime;
    UINT32 FileAttributes;
} PRJ_FILE_BASIC_INFO;
What is the meaning of the various times and file attributes? It can mean whatever you want – it might make sense for some types of data. If left at zero, the current time is used.
GetObjectSize is a helper function that calculates the number of bytes needed to keep the object’s text, which is what is reported to the file system.
Now we can pass the information for the item to ProjFS by calling PrjFillDirEntryBuffer:
	if (FAILED(::PrjFillDirEntryBuffer(
		(itemInfo.IsDirectory ? item.Name : (item.Name + L"." + item.TypeName)).c_str(),
		&itemInfo, dirEntryBufferHandle)))
		break;
	info.Index++;
}
The “name” of the item is comprised of the kernel object’s name, and the “file extension” is the object’s type name. This is just a matter of choice – I could have passed the object’s name only so that it would appear as a file with no extension. If the call to PrjFillDirEntryBuffer fails, it means the buffer is full, so we break out, but the index is not incremented, so we can provide the next object in the next callback that does not requires a rescan.
We have two callbacks remaining. One is GetPlaceholderInformationCallback, whose purpose is to provide “placeholder” information about an item, without providing its data. This is used by the file system for caching purposes. The implementation is like so:
HRESULT ObjectManagerProjection::DoGetPlaceholderInformationCallback(const PRJ_CALLBACK_DATA* callbackData) {
	auto path = callbackData->FilePathName;
	auto dir = ObjectManager::DirectoryExists(path);
	std::optional<ObjectNameAndType> object;
	if (!dir)
		object = ObjectManager::ObjectExists(path);
	if(!dir && !object)
		return HRESULT_FROM_WIN32(ERROR_FILE_NOT_FOUND);

	PRJ_PLACEHOLDER_INFO info{};
	info.FileBasicInfo.IsDirectory = dir;
	info.FileBasicInfo.FileSize = dir ? 0 : GetObjectSize(path, object.value());
	return PrjWritePlaceholderInfo(m_VirtContext, callbackData->FilePathName, &info, sizeof(info));
}
The item could be a file or a directory. We use the file path name provided to figure out if it’s a directory kernel object or something else by utilizing some helpers in the ObjectManager class (we’ll examine those later). Then the structure PRJ_PLACEHOLDER_INFO is filled with the details and provided to PrjWritePlaceholderInfo.
The final required callback is the one that provides the data for files – objects in our case:
HRESULT ObjectManagerProjection::DoGetFileDataCallback(const PRJ_CALLBACK_DATA* callbackData, UINT64 byteOffset, UINT32 length) {
	auto object = ObjectManager::ObjectExists(callbackData->FilePathName);
	if (!object)
		return HRESULT_FROM_WIN32(ERROR_FILE_NOT_FOUND);

	auto buffer = ::PrjAllocateAlignedBuffer(m_VirtContext, length);
	if (!buffer)
		return E_OUTOFMEMORY;

	auto data = GetObjectData(callbackData->FilePathName, object.value());
	memcpy(buffer, (PBYTE)data.c_str() + byteOffset, length);
	auto hr = ::PrjWriteFileData(m_VirtContext, &callbackData->DataStreamId, buffer, byteOffset, length);
	::PrjFreeAlignedBuffer(buffer);

	return hr;
}
First we check if the object’s path is valid. Next, we need to allocate buffer for the data. There are some ProjFS alignment requirements, so we call PrjAllocateAlignedBuffer to allocate a properly-aligned buffer. Then we get the object data (a string, by calling our helper GetObjectData), and copy it into the allocated buffer. Finally, we pass the buffer to PrjWriteFileData and free the buffer. The byte offset provided is usually zero, but could theoretically be larger if the client reads from a non-zero position, so we must be prepared for it. In our case, the data is small, but in general it could be arbitrarily large.
GetObjectData itself looks like this:
std::wstring ObjectManagerProjection::GetObjectData(PCWSTR fullname, ObjectNameAndType const& info) {
	std::wstring target;
	if (info.TypeName == L"SymbolicLink") {
		target = ObjectManager::GetSymbolicLinkTarget(fullname);
	}
	auto result = std::format(L"Name: {}\nType: {}\n", info.Name, info.TypeName);
	if (!target.empty())
		result = std::format(L"{}Target: {}\n", result, target);
	return result;
}
It calls a helper function, ObjectManager::GetSymbolicLinkTarget in case of a symbolic link, and builds the final string by using format (C++ 20) before returning it to the caller.
That’s all for the provider, except when terminating:
void ObjectManagerProjection::Term() {
	::PrjStopVirtualizing(m_VirtContext);
}
The Object Manager
Looking into the ObjectManager helper class is somewhat out of the focus of this post, since it has nothing to do with ProjFS. It uses native APIs to enumerate objects in the object manager’s namespace and get details of a symbolic link’s target. For more information about the native APIs, check out my book “Windows Native API Programming” or search online. First, it includes <Winternl.h> to get some basic native functions like RtlInitUnicodeString, and also adds the APIs for directory objects:
typedef struct _OBJECT_DIRECTORY_INFORMATION {
	UNICODE_STRING Name;
	UNICODE_STRING TypeName;
} OBJECT_DIRECTORY_INFORMATION, * POBJECT_DIRECTORY_INFORMATION;

#define DIRECTORY_QUERY  0x0001

extern "C" {
	NTSTATUS NTAPI NtOpenDirectoryObject(
		_Out_ PHANDLE hDirectory,
		_In_ ACCESS_MASK AccessMask,
		_In_ POBJECT_ATTRIBUTES ObjectAttributes);

	NTSTATUS NTAPI NtQuerySymbolicLinkObject(
		_In_ HANDLE LinkHandle,
		_Inout_ PUNICODE_STRING LinkTarget,
		_Out_opt_ PULONG ReturnedLength);

	NTSTATUS NTAPI NtQueryDirectoryObject(
		_In_  HANDLE hDirectory,
		_Out_ POBJECT_DIRECTORY_INFORMATION DirectoryEntryBuffer,
		_In_  ULONG DirectoryEntryBufferSize,
		_In_  BOOLEAN  bOnlyFirstEntry,
		_In_  BOOLEAN bFirstEntry,
		_In_  PULONG  EntryIndex,
		_Out_ PULONG  BytesReturned);
	NTSTATUS NTAPI NtOpenSymbolicLinkObject(
		_Out_  PHANDLE LinkHandle,
		_In_   ACCESS_MASK DesiredAccess,
		_In_   POBJECT_ATTRIBUTES ObjectAttributes);
}
Here is the main code that enumerates directory objects (some details omitted for clarity, see the full source code in the Github repo):
std::vector<ObjectNameAndType> ObjectManager::EnumDirectoryObjects(PCWSTR path,
	PCWSTR objectName, std::function<bool(PCWSTR)> compare) {
	std::vector<ObjectNameAndType> objects;
	HANDLE hDirectory;
	OBJECT_ATTRIBUTES attr;
	UNICODE_STRING name;
	std::wstring spath(path);
	if (spath[0] != L'\\')
		spath = L'\\' + spath;

	std::wstring object(objectName ? objectName : L"");

	RtlInitUnicodeString(&name, spath.c_str());
	InitializeObjectAttributes(&attr, &name, 0, nullptr, nullptr);
	if (!NT_SUCCESS(NtOpenDirectoryObject(&hDirectory, DIRECTORY_QUERY, &attr)))
		return objects;

	objects.reserve(128);
	BYTE buffer[1 << 12];
	auto info = reinterpret_cast<OBJECT_DIRECTORY_INFORMATION*>(buffer);
	bool first = true;
	ULONG size, index = 0;
	for (;;) {
		auto start = index;
		if (!NT_SUCCESS(NtQueryDirectoryObject(hDirectory, info, sizeof(buffer), FALSE, first, &index, &size)))
			break;
		first = false;
		for (ULONG i = 0; i < index - start; i++) {
			ObjectNameAndType data;
			auto& p = info[i];
			data.Name = std::wstring(p.Name.Buffer, p.Name.Length / sizeof(WCHAR));
			if(compare && !compare(data.Name.c_str()))
				continue;
			data.TypeName = std::wstring(p.TypeName.Buffer, p.TypeName.Length / sizeof(WCHAR));
			if(!objectName)
				objects.push_back(std::move(data));
			if (objectName && _wcsicmp(object.c_str(), data.Name.c_str()) == 0 ||
				_wcsicmp(object.c_str(), (data.Name + L"." + data.TypeName).c_str()) == 0) {
				objects.push_back(std::move(data));
				break;
			}
		}
	}
	::CloseHandle(hDirectory);
	return objects;
}
NtQueryDirectoryObject is called in a loop with increasing indices until it fails. The returned details for each entry is the object’s name and type name.
Here is how to get a symbolic link’s target:
std::wstring ObjectManager::GetSymbolicLinkTarget(PCWSTR path) {
	std::wstring spath(path);
	if (spath[0] != L'\\')
		spath = L"\\" + spath;

	HANDLE hLink;
	OBJECT_ATTRIBUTES attr;
	std::wstring target;
	UNICODE_STRING name;
	RtlInitUnicodeString(&name, spath.c_str());
	InitializeObjectAttributes(&attr, &name, 0, nullptr, nullptr);
	if (NT_SUCCESS(NtOpenSymbolicLinkObject(&hLink, GENERIC_READ, &attr))) {
		WCHAR buffer[1 << 10];
		UNICODE_STRING result;
		result.Buffer = buffer;
		result.MaximumLength = sizeof(buffer);
		if (NT_SUCCESS(NtQuerySymbolicLinkObject(hLink, &result, nullptr)))
			target.assign(result.Buffer, result.Length / sizeof(WCHAR));
		::CloseHandle(hLink);
	}
	return target;
}
See the full source code at https://github.com/zodiacon/ObjMgrProjFS.
Conclusion
The example provided is the bare minimum needed to write a ProjFS provider. This could be interesting for various types of data that is convenient to access with I/O APIs. Feel free to extend the example and resolve any bugs.

Here is another great article from Jacques Bensimon!
A recent How-To Geek article by Chris Hoffman entitled “Windows 10 Is Only Making Windows Fragmentation Worse” crystalized for me a growing sense of unease I’d been having about new features constantly being added to Windows 10 via the “Semi-Annual Channel” (as compared to “Long Term Service Channel” builds that provide feature stability akin to that of previous Windows versions): as an occasional developer of system utilities in the course of client engagements, I’m not so much concerned here about new applets being introduced, or existing applets acquiring new capabilities or being recast as UWP (Metro/Modern/Store) apps, but rather about new (and sometimes powerful) API functionality becoming available in a new Windows build but never becoming available (say via Windows Update) in the increasingly large number of prior builds still found in the wild. Except under highly targeted circumstances, is there any point to my taking advantage of API functions that I know to be absent from most Windows installations? Or to put it philosophically, if an API function only exists in a small subset of Windows machines, does it exist at all?
A perfect example of this is the “Projected File System” feature introduced recently in Microsoft Windows 10 Build 1809: as described in the linked article, it allows an application to “project” data (that has a structure consisting of or resembling a folder & file organization) into the local file system, making it appear as folders and files under a selected root folder. Although the “cute” example provided is a read-only projection of the Registry into the file system (whereby keys and subkeys are folders and values are files – more on that below), I can see such a capability being of great use to present a local view of a remote file repository. The development of the Projected File System is somehow tied to Microsoft’s use of huge GitHub repositories and the desire to make them locally accessible without involving massive data transfers (see the related Git Virtual File System), but in this age of ubiquitous cloud storage providers, one can surmise that this capability could be of great use to developers at DropBox, Box, Citrix (ShareFile), Amazon , Google , etc., including Microsoft itself (OneDrive), all of whom currently have to either roll their own remote file system “drivers” or incorporate third-party libraries (such as Callback Technologies’ CBFS products) into their Windows apps. But this of course can’t and won’t happen until the Projected File System is available in the vast majority of Windows installations. [Note also that the feature doesn’t seem to be available in Windows Server 2019, which is also Build 1809, so it couldn’t be used in RDS deployments, and I’m guessing that it therefore isn’t present in Windows 10 LTSC 2019 either – I’ll note it in the comments if I find out otherwise].
But enough moaning! As long as I was on the subject, I thought I’d compile and make available Microsoft’s above-mentioned Projected File System sample program, RegFS (x64 only), strictly for the fun of it.
To see it in action, run RegFS.exe root_folder_path in a console window, for example RegFS C:\Registry (the selected root folder need not exist in advance). As shown in the screenshot below, the console window will thereafter be populated with trace information about the functions being called (instructive to programmers) while you navigate the Registry tree in File Explorer (or any other program that can browse the file system, including another console window). You can use Notepad to view the contents of any Registry entry, presented as a file by the RegFS provider.
Note: Remember that this is a (in this case thankfully read-only) projection of the Registry into the file system. At no point are the entire contents of the Registry recreated as complete folders and files on disk – only the entries (i.e. files) that you actually open (like “FontSmoothing” in the screenshot) have their contents instantiated on disk (I adore the term Microsoft chose for this, the almost poetic “hydrated”). Once you close the RegFS provider (by pressing Enter in the original console window), only the entries/files that have been ♥hydrated♥ will remain, along of course with all their parent folders. You can safely delete the entire root folder (C:\Registry in this example) when you’re done playing.

If you get the following error message when you attempt to run RegFS.exe, you haven’t yet added the Projected File System feature to your Windows installation (which of course requires that you be running at least Build 1809):

Okay, fun’s over. Back to work!
JB
Be sure to follow Jacques on twitter at @JacqBens.
The Windows Projected File System (ProjFS) is a powerful technology that enables developers to create custom file system experiences in Windows. This article will explore the fundamental concepts of ProjFS, its applications, benefits, and how it can be utilized to enhance user interactions with files and folders. We will also answer some common questions regarding ProjFS, supported by insights from various research articles, including those found on ScienceDirect.
What is Windows Projected File System (ProjFS)?
Windows Projected File System is a framework that allows developers to integrate and project files stored in various locations into a unified view in the Windows file explorer. ProjFS acts as a bridge between the physical file storage and the representation of files within the operating system. It is particularly useful for applications that require access to files in a cloud storage environment or those that need to present data from non-standard locations without users needing to know the intricacies of file management.
Key Features of ProjFS
-
Virtualization: ProjFS enables the virtualization of file storage, allowing files to be displayed in Windows Explorer without the need for them to reside on the local disk.
-
Seamless Integration: Users experience a seamless integration of files from various sources, such as local drives and cloud storage, making file management more efficient.
-
Real-time Updates: ProjFS supports real-time updates, ensuring that any changes made in the actual file location are reflected instantaneously in the projected view.
Benefits of Using ProjFS
Implementing ProjFS can offer several advantages for both developers and end-users:
-
Enhanced User Experience: By providing a unified view of files, users can easily manage documents without switching between different applications or storage locations.
-
Simplified Development: Developers can create applications that simplify file management and interaction, allowing them to focus on enhancing features rather than handling intricate file system interactions.
-
Support for Diverse File Systems: ProjFS can be utilized to work with various file storage services, such as cloud-based storage, making it a flexible solution.
Practical Example
Imagine a cloud storage service that utilizes ProjFS. Users can install the application on their devices, which enables them to access their cloud files directly from their local file explorer. When a user opens a folder in the explorer that points to the cloud service, ProjFS projects the files stored in the cloud, allowing users to interact with them as if they were local files. If a user uploads a file to the cloud through this interface, ProjFS seamlessly communicates that change to the cloud service, ensuring that the file is updated without any manual intervention.
Common Questions About ProjFS
1. What file system APIs does ProjFS use?
ProjFS primarily uses the Windows File System Filter APIs to create a layer between the physical storage and the Windows shell. According to a study on ScienceDirect, these APIs facilitate the communication necessary for real-time file updates and virtualization.
2. How does ProjFS ensure data integrity during file operations?
ProjFS ensures data integrity through a robust event-driven model. This model allows it to listen for changes in both the virtual and physical file systems and synchronize them accordingly. Maintaining data consistency is critical for applications that rely on real-time data, such as collaborative tools.
3. Can ProjFS be used with existing file systems?
Yes, ProjFS can be integrated with existing file systems without requiring significant changes. For instance, developers can project cloud storage files into the local file system view without altering the cloud’s internal structure.
Future of ProjFS
With the growing demand for integrated and seamless file storage solutions, ProjFS is poised to play a significant role in the future of file system management in Windows. As applications become more data-driven and cloud-centric, leveraging ProjFS can provide developers with the tools necessary to build innovative file management solutions.
Conclusion
The Windows Projected File System is a sophisticated technology that bridges the gap between physical file storage and user interaction. With its numerous benefits, including enhanced user experience and real-time updates, ProjFS is set to revolutionize how users manage and interact with files across different storage systems. By understanding and utilizing ProjFS, developers can create powerful applications that streamline file access and enhance productivity.
References
- ScienceDirect
By leveraging the concepts discussed in this article, readers can deepen their understanding of ProjFS and explore its potential in their applications and daily file management tasks. The dynamic nature of this technology opens up new possibilities for innovation in the file system landscape.