
There are certain situations when you would want to find the process start and end time in Windows 11/10. For example, as you try to troubleshoot an application, or if there are too many processes running in the background. You may also want to know the start time and time of the Windows process if you want to monitor the timings of a certain process started by someone else.
While there are a couple of ways to find out the Windows Process start time, there are not many ways to know the end time. Let’s first understand what is the process start and end time in Windows.
What are the Windows Process Start and End times?
Some Windows processes usually start along with a few services as soon as you boot up your PC, or when you launch a program. This is the actual start time of the process. Also, you may want to note the process end time for applications that terminate themselves automatically after they have been idle for some time.
However, considering all these occur in a matter of seconds in the background, it is impossible to note the start time during this period. But for some reason, we may need the data later.
While you are working on the Windows machine, you may want to know for how long the process has been running. For this, you would need to find out two things; the process starts time and the end time.
- Find out the Windows process start time using PowerShell
- Find out the Windows process start time using Process Explorer
- Find out the Windows process end time using system tools
- Find Process Start and End Times using free tool
1] Find out the Windows process Start time using PowerShell

One of the quickest ways to find out the Windows process start time is by using the PowerShell utility in admin mode. There are two PowerShell commands, one of which helps you find out the start time for all processes, and the other helps you to find out the start time of a specific process.
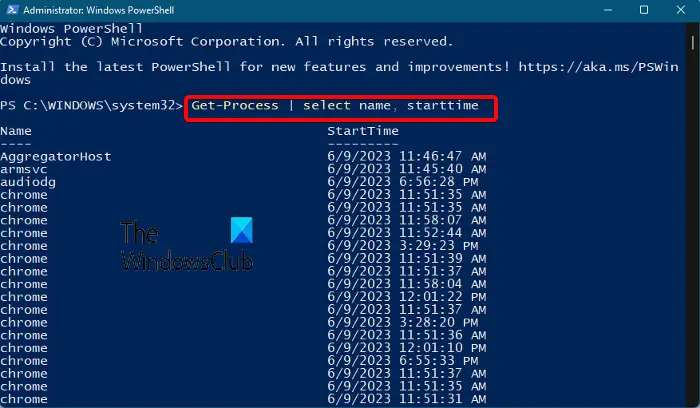
To find out the start time for all processes, open the elevated Windows PowerShell prompt, run the below command and hit Enter:
Get-Process | select name, starttime
Windows PowerShell will now generate and display the list of process start times. You can then look for the process you want the start time for.
Alternatively, to find the start time for a specific process, run the below command in the elevated PowerShell, and hit Enter:
Get-Process ProcessName | select Name, StartTime
So, for example, if you want to find out the process start time for Notepad, simply replace ProcessName syntax with Notepad:
Get-Process Notepad | select Name, StartTime
PowerShell will now display the start time for Notepad and you can note it down for your reference.
Read: Process Manager lets you measure computer reboot, logon times and more
2] Find out the Windows process Start time using Process Explorer

Another way to find out the process start time for Windows 11/10 is by using the Microsoft Sysinternals Process Explorer Tool. It’s a free alternative to Task Manager with advanced features that Task Manager does not offer. It can do all of that Task Manager does, and also doubles up as a system monitor, and as an anti-malware program. As a plus, it can monitor the process start time. Here’s how:

- Download the Process Explorer tool from Microsoft’s official download page.
- Unzip the folder and extract the file to your preferred location.
- Double-click on the file (procexp) and open it.
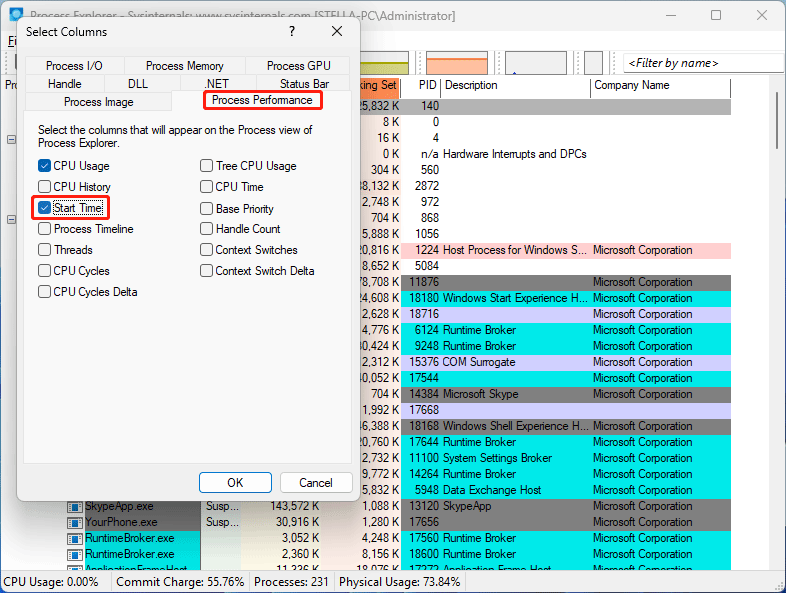
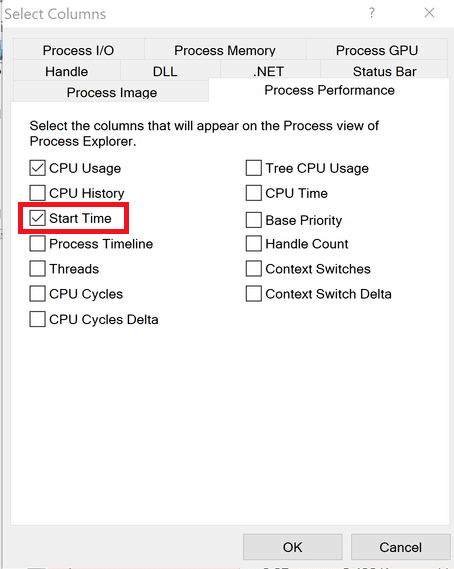
- Next, click on View at the top and click on Select Columns.
- Now, in the Select Columns dialog, go to the Process Performance tab and select Start Time. Press OK.
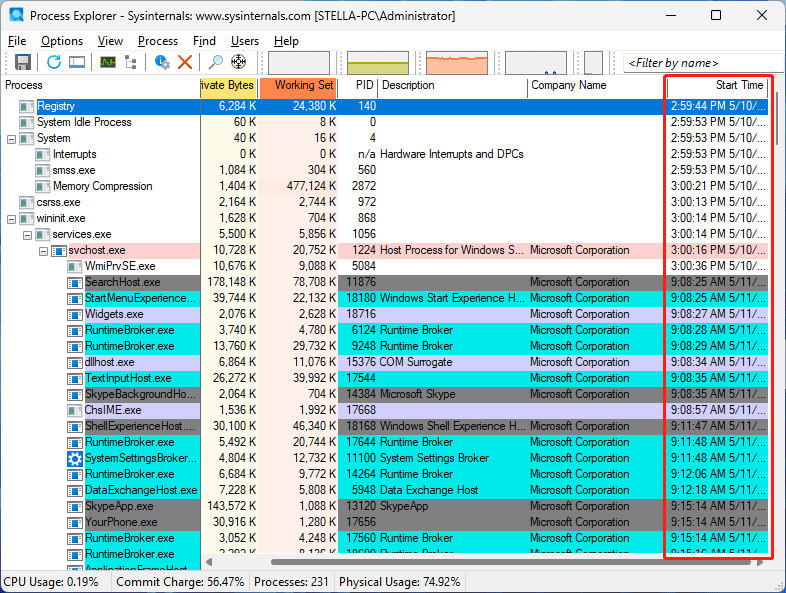
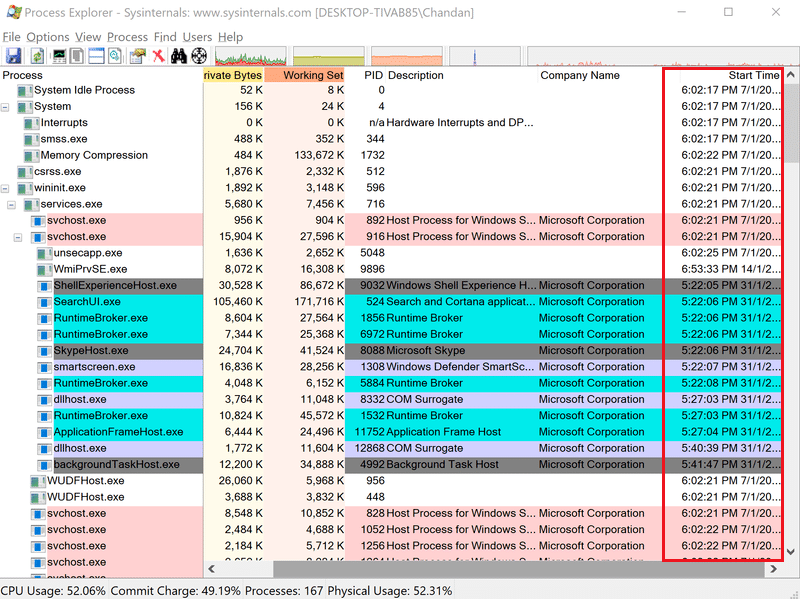
- You should now see a column called Start Time, in the Process Explorer tool.
Read: Task Manager is not responding or opening
3] Find out the Windows process End time using system tools
Finding the end time of a Windows process could be rather tricky because there’s no other option available for the same.
- You can use the Microsoft Process Class to manually start and stop the local system process, and that way, you can monitor the end time.
- You can also use the Microsoft Stopwatch Class to accurately measure the elapsed time and accordingly log the end time.
Related: How to find out Windows Downtime, Uptime and Last Shutdown Time
4] Find Process Start and End Times using free tool
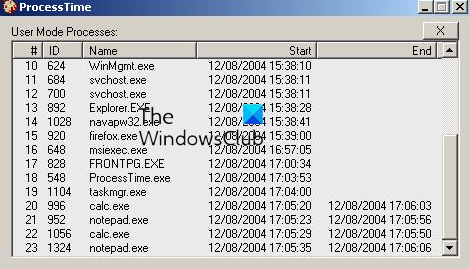
If you are not comfortable with any of these, you can use a third-party tool like the ProcessTime tool by the Code Project to find and log the start and end times of the Windows 11/10 processes. You may also refer to its step-by-step tutorial that guides you on how to do it using the WMI commands.
Read: How to find all running processes using WMIC in Windows
How do I see running processes in Windows 11?
While the Windows Task Manager allows you to see the running processes in Windows 11, you can also use the Command Prompt for the same. Run Command Prompt as an administrator > type tasklist > Enter. It will list all the running processes in Windows 11. Alternatively, you can also run a command called get-process and hit Enter in the elevated Windows PowerShell to check the running processes.
How do I find my PID in Windows 11?
PID or Process ID is a unique decimal number assigned to each process that runs on Windows. The PID can be used for different purposes; for example, it can be useful to fix issues by identifying the process with its id as you attach a debugger to it. Having said that, you can find the PID in Windows 11 using Task Manager, Command Prompt, Resource Monitor, and PowerShell.
-
Home
-
News
- How to Find the Process Start Time on Windows 10/11?
By Stella | Follow |
Last Updated
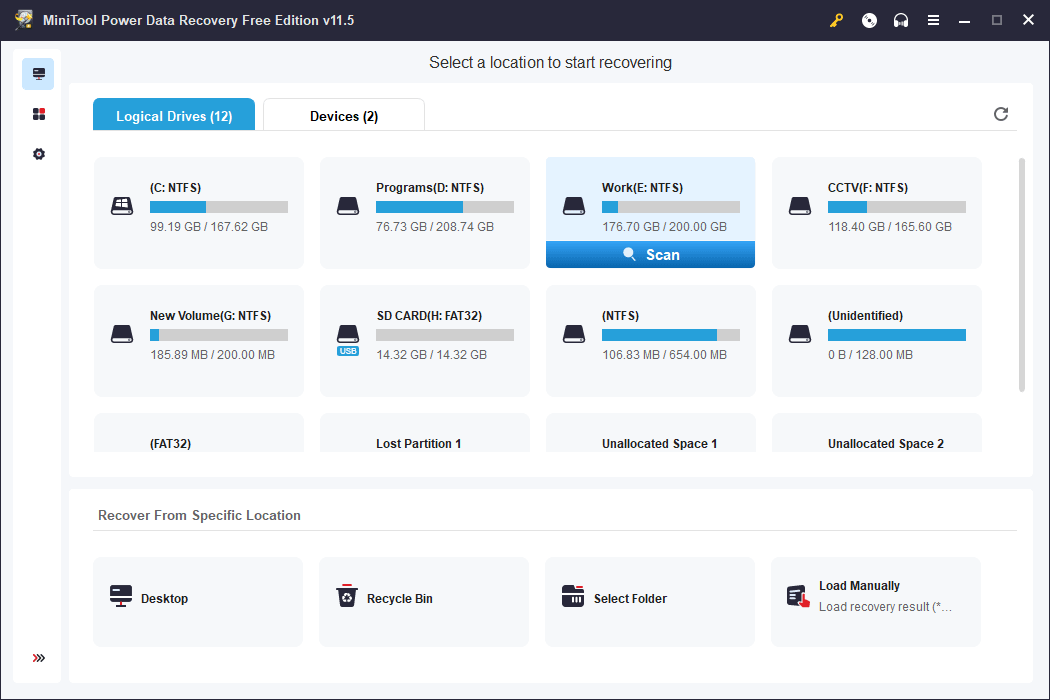
Many processes are running in the background when you use your computer. You may want to know the process start time. You can check a process start time using Windows PowerShell or Process Explorer. MiniTool Software will introduce these two methods here. Besides, if you are looking for a data restore tool, you can try MiniTool Power Data Recovery.
MiniTool Power Data Recovery is the best free data recovery software that can work on all versions of Windows including the latest Windows 11. You can download and install the free edition and try it to scan your drive and retrieve deleted files.
MiniTool Power Data Recovery FreeClick to Download100%Clean & Safe
What Is Process Start Time on Windows 11/10?
When you boot up your computer, some processes and services also start along with the system. This is the time a process was first launched. Some other processes and services start when you launch a program. But most users won’t note the process start time. How can you check the process start time later?
Here are two methods for you:
- You can run special commands in Windows PowerShell to find the process start time on Windows.
- You can use a dedicated process start time checker like Process Explorer to check the process start time.
The following part will introduce these two methods with detailed steps.
How to Find the Process Start Time on Windows 11/10?
Way 1: Use Windows PowerShell
Step 1: Click the search box in the taskbar and search for powershell. Windows PowerShell should be the best match. Then you need to click Run as Administrator.
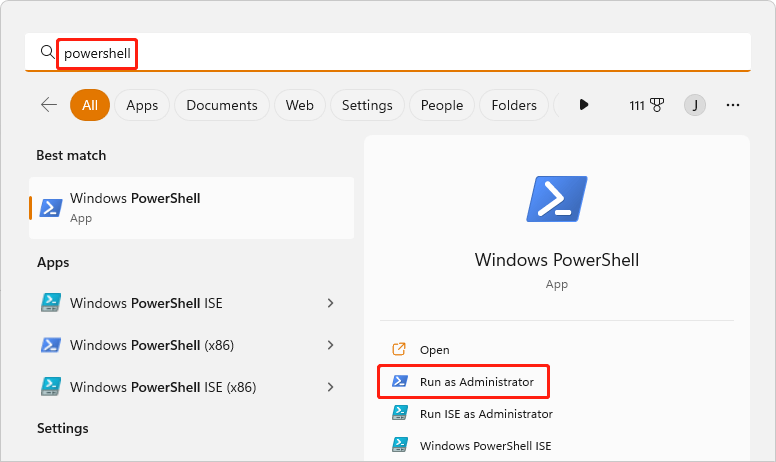
Step 2: Click Yes to continue if you see the User Account Control interface.
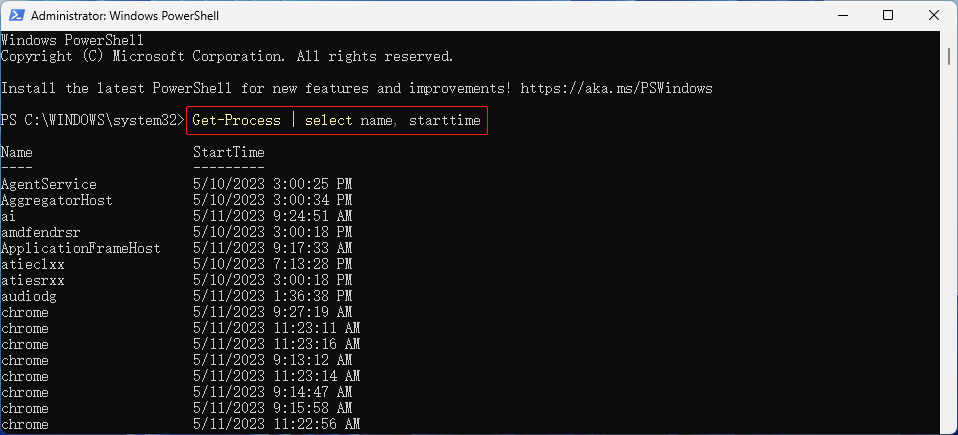
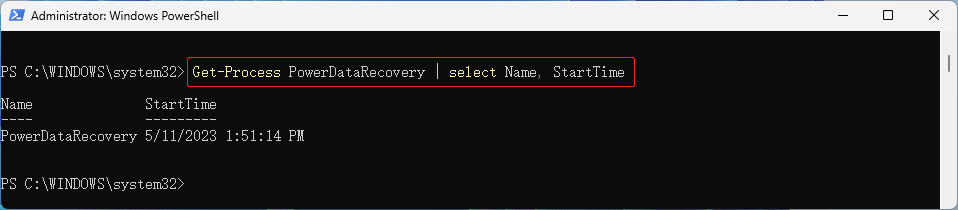
Step 3: Run Get-Process | select name, starttime in Windows PowerShell. You can directly copy this command into PowerShell and press Enter to run it. Then, you can see a list of process starttime.
How to find a specific process’s start time:
Here is a trick for checking a specific process startime. You can run this command in Windows PowerShell: Get-Process ProcessName | select Name, StartTime. For example, if you want to find the start time of Power Data Recovery, you can run this command: Get-Process PowerDataRecovery | select Name, StartTime.
Way 2: Use Process Explorer
Process Explorer is a freeware task manager and system monitor for Windows. It can be used to monitor the process start time. It is not preinstalled on your PC. You need to manually download it.
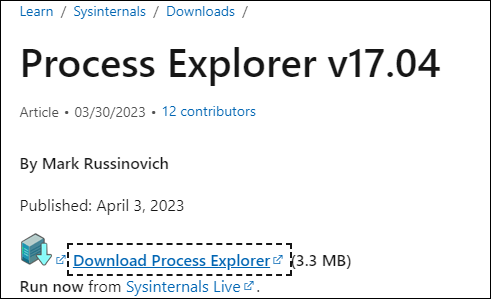
Step 1: Go to this page to download Process Explorer: https://learn.microsoft.com/en-us/sysinternals/downloads/process-explorer.
Step 2: The download item is a compressed folder. You need to unzip it.
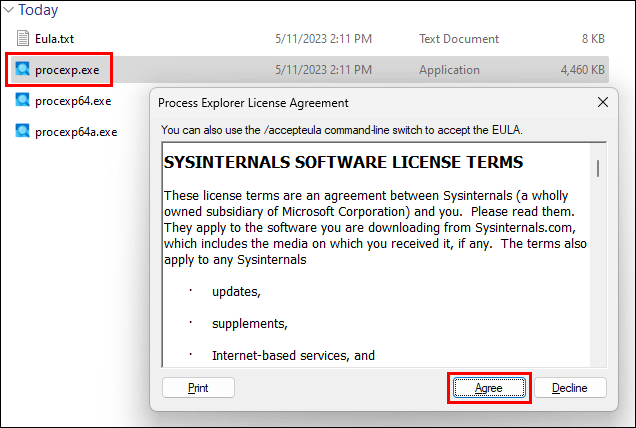
Step 3: Click procexp.exe. Then, click the Agree button to continue.
Step 4: Process Explorer will open, then you need to go to View > Select Columns.
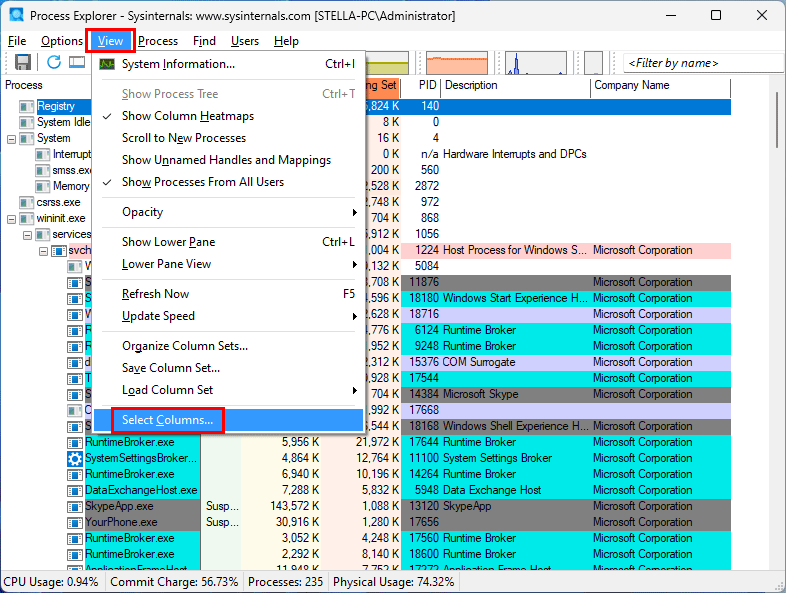
Step 5: Switch to Process Performance on the pop-up interface, then select Start Time.
Step 6: Click OK to save the change.
Step 7: Start Time will be added to the last column. However, you can drag it to the first one if you want.
Find and Recover Your Lost and Deleted Files on Windows 11/10
In this part, we will introduce the professional data recovery software: MiniTool Power Data Recovery. This tool can recover files from SSDs, hard disk drives, SD cards, USB flash drives, pen drives, and some other types of storage devices.
MiniTool Power Data Recovery FreeClick to Download100%Clean & Safe
It is easy to use this software to recover files in different situations. After launching this software, you can select the target drive to scan, view the scan results, and find & select your needed files to recover.
MiniTool Power Data Recovery Free Edition allows you to recover no more than 1 GB of files. If you want to break this limit, you can use an advanced edition. MiniTool Software offers different editions for personal users and business users. You can select one from MiniTool’s store based on your situation. If you use this software for personal purposes, the Personal Ultimate Edition can fully meet your needs.
MiniTool Power Data Recovery FreeClick to Download100%Clean & Safe
Bottom Line
This post contains two ways to help you check the process start time on Windows. You can choose one way accordingly. In addition, you can try MiniTool Power Data Recovery to rescue your files when needed. If you have questions about this software, you can contact [email protected].
About The Author
Position: Columnist
Stella has been working in MiniTool Software as an English Editor for more than 8 years. Her articles mainly cover the fields of data recovery including storage media data recovery, phone data recovery, and photo recovery, videos download, partition management, and video & audio format conversions.
Readers help support Windows Report. We may get a commission if you buy through our links.
Read our disclosure page to find out how can you help Windows Report sustain the editorial team. Read more
Windows is a user-friendly operating system offering a wide range of information to help optimize the system’s performance. And the process start time in Windows is one such parameter.
There are various methods to check the Windows process start time, some straightforward while others require a certain level of technical acumen. And we are here to provide this vital information. Keep reading to find out!
What is the Windows process start?
The technical definition of it is beyond the understanding of a regular user. But in simple words, this happens in the background when a process is started in Windows. All the linking, finding the relevant supporting DLLs and other files, and associating the resource.
All this happens in the background and within a few seconds. But we often need this information to identify the problems, get insights into the performance, and see how long a process has been running in Windows. Sometimes, you will also need the app’s process ID for troubleshooting.
How do I get the process start time in Windows?
1. Via PowerShell
- Press Windows + R to open Run, type powershell, and hit Ctrl + Shift + Enter.

- Click Yes in the UAC prompt that appears.
- Now, paste the following command and hit Enter to get a list of the start time for all running processes:
Get-Process | select name, starttime
- You can now view the start time.
- To get the start time of an individual process and service, run the following command while replacing ProcessName with the actual name:
Get-Process ProcessName | select Name, StartTime
- For instance, to get the start time of Chrome processes, the command becomes:
Get-Process Chrome | select Name, StartTime


That’s it! That’s how to Get-Process start time in PowerShell on Windows from the command line. The list provides just the process start time in Windows, making it easy for users to decipher the data.
2. Use a dedicated tool
- Go to Microsoft’s website, and download the Process Explorer tool.

- Right-click on the downloaded file and click Extract All.

- Go with the default path or choose another one, and click Extract.

- Launch the procexp.exe file.
- Click Agree to accept the license terms.

- Once Process Explorer opens, click the View menu, and choose Select Columns.

- Now, go to the Process Performance tab, tick the checkbox for Start Time, and click OK to save the changes.

- You now have the process start time for each of the programs running in Windows.
- Drag and reposition the column towards the left if your focus is only on the start time.


Process Explorer is a useful tool for viewing the process start time in Windows. It offers a simple user interface and doesn’t require installation. Just download the tool, extract the files, and you can run it immediately.
Besides, it provides other critical information about processes running on the computer, including CPU, PID (Program ID), and process description.
- Windows 11 Insider Preview update brings a sharper focus on accuracy and performance
- How to Delete Windows 11 Saved Passwords
How long does a process run on Windows?
- Press Ctrl + Shift + Esc to open the Task Manager, and navigate to the Performance tab.

- You can now view the Up time listed towards the right.


You can easily view the PC up time in Windows from the Task Manager, and combining this information with the process start time will help find out how low a process has been running in Windows.
Remember, most critical processes start as soon as you boot the OS, so they would have been running for the same period as the uptime.
That’s all! You should now understand the concept fairly and know how to find the process start time in Windows.
If you find the PC running slow, check some quick tips to improve Windows performance and make it run faster. Speaking of which, be sure to check Windows 11 uptime, since keeping your PC running for a long time can cause performance issues.
For any queries or to share your preferred method, drop a comment below.
Kazim Ali Alvi
Windows Hardware Expert
Kazim has always been fond of technology, be it scrolling through the settings on his iPhone, Android device, or Windows PC. He’s specialized in hardware devices, always ready to remove a screw or two to find out the real cause of a problem.
Long-time Windows user, Kazim is ready to provide a solution for your every software & hardware error on Windows 11, Windows 10 and any previous iteration. He’s also one of our experts in Networking & Security.
Understanding when a process started running on a Windows system provides invaluable troubleshooting data for identifying performance issues, malware, resource contention and more. This comprehensive 2800+ word guide covers several methods and tools for checking process start times on Windows, with detailed usage instructions and practical examples.
Why Check Process Start Times?
The start time of a process indicates when that particular process began executing on the system. Knowing this information has several benefits:
-
Performance Troubleshooting – Identifying processes consuming high CPU or memory that started around the same time as issues began occurring can help uncover the root cause.
-
Startup Optimization – Analyzing start times of processes at boot and login can help optimize startup sequences for faster load times.
-
Malware Detection – Suspicious processes running that started at unexpected times may indicate malware or unauthorized activity.
-
Resource Contention – Correlating process start times with waits and blocks can aid investigating file, network or database access issues.
-
Usage Analysis – Understanding process lifecycles from start to exit times helps right-size systems and plan capacity.
In summary, determining process start times provides vital runtime context for diagnosing Windows performance and stability issues.
Using Task Manager
Task Manager provides a quick way to view basic process start time data:
-
Launch Task Manager (Ctrl + Shift + Esc)
-
Select the «Details» tab
-
Right click on the column headings and enable the «Start Time» column
The Start Time column shows when each process began executing on the system. This timestamp can be useful for identifying any suspicious or problematic processes.
However, Task Manager has limited capabilities for logging, filtering and analyzing this data for issues that occurred in the past. For more advanced usage, a tool like Process Explorer or PowerShell querying is required.
Using Process Explorer
Process Explorer from Microsoft Sysinternals provides much greater detail for analyzing process activity over time.
To install Process Explorer:
-
Download ProcExp.zip from https://docs.microsoft.com/en-us/sysinternals/downloads/process-explorer
-
Extract the contents to a directory like C:\Tools
-
Run procexp64.exe
To view process start times:
-
Launch Process Explorer
-
Click View > Select Columns
-
Go to the Process Performance tab
-
Check the box for «Start Time» and click OK
Now an additional «Start Time» column will appear showing the time each process started.
Further helpful columns are PID, User Name, CPU, I/O bytes etc. Right clicking a process enables inspecting detailed activity graphs over time.
This data can identify processes using high resources that correlate with issues after the start time. Exporting filtered process data to a file is possible for offline analysis.
Using PowerShell Get-Process
For automated process data collection and reports, PowerShell provides flexible capabilities via the Get-Process cmdlet.
Basic Get-Process output includes the process Name, ID, CPU/Memory usage. To add start time, use formatting:
Get-Process | Format-Table Name,Id,CPU,StartTime We filter down to processes of interest by piping the output, e.g. high CPU:
Get-Process | Sort CPU -Descending | Select -First 10 | Format-Table Name,CPU,StartTimeFor long-running processes you can calculate the active duration:
Get-Process Explorer | Select Name,StartTime, @{Label="Duration";Expression={(Get-Date) - $_.StartTime}} The flexible filtering and output formatting makes PowerShell ideal for automated process data monitoring, analytics and reporting.
Additional Tools
Beyond the major options covered already, several other tools provide process start time visibility:
Process Monitor – Advanced logging of process activity, filtering & highlighting by start time
Logman – Create command line perf logs tracking CPU, memory and start times
PerfMon – Add Process Start Time counter for correlation with performance data
Utilizing a combination of tools gives the most complete picture of process behaviors affecting system issues.
Real-World Usage Examples
Checking process start times becomes extremely useful when performing root cause analysis of problems like server slowness, crashes or instability.
Here are some scenarios and how checking start times can uncover the issue root cause:
Performance Slowdown
If an application or server begins operating slower than usual at a certain time, checking processes sorted by start time can identify new processes executing around this time that may be causing resource contention.
Login Delays
Processes with long running start times at user login could be delaying loading of the user profile and desktop. Optimizing these startups improves login speed.
Database Deadlocks
Reviewing start times of application processes accessing a database prior to deadlock errors can help identify code changes or deployments potentially causing new locking.
High Memory Usage
A process leaking memory may show an extended running time as it is never stopping and freeing up allocated RAM.
Best Practices
To leverage process start analysis most effectively:
-
Record baseline of normal start times during a period of normal performance.
-
Automate collection for real-time monitoring of emerging outliers.
-
Filter broadly first (e.g. by CPU, Duration) then drill-down to suspicious processes.
-
Cross-reference start times with performance monitors, application logs and system events.
-
Focus on start times of production applications and services during issues.
-
Check for unfamiliar processes starting around an incident.
Following these guidelines helps quickly narrow times and processes of interest when troubleshooting or investigating Windows issues.
Advanced Process Start Analysis
Beyond just the absolute start time, analyzing process initialization stages and durations provides additional troubleshooting context.
The start time indicates when the process was initially created and kicked off by the system. However, full initialization can take much longer depending on actions performed during startup code paths:
- Dynamic library loading
- File parsing
- Network connections
- Complex calculations
- License checks
- Hardware detections
- Multi-threading
Tracking overall process CPU usage and drilling into thread level profiles reveals insights into which activities are dominating start sequences.
An example is querying PowerShell‘s own start phases:
Get-Process -Name powershell | Select ID,StartTime,TotalProcessorTime
Get-Process -Name powershell | Select Threads | Format-List
Identifying initialization hot spots helps prioritize optimization efforts for faster spin up times through configuration changes, data access tuning, filtering unneeded work, parallelizing etc.
Similarly, a start time far in the past but recent high resource usage could indicate a memory leak or accumulator issue where state and consumption grows uncontrolled over time.
Startup Process Optimization
Analyzing start order and interaction of processes coming online at Windows boot and login assists optimizing sequences for faster readiness.
Key process groups initializing early like Windows services, login UI and core apps, user applications/agents, and 3rd party services execute in parallel but have interdependencies.
Tooling like the Sysinternals Autoruns utility provides visibility into start ordering and relationships:
- Disabling unnecessary startup items
- Delaying non-essential processes till after login
- Pooling connections/resources to share across processes
- Init sequencing to prevent conflicts
Getting boot storms under control is crucial for providing snappy logins and performance. Checking start times before and after applying these optimizations quantifies the wins.
On the login side specifically, analyzing user profile load times isolates processes configurable per user for targeted performance gains, e.g with Login VSI testing.
Scripting Process Lifecycle Analysis
While recording start times is useful, often we care about full lifecycle from process inception to exit. Powershell enables tracking this for posterior analysis.
Example script to log all processes ever started:
$logFile = "C:\ProcessLogs\lifecycle.csv"

Get-Process | Select Name,Id,StartTime | Export-CSV $logFile

While ($true) {

    Get-Process |
        Where { $_.StartTime -gt (Get-Content $logFile | Select -Last 1).StartTime } |
        Select Name,Id,StartTime |
        Export-CSV $logFile -Append

    Start-Sleep -Seconds 60
}
We can expand on this to capture additional metrics over time like CPU, memory, I/O counters etc. Now visualizing this data clearly shows behavior of processes coming and going.
Identifying patterns helps establish expected containers lifespans, plan instance recycling, set alerts for stuck processes, right-size capacity based on churn etc. The same methodology applies for application thread and task turnover.
Advanced Memory Leak Detection
In addition to prolonged running times, analyzing memory consumption growth rate versus age of a process helps identifying system leaks.
First we need a baseline – modern Windows releases handle common leaks reasonably well. Running the following periodically records system memory pressure state:
Get-Process | Measure-Object WorkingSet -Average | Select Average
Get-Counter -Counter "\Memory\Available Bytes"
Watching these reset after process restarts establishes normal behavior. Next we check processes sorted by longest running time:
Get-Process | Sort StartTime | Select -Last 10 | Format-Table Name,StartTime,WorkingSetAny growing working set memory over time indicates a leak from somewhere! We can backup this theory by getting more samples:
@(Get-Process Explorer).WorkingSet | Measure-Object -Minimum -MaximumHuge swings confirms uncontrolled growth. Using this data-driven analysis supplements standard programming techniques for fully eliminating leaks.
Malware Persistence Mechanisms
Malware leverages various process start time tricks to gain persistence across restarts to keep infecting the system:
Run Key Abuse – Modifying startup areas like Run/RunOnce keys to execute malware payloads after reboot.
Service Install – Installing new malicious services configured to auto start subsequently.
Shim Injection – Patching legit process memory via shims to divert and inject code.
DLL Hijacking – Replacing referenced libraries with malicious DLLs that gets pulled in at process start.
Detecting these requires reviewing suspicious process start details:
-
Unknown processes launching automatically on boot
-
Signed Microsoft binaries running from temp folders
-
Services with odd file versions/hashes from standard
-
Processes loading unexpected DLLs
-
Startup executables with random, concealable names
-
Activity from default or hijacked user accounts
Locking down autostart areas from unapproved changes blocks most malware persistance tactics. Auditing processes attempting suspicious injections also catches attacks.
Reviewing all running processes regularly for oddities is crucial – early detection prevents major outbreaks before tools can self-propagate further.
Process Start Forensics
When investigating incidents post-mortem, the original process start details may no longer be visible. However forensics can recover artifacts revealing startup history:
Prefetch – Windows prefetch holds process metadata like run counts, last execution etc.
Shimcache – Execution traces of applications are cached here.
UserAssist – Counts of user-initiated app launches.
SuperFetch – Usage statistics per application.
Event Logs – Process create/exit events with metadata around execution.
File Timestamps – Modification dates on payload executables.
AutoRuns – Legacy start points often left infected.
File Paths – Determine drop point and system areas accessed.
Memory Analysis – Capture residue footprints from past processes.
Piecing these together builds a timeline of how malware or a threat entered, what it did post-start, and what it impacted – vital for determining scope and recovery steps needed.
Documenting these forensic process start signatures also improves defenses blocking future recurrence.
Understanding process execution context is vital for optimized Windows administration and troubleshooting. Checking process start times provides valuable temporal analytics not visible from other performance metrics alone. Used proactively and with supporting data, identifying unusual process start activity can swiftly uncover root cause.
While Task Manager provides a quick overview, to fully leverage process start data tools like Process Explorer and PowerShell are essential to investigate both historical and real-time activity. Combining robust process data collection with automated monitoring and alerting on anomalies takes Windows optimization to the next level.
Through numerous techniques from startup optimization to memory leak analysis and malware detection, analyzing process start times offers powerful analytic insights for unlocking next-level Windows performance, stability and security.
One of the essential tasks to find out during application troubleshooting.
Did you ever wonder how to check for how long, particular process is running in Windows?
Lately, I was working on the Windows server and had to find out for how long the process is running.
After some research, I found you could easily find out process start time in Windows by using the Process Explorer tool.
This article will guide you on how to install & check process start time on Windows operating system.
- Download Process Explorer from Microsoft download page
- Extract the downloaded zip file
Now, you are ready to use Process Explorer
- Double click on
procexpto open it, it will look like below
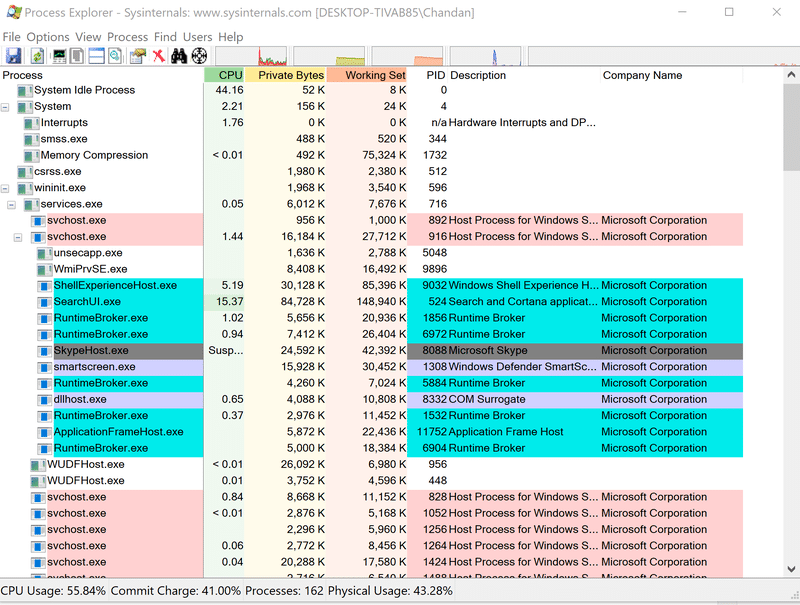
- Click on View >> Select Columns
- Click on Process Performance tab and select Start Time
- Click on Ok
- You will notice an additional column is added called Start Time in Process Explorer.
Easy?
I hope this helps you with your application troubleshooting procedure. If you are looking to learn Windows server administration, then check out this Udemy course.
-
Chandan Kumar is a founder of Geekflare. He is a technology enthusiast and entrepreneur who loves to help businesses and people around the world. Chandan has worked at BNP Paribas, Citibank, Deutsche Bank, Motorola, and HP. He’s got an in-depth understanding of business software and IT infrastructure.
Was this helpful?
Thanks for your feedback.