
-
Home
-
News
- Fixed: Windows Error Reporting (WerFault.exe) High CPU/Disk Usage
Fixed: Windows Error Reporting (WerFault.exe) High CPU/Disk Usage
By Vega | Follow |
Last Updated
Many Windows users reported that they have encountered a problem with Windows Error Reporting high CPU/Disk usage. If you are also one of them, you are at the right place. This article from MiniTool Partition Wizard will provide you with several feasible ways.
Windows Error Reporting, also known as Werfault.exe, is a process that handles error reporting. This process is not a virus or malware. However, some advanced threats masquerade as the Werfault.exe process, which is something to be aware of.
Even if you have a legitimate Windows Problem Reporting process running on your computer, it can still cause you problems like Windows Error Reporting high CPU/Disk usage. This can cause system performance issues and slow down, or even crash or freeze your computer, then you can try the fixes given below to resolve this issue.
# 1. Restart or Disable Windows Error Reporting
You can try to restart or disable the Windows Error Reporting service to solve this Windows problem reporting high disk. To do so, you can follow the steps below.
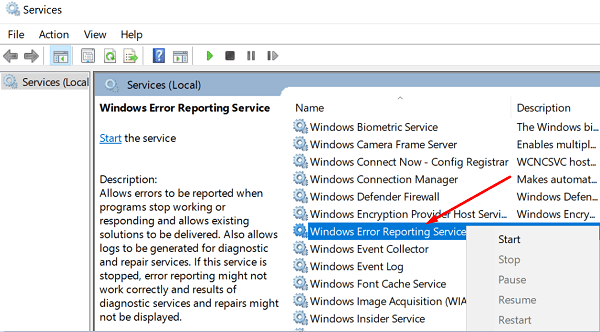
Step 1: Type services.msc in the Windows Search bar and press Enter.
Step 2: In the Services window, right-click on Windows Error Reporting Service.
Step 3: Select Stop and then wait a few seconds. Then restart the service.
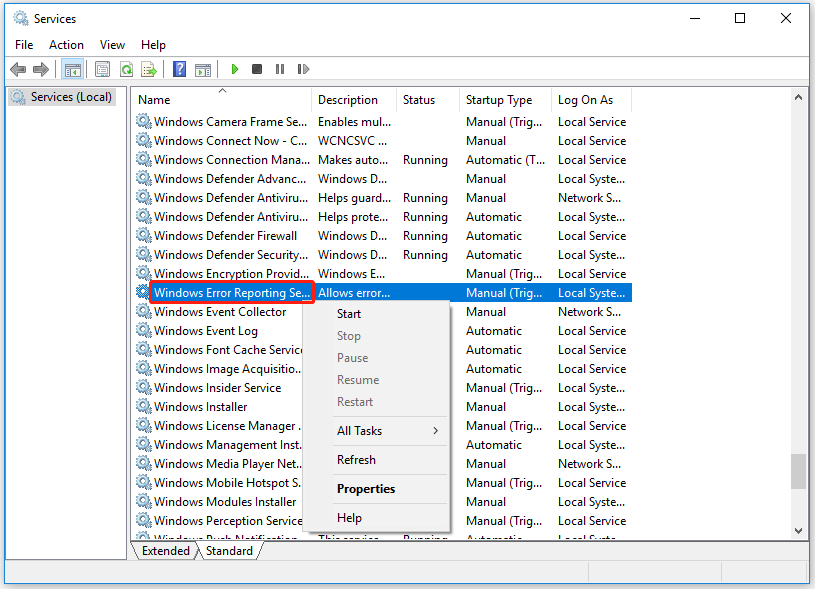
Alternatively, you can double-click on Windows Error Reporting Service, and under Startup type, select Disable to disable the service.
# 2. Update Your Drivers
Outdated drivers may cause all sorts of issues on your computer like Windows Error Reporting high CPU/Disk usage. So, you should try to update your drivers to see if it can solve this problem.
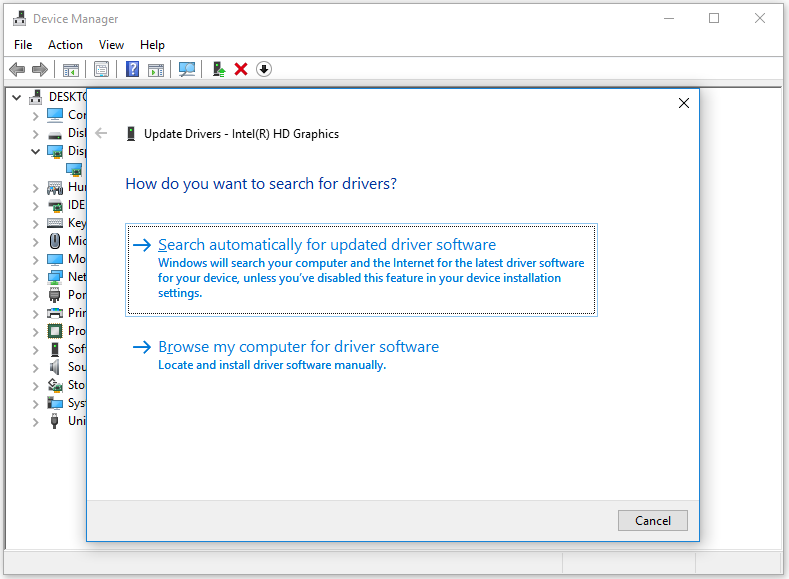
Step 1: Press the Win + S key and type Device Manager in the Search box. Then press Enter.
Step 2: Expand the directory and right-click a driver to select Update Driver.
Step 3: In a pop-up window, select Search automatically for updated driver software. Then your Windows will check, download and install the latest and appropriate driver.
# 3. Scan Your System for Malware
Malware infections often cause programs and processes to use more power than usual. Therefore, we recommend you run an in-depth malware scan with an antivirus solution installed, then restart your computer and check if the problem persists.
How to Run Windows Defender Full/Quick/Custom/Offline Scan
# 4. Close Background Apps
You can try to close background apps to check if other programs running in the background are interfering with the Windows Error Reporting tool. Just right-click the taskbar and select Task Manager. Then select the program and click End task.
# 5. Run SFC and DISM
This issue can be caused due to corrupted or missing system files on your computer. Therefore, you can run SFC and DISM scans to resolve the issue. Proceed as follows:
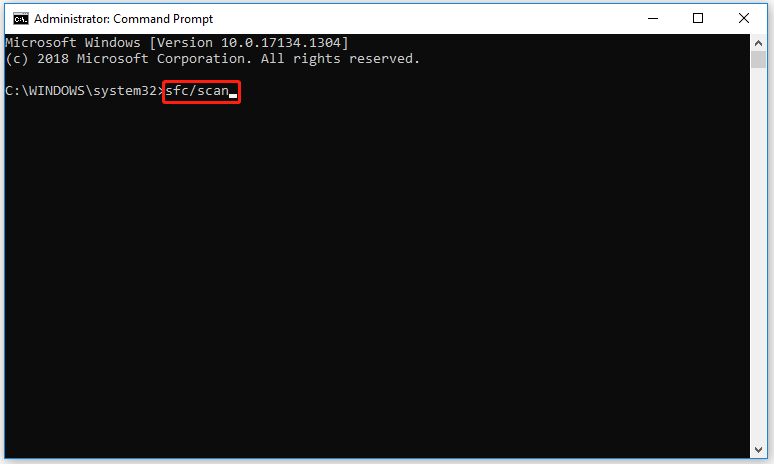
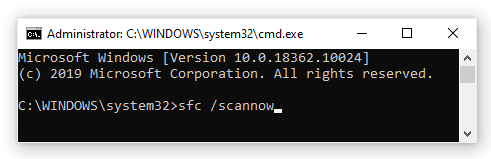
Step 1: Open the Command Prompt as an administrator.
Step 2: Type the following command, and then press Enter: sfc/scan.
If it doesn’t help, you may need to perform a DISM scan to restore system health. Open a command prompt with administrator privileges and enter the following command:
- DISM /Online /Cleanup-image /CheckHealth
- DISM /Online /Cleanup-image /RestoreHealth
Once done, check if the Windows Error Reporting (WerFault.exe) high CPU/Disk usage error gets fixed.
# 6. Perform Disk Cleanup
Junk that accumulates on your computer can cause problems with Werfault.exe. This is because the program associated with it responds slowly due to temporary junk files causing Werfault.exe to time out.
To clean up disk space, you can read this article: 9 Ways to Clean up Disk Space in Windows 10/11
One of the methods is to upgrade the disk with the help of MiniTool Partition Wizard. If you are interested in it, you can have a try.
MiniTool Partition Wizard DemoClick to Download100%Clean & Safe
About The Author
Position: Columnist
Vega joined MiniTool as an editor after graduation. She enjoys helping people with computer problems, including disk management, data recovery, and more. She is constantly expanding her knowledge in related fields. And she will continue to bring more easy-to-understand professional articles to help people solve various problems on the PC. In her daily life, Vega enjoys hanging out with friends, shopping online and listening to music. She is someone who knows how to enjoy life.
Rick Akura
Werfault.exe is a Windows Error Reporting process. In this guide, you will learn how to fix high CPU usage caused by Windows problem reporting.
Many Windows 10 users have been reporting that a problematic process called “Windows Problem Reporting” has been causing significant performance drops. This happens because the process is using up an unusually high amount of CPU, slowing your computer down.
The process is also referred to as Werfault.exe, which may sound alarming to some people. Sudden processes eating up your memory are no good — in this article, you can find out what this process exactly is, and how you can get rid of the issues caused by it.

Jump to:
- What is the Windows Problem Reporting (Werfault.exe) process?
- Common Windows Problem Reporting (Werfault.exe) errors
- Guide to fix Windows Problem Reporting (Werfault.exe) errors
- Method 1: Run the System File Checker
- Method 2: Use the Windows Memory Diagnostic tool
- Method 3: Perform a Disk Cleanup
- Method 4: Scan your computer for possible viruses and malware
- Method 5: Turn Windows Problem Reporting off
What is the Windows Problem Reporting (Werfault.exe) process?
Windows Error Reporting, also referred to as Werfault.exe, is a process that handles your error reports. Whenever one of your apps crashes or runs into an issue, you can report this to Microsoft and enhance their ability to fix the issue in a future update.
Under normal circumstances, this process is not a virus or malware. However, some advanced threats can disguise themselves as the Werfault.exe process, which requires attention. Below, you can find a guide on how to scan your PC for malware, eliminating the possibility of a fake Werfault.exe existing on your device.
Common Windows Problem Reporting (Werfault.exe) errors
Even if you have a completely legitimate Windows Problem Reporting (Werfault.exe) process running on your computer, it may still be causing issues for you. We were able to collect the most common problems related to the process, making it easier to trace its source.
- Unusually high CPU usage. Perhaps the most evident issue related to this process is its high CPU usage. When your CPU is under a lot of pressure, your computer will naturally start to function slower. This can get to a level where it’s hard to perform even the most basic tasks without waiting around for everything to load.
- Corrupted or missing system files or Registry keys. If your system files or Registry keys were damaged or deleted, you may start to experience issues with Windows Problem Reporting (Werfault.exe).
- Werfault.exe Application Error. There’s always the possibility of other errors occurring concerning Werfault.exe. These issues can make using certain apps and Windows features impossible.
- Werfault.exe has encountered a problem and needs to close. We are sorry for the inconvenience. This generic Windows 10 error message can pop up and signal that you can no longer use the Windows Problem Reporting tool.
Guide to fix Windows Problem Reporting (Werfault.exe) errors
Now that we’ve taken a closer look at what the Windows Problem Reporting (Werfault.exe) process exactly is, it’s time to look for solutions. Below are several methods you can use to restore order on your computer.
Note: For some of these methods, you’re required to log in to an administrator account on your device. This is because we’ll be making changes to your system in an attempt to restore damage or change settings.
Don’t have access to an administrator account? Watch GlobalIT Resolution’s video titled “How to Create a New Administrator User Account in Windows 10.”
Let’s get started!
Method 1: Run the System File Checker
The System File Checker is a tool available in Windows 10 by default. It’s also called an “SFC scan,” and it’s your quickest way to automatically fix corrupted system files and other issues.
Here’s how to run it.
-
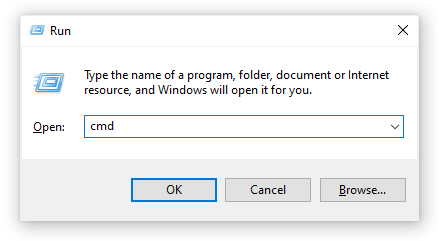
Press the Windows + R keys on your keyboard to launch the Run utility. Type in “cmd” and press Ctrl + Shift + Enter. This is going to open the Command Prompt with administrative permissions.

- If prompted, make sure to allow the Command Prompt to make changes on your device. This means that you might need an administrator account.
-
Type in the following command and press Enter: sfc /scannow.
- Wait for the System File Checker to finish scanning your computer. If it finds any errors, you’ll be able to fix them automatically through the SFC command itself, which may also fix related errors.
Method 2: Use the Windows Memory Diagnostic tool
You can attempt running the Windows Memory Diagnostic tool to solve issues related to the Windows Problem Reporting (Werfault.exe) process.
This isn’t the most reliable method, but some Windows 10 users have reported that the scan was able to identify the correct cause and offer the needed solution.
-
Use the search function (available from your taskbar or by pressing the Windows + S keys on your keyboard,) to search for Windows Memory Diagnostic.
-
Open the Windows Memory Diagnostic Tool from the search results.
-
Click on Restart now and check for problems (recommended). This will restart your computer right away, then scan it for memory issues. Make sure you save your files and don’t have anything important open before clicking on this.
- Wait for your computer to restart. During startup, you’ll see the Windows Memory Diagnostic tool scanning your PC. If any issue is found, the tool will automatically apply a fix.
- Use your computer to determine if you still experience issues with the Windows Problem Reporting (Werfault.exe) process.
Method 3: Perform a Disk Cleanup
There is a possibility that piled-up junk on your computer might cause issues with Werfault.exe. This is because the program associated with it responds slowly due to the temporary junk files, resulting in Werfault.exe timing out.
Tip: Not everything will be caught by the Disk Cleanup tool, but it can help remove most temporary files on your computer. For more thorough cleaning, we recommend using an application such as CCleaner after Disk Cleanup.
You can clear temporary files and junk from your computer with the Disk Cleanup utility. Follow the steps below to perform a cleaning:
-
Use the search function (available from your taskbar or by pressing the Windows + S keys on your keyboard,) to search for Disk Clean-up.
-
Open the Disk Clean-up utility from the matching search results.
-
If prompted, select the drive you want to clear and press OK. This should be the drive where Windows 10 is installed.
- Wait for the scan to complete. This might take a long time depending on the specs of your computer and the number of files you have.
- Select the type of files you want to delete under the “Files to delete” section. Here is a list of things we recommend cleaning to free up space:
- Windows Update Clean-up
- Temporary Internet Files
- Windows error reports and feedback diagnostics
- Delivery Optimization Files
- Device driver packages
- Recycle bin
- Temporary files
- Thumbnails
- Press OK and wait for the Disk Cleanup to finish. Once again, this might take a long time. Don’t turn your computer off during the process.
Method 4: Scan your computer for possible viruses and malware
We recommend checking for malware on your computer at least once every week. There is always a possibility that you clicked on a shady link or downloaded something containing malicious files. This might not be immediately obvious, and in the long run, may cause serious damage to your device and files.
If some type of malware got on your computer and tampered with Werfault.exe, it’s the reason why your errors happen.
You can use the integrated Windows Defender to combat this. It’s Windows 10’s default security solution that doesn’t cause issues and provides basic protection against most threats.
There’s also a great number of third-party antivirus software available for download, which often offers a lot more than Defender does. These applications often offer both free and paid services.
Method 5: Turn Windows Problem Reporting off
If none of the methods above seemed to fix your Werfault.exe issues, you can try disabling the Windows Error Reporting Service altogether. While this isn’t ideal, it’s most definitely going to fix your errors.
- Press and hold the Windows key on your keyboard, then hit R. This shortcut launches the Run utility.
-
Write “services.msc” in the input field, then click the OK button. Doing this will bring up a new window called Services.
-
Scroll down and locate the “Windows Error Reporting Service.”
- Right-click on “Windows Error Reporting Service” and choose “Properties”.
-
Change the Startup type to “Disabled”.
- Press the Apply button, then the OK button.
- Restart your computer. Your device will boot up without the Windows Problem Reporting service active.


We hope this article was able to help you understand what the Windows Problem Reporting (Werfault.exe) process is and how you can get rid of its issues. If you ever notice that the process is starting to eat up your CPU again, feel free to return to this article and try our methods again!
Are you interested in learning more about Windows 10? Do you need help fixing any other Windows 10 errors and issues? You can browse our dedicated blog section and find articles about everything related to Microsoft’s groundbreaking operating system. Check our guide about werfault.exe here.
If you’re looking for a software company you can trust for its integrity and honest business practices, look no further than SoftwareKeep. We are a Microsoft Certified Partner and a BBB Accredited Business that cares about bringing our customers a reliable, satisfying experience on the software products they need. We will be with you before, during, and after all the sales.
When we encounter high CPU and disk usage on our Windows computers, it often leads to performance issues. Windows Error Reporting Service, which generates reports of system errors and crashes, can sometimes be the culprit behind this excessive resource usage.

Upon noticing a significant slowdown, running the Task Manager might reveal that processes associated with Windows Error Reporting, like WerFault.exe, are consuming a large chunk of CPU and disk resources. Understanding the root causes and knowing how to address them can restore system performance.
Our experience tells us that routine system scans for malware are essential, as malicious software can trigger high resource usage by various system processes. It’s also wise to periodically check for driver updates or conflicting software, which might cause the Windows Error Reporting Service to act up.
Contents
- 1 Understanding Windows Error Reporting
- 2 Identifying Common Causes of High CPU and Disk Usage
- 2.1 Inspecting System Resources and Running Processes
- 2.2 Analyzing Resource-Intensive Applications
- 3 Practical Fixes and Optimizations
- 3.1 Utilizing Windows Tools for Performance Issues
- 3.2 Conducting Malware and Virus Scans
- 3.3 Adjusting System Settings and Services
- 4 Maintaining System Health and Preventing Future Issues
- 4.1 Performing Regular System Maintenance
- 4.2 Updating Drivers and Operating System
- 4.3 Optimizing Startup and Recovery Settings
Understanding Windows Error Reporting

Windows Error Reporting (WER) is a feature provided by Microsoft that collects post-error logs from the computer and sends them to Microsoft. These logs include information about the type of error, software related to the error, and other data regarding the error condition. The main executable associated with the Windows Error Reporting Service is werfault.exe. The service’s purpose is twofold: it allows users to send reports when problems occur and helps Microsoft to develop fixes and improvements.
Key Functions:
The WER service performs several key functions, including error detection, prompt display for report sending, and consent management for data submission. Moreover, it aims to collect user comments to gain a better understanding of the context in which bugs and errors occur.
The data collected through error reporting is crucial for developers to fix bugs and enhance user experience. However, in some cases, Windows Error Reporting can consume excessive system resources. When it does, it’s usually an indication that a certain app or system component is repeatedly crashing or encountering errors. High CPU and disk usage might be a symptom of deeper issues, such as a conflict with third-party software or the need for driver updates.
| Components of WER | Common Issues | Potential Solutions |
| werfault.exe | High CPU usage | Restart WER service |
| Problem Reports | High Disk usage | Perform malware scan |
| Logs | Recurring errors | Update drivers |
We must approach Windows problem reporting with a clear understanding that while it plays a crucial role in the maintenance and improvement of the OS, it can sometimes lead to system performance issues. Managing the service properly ensures our system remains informative and functional without compromising performance.
Identifying Common Causes of High CPU and Disk Usage
When our systems exhibit high CPU and disk usage, it often leads to sluggish performance. We’ll dissect the usual culprits and monitoring techniques to get to the root of the problem.
Inspecting System Resources and Running Processes
To start, let’s open Task Manager by pressing Ctrl + Shift + Esc. Here, we observe overall CPU and disk usage in real-time. High CPU usage could be a sign that a particular process or application is demanding too much of our CPU’s processing power. Similarly, 100% disk usage indicates a bottleneck at the storage end. It’s essential to check for any abnormal activity like a system file consuming excessive resources.
Under the “Processes” tab, we look for telltale signs of stress, such as background processes that shouldn’t be running or a Windows search index working overtime. Monitoring the “Performance” tab will give us insights into real-time resource usage over time.
Analyzing Resource-Intensive Applications
Identifying resource-hungry applications is next. We can pinpoint them in Task Manager, where they’re often highlighted due to excessive resource consumption. These applications might include heavy-duty games, video editing software, or even multiple browser tabs. It’s not uncommon for certain apps to run in the background without our knowledge, so it’s vital to check for apps running in the background that could be sapping CPU and disk resources unnecessarily.
| Process Name | CPU Usage | Disk Usage |
| ExampleApp.exe | 45% | 200MB/s |
| Browser | 15% | 50MB/s |
| System | 5% | 0MB/s |
By monitoring and managing these applications, we ensure they don’t bog down our system’s performance. Regular malware scans are crucial, as malware can cause high CPU/disk usage. If suspicious activities are detected, an immediate virus scan is imperative to safeguard our system and keep it running smoothly. Services unessential to startup can be disabled through “services.msc” to keep the system lean at boot.
Practical Fixes and Optimizations
In this section, we’ll guide you through precise and actionable steps to resolve high CPU and disk usage caused by Windows Error Reporting and related system issues.
Utilizing Windows Tools for Performance Issues
Windows provides several built-in tools for diagnosing and fixing performance issues. To address system file corruption that might be bogging down your system, initiate a System File Checker (SFC) scan. Open Command Prompt as an administrator and execute sfc /scannow. Afterward, follow up with a Deployment Image Servicing and Management (DISM) scan using dism /online /cleanup-image /restorehealth command. These scans will repair system files and bolster system integrity.
To address memory issues that could be causing system crashes or slowdowns, run the Windows Memory Diagnostic tool. Open it by typing ‘Windows Memory Diagnostic’ into the Start menu, then select ‘Restart now and check for problems.’ If RAM issues are detected, a memory replacement may be necessary.
Disk Cleanup is another critical utility. Access it by right-clicking your main drive, choosing ‘Properties,’ and hitting ‘Disk Cleanup.’ Remove temporary files, system files, and other unnecessary items to free up space and possibly improve performance.
Conducting Malware and Virus Scans
Viruses and malware can consume precious CPU and disk resources, leading to noticeable slowdowns. It’s essential to routinely run scans using your antivirus software. We recommend Windows Defender for a solid defense against threats as it’s already integrated into the Windows platform. Perform a full virus scan by going to ‘Virus & threat protection’ under Windows Security settings and selecting ‘Scan options.’ Choose ‘Full scan’ and click ‘Scan now’ to commence a comprehensive malware hunt.
Adjusting System Settings and Services
Certain Windows services and settings can cause increased CPU and disk usage when left in their default state. For example, disabling Superfetch (renamed to SysMain in newer versions of Windows) can reduce disk usage, as it’s a service designed to pre-load frequently used applications into RAM, but sometimes it does the opposite by causing more strain. Go to services.msc, find ‘SysMain’, right-click, select ‘Properties’, change ‘Startup type’ to ‘Disabled’, and click ‘Stop’ to disable it.
For background applications consuming resources unnecessarily, adjust your system for best performance in System Properties under the Performance section. Additionally, check for pending Windows Updates as keeping your system updated can fix known bugs and performance issues. Open ‘Settings’, go to ‘Update & Security’, and check for updates.
Ensure these optimizations are performed with care to avoid any unintended consequences to system stability and security.
Maintaining System Health and Preventing Future Issues
In our quest to uphold optimal system performance, it’s crucial for us to engage regularly in comprehensive system maintenance, ensure our drivers and OS are up-to-date, and fine-tune our startup and recovery configurations.
Performing Regular System Maintenance
Regular system maintenance is essential to prevent high CPU and disk usage issues before they arise. We recommend performing a Disk Cleanup weekly to remove temporary files, system files, and other junk files that can accumulate over time. Maintaining the integrity of system files is also critical; running utilities like System File Checker (SFC) and Deployment Image Servicing and Management (DISM) can detect and repair any corrupted system files.
Disk Cleanup Steps:
– Access the Disk Cleanup tool through the Start menu search.
– Select the drive you wish to clean.
– Check the categories you want to delete and click OK.
Updating Drivers and Operating System
Drivers are the essential links between your system’s hardware and software. Outdated drivers can cause crashes and high CPU utilization. We utilize reputable driver updater tools or Microsoft’s own Windows Update service to keep drivers current. Ensuring that our Windows 10 or Windows 11 operating systems are updated is just as critical. The latest updates often include performance improvements and bug fixes that keep our system running smoothly.
Optimizing Startup and Recovery Settings
To optimize system startup and recovery, we manage which apps run at startup. This management is carried out via the Task Manager where we can easily disable unneeded apps. We also navigate to the Services console (services.msc) to adjust the startup type of various services. For example, if certain services are not needed, we can set them to Disabled. For those that are essential but could be contributing to high resource usage, we might opt to set them to run manually. Reducing the number of active background processes will invariably lead to improved system performance.
By focusing on these three areas, we can ensure a more resilient and efficient system, minimizing disruptions before they affect our productivity.
Are you experiencing slow performance on your computer? You might be surprised to learn that Windows Problem Reporting could be the cause. When this feature consumes a high amount of CPU resources, it can significantly impact the speed and responsiveness of your system. But don’t worry, there are ways to address this issue and improve your computer’s performance.
Windows Problem Reporting is a built-in feature in Windows operating systems that allows users to report any issues or errors they encounter. It collects data about software crashes and performance problems to help Microsoft analyze and fix them. However, when this feature becomes overwhelmed or misbehaves, it can result in excessive CPU usage, leading to sluggishness and delays in your system’s operation.
If you’re experiencing Windows Problem Reporting using high CPU, you’re not alone. This issue can be caused by several factors, including software conflicts, corrupt system files, or incompatible hardware drivers. To resolve it, start by updating your Windows operating system and all device drivers. Next, perform a full system scan for malware and viruses. If the problem persists, try disabling the Windows Error Reporting service or adjusting the reporting settings. If all else fails, seek professional assistance or contact Microsoft support for further troubleshooting.

Understanding Windows Problem Reporting
Windows Problem Reporting is a feature in the Windows operating system that collects and sends error reports to Microsoft, allowing them to analyze and fix issues. These error reports help Microsoft identify software and hardware problems that users encounter and continuously improve the performance and reliability of Windows. However, some users have reported experiencing high CPU usage due to the Windows Problem Reporting process.
What Causes High CPU Usage in Windows Problem Reporting?
There can be several reasons behind the high CPU usage related to Windows Problem Reporting:
- Software Conflicts: Conflicts between different software applications running on your computer can cause the Windows Problem Reporting process to consume excessive CPU resources.
- Corrupted System Files: If certain system files essential for the functioning of Windows Problem Reporting get corrupted, it can lead to high CPU usage.
- Malware Infection: Malicious software or viruses that infect your system can interfere with various processes, including Windows Problem Reporting, leading to increased CPU usage.
- Outdated Drivers: Outdated or incompatible device drivers can sometimes cause conflicts with Windows Problem Reporting, resulting in high CPU usage.
Impact of High CPU Usage in Windows Problem Reporting
Excessive CPU usage by Windows Problem Reporting can have several negative impacts on your computer’s performance and user experience:
- Sluggish System Performance: When the CPU is overloaded with the Windows Problem Reporting process, it can slow down other tasks, making your computer run slowly and affecting overall performance.
- Increased Power Consumption: High CPU usage generates excess heat, causing your computer’s fans to work harder, resulting in increased power consumption and potentially shorter battery life on laptops.
- Unresponsive Applications: If the CPU is busy dealing with the high CPU usage caused by Windows Problem Reporting, it can make other applications unresponsive or freeze temporarily.
- Potential Data Loss: In extreme cases, where the CPU is pushed to its limits due to high CPU usage, there is a risk of data loss or system crashes if the problem is not addressed promptly.
How to Identify High CPU Usage by Windows Problem Reporting?
If you suspect that Windows Problem Reporting is causing high CPU usage on your computer, you can follow these steps to identify and confirm the issue:
- Open the Task Manager by right-clicking on the taskbar and selecting «Task Manager» from the menu.
- Select the «Processes» or «Details» tab, depending on your Windows version.
- Look for the process named «Werfault.exe» or «Windows Problem Reporting» in the list of active processes.
- If the CPU usage of this process is consistently high (above 50% or more), it indicates a potential problem.
Once you have confirmed that Windows Problem Reporting is causing high CPU usage, you can take appropriate measures to resolve the issue.
Methods to Fix High CPU Usage by Windows Problem Reporting
Here are some effective methods you can try to fix the problem of high CPU usage caused by Windows Problem Reporting:
1. Update Windows and Drivers
Make sure your Windows operating system is up to date, as Microsoft frequently releases updates that address performance issues and bugs. Similarly, update your device drivers by visiting the manufacturer’s website and downloading the latest versions compatible with your hardware.
Updating both Windows and drivers can resolve compatibility issues and improve system stability, potentially resolving the high CPU usage problem.
2. Perform a Full System Scan
Scan your computer for malware using a reputable antivirus or antimalware software. Malicious programs can interfere with various system processes, including Windows Problem Reporting, leading to high CPU usage. Remove any detected threats and perform a full system scan regularly to prevent future infections.
3. Disable Windows Error Reporting
If you find that the high CPU usage caused by Windows Problem Reporting persists, you can try disabling the Windows Error Reporting feature:
- Open the Control Panel and navigate to «System and Security.»
- Select «Action Center» and then click on «Change Action Center settings» in the left sidebar.
- Click on «Problem reporting settings» and choose «Never check for solutions» option.
- Click «OK» to save the changes.
Seek Expert Assistance
If you have tried the above methods and are still experiencing high CPU usage due to Windows Problem Reporting, it is recommended to seek assistance from a professional. An expert can perform in-depth analysis and troubleshooting to identify and resolve the underlying cause of the issue.
Remember that high CPU usage can have multiple causes, and it’s important to rule out other potential factors before concluding that Windows Problem Reporting is solely responsible for the issue.
Exploring Other Factors Related to Windows Problem Reporting High CPU
In addition to the causes and solutions mentioned earlier, there can be other factors related to Windows Problem Reporting that can contribute to high CPU usage. These factors include:
Windows Problem Reporting Service Settings
The settings of the Windows Problem Reporting service can impact its behavior and resource usage. By modifying these settings, you can potentially mitigate high CPU usage:
- Reduce the frequency of error reporting: Decreasing the frequency of error reports sent to Microsoft can help reduce the strain on CPU resources.
- Limit the number of error reports: Instead of allowing an unlimited number of reports to be sent, consider setting a limit to prevent excessive resource usage.
Application Compatibility Telemetry
Application Compatibility Telemetry is another Windows feature that collects data to improve application compatibility. However, this feature can also contribute to high CPU usage. To address this, you can:
- Disable Application Compatibility Telemetry: You can disable the Application Compatibility Telemetry feature if you find it causing high CPU usage. This can be done through the Group Policy Editor or Registry Editor.
Configuration Changes
Certain configuration changes and optimizations can help reduce the impact of Windows Problem Reporting on CPU usage:
- Adjust the reporting mode: You can change the reporting mode for Windows Problem Reporting to «Queued» or «Disabled» to minimize CPU usage.
- Disable automatic solution retrieval: Disabling the automatic retrieval of solutions for reported errors can reduce the CPU load caused by Windows Problem Reporting.
Remember to exercise caution when making changes to system settings and consult the appropriate documentation or seek expert guidance if needed.
In conclusion, high CPU usage caused by Windows Problem Reporting can impact system performance and user experience. By understanding the underlying causes and implementing the appropriate solutions or optimizations, you can alleviate this issue and ensure smoother operation of your Windows system.
Windows Problem Reporting High CPU
Windows Problem Reporting is a feature of the Windows operating system that collects and sends information about system errors, crashes, and other issues to Microsoft. However, sometimes this process can consume a significant amount of CPU resources, causing your computer to slow down.
If you are experiencing high CPU usage due to Windows Problem Reporting, there are a few steps you can take to resolve the issue:
- Update your Windows operating system to the latest version. Microsoft often releases updates and patches that address performance issues.
- Disable Windows Problem Reporting temporarily. This can be done by going to the Control Panel, clicking on System and Security, and selecting «Action Center». From there, click on «Change Action Center settings» and uncheck the option for «Problem reporting».
- Scan your computer for malware. Malicious software can sometimes cause high CPU usage. Use a reliable antivirus program to scan your system.
If these steps do not resolve the issue, it is recommended to seek professional assistance from an IT technician or contact Microsoft support for further guidance.
Key Takeaways
- Windows Problem Reporting can cause high CPU usage on your computer.
- Windows Problem Reporting is a built-in Windows feature that collects and sends error reports to Microsoft.
- High CPU usage from Windows Problem Reporting can slow down your computer and affect its performance.
- You can check if Windows Problem Reporting is causing high CPU usage through Task Manager.
- To fix high CPU usage from Windows Problem Reporting, you can disable error reporting or limit its impact.
Frequently Asked Questions
If you’re experiencing high CPU usage due to Windows Problem Reporting, you may have questions on how to resolve this issue. Here are some commonly asked questions related to Windows Problem Reporting and high CPU usage.
1. Why is Windows Problem Reporting causing high CPU usage?
Windows Problem Reporting is a feature in Windows that collects and submits information about system errors and crashes to Microsoft. When this feature is enabled and encounters errors, it can sometimes lead to high CPU usage as it processes and submits the error reports. The high CPU usage is often temporary and should subside once the error reports are submitted.
If you notice consistent high CPU usage due to Windows Problem Reporting, it may indicate a larger issue with your system or specific application errors. In such cases, troubleshooting steps may be required to resolve the underlying problem.
2. How can I reduce the high CPU usage caused by Windows Problem Reporting?
To reduce high CPU usage caused by Windows Problem Reporting, you can try the following steps:
1. Disable Windows Problem Reporting: Go to the Control Panel > Action Center > Change Action Center settings. Under the «Maintenance» section, uncheck the box next to «Check for solutions to problem reports.» This will prevent Windows Problem Reporting from collecting and processing error reports, reducing CPU usage.
2. Limit the number of error reports: You can configure Windows Problem Reporting to collect and submit error reports only for specific programs or opt to send them only when connected to an external network. This can help reduce the load on your CPU.
3. Disable error reporting for specific applications: If you notice high CPU usage specifically related to certain applications, you can disable error reporting for those applications. This will prevent Windows Problem Reporting from collecting and processing error reports for those specific programs.
4. Update your system and applications: Outdated software can sometimes lead to compatibility issues and errors that trigger high CPU usage. Make sure your operating system and applications are up to date to avoid such problems.
5. Run a malware scan: Malware infections can also cause high CPU usage. Use a reliable antivirus software to scan your system and remove any potential threats that may be contributing to the issue.
3. Can I completely disable Windows Problem Reporting?
Yes, it is possible to completely disable Windows Problem Reporting. However, keep in mind that by disabling this feature, you will not be able to submit error reports to Microsoft or receive recommended solutions for system errors. To disable Windows Problem Reporting:
1. Go to the Control Panel > Action Center > Change Action Center settings.
2. Under the «Maintenance» section, uncheck the box next to «Check for solutions to problem reports.»
Disabling Windows Problem Reporting may be suitable for users who prefer to handle troubleshooting and error resolution themselves or have alternative methods to collect and analyze error data.
4. Is there a way to limit the CPU usage of Windows Problem Reporting?
Windows Problem Reporting does not have built-in settings to limit its CPU usage directly. However, you can indirectly limit its impact on CPU usage by following the steps mentioned in question 2, such as disabling it or limiting error reports for specific programs or network connections.
If you are experiencing persistent high CPU usage due to Windows Problem Reporting, it is recommended to investigate further to identify the underlying cause. It may be necessary to troubleshoot other system components or applications that are contributing to the problem.
5. Are there any alternative error reporting tools I can use instead of Windows Problem Reporting?
Yes, there are alternative error reporting tools available that can be used instead of Windows Problem Reporting. Some popular options include:
— Third-party crash reporting software: These tools provide enhanced error reporting capabilities and allow you to customize the reporting process.
— Application-specific error reporting: Many applications have their own error reporting mechanisms built-in. These tools can provide specific information about application-related errors and crashes.
In summary, the Windows Problem Reporting process can sometimes consume a high amount of CPU resources on your computer. This can impact the performance of your system and may cause it to slow down or freeze. To address this issue, you can try disabling the Windows Error Reporting service or adjust its settings to minimize the impact on your CPU. Additionally, regularly updating your Windows operating system and keeping your drivers up to date can help prevent any compatibility issues that may contribute to the high CPU usage.
If you continue to experience high CPU usage from Windows Problem Reporting, it may be helpful to scan your system for malware or perform a clean boot to identify any conflicting applications. Remember to always exercise caution when modifying system settings or installing third-party software, as these actions can have unintended consequences and pose security risks. It’s always a good idea to consult with a professional if you are unsure about any adjustments you need to make to resolve the issue. By taking these steps, you can optimize your CPU usage and maintain the performance of your Windows computer.
Windows Error Reporting (werfault.exe) is a system process that comes into play when an app or program crashes. It indicates Windows 10 is looking for a solution to fix the problem. But many users complained this process may sometimes cause high CPU and disk usage issues.
Contents
- 1 How to Fix High Werfault.exe CPU and Disk Usage
- 1.1 Restart or Disable Windows Error Reporting
- 1.2 Update Your Drivers
- 1.3 Scan Your System for Malware
- 1.4 Close Background Apps
- 1.5 Run SFC and DISM
- 1.6 Conclusion
How to Fix High Werfault.exe CPU and Disk Usage
Restart or Disable Windows Error Reporting
Check if restarting or disabling the service solves this problem.
- Type services.msc in the Windows Search bar and hit Enter.
- In the new Services window, right-click on Windows Error Reporting.
- Select Stop, wait a few seconds, and then restart the service.

- Alternatively, you can also disable the service. Double-click on Windows Error Reporting, and under Startup type, select Disable. Save the changes.
Update Your Drivers
Outdated drivers may cause all sorts of issues on your computer. It werfault.exe has trouble retrieving driver-related error information, this may result in high CPU and disk usage. Update or reinstall your drivers and check the results.
Launch the Device Manager and right-click on the drivers that have a yellow mark next to them. Select Update driver. If the issue persists, uninstall the problematic drivers and restart your computer.
Alternatively, you can also use a driver updater to get the job done.
Scan Your System for Malware
Malware infections often cause programs and processes to use more CPU power than usual. Use your antivirus to run an in-depth malware scan. Restart your computer and check if the issue persists.
Close Background Apps
Check if other programs running in the background are interfering with the Windows Error Reporting tool. Launch the Task Manager, click on the Processes tab and close any unnecessary apps.
Alternatively, you can also clean boot your computer.
Run SFC and DISM
Disk errors and corrupted system files may also cause high CPU and disk usage issues.
- Go to This PC, right-click on your drive, and select Properties.
- Go to the General tab and run Disk Cleanup.
- Then click on the Tools tab and hit the Error checking button.
- Launch Command Prompt with admin rights.
- Run the following commands one by one:
- sfc /scannow
- dism /online /cleanup-image /CheckHealth
- dism /online /cleanup-image /restorehealth
- Restart your computer.
Conclusion
To fix Windows Error Reporting high CPU and disk usage issues, scan your main drive for errors and update your drivers. If the issue persists, restart the Windows Error Reporting service and run an in-depth antimalware scan. Which of these solutions worked for you? Let us know in the comments below.