
Как вариант, такой костыль встроенными средствами Windows 10 можно сделать так.
- Нажимаете комбинацию клавиш WIN + SHIFT + S
- Экран затемняется и появляется панелька инструментов в верху экрана.
- Выбираем иконку «Оконный режим» (обычно в середине)
- Выбираем окно, которое нужно заскринить.
- Нажимаем WIN + A , чтобы октрыть панель уведомлений (выезжает справа)
- Кликаем по нашему эскизу.
- После клика по эскизу файл картинки скриншота сохранится автоматически по адресу:
%LOCALAPPDATA%\Packages\Microsoft.ScreenSketch_8wekyb3d8bbwe\TempStateЧтобы быстро получать доступ к пути каталога со скриншотами добавьте ярлык, например: на Рабочий стол
Второй вариант, включить комбинацию WIN + ALT + PrintScreen. Для этого ваша видеокарта должна быть совместима (а возможно и нет) со встроенной в Windows 10 Игровой панелью.
Игровая панель находится в (WIN + I) Параметрах Windows 10 \ Игры. Необходимо включить режим XBox Game Bar. Теперь нажмите WIN + ALT + PrnScreen , файлы скриншота активного окна будут сохранятся по адресу:
C:\Users\%username%\Videos\Captures
Windows 10 can capture your entire screen with the Win+PrintScreen keyboard shortcut. The screenshots are saved to a folder named Screenshots in the Pictures library. Compared to Apple and macOS, this feature has been super late to arrive on Windows and it’s still seemingly basic. You cannot screenshot just one screen, or screenshot the active window this way. That said, there is a way to natively screenshot the active window; Alt+PrintScreen.
The process is pretty simple; set up your screen so that the window that you want to screenshot is the active one. Tap Alt+PrintScreen.
Unlike the Win+PrintScreen shortcut, the Alt+PrintScreen shortcut won’t automatically save the image as a file.
You can use Paint to save the image. Open Paint and click the Paste button or use the Ctrl+V keyboard shortcut to paste the image from the clipboard to Paint. Save it.
You can do that, or you can use an app called Paste into file. It can save an image from the clipboard to a file. You can choose which format to save the file to.
Windows 10 doesn’t lack a screenshot tool. In fact, older versions of it did have one called the Snipping tool. The only problem is that this tool is a separate app which needs to be launched before it can be used to capture screenshots. Taking screenshots, without the Win+PrintScreen shortcut, is tedious and few people knew about the Snipping tool back when Windows 7 was still supported.
Windows 10 has replaced the Snipping tool with Snip & Sketch. It still doesn’t measure up to macOS but it is slowly improving. Unfortunately, it is a step back from the Snipping Tool and lots of users are interested in getting it back. Microsoft is working on improving it. In the next major build for Windows 10, it will allow you to select the format that you save the image to.
Until the screenshot tool improves substantially on Windows 10, users have a long list of screenshot apps to pick from. They range from free apps like Greenshot, a personal favorite, to premium ones like Snagit.
Compared to macOS, Windows works much better with multiple displays. Even the most popular screenshot tools for Windows do not work that well with multiple displays so it’s not like Microsoft is adding useless features that other apps can compensate for. Most users end up buying tools just so they can take HD screenshots which is a default feature on macOS.

Fatima Wahab
Fatima has been writing for AddictiveTips for six years. She began as a junior writer and has been working as the Editor in Chief since 2014.
Fatima gets an adrenaline rush from figuring out how technology works, and how to manipulate it. A well-designed app, something that solves a common everyday problem and looks
Sign in to your MUO account
Taking a screenshot on your Windows PC is sometimes necessary, but snapping an image of just a window is more complicated than it seems. You want to capture what you’re working on but none of your important, confidential, or sensitive information, especially if you will be sharing it with the world. Luckily, there is a simple solution.
Here’s how to take a screenshot of just the open window you’re working on.
How the PrintScreen Function Works
When you press the PrtScr button on your computer, your entire screen as it appears to you, minus a few things (such as the mouse pointer), is copied to the clipboard. You then have to paste this clipboard data into an image processing program – Microsoft Paint, Adobe Photoshop, and the like – before saving it as an image file.
You could shorten this process and have Windows create an image file for you. Do this by holding down the Windows button while pressing the PrtScr button on your keyboard. This image will be saved in PNG format, and by default will be located at the following address:
C:\Users\[Current_User]\Pictures\Screenshots
Here, [Current_User] is a placeholder for the name of your Windows User profile.
If you want a screenshot of just the active window, you’ll have to edit this image and crop out the parts you don’t want. However, you can simplify the process even further.
How to Take a Screenshot of Only the Active Window on Windows
Taking a screenshot of just the open window is actually quite easy: just hold down the Alt key on your keyboard when you press PrtScr. This will add an active window screenshot to the clipboard, which you can paste elsewhere.
Windows, by itself, doesn’t have a way to save active window screenshots when you take them. However, you can use the Xbox Game Bar to do this instead. It should be on your Windows PC by default, but if it’s not, you can download it from the Microsoft Apps store.
Once it’s on your PC, press Win + Alt + PrtScr to immediately save a screenshot of the active window to your computer. Because we’re using the Xbox Game Bar instead of Windows’ default tools, your screenshot will appear in a different location than normal:
C:\Users\[Current_User]\Videos\Captures
Don’t be fooled; despite the fact that we’re taking screenshots, the Xbox Game Bar puts the images in the Videos folder instead.
If you don’t want to use hotkeys to take your screenshot, you can use the Windows Snipping Tool instead. You’ll have to manually select the window you want to capture, but it gives you a lot more control over the final result.
And if that’s not up to scratch, the best screenshot apps for Windows give you even more power over your screenshots and how you take them. This includes taking active window screenshots quickly and easily.
A Simple Way to Improve Your Productivity
Windows 10 has many less well-known features that can make your life easier. Now you know how to take a screenshot of the active window without needing to crop it in an image editor.
Windows 11 makes capturing your screen easier than ever. Get to know these screenshot taking methods and save important information to your PC in a moment’s notice.
How to screen snip on Windows 11
Using the Snipping Tool is one of the easiest ways to take a screenshot. If you’ve taken screenshots using Windows before, you’re probably familiar with the Snipping Tool. This version of the tool combines the original Snipping Tool with the Snip & Sketch Tool. Follow these instructions to open the Snipping Tool and get started:
- Press Windows logo key+Shift+S to open the Snipping Tool directly.
- After entering the keyboard shortcut, you’ll see a box at the top of your computer.
- Choose between the following screenshot options: (from left to right) rectangular selection, freehand selection, window, or full-screen capture.
- Pick the rectangular selection or use freehand selection to highlight a designated screenshot area for an active window or your full screen.
- Look for a thumbnail image of your selection at the lower-right-hand corner of your screen after capturing your screenshot.
- The Snipping Tool copies your screenshot directly to your clipboard, so you can paste (CTRL+V) your image into another app if needed.
How do I edit with the Snipping Tool?
Personalize your screenshot with the Snipping Tool’s user-friendly interface. Simply open the thumbnail at the bottom of your screen and select from the variety of tools available. Highlight, crop, color, and write on your screenshot using various shapes and fonts. If you’re working with a touchscreen, draw on your screenshot directly using your finger or a stylus. When you’re done, you can:
- Save your screenshot and any edits by selecting the floppy disk icon.
- Send your image to friends, family, or colleagues using the share option.
- Print your image.
- Open your image in another app via the menu options.
How to take a screenshot using the Print Screen key
Take a screenshot the old-fashioned way with the Print Screen key. The Print Screen key is at the top-right corner of most keyboards, and usually says Print Screen, PrtSc, PrtScn, or PrntScrn.
How to capture your working screen
Capture a screenshot from an active window, or the window you’re currently working in, by following these steps:
- Select the window you want to screenshot.
- Press ALT+Print Screen.
- Paste (CTRL+V) into an Office program or app of your choice.

How to capture your entire screen
Follow these steps to copy the entire image on your screen:
- Position everything you want to copy to your liking.
- Press Print Screen.
- Paste (CTRL+V) into an Office program or app of your choice.
How to save your screenshot as an image file
Take these steps to save your screenshot directly to your desktop as an image file in Windows 11:
- Press Windows+Print Screen.
- Find your screenshot in a PNG format by navigating to Pictures > Screenshots in your directory.
Looking for the perfect Windows 11 device? Explore all our Windows computers to find the best option for you.
There are so many reasons you might need to capture a screenshot in Windows 11 or Windows 10. You might need to show a coworker how to use your company’s software. You might want to capture an excerpt from a webpage, highlight the relevant portion and share it on social media. Or maybe you have an image stuck in one of your programs and can’t export it any other way.
Whatever your reason, there are lots of ways to take screenshots in Windows 11 or 10 and which method you choose depends on what you need to capture and how you intend to share it. Below, we’ll show you how to capture Windows screenshots that grab the whole desktop, a single window or a custom area of it. We’ll show you how to grab entire web pages that don’t fit on the screen and frames from YouTube videos. If you need to capture video, see our tutorial on how to screen record in Windows. All of the methods below have been tested and verified as of March 2025.
Capture Windows Screenshots with Keyboard Shortcuts
Here’s a quick list of keyboard shortcuts for screen capture that are built into Windows 11 and 10.
Swipe to scroll horizontally
|
Key |
Action |
Header Cell — Column 2 |
|---|---|---|
|
Print Screen |
Capture full screen to clipboard. |
Row 0 — Cell 2 |
|
Windows Key + Print Screen |
Save Full-screen PNG file to Pictures folder |
Row 1 — Cell 2 |
|
Alt + Print Screen |
Capture current window to clicpboard |
Row 2 — Cell 2 |
|
Windows Key + Shift + S |
Launch snipping tool |
Row 3 — Cell 2 |
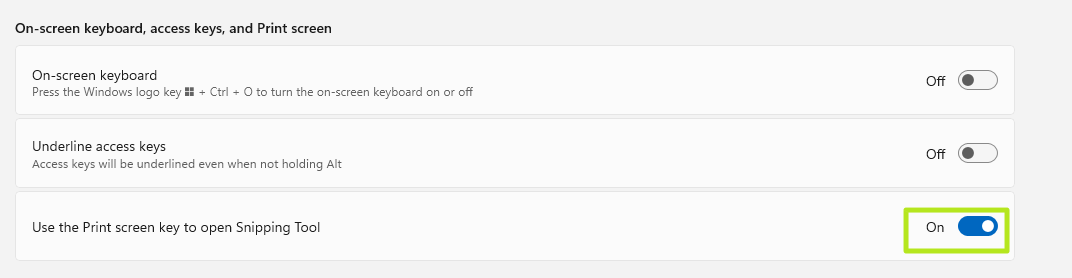
In recent builds of Windows 11, you can set the Print Screen key to launch the snipping tool directly by toggling a switch in Settings->Accessibility->Keyboard.
Print Screen Key Captures Screenshots to Clipboard
The easiest way to take a screenshot in Windows 11 or Windows 10 is to just hit the Print Screen key (sometimes abbreviated as PrtSc or Print Scrn) and your entire desktop will be copied to your clipboard. While easy, the Print Screen method is a little clunky. Also, not every keyboard has a Print Screen key.
If you have multiple monitors, you’ll grab all the desktops in one huge image and, if you want to save your image as a file, you’ll still need to paste it into an image editor such as Microsoft Paint, GIMP or Photoshop.

Windows Key + Print Screen Saves a File
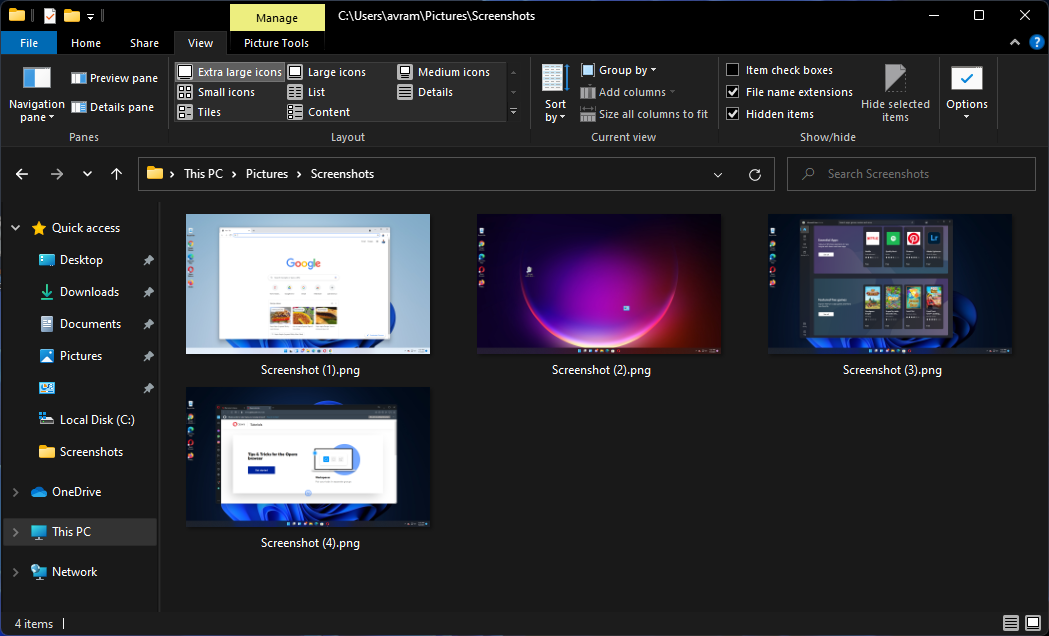
If you just want to take a screenshot of your entire screen and save it as a file, the easiest way is hitting Windows Key + Print Screen. Your entire desktop will darken for a second to show that the screenshot has been captured, and a new PNG file will be saved to the Pictures/Screenshots folder. Each file will be given the name Screenshot (#).png where # is replaced by 1, 2, 3, etc.
Get Tom’s Hardware’s best news and in-depth reviews, straight to your inbox.
Alt + Print Screen Captures Active Window to Clipboard
More often than not, you don’t want to screenshot your entire desktop, just the relevant program you’re using. If you hit Alt + PrtScr, Windows 10 or 11 will capture just the active window and copy it to your clipboard.
It’s important to note that this only screenshots an active window, not an entire app if the app has more than one window. So, for example, if your program has a pop-up menu that appears in a child window, it will only capture the child window, not the parent behind it.
Snipping Tool Captures Regions in Windows
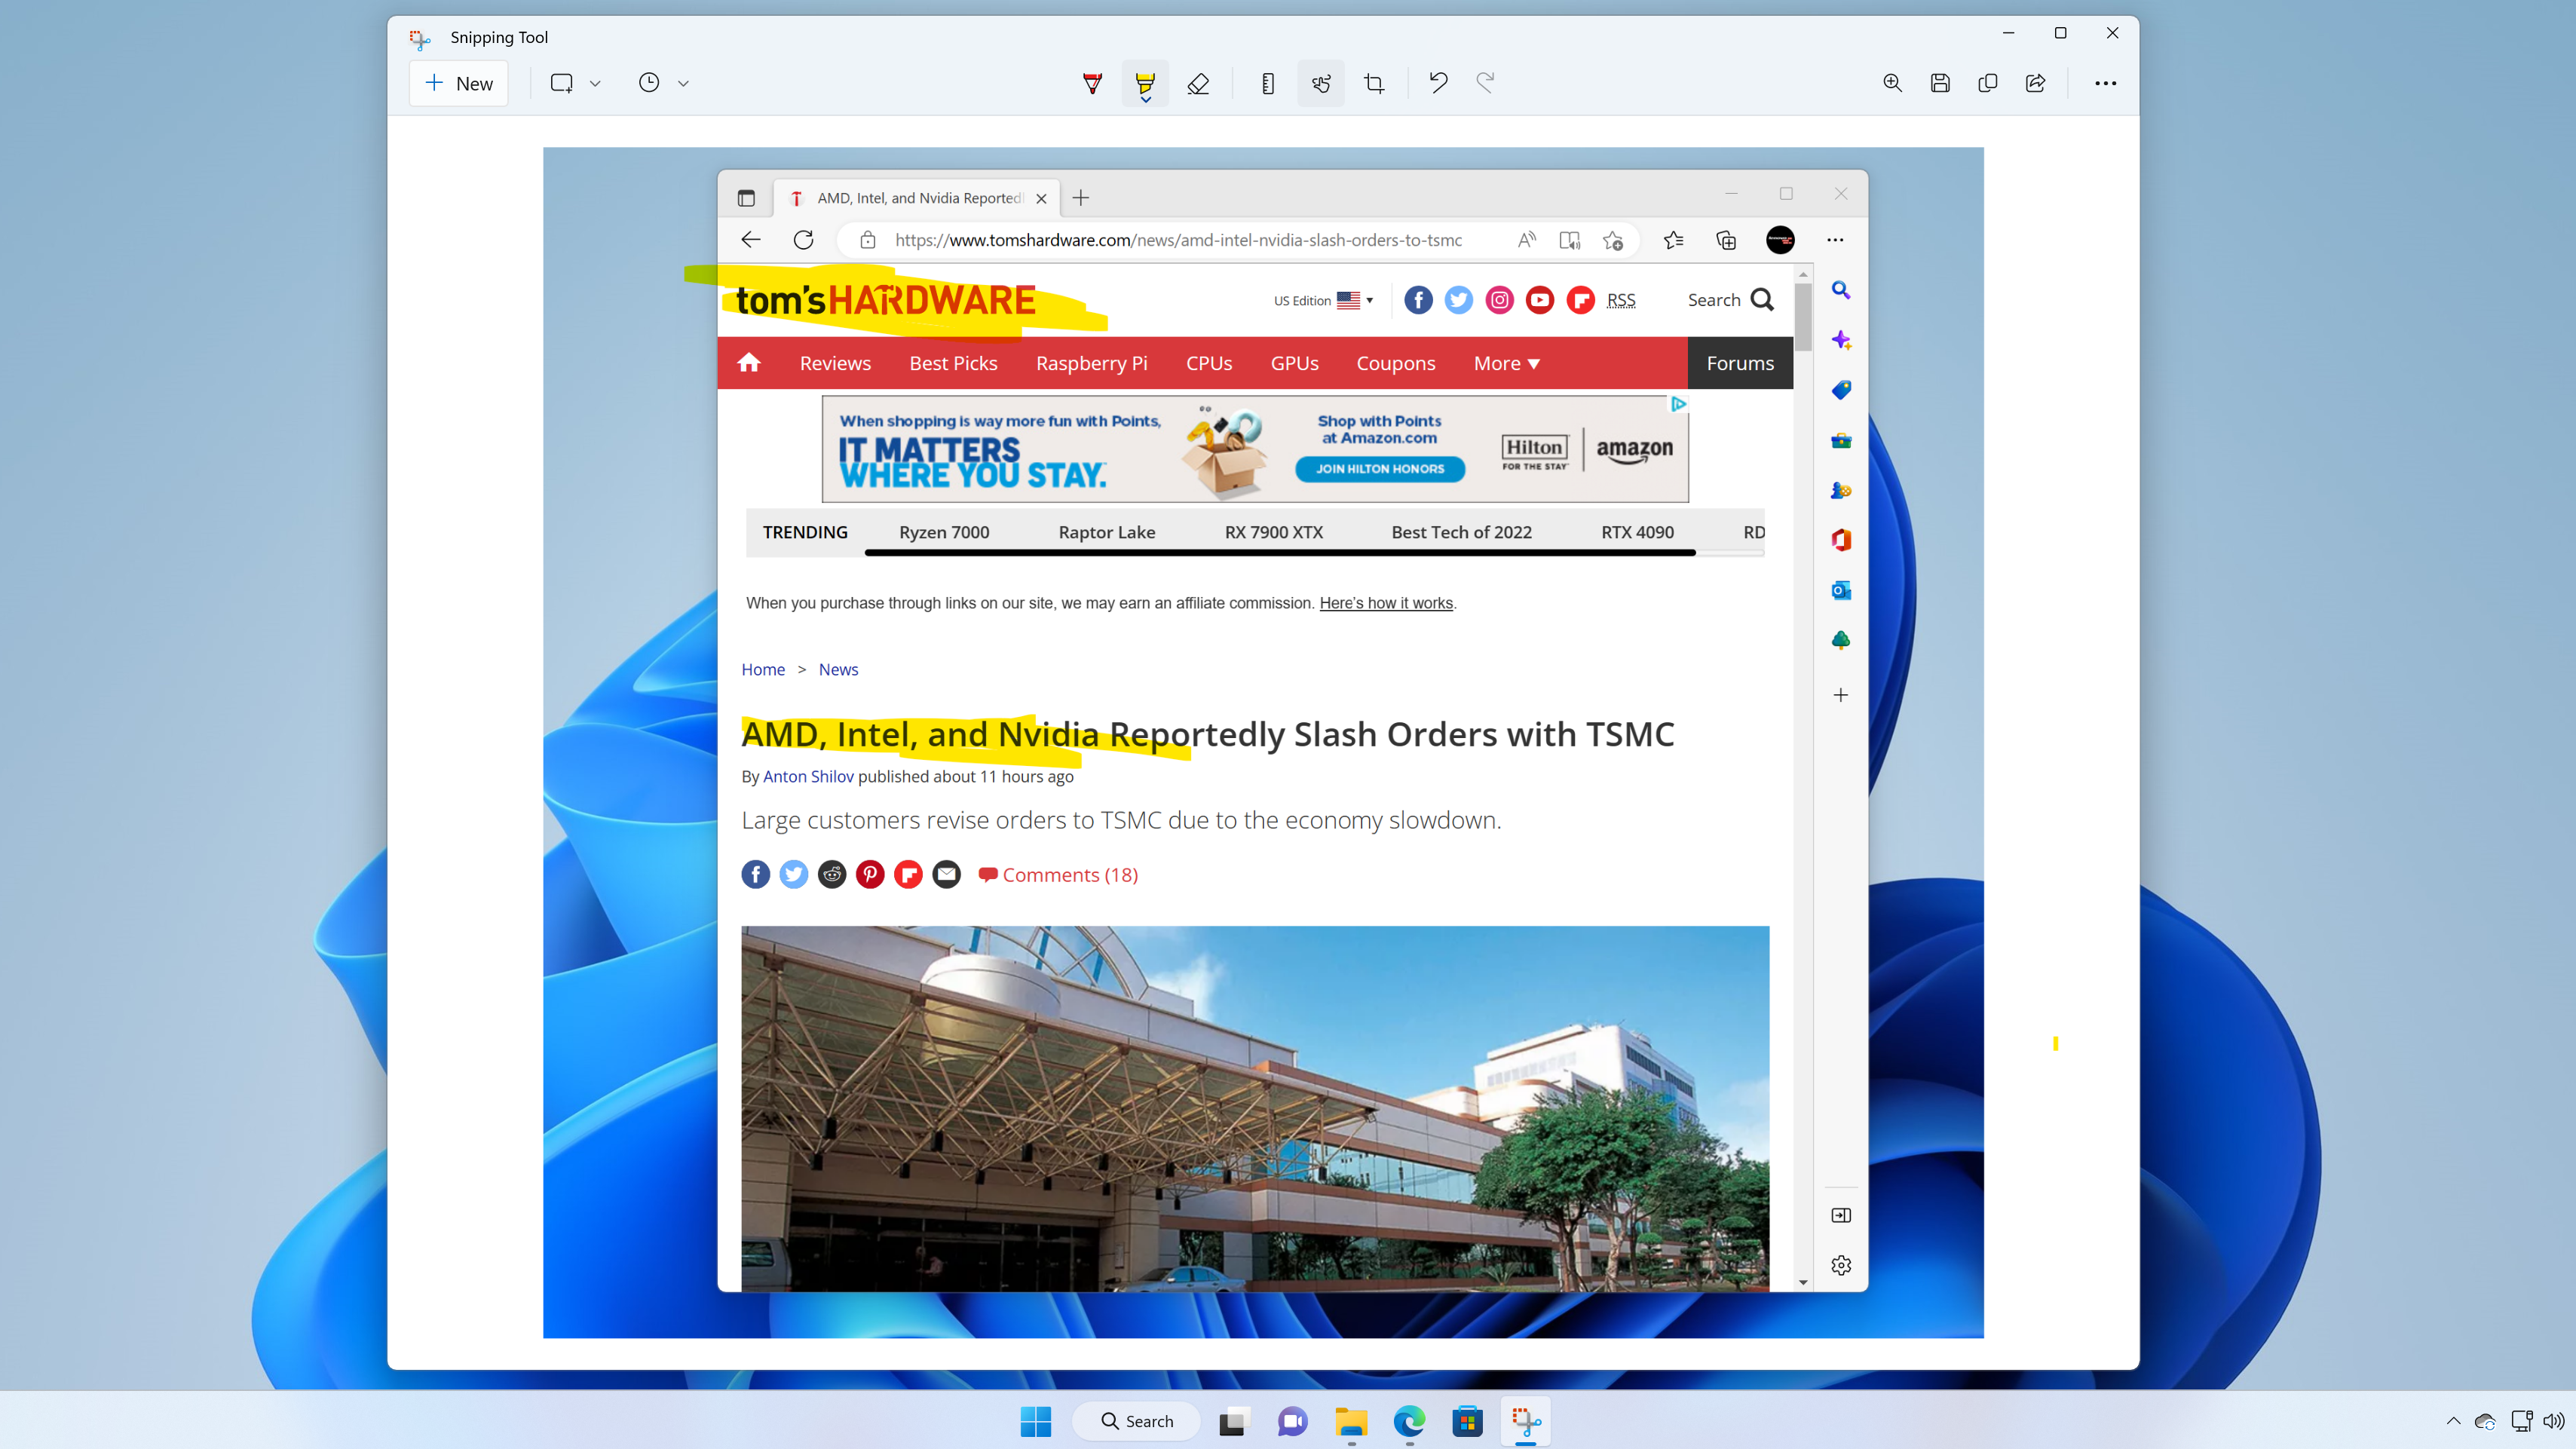
Perhaps you want to take a Windows screenshot that shows just a small portion of the desktop. It could be a portion of a web page in your browser or a series of windows. Whatever the case, hit Windows Key + Shift + S and the Windows Snipping tool will launch, immediately giving you a rectangular box you can draw around whatever you want to capture from Windows 10 or Windows 11.
We should note here that, in Windows 11, the built-in screenshot tool is called «Snipping Tool» and, in Windows 10, there’s both the Snipping Tool and the Snip & Sketch Tool, the latter of which is the newer one that Microsoft recommends. Whatever you call them, the keyboard shortcut pulls up the right one.
If you don’t want to screenshot a rectangular portion of the Windows desktop, you can also choose to freeform sketch a shape, capture the active window or the full screen. Your picture will be captured to the clipboard, but you’ll also get a Windows notification that shows what you captured and, if you click it, you’ll open the editor where you can draw on top of your Windows screenshot, crop it or highlight sections of it with a highlighter.
Delayed Windows Screen Shot with Snipping Tool
Sometimes you need to take a Windows screenshot not right now, but a few seconds from now. Why wait? Because if you need to take a screenshot of yourself activating a pulldown menu or some other item, hitting the Print Screen key or another key combination could make your menu go away before the OS snaps a picture. So you want to activate a screenshot that occurs in the future, giving you time to get to that menu.
To do a delayed screenshot in Windows 10 or 11, launch Snipping Tool (Windows 11) or Snip & Sketch (Windows 10), not via keyboard shortcut but either by searching for it or from the Start menu. Then select a delay time from either the Delay menu (Windows 11) or the New menu (Widndows 10).
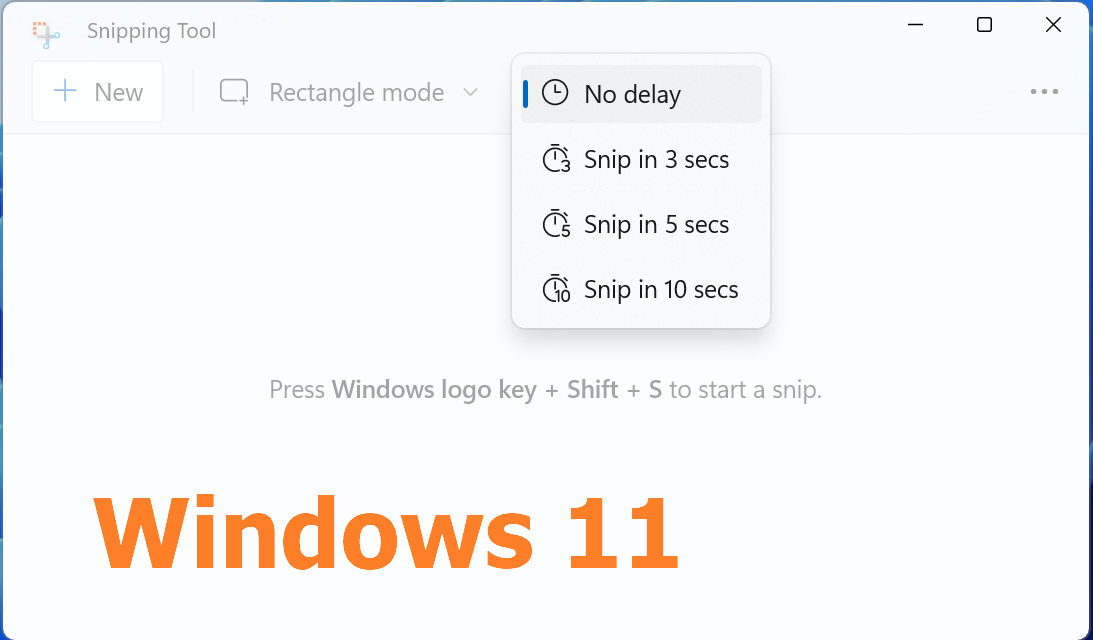
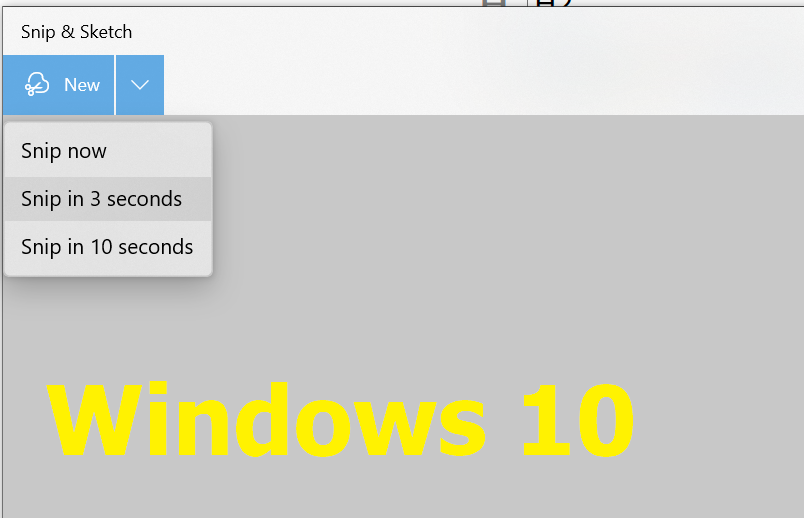
Do what you want to capture within that time frame and then the snipping tools will appear and let you draw a box around it.
Capture a Full Web Page in Windows 10 or 11
Sometimes you want to grab an entire web page as a screenshot and, even if you have a 4K monitor running at 100 percent scaling, most web pages are vertically longer than the display. So you need a Windows screenshot tool that will scroll down to capture even the portions of the web page that are «below the fold.»
The easiest and cheapest way to capture a full web page is to use a browser that either has a built-in whole page screenshot feature or has a plug-in / extension that enables it.
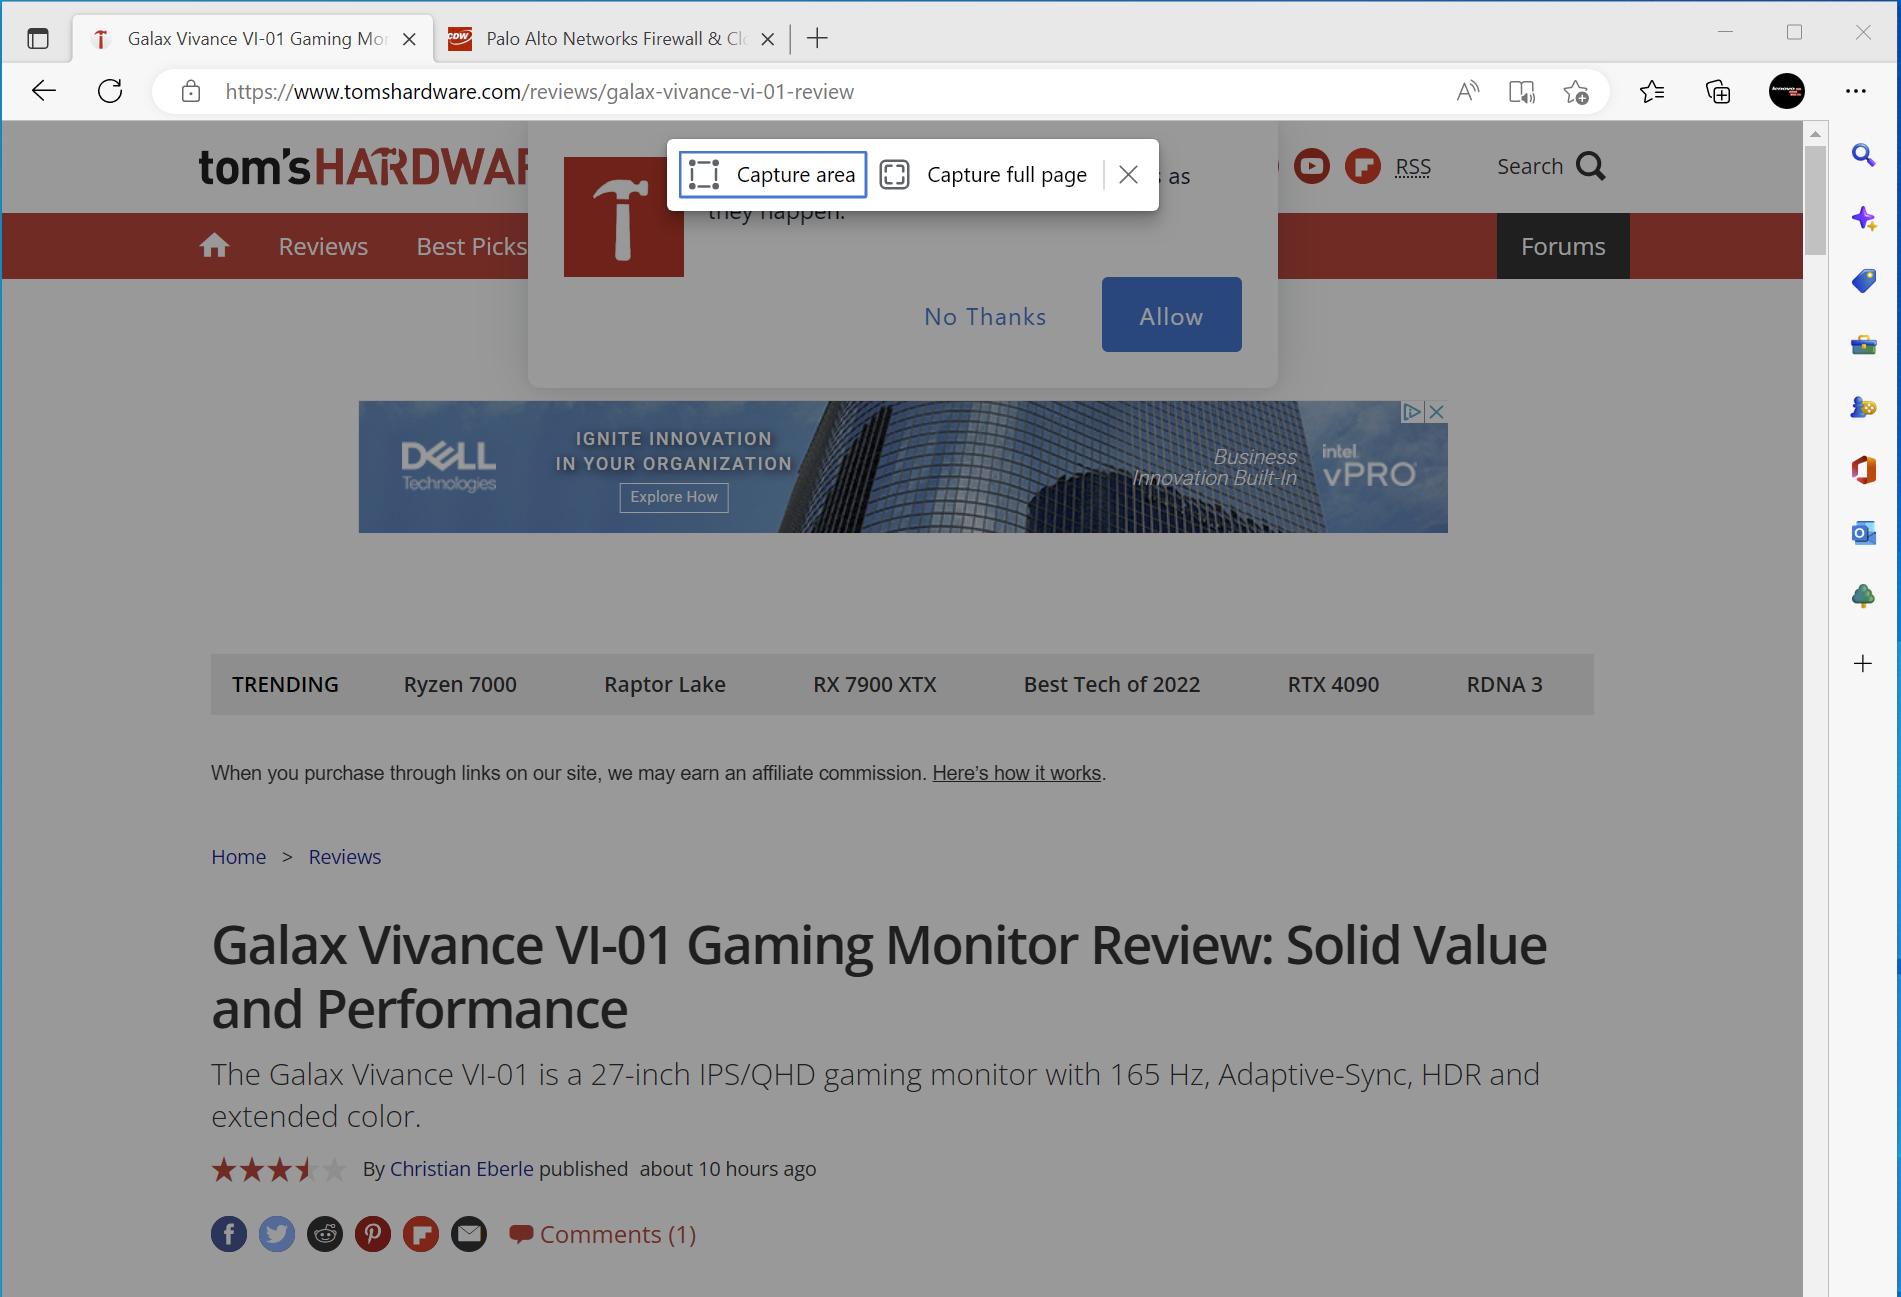
Microsoft Edge Full Page Screenshot
In Microsoft Edge, hitting CTRL + Shift + S or selecting Web Capture from the hamburger menu will give you a menu that allows you choose between «Capture Area» or, what you want, «Capture full page.»
Chrome Capture Full Page Screenshot
Chrome doesn’t have a great full-page screenshot feature. You can get a full-page screen shot as a PDF by using the Print feature and outputting to PDF. And, if you really hate extensions, you can use the Developer Console (CTRL + SHIFT + J) then use the Run command dialog from there and run «Capture full size screenshot.» But that’s a lot of work.
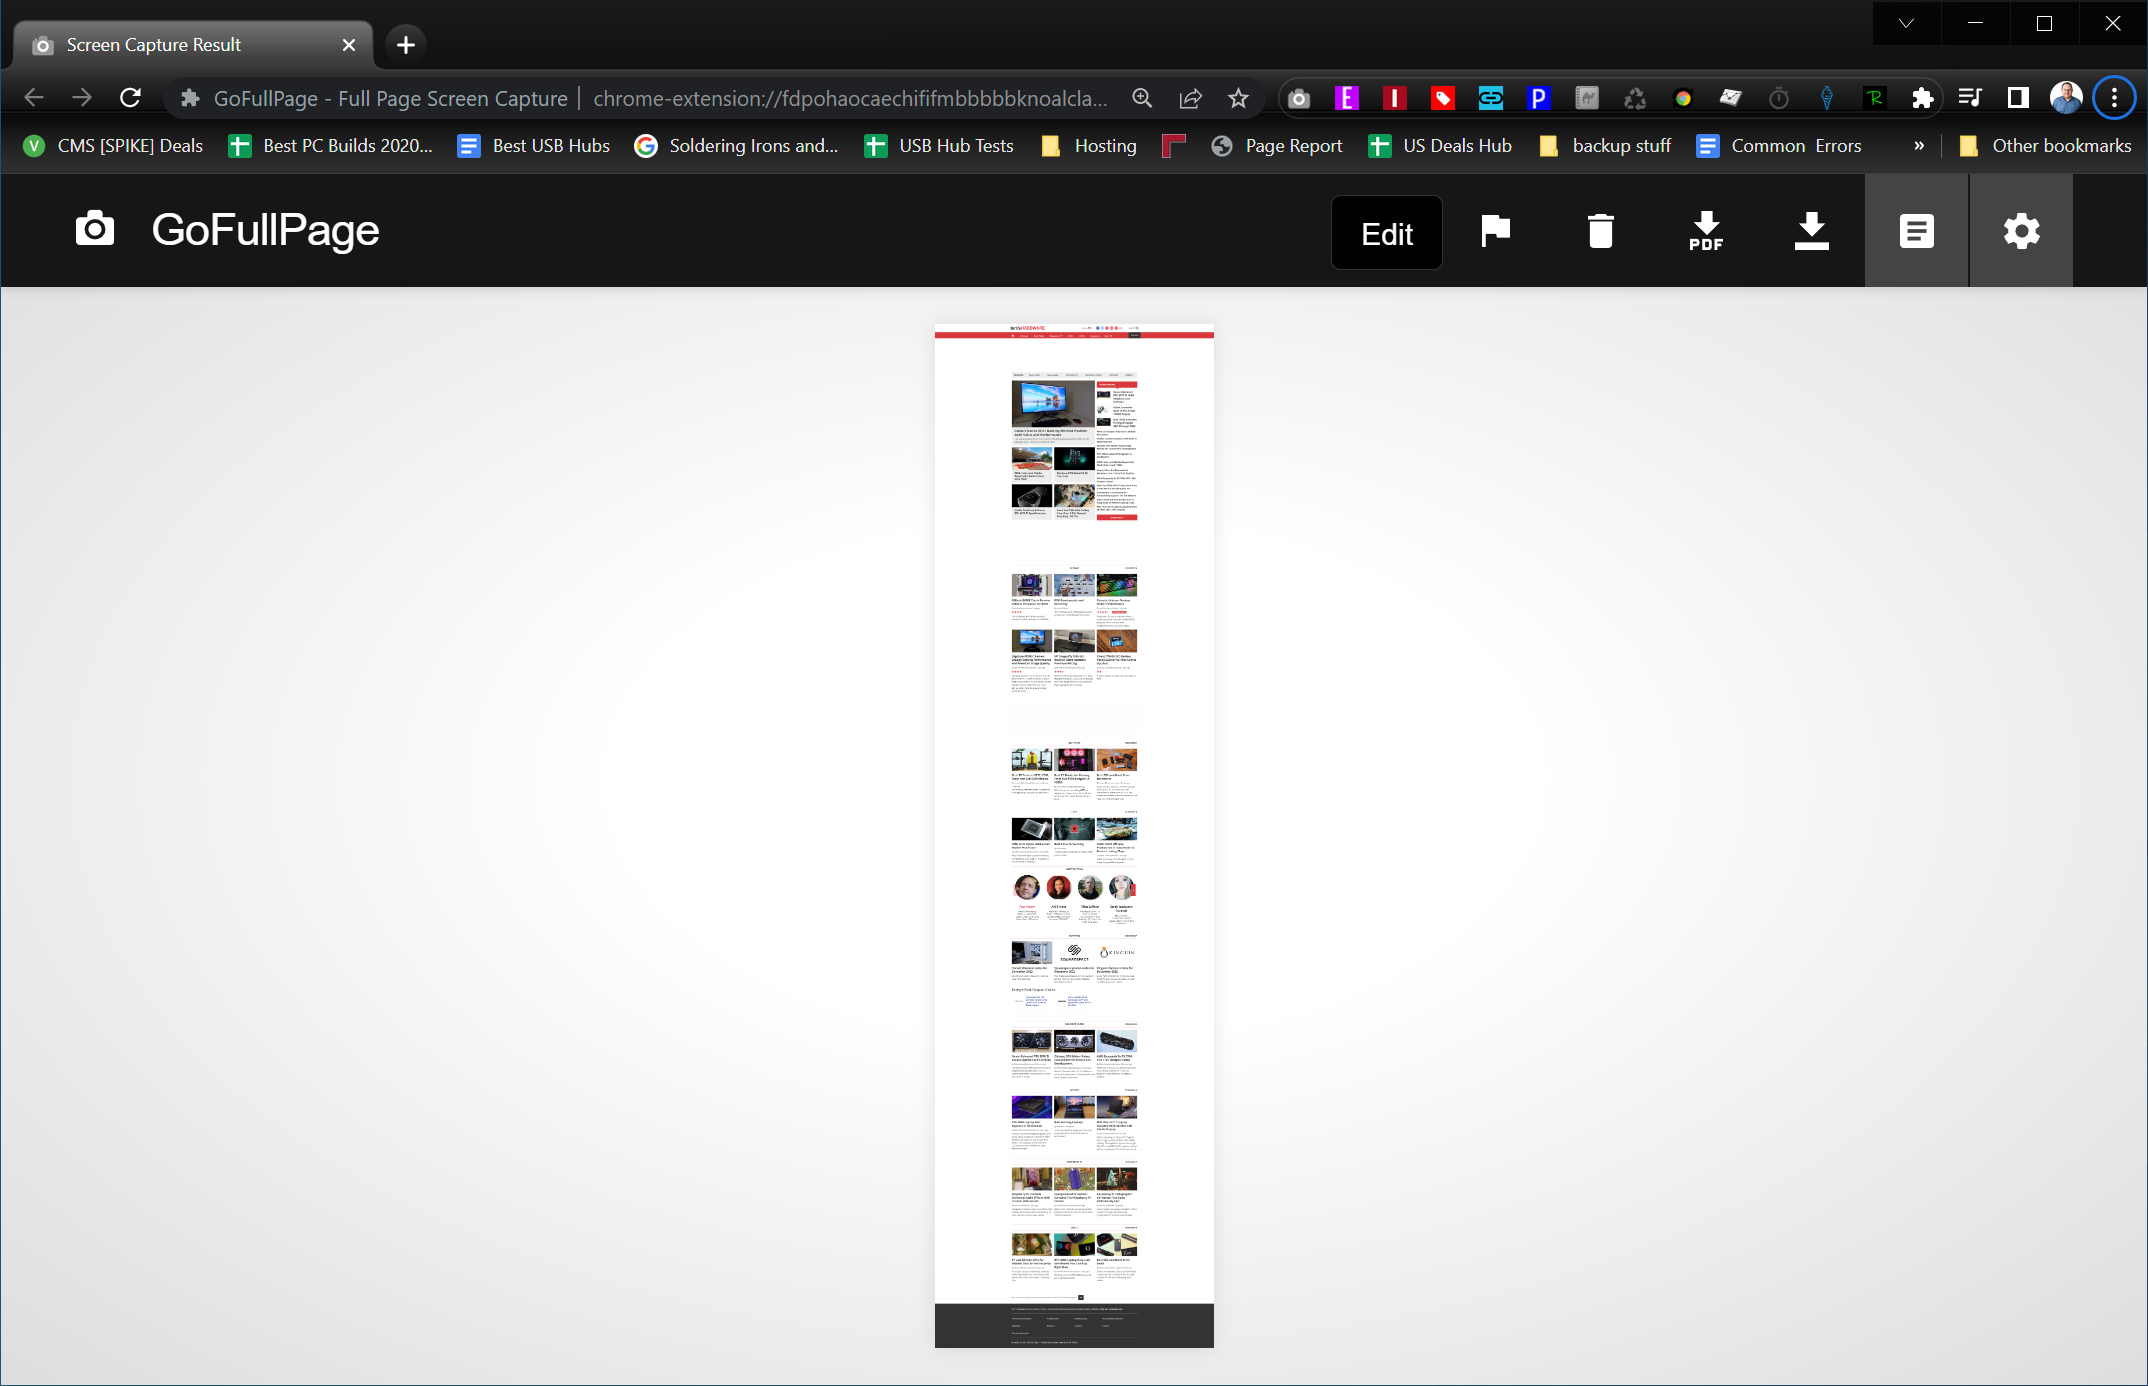
The best solution for Chrome is to use an extension such as GoFullPage, which is free. You just click the camera icon it puts in your toolbar, wait a few seconds for the extension to scroll down the page and then it will offer you the option to save your Chrome screenshot as either a PNG or a PDF.
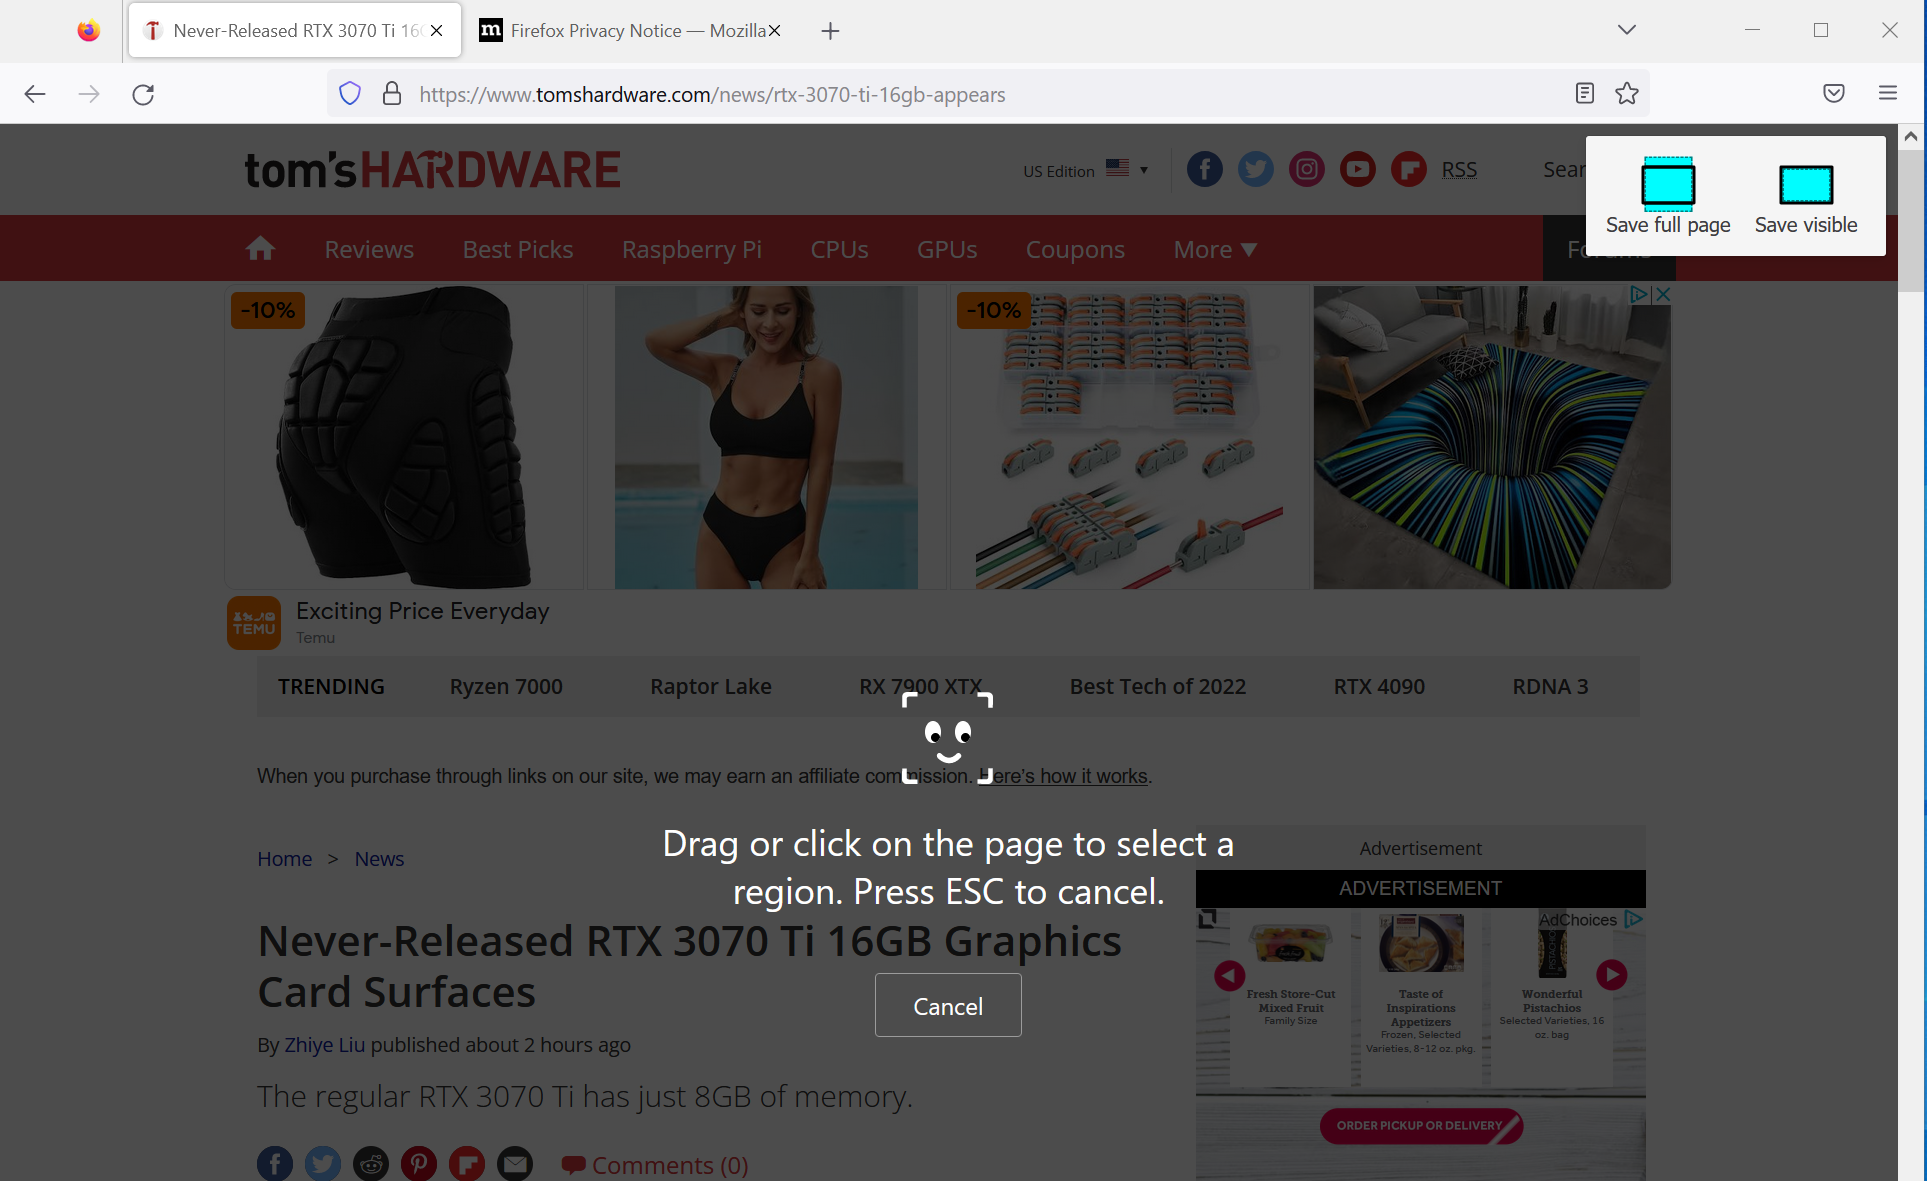
Firefox Capture Full Page Screenshot
Mozilla Firefox has excellent built-in screenshot functionality. All you need to do is right click on an empty area of the web page and select Take Screenshot from the context menu. Then click «Save full page» from the menu that appears. Finally, Firefox will show you a preview of the capture image and give you the choice of either downloading it or copying it to your clipboard.
Screenshot YouTube Videos in Windows 10 or 11
Sometimes you’re watching a video on YouTube and you want to capture an individual frame from it. Sure, you could pause the video at just the right point, set the video to full screen and take a screenshot of it, but sometimes you’ll get things you don’t want in the shot such as a play button, timeline or the title of the video.
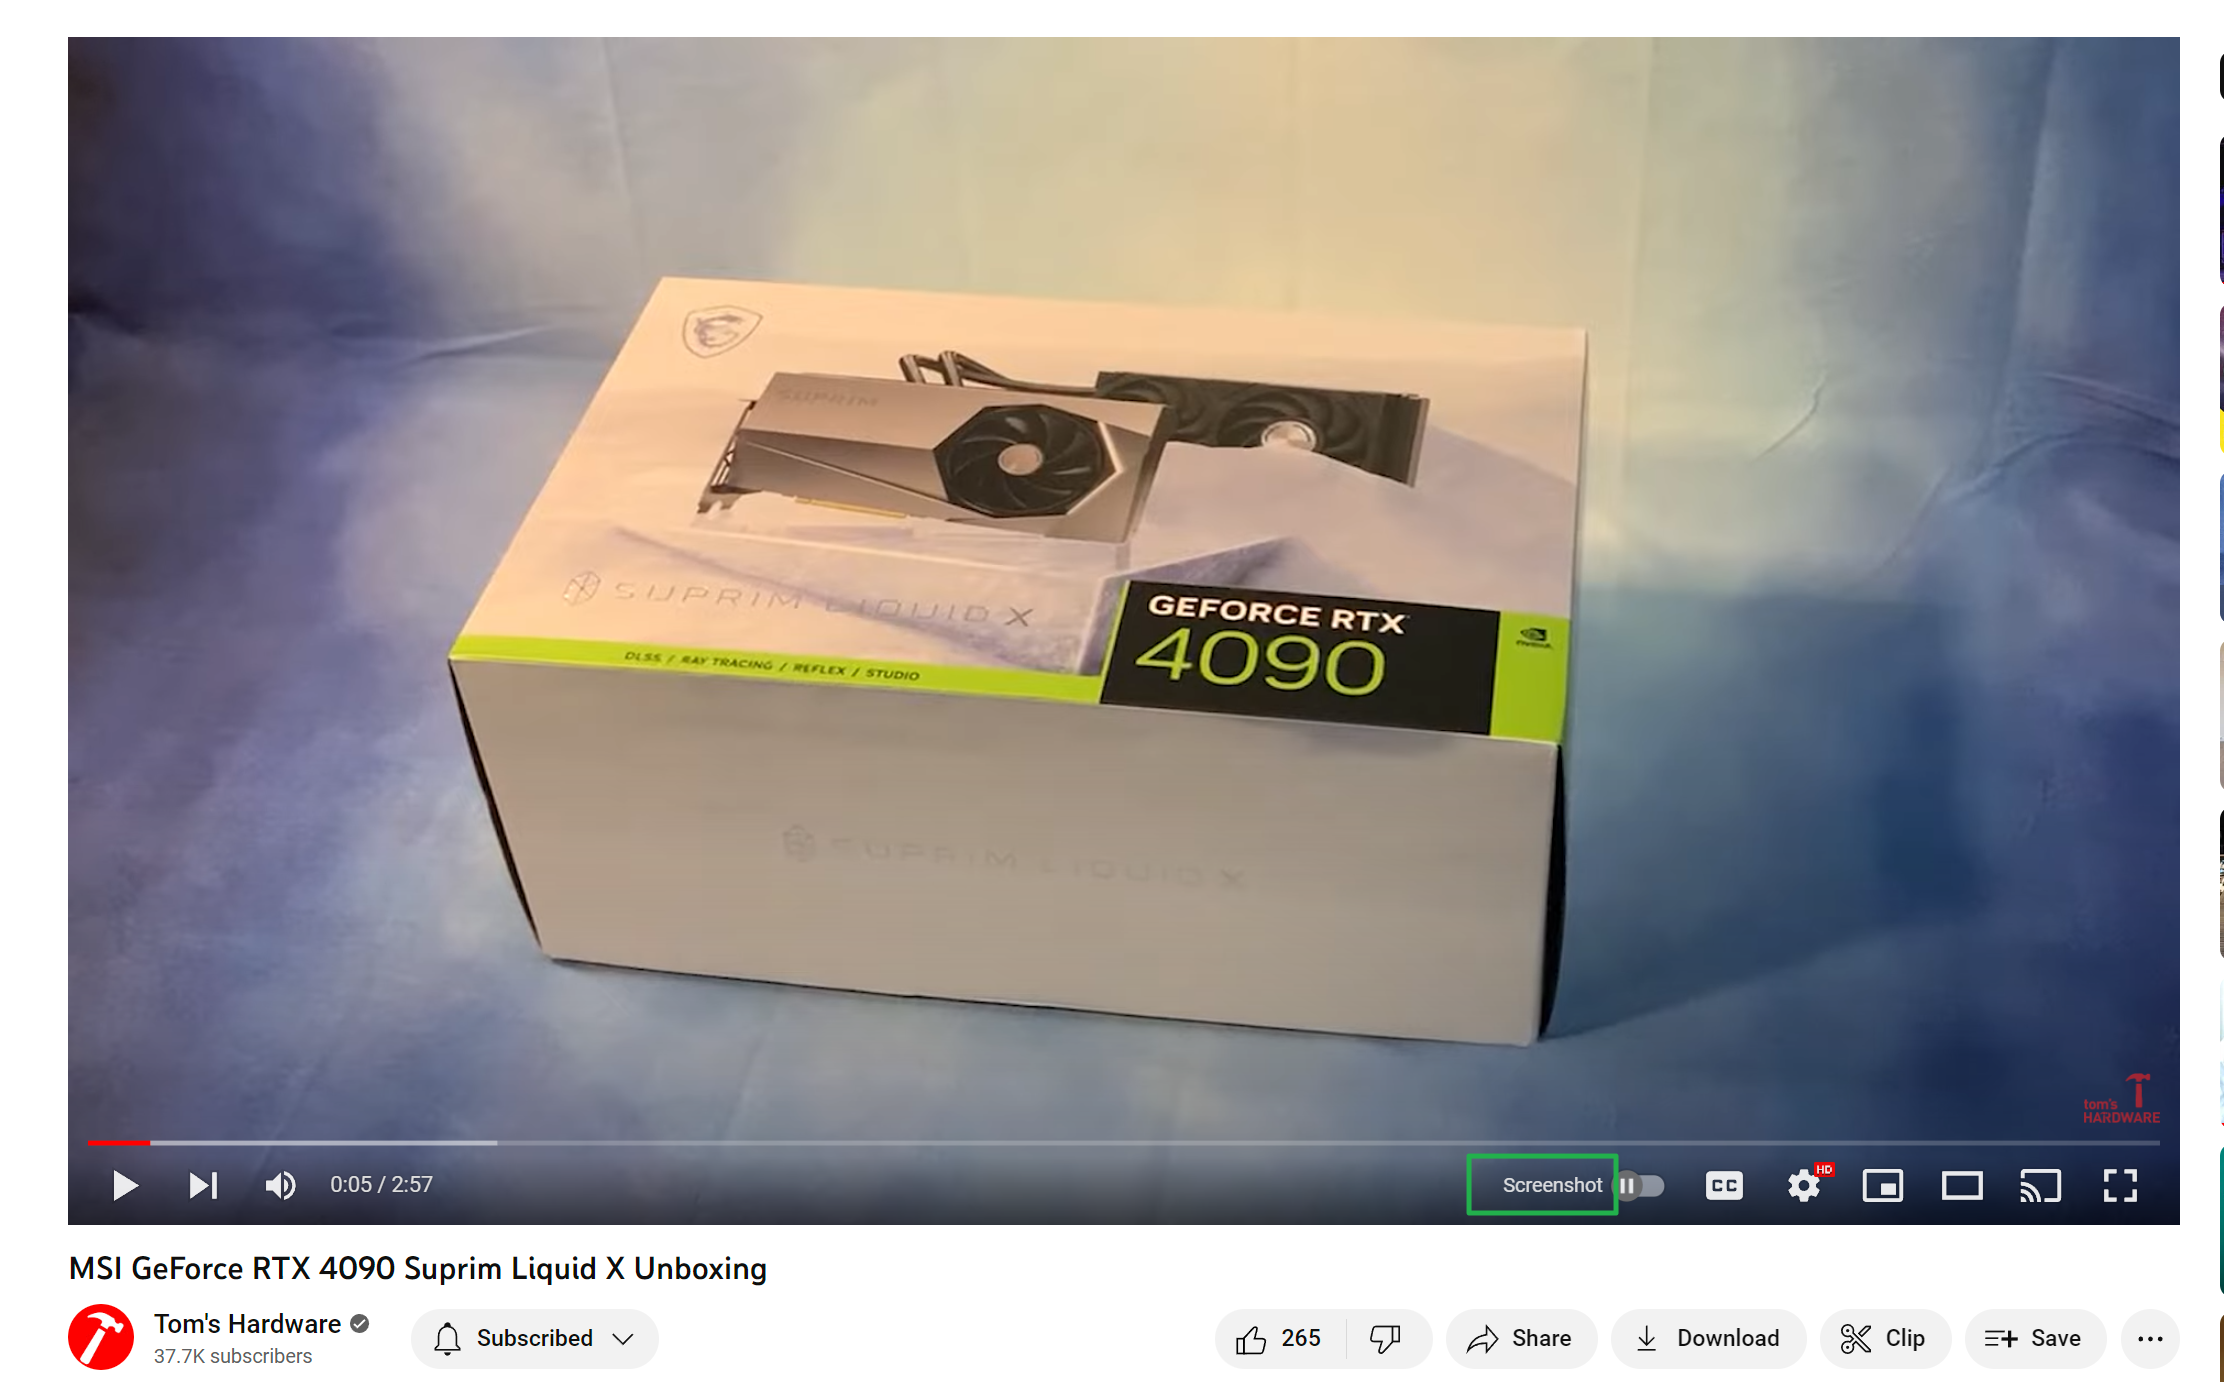
The best way to capture a YouTube screenshot in Windows is with a browser extension that allows you to do it. The best extension for this purpose is Screenshot YouTube which is available in the Chrome webstore and the Edge Add-ons section of the Microsoft store too. Firefox has different add-ons for this purpose, including YouTube Screenshot button.
If you install Screenshot YouTube, it will add a very subtle button that says «Screenshot» right below the timeline.
Include the Pointer in Windows Screenshots
In most screenshot methods, the mouse pointer itself is omitted. But what if you want it to appear? Windows 10 and Windows 11 don’t provide a really good way to capture the pointer.
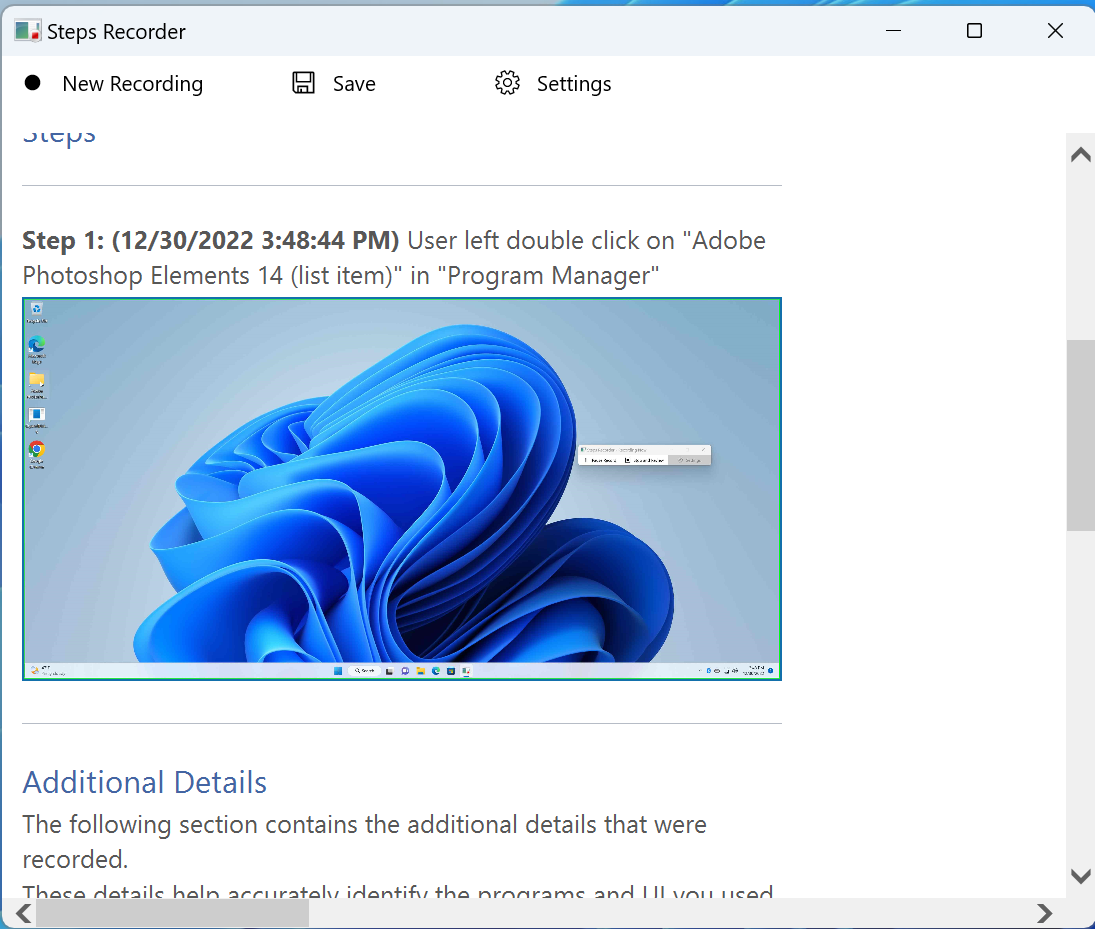
If you’re really anti third-party software, you search for and launch «Steps Recorder,» hit the record button, perform the step you want, stop the recording and then enlarge the screenshot Windows took of that step (pointer and all) by clicking on it. However, you’ll now need to take a screenshot of this screenshot, because the tool doesn’t provide an easy way to export it.
We prefer using a third-party tool such as PicPick, which has a cursor capture option built-in.
Use PicPick for Best Windows Screenshot Experience
If you want the best possible Windows screenshot tool, we recommend PicPick, a utility that is free for personal use and costs $24 for commercial purposes. PicPick has the ability to do scrolling screen captures (for full web pages or full PDFs in a PDF reader), the ability to include the mouse pointer and the ability to set custom delays all built-in.
To capture the entire contents of a webpage, click on the PicPick tray icon and select Screen Capture->Scrolling Window or hit CTRL + ALT + Print Screen (you can also assign a custom hot key). Then select the web browser tab you want to capture from and watch as it scrolls through the whole page and captures it.
If you want to include the mouse pointer in any of your captures, open the Program Options menu, navigate to the Capture tab and check «include cursor image.»
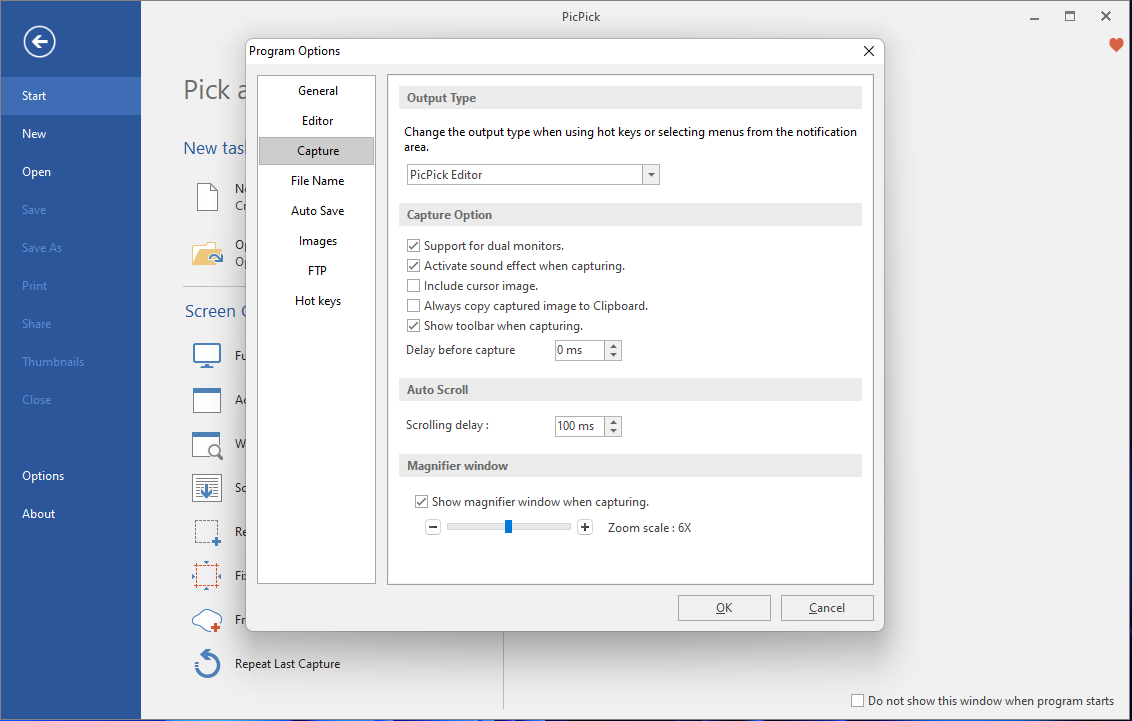
Another great thing about PicPick is that it allows you to set your own custom hot keys for all of its capture features. And it includes an editor that’s much more robust than Snipper / Snip & Sketch so you can draw colorful boxes or circles around the areas of the image you want to highlight.
Avram Piltch is Tom’s Hardware’s editor-in-chief. When he’s not playing with the latest gadgets at work or putting on VR helmets at trade shows, you’ll find him rooting his phone, taking apart his PC or coding plugins. With his technical knowledge and passion for testing, Avram developed many real-world benchmarks, including our laptop battery test.