
Как вариант, такой костыль встроенными средствами Windows 10 можно сделать так.
- Нажимаете комбинацию клавиш WIN + SHIFT + S
- Экран затемняется и появляется панелька инструментов в верху экрана.
- Выбираем иконку «Оконный режим» (обычно в середине)
- Выбираем окно, которое нужно заскринить.
- Нажимаем WIN + A , чтобы октрыть панель уведомлений (выезжает справа)
- Кликаем по нашему эскизу.
- После клика по эскизу файл картинки скриншота сохранится автоматически по адресу:
%LOCALAPPDATA%\Packages\Microsoft.ScreenSketch_8wekyb3d8bbwe\TempStateЧтобы быстро получать доступ к пути каталога со скриншотами добавьте ярлык, например: на Рабочий стол
Второй вариант, включить комбинацию WIN + ALT + PrintScreen. Для этого ваша видеокарта должна быть совместима (а возможно и нет) со встроенной в Windows 10 Игровой панелью.
Игровая панель находится в (WIN + I) Параметрах Windows 10 \ Игры. Необходимо включить режим XBox Game Bar. Теперь нажмите WIN + ALT + PrnScreen , файлы скриншота активного окна будут сохранятся по адресу:
C:\Users\%username%\Videos\Captures
Sign in to your MUO account
Taking a screenshot on your Windows PC is sometimes necessary, but snapping an image of just a window is more complicated than it seems. You want to capture what you’re working on but none of your important, confidential, or sensitive information, especially if you will be sharing it with the world. Luckily, there is a simple solution.
Here’s how to take a screenshot of just the open window you’re working on.
How the PrintScreen Function Works
When you press the PrtScr button on your computer, your entire screen as it appears to you, minus a few things (such as the mouse pointer), is copied to the clipboard. You then have to paste this clipboard data into an image processing program – Microsoft Paint, Adobe Photoshop, and the like – before saving it as an image file.
You could shorten this process and have Windows create an image file for you. Do this by holding down the Windows button while pressing the PrtScr button on your keyboard. This image will be saved in PNG format, and by default will be located at the following address:
C:\Users\[Current_User]\Pictures\Screenshots
Here, [Current_User] is a placeholder for the name of your Windows User profile.
If you want a screenshot of just the active window, you’ll have to edit this image and crop out the parts you don’t want. However, you can simplify the process even further.
How to Take a Screenshot of Only the Active Window on Windows
Taking a screenshot of just the open window is actually quite easy: just hold down the Alt key on your keyboard when you press PrtScr. This will add an active window screenshot to the clipboard, which you can paste elsewhere.
Windows, by itself, doesn’t have a way to save active window screenshots when you take them. However, you can use the Xbox Game Bar to do this instead. It should be on your Windows PC by default, but if it’s not, you can download it from the Microsoft Apps store.
Once it’s on your PC, press Win + Alt + PrtScr to immediately save a screenshot of the active window to your computer. Because we’re using the Xbox Game Bar instead of Windows’ default tools, your screenshot will appear in a different location than normal:
C:\Users\[Current_User]\Videos\Captures
Don’t be fooled; despite the fact that we’re taking screenshots, the Xbox Game Bar puts the images in the Videos folder instead.
If you don’t want to use hotkeys to take your screenshot, you can use the Windows Snipping Tool instead. You’ll have to manually select the window you want to capture, but it gives you a lot more control over the final result.
And if that’s not up to scratch, the best screenshot apps for Windows give you even more power over your screenshots and how you take them. This includes taking active window screenshots quickly and easily.
A Simple Way to Improve Your Productivity
Windows 10 has many less well-known features that can make your life easier. Now you know how to take a screenshot of the active window without needing to crop it in an image editor.
Applies ToExcel for Microsoft 365 Word for Microsoft 365 Outlook for Microsoft 365 PowerPoint for Microsoft 365 Access for Microsoft 365 Project Online Desktop Client Publisher for Microsoft 365 Excel 2024 Outlook 2024 PowerPoint 2024 Access 2024 OneNote 2024 Project Professional 2024 Project Standard 2024 Excel 2021 Word 2021 Outlook 2021 PowerPoint 2021 Access 2021 Project Professional 2021 Project Standard 2021 Publisher 2021 Visio Professional 2021 OneNote 2021 Excel 2019 Word 2019 Outlook 2019 PowerPoint 2019 Access 2019 Project Professional 2019 Project Standard 2019 Publisher 2019 Visio Professional 2019 Excel 2016 Word 2016 Outlook 2016 PowerPoint 2016 Access 2016 OneNote 2016 Project Professional 2016 Project Standard 2016 Publisher 2016 Visio Professional 2016 SharePoint Designer 2007
When you’re using a Microsoft 365 program with Windows, there are two ways to copy the contents of what you see on your screen (commonly referred to as a «screenshot» or «screen capture»). You can use the Snipping Tool or the PRINT SCREEN key.
Use the Snipping Tool
The Windows Snipping Tool captures all or part of your PC screen. After you capture a snip, it’s automatically copied to the Snipping Tool window. From there you can edit, save, or share the snip.
-
Set up your screen so you can clearly see what you want to capture.
-
Press Windows logo key+Shift+S.
The desktop darkens so you can select an area for your screenshot.
-
On the mini toolbar that appears, select the snipping mode you want: rectangular mode, free-form mode, window mode, or full-screen mode:
-
If you select rectangular or free-form mode, you must then click and drag to highlight the area you want to capture. If you select window or full-screen mode, the capture takes place immediately.
-
The screenshot is automatically copied to your clipboard. A notification also appears once you’re finished taking a screenshot. Select the notification to open the image in the Snipping Tool editor.
-
Edit the image as needed with the ink pen, highlighter, eraser, ruler, and cropping tool.
-
Near the upper right, select Save, or select Copy if you want to immediately paste the edited image somewhere else.
For more details and instructions, see Use Snipping Tool to capture screenshots.
Use the PRINT SCREEN key
Pressing PRINT SCREEN captures an image of your entire screen and copies it to the Clipboard in your computer’s memory. You can then paste (CTRL+V) the image into a document, email message, or other file.
Where is the PRINT SCREEN button?
The PRINT SCREEN key is usually located in the upper right corner of your keyboard. The key looks similar to the following:
The text you see on your keyboard might be PrtSc, PrtScn, or PrntScrn. The other text on the Print Screen key is usually SysRq.
Copy only the image of the active window
The active window is the window that you are currently working in. Only one window can be active at a time.
-
Click the window that you want to copy.
-
Press ALT+PRINT SCREEN.
-
Paste (CTRL+V) the image into an Office program or other application.
Copy the entire image on the screen
-
Open everything you want to copy and position it the way you want.
-
Press PRINT SCREEN.
-
Paste (CTRL+V) the image into an Office program or other application.
Modify the image
-
Paste (CTRL+V) the image into a drawing application, such as Microsoft Paint, and by using the tools available in your drawing application, you can add circles around text or images you want to highlight or crop anything that you don’t want to appear in the image.
For more complex modifications, we recommend that you use the Snipping Tool to capture your screen shot.
Need more help?
Want more options?
Explore subscription benefits, browse training courses, learn how to secure your device, and more.
Windows 10 can capture your entire screen with the Win+PrintScreen keyboard shortcut. The screenshots are saved to a folder named Screenshots in the Pictures library. Compared to Apple and macOS, this feature has been super late to arrive on Windows and it’s still seemingly basic. You cannot screenshot just one screen, or screenshot the active window this way. That said, there is a way to natively screenshot the active window; Alt+PrintScreen.
The process is pretty simple; set up your screen so that the window that you want to screenshot is the active one. Tap Alt+PrintScreen.
Unlike the Win+PrintScreen shortcut, the Alt+PrintScreen shortcut won’t automatically save the image as a file.
You can use Paint to save the image. Open Paint and click the Paste button or use the Ctrl+V keyboard shortcut to paste the image from the clipboard to Paint. Save it.
You can do that, or you can use an app called Paste into file. It can save an image from the clipboard to a file. You can choose which format to save the file to.
Windows 10 doesn’t lack a screenshot tool. In fact, older versions of it did have one called the Snipping tool. The only problem is that this tool is a separate app which needs to be launched before it can be used to capture screenshots. Taking screenshots, without the Win+PrintScreen shortcut, is tedious and few people knew about the Snipping tool back when Windows 7 was still supported.
Windows 10 has replaced the Snipping tool with Snip & Sketch. It still doesn’t measure up to macOS but it is slowly improving. Unfortunately, it is a step back from the Snipping Tool and lots of users are interested in getting it back. Microsoft is working on improving it. In the next major build for Windows 10, it will allow you to select the format that you save the image to.
Until the screenshot tool improves substantially on Windows 10, users have a long list of screenshot apps to pick from. They range from free apps like Greenshot, a personal favorite, to premium ones like Snagit.
Compared to macOS, Windows works much better with multiple displays. Even the most popular screenshot tools for Windows do not work that well with multiple displays so it’s not like Microsoft is adding useless features that other apps can compensate for. Most users end up buying tools just so they can take HD screenshots which is a default feature on macOS.

Fatima Wahab
Fatima has been writing for AddictiveTips for six years. She began as a junior writer and has been working as the Editor in Chief since 2014.
Fatima gets an adrenaline rush from figuring out how technology works, and how to manipulate it. A well-designed app, something that solves a common everyday problem and looks
Do you use Windows 10 or Windows 11, and do you need to quickly take a screenshot? Do you have trouble finding the Print Screen key, or it’s not working, so you’re looking for a new Print Screen shortcut? Do you want to know how to take a screenshot of the active window instead of the whole screen? On the internet, there are numerous Windows screenshot apps, both paid and free. Still, before looking for such third-party apps, make sure you’re familiar with the whole range of screenshot options already available in Windows. Without further ado, here’s how to screenshot on Windows 10 and Windows 11:
1. How to screenshot on Windows: Use the Print Screen shortcut key
The first method is also the most popular, as it’s been around for a very long time, since the earliest versions of Windows. Press the Print Screen button on your keyboard to take a screenshot on a PC running either Windows 10 or Windows 11. The button is usually located next to the F12 key. Alternatively, you can also use the CTRL + Print Screen screenshot shortcut.
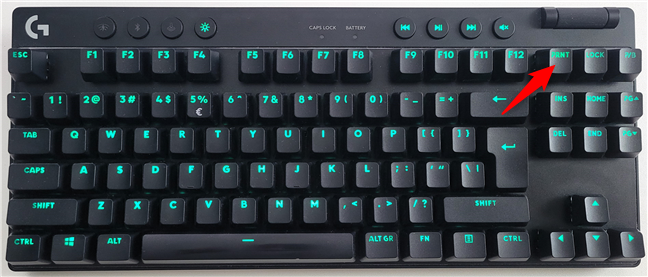
Windows screenshot shortcut: The Print Screen keyboard button
TIP: Depending on your keyboard’s make and model, the Print Screen key may not be marked as Print Screen. Instead, it may be indicated by abbreviations such as PrtScn, Print Scrn, Prnt Scrn, Prnt Scr, Prt Scrn, Prt Scr, Prt Sc, Pr Sc, or simply PS.
When using the Print Screen shortcut key, Windows 10 creates a screenshot of the whole screen and saves it to the clipboard. Next, open an image editing program like Paint and paste the picture from the clipboard. You can now save it as a file and do basic editing.
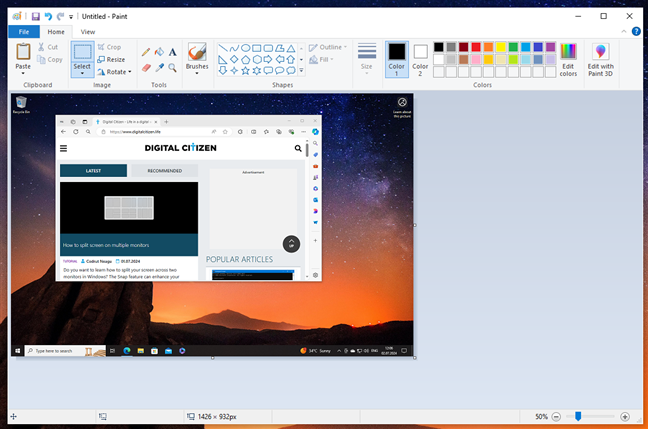
Screenshot of the whole screen, pasted in Paint from Windows 10
Using the Print Screen key for taking screenshots works the same in Windows 11. Here, too, the operating system places the screenshot in the clipboard, and then you can paste it and work with it in any image editing app you prefer, including Paint.

A screenshot in Paint from Windows 11
Now that you know the most common way to screenshot in Windows operating systems, let’s check out the others, too. There’s more:
2. How to take a screenshot on a Windows PC: Use the Win + Print Screen shortcut
Do you want to take a screenshot of the whole screen and automatically save it as an image on your PC? You can do that using a simple Print Screen shortcut without having to resort to any other tools. To take a fullscreen screenshot on Windows 10 or Windows 11, simultaneously press Win + Print Screen on your keyboard.
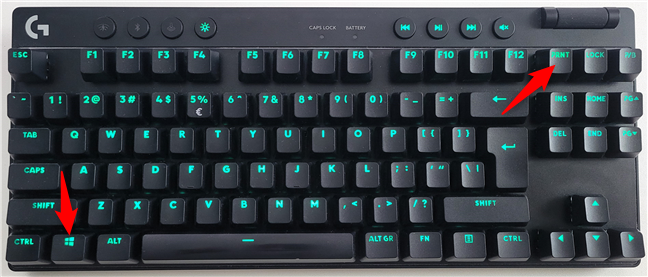
Using Windows + Print Screen to take a screenshot on Windows
When you screenshot on Windows 11 or Windows 10 using this method, the operating system saves the resulting image in a folder called Screenshots, found in your user’s Pictures folder. The usual path for your Windows screenshots looks like this:
C:\Users\Your User Name\Pictures\Screenshots
The files are named Screenshot (number).png, where the number varies based on how many screenshots you have previously taken. This is what it looks like in Windows 10:
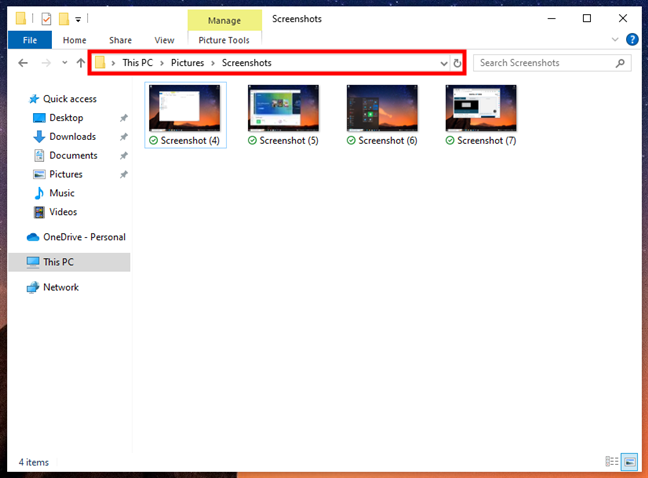
Screenshots location in Windows 10
And here’s the Screenshots folder in Windows 11:

Screenshots location in Windows 11
Both in Windows 11 and Windows 10, you can also see your screenshots using the Photos app by going to Folders > Pictures > Screenshots or Folders > OneDrive > Pictures > Screenshots, if you configured OneDrive to automatically back up your photos. Take a look at the next image to see where to find your screenshots in Windows 10’s Photos:
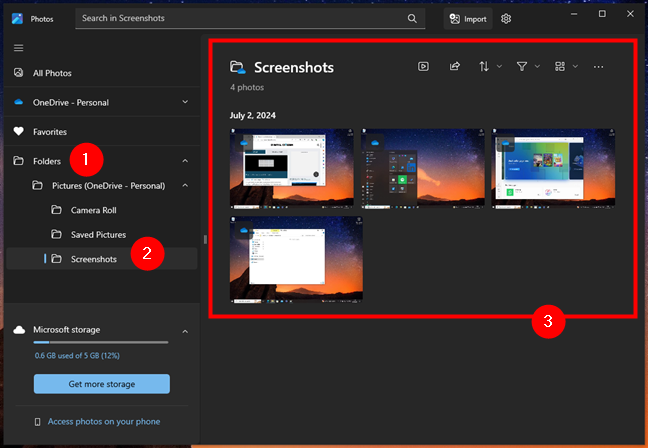
Screenshots in Photos on Windows 10
And this is where you can access your screenshots in Windows 11’s Photos app:
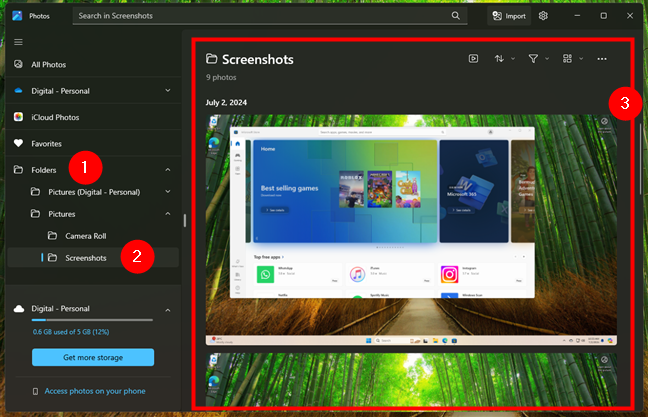
Screenshots viewed in the Photos app from Windows 11
TIP: Besides creating a screenshot file, when using the Win + Print Screen shortcut, Windows operating systems also place a copy of the screenshot in the clipboard.
3. How to take a screenshot in Windows 10 or Windows 11: Press Alt + Print Screen to capture the active window
Whether you use Windows 11 or Windows 10, you can also take a screenshot of just the active window instead of your whole screen. Open the window that you want to capture and press the Alt + Print Screen keys on your keyboard.
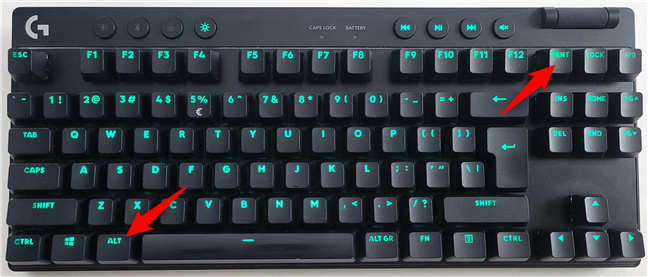
Windows screenshot shortcut for capturing the active window
The operating system saves the screenshot in the clipboard. Open Paint or any other photo editing app and paste the image, so that you can edit and save it to your Windows computer or device.
If you choose to work with Paint on your Windows 10 PC, you can either use the Ctrl + V shortcut or click/tap Paste in the top left corner to add the screenshot to the canvas you’re working on.
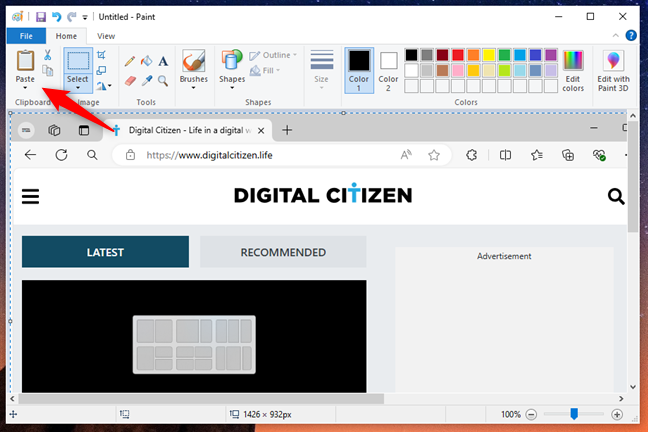
Screenshot of an active window in Paint on Windows 10
The same applies to Windows 11: press Ctrl + V on your keyboard, or select Paste from the Edit menu in Paint, and the screenshot is added to the canvas.
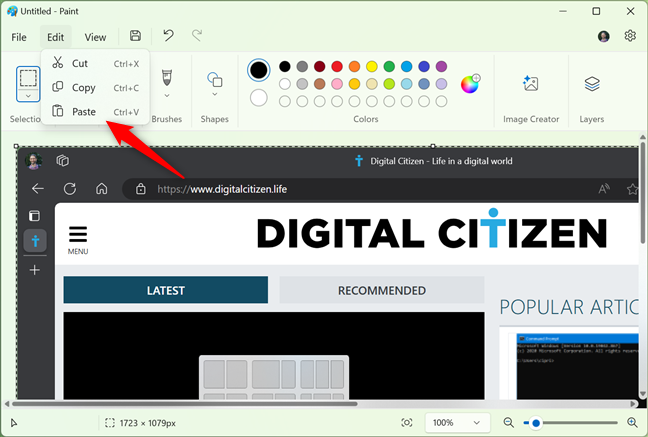
Paste a screenshot of the active window in Paint for Windows 11
4. How to screenshot on a laptop or tablet (Dell, Surface, HP, and others)
The previous methods should work perfectly well on desktop computers running Windows and on standard keyboards. However, some unique situations can occur. If you have a Dell laptop, for example, a HP convertible, or any PC with a keyboard that includes an Fn key, then the Print Screen key might do other things too, besides taking screenshots. Therefore, when you press a screenshot shortcut that includes the Print Screen button, Windows might not capture your screen. So, instead, use one of the Print Screen shortcuts:
- Fn + Print Screen — takes a screenshot of the whole screen and copies it to the clipboard. It is the equivalent of pressing the standard Print Screen key.
- Fn + Windows + Print Screen — captures a screenshot of the whole screen and saves it as a file on the hard drive without using any other tools. Windows stores the screenshot in the Screenshots subfolder of your Pictures folder. It is the same as pressing Windows + Print Screen on a standard keyboard.
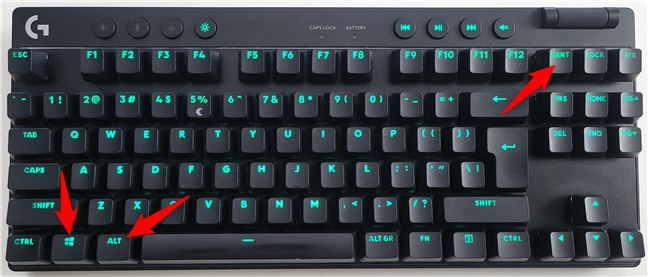
- Fn + Alt + Print Screen — takes a screenshot of the active window. It is the equivalent of pressing Alt + Print Screen on a standard keyboard.
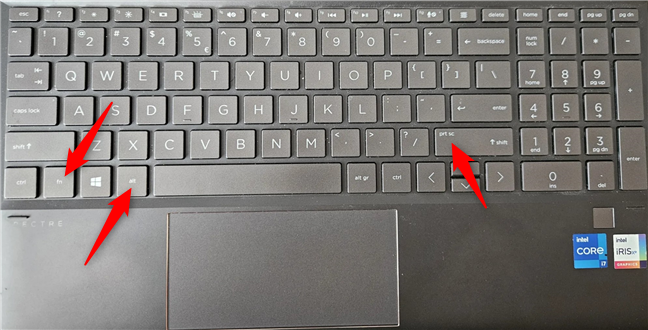
Screenshot shortcut keys for keyboards with an Fn key
On some keyboards, the Print Screen button might not perform two or more actions. However, it will not work until you press the Fn lock key. The Fn key works on such keyboards as a lock for keys like the function and multimedia keys. For example, in the previous screenshot, you can see that my Right Shift key also acts as the Print Screen key.
If you have such a keyboard, press the Fn key to unlock the additional special functions of keys, and then use one of the screenshot shortcuts I described in this guide’s first chapters. They should work now.
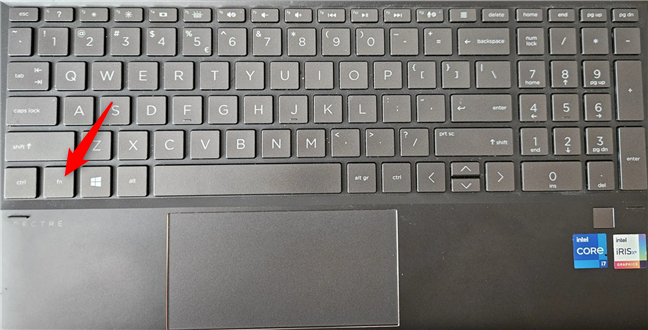
Fn (Function) key on a keyboard
On some Microsoft Surface tablets, you need to use different screenshot shortcuts because some Type Cover models don’t include a Print Screen button. Instead, Microsoft offers the following Surface-specific shortcuts for Windows 11 and Windows 10:
- Fn + Spacebar — this shortcut saves an image of your current screen to the clipboard, so that you can paste it into any application. It is the equivalent of pressing the standard Print Screen key.
- Fn + Alt + Spacebar — this shortcut saves a screenshot of the active window to the clipboard so that you can paste it into any app. It is the equivalent of pressing the Alt + Print Screen keyboard shortcut.
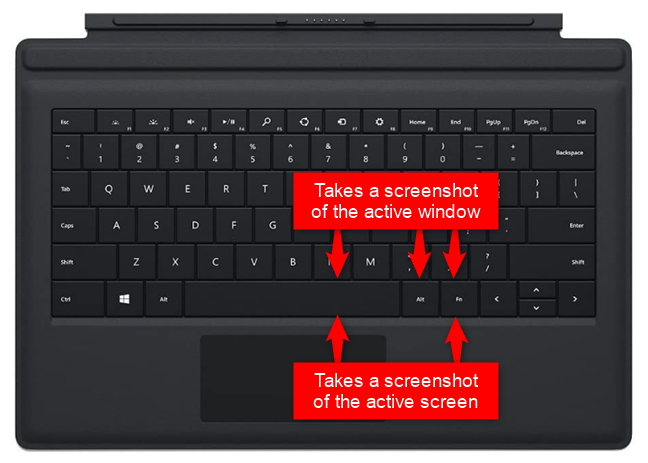
Keyboard screenshot shortcut keys on a Surface Type Cover (1)
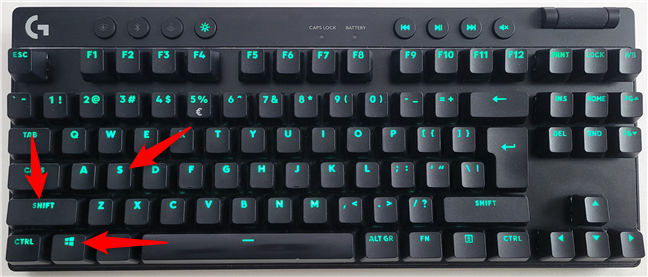
5. How to take a screenshot on Windows using the Windows + Shift + S keyboard shortcut
Windows 10 and Windows 11 also let you capture screenshots using the Windows + Shift + S shortcut. However, depending on which operating system you have on your computer, this keyboard shortcut triggers a different app. In Windows 10, you get Snip & Sketch, while in Windows 11, it opens the Snipping Tool. Here’s what happens in both cases:
5.1. How to screenshot in Windows 10 with the Win + Shift + S shortcut
If you use Windows 10, pressing Windows + Shift + S on your keyboard allows you to take a screenshot using Snip & Sketch. If you’d like to learn in detail how it works, check out this guide: How to use Snip & Sketch to take screenshots in Windows 10. Still, in case you don’t have the time for that, here’s a short breakdown:
Press Win + Shift + S on your keyboard.

The Windows + Shift + S screenshot shortcut
Four options appear at the top of the screen: rectangular, free-form, window, and fullscreen. You must choose the one you prefer.
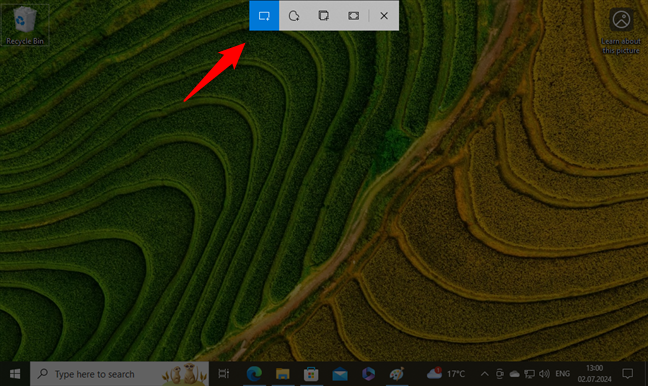
Screenshotting in Windows 10 with Snip & Sketch
Then, you take the screenshot by dragging the cursor on the screen to select the area you want, just like I did in the next image, using a rectangular shape.
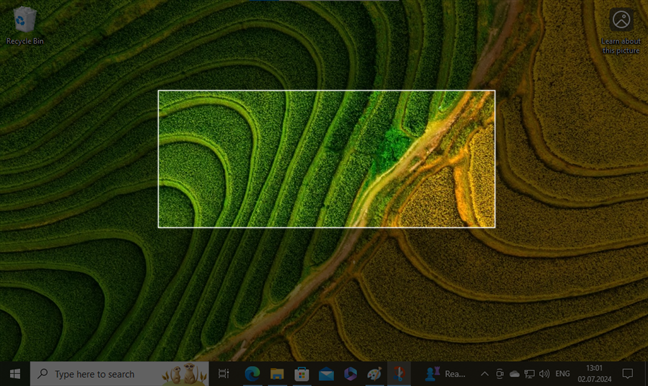
Selecting the area to screenshot
Once you’ve selected what to screenshot, the Snip & Sketch app saves the snip (screenshot) in the clipboard. You also get a notification in the bottom-right area of the screen. If you want, you can click or tap this notification to launch the Snip & Sketch app and do some editing on the screenshot.
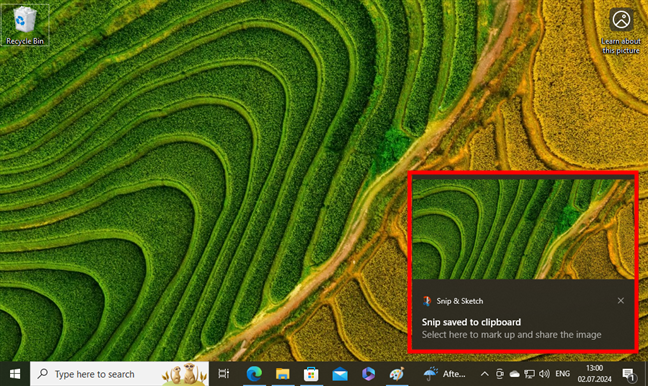
Snip saved to clipboard
This is what the Snip & Sketch app looks like when loading a screenshot you’ve taken using it.
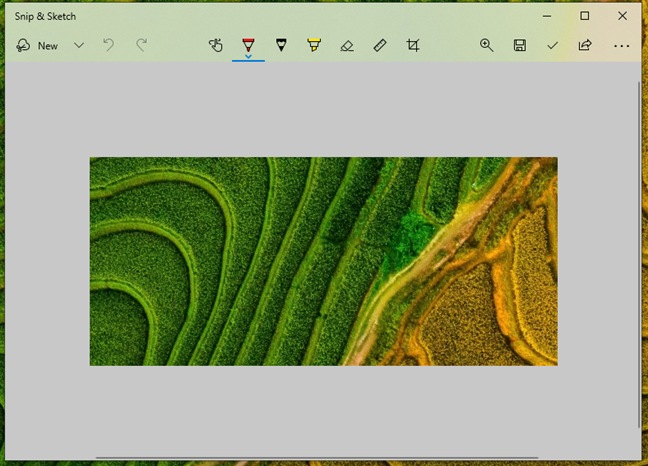
A screenshot in Snip & Sketch
NOTE: While the old Snip & Sketch app is the default option in Windows 10, it’s no longer present in Windows 11, as Microsoft decided to replace it with another app called Snipping Tool.
5.2. How to screenshot in Windows 11 with the Win + Shift + S shortcut
The Snipping Tool is a great desktop app for taking screenshots. It can create all kinds of screenshots, and you can also use it to do some light editing. If you want to know all the ins and outs of using this app to screenshot, read this guide we dedicated to it: How to use the Snipping Tool in Windows 11. If you don’t have the patience to read that right now, here are the basics you should know:
Although you can choose to manually launch the Snipping Tool and only then use it to screenshot, the fastest way to work with it is to simultaneously press Windows + Shift + S on your keyboard.
Using the Windows + Shift + S screenshot shortcut
When you screenshot with the Snipping Tool, Windows dims your screen, and you can press the left mouse button and drag the cursor to mark the area to capture. Then, release the mouse button. If you have a touchscreen, draw the area you want to screenshot using your finger (or pen).
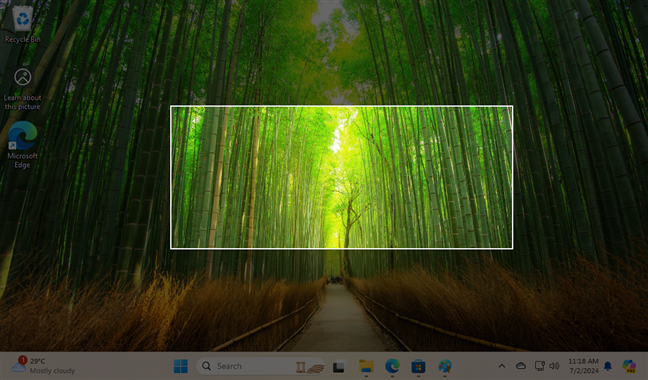
Screenshot of a region in Windows 11
Windows 11 then saves the screenshot in its clipboard, and lets you know about it in a notification displayed in the bottom-right corner of the screen.
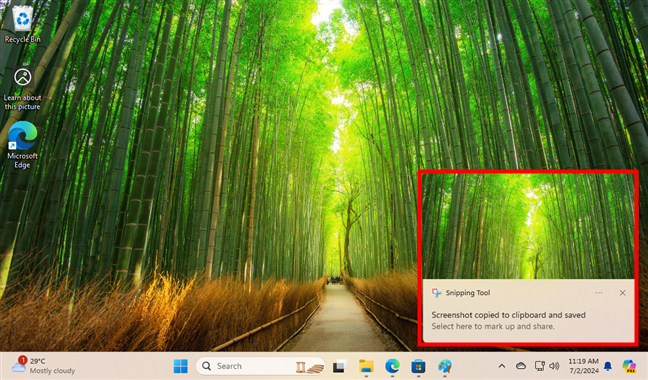
Screenshot copied to clipboard and saved
Clicking or tapping the notification shown earlier makes Windows 11 load the screenshot in the Snipping Tool app, where you can quickly edit it as you like.
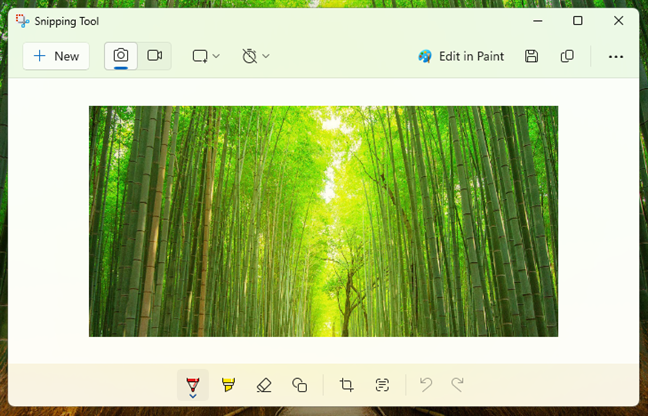
A screenshot in Windows 11’s Snipping Tool
6. How to take a screenshot on a Microsoft Surface tablet (or other tablets)
On some Windows tablets, including Microsoft Surface models, it can be hard to guess how to take a screenshot. If you use your tablet without a keyboard attached, then the Print Screen key is also unavailable. The best solution to screenshot on Windows, in this case, is to use the hardware buttons available on your tablet. You can usually take full-screen screenshots on Windows tablets by simultaneously pressing the Power button and either the Volume Up or Volume Down button. You can then find that screenshot in your Pictures folder, in the Screenshots subfolder.
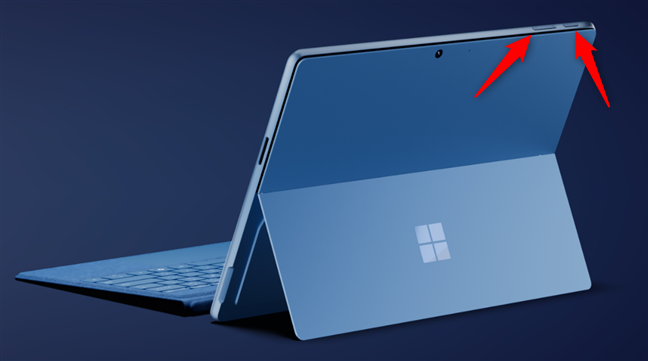
Screenshot shortcut on a Microsoft Surface Pro 11th Edition
Image source: Microsoft
If you have a pen for your tablet, like a Surface Pen connected to your Surface Pro or a ThinkPad Pen Pro paired to your Lenovo ThinkPad X1, you may also be able to capture screenshots with it. In most cases, you can do so by double-pressing the top button. This action will take a screenshot and open it in a built-in application like Snip & Sketch or Snipping Tool, where you can edit and save it.

Double-click the top button of a Surface Pen to take a screenshot
Image source: Microsoft
7. How to screenshot on Windows using the Windows + Alt + Print Screen shortcut (Xbox Game Bar)
In either Windows 11 or Windows 10, you can also use the Xbox Game Bar to take screenshots of the active window. Although it’s a feature designed to use while playing games, you can also benefit from it when you’re not gaming. To capture the active window, which can be a game or not, press the Windows + Alt + Print Screen keys.
Screenshot shortcut keys: Win + Alt + Print Screen
When you do that, Windows automatically creates and saves a screenshot on your PC in the Captures subfolder found in your default Videos user folder. The screenshot’s file name includes the name of the game or app where you took it, as well as its date and time.

Screenshots taken with Xbox Game Bar have unique names
NOTE: Instead of using the Windows + Alt + Print Screen shortcut, you can also bring up the Xbox Game Bar by pressing Windows + G and then clicking or tapping the Take screenshot button highlighted below.

The Take screenshot button from Windows 11’s Xbox Game Bar
What’s your favorite method of taking screenshots in Windows?
As you can see, there are many ways to shoot a screenshot in Windows. Most of them are about capturing the whole screen, while some of them also allow you to take a screenshot of just a window. Unless you have complex needs, you can use the built-in tools from Windows 10 and Windows 11 without installing third-party apps. Before closing this tutorial, tell me: How do you screenshot on Windows? Do you use the old-school method of pressing the Print Screen shortcut key and then pasting things into Paint? Or have you switched to other, more productive methods like pressing Windows + Print Screen? Comment below and let me know.