
If you click our links and make a purchase, we may earn an affiliate commission.
Learn more
Wine is an interesting tool, allowing you to run Windows applications on Linux systems, even on Raspberry Pi. It’s not perfect, and not all applications work with it, but it might help if you’re switching from Windows to Linux. Here is how to set it up on your Raspberry Pi.
The easiest way to install Wine on Raspberry Pi OS is to use Pi-Apps, a tool that helps you install applications that are not available with the default package manager. Once Pi-apps is installed, Wine (and dozens of other apps) can be installed in one click.
If all of this is new to you, don’t worry, I’ll explain everything step-by-step as usual.
If you’re new to Raspberry Pi or Linux, I’ve got something that can help you right away!
Download my free Linux commands cheat sheet – it’s a quick reference guide with all the essential commands you’ll need to get things done on your Raspberry Pi. Click here to get it for free!
Want the best experience? Become a premium member for ad-free browsing, access exclusive content, and ask questions in our private forums. Your membership helps support the site!
Prerequisites to run Wine on Raspberry Pi
Before installing anything else on your Raspberry Pi, make sure to follow these guidelines, especially the software part.
Hardware
There are no limitations to the kind of hardware you can use to set up Wine on a Raspberry Pi.
Anything works and here is what I used to test and write this tutorial:
- Raspberry Pi 4 (4 GB): I use it for everything, the best choice for most projects currently.
- Raspberry Pi OS with Desktop (the default one: Bullseye, 32-bit) installed on this USB stick, my favorite. You can also use this fast SD card if you prefer.
- My usual monitor (review here) and my favorite Raspberry Pi keyboard (here is the link with my comparison of all Raspberry Pi keyboards).
Obviously, the recommendations won’t be the same if your goal is to run Notepad or Photoshop, but basically, any model can run Wine with light Windows applications.
Side note: the installation already takes a long time with a Raspberry Pi 4 and fast storage, so even if you can get it running on a Pi Zero with a slow SD card, keep in mind that it might take way longer to install.
Operating system
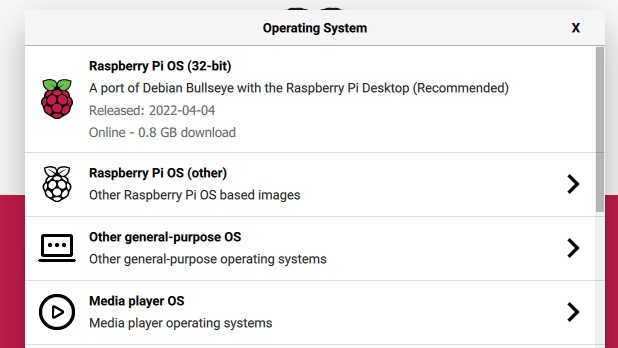
A 32-bit operating system, like Raspberry Pi OS, is mandatory to follow this tutorial.
If you use a 64-bit version, you won’t have the option in Pi-Apps (at the time of writing), and as far as I understand, it’s a bit tricky to get it working manually. You can try Box64 instead but I didn’t have much success with it, and that would be a full tutorial for another day anyway :-).
So, try to get a Raspberry Pi with RPI OS 32-bit installed and it will be much easier. That’s why I installed the default choice with Raspberry Pi Imager instead of the 64-bit edition I generally use when writing tutorials (because I know there are often differences with it).
If you need some guidance to install or reinstall your system on Raspberry Pi, click on this link to read my tutorial.
Then, make sure your system is connected to the Internet and up-to-date:sudo apt update
sudo apt upgrade -y
You can obviously use the graphic tools to do the same thing if you don’t like command lines :-).
I generally recommend configuring SSH, or VNC, so you can follow the next steps from your computer if you don’t have a comfortable setup with your Raspberry Pi. Click on the links for more details on how to use this to be more efficient.
Are you a bit lost in the Linux command line? Check this article first for the most important commands to remember and a free downloadable cheat sheet so you can have the commands at your fingertips.
Pi-Apps
Once the system is ready, Pi-Apps can be installed with one command line.
As mentioned in the introduction, Pi-Apps is a free tool, including a bunch of scripts that will help us to install applications that are not available with APT (or the “Add/Remove Software” tool if you use the GUI).
You can get it from their website, or just copy/paste this line into a terminal:wget -qO- https://raw.githubusercontent.com/Botspot/pi-apps/master/install | bash
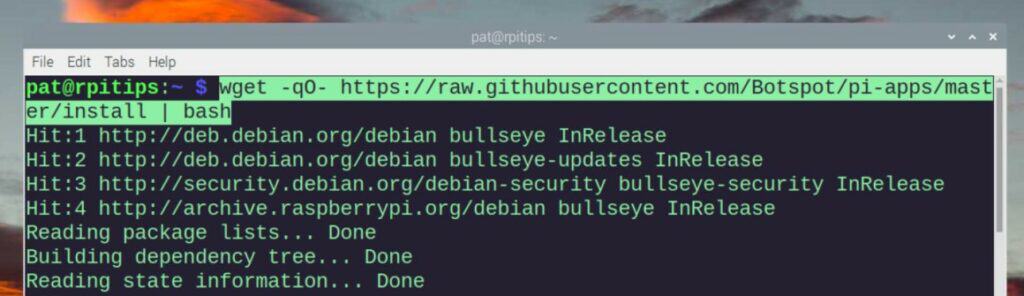
It will download a script that will do everything for you. Just wait a few seconds for the installation to complete.
Once installed, a shortcut is added to your Desktop, and you can also find Pi-Apps in the main menu under Accessories.
Install Wine on Raspberry Pi
Once Pi-Apps is installed on a 32-bit version of Raspberry Pi OS, Wine is available in Pi-Apps, under Tools and Emulation. It can be installed in one click from there.
- Double-click on the shortcut on your Desktop to run Pi-Apps.
- Browse to Tools > Emulation, or use the search engine to find Wine in the apps list.

Once you have the same screen as on my screenshot, you can simply click on “Install” at the bottom right of the window to start the installation. Pi-Apps will open a terminal and run all the commands for you.
The installation will take a while to complete (it took me at least 20 minutes on a Pi 4), it’s a bit like installing Windows, so it’s normal. Don’t worry about all the various messages showing up in the terminal, just be patient.
During the installation, the Wine configuration window will open. You need to close it manually or the installation won’t continue. We’ll get back to this tool in the next section.
Wait a few more minutes, have a coffee, and you should have the installation completed soon. Once done, the line with “Wine (x86)” in Pi-Apps is colored in green. You can now close Pi-Apps, we don’t need it anymore.
Wine configuration on Raspberry Pi
Now that Wine is installed, let’s take a quick look at the Wine configuration tool.
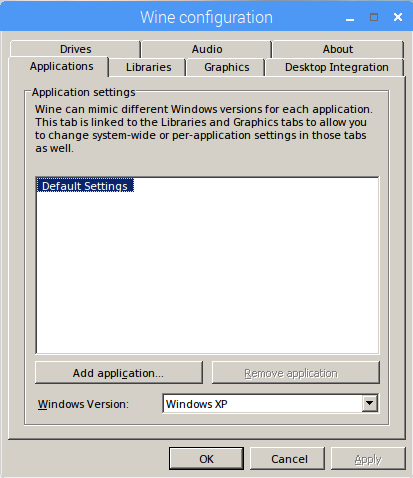
Launch the Wine configuration tool by either selecting it from the main menu of your Raspberry Pi (System Tools > Wine Configuration) or by running the following command in a terminal:winecfg
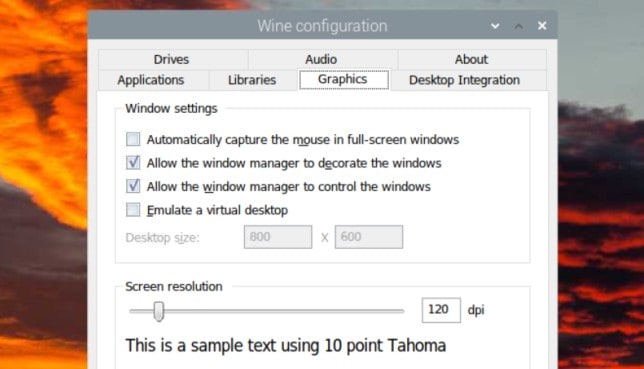
The Wine Configuration Tool will open with several tabs and options for customizing your installation according to your requirements. Here is a short summary of each tab available:
- Applications: The “Application” tab allows you to create settings that are specific to individual applications running through Wine. You may have to come back there later if you try to install an app that doesn’t work with the default settings.
- Libraries: This tab provides the ability to override the default loading behavior of DLLs (Dynamic Link Libraries) in Wine. DLLs are essential components of Windows applications that provide various functionalities and can be shared among multiple applications.
- Graphics: This tab allows you to configure various settings related to the graphical display of Windows applications running through Wine.

- Desktop integration: This provides options to customize the appearance and behavior of Windows applications, allowing you to integrate them more seamlessly with your Linux desktop environment.
- Drives: This tab lets you control how Windows drive letters are mapped to Unix paths within the Wine environment. You can specify the mapping between Windows drive letters (such as C:, D:, etc.) and the corresponding directories or partitions in your Unix file system.
- Audio: If needed, you can use this tab to change the audio devices used with wine.
- About: A simple screen giving you the Wine version and allowing you to change the Windows system owner and organization names.
In most cases, the default settings will be fine, so you don’t have to worry much about this. I can’t cover everything that’s there, I just want to give you an overview of the thing. Check the online documentation for more details on a specific feature.
Note: Remember that Wine has been around forever on Linux systems (first version in 1993). The installation on a Raspberry Pi might be a bit trickier, but once done, using Wine on a Raspberry Pi is not that different from using it on any Linux computer. So, you’ll easily find help online.
Example: Run Notepad++ on Raspberry Pi
Now that Wine is installed and configured, let’s proceed with an example. We’ll try this with Notepad++, a popular text editor only available for Windows.
Keep in mind that not all Windows applications may work flawlessly, so it’s recommended to check Wine’s compatibility database. That’s where you’ll also find specific instructions to change your configuration to make an app work if needed.
Here are the steps to install Notepad++ using Wine:
Remember that all Wine applications run thinking they are on a Windows system, it’s not natively running on Raspberry Pi OS, which means there are a few things to keep in mind.
For example, if you try to open a file with Notepad++, you can’t go directly to /home/$USER, it doesn’t exist. But when we configured Wine, we saw the links existing between Windows drive letters and Linux folders. With the default settings, opening Z:\ on Notepad++ will give you access to the Raspberry Pi OS files:
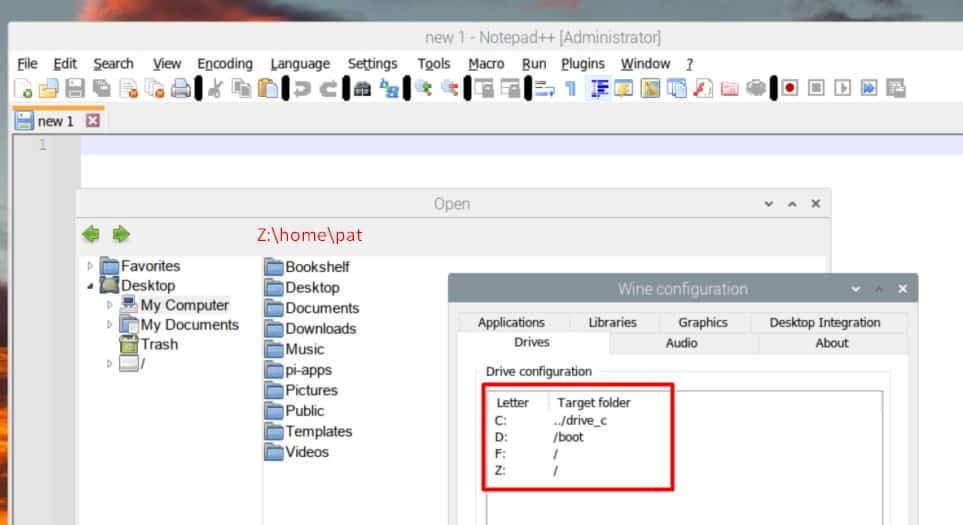
At this point, it might be a good idea to add a new drive (H:\ for example), pointing to your home directory, or your project folder, to save time within Notepad++.
Anyway, we have successfully installed Wine on Raspberry Pi OS and validated that a Windows app can run with it. Now, it’s time to test your favorite applications and see which one you can use on Raspberry Pi OS.
But remember, native applications always work better, and excellent alternatives are available, as you can see in these articles:
- 17 Best Apps to Use a Raspberry Pi as a Desktop PC
- Can a Raspberry Pi 4 really Replace your Desktop PC? (I Tried)
If you are looking for exclusive tutorials, I post a new course each month, available for premium members only. Join the community to get access to all of them right now!
You may also like:
- 57 Raspberry Pi commands you need to know
- Master Raspberry Pi in 30 days with this
- Auto start any program when the Raspberry Pi boots up
- Remote access your Pi from anywhere (best apps)
- Create an image of your SD card (safety first!)
Related questions
Is Wine an emulator?
Wine is not an emulator. Wine stands for “Wine Is Not an Emulator.” It is a compatibility layer or compatibility framework that allows you to run Windows applications on Unix-like operating systems such as Linux, macOS, and Pi.
Emulators, on the other hand, simulate an entire hardware environment, including the CPU, memory, and other system components, to enable the execution of software designed for a different platform. They aim to replicate the behavior of a specific hardware architecture.
Wine, however, does not emulate the entire Windows operating system or hardware environment. Instead, it provides a set of libraries and APIs that reimplement the Windows API (Application Programming Interface) on Unix-like systems.
What are the kinds of Windows applications that can run well with Wine?
Wine has made significant progress in compatibility with a wide range of Windows applications, but the level of compatibility can vary depending on the complexity and age of the application.
As a general rule, simpler or older applications tend to have better compatibility with Wine. These applications often rely on simpler API calls and have fewer dependencies, making them more likely to work well with Wine.
I have many applications already installed on Windows, can I copy them to the Raspberry Pi?
Copying Windows applications directly from a Windows installation to a Raspberry Pi running Wine is not recommended.
Wine is not designed to work directly with Windows installations or copy Windows applications in that manner. Wine requires specific configurations and compatibility layers to run Windows applications on a Unix-like system.
It’s recommended that you download and install the Windows applications on your Raspberry Pi using Wine from scratch, rather than attempting to copy them from a Windows installation. This may require additional setup steps, but it will ensure that your applications are correctly configured and run properly on the Raspberry Pi.
Whenever you’re ready, here are other ways I can help you:
The RaspberryTips Community: If you want to hang out with me and other Raspberry Pi fans, you can join the community. I share exclusive tutorials and behind-the-scenes content there. Premium members can also visit the website without ads.
Master your Raspberry Pi in 30 days: If you are looking for the best tips to become an expert on Raspberry Pi, this book is for you. Learn useful Linux skills and practice multiple projects with step-by-step guides.
The Raspberry Pi Bootcamp: Understand everything about the Raspberry Pi, stop searching for help all the time, and finally enjoy completing your projects.
Master Python on Raspberry Pi: Create, understand, and improve any Python script for your Raspberry Pi. Learn the essentials step-by-step without losing time understanding useless concepts.
You can also find all my recommendations for tools and hardware on this page.
I’m the lead author and owner of RaspberryTips.com.
My goal is to help you with your Raspberry Pi problems using detailed guides and tutorials.
In real life, I’m a Linux system administrator with web developer experience.
Привет, Хабр.
Наверное каждый разработчик на определенном этапе задумывался о собственном IoT-проекте. Internet of Things сейчас поистине вездесущ и многим из нас хочется попробовать свои силы. Но не все знают, с чего начать и за что браться в первую очередь. Сегодня давайте посмотрим, как легко и непринужденно запустить свой собственный IoT-проект под Raspberry Pi 2, используя Windows 10 IoT Core и DeviceHive.
Деплоим Windows 10 приложения на Raspberry Pi 2
Для начала давайте установим Windows 10 IoT Core на Raspberry Pi. Для этого нам потребуется Windows 10 IoT Core Dashboard, который можно взять вот здесь. Там же можно при желании скачать отдельно ISO-образ, но особого смысла в этом нет — инструмент сделает это за вас.
Затем мы загружаем образ на misroSD-флешку.

Подключаем флешку к Raspberry и включаем. Первую загрузку ОС придется подождать, мгновенной она, конечно, не будет. Когда устройство «оживет» — подключаем Raspberry к локальной сети по Ethernet. Снова открываем Windows 10 IoT Core Dashboard и видим в списке «Мои устройства» заветную строчку. К слову, можно обойтись и без проводного подключения – список WiFi-донглов, поддерживаемых Windows 10 IoT Core, находится тут.
Далее нам понадобится Visual Studio 2015. Если она у вас все еще не установлена (хотя вы бы вряд ли читали эту статью в таком случае), можно скачать Community Edition.
Создаем новый или же открываем существующий Windows Universal проект. Кстати, если в проекте не нужен UI, можно создать Headless Application, выбрав тип проекта Windows IoT Core Background Application.

Выбираем деплой на Remote Machine.

Вводим адрес Raspberry. Посмотреть его можно на стартовом экране Win10 IoT Core или в Windows 10 IoT Core Dashboard.
Собственно, Internet of Things
Раз уж у нас статья о embedded — «моргать светодиодами» придется в любом случае. Хорошо, что мы имеем дело с DeviceHive, у которого заготовлены инструменты на все случаи жизни и все платформы. Поэтому светодиод будет виртуальный и тоже на .NET.
Клонируем master-ветку DeviceHive.NET репозитория с GitHub. На момент написания статьи рабочие примеры для Win10 IoT были именно там.
Открываем solution DeviceHive.Device и в файле Program.cs проекта VirtualLed настраиваем доступ к песочнице DeviceHive.
using (var service = new RestfulDeviceService("http://playground.devicehive.com/api/rest"))
{
    // create a DeviceHive network where our device will reside
    var network = new Network("Network WPNBEP", "Playground Network", "%NETWORK_KEY%");

    //...
}
Если вы интересуетесь IoT, но по какой-то немыслимой причине еще не обзавелись DeviceHive Playground – это можно сделать здесь.

А управлять нашим «светодиодом» будет… Нет, пока не Raspberry, а клиент виртуального светодиода. Пример находится в проекте VirtualLedClient солюшена DeviceHive.Client. Его тоже нужно настроить в файле Program.cs:
var connectionInfo = new DeviceHiveConnectionInfo("http://playground.devicehive.com/api/rest", "%ACCESS_KEY%");
Самое интересное
Наше приложение на Raspberry Pi будет не просто кнопочкой включения/выключения светодиода, а практически полноценной админкой всех IoT-устройств нашей DeviceHive-сети. При желании, конечно, можно упростить его до той самой «кнопочки» или наоборот расширить, например, до клиента, управляющего роботом телеприсутствия.
Готовое приложение находится в том же репозитории, в solution DeviceHive.WindowsManager.Universal. Не будем останавливаться на нюансах гайдлайнов Win10 – корни приложения растут еще из Win8. Не будет тут и MVVM – все и так знают, как его применять. Давайте сосредоточимся на главном: нам нужна консоль мониторинга и управления устройствами, подключенными к DeviceHive, под Windows 10 на Raspberry Pi2.

Для DeviceHive реализовано три клиентских библиотеки:
- DeviceHive.Client – для «большого» .NET 4.5 и выше. Использует WebSocket4Net.
- DeviceHive.Client.Portable – для Windows 8.1 и Windows Phone 8.1. Использует нативные WebSockets.
- DeviceHive.Client.Universal – для всех редакций Windows 10, в том числе для Win10 IoT Core. Именно она используется в нашем приложении.
Наследуем ClientService от DeviceHiveClient и инициализируем его сеттингами:
DeviceHiveConnectionInfo connInfo;
if (!String.IsNullOrEmpty(Settings.Instance.CloudAccessKey))
{
    connInfo = new DeviceHiveConnectionInfo(Settings.Instance.CloudServerUrl, Settings.Instance.CloudAccessKey);
}
else
{
    connInfo = new DeviceHiveConnectionInfo(Settings.Instance.CloudServerUrl, Settings.Instance.CloudUsername, Settings.Instance.CloudPassword);
}
current = new ClientService(connInfo, new RestClient(connInfo));
А также указываем не использовать LongPolling, а только WebSocket, дабы не упираться в лимит одновременных HTTP-запросов:
SetAvailableChannels(new Channel[] {
    new WebSocketChannel(connectionInfo, restClient)
});

Загружаем список девайсов и группируем их по сетям в MainPage:
var deviceList = await ClientService.Current.GetDevicesAsync();
var networkList = (await ClientService.Current.GetNetworksAsync()).FindAll(n => n.Id != null);
foreach (Network network in networkList)
{
    var devices = deviceList.FindAll(d => d.Network?.Id == network.Id);
    if (devices.Count > 0)
    {
        networkWithDevicesList.Add(new NetworkViewModel(network) { Devices = devices });
    }
}
А вот и наш виртуальный светодиод:

Переходим на DevicePage, подгружаем информацию о нем:
Device = await ClientService.Current.GetDeviceAsync(deviceId);

Переключаемся на вкладку с уведомлениями. Уведомления отправляются от управляемого устройства к управляющему устройству. В нашем случае – от VirtualLedClient к VirtualLed.
Инициализируем автоподгружающийся список с «бесконечным» скроллом:
NotificationFilter filter = new NotificationFilter()
{
    End = filterNotificationsEnd,
    Start = filterNotificationsStart,
    SortOrder = SortOrder.DESC
};
var list = new IncrementalLoadingCollection<Notification>(async (take, skip) =>
{
    filter.Skip = (int)skip;
    filter.Take = (int)take;
    return await ClientService.Current.GetNotificationsAsync(deviceId, filter);
}, 20);
Если не определена конечная дата фильтрации списка нотификаций, подписываемся на новые уведомления, которые будут приходить через вебсокет:
notificationsSubscription = await ClientService.Current.AddNotificationSubscriptionAsync(new[] { deviceId }, null, async (notificationReceived) =>
{
    await Dispatcher.RunAsync(CoreDispatcherPriority.Normal, () =>
    {
        lock (NotificationsObservable)
        {
            if (!NotificationsObservable.Any(c => c.Id == notificationReceived.Notification.Id))
            {
                NotificationsObservable.Insert(0, notificationReceived.Notification);
            }
        }
    });
});
Если попробовать переключать наш виртуальный светодиод, то уведомления о его новом состоянии тут же отобразятся в списке.

Если поменять настройки фильтрации, то автоподгружающийся список заново инициализируется с новым фильтром.

Теперь пришла очередь вкладки команд. Команды похожи на нотификации, но направлены от управляющего устройства к управляемому, а также могут иметь статус и результат выполнения.
CommandFilter filter = new CommandFilter()
{
    End = filterCommandsEnd,
    Start = filterCommandsStart,
    SortOrder = SortOrder.DESC
};
var list = new IncrementalLoadingCollection<Command>(async (take, skip) =>
{
    filter.Skip = (int)skip;
    filter.Take = (int)take;
    return await ClientService.Current.GetCommandsAsync(deviceId, filter);
}, 20);
Аналогично подписываемся на новые команды:
commandsSubscription = await ClientService.Current.AddCommandSubscriptionAsync(new[] { deviceId }, null, async (commandReceived) =>
{
    await Dispatcher.RunAsync(CoreDispatcherPriority.Normal, () =>
    {
        lock (CommandsObservable)
        {
            if (!CommandsObservable.Any(c => c.Id == commandReceived.Command.Id))
            {
                CommandsObservable.Insert(0, commandReceived.Command);
            }
        }
    });
});

Поскольку мы делаем инструмент не только для мониторинга, но и для управления устройствами в DeviceHive сети, нужно реализовать возможность отправки команд:
var parameters = commandParams.Text != "" ? JObject.Parse(commandParams.Text) : null;
var command = new Command(commandName.Text, parameters);
await ClientService.Current.SendCommandAsync(deviceId, command, CommandResultCallback);
При отправке команды мы подписались на ее обновление методом CommandResultCallback. Обрабатываем результат выполнения команды:
foreach (Command cmd in CommandsObservable)
{
  if (command.Id == cmd.Id)
  {
        // Command class doesn't implement INotifyPropertyChanded to update its result,
        // so old command is replaced by command with result:
        var index = commandsObservable.IndexOf(cmd);
        commandsObservable.RemoveAt(index);
        commandsObservable.Insert(index, command);
        break;
    }
}

Чтобы не копировать команды вручную, нужно предусмотреть клонирование команд. Выделяем, клонируем, если нужно – редактируем, отправляем.

Задача выполнена! Как видите, Raspberry Pi 2 c Windows 10 IoT Core и DeviceHive – отличное решение для практически любой задачи в контексте Internet of Things. Прикрутите пару кнопок, dashboard и подключите Raspberry Pi к телевизору в гостиной – мониторинг и управление умным домом готово. Купили лишних Raspberry? Не вопрос, библиотека DeviceHive.Client умеет работать не только в качестве управляющего клиента, но и в качестве управляемого девайса – реализуем Headless Application, подключаем датчики/реле и устанавливаем Raspberry Pi по дому. Ограничивает вас лишь ваша фантазия.
Заключение
Появление Windows 10 IoT Core – это именно то, чего ждали embedded-разработчики. Когда ресурсов даже самого мощного микроконтроллера на .NET Micro Framework (для которого, кстати, тоже есть реализация DeviceHive) не хватает, а ставить полноценный компьютер на Windows – все равно, что стрелять из пушки по воробьям, то Windows 10 IoT Core – настоящее спасение. И пусть пока есть нюансы с аппаратным ускорением графики и недостатком драйверов для некоторых USB-устройств – это всё простительно. Ведь еще недавно мы только мечтали, чтобы Windows-приложения, работающие на настольных ПК и планшетах запускались не только на телефонах, но и на микрокомпьютерах. А теперь – это реальность, добро пожаловать в «сегодня».

Об авторе
Антон Седышев — Senior .NET-разработчик «DataArt »
В IT работает с далекого 2003, к команде DataArt присоединился в 2012. Ранее занимался разработкой веб- и мобильных проектов, автоматизицией логистических процессов на складах крупной международной компании. Сейчас выступает в роли ведущего .NET-разработчика и идеолога Microsoft-сообщества DataArt. Занимается разработкой приложений на Windows Phone и Windows 10, сервисом DeviceHive и embedded-технологиями вообще. В свободное время работает над собственным OpenSource embedded-проектом по интеграции .NET Micro Framework устройства в автомобили BMW.
Всем привет, хочу поделится с вами статьей о том как запустить на arm процессорах приложения под windows x86 с помощью Exagear и Wine. В частности на телефоне с установленным Nethunter, хотя аналогичные действия можно выполнить и на других девайсах (Raspberry PI, OnDroid и т.д.).
И так приступим к делу:
1. Нам понадобится скачать с официального сайта Exagear пакеты для установки под своё устройство:
Ссылка скрыта от гостей
Ссылка скрыта от гостей
Ссылка скрыта от гостей
Ссылка скрыта от гостей
2. Скачиваем два архива, из таблеткой от жадности Exagear, в атачах: pk-000000003618.zip ubt_x32a32_al.zip
3. Перемещаем скачанный архив с официального сайта Exagear на наше устройство, и распаковываем:
Код:
tar -xvzpf exagear-desktop-armv7.tar.gz4. В директорию куда распаковали архив копируем ключ из атачей к статье, предварительно распаковав.
5. Запускаем скрипт установки Exagear:
Код:
sudo ./install-exagear.sh6. Ждем успешного окончания установки, после копируем с заменой файл из второго архива атачей в директорию куда установился Exagear:
7. Теперь запускаем в консоле Exagear:
Код:
service exagear start
exagear8. Что б убедится что мы находимся в среде x86, вводим команду в терминале:
и видим ответ:
9. Ставим Wine:
10. Ждем окончания установки.
Теперь у нас всё настроено для запуска x86 приложений, просто копируем наш exe файл на устройство и запускаем его командой в терминале:
Результат:
-
pk-000000003618.zip
pk-000000003618.zip
174 байт
· Просмотры: 2 463
-
ubt_x32a32_al.zip
ubt_x32a32_al.zip
530,9 КБ
· Просмотры: 2 543
-
Screenshot_20180904-143829.png
140 КБ
· Просмотры: 1 621
-

Screenshot_20180904-143829.png
13,3 КБ
· Просмотры: 1 034

-
-
#2
Exagear гораздо интересней тем, что позволяет запускать 86 приложения win на андройде и без нетхантер и wine. Но тема достаточно не простая, с костылями. Кому интересно на 4pda есть ветка по exagear.
-
-
#3
Exagear гораздо интересней тем, что позволяет запускать 86 приложения win на андройде и без нетхантер и wine. Но тема достаточно не простая, с костылями. Кому интересно на 4pda есть ветка по exagear.
В любом случае если даже использовать
Ссылка скрыта от гостей
, Exagear использует wine, просто он там уже предустановлен. Впринципи согласен с тобой, если пользователю именно нужно запускать EXE приложения на андроид, то ему будет прощё пользуваться APK версией. У меня просто была другая цель — завести полноценный експлоит doublepulsar которий требует wine, под nethunter.
-
-
#4
В любом случае если даже использовать
Ссылка скрыта от гостей
, Exagear использует wine, просто он там уже предустановлен. Впринципи согласен с тобой, если пользователю именно нужно запускать EXE приложения на андроид, то ему будет прощё пользуваться APK версией. У меня просто была другая цель — завести полноценный експлоит doublepulsar которий требует wine, под nethunter.
Мммм, а не проще тогда задействовать термакс?
Под него есть хорошие репы, да и по отдельности инструменты присутствуют. Думаю скоро выделю время и черкану здесь статью по ним. А то termux инструмент хороший, а информации здесь по нему не густо.
-
-
#5
Мммм, а не проще тогда задействовать термакс?
Под него есть хорошие репы, да и по отдельности инструменты присутствуют. Думаю скоро выделю время и черкану здесь статью по ним. А то termux инструмент хороший, а информации здесь по нему не густо.
В термуксе не получиться завести полноценный експлоит doublepulsar который требует wine, для успешной отработки.
-
-
#6
В термуксе не получиться завести полноценный експлоит doublepulsar который требует wine, для успешной отработки.
тоже верно..
кстати, у меня на termux стоит debian, надо будет позже попробовать wine на него установить.
-
-
#7
Bash:
Package realpath is not available, but is referred to by another package.
This may mean that the package is missing, has been obsoleted, or
is only available from another source
However the following packages replace it:
  manpages-pl

E: Package 'realpath' has no installation candidate
┌─[✗]─[root@kali]─[~]
└──╼ #apt install manpages-pl
Reading package lists... Done
Building dependency tree
Reading state information... Done
manpages-pl is already the newest version (1:0.7-1).
0 upgraded, 0 newly installed, 0 to remove and 16 not upgraded.
Хелпаните, что не так? Как исправить?
-
-
#8
Bash:
Package realpath is not available, but is referred to by another package.
This may mean that the package is missing, has been obsoleted, or
is only available from another source
However the following packages replace it:
  manpages-pl

E: Package 'realpath' has no installation candidate
┌─[✗]─[root@kali]─[~]
└──╼ #apt install manpages-pl
Reading package lists... Done
Building dependency tree
Reading state information... Done
manpages-pl is already the newest version (1:0.7-1).
0 upgraded, 0 newly installed, 0 to remove and 16 not upgraded.
Хелпаните, что не так? Как исправить?
проверь репозитории, на гите посмотривот это SITL installation on Ubuntu 18.04 Error: Package ‘realpath’ has no installation candidate · Issue #8377 · ArduPilot/ardupilot
-
-
#9
Это?

На гите я смотрел эту тему, coreutils у меня уже был установлен.
Layl2018
-
-
#11
Bash:
Package realpath is not available, but is referred to by another package.
This may mean that the package is missing, has been obsoleted, or
is only available from another source
However the following packages replace it:
  manpages-pl

E: Package 'realpath' has no installation candidate
┌─[✗]─[root@kali]─[~]
└──╼ #apt install manpages-pl
Reading package lists... Done
Building dependency tree
Reading state information... Done
manpages-pl is already the newest version (1:0.7-1).
0 upgraded, 0 newly installed, 0 to remove and 16 not upgraded.
Хелпаните, что не так? Как исправить?
Я сделал так:
1. Исправил в конфиге realpath на manpages.pl
2. wget
Ссылка скрыта от гостей
&& sudo dpkg -i realpath_*.deb
3. :# bash install-exagear.sh
Завелось
-
-
#12
Я сделал так:
1. Исправил в конфиге realpath на manpages.pl
2. wgetСсылка скрыта от гостей
&& sudo dpkg -i realpath_*.deb
3. :# bash install-exagear.sh
Завелось
С realpath все решилось, но возникла проблема с alsa-base:
Код:
Package alsa-base is not available, but is referred to by another package.
This may mean that the package is missing, has been obsoleted, or
is only available from another source

E: Package 'alsa-base' has no installation candidate
UPD:
Погуглил, добавил в /etc/apt/sources.list deb http://ftp.de.debian.org/debian jessie main, пошла установка, но произошла ошибка активации
Код:
Activating the copy of ExaGear...
actool: Activation failed.
Последнее редактирование:
-
-
#13
С realpath все решилось, но возникла проблема с alsa-base:
Код:
Package alsa-base is not available, but is referred to by another package.
This may mean that the package is missing, has been obsoleted, or
is only available from another source

E: Package 'alsa-base' has no installation candidate
UPD:
Погуглил, добавил в /etc/apt/sources.listdeb http://ftp.de.debian.org/debian jessie main, пошла установка, но произошла ошибка активацииКод:
Activating the copy of ExaGear...
actool: Activation failed.
Дальше все по инструкции, распаковать второй архив из аттачей ubt_x32a32_al.zip с заменой файла в папку /opt/exagear/bin
дать ему права :# chmod 777 ubt_x32a32_al
Запустить командой
service exagear start
exagear
И собственно попадаем в среду архитектуры i686
-
-
#14
Дальше все по инструкции, распаковать второй архив из аттачей ubt_x32a32_al.zip с заменой файла в папку /opt/exagear/bin
дать ему права :# chmod 777 ubt_x32a32_al
Запустить командой
service exagear start
exagear
И собственно попадаем в среду архитектуры i686
Bash:
┌─[root@kali]─[/opt/exagear/bin]
└──╼ #unzip /root/Downloads/ubt_x32a32_al.zip
Archive:  /root/Downloads/ubt_x32a32_al.zip
replace ubt_x32a32_al? [y]es, [n]o, [A]ll, [N]one, [r]ename: y
  inflating: ubt_x32a32_al
┌─[root@kali]─[/opt/exagear/bin]
└──╼ #chmod 777 ubt_x32a32_al
┌─[root@kali]─[/opt/exagear/bin]
└──╼ #service exagear start
┌─[root@kali]─[/opt/exagear/bin]
└──╼ #exagear
/usr/bin/exagear: line 135:  1924 Segmentation fault      $ubt --path-prefix $image_dir --vpaths-list $vpaths_list -- /bin/echo "Starting $command $args in the guest image $image_dir"
Failed to start Exagear. Please check that file /opt/exagear/bin/ubt_x32a32_al exists and has executable permission
/usr/bin/exagear: line 137:  1925 Segmentation fault      /opt/exagear/bin/ubt_x32a32_al --path-prefix /opt/exagear/images/ubuntu-1404lts --vpaths-list /opt/exagear/images/ubuntu-1404lts/.exagear/vpaths-list --opaths-list /opt/exagear/images/ubuntu-1404lts/.exagear/opaths-list --use-binfmt_misc -- /bin/bash
-
-
#15
Bash:
┌─[root@kali]─[/opt/exagear/bin]
└──╼ #unzip /root/Downloads/ubt_x32a32_al.zip
Archive:  /root/Downloads/ubt_x32a32_al.zip
replace ubt_x32a32_al? [y]es, [n]o, [A]ll, [N]one, [r]ename: y
  inflating: ubt_x32a32_al
┌─[root@kali]─[/opt/exagear/bin]
└──╼ #chmod 777 ubt_x32a32_al
┌─[root@kali]─[/opt/exagear/bin]
└──╼ #service exagear start
┌─[root@kali]─[/opt/exagear/bin]
└──╼ #exagear
/usr/bin/exagear: line 135:  1924 Segmentation fault      $ubt --path-prefix $image_dir --vpaths-list $vpaths_list -- /bin/echo "Starting $command $args in the guest image $image_dir"
Failed to start Exagear. Please check that file /opt/exagear/bin/ubt_x32a32_al exists and has executable permission
/usr/bin/exagear: line 137:  1925 Segmentation fault      /opt/exagear/bin/ubt_x32a32_al --path-prefix /opt/exagear/images/ubuntu-1404lts --vpaths-list /opt/exagear/images/ubuntu-1404lts/.exagear/vpaths-list --opaths-list /opt/exagear/images/ubuntu-1404lts/.exagear/opaths-list --use-binfmt_misc -- /bin/bash
Ok.
:# chmod 777 ~/Downloads/ubt_x32a32_al
:# mv ~/Downloads/ubt_x32a32_al /opt/exagear/bin
:# service exagear start
:# exagear
-
-
#16
Ok.
:# chmod 777 ~/Downloads/ubt_x32a32_al
:# mv ~/Downloads/ubt_x32a32_al /opt/exagear/bin
:# service exagear start
:# exagear
Неа, то же самое
-
-
#17
Как вариант, снести. Докачать realpath и base-alsa deb-ы.. под своё ядро!!! И выполнять все от sudo не от рута. Скипт установки должен отработать без ошибок. Смотрите внимательней.
DOMI_NIK
-
-
#18
Привествую
спасибо огромное за информацию, но у меня аналогичное сообщение :
/usr/bin/exagear: line 135: 1924 Segmentation fault $ubt —path-prefix $image_dir —vpaths-list $vpaths_list — /bin/echo «Starting $command $args in the guest image $image_dir»
Failed to start Exagear. Please check that file /opt/exagear/bin/ubt_x32a32_al exists and has executable permission
/usr/bin/exagear: line 137: 1925 Segmentation fault /opt/exagear/bin/ubt_x32a32_al —path-prefix /opt/exagear/images/ubuntu-1404lts —vpaths-list /opt/exagear/images/ubuntu-1404lts/.exagear/vpaths-list —opaths-list /opt/exagear/images/ubuntu-1404lts/.exagear/opaths-list —use-binfmt_misc — /bin/bash
удалось победить ?
-
-
#19
Привествую
спасибо огромное за информацию, но у меня аналогичное сообщение :/usr/bin/exagear: line 135: 1924 Segmentation fault $ubt —path-prefix $image_dir —vpaths-list $vpaths_list — /bin/echo «Starting $command $args in the guest image $image_dir»
Failed to start Exagear. Please check that file /opt/exagear/bin/ubt_x32a32_al exists and has executable permission
/usr/bin/exagear: line 137: 1925 Segmentation fault /opt/exagear/bin/ubt_x32a32_al —path-prefix /opt/exagear/images/ubuntu-1404lts —vpaths-list /opt/exagear/images/ubuntu-1404lts/.exagear/vpaths-list —opaths-list /opt/exagear/images/ubuntu-1404lts/.exagear/opaths-list —use-binfmt_misc — /bin/bashудалось победить ?
К сожалению нет
Shaman666
-
-
#20
Привествую
спасибо огромное за информацию, но у меня аналогичное сообщение :/usr/bin/exagear: line 135: 1924 Segmentation fault $ubt —path-prefix $image_dir —vpaths-list $vpaths_list — /bin/echo «Starting $command $args in the guest image $image_dir»
Failed to start Exagear. Please check that file /opt/exagear/bin/ubt_x32a32_al exists and has executable permission
/usr/bin/exagear: line 137: 1925 Segmentation fault /opt/exagear/bin/ubt_x32a32_al —path-prefix /opt/exagear/images/ubuntu-1404lts —vpaths-list /opt/exagear/images/ubuntu-1404lts/.exagear/vpaths-list —opaths-list /opt/exagear/images/ubuntu-1404lts/.exagear/opaths-list —use-binfmt_misc — /bin/bashудалось победить ?
точно такая же проблема(
Обучение наступательной кибербезопасности в игровой форме. Начать игру!
Want to run Windows software on your Raspberry Pi? It’s an ambitious proposition, but now possible for a small number of apps. To find out how easy this is, I set up Eltechs ExaGear software onto a Raspberry Pi 3.
Why Windows Software on Raspberry Pi?
With so many excellent Linux applications and utilities, why would you want, or need, to run Windows software on the Raspberry Pi?
Well, let’s take the practical benefits first: if you use your Pi as a desktop (e.g. for low-level office tasks), you might wish to install a Windows application that you use on your main computer.
There’s also the entertainment advantage. We know the Raspberry Pi can play retro video games. We also know that certain open-source videogames have been ported to the Pi.
What if you wanted to play a game that hasn’t been ported? Although modern videogames will almost certainly not run, older titles have a better chance on the Pi.
This is all made possible thanks to the ExaGear x86 environment, and Wine, the popular Windows application layer for Linux.
On desktop Linux PCs, Wine makes it possible to run Windows software. But Wine cannot run on its own on the Raspberry Pi, because the Raspberry Pi doesn’t use the x86 (32-bit) architecture. Rather, it is based on the ARM architecture, which is completely different.
All you need is to optimize the Wine application layer software for the ARM processor of the Raspberry Pi. Does ExaGear Desktop Software do the job?
What Is the ExaGear Desktop Software?
Eltechs ExaGear Desktop is a powerful virtual machine that creates an x86 environment on a Raspberry Pi. This means that software intended for Windows and Linux desktops can run within the ExaGear environment.
Example applications you can run on a Raspberry Pi include Skype, Dropbox, Plex, and uTorrent. Because ExaGear runs within the Raspbian OS, you don’t need to make any changes to your existing Raspberry Pi set up.
As far as the Pi goes, the best results will be attained using a Raspberry Pi 3. However, other ARM devices, such as the ODROID, Cubieboard, PINE64 and Banana Pi can also run ExaGear.
The result is that you can use older x86 software on the Raspberry Pi. This might be an application, or a video game.
While there are other ways to create a virtualized environment, ExaGear simplifies the process. Although a trial version is available, ExaGear is not free software.
Head to the ExaGear page at eltechs.com to find out more. Note that versions for Chromebook and Android are also available.
Getting Started: Download ExaGear Desktop
Before you install ExaGear, ensure your Raspberry Pi 3 is ready. The minimum size for ExaGear to run is 1500MB (1.5GB), so you’ll need to make sure it has enough space to run. Begin by resizing the Raspbian file system.
This can be done in Menu > Preferences > Raspberry Pi Configuration, where you should choose System > Expand filesystem. Alternatively, run:
sudo raspi-config
From here, open Advanced Options > Expand Filesystem, and click OK.
Several versions of ExaGear for the Raspberry Pi are available.
- Raspberry Pi 1/Zero version
- Raspberry Pi 2 version
- Raspberry Pi 3 version
You can download your preferred version to your PC and copy the data across via FTP. Or you could simply download ExaGear directly on your Raspberry Pi.
The recommended steps are to save the license key (which you’ll get when you buy the software) to the Downloads directory on your Pi. To the same directory, download ExaGear using wget in the command line:
wget http://downloads.eltechs.com/exagear-desktop-v-2-2/exagear-desktop-rpi3.tar.gz
How long this takes will depend on your internet speed; the download is about 280MB.
Installing ExaGear Desktop on Raspberry Pi
When you’re ready, unpack the downloaded TAR.GZ file.
tar -xvzpf exagear-desktop-rpi3.tar.gz
You can then install and activate ExaGear Desktop by running install-exagear.sh script in the directory with the extracted packages and the license key you downloaded earlier.
sudo ./install-exagear.sh
This script installs the guest environment, where x86 software can be run. However, you’ll also need to install Wine. Without this, you won’t be able to run Windows software, although 32-bit Linux software will install and run.
Whichever you plan to do, the next step is to enter the simple command:
exagear
This will run the x86 environment, a «guest» running atop the «host» (Raspbian).
Installing Wine to Run Windows Software
Before you start installing Windows software (we’ll take a look at some examples later) you’ll need to configure ExaGear. This is done by installing Wine while within the ExaGear environment.
Begin with an update:
sudo apt update
Once your repositories have updated, you’ll be ready to install Wine.
sudo apt install wine
With Wine installed, your Raspberry Pi can now run Windows software. Note that this isn’t possible without ExaGear (or some other x86 virtualized environment). You may be able to find a version of Wine for ARM devices, but it won’t run Windows software without the correct environment.
How to Install Windows Software on Raspberry Pi
So, you’re now running a 32-bit guest environment on your Raspberry Pi, within the operating system. You’ve installed Wine, which is used on Linux desktops to run Windows software.
You’re now ready to install video games or other software on the Raspberry Pi.
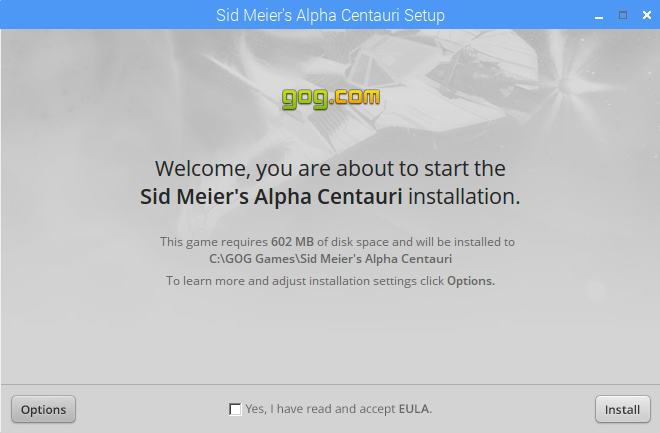
But what will you install? ExaGear developers Eltechs provides a regularly updated list. Among the Windows apps (Linux x86 apps such as Skype and Dropbox are included) listed are Word Viewer, Mono, and .NET Framework 4.5. A nice selection of Windows games are also cited as running on a Raspberry Pi with ExaGear and Wine, such as Counter Strike, Fallout, and Sid Meier’s Alpha Centauri.
I’m a big fan of the Civilization series, and Alpha Centauri is one of my all-time favorite games. This makes it an ideal candidate for installation.
Whichever game you plan to install, find a source. This might be the original media, or a download from a site like GOG.com. As long as you’ve bought the game, you’ll be able to download it to your computer.

In the command line, within the ExaGear environment, navigate to the download folder, and enter:
wine setup_sid_meiers_alpha_centauri_2.0.2.23.exe
Substitute the name of the executable with whatever compatible game you’re running. The command line will scroll a few lines of text, and the Windows installation wizard will open.
Proceed through this to complete installation. Before running the installed game, ensure Wine is correctly configured. You can do this using the command:
winecfg
This lets you specify (among other things) Windows compatibility by version. For Sid Meier’s Alpha Centauri, you need to set this to Windows XP. You should find this option on the Applications tab.
This is perhaps the most important part of installing and running Windows software. If the wrong version is selected, the application or game may not run, due to the same compatibility issues found on Windows itself.
Once you’ve installed your Windows software, you’ll find it via the main menu, under Wine > Programs.

It’s that simple! Given the spec of the Raspberry Pi, running 32-bit software on an ARM board is an impressive achievement.
Getting 3D Graphics on Raspberry Pi
Note that if you plan to install PC games with 3D graphics, you need to configure your Raspberry Pi. Several graphics modes are available, and you’ll need to select the right one.
Begin by opening a new terminal emulator (Ctrl + Alt + T) and enter:
sudo raspi-config
In the configuration tool, begin by selecting Update this tool to the latest version. Wait for the update, then open Advanced Options and choose GL Driver > GL (Full KMS) OpenGL desktop driver with full KMS.
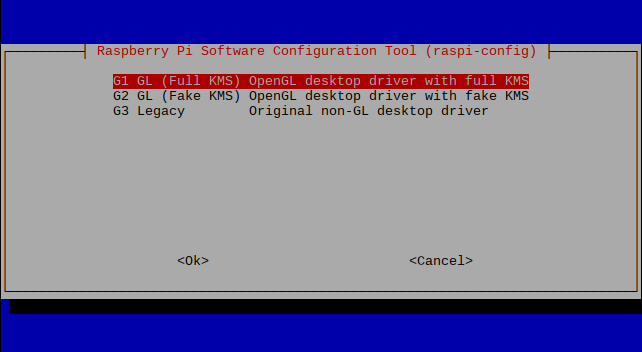
Select OK then Finish to confirm, and reboot when prompted. When your Raspberry Pi reboots, remember to run the exagear command again to continue.
When you’re done with the ExaGear environment, use the exit command to end it. Repeat the command to end the terminal session and close the command line.
Want to know more about running Windows software on Linux? Check our nifty guide to Wine on Linux.
While you can’t run Windows software natively that way, note that you can install Windows 10 IoT Core on your Raspberry Pi!
В данной статье я опишу историю о том,как я пытался запустить WineHQ и что из этого вышла.
Внимание!Статья довольно бредовая :).Слабонервным лучше не читать.
В конце статьи расскажу как запустить Windows
Данная история началась уже довольно давно,еще в прошлом году меня посетила эта поистине бредовая затея.
После непродолжительных поисков я наткнулся на статью о том,как кому-то удалось скомпилировать Wine для Малинки.Понимая головой,что Windows приложения написаны для x86/x64 ,а Малинка имеем ARM процессор я все таки решил попробовать посмотреть ,что получится.
Загрузив исходники я запустил их компиляцию на Raspberry Pi и пошел спать.
На утро я увидел,что все собралось без единой ошибки и на лице появилась глупая улыбка
И что с этим делать?
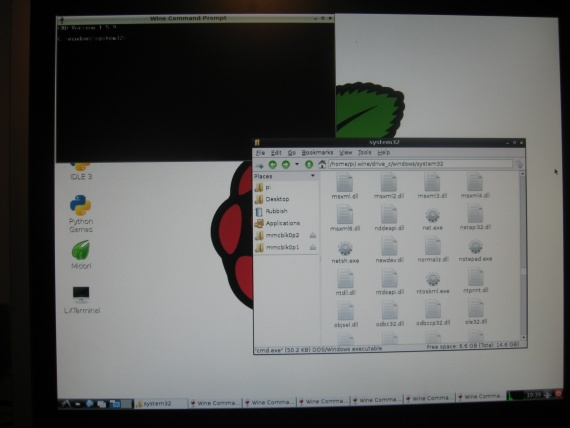
Да ничего на самом деле.Мне удалось собрать блокнот(notepad.exe) из React OS для малинки и запустить его.
А если я хочу и правда запустить x86 приложения ?
Тогда есть QEMU и ExaGear Desktop!
Чтож,будем запускать Windows в Qemu
sudo apt-get install
sudo apt-get uprage
sudo apt-get install git zlib1g-dev libsdl1.2-dev libpixman-1-0 libpixman-1-dev
Загрузим исходник
git clone git://git.qemu-project.org/qemu.git
Теперь мы соберем программу из исходника
cd qemu
./configure --target-list="i386-softmmu" --enable-sdl --prefix=/usr
sudo make
Отладка может продолжаться неопределённое время, (~15-20 минут). Последнее, что мы должны сделать, это подправить конфигурации и отладить.
sudo nano /home/pi/qemu/tcg/arm/tcg-target.c
sudo nano /home/pi/qemu/tcg/i386/tcg-target.c
Зажимаем Ctrl+W, открывается строка поиска, вводим: static void tcg_out_addi. Меняем на static inline void tcg_out_addi. Переходим ко второму конфигу, так же вызываем строку поиска и вводим этот текст: static void tcg_out_opc и меняем на static inline void tcg_out_opc. Если вы не нашли какую-то из строк, то ничего не делаем, а просто закрываем конфиг и выполняем следующий шаг (в первом конфиге я не нашёл нужную строку, однако эмулятор у меня работает нормально).
Идем дальше.
sudo make
sudo make install
Загрузим образ отсюда
В директории с образом выполним
qemu-system-i386 здесь тип образа (-hda, -fda, -cdrom) НазваниеВашегоОбраза.img -m
Тут_Кол-во_ОЗУ_В_МБ(Без подчёркиваний)
Если все было сделать правильно,то начнется загрузка системы.Медленно,но начнется,правда