
With the increasing popularity of Linux desktops, There is another requirement occurred that we should have an application that can be used to run Windows applications. Windows has a long list of beautiful applications for users who are not available for Linux users. As we know that Linux does not support windows executables so WineHQ is a solution to run Windows applications and Linux systems.
In this article, we have discussed two methods of Wine installation on RHEL-based Linux distributions. The first method will help you to install Wine 8.0 stable release by compiling from source code on RHEL-based systems. The second method will install Wine using the package manager from the EPEL repository. In that case, it will install wine previous version.
Method 1: Installing Wine 8.0 from Source Code
In the first method, we will download the latest version of the WineHQ source code from the official site. So let’s begin the installation:
- Installing Required Packages
- Download Wine Source Code
- Compiling Wine from Source Code
- Check Wine Version
Wine required many development packages. First, we recommend upgrading all system packages using the following commands.
sudo dnf clean all && sudo dnf update
Now install the required packages for Wine using the DNF package manager using the following commands.
sudo dnf groupinstall 'Development Tools'sudo dnf install libX11-devel zlib-devel libxcb-devel libxslt-devel libgcrypt-devel libxml2-devel gnutls-devel libpng-devel libjpeg-turbo-devel libtiff-devel gstreamer-devel dbus-devel fontconfig-devel freetype-devel
RPM packages for wine are not available for the latest versions, So we need to download wine source code. Use the below commands to download it.
wget https://dl.winehq.org/wine/source/8.x/wine-8.0.tar.xz
Once the download is finished successfully, extract the archive file.
tar -Jxf wine-8.0.tar.xz -C /tmp/
Configure wine using one of the following commands based on your system architecture. This will set the installation environment for Wine according to your system.
cd /tmp/wine-8.0./configure --enable-win64makemake install
Use the following command to check the version of wine installed on your system
wine64 --version
Method 2: Installing Wine using Package Manager
The EPEL yum repository also contains the Wine packages for installation on RHEL-based systems. You can install the Wine using the package manager without compiling it from the source code.
Follow the below steps to install Wine on RHLE-based system via package manager:
- Enable the EPEL Repository
- Install WineHQ
- Install the Windows Compatibility Layer
- Configure WineHQ
WineHQ is not included in the default repositories of CentOS/RHEL 9/8, so we need to enable the Extra Packages for Enterprise Linux (EPEL) repository. To do this, open a terminal and run the following command:
sudo dnf install epel-release
Now that the EPEL repository is enabled, we can install WineHQ by running the following command:
sudo yum install wine
This command will install the latest version of WineHQ available in the EPEL repository.
WineHQ is a compatibility layer that allows Windows applications to run on Linux. However, it does not come with the necessary Windows libraries to run these applications. To install the Windows Compatibility Layer, we need to run the following command:
sudo yum install wine-mono wine-gecko
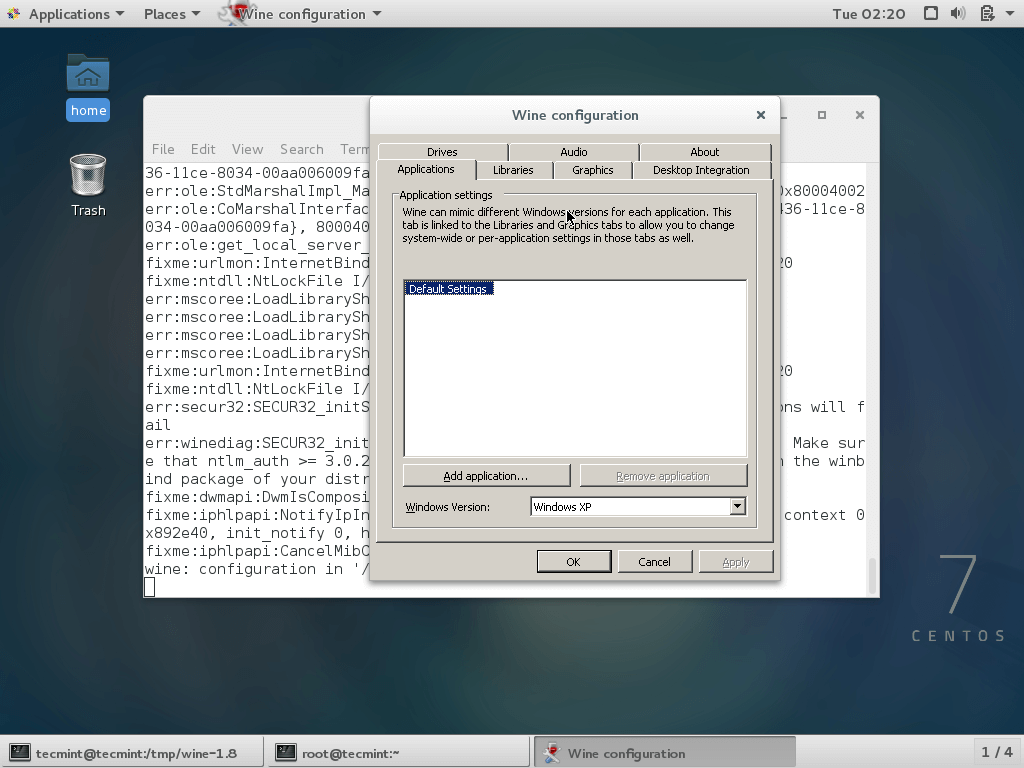
WineHQ allows us to configure various settings to optimize the performance and compatibility of Windows applications. To access the Wine configuration window, we can run the following command:
winecfg
This will open the Wine configuration window, where we can configure settings such as the Windows version, graphics, and sound.
Install Windows Application on Linux
With WineHQ and the Windows Compatibility Layer installed, we can now install Windows applications on our Linux system. To do this, we can either use the command line or the graphical user interface (GUI).
To install a Windows application using the command line, we need to run the following command:
wine application.exe
Make sure to replace “application.exe” with the actual name of the executable file of the Windows application you want to install.
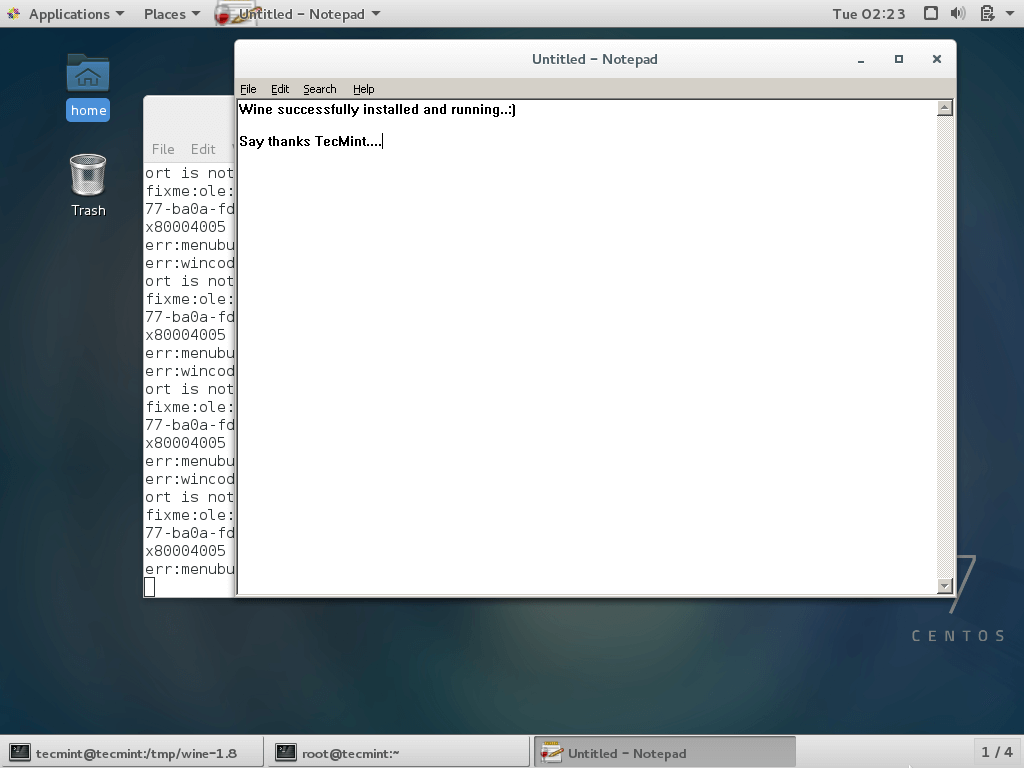
To install a Windows application using the GUI, we need to double-click on the executable file of the application. This will open the Wine configuration window, where we can select the options to install the application.
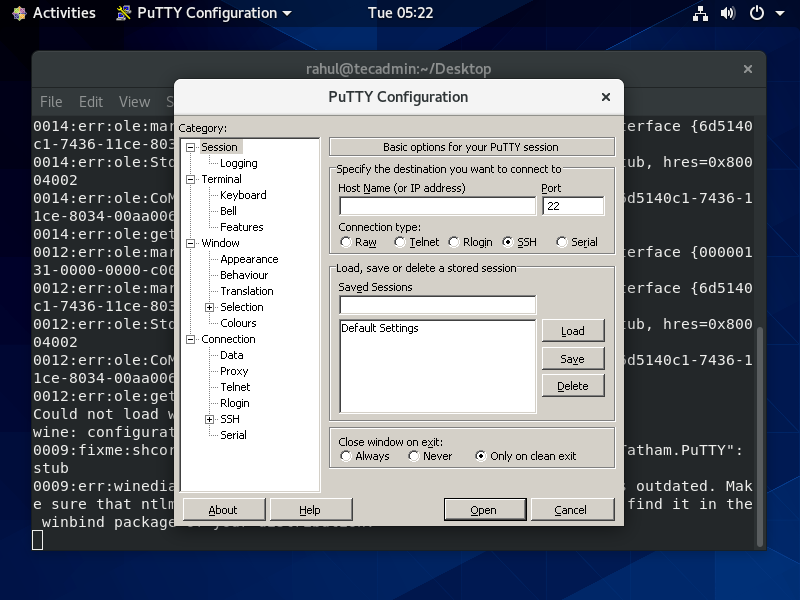
Running .exe File Using Wine
To use wine we need to log in to the RHEL-based desktop system. After that Download a windows executable (.exe) file like PuTTY on your system and open it with Wine as below screenshot or use the following command.
wine ~/Downloads/putty.exe
Conclusion
In conclusion, installing WineHQ on CentOS/RHEL 9/8 is a straightforward process that allows you to run Windows applications on your Linux system without the need for a virtual machine. With this guide, you should be able to install WineHQ, the Windows Compatibility Layer, and Windows applications on your system with ease.
Wine is an open-source and free application for Linux that allows users to run Windows-based software and games on Unix/Linux-like operating systems.
Recently, the Wine team proudly announced the stable release of version 10.0, which is now available for download as the source and binary packages for various distributions including Linux, Windows, and Mac.
This release reflects a year of hard work and over 8,600 changes, introducing several exciting improvements. The main highlights include:
- Enhanced support for Bluetooth devices.
- Better support for HID input devices.
- Optimized for running 32-bit and 64-bit applications.
- Early support for Wayland display server protocol.
In this article, we will show how to install the Wine 10.0 version in RHEL-based distributions such as CentOS Stream, Rocky Linux, and AlmaLinux using source code (difficult and only suitable for experts) and on Fedora Linux using the official wine repository.
Step 1: Installing Dependency Packages
To begin the installation process, you need to install the necessary development tools and libraries, which include packages like GCC, libX11-devel, freetype-devel, zlib-devel, and libxcb-devel.
yum -y groupinstall 'Development Tools'
yum install gcc libX11-devel freetype-devel zlib-devel libxcb-devel libxslt-devel
For Fedora users, the commands are slightly different:
dnf -y groupinstall 'Development Tools'
dnf -y install gcc libX11-devel freetype-devel zlib-devel libxcb-devel libxslt-
Step 2: Downloading the Wine Source Code
Next, you need to download the Wine source code using the wget command under /tmp directory as a normal user.
cd /tmp
wget http://dl.winehq.org/wine/source/10.0/wine-10.0.tar.xz
After downloading the source code, use the following tar command to extract it under /tmp directory.
tar -xvf wine-10.0.tar.xz -C /tmp/
Step 4: Installing Wine from Sources
After extracting the source code, you need to compile Wine from the sources as a normal user.
Note: The installer might take up to 20-30 minutes and in the middle, it will ask you to enter the root password.
---------- On 64-bit Systems ----------
cd wine-10.0/
./configure --enable-win64
make
sudo make install

---------- On 32-bit Systems ----------
cd wine-10.0/
./configure
make
sudo make install
Install Wine on Fedora Linux Using Wine Repository
For Fedora users, you can install Wine using the official Wine repository by using the following commands.
---------- On Fedora 41 ----------
dnf config-manager --add-repo https://dl.winehq.org/wine-builds/fedora/41/winehq.repo
dnf install winehq-stable

---------- On Fedora 40 ----------
dnf config-manager --add-repo https://dl.winehq.org/wine-builds/fedora/40/winehq.repo
dnf install winehq-stable
Configuring and Running Wine
Once the installation completes run the “winecfg” configuration tool from GNOME desktop to see the supported configuration. If you don’t have any of the desktops, you can install it by using the below command as the root user.
dnf groupinstall workstation
OR
yum groupinstall "GNOME Desktop"
Once the X Window System is installed, run the command as a normal user to see the wine configuration.
winecfg
To run the Wine, you must specify the full path to the executable program or program name as shown in the example below.
--------- On 32-bit Systems ---------
wine notepad
wine c:\\windows\\notepad.exe
--------- On 64-bit Systems ---------
wine64 notepad
wine64 c:\\windows\\notepad.exe
Conclusion
Wine 10.0 is a significant milestone, bringing better support for modern hardware and software. While it’s not perfect and some applications may still crash, the Wine team continues to make great strides in improving compatibility.
If you’ve tried Wine 10.0, share your experiences in the comments below!
Wine is free software that allows you to run Windows applications on other systems, including Linux, Mac, Solaris, and FreeBSD.
You can download this open-source software using the source code or from the EPEL repository.
In this tutorial, you will learn how to install Wine 4.0 on CentOS 7 using the source code or EPEL Repository.

Prerequisites
- Access to a command-line/terminal window
- Access to root or a user account with sudo privileges
- The yum package manager, included by default
Steps For Installing Wine 4.0 Using Source Code
Step 1: Install Development Tools
To compile and build new packages, you need to install fundamental development tools grouped by the name ‘Development Tools’.
To do so, run the following commands:
yum -y groupinstall 'Development Tools'yum install libX11-devel freetype-devel zlib-devel libxcb-devel libxslt-devel libgcrypt-devel libxml2-devel gnutls-devel libpng-devel libjpeg-turbo-devel libtiff-devel gstreamer-devel dbus-devel fontconfig-devel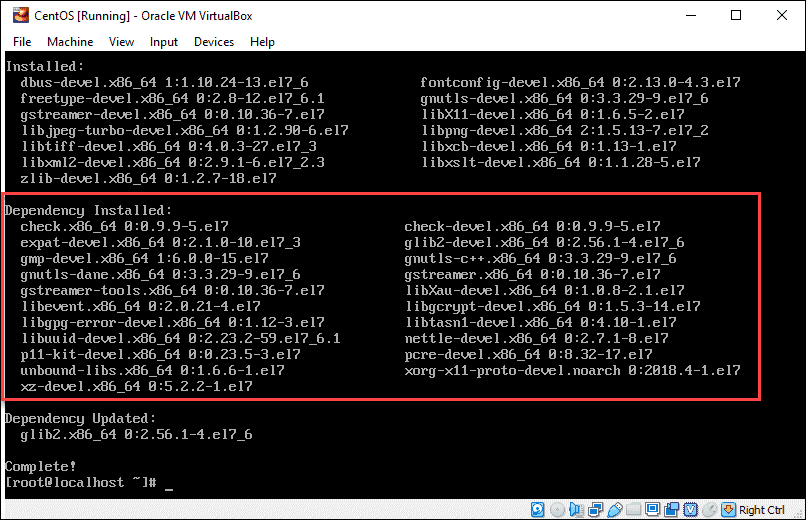
Step 2: Download Wine 4.0
Next, you need to download Wine source file using the wget command.
1. If you do not have wget, you can easily download it by typing the command:
yum install wget2. Now navigate to the /<strong>tmp</strong> directory:
cd /tmp3. Download the source file for Wine 4.0 with the following command:
wget https://dl.winehq.org/wine/source/4.0/wine-4.0.tar.xz
Step 3: Extract Wine
Then, extract the source file using the tar command:
tar -xvf wine-4.0.tar.xz -C /tmp/Step 4: Install Wine 4.0
Once you extract the file, you can move on to installing.
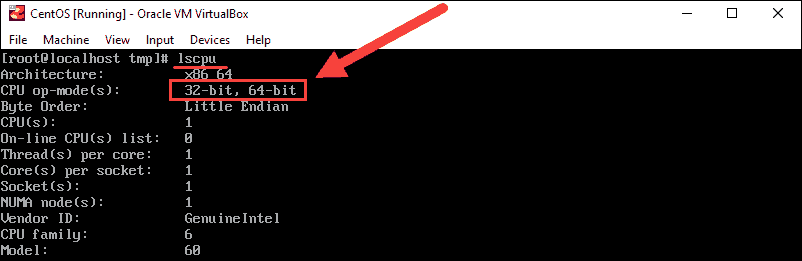
1. Wine uses different applications depending on whether you have a 32-bit or 64-bit OS. If you are not sure which one is running on your system, use the lscpu command to find out:
lscpu2. Find the information in the CPU op-mode(s) line. In the example seen in the image below, the OS supports both 32-bit and 64-bit applications.
3. Next, you need to compile and build the Wine installer. As the root user, type in the commands that apply for the system you are using. If you have both CPU modes, use the instructions for the 64-bit system.
On 32-bit systems, run the following commands:
cd wine-4.0/

./configure

make

make install
On 64-bit systems, install Wine with:
cd wine-4.0/

./configure --enable-win64

make

make install
Step 5: Verify Installation (Check Wine Version)
The best way to check if you have successfully installed Wine is by verifying the version.
To check Wine version on 32-bit systems use:
wine --versionTo check Wine version on 64-bit systems use:
wine64 --versionThe output should show you that you have Wine 4.0, as in the image below:

Installing Wine With EPEL Repository
It only takes a couple of steps to install Wine 4.0 from the EPEL repository.
1. First, install the EPEL repository with the command:
yum install epel-release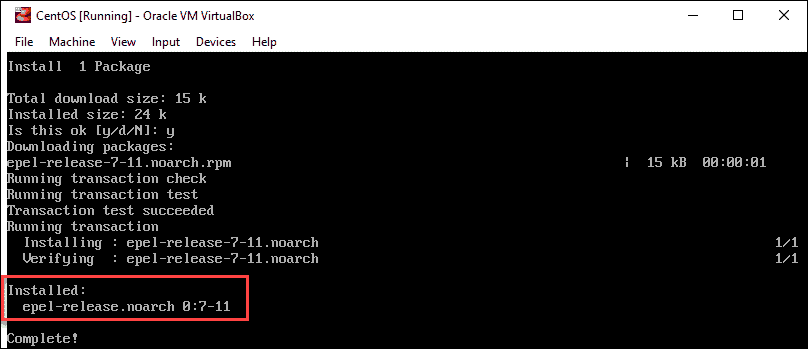
2. Then, install Wine using:
yum install wine3. Verify installation was successful by checking the Wine version:
wine --versionThe output should display Wine 4.0 is installed on CentOS 7, as in the image above.
Start Using Wine
To start using Wine, include the executable program in the path you type in the terminal. The command to run Wine will differ based on whether you have a 32-bit or 64-bit system:
On 32-bit systems, enter the following to run Wine:
wine notepad
wine c:\windows\notepad.exe
On 64-bit systems, run Wine with the command:
wine64 notepad

Wine64 c:\windows\notepad.exe
How to Uninstall Wine
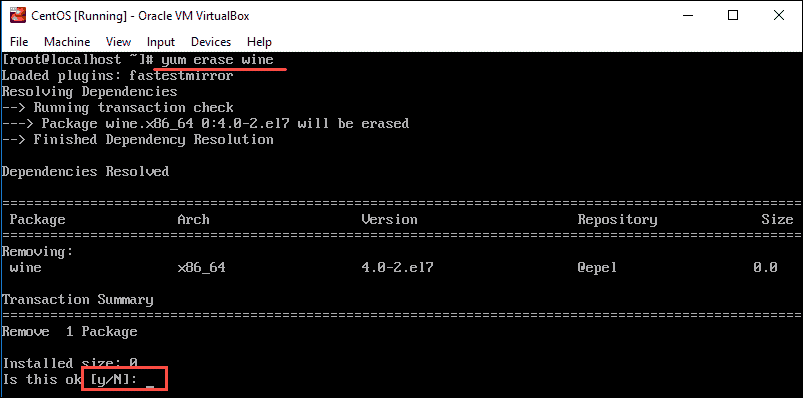
To uninstall Wine 4.0 on CentOS 7, use the command:
yum erase wineType y to confirm you want to remove the package from CentOS and hit Enter.
Conclusion
After reading this article, you should have successfully installed Wine 4.0 on CentOS. Now you can run any Windows program on your Linux system.
Was this article helpful?
YesNo
In this tutorial, we will show you how to install Wine on CentOS Stream 10. Wine (Wine Is Not an Emulator) is a powerful compatibility layer that allows Linux users to run Windows applications on their systems. For CentOS Stream 10 users, installing Wine opens up a world of possibilities, enabling them to use their favorite Windows software without the need for a separate Windows installation. This comprehensive guide will walk you through the process of installing Wine on CentOS Stream 10, providing detailed instructions, troubleshooting tips, and additional resources to ensure a smooth installation experience.
Prerequisites
Before we dive into the installation process, let’s ensure that your system meets the necessary requirements and is properly prepared for Wine installation.
System Requirements
To install Wine on CentOS Stream 10, your system should meet the following minimum specifications:
- A 64-bit x86 processor (Intel or AMD)
- At least 2GB of RAM (4GB or more recommended)
- 10GB of free disk space
- Internet connection for downloading packages
Preparation Steps
To ensure a smooth installation process, follow these preparation steps:
- Update your system packages:
sudo dnf update -y - Install development tools:
sudo dnf groupinstall "Development Tools" -y - Enable the EPEL repository:
sudo dnf install epel-release -y
Installing Wine from Source Code
For users who prefer more control over the installation process or need the latest features, installing Wine from source code is an option. This method requires more technical knowledge but allows for customization.
Downloading Source Code
First, let’s download the Wine source code:
- Navigate to the
/tmpdirectory:cd /tmp - Download the latest Wine source code:
wget https://dl.winehq.org/wine/source/9.x/wine-9.1.tar.xz - Extract the archive:
tar -xvf wine-9.1.tar.xz
Compilation Process
Now, let’s compile and install Wine from the source code:
- Navigate to the extracted directory:
cd wine-9.1 - Configure the build:
./configure --enable-win64 - Compile Wine (this may take some time):
make - Install Wine:
sudo make install
Configuration and Setup
After installing Wine, it’s essential to configure it properly for optimal performance and compatibility.
Initial Configuration
- Run the Wine configuration tool:
winecfg - In the “Windows Version” tab, select the Windows version you want to emulate (e.g., Windows 10)
- Configure drive mappings in the “Drives” tab to access your Linux files from Windows applications
Performance Optimization
To enhance Wine’s performance:
- In the “Graphics” tab of winecfg, enable “Automatically capture the mouse in full-screen windows”
- In the “Audio” tab, select the appropriate driver for your system (usually PulseAudio)
- Consider using DXVK for improved DirectX performance in games
Installing Windows Applications
Now that Wine is installed and configured, you can start installing Windows applications.
Basic Usage
To install a Windows application:
- Open a terminal and navigate to the directory containing the Windows installer (.exe file)
- Run the installer using Wine:
wine installer.exe - Follow the installation prompts as you would on a Windows system
To run an installed application:
wine "C:\Program Files\Application Name\application.exe"Troubleshooting Common Issues
While Wine is generally reliable, you may encounter some issues. Here are solutions to common problems:
- Missing dependencies: Use winetricks to install common Windows libraries:
winetricks vcrun2015 d3dx9 xact - Graphics issues: Update your graphics drivers and consider using DXVK for DirectX applications
- Audio problems: Ensure PulseAudio is properly configured in winecfg
Tips and Best Practices
To get the most out of Wine on CentOS Stream 10:
- Regularly update Wine to benefit from bug fixes and new features
- Use separate Wine prefixes for different applications to avoid conflicts
- Check the Wine AppDB for compatibility information before installing applications
- Consider using PlayOnLinux for easier management of multiple Wine versions and prefixes
Congratulations! You have successfully installed Wine. Thanks for using this tutorial for installing the Wine on CentOS Stream 10 system. For additional or useful information, we recommend you check the official Wine website.
VPS Manage Service Offer
If you don’t have time to do all of this stuff, or if this is not your area of expertise, we offer a service to do “VPS Manage Service Offer”, starting from $10 (Paypal payment). Please contact us to get the best deal!
r00t is an experienced Linux enthusiast and technical writer with a passion for open-source software. With years of hands-on experience in various Linux distributions, r00t has developed a deep understanding of the Linux ecosystem and its powerful tools. He holds certifications in SCE and has contributed to several open-source projects. r00t is dedicated to sharing her knowledge and expertise through well-researched and informative articles, helping others navigate the world of Linux with confidence.
In this article, we want to teach you How To Install and Use Wine on Centos 7.
Wine (Wine Is Not an Emulator) Software that runs Windows applications under Linux and Unix on an x86 PC. It runs Windows executables intact, trapping calls from the application to the Windows interface, converting them as necessary, and directing them to X Window routines that do the processing.
Unlike virtual machine software such as Parallels and VMware Fusion, Wine does not require a copy of the Windows OS to be installed.
Before you start to install Wine on Centos 7, you need to log in to your server as a non-root user with sudo privileges. To do this, you can follow our article the Initial Server Setup with Centos 7.
Now follow the steps below to complete this guide.
Steps To Install WineHQ on Centos 7
First, you need to update your local package index with the following command:
sudo yum update -y
Install Development Tools on Centos 7
Then, you need to install the development tools to compile and build new packages on Centos 7:
sudo yum -y groupinstall 'Development Tools'
Now you need to install the required packages with the following command:
sudo yum install libX11-devel freetype-devel zlib-devel libxcb-devel libxslt-devel libgcrypt-devel libxml2-devel gnutls-devel libpng-devel libjpeg-turbo-devel libtiff-devel gstreamer-devel dbus-devel fontconfig-devel
Next, switch to your tmp directory:
cd /tmp
At this point, you need to visit the WineHQ Downloads Page to check the latest release of Wine.
Download Wine on Centos 7
Then, use the wget command to download the Wine tar.xz file on Centos 7:
wget https://dl.winehq.org/wine/source/7.x/wine-7.4.tar.xz
Extract your source file:
tar -xvf wine-7.4.tar.xz -C /tmp/
Wine uses different applications depending on whether you have a 32-bit or 64-bit OS. If you are not sure which one is running on your system, use the following command to find out:
lscpu
Output
Architecture: x86_64
CPU op-mode(s): 32-bit, 64-bit
Byte Order: Little Endian
CPU(s): 2
On-line CPU(s) list: 0,1
Thread(s) per core: 1
Core(s) per socket: 1
Socket(s): 2
NUMA node(s): 1
...
In my case, is 64-bit as shown above.
Compile and Build Wine on Centos 7
Next, you need to compile and build the Wine installer on Centos 7.
On 32-bit systems, run the following commands:
# cd wine-7.4/
# ./configure
# make
# make install
On 64-bit systems, install Wine with:
# cd wine-7.4/
# ./configure --enable-win64
# make
# make install
This will take some time to complete.
At this point, you can verify Wine installation on Centos 7 with the commands below.
To check the Wine version on 32-bit systems, run:
wine --version
To check the Wine version on 64-bit systems, use:
wine64 --version
How To Use WineHQ
To start using Wine on Centos 7, include the executable program in the path you type in the terminal. The command to run Wine will differ based on whether you have a 32-bit or 64-bit system.
On 32-bit systems, enter the following to run Wine:
# wine notepad# wine c:\windows\notepad.exe
On 64-bit systems, run Wine with the command:
# wine64 notepad
# Wine64 c:\windows\notepad.exe
How To Remove Wine from Centos 7
To uninstall Wine on CentOS 7, use the following command:
sudo yum erase wine
Conclusion
At this point, you learn to Install and Use Wine on Centos 7.
Hope you enjoy it.
You may be like these articles:
How To Install WineHQ on Ubuntu 22.04
How To Set up WineHQ on Rocky Linux 8