
Windows Presentation Foundation (WPF)
Windows Presentation Foundation (WPF) is a UI framework for building Windows desktop applications.
WPF supports a broad set of application development features, including an application model, resources, controls, graphics, layout, data binding and documents. WPF uses the Extensible Application Markup Language (XAML) to provide a declarative model for application programming.
WPF’s rendering is vector-based, which enables applications to look great on high DPI monitors, as they can be infinitely scaled. WPF also includes a flexible hosting model, which makes it straightforward to host a video in a button, for example.
Visual Studio’s designer, as well as Visual Studio Blend, make it easy to build WPF applications, with drag-and-drop and/or direct editing of XAML markup.
As of .NET 6.0, WPF supports ARM64.
See the WPF Roadmap to learn about project priorities, status and ship dates.
WinForms is another UI framework for building Windows desktop applications that is supported on .NET (7.0.x/6.0.x). WPF and WinForms applications only run on Windows. They are part of the Microsoft.NET.Sdk.WindowsDesktop SDK. You are recommended to use the most recent version of Visual Studio to develop WPF and WinForms applications for .NET.
To build the WPF repo and contribute features and fixes for .NET 8.0, Visual Studio 2022 Preview is required.
Getting started
- .NET 6.0 SDK, .NET 7.0 SDK
- .NET Preview SDKs (8.0 daily, 7.0 servicing)
- Getting started instructions
- Contributing guide
- Migrating .NET Framework WPF Apps to .NET Core
Status
- We are currently developing WPF for .NET 8.
See the WPF roadmap to learn about the schedule for specific WPF components.
Test published at separate repo Tests and have limited coverage at this time. We will add more tests, however, it will be a progressive process.
The Visual Studio WPF designer is now available as part of Visual Studio 2019.
How to Engage, Contribute and Provide Feedback
Some of the best ways to contribute are to try things out, file bugs, join in design conversations, and fix issues.
- This repo defines contributing guidelines and also follows the more general .NET Core contributing guide.
- If you have a question or have found a bug, file an issue.
- Use daily builds if you want to contribute and stay up to date with the team.
.NET Framework issues
Issues with .NET Framework, including WPF, should be filed on VS developer community,
or Product Support.
They should not be filed on this repo.
Relationship to .NET Framework
This code base is a fork of the WPF code in the .NET Framework. .NET Core 3.0 was released with a goal of WPF having parity with the .NET Framework version. Over time, the two implementations may diverge.
The Update on .NET Core 3.0 and .NET Framework 4.8 provides a good description of the forward-looking differences between .NET Core and .NET Framework.
This update states how going forward .NET Core is the future of .NET. and .NET Framework 4.8 will be the last major version of .NET Framework.
Code of Conduct
This project uses the .NET Foundation Code of Conduct to define expected conduct in our community. Instances of abusive, harassing, or otherwise unacceptable behavior may be reported by contacting a project maintainer at conduct@dotnetfoundation.org.
Reporting security issues and security bugs
Security issues and bugs should be reported privately, via email, to the Microsoft Security Response Center (MSRC) secure@microsoft.com. You should receive a response within 24 hours. If for some reason you do not, please follow up via email to ensure we received your original message. Further information, including the MSRC PGP key, can be found in the Security TechCenter.
Also see info about related Microsoft .NET Core and ASP.NET Core Bug Bounty Program.
License
.NET Core (including the WPF repo) is licensed under the MIT license.
.NET Foundation
.NET Core WPF is a .NET Foundation project.
See the .NET home repo to find other .NET-related projects.
Особенности платформы WPF
Последнее обновление: 26.11.2023
Технология WPF (Windows Presentation Foundation) является часть экосистемы платформы .NET и представляет собой подсистему для построения графических интерфейсов.
Если при создании традиционных приложений на основе WinForms за отрисовку элементов управления и графики отвечали такие части ОС Windows, как User32 и GDI+,
то приложения WPF основаны на DirectX. В этом состоит ключевая особенность рендеринга графики в WPF: используя WPF,
значительная часть работы по отрисовке графики, как простейших кнопочек, так и сложных 3D-моделей, ложиться на графический процессор на видеокарте,
что также позволяет воспользоваться аппаратным ускорением графики.
Одной из важных особенностей является использование языка декларативной разметки интерфейса XAML, основанного на XML: вы можете создавать насыщенный
графический интерфейс, используя или декларативное объявление интерфейса, или код на управляемых языках C#, VB.NET и F#, либо совмещать и то, и другое.
Первая версия — WPF 3.0 вышла вместе с .NET Framework 3.0 и операционной системой
Windows Vista в 2006 году. И с тех пор платформа WPF является частью экосистемы .NET и развивается вместе с фреймворком .NET. Например, на сегодняшний день последней версией фреймворка
.NET является .NET 8, и WPF полностью поддерживается этой версией фреймворка.
Преимущества WPF
Что вам, как разработчику, предлагает WPF?
-
Использование традиционных языков .NET-платформы — C#, F# и VB.NET для создания логики приложения
-
Возможность декларативного определения графического интерфейса с помощью специального языка разметки XAML, основанном на xml и представляющем
альтернативу программному созданию графики и элементов управления, а также возможность комбинировать XAML и C#/VB.NET -
Независимость от разрешения экрана: поскольку в WPF все элементы измеряются в независимых от устройства единицах, приложения на WPF легко масштабируются под разные экраны с разным разрешением.
-
Новые возможности, которых сложно было достичь в WinForms, например, создание трехмерных моделей, привязка данных, использование таких элементов, как стили, шаблоны, темы и др.
-
Хорошее взаимодействие с WinForms, благодаря чему, например, в приложениях WPF можно использовать традиционные элементы управления из WinForms.
-
Богатые возможности по созданию различных приложений: это и мультимедиа, и двухмерная и трехмерная графика, и богатый набор встроенных
элементов управления, а также возможность самим создавать новые элементы, создание анимаций, привязка данных, стили, шаблоны, темы и многое другое -
Аппаратное ускорение графики — вне зависимости от того, работаете ли вы с 2D или 3D, графикой или текстом, все компоненты приложения
транслируются в объекты, понятные Direct3D, и затем визуализируются с помощью процессора на видеокарте, что повышает производительность, делает графику более плавной. -
Создание приложений под множество ОС семейства Windows
В тоже время WPF имеет определенные ограничения. Несмотря на поддержку трехмерной визуализации, для создания приложений с большим количеством трехмерных изображений, прежде всего игр, лучше использовать другие средства — DirectX
или специальные фреймворки, такие как Monogame или Unity.
Также стоит учитывать, что по сравнению с приложениями на Windows Forms объем программ на WPF и потребление ими памяти в процессе работы в среднем несколько выше. Но это с лихвой компенсируется
более широкими графическими возможностями и повышенной производительностью при отрисовке графики.
Кроме того, несмотря на то, что WPF работает поверх кроссплатформенной среды .NET, но в силу природы WPF и зависимости от компонентов Windows, на данный момент
создавать приложения на WPF можно только под ОС Windows.
Архитектура WPF
Схематически архитектуру WPF можно представить следующим образом:
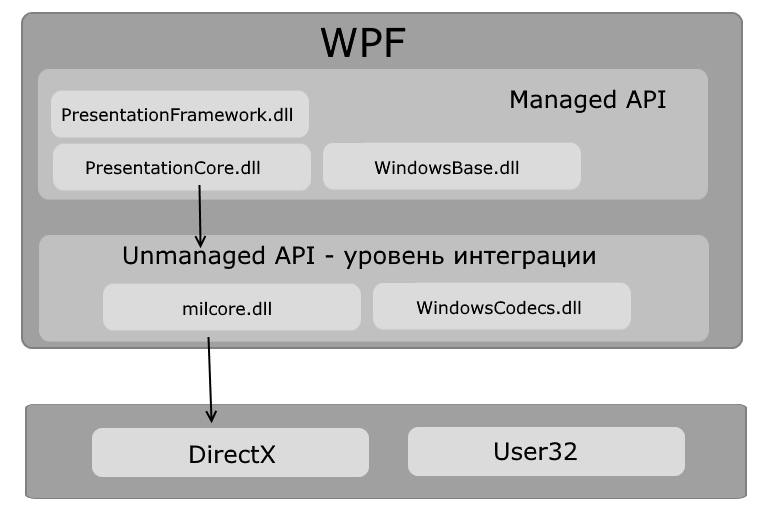
Как видно на схеме, WPF разбивается на два уровня: managed API и unmanaged API (уровень интеграции с DirectX).
Managed API (управляемый API-интерфейс) содержит код, исполняемый под управлением общеязыковой среды выполнения .NET — Common Language Runtime.
Этот API описывает основной функционал платформы WPF и состоит из следующих компонентов:
-
PresentationFramework.dll: содержит все основные реализации компонентов и элементов управления, которые можно использовать при
построении графического интерфейса -
PresentationCore.dll: содержит все базовые типы для большинства классов из PresentationFramework.dll
-
WindowsBase.dll: содержит ряд вспомогательных классов, которые применяются в WPF, но могут также использоваться и вне данной платформы
Unmanaged API используется для интеграции вышележащего уровня с DirectX:
-
milcore.dll: собственно обеспечивает интеграцию компонентов WPF с DirectX. Данный компонент написан на неуправляемом коде
(С/С++) для взаимодействия с DirectX. -
WindowsCodecs.dll: библиотека, которая предоставляет низкоуровневую поддержку для изображений в WPF
Еще ниже собственно находятся компоненты операционной системы и DirectX, которые произвоят визуализацию компонентов приложения, либо выполняют прочую низкоуровневую обработку.
В частности, с помощью низкоуровневого интерфейса Direct3D, который входит в состав DirectX, происходит трансляция
Здесь также на одном уровне находится библиотека user32.dll. И хотя выше говорилось, что WPF не использует эту библиотеку
для рендеринга и визуализации, однако для ряда вычислительных задач (не включающих визуализацию) данная библиотека продолжает использоваться.
Written by
Contributor
Opinions expressed by Twilio contributors are their own
Reviewed by
AJ Saulsberry
Contributor
Opinions expressed by Twilio contributors are their own
Getting Started with Windows Presentation Foundation (WPF) in .NET Core

Windows Presentation Foundation (WPF) is a user interface framework for building desktop applications. Implementing Extensible Application Markup Language (XAML) to define and script views, it has become the standard for Windows application user interfaces. Introduced in 2006, Microsoft has reenergized its commitment to WPF with its inclusion into .NET Core.
The tutorial in this post will guide you through creating a project that will mimic many of the basic functions of a word processor. You will be surprised at how easy it is to implement many features with standard tool elements. You will be introduced to some of the many constructs of WPF and create a foundation for experimenting further.
Prerequisites
You’ll need the following tools and resources to build and run this project:
Windows 10 – It puts the Windows in Windows Presentation Foundation.
.NET Core SDK 3.1 – The SDK includes the APIs, runtime, and CLI.
Visual Studio 2019 with the following workloads and individual components:
- .NET desktop development workload (Includes C#)
- GitHub Extension for Visual Studio (If you want to clone the companion repository.)
You should have a general knowledge of Visual Studio and the C# language syntax. You will be adding and editing files, and debugging code.
There is a companion repository for this post available on GitHub. It contains the complete source code for the tutorial project.
Creating the project
Begin this tutorial by creating a WPF App (.NET Core) project for C# named WPFTwilioExample. You can put the solution and project folders wherever it’s most convenient for you.
While you could easily use this code in a .NET Framework project, this example uses .NET Core, which is closer to the forthcoming .NET 5 release scheduled for November 2020.
After the tooling finishes creating the project, note the presence of the App.xaml file and its associated App.xaml.cs code-behind file. Also examine the MainWindow.xaml and associated code-behind file, MainWindow.xaml.cs.
MainWindow will be the main window for this application and where you will add UI elements. The App class is the entry point to the application and where the MainWindow.xaml is specified as the startup window. You can see this App.xaml file with the line:
StartupUri="MainWindow.xaml"If you ever wanted your application to start with another window, this is where you would specify that. For now, leave it as it is.
In the MainWindow.xaml file, note how the main element is a Grid. The Grid is one of several very powerful container components in WPF. Others include StackPanel, Canvas, WrapPanel, UniformGrid and DockPanel. Each has its advantages and situations that it fits best. In this example you will be using the DockPanel.
Replace the existing contents of the MainWindow.xaml file with the following XAML markup:
<Window x:Class="WPFTwilioExample.MainWindow"
        xmlns="http://schemas.microsoft.com/winfx/2006/xaml/presentation"
        xmlns:x="http://schemas.microsoft.com/winfx/2006/xaml"
        xmlns:d="http://schemas.microsoft.com/expression/blend/2008"
        xmlns:mc="http://schemas.openxmlformats.org/markup-compatibility/2006"
        xmlns:local="clr-namespace:WPFTwilioExample"
        mc:Ignorable="d"
        Title="Mini WordProcessor" Height="450" Width="800">
    <DockPanel LastChildFill="True">

    </DockPanel>
</Window>
The changed value for the Title attribute will be displayed in the window’s title bar when the application runs. Also, note that the DockPanel element has an attribute of LastChildFill="True". While this is the default value, it is done for clarity.
The DockPanel is a container that allows you to dock child controls to the top, bottom, left or right. By default, the last control, if not given a specific dock position, will fill the remaining space. Use the DockPanel whenever you need to dock one or several controls to one of the sides, like for dividing up the window into specific areas. In this example, you will be adding a menu, toolbar, and status elements.
With the window ready you will add components to it which will add capability. The first component you will add is applicable to the window as a whole and will be placed outside of the DockPanel. This will be the CommandBindings section where CommandBinding elements will be defined.
Insert the following XAML markup in the MainWindow.xaml file above the DockPanel element:
    <Window.CommandBindings>
<CommandBinding Command="New" Executed="New_Executed" CanExecute="CommonCommandBinding_CanExecute" />
  <CommandBinding Command="Open" Executed="Open_Executed" CanExecute="CommonCommandBinding_CanExecute" />
        <CommandBinding Command="Save" Executed="Save_Executed" CanExecute="CommonCommandBinding_CanExecute" />
    </Window.CommandBindings>
Open the MainWindow.xaml.cs code-behind file and insert the following C# code after the MainWindow() constructor:
private void CommonCommandBinding_CanExecute(object sender, CanExecuteRoutedEventArgs e)
{
        e.CanExecute = true;
}
private void New_Executed(object sender, ExecutedRoutedEventArgs e)
{
}

private void Open_Executed(object sender, ExecutedRoutedEventArgs e)
{
}

private void Save_Executed(object sender, ExecutedRoutedEventArgs e)
{
}
The code block above adds a group of Commands. Commands are constructs that associate a name with an action. They lend to a more loose coupling between UI elements and the code. In this case, you are adding the New, Open, and Save commands. The Executed attributes in the <CommandBinding> elements in the MainWindow.xaml file direct the Command to execute the listed method while the CanExecute attribute points to the CommonCommandBinding_CanExecute method. The CanExecute associated method in the code-behind file is run when the app is idle to indicate whether the command can be run or it is disabled. In this case it always returns true. This is useful in situations where a command might be disabled unless certain conditions are met.
The _Execute handler methods for the New, Open and Save commands in the code behind are provided as stubs for now and will be fleshed out shortly.
You will now be adding the first UI element to the window. Just inside the DockPanel container add a menu with File and Edit top level items by inserting the following XAML markup inside the <DockPanel> element:
<Menu DockPanel.Dock="Top">
    <MenuItem Header="_File">
        <MenuItem Command="New" Header="_New" />
        <MenuItem Command="Open" Header="_Open" />
        <MenuItem Command="Save" Header="_Save" />
        <Separator />
        <MenuItem Header="_Exit" />
    </MenuItem>
    <MenuItem Header="_Edit">
        <MenuItem Command="Cut"   Header="Cut    (Ctrl+X)" />
        <MenuItem Command="Copy"  Header="Copy   (Ctrl+C)" />
        <MenuItem Command="Paste" Header="Paste  (Ctrl+V)" />
    </MenuItem>
</Menu>
Note how the _File MenuItem elements reference the Commands that were added earlier.
The _Edit menu items reference Cut, Copy and Paste, but those CommandBindings were not created. The commands reference the ApplicationCommands.Cut, ApplicationCommands.Copy and ApplicationCommands.Paste commands. These are RoutedCommands and will be processed by the TextBox that you will add shortly. Rather than implement these commands in the code, they’ll use the default behavior of the TextBox element. The application will simply route the commands until an element that can handle them processes them. WPF event routing is a very powerful capability. Routed Events tunnel down the element tree and bubble up the element tree.
But while the menu is now visible, the application still does nothing.
Before going on, look at the design panel and notice how the menu bar that was just added with the <Menu> element is positioned at the top of the DockPanel. That results from the DocPanel.Doc="Top" attribute for the Menu element.
Continuing with the UI elements, add the following code to the MainWindow.xaml file inside the DockPanel element and after the menu elements you previously inserted:
<ToolBarTray DockPanel.Dock="Top" Background="LightGray">
    <ToolBar>
        <Button Command="Cut" Content="Cut" />
        <Button Command="Copy" Content="Copy" />
        <Button Command="Paste" Content="Paste" />
        <ToggleButton Command="EditingCommands.ToggleBold" Name="btnBold" Content="Bold"/>
        <ToggleButton Command="EditingCommands.ToggleItalic" Name="btnItalic" Content="Italic"/>
        <ComboBox Name="cmbFontFamily" Width="150" SelectionChanged="cmbFontFamily_SelectionChanged" />
        <ComboBox Name="cmbFontSize" Width="50" IsEditable="True" TextBoxBase.TextChanged="cmbFontSize_TextChanged" />

  </ToolBar>
</ToolBarTray>
<StatusBar Name="statusbar" DockPanel.Dock="Bottom">
    <StackPanel Orientation="Horizontal">
        <TextBlock Name="StatusBlock"></TextBlock>
    </StackPanel>
</StatusBar>
<RichTextBox  AcceptsReturn="True" Name="MyTextBox"
    SelectionChanged ="MyTextBox_SelectionChanged">
</RichTextBox>
Here you added a ToolBarTray with several buttons docked to the top, a StatusBar with a TextBlock docked to the bottom, and a RichTextBox as the last element in the DockPanel. Since the RichTextBox is the last element in the DockPanel, it will fill the center of the window.
That takes care of the code in the .xaml file.
You will next add the functionality in the code-behind file MainWindow.xaml.cs which will make the application come alive.
File system dialog boxes use resources from the Microsoft.Win32 and System.IO namespaces, so you will need to add the following using directives to the others in MainWindow.xaml.cs:
using System.IO;
using Microsoft.Win32;
Earlier, you added placeholder stub methods for the New, Open and Save commands. Replace the stub methods with the following code:
private void New_Executed(object sender, ExecutedRoutedEventArgs e)
{
MyTextBox.Document.Blocks.Clear();
}

private void Open_Executed(object sender, ExecutedRoutedEventArgs e)
{
OpenFileDialog dlg = new OpenFileDialog();
       dlg.Filter = "Rich Text Format (*.rtf)|*.rtf|All files (*.*)|*.*";
       if (dlg.ShowDialog() == true)
       {
               FileStream fileStream = new FileStream(dlg.FileName, FileMode.Open);
             TextRange range = new TextRange(MyTextBox.Document.ContentStart, MyTextBox.Document.ContentEnd);
             range.Load(fileStream, DataFormats.Rtf);
        }
 }

 private void Save_Executed(object sender, ExecutedRoutedEventArgs e)
 {
       SaveFileDialog dlg = new SaveFileDialog();
       dlg.Filter = "Rich Text Format (*.rtf)|*.rtf|All files (*.*)|*.*";
       if (dlg.ShowDialog() == true)
       {
           FileStream fileStream = new FileStream(dlg.FileName, FileMode.Create);
           TextRange range = new TextRange(MyTextBox.Document.ContentStart, MyTextBox.Document.ContentEnd);
           range.Save(fileStream, DataFormats.Rtf);
       }
}
New_Executed() is the handler method for the New command. When a new file is to be created the currently displayed text area will be cleared.
The Open_Executed() and Save_Executed() methods are a bit more involved but similar to each other. A dialog box is opened to specify a file to load or save. The file extension applied to the files will be “.rtf” for Rich Text Format.
There are three more things that need to be added to wrap up the functionality:
- Populating the combo boxes
- Taking action when the combo boxes selection changes
- Providing visual feedback for selected text
The combo boxes for the font and the font size in the toolbar need to be populated. That will be done in the MainWindow class constructor with the following code.
public MainWindow()
{
InitializeComponent();
      cmbFontFamily.ItemsSource = Fonts.SystemFontFamilies.OrderBy(f => f.Source);
      cmbFontSize.ItemsSource = new List<double>() { 8, 9, 10, 11, 12, 14, 16, 18, 20, 22, 24, 26, 28, 36, 48, 72 };

}
Although the combo boxes have data to display, they still do not do anything. Add the following code after the MainWindow constructor:
private void cmbFontFamily_SelectionChanged(object sender, SelectionChangedEventArgs e)
{
if (cmbFontFamily.SelectedItem != null)
MyTextBox.Selection.ApplyPropertyValue(Inline.FontFamilyProperty,   cmbFontFamily.SelectedItem);
}

private void cmbFontSize_TextChanged(object sender, TextChangedEventArgs e)
{
MyTextBox.Selection.ApplyPropertyValue(Inline.FontSizeProperty, cmbFontSize.Text);

}
These methods will be invoked when the combo box selections change. They’ll apply the font type and size styling to text that’s selected.
With that completed there is one block of code left to add, the TextBox.SelectionChanged event handler. This method gets called any time there is a change to the selection in the textbox. It is here that all the elements you added (combo boxes, toolbar buttons, statusbar, and the textbox) are synchronized.
Add the following code to the MainWindow.xaml.cs file at the bottom of the MainWindow class:
private void MyTextBox_SelectionChanged(object sender, RoutedEventArgs e)
{
object temp = MyTextBox.Selection.GetPropertyValue(Inline.FontFamilyProperty);
       cmbFontFamily.SelectedItem = temp;

       temp = MyTextBox.Selection.GetPropertyValue(Inline.FontSizeProperty);
       if(temp is Double)
            cmbFontSize.Text = temp.ToString();

       temp = MyTextBox.Selection.GetPropertyValue(Inline.FontWeightProperty);
       btnBold.IsChecked = (temp != DependencyProperty.UnsetValue) && (temp.Equals(FontWeights.Bold));

       temp = MyTextBox.Selection.GetPropertyValue(Inline.FontStyleProperty);
       btnItalic.IsChecked = (temp != DependencyProperty.UnsetValue) && (temp.Equals(FontStyles.Italic));

       string info = string.Format($"{MyTextBox.Selection.Text}");
       StatusBlock.Text = info;
 }
This is an interesting block of code. The first thing done is to get the FontFamilyProperty value from the selected code in the textbox. That value is used to select the related item in the cmbFontFamily combo box. In this way, the font of the selected code will be selected in the combo box.
The next several lines do the same thing for the font size, font weight, and bold and italic buttons.
Lastly, the status bar is given something to display and shows the selected text.
Note the type checking done in the if statement prior to setting the cmbFontSize text. If multiple font sizes are detected in the selected text, the value of temp will be a data type that’s incompatible with the data type of cmbFontSize.Text. Checking for the correct data type prevents an error when assigning the property value.
Testing the completed application
Build and run the application. Enter some text in the textbox that fills the center of the app. Select a portion and make it bold or italic. Change the font size and style. When ready, save the file and give it a name. Creating a new file will clear the textbox for something new. Load the file you just saved and you will be able to continue working on it. Note how the selected text attributes are reflected in the toolbar elements. Observe the status bar when text is selected. You should see the selected text.
Potential enhancements
The RichTextBox control has a lot of very powerful editing capabilities. Exposing those capabilities through commands and a handful of UI elements creates a simple, yet powerful text editor.
The layout created here is a standard style window with menu, toolbar, and status bar and is a good foundation for building additional functionality. Consider adding alignment tools to align text to the left or right or centered. Perhaps you wish to add color to your text in terms of a foreground or background color. The status bar could also be expanded to show more pertinent information, such as the number of words in the text box, or even a clock.
Summary
Windows Presentation Foundation is a very powerful tool. It supports layered text, animations, a powerful event and command routing system, and even includes support for elaborate graphics and styling. Microsoft has committed to the future of WPF with its inclusion in .NET Core and .NET 5 due for release later this year. Give it a try. You may be pleasantly surprised.
Additional resources
The following reference resources provide in-depth information on the topics discussed in this post:
Differences in WPF — Differences between Windows Presentation Foundation (WPF) on .NET Core and .NET Framework. WPF for .NET Core.
RichTextBox Overview — Differences between Textbox and RichTextBox
If you’d like to learn how to build a WPF application to verify phone numbers and obtain information about callers and their phones, check out this post:
Using Twilio Lookup in .NET Core WPF Applications
TwilioQuest – If you’d like to learn more about programming C# and other languages, try this action-adventure game inspired by the 16-bit golden era of computer gaming.
Jeffrey Rosenthal is a C/C++/C# developer and enjoys the architectural aspects of coding and software development. Jeff is a MCSD and has operated his own company, The Coding Pit since 2008. When not coding, Jeff enjoys his home projects, rescuing dogs, and flying his drone. Jeff is available for consulting on various technologies and can be reached via email, Twitter, or LinkedIn.
Related Posts
Related Resources
Года 3 назад, обсуждая Windows Forms с другом, я жаловался на то что неудобно использовать Windows Forms для вывода видео и музыки, а друг о том, что ему неудобно создавать свои контролы, а также формировать тулбары.
Мы и не думали тогда, что нам так упростят жизнь.
Но у любой технологии есть свои плюсы и минусы. Мы платим за нее своим временем, своими проектами, когда года 1.5 назад я выпустил простейшее приложение для обновления одной игры (такого рода программы зачастую называют «Автопатчеры»), я и не думал о том, что не может быть столько людей, которые будут кричать не о том, что программа имеет плохой дизайн или баги, а то, что ведь нужно скачать 20 мегабайт .Net Framework 2.0.
Жизнь научила меня изучать теперь сначала рынок, ведь даже самое красивое и правильное приложение может быть не оценено, если пользователю нужно совершать телодвижения, которые могут вызвать у него от сведения руки от нажатий кучи ненужных кнопок в диалогах программ до того, что ему нужно потратить дополнительный пенни для запуска вашей программы.
Год назад я много слышал о различных технологиях, появившихся в Net Framework 3.0. Я уже начал писать ранее на C#/VB.Net в контексте ASP.Net и почитав отзывы наиболее рьяных архитекторов, решил подождать.
Спустя полгода, а точнее прошлой весной, я слушал великолепные отзывы о технологии WPF от своего товарища, у него была одна проблема: 80% возможностей он так и не смог раскрыть, т.к. нормальная книга появилась летом (из тех, где подробно и довольно в доступной форме рассказывается о технологии), а до этого можно было почерпнуть информацию только из блогов, в коих, зачастую, многое упускалось из вида…
Наслушавшись его, и умудрившись опыта, я сначала начал читать книгу, которая обновилась к этому времени, вместе с фреймворком до версии 3.5. Многое ускользало и пока продолжает ускользать от моего понимания, но теперь есть куда копать: западные блоггеры-программисты, раскусив плод WPF, застрочили как из пулемета, да и наши начинают догонять.
Что такое WPF?
В Windows с версии 3.11 присутствовал компонент вывода на экран GDI, позже его обновили, в Windows XP, если не ошибаюсь, уже используется GDI+.
Проблем от использования GDI+ в приложениях было и будет много, наряду с GDI была подсистема вывода 3D – DirectX, существовавшая с Windows 95. У нее были другие проблемы, но главной проблемы – сильной загрузки процессора для перерисовки моделей у нее не было.
Видимо решение у Microsoft зрело давно, раз они интегрировали WPF в Vista и Server 2008, которое, как мне кажется, и дало больший толчок для его использования, нежели всяческие семинары и статьи. Это, кстати дает дополнительный плюс, ведь упрощается модель редистрибуция приложений использующих 3 и 3.5 фреймворки.
Собственно, как я думаю, Вы уже догадались, WPF использует DirectX для вывода приложений на экран пользователя. Но тут и первые грабли, т.к. отображение форм у пользователей будет местами разниться, ведь мы, же не сговорились и не скупили продукцию 3D middle и high видеокарт.
В WPF, на данный момент существуют 3 уровня, для определения как будет «рендерится» формочка и остальные примитивы на экране.
a) Уровень 0: Нет hardware acceleration (внутреннего ускорения). Примерно DirectX 7.0
b) Уровень 1: Частичная hardware acceleration. Примерно DirectX 8.
c) Уровень 2: Все фичи задействованы. Примерно DirectX 9 и выше.
Как узнать какой у вас уровень или у пользователя?
Int renderingTier = (RenderCapability.Tier >> 16);
if (renderingTier == 0)
{
// 0 уровень
}
Однако разработчики не ограничились тем, что использовали другой уровень презентационной модели, а сделали еще много вещей:
a) Новая описательная модель формы и интерфейса в принципе — XAML
b) Новая модель Компоновки: имеется ввиду не компоновщик на уровне компилятора,
а новая модель включения одного в другое. Пример (в textbox вставить checkbox).
c) Новые сопутствующие контролы и методы для печати и медиа.
d) Новая модель привязки данных.
e) Новые возможности в формах.
f) Многое другое, что я еще не узнал.
g) Возможность почти безболезненно перенести проект в Web
(О XBAP Rich Web Application я расскажу, через пару статей).
h) Анимация.
Да называть все везде формами, наверное, неверно, ведь модель состоит из окон и страниц, страницы можно соответственно подгружать, что в веб-версии, что в обычной, через компонент Frame или через Canvas, например, в WPF/E (SilverLight).
Пример подгрузки страницы:
Frame.Source = new Uri («Page1.xaml», UriKind.Relative);
В следующей статье я рассмотрю XAML. Вкратце пока скажу, что XAML
(eXtensible Application Markup Language) – это специальный описательный язык для
документов, окон и страниц, чем то, напоминает этакую помесь XML и HTML.
Ну и простой пример окна (только XAML):
- <Window
- xmlns=»http://schemas.microsoft.com/winfx/2006/xaml/presentation»
- xmlns:x=»http://schemas.microsoft.com/winfx/2006/xaml»
- Title=»TestingWPF» Width=»310″ Height=»260″
- WindowStartupLocation=»CenterScreen»>
- <Grid>
- <Grid.ColumnDefinitions>
- <ColumnDefinition></ColumnDefinition>
- </Grid.ColumnDefinitions>
- <Grid.RowDefinitions>
- <RowDefinition></RowDefinition>
- </Grid.RowDefinitions>
- <TextBlock Grid.Row=»0″ Grid.Column=»0″>Hello World</TextBlock>
- </Grid>
- </Window>
* This source code was highlighted with Source Code Highlighter.
Кстати, советую для тестирования разметки и небольших кусочков использовать не Visual Studio, а XamlPadX или XamlHack, или XamlPad.
В заключение, хотелось бы порекомендовать книги по WPF:
1) WPF. Windows Presentation Foundation в .NET 3.5 с примерами на C# 2008 для профессионалов
Автор: Мэтью Мак-Дональд.
Впечатления:
Написано очень добротно, неточностей перевода мало, рассказано почти обо всем, минус – то, что маленький тираж, и когда она только появилась, пришлось побегать и месяца полтора ждать.
2) WPF. Windows Presentation Foundation в .NET 3.0 для профессионалов.
Автор: тот же.
Впечатления:
«В целом книга написана очень хорошо, но, похоже, все-таки, местами слишком все подробно расписано и присутствуют неточности перевода» – это со слов человека (который упоминался в повествовании ранее), который ее читал.
Upd.
Блоги
Вот немного блогов, посвящённых WPF:
blogs.msdn.com/adam_nathan/
www.drwpf.com/blog — один из лучших WPF-блоггеров
www.beacosta.com/blog — всё о Data Binding в WPF
marlongrech.wordpress.com/
joshsmithonwpf.wordpress.com/ — один из лучших WPF-блоггеров
work.j832.com/
learnwpf.com/
blog.pixelingene.com/
sachabarber.net/ — один из лучших WPF-блоггеров
blogs.msdn.com/wpfsdk/
windowsclient.net/
www.codeplex.com/wpf/ — новые официальные контролы WPF
wpf.netfx3.com/blogs/presentation_bloggers/
Английские книги
Pro WPF: Windows Presentation Foundation in .NET 3.0 by Matthew MacDonald
Essential Windows Presentation Foundation by Chris Andersen
WPF Unleashed by Adam Nathan
Дополнительные программы, для работы с WPF

Kaxaml
(Спасибо хаброюзеру Vladek за помощь в дополнении поста и хаброюзеру XaocCPS за его рецензирование)
Буду рад, если Вы дополните этот список, особенно книгами на английском,
т.к я пока еще их не изучал, но видел, либо сделаете уточнения к статье. Спасибо!
Windows Presentation Foundation (WPF) is a powerful tool for creating desktop applications with .NET. This tutorial aims to provide a comprehensive introduction to WPF, and by the end of it, you should have a good understanding of its basics and how to use it in your projects effectively. If you are looking to hire .NET remote developers who are proficient in WPF, you are also in the right place.

What is WPF?
WPF, or Windows Presentation Foundation, is a graphical subsystem by Microsoft for rendering user interfaces in Windows-based applications. It is a part of the .NET Framework, providing a unified programming model for building line-of-business desktop applications on Windows.
Getting Started with WPF
To start with WPF, you first need to install Visual Studio, if you haven’t already. You can download the latest version of Visual Studio from the official website.
Once Visual Studio is installed, you can create a new WPF Application project. Here’s how to do it:
- Open Visual Studio.
- Click on «Create a new project.»
- In the «Create a new project» window, select «WPF App (.NET Framework)» and then click Next.
- Name your project, choose a location, and click «Create.»
Understanding the WPF Application Structure
Visual Studio creates several files for you when you create a new WPF application. The most important ones are App.xaml and MainWindow.xaml.
The App.xaml file allows you to set application-wide properties and handle application-wide events. The MainWindow.xaml file, on the other hand, is where you define the user interface for your main window.
Creating a Simple WPF Application
Let’s create a simple WPF application that displays a button. When you click the button, a message box says «Hello, World!»
First, open MainWindow.xaml and add the following XAML code:
    <Window x:Class="WpfApp.MainWindow"
        xmlns="http://schemas.microsoft.com/winfx/2006/xaml/presentation"
        xmlns:x="http://schemas.microsoft.com/winfx/2006/xaml"
        Title="MainWindow" Height="350" Width="525">
    <Grid>
        <Button Name="btnHello" Content="Click me!" HorizontalAlignment="Center" VerticalAlignment="Center" Click="btnHello_Click" />
    </Grid>
    </Window>
Then, open MainWindow.xaml.cs and add the following C# code:
    using System.Windows;

    namespace WpfApp
    {
        public partial class MainWindow : Window
        {
            public MainWindow()
            {
                InitializeComponent();
            }

            private void btnHello_Click(object sender, RoutedEventArgs e)
            {
                MessageBox.Show("Hello, World!");
            }
        }
    }
That’s it! You have now created your first WPF application. If you click the «Click me!» button, you will see a message box saying «Hello, World!»
Conclusion
This tutorial provided a brief introduction to WPF. We discussed what WPF is, and how to get started with it, and we even created a simple WPF application. However, WPF is a very powerful and complex technology, and there’s still much to learn. With patience and practice, you can master it and create stunning desktop applications with .NET.