

Emir K.
Posted on
• Edited on
Introduction:
In the world of modern networking and system administration, the effective management of users, computers, and resources is essential for maintaining a secure and organized infrastructure. This guide will lead you through the process of automating the deployment of Active Directory (AD) on a Windows Server 2022 using a powerful PowerShell script. Windows Server 2022 stands as the pinnacle of Microsoft’s server operating systems, boasting enhanced security features, improved performance, and advanced administrative capabilities. Within this framework, Active Directory serves as a fundamental pillar, providing centralized identity and access management for enterprises and organizations.
Understanding Active Directory (AD):
Active Directory is a comprehensive directory service developed by Microsoft, designed to facilitate the management of network resources and streamline user administration. It functions as a repository of critical information about users, computers, groups, and other network entities. Beyond its core function of authentication and authorization, AD enables the creation of a hierarchical structure that mirrors an organization’s real-world structure. This structure, referred to as the domain hierarchy, allows administrators to manage and enforce security policies, deploy software, and facilitate resource sharing efficiently.
Key Benefits of Active Directory:
Active Directory brings a multitude of benefits to organizations, including:
- Centralized Management: AD offers a centralized platform for managing users, groups, computers, and network resources. This streamlines administration and reduces the complexity of managing multiple user accounts and access rights.
- Single Sign-On (SSO): With AD, users can access multiple services and applications using a single set of credentials, simplifying the authentication process and enhancing user experience.
- Group Policy: AD’s Group Policy feature enables administrators to enforce security settings, policies, and configurations across the network, ensuring consistent and standardized management.
- Resource Sharing: AD facilitates seamless sharing of files, printers, and other resources within the organization, promoting collaboration and productivity.
- Security and Access Control: AD provides robust security mechanisms, including access controls, encryption, and authentication, reducing the risk of unauthorized access and data breaches.
Prerequisites and Script Customization:
Before initiating the automated deployment of Active Directory using the PowerShell script, ensure the following prerequisites are met:
- Administrative Privileges: You must have administrative privileges on the Windows Server 2022 system to execute the necessary configurations and settings.
- Windows Server 2022: The script is designed specifically for Windows Server 2022. Make certain that you are utilizing the correct operating system version.
- Backup: It is strongly recommended to create a backup of your system or a snapshot of your virtual machine. This precautionary measure ensures that you can revert to a previous state in case of unexpected issues.
Preparing the Script:
Before executing the PowerShell script, there are several pieces of information that you need to prepare and input into the script to customize it for your environment:
Network Variables:
$ethipaddress: Static IP address of the server.
$ethprefixlength: Subnet mask prefix length (in CIDR format, e.g., 24 for 255.255.255.0).
$ethdefaultgw: Default gateway.
$ethdns: DNS servers (you can add multiple DNS addresses separated by commas).
$globalsubnet: Global subnet used for DNS reverse lookup and Active Directory Sites and Services.
$subnetlocation: Location of the subnet for Active Directory Sites and Services.
$sitename: New name for Default-First-Site in Active Directory Sites and Services.
Active Directory Variables:
$domainname: Name of your Active Directory domain.
Remote Desktop Variable:
$enablerdp: Option to enable or disable Remote Desktop (yes or no).
Disable IE Enhanced Security Configuration Variable:
$disableiesecconfig: Option to enable or disable Internet Explorer Enhanced Security Configuration (yes or no).
Hostname Variables:
$computername: New server name.
NTP Variables:
$ntpserver1: First NTP server for time synchronization.
$ntpserver2: Second NTP server for time synchronization.
DNS Variables:
$reversezone: DNS reverse lookup zone.
Execution and Customization:
Review each variable carefully and input accurate values that align with your network configuration and preferences. Customize the script as needed, adjusting parameters to meet your specific requirements.
#--------------------------------------------------------------------------------------------------------
#- Created by:             Emir Kurtovic                                                                -
#- Version:                2.1                                                                          -
#--------------------------------------------------------------------------------------------------------
# Change Log                                                                                            -
# 18th August 2024          Added FQDN prompt for source domain controller when joining existing domain -
#--------------------------------------------------------------------------------------------------------

#-------------
#- Variables -
#-------------

# Network Variables
$ethipaddress = '10.10.100.251' # static IP Address of the server
$ethprefixlength = '24' # subnet mask - 24 = 255.255.255.0
$ethdns = '8.8.8.8','1.1.1.1' # for multiple DNS you can append DNS entries with commas
$ethdefaultgw = '10.10.100.1' # default gateway
$globalsubnet = '10.10.100.0/24' # Global Subnet will be used in DNS Reverse Record and AD Sites and Services Subnet
$subnetlocation = 'Sarajevo'
$sitename = 'Main-Site' # Renames Default-First-Site within AD Sites and Services

# Active Directory Variables
$domainname = 'elab.local' # enter your active directory domain name
$domainNetbiosName = 'ELAB' # NetBIOS name for the domain, typically a short version of the domain name

# Remote Desktop Variable
$enablerdp = 'yes' # to enable RDP, set this variable to yes. to disable RDP, set this variable to no

# Disable IE Enhanced Security Configuration Variable
$disableiesecconfig = 'yes' # to disable IE Enhanced Security Configuration, set this variable to yes. to leave enabled, set this variable to no

# Hostname Variables
$computername = 'srv-dc02' # enter your server name

# NTP Variables
$ntpserver1 = '0.ba.pool.ntp.org'
$ntpserver2 = '1.ba.pool.ntp.org'

# DNS Variables
$reversezone = '100.10.10.in-addr.arpa'

# Timestamp
Function Timestamp {
    $Global:timestamp = Get-Date -Format "dd-MM-yyy_hh:mm:ss"
}

# Log File Location
$logfile = "C:\psscript\Win_2022_AD_Deployment_logs.txt"

# Create Log File
Write-Host "-= Get timestamp =-" -ForegroundColor Green

Timestamp

IF (Test-Path $logfile) {
    Write-Host "-= Logfile Exists =-" -ForegroundColor Yellow
}
ELSE {
    Write-Host "-= Creating Logfile =-" -ForegroundColor Green
    Try {
        New-Item -Path 'C:\psscript' -ItemType Directory
        New-Item -ItemType File -Path $logfile -ErrorAction Stop | Out-Null
        Write-Host "-= The file $($logfile) has been created =-" -ForegroundColor Green
    }
    Catch {
        Write-Warning -Message $("Could not create logfile. Error: " + $_.Exception.Message)
        Break
    }
}

# Define the Disable-IEESC function
function Disable-IEESC {
    # Disable IE ESC for Administrators
    Set-ItemProperty -Path 'HKLM:\SOFTWARE\Microsoft\Active Setup\Installed Components\{A5AB5C05-5B50-421F-95D7-1F08E602371E}' -Name "IsInstalled" -Value 0 -ErrorAction SilentlyContinue

    # Disable IE ESC for Users
    Set-ItemProperty -Path 'HKLM:\SOFTWARE\Microsoft\Active Setup\Installed Components\{A5AB5C05-5B50-421F-95D7-1F08E602371F}' -Name "IsInstalled" -Value 0 -ErrorAction SilentlyContinue

    Write-Host "-= IE Enhanced Security Configuration successfully disabled for Admin and User =-" -ForegroundColor Green
}

# Check Script Progress via Logfile
$firstcheck = Select-String -Path $logfile -Pattern "1-Basic-Server-Config-Complete"

IF (!$firstcheck) {
    Write-Host "-= 1-Basic-Server-Config-Complete, does not exist =-" -ForegroundColor Yellow
    Timestamp
    Add-Content $logfile "$($Timestamp) - Starting Active Directory Script"

    ## 1-Basic-Server-Config ##
    #------------
    #- Settings -
    #------------

    # Set Network
    Timestamp
    Try {
        New-NetIPAddress -IPAddress $ethipaddress -PrefixLength $ethprefixlength -DefaultGateway $ethdefaultgw -InterfaceIndex (Get-NetAdapter).InterfaceIndex -ErrorAction Stop | Out-Null
        Set-DNSClientServerAddress -ServerAddresses $ethdns -InterfaceIndex (Get-NetAdapter).InterfaceIndex -ErrorAction Stop
        Write-Host "-= IP Address successfully set to $($ethipaddress), subnet $($ethprefixlength), default gateway $($ethdefaultgw) and DNS Server $($ethdns) =-" -ForegroundColor Green
        Add-Content $logfile "$($Timestamp) - IP Address successfully set to $($ethipaddress), subnet $($ethprefixlength), default gateway $($ethdefaultgw) and DNS Server $($ethdns)"
    }
    Catch {
        Write-Warning -Message $("Failed to apply network settings. Error: " + $_.Exception.Message)
        Break
    }

    # Set RDP
    Timestamp
    Try {
        IF ($enablerdp -eq "yes") {
            Set-ItemProperty -Path 'HKLM:\System\CurrentControlSet\Control\Terminal Server' -name "fDenyTSConnections" -Value 0 -ErrorAction Stop
            Enable-NetFirewallRule -DisplayGroup "Remote Desktop" -ErrorAction Stop
            Write-Host "-= RDP Successfully enabled =-" -ForegroundColor Green
            Add-Content $logfile "$($Timestamp) - RDP Successfully enabled"
        }
    }
    Catch {
        Write-Warning -Message $("Failed to enable RDP. Error: " + $_.Exception.Message)
        Break
    }

    IF ($enablerdp -ne "yes") {
        Write-Host "-= RDP remains disabled =-" -ForegroundColor Green
        Add-Content $logfile "$($Timestamp) - RDP remains disabled"
    }

    # Disable IE Enhanced Security Configuration
    Timestamp
    Try {
        IF ($disableiesecconfig -eq "yes") {
            Disable-IEESC
            Add-Content $logfile "$($Timestamp) - IE Enhanced Security Configuration successfully disabled for Admin and User"
        }
    }
    Catch {
        Write-Warning -Message $("Failed to disable IE Security Configuration. Error: " + $_.Exception.Message)
        Break
    }

    If ($disableiesecconfig -ne "yes") {
        Write-Host "-= IE Enhanced Security Configuration remains enabled =-" -ForegroundColor Green
        Add-Content $logfile "$($Timestamp) - IE Enhanced Security Configuration remains enabled"
    }

    # Set Hostname
    Timestamp
    Try {
        Rename-Computer -ComputerName $env:computername -NewName $computername -ErrorAction Stop | Out-Null
        Write-Host "-= Computer name set to $($computername) =-" -ForegroundColor Green
        Add-Content $logfile "$($Timestamp) - Computer name set to $($computername)"
    }
    Catch {
        Write-Warning -Message $("Failed to set new computer name. Error: " + $_.Exception.Message)
        Break
    }

    # Enable cryptography algorithms compatible with Windows NT 4.0
    Timestamp
    Try {
        Set-ItemProperty -Path 'HKLM:\System\CurrentControlSet\Control\Lsa\FipsAlgorithmPolicy' -Name 'EnableNT4Cryptography' -Value 1 -ErrorAction Stop
        Write-Host "-= Enabled NT4-compatible cryptography algorithms =-" -ForegroundColor Green
        Add-Content $logfile "$($Timestamp) - Enabled NT4-compatible cryptography algorithms"
    }
    Catch {
        Write-Warning -Message $("Failed to enable NT4-compatible cryptography algorithms. Error: " + $_.Exception.Message)
        Break
    }

    # Add first script complete to logfile
    Timestamp
    Add-Content $logfile "$($Timestamp) - 1-Basic-Server-Config-Complete, starting script 2 =-"

    # Enable FIPS-compliant algorithms
    Timestamp
    Try {
        Write-Host "-= Enabling FIPS-compliant algorithms =-" -ForegroundColor Yellow
        $fipsPolicyValue = "Enabled"
        $fipsPolicyPath = "HKLM:\SYSTEM\CurrentControlSet\Control\Lsa\FipsAlgorithmPolicy"
        Set-ItemProperty -Path $fipsPolicyPath -Name "Enabled" -Value $fipsPolicyValue -ErrorAction Stop
        Write-Host "-= FIPS-compliant algorithms enabled successfully =-" -ForegroundColor Green
        Add-Content $logfile "$($Timestamp) - FIPS-compliant algorithms enabled successfully"
    }
    Catch {
        Write-Warning -Message $("Failed to enable FIPS-compliant algorithms. Error: " + $_.Exception.Message)
        Break
    }

    # Reboot Computer to apply settings
    Timestamp
    Write-Host "-= Save all your work, computer rebooting in 30 seconds =-" -ForegroundColor White -BackgroundColor Red
    Sleep 30

    Try {
        Restart-Computer -ComputerName $env:computername -ErrorAction Stop
        Write-Host "-= Rebooting Now!! =-" -ForegroundColor Green
        Add-Content $logfile "$($Timestamp) - Rebooting Now!!"
        Break
    }
    Catch {
        Write-Warning -Message $("Failed to restart computer $($env:computername). Error: " + $_.Exception.Message)
        Break
    }

} # Close 'IF (!$firstcheck)'

# Check Script Progress via Logfile
$secondcheck1 = Get-Content $logfile | Where-Object { $_.Contains("1-Basic-Server-Config-Complete") }

IF ($secondcheck1) {
    $secondcheck2 = Get-Content $logfile | Where-Object { $_.Contains("2-Build-Active-Directory-Complete") }

    IF (!$secondcheck2) {

        ## 2-Build-Active-Directory ##

        # Domain Operation Variable
        $domainAction = Read-Host "Enter 'new' to create a new domain or 'join' to add this server to an existing domain"

        # Prompt for the DSRM password
        $dsrmpassword = Read-Host "Enter Directory Services Restore Password" -AsSecureString

        # If joining an existing domain, prompt for the IP address of the primary AD and credentials
        $primaryADIP = $null
        $sourceDomainControllerFQDN = $null
        $domainCreds = $null
        IF ($domainAction -eq "join") {
            $primaryADIP = Read-Host "Enter the IP address of the primary AD domain controller"
            $sourceDomainControllerFQDN = Read-Host "Enter the fully qualified DNS name (FQDN) of the source domain controller"

            # Set DNS to point to the primary AD controller
            Set-DnsClientServerAddress -InterfaceIndex (Get-NetAdapter).InterfaceIndex -ServerAddresses $primaryADIP

            # Test connectivity to the primary AD
            IF (-not (Test-Connection -ComputerName $primaryADIP -Count 2 -Quiet)) {
                Write-Host "Unable to reach the primary AD domain controller at $primaryADIP" -ForegroundColor Red
                Break
            }

            # Prompt for domain admin credentials
            $domainCreds = Get-Credential -Message "Enter the credentials for a domain account with permissions to add a domain controller"
        }

        Timestamp
        Try {
            Write-Host "-= Active Directory Domain Services installing =-" -ForegroundColor Yellow
            Install-WindowsFeature -name AD-Domain-Services -IncludeManagementTools
            Write-Host "-= Active Directory Domain Services installed successfully =-" -ForegroundColor Green
            Add-Content $logfile "$($Timestamp) - Active Directory Domain Services installed successfully"
        }
        Catch {
            Write-Warning -Message $("Failed to install Active Directory Domain Services. Error: " + $_.Exception.Message)
            Break
        }

        # Configure Active Directory Domain Services
        Timestamp
        Try {
            IF ($domainAction -eq "new") {
                Write-Host "-= Creating new domain =-" -ForegroundColor Yellow
                Install-ADDSForest -DomainName $domainname -DomainNetbiosName $domainNetbiosName -InstallDNS -SafeModeAdministratorPassword $dsrmpassword -Confirm:$false | Out-Null
                Write-Host "-= New domain created successfully =-" -ForegroundColor Green
                Add-Content $logfile "$($Timestamp) - New domain created successfully"
            }
            ELSEIF ($domainAction -eq "join") {
                Write-Host "-= Joining existing domain =-" -ForegroundColor Yellow
                Install-ADDSDomainController -DomainName $domainname -InstallDNS -SafeModeAdministratorPassword $dsrmpassword -Credential $domainCreds -Confirm:$false -ReplicationSourceDC $sourceDomainControllerFQDN | Out-Null
                Write-Host "-= Server added to existing domain successfully =-" -ForegroundColor Green
                Add-Content $logfile "$($Timestamp) - Server added to existing domain successfully"
            }
            ELSE {
                Write-Host "-= Invalid option selected. Exiting... =-" -ForegroundColor Red
                Break
            }
        }
        Catch {
            Write-Warning -Message $("Failed to configure Active Directory Domain Services. Error: " + $_.Exception.Message)
            Break
        }

        # Add second script complete to logfile
        Timestamp
        Add-Content $logfile "$($Timestamp) - 2-Build-Active-Directory-Complete, starting script 3 =-"

        # Reboot Computer to apply settings
        Write-Host "-= Save all your work, computer rebooting in 30 seconds =-" -ForegroundColor White -BackgroundColor Red
        Sleep 30

        Try {
            Restart-Computer -ComputerName $env:computername -ErrorAction Stop
            Write-Host "Rebooting Now!!" -ForegroundColor Green
            Add-Content $logfile "$($Timestamp) - Rebooting Now!!"
        }
        Catch {
            Write-Warning -Message $("Failed to restart computer $($env:computername). Error: " + $_.Exception.Message)
            Break
        }

    } # Close 'IF (!$secondcheck2)'
} # Close 'IF ($secondcheck1)'

# Add second script complete to logfile

# Check Script Progress via Logfile
$thirdcheck = Get-Content $logfile | Where-Object { $_.Contains("2-Build-Active-Directory-Complete") }

## 3-Build-Active-Directory ##

#------------
#- Settings -
#------------

# Add DNS Reverse Record
Timestamp
Try {
    Add-DnsServerPrimaryZone -NetworkId $globalsubnet -DynamicUpdate Secure -ReplicationScope Domain -ErrorAction Stop
    Write-Host "-= Successfully added in $($globalsubnet) as a reverse lookup within DNS =-" -ForegroundColor Green
    Add-Content $logfile "$($Timestamp) - Successfully added $($globalsubnet) as a reverse lookup within DNS"
}
Catch {
    Write-Warning -Message $("Failed to create reverse DNS lookups zone for network $($globalsubnet). Error: "+ $_.Exception.Message)
    Break
}

# Add DNS Scavenging
Write-Host "-= Set DNS Scavenging =-" -ForegroundColor Yellow

Timestamp
Try {
    Set-DnsServerScavenging -ScavengingState $true -ScavengingInterval 7.00:00:00 -Verbose -ErrorAction Stop
    Set-DnsServerZoneAging $domainname -Aging $true -RefreshInterval 7.00:00:00 -NoRefreshInterval 7.00:00:00 -Verbose -ErrorAction Stop
    Set-DnsServerZoneAging $reversezone -Aging $true -RefreshInterval 7.00:00:00 -NoRefreshInterval 7.00:00:00 -Verbose -ErrorAction Stop
    Add-Content $logfile "$($Timestamp) - DNS Scavenging Complete"
}
Catch {
    Write-Warning -Message $("Failed to DNS Scavenging. Error: "+ $_.Exception.Message)
    Break
}

Get-DnsServerScavenging

Write-Host "-= DNS Scavenging Complete =-" -ForegroundColor Green

# Create Active Directory Sites and Services
Timestamp
Try {
    New-ADReplicationSubnet -Name $globalsubnet -Site "Default-First-Site-Name" -Location $subnetlocation -ErrorAction Stop
    Write-Host "-= Successfully added Subnet $($globalsubnet) with location $($subnetlocation) in AD Sites and Services =-" -ForegroundColor Green
    Add-Content $logfile "$($Timestamp) - Successfully added Subnet $($globalsubnet) with location $($subnetlocation) in AD Sites and Services"
}
Catch {
    Write-Warning -Message $("Failed to create Subnet $($globalsubnet) in AD Sites and Services. Error: "+ $_.Exception.Message)
    Break
}

# Rename Active Directory Site
Timestamp
Try {
    Get-ADReplicationSite Default-First-Site-Name | Rename-ADObject -NewName $sitename -ErrorAction Stop
    Write-Host "-= Successfully renamed Default-First-Site-Name to $sitename in AD Sites and Services =-" -ForegroundColor Green
    Add-Content $logfile "$($Timestamp) - Successfully renamed Default-First-Site-Name to $sitename in AD Sites and Services"
}
Catch {
    Write-Warning -Message $("Failed to rename site in AD Sites and Services. Error: "+ $_.Exception.Message)
    Break
}

# Add NTP settings to PDC

Timestamp

$serverpdc = Get-AdDomainController -Filter * | Where-Object {$_.OperationMasterRoles -contains "PDCEmulator"}

If ($serverpdc) {
    Try {
        Start-Process -FilePath "C:\Windows\System32\w32tm.exe" -ArgumentList "/config /manualpeerlist:$($ntpserver1),$($ntpserver2) /syncfromflags:MANUAL /reliable:yes /update" -ErrorAction Stop
        Stop-Service w32time -ErrorAction Stop
        sleep 2
        Start-Service w32time -ErrorAction Stop
        Write-Host "-= Successfully set NTP Servers: $($ntpserver1) and $($ntpserver2) =-" -ForegroundColor Green
        Add-Content $logfile "$($Timestamp) - Successfully set NTP Servers: $($ntpserver1) and $($ntpserver2)"
    }
    Catch {
        Write-Warning -Message $("Failed to set NTP Servers. Error: "+ $_.Exception.Message)
    }
}
Enter fullscreen mode
Exit fullscreen mode
Conclusion:
Utilizing PowerShell to create an Active Directory infrastructure on Windows Server 2022 brings significant benefits in terms of speed, efficiency, and consistency of administrative tasks. Throughout this article, we’ve explored the basics of Windows Server 2022, Active Directory, and PowerShell, and demonstrated the steps to quickly start creating an AD domain using a PowerShell script.
This post serves as an introduction to the wide range of possibilities that Windows Server 2022 and PowerShell offer. I hope this article helps you lay the foundation for further exploration and management of your server infrastructure.
Note: Before executing any scripts or administrative tasks in a production environment, it’s always important to thoroughly test and understand the consequences of your actions.
Best of luck in creating your Active Directory infrastructure on Windows Server 2022 with the help of PowerShell!
🙋♂️💻More about Autor 🖱️💻
This article serves as an Active Directory tutorial covering installation and setup of Windows 2012 Active Directory Services Role & Domain Controller using Windows 2012 PowerShell.
Our previous article covered the installation of Windows Server 2012 Active Directory Services role and Domain Controller installation using the Windows Server Manager (GUI) interface.
FREE Hyper-V & VMware Backup: FREE for Firewall.cx readers for a Limited Time! Download Now!
What Is Active Directory?
Active Directory is a heart of Windows Server operating systems. Active Directory Domain Services (AD DS) is central repository of active directory objects like user accounts, computer accounts, groups, group policies and so on. Similarly, Active Directory authenticates user accounts and computer accounts when they login into the domain. Computers must be joined to the domain in order to authenticate Active Directory users.
Active Directory is a database that is made up of several components which are important for us to understand before attempting to install and configure Active Directory Services on Windows Server 2012. These components are:
- Domain Controller (DC): — Domain Controllers are servers where the Active Directory Domain Services role is installed. The DC stores copies of the Active Directory Database (NTDS.DIT) and SYSVOL (System Volume) folder.
- Data Store: — It is the actual file (NTDS.DIT) that stores the Active Directory information.
- Domain: — Active Directory Domain is a group of computers and user accounts that share common administration within a central Active Directory database.
- Forest: — Forest is a collection of Domains that share common Active Directory database. The first Domain in a Forest is called a Forest Root Domain.
- Tree: — A tree is a collection of domain names that share common root domain.
- Schema: — Schema defines the list of attributes and object types that all objects in the Active Directory database can have.
- Organizational Units (OUs): — OUs are simply container or folders in the Active Directory that stores other active directory objects such as user accounts, computer accounts and so on. OUs are also used to delegate control and apply group policies.
- Sites: — Sites are Active Directory object that represent physical locations. Sites are configured for proper replication of Active Directory database between sites.
- Partition: — Active Directory database file is made up of multiple partitions which are also called naming contexts. The Active Directory database consists of partitions such as application, schema, configuration, domain and global catalog.
Checking Active Directory Domain Services Role Availability
Another method of installing an Active Directory Services Role & Domain Controller is with the use of Windows PowerShell. PowerShell is a powerful scripting tool and an alternative to the Windows GUI wizard we covered in our previous article. Open PowerShell as an Administrator and type the following cmdlet to check for the Active Directory Domain Services Role availability:
PS C:\Users\Administrator> Get—WindowsFeature AD—Domain—Services
The system should return the Install State as Available, indicating the role is available for immediate installation. We can now safely proceed to the next step.
Install Active Directory Services Role & Domain Controller Using Windows PowerShell
To initiate the installation of Active Directory Services Role on Windows Server 2012 R2, issue the following cmdlet:
PS C:\Users\Administrator> Install-WindowsFeature –Name AD-Domain-Services
The system will immediately begin the installation of the Active Directory Domain Services role and provide an update of the installation’s progress:

Figure 1. Installing Active Directory Domain Services with PowerShell
Once the installation is complete, the prompt is updated with a success message (Exit Code) as shown below:

Figure 2. Finished Installing ADDS with PowerShell
Next step is to promote the server to an active directory domain controller. To do so, you need to perform the prerequisite installation at the forest level by typing the following cmdlet in PowerShell:
PS C:\Users\Administrator> Test-ADDSForestInstallation
The following figure shows the command execution and system output:

Figure 3. Prerequisite Installation
Now it’s time to promote the server to a domain controller. For this step, we need to save all parameters in a PowerShell script (using notepad), which will then be used during the domain controller installation.
FREE Hyper-V & VMware Backup: FREE for Firewall.cx readers for a Limited Time! Download Now!
Below are the options we used — these are identical to what we selected in our GUI Wizard installation covered in our Windows Server 2012 Active Directory Services role and Domain Controller installation using the Windows Server Manager (GUI) article:
#
# Windows PowerShell script for AD DS Deployment
#
Import-Module ADDSDeployment
Install-ADDSForest
-CreateDnsDelegation:$false
-DatabasePath «C:\Windows\NTDS»
-DomainMode «Win2012R2»
-DomainName «firewall.local»
-DomainNetbiosName «FIREWALL»
-ForestMode «Win2012R2»
-InstallDns:$true
-LogPath «C:\Windows\NTDS»
-NoRebootOnCompletion:$false
-SysvolPath «C:\Windows\SYSVOL»
-Force:$true
Save the script at an easy accessible location e.g Desktop, with the name InstallDC.ps1.
Before running the script, we need to change the execution policy of PowerShell to remote signed. This is accomplished with the following cmdlet:
PS C:\Users\Administrator\Desktop> Set-executionpolicy remotesigned
The following figure shows the command execution and system output:

Figure 4. Changing the Execution Policy of PowerShell
Now we can execute our script from within PowerShell by changing the PowerShell directory to the location where the script resides and typing the following cmdlet:
PS C:\Users\Administrator\Desktop> .\InstallDC.ps1
Once executed, the server is promoted to Domain Controller and installation updates are provided at the PowerShell prompt:
Figure 5. Promoting Server to Domain Controller
After the installation is complete, the server will reboot and the server will have Active Directory Domain Services installed with the server being a Domain Controller.
This completes the installation and setup of Windows 2012 Active Directory Services Role & Domain Controller using Windows 2012 PowerShell.
FREE Hyper-V & VMware Backup: FREE for Firewall.cx readers for a Limited Time! Download Now!
This is a detailed guide on how to install Active Directory Domain Services (AD DS).
The steps in this guide walk through how to install and configure the first domain controller in the forest.
I’ll be using a Windows 2025 server, but these same steps will work with 2012 and later server OS.
Table of contents
- Prerequisites
- Install AD DS using Server Manager
- Install AD DS using PowerShell
Prerequisites
Before you install the AD DS role make sure you have the following:
- Windows Server: You need a server with Windows Server OS (2012, 2016, 2019, or later).
- Static IP: Assign a static IP address to your windows server.
- Hostname:
- Make sure you have the hostname of the server set to what you want. Changing hostnames on a domain controller can cause temporary outage.
Install AD DS using Server Manager
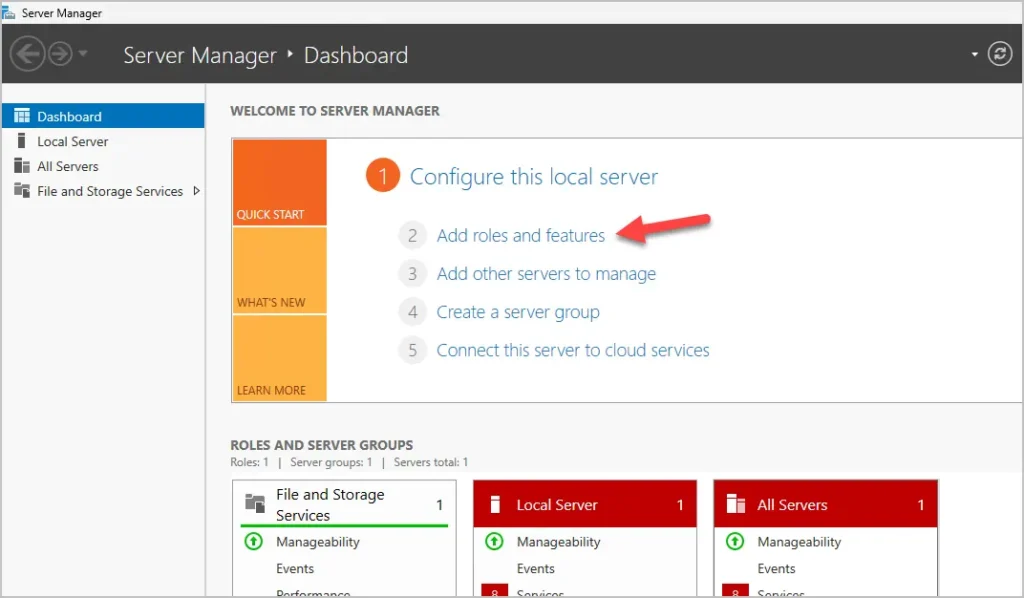
Step 1. Open Server Manager
Step 2. Click Add roles and features
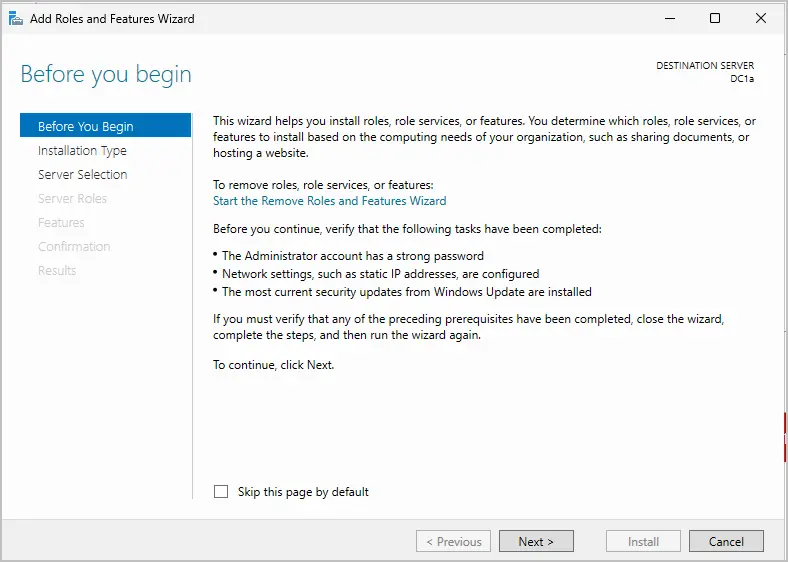
Step 3. The Add Roles and Features wizard will open. Click Next.
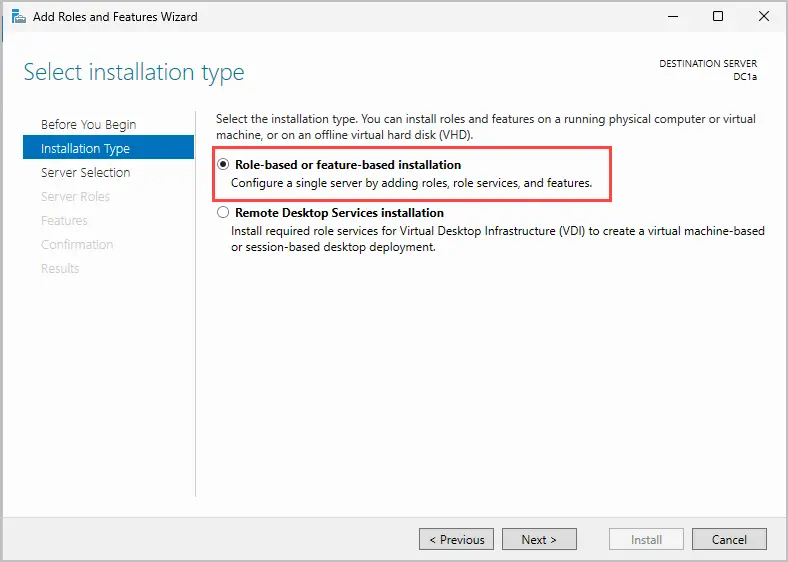
Step 4. Select “Role-based or featured-based installation”. Click Next.
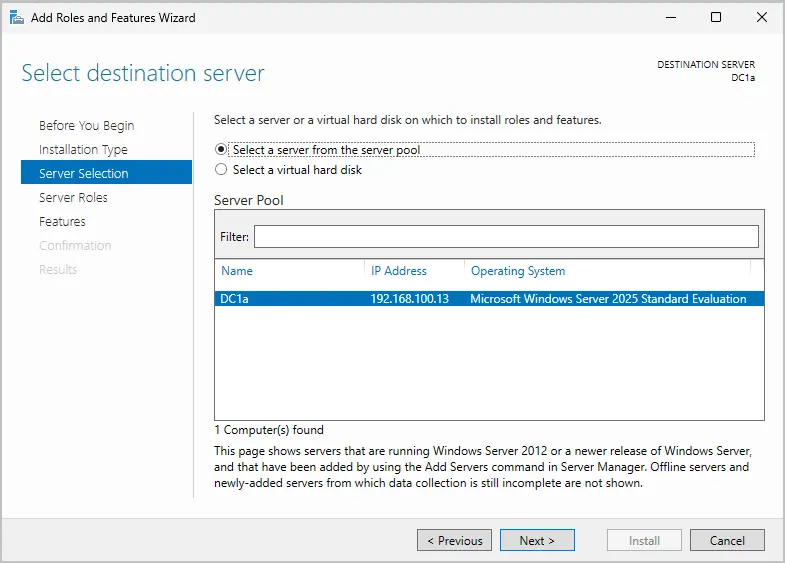
Step 5. Select your server from the pool and click Next.
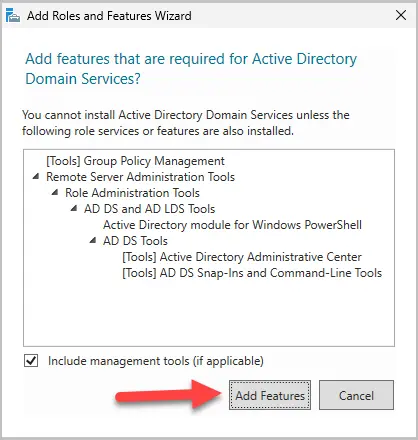
Step 6. Select “Active Directory Domain Services” from the list of roles.
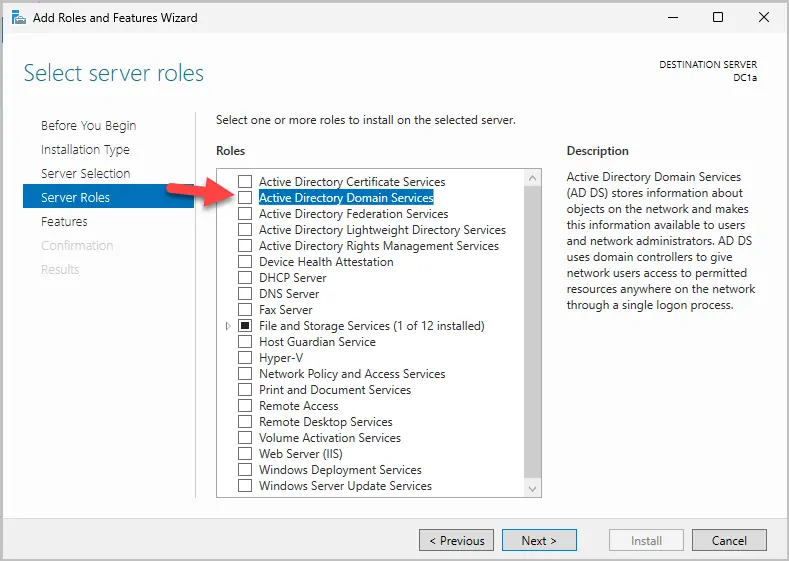
When you click the checkbox, you will get a popup. Click “Add Features”.
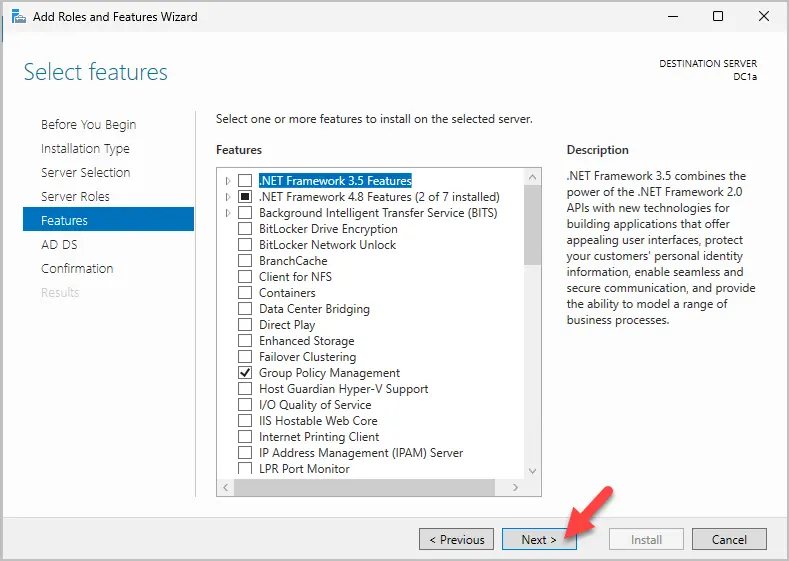
Step 7. On the select features screen just click Next. You do not need to add any additional features.
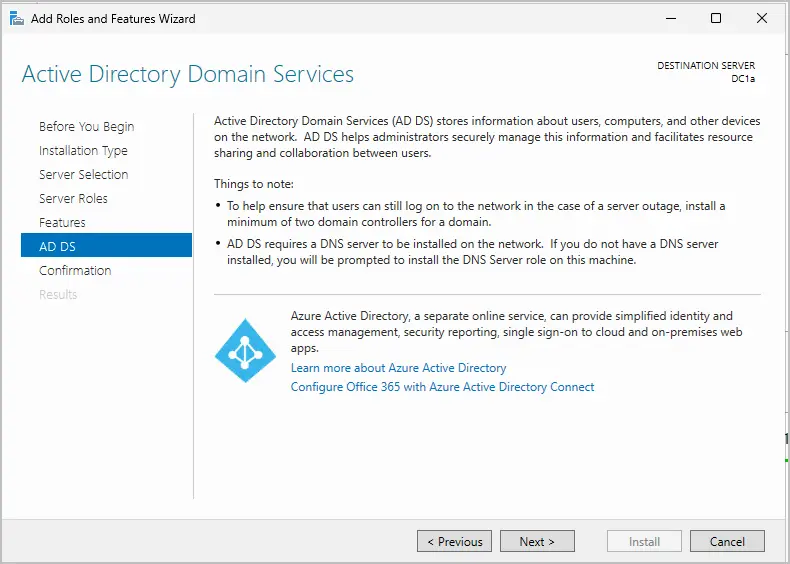
Step 8. On the Active Directory Domain Services overview page, click next.
Step 9. On the Confirm installation page, click install.
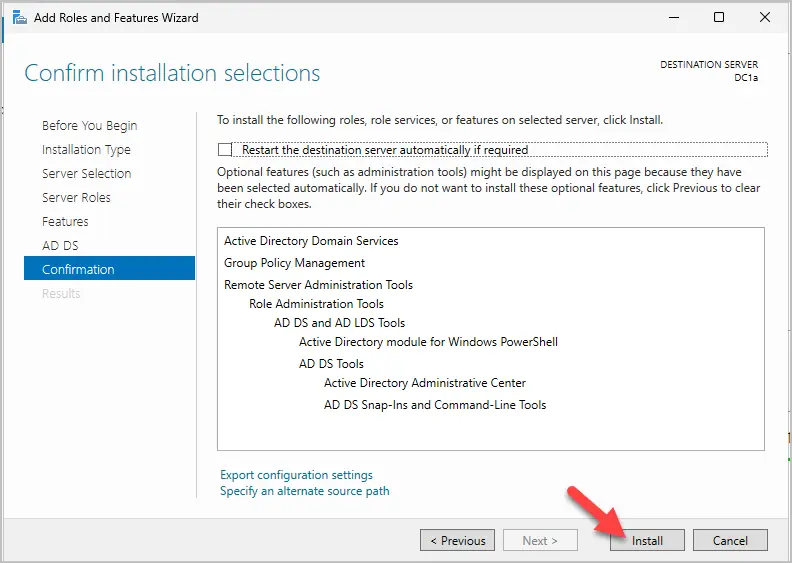
The install progress begins.
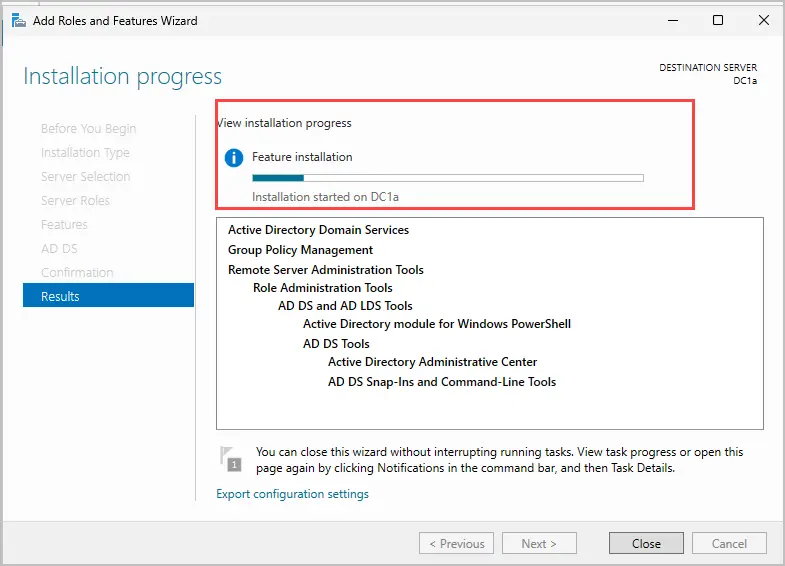
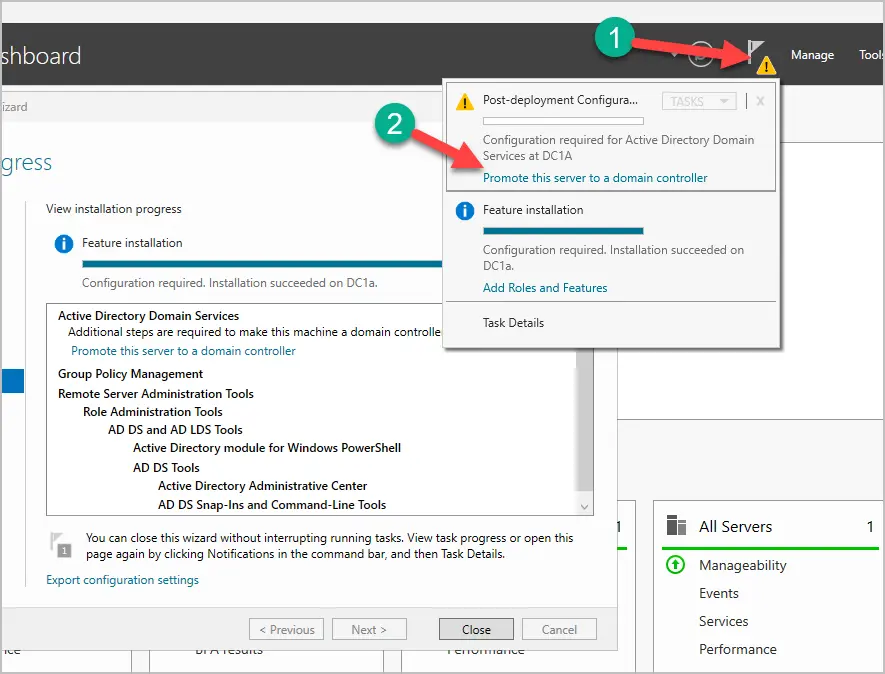
Step 10. When AD DS role has completed the installation, the next step is to promote the server to a domain controller.
- Click the yellow symbol in the top right.
- Click “Promote this server to a domain controller.
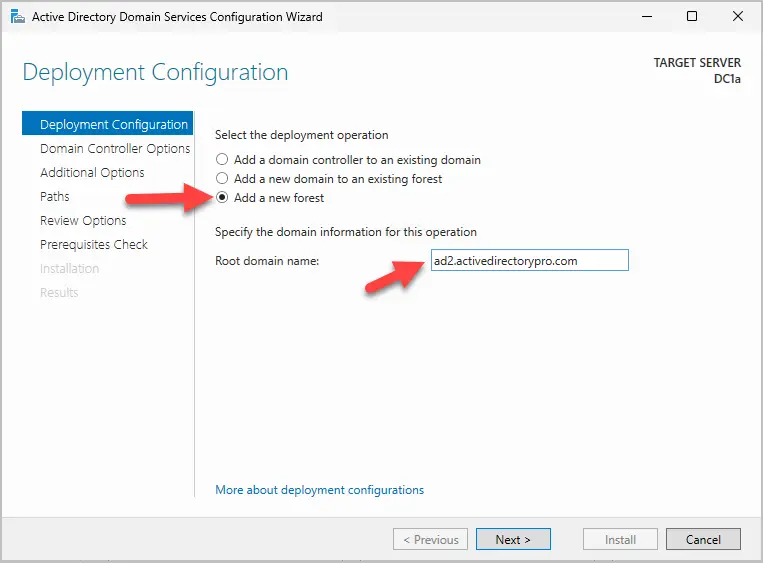
Step 11. Select “Add a new forest”. Enter your root domain name and click next.
Tips for Choosing the Root Domain Name:
- Use a Sub-Domain:
- If you have a public domain, you should use a sub-domain for your AD root domain.
- Example, my primary domain is activedirectorypro.com, I’ll use ad.activedirectory.com for my ad root domain.
- If you do not have a public domain, you can use whatever you want. .local or .internal is common.
- If you have a public domain, you should use a sub-domain for your AD root domain.
- Length:
- The maximum length for an AD root domain name is 64 characters. Aim for something much shorter for practical reasons, ideally under 20 characters.
- Compatibility and Best Practices:
- Use only lowercase letters, numbers, and hyphens in the DNS name to ensure compatibility across different systems. Avoid underscores as they are not supported in DNS names per RFC standards.
- Keep it simple and avoid overly complex names that might lead to confusion or typing errors.
- Consider Single vs. Multi-Forest Designs:
- If you plan for a multi-forest environment, your root domain name choice might influence how you structure these forests. Again, sub-domains can help in planning a multi-forest design. Examples, west.activedirectory.com, east.activedirectory.com, south.activedirectory.com, are some options for multi forest designs.
- NetBIOS Name (Step 14)
- Keep in mind that Windows uses the first 15 characters of the domain name for NetBIOS names
For more details on the root domain name refer to the articles below.
- Deployment and operation of Active Directory domains that are configured by using single-label DNS names
- Selecting the forest root domain
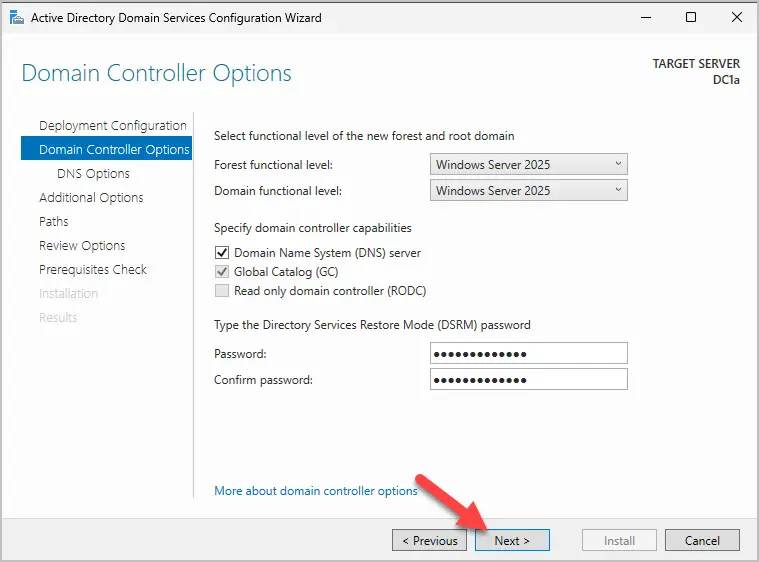
Step 12. On the “Domain Controller Options” page, enter the DSRM password and click Next.
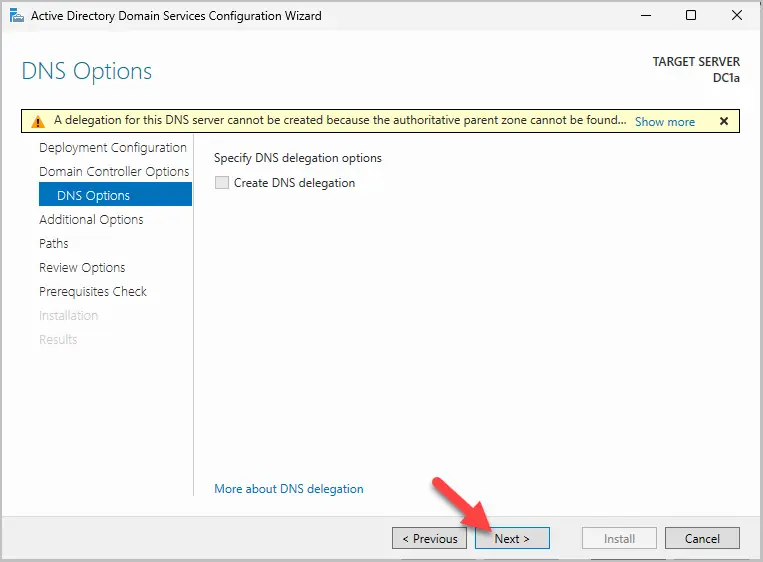
Step 13. On the DNS Options page, click Next.
Note. The DNS delegation warning is typical, and you can ignore this message.
Error Meaning: The error suggests that the DNS server promoting to a domain controller cannot find or connect to the DNS server hosting the parent zone. This might occur because:
- The parent zone is not hosted on a local domain controller but instead by an external provider or another DNS server not directly accessible. This is the most common reason for this warning.
- The DNS server you’re promoting does not have the correct DNS settings to locate the authoritative server for the parent zone.
Step 14. Enter a NetBIOS domain name and click Next.
- Name Suggestion: The wizard often suggests a NetBIOS name based on the DNS name of the domain you’re creating or joining. For example, I entered ad2.activedirectorypro.com for the DNS domain name, and the wizard suggested AD2 for the NetBIOS domain name.
- Manual Selection: You can manually type in a different NetBIOS name if the suggested one doesn’t fit your needs or if you want something specific. Remember, it must be unique within your network environment to avoid conflicts.
- Character Limit: The NetBIOS name is limited to 15 characters.
- What is it for: This name is used in scenarios involving legacy systems or older network protocols where NetBIOS is still relevant. It’s particularly important for network browsing in environments where NetBIOS over TCP/IP is enabled or for applications that rely on NetBIOS for domain name resolution. Even though its considered legacy it’s still used by default as the sign in to on Windows computer.
- Changing NetBIOS: Once set, changing the NetBIOS name of a domain is not recommended. It requires significant reconfiguration, so it’s generally set once and never changed.
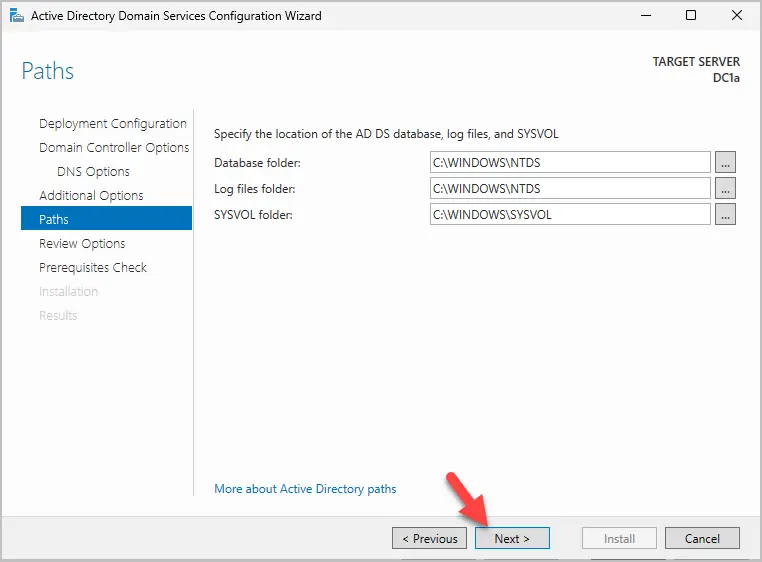
Step 15. On the paths page, click next.
Step 16. On the Review Options page, click next.
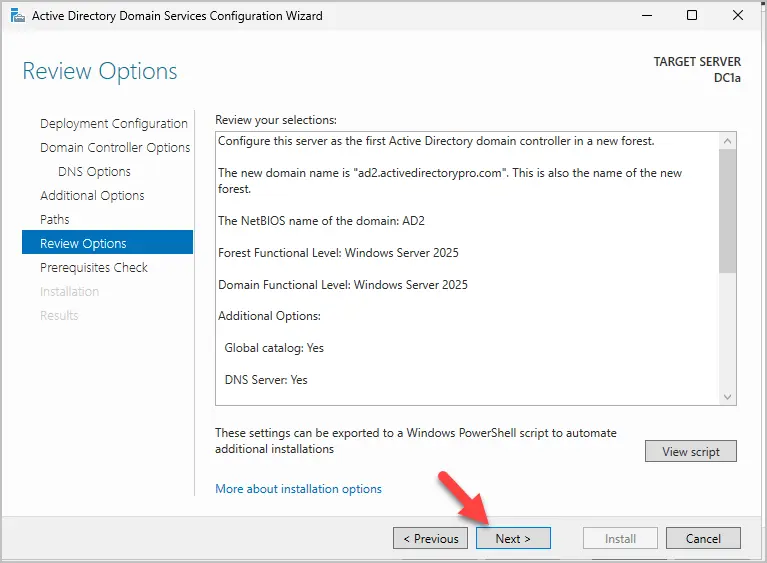
Step 17. On the Prerequisites check page, click “Install” to complete the install.
Note: You will have a warning about the DNS delegation, this is normal.
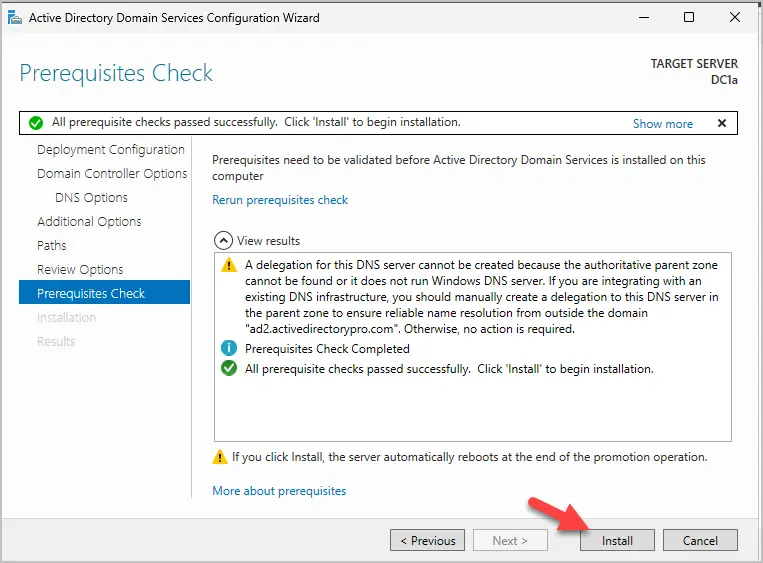
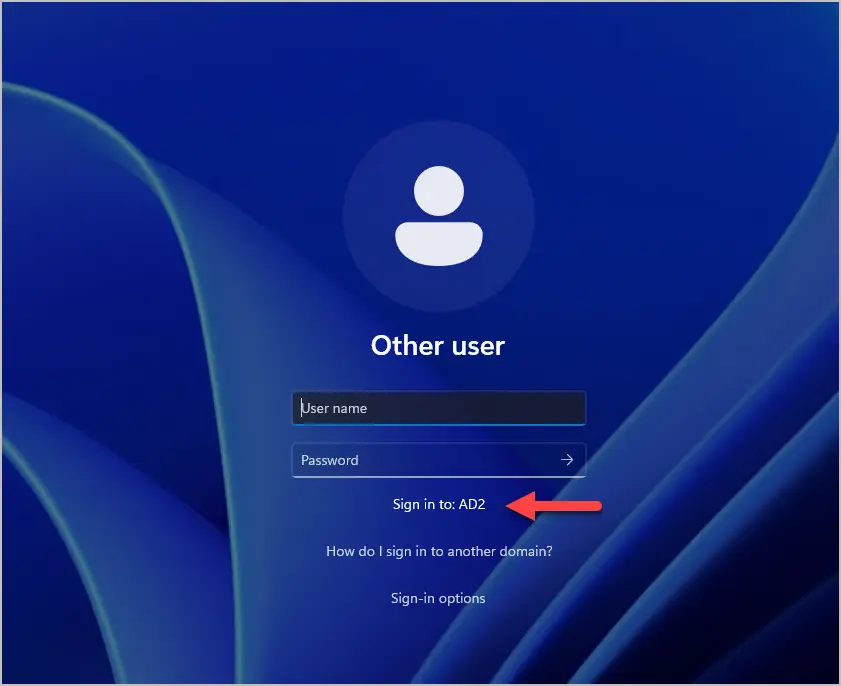
The install will begin, and the server will reboot when it is completed.
After the reboot you can now sign in to your domain.
Install AD DS using PowerShell
Installing Active Directory Domain Services with PowerShell is much faster than server manager. It saves you the time of clicking through multiple pages.
Step 1. Install AD PowerShell module
Install-WindowsFeature -Name AD-Domain-Services -IncludeManagementTools
Step 2. Run the below script.
Modify the script as needed.
- You will need to change the DomainName and DomainNetbiosName.
- Depending on your OS you might need to change the DomainMode.
- Refer to the Install-ADDSForest documentation for a complete list of command line options.
#
# Windows PowerShell script for AD DS Deployment
#

Import-Module ADDSDeployment
Install-ADDSForest `
-CreateDnsDelegation:$false `
-DatabasePath "C:\WINDOWS\NTDS" `
-DomainMode "Win2025" `
-DomainName "ad2.activedirectorypro.com" `
-DomainNetbiosName "AD2" `
-ForestMode "Win2025" `
-InstallDns:$true `
-LogPath "C:\WINDOWS\NTDS" `
-NoRebootOnCompletion:$false `
-SysvolPath "C:\WINDOWS\SYSVOL" `
-Force:$true
You will be prompted for the safe mode password.
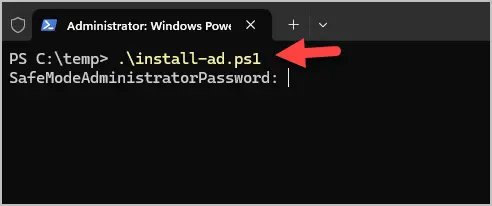
Then the install process will begin.
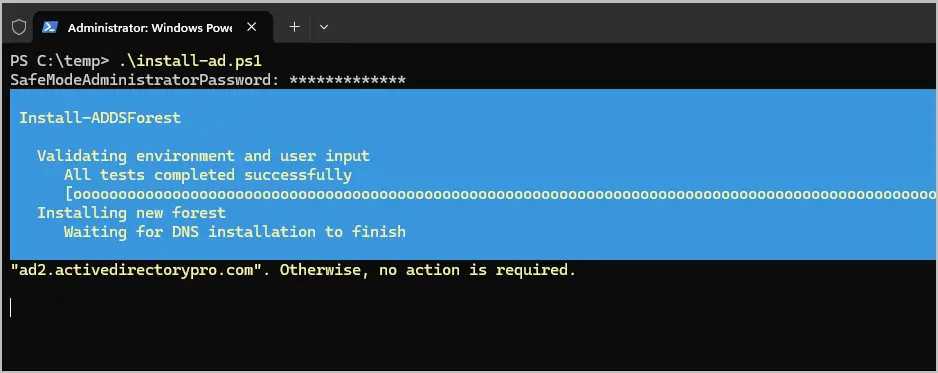
When the install is complete the server will reboot. Thats all the steps for installing AD DS with PowerShell.
Conclusion
Installing Active Directory Domain Services (AD DS) involves several steps when using the server manager. If you want a more streamline approached than consider using PowerShell with the script I provided.
If you found this article helpful, then check out our Active Directory Management Best practices guide.
Note
The -credential argument is only required when you are not currently logged on as a member of the Enterprise Admins group.The -NewDomainNetBIOSName argument is required if you want to change the automatically generated 15-character name based on the DNS domain name prefix or if the name exceeds 15 characters.
Deployment
Deployment Configuration
The following screenshot shows the options for adding a child domain:

The following screenshot shows the options for adding a tree domain:
Server Manager begins every domain controller promotion with the Deployment Configuration page. The remaining options and required fields change on this page and subsequent pages, depending on which deployment operation you select.
This topic combines two discrete operations: child domain promotion and tree domain promotion. The only difference between the two operations is the domain type that you choose to create. All of the other steps are identical between the two operations.
- To create a new child domain, click Add a domain to an existing Forest and choose Child Domain. For Parent domain name, type or select the name of the parent domain. Then type the name of the new domain in the New domain name box. Provide a valid, single-label child domain name; the name must use DNS domain name requirements.
- To create a tree domain within an existing forest, click Add a domain to an existing Forest and choose Tree Domain. Type the name of the forest root domain, and then type the name of the new domain. Provide a valid, fully qualified root domain name; the name cannot be single-labeled and must use DNS domain name requirements.
For more information about DNS names, see Naming conventions in Active Directory for computers, domains, sites, and OUs.
The Server Manager Active Directory Domain Services Configuration Wizard prompts you for domain credentials if your current credentials are not from the domain. Click Change to provide domain credentials for the promotion operation.
The Deployment Configuration ADDSDeployment cmdlet and arguments are:
Install-AddsDomain
-domaintype <{childdomain | treedomain}>
-parentdomainname <string>
-newdomainname <string>
-credential <pscredential>
Domain Controller Options
The Domain Controller Options page specifies the domain controller options for the new domain controller. The configurable domain controller options include DNS server and Global Catalog; you cannot configure read-only domain controller as the first domain controller in a new domain.
Microsoft recommends that all domain controllers provide DNS and GC services for high availability in distributed environments. GC is always selected by default and DNS is selected by default if the current domain hosts DNS already on its DCs, based on a Start-of-Authority query. You must also specify a Domain functional level. The default functional level is Windows Server 2012, and you can choose any other value that is equal to or greater than the current forest functional level.
The Domain Controller Options page also enables you to choose the appropriate Active Directory logical site name from the forest configuration. By default, the site with the most correct subnet is selected. If there is only one site, it is selected automatically.
Important
If the server does not belong to an Active Directory subnet and there is more than one Active Directory site, nothing is selected and the Next button is unavailable until you choose a site from the list.
The specified Directory Services Restore Mode Password must adhere to the password policy applied to the server. Always choose a strong, complex password or preferably, a passphrase.
The Domain Controller Options ADDSDeployment cmdlet arguments are:
-InstallDNS <{$false | $true}>
-NoGlobalCatalog <{$false | $true}>
-DomainMode <{Win2003 | Win2008 | Win2008R2 | Win2012 | Default}>
-Sitename <string>
-SafeModeAdministratorPassword <secure string>
-Credential <pscredential>
Important
The site name must already exist when provided as a value to the sitename argument. The install-AddsDomainControllercmdlet does not create site names. You can use the new-adreplicationsite cmdlet to create new sites.
The Install-ADDSDomainController cmdlet arguments follow the same defaults as Server Manager if not specified.
The SafeModeAdministratorPassword argument’s operation is special:
- If not specified as an argument, the cmdlet prompts you to enter and confirm a masked password. This is the preferred usage when running the cmdlet interactively.
For example, to create a new child domain named NorthAmerica in the Contoso.com forest and be prompted to enter and confirm a masked password:
Install-ADDSDomain "NewDomainName NorthAmerica "ParentDomainName Contoso.com "DomainType Child - If specified with a value, the value must be a secure string. This is not the preferred usage when running the cmdlet interactively.
For example, you can manually prompt for a password by using the Read-Host cmdlet to prompt the user for a secure string:
-safemodeadministratorpassword (read-host -prompt "Password:" -assecurestring)
Warning
As the previous option does not confirm the password, use extreme caution: the password is not visible.
You can also provide a secure string as a converted clear-text variable, although this is highly discouraged.
-safemodeadministratorpassword (convertto-securestring "Password1" -asplaintext -force)
Finally, you could store the obfuscated password in a file, and then reuse it later, without the clear text password ever appearing. For example:
$file = "c:\pw.txt"
$pw = read-host -prompt "Password:" -assecurestring
$pw | ConvertFrom-SecureString | Set-Content $file

-safemodeadministratorpassword (Get-Content $File | ConvertTo-SecureString)
Warning
Providing or storing a clear or obfuscated text password is not recommended. Anyone running this command in a script or looking over your shoulder knows the DSRM password of that domain controller. Anyone with access to the file could reverse that obfuscated password. With that knowledge, they can logon to a DC started in DSRM and eventually impersonate the domain controller itself, elevating their privileges to the highest level in an AD forest. An additional set of steps using System.Security.Cryptography to encrypt the text file data is advisable but out of scope. The best practice is to totally avoid password storage.
The ADDSDeployment module offers an additional option to skip automatic configuration of DNS client settings, forwarders, and root hints. This is not configurable when using Server Manager. This argument matters only if you already installed the DNS Server service prior to configuring the domain controller:
-SkipAutoConfigureDNS
DNS Options and DNS Delegation Credentials
The DNS Options page enables you to provide alternate DNS Admin credentials for delegation.
When installing a new domain in an existing forest – where you selected DNS installation on the Domain Controller Options page – you cannot configure any options; the delegation happens automatically and irrevocably. You have the option to provide alternate DNS administrative credentials with rights to update that structure.
The DNS Options ADDSDeployment Windows PowerShell arguments are:
-creatednsdelegation
-dnsdelegationcredential <pscredential>
For more information about DNS delegation, see Understanding Zone Delegation.
Additional Options
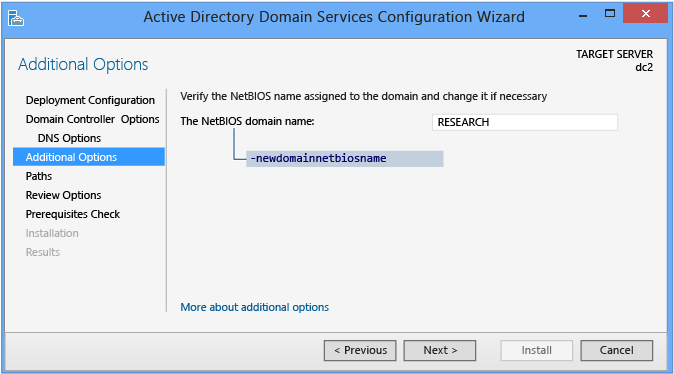
The Additional Options page shows the NetBIOS name of the domain and enables you to override it. By default, the NetBIOS domain name matches the left-most label of the fully qualified domain name provided on the Deployment Configuration page. For example, if you provided the fully qualified domain name of corp.contoso.com, the default NetBIOS domain name is CORP.
If the name is 15 characters or less and does not conflict with another NetBIOS name, it is unaltered. If it does conflict with another NetBIOS name, a number is appended to the name. If the name is more than 15 characters, the wizard provides a unique, truncated suggestion. In either case, the wizard first validates the name is not already in use via a WINS lookup and NetBIOS broadcast.
For more information about DNS names, see Naming conventions in Active Directory for computers, domains, sites, and OUs.
The Install-AddsDomain arguments follow the same defaults as Server Manager if not specified. The DomainNetBIOSNameoperation is special:
- If the NewDomainNetBIOSName argument is not specified with a NetBIOS domain name and the single-label prefix domain name in the DomainName argument is 15 characters or fewer, then promotion continues with an automatically generated name.
- If the NewDomainNetBIOSName argument is not specified with a NetBIOS domain name and the single-label prefix domain name in the DomainName argument is 16 characters or more, then promotion fails.
- If the NewDomainNetBIOSName argument is specified with a NetBIOS domain name of 15 characters or fewer, then promotion continues with that specified name.
- If the NewDomainNetBIOSName argument is specified with a NetBIOS domain name of 16 characters or more, then promotion fails.
The Additional Options ADDSDeployment cmdlet argument is:
-newdomainnetbiosname <string>
Paths
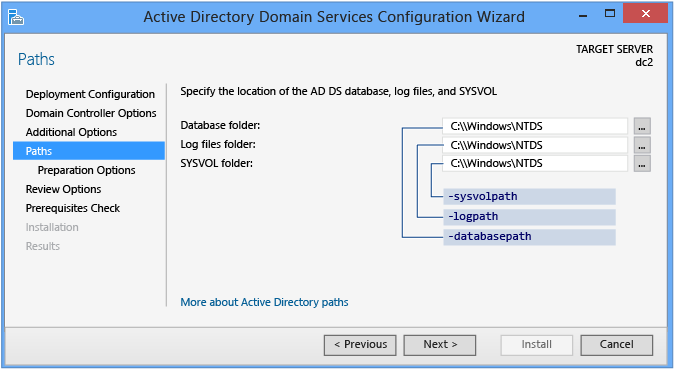
The Paths page enables you to override the default folder locations of the AD DS database, the data base transaction logs, and the SYSVOL share. The default locations are always in subdirectories of %systemroot%.
The Paths ADDSDeployment cmdlet arguments are:
-databasepath <string>
-logpath <string>
-sysvolpath <string>
Review Options and View Script
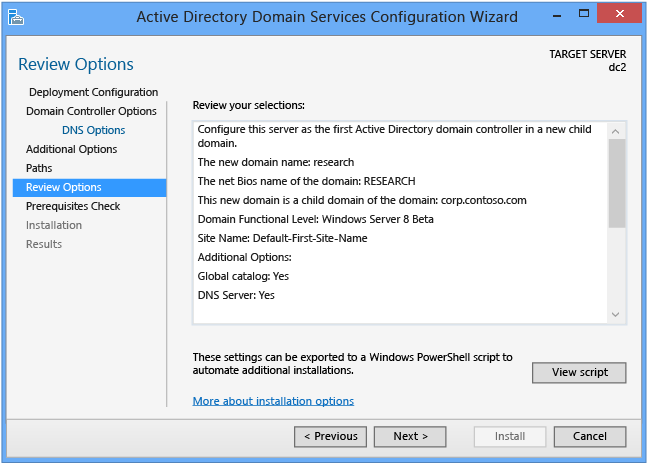
The Review Options page enables you to validate your settings and ensure they meet your requirements before you start the installation. This is not the last opportunity to stop the installation when using Server Manager. This is simply an option to confirm your settings before continuing the configuration
The Review Options page in Server Manager also offers an optional View Script button to create a Unicode text file that contains the current ADDSDeployment configuration as a single Windows PowerShell script. This enables you to use the Server Manager graphical interface as a Windows PowerShell deployment studio. Use the Active Directory Domain Services Configuration Wizard to configure options, export the configuration, and then cancel the wizard. This process creates a valid and syntactically correct sample for further modification or direct use. For example:
#
# Windows PowerShell Script for AD DS Deployment
#

Import-Module ADDSDeployment
Install-ADDSDomain `
-NoGlobalCatalog:$false `
-CreateDNSDelegation `
-Credential (Get-Credential) `
-DatabasePath "C:\Windows\NTDS" `
-DomainMode "Win2012" `
-DomainType "ChildDomain" `
-InstallDNS:$true `
-LogPath "C:\Windows\NTDS" `
-NewDomainName "research" `
-NewDomainNetBIOSName "RESEARCH" `
-ParentDomainName "corp.contoso.com" `
-Norebootoncompletion:$false `
-SiteName "Default-First-Site-Name" `
-SYSVOLPath "C:\Windows\SYSVOL"
-Force:$true
Note
Server Manager generally fills in all arguments with values when promoting and does not rely on defaults (as they may change between future versions of Windows or service packs). The one exception to this is the -safemodeadministratorpasswordargument (which is deliberately omitted from the script). To force a confirmation prompt, omit the value when running cmdlet interactively.
Use the optional Whatif argument with the Install-ADDSForest cmdlet to review configuration information. This enables you to see the explicit and implicit values of the arguments for a cmdlet.

Prerequisites Check
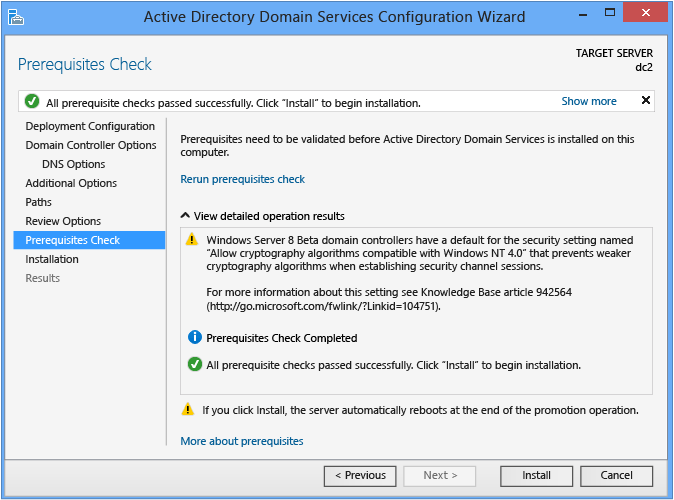
The Prerequisites Check is a new feature in AD DS domain configuration. This new phase validates that the server configuration is capable of supporting a new AD DS domain.
When installing a new forest root domain, the Server Manager Active Directory Domain Services Configuration Wizard invokes a series of serialized modular tests. These tests alert you with suggested repair options. You can run the tests as many times as required. The domain controller process cannot continue until all prerequisite tests pass.
The Prerequisites Check also surfaces relevant information such as security changes that affect older operating systems.
For more information on the specific prerequisite checks, see Prerequisite Checking.
You cannot bypass the Prerequisite Check when using Server Manager, but you can skip the process when using the AD DS Deployment cmdlet using the following argument:
-skipprechecks
Warning
Microsoft discourages skipping the prerequisite check as it can lead to a partial domain controller promotion or damaged AD DS forest.
Click Install to begin the domain controller promotion process. This is last opportunity to cancel the installation. You cannot cancel the promotion process once it begins. The computer will reboot automatically at the end of promotion, regardless of the promotion results.
Installation
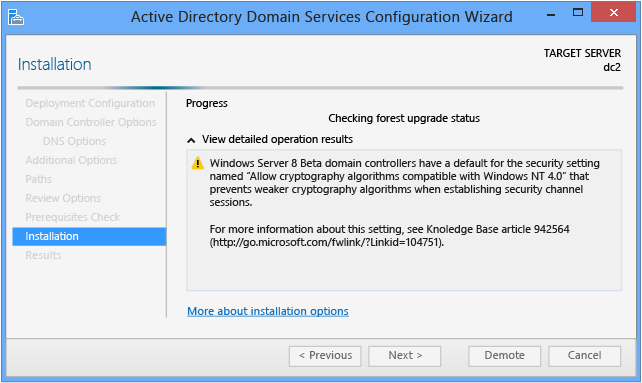
When the Installation page displays, the domain controller configuration begins and cannot be halted or canceled. Detailed operations display on this page and are written to logs:
- %systemroot%\debug\dcpromo.log
- %systemroot%\debug\dcpromoui.log
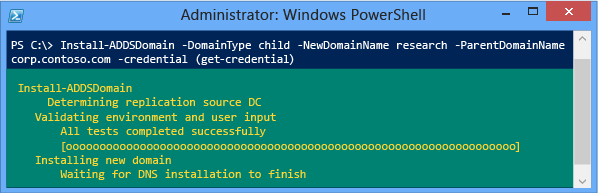
To install a new Active Directory domain using the ADDSDeployment module, use the following cmdlet:
Install-addsdomain
See Child and Tree Domain Windows PowerShell for required and optional arguments.The Install-addsdomain cmdlet only has two phases (prerequisite checking and installation). The two figures below show the installation phase with the minimum required arguments of -domaintype, -newdomainname, -parentdomainname, and -credential. Note how, just like Server Manager, Install-ADDSDomain reminds you that promotion will reboot the server automatically.
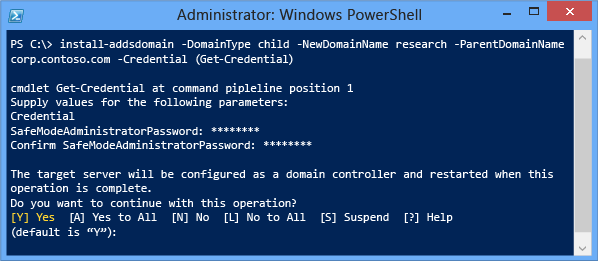
To accept the reboot prompt automatically, use the -force or -confirm:$false arguments with any ADDSDeployment Windows PowerShell cmdlet. To prevent the server from automatically rebooting at the end of promotion, use the -norebootoncompletionargument.
Warning
Overriding the reboot is not recommended. The domain controller must reboot to function correctly
Results
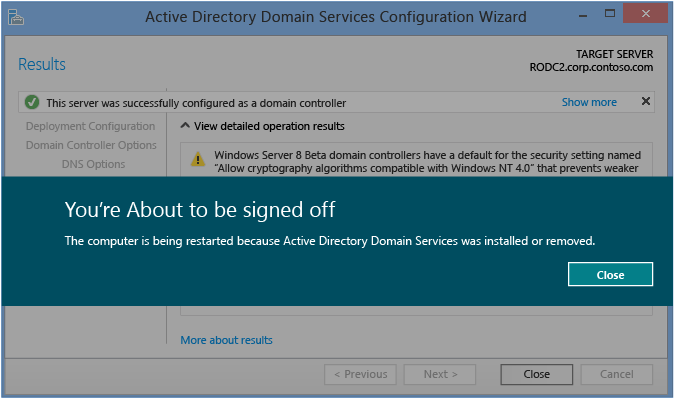
The Results page shows the success or failure of the promotion and any important administrative information. The domain controller will automatically reboot after 10 seconds.
Here is the Windows PowerShell script for Active Directory Domain Services Deployment on Windows Server 2012 R2.

[code language=”powershell”]
#
# Windows PowerShell script for AD DS Deployment
#
Import-Module ADDSDeployment
Install-ADDSForest `
-CreateDnsDelegation:$false `
-DatabasePath «C:\Windows\NTDS» `
-DomainMode «Win2012R2» `
-DomainName «xdpoc.lan» `
-DomainNetbiosName «XDPOC» `
-ForestMode «Win2012R2» `
-InstallDns:$true `
-LogPath «C:\Windows\NTDS» `
-NoRebootOnCompletion:$false `
-SysvolPath «C:\Windows\SYSVOL» `
-Force:$true
[/code]