
To run a PowerShell script as an administrator, you can right-click on the PowerShell icon and select «Run as administrator,» or use the following code snippet to elevate your script programmatically:
Start-Process powershell -ArgumentList '-NoProfile -ExecutionPolicy Bypass -File "C:\Path\To\YourScript.ps1"' -Verb RunAs
Understanding PowerShell Scripts
What is a PowerShell Script?
A PowerShell script is a text file containing a series of PowerShell commands that automate processes and tasks. Typically, these scripts are used for system administration tasks, such as managing user accounts, configuring network settings, or performing batch processing of files. The power of PowerShell scripts lies in their ability to interact directly with the Windows operating system and perform administrative tasks efficiently.
Why Run PowerShell Scripts as Administrator?
Running a PowerShell script as an administrator is essential when the script needs elevated permissions to perform specific actions. Certain tasks require administrative privileges, such as modifying system files, changing configurations, or accessing sensitive areas of the system. Understanding the need for admin rights will enable you to effectively manage your environment and automate tasks securely.
Run PowerShell Script as Administrator Without Prompt: A Guide
Prerequisites for Running PowerShell Scripts as Administrator
Checking Your PowerShell Version
To ensure compatibility with your scripts and features, it’s vital to verify your PowerShell version. Here’s how you can do it:
- Open PowerShell (you can search for it in the Start menu).
- Type the following command and press Enter:
$PSVersionTable.PSVersion
This command outputs the version number, allowing you to confirm you are using a supported version.
User Account Control (UAC) and Administrative Permissions
User Account Control (UAC) is a security feature that helps prevent unauthorized changes to your operating system. It may prompt you when you attempt to run PowerShell as an administrator. To check if your user account has administrative privileges, follow these steps:
- Go to Control Panel > User Accounts > User Accounts.
- Look for the label «Administrator» under your username.
If administrative privileges are necessary for running your scripts, it’s crucial to ensure you have the proper rights before executing commands.
How to Run PowerShell Script From Command Line Effortlessly
Methods to Run a PowerShell Script as Administrator
Using the Context Menu
One of the easiest ways to execute a PowerShell script as an administrator is through the context menu. Simply locate your script file, then:
- Right-click on the script (.ps1) file.
- Select «Run with PowerShell».
- If prompted by UAC, click Yes to allow it to run.
This method is straightforward and works well for ad-hoc script execution.
Code Snippet Example:
# Sample Script: MyScript.ps1
Write-Host "Hello, Administrator!"
Running PowerShell from the Start Menu
You can also open PowerShell directly from the Start menu with elevated privileges:
- Search for PowerShell in the Start menu.
- Right-click on the Windows PowerShell option.
- Select «Run as Administrator».
- Once the PowerShell window is open, navigate to the script location, and execute it using:
.\MyScript.ps1
This method allows you to run your scripts in an elevated session directly from the command line.
Creating a Desktop Shortcut to Run as Administrator
Creating a shortcut to run a PowerShell script as an administrator simplifies the process for future execution. Here’s how to set it up:
- Right-click on your desktop and select New > Shortcut.
- In the location field, enter:
powershell.exe -ExecutionPolicy Bypass -File "C:\path\to\MyScript.ps1" - Name your shortcut and click Finish.
- After creating the shortcut, right-click it and select Properties.
- Under the Shortcut tab, click Advanced… and check Run as administrator.
Now, double-clicking this shortcut will automatically run your script with elevated permissions.
Using the Command Line
If you prefer working from the Command Prompt, you can execute your PowerShell script as an admin with this command:
- Open Command Prompt as an administrator.
- Type the following command:
powershell -ExecutionPolicy Bypass -File "C:\path\to\MyScript.ps1"
This allows you to run the script without opening a PowerShell window first.
Task Scheduler
For running PowerShell scripts automatically with administrative rights, you can utilize Task Scheduler. Here’s how:
- Open Task Scheduler from the Start menu.
- Click Create Basic Task.
- Follow the wizard to name your task and select a trigger (e.g., daily).
- Under Action, select «Start a program». For the program/script, enter:
powershell.exe - In the Add arguments section, add:
-ExecutionPolicy Bypass -File "C:\path\to\MyScript.ps1" - Finally, in the Conditions tab, check «Run with highest privileges».
Your script will now run automatically with administrative rights at scheduled times.
Run PowerShell Script as Administrator from Batch File Explained
Best Practices for Running PowerShell Scripts as Admin
Ensuring Script Safety
Before running a script as an administrator, it is vital to validate its content and sources. Malicious scripts can compromise your system. Always:
- Review the script for potentially harmful commands.
- Run scripts from trusted sources only.
- Use a text editor to examine scripts before execution.
Logging and Monitoring Scripts
Logging script execution is crucial when performing administrative tasks. It helps in auditing what commands were run and by whom. You can enable logging in PowerShell by adding the following line at the beginning of your script:
Start-Transcript -Path "C:\path\to\logfile.txt"
This command will create a transcript of all command outputs and errors, aiding in any troubleshooting efforts.
Understanding Microsoft.PowerShell.Commands.Internal.Format.FormatStartData
Troubleshooting Common Issues
UAC Prompt Issues
If you’re facing persistent UAC prompts each time you run a script, consider adjusting UAC settings or using Task Scheduler, as discussed earlier, to bypass repeated confirmations.
Script Errors
Common errors might occur when running scripts as an administrator. If an error arises, PowerShell provides mechanisms for exception handling. Utilize a try-catch block for better control:
try {
    # Your script code here
} catch {
    Write-Host "An error occurred: $_"
}
This not only handles errors gracefully but also gives you insight into what went wrong.
Unlocking Windows PowerShell Scriptomatic For Quick Tasks
Conclusion
Understanding how to run PowerShell scripts as admin is crucial for effective system management. By following the outlined methods and best practices, you can leverage the power of PowerShell scripts while maintaining security and compliance. Experiment and practice with PowerShell to enhance your administrative skills, and remember to validate your scripts for safety!
Handy PowerShell Scripts for Everyday Tasks
Additional Resources
- Always refer to the official PowerShell documentation for in-depth information and updates on new features.
- Engage with online forums and communities to learn from other PowerShell users and share your experiences.
Whether you’re just starting out with PowerShell or you already know how to run commands, there are times when you must use PowerShell to ‘run as administrator’ Why? Because sometimes, any activity you do inside of PowerShell will require elevated privileges.
In this tutorial, you’re going to learn just about every way possible to run PowerShell as administrator from the perspective of an end-user, a command-line junkie, or an IT admin!
This tutorial has many sections each showcasing how to run PowerShell as administrator. Feel free to click on whichever method you prefer in the Table of Contents.
Prerequisites
This article will be a hands-on tutorial. If you’d like to follow along, please be sure you have:
- A Windows 10 PC – Although Windows 10 was used as an example for this article, most of the methods provided will work with Windows 7+.
- An account with administrator privileges. If you don’t already have one, learn how to create one here.
- PowerShell – Most of these methods will work with Windows PowerShell 5.1 or PowerShell 7.
Running PowerShell as Administrator with a Right-Click
One of the simplest ways to run PowerShell as administrator is with a right-click. There are a few different areas where you can right click on PowerShell and run it. Let’s run through them.
Using the Search Bar
The Search Bar is practically one of the easiest ways to run most of the programs installed on your computer. It’s also an easy way to run any program as administrator, including PowerShell.
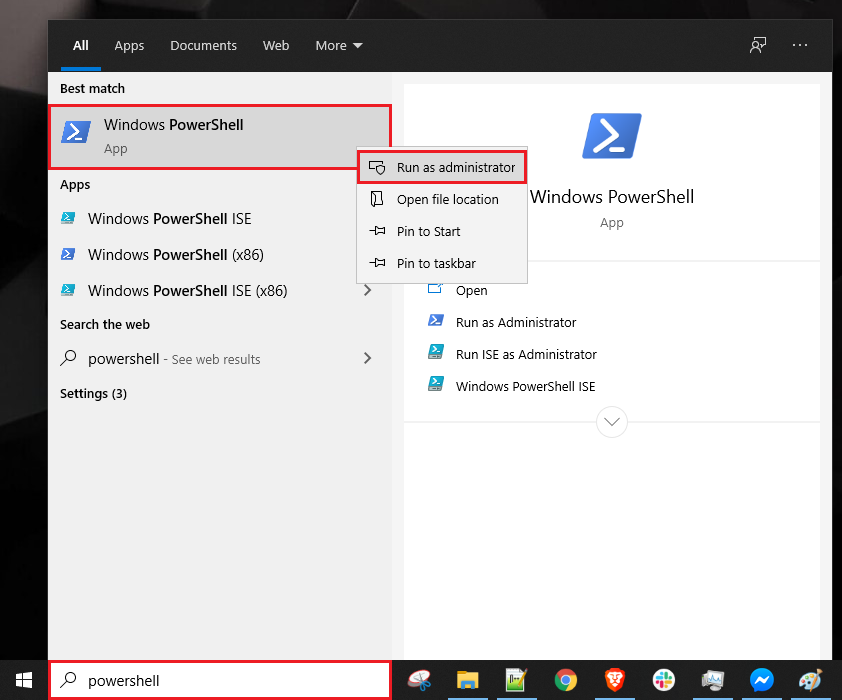
To run PowerShell, specifically, as administrator from the search bar:
- Click on the search box at the taskbar and type powershell. This action will bring up the PowerShell edition of your preference.
- Look for Windows PowerShell or just PowerShell, if using PowerShell Core, from the search result.
- Right-click on the menu item and select Run as administrator.
You can see these steps demonstrated in the screenshot below.
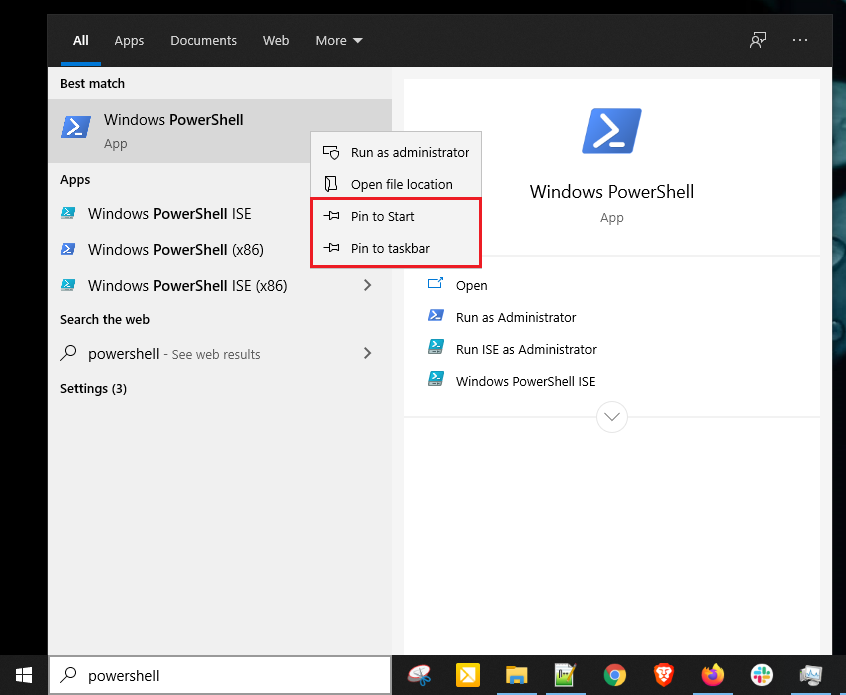
If you pin a program to the start menu or taskbar, you can also right-click on the menu item there as well. With this method, Windows 10 creates a shortcut for PowerShell that is more accessible to you at the start menu or the taskbar.
To run PowerShell as administrator on a pinned item:
- Find the PowerShell icon in the search box again.
- Right-click on the PowerShell icon and select Pin to Start or Pin to Taskbar.
- Click on the Start button
- Look for Windows PowerShell (or PowerShell Core) on the right side of the Start Menu.
- Right-click on the menu item and choose Run as administrator.

Running PowerShell as Administrator Using File Explorer
Are you in Windows’ File Explorer, you can fire up PowerShell as administrator there too!
- Open up File Explorer by using Win Key + E shortcut keys or by simply clicking the icon at the taskbar as you can see on the screenshot below.
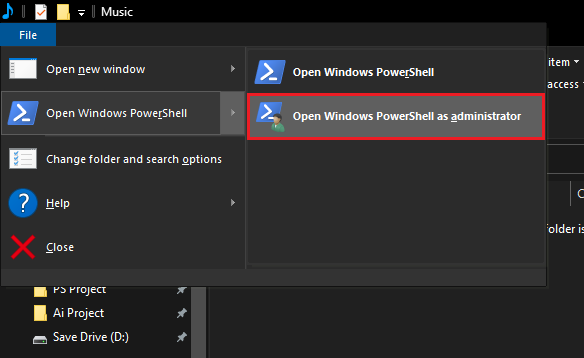
2. Once in File Explorer, click on File → Open Windows PowerShell → Open Windows PowerShell as administrator as shown below.
Using the PowerShell Executable
Whether you’re using a 32-bit or 64-bit operating system, you can run PowerShell as administrator from its respective location.
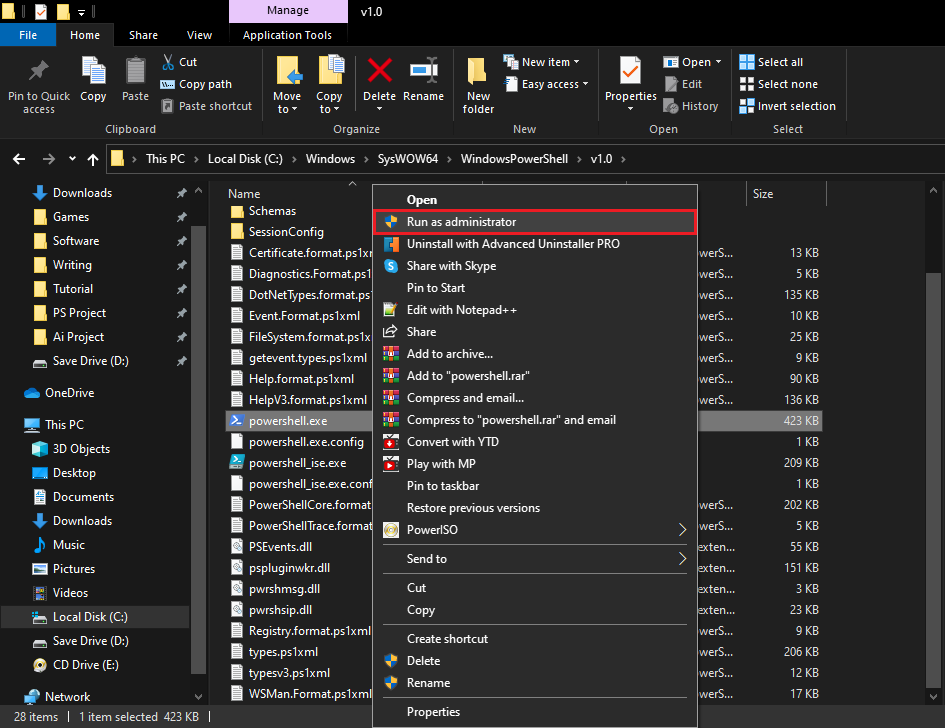
- In File Explorer, navigate to one of the folders below.
- For 32-bit OS: C:\Windows\System32\WindowsPowerShell\v1.0
- For 64-bit OS: C:\Windows\SysWOW64\WindowsPowerShell\v1.0
- Find the powershell.exe file.
- Right-click on powershel.exe and select Run as Adminstrator.
Creating a Shortcut for PowerShell on the Desktop
If you’d like an easy way to invoke PowerShell, you can also create a Windows shortcut for it.
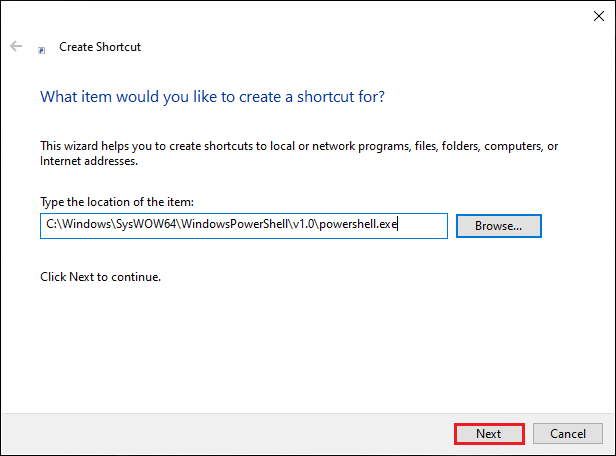
- Once you’ve got the Create Shortcut process started, provide the path to the PowerShell executable. For Windows PowerShell, that path is:
- For 32-bit OS: C:\Windows\SysWOW64\WindowsPowerShell\v1.0\powershell.exe
- For 64-bit OS: C:\Windows\System32\WindowsPowerShell\v1.0\powershell.exe
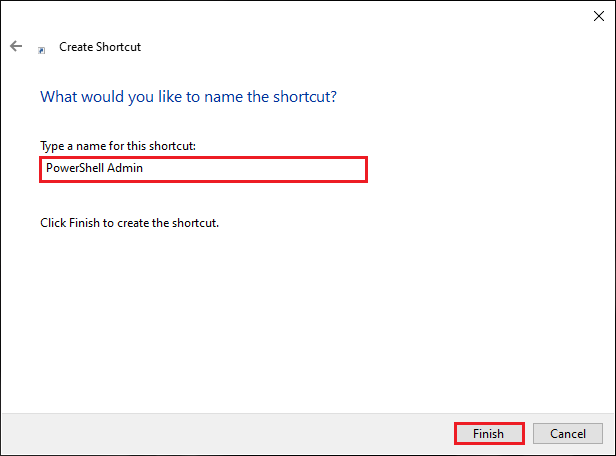
2. Provide the shortcut a handy name (PowerShell Admin for example).
3. Find the shortcut you just created and right-click on it and choose Properties as shown below.
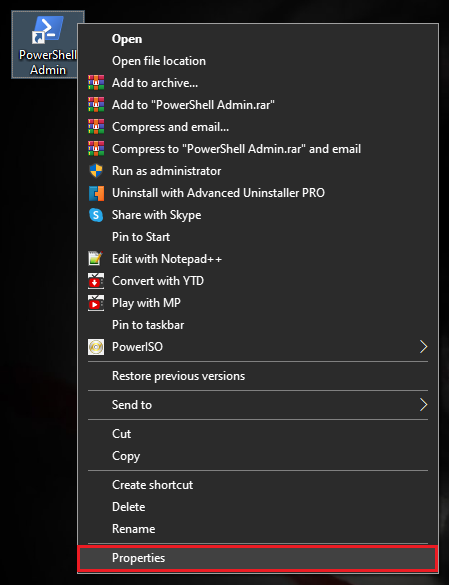
4. Click on Shortcut tab and then on the Advanced button and the Advanced Properties window will pop-up.
5. In the Advanced Properties window, select the Run as administrator checkbox and click OK.
6. Back to the Shortcut Properties, click OK to apply the changes and you’re all set.
Another way to easily access PowerShell is via the Win-X menu as shown in the following screenshot. This menu was never given an official name but was widely referred to as Win-X (or power user menu) as the shortcut to access it is Win Key + X.
Once the menu is up, simply click on Windows PowerShell (Admin) and you’re off to th races.

Using the Run Command Window
The Run Command Window is a powerful tool that lets you run programs without searching for them using the SearchBar, Start Menu or File Explorer. To run PowerShell as administrator via the Run command window:
- Press Win Key + R. A a small window will pop up as shown in the screenshot below.
- Type in powershell and press Ctrl+Shift+Enter or press and hold Ctrl+Shift.
- Click OK to make PowerShell run as administrator.
You’re now running PowerShell as administrator.
Using Task Manager
Task Manager is a tool that lets you monitor or end a process of the programs and services that are currently running on your computer. You can also use it to execute a task such as running PowerShell as administrator manually.
To run PowerShell as administrator via the task manager:
- Open the Task Manager by pressing Ctrl+Shift+Esc keys on your keyboard or as you see in the screenshot below
You can alternatively right-click on the Task Bar and select Task Manager to bring up Task Manager.
2. Once Task Manager opens, go up to File and click on Run new task as shown below.
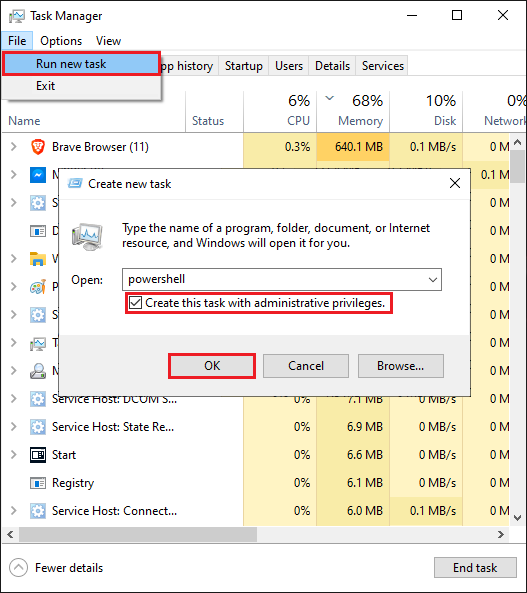
3. You should then see a window pop up that looks similar to the Run window described earlier.
4. Type in powershell ensuring you also check the Create this task with administrative privileges checkbox and click OK to make PowerShell run as administrator.
Running PowerShell as Administrator with the Command Line
If you regularly find yourself on the command line, don’t fret, you can run PowerShell as administrator there too!
If you already have cmd. exe open running as adminstrator using the same techniques described in this article, you can simply run start powershell and it will be running as adminstrator.
If you’re running a command prompt not as administrator yet, that’s not a problem. Invoke the Start-Process cmdlet with PowerShell from cmd. exe using the -Verb runas parameter.
powershell Start-Process powershell -Verb runAsIf you’re already in a PowerShell window, you can run Start-Process powershell -Verb runas directly to open a new PowerShell instance running as administrator
Creating a Batch File to Run PowerShell as Administrator
So you now know how to invoke PowerShell as administrator from a command prompt. If you already know how to do that, you can create a batch file to automate it!
Open up your favorite text editor, paste in the following line and save the file as PowerShell as admin.bat anywhere you’d like.
Powershell.exe -Command "& {Start-Process Powershell.exe -Verb RunAs}"Run the batch file and you’ll notice up comes a PowerShell window running as administrator!
Creating a Scheduled Task to Run PowerShell as Administrator
Task Scheduler is a built-in app on Windows 10 that lets you virtually run automated tasks. Hence, you can also use it to create a task that runs PowerShell as administrator each time you logon to your computer, for example.
Start up the Create Taskbox and specify the file to run as one of the below:
- For 32-bit OS: C:\Windows\System32\WindowsPowerShell\v1.0\powershell.exe
- For 64-bit OS: C:\Windows\SysWOW64\WindowsPowerShell\v1.0\powershell.exe
In the Create Task windows, provide the values to all of the menu items shown below ensuring the Run with highest privileges checkbox is checked.

Now when the scheduled task is invoked, it will execute PowerShell as administrator!
Further Reading
- PowerShell Objects, Properties and Methods
- How to Set Up and Manage Scheduled Tasks with PowerShell
There are several ways to run PowerShell scripts as an administrator interactively and non-interactively — which is suitable for automation.
Running PowerShell as Administrator (Interactive)
An elevated PowerShell session is required to run PowerShell scripts as an administrator. Opening the elevated PowerShell console triggers the UAC prompt.
- Right-click the Start button or press Win+X on the keyboard to open the Power User Menu on Windows.
- Click Windows PowerShell (Admin) (replaced with Terminal (Admin) on Windows 11) to open the elevated PowerShell console;

- Confirm the elevation at the UAC prompt.
- Any command or PowerShell script that is run from this console will be run as an administrator.
- For example, to run a specific PS1 script file, change the directory and run:
cd C:\PS

.\my_script.ps1


You can create a desktop shortcut that always runs an elevated interactive PowerShell console.
- Right-click anywhere on the desktop and click New → Shortcut.
- Type powershell.exe (Windows PowerShell) or pwsh.exe (PowerShell 7+) and click Next.

- Type the shortcut name and click Finish.
- Open the shortcut properties and click Advanced. Check the “Run as administrator” box and save changes.


Every time you use the new shortcut to start PowerShell, it will run as an administrator.
To run PowerShell script file as an administrator from the command prompt or from a BAT/CMD script, use the following command:
powershell -NoProfile -ExecutionPolicy Bypass -Command "Start-Process -Verb RunAs powershell -ArgumentList '-NoProfile -ExecutionPolicy Bypass -File C:\ps\my_script.ps1'
Note. The Bypass parameter is used to ignore the current settings of the PowerShell execution policy.

How to Check if a PowerShell Script is Running as Administrator
When you run a PowerShell script, you may need to check that it is running in elevated mode. Add the following block code at the beginning of the script to indicate that this script is being run as an administrator:
if (([System.Security.Principal.WindowsPrincipal] [System.Security.Principal.WindowsIdentity]::GetCurrent()).IsInRole([System.Security.Principal.WindowsBuiltInRole]::Administrator)){

"Run as admin - SUCCESSFUL"

}

else {

"Run as admin - FAILED"

}

Start-Sleep -Seconds 10
Run PowerShell Script as Administrator Without UAC Confirmation
In all of the cases described above, running the PowerShell script as an administrator requires UAC elevation confirmation. To run a PowerShell script as an administrator without the UAC prompt, you must create a special scheduled task with Highest Privileges option enabled.
- Open the Task Scheduler (taskschd.msc) and click “Create a task.”

- Under the General tab, configure the following:
- The name is RunMeAsAdmin.
- Select Run only when user is logged on.
- Check Run with highest privileges.


- Switch to the Actions tab and click New.
- In the New Action window:
- Type powershell.exe for Windows PowerShell or pwsh.exe for PowerShell Core in the “Program/script” box.
- Type -NoProfile -ExecutionPolicy Bypass -File C:\ps\my_script.ps1 inside the “Add arguments”.

- Click OK to close the New Action window.
- Click OK to save the new task.
- Once the task is created, select it from the list and click Run in the Actions pane. This will run your PowerShell script elevated without UAC prompt.

- Or you can trigger it from PowerShell by running the below command:
Start-ScheduledTask -TaskName <task name>


This approach allows PowerShell scripts to run in the elevated non-interactive mode without triggering the UAC prompt.
-
Using the
Start-ProcessCmdlet to Run PowerShell Script as Administrator -
Run PowerShell Script With Arguments as Administrator
-
Run PowerShell Script as Administrator While Preserving the Working Directory
Most scripts that we write and execute will require permissions, leading to an administrator running the scripts from an elevated PowerShell prompt. In PowerShell, we elevate our permissions by running Windows PowerShell with administrator privileges and entering our administrator credentials.
However, we may need to run our scripts seamlessly for specific situations without keying in administrator credentials. Therefore, we can integrate various self-elevating commands at the beginning of our scripts, and we will show you how in this article.
Using the Start-Process Cmdlet to Run PowerShell Script as Administrator
The Start-Process cmdlet initiates one or more processes, executable or script files, or any files that an installed software can open on the local computer, including Windows PowerShell.
With this cmdlet and a set of parameters, we can run Windows PowerShell as an administrator.
For this example, we have created a Hello_World.ps1 script, which will output a simple Hello World string inside our console.
Hello_World.ps1:
Write-Output 'Hello World!'
We can use the PowerShell file above as an example to check and verify if we are running our scripts in administrator privileges. To start, run the snippet code below.
Note
Windows PowerShell may still need to ask for your confirmation due to your local computer’s User Account Control (UAC). We do not recommend entirely disabling UAC for security purposes.
Start-Process powershell -Verb RunAs -ArgumentList ".\Hello_World.ps1"
Upon running the script above, it will spawn a new instance of Windows PowerShell with administrative rights. The only caveat for the script run above is that if we need to pass arguments to our PowerShell file, we will not carry the arguments over to the newly spawned administrative console.
Run PowerShell Script With Arguments as Administrator
This example can take our previous one-liner script and revise it inside multiple conditional statements.
# Self-elevate the script if required
if (-Not ([Security.Principal.WindowsPrincipal] [Security.Principal.WindowsIdentity]::GetCurrent()).IsInRole([Security.Principal.WindowsBuiltInRole] 'Administrator')) {
    if ([int](Get-CimInstance -Class Win32_OperatingSystem | Select-Object -ExpandProperty BuildNumber) -ge 6000) {
        $Command = "-File `"" + $MyInvocation.MyCommand.Path + "`" " + $MyInvocation.UnboundArguments
        Start-Process -FilePath PowerShell.exe -Verb RunAs -ArgumentList $Command
        Exit
    }
}

# Place your script here
Write-Output 'Hello World!'
Previously, we ran our PowerShell script by calling a separate file, but we can simply place our script (eg. Hello_World.ps1) below this snippet for this example.
Here’s how the snippet works.
- The first
ifstatement checks if the executed script is already running in Windows PowerShell with administrative privileges. - The second
ifstatement checks if the Windows Operating System build number is 6000 or greater. (Windows Vista or Windows Server 2008, or later) - The
$Commandvariable retrieves and saves the command used to run the script, including arguments. - The
Start-Processstarts a new instance of Windows PowerShell with elevated privileges and reruns the script just like our previous script.
Run PowerShell Script as Administrator While Preserving the Working Directory
We may need to preserve the script’s working directory for specific situations. So, here’s a self-elevating snippet that will maintain the working directory:
if (-Not ([Security.Principal.WindowsPrincipal][Security.Principal.WindowsIdentity]::GetCurrent()).IsInRole([Security.Principal.WindowsBuiltInRole]::Administrator)) {
    if ([int](Get-CimInstance -Class Win32_OperatingSystem | Select-Object -ExpandProperty BuildNumber) -ge 6000) {
        Start-Process PowerShell -Verb RunAs -ArgumentList "-NoProfile -ExecutionPolicy Bypass -Command `"cd '$pwd'; & '$PSCommandPath';`"";
        Exit;
    }
}
# Place your script here
Write-Output 'Hello World!'
In this snippet, we passed $PSCommandPath as one of the arguments inside the Start-Process cmdlet to preserve the working directory on where the script has been executed.
Preserving the working directory is vital for performing path-relative operations. Unfortunately, the previous couple of snippets that we showed earlier will not maintain their path, which can cause unexpected errors. Therefore you can use the revised syntax above.
Enjoying our tutorials? Subscribe to DelftStack on YouTube to support us in creating more high-quality video guides. Subscribe
Quick Tips
- Utilize the search bar. Hit the Windows key + S > type PowerShell > right-click the result > select Run as administrator.
- Press Win + R > type powershell > hold Ctrl + Shift + Enter to launch with admin rights.
- Need another way? Press the Windows key + X and select Terminal (Admin).
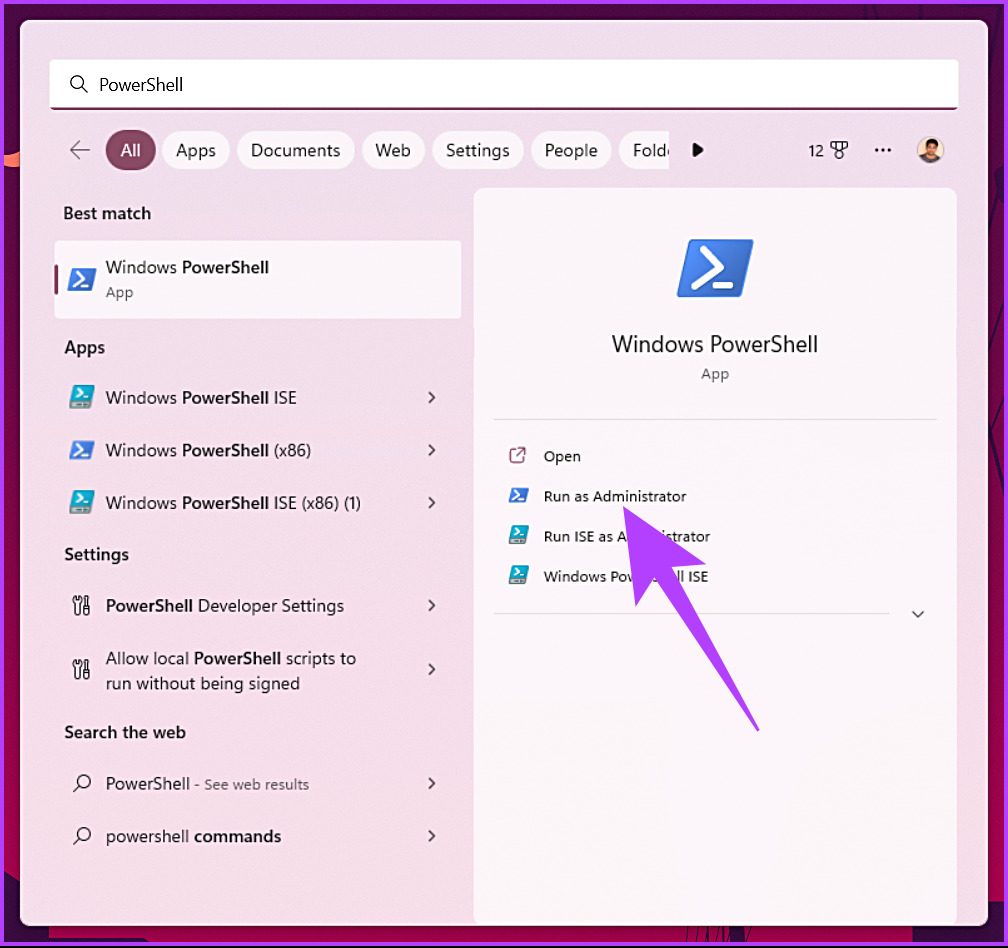
Method 1. Using Windows Search
Step 1: Press the Windows key and type PowerShell in the search box.
Step 2: Click on Run as Administrator from the right pane.
Step 3: You will get a UAC prompt asking for your consent; click Yes.
That’s it. The PowerShell will open as administrator. If you don’t want to use the Windows Search feature to find and open PowerShell, you can do the same with the help of the Windows context menu. Keep reading.
Method 2. Using WinX
Step 1: Press the Windows key + X on your keyboard.
Step 2: From the context menu, select Terminal (Admin).
Step 3: In the UAC prompt, click Yes.

There you go. You have launched PowerShell in administrator mode. If you landed on some Command Prompt or in any other terminal, click on the Chevron (arrow) icon at the top and select PowerShell.
We will be using Windows Tools to execute this method.
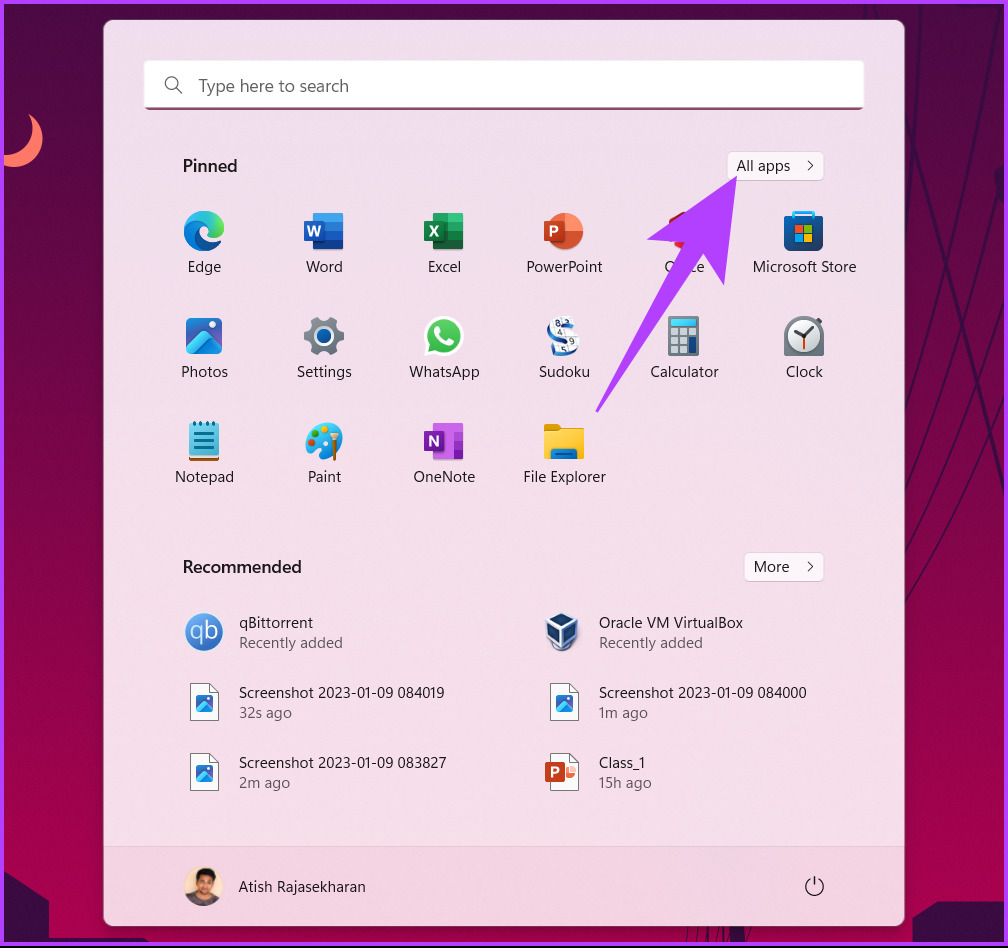
Step 1: Press the Windows key on your keyboard > click on All apps.
Step 2: Scroll down and click on Windows Tools.
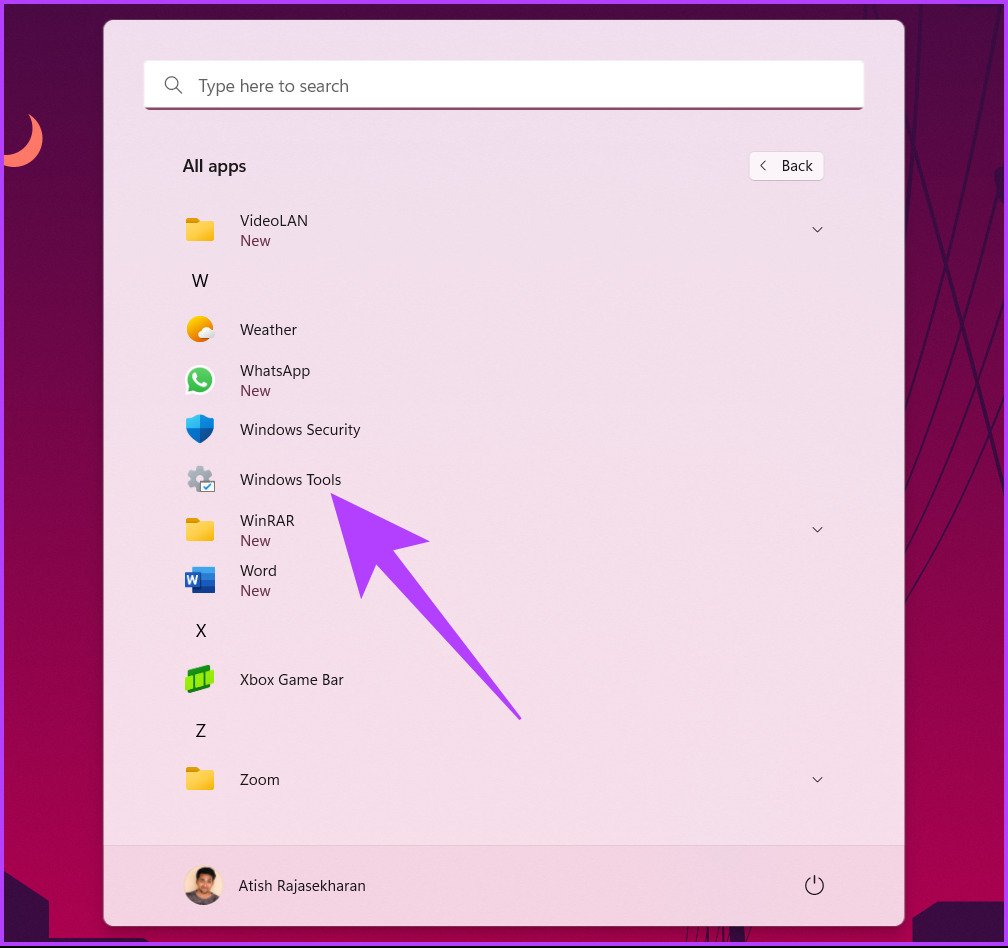
Step 3: In the Windows Tools window, scroll down and right-click on Windows PowerShell.
Step 4: From the context menu, select Run as administrator.

Step 5: In the prompt, click Yes.
There you go. You can now work on PowerShell with administrator privileges. If you want to know another way, jump to the next method.
Method 4. Using Task Manager
Step 1: Press Ctrl + Shift + Esc on your keyboard to open Task Manager.
Step 2: Click on the Run new task button. It will open a Create new task dialog box.
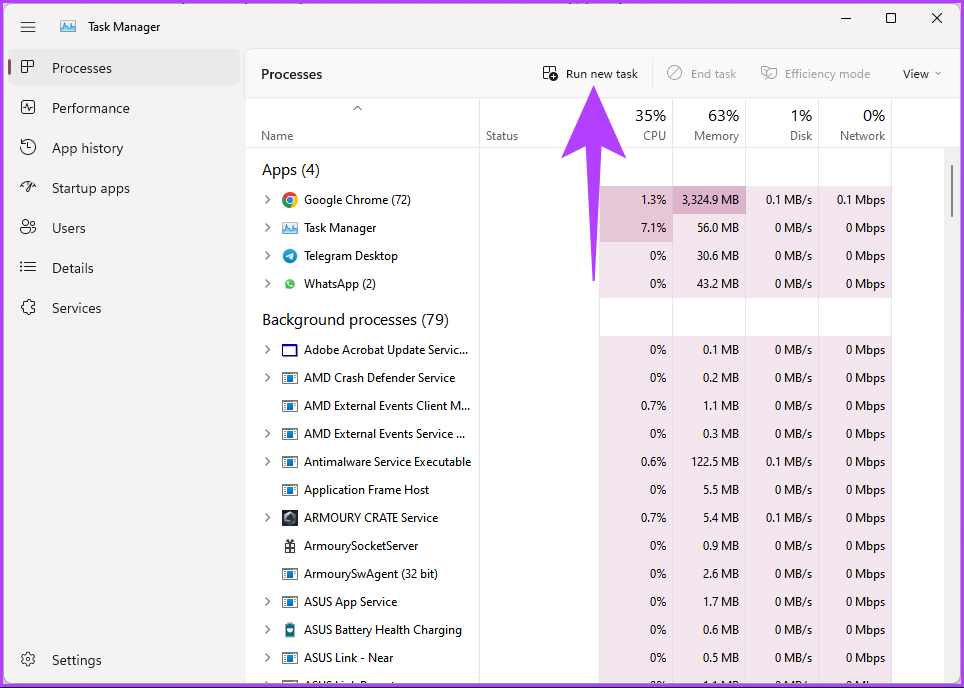
Step 3: Type PowerShell in the text field > check the box for Create this task with administrative privileges > click OK.

There you have it. It will open PowerShell with administrative privileges without any complications.
Method 5. Using the Run Command Box
Step 1: Press the Windows key + R on your keyboard to open the Run dialog box.
Step 2: Type PowerShell > click OK. This will open Windows PowerShell with the rights of the current user.

Step 3: To switch from normal (current user) mode to administrator mode, type the below command and press Enter.
Start-Process powershell -Verb runAs
Step 4: In the UAC prompt, click Yes.

Method 6. Using CMD
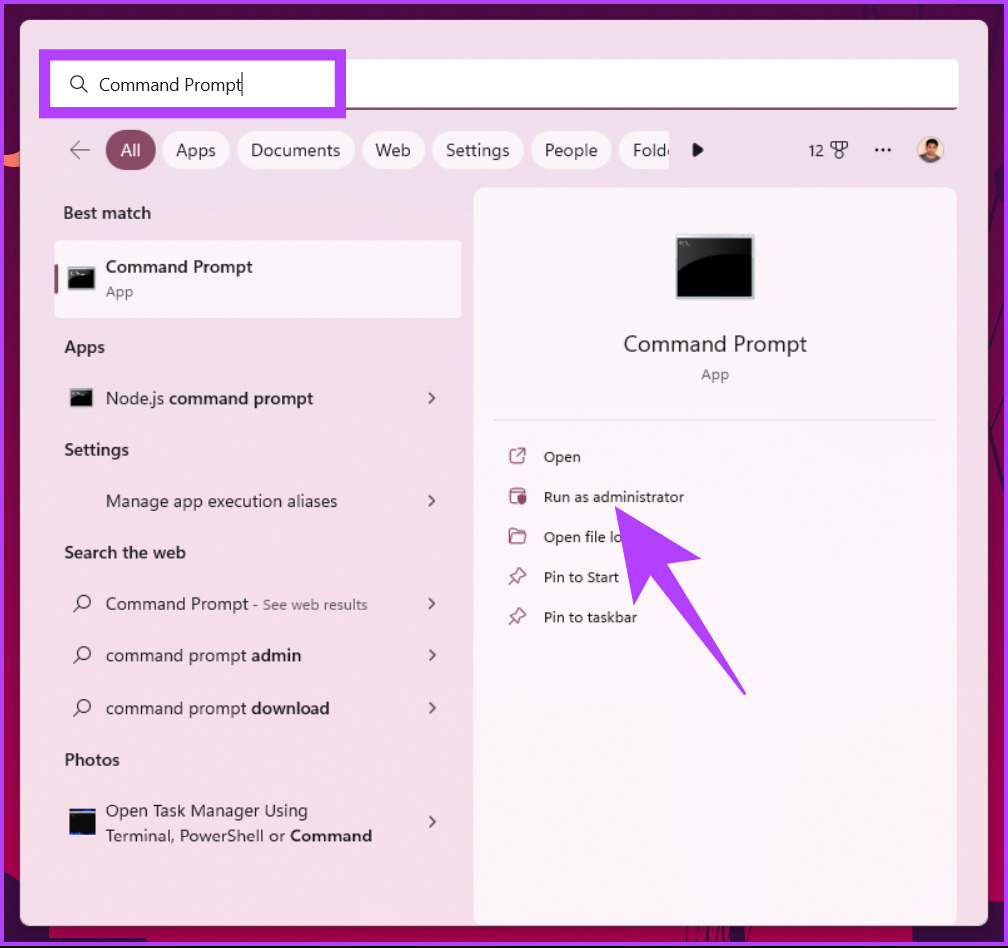
Step 1: Press the Windows key > type Command Prompt > click Run as administrator. In the prompt, click Yes.
Step 2: In the Command Prompt window, type PowerShell > press Enter.

FAQs
1. Does Windows PowerShell run in administrator mode by default?
Windows PowerShell does not run in administrator mode by default. When you launch PowerShell, it runs with the permissions of the currently logged-in user.
2. How do I know if PowerShell is running as an administrator?
There are several ways to determine if PowerShell is running as an administrator. One is to check the PowerShell window title or the PowerShell execution policy. Another is to check the user account control (UAC) prompt.
Was this helpful?
Thanks for your feedback!
The article above may contain affiliate links which help support Guiding Tech. The content remains unbiased and authentic and will never affect our editorial integrity.