
In Windows, changing directories is a fundamental part of file management, but would you settle for writing full paths of each directory you visit? Luckily, PowerShell change directory commands can make your life easier.
In this tutorial, you will explore the commands available to change directories in PowerShell, helping you navigate your file system effortlessly.
Read on and master the basics of file system navigation with PowerShell today!
Prerequisites
This tutorial will be a hands-on demonstration. To follow along, ensure you have a Windows system with PowerShell installed. This tutorial uses Windows 10 and PowerShell v7.
Switching from One Drive to Another
Each storage device, such as a hard disk or USB drive, is assigned a drive letter (i.e., C:, D:, E:, …Z:). When you open a PowerShell window, the prompt is in your user profile directory on the current drive by default.
Suppose you need frequent access to files or folders stored on a different drive than the one you are currently on. If so, switching from one drive to another is necessary.
To see how to switch from one drive to another:
1. Open PowerShell and confirm if the prompt says C:\Users\admin. If so, then you are currently on the C: drive in the admin user’s profile directory, as shown below.
2. Next, open another PowerShell session, but this time, as an administrator.
Below, the prompt starts in a different default directory than launching PowerShell as a regular user. Specifically, the prompt starts in the System32 directory within the Windows directory on the current drive (C:), as shown below.
This default behavior prevents non-administrative users from accidentally modifying critical system files or running sensitive tools.
3. Run the below command to change the current drive to D: (or to any available drive). This syntax is a quick way to navigate between different drives in PowerShell.
When switching drives in PowerShell with this method, the prompt changes to the root directory of the new drive, as in the output below.
As you can see, regardless of the default directory that PowerShell starts in, you always can switch to another drive.
4. Now, run the below command to attempt switching to the D:\Kitty directory (or to any other subdirectory).
Did you get the same error as below? This error shows since you cannot switch to subdirectories (for example, D:\Kitty) in one go by this method.
Jump to the following section to see how to switch to subdirectories.

Navigating the File System via the cd Command
Navigating multiple subdirectories is a common task in PowerShell. But is there a quick way to navigate through different subdirectories? Yes! The cd command, short for “change directory,” lets you quickly switch to another subdirectory regardless of your current directory.
Back in the day, the
cdcommand was used to navigate between drives and directories in the Command Prompt. Microsoft made thecdcommand backward compatible so you can still navigate between directories in PowerShell.
Read on and see how to navigate your file system with the cd command.
Moving to a Directory in a Different Drive
Jumping to a subdirectory within a different drive may seem like a hassle if you think about it. Well, there is no need to overthink it. You will be surprised how quickly the cd command lets you jump to another drive while moving into one of its directories.
Run the below command to navigate to the subdirectory called Kitty in the D:* drive.
Moving One to Many Levels Up in the Directory Hierarchy
With file system management, or when working on a project, you may frequently need to move up one or two levels from your current directory. The cd command supports the .. notation that lets you effectively switch to the parent directory of your current directory.
This feature lets you move up a level in your file system without specifying the full path to the parent directory.
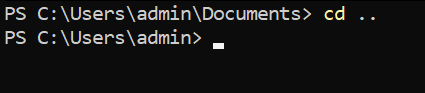
1. Run the cd command below, append a space and the .. notation, which tells PowerShell to go up one level in the directory hierarchy.
The space character after the
cdcommand is not required, as the command will work fine without it. But adding a space is a common practice for better readability and consistency with other commands.
In the output below, you can see the prompt moves up one level from the C:\Users\admin\Documents to the C:\Users\admin directory. Mind you that you did not have to specify the full path for the C:\Users\admin directory to move up.
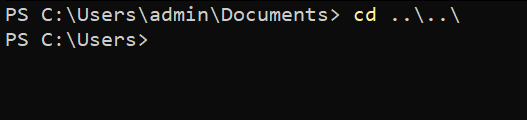
2. Instead of moving one level up, run the following command with two .. notations, appending a backslash (\) at the end of each. Doing so lets you move up two levels in the directory hierarchy.
Below, the output shows you jumped from the C:\Users\admin\Documents straight to the C:\Users directory.
3. Lastly, run the command below to move to the root directory of your current drive.
If you got lost in your file system, this command comes in handy as you can quickly jump to the root directory. This command saves your the hassle of running the cd .. command multiple times.

Moving Into a Specific Subdirectory
Like moving a level up in the directory hierarchy, moving into a specific subdirectory is also a quick task. Since there might be many subdirectories, appending notations like the previous ones (.., and ..\) will not work, you must specify the subdirectory’s name.
Run the below command to move into one of the subdirectories (\admin) in your current directory (.).
Notice below that you saved time and effort since you did not have to specify the full path of the C:\Users\admin directory.
Navigating the File System with PowerShell Cmdlets
Although the cd command undoubtedly works in PowerShell, Microsoft has introduced many cmdlets, like Set-Location, that let you navigate through your file system.
These cmdlets provide more robust functionality than the cd command that you can use to switch between drives, navigate stacked locations, and cycle through directories in the location history.
Stay tuned and witness how powerful PowerShell cmdlets are in navigating your file system.
Setting a Location from a Different Drive
Like the cd command, the Set-Location cmdlet allows you to jump from one directory to another and navigate straight to one of its directories. But since you are using a PowerShell cmdlet, you must append the -Path parameter to set the path of your target location.
The Set-Location cmdlet sets the current working directory to a specified location. That specified location can be one of the following:
- A directory, or subdirectory on the local file system.
- Any other location supported by a provider in PowerShell.
- Or a registry location.
To see how the Set-Location cmdlet works in navigating your file system:
Run the below command to navigate to the Kitty directory in your D: drive specified in the -Path parameter.
Set-Location -Path "D:\Kitty"
If you feel a bit lazy typing the full
Set-Locationcmdlet, you can also use one of its aliases, likechdirandsl, to navigate your file system. Aliases provide a more convenient way to access frequently used commands.
Now, run the below command to set the working location to a specific registry location. In this case, the HKLM:\ path (a shorthand) refers to the HKEY_LOCAL_MACHINE hive in your Windows Registry.
This command sets the working location to the root of the HKEY_LOCAL_MACHINE hive in the registry. Navigating to a registry allows you to access and modify its subkeys and values via other PowerShell commands.
Set-Location -Path "HKLM:\”
Switching Between Stacked Locations (Push and Pop)
Quickly accessing stacked locations sounds convenient. But is it possible? Yes! The Push-Location and Pop-Location cmdlets let you push and pop locations in a last-in-first-out (LIFO) order from a named stack.
To navigate stacked locations, follow these steps:
1. Run the below Push-Location command to push your current location to a stack called Paths and set the C:\Program Files\PowerShell\ directory as the current directory.
Push-Location -Path 'C:\Program Files\PowerShell\' -StackName "Paths"
2. Next, run the command below to push your current location (C:\Program Files\PowerShell\) to the top of the same Paths stack.
Push-Location -Path 'C:\Program Files\WindowsPowerShell\' -StackName "Paths"
3. Run each command below to set Paths as the default stack and view (Get-Location) the stacked locations.
# Sets the Paths stack as default
Set-Location -StackName "Paths"
# View all stacked paths in the default stack
Get-Location -Stack
Below, you can see you currently have two locations stacked, where the last location you pushed is at the top.

4. Now, run the following Pop-Location command twice to pop the top stacked location from the default stack, which currently is the Paths stack.

Note that popping the location from the stack removes the location from the stack. The error below indicates that you have popped all stacked locations from the default stack.

Navigating to a Directory Stored in a Variable
You have gone through different ways to navigate directories in your file system. But what if you need to navigate a specific location frequently? Typing full paths multiple times or cycling through the location history can be tedious. Why not store a directory’s full path in a variable instead?
With a declared variable, you can navigate to your target directory without specifying the path off the top of your head.
1. Run the below commands to store the C:\Program Files\PowerShell\ directory to the $psh variable, and set that location ($psh) as the current directory.
# Store a directory path to a variable
$psh = 'C:\Program Files\PowerShell\'
# Set the directory from the $psh variable as the current directory
Set-Location -Path $psh
The output below confirms successful directory change using a variable. Regardless of your current directory, you can quickly navigate to the C:\Program Files\PowerShell\ directory via the $psh variable.
But note that this method only works for the current PowerShell session unless you persist the variable, as demonstrated in the following step.

2. Next, run the below commands, which do not provide output, but persist the ev_psh variable as an environment variable (SetEnvironmentVariable) with the value of the directory’s full path.
# Add psh as an environment variable
[System.Environment]::SetEnvironmentVariable('ev_psh', 'C:\Program Files\PowerShell\', 'Machine')
# Reload the newly-added environment variable (ev_psh)
$Env:ev_psh = [System.Environment]::GetEnvironmentVariable("ev_psh","Machine")
3. Lastly, run the below command to set the value from the ev_psh environment variable as the current directory. Ensure that you are in a different directory than the one in your ev_psh variable.
Set-Location -Path $env:ev_psh
Cycling Through Directories in PowerShell’s Location History
Another quick way to cycle through directories in PowerShell is using the location history. The -Path parameter tells the Set-Location cmdlet to navigate to another directory from the location history (previous and following), depending on the specified value (- or +).
To cycle through directories in PowerShell’s location history:
Run the following commands set locations from the history as the current directory. The + character takes you forward in location history, while the - character takes you back.
# Sets the system root directory as the current directory
Set-Location -Path $env:SystemRoot

# Navigates back to the previous directory in history (certificate provider)
Set-Location -Path -

# Navigates back to the previous directory in history again (system root directory)
Set-Location -Path -

# Navigates forward to the following working directory in history (certificate provider)
Set-Location -Path +

# Navigates forward to the following working directory in history (HKEY_LOCAL_MACHINE hive)
Set-Location -Path +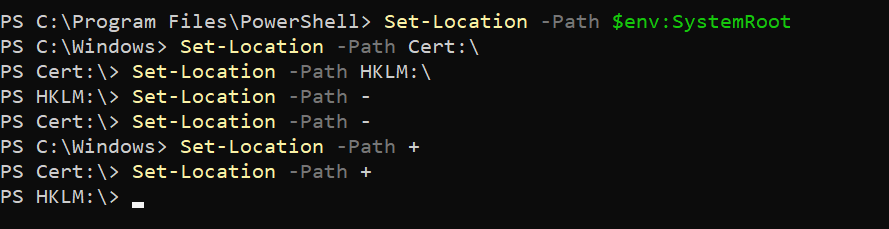
Conclusion
File system navigation can be tricky when your options are limited. But with PowerShell change directory commands, like Set-Location, you have plenty of options. How you wish to navigate your file system more efficiently is entirely up to you.
In addition, mastering the use of Push-Location and Pop-Location to save and recall recent locations is a valuable skill.
These techniques allow you to move quickly and seamlessly through directories and locations in PowerShell. But to further improve, why not consider learning about additional commands, like Get-ChildItem, which can save you plenty of time in your daily tasks?
How To Change PowerShell To Root Directory

Enter the command below and press enter to change the directory to the root directory in PowerShell.
Set-Location \
PowerShell Prompt is in the location “C:\Users\Victo” in my first example. To change to the root of C, I will input the command “Set-Location \” command and press enter on the keyboard. The directory is now in the root of C, as shown in the second figure below.
How to change the Directory One Step from the Current Directory

You may also move directories from one directory to the current one. To do this Enter this command and hit enter to accomplish this.
Set-Location.
In this second example, my current PowerShell Prompt is located in the directory “C:\Users\Victo” However, I want to modify the Powershell change directory to “C:\Users”
How to Change PowerShell Directory From C to D

In the PowerShell prompt, you may also switch from one drive to another. , to switch from drive “C:” to drive “D:”
The command below will do the trick – type it in and hit enter.
Set-Location D:
The Powershell change directory prompt will switch from the old directory, “C:” to the new drive, “D:”
How to change the directory to a specified path

PowerShell also allows you to change the directory to a specific path. To change directories, enter Set-Location followed by the Path parameter and the complete path to which you wish to shift. If the new directory path contains spaces, surround it in double quotes (“_”).
Set-Location -Path [full path]
In this example, we will change to “C:\G-Drive”, input this command, and hit enter.
Set-Location -Path “C:\G-Drive”
The PowerShell prompt will immediately change to the new directory.
The same command may be used to change the directory to a path on another drive.
How To Navigate To A Different Directory Within The Current Directory
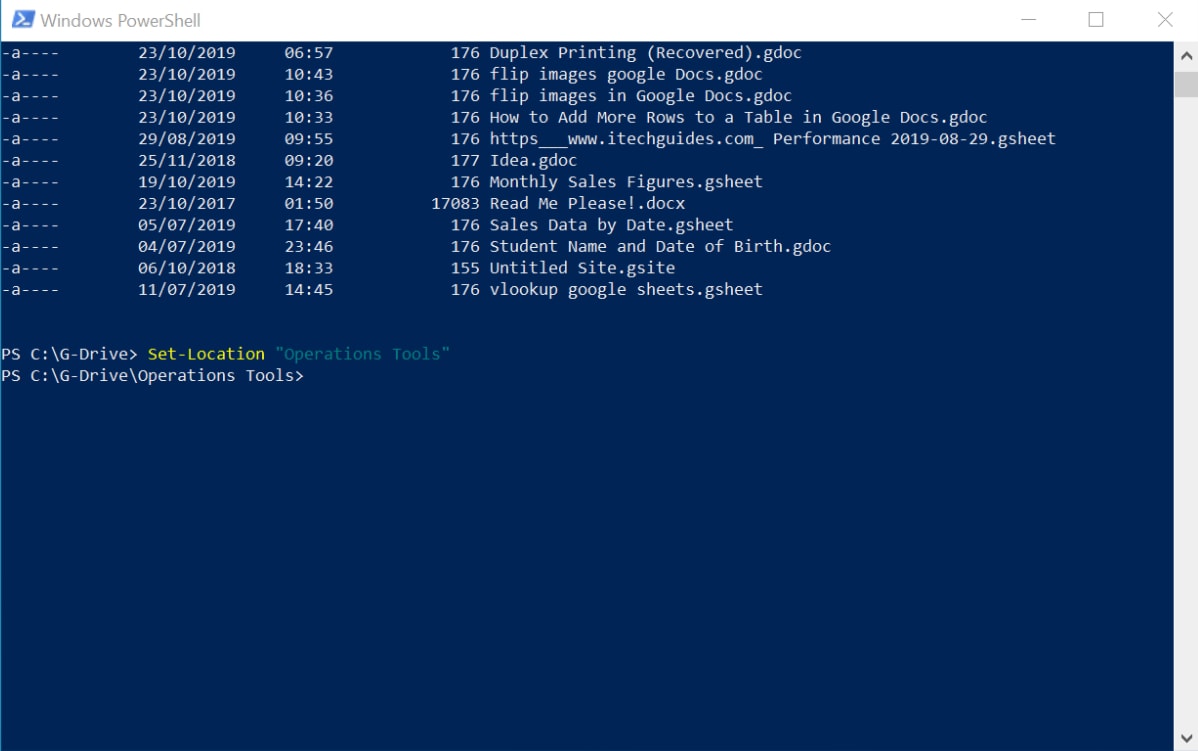
In this final example, I’ll show you how to shift from one directory to another within the current directory. The first step is to display a list of all directories in the current directory. Enter the Get-ChildItem command to do this.
The screenshot below indicates that I have two folders in the “C:\G-Drive directory: “Operations Tools” and “Work Tools.”
We’ll use the command below to change to “Operations Tools”.
Set-Location “Operations Tools”
The PowerShell prompt will immediately change to the new directory.
How to Change a PowerShell Script’s Directory

When you execute a PowerShell script, there may be times when you need to access the location from which the script is executing. “$Script:MyInvocation.MyCommand.Path”. is an automatic variable.
This variable may be used to determine the directory from which your script is executing. This variable, however, is only available when a PowerShell script is running.
To illustrate, paste the following script into PowerShell and save it as AccessScriptDirectory.
This simple script generates a report of the latest five logs in the “System,” “Application,” and “Security” event logs.
Pay attention to the last three lines. In the third to the final line, I saved the automated variable “$Script:MyInvocation.MyCommand.Path” to a named variable called $ReportPath.
With the Parent argument, the Split-Path command returns the directory from which the current script is executing. This is how you shift to the script Powershell change directory for the sake of this lesson! So, if you don’t choose anything else in this area, make a note of the command “Split-Path -Parent $Script:MyInvocation.MyCommand.Path”.
Then, on the very last line, I added another variable, $CSVReportFile. This variable specifies the location of the CSV file in which I want to save my event log report.
What matters most is that the path to the CSV file is in the current directory where my PowerShell script is executing.
Finally, in the script’s final line, I export the event log report to a CSV file.
Please keep in mind that my script is saved in the directory “D:\PS-Tutorial” As a result, I anticipate that my CSV file will be produced in this place.
#Create a single-key hashtable (LogName) with values – “System”, “Application”, “Security”
$LogNameKeys = @{
LogName = @(“System”, “Application”, “Security”)
}
#Convert the hashtable to a string
$LogNameKeysAsStrings = $LogNameKeys.Values | out-string -stream
#Uses ForEach to loop through $LogNameKeysAsStrings and run the Get-EventLog command.
#Then, save the output of the command in the EventLogReport variable,
$EventLogReport = ForEach ($LogNameKey in $LogNameKeysAsStrings) {
Get-EventLog -LogName $LogNameKey -Newest 5
}
$ReportPath = Split-Path -Parent $Script:MyInvocation.MyCommand.Path
$CSVReportFile = “$ReportPath + “EventLogsReport.csv”
$EventLogReport | Export-Csv -Path $CSVReportFile -NoTypeInformation
After saving the script, launch Powershell change directory as administrator, browse to the directory where you saved the script, and run the following command:
.\AccessScriptDirectory.ps1
After running the script, navigate to the location where you stored the preceding script. The CSV report should be stored in the same folder — my report is shown in the second picture below.
How to Change Directory in PowerShell Using Spaces

It is quite simple to switch to a directory containing spaces. However, if not done correctly, it may result in mistakes.
When moving to another directory containing spaces, it is typical for individuals to forget to surround the directory in double-quotes.
In the Powershell change directory, for example, if I wish to go to the D:\G-Drive-P\Work Tools directory, I will use the command below…
Set-Location “D:\G-Drive-P\Work Tools”
The preceding command works
If you execute the same command without enclosing D:\G-Drive-P\Work Tools in double quotes, you may get an error.
Set-Location D:\G-Drive-P\Work Tools
Finally, the key to converting the directory in PowerShell to one with spaces is to surround the directory in double quotations, “-”.
How to Change PowerShell Directory to Program Files
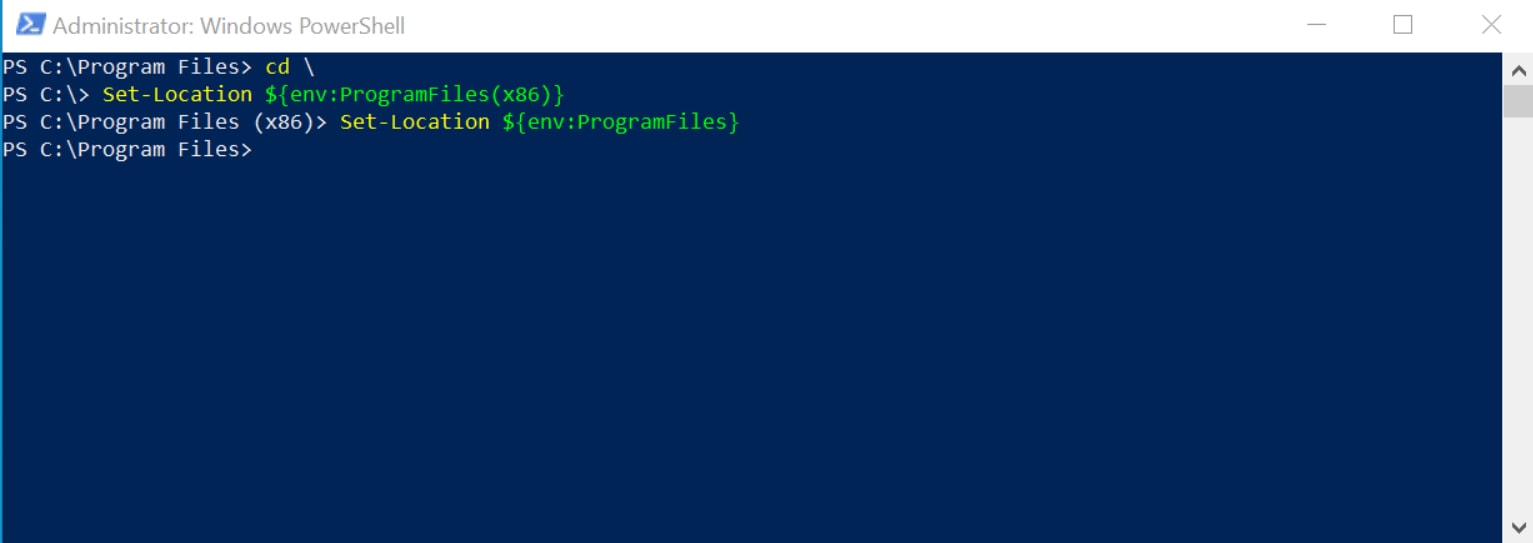
Windows 10 offers two routes for Program Files: \Program Files (x86) and \Program Files. In PowerShell, the easiest method to navigate to these folders is to use their environment variables.
\Program Files (x86) is an environment variable.
${env:ProgramFiles(x86)}
Furthermore, the environment variable for \Program Files is
${env:ProgramFiles}
Run the instructions below in PowerShell to go to these Program File folders.
Set-Location ${env:ProgramFiles(x86)}
Set-Location ${env:ProgramFiles}
Here are the Powershell change directory results.
How to Change PowerShell Directory to Desktop
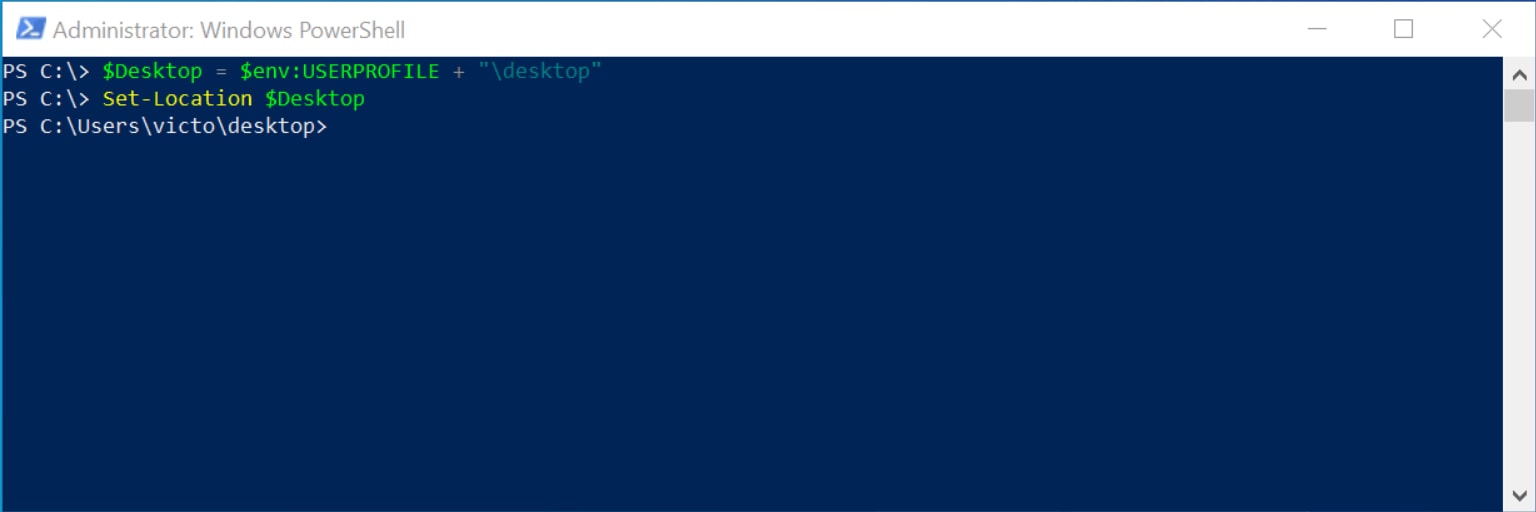
In the last part, I accessed Program Files using a PowerShell environment variable. PowerShell, as expected, has an environment variable for the path to the current user’s profile.
The path to the currently logged-in user’s profile is an environment variable.
$env:USERPROFILE
Run the above command to see the path to your user profile. Mine may be found in C:\Users\victo.
When you examine the path to a user’s profile in Windows 10, you’ll notice a folder called “Desktop.”
So, to change directory in PowerShell to the current user’s desktop, use the instructions following.
$Desktop = $env:USERPROFILE + “\desktop”
Set-Location $Desktop
Because using $env:USERPROFILE + “\desktop” directly in the Set-Path command was throwing all sorts of problems, I stored the location of the desktop folder to a variable.
Here is the output of the Powershell change directory command.
How to Change a Registry Path in PowerShell

PowerShell can access the Windows registry in the same way that it can access files. I highly advise you to study the Abbreviated Registry Key Path portion of our How to Use PowerShell to Read Registry Value tutorial before proceeding with this section.
The registry root key acronyms are provided below based on the information in the above-mentioned instructions.
HKEY_LOCAL_MACHINE – HKLM
HKEY_CURRENT_CONFIG – HKCC
HKEY_CLASSES_ROOT – HKCR
HKEY_USERS – HKU
HKEY_CURRENT_USER – HKCU
In PowerShell, insert the abbreviation of the root key, followed by “:\” – in the Set-Location command to change the directory to any of these registry keys.
I want to modify the directory in the command below to HKEY_LOCAL_MACHINE
Set-Location HKLM:\
Here is the Powershell change directory output
April 6, 2020 by Kenneth Fisher
The other day Kendra Little (blog|twitter) mentioned that she was trying to get a command in Powershell working. Specifically one that used an environment variable (%programfiles(x86)%). Shockingly (not) she figured that part out pretty quickly but I still thought it would make an interesting subject for a blog post.
Powershell is hard. I tried to figure out the equivalent of this (which works in a cmd prompt) and… oy.
«%programfiles(x86)%Red GateSQL Compare 14SQLCompare.exe» /scripts1:»C:agent_work1State» /sca2:»C:agent_work1MigrationsDemoWorkflow_Migrations.sqlproj»
— Kendra Little (@Kendra_Little) March 30, 2020
So to start, in batch, cmdshell, or DOS (whatever you want to call it) you can use certain environment variables in your code. For example %programfiles(x86)% that Kendra mentioned will tell you the location of the Program Files (x86) directory. This is handy because not every system uses C:\Program Files (x86) for that particular set of directories. Some other ones I found include the path for the system and temp directories. Interestingly I did some research and I wasn’t able to find a list of this type of environment variable. They appear to be stored in the registry but weren’t easy to find.
Powershell makes this pretty darn easy. All environment variables are under env:. So you can get that same variable this way: (Technically this is a different variable but I couldn’t figure out how to get the ProgramFiles(x86) to work. The parenthesis kept giving me issues.)
$env:ProgramFiles
And Powershell being what it is getting the list here turned out to be pretty easy:
Set-Location Env:

Get-ChildItem
From what I can tell these same variables are also available in cmdshell.
Category: Powershell, SQLServerPedia Syndication
| Tags: Powershell
- To list items within the current directory in PowerShell, use “Get-ChildItem,” or use this command followed by the complete path of the directory to list all items using the absolute path.
- Use “Set-Location -Path” followed by absolute path to change the directory to the specified folder, or go up the directory levels using “cd ..”, “cd ..\..\”, or “cd \”.
Efficiently managing directories and navigating through the filesystem is crucial as vast amounts of data are generated and organized. PowerShell emerges as a powerful tool that makes interacting with directories seamless and enables effortless manipulation of files and folders.
Whether you are an experienced IT professional or a curious tech enthusiast, this guide aims to simplify the complexities of working with directories and the filesystem in PowerShell. In this article, we show you, with examples, how to navigate through and work with files and folders using the PowerShell command line.
Table of Contents
How to Open Windows PowerShell
There are multiple ways through which you can open the PowerShell application in your system.
You can access PowerShell in Windows 10 or Windows 11 by simply right-clicking on the Windows icon in the taskbar or pressing the “Win + X” keys and selecting “Windows PowerShell.” If you want to run it as an administrator, click on “Windows PowerShell (Admin).”
Alternatively, you can also open PowerShell from the Run Command box.
-
Press the Windows Key + R to open the Run Command box.
-
Type in “PowerShell” and press Enter.
Open PowerShell via the run command box
To launch PowerShell as an administrator, press Ctrl + Shift + Enter after typing “PowerShell” in the Run Command box.
Working with Directories and Filesystem in PowerShell
Directories, or folders, help you organize your computer files. They act as containers where you can put your files and even other folders.
Whereas, the filesystem in Windows is like a big map that shows you where everything is stored on your computer. It’s like a blueprint that helps you navigate through all your files and folders. The filesystem decides how things are organized and makes sure everything is in the right place.
Let us now continue to show you how to perform specific tasks relating to files and folders using just PowerShell.
Change Directory to a Specific Path in PowerShell
In PowerShell, you can switch to a specified directory by using the “Set-Location” command.
Use the following command to switch the working (current) directory using the following “-Path” parameter:
Set-Location -Path "[FullPath]"Note: If the path contains spaces, enclose it in double quotation marks.
For example, to change to the “C:\Users” directory, use this command:
Set-Location -Path "C:\Users"
You can also switch between different directories simply by entering the drive letter followed by a colon, like in this example:

As you can see, no PowerShell-specific command is needed.
Change Directory using Environmental Variables in PowerShell
In Windows, there are two main directories for programs: \Program Files (x86) and \Program Files. To switch to these directories in PowerShell, it’s best to use their environment variables. This way, you do not need to provide complete paths.
Environment variables are like shortcuts that represent specific paths on your computer. By calling these variables in PowerShell, you can easily navigate to the corresponding directories without typing out the full paths.
For example, to change to the “C:\Program Files (x86)” directory, you can use the environment variable “%ProgramFiles(x86)%”. Similarly, to switch to the “C:\Program Files” directory, you can use the “%ProgramFiles%” variable. Following are the steps to do it:
Note: The environment variable for the “Program Files (x86)” folder is {env:ProgramFiles(x86)} and for the “Program Files” folder is {env:ProgramFiles}.
Use the following syntax to change the directory to a folder with an environmental variable:
Set-Location $[EnvironmentalVariable]
You can use the same concept with all directories that have an environmental variable.
Move a File, Folder with PowerShell
If you want to move a certain file or folder via PowerShell, use the “Move-Item” command. With this command, you can move a single file or folder, or even specify the types of multiple files to move. Of course, for this purpose, you need to use both the source path and the destination path.
The command syntax for moving a single file or folder is:
Move-Item -Path "[SourcePath]" -Destination "[DestinationPath]"Replace [SourcePath] with the path of the file/folder you want to move, and [DestinationPath] with the path where you want to move it. If it is a file that you are moving, also specify its file extension.

In the example above, we have moved the “TestFile.txt” from D drive to the root of E drive.
To move a specific file type, we will use the “*” (asterisk) followed by the file extension. this will move all files within the particular directory to the destination path. Here is the command’s syntax:
Move-Item -Path "[SourcePath]\*.[FileExtension]" -Destination "[DestinationPath]"Replace [SourcePath] with the path of the folder from where you want to move the files, [FileExtension] with the file type you want to move, and [DestinationPath] with the path where you want to move them.

Copy a File, Folder with PowerShell
Above, we discussed how to move a file, multiple files, or a folder using PowerShell. Let us now show you how to copy them to another location. The “Copy-Item” cmdlet is used for this purpose.
Use the syntax below to copy a file or a folder to a new location using PowerShell:
Copy-Item -Path "[SourcePath]" -Destination "[DestinationPath]"Replace [SourcePath] with the path of the file/folder you want to copy, and [DestinationPath] with the path where you want to copy it. If it is a file that you are moving, also specify its file extension.

In this example, we copied the “TestFile1.txt” from the DestinationFolder in the E drive to the SourceFolder in the D drive.
You can use the same syntax to copy complete folders as well. Of course, a file extension won’t be needed in that case.
You can also rename the file being copied during the process. Simply provide the new name in the [DestinationPath] variable, and the file will be copied with the specified name. Here’s an example where we renamed the file “TestFile1.txt” to “NewTestFile.txt”.

You can also copy all contents of a folder into another directory using the “*” (asterisk) using the command syntax:
Copy-Item -Path "[SourcePath]\*" -Destination "[DestinationPath]"
Navigate to a Variable Directory in PowerShell
To simplify the process of navigating to a specific location in your file system, you can store the full path of a directory in a variable. Using variables allows for easy access to frequently used directories, eliminating the need to type the full path multiple times or rely on location history. Here are the steps to follow:
-
Store a directory path to a custom variable by using the following command:
$[VariableName]='[PathToStore]'Replace [VariableName] with any custom name for the variable, and [PathToStore] with the complete path of the file/folder you want to store.

Store a file/folder location inside a variable in PowerShell Set-Location -Path $psh -
Now use this variable instead of complete paths.
You can use this variable in the
copy-itemcommand,move-itemcommand, orset-locationcommand. Here are some examples:Set-Location -Path $[VariableName] Copy-Item -Path "D:\SourceFolder\TestFile1.txt" -Destinaton $[VariableName] Move-Item -Path "D:\SourceFolder\*.txt" -Destinaton $[VariableName]

Moving Up Levels within Directory Hierarchy in PowerShell
When managing files or working on projects in PowerShell, it is common to navigate to the parent directory of the current directory. The CD (Change Directory) command in PowerShell supports the “..” notation, which allows you to easily switch to the parent directory without specifying the full path.
This feature simplifies moving up one level in the file system hierarchy and facilitates efficient directory navigation.
To move up one level in the directory hierarchy, enter the following command:
cd ..The space after the command is optional but improves readability. This prompt will change to the parent directory without specifying the full path.
To move up two levels in the directory hierarchy, run the command:
cd ..\..\Lastly, to navigate to the root directory of the current drive, enter the following command:
cd \
List Items in a Specific Directory in PowerShell
To list the contents of a directory in PowerShell, the “Get-ChildItem” cmdlet is used. You can either provide the absolute path of the directory or simply use Get-ChildItem when you are already in the same directory.
In this example, we will be listing the content of the E:\Documents directory.
When running the Get-ChildItem command from outside this directory, the absolute path of the directory should be specified. This ensures that PowerShell knows exactly which directory to retrieve the contents from. The command will be:
Get-ChildItem E:\Documents\
When executing the Get-ChildItem command directly within a directory, there is no need to specify the full path. This is known as a relative path. In such cases, you can simply run the command without providing the absolute path, and PowerShell will display the contents of the current directory. The command will be:
Get-ChildItem
Conclusion
Using PowerShell to manage directories and files offers numerous benefits to users. It is versatile and provides easy-to-use commands that simplify the process of working with directories and navigating the file system.
Whether it is about effortlessly changing directories, accessing files with spaces in their names, or efficiently organizing and manipulating files, PowerShell proves to be a valuable tool for it all.