
PowerShell предоставляет широкие возможности управления процессами на локальном или удаленном компьютере. С помощью PowerShell можно получить список запущенных процессов, приостановить зависший процесс, найти процесс по заголовку окна, запустить новый процесс в скрытом или интерактивном режиме.
Список доступных командлетов управления процессами в Windows 10 можно вывести так:
Get-Command –Noun Process

- Get-Process – получить список запущенных процессов;
- Start-Process – запустить процесс/программу;
- Stop-Process – принудительно остановить процесс;
- Debug-Process – используется для отладки процессов;
- Wait-Process – используется для ожидания окончания процесса.
Содержание:
- Get-Process – получение списка запущенных процессов
- Start-Process, Stop-Process: запуск и остановка процессов из PowerShell
- PowerShell: управление процессами на удаленном компьютере
Get-Process – получение списка запущенных процессов
Командлет
Get-Process
позволяет вывести список запущенных процессов на локальном компьютере.
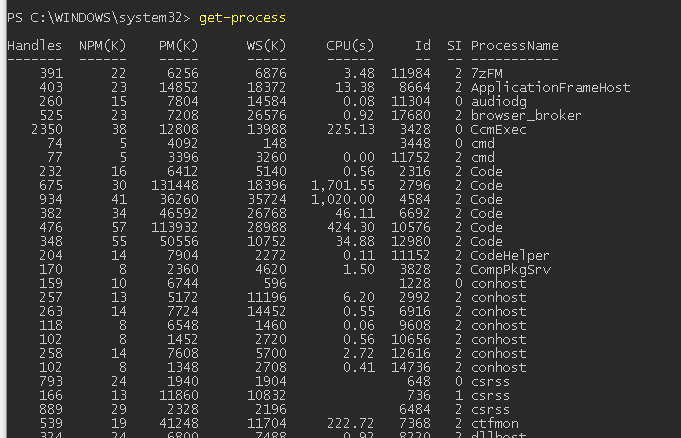
По-умолчанию выводятся следующие свойства запущенных процессов:
- Handles – количество дескрипторов ввода — вывода, которые отрыл данный процесс;
- NPM(K) — Non-paged memory (невыгружаемый пул). Размер данных процесса (в Кб.), которые никогда не попадают в файл подкачки на диск;
- PM(K) – размер памяти процесса, которая может быть выгружена на диск;
- WS(K) – размер физической памяти в Кб, используемой процессом (working set).
- CPU(s) – процессорное время, использованное процессом (учитывается время на всех CPU);
- ID — идентификатор процесса;
- SI (Session ID) – идентификатор сеанса процесса (0 — запущен для всех сессий, 1 – для первого залогиненого пользователя, 2 — для второго и т.д.);
- ProcessName – имя процесса.
Чтобы получить все свойства нескольких процессов:
Get-Process winword, notep* | Format-List *
Можно вывести только определенный свойства процессов. Например, имя (ProcessName) время запуска (StartTime), заголовок окна процесса (MainWindowTitle), имя исполняемого файла (Path) и наименование разработчика (Company):
Get-Process winword, notep* | Select-Object ProcessName, StartTime, MainWindowTitle, Path, Company|ft

Вывести список запущенных процессов пользователя с графическими окнами (в список не попадут фоновые и системные процессы):
Get-Process | Where-Object {$_.mainWindowTitle} | Format-Table Id, Name, mainWindowtitle

С помощью параметра
IncludeUserName
можно вывести имя пользователя (владельца), который запустил процесс:
Get-Process -Name winword -IncludeUserName
С помощью Where-Object можно выбрать процессы в соответствии с заданными критериями. Например, выведем все процессы, которые используются более 200 Мб оперативной памяти, отсортируем процессы в порядке убывания используемого объема RAM, размер памяти из Кб преобразуем в Мб:
Get-Process| where-object {$_.WorkingSet -GT 200000*1024}|select processname,@{l="Used RAM(MB)"; e={$_.workingset / 1mb}} |sort "Used RAM(MB)" –Descending

Как мы уже говорили ранее командлет Get-Process в параметре CPU содержит время использования процессора конкретным процессом в секундах. Чтобы отобразить процент использования CPU процессами (по аналогии с Task Manager), используйте такую функцию:
function Get-CPUPercent
{
$CPUPercent = @{
Name = 'CPUPercent'
Expression = {
$TotalSec = (New-TimeSpan -Start $_.StartTime).TotalSeconds
[Math]::Round( ($_.CPU * 100 / $TotalSec), 2)
}
}
Get-Process | Select-Object -Property Name, $CPUPercent, Description | Sort-Object -Property CPUPercent -Descending | Select-Object -First 20
}
Get-CPUPercent
Чтобы найти зависшие процессы (которые не отвечают), выполните команду:
Get-Process | where-object {$_.Responding -eq $false}
Start-Process, Stop-Process: запуск и остановка процессов из PowerShell
Чтобы запустить новый процесс с помощью PowerShell используется команда:
Start-Process -FilePath notepad
Если каталог с исполняемым файлом отсутствует в переменной окружения $env:path, нужно указать полный путь к файлу:
Start-Process -FilePath 'C:\distr\app.exe'
Можно запустить программу и передать ей аргументы:
Start-Process -FilePath ping -ArgumentList "-n 10 192.168.1.11"
С помощью параметра WindowStyle вы можете задать режим запуска окна процесса (normal, minimized, maximized, hidden). Например, чтобы запустить программу в максимально развернуом окне и дождаться завершения процесса, выполните команду:
Start-Process -FilePath tracert -ArgumentList "192.168.1.11" –wait -windowstyle Maximized
С помощью командлета Stop-Process можно завершить любой процесс. Например, чтобы закрыть все запущенные процессы notepad:
Stop-Process -Name notepad
По-умолчанию не запрашивается подтверждение завершения процесса. Закрываются все процессы, которые соответствуют указанным критериям. Чтобы запросить подтверждение завершения для каждого процесса, добавьте –Confirm.
Stop-Process -Name notepad.exe -Confirm

Также завершить процесс можно так:
(Get-Process -Name notepad).Kill()
Из PowerShell можно принудительно завершить все приложения, которые не отвечают диспетчеру процессов Windows:
Get-Process | where-object {$_.Responding -eq $false}| Stop-Process
PowerShell: управление процессами на удаленном компьютере
С помощью аргумента ComputerName командлет Get-Process позволяет управлять процессами на удаленных компьютерах (должен быть включен и настроен WinRM).
Get-Process -ComputerName dc01, dc02| Format-Table -Property ProcessName, ID, MachineName
Мы рассматриваем встроенные возможности комнадлета Get-Process для управления процессами на удаленных компьютерах. Здесь не учитываются возможности PowerShell Remoting, которые доступны в командлетах Invoke-Command и Enter-PSSession.
Если вы хотите завершить процесс на удаленном компьютере, имейте в виду, что у командлета Stop-Process отсутствует параметр –ComputerName. Для завершения процесса на удаленном компьютере можно использовать такой PowerShell код:
$RProc = Get-Process -Name notepad -ComputerName dc01
Stop-Process -InputObject $RProc
Время на прочтение3 мин
Количество просмотров122K
Наверное, все слышали о PowerShell, но наверняка не всем довелось с ним работать. Для тех, кто только начинает прокладывать свой путь в дебри PowerShell, мы приводим перевод поста, вышедшего на портале 4sysops.com. В нем рассказано о 7 командах, которые помогут тем, кто только начал работать с PowerShell. За подробностями – добро пожаловать под кат.
GET-HELP
Самый первый и самый главный командлет PowerShell – вызов справки. С помощью командлета Get-Help можно проверить синтаксис, посмотреть примеры использования и детальное описание параметров любого PowerShell командлета. Этот командлет примечателен тем, что вы просто можете набрать Get-Help Services, чтобы получить список всех командлетов, которые подходят для работы со службами.
Пример:
PS C:\> Get-Help Service

Вы можете выбрать любой командлет из списка, выведенного по запросу выше, чтобы получить справку о нем. Например,
PS C:\> Get-Help -Name Get-Service
Вы получаете всю информацию о командлете Get-Service (будет рассмотрен ниже).

GET-CONTENT
Чтение содержимого файлов – наиболее частое требование для новичков, которые пытаются выучить PowerShell. Процедура чтения файлов с PowerShell упрощается. Даже неспециалист может читать содержимое файла, просто передав его в командлет Get-Content.
Пример.
PS C:\> Get-Content C:\scripts\Computers.txt
mytestpc1
techibee.com
dummynotresolvinghost.com
PS C:\>

Необходимо больше информации о командлете? Воспользуйтесь Get-Help:
PS C:\> Get-Help Get-Content -Detailed
GET-SERVICE
Этот командлет перечисляет все службы, установленные на компьютере. Вы можете использовать его для получения информации о конкретной службе, совокупности служб или просто обо всех службах на компьютере.
Пример:
PS C:\> Get-Service wwansvc, spooler
Status Name DisplayName
------ ---- -----------
Running spooler Print Spooler
Stopped wwansvc WWAN AutoConfig
PS C:\>
Здесь мы запросили информацию о двух службах wwansvc и spooler
Выводится таблица со статусом службы, ее именем и отображаемым именем.
Мы можем видеть что служба spooler запущена, а wwansvc остановлена
STOP-SERVICE И START-SERVICE
Запуск и остановка служб – достаточно важный момент в работе администратора Windows. В PowerShell имеются встроенные командлеты, которые упрощают работу администратора, не требуя открытия консоли MMC. Используя эти командлеты Вы можете останавливать/запускать службы как на локальных, так и на удаленных компьютерах.
Примеры:
Запуск/остановка службы на локальном компьютере (на примере службы spooler):
PS C:\> Stop-Service -Name Spooler
PS C:\> Start-Service -Name Spooler
Запуск/остановка службы на удаленном компьютере (spooler):
PS C:\> $ServiceObj = Get-Service -ComputerName MyPC1 -Name spooler
PS C:\> Stop-Service -InputObj $ServiceObj
PS C:\> Start-Service -InputObj $ServiceObj
GET-PROCESS
Этот командлет позволяет быть в курсе, какие процессы запущены на локальных или удаленных компьютерах. Показываются имя и ID процесса, а также путь к исполняемому файлу, имя компании, версия исполняемого файла и память, используемая процессом.
Примеры:
Получение информации о процессах, запущенных на локальном компьютере:
PS C:\> Get-Process

Введите следующий командлет для получения подробной информации о запущенных процессах
PS C:\> Get-Process | Format-List * -Force
Получение информации о процессах, запущенных на удаленном компьютере:
PS C:\> Get-Process -ComputerName MYPC1 | Format-List * -Force
MYPC1 необходимо заменить на имя того компьютера, с которого вы хотите получить информацию о запущенных процессах.
STOP-PROCESS
Этот командлет остановливает процесс на локальном или удаленном компьютере. Он берет имя или ID процесса и завершает этот процесс. Это полезно в тех случаях, когда приложение не отвечает.
Пример:
Остановить процесс с ID 22608 на локальном компьютере:
PS C:\> Stop-Process -Id 22608
Остановить все процессы Excel на локальном компьютере:
PS C:\> Stop-Process -name excel
Совет: Хотя у командлета Stop-Process отсутствует параметр -ComputerName, Вы все равно можете использовать его для завершения удаленных процессов, используя предложенный ниже совет:
PS C:\> $Obj = Get-Process -Name excel -ComputerName MYPC1
PS C:\> Stop-Process -InputObject $Obj
Upd:
В посте приведен перевод статьи с портала 4sysops.com
Top 7 PowerShell commands for beginners
P.S. Смотрите также интересные посты на Хабре, посвященные работе с PowerShell
Аудит доступа к файлам
Аудит Active Directory (Часть 1 и 2)
Актуализируем учетные данные Active Directory
Аудит создания учетных записей в AD
In PowerShell, you can terminate a running process using the `Stop-Process` cmdlet followed by the process ID or name.
Stop-Process -Name "notepad" -Force
Understanding Processes in PowerShell
What is a Process?
A process is a program that is currently being executed on your computer. Each process has its own memory space and system resources, making it essential for the operating system to manage them efficiently. Understanding processes is crucial, especially when dealing with applications that may become unresponsive or use excessive resources.
PowerShell’s Role in Process Management
PowerShell serves as a powerful tool for managing processes through its cmdlets. Unlike graphical user interfaces that may be limited, PowerShell allows for quick, command-line-based management of tasks, including retrieving information about processes, starting new ones, and terminating unwanted or stuck ones. The ability to manage processes through scripts enables automation and improved productivity.
Mastering PowerShell Get Process: A Quick Guide
Introduction to the Stop-Process Cmdlet
The `Stop-Process` cmdlet in PowerShell is specifically designed to terminate a running process. It allows users to identify processes they wish to stop using either their IDs or names. The basic syntax of the `Stop-Process` command is as follows:
Stop-Process -Id <ProcessID> [-Force] [-PassThru]
This simple command can provide significant control over process management on your system.
Parameters Explained
-Id
The -Id parameter allows you to specify the unique identifier of the process you want to terminate. Each process is assigned a Process ID (PID) by the operating system, making it easy to target specific processes.
Example of using -Id:
Stop-Process -Id 1234
This command will effectively terminate the process with the PID of 1234.
-Name
The -Name parameter lets you kill processes by their names rather than by their IDs. This can be particularly useful when the exact process ID isn’t readily available.
Example for killing processes by name:
Stop-Process -Name "notepad"
Using this command will close all instances of Notepad running on your system.
-Force
The -Force parameter is used to forcibly terminate a process, which means the process will be stopped even if it is busy or unresponsive. It’s worth noting that using this parameter may result in data loss, so exercise caution.
Example of using -Force:
Stop-Process -Id 1234 -Force
This command will terminate the process with PID 1234 without regard for any unsaved data.
-PassThru
The -PassThru parameter provides output for the processes that were stopped. This is beneficial if you want to verify that the process was successfully terminated.
Example of usage:
Stop-Process -Name "notepad" -PassThru
This command will output the details of the Notepad instances that were closed.
Harness PowerShell Compress-Archive for Quick File Management
Killing a Process Using PowerShell
Kill Process by Name
To kill a process using its name is straightforward. This method is particularly useful when you want to close applications without searching for their IDs.
Example:
Stop-Process -Name "chrome" -Force
Executing this line will close all instances of Google Chrome running on your machine.
Kill Process by ID
Identifying a process ID is often necessary when you have multiple instances of the same application. You can find a process ID using the `Get-Process` cmdlet.
Detailed steps:
- Run the following command to retrieve the list of running processes:
Get-Process - Once you identify the process you want to terminate, use its ID in the `Stop-Process` command:
Stop-Process -Id <ProcessID>
If the process ID of Chrome is, for example, 5678, you would run:
Stop-Process -Id 5678
PowerShell Suppress Error: Mastering Command Control
Practical Scenarios
Use Case: Stopping a Stuck Application
When an application becomes unresponsive, you can use PowerShell to close it quickly. For instance, if Notepad hangs, perform the following steps:
- To ensure Notepad is running:
Get-Process -Name "notepad" - If it is unresponsive, you can terminate it with:
Stop-Process -Name "notepad" -Force
Use Case: Automating Process Management
Using PowerShell scripts can help automate the management of multiple processes. You can create a simple script to terminate specific applications efficiently:
$appsToStop = "notepad", "chrome"
foreach ($app in $appsToStop) {
    Stop-Process -Name $app -Force -ErrorAction SilentlyContinue
}
This script will loop through the specified applications, closing each one forcefully without interruption.
Mastering PowerShell Suppress Output for Clean Scripts
Best Practices for Using Stop-Process
Confirming Process Termination
After executing a command to stop a process, it’s vital to confirm that the action was successful. You can use the `Get-Process` cmdlet to check:
Get-Process -Name "notepad" -ErrorAction SilentlyContinue
If the command returns no output, it indicates that Notepad has been successfully terminated.
Avoiding Common Mistakes
When using the `Stop-Process` cmdlet, avoiding common pitfalls is necessary to prevent data loss or unintended system behavior. Some tips include:
- Always double-check the Process ID or Name before executing a termination command.
- Avoid using the -Force parameter unless necessary, as it can lead to unsaved work being lost.
- Run PowerShell with appropriate permissions; otherwise, access to certain processes may be denied.
PowerShell Restart Process: Simple Steps to Master It
Conclusion
Understanding how to use the `PowerShell Stop Process` command effectively can save you considerable time and help manage your system more efficiently. With the ability to terminate processes by ID or name, and the option to forcefully close them when necessary, PowerShell provides a powerful toolkit for users.
Practice using the commands and gradually integrate them into your workflow. As you become more comfortable with these commands, you can simplify and automate other aspects of your system management effectively. Explore further advanced PowerShell commands and scripting to enhance your skills even more.
Managing processes in complex Windows environments can be an overwhelming and time-consuming experience. Having to be constantly logging into different machines at different times, hitting the “Ctrl+Alt+Del”, looking for specific processes, and “Ending Tasks” is a long and tedious process.
Thankfully, you can leverage PowerShell (PS) to automate those tedious administrative tasks, like dealing with unresponsive or frozen programs.
With PowerShell (PS), you can programmatically find and stop a service. You can use PS’s cmdlets to create scripts to look for and stop a specific service, scripts that kill a process based on specific criteria, auto-startup scripts, or whatever sets your imagination.
In this tutorial, you’ll learn how to locate and kill any process using two different commands available in PowerShell, the TASKKILL and the Stop-Process cmdlet. The advantage of using PowerShell over simple CMD, is that you can create automation routines to close processes.
Table of Contents
- Kill a process using PowerShell
- Why would you want to kill a process?
- Install and Open PowerShell.
- Open the PowerShell Interface.
- Killing a process with TASKKILL
- How to use TASKKILL?
- Forceful (/f) vs Graceful?
- Task Listing.
- Using TASKKILL in PowerShell?
- Killing a Process with PowerShell’s Stop-Process
- TASKKILL vs Stop-Process?
- A Stop-Process Example?
- Conclusion
1. Kill a Process Using PowerShell
When an application (or service) starts, Windows OS creates a process for the executable file. This process contains the code and the current activity. Additionally, the OS also creates a unique Process Identifier (PID) for that particular process. This PID is a decimal number that can be used for debugging or troubleshooting.
An example is when you open an application such as Chrome or Skype, Windows creates a particular PID for each of those applications. You can use this PID to attach a debugger, monitor it, or kill the process.
Why would you want to kill a process?
There are several reasons why you would want to kill a process. For example, sysadmins would kill processes; if an application is taking too long to respond, it has stopped responding, is behaving abnormally, or just doesn’t allow you to quit. But developers would also kill processes when testing new software, or servers.
The two traditional ways to kill a process are via the Windows Task Manager and the CMD command prompt. The third way, not so common but very efficient, is using PowerShell.
2. Install and Open PowerShell
PowerShell (PS) is Microsoft’s automation and configuration management framework. It comes with its own command-line shell and scripting language. PS works well with any tool and is optimized to work with structured data (CSV, XML, JSON, etc), and REST APIs.
Microsoft’s PS is open-source and available as a cross-platform. It is available on Windows, Linux, or macOS.
To download, install, or update the latest stable version of PowerShell, visit the GitHub repository: https://github.com/PowerShell/PowerShell/
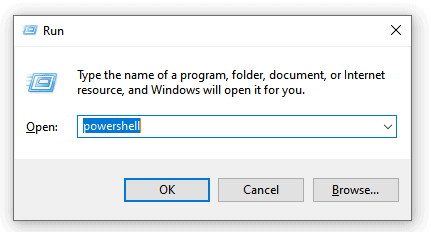
Now, let’s open the PowerShell Interface.
Press “Windows + R” keys to open the run box, and type “PowerShell”. Clicking “Ok” will open a regular PS interface. But you can also open an interface with elevated permissions, by pressing Ctrl+Shift+Enter.
Bear in mind that some processes run with Administrator privileges, so you will not be able to kill them unless you open the PS interface with Administrator rights. Windows PowerShell with Administrator rights gives you more control over all your processes.
Although the PS interface looks a lot like Windows Command Prompt (cmd), PS is a more advanced “version” of cmd. As mentioned before PS comes with its own scripting language and command-line shell.
With PowerShell, you can run any cmd command, like ListTask or KillTask.
3. Killing a process with TASKKILL
Let’s start by defining the TASKKILL utility (taskkill.exe) and how to use it.
TASKKILL is a Microsoft utility that allows you to terminate one or more processes (or tasks). At the basic level, TASKKILL is like clicking the X button on the top-right corner of any Windows application. It will “gracefully” exit the program and will prompt you “whether to save changes” before exiting. However, the TASKKILL utility gives you more flexibility on how you would want to kill a process— you can go gracefully or forcefully.
This utility can be used from the command line with different configuration arguments such as /F, /T, PID, and /IM.
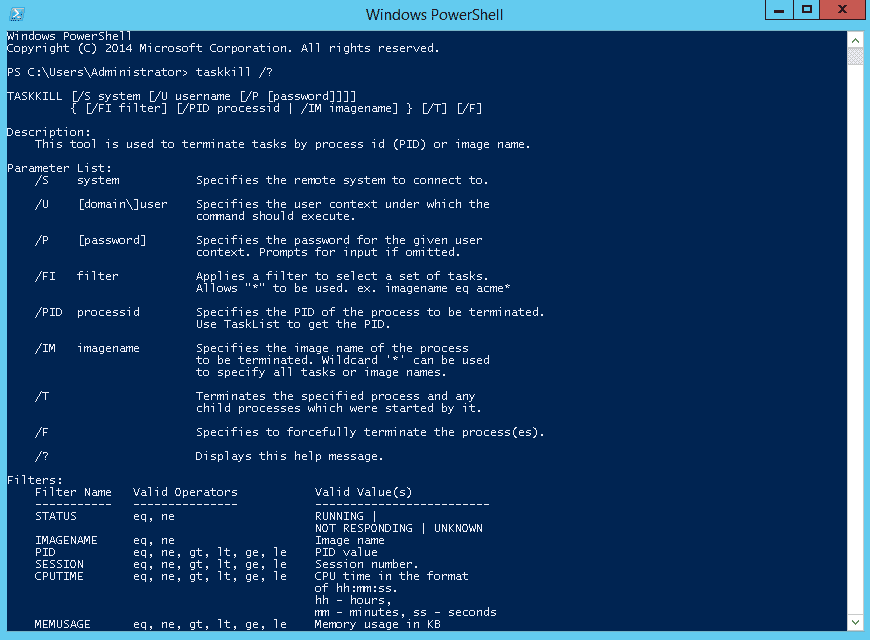
To learn more about the TASKKILL utility (or see the help), you can simply open the command prompt and type:
taskkill/?
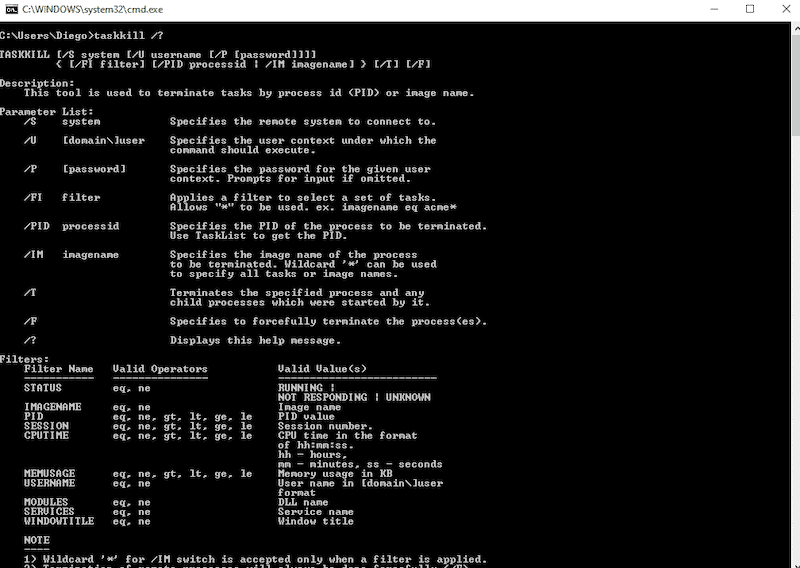
The TASKKILL command syntax is (As shown in the screenshot above):
TASKKILL [/S system [/U [/P [password]]]] {[/FI filter] [/PID process id | /IM imagename]} [/T][/F]
The useful parameters to kill a process with TASKKILL are:
- /S (System) Define the remote system to connect to.
- /U (Username) Specify the username.
- /P (password) Determines the password for that specific user.
- /PID (Process ID) Specify the ID of the process you want to terminate.
- /IM (Image name) Specify the image name of the process you want to terminate.
- /T (Terminate) Terminate the PID along with any child processes associated with it.
- /F (Forceful) Forcefully terminate the process.
How to use TASKKILL?
Let’s put together a couple of TASKKILL parameters.
The basic command syntax to forcefully kill a specific process is as follows:
taskkill /PID process-number /F
Additionally, if you want to forcefully kill a process using a specific image name, use the following command:
taskkill /IM process-name /F
Forceful (/f) vs Graceful?
As many of us have probably experienced before, the graceful way to exit a program (the “X” on top of a Windows bar) will usually not work, if an application is frozen or buggy.
When you force a process to exit (forceful kill), you are doing the same as Alt+F4 or going to the task manager with Ctrl+Alt+Del and clicking on “End Task”. Without the parameter (/F) is like clicking on the (X) on the top bar of any window.
So, you’ll need to force a program to exit with (/f) in some cases.
Task Listing
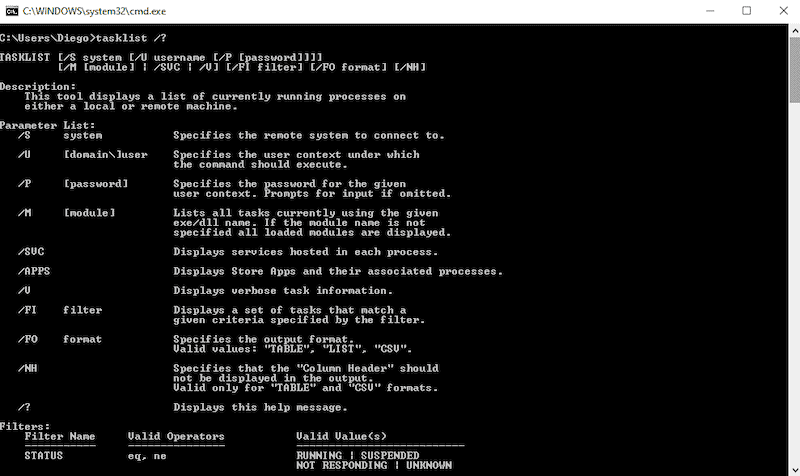
If you don’t know the running processes and their IDs, you can use the command: “tasklist” to display all the tasks running on the computer. Adding the “ | more” filter will separate the output in pages so that you can view them easily.
“tasklist | more”
You can also filter your search based on some criteria using the “/fi” parameter. For example:
tasklist /fi "imagename eq notepad.exe"
Again, if you want to know more about the Tasklist command, type “tasklist/?” on the command prompt.
Using TASKKILL in PowerShell?
Let’s perform a kill (or forceful exit) to the notepad.exe application using PS. Remember, to forcefully kill a process, you would need to open PS using administrator rights.
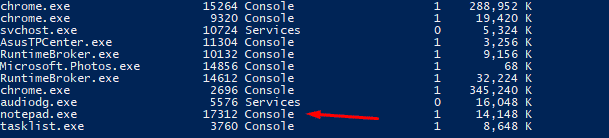
First, as mentioned before, use the TASKLIST command to find the Image Name and its PID:
tasklist | more
Find the name of the process and record the PID or image name (i.e., notepad.exe).
In this example, “notepad.exe” is using the PID:13252
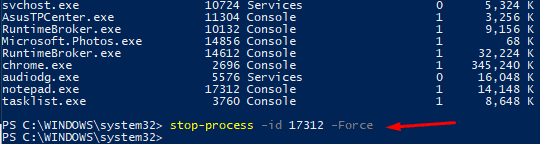
To kill the process on PowerShell, use any of the following commands:
- To gracefully kill the notepad process with pid:
taskkill /pid 13252 - To forcefully kill the notepad process with pid:
taskkill /pid 13252 /f - To forcefully kill the notepad process using image name:
taskkill /im notepad.exe /f
4. Kill a Process with PowerShell’s Stop-Process
The Stop-Process is PowerShell’s own way to kill a process (although they prefer to use the word “Stop” rather than killing!). Stop-Process is a cmdlet that performs similar to the TASKKILL command but gives you a slightly different set of options.
The Syntax for the Stop-Process command is as follows:
- Stop-Process [-id] <Int32[]> [-passThru] [-Force] [WhatIf][-confirm] [<CommonParameters>]
- Stop-Process -name string[] [-passThru] [-Force] [-WhatIf] [-confirm] [<CommonParameters>]
- Stop-Process -inputObject Process[] [-passThru] [-WhatIf] [-Force] [-confirm] [<CommonParameters>]
TASKKILL vs Stop-Process?
Both the TASKKILL and Stop-Process allow you to kill a process forcefully with a PID or name. A big difference with Stop-Process is that it lets you define a process object (a variable or command). Also, you can’t define things like system name, username, or password, as you would in the TASKKILL command.
PowerShell’s Stop-Process, on the other hand, helps you create an autonomous task with scripting powers. For example, the “-passthru” parameter allows you to return objects from commands, which you can later use for scripting. The Stop-Process also includes two risk mitigation parameters (-WhatIf) and (-Confirm) to avoid the Stop-Process from making dramatic changes to the system.
A Stop-Process Example?
We’ll kill the notepad process forcefully, first by defining its PID, and then by its process name.
Step 1. Find it
Use the “Tasklist” command to see all your processes (or create a filter).
Step 2. Stop the process with its PID:
Optional: You can also stop the process using its name. For example:
- Stop-process -name notepad -Force
Other examples:
- Stop-Process -name CMD -Force
- Stop-process -name putty -Force
- Stop-Process -Name Chrome -Force
To return a process object to the PowerShell console, use the PassThru command. This command is useful for keeping track of process objects. For example, if you want to monitor the newly opened Notepad process.
The below screenshot starts the process with a -PassThru parameter and later stops the same process with a -PassThru. You can store the returned process object into a variable and use it to monitor metrics like CPU or PM, etc.
Conclusion
Buggy or problematic services and applications can be overwhelming. They are time-consuming to manage and can make entire servers slow— or even crash them.
Instead of having to every time restart the entire server, you can kill the specific service that is giving you headaches, and get the server back to normal.
In this tutorial, we went through two ways to kill a process using PowerShell. The TASKKILL is simple and easy to use. You can connect to remote servers and kill processes using its PID or name. The PowerShell’s Stop-Process cmdlet can do the same but goes beyond by allowing you to automate tasks. With Stop-Process, you can create auto-restart scripts that monitor and kill risky processes.
PowerShell Kill Process Command FAQs
Can I use TASKKILL to terminate multiple processes at once?
Yes, you can use the /F option to force the termination of multiple processes at once. For example, «TASKKILL /F /IM [process name]»
How can I find the process ID of a process?
You can use the Task Manager to find the process ID of a process. In Task Manager, select the «View» menu, then select «Select Columns,» and then check the «PID (Process Identifier)» check box. Or you can use the command line tool tasklist in the command prompt, which will list the running process with their pid.
What happens when I use the TASKKILL command?
When you use the TASKKILL command, the specified process is terminated and all resources associated with it are freed up.
Can I use TASKKILL to terminate a process that is not responding?
Yes, you can use the /F option with the TASKKILL command to force the termination of a process that is not responding.
PowerShell is a simple, powerful and cross-platform command-line shell and scripting language designed for system administration. It helps the system administrators to manage and automate day-to-day system administration tasks. You can write your own PowerShell script to perform your tasks.
In Windows operating system, when you start any application, it will create a process for each application and assigns a unique PID. This PID is used to debug and troubleshoot system-related issues. There are a number of reasons you might want to kill a process. When you want to close the application manually and you are unable to close it. Then, you can kill the PID of that application using PowerShell. There are different methods in Windows to kill a process. Mostly everyone using the Task Manager or Windows CMS to kill the process.
In this guide, we will explain how to kill a process using PowerShell.
Open a PowerShell Interface
By default, PowerShell is installed in all modern Windows operating system.
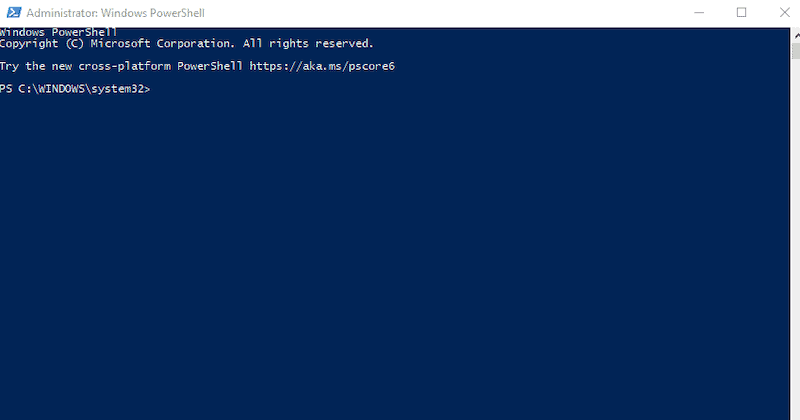
In order to launch the PowerShell, login to the Windows machine with the Administrator user then press the Windows + R button to launch the Run windows as shown below:
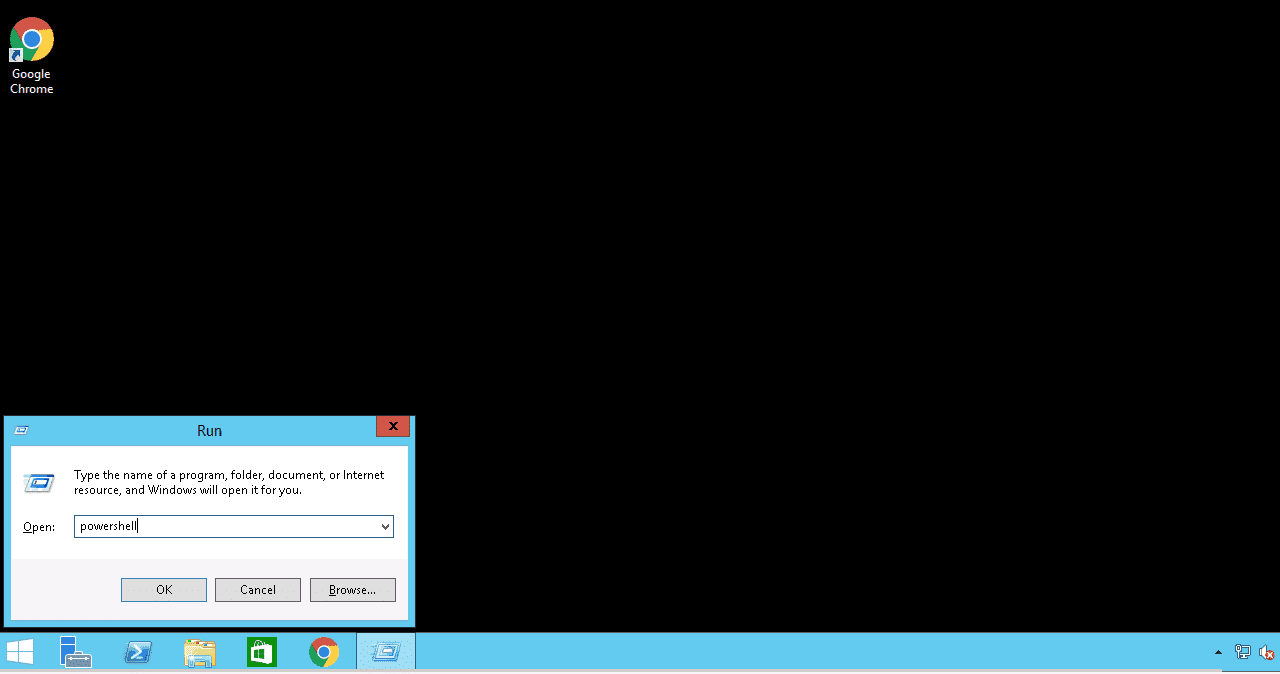
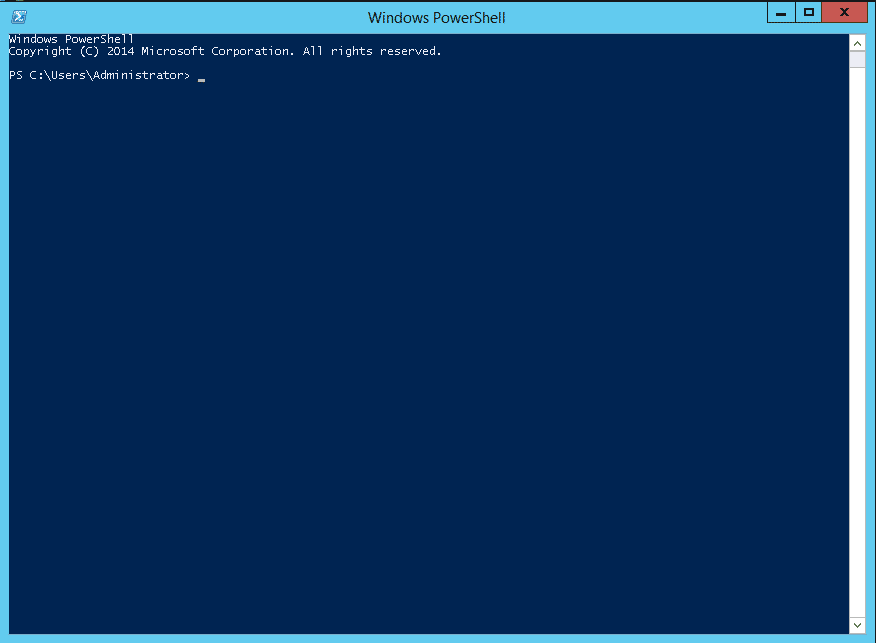
Now, type powershell and click on the OK button. This will open a PowerShell window as shown below:
PowerShell allows you to run any CMD commands.
Kill a Process with TASKKILL
TASKKILL is a simple and powerful utility that can be used to kill one or more processes. It provides many options that allow you to kill your application process in an easier way.
Basic Syntax
The basic syntax of the TASKKILL command is shown below:
taskkill [option] [PID]
To list all options available with the TASKKILL command, run the following command:
taskkill /?
You should get a list of all available options on the following screen:
A brief explanation of each option is shown below:
- /S – Specify the remote system that you want to connect.
- /U – Specify the username of the system.
- /P – Specify the password of the system.
- /PID – Specify the process id of the application that you want to kill.
- /IM – Specify the name of the application that you want to kill.
- /T – Used to kill the process with any child processes.
- /F – USed to kill the process forcefully.
How to Kill a Process
First, you will need to find out the PID of any application that you want to kill or close.
You can get a list of all running application’s PIDs using the following command:
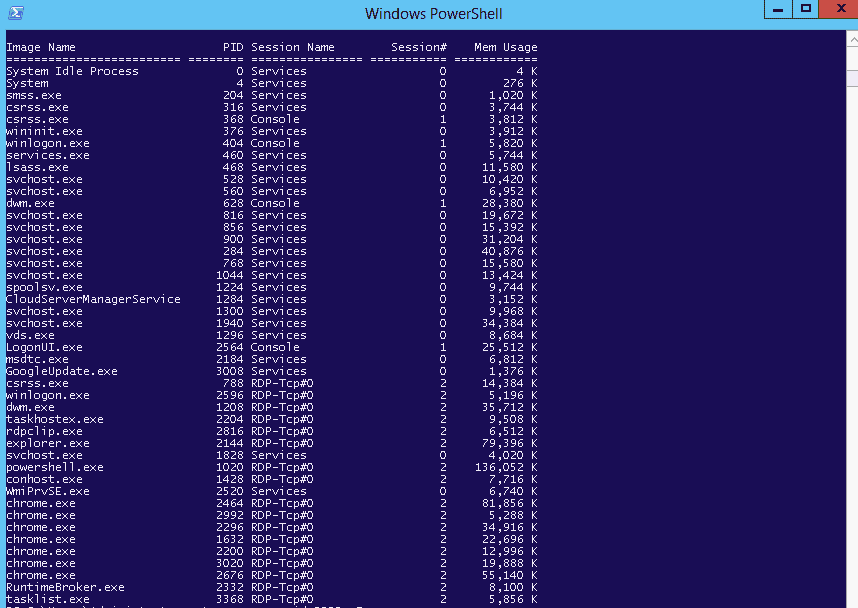
tasklist
You should see the following output:
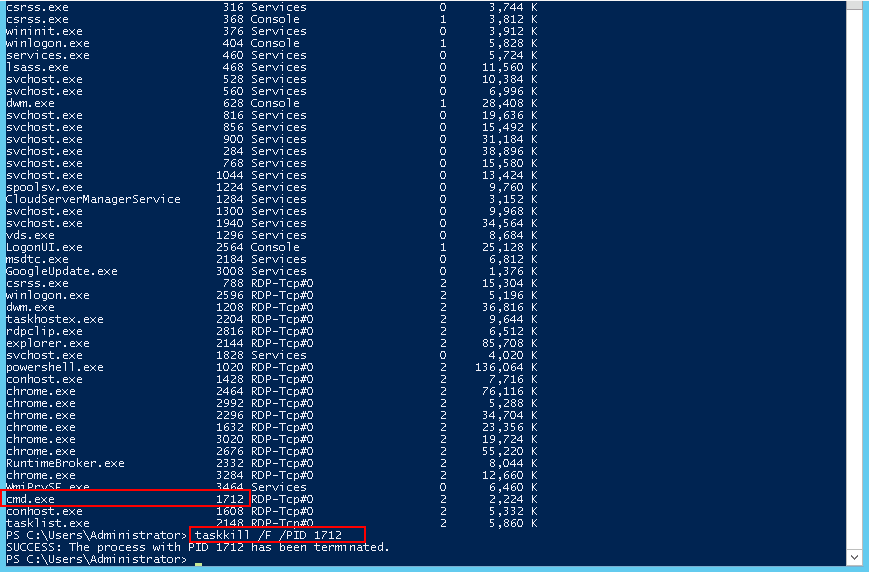
You can also filter the process list as per your requirement. For example, to get the PID of the application Chrome, run the following command:
tasklist /FI "imagename eq chrome.exe"
Now, choose the PID of any process from the above list. In this case, 1712 is the PID of cmd.exe. Now, run the following command to kill the process:
taskkil /F /PID 1712
If you want to kill the application by name, run the following command:
taskkill /F /IM cmd.exe
Kill a Process with Stop-Process
The Stop-Process is another command-line utility in PowerShell that is used to kill the process its own way. It is very similar to TASKKILL but provides different options.
Before starting, get a PID of all running processes with the following command:
tasklist
You should see the following output:

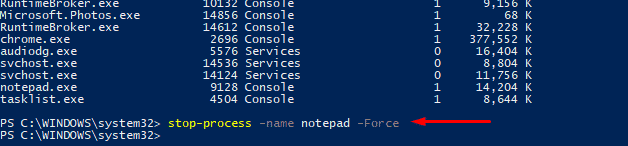
Now, stop the process with ID 2200 with the following command:
stop-process -id 2200 -Force

If you want to stop the process by its name, run the following command:
stop-process -name Chrome -Force
+
If you want to display a prompt before stopping the process, run the following command:
stop-process -name Chrome -Force -confirm -passthru
The PassThru option will help you to keep track of process objects.
Conclusion
In this guide, you learned how to kill a process using the stop-process and taskkill command in PowerShell. You can also kill a process in the remote server using PowerShell. You can also use both utilities to create a PowerShell script that monitors and kill risky processes.
PowerShell Kill Process Command FAQs
What is PowerShell Kill Process?
PowerShell Kill Process is a PowerShell cmdlet that can be used to terminate a running process.
What are some common use cases for PowerShell Kill Process?
Common use cases for PowerShell Kill Process include terminating unresponsive or problematic processes, and managing processes in a scripting environment.
What are some best practices for using PowerShell Kill Process?
Best practices for using PowerShell Kill Process include identifying the correct process ID or name, verifying that the process should be terminated, and testing the cmdlet in a non-production environment.
How can organizations use PowerShell Kill Process to automate process management?
Organizations can use PowerShell Kill Process in conjunction with other PowerShell cmdlets and scripting tools to automate process management tasks.
What are some limitations of PowerShell Kill Process?
Limitations of PowerShell Kill Process can include the inability to terminate processes that are protected by security features or access controls, and the potential for unintended consequences if used improperly.