
#Руководства
-
0
Рассказываем о языке программирования, с помощью которого можно творить чудеса в Windows (и не только).
Иллюстрация: Francesca Tosolini / Unsplash / Annie для Skillbox Media
Журналист, изучает Python. Любит разбираться в мелочах, общаться с людьми и понимать их.
Рядовые пользователи общаются со своими ПК через графический интерфейс: нажимают иконки и кнопки, переключаются между окнами и вкладками.
А системные администраторы используют для этого командную строку. Чтобы компьютер понимал их указания, интерпретатор, он же командная оболочка, переводит всё на машинный язык.
Есть десятки оболочек под разные нужды, предпочтения и операционные системы. В Linux обычно используют Bash, в macOS по умолчанию установлен Zsh, а для Windows (но не только) есть PowerShell.
Из статьи вы узнаете:
- Что такое Windows PowerShell
- Как открыть PowerShell в Windows
- Какие у неё есть команды (они же командлеты)
- Что такое объекты и конвейеры (пайплайны)
- Как запустить выполнение задач в фоновом режиме
- Как работать в PowerShell ISE
- О переменных
- О логических операторах
- Об условиях в Power Shell
- Как работать с циклами
- О массивах, хеш-таблицах, функциях и классах
Windows PowerShell — это одновременно командная оболочка и язык сценариев, основанный на .NET. PowerShell используют для управления компьютером и автоматизации задач. Это полноценный объектно-ориентированный язык, в котором есть переменные, функции, классы и объекты.
В отличие от других командных оболочек, PowerShell работает не со строками, а с объектами. Благодаря этому можно создавать сложную логику. При этом интерпретатор полностью совместим со стандартными командами cmd.exe и может выполнять их.

Команды пишут в интерактивном режиме внутри терминала. Но если вы хотите сохранить какой-то часто используемый скрипт, удобнее использовать ISE.
Windows PowerShell ISE — это интегрированная среда сценариев для PowerShell. В ней можно писать, сохранять и запускать скрипты, есть подсветка синтаксиса, автодополнение, справочник команд и инструменты отладки. PowerShell ISE — легаси-инструмент, он работает для версии языка 5.1 и ниже. Для более поздних обновлений используют IDE общего назначения с плагинами.
С 2016 года язык стал кросс-платформенным. Его можно использовать не только в Windows, но и в macOS (начиная с версии 10.13) и популярных дистрибутивах Linux (каких именно, можно узнать в документации).
Обычно PowerShell предустановлен по умолчанию. Но если у вас его нет, можете воспользоваться инструкцией от Microsoft. Также в документации есть руководства по установке для macOS и Linux.
PowerShell не зависит от версии операционной системы и одинаково работает как на Windows 10, так и на Windows Server.
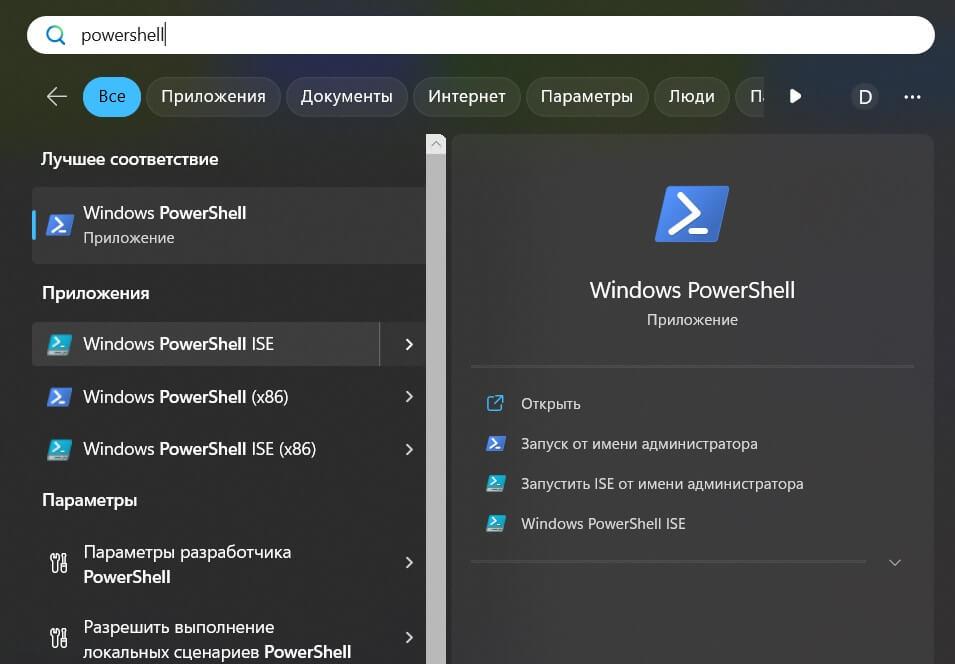
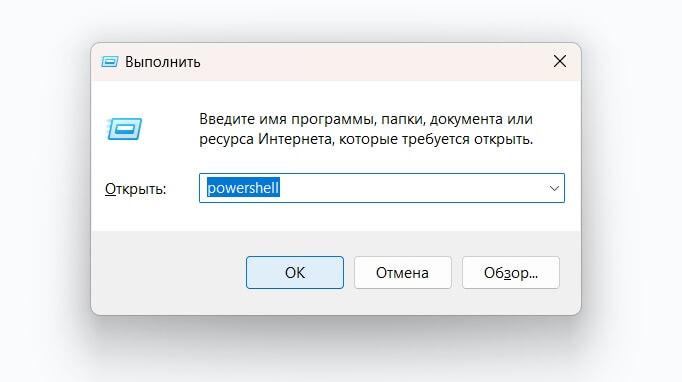
Есть два основных способа открыть PowerShell или PowerShell ISE в Windows: меню «Пуск» и приложение «Выполнить».
В меню «Пуск» долистайте до папки Windows PowerShell, откройте её и выберите нужное приложение. Здесь есть 32-разрядные (у них х86 в скобках) и 64-разрядные версии терминала и ISE.
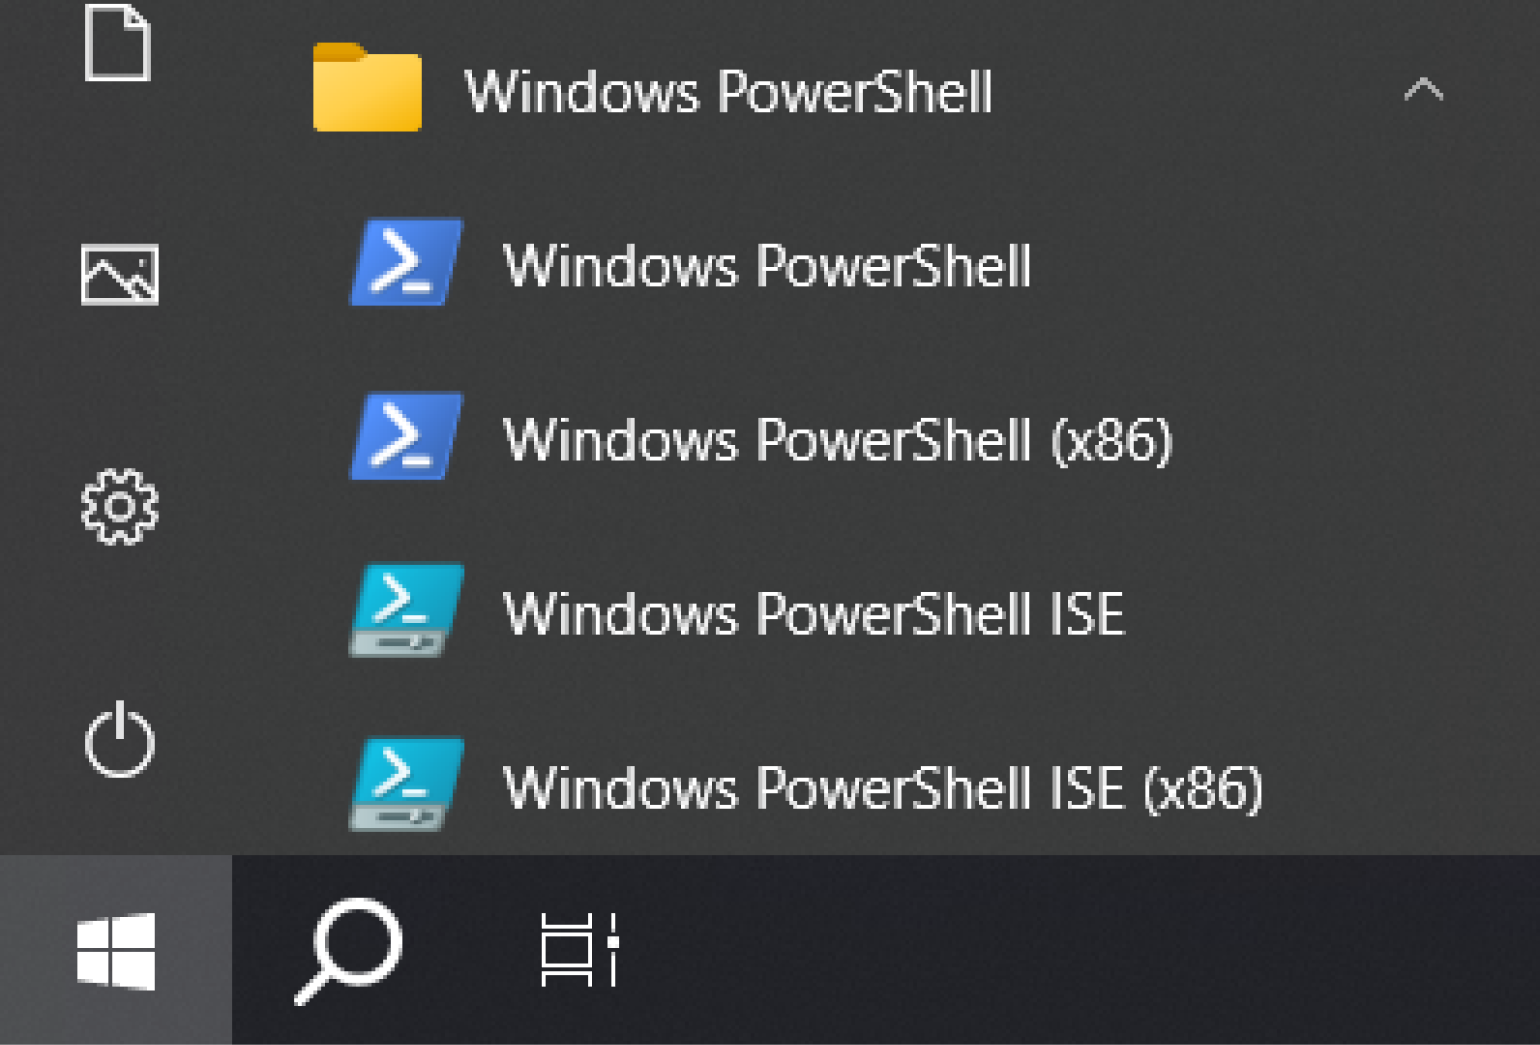
Скриншот: Skillbox Media
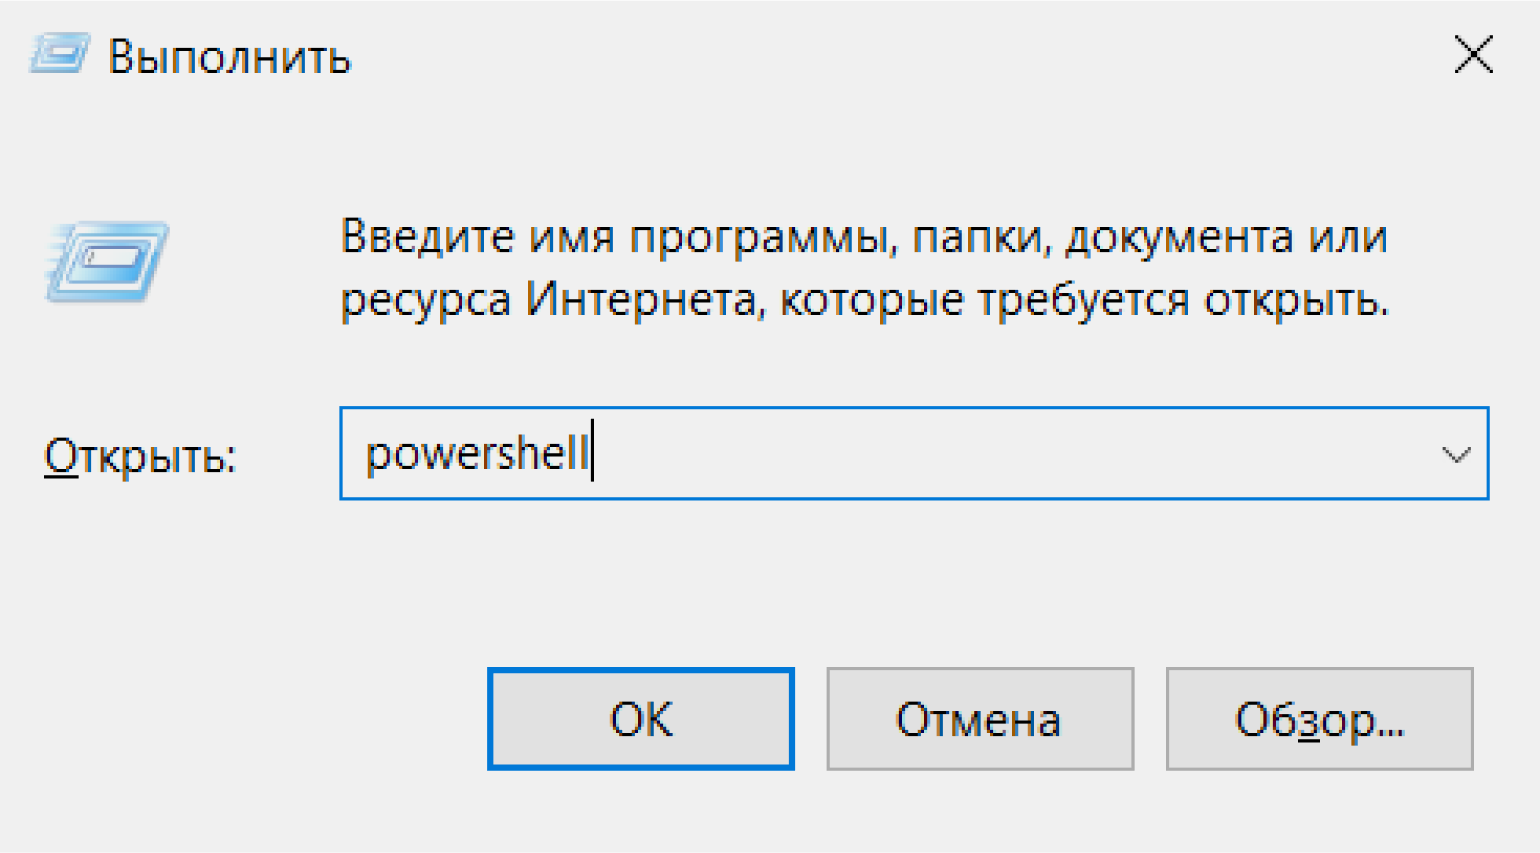
Приложение «Выполнить» открывается сочетанием клавиш Win + R. В появившемся окне введите powershell или powershell ise (в зависимости от того, что вам нужно) и нажмите ОК.
Скриншот: Skillbox Media
Команды в PowerShell называются командлетами (от английского cmdlet). Все они состоят из связки «Глагол-Существительное», или по-другому «Действие-Объект». Например, Get-Services и Start-Process. Благодаря такой структуре можно понять назначение команды, даже если вы с ней ещё не сталкивались.
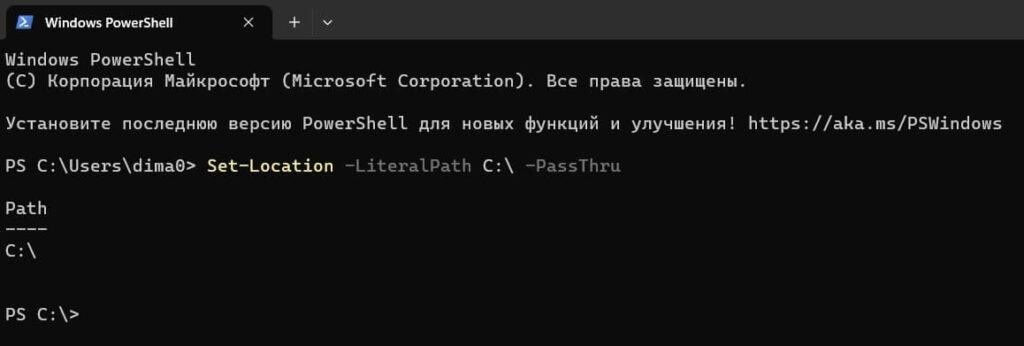
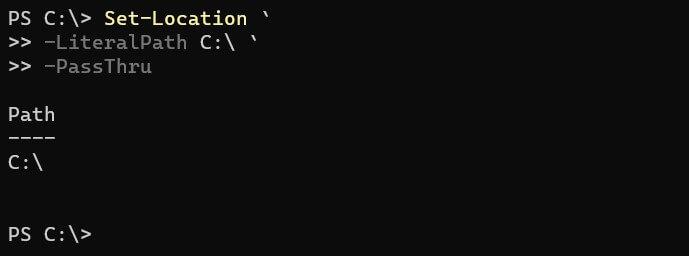
После самого командлета ему передаются параметры и их значения. Между всеми словами в команде ставится пробел. Вот пример синтаксиса команды, чтобы перейти в каталог C:\:
Set-Location -LiteralPath C:\ -PassThru
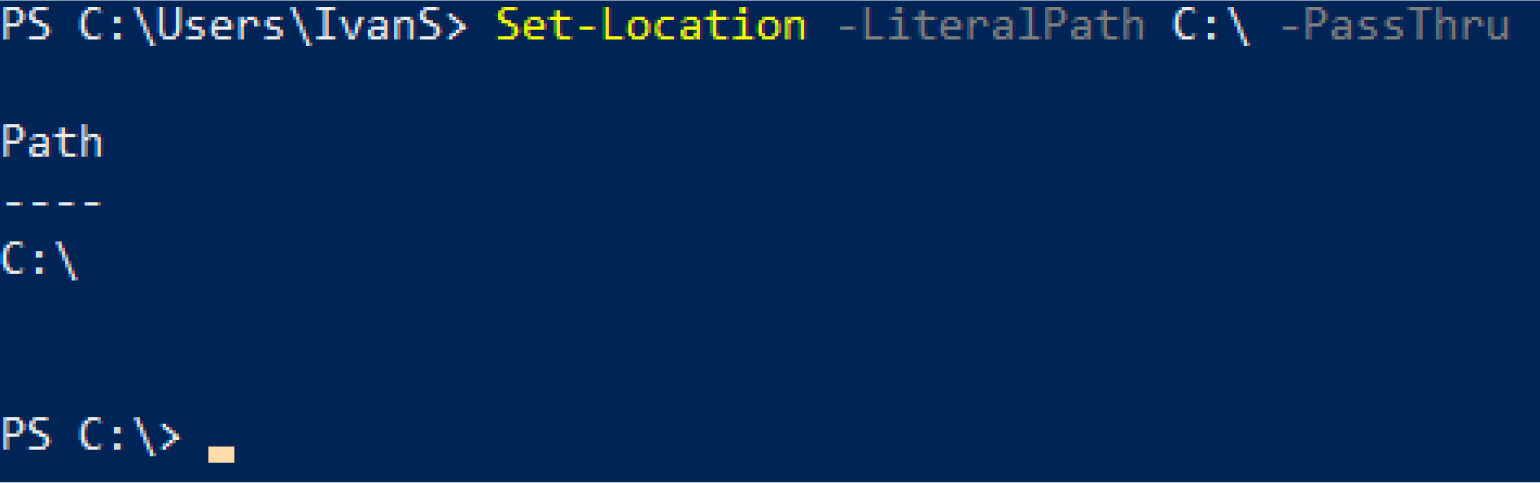
Препарируем её:
- Set-Location — буквально «установить местоположение». Переходит в нужный каталог.
- -LiteralPath C:\ — в этом параметре мы прописываем путь до каталога, в который хотим перейти. У командлета Set-Location это аргумент по умолчанию, поэтому -LiteralPath можно не прописывать отдельно: Set-Location C:\ -Passthru сработает точно так же.
- -PassThru — обычно командлет Set-Location просто меняет местоположение и ничего не возвращает. Этот параметр говорит, что нужно вывести на экран расположение каталога, в который мы перешли.
При этом в PowerShell не важен регистр. Эту же команду можно записать только заглавными буквами, только строчными и даже «лесенкой» — она всё равно сработает.
sEt-loCATion -PATH c:\ -passthru

Если в одной строке написаны сразу несколько команд, они разделяются точкой с запятой ;.
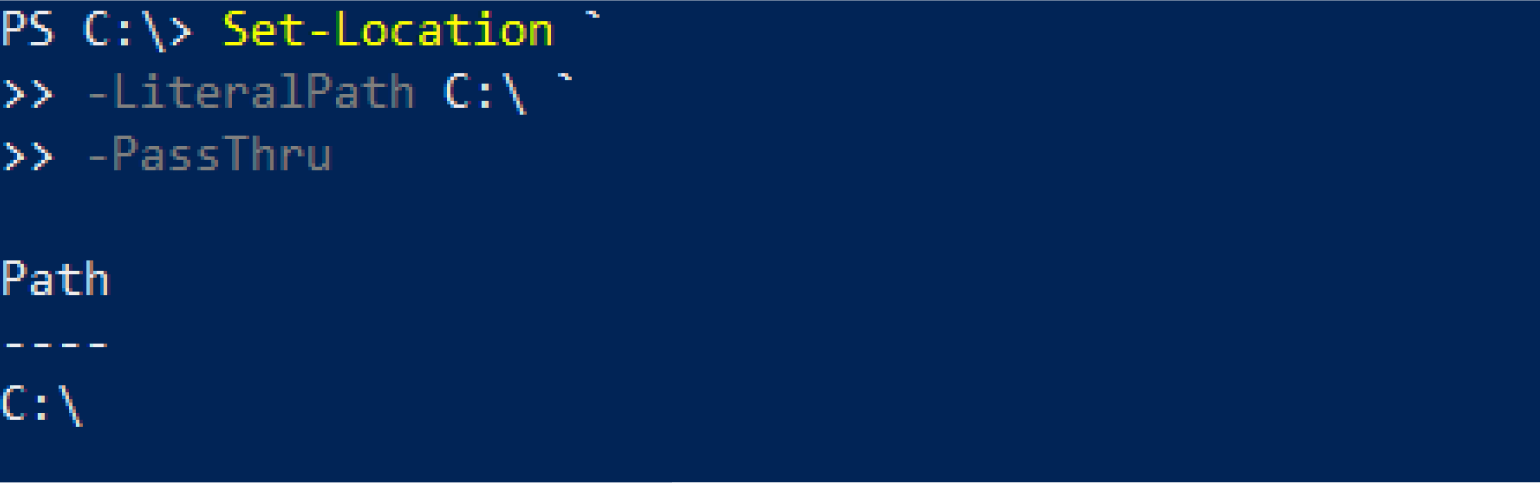
Иногда команда может получиться слишком длинной. Чтобы разбить её на несколько строк, в месте переноса ставится гравис `. Создать новую строку можно сочетанием клавиш Shift + Enter (появится ниже текущей) или Ctrl + Enter (появится выше текущей).
Разделим предыдущую команду:
Set-Location `
-LiteralPath C:\ `
-PassThru
Совет
Стрелки вверх и вниз позволяют прокручивать историю команд, которые вы вводили. Это удобно, если нужно выполнить одну из предыдущих команд ещё раз или внести в неё небольшие изменения.
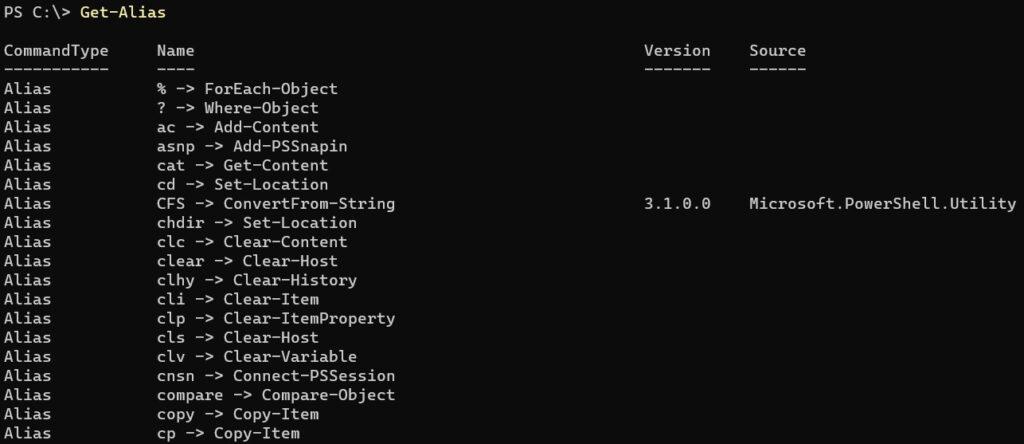
При работе с терминалом в интерактивном режиме бывает неудобно каждый раз вводить полные названия командлетов. Поэтому у самых распространённых есть псевдонимы, или алиасы, — их сокращённые версии.
Получить список доступных алиасов можно командой Get-Alias (у неё тоже есть свой псевдоним — gal).
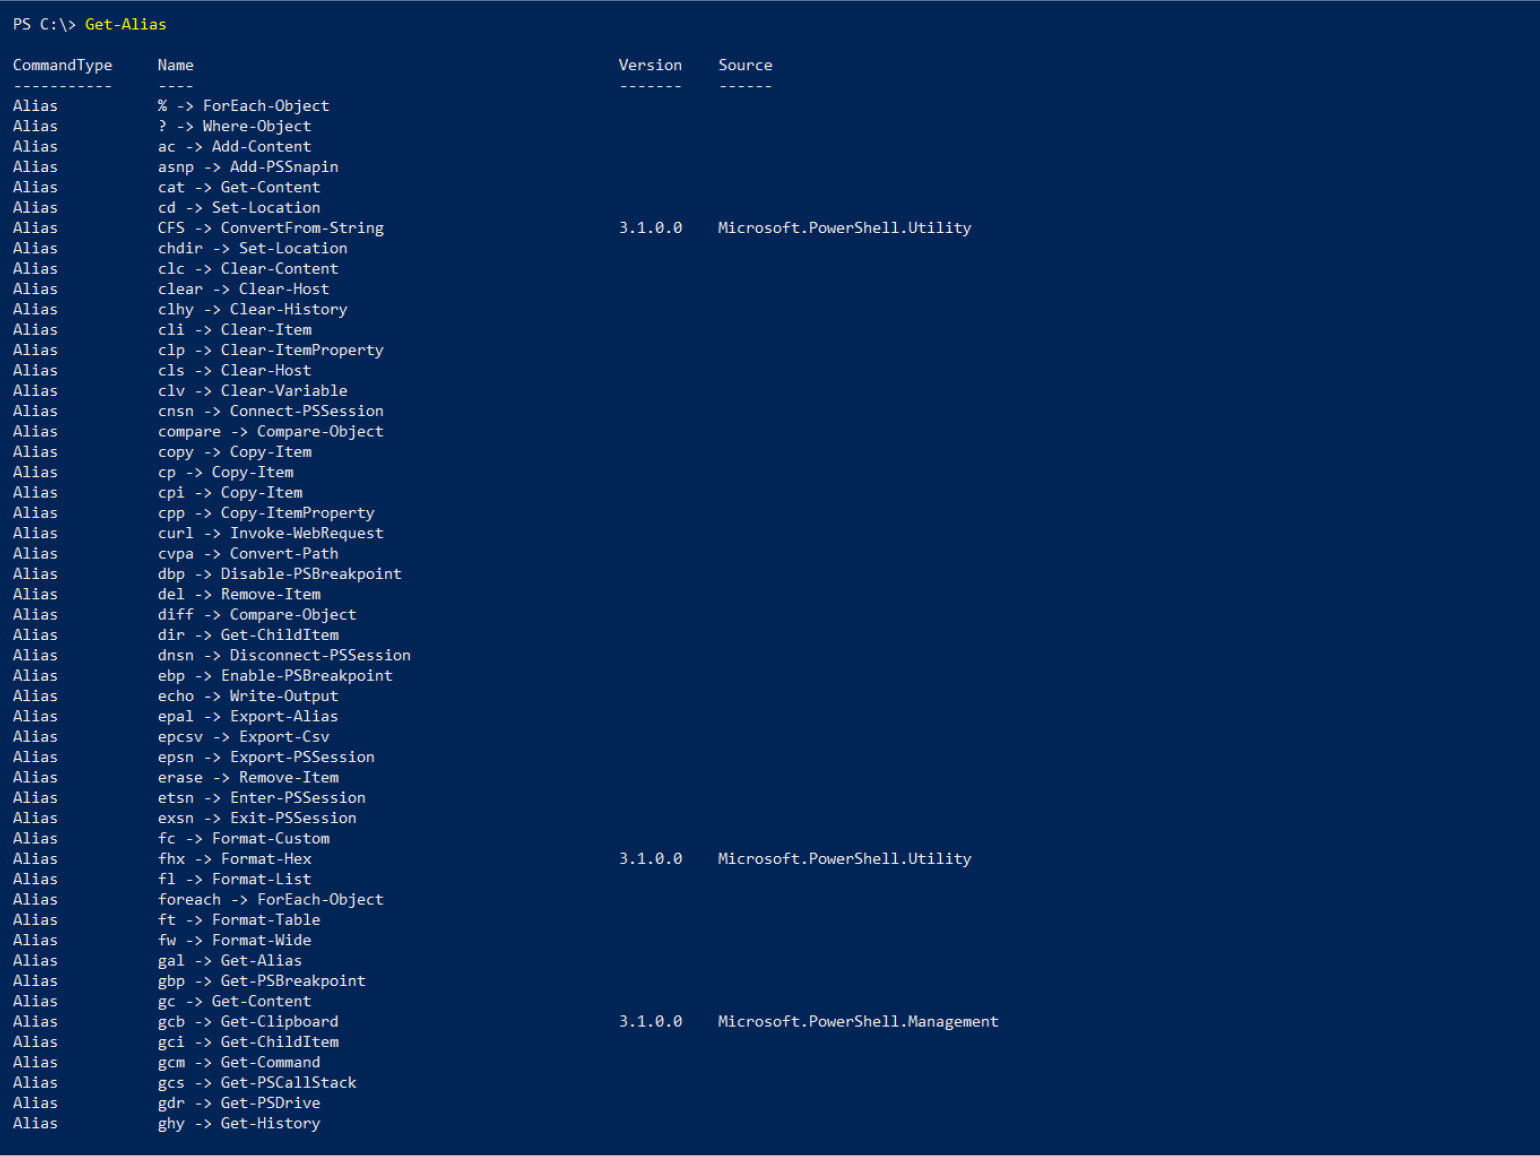
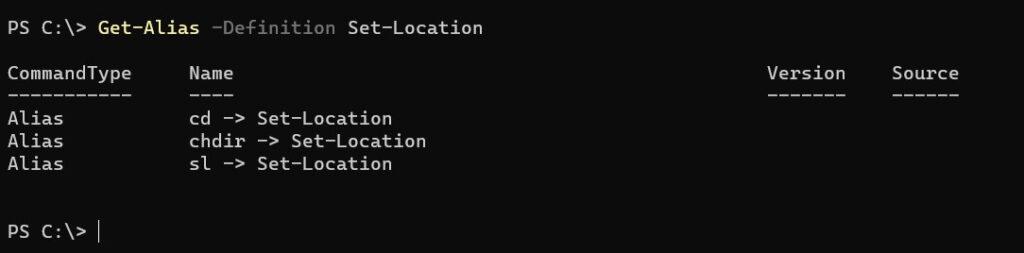
Чтобы узнать список алиасов для отдельного командлета, воспользуйтесь параметром -Definition. Например:
Get-Alias -Definition Get-ChildItem

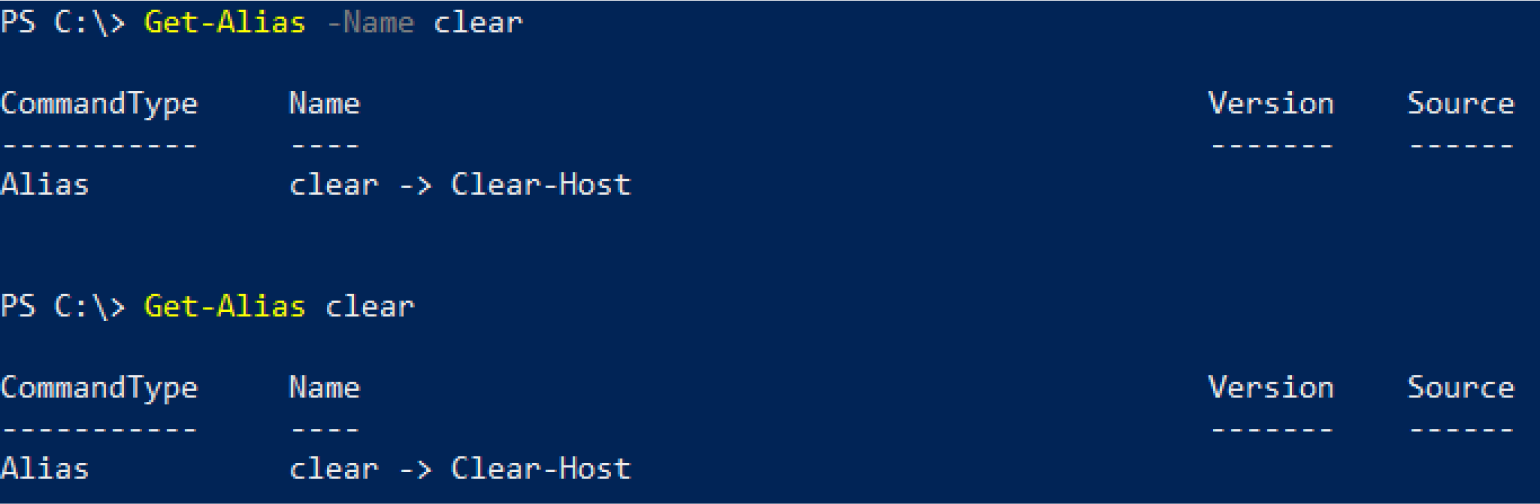
Если вы по алиасу хотите узнать полное название командлета, примените параметр -Name. Это аргумент по умолчанию, поэтому писать его необязательно.
# Оба варианта равноправны
Get-Alias -Name clear
Get-Alias clear
Многим командлетам для работы нужно передать путь до файла или каталога. Делается это в виде строки, например: C:\Windows\System32.
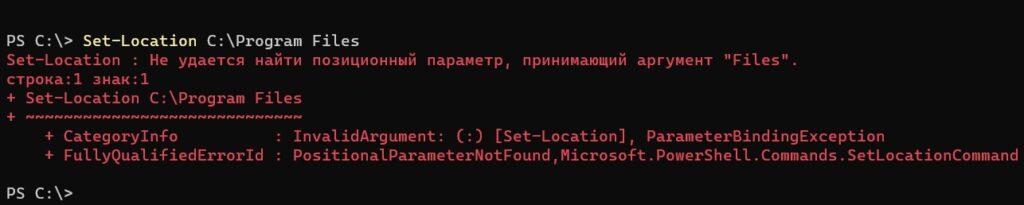
Но если в этом адресе встретится пробел или другой спецсимвол, PowerShell воспримет его как разделитель. Например:
# Эта команда не будет работать
Set-Location C:\Program Files

PowerShell «видит» пробел и думает, что путь до папки закончился на слове Program, а files — это уже значение какого-то другого параметра.
Есть два способа избежать таких ситуаций:
- Экранировать проблемные символы обратным грависом `: C:\Program` Files. Если путь длинный, то это может быть неудобно.
- Поместить весь путь в одинарные или двойные кавычки: ‘C:\Program Files’ или «C:\Program Files» (лучше одинарные).
Также в PowerShell есть сокращения для быстрого доступа к ближайшим директориям:
- Точка . указывает на текущий каталог. Например, Get-ChildItem . позволяет посмотреть все папки и файлы в нынешнем местоположении.
- Две точки .. указывают на родительский каталог. Например, Set-Location .. позволяет быстро к нему перейти. Это может быть полезно, если вы находитесь где-то в глубоко вложенной директории.
У многих командлетов есть сразу два параметра, в которых можно указать путь до папки или файла: -Path и -LiteralPath. Разница между ними в том, что в -Path можно подставлять переменные, а -LiteralPath воспринимает символы буквально, даже если в них указано имя переменной. О переменных в PowerShell мы рассказываем ниже.
Чтобы узнать подробную информацию о командлете, используйте Get-Help Название-Командлета. Например:
Get-Help Get-Childitem
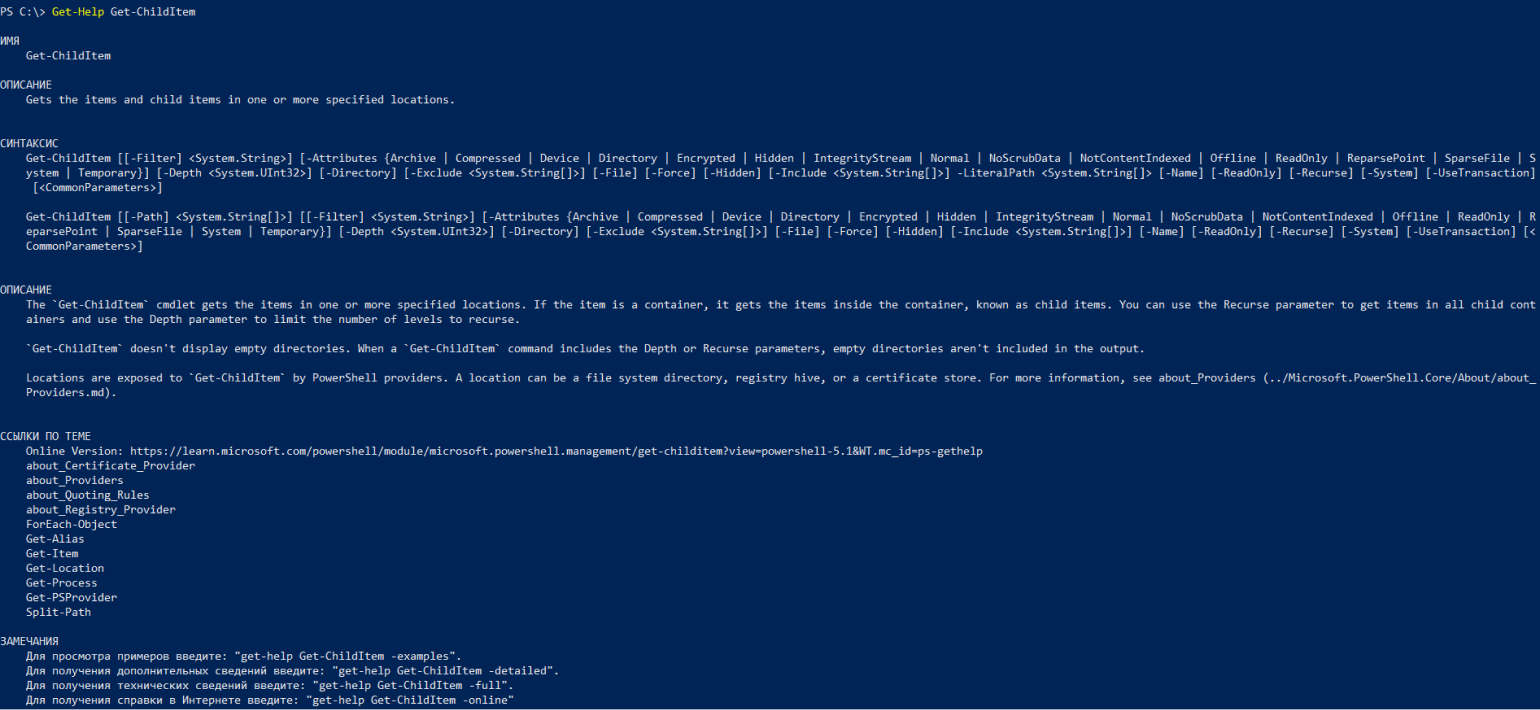
У Get-Help есть несколько полезных параметров:
- -Detailed даёт более детальную справку.
- -Full даёт полную справку.
- -Examples приводит примеры использования командлета.
- -Online перенаправляет на веб-страницу с документацией.
Командлеты PowerShell возвращают в терминал не строки, а объекты — структуру данных с набором свойств и методов. Подробно об объектах можно прочитать в нашей статье.
Строка, которую вы видите в терминале после выполнения команды — только визуальное представление объекта. PowerShell в виде таблицы показывает некоторые свойства, но не все.
Так же, как командлеты возвращают объекты, они могут принимать и обрабатывать их. Можно написать команду, на выходе получить объект, передать его другому командлету, получить объект уже от него, передать — и так до бесконечности. Это и есть конвейеры, или пайплайны.
Чтобы передать результат командлета другому командлету, между ними ставят вертикальную черту |.
Get-Process возвращает список процессов, запущенных на компьютере. Если передать ему название процесса (или шаблон, написанный с помощью регулярных выражений), командлет выведет только нужные элементы списка.
Вызовем запущенный процесс powershell.
Get-Process powershell

Мы получили объект и таблицу с некоторыми его свойствами. Чтобы узнать все свойства и методы, передадим объект командлету Get-Member. Для этого нам и понадобится конвейер.
Get-Process powershell | Get-Member
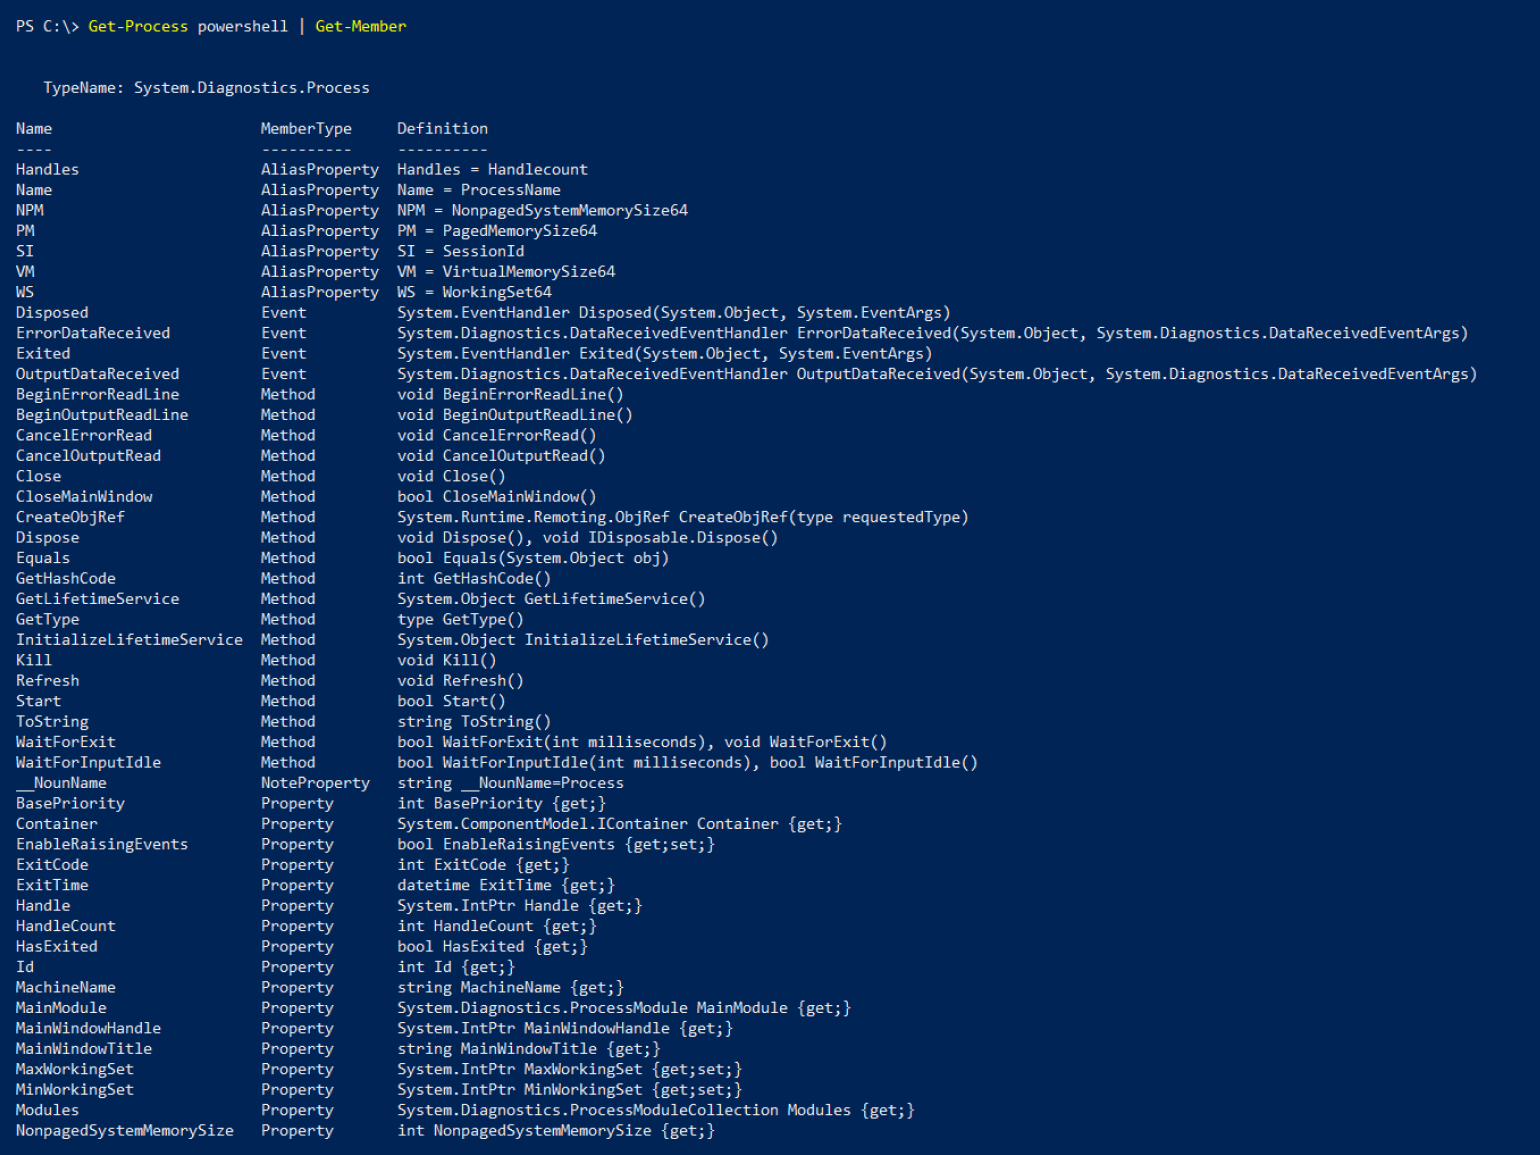
Get-Member получил объект от Get-Process и вывел таблицу со всем его содержимым. Результат работы Get-Member — тоже объект (вернее, список объектов), который можно передать по конвейеру дальше.
Например, мы хотим отобразить только те строки, в которых MemberType — это Property. Для этого используем командлет Where-Object.
Get-Process powershell | Get-Member | Where-Object {$_.MemberType -eq 'Property'}
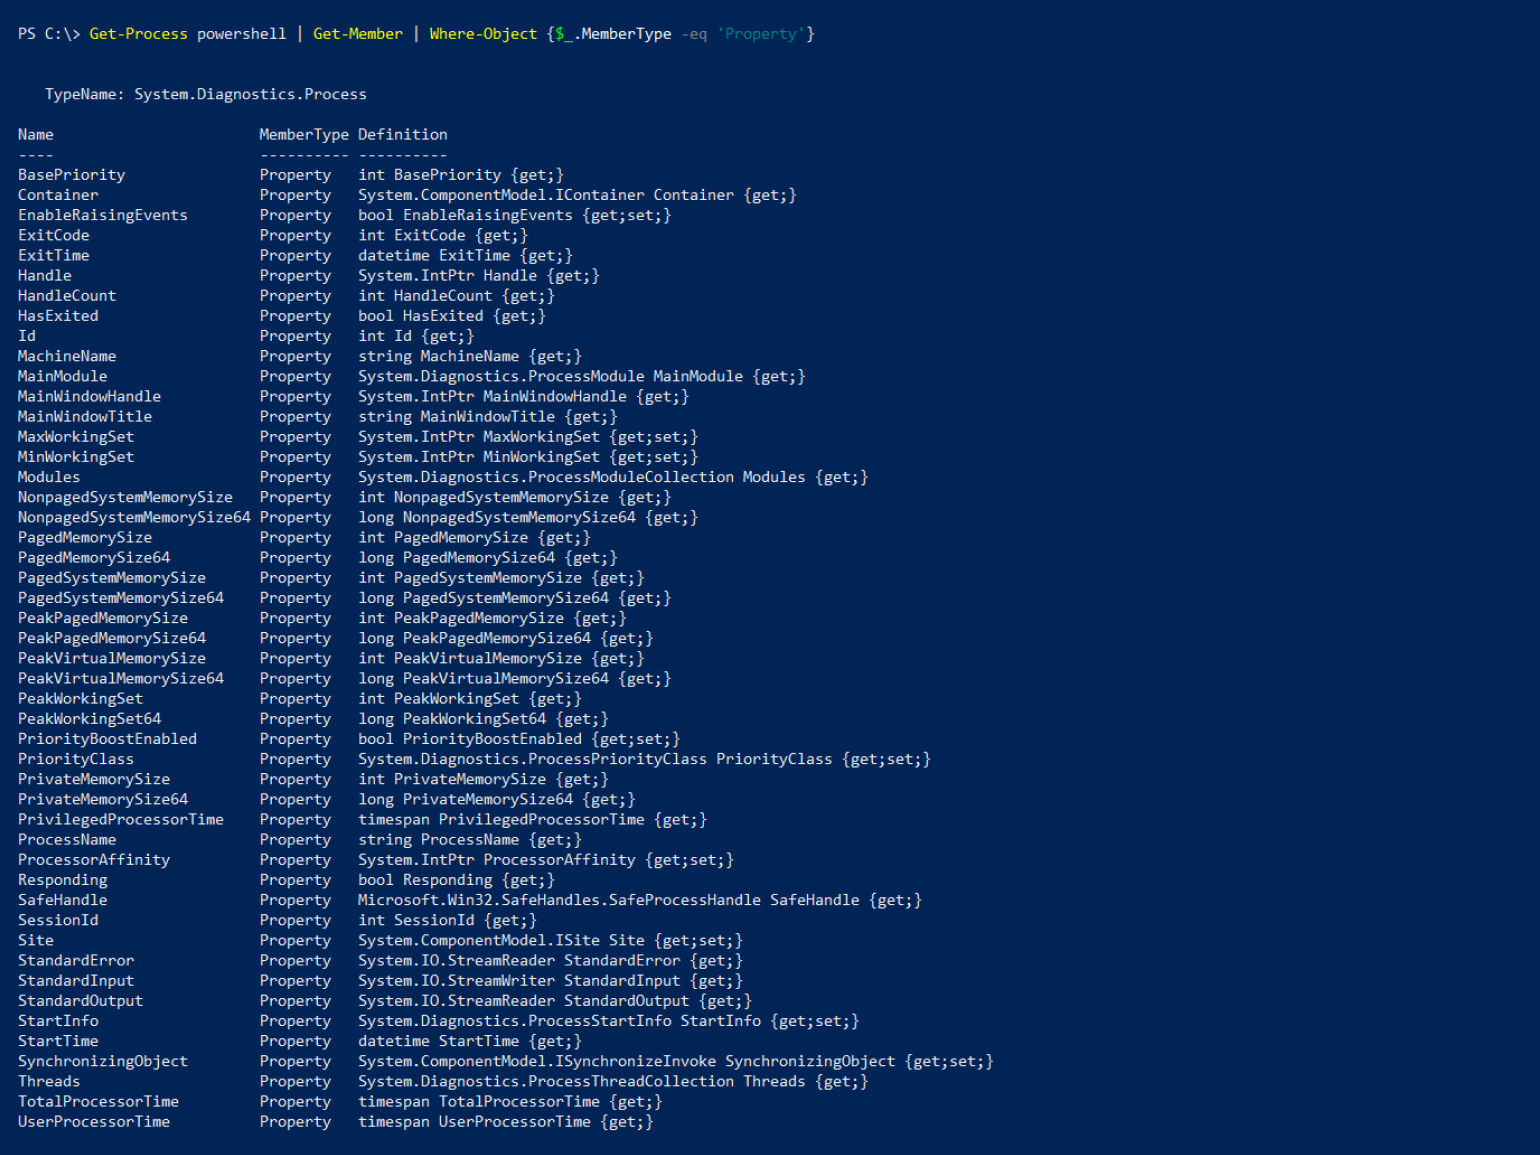
Where-Object по очереди перебирает каждый объект, полученный от Get-Member. Выражение в фигурных скобках — логическое:
- $_ ссылается на текущий объект (то есть на отдельную строку в таблице);
- .MemberType обращается к значению свойства MemberType в этом объекте;
- -eq сравнивает, равно ли выражение слева от него выражению справа от него;
- ‘Property’ — это значение, которое мы ожидаем увидеть у свойства MemberType.
О логических выражениях мы рассказываем ниже.
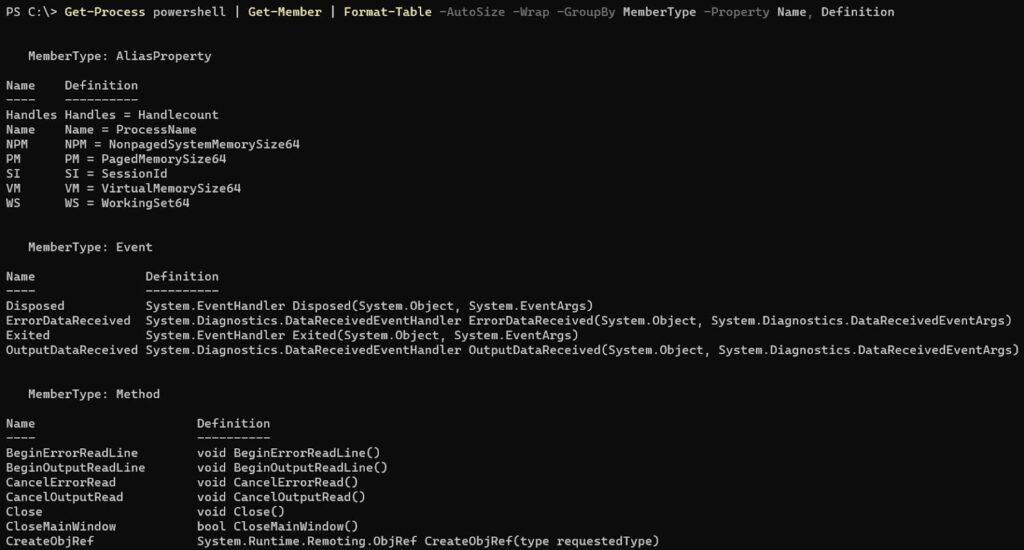
Командлет Format-Table позволяет настроить отображение таблицы, которую PowerShell выводит в терминале: выбрать свойства и методы, которые в ней будут, установить ширину столбцов, сгруппировать данные по нескольким таблицам и так далее.
Отформатируем таблицу, которую получили от командлета Get-Member.
Get-Process powershell | Get-Member | Format-Table -AutoSize -Wrap -GroupBy MemberType -Property Name, Definition
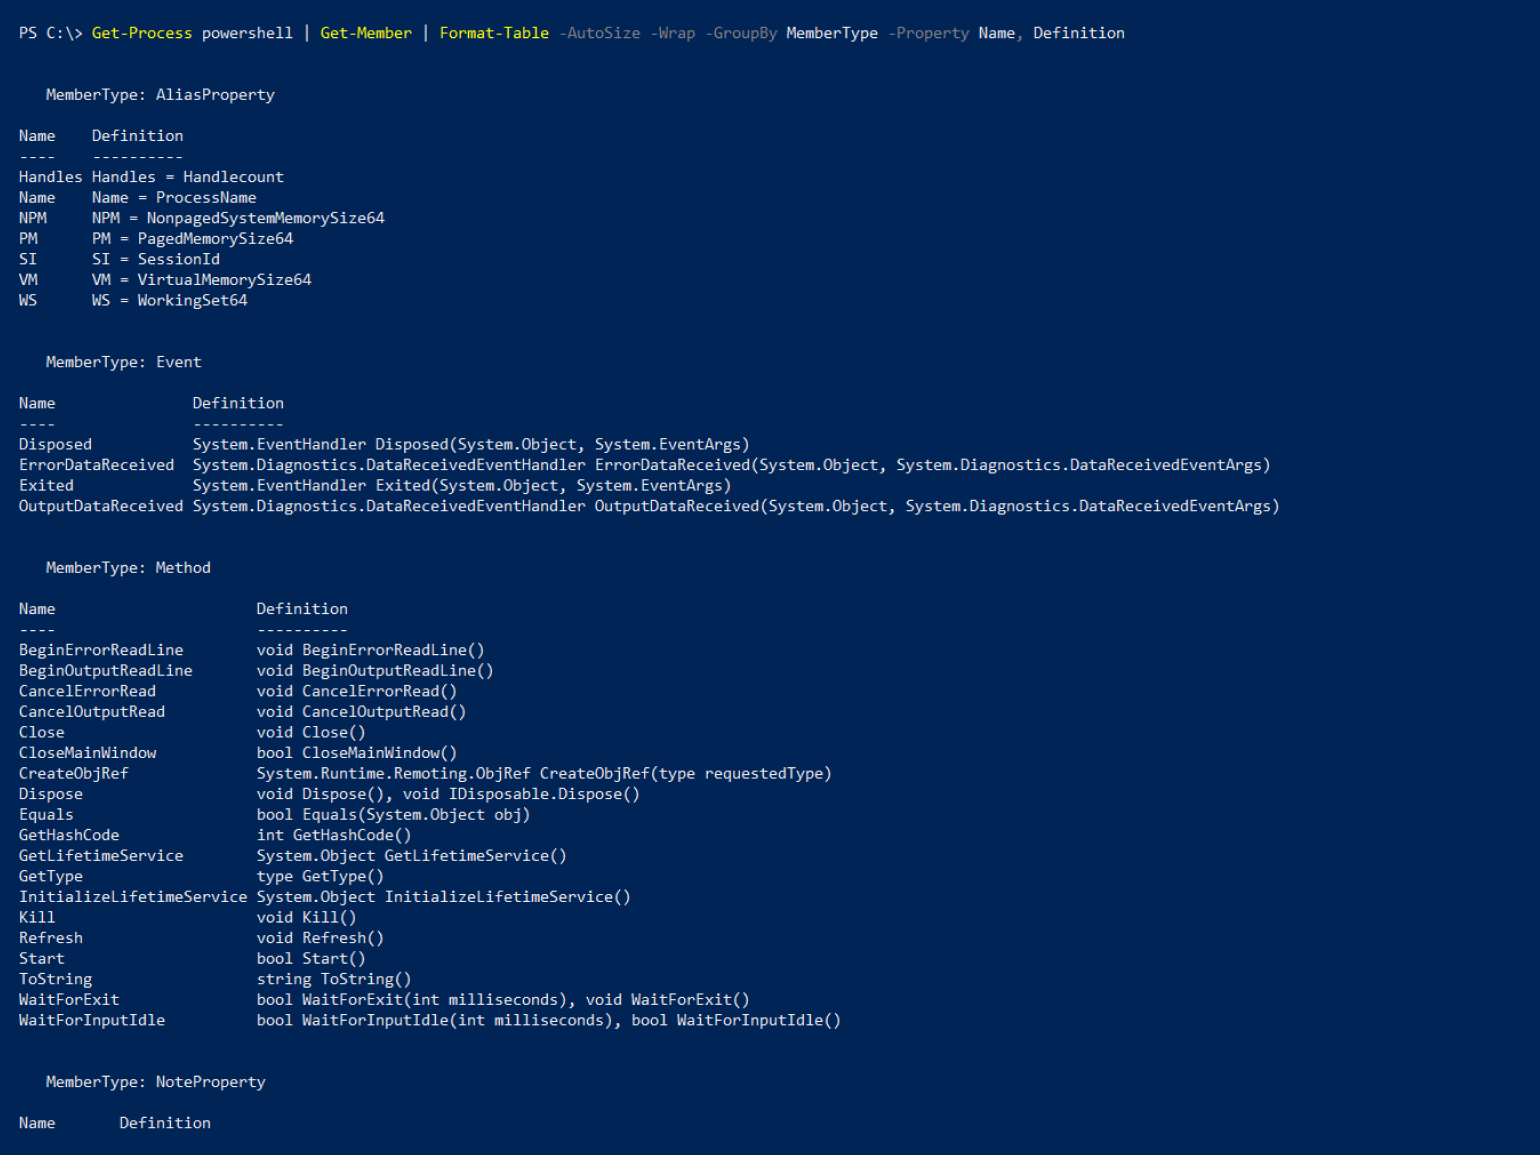
Расшифруем параметры Format-Table:
- -AutoSize выравнивает ширину столбцов по размеру их содержимого;
- -Wrap переносит содержимое ячейки на следующую строку, если она не помещается в размеры экрана (по умолчанию текст обрезается);
- -GroupBy разделяет одну таблицу на несколько, сгруппированных по значению какого-либо свойства (в нашем случае для каждого MemberType создана отдельная таблица);
- -Property указывает, какие свойства объекта будут отображаться в таблице в качестве столбцов (в нашем случае Name и Definition).
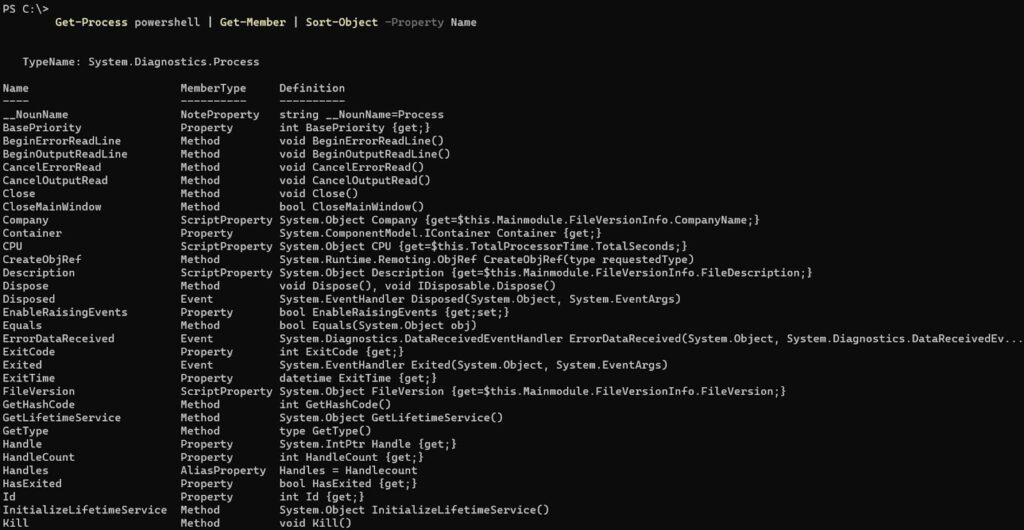
Командлет Sort-Object позволяет отсортировать список объектов (то есть таблицу) по значениям её свойств (то есть столбцов). Отсортируем результат работы GetMember по столбцу Name в алфавитном порядке. Для этого используем параметр -Property (работает как у Format-Table).
Get-Process powershell | Get-Member | Sort-Object -Property Name
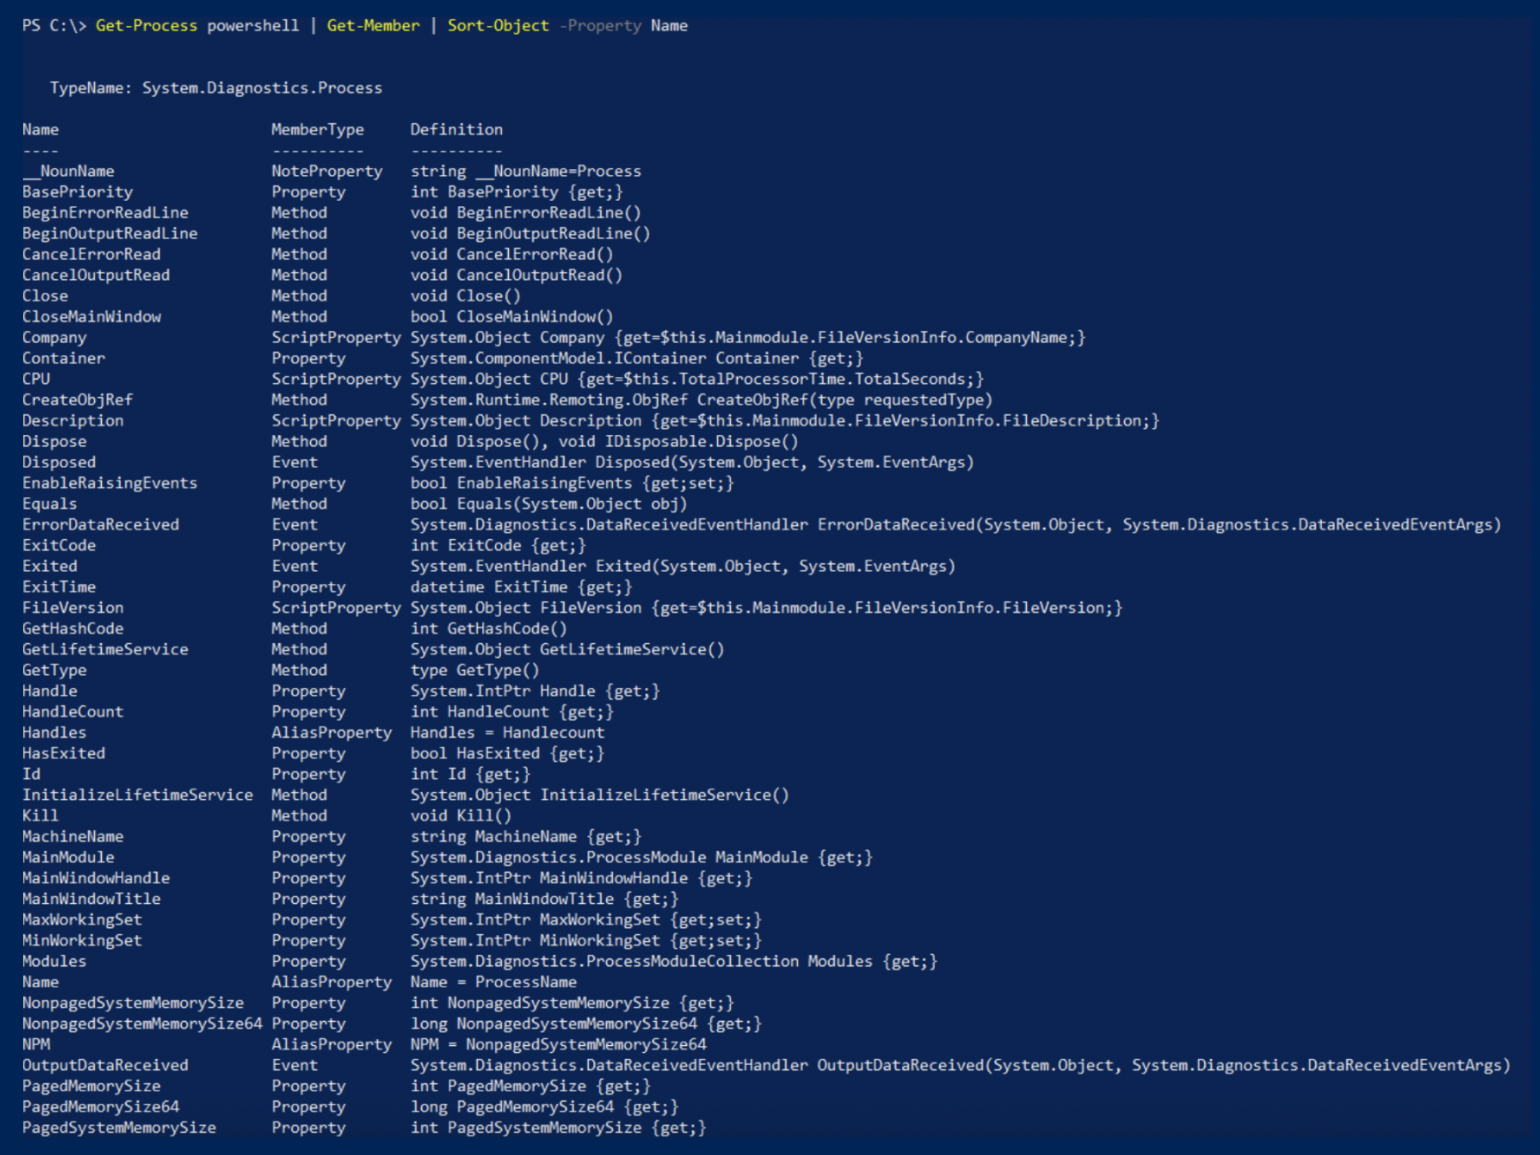
У Sort-Object есть и другие полезные параметры:
- -Descending сортирует объекты в порядке убывания.
- -Unique удаляет дубликаты и возвращает только уникальные объекты.
- -Top получает число N и отображает первые N объектов в таблице.
- -Bottom получает число N и отображает последние N объектов в таблице.
Некоторые задачи могут занимать много времени. Это, например, установка и обновление ПО, поиск файла в большой директории. Пока PowerShell выполняет одну команду, писать другие нельзя.
К примеру, попытаемся найти на всём диске C файл powershell.exe. Используем для этого командлет Get-ChildItem с параметром -Recurse. Так он будет искать не только в текущем каталоге, но и во всех подкаталогах.
PowerShell может попытаться зайти в папки, к которым у него нет доступа, поэтому добавим -ErrorAction SilentlyContinue. Если случится ошибка, команда не станет сообщать об этом и просто продолжит выполняться.
Получается так:
Get-ChildItem -Path C:\ -Name powershell.exe -Recurse -ErrorAction SilentlyContinue

Как видим, пока задача не завершена, командная строка недоступна. Чтобы принудительно прервать её выполнение, нажмите сочетание клавиш Ctrl + C (при этом ничего не должно быть выделено, иначе компьютер воспримет это как команду «Копировать»).
Чтобы не ждать выполнения долгих задач и сразу приступать к следующим, их можно запускать в фоновом режиме. Делается это командлетом Start-Job, а сама команда помещается в фигурные скобки.
Start-Job {Get-ChildItem -Path C:\ -Name powershell.exe -Recurse -ErrorAction SilentlyContinue}

Одновременно можно выполнять любое количество фоновых задач. Помимо Start-Job для работы с фоновыми задачами есть другие командлеты:
- Get-Job выдаёт отчёт со статусом фоновых задач.
- Wait-Job делает консоль недоступной, пока выполняется фоновая задача.
- Stop-Job прерывает выполнение фоновой задачи.
- Receive-Job выводит результат фоновой задачи и удаляет его из памяти. Чтобы сохранить результат в памяти, используйте параметр -Keep.
Wait-Job, Stop-Job и Receive-Job ожидают, что вы примените их к конкретной задаче (или нескольким). Для этого укажите название Name или идентификатор Id. Делать это можно и в связке с Get-Job.
Get-Job Job1

Терминал PowerShell удобен для выполнения небольших коротких однострочных задач. Чтобы создавать и сохранять сложные скрипты, есть интегрированная среда сценариев.
Важно!
PowerShell ISE предназначен для версий языка 5.1 и младше. Для более старших версий Microsoft рекомендует использовать Visual Studio Code с расширением PowerShell.
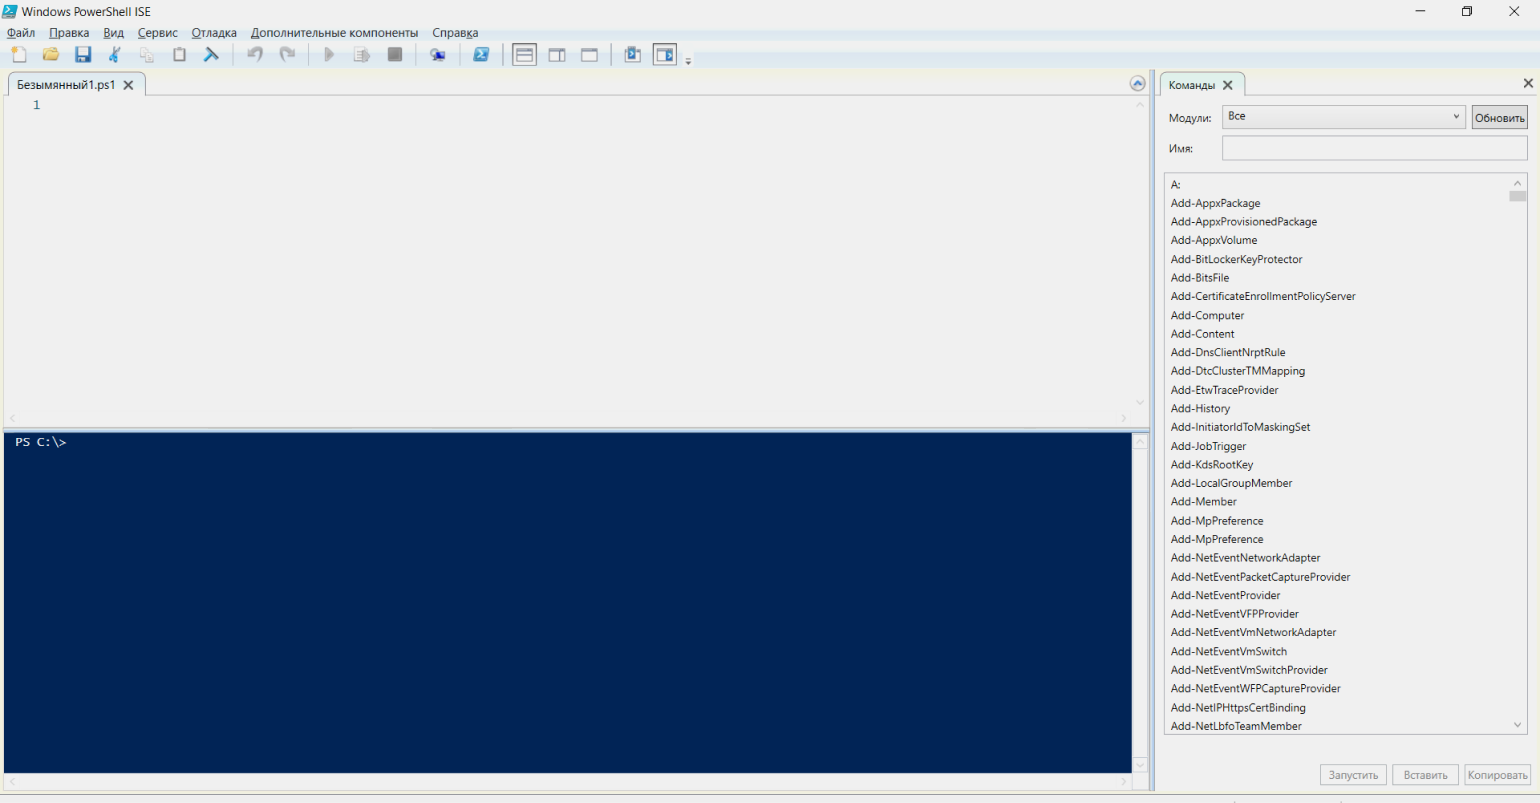
PowerShell ISE состоит из трёх основных окон:
- область сценариев в верхней части экрана — в ней пишут скрипты;
- область консоли в нижней части экрана — работает так же, как обычный терминал, здесь можно писать команды в интерактивном режиме;
- панель команд в правой части экрана — полный справочник команд PowerShell с конструктором, в котором можно указать значения нужных параметров.
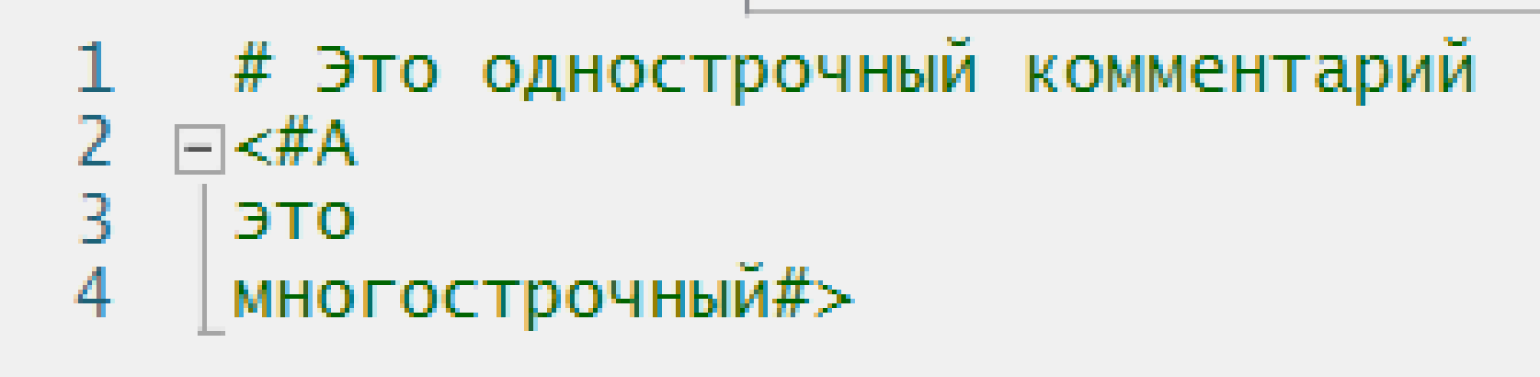
PowerShell позволяет вставлять в код комментарии. Они никак не влияют на выполнение скрипта и нужны людям, которые будут читать вашу программу. Однострочный комментарий начинается с символа #, а многострочный обрамляется с двух сторон символами <# и #>.
Любой код чаще читают, чем пишут, и важно делать его понятным для человека. Разработчики PowerShell договорились между собой о едином своде правил и выпустили стайлгайд. Вот несколько правил оттуда.
Используйте нотацию PascalCase в названиях командлетов, функций, параметров, свойств, методов, переменных и классов. Неправильно писать: get-service, Get-service, GET-SERVICE. Правильно: Get-Service.
Пишите полные названия командлетов. Алиасы удобны для работы в интерактивном режиме, но в скриптах могут затруднять чтение команд. Неправильно: dir, gci, ls. Правильно: Get-ChildItem.
One True Brace Style при оформлении вложенности. Если вы где-то используете фигурные скобки, то код внутри них отбивается табуляцией (четыре пробела), а сами скобки ставятся так:
if ($var1 -eq $var2) {
    # Код внутри условия
} else {
    # Код внутри условия
    # Ещё код внутри условия
}
Исключение из прошлого правила — когда код в фигурных скобках совсем небольшой, его можно записать в одну строку. Например:
Get-ChildItem | Where-Object { $_.Length -gt 10mb }
Комментируйте код. Так будет гораздо проще разобраться, что он делает и как работает. Причём как другому человеку, так и вам самим через полгода.
В PowerShell ISE можно выполнить код целиком или частично, есть инструменты отладки. Скрипты сохраняются в файлах с расширением .ps1. Но запустить их двойным кликом не получится — нужно нажать правую кнопку мыши и в появившемся окне выбрать Выполнить с помощью PowerShell.
Также запустить скрипт можно из оболочки. Например, в каталоге C:\Scripts есть файл test_script.ps1. Выполнить его можно:
- командой PowerShell -File C:\Scripts\test_script.ps1, запущенной из любого места;
- командой .\test_script.ps1, запущенной, когда вы находитесь в каталоге C:\Scripts.
По умолчанию запускать любые файлы с PowerShell-скриптами запрещено. Сделано это в целях безопасности. Узнать нынешнюю политику выполнения можно с помощью командлета Get-ExecutionPolicy. Вот какая она может быть:
- Restricted (установлена по умолчанию) — запрещено запускать любые скрипты.
- AllSigned — разрешено запускать только скрипты, которые были подписаны доверенным разработчиком.
- RemoteSigned — разрешено запускать подписанные доверенным разработчиком и собственные скрипты.
- Unrestricted — разрешено запускать любые скрипты.
Чтобы ваши ps1-файлы запускались, нужно заменить политику выполнения на RemoteSigned. Для этого откройте PowerShell от имени администратора и выполните команду:
Set-ExecutionPolicy RemoteSigned
Чтобы подтвердить действие, введите y.

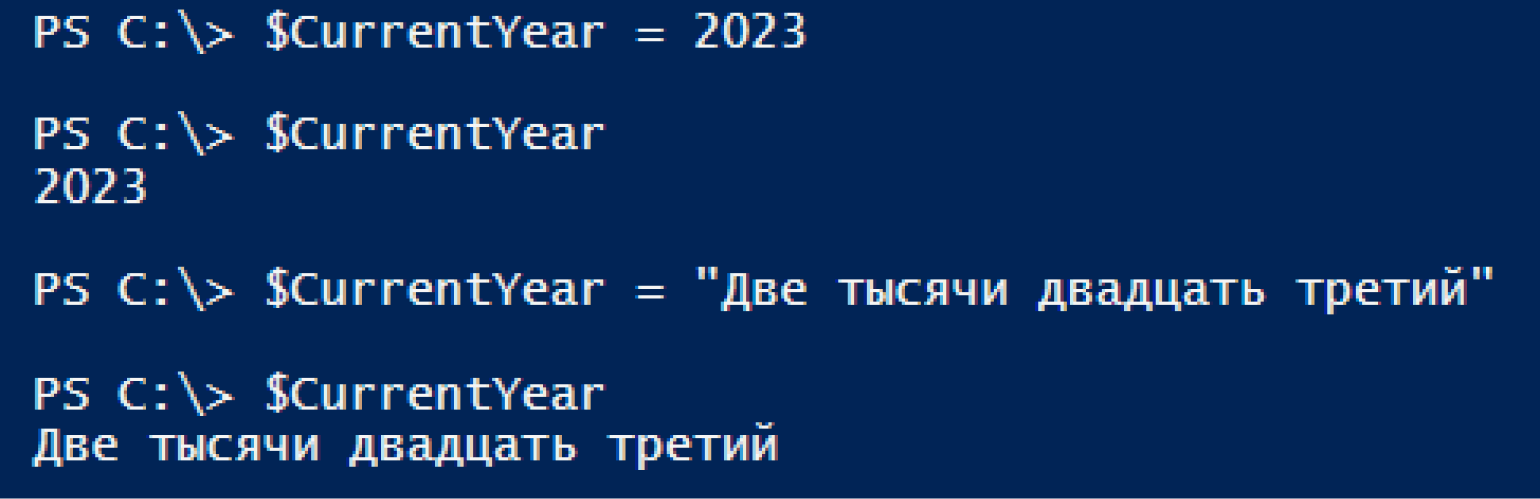
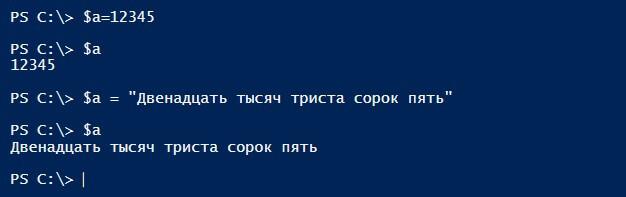
Чтобы сохранять данные и обращаться к ним в будущем, в PowerShell есть переменные. Перед их названием ставится знак доллара $, а сами они могут содержать латинские буквы (заглавные и строчные), цифры и нижние подчёркивания.

Переменная может хранить данные любого типа, и их можно перезаписывать.
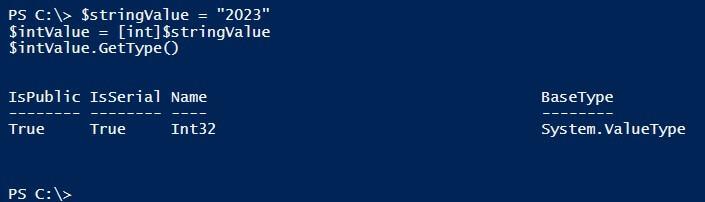
Переменную можно привести к определённому типу данных. Создадим переменную со строкой 2023 и преобразуем её в число. Чтобы узнать тип данных, воспользуемся методом .GetType().
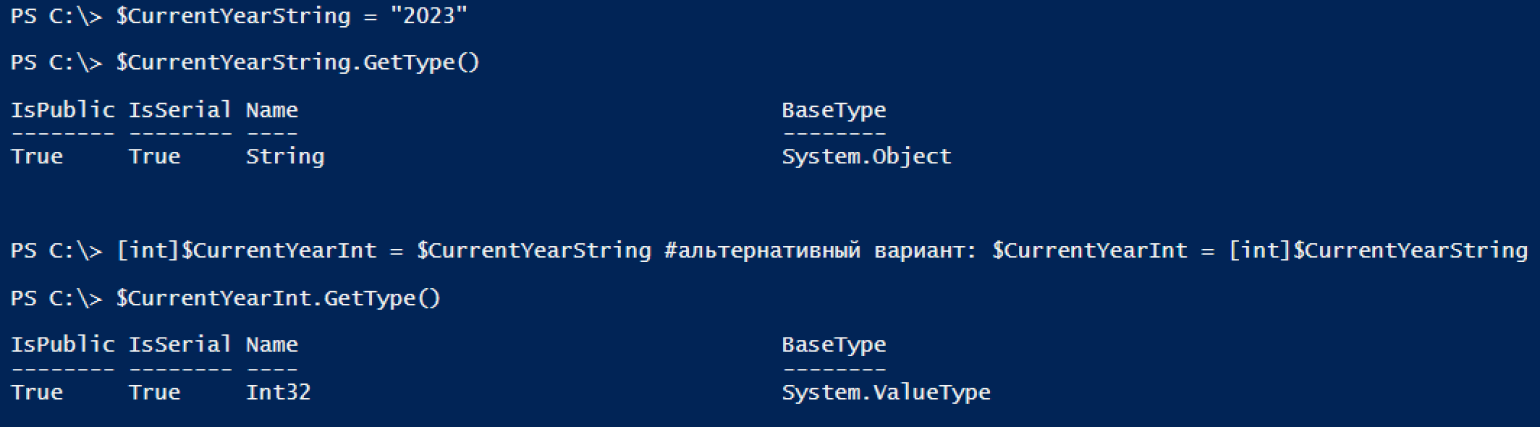
Чтобы удалить переменную, используется метод .Clear().
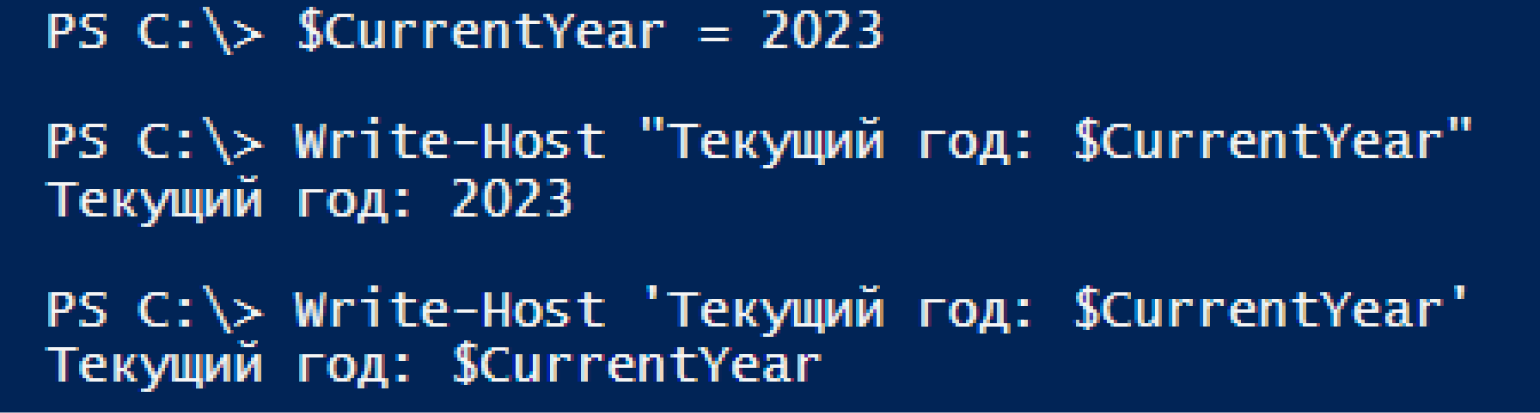
Переменные можно подставлять в строки, если они оформлены двойными кавычками. Если же кавычки одинарные, то PowerShell воспринимает символы в строке буквально. Сравните:
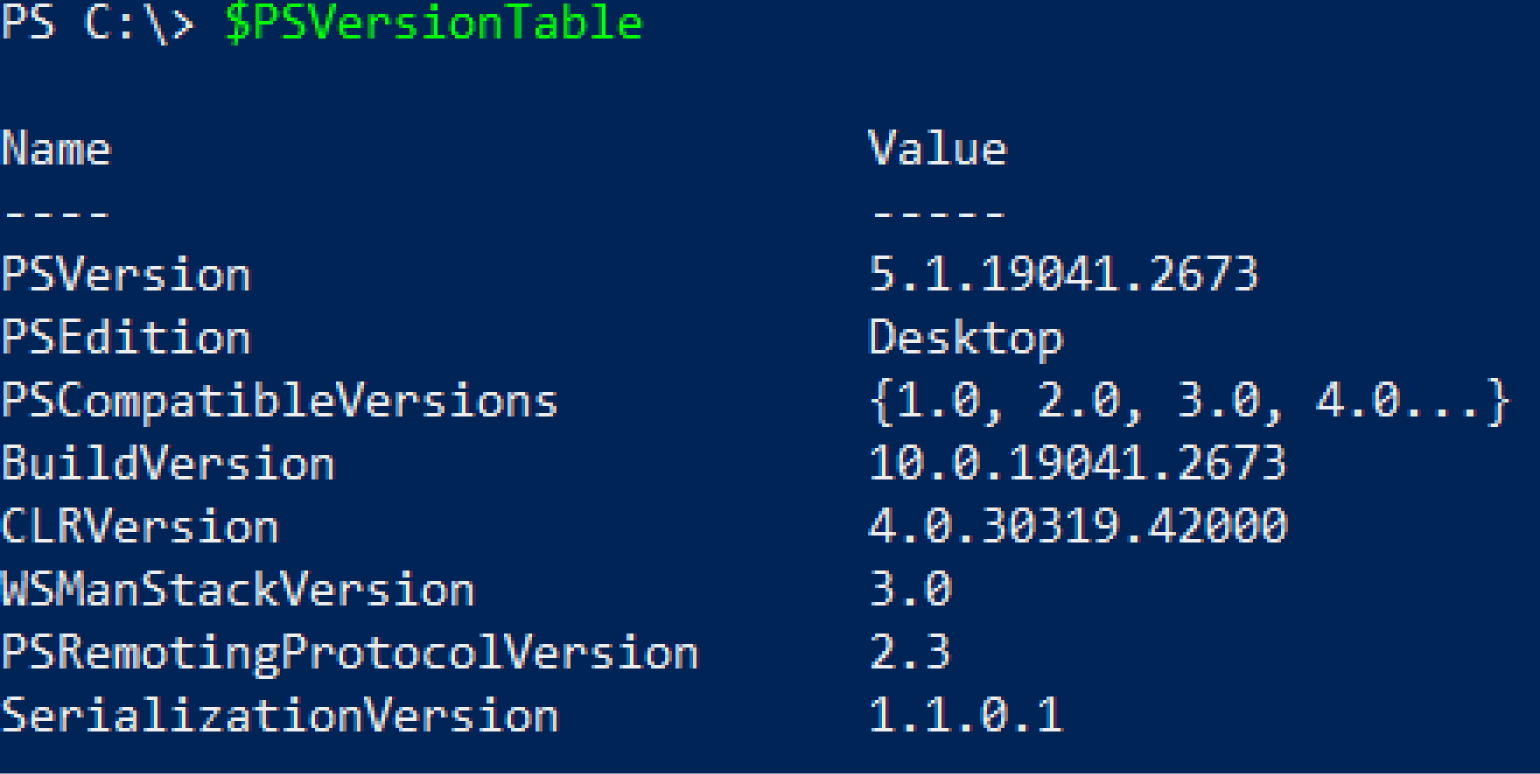
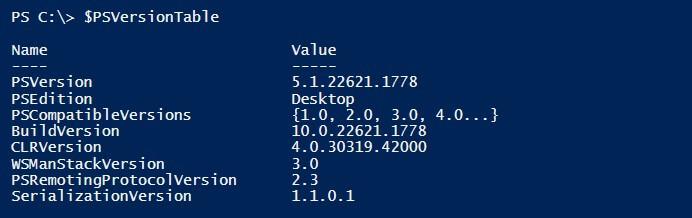
Помимо пользовательских также есть системные переменные. Например, $PSVersionTable хранит информацию о версии PowerShell.
PowerShell позволяет проводить с объектами арифметические операции и сравнивать их друг с другом. Для этого он использует логические операторы.
Арифметические операторы:
- + — сложение;
- — — вычитание;
- * — умножение;
- / — деление;
- % — деление по модулю;
- ( и ) — скобки для группировки операций.
Операторы сравнения оформляются так же, как параметры командлетов. Их названия произошли от английских выражений, указанных в скобках.
- -eq — равно (от equal);
- -ne — не равно (от not equal);
- -gt — больше (от greater than);
- -ge — больше либо равно (от greater than or equal);
- -lt — меньше (от less than);
- -le — меньше либо равно (от less than or equal).
Условия в PowerShell создаются с помощью ключевых слов if, elseif и else. В обычных скобках указывается само условие, в фигурных — код, который запускается при его выполнении. Например:
$Number = 123

if ($Number -gt 0) {
Write-Host 'Число больше нуля'
} elseif ($Number -lt 0) {
Write-Host 'Число меньше нуля'
} else {
Write-Host 'Число равно нулю'
}

>>> Число больше нуля
Также условия можно задавать с помощью ключевого слова switch. Например:
$Day = 2

switch ($Day) {
    1 {Write-Host 'Понедельник'}
    2 {Write-Host 'Вторник'}
    3 {Write-Host 'Среда'}
    4 {Write-Host 'Четверг'}
    5 {Write-Host 'Пятница'}
    6 {Write-Host 'Суббота'}
    7 {Write-Host 'Воскресенье'}
}

>>> Вторник
Windows PowerShell — язык программирования, на котором администрируют операционные системы и автоматизируют процессы. Он поддерживает объектно-ориентированное программирование и позволяет работать в интерактивном режиме, а также писать, сохранять и выполнять полноценные скрипты.
- PowerShell предустановлен в Windows, но его можно скачать на macOS и Linux.
- У языка есть собственная интегрированная среда сценариев PowerShell ISE, предназначенная для старых версий языка (5.1 и ниже).
- PowerShell работает не со строками, а с объектами. Он обрабатывает их с помощью командлетов, построенных по принципу «Глагол-Существительное».
- Результат выполнения одного командлета можно передавать другому в конвейере.
- Задачи можно выполнять в фоновом режиме.
- PowerShell — высокоуровневый язык, на котором можно работать с переменными, логическими операторами, условиями, циклами, массивами, хеш-таблицами, функциями и классами.
С чего начать путь в IT?
Получите подробный гайд в нашем телеграм-канале бесплатно! Кликайте по баннеру и заходите в канал — вы найдёте путеводитель в закрепе.
Забрать гайд>
Рассказываем про Windows PowerShell — технологию для автоматизации рутинных задач, пришедшую на смену bat-файлам.
Работа с консолью Microsoft Windows
Ранее мы рассматривали командные интерпретаторы COMMAND.CMD и CMD.EXE, обеспечивающие автоматизацию задач в семействе операционных систем Microsoft Windows. Фактически данные интерпретаторы не получали обновлений с начала 2000-х годов и существуют в современных операционных системах для обеспечения совместимости.
Подробнее о bat-файлах →
Хотя современные операционные системы предлагают богатый на функции графический интерфейс, ряд однотипных задач быстрее решается через консоль. Более того, серверные редакции ОС не предоставляют графический интерфейс по умолчанию, поэтому интерпретатор командной строки является неотъемлемой частью практически любой операционной системы.
Помимо отсутствия обновлений, CMD.EXE имеет ограниченный функционал. Он не позволяет писать сложную логику и полностью отказаться от использования графического интерфейса. Корпорация Microsoft пыталась решить эти проблемы с помощью инструмента под названием Microsoft Script Host, который имел интеграцию со скриптовыми языками JScript и VBScript.
Однако Microsoft Script Host имел ряд собственных проблем:
- плохо интегрировался с командной оболочкой операционной системы,
- сопровождался скудной документацией,
- разные версии Windows имели командные интерпретаторы с разным набором команд,
- инструмент становился отличным вектором для атак.
Все это побуждало Microsoft сделать командный интерпретатор с нуля.
Новый командный интерпретатор Windows PowerShell
В 2003 году корпорация Microsoft начала разработку нового инструмента — Microsoft Shell (MSH), или Monad. Спустя три года и три бета-версии Monad была официально выпущена под новым названием Windows PowerShell 1.0 на Windows XP и Windows Vista. По ходу развития командная оболочка меняла свои названия на PowerShell Core и PowerShell.
При создании PowerShell разработчики задались целью создать инструмент, который позволил бы с легкостью использовать множество разнородных интерфейсов, предоставляемых операционной системой. Новый инструмент должен быть консистентным и легким для администратора, несмотря на количество технологий «под капотом». Например, PowerShell предоставляет доступ к API .NET-фреймворка, но не требует от администратора знания .NET.
Как и любой командный интерпретатор, PowerShell умеет запускать исполняемые файлы и имеет встроенные команды. Однако у PowerShell встроенные команды имеют название «командлет», появившееся от английского cmdlet.
Что такое командлет?
В основе взаимодействия с PowerShell лежат объекты, а не текст, как у CMD.EXE и командных интерпретаторов в *nix-системах. Такой подход меняет взгляд на организацию встроенных команд.
Командлет — это встроенная команда в PowerShell, выполняющая одну задачу и реализованная на .NET. Имя командлета соответствует правилу Глагол-Существительное, которое можно читать как Действие-Объект.
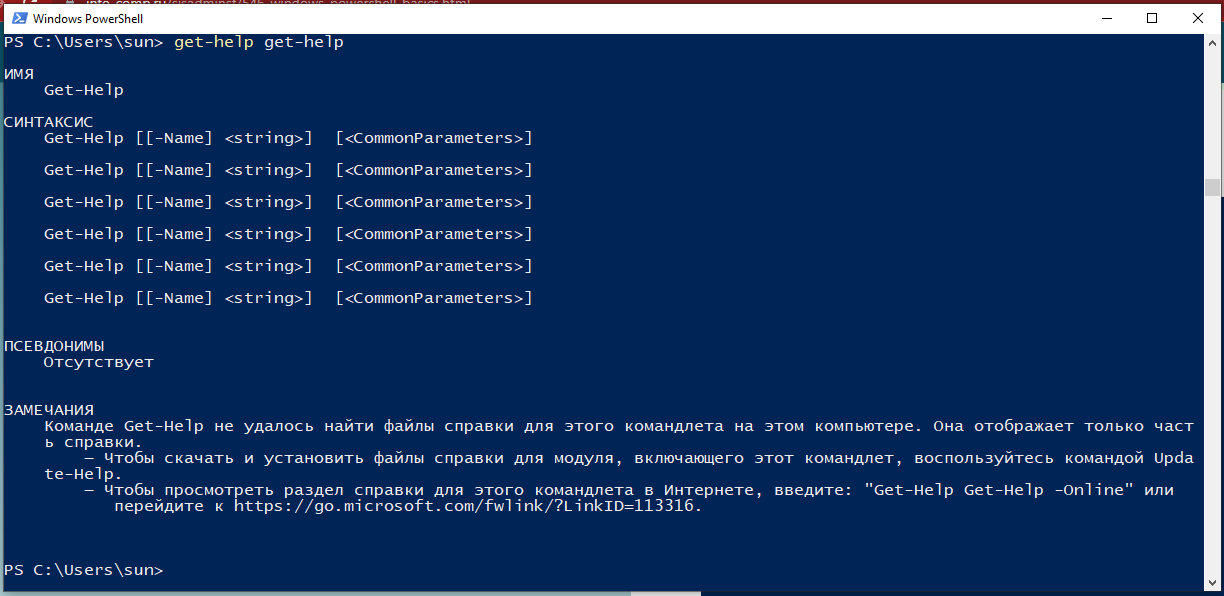
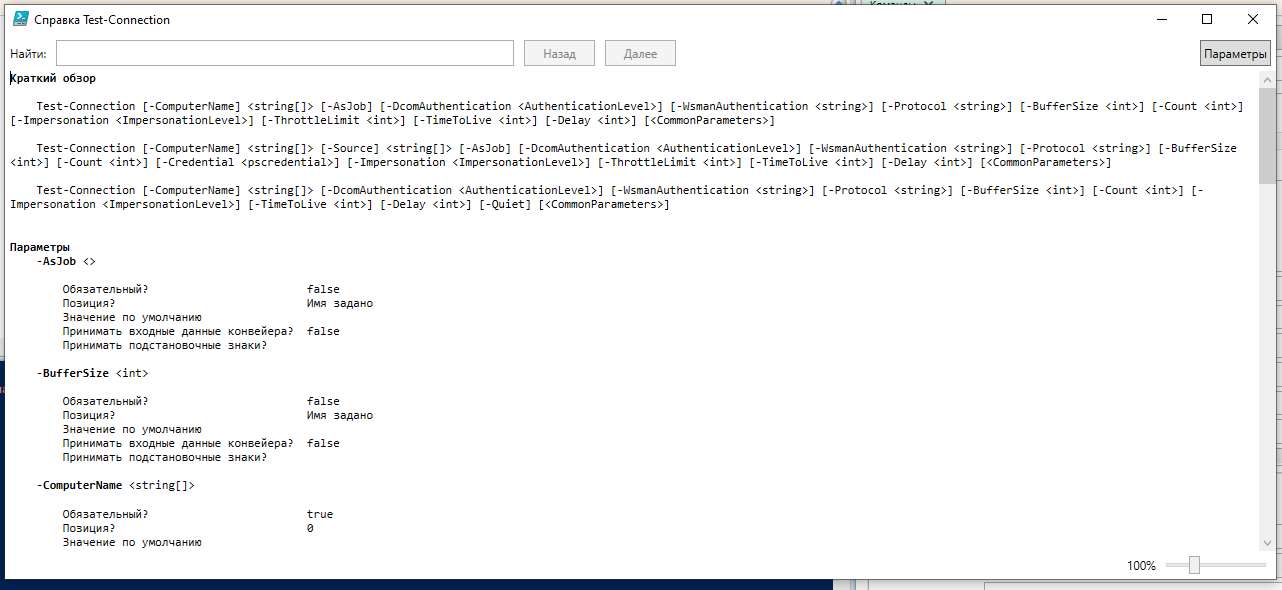
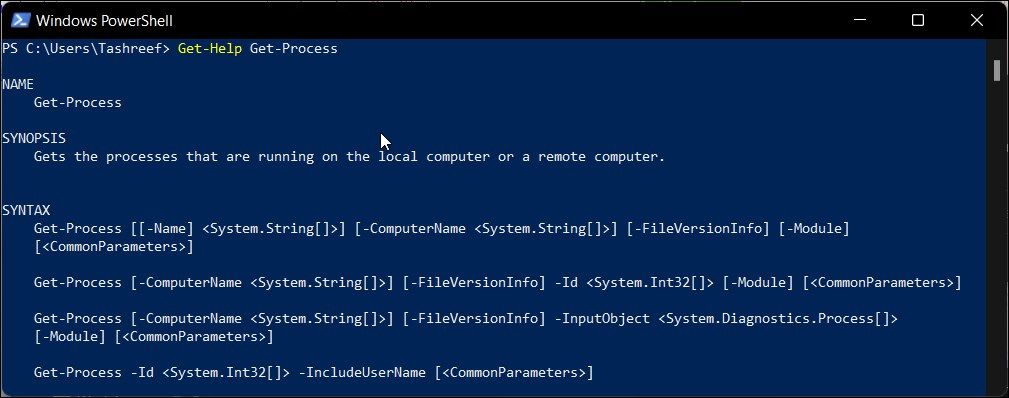
Самый важный командлет, о котором необходимо узнать в первую очередь, — Get-Help. Он отображает справочную информацию о PowerShell и командлетах.
# Получить общую справку по PowerShell
Get-Help

# Получить справку по командлету Get-Content
Get-Help Get-Content

# Получить справку по командлету Get-Help
Get-Help Get-Help
Если вам кажется, что использовать большие буквы в названии командлетов — это перебор, для вас есть хорошие новости. Все команды в PowerShell являются регистронезависимыми. Иными словами, перечисленные ниже написания эквивалентны:
Get-Help Get-Help
get-help get-help
GET-HELP GET-HELP
GeT-hElP gEt-HeLp
Хотя Windows PowerShell нечувствительна к регистру в именах и параметрах, внешние программы, которые вызываются через оболочку, могут не обладать такими возможностями.
В первой версии PowerShell все командлеты были реализованы на .NET, но начиная с версии 2.0 появилась возможность писать командлеты с использованием синтаксиса PowerShell.
Основы программы PowerShell
Перейдем к практике. PowerShell является кроссплатформенным инструментом и может быть запущена на Linux и macOS, но в данной статье будет рассматриваться только «родное» окружение — Windows.
Как запустить?

Запуск PowerShell можно произвести из меню поиска около кнопки Пуск, набрав powershell.
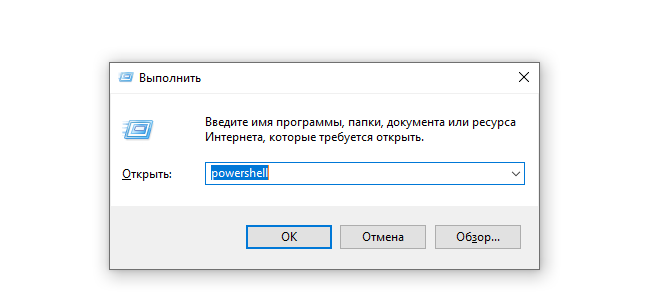
Аналогично можно запустить PowerShell через диалоговое окно Выполнить…, которое открывается через сочетание клавиш Windows + R.
Если по каким-то причинам у вас не установлен PowerShell, то необходимо сделать это, следуя инструкции в базе знаний Microsoft.
В случае успеха откроется синее окно. Windows PowerShell готов к вашим командам.
Синтаксис
Синтаксис PowerShell похож на синтаксис других командных интерпретаторов. Сначала команда, а затем аргументы команды. Несколько команд в одной строке разделяются точкой с запятой. Рассмотрим на примере.
Get-Help Get-Command -OnlineДанная команда откроет в браузере вкладку с описанием командлета Get-Command в базе знаний Microsoft. Разберем подробнее:
- Get-Help – команда, в данном случае командлет,
- Get-Command – первый позиционный аргумент, который передается командлету,
- -Online – ключ, то есть именованный аргумент.
Обратите внимание, что в CMD.EXE именованные аргументы, то есть ключи, для встроенных команд начинались с символа слэш (/). У командлетов аргументы начинаются со знака минус. Использование знака / в PowerShell недопустимо и будет интерпретировано как ошибка.
Хотя PowerShell во многом похож на CMD.EXE, он имеет несколько существенных отличий. Во-первых, обращение к переменным производится через символ доллар, а не через знак процента. Во-вторых, PowerShell позволяет определять функции. Например:
function Get-Version {
    $PSVersionTable.PSVersion
}
Данный код объявит функцию Get-Version, которая обращается к системной переменной (объекту) PSVersionTable и возвращает значение поля PSVersion. Проще говоря, выводит версию PowerShell.
Именование командлетов может быть неочевидным для администраторов с опытом работы с другими командными интерпретаторами. Поэтому рассмотрим основные команды Windows PowerShell.
Основные команды языка Windows PowerShell
В следующей таблице перечислены основные команды PowerShell и их аналоги в *nix-подобных системах и CMD.EXE. В версии PowerShell 7 количество командлетов превышает полторы тысячи!
| Командлет (псевдоним) | Команда в *nix | Команда в CMD.exe | Описание |
| Get-Location (pwd) | pwd | Выводит путь до текущего каталога | |
| Set-Location (cd) | cd | cd | Меняет текущий каталог |
| Get-ChildItem (ls) | ls | dir | Выводит содержимое текущего каталога |
| Get-ChildItem | find | find | Производит поиск файлов по заданным критериям |
| Copy-Item (cp) | cp | cp | Копирует файл |
| Remove-Item (rm) | rm | rm | Удаляет файл |
| New-Item (mkdir) | mkdir | mkdir | Создает каталог |
| New-Item | touch | Создает пустой файл | |
| Get-Content (cat) | cat | Выводит файлы | |
| Get-Content | tail | Выводит последние 10 строк | |
| Where-Object | grep | Производит фильтрацию | |
| Create-Volume Format-Volume |
mkfs | Форматирует раздел | |
| Test-Connection | ping | ping.exe | Отправляет ICMP-запросы, «пингует» |
| Get-Help (man) | man | help | Показывает справку |
После работы в консоли *nix командлет для популярного действия, смены каталога, выглядит громоздко и непривычно. К счастью, командлеты имеют псевдонимы (алиасы), которые могут не следовать правилу именования командлетов. Список известных псевдонимов можно получить с помощью командлета Get-Alias.
Хотя таблица, представленная выше, значительно облегчит назначение командлетов, не стоит ожидать от командлетов поведения как в *nix-системах. Так, например, в PowerShell командлет Get-Content создан для вывода содержимого одного файла на экран, в то время как на *nix-системах утилита cat изначально использовалась для конкатенации (процесса соединения) нескольких файлов с последующим выводом на экран.
Очевидно, что возможности PowerShell значительно больше, чем CMD.exe. Опытный администратор знает, что некоторые задачи из таблицы можно решить в CMD.exe, несмотря на отсутствие специальных команд. Однако эти команды требуют опыта или смекалки.
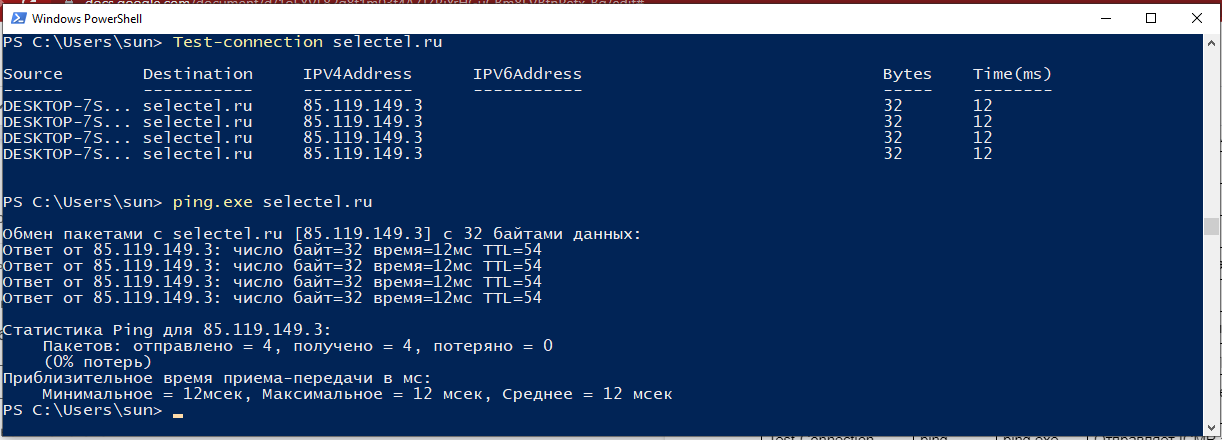
Отдельно хочется отметить командлет Test-Connection, который делает то же самое, что утилита ping, но не имеет такого алиса. Разница между утилитой и командлетом в формате вывода: утилита выводит текст, а командлет возвращает объект, который можно использовать в конвейерах.
Конвейер PowerShell: особенности и параметры
По своей задумке конвейеры в PowerShell не отличаются от конвейеров в *nix-системах: они перенаправляют вывод одной команды на ввод другой. Как отмечалось ранее, в PowerShell происходит взаимодействие не с текстом, а с объектами. При выводе на экран объект трансформируется в таблицу, чтобы человеку было удобнее читать, но не всегда таблица выводит все поля объекта.
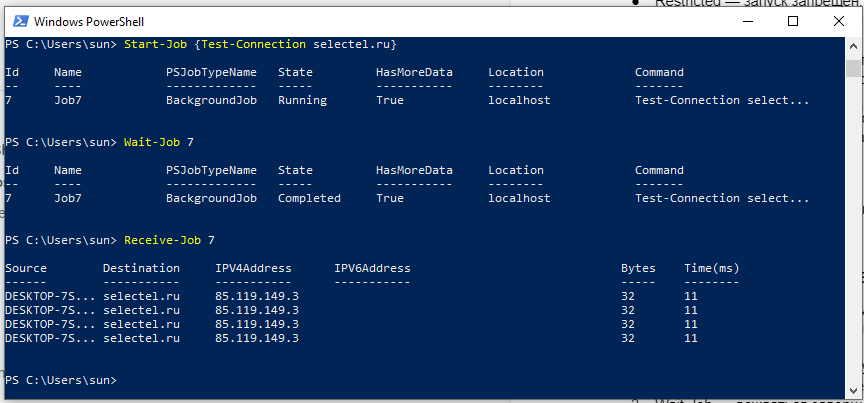
Особенность конвейеров PowerShell заключается в том, что конвейер передает результат не целиком, а по одному объекту. Командлет Test-Connection выводит четыре объекта: по одному на каждый ICMP-запрос. Если подключить командлет к конвейеру, то можно увидеть подтверждение этому тезису. Воспользуемся командлетом Select-Object, чтобы выбрать колонку со временем запроса.
Test-Connection selectel.ru | Select-Object ‘Time(ms)’После запуска данной команды можно наблюдать, как с некоторой задержкой печатаются пустые строки по одной.
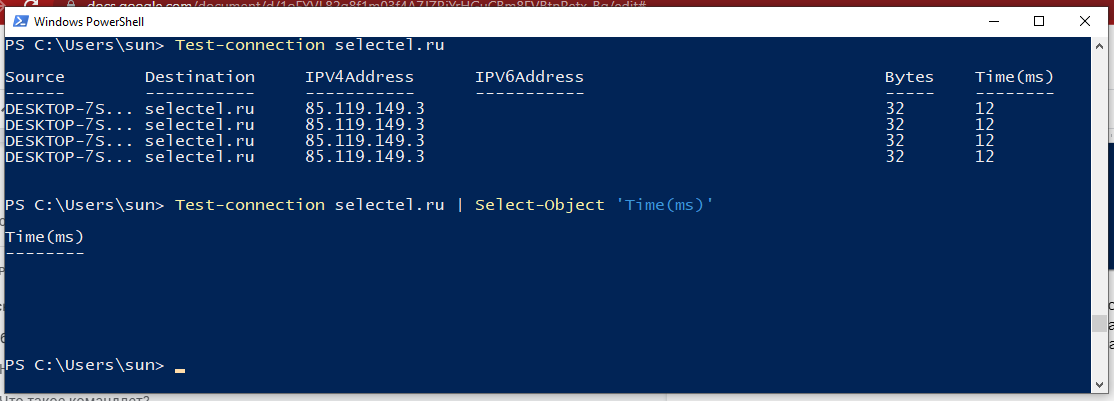
Но как же так? Дело в том, что отображение объекта при выводе на экран не всегда соответствует имени поля в объекте. Чтобы получить полный список полей в объекте, необходимо вызвать командлет Get-Member.
PS C:\Users\sun> Test-connection selectel.ru | Get-Member


   TypeName: System.Management.ManagementObject#root\cimv2\Win32_PingStatus

Name                           MemberType     Definition
----                           ----------     ----------
PSComputerName                 AliasProperty  PSComputerName = __SERVER
Address                        Property       string Address {get;set;}
BufferSize                     Property       uint32 BufferSize {get;set;}
NoFragmentation                Property       bool NoFragmentation {get;set;}
PrimaryAddressResolutionStatus Property       uint32 PrimaryAddressResolutionStatus {get;set;}
ProtocolAddress                Property       string ProtocolAddress {get;set;}
ProtocolAddressResolved        Property       string ProtocolAddressResolved {get;set;}
RecordRoute                    Property       uint32 RecordRoute {get;set;}
ReplyInconsistency             Property       bool ReplyInconsistency {get;set;}
ReplySize                      Property       uint32 ReplySize {get;set;}
ResolveAddressNames            Property       bool ResolveAddressNames {get;set;}
ResponseTime                   Property       uint32 ResponseTime {get;set;}
ResponseTimeToLive             Property       uint32 ResponseTimeToLive {get;set;}
RouteRecord                    Property       string[] RouteRecord {get;set;}
RouteRecordResolved            Property       string[] RouteRecordResolved {get;set;}
SourceRoute                    Property       string SourceRoute {get;set;}
SourceRouteType                Property       uint32 SourceRouteType {get;set;}
StatusCode                     Property       uint32 StatusCode {get;set;}
Timeout                        Property       uint32 Timeout {get;set;}
TimeStampRecord                Property       uint32[] TimeStampRecord {get;set;}
TimeStampRecordAddress         Property       string[] TimeStampRecordAddress {get;set;}
TimeStampRecordAddressResolved Property       string[] TimeStampRecordAddressResolved {get;set;}
TimestampRoute                 Property       uint32 TimestampRoute {get;set;}
TimeToLive                     Property       uint32 TimeToLive {get;set;}
TypeofService                  Property       uint32 TypeofService {get;set;}
__CLASS                        Property       string __CLASS {get;set;}
__DERIVATION                   Property       string[] __DERIVATION {get;set;}
__DYNASTY                      Property       string __DYNASTY {get;set;}
__GENUS                        Property       int __GENUS {get;set;}
__NAMESPACE                    Property       string __NAMESPACE {get;set;}
__PATH                         Property       string __PATH {get;set;}
__PROPERTY_COUNT               Property       int __PROPERTY_COUNT {get;set;}
__RELPATH                      Property       string __RELPATH {get;set;}
__SERVER                       Property       string __SERVER {get;set;}
__SUPERCLASS                   Property       string __SUPERCLASS {get;set;}
ConvertFromDateTime            ScriptMethod   System.Object ConvertFromDateTime();
ConvertToDateTime              ScriptMethod   System.Object ConvertToDateTime();
IPV4Address                    ScriptProperty System.Object IPV4Address {get=$iphost = [System.Net.Dns]:...
IPV6Address                    ScriptProperty System.Object IPV6Address {get=$iphost = [System.Net.Dns]:...
Можно визуально оценить список и найти поле ResponseTime. Также в начале указан тип данного объекта, Win32_PingStatus, информацию о котором можно поискать в базе знаний Microsoft. В документации не только перечислены поля, но и их назначение. Таким образом, конечный вид конвейера будет таким:
Test-connection selectel.ru | Select-Object ResponseTimeХотя PowerShell побуждает к интерактивной работе, его основное предназначение — автоматизировать рутинные задачи. Значит, необходимо писать скрипты.
Соберите сервер в конфигураторе под свои задачи. Или выберите из более 100 готовых.
Интегрированная среда разработки
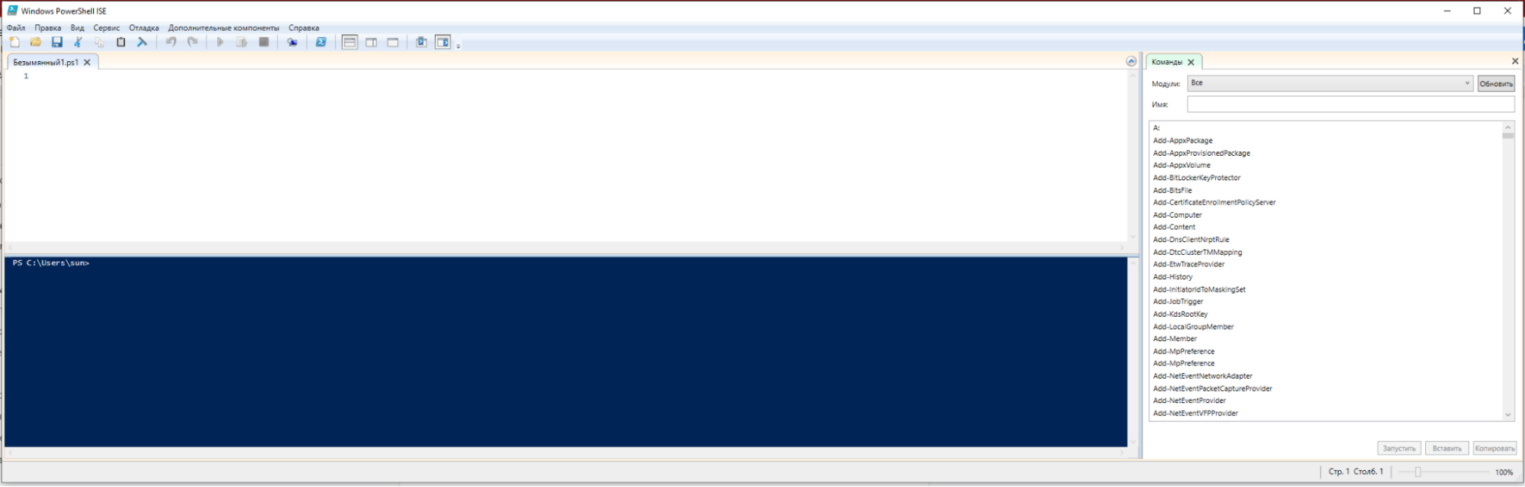
Если вы запускали PowerShell через поиск, вероятно, вы могли заметить приложение Windows PowerShell ISE.
PowerShell-скрипты — это текстовые файлы с расширением .ps1.
Windows PowerShell ISE — это интегрированная среда сценариев PowerShell, включающая в себя:
- редактор PowerShell-скриптов с автодополнением,
- окно для интерактивного выполнения командлетов в скрипте,
- список доступных командлетов с поиском.
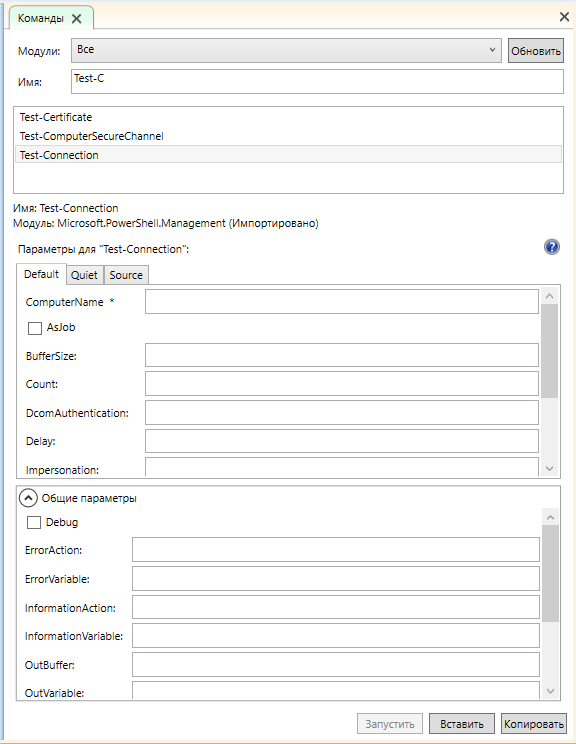
Обратите внимание, что модуль ISE предоставляет графический интерфейс для генерации аргументов командлета. Помимо генерации команд, в функции модуля также входит вызов «справочника» по командлетам, аналогичного Get-Help, только в графическом интерфейсе.
После написания своего первого PowerShell-скрипта вы столкнетесь с некоторыми ограничениями. Во-первых, файл с расширением ps1 нельзя запустить «двойным кликом» по файлу. Необходимо открыть контекстное меню с помощью правой клавиши мыши и выбрать Запустить с помощью PowerShell.
Во-вторых, скрипт не запустится со следующей ошибкой:
Невозможно загрузить файл C:\Users\sun\Documents\HelloWorld.ps1, так как выполнение сценариев отключено в этой системе. Для получения дополнительных сведений см. about_Execution_Policies по адресу https:/go.microsoft.com/fwlink/
?LinkID=135170.
    + CategoryInfo          : Ошибка безопасности: (:) [], ParentContainsErrorRecordException
    + FullyQualifiedErrorId : UnauthorizedAccess
По умолчанию запуск PowerShell-скриптов ограничен соответствующей политикой безопасности. Посмотреть текущее значение политики безопасности можно с помощью командлет Get-ExecutionPolicy:
PS C:\Users\sun> Get-ExecutionPolicy
Restricted
Список возможных значений:
- Restricted — запуск запрещен,
- AllSigned — разрешен только запуск подписанных доверенным разработчиком скриптов,
- RemoteSigned — разрешен запуск подписанных и собственных скриптов,
- Unrestricted — разрешен запуск любых скриптов.
По умолчанию стоит значение Restricted. В идеале необходимо подписывать скрипты, но для собственных нужд можно ограничиться значением RemoteSigned:
Set-ExecutionPolicy RemoteSignedДля выполнения данной команды необходимо запустить PowerShell от имени администратора.
Выполнение задач в фоне
PowerShell позволяет выполнять задачи в фоновом режиме, эту функциональность обеспечивают командлеты с существительным Job:
- Start-Job — запустить команду или командлет в фоновом режиме,
- Get-Job — показать состояние фоновых команд,
- Wait-Job — дождаться завершения выполнения фоновой команды,
- Receive-Job — получить результат выполнения команды.
Командлет Start-Job возвращает информацию о запущенном фоновом задании. Идентификатор, обозначенный в поле Id, является уникальным для сессии PowerShell.
Настройка удаленного выполнения
PowerShell позволяет реализовать удаленное выполнение командлетов, скриптов, но только на платформе Windows. Для включения возможности удаленного управления необходимо выполнить командлет Enable-PSRemoting с правами администратора.
Командлет Enter-PSSession запустит удаленную интерактивную сессию, а Invoke-Command выполнит команду на одном или нескольких удаленных компьютерах.
PowerShell – актуальные версии программы
PowerShell — мощный инструмент, пришедший на смену пакетным файлам. Он более функциональный и современный, а документация и различные руководства Windows PowerShell по работе делают его подходящим как для начинающих, так и продолжающих пользователей. В тексте мы составили описание PowerShell, — рассмотрели основные возможности программы, понятия, связанные с ней, синтаксис PowerShell и структуру языка.
На момент написания статьи актуальная версия PowerShell — 7.2. Используйте этот текст в качестве краткого справочника по Windows PowerShell, администрирование систем со скриптами в этой программе будет довольно простым.
Windows PowerShell — программа, который объединяет в себе командную оболочку и среду для написания сценариев. Она базируется на .NET и предоставляет средства для управления компьютером и автоматизации рутинных задач. Платформа обладает функциональностью полноценного объектно-ориентированного языка, включая поддержку переменных, функций, классов и объектов.
В отличие от многих других командных оболочек, PowerShell при работе оперирует не строками, а объектами. Это позволяет разрабатывать и применять сложные логические конструкции. Важно отметить, что интерпретатор PowerShell полностью совместим со стандартными командами cmd.exe и способен выполнять их функции без ограничений.
Взаимодействие с командами осуществляется в интерактивном режиме внутри терминала. Однако, если требуется сохранить используемый скрипт, более удобным вариантом станет использование среды ISE.
Windows PowerShell ISE представляет собой интегрированное средство разработки сценариев для языка PowerShell. Здесь можно создавать, сохранять и запускать скрипты с выделением синтаксиса, автоматическим дополнением, справочником команд и инструментами отладки. PowerShell ISE является легаси-инструментом, специфичным для версий языка до 5.1 включительно. В более поздних версиях предпочтение отдается универсальным интегрированным средам разработки с плагинами.
С начала 2016 года язык получил кросс-платформенную поддержку. Теперь его можно применять не только в операционных системах Windows 7, 8, 10, и 11, но и на macOS (начиная с версии 10.13), а также на различных популярных дистрибутивах Linux (подробная информация о совместимых дистрибутивах доступна в официальной документации).
Как открыть PowerShell в Windows
Как правило, PowerShell уже установлен на вашем компьютере по умолчанию. Однако, если по какой-то причине его нет, вы можете воспользоваться инструкциями, предоставленными Microsoft. В дополнение, в официальной документации имеются подробные руководства по установке на macOS и Linux.
PowerShell является независимым от версии операционной системы инструментом и работает одинаково стабильно как на Windows 10, так и на Windows Server.
Существует два основных метода для запуска PowerShell или PowerShell ISE в системе Windows: через меню «Пуск» и с помощью приложения «Выполнить».
- Для того чтобы открыть PowerShell через меню «Пуск», пройдите к папке Windows PowerShell, откройте её и выберите необходимое приложение. В этой директории доступны как 32-разрядные версии (отмечены как x86 в скобках), так и 64-разрядные версии терминала и ISE.
- Чтобы запустить PowerShell через приложение «Выполнить», используйте комбинацию клавиш Win + R. Когда появится окно, введите
powershellилиpowershell ise(в зависимости от того, какое приложение вам нужно) и нажмите кнопку ОК.
Команды (командлеты) PowerShell
В языке программы PowerShell команды носят название командлеты (от английского «cmdlet»). Все они формируются с использованием шаблона «Глагол-Существительное», или «Действие-Объект». Например, Get-Services и Start-Process. Благодаря такой структуре, можно легко понять предназначение команды, даже если вы с ней ещё не работали ранее.
Синтаксис командлетов
После имени самого командлета следует указание параметров и их значений. Между всеми частями команды следует проставлять пробелы. Вот пример синтаксиса командлета, который позволяет перейти в директорию C:\:
Set-Location -LiteralPath C:\ -PassThru
Разберем его на составные части:
Set-Location— буквально «вызвать команду». Этот командлет позволяет выполнять указанный блок сценария.-LiteralPath C:\— здесь передаем блок сценария, в котором используется командаSet-Locationдля перехода в каталогC:\.-PassThru— по умолчанию командлетInvoke-Commandне возвращает результат выполнения. Этот параметр указывает на необходимость вывода информации о местоположении, в которое был выполнен переход с помощью командыSet-Location.
Важно отметить, что регистр букв в командах PowerShell не имеет значения. Таким образом, данную команду можно записать в виде заглавных букв, строчных букв или даже смешанного регистра, и она все равно будет выполняться:
sEt-loCATion -PATH c:\ -passthru
Когда в одной строке объединены несколько команд, они разделяются точкой с запятой ;
Иногда команда может быть слишком длинной. Для разделения на несколько строк можно использовать символ обратного апострофа ` в месте переноса. Новую строку можно создать, нажав Shift + Enter (для переноса строки ниже текущей) или Ctrl + Enter (для переноса строки выше текущей).
Разделим предыдущую команду:
Set-Location `
-LiteralPath C:\ `
-PassThru
Алиасы
В процессе работы с терминалом иногда может быть неудобно постоянно вводить полные названия командлетов. Именно поэтому у наиболее часто используемых командлетов существуют псевдонимы (алиасы) — их сокращенные варианты.
Чтобы получить список доступных алиасов, вы можете воспользоваться командой Get-Alias. Кроме того, данной команде также доступен псевдоним gal.
Чтобы получить список алиасов для конкретного командлета, вы можете использовать параметр -Definition. Пример:
Get-Alias -Definition Set-Location
Если вам нужно узнать полное название командлета по его алиасу, используйте параметр -Name. Этот параметр необязателен, так как он является аргументом по умолчанию.
# Оба следующих варианта эквивалентны:
Get-Alias -Name clear
Get-Alias clear

Особенности обработки путей к каталогам
Для многих командлетов необходимо предоставить путь к файлу или каталогу. Это делается с использованием строки, например: C:\Windows\System32.
Однако, если в пути встречается пробел или другой специальный символ, PowerShell будет рассматривать его как разделитель. Например:
# Следующая команда не будет выполнена корректно
Set-Location C:\Program Files
PowerShell «воспринимает» пробел и интерпретирует его так, будто путь к папке закончился на слове Program, а files — это уже значение другого параметра.
Чтобы избежать подобных ситуаций, существует два метода:
- Экранировать символы с помощью обратного апострофа
`:C:\Program` Files. Однако это может быть неудобным, если путь длинный. - Поместить весь путь в одинарные или двойные кавычки:
'C:\Program Files'или"C:\Program Files"(желательнее использовать одинарные кавычки).
Кроме того, в PowerShell существуют сокращения для быстрого доступа к ближайшим директориям:
- Точка
.указывает на текущий каталог. Например,Get-ChildItem .позволяет просмотреть содержимое текущего местоположения. - Две точки
..указывают на родительский каталог. Например,Set-Location ..позволяет перейти к родительскому каталогу. Это может быть полезно, если вы находитесь в глубоко вложенной директории.
Большинство командлетов имеют параметры -Path и -LiteralPath, позволяющие указать путь к файлу или папке. Разница между ними заключается в том, что в -Path можно включать переменные, в то время как —LiteralPath интерпретирует символы буквально, даже если они содержат имя переменной.
Get-Help: как изучать новые командлеты
Для получения подробной информации о конкретном командлете воспользуйтесь командой Get-Help Название-Командлета. Пример:
Get-Help Get-Childitem
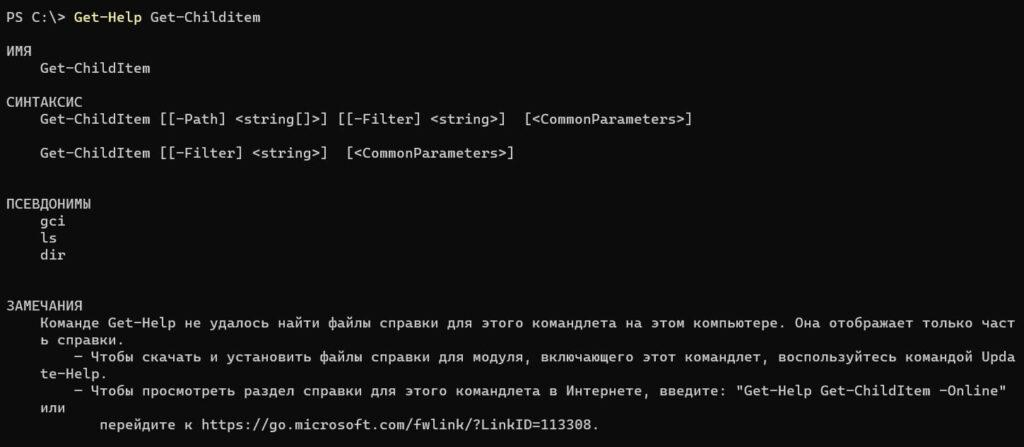
У команды Get-Help имеется несколько полезных параметров:
-Detailedпредоставляет более подробную справку по командлету.-Fullпредоставляет полную справку.-Examplesдемонстрирует примеры использования командлета.-Onlineперенаправляет пользователя на веб-страницу с соответствующей документацией.
Объекты и конвейеры (пайплайны) в PowerShell
Когда вы работаете с командлетами в PowerShell, они возвращают не просто строки, а объекты — структуры данных, содержащие набор свойств и методов.
То, что отображается в терминале после выполнения команды в виде строки, на самом деле является визуальным представлением объекта. Программа PowerShell отображает определенные свойства объектов в виде таблицы, но далеко не все свойства могут быть отображены таким образом.
Аналогично тому, как командлеты могут возвращать объекты, они также могут принимать и обрабатывать их. Вы можете создать команду, которая возвращает объект, передать этот объект другому командлету, получить объект из него и так далее — этот процесс и называется конвейерами или пайплайнами.
Чтобы передать результат одного командлета другому, используется символ вертикальной черты |.
Пример работы конвейера в PowerShell
Команда Get-Process возвращает список запущенных процессов на компьютере. При передаче ей имени процесса (или шаблона, созданного с помощью регулярных выражений), команда выведет только соответствующие элементы списка.
Рассмотрим пример, где вызываем запущенный процесс PowerShell:
Get-Process powershell
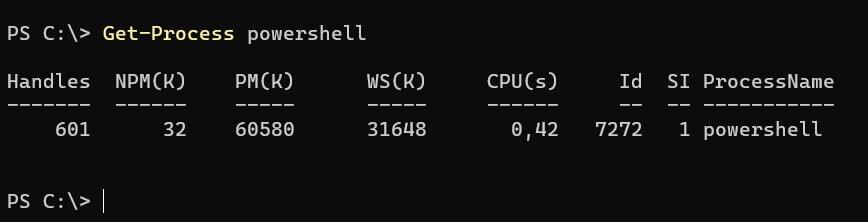
Мы получаем объект и таблицу, отображающую некоторые его свойства. Чтобы узнать все свойства и методы, давайте передадим этот объект командлету Get-Member. Для этого используется конвейер:
Get-Process powershell | Get-Member
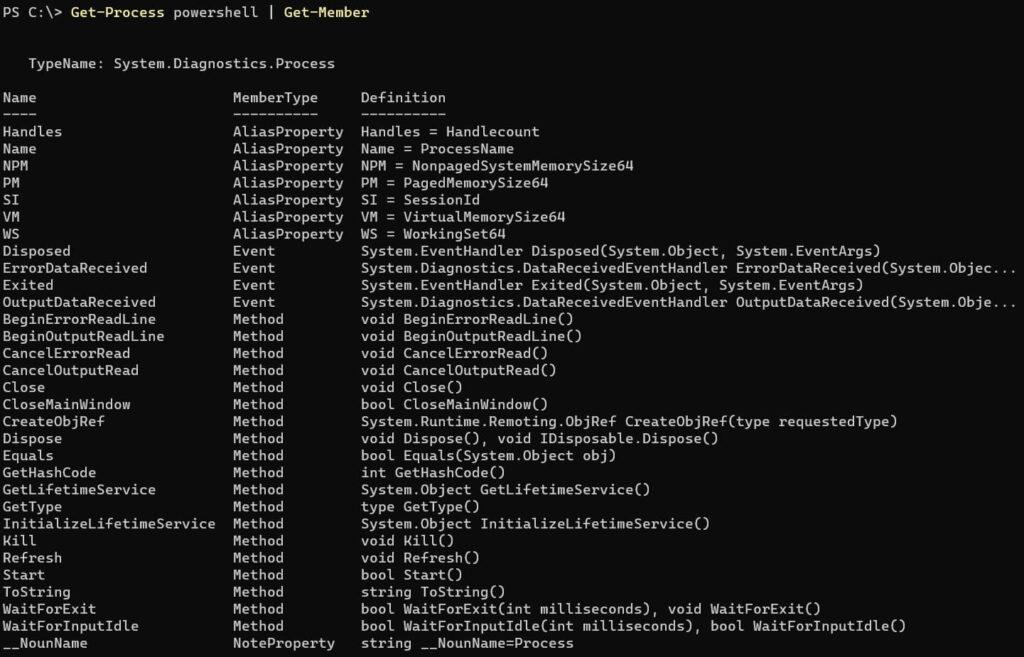
Команда Get-Member получает объект от команды Get-Process и выводит таблицу со всеми его свойствами и методами. Результат работы Get-Member также представляет собой объект (точнее, список объектов), который можно передать по конвейеру дальше.
Допустим, нужно вывести только те строки, в которых MemberType равно Property. Для этого используем команду Where-Object:
Get-Process powershell | Get-Member | Where-Object {$_.MemberType -eq 'Property'}
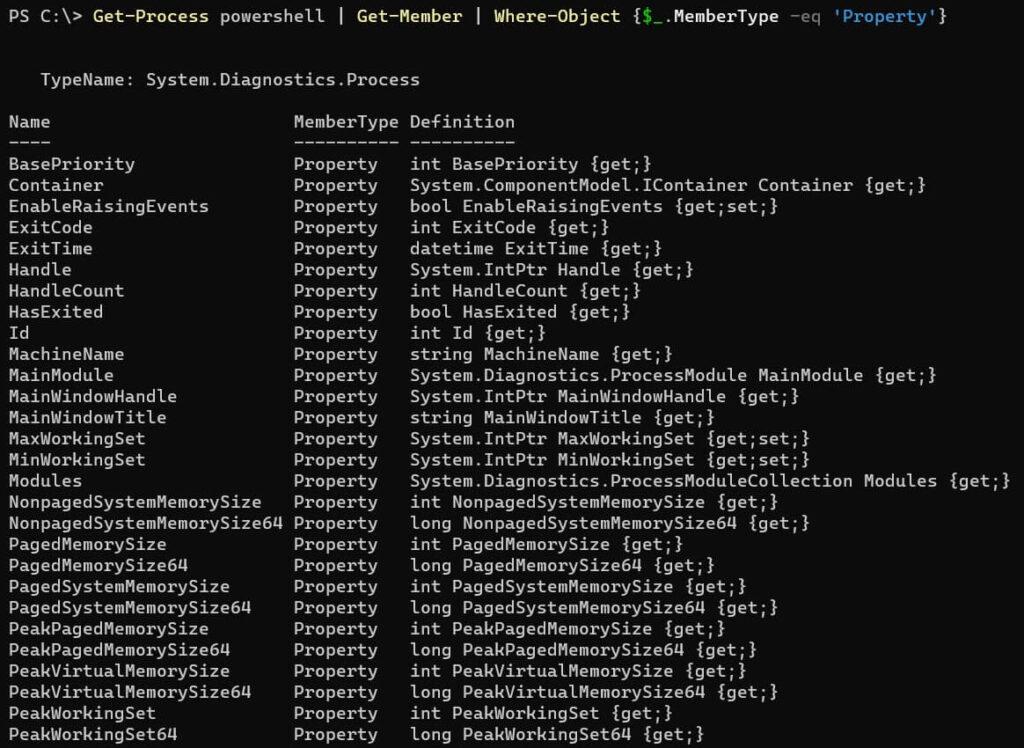
Команда Where-Object последовательно обходит каждый объект, полученный от команды Get-Member. Выражение в фигурных скобках — логическое:
$_ссылается на текущий объект (то есть на отдельную строку в таблице);.MemberTypeобращается к значению свойстваMemberTypeв этом объекте;-eqвыполняет сравнение между выражением слева и выражением справа от него;'Property'представляет значение, которое ожидаем увидеть у свойстваMemberType.
Более подробно о логических выражениях рассказано ниже.
Форматирование таблиц с помощью конвейеров
Командлет Format-Table в PowerShell предоставляет возможность настроить вывод таблицы в терминале: выбирать нужные свойства и методы, устанавливать ширину столбцов, группировать данные по нескольким таблицам и т. д.
Форматируем таблицу, полученную с помощью командлета Get-Member. Следует использовать следующий синтаксис:
Get-Process powershell | Get-Member | Format-Table -AutoSize -Wrap -GroupBy MemberType -Property Name, Definition
Разберем параметры командлета Format-Table:
-AutoSizeвыравнивает ширину столбцов в соответствии с размерами их содержимого. Это позволяет оптимально использовать ширину экрана.-Wrapпереносит содержимое ячейки на новую строку, если оно не помещается в текущих размерах экрана. По умолчанию, если текст не помещается, он обрезается.-GroupByпозволяет разделить одну таблицу на несколько, сгруппированных по значению определенного свойства. В данном случае, для каждого значенияMemberTypeбудет создана отдельная таблица.-Propertyопределяет, какие свойства объекта будут отображены в таблице в качестве столбцов. В данном примере, мы указали свойстваNameиDefinition.
Эти параметры позволяют настраивать внешний вид таблицы, сделать вывод более читабельным и структурированным.
Сортировка таблиц с помощью конвейеров
Командлет Sort-Object в PowerShell позволяет сортировать список объектов (таблицу) по значениям их свойств (столбцов). Давайте отсортируем результат, полученный с помощью командлета Get-Member, по столбцу Name в алфавитном порядке. Для этого воспользуемся параметром -Property, который действует аналогично параметру у командлета Format-Table:
Get-Process powershell | Get-Member | Sort-Object -Property Name
Командлет Sort-Object в PowerShell имеет также другие полезные параметры:
-Descendingсортирует объекты в порядке убывания. Например:
Get-Process powershell | Get-Member | Sort-Object -Property Name -Descending
-Uniqueудаляет дубликаты и возвращает только уникальные объекты. Например:
Get-Process powershell | Get-Member | Sort-Object -Property Name -Unique
- Параметр
-Topполучает число N и отображает первые N объектов в таблице. Например:
Get-Process | Sort-Object -Property CPU -Top 10
- Параметр
-Bottomполучает число N и отображает последние N объектов в таблице. Например:
Get-Process | Sort-Object -Property Memory -Descending -Bottom 5
Эти параметры позволяют более гибко настраивать сортировку и отображение объектов в выводе.
Фоновое выполнение команд
Определенные задачи могут требовать значительного времени на выполнение. Примеры таких задач включают установку и обновление программного обеспечения или поиск файлов в обширной директории. Важно помнить, что во время выполнения одной команды в PowerShell нельзя вводить другие команды.
Рассмотрим пример: предположим, нужно найти файл powershell.exe на всем диске C. Для этой цели воспользуемся командлетом Get-ChildItem с параметром -Recurse. Это позволит ему искать файл не только в текущем каталоге, но и во всех его подкаталогах.
Следует учитывать, что PowerShell может столкнуться с папками, к которым у него нет доступа. Чтобы обойти возможные ошибки, добавим параметр -ErrorAction SilentlyContinue. Это означает, что в случае ошибки команда не будет генерировать уведомления, а просто продолжит выполнение.
Таким образом, данная ситуация выглядит следующим образом:
Get-ChildItem -Path C:\ -Name powershell.exe -Recurse -ErrorAction SilentlyContinue

Очевидно, что во время выполнения задачи, командная строка становится недоступной. Для принудительного прерывания выполнения задачи можно воспользоваться сочетанием клавиш Ctrl + C. Важно убедиться, что при этом ничего не выделено, чтобы избежать возможного восприятия компьютером как команды «Копировать».
Чтобы избежать ожидания завершения длительных задач и сразу перейти к следующим, можно запустить задачи в фоновом режиме. Для этого используется командлет Start-Job, а сам код задачи заключается в фигурные скобки:
Start-Job {Get-ChildItem -Path C:\ -Name powershell.exe -Recurse -ErrorAction SilentlyContinue}

Параллельно возможно выполнение любого числа фоновых задач. В дополнение к командлету Start-Job, предназначенному для управления фоновыми задачами, существуют и другие командлеты:
Get-Jobпредоставляет отчет о состоянии фоновых задач.Wait-Jobблокирует консоль до завершения фоновой задачи.Stop-Jobпрекращает выполнение фоновой задачи.Receive-Jobвыводит результаты выполнения фоновой задачи и очищает их из памяти. Для сохранения результатов в памяти используйте параметр-Keep.
Опции Wait-Job, Stop-Job и Receive-Job требуют указания имени Name или идентификатора Id конкретной задачи или задач (в случае нескольких). Это можно сделать непосредственно или в связке с командлетом Get-Job.
Get-Job Job1

Работа с файлами
PowerShell предоставляет удобные средства для работы с файлами. Вот некоторые ключевые методы:
Для создания файла используйте командлет New-Item с указанием пути к файлу:
New-Item -Path "C:\путь\к\файлу\новыйфайл.txt" -ItemType File
Чтобы записать данные в файл, используйте Out-File или Set-Content:
"Содержимое файла" | Out-File -FilePath "C:\путь\к\файлу\новыйфайл.txt"
Set-Content -Path "C:\путь\к\файлу\новыйфайл.txt" -Value "Новое содержимое файла"
Для чтения содержимого файла в массив используйте Get-Content:
$содержимое = Get-Content -Path "C:\путь\к\файлу\новыйфайл.txt"
Для получения информации о файле (размер, дата создания и др.) используйте Get-Item:
$информацияОФайле = Get-Item -Path "C:\путь\к\файлу\новыйфайл.txt"
Для копирования файла в другое место используйте Copy-Item:
Copy-Item -Path "C:\путь\к\файлу\новыйфайл.txt" -Destination "C:\путь\к\копия\новыйфайл.txt"
Для удаления файла воспользуйтесь командлетом Remove-Item:
Remove-Item -Path "C:\путь\к\файлу\новыйфайл.txt" -Force
Помните, что операции удаления файлов необратимы, поэтому будьте осторожны при их использовании.
Работа в PowerShell ISE
Командная оболочка PowerShell представляет собой удобный инструмент для выполнения малых, кратких однострочных задач. Однако для создания и сохранения более сложных сценариев существует интегрированная среда разработки скриптов PowerShell ISE.
PowerShell ISE представляет собой инструмент, состоящий из трех основных панелей:
- Область скриптов в верхней части экрана, предназначенная для написания сценариев.
- Консольная область в нижней части экрана, которая функционирует как обычный терминал, позволяя вводить команды в интерактивном режиме.
- Панель команд в правой части экрана, предоставляющая полное руководство по командам PowerShell. В ней также есть конструктор, который помогает задать значения нужных параметров.
Комментарии в коде
В PowerShell имеется возможность включать комментарии в код, которые не влияют на выполнение сценария, но предназначены для читаемости программы другими людьми. Однострочный комментарий начинается с символа #, а многострочный комментарий заключается между символами <# и #>.
Вот пример PowerShell скрипта с комментариями:
# Это комментарий в одну строку, начинается с символа '#' и продолжается до конца строки.

# Пример переменной
$имя = "John"
$возраст = 30

# Вывод информации
Write-Host "Привет, $имя! Тебе $возраст лет."

# Это многострочный комментарий, который начинается с '<#' и заканчивается '#>'.
<#
Этот блок комментария может быть многострочным и располагаться
на нескольких строках, чтобы объяснить более сложные участки кода.
#>

# Функция для сложения двух чисел
function Сложить-Числа {
    param(
        [int]$число1,
        [int]$число2
    )

    $результат = $число1 + $число2

    return $результат
}

# Вызов функции и вывод результата
$результатСложения = Сложить-Числа -число1 5 -число2 7
Write-Host "Результат сложения: $результатСложения"
Хорошая практика — комментировать код таким образом, чтобы другие разработчики (или вы в будущем) могли легко понять, как работает код и какие цели преследовались при его написании.
Советы по написанию хорошего кода:
- Применяйте нотацию PascalCase для названий командлетов, функций, параметров, свойств, методов, переменных и классов. Разработчики Powershell выпустили для этого гайд. Не рекомендуется:
get-service,Get-service,GET-SERVICE. Рекомендуется:Get-Service. - Используйте полные названия командлетов. Алиасы удобны для интерактивного режима, но в скриптах они могут затруднить понимание. Не рекомендуется:
dir,gci,ls. Рекомендуется:Get-ChildItem. - Применяйте стиль One True Brace для форматирования вложенных блоков кода. Если вы используете фигурные скобки, внутренний код отделяется табуляцией (четыре пробела), а фигурные скобки размещаются следующим образом:
if ($var1 -eq $var2) {
    # Код внутри условия
} else {
    # Код внутри else
    # Еще код внутри else
}
Исключение: когда код внутри фигурных скобок небольшой, его можно записать в одну строку:
Get-ChildItem | Where-Object { $_.Length -gt 10mb }
Запуск скриптов
В PowerShell ISE имеется возможность выполнять код как целиком, так и частично, а также предоставляются инструменты для отладки. Скрипты сохраняются в файлах с расширением .ps1. Однако запустить скрипт, просто дважды щелкнув по нему, не получится. Вместо этого вы можете нажать правую кнопку мыши и выбрать опцию Выполнить с помощью PowerShell.
Также существует возможность запуска скрипта из оболочки. Например, предположим, у вас есть файл скрипта test_script.ps1 в каталоге C:\Scripts. Вы можете выполнить его двумя способами:
- Используя команду
PowerShell -File C:\Scripts\test_script.ps1из любого места. Это позволяет запустить скрипт, указав полный путь к файлу. - Используя команду
.\test_script.ps1, если вы находитесь в каталогеC:\Scripts. Это запустит скрипт, находясь в том же каталоге, что и файл скрипта.
Такие методы позволяют управлять выполнением PowerShell скриптов из разных мест и с разных уровней оболочки.
Политика выполнения. Как разрешить выполнения скриптов
По умолчанию запрещено выполнение файлов с PowerShell-скриптами, и это сделано с целью обеспечения безопасности. Вы можете узнать текущую политику выполнения с помощью командлета Get-ExecutionPolicy. Вот какие варианты политики выполнения могут быть доступны:
- Restricted (Установлена по умолчанию) — запрещено выполнение любых скриптов. Это означает, что нельзя будет запустить ни один скрипт.
- AllSigned — разрешено выполнение только тех скриптов, которые были подписаны доверенным разработчиком. Это обеспечивает повышенный уровень безопасности, так как только подписанные и проверенные скрипты могут быть выполнены.
- RemoteSigned — разрешено выполнение подписанных доверенным разработчиком скриптов, а также собственных скриптов. Это предоставляет баланс между безопасностью и удобством, позволяя запускать свои скрипты.
- Unrestricted — разрешено выполнение любых скриптов без каких-либо ограничений. Это предоставляет наивысший уровень гибкости, но может повысить риск безопасности.
Выбор политики выполнения зависит от вашей ситуации и потребностей. Учтите, что уровень безопасности можно поднять, ослабить или настроить для определенных директорий с помощью командлетов Set-ExecutionPolicy и Unblock-File.
Чтобы ваши файлы с расширением .ps1 запускались, вам следует изменить политику выполнения на RemoteSigned. Для этого выполните следующие шаги:
- Откройте PowerShell от имени администратора. Для этого щелкните правой кнопкой мыши по значку PowerShell на панели задач или в меню «Пуск» и выберите «Запуск от имени администратора».
- В открывшемся окне PowerShell введите следующую команду и нажмите Enter:
Set-ExecutionPolicy RemoteSigned
- Подтвердите изменение политики выполнения, нажав клавишу
Y(Yes).
Теперь вы сможете запускать свои файлы .ps1 без ограничений. Однако, имейте в виду, что изменение политики выполнения может повлиять на безопасность системы, поэтому будьте осторожны и убедитесь, что вы запускаете только те скрипты, которые вы знаете и доверяете.
Переменные
Для сохранения данных и обращения к ним в будущем в PowerShell используются переменные. Перед названием переменной ставится символ доллара $, и переменные могут содержать латинские буквы (как заглавные, так и строчные), цифры и символ нижнего подчеркивания.
Переменные в могут хранить данные различных типов, и значения в них можно изменять (перезаписывать).
Создадим переменную со строкой 2023 и преобразуем её в число. Для того чтобы узнать тип данных, воспользуемся методом .GetType():
$stringValue = "2023"
$intValue = [int]$stringValue
$intValue.GetType()
Этот код создает переменную $stringValue со значением 2023, затем преобразует её в число $intValue с помощью [int]. После этого вызывается метод .GetType() для переменной $intValue, чтобы определить её тип данных.
Для удаления переменной используется метод .Clear().
Переменные можно вставлять в строки, если строки оформлены двойными кавычками. В случае одинарных кавычек, PowerShell воспринимает символы в строке буквально. Давайте сравним два примера:
$number = 42
Write-Host "The number is $number"   # Вывод: The number is 42
Write-Host 'The number is $number'   # Вывод: The number is $number
В первом случае, используя двойные кавычки, значение переменной $number подставляется в строку. Во втором случае, с использованием одинарных кавычек, строка остается буквальной, и $number не интерпретируется как переменная.
Кроме пользовательских переменных, существуют и системные переменные. Например, $PSVersionTable содержит информацию о версии PowerShell.
Логические операторы
В PowerShell вы также можете выполнять арифметические операции над объектами и строками, сравнивать их друг с другом, используя логические операторы.
Арифметические операторы:
+— сложение;-— вычитание;*— умножение;/— деление;%— деление по модулю;(и)— скобки для группировки операций.
Операторы сравнения оформляются так же, как параметры командлетов, и их названия произошли от английских выражений, указанных в скобках:
-eq— равно (от «equal»);-ne— не равно (от «not equal»);-gt— больше (от «greater than»);-ge— больше либо равно (от «greater than or equal»);-lt— меньше (от «less than»);-le— меньше либо равно (от «less than or equal»).
Работа со строками в PowerShell
PowerShell — мощный инструмент для автоматизации задач на платформе Windows. Работа со строками играет важную роль при обработке текстовых данных. Вот некоторые ключевые аспекты:
- Объединение строк: Чтобы объединить строки, используйте оператор
+или метод.Concat(). Пример:
$firstString = "Привет, "
$secondString = "мир!"
$combinedString = $firstString + $secondString
- Форматирование строк: Используйте оператор
-fили метод.Format()для вставки значений в строку. Пример:
$name = "Alice"
$age = 30
$formattedString = "Привет, меня зовут {0} и мне {1} лет." -f $name, $age
- Интерполяция строк: С помощью символа
$и фигурных скобок{}можно вставлять значения переменных в строки. Пример:
$city = "Москва"
$interpolatedString = "Я живу в городе $($city)."
- Разделение строк: Метод
.Split()используется для разделения строки на подстроки. Пример:
$text = "яблоко,груша,банан"
$fruits = $text.Split(",")
- Замена подстрок: С помощью метода
.Replace()можно заменить подстроку в строке. Пример:
$text = "Привет, мир!"
$modifiedText = $text.Replace("мир", "вселенная")
- Обрезка строк: Методы
.Trim(),.TrimStart()и.TrimEnd()удаляют пробелы и другие символы в начале и конце строки.
Примеры использования методов для обрезки строк в PowerShell:
# Обрезка пробелов в начале и конце строки
$rawString = "   Пример строки с пробелами   "
$trimmedString = $rawString.Trim()
Write-Host "Исходная строка: '$rawString'"
Write-Host "Обрезанная строка: '$trimmedString'"

# Обрезка только в начале строки
$leftTrimmedString = $rawString.TrimStart()
Write-Host "Строка после обрезки в начале: '$leftTrimmedString'"

# Обрезка только в конце строки
$rightTrimmedString = $rawString.TrimEnd()
Write-Host "Строка после обрезки в конце: '$rightTrimmedString'"
При выполнении этого кода в консоли PowerShell вы увидите следующий вывод:
Исходная строка: '   Пример строки с пробелами   '
Обрезанная строка: 'Пример строки с пробелами'
Строка после обрезки в начале: 'Пример строки с пробелами   '
Строка после обрезки в конце: '   Пример строки с пробелами'
В данном примере видно, как методы .Trim(), .TrimStart() и .TrimEnd() удаляют пробелы в начале и конце строки, соответственно.
Условия
Условные операторы в PowerShell создаются с использованием ключевых слов if, elseif и else. В круглых скобках указывается само условие, а в фигурных скобках содержится код, который выполняется при выполнении условия. Например:
$Number = 123

if ($Number -gt 0) {
    Write-Host 'Число больше нуля'
} elseif ($Number -lt 0) {
    Write-Host 'Число меньше нуля'
} else {
    Write-Host 'Число равно нулю'
}

Результат выполнения кода: Число больше нуля
Кроме того, условия также можно задавать с помощью ключевого слова switch. Например:
$Day = 5

switch ($Day) {
    1 { Write-Host 'Понедельник' }
    2 { Write-Host 'Вторник' }
    3 { Write-Host 'Среда' }
    4 { Write-Host 'Четверг' }
    5 { Write-Host 'Пятница' }
    6 { Write-Host 'Суббота' }
    7 { Write-Host 'Воскресенье' }
}

Результат выполнения кода: Пятница
Циклы
В PowerShell существует несколько видов циклов:
- Цикл с предусловием
while:
$counter = 0

while ($counter -lt 5) {
    Write-Host "Counter is $($counter)"
    $counter++
}
- Цикл с постусловием истинным
do while:
$counter = 0

do {
    Write-Host "Counter is $($counter)"
    $counter++
} while ($counter -lt 5)
- Цикл с постусловием ложным
do until:
$counter = 0

do {
    Write-Host "Counter is $($counter)"
    $counter++
} until ($counter -ge 5)
- Цикл с известным числом итераций
for:
for ($i = 0; $i -lt 5; $i++) {
    Write-Host "Iteration is $i"
}
- Цикл с перебором элементов коллекции
foreach:
$numbers = 1..5

foreach ($num in $numbers) {
    Write-Host "Number is $num"
}
Во всех случаях синтаксис похож на синтаксис условных операторов: в круглых скобках указывается условие или параметры, а в фигурных скобках — код, который выполняется внутри цикла.
Массивы, хеш-таблицы, функции и классы
В PowerShell есть множество возможностей для создания сложных структур данных и алгоритмов. Вот краткое описание некоторых из них:
- Массивы (Arrays): позволяют хранить набор элементов одного типа. Элементы могут быть доступны по индексам. Создаются массивы с использованием квадратных скобок
[ ].
$fruits = "Apple", "Banana", "Orange"
$fruits[0]  # Доступ к элементу массива по индексу
- Хеш-таблицы (Hash Tables): представляют собой пары ключ-значение, где ключи уникальны. Они полезны для хранения и быстрого доступа к данным по ключу.
$person = @{
    Name = "John"
    Age = 30
    City = "New York"
}

$person["Name"]  # Доступ к значению по ключу
- Пользовательские функции: Вы можете определить собственные функции для группировки кода и повторного использования. Их определение происходит с использованием ключевого слова
function.
function Get-Sum {
    param($a, $b)
    return $a + $b
}

$result = Get-Sum 5 3
- Пользовательские классы: PowerShell также поддерживает создание пользовательских классов, что позволяет создавать более сложные объекты с различными свойствами и методами.
class Person {
    [string] $Name
    [int] $Age
    Person([string] $name, [int] $age) {
        $this.Name = $name
        $this.Age = $age
    }
    [string] GetInfo() {
        return "$($this.Name), $($this.Age) years old"
    }
}

$person = [Person]::new("Alice", 25)
$info = $person.GetInfo()
Это всего лишь краткий обзор, и в документации PowerShell можно найти более подробную информацию и примеры использования этих и других возможностей для создания более сложных структур данных и алгоритмов:
- Массивы
- Хеш-таблицы
- Пользовательские функции
- Пользовательские классы
Для чего нужен PowerShell
PowerShell — это мощный инструмент для автоматизации задач, управления операционной системой и взаимодействия с различными приложениями и сервисами. Он широко используется администраторами систем, разработчиками, а также специалистами в области IT для решения разнообразных задач. Вот некоторые из основных применений PowerShell:
- Автоматизация задач: PowerShell позволяет создавать сценарии (скрипты) для автоматизации повторяющихся и рутинных задач, таких как установка программ, настройка системных параметров, копирование файлов и многие другие операции.
- Управление системой: PowerShell предоставляет доступ к широкому спектру системных функций, позволяя администраторам управлять пользователями, группами, службами, процессами, реестром и другими системными ресурсами.
- Конфигурация и развертывание: С помощью PowerShell можно создавать и применять конфигурации для развертывания и управления серверами и компьютерами, что делает процесс управления парком устройств более эффективным.
- Мониторинг и анализ: PowerShell позволяет анализировать системные данные, собирать статистику, мониторить производительность и события, что помогает администраторам быстро реагировать на проблемы.
- Взаимодействие с внешними приложениями и службами: PowerShell может взаимодействовать с другими приложениями и службами, используя API, веб-службы, REST API и другие протоколы, что позволяет автоматизировать процессы, связанные с сторонними приложениями.
- Разработка и тестирование: Разработчики используют PowerShell для создания сценариев тестирования, сборки проектов, управления версиями и других задач, связанных с разработкой ПО.
- Обработка данных: PowerShell предоставляет мощные инструменты для обработки и анализа данных, таких как текстовые файлы, CSV, XML и другие форматы данных.
- Безопасность: PowerShell может использоваться для управления политиками безопасности, мониторинга событий безопасности, а также для проведения аудитов безопасности системы.
Чем PowerShell отличается от cmd
Рассмотрим сравнение двух основных инструментов командной строки в операционной системе Windows: PowerShell и командной строки (cmd). Оба инструмента позволяют взаимодействовать с операционной системой через команды и сценарии, однако они существенно различаются по своим характеристикам и функциональности.
| Аспект | PowerShell | Командная строка (cmd) |
|---|---|---|
| Язык сценариев | Мощный язык на основе .NET Framework | Ограниченный язык для выполнения команд |
| Объектная модель | Работа с объектами и конвейерная обработка | Работа с текстовыми строками и потоками |
| Управление системой | Обширный набор командлетов для управления | Ограниченный набор команд для управления |
| Синтаксис | Современный и читаемый синтаксис | Простой синтаксис команд и аргументов |
| Поддержка модулей | Поддержка модулей для организации функциональности | Отсутствие концепции модулей |
Итоги
Windows PowerShell представляет собой программу и язык программирования, который применяется для управления операционными системами и автоматизации операций. Этот инструмент поддерживает концепции объектно-ориентированного программирования и обеспечивает возможность взаимодействия в интерактивном режиме, а также создания, сохранения и выполнения разнообразных скриптов.
- PowerShell изначально интегрирован в операционную систему Windows версий 7, 8, 10, 11 и Server, но также доступен для скачивания на платформах macOS и Linux. В дополнение к этому, для более старых версий языка (5.1 и ранее) имеется инструмент под названием PowerShell ISE — интегрированная среда сценариев.
- Центральной концепцией PowerShell является работа с объектами, а не с простыми строками. Взаимодействие с объектами осуществляется через командлеты, построенные в соответствии с принципом «Глагол-Существительное».
- Сила PowerShell заключается в возможности передачи результатов выполнения одного командлета в качестве входных данных для другого, используя конвейер. Этот подход способствует более эффективной и гибкой обработке данных.
- Помимо этого, PowerShell предоставляет функциональность для выполнения задач в фоновом режиме, что позволяет параллельно выполнять несколько операций.
- PowerShell является высокоуровневым языком программирования, который обеспечивает возможность работы с переменными, логическими операторами, условиями, циклами, массивами, хеш-таблицами, функциями и классами.
https://youtu.be/-5u8m—A1gQ
Most of us prefer PowerShell due to its automation capabilities. It’s a command-line shell with a fully developed scripting language. You can use the built-in cmdlets or write your own script to automate the administrative tasks of Windows and other compatible operating systems. It allows you to do everything that you can do with the GUI apps and more.
However, mastering the functionality and flexibility of PowerShell involves a steep learning curve. If you are just getting started with PowerShell, here are the essential commands you can learn to master this scripting language in the long run.
1. Get-Help
Get-Help, as the name suggests, is part of PowerShell’s integrated help system. It helps you find necessary information for the command, concepts, and functions, identify alias, scripts, and more.
To get help for a PowerShell cmdlet, you need to use the Get-help cmdlet followed by a cmdlet name. For example, to view the synopsis and syntaxes associated with the get-process cmdlet, type:
Get-Help Get-Process
This command can read both comment-based and XML-based help provided by the function author.
Alternatively, you can use the Get-Help -online command to get help for a PowerShell cmdlet online. For example, to view Microsoft’s online documentation for the Get-Content cmdlet, type:
Get-Help Get-Content -online
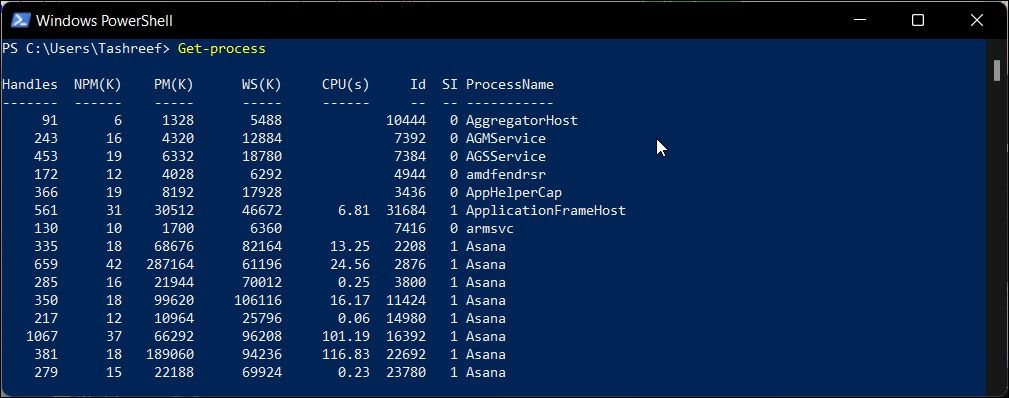
2. Get-Process

The Get-Process command helps you retrieve and show a list of all the active system processes with their identifiers (IDs). You can use it as an efficient alternative to Windows Task Manager to view, stop and restart system processes.
For example, if you need to stop the GameBar process, first you need to find the process ID associated with it. So, type:
Get-Process
This command will show all the running system processes. Next, find the ID associated with the process you want to stop. To stop the process, type:
Get-Process -ID 20496 | Stop-Process
Here -ID 20496 is the ID of the process (GameBar) you want to stop.
3. Start-Process
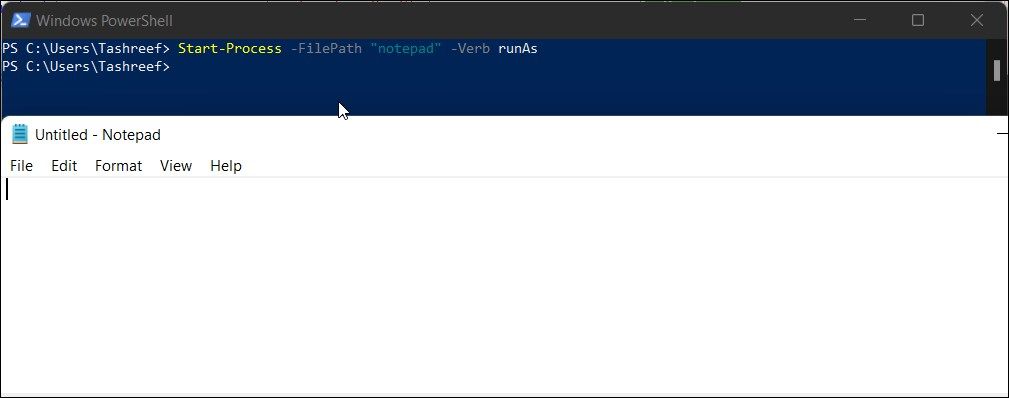
You can use the Start-Process cmdlet in PowerShell to start one or more processes on a local computer. To use the cmdlet, type Start-Process followed by the process name. For example, if you want to start a new notepad process, type:
Start-Process notepad
Additionally, you can use the parameters of Start-Process to specify options. For example, if you need to launch a process as administrator, type:
Start-Process -FilePath "notepad" -Verb runAs
4. Get-Command
The Get-Command lets you view all the PowerShell commands installed on your computer. Similar to Get-Help, you can use the Get-Command followed by a search query to find commands for a specific feature.
Since the Get-Command displays all the commands, you can specify parameters to find features with a specific name and CommandType. For example, to find cmdlets (CommandTypes) that start with A (Name), type:
Get-Command -Name A* -CommandType cmdlet
Alternatively, type Get-Help Get-Command -Examples to view more examples.
5. Get-Service
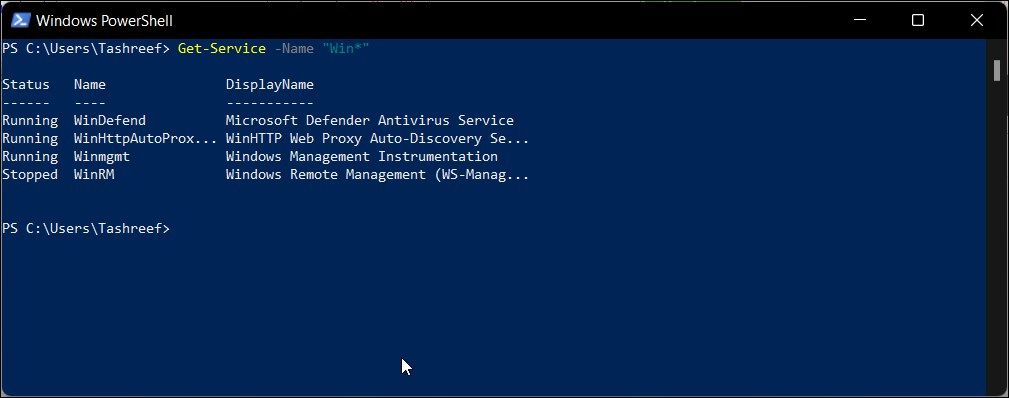
The Get-Service cmdlet lets you view your computer’s status and list of services. By default, the Get-Service command returns all the (stopped and running) services.
You can use the parameters to specify and find services depending on their status, name, and dependent services. For example, to view all the services starting with the name Win, type:
Get-Service -Name "Win*"
6. Get-ChildItem
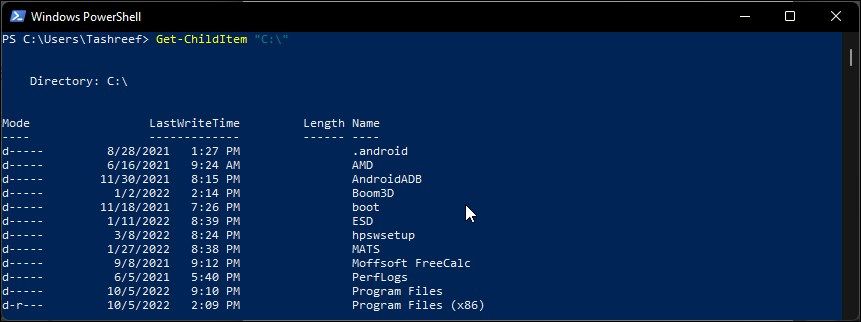
You can use PowerShell to search through directories. The Get-ChildItem command is a handy cmdlet to look for folders and files and quickly perform content-based searches without using File Explorer.
To view all the top-level folders in the C:\ directory, type:
Get-ChildItem "C:\"
Additionally, use the -Path parameter to view a particular folder, sub-folders, and content. For example, to view all the sub-folders and files in the Programs Files folder, type:
Get-ChildItem -Path "C:\Program Files"
Additionally, use the —Recurse parameter to view all the files in the specified folder and the -Name parameter to view item names in a directory.
Get-ChildItem -Path "C:\Program Files\Fodler_Name" -Recurse | Select FullName
In the above command, replace sub-folder with the folder name to view its content.
7. Copy-Item

The Copy-Item cmdlet lets you copy-paste files and folders and their contents to a different directory. To copy files and folders, type Copy-Item followed by the source —Path, -Destination parameter, and destination address. For example, to copy E:\Folder1 and its contents to E:\Folder2, type:
Copy-Item "E:\Folder1" -Destination "E:\Folder2" -Recurse
Note that the -Recurse parameter in the above command is responsible for moving all the folder contents. Without it, PowerShell will only copy the top-level folder (Folder1) and files specified in the command.
8. Move-Item

Similarly, to move an item, you can use the Move-Item cmdlet. For example, to move the folder, files, sub-folders, and all its contents to your specified destination, type:
Move-Item -Path "E:\Folder1" -Destination "E:\Folder2"
9. Remove-Item

The Remove-Item cmdlet lets you delete files, folders, functions, and other data types from the specified directory. For example, to delete the Test.txt file in the E:\Folder1 folder, type:
Remove-Item E:\Folder1\Test.txt
10. Get-Content

The Get-Content cmdlet lets you view the content of an item item without using a text editor. For example, to retrieve the contents of the Test.txt file, type:
Get-Content "E:\Folder1\Test.txt"
You can further specify the content length to view using the -TotalCount parameter.
11. Clear-Content
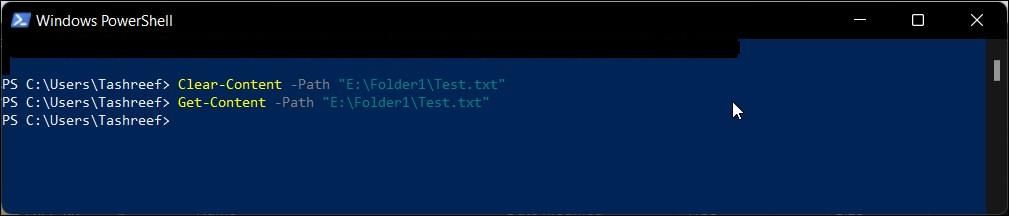
You can use the Clear-Content cmdlet to delete the contents of a specified file without deleting the file itself. Useful for task automation where you have a hard-coded file name but want to have a clean file each time the script runs.
To test the command, create a text file with some content in it. Next, type:
Clear-Content -Path "E:\Folder1\Test1.txt"
This will delete the contents of the file without deleting the file.
12. Set-ExecutionPolicy
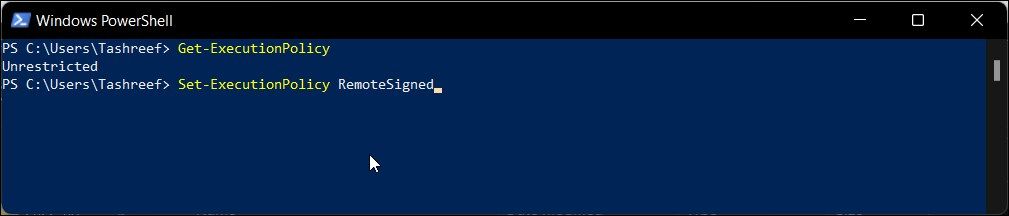
The default execution policy in PowerShell is set to Restricted. This prevents the execution of malicious scripts in the PowerShell environment. However, when you execute a local PowerShell script, you may encounter the execution script is disabled on this system error.
The Set-ExecutionPolicy cmdlets let you change the security levels for script execution. To know your current execution policy, type:
Get-ExecutionPolicy
If you need to execute an unsigned script, in an elevated PowerShell prompt, type:
Set-ExecutionPolicy RemoteSigned
Other valid Set-ExecutionPolicy values include Restricted, AllSigned, and Unrestricted.
13. Set-Location
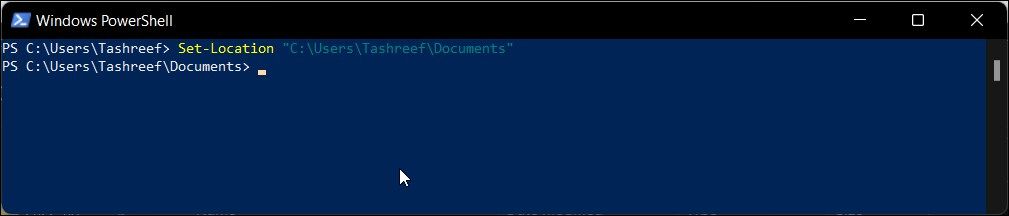
By default, PowerShell uses C:\Users\Username as the default working directory. The Set-Location cmdlet lets you set the current working directory to a specified location. Useful if you want to run a script or command from a specific location without having to specify the path each time.
For example, to set C:\Users\Username\Documents as the current working directory, type:
Set-Location "C:\Users\usrename\Documents"
This is a temporary measure as PowerShell will reset the working directory back to its default directory after the restart.
14. Export-CSV
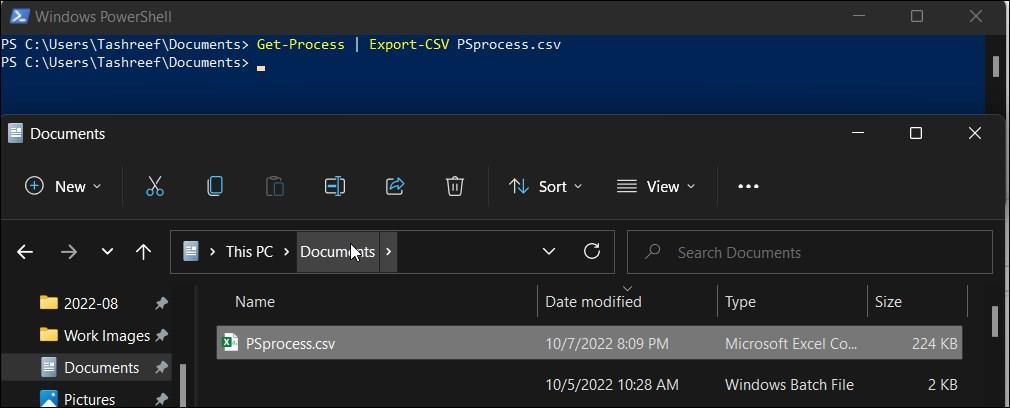
If you want to export and present PowerShell output in a more organized way, you can use the Export-CSV cmdlet. It takes the output file for the specified command and converts it to a CSV file.
To test the command, try the following command:
Get-Process | Export-CSV PSprocess.csv
The above command will create a psporcess.csv file with all the active processes’ data.
15. ConvertTo-HTML
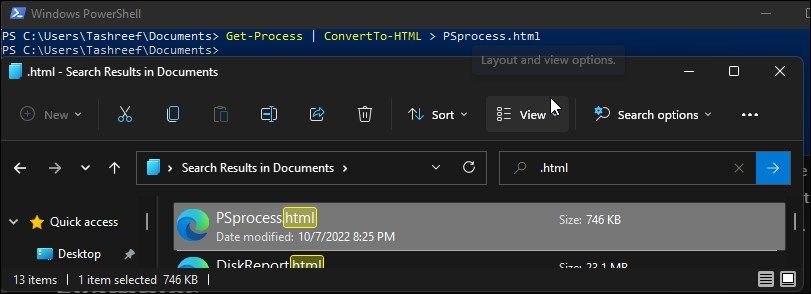
If you would rather create an HTML report, you can use the ConvertTo-HTML Cmdlet. To create an HTML report for all the running process on your PC, type :
Get-Process | ConvertTo-HTML > PSprocess.html
In the above command, psprocess is the name of the export file, and HTML is the extension. You can access the exported HTML file in the current working directory located at C:\Users\username.
16. Get-History
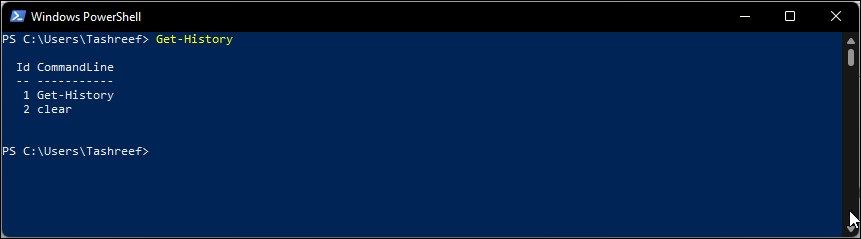
You can use the Up-Down arrow key to scroll through the recently executed commands in PowerShell. However, to view a list of all the recently executed commands in your current session at once, you can use the Get-History cmdlet.
It will display a list of all the recently executed commands with their ID. Useful if you want to view the complete context of the previously executed commands. To do this, type:
Get-History Id | fl
For example, to view the execution details such as status, start and end time, and duration for the third command, type:
get-history 3 | fl,
To rerun any command from the list, type:
Invoke-History followed by the command id
For example, type Invoke-History 3 to rerun a previously executed command without typing it again.
Additionally, use Clear-History to clear history for the current session.
Now that you have a basic idea of PowerShell commands, go ahead and explore our guide on best PowerShell Cmdlets to improve your Windows admin skills. Here, you can learn to work with data using cmdlets, format tables and list, and a quick overview of the Get-Member command.
PowerShell Commands to Streamline Your Tasks
PowerShell is known for its automation capabilities. This can help you automate hundreds of activities in your development work to save time and improve productivity.
While we have only covered the basic commands, try to explore the syntax, alias, and variables, functions available on many of these commands to master this highly efficient scripting language.
If you’re a Windows power user, you probably know and understand how performing various operations on your PC can have more than just one approach and that specialized GUI apps are oftentimes more limiting (and less satisfying, let’s be honest) than inputting commands in a command line manually. There’s just that feeling of satisfaction when you see that wall of text unfold in front of you, and if the result is not an error, it makes it all the more worthwhile.
On Windows PCs, there are only two ways you can achieve this: through CMD or PowerShell. Although CMD is a tad more popular than PowerShell, it’s also less powerful, given that its counterpart allows you to perform a whole lot more operations, including ones that you can run through the CMD. You could say that PowerShell combines the power of the old CMD with scripting and cmdlet abilities, giving you a plethora of possibilities regarding operations you can perform with it.
However, the sheer number of possible operations you could perform by using PowerShell can be quite intimidating even for seasoned users, not to mention users who never heard of CMD (let alone PowerShell) before. Not to worry, though, we’ll try and teach you a few easy tricks you can pull off with PowerShell and maybe even memorize in the long run. Although this “crash course” of ours won’t serve as a comprehensive manual for PowerShell, it will hopefully help you find your way around PowerShell by giving you a few pointers and explaining a bunch of commands. If you’re ready, let’s begin.
What is PowerShell?
As we’ve briefly mentioned above, PowerShell is a powerful tool that you can use for a huge range of operations. More than that, PowerShell is a task automation solution that comprises several powerful tools under its hood, including but not limited to a command-line shell (such as CMD), a scripting language, as well as a configuration management framework.
As opposed to other shells that can only accept and return text, PowerShell can also accept and return .NET objects thanks to the outstanding amount of features that it encompasses. Some of the most important shell-related features of PowerShell are as follows:
- Command prediction and tab completion
- Parameter and command alias support
- Comprehensive command-line history
- The ability to chain commands through the pipeline
- An in-console help system that’s similar to man pages in Unix-based systems
However, that’s only scratching the tip of the iceberg since, as we’ve mentioned before, PowerShell is more than just a shell; you can use it as a powerful scripting language for automating system management operations, but also if you want to build, analyze, test, and deploy solutions in various environments.
Given that PowerShell is based on the .NET CLR (.NET Common Language Runtime), it’s easy to see why all the inputs and outputs PowerShell works with are .NET objects. Additionally, there’s absolutely no need to parse text output just so PowerShell could extract information from it. Among PowerShell’s scripting features you may find the following:
- A comprehensive formatting system that ensures a clean, easy output
- Create dynamic types through an extensive type system
- You can extend PowerShell’s capabilities through classes, functions, modules, and scripts
- Native support for various data formats, including XML, JSON, and CSV
If you’re more interested to manage and configure your enterprise infrastructure through code, you’ll be glad to learn that PowerShell also offers you this possibility through its Desired State Configuration (DSC) management framework. Among the operations you could easily perform by making use of PowerShell’s DSC, we remind you of:
- Deploy various configuration schemes by using either push or pull models
- Design custom scripts and declarative configurations that you can use for repeatable deployments in your environment
- Enforce various configuration schemes
- Report on configuration drift
PowerShell has a proprietary command-line that comes with a proprietary programming language that is somewhat similar to Perl. Note that in the beginning, PowerShell was developed to help users manage objects on their computers, but, as you can figure, it has come a long way and is now used for more extensive, complex jobs.
For instance, you can make use of PowerShell’s extensive work environment not only to perform various system management operations but also to automate them so you don’t have to engage in tedious, repetitive tasks every once in a while. It’s also quite important to mention that you can access a plethora of resources through just one program (i.e. PowerShell), including, but not limited to:
- Windows Management Instrumentation
- .NET Framework API
- Command Prompt
- Windows Component Object Model
- PowerShell Commands
Nowadays, one of PowerShell’s most popular purposes is to help end-users automate system management tasks, thus helping them avoid engaging in a series of boring, repetitive operations. Eliminating the human factor from repetitive actions has been proven to increase efficiency and reduce human errors due to various reasons, so it’s really a win-win for everyone.
You can use PowerShell to issue simple or more complex commands, but this program can also help you create scripts based on those commands, which will be run automatically by PowerShell. Furthermore, there is an outstanding amount of commands you can customize and issue afterward called cmdlets.
It’s worth mentioning that PowerShell is cross-platform and open-source, meaning that you can also use it on other systems such as Mac or Linux natively, without resorting to tricks and compatibility enhancing tools such as Wine or Boot Camp.
List of Basic PowerShell Commands
We understand that PowerShell may feel a bit intimidating, especially now that you’ve discovered that it’s more than simply another command prompt on your computer, and it actually encompasses CMD features, but also a specific programming language and various scripts you can use to automate system management operations.
However, if you’re feeling determined to master PowerShell and all that it has to offer, we strongly suggest you start with its most basic features. That way you won’t have to roll back on months of progress when you’ve discovered that you accidentally used the wrong function and all the work you’ve performed in the meantime is starting to look more like a distant memory.
That’s precisely why we’ve prepared a list of basic commands you can safely use within your PowerShell sessions to test this powerful program’s features and see which one does exactly what. The list below comprises the command names, their aliases, and a brief description of what each command does.
Note that you can use either command names or their aliases, and the result will be precisely the same. The reason why one would prefer using aliases is that they’re a lot faster to type and if you can correctly remember them and associate them with their corresponding command name, it makes more sense if you want to get the job done quickly.
| Command name | Alias | Description |
|---|---|---|
| Add-Content | ac | Lets you append content (e.g. words, or data) to a file |
| Add-PSSnapIn | asnp | Helps you add multiple Windows PowerShell snap-ins to the current session |
| Clear-Content | clc | Clears the contents of an item without deleting the actual item |
| Clear-History | clhy | Clears any and all entries from the command history |
| Clear-Host | clear | Clears the host program’s display |
| Clear-Host | cls | Does the same thing as clear |
| Clear-Item | cli | Removes the contents of an item without deleting the actual item |
| Clear-ItemProperty | clp | Wipes a property’s value without actually deleting the property itself |
| Clear-Variable | clv | Deletes a variable’s value |
| Compare-Object | compare | Lets you compare two sets of objects |
| Compare-Object | diff | Does the same thing as compare |
| Connect-PSSession | cnsn | Lets you reconnect to sessions you’ve disconnected from |
| Convert-Path | cvpa | Allows you to convert a Windows PowerShell path into a Windows PowerShell provider path |
| Copy-Item | copy | Helps you copy an item from a specific location to another |
| Copy-Item | cp | Does the same thing as copy |
| Copy-Item | cpi | Does the same thing as copy and cp |
| Copy-ItemProperty | cpp | Lets you copy a value and a property from a given location to a different one |
| Disable-PSBreakpoint | dbp | Helps you disable breakpoints in the current console |
| Disconnect-PSSession | dnsn | Disconnects you from the current session |
| Enable-PSBreakpoint | ebp | Lets you enable breakpoints in the current console |
| Enter-PSSession | etsn | Helps you launch an interactive session with a remote device |
| Exit-PSSession | exsn | Terminates an interactive session with a remote device |
| Export-Alias | epal | Lets you to export information about aliases that are currently defined to an output file |
| Export-Csv | epcsv | Lets you convert objects into multiple comma-separated (CSV) strings and exports the strings to a CSV document |
| Export-PSSession | epsn | Imports commands from a different session and exports them to a Windows PowerShell module |
| ForEach-Object | % | Performs a specific operation against each of the items contained in a collection of input objects |
| ForEach-Object | foreach | Does the same thing as % |
| Format-Custom | fc | Helps you use a customized view in order to format the output |
| Format-List | fl | Lets you format the output as a properties list where each property is placed on a new line |
| Format-Table | ft | Lets you format the output as a table |
| Format-Wide | fw | Helps you format objects as wide tables where only one property of each object is displayed |
| Get-Alias | gal | Fetches you aliases for your current session |
| Get-ChildItem | dir | Fetches a list of all the files and folders in a file system drive |
| Get-ChildItem | gci | Does the same thing as dir |
| Get-ChildItem | ls | Does the same thing as dir and gci |
| Get-Command | gcm | Fetches a list of all commands you can use |
| Get-Content | cat | Displays the contents of a file |
| Get-Content | gc | Does the same thing as cat |
| Get-History | ghy | Fetches a list of all the commands you entered during your current session |
| Get-History | h | Does the same thing as ghy |
| Get-History | history | Does the same thing as ghy and h |
| Get-Item | gi | Lets you fetch files and folders |
| Get-ItemProperty | gp | Fetches the properties of the item you specified |
| Get-Job | gjb | Retrieves a list of all the Windows PowerShell background jobs that are currently running in your session |
| Get-Location | gl | Fetches information about your current location stack or working location |
| Get-Location | pwd | Does the same thing as gl |
| Get-Member | gm | Fetches all the properties and methods of specified objects |
| Get-Module | gmo | Retrieves a list of imported modules or modules that can be imported into the current session |
| Get-Process | gps | Fetches a list of all the processes that are running locally or on a remote computer |
| Get-Process | ps | Does the same thing as gps |
| Get-PSBreakpoint | gbp | Retrieves all the breakpoints set in your current session |
| Get-PSCallStack | gcs | Displays your current call stack |
| Get-PSDrive | gdr | Fetches the drives in your current session |
| Get-PSSession | gsn | Retrieves a list of local and remote Windows PowerShell sessions |
| Get-PSSnapIn | gsnp | Fetches a list of all the Windows PowerShell snap-ins on the computer |
| Get-Service | gsv | Lists all the services on a local or remote computer |
| Get-Unique | gu | Retrieves unique items from a sorted list |
| Get-Variable | gv | Displays a list of all the variables in the current console |
| Get-WmiObject | gwmi | Fetches Windows Management Instrumentation (WMI) classes instances or information about available classes |
| Group-Object | group | Lets you group objects that contain the same value for the properties that you specify |
| help | man | Displays more details about Windows PowerShell commands and concepts |
| Import-Alias | ipal | Allows you to import a list of aliases from a file |
| Import-Csv | ipcsv | Build table-like custom objects using all the items contained within a CSV file |
| Import-Module | ipmo | Import modules to your current session |
| Import-PSSes sion | ipsn | Imports commands from a different session into your current session |
| Invoke-Command | icm | Lets you execute commands on local and remote computers |
| Invoke-Expression | iex | Lets you execute commands or expressions on the local computer |
| Invoke-History | ihy | Executes commands from your session history |
| Invoke-History | r | Does the same thing as ihy |
| Invoke-Item | ii | Performs the default action on a specified item |
| Invoke-RestMethod | irm | Sends either an HTTP or an HTTPS request to a RESTful web service |
| Invoke-WebRequest | curl | Retrieves content from a webpage on the Internet |
| Invoke-WebRequest | iwr | Does the same thing as curl |
| Invoke-WMIMethod | iwmi | Allows you to call Windows Management Instrumentation (WMI) methods |
| Measure-Object | measure | Determines numeric properties of objects, as well as words, lines, and characters in string objects |
| mkdir | md | Creates a new item (directory) |
| Move-Item | mi | Allows you to move an item from a specific location to a different one |
| Move-Item | move | Does the same thing as mi |
| Move-Item | mv | Does the same thing as mi and move |
| Move-ItemProperty | mp | Allows you to move a property from a specific location to a different one |
| New-Alias | nal | Allows you to create a new alias |
| New-Item | ni | Lets you create a new item |
| New-Module | nmo | Generates a new dynamic module that exists only in memory |
| New-PSDrive | mount | Allows you to create temporary and persistent mapped network drives |
| New-PSDrive | ndr | Does the same thing as mount |
| New-PSSession | nsn | Establishes a persistent connection to a local or remote computer |
| New-PSSessionConfigurationFile | npssc | Creates a session configuration file |
| New-Variable | nv | Lets you create a new variable |
| Out-GridView | ogv | Allows you to send output to an interactive table in a separate window |
| Out-Host | oh | Sends the output to the command line (CMD) |
| Out-Printer | lp | Lets you send the output to a printer |
| Pop-Location | popd | Modifies your current location to the location that was pushed to the stack most recently. You can use the Push-Locationcmdlet (pushd) to pop the location either its default stack or from a stack that you create. |
| powershell_ise.exe | ise | Displays an explanation on how you can use the PowerShell_ISE.exe command-line tool |
| Push-Location | pushd | Appends the current location to the top of a location stack |
| Receive-Job | rcjb | Fetches the results of current session Windows PowerShell background jobs |
| Receive-PSSession | rcsn | Retrieves results of commands from disconnected sessions |
| Remove-Item | del | Removes files and folders |
| Remove-Item | erase | Does the same thing as del |
| Remove-Item | rd | Does the same thing as del and erase |
| Remove-Item | ri | Does the same thing as del, erase and rd |
| Remove-Item | rm | Does the same thing as del, erase, rd, and ri |
| Remove-Item | rmdir | Deletes folders |
| Remove-ItemProperty | rp | Allows you to delete a property and its value from a given item |
| Remove-Job | rjb | Lets you delete a Windows PowerShell background job |
| Remove-Module | rmo | Helps you remove modules from your current session |
| Remove-PSBreakpoint | rbp | Lets you remove breakpoints from the current console |
| Remove-PSDrive | rdr | Removes temporary Windows PowerShell drives, as well as disconnects mapped network drives |
| Remove-PSSession | rsn | Lets you close one or more Windows PowerShell sessions (PSSessions) |
| Remove-PSSnapin | rsnp | Enables you to remove Windows PowerShell snap-ins from your current session |
| Remove-Variable | rv | Clears a variable and its value |
| Remove-WMIObject | rwmi | Lets you delete an instance of an existing Windows Management Instrumentation (WMI) class |
| Rename-Item | ren | Helps you rename an item in a Windows PowerShell provider namespace |
| Rename-Item | rni | Does the same thing as ren |
| Rename-ItemProperty | rnp | Enables you to rename an item’s property |
| Resolve-Path | rvpa | Resolves wildcard characters in a path, as well as displays the contents of the path |
| Resume-Job | rujb | Helps you restart a job that was suspended |
| Select-Object | select | Lets you select objects as well as their properties |
| Set-Alias | sal | Lets you create or change a cmdlet’s or command element’s alias (alternate name) in the current Windows PowerShell session |
| Set-Content | sc | Allows you to replace a file’s contents with contents that you specify. |
| Set-Item | si | Changes an item’s value to a value that’s specified in the command |
| Set-Location | cd | Lets you set your current working location to a specified location (changes the active location) |
| Set-Location | chdir | Does the same thing as cd |
| Set-PSBreakpoint | sbp | Lets you set a breakpoint on a command, variable, or line |
| Set-Variable | set | Enables you to set a variable’s value or generates a variable if one with the requested name does not exist |
| Show-Command | shcm | Displays a list of Windows PowerShell commands in a graphical command window |
| Start-Job | sajb | Starts a background job in Windows PowerShell |
| Start-Process | saps | Launches one or more local processes |
| Start-Service | sasv | Lets you start one or more stopped services |
| Stop-Process | kill | Helps you stop one or more running processes |
| Where-Object | ? | Enables you to select certain objects from a collection based on their property values |
| Write-Output | echo | Allows you to send an object to the next command in the pipeline. If it reaches the last command in the pipeline, the command will display the objects in the console |
Don’t let the sheer amount of basic PowerShell commands intimidate you. Although we called them basic, there’s absolutely no need for you to start memorizing them. In fact, that’s the exact reason why we created the table above so that you can go on about your work without worrying about having to remember each and every command we mentioned above.
You can use it as a quick refresher or even use your browser’s search feature to locate a specific command, its alias, and what it does if you’re confused. Although we already included this piece of information in the table above, if you’re ever confused while working in PowerShell, using the help command will display a few helpful details on how you can use this program and its commands more efficiently.
You can also pair the help command with another command or alias if you want more details about that specific command. For instance, this is what PowerShell displays when you type help Add-Computer:
However, you can use help with any other of the commands or their aliases in our table above. Make sure you understand that the same command can have multiple aliases, which means that you can achieve the same result by using various aliases. Although this may sound confusing, it actually gives you plenty of flexibility in case you can’t remember one command alias, but you remember another one that can help you achieve the same goal.
Using PowerShell
Naturally, the first thing you’d want to do is locate PowerShell and launch it. One sure way to launch PowerShell from just about anywhere you are on your PC is to hold down the Shift button on your keyboard, right-click any empty spot on your screen (not a menu, icon, button, or similar object), and select Open PowerShell window here from the context menu.
In addition to giving you quick access to the PowerShell console anywhere on your PC, doing so will automatically switch the default working directory for PowerShell to the one you’re currently located at. If you’re on a Windows 10 PC, you can also launch PowerShell by pressing the Win key on your keyboard, typing PowerShell in the Start menu, and selecting PowerShell when it becomes visible in the list of results.
On older versions of Windows, you’ll need to manually locate the PowerShell executable, which you can either find in the Accessories or System folders in your Start menu. Furthermore, seeing how older systems (such as Windows 7) don’t provide you with PowerShell by default, you’ll also have to install it on your computer, along with all of its dependencies.
Notice how launching PowerShell from the Start menu will set your active working directory to C:\Users\[your username here]. By comparison, using the Shift + Right-click method we’ve presented above will set PowerShell’s active directory to the one you’re currently at when you spawn the console. For instance, if you use Shift + right-click and open PowerShell from your desktop, you’ll notice that the active directory will be C:\Users\[your username here]\Desktop. For obvious reasons, the [your username here] part will be different depending on your username.
Although you can keep PowerShell for home usage just fine, it’s better if you could make use of all that it has to offer. Incidentally, these features make PowerShell awesome for corporate usage, where you need to perform a large number of operations in a short time, and most likely on a huge number of devices.
Thus, instead of running each command manually on every single machine, you could simply create an automation script in PowerShell and receive the information you need automatically, without having to physically interact with the devices in case or even be near them. Just as CMD, PowerShell can be used through command lines. However, unlike its more rudimentary counterpart (i.e. the CMD), PowerShell also lets you summon scripts and cmdlets, which makes it more powerful, but also more complicated to use.
How to use cmdlets
We’ve used the term cmdlets quite a few times in our guide, so you’re probably left wondering whatever they mean. Well, to start at the beginning, it’s worth reminding you that CMD works with commands. A cmdlet, which is pronounced command-let, is also a command, but unlike traditional CMD commands, cmdlets are specific to PowerShell and let you perform single specific operations, such as copying files, moving items from one place to another, changing the active directory, or see the contents of an item.
Simply put, cmdlets are single function commands that you can type directly in PowerShell’s command line. If you have any prior experience with the CMD, you’ll find PowerShell somewhat intuitive to work with. One interesting thing about PowerShell is that it shares plenty of commands with CMD. Therefore, using CD with PowerShell will still change your active directory, DIR will still display the contents of the current folder, and CP will still let you copy an item from one place to another.
It’s quite worth mentioning that PowerShell is not case sensitive, unlike many other shells, which return errors if you miss using the correct case when typing your commands in them. Thus, copy-item will work just as well as Copy-Item, and if you remember neither one of them you can also use Copy, CP, and CPI (but also copy, COPY, cp, or cpi).
Most PowerShell cmdlets are written in C# and are specially built to perform operations that will return a .NET object as their result. At the time being, you could find more than a couple of hundred cmdlets you can use in PowerShell, which, let’s be fair, gives you more than just a little elbow room as far as performing operations goes.
Although it will be difficult to remember all the cmdlets you may have to work with (remember that you can use the table above), there are a few that you’ll use more frequently, which will make them incredibly easy to remember. Not to mention the fact that some of them are intuitive enough that their name actually gives away their purpose (e.g. copy is used to copy items, move can be used to move files, compare helps you compare sets of objects, etc).
However, if you’re not exactly in the mood to bookmark this article to use it later, you could also type in the Get-Command cmdlet in PowerShell, or gcm, if you want to keep things short. Doing so will display a full list of commands that are available to you, and you can use that list to plan ahead on whatever it is you’re trying to do.
Unlocking custom cmdlets
On the downside, Microsoft doesn’t just give you full access to the whole array of cmdlets that you can use in PowerShell by default, so you’ll have to jump through a bunch of extra hoops to unlock this feature and use it at your leisure. The good news is that the unlocking process doesn’t take long, and then there’s the fact that it can also be done through the PowerShell, which will make great practice for you. Without any further ado, let’s see how you can unlock custom cmdlets privileges in PowerShell.
- Log in to an Administrator account (it won’t work without Admin rights)
- Launch PowerShell with Administrator rights (Run as administrator)
- Type the following command in PowerShell and press Enter:
Set-ExecutionPolicy
- If done right, PowerShell will prompt you with a dialog, asking you for the new ExecutionPolicy value
- Type
RemoteSignedin the PowerShell command prompt and press Enter - PowerShell will give you a heads up on the risks of modifying the value of the ExecutionPolicy
- Type Y and press the Enter key
- If you need to turn custom cmdlets off, just follow steps 1-4, and when PowerShell asks you to type the value, type
Restrictedand confirm your choice as you did at step 7
If you want to streamline the whole process and not waste time typing everything down in PowerShell’s command prompt, you’ll be glad to learn that there’s an even simpler way to achieve the same result. Launch PowerShell with Administrator rights as you did at step one, and instead of typing each command and waiting for the prompt, you’re gonna pipeline everything up until the confirmation by typing this:
Set-ExecutionPolicy -ExecutionPolicy RemoteSigned
Naturally, you will still need to confirm your choice by typing Y and hitting Enter on your keyboard, but you just skipped a step and performed a series of operations at the same time. This is exactly why advanced PowerShell users create automation scripts to perform various management operations automatically: to save time and hassle. If you want, you can use the same command above to disable custom cmdlets on your system, but you’ll have to replace RemoteSigned with Restricted and also confirm your choice at the end.
You can also use AllSigned and Unrestricted to grant yourself even more privileges when it comes to running potentially unsafe scripts on your Windows PowerShell. The AllSigned option will let you run all scripts that were created by trusted publishers, whereas the Unrestricted option will enable PowerShell to run any script, regardless of its provenience and trustworthiness. Naturally, the Unrestricted option is also the most dangerous, so try to avoid it as best as you can, if possible, especially if you are a PC novice.
See? PowerShell is already starting to look a lot more accessible than it did just a few minutes back.
How to create and use scripts in PowerShell
As we’ve mentioned before and we’re positively sure you remember, you can use PowerShell to run automation scripts. However, you can’t just yell at PowerShell “Hey you, create this script for me!” and expect it to magically work, so you’ll have to put in some elbow grease and get it done yourself. However inconvenient this may sound right now, trust us, you’ll be thankful in the long run, considering all the work you won’t need to do anymore.
Although most of us rely on specialized software such as IDEs to create scripts or programs in a specific programming language, truth be told you can use any text editor as long as it can save files to the right extension. And even if it can’t, you can just navigate to the file you created and modify its extension manually by renaming it, but let’s get back to our sheep.
If you’re interested in creating a script that can work in PowerShell, you’ll be thrilled to learn that this script you’ve probably heard a lot of, is merely a text document with an extension that makes it compatible with PowerShell, PS1. Therefore, it’s easy to see why creating these scripts can be actually handled from within virtually any text editor, as long as you save it with the right (PS1) extension.
Write-host "Please enter your name:"
$Name = read-host
"Hello $Name! Visit AddictiveTips.com for more awesome tutorials and guides!"
Now for the actual creation part:
- Launch Notepad (or any other text editor for that matter)
- Copy the code above (the script you’ll be creating and running)
- Paste it into your new Notepad document
- Use CTRL + S to save the document
- Type
script.ps1as the file name - Save the file somewhere accessible
- Open a PowerShell instance with administrator rights (very important)
- Make sure you’ve enabled custom scripts on your system (check sections above)
- Navigate to the location where you saved the script
- Type the full path of the script to run it
- For instance, if your script is in a Scripts folder on your C drive, your command will be
C:\Scripts\script.ps1 - Alternatively, you could simply navigate to the location of your script and use this command to run it:
.\script.ps1
- For instance, if your script is in a Scripts folder on your C drive, your command will be
If you can’t run the script and PowerShell returns an error, make sure you’ve enabled PowerShell to run custom scripts on your system, and that you’re running PowerShell as an administrator. Not doing any or both things that we’ve specified in our instructions will most likely result in an error and you won’t be able to run your script.
Remember that this is merely a basic script that is somewhat similar to the classic “Hello, world!” one. It puts a spin on it by interacting with you (i.e. asking what your name is) and letting you interact with it (i.e. typing your name which will be used to print a message for you). However, PowerShell is capable of running far more complex scripts, ranging from collecting data from an array of machines to intricate data management, advanced system configuration operations, and even creating backups of SQL databases in a blink of an eye.
How can I backup SQL databases with PowerShell?
We’re glad you asked. As we’ve mentioned countless times in our guide, there are almost endless possibilities when it comes to operations that PowerShell can help you perform. One of the most popular ones is backing up an SQL database without having to go great lengths or possess extraordinary database management capabilities. All you have to do is fire up an elevated instance of PowerShell (with Administrator privileges) and use the Backup-SqlDatabase command. However, things are a bit more complicated than that, but we’ll get to that in a few.
Backing up an SQL database isn’t as easy as simply copying files from your PC to a safe location and hope they stay safe for whenever you may need them to perform data restoration operations, but on the bright side, using PowerShell can make it look like a walk in the park. Although there are several ways to achieve this, using the command we’ve mentioned above is the fastest, simplest way to backup an SQL database.
Among the capabilities of the Backup-SqlDatabase command, it’s possible to find full database backups, database file backups, as well as transaction log backups, so you got the full package within a single command-line tool. By default, using this command will perform a full database backup, so you will need to specify if you want it to follow a certain set of rules by using the BackupFile parameter.
Note that some versions of PowerShell won’t feature this command by default, so you’ll either have to import it or install it. The good news is that installing the SQL module isn’t exactly rocket science and can be accomplished even by novices. Here’s what you’ll have to do if you can’t use the Backup-SqlDatabase command in your PowerShell session:
- Launch PowerShell with administrator rights
- Type the following command:
install-module sqlserver
- When asked to confirm your actions, type Y and hit Enter on your keyboard
- Confirm the untrusted repository once more by typing Y and Enter
- Once the installation is complete, type the following command:
import-module sqlserver
- Try running the Backup-SqlDatabase command by typing it in the PowerShell command-line
- If it works, you should see that PowerShell is asking you to supply values for some parameters
- If it doesn’t work, make sure that you’ve set PowerShell’s permission to allow it to run custom scripts
1. Complete SQL database backup
Backup-SqlDatabase -ServerInstance "Computer\Instance" -Database "AddictiveTips"
The command we’ve exemplified above will generate a full database backup of a database called AddictiveTips and save it to the default backup location of the “Computer\Instance” server instance as ‘AddictiveTips.bak’.
2. Perform a location-based database backup
Set-Location "SQLSERVER:\SQL\Computer\Instance"
PS SQLSERVER:\SQL\Computer\Instance> Backup-SqlDatabase -Database "AddictiveTips"
The first command above will change your location to the active directory within the server instance on which the backup will occur. Essentially, this technique works almost like the full database backup we’ve exemplified above, but in this example, you get to change the working directory in order to locate the server instance where the backup occurs.
This operation will also create a full backup of a database called AddictiveTips and export it as an ‘AddictiveTips.bak’ file in the default location of the server instance you’re connected to.
3. Perform a transaction log backup
Backup-SqlDatabase -ServerInstance "Computer\Instance" -Database "AddictiveTips" -BackupAction Log
If you only need to backup the transaction log of a specific database, PowerShell can also help you do that through a single command you can input straight in its command-line interface. The command above will generate a backup copy of the ‘AddictiveTips’ database’s transaction log and export it to the default location of the ‘Computer\Instance’ server instance as a file named ‘AddictiveTips.trn’.
4. Create an encrypted SQL database backup
$EncryptionOption = New-SqlBackupEncryptionOption -Algorithm Aes256 -EncryptorType ServerCertificate -EncryptorName "BackupCert"Backup-SqlDatabase -ServerInstance "." -Database "AddictiveTips" -BackupFile "AddictiveTips.bak" -CompressionOption On -EncryptionOption $EncryptionOption
If you’re worried that your database backup may fall in the wrong hands, PowerShell can also help you create ready-encrypted backup files. Naturally, you’ll have to specify some parameters such as the encryption algorithm, the encryption type (i.e. certificate), server instance, database name, backup file, and whether or not you want the output to be compressed.
The example above will create a backup of a certain ‘AddictiveTips’ database, encrypt it with AES-256 encryption and a server certificate, compress it, and save the resulting ‘AddictiveTips.bak’ file on the server instance’s default backup location. This is quite important if you plan a migration and have no surefire way to transport all backup files without risking estranging any single one of them.
5. Perform a backup on all databases in a server instance
Get-ChildItem "SQLSERVER:\SQL\Computer\Instance\Databases" | Backup-SqlDatabase
Another tool that may come in handy is PowerShell’s ability to backup all the databases on a server instance at the same time. Regardless of their number, you just fire up PowerShell, type an adaptation of the command above, and wait for the backup process to come to an end. Note that since this will backup all the databases within the server instance, you may have to wait for a while, so be patient.
The command above will back up all the databases located on the ‘Computer\Instance’ server instance and export the resulting files to the default backup location on the same server instance. The names of the backup files will be generated automatically according to each one’s corresponding database followed by the BAK extension (i.e. <database name>.bak).
Although there are several more methods to perform SQL backup with PowerShell in various ways, we’ve only presented a few that we felt were more important. Note that the commands we used in our examples above are not likely to work on your environment in their current form, so you will have to adapt them to your current situation.
For instance, you will have to change the ‘Computer\Instance’ parameter to match your own server instance and modify the name of your database to reflect the name of your own database. Remember that you can always turn to the help command in PowerShell if you ever feel that the command you’re trying to run is confusing or doesn’t work as it should.
Must-know PowerShell commands
1. Get-Help
We can’t stress this enough, but the Get-Help command should be the first one you ever learn, as it can seriously get you out of numerous sticky situations where you’re not exactly sure if you’re using the correct command, or exactly what you can achieve with the command that you’re trying to deploy.
Now that you’ve installed the sqlserver module on your system, you can try the Get-Help command now and see how Backup-SqlDatabase works. Just type Get-Help Backup-SqlDatabase in the command-line of PowerShell and brush up your PowerShell SQL database backup skills.
Note that if you just recently installed the sqlserver module on your system, the Help database may still be outdated, and you may need to run an update on it so that it can catch up on any new scripts. By default, PowerShell will detect that the content you’re trying to reach is available online, but you can’t access it locally, and even offer to update the database for you. In this case, all you need to do is type Y when prompted and hit the Enter key on your keyboard.
However, if PowerShell just prompts you with an error stating that there’s no help manual available for the command you’re interested in, you can update it manually by typing Update-Help and hitting the Enter key on your keyboard. After the update process comes to an end, you should be able to check available help documentation for the command you’re interested in.
2. Get-Process
Get-Process is paramount if you want to discover more about the system you’re currently working on. To be more specific, although you might’ve guessed what this command does already by merely looking at it, Get-Process will provide you with a list of all the processes that are currently running on the system you’re working on.
By default, Get-Process will retrieve a list of every process running on the current system you’re working on, so you may need to append some extra parameters to this command if you want more specific information and narrow the list of results. Check out in the screenshots below what you get when you run the Get-Process command by itself versus how it looks if you’re more specific and format the results.
Get-Process
Get-Process explorer | Format-List *
The second command can be customized to display additional details about any active process on your system. You can replace explorer with svchost or Chrome or any other active process on your system that you’re interested in. As we’ve mentioned above, using Get-Processes by itself can help you with that (i.e. finding a list of all running processes).
3. Stop-Process
This command is pretty much self-explanatory, as you may already have figured out that it can help you stop processes that are currently running on your system. The most common reason for doing that from PowerShell and not by using the Windows Task Manager is that sometimes processes can freeze and make GUI apps barely usable.
PowerShell users can easily identify a troublesome process using the Get-Process command we’ve previously explained, then using Stop-Process to terminate it, thus unclogging the system. Running Stop-Process by itself (without any additional parameter) in your PowerShell command-line interface will prompt you to input the ID of the process you’re trying to terminate.
However, you can also terminate a process by its name (if you know it) by appending the -Name parameter to the cmdlet, like in the example below:
Stop-Process -Name "explorer"
The command above will terminate the Explorer process, which can be useful especially if it freezes or crashes on you and refuses to load properly. Note that you’ll need to use quotes when specifying the name of the process you’re trying to terminate. If a process is stubborn and refuses to terminate (usually higher clearance processes do that), you can “convince” it by appending a -Force parameter to your command. Say, for instance, that you can’t terminate your Explorer process. In this case, you can simply type the command below:
Stop-Process -Force -Name "explorer"
Furthermore, it’s worth mentioning that using the -Force parameter in your Stop-Process command won’t ask for confirmation, as opposed to running the command without this option. If you want to find out more about this cmdlet, make sure to use the Get-Help command.
4. Get-Service
This command is among the essential command list for a good reason: it can provide you with a list of all the services that are currently installed on the system you’re working on, regardless of whether they’re running or not. As with many other cmdlets, you can customize Get-Service to provide you with more specific information, either regarding a certain service or even displaying a list of all running (or stopped) services on your machine.
You can go ahead and type Get-Service in your PowerShell command line. Doing so should provide you with a list of all the services available on your computer, as well as their display names and statuses. If you append an additional command to the original cmdlet, you can change the output, making it display only results that you’re interested in.
Get-Service "W*"
For instance, typing the command above should return a list of all services available on your computer that start with the letter ‘W’. However, you can go even further and customize your command in order to narrow the list of results even more.
Get-Service | Where-Object {$_.Status -eq “Running”}
The command above will let you see a list of all the available services on your computer that are also running at the time you’re running the cmdlet. Appending the “W*” as we did in the previous example will display a list of all the running services on your computer that start with the letter ‘W’, and the command should look like this:
Get-Service "W*" | Where-Object {$_.Status -eq "Running"}
5. Get-EventLog
Every responsible system administrator should know its way around working with event logs, seeing that these documents can provide you with useful knowledge about what happened on your system, at what time did it occur, and sometimes even what triggered that specific event.
Therefore, we can safely assume that PowerShell’s Get-EventLog command is not something you want to be missing from your toolbelt, especially if you plan on honing your system administration skills. If you know everything there is to know about event logs and their names, you can go ahead and type Get-EventLog directly in your PowerShell’s command line. Note that PowerShell will prompt you to input the name of the log you’re trying to view.
If you type the name of an empty event log (one with no entries), PowerShell will prompt you with an error and return you to the command-line interface. Therefore, it would be easier if you just used the command below, which will provide you with a list of Event Logs on your system, along with additional details about each one, such as the default overflow action, and the number of entries.
Get-EventLog -List
One of the most popular use cases for event logs is checking for errors, especially if they occurred silently, were shortly followed by a system crash, or lead to a BSOD, which we all know how cryptic can be. However, you will need to be more specific with the Get-EventLog cmdlet if you want to narrow down the list of results, which oftentimes can be huge.
Get-EventLog -LogName Security -EntryType Error
Typing the command above in your PowerShell’s command-line interface should provide you with a list of all the errors registered in your Security event log. Note that you can use the -List parameter to see all the log types in your system and replace Security in the command above with any other log type that you find on your list, just as long as it has more than zero entries.
If you want to learn more about using the Get-EventLog command in PowerShell, feel free to use the Get-Help command we’ve talked about in the first section of this subchapter.
6. ConvertTo-HTML
Sometimes when you’re using PowerShell, you may stumble upon certain information that you want to extract and keep for future reference, create reports, or simply import it from a different application. One of the most frequently-used ways to extract this data from PowerShell and export it to an external file on your computer is the ConvertTo-HTML command.
Using this command will help you build comprehensive reports that can help you analyze extracted information and insights in a more effective manner by providing you with HTML tables that you can customize later by adding custom styles and color-coded data. As with many other PowerShell commands, ConvertTo-HTML doesn’t work by itself, and you’ll need to pair it up with an additional command which it will use as an input (or a source of data).
For instance, if you’re trying to print a report consisting of every service that starts with the letter ‘W’ and is currently running on your computer, you can type the command below:
Get-Service "W*" | Where-Object {$_.Status -eq "Running"} | ConvertTo-HTML
This will provide you with an HTML code of the data you fed to the ConvertTo-HTML function, which you can simply copy directly from the PowerShell’s command-line interface, paste it in your favorite text editor and save it as an HTML file, which you can use to view the result in any web browser.
You can use ConvertTo-HTML with virtually any PowerShell command, as long as the command you’re using as a data source will generate output. You can try it with other cmdlets, such as Get-Process, Get-EventLog, or Get-Help. Note that aside from HTML conversions, the ConvertTo cmdlet can also be used to generate JSON, CSV, and XML files. You just have to replace HTML in the command syntax with the format you’re interested in.
7. Export-CSV
If you’re working with various objects that you feel may fit way better in a table, you can use PowerShell to convert the items you’re currently handling into a series of CSV (comma-separated value) strings and export the strings to a file in one swift motion through the Export-CSV cmdlet.
As with ConvertTo-HTML, Export-CSV needs an input that it can convert to CSV strings, as it can’t just work on its own. Thus, you will need to pair it with a command that can be used to generate data, such as the Get-Service or Get-Process ones we’ve explained earlier.
Essentially, Export-CSV does almost the same thing as the ConvertTo-HTML cmdlet we’ve discussed above, aside from one important aspect that shouldn’t be overlooked: this cmdlet actually generates a file and saves it on your computer, as opposed to the ConvertTo command, which only gives you the output and lets you create the file on your own.
Let’s assume, for instance, that you’d like to turn the list of services running on your computer into a CSV file so that you can process the file further with third-party software, or put it in a spreadsheet for further reference. All you’d have to do is type the Get-Service command followed by the Export-CSV one, and mention a location where you’d like the CSV file to be generated, like in the example below:
Get-Service | Export-CSV c:\AddictiveTips.csv
The command above will fetch a list of all the services that are available on your computer, running or not, convert them into a series of CSV strings, and save the result as a CSV file named ‘AddictiveTips’ in the root of your C drive. You can then open the file in a third-party software solution, convert it into a fully-fledged table, or just store it for future usage.
PowerShell cheatsheet – CONCLUSION
Although there’s still a lot of people advocating for CMD, truth be told PowerShell is more versatile, way more powerful, but at the same time more complicated to work with than its traditional CMD counterpart. The sheer amount of features, combined with the fact that you can create automation scripts in PowerShell and perform complicated system management operations just leaves CMD in a cone of shadow.
If you’re just starting to discover PowerShell and you’re struggling to figure out what each command does, how to pipeline several commands, or how to create and run simple PowerShell scripts on your own, our guide is a great starting point. We’ve taken our time to explain some of the most important commands you should know about in PowerShell, created a few short tutorials, and also included a list of basic PowerShell commands, their aliases, and short descriptions for each item, just to simplify your PowerShell discovery journey.
