
One of the great features of PowerShell is its extensibility. In PowerShell version 1 it was possible for other product teams within Microsoft or elsewhere to use a delivery mechanism known as snap-ins to extend PowerShell with additional PowerShell cmdlets. Although the snap-in mechanism is still supported within PowerShell version 2, the new feature known as a PowerShell module has made it much easier to extend PowerShell to make it more appropriate for specialised uses.
PowerShell modules bring extendibility to the systems administrator, DBA, and developer. Whether it’s simply as a method to share functions and scripts you have created or delving further into providing what would have been snap-in territory in version 1, you should be aware of the capabilities of modules.
PowerShell is an integral part of Windows 7 and Windows Server 2008 R2. Window Server 2008 R2 ships with a number of built-in modules. Further modules become available after installing various additional components of the operating system.
In this article we will examine the fundamentals of modules and then, by way of an example, look at some practical ways you can make use of them in Windows Server 2008 R2.
PowerShell Modules
in PowerShell version 1, Snap-ins were popular with systems administrators who used cmdlets provided by third parties, such as Quest’s Active Directory cmdlets and VMware’s PowerCLI cmdlets. However, you did not find many of those same administrators creating their own snap-ins, particularly if they were just starting out learning PowerShell because it would typically involve writing some C# code.
PowerShell version 2 makes it easier to achieve the objective of sharing functions and scripts as part of a module. In addition, whilst a snap-in can only contain cmdlets and providers, a module can also contain other common PowerShell items such as functions, variables, aliases and PowerShell drives.
Creating Your First PowerShell Module
Before you create your first PowerShell Module you will need to know what to create and where to store it. PowerShell will look in the paths specified in the $env:PSModulePath environment variable when searching for available modules on a system. By default this contains two paths; one in a system location %windir%\System32\WindowsPowerShell\v1.0\Modules and also in the currently logged on user location %UserProfile%\Documents\WindowsPowerShell\Modules . In this article for the sake of convenience we will store our module in the %UserProfile% location.
Each module should be stored in a sub folder of either of these paths and typically be the name of the module – within that folder you will then store the files that make up the module. At the least, we need a *.psm1 file. In this file could be placed a number of functions or variables that make up the module. In addition it is possible to place PowerShell scripts in *.ps1 files in the module’s folder and reference them in the *.psm1 file. As a final touch, a module manifest file can be created which will give a more professional and rounded feel to your module, but we will come on to manifests later.
Let’s look at the process of creating an example module.
To start with we will place a couple of functions in a *.psm1 file to make the module. There is nothing special in a *.psm1 file other than the file extension, so we can take a normal *.ps1 PowerShell script file containing our functions and rename it to make the *.psm1 file.
Firstly, let’s create two functions that we can use for our module which we will call CurrencyConversion. The first function will convert British Pounds into Euros. It does this by connecting to a web service at http://www.webservicex.net to obtain the current conversion rate between British Pounds and Euros, and then multiplies the inputted value of Pounds by the conversion rate to output the Euro value.
|
Function ConvertTo-GBPEuro { param ([int]$Pounds) $Currency = New-WebServiceProxy -Uri http://www.webservicex.net/CurrencyConvertor.asmx?WSDL $GBPEURConversionRate = $Currency.ConversionRate(‘GBP’,‘EUR’) $Euros = $Pounds * $GBPEURConversionRate Write-Host «$Pounds British Pounds convert to $Euros Euros» } |
The second function carries out the reverse operation; it converts Euros into their value in British Pounds.
|
Function ConvertTo-EuroGBP { param ([int]$Euros) $Currency = New-WebServiceProxy -Uri http://www.webservicex.net/CurrencyConvertor.asmx?WSDL $EURGBPConversionRate = $Currency.ConversionRate(‘EUR’,‘GBP’) $Pounds = $Euros * $EURGBPConversionRate Write-Host «$Euros Euros convert to $Pounds British Pounds» } |
Executing these functions with a value of 10 each time produces the following results:
Fig 1. Executing the Conversion Functions
We now save these functions into the CurrencyConversion.psm1 file and save it into the folder C:\Users\Jonathan\Documents\WindowsPowerShell\Modules\CurrencyConversion.
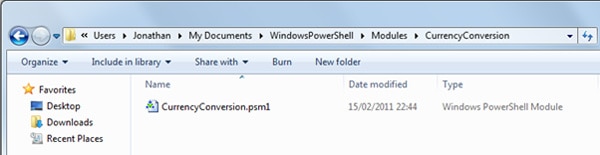
Fig 2. The CurrencyConversion Module File Location
So far, so simple – no real magic required. We can use the Get-Module cmdlet to reveal the modules that are available on our system (Note: it is Windows 7, later in this article we will look in particular at modules which ship with Windows Server 2008 R2) and we are pleased to see that with very little effort we have created our first module CurrencyConversion.
|
Get—Module —ListAvailable |
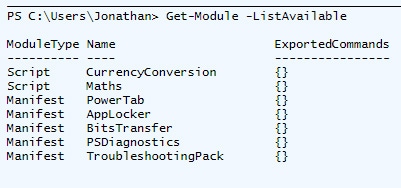
Fig 3. List Available Modules
We can now make the functions in our CurrencyConversion module available to the current PowerShell session via the Import-Module cmdlet. Note: For illustrative purposes we will use the -PassThru parameter to display the output of this cmdlet to the console; by default this does not happen.
|
Import—Module CurrencyConversion —PassThru |
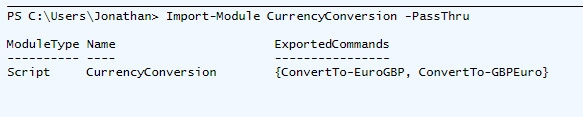
Fig 4. Importing the CurrencyConversion Module
We can see that the two functions are available to us in this PowerShell session, by using the Get-Command cmdlet.
|
Get—Command —Module CurrencyConversion |
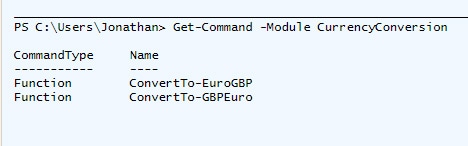
Fig 5. Viewing the Functions in the CurrencyConversion Module
Remember, to make these functions available to somebody else, there is no need to bundle them up into an MSI file for installation, like a PSSnapin, all that needs to be done is the CurrencyConversion folder and files to be copied to the right location. Currently this module only contains two functions, however it would be quite straightforward to expand it to contain conversion functions for all kinds of currencies and add these to the CurrencyConversion.psm1 file and no further work would be necessary since it is already a valid module.
PowerShell Module Manifests
Earlier in this article we mentioned that it was possible to smarten up your modules and give them a more professional look by using module manifests. For instance you may wish to include some Author and Versioning information as part of the module or you may wish to specify minimum versions of PowerShell and / or the .NET Framework which are needed for components of your module. So how do you go about creating a module manifest? Well Microsoft have made creating a basic module manifest easy by giving us the New-ModuleManifest cmdlet. Whilst it is possible to create a module manifest manually (simply create a *.psd1 file containing your requirements and place it in the module folder), using the cmdlet makes it easy to create a basic one. Let’s continue with the CurrencyConversion module and create a basic module manifest using New-ModuleManifest.
We have two options when using this cmdlet. We can either specify all of the parameters we wish to include in the manifest and supply them on the command line, or we can simply enter New-ModuleManifest and be prompted for parameters that we might want to provide.
For this example we’ll take the latter method. Entering New-ModuleManifest first prompts us for a path to the module manifest file; in this case we give the path to the CurrencyConversion module and the name of the manifest file: C:\Users\Jonathan\Documents\WindowsPowerShell\Modules\CurrencyConversion\CurrencyConversion.psd1.
(Note: in all of these examples I am using the built-in PowerShell ISE rather than the basic console, consequently the screenshots are dialogue boxes)
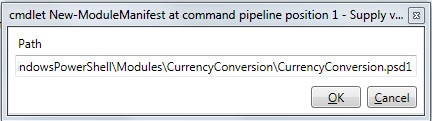
Fig 6. Enter the Path to the Module Manifest
We will then be prompted for a number of other options, particular ones to consider are:
Author: if you don’t specify one PowerShell will use the value of the currently logged on user.
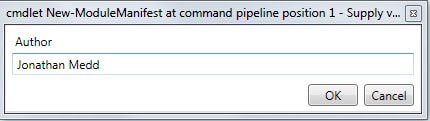
Fig 7. Enter the Author of the Module
ModuleToProcess: Specify the name of the *.psm1 file used to store the functions in the module.
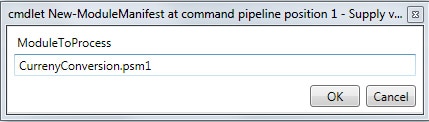
Fig 8. Enter the name of the *.psm1 file
You can Use Get-Help New-ModuleManifest to examine in more detail other options you may wish to include in your module manifest.
The resultant file created from New-ModuleManifest will look something like the below, which can now be modified further if necessary:
|
1 2 3 4 5 6 7 8 9 10 11 12 13 14 15 16 17 18 19 20 21 22 23 24 25 26 27 28 29 30 31 32 33 34 35 36 37 38 39 40 41 42 43 44 45 46 47 48 49 50 51 52 53 54 55 56 57 58 59 60 61 62 63 64 65 66 67 68 69 70 71 72 73 74 75 76 77 78 79 80 81 82 83 84 85 86 87 88 89 |
# # Module manifest for module ‘CurrencyConversion’ # # Generated by: Jonathan Medd # # Generated on: 16/02/2011 # @{ # Script module or binary module file associated with this manifest ModuleToProcess = ‘CurrencyConversion.psm1’ # Version number of this module. ModuleVersion = ‘1.0’ # ID used to uniquely identify this module GUID = ‘c6f2e5e7-91ff-4924-b4bb-8db0624195c9’ # Author of this module Author = ‘Jonathan Medd’ # Company or vendor of this module CompanyName = ‘Unknown’ # Copyright statement for this module Copyright = ‘(c) 2011 Jonathan Medd. All rights reserved.’ # Description of the functionality provided by this module Description = ‘Convert values between different currencies’ # Minimum version of the Windows PowerShell engine required by this module PowerShellVersion = » # Name of the Windows PowerShell host required by this module PowerShellHostName = » # Minimum version of the Windows PowerShell host required by this module PowerShellHostVersion = » # Minimum version of the .NET Framework required by this module DotNetFrameworkVersion = » # Minimum version of the common language runtime (CLR) required by this module CLRVersion = » # Processor architecture (None, X86, Amd64, IA64) required by this module ProcessorArchitecture = » # Modules that must be imported into the global environment prior to importing this module RequiredModules = @() # Assemblies that must be loaded prior to importing this module RequiredAssemblies = @() # Script files (.ps1) that are run in the caller’s environment prior to importing this module ScriptsToProcess = @() # Type files (.ps1xml) to be loaded when importing this module TypesToProcess = @() # Format files (.ps1xml) to be loaded when importing this module FormatsToProcess = @() # Modules to import as nested modules of the module specified in ModuleToProcess NestedModules = @() # Functions to export from this module FunctionsToExport = ‘*’ # Cmdlets to export from this module CmdletsToExport = ‘*’ # Variables to export from this module VariablesToExport = ‘*’ # Aliases to export from this module AliasesToExport = ‘*’ # List of all modules packaged with this module ModuleList = @() # List of all files packaged with this module FileList = ‘CurrencyConversion.psm1’ # Private data to pass to the module specified in ModuleToProcess PrivateData = » } |
Now that we have created a basic module manifest, we can take that as a template for future modules and customise it for our needs.
In Fig 3. you saw that our CurrencyConversion module had a ModuleType of Script , whilst other built-in and third-party modules had a ModuleType of Manifest. Now that we have created a module manifest file let’s see if that has made a difference to our CurrencyConversion module.
|
Get—Module —ListAvailable |
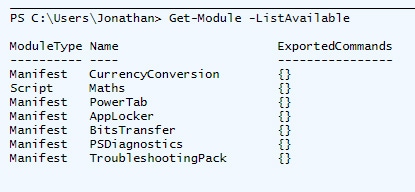
Fig 9. CurrencyConversion Module of ModuleType Manifest
Our CurrencyConversion module is now right up there with the Windows Server 2008 built-in modules! OK, maybe not, but hopefully you get the idea.
PowerShell Modules Built-In to Windows Server 2008 R2
Now that we have seen how to create our own modules, let’s take a look at some of the modules which ship as part of the Windows 2008 R2 operating system. As previously seen, to find out what modules are available we use the Get-Module cmdlet.
|
Get—Module —ListAvailable |
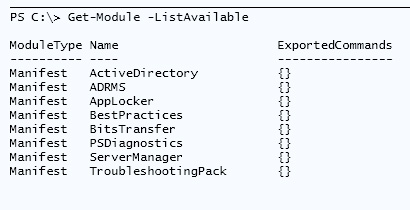
Fig 10. Available Modules on a Windows Server 2008 R2 System
You will notice that in Fig 10, the available modules are slightly different from those we saw earlier on a Windows 7 system. Out of the box we have the BestPractises and ServerManager modules, and in this particular case we have the ActiveDirectory and ADRMS modules. Windows Server 2008 R2 has evolved to become a more modular style operating system, where not everything is installed by default. Instead, depending on the role of the server, the required components for that role are installed as required. So an Active Directory Domain Controller may not necessarily have the IIS components installed, and a File Server may not have the DNS components installed.
When an additional server role or feature is installed, the relevant PowerShell modules are installed. In Fig .10 the Remote Server Administration Tools for Active Directory have been installed, consequently the ActiveDirectory and ADRMS modules are present.
Server Manager Module
In fact there is actually a module included as part of Windows Server 2008 R2 to help you manage the modular components that are installed, the ServerManager module. By importing this module and using the Get-WindowsFeature cmdlet we can see which components have been installed. By default this will produce a long list of results so it is possible to use wildcard filters to narrow the search down to what we are interested in – in this case Active Directory. Note in Fig. 11 that the elements marked with a X are those which have been installed.
|
Import—Module ServerManager Get—WindowsFeature *AD* |

Fig 11. Viewing Installed Components
To install a component we use the Add-WindowsFeature cmdlet from the ServerManager module. (Note that this is an operation that will require elevated privileges so you will need to run PowerShell as an Administrator first.) In this case we will install the Print Server Role Service. Firstly we need to find out the name of the Print Server Role Service and then we can add it.
Get-WindowsFeature *print*
Add-WindowsFeature Print-Server
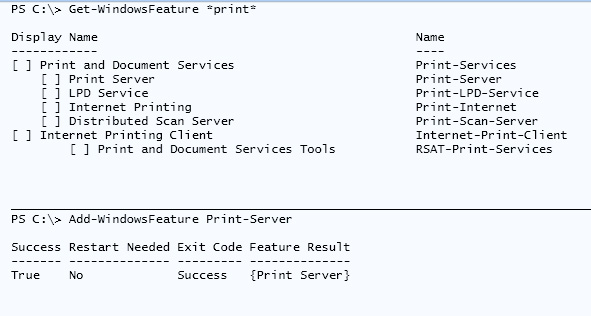
Fig 12. Adding the Print Server Role Service
The ServerManager module is great for deployment scenarios. As an alternative to storing different virtual machine templates for different server roles, it would be possible to maintain fewer base OS templates and then have different build scripts ready to deploy the different server roles. These scripts could also contain customised settings for that server role, e.g. fine tuned registry settings.
Troubleshooting Pack Module
Windows Server 2008 R2 was a big leap forward in terms of PowerShell cmdlet coverage and there are now cmdlets available via modules for everything from Active Directory, through Group Policy and Failover Clusters to IIS. For a full list check out the below table on Technet.
http://technet.microsoft.com/en-us/library/ee308287%28WS.10%29.aspx#BKMK_Appendix
Another example is the built-in TroubleshootingPack PowerShell module. To start using it we need to first of all import it and then find out what cmdlets are available to us after importing it.
|
Import—Module TroubleshootingPack Get—Command —Module TroubleshootingPack |
Fig 13. Cmdlets Available in the TroubleshootingPack Module
From Fig 11. we can see that there are two cmdlets available in this module. Troubleshooting Packs are found in the C:\Windows\Diagnostics folder. From a base install of Windows Server 2008 R2 we appear to have two available, Networking and the Program Compatibility Wizard.
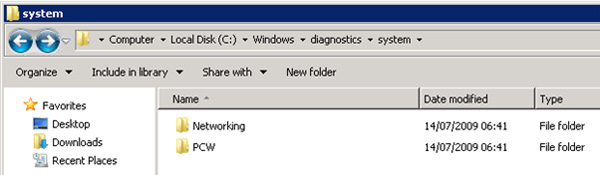
Fig 14. Available Troubleshooting Packs
Let’s examine the Networking Troubleshooting Pack and see what we might be able to do with it:
|
Get—TroubleshootingPack C:\Windows\Diagnostics\System\Networking | Format—List * |
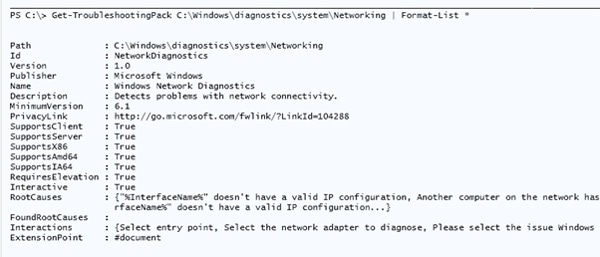
Fig 15. Networking Troubleshooting Pack
It looks like we should be able to use this to help troubleshoot networking issues on this machines. We can execute the Networking Troubleshooting Pack with the other cmdlet from the module Invoke-TroubleshootingPack.
|
Get—TroubleshootingPack C:\Windows\Diagnostics\System\Networking | Invoke—TroubleshootingPack |
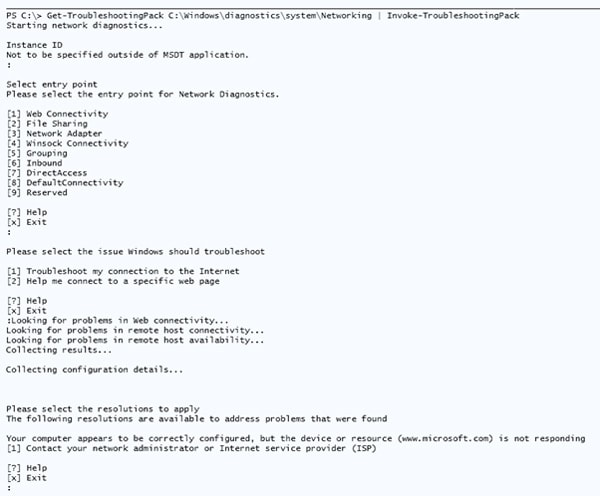
Fig 16. Invoking the TroubleShooting PowerPack
During the running of this TroubleShooting Pack I was first prompted for an InstanceID, which I left blank, and then which test to carry out – I choose [1] Web Connectivity. I knew that this server did not have Internet connectivity so I choose that it should troubleshoot [1] Troubleshoot my connection to the Internet.
It correctly determined that whilst the server appeared to be configured for Internet access it was not able to contact external resources. This is possibly not the most practical of examples, but you get the idea and the enormous scope for these Troubleshooting Packs.
Third-Party Modules
Many organisations and community members are taking advantage of the modules feature and there are already many modules you can obtain via the Internet. A great starting point for finding these is the Codeplex site http://www.codeplex.com/. Head to the site and search for ‘PowerShell Module’. As of the time of this article there are over 50 modules including the PowerShell Community Extensions Module, the BSonPosh Module and SQLPSX. I encourage you to look at the site and check out the many options there.
Summary
In this article we have looked at how the use of Modules has made it much easier to package and distribute PowerShell scripts and functions for special purposes. No longer do the creators of scripts need to be developers who can compile code into PSSnapins as with PowerShell 1. Modules can be developed that fit the particular needs of a particular application or server role.
This is a great encouragement to DBAs and Systems Administrators to create PowerShell cmdlets to automate a number of processes, and make them accessible via modules. It has also enabled Microsoft to provide modules to accompany added roles or features of the OS that ease the administrative workload. Getting access to these modules is a simple process by installing the correct role or feature and then importing the module. As IT organisations strive to greater automation it is well worth checking out the automation possibilities that these modules bring.
Updated February 28, 2023
Introduction to PowerShell Modules
PowerShell module is a package that contains various commands such as functions, cmdlets, aliases, parameters, workflow, and providers. There are predefined modules and installed default with each PowerShell version. With every new PowerShell version, more enhanced modules are added and loaded automatically. For example, from PowerShell 3.0, modules are automatically imported when you run any command in all installed modules. You can get all the installed modules on your computer with the below command. The list of modules you get depends upon the PowerShell version installed.

Get-Module -ListAvailable
From a particular module, you can get all their commands by,
Get-Command -Module ModuleName
Wildcard character (*) is allowed in ModuleName.
Modules are so flexible that you can create your module with your own sets of commands and publish them to the other computers and servers for usability.
PowerShell modules can be found and installed at the below location to be available to other users and in different profiles.
$env:PSModulePath -split ';'

PowerShell Modules
There are some default and imported third-party modules available in PowerShell on the above path. Here, we are going to explain the default modules in PowerShell 5.1.
Below is a short description of each module.
1. AppLocker
This module is designed for the administration of application control policies. The cmdlets can be used to help the author test, maintain, and troubleshoot application control policies. AppLocker user interface that is accessed through the MMC snap-in extension to the Local Security Policy Snap-in and group policy management console.
Get-Command -Module AppLocker

2. AppBackgroundTask
This module contains cmdlets for all the app background tasks.
Get-Command -Module AppBackgroundTask

3. Appvclient
This module is for the Microsoft Application Virtualization cmdlets.
Get-Command -Module AppVClient

4. AssignedAccess
This cmdlet is designed to provide restricted access to specific user accounts. When assigned access is configured to users, then they can use only one application from the windows store but can’t modify the application or system settings, exit or sign out of the application.
Get-Command -Module AssignedAccess

5. BitLocker
This module provides a cmdlet for BitLocker encryption technology. BitLocker is used to encrypt hard drives to prevent data from stealing when connected to another computer.
Get-Command -Module BitLocker

6. BitsTransfer
BITS (Background Intelligence Transfer Service) is the modern way to transfer a file between the windows computer system with an idle bandwidth whenever there is no application utilizing the bandwidth. In case of any disruption, it pauses the transfer and resumes again whenever there is a network or client machine availability.
Get-Command -Module BitsTransfer

7. CimCmdlets
CimCmdlets use several commands for remoting and are very helpful over legacy WMI cmdlets. First, it supports the auto-completion, and second, the use of WS-Management protocol, but this module also has some limitations.
Get-Command -Module CimCmdlets

8. Defender
Windows Servers and other versions of Windows operating systems have a built-in antivirus feature called the Windows Defender, and this cmdlet provides command base management of the antivirus features.
Get-Command -Module Defender

9. DeliveryOptimization
This module is introduced in Windows 10 and its later versions 1709 and 1803. Delivery optimization is a new form of download and sharing technology in comparison to BITS. It has some additional capabilities like storing and sharing content on the intranet and internet.
Get-Command -Module DeliveryOptimization

10. DISM
Deployment Image Servicing and Management (DISM) in PowerShell provides the same functionality asdism.exe in cmd.
Get-Command -Module Dism

11. DnsClient
With this module, you can get and modify DNS client-related settings on the local system and remote systems.
Get-Command -Module DnsClient

12. International
PowerShell module to get and set the computer’s regional language and culture that was provided at the time of installation of an operating system.
Get-Command -Module International

13. iSCSI
PowerShell module to get/update/remove/add iSCSI storage devices.
Get-Command -Module iSCSI

14. Microsoft.PowerShell.Archive
PowerShell module to compress files or folders to the ZIP file and extract the archive files and folders.
Get-Command -Module Microsoft.PowerShell.Archive

15. Microsoft.PowerShell.Host
Module to record PowerShell session output and store it in a text file.
Get-Command -Module Microsoft.PowerShell.Host

16. Microsoft.PowerShell.Management
PowerShell module with miscellaneous cmdlets for managing computers or servers. For example, create a mapped drive, get /start/ stop services or processes, get the local and remote computer information, and many more.
Get-Command -Module Microsoft.PowerShell.Management


17. Microsoft.PowerShell.LocalAccounts
This module is to retrieve, create, delete, and modify local users and groups. For example, add new users to new local groups, change account expiry and password for the local user, enable or disable local users, etc.
Get-Command -Module Microsoft.PowerShell.LocalAccounts

18. Microsoft.PowerShell.Operation.Validation
The operation validation framework is used to test the installed modules. In addition, diagnostic folders are inspected for the pester tests for the simple or comprehensive subfolder, or both.
Get-Command -Module Microsoft.PowerShell.Operation.Validation

19. Microsoft.PowerShell.Security
This module contains Windows files and folders security cmdlets. For example, getting and setting security permissions for files and folders, protecting password strings, protecting/unprotecting CMS messages, etc.
Get-Command -Module Microsoft.PowerShell.Security

20. Microsoft.PowerShell.Utility
Module with miscellaneous cmdlets and functions. For example, export/import CSV files, format the PowerShell console output, add/remove the properties of the output table, etc.
Get-Command -Module Microsoft.PowerShell.Utility


21. Microsoft.PowerShell.Diagnostics
This PowerShell module provides cmdlets to diagnose windows related stuff. For example, evaluating the performance counter, getting windows events from the event-viewer, etc.
Get-Command -Module Microsoft.PowerShell.Diagnostics

22. Microsoft.WSMan.Management
This module provides access to WS-Management (Web Service for Management). With this module cmdlets, you can add, clear, change and delete WS-Management data on local and remote computers.
Get-Command -Module Microsoft.WSMan.Management

23. MsDtc
This module provides cmdlets for the Microsoft Distributed Transaction Coordination (MsDtc).
Get-Command -Module MsDtc

24. NetAdapter
This module provides cmdlets to get, add, remove, and change the network adapter properties.
Get-Command -Module NetAdapter


25. Net connection
This module provides cmdlets to get and set the network connection profile associated with one or more physical adapters.
Get-Command -Module NetAdapter

26. NetEventPacketCapture
This module’s cmdlets are used to get, add and remove network adapters associated with the remote capture provider for a network event session.
Get-Command -Module NetAdapter

27. Aa. Netlbfo
This module provides cmdlets for all NIC teaming-specific operations like removing, creating, or modifying the properties.
Get-Command -Module NetLbfo

28. NetSecurity
This module provides cmdlets for Network Security related configuration changes and data retrieval. For example, it can set the Windows OS firewall settings, apply and modify rules, set new firewall rules, etc.
Get-Command -Module NetSecurity


29. NetTCPIP
This module provides Network TCP/IP configuration functionality like Network IP interface configuration, IP configuration, finding the best route for the host, removal of IP / Interface, etc.
Get-Command -Module NetTCPIP

30. NetworkConnectivityStatus
This module provides the cmdlets for network connectivity status.
Get-Command -Module NetworkConnectivityStatus

31. NetworkSwitchManager
This module provides the cmdlets for the management of Network switches.
Get-Command -Module NetworkSwitchManager

32. PCSVDevice
This module contains cmdlets to support Out-of-Band management and to manage IPMI devices.
Get-Command -Module PcsvDevice

33. PKI
This module deals with PKI and Active Directory Certificate Management.
Get-Command -Module PKI

34. PnPDevice
This module provides cmdlets and functions to manage Plug n Play (PnP) devices.
Get-Command -Module PnpDevice

35. PrintManagement
This module provides cmdlets to manage local and remote printers.
Get-Command -Module PrintManagement

36. PSDesiredStateConfiguration
This module provides cmdlets and functions related to DSC resources.
Get-Command -Module PSDesiredStateConfiguration

37. PSDiagnostics
This module contains functions to troubleshoot PowerShell functionality, and it can also log events to event viewers.
Get-Command -Module PSDiagnostics

38. PSScheduledJob
This module provides commands to manage the background job. For example, you can create, remove, register, and trigger jobs, etc.
Get-Command -Module PSScheduledJob

39. PSWorkFlow&PSWorkFlowUtility
PSWorkFlow module provides cmdlets to write and run the workflows.
Get-Command -Module PSWorkflow

Get-Command -Module PSWorkflowUtility

40. ScheduledTasks
This module provides functions to administer and manage the scheduled tasks.
Get-Command -Module ScheduledTasks

41. SecureBoot
This module provides cmdlets related to the secure boot of your system. For example, check if secure boot is enabled for your system to use Confirm-SecureBootUEFI.
Get-Command -Module SecureBoot

42. SmbShare
This module provides cmdlets specific to SMB (Server Message Block) share. You can create, remove, enable, disable SMB Share, and provide/remove users’ permissions on them.
Get-Command -Module SmbShare

43. SMBWitness
This module retrieves the information about the SMB clients connected to SMB witness servers in the cluster and moves the SMB connection to the specified cluster node.
Get-Command -Module SmbWitness

44. Storage
This module provides storage-specific functionality and cmdlets.
Get-Command -Module Storage


45. TLS
This module provides functionality to manage Transport Layer Security (TLS) related settings.
Get-Command -Module TLS

46. WindowsErrorReporting
Windows Error Reporting (WER) collects hardware and software problems on the system and sends it to Microsoft for Analysis. This module is available in PowerShell.
Get-Command -Module WindowsErrorReporting

47. WindowsSearch
You can get and set the Windows Search-related items with this PowerShell module.
Get-Command -Module WindowsSearch

Conclusion
You can create your PowerShell module with the packaging of different cmdlets and functions, and you can use them on multiple systems. There are also many modules that are not default installed but very helpful in administration jobs, and you can download them from PowerShell Gallery.
Recommended Articles
This is a guide to PowerShell Modules. Here we also discuss the Introduction and Various PowerShell modules along with syntax and examples. You may also have a look at the following articles to learn more –
- PowerShell Concatenate String
- PowerShell Convert to String
- PowerShell Split String
- PowerShell Wildcards
PowerShell is a scripting engine. Commands are strictly separated from this engine and reside in modules. That’s why you can easily extend the PowerShell command set. Even the specialized PowerShell consoles shipping with Exchange or SQL Server are plain regular PowerShell consoles that simply load more commands from external modules.
You can use whatever PowerShell host you like (console, ISE editor, VSCode editor, etc.) to manage Active Directory, Exchange, Sharepoint, or whatever it may be. Just make sure the PowerShell modules are loaded that provide the commands you require.
This is the first part of an article series deeply looking into PowerShell modules. It applies to both Windows PowerShell and the new PowerShell 7 aka PowerShell Core. The first part explains how commands are loaded from modules, and how PowerShell automatically loads modules on-demand.
As an experienced PowerShell user, you may safely skip this article. It provides you with a basic overview of the module architecture, and I’ll reference this material in other articles where I explain how to author your own modules.
Before PowerShell modules were invented in PowerShell 2, commands were added using Snap-Ins. The snap-in technology is obsolete and was removed from PowerShell 7. In Windows PowerShell, you can still use
Add-PSSnapinto load snap-ins. Snap-ins are not covered in this article, and you should try and avoid them in favor of modules.
Commands On Demand
When you launch a new PowerShell it comes with only very few commands loaded into memory:
(Get-Command -ListImported).Count
Still, there are thousands of commands potentially available:
The reported numbers can vary greatly, too, so they may be different for you. That’s because PowerShell loads commands on demand which saves resources and speeds up the launch process, and commands can be extended by adding PowerShell modules. The more modules you have, the more commands are available.
Automatic Module Loading
When you launch a fresh PowerShell, only a few Modules are pre-loaded in memory:
# load a new fresh PowerShell instance w/o running any profile scripts:
powershell.exe -NoProfile
# dump all modules loaded in memory:
Get-Module
ModuleType Version    Name                                ExportedCommands
---------- -------    ----                                ----------------
Manifest   3.1.0.0    Microsoft.PowerShell.Utility        {Add-Member, Add-Type, Clear-Variable, Compare-O...
Script     2.0.0      PSReadline                          {Get-PSReadLineKeyHandler, Get-PSReadLineOption,...
These pre-loaded Modules provide a basic set of PowerShell commands:
(Get-Module).ExportedCommands | Format-Wide -Column 6
Add-Computer       Add-Content        Checkpoint-Com... Clear-Content     Clear-EventLog    Clear-Item
Clear-ItemProperty Clear-RecycleBin   Complete-Trans... Convert-Path      Copy-Item         Copy-ItemProperty
Debug-Process      Disable-Compute... Enable-Compute... Get-ChildItem     Get-Clipboard     Get-ComputerInfo
...
With these pre-loaded commands you can already do a lot of sophisticated things, for example download information from websites:
# dump source code from url:
Invoke-RestMethod -Uri powershell.fun -UseBasicParsing
You are not restricted to the pre-loaded commands, though. PowerShell automatically loads modules on demand when you use a command that hasn’t been loaded into memory yet.
Implicitly Importing New Modules
There is no need for you to manually import modules or even know about them:
- Cache: Details of all commands from all modules are kept in a cache file. Because of this cache, PowerShell always suggests all available commands to you even if their modules haven’t been loaded into memory yet.
- Auto-Loading: Once you actually use a command, PowerShell determines whether the module that defines the command has been loaded into memory. If it wasn’t loaded yet, PowerShell automatically calls
Import-Modulefor you. Imported modules typically stay in memory until you close PowerShell.
Discovering Commands and Modules
This command lists all PowerShell commands with the verb Get from all modules, including the ones that haven’t been loaded into memory yet:
As a beginner, it’s a good idea to focus on PowerShell commands with verb Get because these commands only read information and are safe to play with. There is no risk of accidentally changing settings or deleting things.
The column Source reveals the name of the Module that defines the command:
CommandType Name                         Version   Source
----------- ----                         -------   ------
...
Cmdlet      Get-Event                    3.1.0.0   Microsoft.PowerShell.Utility
Cmdlet      Get-EventLog                 3.1.0.0   Microsoft.PowerShell.Management
Cmdlet      Get-EventSubscriber          3.1.0.0   Microsoft.PowerShell.Utility
Cmdlet      Get-ExecutionPolicy          3.0.0.0   Microsoft.PowerShell.Security
Cmdlet      Get-FormatData               3.1.0.0   Microsoft.PowerShell.Utility
Cmdlet      Get-GPInheritance            1.0.0.0   GroupPolicy
Cmdlet      Get-GPO                      1.0.0.0   GroupPolicy
Cmdlet      Get-GPOReport                1.0.0.0   GroupPolicy
Cmdlet      Get-GPPermission             1.0.0.0   GroupPolicy
Cmdlet      Get-GPPrefRegistryValue      1.0.0.0   GroupPolicy
Cmdlet      Get-GPRegistryValue          1.0.0.0   GroupPolicy
Cmdlet      Get-GPResultantSetOfPolicy   1.0.0.0   GroupPolicy
Cmdlet      Get-GPStarterGPO             1.0.0.0   GroupPolicy
Cmdlet      Get-Help                     3.0.0.0   Microsoft.PowerShell.Core
...
If a module name starts with Microsoft.PowerShell. then it is shipping as part of PowerShell, and you can safely assume the module (and its commands) are available to anyone using the same PowerShell version that you use.
Any module with a different name is not part of PowerShell. It may be part of the operating system, a software installation, or installed from the PowerShell Gallery. If your scripts use commands from these modules, it is your job to identify these dependencies and make sure the modules (and commands inside of it) are available wherever you want to run your script.
When you want to use any one of the listed commands, there is no need to manually import modules. Just use them. PowerShell does all the rest for you.
Let’s dump the local Administrator accounts and show them in a dialog: Get-LocalGroupMember can read the members of a local user group, and Out-GridView shows data in a dialog, so here is a one-liner that shows all accounts in the local Administrators group:
Get-LocalGroupMember -SID S-1-5-32-544 | Out-GridView
The command immediately runs. No need for you to care much about modules.
Modules Ship Commands
To better understand the mechanisms behind the scenes, let’s manually identify the modules that ship these two commands. Start a new PowerShell, then run this code:
# get all commands (do NOT use parameter -Name)
Get-Command |
  # pick the commands we want to investigate
  Where-Object { 'Get-LocalGroupMember', 'Out-GridView' -contains $_.Name } |
  # add a calculated property "Loaded" which indicates whether the module was loaded into memory:
  Select-Object -Property Name, Source, @{N='Loaded';E={(Get-Module $_.Source) -ne $null}}
I am using
Get-Commandwithout any parameters and dump all commands, then useWhere-Objectto pick only the commands I am planning to use. Why not use the parameter -Name to pick the two commands immediately?When you use the parameter -Name,
Get-Commandautomatically loads the module for these commands to provide you with original information about the commands. When you avoid the parameter -Name,Get-Commandwill not load modules and instead takes command information from its internal cache.
As it turns out, Out-GridView is part of the module Microsoft.PowerShell.Utility which is preloaded. Get-LocalGroupMember ships with Microsoft.PowerShell.Management which is initially not loaded:
Name                 Source                             Loaded
----                 ------                             ------
Get-LocalGroupMember Microsoft.PowerShell.LocalAccounts  False
Out-GridView         Microsoft.PowerShell.Utility         True
Still, you can immediately run Get-LocalGroupMember.
Get-LocalGroupMember -SID S-1-5-32-544 | Out-GridView
PowerShell has automatically imported the module Microsoft.PowerShell.LocalAccounts for you:
ModuleType Version    Name                                ExportedCommands
---------- -------    ----                                ----------------
Binary     1.0.0.0    Microsoft.PowerShell.LocalAccounts  {Add-LocalGroupMember, Disable-LocalUser, Enable...
Manifest   3.1.0.0    Microsoft.PowerShell.Management     {Add-Computer, Add-Content, Checkpoint-Computer,...
Manifest   3.1.0.0    Microsoft.PowerShell.Utility        {Add-Member, Add-Type, Clear-Variable, Compare-O...
Script     2.0.0      PSReadline                          {Get-PSReadLineKeyHandler, Get-PSReadLineOption,...
Since the module Microsoft.PowerShell.LocalAccounts starts with Microsoft.PowerShell., you know that it ships as part of PowerShell, and you can safely use it in your scripts without having to worry about dependencies.
The module Microsoft.PowerShell.LocalAccounts was added in PowerShell 5. As long as your customers use at least PowerShell 5, you can trust that this module is available.
Module Auto-Import: Behind The Scenes
Let’s take a look at what PowerShell does behind the scenes when you run a command like Get-LocalGroupMember that wasn’t loaded before.
I am just illustrating the steps with individual PowerShell commands. Of course, in reality this is all done internally in one step.
Command Lookup
PowerShell looks up the command Get-LocalGroupMember in its internal cache:
Get-Command -Name Get-LocalGroupMember
It discovers that the command is shipped as part of the module Microsoft.PowerShell.LocalAccounts (see column Source):
CommandType Name                 Version Source
----------- ----                 ------- ------
Cmdlet      Get-LocalGroupMember 1.0.0.0 Microsoft.PowerShell.LocalAccounts
In classic shells and programming languages, you are responsible for importing libraries and extensions before you can use them. In PowerShell, this is done automatically.
This feature is driven by an internal command cache that lists all available commands, and the location of the modules providing these commands.
This cache can get corrupted or become stale, especially when you add new modules. If PowerShell fails to suggest commands correctly, you can force a cache rebuild and diagnose auto-discovery issues. Run this command:
Get-Module -ListAvailable -RefreshThis command rebuilds the command cache and re-examines all modules in all PowerShell default locations. The result is a folder listing including all default module folders. These folders are defined in the environment variable
$env:PSModulePath.$env:PSModulePath -split ';'Make sure the listing contains the module you intended to use, and lists the command in the column ExportedCommands.
If your module isn’t included in the list, make sure it exists and is present in one of the default folders. If the module is listed but the command isn’t showing in ExportedCommands, make sure the ExecutionPolicy allows scripts to run, and the module isn’t corrupted.
If the module is listed, and the command shows in ExportedCommands, make sure there is no other module exporting a conflicting command with the same name as the one you intended to run.
Module Auto-Import
It then checks whether the module is already loaded into memory:
$loaded = (Get-Module -Name Microsoft.PowerShell.LocalAccounts) -ne $null
$loaded
If the module isn’t yet loaded, it figures out whether the module is available:
# find the module and its file location:
Get-Module -Name Microsoft.PowerShell.LocalAccounts -ListAvailable | Select-Object -ExpandProperty ModuleBase
If it is available, it then imports it explicitly into memory:
Import-Module -Name Microsoft.PowerShell.LocalAccounts
Adjusting And Disabling Module Auto-Loading
You can turn off module auto-loading by setting the variable $PSModuleAutoLoadingPreference to None:
# turn module autoloading off:
$PSModuleAutoLoadingPreference = 'None'
# command will not run (unless its module was loaded previously)
Get-LocalGroup
# turn module autoloading on again (default):
$PSModuleAutoLoadingPreference = 'All'
# command runs (PowerShell identifies and imports required module)
Get-LocalGroup
This preference variable was added for security reasons. Auto-loading PowerShell modules can be a security risk. After all, when a module is imported it can execute arbitrary PowerShell code.
With module auto-loading disabled, it is your responsibility to import all required modules via Import-Module. PowerShell will no longer import any module automatically.
You can also set the variable to ModuleQualified: modules are auto-loaded only when you run a module-qualified command (prepend the command name with the module name that defines the command):
# launch a fresh powershell (replace with pwsh.exe for PowerShell 7)
powershell.exe -noprofile
# enable module-qualified auto-import only:
$PSModuleAutoLoadingPreference = 'ModuleQualified'
# plain commands will not auto-import modules:
Get-LocalGroup
# module-qualified commands will auto-import:
Microsoft.PowerShell.LocalAccounts\Get-LocalGroup
Explicitly Importing Modules
Most of the time, PowerShell is importing modules automatically. There are five scenarios, though, where running Import-Module manually can be helpful or even required:
-
Refresh Module: If you are authoring your own PowerShell modules, you may want to freshly re-import an already imported module, i.e. when you changed code inside of it. Use the parameter -Force to force a fresh import:
# freshly re-import an already imported module because you changed its code: Import-Module -Name MyLittleModule -Force -
Load From Custom Location: PowerShell auto-imports modules only from known module folders. If the module isn’t located in one of the folders listed in
$env:PSModulePath, useImport-Moduleand provide the path to the module instead of its name:# import a module from a non-default file location, i.e. from a USB stick: Import-Module -Name 'd:\mytools\MyLittleModule' -
Ensure Loaded: Module auto-import is triggered by command usage. PowerShell modules can contain more than commands, though. Some PowerShell modules include PowerShell providers. A provider implements drives. For example, the optional Microsoft module ActiveDirectory ships with a provider that implements the new PowerShell drive AD: to traverse the Active Directory structure. Before you can use the drive, you need to import the module. Either use one of its commands to trigger implicit loading, or use
Import-Module:# import module to load contained providers: Import-Module -Name ActiveDirectory # (make sure you installed the module, it is optional) # drive AD: now available: Get-ChildItem -Path 'AD:\' -
Diagnose Correct Module Loading: If you suspect there is something wrong with a module, import it manually and enable verbose and debug output:
# manually load module and enable verbose and debug output:
# (this invokes the command in a scriptblock so $DebugPreference won't change globally)
& { $DebugPreference = 'Continue'; Import-Module -Name Microsoft.PowerShell.Utility -Force -Verbose }
The output lists all commands imported by the module, plus potentially other information that may be useful to investigate issues:
VERBOSE: Loading module from path 'C:\Windows\system32\WindowsPowerShell\v1.0\Modules\Microsoft.PowerShell.Utility\Microsoft.PowerShell.Utili ty.psd1'. VERBOSE: Importing cmdlet 'New-Object'. VERBOSE: Importing cmdlet 'Measure-Object'. ... -
Auto-Import Disabled: If you have disabled module auto-import for security reasons (by setting the variable
$PSModuleAutoLoadingPreferenceto None) you must useImport-Moduleand import all modules manually that you intend to use.
Module Location
Let’s take a look at all PowerShell commands available for your PowerShell environment, and add the information about the module that defines these commands:
# calculated property:
# get the base path for a module
$basePath = @{
  Name = 'Path'
  Expression = { $_.Module.ModuleBase }
}

# get all PowerShell commands...
Get-Command -CommandType Function, Cmdlet |
  # ...that are defined by a module...
  Where-Object ModuleName |
  # ...and output command name, type, module name, and module location:
  Select-Object -Property Name, CommandType, ModuleName, $basePath
The output reports the commands, command types, and the module from which they will be loaded when you use the commands:
Name                                       CommandType ModuleName                             Path
----                                       ----------- ----------                             ----
...
Revoke-SPOTenantServicePrincipalPermission      Cmdlet Microsoft.Online.SharePoint.PowerShell C:\Users\tobia\OneDrive\Dokumente\WindowsPo...
Revoke-SPOUserSession                           Cmdlet Microsoft.Online.SharePoint.PowerShell C:\Users\tobia\OneDrive\Dokumente\WindowsPo...
Save-CauDebugTrace                              Cmdlet ClusterAwareUpdating                   C:\Windows\system32\WindowsPowerShell\v1.0\...
Save-Help                                       Cmdlet Microsoft.PowerShell.Core
Save-Package                                    Cmdlet PackageManagement                      C:\Program Files\WindowsPowerShell\Modules\...
Save-ShieldedVMRecoveryKey                      Cmdlet ShieldedVMDataFile                     C:\Windows\system32\WindowsPowerShell\v1.0\...
Save-VolumeSignatureCatalog                     Cmdlet ShieldedVMDataFile                     C:\Windows\system32\WindowsPowerShell\v1.0\...
Save-WindowsImage                               Cmdlet Dism                                   C:\Windows\system32\WindowsPowerShell\v1.0\...
Search-ADAccount                                Cmdlet ActiveDirectory                        C:\Windows\system32\WindowsPowerShell\v1.0\...
Select-Object                                   Cmdlet Microsoft.PowerShell.Utility           C:\Windows\System32\WindowsPowerShell\v1.0
Select-String                                   Cmdlet Microsoft.PowerShell.Utility           C:\Windows\System32\WindowsPowerShell\v1.0
Select-Xml                                      Cmdlet Microsoft.PowerShell.Utility           C:\Windows\System32\WindowsPowerShell\v1.0
Send-AppvClientReport                           Cmdlet AppvClient                             C:\Windows\system32\WindowsPowerShell\v1.0\...
...
The module Microsoft.PowerShell.Core is the only module in this list that does not report a file location. This module is hardcoded into PowerShell and always loaded when PowerShell launches. The commands in this module are vital to PowerShell:
Get-Command -Module Microsoft.Powershell.Core
Default Module Locations
PowerShell is monitoring all folders listed in this environment variable:
$env:PSModulePath -split ';'
By default, this variable contains three folders:
C:\Users\tobia\OneDrive\Dokumente\WindowsPowerShell\Modules
C:\Program Files\WindowsPowerShell\Modules
C:\Windows\system32\WindowsPowerShell\v1.0\Modules
The first path holds all modules installed per user and is located in your user profile. The second path stores all modules installed for all users and is located inside the default location for installed 3rd party software. The last folder keeps all internal Microsoft modules and is off limits for anyone else.
Custom Module Locations
Even though you can edit the folder list in $PSModulePath and add more locations, this is strongly discouraged:
-
Per User, All User: Sometimes, 3rd party software decide to install PowerShell modules in completely separate custom locations. Only why? Typically, PowerShell modules are installed either per user or for all users, just like any other type of software. The default module folders enable you to do just that. There is really no reason for adding additional module locations.
-
Damages To Default Folders: Occasionally, software publishers damage the default locations while trying to add their custom folders. Typically, this occurs when PowerShell modules are shipped as MSI packages. For example, when an MSI package accidentally replaced the path to your user profile with a custom location (rather than adding that custom location), any module installed per user becomes suddenly unavailable.
-
Slow Network, Slow PowerShell: Network shares and UNC paths are frequently abused as a convenient central module store. While technically possible, this slows down PowerShell command discovery and command completion, and can add hefty network traffic:
PowerShell visits the folders listed in
$env:PSModulePathvery frequently, i.e. whenever you request command completion, and unless you have a very fast network and file server, you start to see strange progress bars while waiting for command completion results.PowerShell modules should strictly be stored in local folders: push them to one of the local default module folders in
$env:PSModulePathusing classic software distribution, or pull them from central repositories usingInstall-Module.
If you see more or less (or different) folders than the default folders in $env:PSModulePath, you should rethink and try and make sure all PowerShell modules are stored in the default folders.
If you must import modules from non-default places, use
Import-Moduleand submit the path to the module folder. This call can then be added to your profile script in$profileto automatically load such modules.
What’s Next
Now that you know the basics about PowerShell modules, let’s take a look at some of the best sources for new free PowerShell modules, and how to install, update, and remove additional PowerShell modules.
Last time we played with PowerShell Drives. In this part we dedicate ourselves to the structure of PowerShell, especially the PowerShell Module structure. But first, let’s look at the exercise from the last part.
All parts of the series can be found here: PowerShell for Beginners (Series)
Review (Part 11)
In Part 11 I ask for this:
Discovering
Find out how to show the Computername with the PS Drive env.
Creating
Create a new persistent PowerShell Drive that refers to a shared folder on a remote computer. Find out how to make this drive persistent. (Use the Online Help, the Local Help or whatever)
Let’s do the first more easy part. To find out the computer name we have to browse the env: directory. There we’ll find the computer name environment variable, stored in a PowerShell Drive.
cd env:

dir *computer*

But most of all it’s called that way:
$env:computername

The second task asks for creating a persistent PowerShell Drive which refers to a shared folder. For mapping a network drive to a shared folder “Data” on Client01 for the drive letter F, the command looks like this:
New-PSDrive -Name F -PSProvider FileSystem -Root \\Client01\Data -Persist

A quick glance in the Windows Explorer shows that the drive is correctly mapped:
That’s it. Let’s move on with PowerShell Modules.
Summary
A Windows PowerShell drive is a data store location that you can access like a file system drive in Windows PowerShell.
What are PowerShell Modules?
Some may think knowledge about Modules is not a topic for beginners. I don’t think so, because you have to understand why some commands are available on a Windows Server, for example on a Domain Controller, but not on a Client operating system. All these procedures are controlled by PowerShell Modules. Let’s take a look at the original description by the PowerShell team:
A module is a set of related Windows PowerShell functionalities, grouped together as a convenient unit (usually saved in a single directory). By defining a set of related script files, assemblies, and related resources as a module, you can reference, load, persist, and share your code much easier than you would otherwise.
https://msdn.microsoft.com/en-us/library/dd878324(v=vs.85).aspx
So far so good. They say it’s a set of functionalities. And they are grouped together in a unit.
Summary
A module is a set of related Windows PowerShell functionalities, grouped together as a convenient unit (usually saved in a single directory). It’s usually a set of commands and codes.
Finding PowerShell Modules with PowerShell and File System
As you may suspect, there’s a command for this task.
Get-Module shows you the currently imported modules. Note that these modules are a set of commands, as mentioned above by the PowerShell team.
Get-Module

But there’s more. There’s much more! To list all modules run
Get-Module -ListAvailable

What’s the difference between ListAvailable and the three modules above? All Modules are imported automatically if you try to run one of the module’s commands. That’s an important point when it comes to scripting.
For example my little script Do-Speak which can be found here Do-Speak: Start talking with Remote Computers (System.Speech) is listed in the Module Do-Speak.
If I try to run this command the module which hast the same name than the command is loaded automatically into the current PowerShell Session.

Now after running my custom script, I can see the module loaded into the current session.

The same is true for buit-in modules by Windows Server Roles and Features. If you run any Active Directory command, then the corresponding module is loaded into the PowerShell session.

There are many ways to show all commands of a module. I’ll show you two of them.
(Get-Module ActiveDirectory).ExportedCommands

Or, in my opinion, the better choice:
Get-Command -Module ActiveDirectory

So our last question for this part is how can we find something about this modules? Where are they stored? Can I get more information? The answer is Yes.
The default folder for modules that are shipped with Windows is here:
cd $PSHome\Modules

If you write your own script place it here for all users:
cd $Env:ProgramFiles\WindowsPowerShell\Modules

Last, but not least the location for the current user:
cd $Home\Documents\WindowsPowerShell\Modules
Ok that’s it for this part.
What have we learned so far?
Get-Module lists all currently imported modules. Get-Module -ListAvailable lists all modules which are automatically imported when your run a command of these modules. Store all custom modules in C:\ProgramFiles\WindowsPowerShell\Modules.
Installing Modules (Windows Server Only)
When you install new roles or features on Windows Server then you have to take care that the associated PowerShell Module is also installed.
For example, if you promote a Windows Server to a Domain Controller make sure you provide the IncludeManagementTools parameter. This includes all Active Directory graphical tools and the Windows PowerShell Module. If you do not provide this parameter the Server will be promoted (after you run New-ADForest or New-ADDomainController) to a Domain Controller, but you have to administer the Server from a remote computer, because there are no tools available to administer the Server locally. No Active Directory Users and Computers (dsa.msc), no AD Sites (dssite.msc) … Crazy thing hu?
Install-WindowsFeature -Name AD-Domain-Services -IncludeManagementTools

If you install new Roles and Features graphically via Server Manager make sure the right checkboxes are selected:

Otherwise there is little to say about this topic, since everything happens automatically.
Using Custom Modules
Let’s say you find a very interesting script. You download it. Then you have the code. You open it with PowerShell ISE. It’s the script above. It tests the connectivity to the Default Gateway. Best of all, you don’t even need to know the IP address of the gateway. And it works on remote computers as well.
function Test-Gateway {
param($Computer = $null,
 $Count = "1")
If ($Computer -eq $null)
{Test-Connection -Destination (Get-NetRoute -DestinationPrefix 0.0.0.0/0 | Select-Object -ExpandProperty Nexthop) -Count $Count}
 else
 {$Route=Invoke-Command -ComputerName $Computer {Get-NetRoute -DestinationPrefix 0.0.0.0/0 | Select-Object -ExpandProperty Nexthop}; Test-Connection -Source $Computer -Destination $Route -Count $Count}
 }
You think you’ll surely need this script very often. What’s wrong with making a module out of it? The big advantage is that the command (Test-Gateway) is then available every time you start PowerShell. That’s a good thing, hu?
Before we begin copying the file, create a “Test-Gateway” folder. Note that the file name and the folder name must match!

Then copy the code in PowerShell ISE. (To open ISE type ise).

Save the file as Test-Gateway.psm1 (psm1 is the file assocation for PowerShellModules) in your recently created folder.

Now close PowerShell. Open PowerShell again. Try to run Test-Gateway without any parameters.

From now on the command (module) is available in every PowerShell session for all users.

By the way, to view the code of the script run
Get-Command Test-Gateway -ShowCommandInfo

or
Get-Command Test-Gateway | Select-Object -ExpandProperty ScriptBlock

Remember that we have already learned something about Select-Object: PowerShell for Beginners (Part 8): The Power of PowerShell – Getting in Touch with Objects (Get-Member, Select-Object)
What have we learned so far?
When installing Roles and Features verify the checkbox “Include Management Tools”. Use PowerShell ISE for importing custom modules and codes. Create a folder in C:\ProgramFiles\WindowsPowerShell\Modules and make sure the folder and the file name match. Save the code as psm1 file. PowerShell will then import the module every time you run the command.
Exercise
Here is the exercise til next part.
For this part it’s an easy, but very important task to get familiar with PowerShell modules:
Go to https://sid-500.com/2018/02/02/powershell-test-open-tcp-ports-with-test-openport-multiple-hosts-multiple-port-numbers/ and make this command (code) available to all users in all PowerShell Sessions.
See you next time at the topic: PowerShell for Beginners (Part 13): PowerShell Remoting
Patrick Gruenauer, MVP PowerShell
Привет! Как большой поклонник и активный практик PowerShell я часто сталкиваюсь с тем, что мне необходимо повторно использовать ранее написанные куски кода.
Собственно, для современных языков программирования code reuse — это обычное дело.
PowerShell в этом вопросе не отстает, и предлагает разработчикам (написателям скриптов) сразу несколько механизмов обращения к написанному ранее коду.
Вот они по возрастанию сложности: использование функций, дот-сорсинг и написание собственных модулей.
Рассмотрим их все порядку.
В качестве решения лабораторной задачи напишем скрипт, который расширяет раздел C:\ до максимально возможного размера на удаленном Windows-сервере LAB-FS1.
Такой скрипт будет состоять из одной строки и выглядеть так:
Invoke-Command -ComputerName LAB-FS1 -ScriptBlock { "rescan", "select volume=c", "extend" | diskpart }Работает это так. Сначала PowerShell устанавливает удаленное соединение с сервером LAB-FS1 и запускает на нем локально набор команд, заключенный в фигурные скобки параметра -ScriptBlock. Этот набор в свою очередь последовательно передает команде diskpart три текстовых параметра, а diskpart выполняет (по очереди) повторное сканирование разделов, выбор раздела C:\ и расширение его до максимально возможного размера.

Как видите, скрипт крайне простой, но в то же время крайне полезный.
Рассмотрим, как правильно упаковать его для повторного использования.
1. Использование функций
Самый простой вариант.
Предположим, что мы пишем большой скрипт, в котором нам по разным причинам необходимо много раз запускать расширение разделов на разных серверах. Логичнее всего выделить весь этот скрипт в отдельную функцию в этом же .ps1-файле и в дальнейшем просто вызывать ее по необходимости. Помимо этого мы расширим функционал скрипта, позволив администратору явно указывать имя удаленного сервера и букву расширяемого раздела. Имя и букву будем передавать с помощью параметров.
Функция и ее вызов будут выглядеть так:
function ExtendDisk-Remotely
{
    param (
     [Parameter (Mandatory = $true)]
        [string] $ComputerName,
     [Parameter (Mandatory = $false)]
        [string] $DiskDrive = "c"
    )

    Invoke-Command -ComputerName $ComputerName -ScriptBlock {"rescan", "select volume=$using:DiskDrive", "extend" | diskpart}
}

ExtendDisk-Remotely -ComputerName LAB-FS1
Здесь для функции ExtendDisk-Remotely заданы два параметра:
- Обязательный ComputerName;
- Необязательный DiskDrive. Есть не задать имя диска явным образом, скрипт будет работать с диском C:\
Также можно отметить, что передача локальной переменной в удаленную сессию осуществляется с помощью ключевого слова using.
Сохраним скрипт под именем Example-01-Functions.ps1 и запустим:
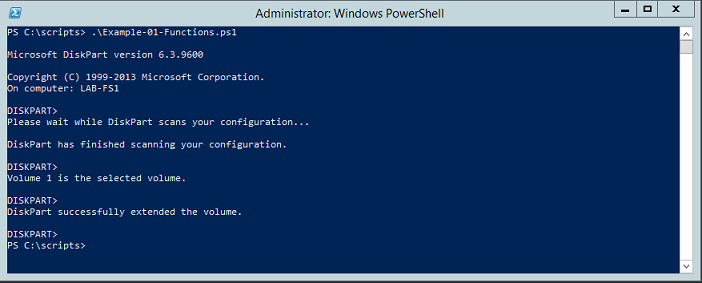
Видим, что наша функция успешно вызвалась и расширила раздел C:\ на сервере LAB-FS1.
2. Дот-сорсинг
Усложняем ситуацию. Наша функция по расширению разделов оказалась так хороша, что мы хотим прибегать к ее использованию и в других скриптах. Как быть?
Копировать текст функции из исходного .ps1-файла и вставлять ее во все необходимые? А если код функции регулярно обновляется? А если эта функция нужна сотне скриптов? Очевидно, надо выносить ее в отдельный файл и подключать по мере необходимости.
Создадим отдельный файл для всех наших функций и назовем его Example-02-DotSourcing.ps1.
Его содержимое будет таким:
function ExtendDisk-Remotely
{
    param (
     [Parameter (Mandatory = $true)]
        [string] $ComputerName,
     [Parameter (Mandatory = $false)]
        [string] $DiskDrive = "c"
    )

    Invoke-Command -ComputerName $ComputerName -ScriptBlock {"rescan", "select volume=$using:DiskDrive", "extend" | diskpart}
}
Это объявление функции (без вызова), которая теперь хранится у нас в отдельном файле и может быть вызвана в любой момент с помощью техники, которая называется dot-sourcing. Синтаксис выглядит так:
. C:\Scripts\Example-02-DotSourcing.ps1
ExtendDisk-Remotely LAB-FS1
Внимательно посмотрите на первую строку кода и проанализируйте ее содержимое: точка, пробел, путь к файлу с описанием функции.
Такой синтаксис позволяет нам подключить к текущему скрипту содержимое файла Example-02-DotSourcing.ps1. Это то же самое, что использовать директиву #include в C++ или команду using в C# — подключение кусков кода из внешних источников.
После подключения внешнего файла мы уже во второй строке можем вызвать входящие в него функции, что мы успешно и делаем. При этом задотсорсить внешний файл можно не только в теле скрипта, но и в «голой» консоли PowerShell:

Техникой дотсорсинга можно пользоваться, и она будет у вас работать, однако гораздо удобнее пользоваться более современным способом, который мы рассмотрим в следующем разделе.
3. Написание собственного модуля PowerShell
Внимание: Я использую в работе PowerShell версии 4.
Одна из его особенностей заключается в том, что он автоматически подгружает в оперативную память модули по мере обращения к ним, без использования командлета Import-Module.В старых версиях PowerShell (начиная с 2) написанное ниже будет работать, но может потребовать дополнительных манипуляций, связанных с предварительным импортом модулей перед их использованием.
Мы же будем рассматривать современные среды.
Усложняем ситуацию еще раз.
Мы стали очень хорошими PowerShell-программистами, написали сотни полезных функций, для удобства использования разделили их на десятки .ps1-файлов, и в нужные нам скрипты дотсорсим нужные файлы. А если у нас десятки файлов для дотсорсинга и их надо указать в сотне скриптов? А если мы несколько из них переименовали? Очевидно, что придется менять путь ко всем файлам во всех скриптах — это страшно неудобно.
Поэтому.
Независимо от того, сколько функций для повторного использования вы написали, пусть даже одну, сразу оформляйте ее в отдельный модуль. Написание собственных модулей — это самый простой, лучший, современный и грамотный метод повторного использования кода в PowerShell.
Что такое модуль Windows PowerShell
Модуль Windows PowerShell — это набор функционала, который в том или ином виде размещен в отдельных файлах операционной системы. Например, все родные Микрософтовские модули являются бинарными и представляют собой скомпилированные .dll. Мы же будем писать модуль скриптовый — скопируем в него код из файла Example-02-DotSourcing.ps1 и сохраним как файл с расширением .psm1.
Чтобы понять, куда сохранять, посмотрим содержимое переменной окружения PSModulePath.
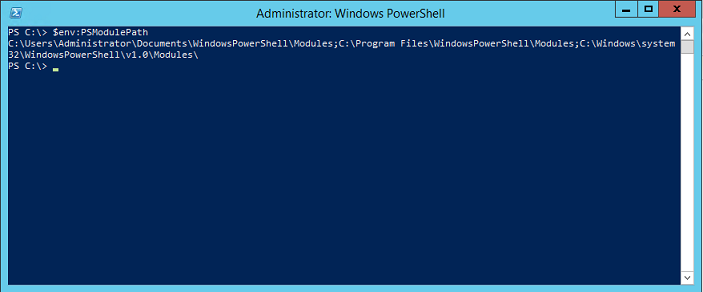
Видим, что по умолчанию у нас есть три папки, в которых PowerShell будет искать модули.
Значение переменной PSModulePath можно редактировать с помощью групповых политик, задавая таким образом пути к модулям для всей сети, но это другая история, и рассматривать ее сейчас мы не будем. Зато будем работать с папкой C:\Users\Administrator\Documents\WindowsPowerShell\Modules и сохраним наш модуль в нее.
Код остается неизменным:
function ExtendDisk-Remotely
{
    param (
     [Parameter (Mandatory = $true)]
        [string] $ComputerName,
     [Parameter (Mandatory = $false)]
        [string] $DiskDrive = "c"
    )

    Invoke-Command -ComputerName $ComputerName -ScriptBlock {"rescan", "select volume=$using:DiskDrive", "extend" | diskpart}
}
Меняется лишь папка, в которую сохраняется файл, и его расширение.
Очень важно!
Внутри папки Modules необходимо создать подпапку с именем нашего модуля. Пусть этим именем будет RemoteDiskManagement. Сохраняем наш файл внутрь этой подпапки и даем ему точно такое же имя и расширение .psm1 — получаем файл C:\Users\Administrator\Documents\WindowsPowerShell\Modules\RemoteDiskManagement\RemoteDiskManagement.psm1.
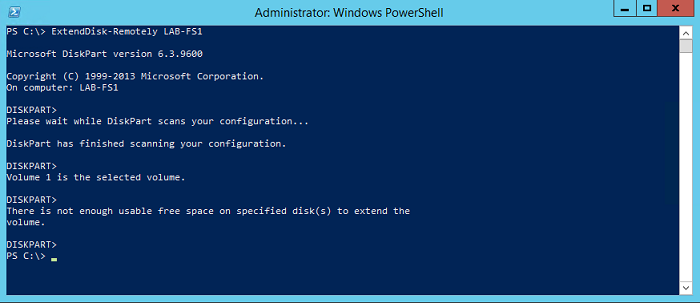
Наш модуль готов, и мы можем проверить, что он виден в системе:
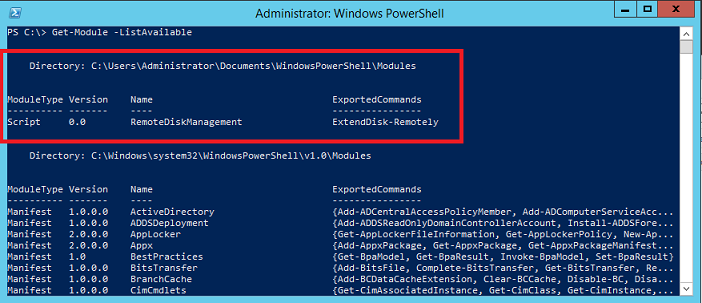
Модуль виден, и в дальнейшем мы можем вызывать его функции без предварительного объявления их в теле скрипта или дотсорсинга.
PowerShell будет воспринимать нашу функцию ExtendDisk-Remotely как «встроенную» и подключать ее по мере необходимости:
На этом всё: мы можем написать десятки собственных модулей, править код включенных в них функций и использовать их в любой момент, не думая о том, в каком скрипте необходимо поменять название функции или путь к дотсорсному файлу.
4. Другие advanced-возможности
Как я уже писал, я люблю PowerShell, и если сообществу интересно, могу написать еще с десяток статей о его расширенном функционале. Вот примеры тем для обсуждения: добавление справки к написанным функциям и модулям; как заставить вашу функцию принимать значения из конвейера и какие это особенности это накладывает на написание скрипта; что вообще такое конвейер и с чем его едят; как с помощью PowerShell работать с базами данных; как устроены расширенные функции и какими свойствами могут обладать их параметры и т.д.
Интересно?
Тогда попробую выдавать по одной статье в неделю.