
What is Windows PowerShell Integrated Scripting Environment (ISE)?
The Windows PowerShell Integrated Scripting Environment (ISE) is a graphical user interface and front-end hosting application for Windows PowerShell. The ISE lets developers run PowerShell commands and create, test and refine PowerShell scripts without operating directly in the traditional PowerShell command-line interface (CLI).
At first glance, PowerShell ISE is a convenient graphical user interface (GUI) for the PowerShell console. The ISE provides a variety of editing controls, user help and other ease-of-use features that aren’t readily present in PowerShell. For example, the ISE supports multi-line editing, tab completion, syntax-based coloring, selective execution, context-sensitive help and multi-language support. Menu options and keyboard shortcuts in the ISE mimic many of the common tasks traditionally performed in the PowerShell console.
PowerShell ISE features
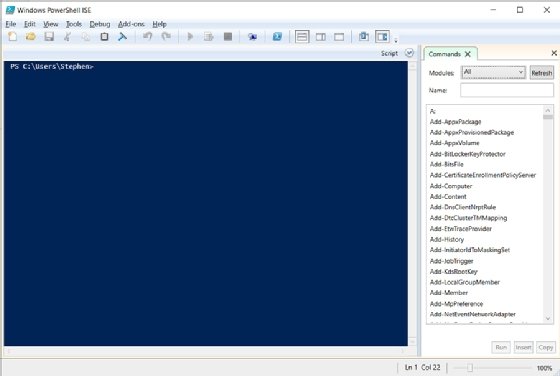
A typical Windows 10 PowerShell ISE appears below. The conventional console area — the Console pane — is delineated in dark blue. A suite of familiar file and view controls are positioned along a top toolbar, including buttons to start a remote PowerShell session as well as a conventional PowerShell console.
PowerShell ISE users can access help for the ISE by clicking the Help button in the top toolbar and selecting Windows PowerShell ISE Help. This opens a web page that offers descriptions and details of the PowerShell ISE and further reading.
One key feature of the ISE is access to a complete library of PowerShell scripting language commands available from a command window located on the right. Developers can locate a command alphabetically and, by command group — which is filterable — drill down to enter all relevant parameters within the right panel. They can then insert the properly configured command into the console without the need to type the entire command by hand.
A second core feature of ISE 2.0 is support for up to 32 concurrent execution environments. Previous versions of ISE supported only up to eight. This might seem like a great deal of multitasking. But developers can use this capability to work with related scripts and make real-time tweaks and enhancements while seeing the immediate effects of their changes across other related scripts.
Other features of the ISE are related mainly to editing support. For example, the ISE supports multiline editing, allowing blank or new lines to be inserted beneath selected lines within the Command pane. Selective execution enables developers to run or test desired parts of the script by highlighting the desired portion of the script and clicking the Run Script button or pressing the F5 button. Similarly, users can add breakpoints to check variables and review script behaviors at critical points. Text copying and pasting is supported. A context-sensitive help system provides additional information about any item. The ISE itself has some customization options, and users can tailor text colors, fonts and layouts; add line and column number; and adjust keyboard shortcuts.
Later versions of the PowerShell ISE add autocomplete capabilities for cmdlets, parameters, files and values. Autosave capabilities store the script every few minutes to avoid content loss if a crash occurs. The Snippets function saves short segments of code for reuse, and a most recently used list offers fast access to recent files. PowerShell ISE merges the command and output panes into a single view to more closely reflect the response of the PowerShell console. Users can extend the features and functionality of PowerShell ISE with code based on the ISE Scripting Object Model.
Uses of PowerShell ISE
The Windows PowerShell ISE is fundamentally an editing tool that is used to create, edit, test and execute PowerShell scripts in Windows environments. The ISE offers a more flexible and interactive editing and execution environment than a traditional PowerShell console.
- Save time and reduce errors when creating scripts. Scripts routinely employ long sequences of complex command lines, each with granular parameters. It’s possible to construct the same script in PowerShell and the PowerShell ISE. But ISE features such as an interactive index of available commands and context-sensitive make it easy to find important commands, select proper parameters within the pane and then drop the properly formatted command into the script. This — along with other editing niceties such as copy and paste — can save time by speeding up proper command formatting as well as reducing common typing and syntactic errors that can be time-consuming to find and fix.
- Improve script debugging and testing. A script is basically a short piece of software where the instructions involve the PowerShell scripting language. As with any software, there are bound to be errors, oversights and unintended consequences produced by the script. ISE features such as an integrated debugger and syntax highlighting can highlight common errors and recommend fixes before the script is ever executed. Additional capabilities such as breakpoints and selective execution let developers check desired portions of the script and intentionally stop execution at critical points in the script to inspect the state of important variables and other behaviors.
- Get greater insight into related scripts. Scripts can be highly interactive entities where one script interacts with other scripts. This can result in complex relationships that can be difficult to follow with vanilla execution engines, such as PowerShell. The ISE supports multiple simultaneous execution environments, letting developers load and follow the cause-and-effect relationships among several scripts at the same time. The ISE helps with troubleshooting, especially after a change in one script triggers an unexpected behavior or error in another.
PowerShell vs. PowerShell ISE
PowerShell and PowerShell ISE both provide fundamentally the same scripting capabilities for Windows environments. The principal difference between the two is convenience. PowerShell is a simpler and more straightforward scripting and execution environment, while the ISE provides more flexible and forgiving editing and execution features. PowerShell can be a good platform for simple tasks where actions are clear. The ISE is preferable when scripting tasks are larger, more complex and interrelated.
A comparison of word processors offers a sound analogy. A tool such as Notepad can be ideal to create and edit notes and short, straightforward text. But a tool such as Word provides far more editing features, fonts, colors, formatting, and spelling and grammar checks. Thus, Word could be a preferable tool for complex tasks, such as professional report writing and developing a book chapter. Still, both tools are word processors.
Advantages of PowerShell ISE
To summarize, the advantages of PowerShell ISE include the following:
- saved time;
- fewer errors when creating scripts;
- similar keyboard shortcuts replicating tasks possible in PowerShell;
- improved debugging and testing; and
- greater insight into related scripts.
Disadvantages of PowerShell ISE
The disadvantages of PowerShell ISE include the following:
- unnecessary complexity for certain tasks;
- lack of support for interactive sessions;
- limited paging;
- lack of support for certain legacy commands.
How to run PowerShell ISE
Windows PowerShell ISE is available in Windows 11, 10, 8.1, 8.0, and 7 as well as Windows Server 2008 R2 SP1 and later. PowerShell ISE can be launched on a PC in either one of two ways:
- Click Start, search for PowerShell in the Search bar and then select Windows PowerShell ISE from the resulting list of apps.
- Open the Windows Run prompt or any command shell, type powershell_ise.exe and press Enter.
Once the ISE is launched, users can employ the ISE in several common ways.
- Use the Console pane. Once the ISE starts, it functions exactly like PowerShell, and users can enter commands into the Console pane — the large, dark blue area of the GUI — just as if it were PowerShell. For example, to run a command, just type the command into the Console pane at the command prompt and press Enter. Users can enter and execute multiple commands by using Shift+Enter — basically a line return — between commands. Users can stop the execution of a command with the Stop Operation button in the GUI or with Ctrl+Break on the keyboard.
- Create and use tabs. PowerShell ISE 2.0 supports up to 32 simultaneous but independent execution environments or sessions. Each environment is referred to as a tab, and users can switch between tabs at-will. To create a new tab, click New PowerShell Tab on the File menu. Users can opt to create and use a remote PowerShell tab to establish a session on a remote computer, though this requires additional details to log in and access the remote computer.
- Manage breakpoints for debugging. The ISE supports the use of breakpoints, which are points in the script where operation is paused for manual inspection of variables and environments. Once a breakpoint is encountered, the user can run commands to examine the state of the script, make changes to the state of the script and even resume operation of the script. Users can employ line breakpoints to pause at specific places, variable breakpoints to pause when a desired variable changes and command breakpoints to pause when a desired command is encountered. The ISE lets users set, remove and enable/disable breakpoints.
- Run a profile when the ISE starts. A profile is a script that runs when a session is started. A profile can be vital to configure the PowerShell ISE environment for aliases, functions, variables, colors and fonts, and other preferences used in the ISE session or tab. Users can create, select, edit and enable/disable profiles in the ISE.
- Write and run scripts. The core use for the ISE is to write, edit and run Windows PowerShell scripts. Script files can include conventional script files (.ps1), script data files (.psd1) and script module files (.psm1) as well as other files such as configuration files (.ps1xml), XML files and text files. To create a new script file, click New on the toolbar or click New on the File menu. The new empty file appears in a new file tab. Users can add commands and data to compose the script. To run the script, click Run Script on the toolbar or click Run on the File menu. To run just a part of the script, select or highlight the desired portion of the script and click Run Selection on the File menu or click Run Selection on the toolbar.
Creating a simple script in PowerShell ISE
PowerShell files can be opened and edited in the PowerShell ISE script pane. Several file types are supported including script files (.ps1), script data files (.psd1) and script module files (.psm1) as well as configuration files (.ps1xml), XML files and text files. To create a new script file:
- Click the New Script icon in the toolbar or click File and then New in the top tools. A new tab opens for the untitled file, which will be a .ps1 script file by default.
- Type the new script. For this exercise, consider writing a simple statement to the monitor, such as Write-host «This is a test output to the monitor»
- Save the new script by clicking the Save Script icon in the toolbar or click File and then Save or Save As in the top tools.
- Enter a useful name for the script, such as testscript1.ps1.
- Run the script by clicking the Run Script icon in the toolbar, or click File and then Run in the top tools. For this example, the text will appear in the PowerShell pane.
Note that script execution is normally blocked by default as a security measure. If the script refuses to run, it might be necessary to change the execution policy on the computer so that scripts will run.
Users can take advantage of PowerShell ISE debugging features by running a portion of the script. For example, users can simply select or highlight the desired portion of a script and then click File and then Run Selection. Similarly, scripts can be halted deliberately by clicking Stop Operation on the toolbar or typing CTRL+Break.
Microsoft support and replacement
The PowerShell Integrated Scripting Environment was first introduced with Windows PowerShell v2. The ISE was revised and updated for PowerShell v3. As of February 2020, the ISE is supported in all versions of Windows PowerShell up to v5.1.
It’s important to note that the ISE is no longer in active development. Although the ISE is still supported with security and functional patches, there are no plans to update the ISE for PowerShell v6 or later. PowerShell v6 and later users might prefer to forego the ISE in favor of alternate ISE platforms such as Visual Studio Code with the PowerShell Extension available through the Visual Studio Marketplace.
Other alternatives for PowerShell ISE include Sapien PowerShell Studio 2023, Idera PowerShell Plus and Notepad++.
This was last updated in February 2023
Continue Reading About Microsoft Windows PowerShell Integrated Scripting Environment (ISE)
- Best practices for using PowerShell ISE for scripting
- Build a PowerShell performance monitoring script step by step
- Set up PowerShell script block logging for added security
- How to upload and download files with PowerShell FTP script
- When to use the Windows command prompt vs. PowerShell
Dig Deeper on IT operations and infrastructure management
-

How to successfully debug PowerShell scripts
By: Anthony Howell
-
How to find and customize your PowerShell profile
By: Anthony Howell
-
How to use the PowerShell extension for Visual Studio Code
By: Anthony Howell
-
When to use the Windows command prompt vs. PowerShell
By: Anthony Howell


-
Home
-
Knowledge Base
- What Is Windows PowerShell ISE & How to Open It (5 Ways)?
By Helen | Follow |
Last Updated
This library discussed by MiniTool Software Limited mainly talks about a special type of Windows PowerShell command pane – PowerShell ISE. It is a different platform compared with normal PowerShell.
What Is PowerShell ISE?
Windows PowerShell ISE (Integrated Scripting Environment) is a host app for Windows PowerShell. In the ISE, you can perform commands and write, test, and debug scripts in a single Windows-based graphic UI (user interface).
Windows PowerShell ISE was first introduced with PowerShell v2. It was re-designed with PowerShell v3. The ISE is supported in all supported versions of PowerShell up to and including Windows PowerShell v5.1.
PowerShell ISE is no longer in active feature development. As a shipping component of Windows, there is no need to download it somewhere. PowerShell ISE continues to be officially supported for security and high-priority servicing fixes. Currently, Microsoft has no plan to remove it.
However, there is no support for the ISE in PowerShell v6 and beyond. As a replacement, you can make use of Visual Studio Code with the PowerShell Extension.
PowerShell ISE Key Features
PowerShell ISE offers multiline editing, tab completion, selective execution, context-sensitive help, syntax coloring, as well as supports right-to-left languages. Menu items and keyboard shortcuts are mapped to many of the same tasks that you would do in the Windows PowerShell console.
- Multiple editing: to insert a blank line under the current line in the command pane. Just use Shift + Enter.
- Selective execution: to run a part of a script, select the text and click the Run Script Or, just press F5.
- Context-sensitive help: input Invoke-Item and press F1. The help file options to the article for the Invoke-Item cmdlet.
The Windows PowerShell ISE enables you to customize some aspects of its appearance. It also has its own Windows PowerShell profile script. PowerShell ISE supports up to 8 PowerShell Unicode-enabled consoles (Runspaces) in a tabbed UI. It allows users to use dialog boxes to fill in parameters for PowerShell cmdlets.
How to Open Windows PowerShell ISE?
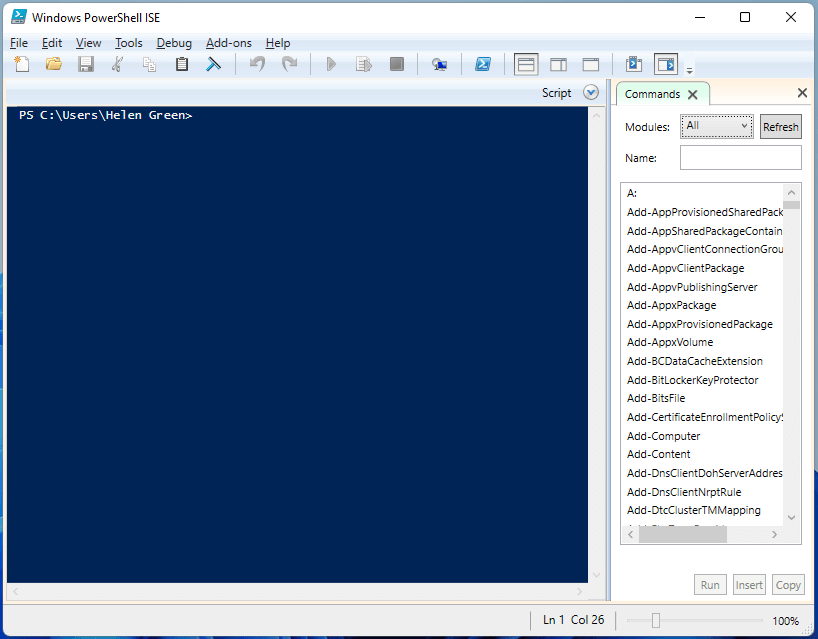
In general, there are many ways to open Windows PowerShell ISE. The following screenshots are based on the latest Windows 11 operating system (OS).
#1 Start PowerShell ISE Through Searching
First of all, you can find and open PowerShell ISE using the Windows Search utility. Just type “powershell ise” in the search blank and press Enter.

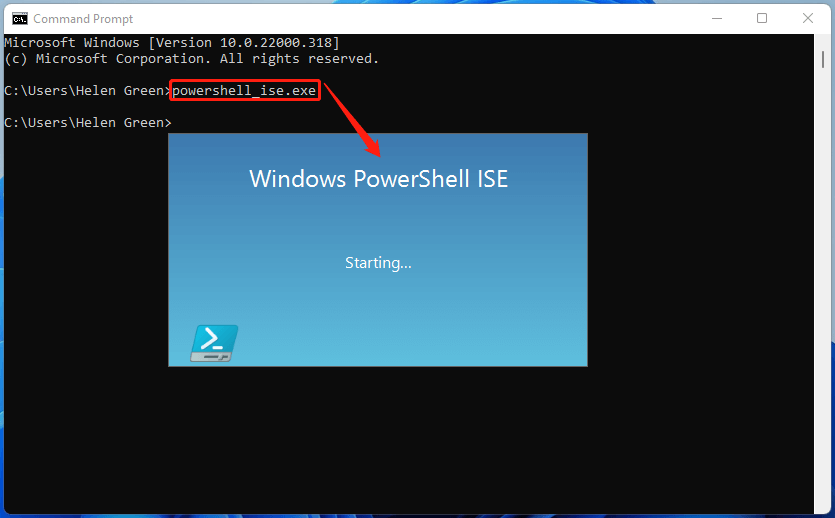
#2 Run PowerShell ISE in Command Platforms
Secondly, you can launch Windows PowerShell ISE within any command platform including PowerShell, CMD, and Windows Run. Just type powershell_ise.exe and press Enter.
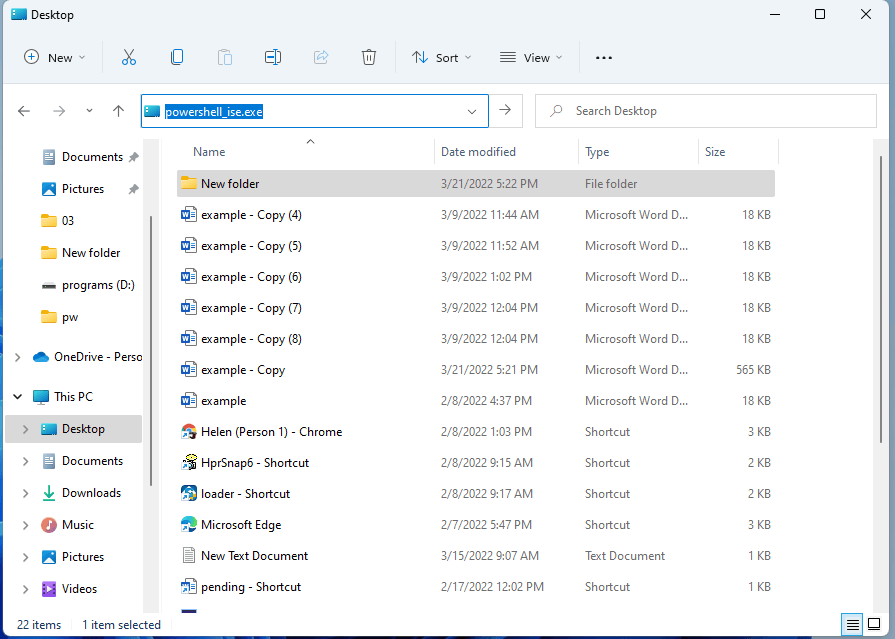
#3 Launch PowerShell ISE by File Explorer
Thirdly, you are able to trigger PowerShell ISE from Windows File Explorer. Simply, key in powershell_ise.exe in the address bar of Windows Explorer and press Enter.
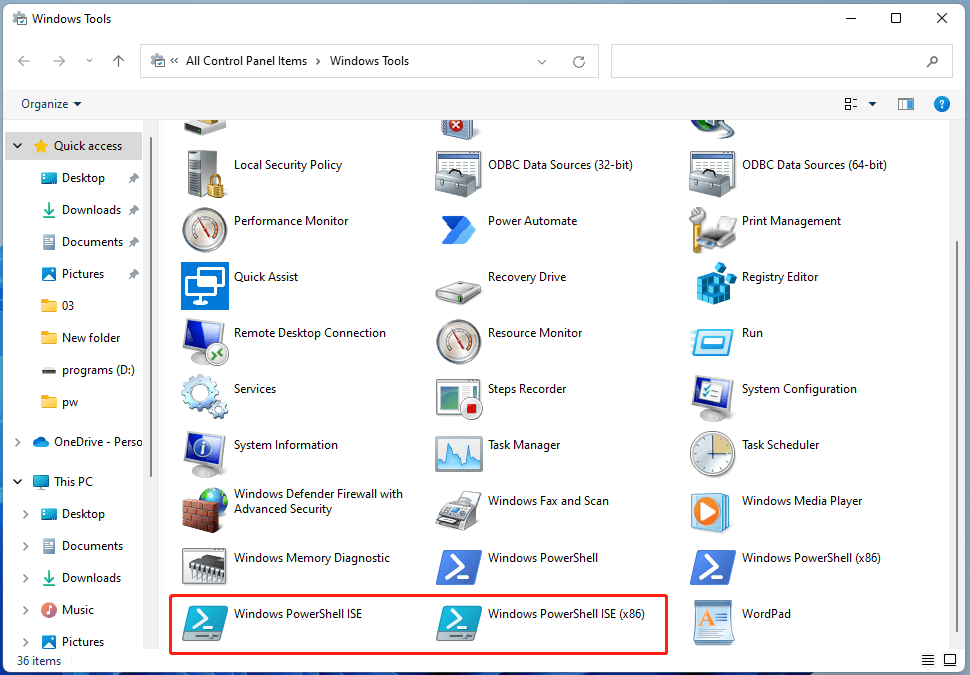
#4 Open PowerShell ISE from Control Panel
Besides, you can also start Windows PowerShell ISE via Control Panel. Open Windows Control Panel and navigate to All Control Panel Items > Windows Tools. There, double-click to open the PowerShell ISE version you prefer, Windows PowerShell ISE or Windows PowerShell ISE (x86).
#5 Launch PowerShell ISE with Desktop Shortcut
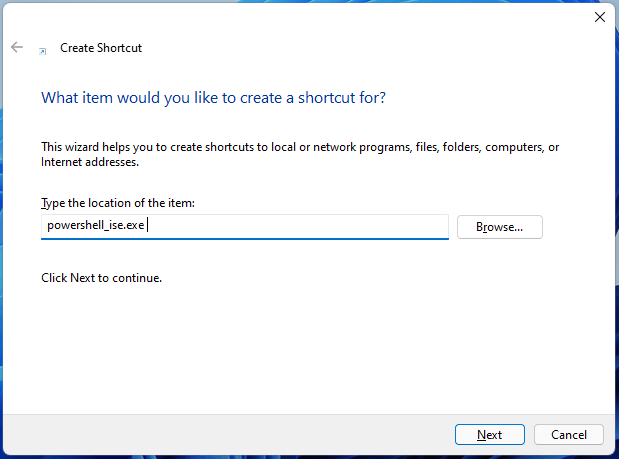
Finally, you can create a desktop shortcut to build an entrance to PowerShell ISE. The guide is below.
- Right-click on your desktop and choose New > Shortcut.
- In the pop-up window, input exe.
- Next, click Finish.
PowerShell vs PowerShell ISE
Both PowerShell ISE and PowerShell offer fundamentally the same scripting capabilities for the Windows environments. Yet, there are still differences between PowerShell and PowerShell ISE – convenience. PowerShell is a more straightforward scripting and execution environment while PowerShell ISE offers more flexible and forgiving editing and execution features.
Therefore, PowerShell is a good choice for simple tasks whereas PowerShell ISE is more suitable for situations where scripting tasks are larger, more complicated and interrelated.
Windows 11 Assistant Software Recommended
The new and powerful Windows 11 will bring you many benefits. At the same time, it will also bring you some unexpected damages such as data loss. Thus, it is strongly recommended that you back up your crucial files before or after upgrading to Win11 with a robust and reliable program like MiniTool ShadowMaker, which will assist you to protect your increasing data automatically on schedules!
MiniTool ShadowMaker TrialClick to Download100%Clean & Safe
About The Author
Position: Columnist
Helen Graduated from university in 2014 and started working as a tech editor in the same year. Her articles focus on data backup & recovery and disk management. Through an in-depth exploration of computer technology, Helen has successfully helped thousands of users solve their annoying problems.
Windows PowerShell ISE is used to create and run PowerShell scripts. It offers a user-friendly interface that makes it easy for both beginners and experts to work with PowerShell commands. The Integrated Scripting Environment (ISE) combines a script editor, console, and debugging tools in one application.
PowerShell ISE allows users to write, test, and run scripts all in one place. It has helpful features like syntax highlighting, auto-completion, and context-sensitive help. These features can speed up script writing and reduce errors.
PowerShell ISE is built into Windows, so it’s ready to use without extra downloads. It supports various file encodings and lets users run parts of a script for testing. With its split-pane view, users can see their script and results at the same time. This makes it easier to spot and fix issues quickly.
How to Start with Windows PowerShell ISE
Windows PowerShell ISE is a powerful tool for writing and testing scripts. It has an easy-to-use interface and helpful features for both new and experienced users.
The User Interface
The Windows PowerShell ISE window has three main parts. At the top is the menu bar with File, Edit, View, and Help options. The Script Pane is on the upper half of the screen. This is where users write and edit scripts. The Console Pane is on the bottom half. It shows the output of commands and scripts.
The Command Pane sits above the Console Pane. It lets users run single commands quickly. Users can resize these panes to fit their needs. The ISE also has a toolbar with buttons for common tasks like running scripts or stopping execution.
Basic Operations
To start Windows PowerShell ISE, type “powershell_ise” in the Windows search bar. Once open, users can create a new script by clicking File > New. To save work, use File > Save. The ISE supports syntax highlighting, making code easier to read.
To run a script, click the green “play” button or press F5. To test parts of a script, highlight the code and press F8. This runs only the selected lines. The ISE also helps debug scripts. Users can set breakpoints by clicking in the left margin of the Script Pane.
The Help menu offers quick access to PowerShell documentation. This is useful for learning new commands or checking syntax. Users can customize the ISE’s appearance through the View menu, changing things like font size and color scheme.

Check out SharePoint Online Management Shell
Working with PowerShell Scripts
Windows PowerShell ISE offers many features for creating, editing, running, and managing scripts. It provides a user-friendly environment for PowerShell scripting tasks with helpful tools and shortcuts.
Creating and Opening Scripts
To create a new script in PowerShell ISE, click the “New Script” button or use the keyboard shortcut Ctrl+N. This opens a blank script tab in the editor pane.
To open an existing script, click “Open” or press Ctrl+O. Browse to the script file and select it. The script will open in a new tab.
PowerShell ISE supports multiple script tabs. Switch between open scripts by clicking the tabs or using Ctrl+Tab.
Editing and Multiline Editing
PowerShell ISE has many editing features to help write scripts. The editor supports syntax highlighting, code folding, and IntelliSense for auto-completion.
Multiline editing lets you work with multiple lines at once. To add a blank line below the current one, press Shift+Enter. This is useful for organizing code.
The editor also has find and replace. Press Ctrl+F to open the find dialog. Use Ctrl+H for find and replace across the whole script.
Executing and Running Scripts
There are several ways to run scripts in PowerShell ISE. Click the “Run Script” button or press F5 to run the whole script.
For selective execution, highlight part of the script and click “Run Selection” or press F8. This runs only the selected code.
The Console pane shows script output. It also lets you enter commands to test parts of your script interactively.
Saving and Managing Scripts
To save a script, click the “Save” button or press Ctrl+S. For a new script, you’ll be asked to choose a file name and location.
Use “Save As” to create a copy of a script with a new name. This helps manage different versions of your scripts.
PowerShell ISE remembers recently used scripts. Find them in the “File” menu under “Recent Files” for quick access to scripts you work with often.
Create Your First Script using PowerShell ISE
To create the first script using the Microsoft PowerShell ISE, follow the below steps:
- Open PowerShell ISE and navigate to the File menu.
- Select New to create a new script.
- In the Script Pane, type in your PowerShell commands, for example:
Write-Host "Hello, World!" - Save the script by clicking File > Save or using the keyboard shortcut Ctrl + S.

The script can now be run within the environment.
Execution Policies
PowerShell ISE adheres to the system’s execution policies. These policies determine what scripts can be run and from where. To view or set the execution policy, one can use the Get-ExecutionPolicy and Set-ExecutionPolicy cmdlets, respectively.
For example:
- To view the current policy:
Get-ExecutionPolicy - To set a new policy:
Set-ExecutionPolicy RemoteSigned
Users should ensure the policy is appropriately set to permit the execution of desired scripts while maintaining system security.
Check out Create a File in PowerShell if it Doesn’t Exist
Advanced Scripting Features in PowerShell ISE
PowerShell ISE offers tools to help write and test complex scripts. These features make it easier to find and fix errors in code.
Integrated Debugging Tools
PowerShell ISE has built-in debugging tools. These tools let users step through scripts line by line. This helps find issues in the code.
Users can set breakpoints in their scripts. Breakpoints pause the script at specific lines. This allows checking variable values and the script’s state.
The debugger shows the current values of variables. It also displays the call stack. This helps track which functions are running.
PowerShell ISE supports debugging remote scripts. Users can connect to other computers and debug scripts running there.
The debugging environment is user-friendly. It has buttons to step over, step into, and step out of functions. This makes it easy to navigate through code.
Check out PowerShell Get-date Add Days Examples
Customization and Extensions
PowerShell ISE offers many ways to personalize your scripting setup. Users can change the interface and add new features to make their work easier.
Customizing the ISE Environment
The ISE lets users tweak its appearance and behavior. You can change colors for different parts of your code, making it easier to read. The font size and style can be adjusted to suit your needs.
Tab completion helps you write code faster. As you type, it suggests commands and parameters. This saves time and reduces errors.
Syntax coloring makes different parts of your code stand out. It uses colors to show commands, variables, and other elements. This helps you spot mistakes and understand your scripts better.
You can set up a profile script to run when ISE starts. This lets you customize your environment each time you open it.
Expanding Functionality with Add-ons
Add-ons boost what ISE can do. The Show Command add-on displays a list of available commands. It shows what parameters each command needs. This is great for learning new commands or remembering how to use them.
IntelliSense is a powerful feature that suggests code as you type. It shows command options and helps fill in parameter values. This makes writing scripts much faster and more accurate.
Many third-party add-ons are available. These can add new tools, improve debugging, or connect to other systems. Some popular add-ons include Git integration and additional formatting options.
Add-ons can be installed easily through the ISE interface. They often come with their own settings, letting you fine-tune how they work.
Check out Create a Log File using PowerShell
PowerShell ISE and Other Editors
PowerShell ISE was Microsoft’s original editor for PowerShell scripts. It offers basic features for writing and running PowerShell code. Other editors like Visual Studio Code have become popular alternatives.
Comparing ISE to Visual Studio Code
PowerShell ISE has a simple interface with a script pane and console. It provides syntax highlighting and basic code completion. Visual Studio Code offers more advanced features. With the PowerShell extension, VS Code has better IntelliSense, debugging, and Git integration.
VS Code works with PowerShell 7 and newer versions. ISE only supports Windows PowerShell 5.1 and earlier. This limits ISE’s compatibility with modern PowerShell.
VS Code gets frequent updates. It has a large marketplace of extensions to add functionality. ISE hasn’t had major updates in years.
Migration Tips for Editor Switching
Moving from ISE to VS Code takes some adjustment. The layouts are different, but both have script and console areas.
VS Code uses different keyboard shortcuts. Users can customize them to match ISE if needed.
Some key VS Code tips:
- Install the official PowerShell extension
- Use the integrated terminal for PowerShell
- Set up snippets for common code blocks
- Learn to use the debugger for troubleshooting
VS Code has better support for version control. This helps manage script changes over time.
Check out Compare Dates in PowerShell
PowerShell ISE Versions and Updates
PowerShell ISE has gone through several versions since its introduction. The tool was designed to work with Windows PowerShell but is no longer the primary focus for Microsoft’s PowerShell development.
From PowerShell ISE to PowerShell 7
PowerShell ISE was first released with Windows PowerShell V2. It saw updates with V3 and V5.1. Windows PowerShell V5.1 is the last version to fully support ISE.
Microsoft shifted focus to PowerShell 7. This newer version isn’t compatible with the original ISE. Instead, Microsoft recommends using Visual Studio Code with the PowerShell extension.
For those still using ISE, it remains available in Windows 10 and Server 2019. Microsoft has no plans to remove it completely.
Some users have found ways to use PowerShell 7 within ISE. This isn’t officially supported but can be done through workarounds.
The move from ISE to newer tools reflects Microsoft’s push for cross-platform compatibility and enhanced features in PowerShell 7.
Support and Accessibility
Windows PowerShell ISE offers features to help users with different needs. It aims to make scripting easier for everyone.
Accessibility Features
PowerShell ISE works well with high contrast mode. This helps users who have trouble seeing. The Get-Help cmdlet gives info on commands right in the console. Users can get help without leaving their work.
PowerShell ISE supports right-to-left languages. This is great for users who read and write in these languages. The interface adjusts to show text correctly.
Keyboard shortcuts make it easy to use PowerShell ISE without a mouse. Users can run scripts, open files, and more with just keys. This helps people who can’t use a mouse well.
Screen readers can work with PowerShell ISE. The tool gives text info that screen readers can speak out loud. This lets visually impaired users code and script.
Check out PowerShell Copy-Item with Folder Structure
Exporting and Sharing
PowerShell ISE lets users export scripts and share them with others. This makes it easy to work together on projects and keep track of different versions.
Exporting Scripts and Configurations
PowerShell ISE makes it simple to save scripts. Users can click “Save” or “Save As” to store their work. The ISE supports many file types, like .ps1 for scripts and .psd1 for data files.
To export settings, users can use the Export-ISEState function. This saves open files and editor preferences. It’s helpful for moving setups to new computers or sharing with teammates.
Users can also export parts of scripts. They can select text and copy it to share specific code sections.
Collaboration and Version Control
PowerShell ISE works well with version control systems like Git. This helps teams track changes and work together on scripts.
Users can connect their ISE projects to online platforms like GitHub. This allows easy sharing and updating of scripts with others.
For direct collaboration, users can share script files through email or file-sharing services. This is useful for quick feedback or help from colleagues.
Teams can set up shared folders for scripts. This creates a central place for everyone to access and update files, making teamwork smoother.
Frequently Asked Questions
PowerShell ISE is a useful tool, but users often question its features and usage. Here are some common inquiries and their answers.
How can I install PowerShell ISE on a newer version of Windows?
PowerShell ISE comes pre-installed on many Windows versions. To check if it’s installed, search for “PowerShell ISE” in the Start menu. If it’s not there, you can add it through the “Turn Windows features on or off” settings.
What are the main differences between PowerShell ISE and the standard PowerShell console?
PowerShell ISE has a graphical interface with features like syntax highlighting and multi-line editing. The standard console is text-based. ISE also allows script debugging and has a built-in help system.
Is it possible to uninstall PowerShell ISE, and if so, how?
Yes, you can uninstall PowerShell ISE. Go to “Control Panel” > “Programs and Features” > “Turn Windows features on or off”. Find “Windows PowerShell ISE” and uncheck the box. Click “OK” to apply the changes.
What are the steps for running a script within PowerShell ISE?
To run a script in PowerShell ISE, open the script file. Click the “Run Script” button or press F5. You can also select part of the script and run only that section by pressing F8.
How does PowerShell ISE enhance the scripting experience compared to a traditional command line interface?
PowerShell ISE offers syntax highlighting, which makes code easier to read. It has auto-completion for commands and variables. The script pane allows editing multiple lines at once. These features make writing and testing scripts faster and simpler.
Can PowerShell ISE be used to manage remote Windows servers, and how is this configured?
Yes, PowerShell ISE can manage remote servers. Use the “Enter-PSSession” command to start a remote session. You can also use the “New-PSSession” command to create a persistent connection to a remote computer.
Conclusion
Windows PowerShell ISE is a valuable tool for PowerShell scripting. It offers a user-friendly interface for writing and running scripts. The ISE includes features like syntax highlighting and debugging tools.
This environment helps both beginners and experienced users work with PowerShell more efficiently. It allows for easier script development and testing. Users can run parts of scripts, which is helpful for troubleshooting.
The ISE also provides context-sensitive help. This feature makes it easier to learn and use PowerShell commands. With its multi-line editing capabilities, users can create complex scripts more easily.
While newer tools like Visual Studio Code are available, PowerShell ISE remains a solid choice for many users. It’s pre-installed on Windows systems, making it readily accessible. The ISE continues to be a practical option for PowerShell scripting needs. I hope you now understand how to work with Windows PowerShell ISE.
You may also like:
- PowerShell Functions
- PowerShell Reference Variable
- PowerShell Get-Date Format
- Powershell Global Variable
I am Bijay a Microsoft MVP (10 times – My MVP Profile) in SharePoint and have more than 17 years of expertise in SharePoint Online Office 365, SharePoint subscription edition, and SharePoint 2019/2016/2013. Currently working in my own venture TSInfo Technologies a SharePoint development, consulting, and training company. I also run the popular SharePoint website EnjoySharePoint.com
The Windows PowerShell Integrated Scripting Environment (ISE) is a GUI-based hosting program for Windows PowerShell and is used to run and write the debug commands. It offers an easy-to-use graphical interface and more advanced features simultaneously.
In addition to multi-task editing, syntax coloring, tab completion, context-sensitive, and selective execution service, the PowerShell ISE supports everything that the traditional PowerShell command-line interface doesn’t.
This guide will explain everything you need to know about the ISE application.
Powershell ISE Key Features
The Powershell ISE is an excellent tool for beginners and provides multiple valuable features. Let’s look at some key features of ISE which differentiate it from other scripting languages.
- Windows PowerShell Workflow: The 3.0 version of Windows PowerShell introduces the Workflow feature that is designed to support users to perform long-running and uncomplicated execution of complex tasks on multiple devices at the same time.
- Script debugging: The PowerShell script, function, command, or expressions can be examined while the script is actually running. It provides a set of cmdlets for setting breakpoints and displaying call stacks in PowerShell script debuggers.
- Complete Library Access: Another essential feature of the ISE is the entire library is accessible from the top right corner of PowerShell. You can find all the scripting language commands with a few clicks. You can also sort them by A to Z or by command group. You can browse all the applicable parameters from the right panel. By doing this, the console will automatically display the rightly configured command without typing it manually.
- Tab Key Control: Using the Tab key, you can complete the names of cmdlets, properties, and parameters using auto-completion.
- Transactions: Windows PowerShell has a feature called transactions, that enables us to start a transaction, specify which command belongs to it, and either rollback or commit it.
- Error-handling: A similar error-handling mechanism like .NET is provided by Windows PowerShell by using the Try{ }, Catch { }, and Finally {} blocks.
Pros and Cons of PowerShell ISE
A scripter, if you are not convinced about the critical features of ISE, Let’s underline some of its pros. However, there are some cons of PowerShell ISE as well.
The Pros of PowerShell ISE include:
- No need to memorize cmdlets and their parameters
- Productive and reduce errors in script creation
- Enhance in debugging and testing.
- Its support of standard shortcuts services.
- Greater insight into related scripts with color coding.
The Cons of PowerShell ISE include:
- It does not support some commands interactively.
- Unnecessary complexity for some basic tasks
- Its auto-completion feature is slightly slow.
- Lack of support and limited paging for individual legacy commands.
PowerShell and PowerShell ISE have relatively similar debugging command and scripting features in Windows 10/11. The user interface is the primary difference between both platforms. However, there are several other differences, such as PowerShell provides uncomplicated and straightforward scripting scenarios, while ISE has more complex and gracious editing functionalities.
PowerShell is usable to perform quick and simple tasks with clear steps, while ISE is suitable for more significant and complicated tasks. The ISE is preferable when scripting tasks are more extensive, challenging, complex, and rigid. In short, PowerShell ISE offers more advanced features compared to Windows PowerShell.
PowerShell ISE FAQ
Here, are a few frequently asked questions that you may need to know.
1. Is PowerShell ISE Still Supported?
It is important to note that the ISE is no longer in operational growth. According to Microsoft, PowerShell v6 or later is not planned to update the ISE, even though it is still supported with security and functionality patches.
2. How to Install/Uninstall PowerShell ISE?
The following steps will help you Install/uninstall PowerShell ISE using Windows Optional functions:
Go to Windows Settings > Apps > Apps/features > Optional features. Browse the list and click on the Windows PowerShell ISE. Click «Uninstall.» Follow the same procedure to Install.
3. How Do I Start PowerShell ISE?
Go to Start Menu and Type Windows PowerShell ISE and click to open.
In cmd.exe, to start Windows PowerShell ISE, type:
PowerShell_ISE
Windows PowerShell ISE is a GUI-based application that is used to run and debug commands and scripts. If you compare it with Windows PowerShell, you will find that PowerShell ISE offers many advanced features that are not available in Windows PowerShell. The graphical user interface of PowerShell ISE makes it more user-friendly for beginners. In this beginner’s guide, we will explain how to install, uninstall, and use Windows PowerShell ISE.
We will explain the following methods to install and uninstall Windows PowerShell ISE:
- Installing PowerShell ISE via Windows Optional Features.
- Uninstalling PowerShell via Windows Optional features.
- Installing PowerShell ISE via Command Prompt.
- Uninstalling PowerShell ISE via Command Prompt.
1] Install PowerShell ISE via Windows Optional Features
By default, Windows 10 comes with a pre-installed PowerShell ISE app. But if you do not find it on your computer, you can install it through Windows Optional Features.
The following steps will help you install and uninstall Windows PowerShell ISE:
- Launch the Settings app and click Apps.
- Click Apps & features on the left pane.
- You will see a link named Optional features on the right pane. Click on it.
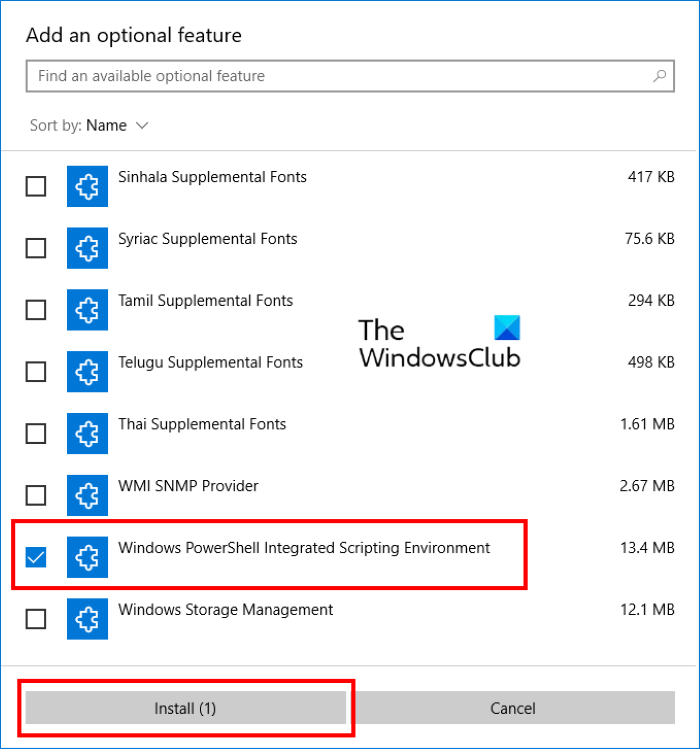
- Now, click on the Add a feature button. This will open the Add an optional feature window.
- Scroll down the list and select Windows PowerShell Integrated Scripting Environment, and click on the Install button.
After the installation gets completed, you can access PowerShell ISE from the Start menu.
2] Uninstall PowerShell ISE via Windows Optional Features
The following steps will help you uninstall PowerShell ISE using Windows Optional Features:
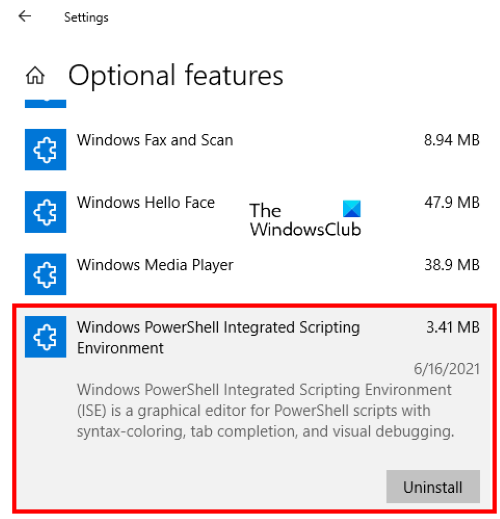
- Go to “Settings > Apps > Apps & features > Optional features.”
- Scroll down the list and click on the Windows PowerShell Integrated Scripting Environment.
- Click Uninstall.
You have to wait till the uninstallation process gets completed.
3] Install PowerShell ISE via Command Prompt
To install Windows PowerShell ISE using Command Prompt, first, launch the Command Prompt as an administrator, then copy and paste the following command into it. When you are done, hit Enter.
DISM /Online /Add-Capability /CapabilityName:Microsoft.Windows.PowerShell.ISE~~~~0.0.1.0
Please do not close the Command Prompt till the installation process gets completed.
4] Uninstall PowerShell ISE via Command Prompt
Launch the command prompt as an administrator, copy the following command and paste it there. After that, press Enter.
DISM /Online /Remove-Capability /CapabilityName:Microsoft.Windows.PowerShell.ISE~~~~0.0.1.0
Do not interrupt the uninstallation process or close the Command Prompt before uninstallation gets finished.
Read: Windows PowerShell ISE vs Windows PowerShell – What is the difference?
How to use Windows PowerShell ISE
To launch the app, click on the Windows Search box, type PowerShell ISE, and click Windows PowerShell ISE. If you want to launch it with administrative rights, right-click on it and select Run as Administrator.

The PowerShell ISE comes with the following elements:
- Menu bar
- Toolbar
- PowerShell tabs
- Script tabs
- Console pane
- Script pane
- Status bar
- Text-size slider
These elements make it easy for a user to run, edit, and execute the commands and scripts. Let’s see the function of each of these elements:
1] Menu bar
As the name implies, the menu bar of PowerShell ISE consists of different menus including File, Edit, Tools, View, Debug, Add-ons, and Help. Using these menu buttons, you can perform different tasks, customize the ISE interface, debug commands or scripts, etc.
2] Toolbar
Like other software and apps, Windows PowerShell ISE also features a toolbar that consists of different tools. Some of these tools include:
- New Script button
- Open Script button
- Save Script button
- Clear Console Pane button
- Start PowerShell in a separate window button, and more.
3] PowerShell tabs
You can create multiple tabs in Windows PowerShell ISE. This feature lets you run multiple scripts and commands at a time. To open a new tab, go to “File > New PowerShell Tab.” Alternatively, you can also press the Ctrl + T keys on your keyboard.
To close a particular PowerShell tab, select it and click on the small cross icon, or simply press Ctrl + W keys.
4] Script tab
You can create multiple Script tabs in each PowerShell tab. This lets you run and edit more than one script at a time. To open a new Script tab, go to “File > New” or press Ctrl + N keys on your keyboard.
To close a specific Script tab, select it and click on the small cross icon. There is no keyboard shortcut to close the Script tabs.
5] Console Pane
It shows the results of the scripts and commands you run. Apart from that, you can also use Console Pane to run PowerShell commands.
6] Script Pane
This is the space where you can write and run PowerShell scripts.
7] Status bar
As the name implies, here, you can view the status of the commands and scripts that you have executed. It tells you whether the commands or scripts are completed or not.
8] Text-size Slider
It lets you increase and decrease the text size on the screen. You will find it at the bottom right corner of the PowerShell ISE.
That’s it.
Related posts:
- How to disable PowerShell in Windows.
- How to uninstall PowerShell in Windows.