
Для управления обновлениями Windows можно использовать PowerShell модуль PSWindowsUpdate. Модуль PSWindowsUpdate доступен для загрузки из PowerShell Gallery и позволяет администратору просканировать, скачать, установить, удалить или скрыть обновления на локальном или удаленных рабочих станциях и серверах Windows.
Содержание:
- Установка модуля управления обновлениями PSWindowsUpdate
- Сканировать и загрузить обновления Windows с помощью PowerShell
- Установка обновлений Windows с помощью команды Install-WindowsUpdate
- >Просмотр истории установленных обновлений в Windows
- Удаление обновлений в Windows с помощью PowerShell
- Скрыть ненужные обновления Windows с помощью PowerShell
- Управление обновлениями Windows на удаленных компьютерах через PowerShell
Установка модуля управления обновлениями PSWindowsUpdate
В современных версиях Windows 10/11 и Windows Server 2022/2019/2016 модуль PSWindowsUpdate можно установить из онлайн репозитория PowerShell Gallery с помощью команды:
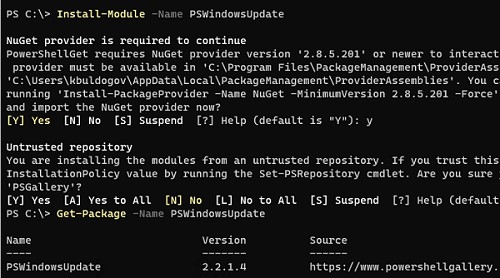
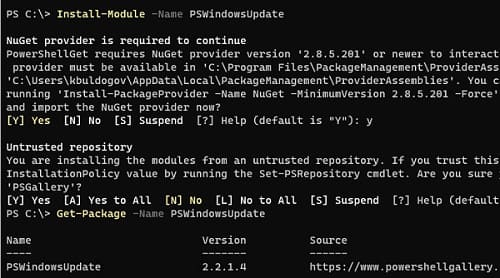
Install-Module -Name PSWindowsUpdate
Подтвердите добавление репозитариев, нажав Y. Проверьте, что модуль управлениям обновлениями установлен в Windows:
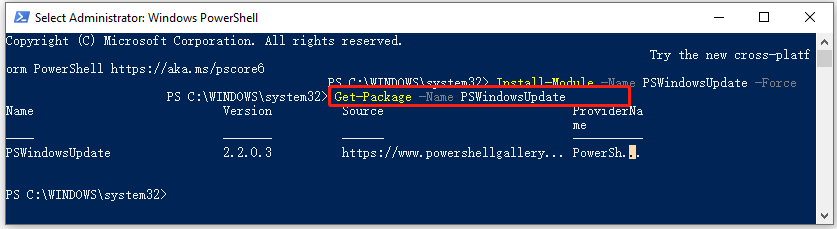
Get-Package -Name PSWindowsUpdate
- В изолированной среде модуль PSWindowsUpdate можно установить в офлайн режиме;
- В старых версиях Windows для использования модуля нужно предварительно обновить версию PowerShell.
Можно удаленно установить PSWindowsUpdate на другие компьютеры в сети. Следующая команда скопирует файлы модуля на указанные компьютеры (для доступа к удаленным компьютерам используется WinRM).
$Targets = "srv1.winitpro.loc", "srv2.winitpro.loc"
Update-WUModule -ComputerName $Targets -local
Политика выполнения PowerShell скриптов в Windows по умолчанию блокирует запуск командлетов из сторонних модулей, в том числе PSWindowsUpdate. Чтобы разрешить запуск любых локальных скриптов, выполните команду:
Set-ExecutionPolicy –ExecutionPolicy RemoteSigned -force
Либо вы можете разрешить запускать команды модуля в текущей сессии PowerShell:
Set-ExecutionPolicy -ExecutionPolicy RemoteSigned -Scope Process
Импортируйте модуль в сессию PowerShell:
Import-Module PSWindowsUpdate
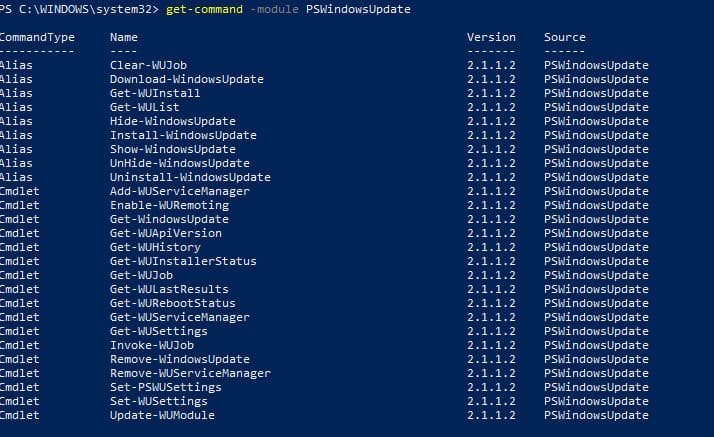
Выведите список доступных командлетов:
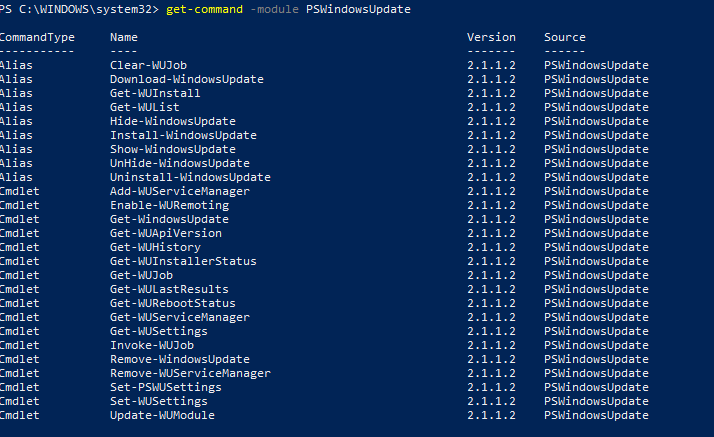
Get-command -module PSWindowsUpdate
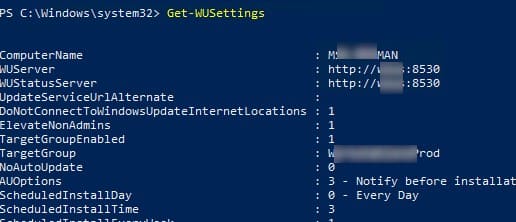
Проверить текущие настройки клиента Windows Update:
Get-WUSettings
ComputerName : WKS22122 WUServer : http://MS-WSUS:8530 WUStatusServer : http://MS-WSUS:8530 AcceptTrustedPublisherCerts : 1 ElevateNonAdmins : 1 DoNotConnectToWindowsUpdateInternetLocations : 1 TargetGroupEnabled : 1 TargetGroup : WorkstationsProd NoAutoUpdate : 0 AUOptions : 3 - Notify before installation ScheduledInstallDay : 0 - Every Day ScheduledInstallTime : 3 UseWUServer : 1 AutoInstallMinorUpdates : 0 AlwaysAutoRebootAtScheduledTime : 0 DetectionFrequencyEnabled : 1 DetectionFrequency : 4

В данном примере клиент Windows Update на компьютере настроен с помощью GPO на получение обновлений с локального сервера обновлений WSUS.
Сканировать и загрузить обновления Windows с помощью PowerShell
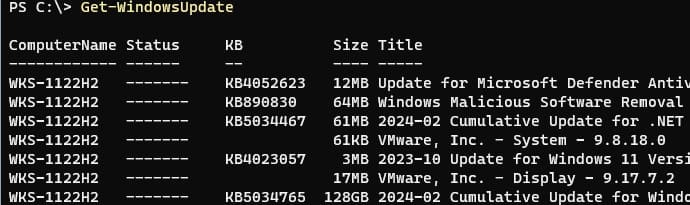
Чтобы просканировать компьютер на сервере обновлений и вывести список обновлений, которые ему требуется, выполните команду:
Get-WindowsUpdate
или
Get-WUList
Команда должна вывести список обновлений, которые нужно установить на вашем компьютере.

Команда Get-WindowsUpdate при первом запуске может вернуть ошибку:
Value does not fall within the expected range.

Для исправления ошибки нужно сбросить настройки агента Windows Update, перерегистрировать библиотеки и восстановить исходное состояние службы wususerv с помощью команды:
Reset-WUComponents -Verbose
Чтобы проверить, откуда получает ли Windows обновлений с серверов Windows Update в Интернете или локального WSUS, выполните команду:
Get-WUServiceManager

В этом примере вы видите, компьютер настроен на получение обновлений с локального сервера WSUS (Windows Server Update Service = True). В этом случае вы должны увидеть список обновлений, одобренных для вашего компьютера на WSUS.
Если вы хотите просканировать ваш компьютер на серверах Microsoft Update в Интернете (кроме обновлений Windows на этих серверах содержатся обновления Office и других продуктов), выполните команду:
Get-WUlist -MicrosoftUpdate
Вы получаете предупреждение:
Get-WUlist : Service Windows Update was not found on computer
Чтобы разрешить сканирование на Microsoft Update, выполните команду:
Add-WUServiceManager -ServiceID "7971f918-a847-4430-9279-4a52d1efe18d" -AddServiceFlag 7
Чтобы убрать определенные продукты или конкретные KB из списка обновлений, которые получает ваш компьютер, вы их можете исключить по:
- Категории (-NotCategory);
- Названию (-NotTitle);
- Номеру обновления (-NotKBArticleID).
Например, чтобы исключить из списка обновления драйверов, OneDrive, и одну конкретную KB:
Get-WUlist -NotCategory "Drivers" -NotTitle OneDrive -NotKBArticleID KB4533002
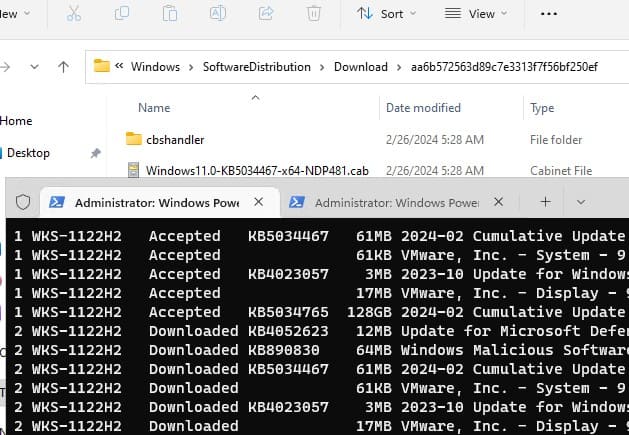
Скачать все доступные обновления на компьютер (обновления загружаются в локальный кэш обновлений в каталоге
C:\Windows\SoftwareDistribution\Download
).
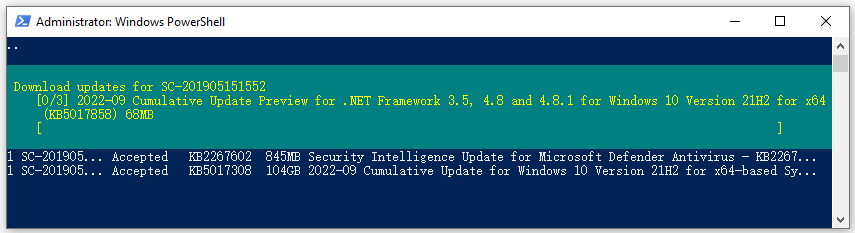
Get-WindowsUpdate -Download -AcceptAll
Windows загрузит все доступные патчи сервера обновлений (MSU и CAB файлы) в локальный каталог обновлений, но не запустит их автоматическую установку.

Установка обновлений Windows с помощью команды Install-WindowsUpdate
Чтобы автоматически скачать и установить все доступные обновления для вашей версии Windows с серверов Windows Update (вместо локального WSUS), выполните:
Install-WindowsUpdate -MicrosoftUpdate -AcceptAll -AutoReboot
Ключ AcceptAll включает одобрение установки для всех пакетов, а AutoReboot разрешает автоматическую перезагрузку Windows после завершения установки обновлений.
Также можно использовать следующе параметры:
- IgnoreReboot – запретить автоматическую перезагрузку;
- ScheduleReboot – задать точное время перезагрузки компьютера.
Можете сохранить историю установки обновлений в лог файл (можно использовать вместо WindowsUpdate.log).
Install-WindowsUpdate -AcceptAll -Install -AutoReboot | Out-File "c:\$(get-date -f yyyy-MM-dd)-WindowsUpdate.log" -force
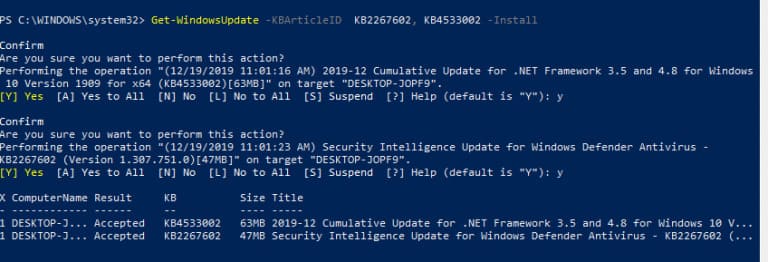
Можно установить только конкретные обновления по номерам KB:
Get-WindowsUpdate -KBArticleID KB2267602, KB4533002 -Install

Если вы хотите пропустить некоторые обновления при установке, выполните:
Install-WindowsUpdate -NotCategory "Drivers" -NotTitle OneDrive -NotKBArticleID KB4011670 -AcceptAll -IgnoreReboot
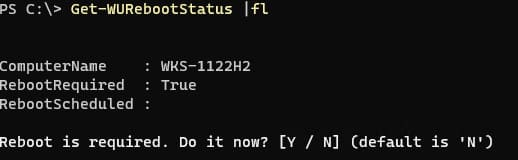
Проверить, нужна ли перезагрузка компьютеру после установки обновления (атрибуты RebootRequired и RebootScheduled):
Get-WURebootStatus

>Просмотр истории установленных обновлений в Windows
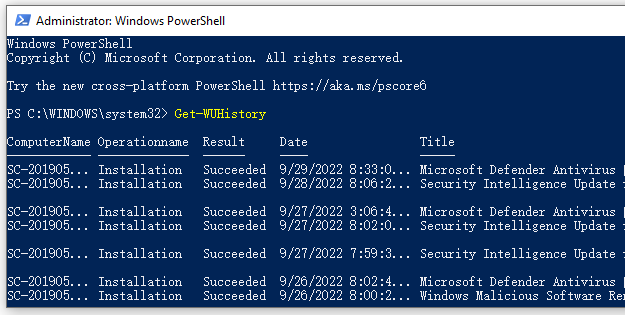
С помощью команды Get-WUHistory вы можете получить список обновлений, установленных на компьютере ранее автоматически или вручную.

Можно получить информацию о дате установки конкретного обновления:
Get-WUHistory| Where-Object {$_.Title -match "KB4517389"} | Select-Object *|ft

Вывести даты последнего сканирования и установки обновлении на компьютере:
Get-WULastResults |select LastSearchSuccessDate, LastInstallationSuccessDate

Удаление обновлений в Windows с помощью PowerShell
Для корректного удаления обновления Windows используется командлет Remove-WindowsUpdate. Вам достаточно указать номер KB в качестве аргумента параметра KBArticleID.
Remove-WindowsUpdate -KBArticleID KB4011634
Скрыть ненужные обновления Windows с помощью PowerShell
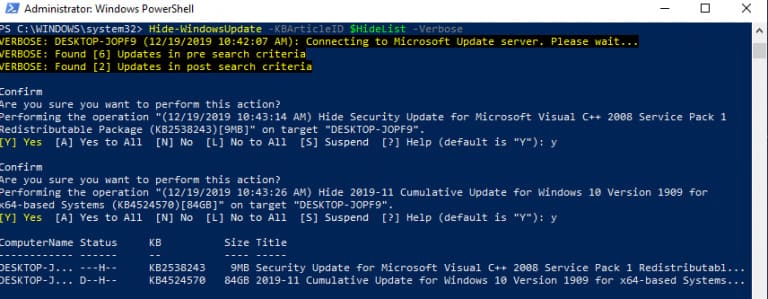
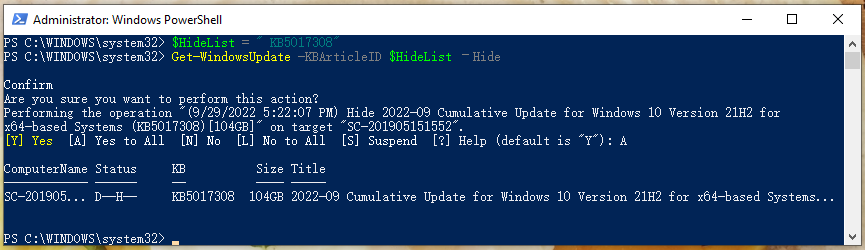
Вы можете скрыть определенные обновления, чтобы они никогда не устанавливались службой обновлений Windows Update на вашем компьютер (чаще всего скрывают обновления драйверов). Например, чтобы скрыть обновления KB2538243 и KB4524570, выполните такие команды:
$HideList = "KB2538243", "KB4524570"
Get-WindowsUpdate -KBArticleID $HideList -Hide
или используйте alias:
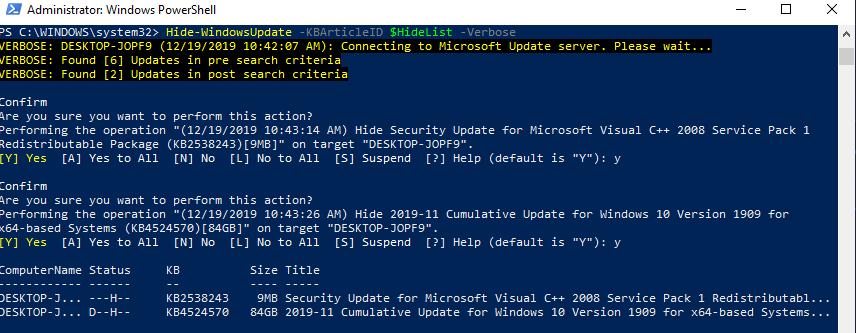
Hide-WindowsUpdate -KBArticleID $HideList -Verbose
Теперь при следующем сканировании обновлений с помощью команды Get-WindowsUpdate скрытые обновления не будут отображаться в списке доступных для установки.
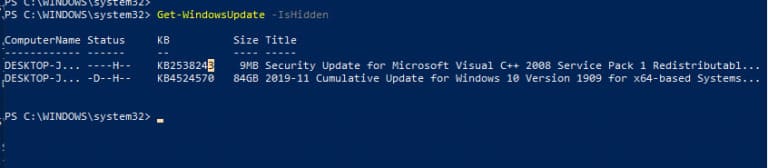
Вывести список скрытых обновлений:
Get-WindowsUpdate –IsHidden
Обратите внимание, что в колонке Status у скрытых обновлений появился атрибут H (Hidden).

Отменить скрытие обновлений можно так:
Get-WindowsUpdate -KBArticleID $HideList -WithHidden -Hide:$false
или так:
Show-WindowsUpdate -KBArticleID $HideList
Управление обновлениями Windows на удаленных компьютерах через PowerShell
Практически все командлеты модуля PSWindowsUpdate позволяют управлять обновлеями на удаленных компьютерах. Для этого используется атрибут
-Computername Host1, Host2, Host3
. На удаленных компьютерах должен быть включен и настроен WinRM (вручную или через GPO). Модуль PSWindowsUpdate можно использовать для удаленного управлений обновлениями Windows как на компьютерах в домене AD, так и в рабочей группе (потребует определенной настройки PowerShell Remoting).
Для удаленного управления обновлениями компьютерах, нужно добавить имена компьютеров доверенных хостов winrm, или настроить удаленное управление PSRemoting через WinRM HTTPS:
winrm set winrm/config/client ‘@{TrustedHosts="HOST1,HOST2,…"}’
Или с помощью PowerShell:
Set-Item wsman:\localhost\client\TrustedHosts -Value wsk-w10BO1 -Force
С помощью Invoke-Command можно разрешить использовать модуль PSWindowsUpdate на удаленных компьютерах и открыть необходимые порты в Windows Defender Firewall (команда
Enable-WURemoting
):
Invoke-Command -ComputerName $computer -ScriptBlock {Set-ExecutionPolicy RemoteSigned -force }
Invoke-Command -ComputerName $computer -ScriptBlock {Import-Module PSWindowsUpdate; Enable-WURemoting}
Проверить список доступных обновлений на удаленном компьютере:
Get-WUList –ComputerName server2
Скачать и установить все доступные обновлений на нескольких удаленных серверах:
$ServerNames = “server1, server2, server3”
Invoke-WUJob -ComputerName $ServerNames -Script {ipmo PSWindowsUpdate; Install-WindowsUpdate -AcceptAll | Out-File C:\Windows\PSWindowsUpdate.log } -RunNow -Confirm:$false -Verbose -ErrorAction Ignore
Командлет Invoke-WUJob (ранее командлет назывался Invoke-WUInstall) создаст на удаленном компьютере задание планировщика, запускаемое от SYSTEM. Можно указать точное время для установки обновлений Windows:
Invoke-WUJob -ComputerName $ServerNames -Script {ipmo PSWindowsUpdate; Install-WindowsUpdate –AcceptAll -AutoReboot | Out-File C:\Windows\PSWindowsUpdate.log } -Confirm:$false -TriggerDate (Get-Date -Hour 20 -Minute 0 -Second 0)
Проверить статус задания установки обновлений:
Get-WUJob -ComputerName $ServerNames
Если команда вернет пустой список, значит задача установки на всех компьютерах выполнена.
Проверьте наличие обновления на нескольких удаленных компьютерах:
"server1","server2" | Get-WUHistory| Where-Object {$_.Title -match "KB4011634"} | Select-Object *|ft
Получить дату последней установки обновлений на всех компьютерах в домене можно с помощью командлета Get-ADComputer из модуля AD PowerShell:
$Computers=Get-ADComputer -Filter {enabled -eq "true" -and OperatingSystem -Like '*Windows*' }
Foreach ($Computer in $Computers)
{
Get-WULastResults -ComputerName $Computer.Name|select ComputerName, LastSearchSuccessDate, LastInstallationSuccessDate
}
PowerShell модуль PSWindowsUpdate удобно использовать для загрузки и установки обновлений Windows из командной строки (единственный доступны вариант в случае установки обновлений на хосты без графического интерфейса: Windows Server Core и Hyper-V Server). Также этот модуль незаменим, когда нужно одновременно запустить и проконтролировать установку обновлений сразу на множестве серверов/рабочих станциях Windows.
Для управления обновлениями Windows можно использовать PowerShell модуль PSWindowsUpdate. Этот модуль доступен для загрузки из PowerShell Gallery и позволяет администраторам сканировать, скачивать, устанавливать, удалять или скрывать обновления на локальных или удаленных рабочих станциях и серверах Windows.
Приобрести оригинальные ключи активации Windows всегда можно у нас в каталоге от 1099 ₽
1. Установка модуля PSWindowsUpdate
В современных версиях Windows 10/11 и Windows Server 2022/2019/2016 модуль PSWindowsUpdate можно установить из онлайн репозитория PowerShell Gallery с помощью команды:
Install-Module -Name PSWindowsUpdate
Подтвердите добавление репозитория, нажав Y. Чтобы убедиться, что модуль установлен:
Get-Package -Name PSWindowsUpdate
Также PSWindowsUpdate можно установить в офлайн-режиме. В изолированной среде для установки потребуется предварительное обновление PowerShell.
Вы можете также установить модуль удалённо на другие компьютеры:
$Targets = "srv1.winitpro.loc", "srv2.winitpro.loc"
Update-WUModule -ComputerName $Targets -local
Политика выполнения PowerShell скриптов в Windows по умолчанию блокирует запуск командлетов из сторонних модулей. Чтобы разрешить выполнение скриптов, выполните:
Set-ExecutionPolicy –ExecutionPolicy RemoteSigned -force
После этого импортируйте модуль в сессию PowerShell:
Import-Module PSWindowsUpdate
Проверьте список команд, доступных в модуле:
Get-command -module PSWindowsUpdate
Для проверки текущих настроек Windows Update на вашем компьютере выполните команду:
Get-WUSettings
Пример вывода:
ComputerName                                 : WKS22122

WUServer                                     : http://MS-WSUS:8530

WUStatusServer                               : http://MS-WSUS:8530

AcceptTrustedPublisherCerts                  : 1

ElevateNonAdmins                             : 1

DoNotConnectToWindowsUpdateInternetLocations : 1

TargetGroupEnabled                           : 1

TargetGroup                                  : WorkstationsProd

NoAutoUpdate                                 : 0

AUOptions                                    : 3 - Notify before installation

ScheduledInstallDay                          : 0 - Every Day

ScheduledInstallTime                         : 3

UseWUServer                                  : 1

AutoInstallMinorUpdates                      : 0

AlwaysAutoRebootAtScheduledTime              : 0

DetectionFrequencyEnabled                    : 1

DetectionFrequency                           : 4
В этом примере клиент Windows Update настроен с помощью GPO на получение обновлений с локального сервера WSUS.
2. Сканировать и загрузить обновления с помощью PowerShell
Для сканирования компьютера на наличие обновлений выполните команду:
Get-WindowsUpdate
Также можно использовать команду:
Get-WUList
Команда должна вывести список обновлений, которые нужно установить на вашем компьютере.
Команда Get-WindowsUpdate при первом запуске может вернуть ошибку:
Value does not fall within the expected range.

Для исправления ошибки нужно сбросить настройки агента Windows Update, перерегистрировать библиотеки и восстановить исходное состояние службы wususerv с помощью команды:
Reset-WUComponents -Verbose
Чтобы проверить источники обновлений (например, серверы Microsoft или локальный WSUS):
Get-WUServiceManager

В этом примере вы видите, компьютер настроен на получение обновлений с локального сервера WSUS (Windows Server Update Service = True). В этом случае вы должны увидеть список обновлений, одобренных для вашего компьютера на WSUS.
Если хотите сканировать обновления с серверов Microsoft Update (включая обновления для Office):
Get-WUlist -MicrosoftUpdate
Если при попытке поиска обновлений вы получаете предупреждение:
Get-WUlist : Service Windows Update was not found on computer
Чтобы разрешить сканирование на Microsoft Update, выполните команду:
Add-WUServiceManager -ServiceID "7971f918-a847-4430-9279-4a52d1efe18d" -AddServiceFlag 7
Чтобы убрать определенные продукты или конкретные KB из списка обновлений, которые получает ваш компьютер, вы их можете исключить по:
— Категории (-NotCategory);
— Названию (-NotTitle);
— Номеру обновления (-NotKBArticleID).
Например, чтобы исключить из списка обновления драйверов, OneDrive, и одну конкретную KB:
Get-WUlist -NotCategory "Drivers" -NotTitle OneDrive -NotKBArticleID KB4533002
Скачать все доступные обновления на компьютер (обновления загружаются в локальный кэш обновлений в каталоге C:\Windows\SoftwareDistribution\Download):
Get-WindowsUpdate -Download -AcceptAll
Windows загрузит все доступные патчи сервера обновлений (MSU и CAB файлы) в локальный каталог обновлений, но не запустит их автоматическую установку.
3. Установка обновлений Windows с помощью команды Install-WindowsUpdate
Чтобы автоматически скачать и установить все доступные обновления для вашей версии Windows с серверов Windows Update (вместо локального WSUS), выполните:
Install-WindowsUpdate -MicrosoftUpdate -AcceptAll -AutoReboot
Ключ AcceptAll включает одобрение установки для всех пакетов, а AutoReboot разрешает автоматическую перезагрузку Windows после завершения установки обновлений.
Дополнительно можно использовать следующие параметры:
— IgnoreReboot — запретить автоматическую перезагрузку.
— ScheduleReboot — задать точное время перезагрузки компьютера.
Пример команды для сохранения истории установки обновлений в лог-файл:
Install-WindowsUpdate -AcceptAll -Install -AutoReboot | Out-File "c:\$(get-date -f yyyy-MM-dd)-WindowsUpdate.log" -force
Если вам нужно установить только конкретные обновления по номерам KB, используйте:
Get-WindowsUpdate -KBArticleID KB2267602, KB4533002 -Install
Если вы хотите исключить определённые обновления, например драйверы или пакеты OneDrive, выполните следующую команду:
Install-WindowsUpdate -NotCategory "Drivers" -NotTitle OneDrive -NotKBArticleID KB4011670 -AcceptAll -IgnoreReboot
Чтобы проверить, требуется ли перезагрузка компьютера после установки обновлений, выполните команду:
Get-WURebootStatus
4. Просмотр истории установленных обновлений в Windows
Для просмотра списка всех установленных обновлений, используйте следующую команду:
Get-WUHistory

Чтобы найти информацию о конкретном обновлении по его номеру KB, выполните:
Get-WUHistory | Where-Object {$_.Title -match "KB4517389"} | Select-Object *

Для вывода дат последнего успешного сканирования и установки обновлений на компьютере:
Get-WULastResults | Select-Object LastSearchSuccessDate, LastInstallationSuccessDate

5. Удаление обновлений в Windows с помощью PowerShell
Для удаления конкретного обновления, используя его номер KB, выполните:
Remove-WindowsUpdate -KBArticleID KB4011634
6. Скрыть ненужные обновления Windows с помощью PowerShell
Вы можете скрыть определённые обновления, чтобы они не отображались в списке доступных для установки. Например, для скрытия обновлений с номерами KB2538243 и KB4524570 выполните:
$HideList = "KB2538243", "KB4524570"
Get-WindowsUpdate -KBArticleID $HideList -Hide
Или используйте сокращённую команду alias:
Hide-WindowsUpdate -KBArticleID $HideList -Verbose
Чтобы отменить скрытие обновлений:
Show-WindowsUpdate -KBArticleID $HideList
Для просмотра списка всех скрытых обновлений выполните команду:
Get-WindowsUpdate –IsHidden
7. Управление обновлениями Windows на удалённых компьютерах через PowerShell
Все командлеты модуля PSWindowsUpdate можно использовать для управления обновлениями на удалённых компьютерах, используя параметр -Computername Host1, Host2, Host3. На удалённых компьютерах должен быть включён и настроен WinRM (это можно сделать вручную или через GPO). Модуль PSWindowsUpdate работает как в доменных сетях, так и в рабочей группе.
Для добавления имён компьютеров в список доверенных хостов WinRM, выполните следующую команду:
winrm set winrm/config/client ‘@{TrustedHosts="HOST1,HOST2,…"}’
Или используйте PowerShell для настройки:
Set-Item wsman:\localhost\client\TrustedHosts -Value "HOST1,HOST2" -Force
Чтобы развернуть модуль PSWindowsUpdate на удалённых компьютерах и настроить необходимые порты, выполните следующие команды:
Invoke-Command -ComputerName $computer -ScriptBlock {Set-ExecutionPolicy RemoteSigned -force }
Invoke-Command -ComputerName $computer -ScriptBlock {Import-Module PSWindowsUpdate; Enable-WURemoting}
Для проверки доступных обновлений на удалённых компьютерах используйте:
Get-WUList –ComputerName server2
Для установки всех доступных обновлений на нескольких серверах:
$ServerNames = "server1, server2, server3"
Invoke-WUJob -ComputerName $ServerNames -Script {ipmo PSWindowsUpdate; Install-WindowsUpdate -AcceptAll | Out-File C:\Windows\PSWindowsUpdate.log} -RunNow -Confirm:$false -Verbose -ErrorAction Ignore
Вы можете так же указать точное время для запуска задания по установке обновлений:
Invoke-WUJob -ComputerName $ServerNames -Script {ipmo PSWindowsUpdate; Install-WindowsUpdate –AcceptAll -AutoReboot | Out-File C:\Windows\PSWindowsUpdate.log } -Confirm:$false -TriggerDate (Get-Date -Hour 20 -Minute 0 -Second 0)
Для проверки статуса задания на удалённых компьютерах выполните:
Get-WUJob -ComputerName $ServerNames
Если команда вернет пустой список, значит задача установки на всех компьютерах выполнена.
Проверьте наличие обновления на нескольких удаленных компьютерах:
"server1","server2" | Get-WUHistory| Where-Object {$_.Title -match "KB4011634"} | Select-Object *|ft
Получить дату последней установки обновлений на всех компьютерах в домене можно с помощью командлета Get-ADComputer из модуля AD PowerShell:
$Computers=Get-ADComputer -Filter {enabled -eq "true" -and OperatingSystem -Like '*Windows*' }

Foreach ($Computer in $Computers)

{

Get-WULastResults -ComputerName $Computer.Name|select ComputerName, LastSearchSuccessDate, LastInstallationSuccessDate

}
Модуль PowerShell PSWindowsUpdate является удобным инструментом для загрузки и установки обновлений Windows через командную строку. Это особенно важно для серверов, которые работают без графического интерфейса, таких как Windows Server Core и Hyper-V Server. Кроме того, данный модуль незаменим в ситуациях, когда необходимо одновременно инициировать и контролировать процесс установки обновлений на множестве серверов или рабочих станций Windows.
To install Windows updates using PowerShell, you can utilize the `Install-WindowsUpdate` cmdlet from the PSWindowsUpdate module, which allows you to quickly manage and automate the update process.
Here’s a simple code snippet to perform the update:
Install-WindowsUpdate -AcceptAll -AutoReboot
Understanding Windows Updates
What are Windows Updates?
Windows Updates are essential components that ensure your operating system runs smoothly and securely. These updates can be categorized into several types:
- Feature Updates: Major upgrades that introduce new features and improvements to the operating system.
- Security Updates: Critical patches designed to fix vulnerabilities and protect your system from potential threats.
- Quality Updates: Regularly issued updates that focus on improving the reliability and performance of the system.
- Driver Updates: Updates that enhance your hardware drivers for better compatibility and performance.
Why Use PowerShell for Updates?
Utilizing PowerShell to install Windows updates offers numerous advantages:
Efficiency: Automating the update process through scripts saves time and reduces manual effort.
Flexibility: You can run updates remotely or in bulk across multiple machines, making management significantly easier.
Control: PowerShell enables you to customize the update process, allowing you to choose specific updates and settings.
PowerShell Install Windows Updates Remotely: A Simple Guide
Setting Up PowerShell for Windows Updates
Checking PowerShell Version
Before diving into using PowerShell to install Windows updates, ensure your PowerShell version is compatible. You can check this by running:
Get-Host
or
$PSVersionTable.PSVersion
This will return the version number, ensuring you meet the requirements.
Installing Required Modules
PowerShell relies on specific modules to handle Windows updates effectively. The PSWindowsUpdate module is commonly used. To install it, execute:
Install-Module PSWindowsUpdate -Force
This command downloads and installs the necessary module, enabling you to use various commands related to Windows updates.
PowerShell: List Windows Updates Made Easy
Importing the Module
Once the module is installed, you need to import it into your PowerShell session:
Import-Module PSWindowsUpdate
This step is crucial as it activates the commands available in the PSWindowsUpdate module.
Checking for Available Updates
To see which updates are available for your system, you can list them with the following command:
Get-WindowsUpdate
This command will provide a detailed output of all available updates, including their KB article IDs and descriptions, helping you make informed decisions on which updates to install.
Installing Updates
Basic Installation Command
If you’re ready to install all available updates, you can use the following command:
Install-WindowsUpdate -AcceptAll -AutoReboot
Parameters Explained:
- -AcceptAll: Automatically agrees to installation prompts for all updates, removing the need for manual confirmation.
- -AutoReboot: Triggers a system reboot after installation if necessary, ensuring installation completion.
Installing Specific Updates
If you only want to install a specific update, such as a security patch identified by its KB number, use:
Install-WindowsUpdate -KBArticleID "KBXXXXXXX"
Replace «KBXXXXXXX» with the actual KB number of the update you wish to install, for example, `KB5000802`.
Scheduling Updates with PowerShell
Using Task Scheduler
For consistent update management, you can set up a scheduled task that runs PowerShell commands at specified intervals. Here’s an example of creating a scheduled task to run updates weekly:
$Action = New-ScheduledTaskAction -Execute 'powershell.exe' -Argument "Install-WindowsUpdate -AcceptAll -AutoReboot"
$Trigger = New-ScheduledTaskTrigger -Weekly -At 3AM
Register-ScheduledTask -Action $Action -Trigger $Trigger -TaskName "Weekly Windows Update"
This script sets the task to execute every week at 3 AM, keeping your system updated without manual intervention.
PowerShell: Disable Windows Firewall in a Snap
Advanced PowerShell Commands for Windows Updates
Filtering Updates
If you want to filter for specific types of updates, such as security updates only, you can use this command:
Get-WindowsUpdate -MicrosoftUpdate | Where-Object {$_.Title -like "*Security*"}
This command targets only updates related to security, helping you focus on critical patching needs.
Logging Update Activities
Creating logs of your update activities can be invaluable for troubleshooting and record-keeping. To log the installation process, use:
Install-WindowsUpdate -AcceptAll -LogPath "C:\Windows\Logs\UpdateLog.txt"
This command will save a log of the updates in the specified path, making it easier to review what updates were installed.
Error Handling
Errors are a common occurrence and handling them gracefully is essential. You can implement error handling using `Try-Catch` blocks to catch and manage exceptions during the update process:
Try {
    Install-WindowsUpdate -AcceptAll -AutoReboot
} Catch {
    Write-Host "An error occurred: $_"
}
This way, if an error does occur, you will have a message displayed that can help identify the issue.
PowerShell Check for Windows Updates: A Quick Guide
Best Practices for Using PowerShell to Manage Updates
Regular Updates
It’s important to run your update scripts regularly to ensure your systems remain secure and optimized. Automating the process through Task Scheduler, as previously mentioned, can help solidify this practice.
Backup
Always back up your system before performing major updates. This precaution helps prevent potential data loss or system issues due to an update failure.
Testing in Non-Production Environments
Before deploying updates in a critical environment, test them in a controlled setting. This testing helps identify potential issues and minimizes disruption to production systems.
Mastering the PowerShell Windows Update Command Effortlessly
Conclusion
Using PowerShell to install Windows updates empoweringly transforms your update management processes. It provides you with the tools needed for efficiency, flexibility, and control, thus ensuring that your systems remain secure and up-to-date. By practicing the techniques outlined here, you can streamline your update protocols and gain greater confidence in managing your systems.
PowerShell 7 Installation: A Quick Start Guide
Additional Resources
For continued learning and deeper understanding, you may refer to:
- Official Microsoft documentation on [PowerShell](https://docs.microsoft.com/en-us/powershell/) and [Windows Updates](https://docs.microsoft.com/en-us/windows/deployment/update/windows-update-in-windows-10).
- Books and online courses focused on advanced PowerShell scripting techniques.
PowerShell Install MSU: A Simple Step-by-Step Guide
Call to Action
Stay updated and enhance your PowerShell skills! Subscribe for more insightful tips and guides that will elevate your scripting knowledge.
If you only need to update one Windows system, you can use the GUI. However, if you need to update many Windows systems, it’s best to use PowerShell. Managing Windows Updates from a PowerShell window with the module PSWindowsUpdate is excellent. In this article, you will learn how to install Windows Updates with PowerShell.
Table of contents
- Install PSWindowsUpdate module
- 1. Set Windows PowerShell Execution Policy
- 2. Install PowerShellGet module
- 3. Install PSWindowsUpdate module
- Check PSWindowsUpdate commands
- Find Windows Updates
- Install Windows Updates
- Install Windows Updates on local system
- Install Windows Updates on remote systems
- Conclusion
Install PSWindowsUpdate module
To install PSWindowsUpdate module on your system, follow the steps below.
1. Set Windows PowerShell Execution Policy
By default, we can’t install scripts. To require all PowerShell scripts that you download from the internet are signed by a trusted publisher, run PowerShell as administrator, and run the cmdlet.
Set-ExecutionPolicy RemoteSigned -ForceImportant: Close and re-open the elevated Windows PowerShell window to have the changes apply.
2. Install PowerShellGet module
Run the command below to install NuGet Provider. When asked to install NuGet provider, press Y and follow with Enter.
Install-Module PowershellGet -ForceIf you get an error that it’s unable to install, read the article Unable to install NuGet provider for PowerShell.
3. Install PSWindowsUpdate module
Install the PSWindowsUpdate module.
Install-Module -Name PSWindowsUpdate -ForceCheck PSWindowsUpdate commands
The PSWindowsUpdate module comes with many cmdlets and aliases. You can use these to install, uninstall, hide, and unhide Windows Updates, among other things.
To get all the cmdlets and aliases, run the command below.
Get-Command -Module PSWindowsUpdateThe output below appears.
CommandType     Name                                               Version    Source
-----------     ----                                               -------    ------
Alias           Clear-WUJob                                        2.2.1.5    PSWindowsUpdate
Alias           Download-WindowsUpdate                             2.2.1.5    PSWindowsUpdate
Alias           Get-WUInstall                                      2.2.1.5    PSWindowsUpdate
Alias           Get-WUList                                         2.2.1.5    PSWindowsUpdate
Alias           Hide-WindowsUpdate                                 2.2.1.5    PSWindowsUpdate
Alias           Install-WindowsUpdate                              2.2.1.5    PSWindowsUpdate
Alias           Show-WindowsUpdate                                 2.2.1.5    PSWindowsUpdate
Alias           UnHide-WindowsUpdate                               2.2.1.5    PSWindowsUpdate
Alias           Uninstall-WindowsUpdate                            2.2.1.5    PSWindowsUpdate
Cmdlet          Add-WUServiceManager                               2.2.1.5    PSWindowsUpdate
Cmdlet          Enable-WURemoting                                  2.2.1.5    PSWindowsUpdate
Cmdlet          Get-WindowsUpdate                                  2.2.1.5    PSWindowsUpdate
Cmdlet          Get-WUApiVersion                                   2.2.1.5    PSWindowsUpdate
Cmdlet          Get-WUHistory                                      2.2.1.5    PSWindowsUpdate
Cmdlet          Get-WUInstallerStatus                              2.2.1.5    PSWindowsUpdate
Cmdlet          Get-WUJob                                          2.2.1.5    PSWindowsUpdate
Cmdlet          Get-WULastResults                                  2.2.1.5    PSWindowsUpdate
Cmdlet          Get-WUOfflineMSU                                   2.2.1.5    PSWindowsUpdate
Cmdlet          Get-WURebootStatus                                 2.2.1.5    PSWindowsUpdate
Cmdlet          Get-WUServiceManager                               2.2.1.5    PSWindowsUpdate
Cmdlet          Get-WUSettings                                     2.2.1.5    PSWindowsUpdate
Cmdlet          Invoke-WUJob                                       2.2.1.5    PSWindowsUpdate
Cmdlet          Remove-WindowsUpdate                               2.2.1.5    PSWindowsUpdate
Cmdlet          Remove-WUServiceManager                            2.2.1.5    PSWindowsUpdate
Cmdlet          Reset-WUComponents                                 2.2.1.5    PSWindowsUpdate
Cmdlet          Set-PSWUSettings                                   2.2.1.5    PSWindowsUpdate
Cmdlet          Set-WUSettings                                     2.2.1.5    PSWindowsUpdate
Cmdlet          Update-WUModule                                    2.2.1.5    PSWindowsUpdate
Find available Windows Updates for the system.
Get-WindowsUpdateFind available Windows updates on another system.
Get-WindowsUpdate -ComputerName "DC02-2022"Find available Windows updates on multiple systems.
# List of computer names or IP addresses
$computers = @(
    "DC01-2022",
    "DC02-2022",
    "DC03-2022"
)

# Loop through each computer and execute the Get-WindowsUpdate command
foreach ($computer in $computers) {
    Get-WindowsUpdate -ComputerName $computer -AcceptAll
}
Install Windows Updates
Find available Windows Updates on the system and prompt if you are sure to install the Windows Update.
Install Windows Updates on local system
Find available Windows Updates on the local system and install them with a reboot if that’s needed.
Get-WindowsUpdate -InstallFind available Windows Updates on the system and install them without a reboot when it finishes.
Get-WindowsUpdate -AcceptAll -Install -IgnoreRebootFind available Windows Updates on the system and install them with a reboot if that’s needed.
Get-WindowsUpdate -Install -AcceptAll -AutoRebootInstall Windows Updates on remote systems
Find available Windows Updates on multiple systems and install them with a reboot if that’s needed.
Note: You need to install the PSWindowsUpdate module on all the systems on which you want to install Windows Updates.
Fill in the computer names or the IP addresses and run the script to get and install Windows Updates on the systems.
# List of computer names or IP addresses
$computers = @(
    "DC01-2022",
    "DC02-2022",
    "DC03-2022"
)

# Loop through each computer and execute the Get-WindowsUpdate command
foreach ($computer in $computers) {
    Get-WindowsUpdate -ComputerName $computer -Install -AcceptAll -AutoReboot
}
Fill in the OU distinguished name and run the script to get and install Windows Updates on the systems.
# Specify the distinguished name of the OU
$ouDN = "OU=Computers,OU=Company,DC=exoip,DC=local"

# Get the list of computer names in the specified OU
$computers = Get-ADComputer -Filter * -SearchBase $ouDN | Select-Object -ExpandProperty Name

# Loop through each computer and execute the Get-WindowsUpdate command
foreach ($computer in $computers) {
    Get-WindowsUpdate -ComputerName $computer -Install -AcceptAll -AutoReboot
}
That’s it!
Read more: How to Install and Update PowerShell 7 »
Conclusion
You learned how to install PSWindowsUpdate module. Run Windows PowerShell 5.1 or PowerShell 7 and run the commands step by step to install the latest PSWindowsUpdate module. From now on, use the commands to install Windows Updates with PowerShell and manage everything from one window.
Did you enjoy this article? You may also like Check free disk space on Windows with PowerShell script. Don’t forget to follow us and share this article.
A great many users are confused about how to install Windows updates with PowerShell. If you are also trying to figure it out, this post from MiniTool is worth reading. It explains the PSWindowsUpdate and PowerShell Windows update install in detail.
PowerShell is a powerful graphical user interface that can access various services of an operating system as an administrator via command lines. This tool can be used to deal with many different works such as copy file PowerShell, connect to exchange online, shut down/restart a remote computer, and Windows update PowerShell.
When it comes to installing Windows update on Windows 10/11/8/7, most of us may want to use the Windows Update Settings feature. Sometimes, however, the Windows Updates may be stuck at downloading or some error codes.
If you want to run a custom script to automate the installation or patch a new installation, you can perform the PowerShell Windows update cmdlets with PSWindowsUpdate. How to install/manage Windows update PowerShell on Windows 10/11? Let’s keep reading.
What Is PSWindowsUpdate
When it comes to PowerShell Windows update install and management, it’s inevitable to discuss the PSWindowsUpdate module. It is an important module that can help you install or manage Windows updates from the PowerShell command lines.
In addition, it allows an administrator to remotely check, install, hide, and remove Windows updates using PowerShell on Windows servers and workstations. It is a community module by Michal Gajda and available for installation from the PowerShell Gallery repository. So, it is not built into Windows.
How to Install/Manage Windows Updates with PowerShell
In this part, you will learn how to install Windows updates PowerShell on Windows 10/11. Besides, it also introduces other useful information related to PowerShell Windows updates, including PSWindowsUpdate install, PowerShell check for Windows updates, PowerShell Windows updates remove, etc. Let’s start exploring.
# 1. Install the PSWindowsUpdate Module
As discussed above, the PSWindowsUpdate module is necessary to make PowerShell install Windows updates. Since it is not built into Windows, you need to install it from the PowerShell Gallery. Here you can install it on Windows 10/11 and Windows Server 2022/2019/2016 via the PowerShell PackageManagement. For that:
Step 1. Right-click the Windows menu at the left button of your screen and select Windows PowerShell (Admin), and click on Yes to confirm it.
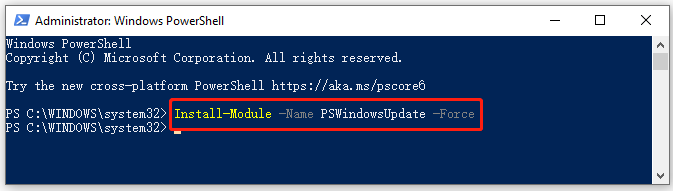
Step 2. In the elevated PowerShell window, type the following command and hit Enter to start installing PSWindowsUpdate.
Tips:
Installing the thSWindowsUpdate module requires to use the TLS 1.2 protocol for connection. To enable it for PowerShell, you can run the [Net.ServicePointManager]::SecurityProtocol = [Net.SecurityProtocolType]::Tls12 command.
Install-Module -Name PSWindowsUpdate -Force
Step 3. Once installed, run the following command to check the package.
Get-Package -Name PSWindowsUpdate
Step 4. You can run the following command to show the list of available command lines in the PSWindowsUpdate module.
get-command -module PSWindowsUpdate
# 2. List All Available Windows Updates with PowerShell
Before you PowerShell install Windows updates, you can check all available Windows updates for your current computer by running the Get-WindowsUpdate or Get-WUList command in the elevated PowerShell window.
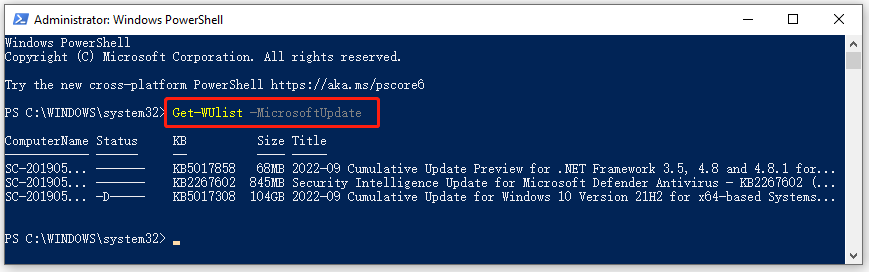
If you want to list all available updates on a remote computer, you can run Get-WUList –ComputerName server2 command.
# 3. Install All Available Windows Updates with PowerShell
Now, you can automatically download and install all available Windows updates PowerShell from the Windows Update servers. To do this work, open the elevated PowerShell window as we explain above and run the following command.
Install-WindowsUpdate -MicrosoftUpdate -AcceptAll -AutoReboot
or
Get-WindowsUpdate -AcceptAll -Install -AutoReboot
After running the command, Windows 10/11 should download and install Windows Updates and automatically reboot the computer to apply these changes.
# 4. Install Specific Windows Updates with PowerShell
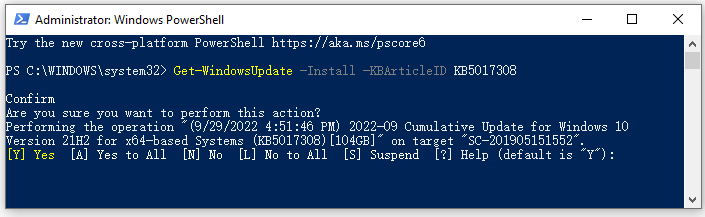
Sometimes, you may want to install specific Windows updates instead of all of them. In this case, you can open the elevated PowerShell window, type the following command, hit Enter, type A, and hit Enter.
Note:
Here you need to replace KB5017308 with the KB name of the update you want to install.
Get-WindowsUpdate -Install -KBArticleID KB5017308
# 5. Check the Windows Updates Installed History with PowerShell
You may want to check the Windows update history with PowerShell. To do so, you can open the PowerShell window and run the Get-WUHistory command. Then you will get a list of Windows updates you installed on the computer earlier.
# 6. Remove Specific Windows Updates with PowerShell
Sometimes you may want to remove recently installed Windows updates due to some reasons such as Windows 10 keeps instilling the same updates over and over. In this case, you can run the following command and just specify the KB number as the one you want to remove from Windows 10/11.
Remove-WindowsUpdate -KBArticleID KB5017308 -NoRestart
Also, you can hide a specific Windows update so that it will be never installed by the Windows Update server on your computer. For example, you can run the following commands to hide the KB5017308 update.
- $HideList = “KB5017308”
- Get-WindowsUpdate -KBArticleID $HideList –Hide
If you want to unhide the update later, you can run the following command:
Show-WindowsUpdate -KBArticleID $HideList
Further reading: If you can’t install the Windows Updates with PowerShell due to insufficient disk space, don’t worry. MiniTool Partition Wizard can help you fix the problem easily by analyzing disk space, extending partition, upgrading to a larger hard drive, etc.