
The PowerShell command `Get-Content` retrieves the contents of a file and displays it in the console.
Get-Content -Path 'C:\path\to\your\file.txt'
Understanding Get-Content
What is Get-Content?
`Get-Content` is a PowerShell cmdlet that allows users to read content directly from files. It plays a crucial role in scripting and automation, enabling the retrieval of file data easily and efficiently. Whether you need to analyze logs, extract specific data from text files, or read configuration settings, `Get-Content` serves as a fundamental tool in PowerShell.
How Does Get-Content Work?
When you run the `Get-Content` cmdlet, PowerShell opens the specified file and retrieves its content line by line, sending it to the output. This process can be streamlined using the pipeline, allowing you to manipulate or analyze the data further.
PowerShell Get File Extension: A Quick Guide
Basic Usage of Get-Content
Syntax of Get-Content
The basic syntax for using `Get-Content` is as follows:
Get-Content -Path <FilePath>
In this syntax, the `-Path` parameter is essential. It specifies the location of the file from which you want to read content.
Examples of Basic Usage
Reading a simple text file can be done with just a single command. For instance, the following code retrieves the content of a file located in `C:\example\`.
Get-Content -Path "C:\example\sample.txt"
When executed, this command will display the entire content of `sample.txt` in the PowerShell console.
You can also use wildcard characters to read multiple files at once. For example:
Get-Content -Path "C:\example\*sample.txt"
This command retrieves content from all files that match the `*sample.txt` pattern, providing a flexible way to manage file content.
Mastering PowerShell: Get File Owner with Ease
Advanced Usage of Get-Content
Reading Specific Lines
Sometimes you may only want to read certain lines of a file. `Get-Content` provides several parameters for this purpose, including `-TotalCount`, `-Tail`, and `-ReadCount`.
To read the first few lines from a file, use the `-TotalCount` parameter:
Get-Content -Path "C:\example\sample.txt" -TotalCount 5
This will display the first five lines of `sample.txt`. Conversely, if you want to fetch the last few lines, you can use the `-Tail` parameter:
Get-Content -Path "C:\example\sample.txt" -Tail 3
This retrieves and displays the last three lines of the specified file.
Filtering Content
Using Select-String with Get-Content
To search for a specific keyword or phrase within a file, you can combine `Get-Content` with the `Select-String` cmdlet. This allows you to filter the results and only display relevant lines.
For example, the following command searches for the keyword «error» in the file:
Get-Content -Path "C:\example\sample.txt" | Select-String "error"
This will return only the lines containing «error,» streamlining your search and providing targeted results.
PowerShell Get-WinEvent: A Quick Guide to Event Logs
Working with Different File Types
Reading from Different Text Formats
`Get-Content` is not limited to just reading `.txt` files. It can also handle other text formats, such as `.csv` and `.json`, although for structured data like CSV, the `Import-Csv` cmdlet is often more appropriate. For instance:
Import-Csv -Path "C:\example\sample.csv"
This command allows you to read and format the contents of a CSV file into objects for easier manipulation.
Accessing File Attributes
When reading files with `Get-Content`, you can access additional file properties using the `-File` flag. This ensures that you are working strictly with file content and not other types of input. For example:
Get-Content -Path "C:\example\sample.txt" -File
This command ensures that only the contents of the specified text file are read, ignoring any additional input like directories.
PowerShell Test-NetConnection: A Quick Guide to Connectivity
Performance Considerations
Pros and Cons of Using Get-Content
Using `Get-Content` offers several advantages, including ease of use and the ability to quickly read file content. However, for very large files, it may result in performance issues, as PowerShell reads line by line, which can slow down operations.
Best Practices
To enhance performance, consider these best practices:
- Use the `-ReadCount` parameter to specify how many lines are read in one go. For example:
Get-Content -Path "C:\example\sample.txt" -ReadCount 10
This reads ten lines at a time, improving efficiency.
- For massive files, consider using a dedicated log management tool or alternative cmdlets that specialize in large data processing.
Mastering PowerShell Get-Credential: A Quick Guide
Error Handling
Common Errors and Solutions
When using `Get-Content`, certain errors may arise, such as file not found or access denied. To handle these situations effectively, you can utilize try-catch blocks:
try {
    Get-Content -Path "C:\example\sample.txt"
} catch {
    Write-Host "Error: $($_.Exception.Message)"
}
This will catch errors and display a user-friendly message, allowing your scripts to handle exceptions gracefully.
Mastering PowerShell Get File Name: A Quick Guide
Conclusion
Throughout this guide, we’ve explored the powerful capabilities of the `Get-Content` cmdlet in PowerShell. Mastering this command opens doors for effective file management and data analysis in your scripting endeavors. We encourage you to practice and employ `Get-Content` in real-world scenarios to enhance your PowerShell skillset further.
Mastering PowerShell Get Time Zone: A Quick Guide
Additional Resources
For further learning, consider exploring the official Microsoft documentation on PowerShell commands and cmdlets. Engaging with community forums and investing in books or online courses can also provide valuable insights for PowerShell beginners. Additionally, explore example scripts and their associated GitHub repositories to see practical applications of `Get-Content` in action.
The Get-Content cmdlet can be used to retrieve the contents from a file in PowerShell. It will retrieve the contents one line at a time, storing them in an array. This allows you to use or process each line in your PowerShell script.
Get-Content comes with several parameters that allow you to select or filter the results you want to retrieve from the file. And when you need to process a lot of large files, then using the -raw parameter can speed up the process.
In this article
In this article, we are going to take a look at how to use the Get-Content cmdlet, and explain the different parameters that we can use.
We are going to start with the basics, read a file in PowerShell line-by-line using the Get-Content cmdlet. For the examples below I will be using a text file with 100 lines, which are numbered. This makes it easier to follow the examples:
1..100 | ForEach-Object { Add-Content -Path .\LineNumbers.txt -Value "This is line $_." }
The code above is from Microsoft and creates a text file where each line starts with the string “This is line ” followed by the line number:
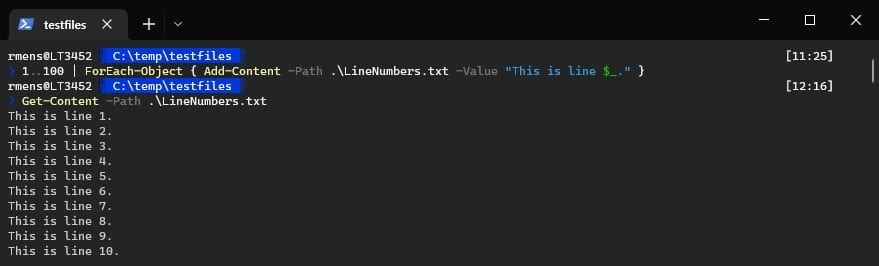
To view the results of the newly created file, we can use the Get-Content cmdlet. You only need to specify the path to the file to start reading its contents of it:
Get-Content -Path .\LineNumbers.txt
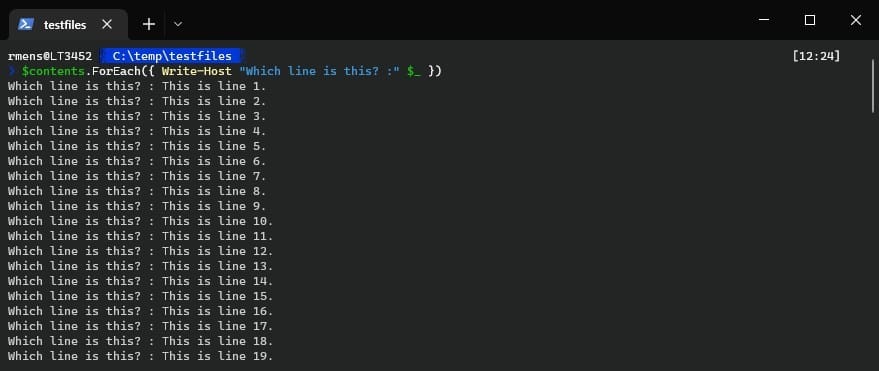
If we store the result of Get-Content in a variable, then we can see that PowerShell stores the results in an array. This means that we can use any Array function on the results, or process each line using a ForEach loop:
$contents = Get-Content -Path .\LineNumbers.txt
$contents.GetType()

# Result
IsPublic IsSerial Name                                     BaseType
-------- -------- ----                                     --------
True     True     Object[]                                 System.Array

# Return the 6th line (the index of an array start at 0 😉 )
$contents[5]

# Result
This is line 6
Returning the First or Last x Lines
By default, the Get-Content cmdlet will return all the contents of a file in PowerShell. But in some cases, you only want to view the first or last x lines from a file. For example, when debugging an issue, you often only need the last couple of lines from a log file.
For this we have two options, we can use the parameter -TotalCount, which returns the first x items of the content. Or we can use the parameter -Tail, which returns the last x items of a file.
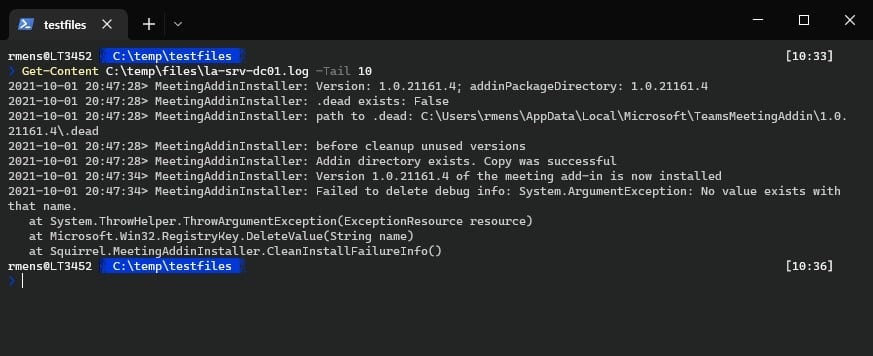
So let’s go back to our log file example. We want to view the last 10 lines from the log. To do this, we need to specify the path and add -Tail 10 to return only the last 10 lines:
Get-Content C:\temp\files\la-srv-dc01.log -Tail 10
To read the first x item from a file we will need to use the parameter -TotalCount:
Get-Content -Path .\LineNumbers.txt -TotalCount 5
Return a single line from a file
If you know which specific line you need from a text file, then it’s possible to select only a single line from the text file. As we know, the results are stored in an array. So we can use the array index to select a line number that we need.
Keep in mind that the array index starts at 0, so if we want to return line 16, we need to specify index number 15. We wrap the Get-Content command in parentheses ( ) so that PowerShell first completes the Get-Content command before it continues.
(Get-Content -Path .\LineNumbers.txt)[15]

# Result
This is line 16.
If you have a large text file then you might not want to read it completely to only return a single line. What you can do is select only the first or last x lines from the file, and then select the line number using the array index.
For example, let’s say we need the fifth line from a file. We set the TotalCount to 5, reading only the first 5 lines, and return the last item from the array:
(Get-Content -Path .\LineNumbers.txt -TotalCount 5)[-1]

# Result
This is line 5.
Reading Multiple Files with Get-Content
It’s also possible to read the contents of multiple files at once with Get-Content in PowerShell. To do this you only need to specify the path where the files are located followed by an asterisk *.
Get-Content -Path c:\temp\files\*
Keep in mind though that there won’t be any reference in the results to the source files. So you won’t know from which file line x comes.
We can also filter which files we want to read. So for example, if you only want to get the contents of all the .log files then you can add the parameter -Filter to it:
Get-Content -Path c:\temp\files\* -Filter '*.log'
Using -Raw
The Get-Content cmdlet reads each line of the file into the array, which is great when you need to process each line independently or you are looking for a single line. But array a terrible if you need to do a search and replace on the contents of a file.
For example, when you have an HTML file that you are using as a template for an email that you are about the send with PowerShell. In the HTML file, we have placeholders that we need to replace, like this:
<p>Hi {{manager.firstname}},</p>
<p>
 The account for {{user.fullname}} is ready. Below you will find the login details for {{user.firstname}}. We have set a temporary password which must be
 changed after the first login.
</p>
<p>
 In the attachment you will find a starting guide for new users
</p>
Instead of looping through each line to find the placeholders and replace them, we can use the -Raw parameter to read the whole file as a single string and use the -Replace operator to replace the placeholders:
(Get-Content -Path c:\temp\template.html -Raw) -replace '{{user.fullname}}', $user.fullName -replace '{{user.firstname}}', $user.givenName
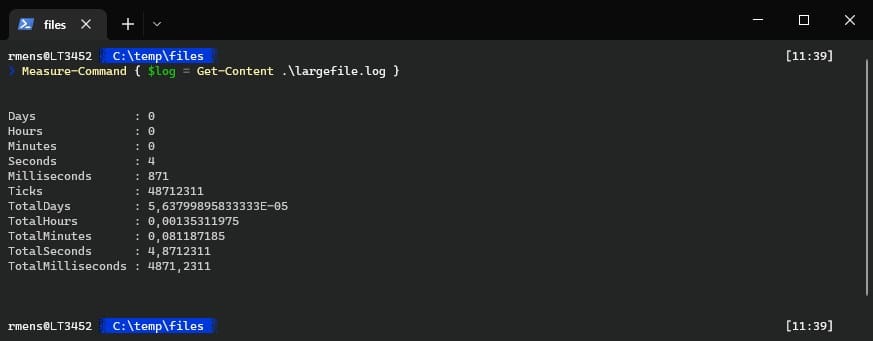
Another advantage of using the -Raw parameter is that it’s a lot faster. Get-Content works great with small text files, but when you need to process large text files then you will probably notice that the command is a bit sluggish.
For example, a text file of 50Mb takes almost 5 seconds to read as you can see in the screenshot below:
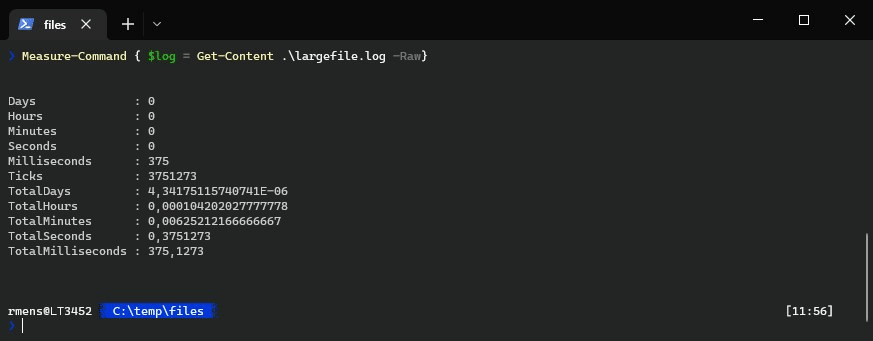
But when using -Raw it took less than half a second:
If you still need the results in an array then we can use -Raw combined with the -split string operator to create an array of each line of the file. This method is still 5 times faster than using Get-Content without -Raw.
$log = (Get-Content .\largefile.log -Raw) -split "`r`n"
Reading files faster with ReadAllLines
When processing very large files, 100Mb and large, then there is an even faster method to read the contents of the file with PowerShell. The .Net method System.IO.File.ReadAllLines(). will read all the lines into the memory in half of the time compared to using the -Raw method.
The results are, just like with Get-Content, stored in an array. So you can process that data in the same way.
$log = [System.IO.File]::ReadAllLines('c:\temp\files\largefile.log')
You can also use the method [System.IO.File]::ReadLines, which is even faster. But this will immediately stream the contents to the console, instead of storing it in the memory. The problem with this method is that you will need to close the file when done, otherwise, it will be locked by the stream.
Watch files with -Wait
The last interesting function of Get-Contents is that we can monitor or watch the contents of a file using the -Wait parameter. If you, for example, want to monitor a log file. Then instead of rerunning the Get-Content cmdlet every time, you can add the -wait parameter.
As soon as the contents of the file are updated (and saved), it will update the output of Get-Content.
Get-Content -Path c:\temp\testfiles\LineNumbers.txt -Tail 5 -Wait

# Result
This is line 96.
This is line 97.
This is line 98.
This is line 99.
This is line 100.
If we add new lines to the end of the file, then these will show up in the results.
Wrapping Up
The Get-Content cmdlet in PowerShell is great when you need to read a file quickly. But when working with large files you really need to use the -Raw parameter at least to speed up the process. Also, give the .Net method a try, you will be amazed at how fast it is.
I hope you found this article useful, if you have any questions, then just drop a comment below.
With automation, reading data from a text file is a common scenario. Most programming languages have at least one way of reading text files, and PowerShell is no exception. The PowerShell Get-Content cmdlet, a PowerShell tail equivalent, reads a text file’s contents and imports the data into a PowerShell session.
The PowerShell Get-Content cmdlet is an indispensable tool when you need to use text files as input for your script. Perhaps your PowerShell script needs to read a computer list to monitor or import an email template to send to your users. PowerShell Get-Content easily supports these scenarios!
How about following a log file in real-time? Yes, the PowerShell Get-Content can do that, too!. Continue reading this article, and you will learn how to use the Get-Content cmdlet to read text files in PowerShell.
Prerequisites
If you’re interested in following the examples in this tutorial, you will need the following requirements.
- You’ll need a computer that is running on Windows 10. This tutorial uses Windows 10 version 20H2. But don’t worry, you’ll be okay with the Windows 10 version that you have.
- You should have at least Windows PowerShell 5.1, or PowerShell 7.1 installed on your computer. Here PowerShell 7.1 is used, but either will version will work!
- You’ll be writing and testing commands, so you’ll need a code editor. The recommended editors are Windows PowerShell ISE, built-in to Windows, and Visual Studio Code (VSCode). This article uses VSCode.
- It will also help if you create a working directory on your computer. The working folder can be anywhere you want. However, you’ll notice that the examples in this tutorial reside in the C:\demo folder.
- To get started, you need some content! Create a file, in your working directory, with the name fruits.txt that includes ten different fruits for simplicity. You will be using this text file in all the examples.
cherry
 berry
 apricot
 papaya
 raspberry
 melon
 peach
 tangerine
 cantaloupe
 orange
Don’t know which PowerShell version you have? Visit the article How to Check your PowerShell Version (All the Ways!).
Reading a Text File and Returning the Result as a String Array
The Get-Content cmdlet reads content from a file, and by default, returns each line of a text file as a string object. As a result, the collection of PowerShell objects becomes an array of string objects.
The below code reads the contents of the fruits.txt file and displays the result on the PowerShell console as seen in the below screenshot.
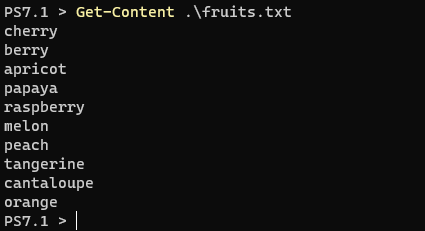
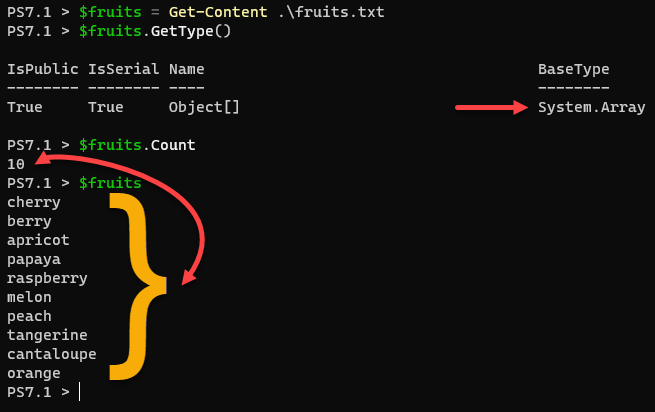
Get-Content.Get-Content reads and stores the content as an array, but how do you know that for sure? First, save the content to a PowerShell object which you can then examine to determine the type.
Save the content into to a object
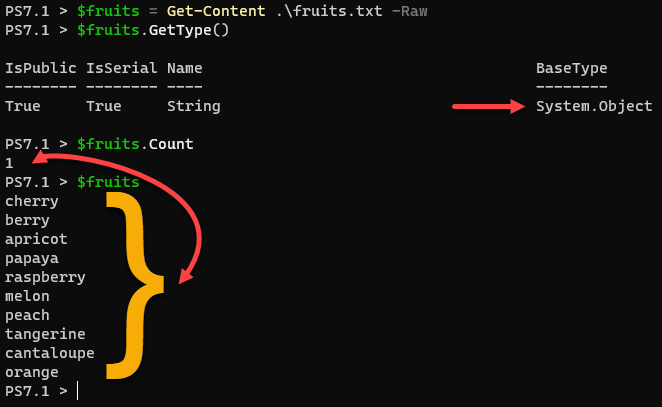
$fruits = Get-Content .\fruits.txt
Display the type of the object
$fruits.GetType()
Retrieve the count of items within the object
$fruits.Count
Output the contents of the object to the console
$fruitsLooking at the screenshot below, the $fruits variable is an array that contains ten objects. Each object represents a single line of text.
Returning a Specific Line From a Text File
In the previous example, you’ve learned that the default Get-Content result is an array or a collection of objects. Each item in a collection corresponds to an index number, and PowerShell indexes typically start at zero.
The screenshot below shows that there are ten items in the string array. The array indexed the ten items from zero to nine.
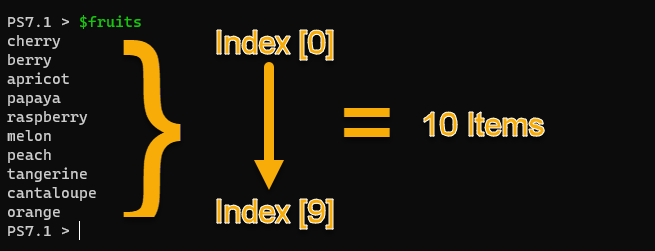
To only display the fifth line of content, you’ll need to specify the index number 4, enclosed in square brackets (known as array notation).
(Get-Content .\fruits.txt)[4]
You may notice that the
Get-Contentcommand is enclosed in a parenthesis. This notation tells PowerShell to run the command enclosed in the parenthesis first before other operations.
In the screenshot below, you’ll see that the only returned result is raspberry, which is the item at index 4 and corresponds to the fifth line in the text file.

Get-Content results.What if you need to get the content in the last line? Thankfully, you do not need to know the total number of lines. Instead, use [-1] as the index, and Get-Content will display only the last line of the file.
(Get-Content .\fruits.txt)[-1]
Limiting the Number of Top Results Returned by Get-Content
Use the TotalCount parameter of Get-Content to retrieve a specified number of lines from a text file. The TotalCount parameter accepts a long value which means a maximum value of 9,223,372,036,854,775,807.
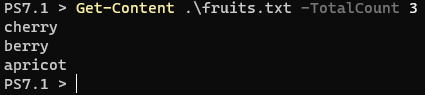
For example, the command below reads the content and limits the result to three items.
Get-Content .\fruits.txt -TotalCount 3
As you would expect, the result below displays only the top three lines from the beginning of the text file.
Get-Content command and the TotalCount parameter.Use the PowerShell Tail Parameter to Return Results From the End of a File
In the previous example, you used the PowerShell Get-Content cmdlet to read a text file and limit the top results. It is also possible to achieve the opposite with PowerShell Get-Content. Use the PowerShell Tail parameter to read a specified number of lines from the end of a file.
The example code below reads the text file and displays the content of the bottom four lines.
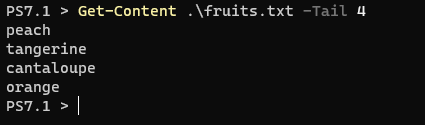
Get-Content .\fruits.txt -Tail 4
After running the PowerShell tail command, the expected outcome will be limited to the last four lines of content, as shown in the image below.
Get-Content Tail parameter.The Tail parameter is often used together with the Wait parameter. Using the Wait parameter keeps the file open and checks for new content once every second. The demonstration below shows the Tail and Wait parameters in action. To exit Wait, use the key combination of CTRL+C.
Get-Content -Path .\fruits.txt -Tail 1 -Wait

wait and Tail parameters with Get-Content.Returning the Results as a Single String
You may have noticed in previous examples that you’ve been dealing with string arrays as the PowerShell Get-Content output. And as you’ve learned so far, the nature of arrays allows you to operate on the content one item at a time.
Arrays often work great but can make replacing strings more difficult. The Raw parameter of Get-Content reads a file’s entire content into a single string object. Although the code below is the same as used within the first example, the Raw parameter stores the file content as a single string.
Save the content into to a object
 $fruits = Get-Content .\fruits.txt -Raw
 Display the type of the object
 $fruits.GetType()
 Retrieve the count of items within the object
 $fruits.Count
 Output the contents of the object to the console
 $fruits
The screenshot below demonstrates that adding the Raw parameter to Get-Content results in treating the content as a single string and not an array of objects.
Raw parameter of Get-Content reads the file content as a single string object.Once you have the contents of a file in a single string using the Raw parameter, what can you do with it? Perhaps you need to find and replace a string inside of that file’s content. In the example below, Get-Content reads the content of a file as a single string. Then, using the replace operator, replace a specific word with another.
Related: Finding and Replacing Strings
# Get the raw content of the text file
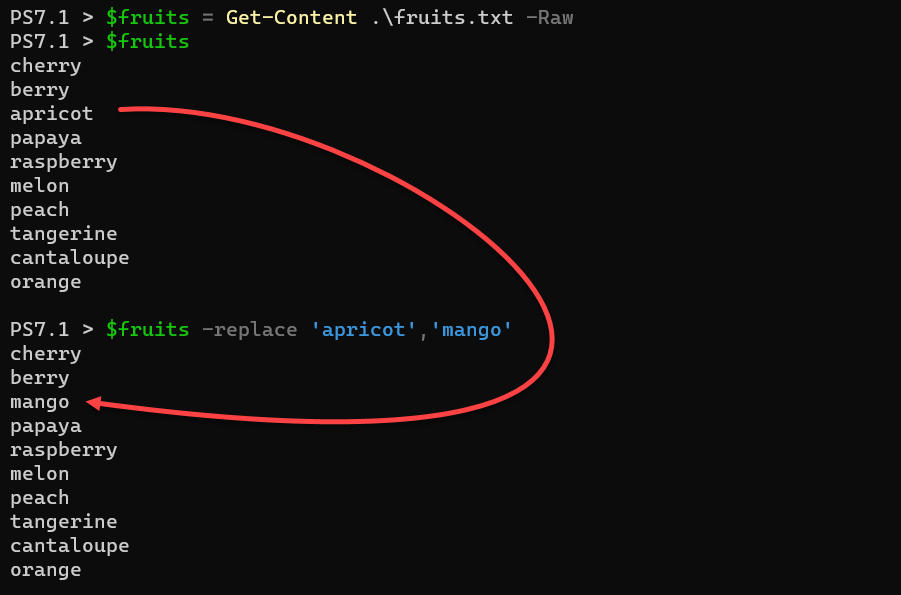
$fruits = Get-Content .\fruits.txt -Raw
# Display the content
$fruits
# Find and replace the word 'apricot' with 'mango'
$fruits -replace 'apricot','mango'
replace operator.Read Content Only from Files that Matched a Filter
Do you have a folder full of files but need to read the content of a select few? With PowerShell Get-Content, you do not have to filter the files separately before reading the files’ contents. The Filter parameter of Get-Content limits which files the cmdlet reads.
To demonstrate reading the content of only select files, first, create a couple of files to read. As shown below, create the files in your working folder using Add-Content.
# Add-Content creates the log1.log and log2.log file if they don't exist already and adds the given value
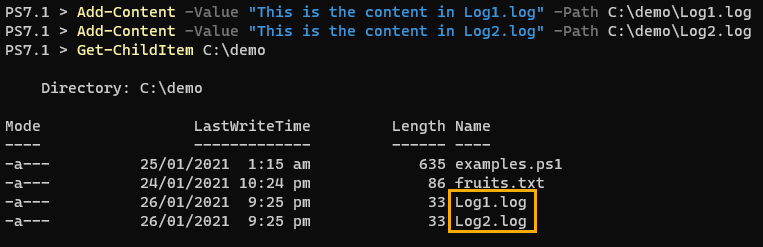
Add-Content -Value "This is the content in Log1.log" -Path C:\demo\Log1.log
Add-Content -Value "This is the content in Log2.log" -Path C:\demo\Log2.log
# Verify that the files have been created
Get-ChildItem C:\demo
.log files using Add-Content.With your test files created, use the Filter and Path parameters to only read .log files in the root directory. The asterisk used in the filter definition indicates to Get-Content to read any file ending with .log. The ending asterisk of the path parameter limits the reading of files to only the root directory.
Get-Content -Path C:\demo* -Filter *.logAs shown in the below output, only the content from the .log files is displayed.

Filter parameter with PowerShell Get-Content to limit the read files.Related: Get-ChildItem: Listing Files, Registry, Certificates, and More as One
Reading the Alternate Data Stream of a File
Until now, you have been working exclusively with text files, but Get-Content can read data from the alternate data stream (ADS) of a file. Feel free to read more about streams, but you can think of a stream as another data attribute stored alongside the typical file contents.
Alternate data streams are a feature of the Windows NTFS file system, therefore this does not apply to
Get-Contentwhen used with non-Windows operating systems.
You can see alternate data streams by running Get-Item with the Stream parameter. When referencing a file using the Stream parameter, Get-Item returns a property called Stream as shown below. This default file content stream is represented with :$DATA.
To demonstrate the default :$DATA stream, use the Get-Item cmdlet to display all available streams in the file fruits.txt. As shown below, Get-Item displays a single stream.
Get-Item -Path .\fruits.txt -Stream *
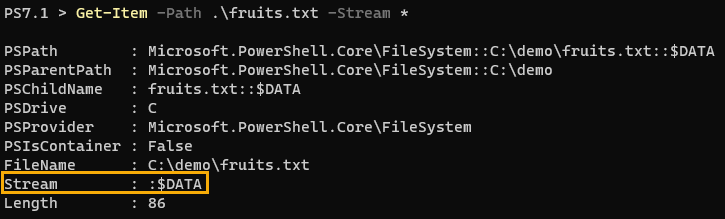
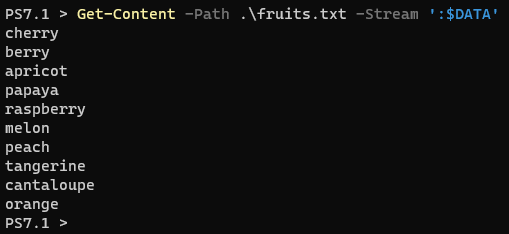
Get-Item.The Stream parameter of Get-Content explicitly reads the content of the default :$DATA stream as shown below. The returned content is the same as the default Get-Content output as the :$DATA stream is read by default.
Get-Content -Path .\fruits.txt -Stream ':$DATA'
:$DATA stream using Get-Content.To demonstrate retrieving an alternate data stream using Get-Content, modify a file using Add-Content to add the new stream. Use Get-Item to show the new stream alongside the default :$DATA stream, as seen in the below example.
# Add a new ADS named Secret to the fruits.txt file
Add-Content -Path .\fruits.txt -Stream Secret -Value 'This is a secret. No one should find this.'
Get-Item -Path .\fruits.txt -Stream *

As only the :$DATA stream is read by default, use the Stream parameter of Get-Content to retrieve the new Secret stream content. As shown below, the Secret stream content is displayed instead of the default file content.
Get-Content -Path .\fruits.txt -Stream secret

Get-Content to read the Secret alternate data stream content.Next Steps With PowerShell Get-Content
In this article, you’ve learned many ways to use Get-Content to read and manipulate content. You’ve even learned that Get-Content is flexible enough to read content from alternate data streams!
With what you’ve learned in this article, what other ways can you use Get-Content in your work? Perhaps you can use Get-Content to determine if a backup file is outdated and trigger an automatic call to run a backup job?
Время на прочтение3 мин
Количество просмотров122K
Наверное, все слышали о PowerShell, но наверняка не всем довелось с ним работать. Для тех, кто только начинает прокладывать свой путь в дебри PowerShell, мы приводим перевод поста, вышедшего на портале 4sysops.com. В нем рассказано о 7 командах, которые помогут тем, кто только начал работать с PowerShell. За подробностями – добро пожаловать под кат.
GET-HELP
Самый первый и самый главный командлет PowerShell – вызов справки. С помощью командлета Get-Help можно проверить синтаксис, посмотреть примеры использования и детальное описание параметров любого PowerShell командлета. Этот командлет примечателен тем, что вы просто можете набрать Get-Help Services, чтобы получить список всех командлетов, которые подходят для работы со службами.
Пример:
PS C:\> Get-Help Service

Вы можете выбрать любой командлет из списка, выведенного по запросу выше, чтобы получить справку о нем. Например,
PS C:\> Get-Help -Name Get-Service
Вы получаете всю информацию о командлете Get-Service (будет рассмотрен ниже).

GET-CONTENT
Чтение содержимого файлов – наиболее частое требование для новичков, которые пытаются выучить PowerShell. Процедура чтения файлов с PowerShell упрощается. Даже неспециалист может читать содержимое файла, просто передав его в командлет Get-Content.
Пример.
PS C:\> Get-Content C:\scripts\Computers.txt
mytestpc1
techibee.com
dummynotresolvinghost.com
PS C:\>

Необходимо больше информации о командлете? Воспользуйтесь Get-Help:
PS C:\> Get-Help Get-Content -Detailed
GET-SERVICE
Этот командлет перечисляет все службы, установленные на компьютере. Вы можете использовать его для получения информации о конкретной службе, совокупности служб или просто обо всех службах на компьютере.
Пример:
PS C:\> Get-Service wwansvc, spooler
Status Name DisplayName
------ ---- -----------
Running spooler Print Spooler
Stopped wwansvc WWAN AutoConfig
PS C:\>
Здесь мы запросили информацию о двух службах wwansvc и spooler
Выводится таблица со статусом службы, ее именем и отображаемым именем.
Мы можем видеть что служба spooler запущена, а wwansvc остановлена
STOP-SERVICE И START-SERVICE
Запуск и остановка служб – достаточно важный момент в работе администратора Windows. В PowerShell имеются встроенные командлеты, которые упрощают работу администратора, не требуя открытия консоли MMC. Используя эти командлеты Вы можете останавливать/запускать службы как на локальных, так и на удаленных компьютерах.
Примеры:
Запуск/остановка службы на локальном компьютере (на примере службы spooler):
PS C:\> Stop-Service -Name Spooler
PS C:\> Start-Service -Name Spooler
Запуск/остановка службы на удаленном компьютере (spooler):
PS C:\> $ServiceObj = Get-Service -ComputerName MyPC1 -Name spooler
PS C:\> Stop-Service -InputObj $ServiceObj
PS C:\> Start-Service -InputObj $ServiceObj
GET-PROCESS
Этот командлет позволяет быть в курсе, какие процессы запущены на локальных или удаленных компьютерах. Показываются имя и ID процесса, а также путь к исполняемому файлу, имя компании, версия исполняемого файла и память, используемая процессом.
Примеры:
Получение информации о процессах, запущенных на локальном компьютере:
PS C:\> Get-Process

Введите следующий командлет для получения подробной информации о запущенных процессах
PS C:\> Get-Process | Format-List * -Force
Получение информации о процессах, запущенных на удаленном компьютере:
PS C:\> Get-Process -ComputerName MYPC1 | Format-List * -Force
MYPC1 необходимо заменить на имя того компьютера, с которого вы хотите получить информацию о запущенных процессах.
STOP-PROCESS
Этот командлет остановливает процесс на локальном или удаленном компьютере. Он берет имя или ID процесса и завершает этот процесс. Это полезно в тех случаях, когда приложение не отвечает.
Пример:
Остановить процесс с ID 22608 на локальном компьютере:
PS C:\> Stop-Process -Id 22608
Остановить все процессы Excel на локальном компьютере:
PS C:\> Stop-Process -name excel
Совет: Хотя у командлета Stop-Process отсутствует параметр -ComputerName, Вы все равно можете использовать его для завершения удаленных процессов, используя предложенный ниже совет:
PS C:\> $Obj = Get-Process -Name excel -ComputerName MYPC1
PS C:\> Stop-Process -InputObject $Obj
Upd:
В посте приведен перевод статьи с портала 4sysops.com
Top 7 PowerShell commands for beginners
P.S. Смотрите также интересные посты на Хабре, посвященные работе с PowerShell
Аудит доступа к файлам
Аудит Active Directory (Часть 1 и 2)
Актуализируем учетные данные Active Directory
Аудит создания учетных записей в AD
The PowerShell Get-Content cmdlet gets the content of an item at a specified location. The gc, cat, and type are the aliases of this cmdlet.
Syntax
Parameters
-Filter
The -Filter parameter is used to specify a filter to qualify the -Path parameter. The FileSystem provider is the only PowerShell provider that supports the uses of filters. This parameter is more efficient as the provider applies the filters when the cmdlet gets the object, rather than having Powershell filters the object after they are accessed.
-Include
The items that this cmdlet includes in the operation are specified as a string array. The value of -Include parameter qualifies the -Path parameter. Enter a pattern or a path element, such as *.txt. The characters of wildcard are permitted. It is effective only when the cmdlet includes the contents of an item, such as C:*, the wildcard character ‘*‘ is used to specify the contents of the C: directory.
-Exclude
The items that this cmdlet excludes in operation are specified as a string array. The value of -Exclude parameter qualifies the -Path parameter. Enter a pattern or a path element, such as *.txt. The characters of wildcard are accepted. The -Exclude parameter is effective only when the cmdlet includes the contents of an item, such as C:*, the wildcard character ‘*‘ is used to specify the contents of the C: directory.
-Force
The -Force parameter will override the read-only attribute or creates the directories to complete a file path. It does not attempt to change the file permissions or override the security permissions.
-Path
The -Path parameter is used to specify the path to an item where this cmdlet gets the content. Wildcard characters are accepted. The paths must be the paths to the items, not to containers.
-ReadCount
The -ReadCount parameter is used to specify how many lines of the content are sent through the pipeline at a time. It does not change the content to be displayed, but it affects the time taken to display the content.
-TotalCount
The -TotalCount parameter is used to specify the number of lines from the beginning of the file. We can also use the aliases First or Head of this parameter.
-Tail
The -Tail parameter is used to specify the number of lines from the end of the file. It was introduced in Windows PowerShell 3.0. We can also use the alias Last of this parameter.
-Delimiter
The -Delimiter parameter is used in this cmdlet to divide the file into objects while it reads. We can use this parameter to split the large files into smaller files by specifying a file separator, as a delimiter.
It is preserved and becomes the last item in the section of each file. It is a dynamic parameter which is added by the FileSystem provider to the Get-Content cmdlet.
-Wait
The -Wait parameter is used to keep the files open after all the existing lines have been output.
It is a dynamic parameter which is added by the FileSystem provider to the Get-Content cmdlet. This parameter cannot be combined with the -Raw parameter.
-Raw
The -Raw parameter is used to ignore the newline characters and returns the whole content of a file in a single string. In the file, the newline characters are used as delimiters by default to separate the inputs into an array of string. It was introduced in Windows PowerShell 3.0.
It is a dynamic parameter which is added by the FileSystem provider to the Get-Content cmdlet
-Encoding
The -Encoding parameter is used to specify the type of encoding for the target file. Its default value is UTF8NoBOM.
Following are the acceptable values for this parameter:
- ASCII: This value uses the encoding for the ASCII (7-bit) character set.
- Unicode: It encodes in UTF-16 format using the little-endian byte order.
- UTF7: It encodes in UTF-7 format.
- UTF8: It encodes in UTF-8 format.
- BigEndianUnicode: It encodes in UTF-16 format using the big-endian byte order.
- OEM: It uses the default encoding for MS-DOS and console programs.
- UTF8NoBOM: It encodes in UTF-8 format without Byte Order Mark (BOM)
- UTF32: It encodes in UTF-32 format.
- UTF8BOM: It encodes in UTF-8 format with Byte Order Mark (BOM)
It is a dynamic parameter which is added by the FileSystem provider to the Get-content cmdlet. It is available only in the drives of a file system.
-Stream
The -Stream parameter is used to get the content of the specified alternative NTFS file stream from the file. Wildcard characters are not supported. It was introduced in Windows PowerShell 3.0.
It is a dynamic parameter which is added by the FileSystem provider to the Get-content cmdlet and works only in the file system drives.
Examples
Example1: To get the content of a text file
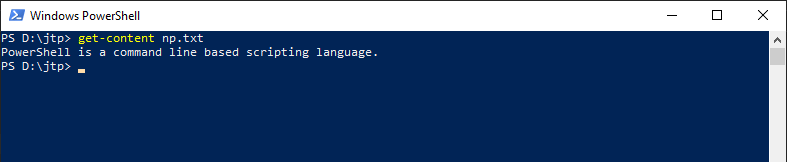
The cmdlet in this example is used to display the content of an np.txt file on the PowerShell console in the current directory.
Example2: To get the content of first n lines from a text file
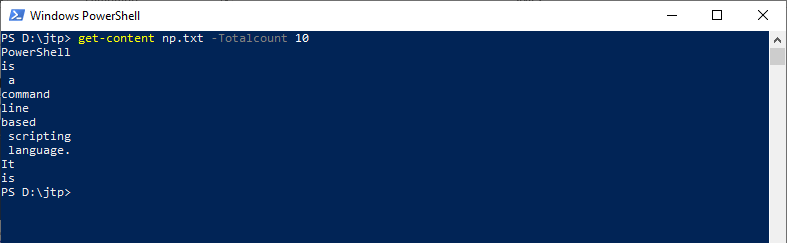
The cmdlet in this example displays the specific number of lines from the text file. The -Totalcount parameter displays the first 10 lines of content.
Example3: To get the specific line of content from a text file

The cmdlet in this example is used to display the specific line of that content.
Example4: To get the last line of content from a text file

The cmdlet in this example displays the last line of the content from the file. The -Tail parameter gets the last line of the file.