As a PowerShell developer, you might use Get-ChildItem cmdlet in your daily life. In this tutorial, I will explain how to work with Get-ChildItem cmdlet in PowerShell.
To filter files larger than 1MB using PowerShell’s Get-ChildItem, you can combine it with Where-Object. For example, the command Get-ChildItem -Path "C:\Users\JohnDoe\Documents" -File | Where-Object { $_.Length -gt 1MB } will list all files in the specified directory that exceed 1MB in size.
Get-ChildItem is a cmdlet in PowerShell that retrieves the items and child items in one or more specified locations. It can be used to list files, directories, registry keys, and certificates. This command is equivalent to the dir or ls command in other shells.
Syntax Of PowerShell Get-ChildItem cmdlet
The basic syntax for PowerShell Get-ChildItem is:
Get-ChildItem [-Path] <string[]> [-Filter <string>] [-Include <string[]>] [-Exclude <string[]>] [-Recurse] [-Name] [-Force] [-Attributes <FileAttributes>] [-File] [-Directory] [-Hidden] [-System] [<CommonParameters>]Here are the key parameters:
- -Path: Specifies the path to the items.
- -Filter: Filters the items based on a string.
- -Include: Includes only items that match the specified pattern.
- -Exclude: Excludes items that match the specified pattern.
- -Recurse: Gets items from the specified location and all child locations.
- -Name: Gets only the item names.
- -Force: Gets hidden and system files.
- -File: Gets only files.
- -Directory: Gets only directories.
- -Hidden: Gets only hidden items.
- -System: Gets only system items.
Check out How to Add Date to Filename Using PowerShell?
PowerShell Get-ChildItem Examples
Let me show you some real examples of using the Get-ChildItem cmdlet in PowerShell.
Example 1: List Files and Directories
To list all files and directories in the “C:\MyFolder” directory, you can use the below PowerShell script.
Get-ChildItem -Path "C:\MyFolder"This command will list all files and directories within the specified path.
Here is the output in the screenshot below:

Example 2: Filter Files by Extension
If you want to list only .txt files in the “C:\MyFolder” directory, use:
Get-ChildItem -Path "C:\MyFolder" -Filter "*.txt"This command is particularly useful when you need to focus on specific types of files. For instance, if you’re working on a project that involves text files, this command will help you quickly locate all .txt files in the specified directory. It saves time and makes file management more efficient.
Check out Sort Files by Date in PowerShell
Example 3: Recursively Listing Items
To list all items, including those in subdirectories, use the -Recurse parameter with the PowerShell Get-ChildItem like below:
Get-ChildItem -Path "C:\MyFolder" -RecurseThe -Recurse parameter is invaluable when you need to perform a deep search within a directory. It will list all items, including those in nested subdirectories.
Example 4: Get Only Directories
If you want to get only the directories, use the -Directory parameter with the Get-ChildItem.
Get-ChildItem -Path "C:\MyFolder" -DirectoryThis will display only the directories.
Here is the exact output in the screenshot below:

Example 5: List Hidden Files
To list hidden files in a directory, include the -Hidden parameter with the Get-ChildItem in PowerShell.
Get-ChildItem -Path "C:\MyFolder" -HiddenThis command will list all hidden files within the specified directory. It’s particularly useful for troubleshooting issues or tasks requiring access to files that are not normally visible.
Check out Get the First 10 Files in a Folder Using PowerShell
Get-ChildItem Advanced Methods
Now, let me show you a few other advanced methods related to Get-ChildItem in PowerShell.
Method 1: Using Get-ChildItem with Where-Object
You can use Where-Object to filter items based on specific criteria. For example, to list files larger than 1MB:
Get-ChildItem -Path "C:\MyFolder" -File | Where-Object { $_.Length -gt 1MB }This command combines Get-ChildItem with Where-Object to filter files based on their size. It’s particularly useful for identifying large files that may take up unnecessary space.
Method 2: Count Files
You can use the PowerShell cmdlets to count the number of files in a directory.
(Get-ChildItem -Path "C:\MyFolder" -File).CountThis command is useful for quickly counting files within a directory. Whether you’re conducting an inventory or need to know the number of files for organizational purposes, this command provides a fast and accurate count.
I executed the above PowerShell script, and you can see the exact output in the screenshot below:

Check out Get Unique Lines from a File Using PowerShell
Method 3: Sort Files by Date
To list files sorted by their last write time, you can write the below PowerShell script.
Get-ChildItem -Path "C:\MyFolder" -File | Sort-Object LastWriteTimeThis command will list files in order of their last modification date, making it easy to track recent changes. Whether you’re monitoring project updates or conducting audits, this command provides valuable insights into file activity.
Method 4: Export File List to CSV
You can export the list of files to a CSV file for further analysis using the Get-ChildItem PowerShell cmdlets.
Get-ChildItem -Path "C:\MyFolder" -File | Export-Csv -Path "C:\MyFolder\FileList.csv" -NoTypeInformationThis command will create a CSV file containing the list of files, which can be opened in spreadsheet applications like Microsoft Excel. It’s particularly useful for generating reports, conducting audits, or sharing file information with others.
Method 5: Using Get-ChildItem with Select-Object
To get specific properties of files, use Select-Object with the Get-ChildItem cmdlets.
Get-ChildItem -Path "C:\MyFolder" -File | Select-Object Name, Length, LastWriteTimeThis command allows you to select specific properties of files, such as their name, size, and last write time. It’s useful for generating customized views of file information.
Here is the exact output in the screenshot below:

Conclusion
In this tutorial, I explained how to work with the PowerShell Get-ChildItem cmdlet. I have explained a few examples of Get-ChildItem cmdlets.
You may also like the following tutorials:
- Count Duplicate Lines in a Text File Using PowerShell
- Count Words in a File Using PowerShell
- PowerShell Find and Replace in File
Bijay Kumar is an esteemed author and the mind behind PowerShellFAQs.com, where he shares his extensive knowledge and expertise in PowerShell, with a particular focus on SharePoint projects. Recognized for his contributions to the tech community, Bijay has been honored with the prestigious Microsoft MVP award. With over 15 years of experience in the software industry, he has a rich professional background, having worked with industry giants such as HP and TCS. His insights and guidance have made him a respected figure in the world of software development and administration. Read more.
-
Filter Files Using the
Get-ChildItemCmdlet in PowerShell -
the
Get-ChildItemAlias -
Get All Files Inside Subdirectories Using
Get-ChildItemCmdlet in PowerShell -
Filter Files With a Specific Conditions Using
Get-ChildItemCmdlet in PowerShell

There will be situations wherein we need to check if files exist inside a specific location or directory. Though we can use the legacy command dir, it wouldn’t be enough to only export specific files. We can use Windows PowerShell’s Get-ChildItem cmdlet for this use case.
This article will discuss the PowerShell Get-ChildItem cmdlet that we will use to get all items inside the directory and utilize its filter switch parameters.
The Windows PowerShell Get-ChildItem cmdlet gets the child items in a specific location or directory. For example, the location specified in the cmdlet can be file system directory, registry, or certificate store. Also, the child items mentioned can either be another directory, subfolder, or file.
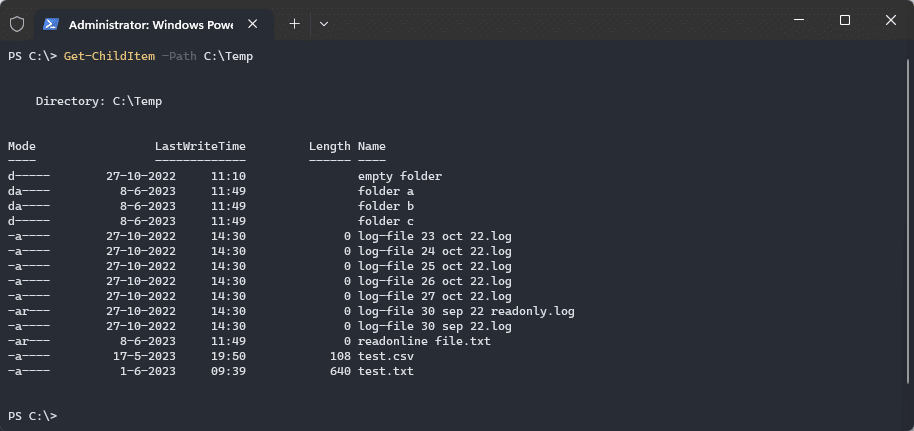
Get-ChildItem -Path C:\Temp
In the above command, Get-ChildItem gets child items from the path specified using the -Path parameter.
Get-ChildItem cmdlet when executed, display files, directories with their Mode, LastWriteTime, Length (file size), and Name properties on the PowerShell console.
Mode                 LastWriteTime         Length Name
----                 ------------ - ------ ----
d----l        18/01/2022   8:52 pm                WindowsPowerShell
d----l        20/12/2021   3:36 pm                Zoom
-a---l        30/12/2020   3:23 pm          (151) backup phrase.txt
-a---l        17/06/2021   3:13 am       (410049) CEF1750.pdf
-a---l        16/05/2020   3:32 am          (677) default.cpu1
-a---l        21/08/2019   9:06 am         (2240) Default.rdp
-a---l        26/05/2021   8:24 am        (63399) e-sig.jpg
-a---l        09/03/2020  10:48 pm          (143) fan config.sfsm
-a---l        19/09/2020  12:07 pm    (279515089) MCSA.rar
Filter Files Using the Get-ChildItem Cmdlet in PowerShell
We may use the -File switch parameter to only return files inside a path or directory.
Example Code:
Get-ChildItem -Path C:\Temp -File
Output:
Mode                 LastWriteTime         Length Name
----                 -------------         ------ ----
-a---l        30/12/2020   3:23 pm          (151) backup phrase.txt
-a---l        17/06/2021   3:13 am       (410049) CEF1750.pdf
-a---l        16/05/2020   3:32 am          (677) default.cpu1
-a---l        21/08/2019   9:06 am         (2240) Default.rdp
-a---l        26/05/2021   8:24 am        (63399) e-sig.jpg
-a---l        09/03/2020  10:48 pm          (143) fan config.sfsm
-a---l        19/09/2020  12:07 pm    (279515089) MCSA.rar
the Get-ChildItem Alias
Windows PowerShell uses a default built-in alias gci for the Get-ChildItem cmdlet. Like the example snippet below, you may use the alias instead of the cmdlet for faster and seamless scripting.
Example Code:
Get All Files Inside Subdirectories Using Get-ChildItem Cmdlet in PowerShell
If we want to get all files in directory and subdirectories, use the -Recurse switch parameter.
Example Code:
gci -Path C:\Temp -Recurse - Force -File
Note
The -Force parameter allows the cmdlet to get items that otherwise can’t be accessed by the user, such as system files or hidden files. The Force parameter doesn’t override security restrictions. Implementation varies among providers.
Filter Files With a Specific Conditions Using Get-ChildItem Cmdlet in PowerShell
Using the -Filter parameter, we can filter out the results using a single expression. The -Filter parameter doesn’t require the -Path parameter as it will use your current working directory.
Example Code:
gci -Filter C:\Temp\* -Filter *.txt
We can also use the -Include switch parameters, which accepts multiple conditions, an excellent advantage to the -Filter parameter. However, remember that the -Include parameter requires the -Path parameter to be present in the expression.
Example Code:
gci -Path C:\Temp\* -File -Include CEF*.pdf, *.txt
Aside from accepting multiple conditions, the -Include parameter works well with regex, thus making this a more versatile method than the -Filter parameter.
Output:
Mode                 LastWriteTime         Length Name
----                 -------------         ------ ----
-a---l        30/12/2020   3:23 pm          (151) backup phrase.txt
-a---l        17/06/2021   3:13 am       (410049) CEF1750.pdf
Note
The path should include a wildcard asterisk (*) at the end when using the -Include switch parameter. This wildcard denotes that you’re querying for all the path child items that have the specific extension defined in the -Include parameter.
Enjoying our tutorials? Subscribe to DelftStack on YouTube to support us in creating more high-quality video guides. Subscribe
The PowerShell Get ChildItem cmdlet retrieves the child items from the specified location(s). The cmdlet is mainly used to retrieve files and folders, but it can also be used to get registry items and certificates.
The true strength of the cmdlet is in the filter options that we have. We can use different filters to only select specific child items and determine how many nested levels we want to retrieve or not.
In this article
In this article, we are going to take a look at how to use the Get ChildItem cmdlet in PowerShell and how to use the different filtering options.
If your run the Get-ChildItem cmdlet without any parameter, then it will get all items from the current working directory. It won’t get the nested items, hidden files, or system files. Only the files and folders from the first level. So using the correct parameters is really important when using the cmdlet.
With the Get-ChildItem cmdlet (or its shorthand gci) we can use the following parameters:
| Parameter | Description |
|---|---|
| -Path | Specifies the path to get the child items from |
| -Filter | Most efficient way to filter items |
| -Include | Get’s only specified items from the path. Can be used with wildcards |
| -Exclude | Excludes specified items from the path. Can be used with wildcards |
| -Recurse | Searches also through the subdirectories |
| -Depth | Determines the number of subdirectory levels to include |
| -Force | Also returns hidden and system files |
| -Name | Returns only the names of the items |
| -Directory | Returns only directories |
| -File | Returns only files |
| -Hidden | Get only hidden items |
| -Readonly | Get only read-only items |
To simply get the files from a specified location you can use the -path parameter:
Get-ChildItem -Path C:\Temp
This will return only the items from the selected directory and not from the subfolder.
Including Subdirectories with Recurse and Depth
So the first parameters we are going to take a look at are the -Recurse and -Depth parameters. These parameters allow us to include items from subfolders as well. By default the -Recurse parameter will go through all nested folders:
Get-ChildItem -Path C:\Temp -Recurse
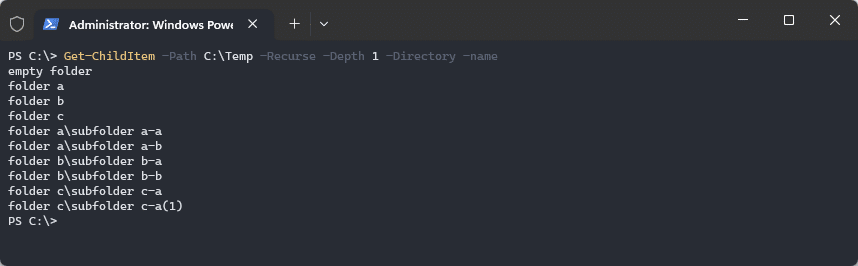
To limit this we can include the parameter -depth. This will take a number specifying how many levels deep it should go through the subfolders. In the screenshot below I also included the -Directory parameter and -Name parameter. The first gets only the directories and the latter returns only the folder names, instead of the complete object:
Get-ChildItem -Path C:\Temp -Recurse -Depth 1 -Directory -name
Using the Filter
Filters are more efficient than the other parameters for this cmdlet. When you use -Include for example, then the filter is done after PowerShell has retrieved all the objects. The filter, however, is passed to the .NET API to filter out objects, making it a lot faster.
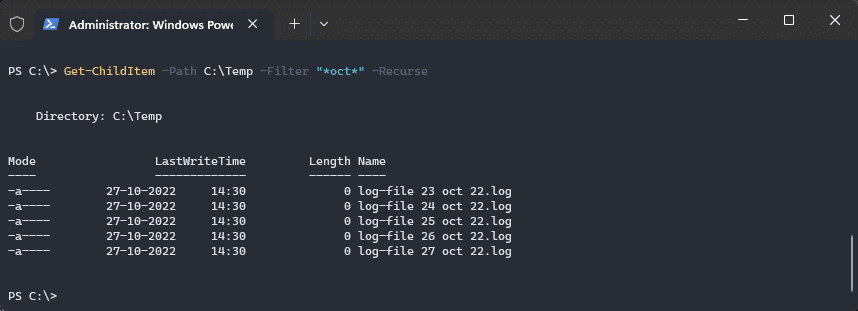
So the filter can be used to get only specific file types or folders. The filter isn’t really advanced, we can only use the * and ? wildcards in the string. For example, to get all files that have the word oct in it, we can do:
Get-ChildItem -Path C:\Temp -Filter "*oct*" -Recurse
We can also apply the filter to the file types, for example, to get all .log files, we can simply filter the filename on *.log:
Get-ChildItem -Path C:\Temp -Filter "*.log" -Recurse -Name

# Result
log-file 23 oct 22.log
log-file 24 oct 22.log
log-file 25 oct 22.log
log-file 26 oct 22.log
log-file 27 oct 22.log
log-file 30 sep 22 readonly.log
log-file 30 sep 22.log
folder b\subfolder log-file.log
The filter can also be used against directories, simply specify a part of the folder name that you want to include in the filter:
Get-ChildItem -Path C:\Temp -Filter "folder *" -Recurse -Name

# Result
folder a
folder b
folder c
Include and Exlude items
Even though the filter parameter is the most efficient way to filter items, it those have its limitations. The filter in Get-ChildItem only accepts a single string. You can’t get all .txt and .log files for example. This is where the -Include and -Exclude parameters come in. They accept an array of one or more strings to include or exclude.
For example, to get all log and txt files we can do:
Get-ChildItem -Path C:\Temp\* -Include ("*.log","*.txt") -Name
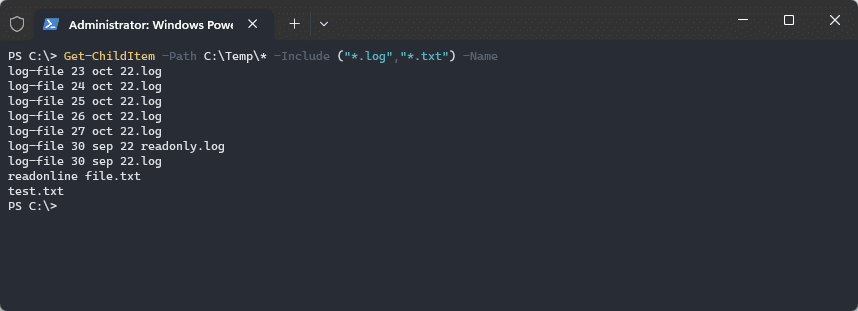
Note that we need to add an * to the path to include all items. Also, the parentheses are not necessary, but personally prefer it because it makes it easier to read the code.
The exclude parameter returns all results, except files matching the patterns specified. So if we would change the include parameter of exclude in the previous example, then the result would be:
Get-ChildItem -Path C:\Temp\* -exclude ("*.log","*.txt") -Name

# Results
empty folder
folder a
folder b
folder c
test.csv
Return only Files or Directories
Another use parameters that we can use are the -File and -Directory parameters. These parameters make sure that only files or directories are returned in the results. For example, if you want to get the complete folder structure of a folder, then can simply use the command below:
Get-ChildItem -Path C:\Temp\ -Recurse -Directory -Name

# Result
empty folder
folder a
folder b
folder c
folder a\subfolder a-a
folder a\subfolder a-b
folder b\subfolder b-a
folder b\subfolder b-b
folder c\subfolder c-a
folder c\subfolder c-a(1)
You can also combine these parameters with other parameters, like -include or -filter.
Get Readonly, System, and Hidden Files
Hidden files are excluded from the results. If you want to include these files in your results as well then you can use the -Force parameter. This will return all the files from the given directory.
If you look at the screenshot below, you can see on the left side that hidden file.txt isn’t included. But if we add the -Force parameter, then the hidden file (or directory) is included as well:
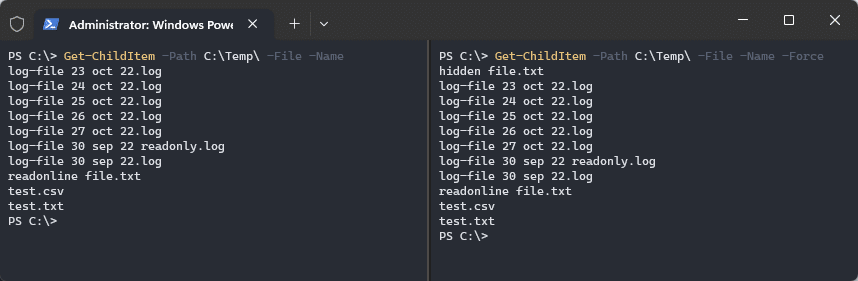
We can also select only the hidden, read-only, or system files. For this, we can use their respective parameter. Note that you can’t combine these:
# Return all hidden files
Get-ChildItem -Path C:\Temp\* -Hidden

# Return all readonly files
Get-ChildItem -Path C:\Temp\* -Readonly

# Return all system files
Get-ChildItem -Path C:\Temp\* -System
Advanced Filtering with Get ChildItem
We have discussed the parameters that you can use with the PowerShell cmdlet Get-ChildItem. These parameters allow you to filter the results mainly on a part of the name, extension, or file attribute. But what if you need more? For example, get all the files older than x days. Or all files that are larger than 1 MB?
In these cases, we can use the normal PowerShell where-object cmdlet to filter the results that we got from the Get ChildItem cmdlet.
Find Large Files
To return all files that are larger than 1MB we can use the following command:
Get-ChildItem -Path C:\Temp -Recurse | Where-Object { $_.Length -gt 1MB } | Select-Object Name, Directory, Length

# Result
Name                Directory          Length
----                ---------          ------
10mb - Copy (2).bin C:\Temp          10485760
10mb - Copy (3).bin C:\Temp          10485760
10mb - Copy (4).bin C:\Temp          10485760
10mb - Copy (8).bin C:\Temp          10485760
10mb - Copy (9).bin C:\Temp          10485760
bin file.bin        C:\Temp\folder b 10485760
dummy file.bin      C:\Temp\folder b 10485760
Files older than
Another common option is to get all files that are older than x days or hours. For this, we can use the same principle as with finding large files. We are first going to get all files from the giving directory with the Get ChildItem cmdlet, and then select the results that we need.
For example, to get all the files that are created in the last 12 hours, we can compare the file LastWriteTime attribute against the current DateTime minus 12 hours.
Get-ChildItem -Path C:\temp | Where-Object { $_.LastWriteTime -gt (Get-Date).AddHours(-12) }

# Result
Name                Directory LastWriteTime
----                --------- -------------
folder a                      8-6-2023 11:49:21
folder b                      8-6-2023 14:08:31
folder c                      8-6-2023 11:49:21
readonline file.txt C:\temp   8-6-2023 11:49:49
Get Registry Items with PowerShell
Until now we have only looked at retrieving files and folders with the Get ChildItem cmdlet in PowerShell. But we can also find and retrieve registry items with the cmdlet. For example, to simply get all registry keys from a given path, we just use the -path parameter and specify the registry path:
Get-ChildItem -Path "HKLM:\Software"

Just like with files and folders, we can also get all the registry keys (subkeys) of the specified path. For this, we can use the -Recurse parameter and optionally combine it with -Depth:
Get-ChildItem -Path "HKLM:\Software" -Recurse -Depth 1
To get the value of the registry key you will need to use the cmdlet Get-ItemProperty and specify the path of the item that you want to view:
Get-ItemProperty -path "HKLM:\Software\Adobe\Photoshop\140.0"
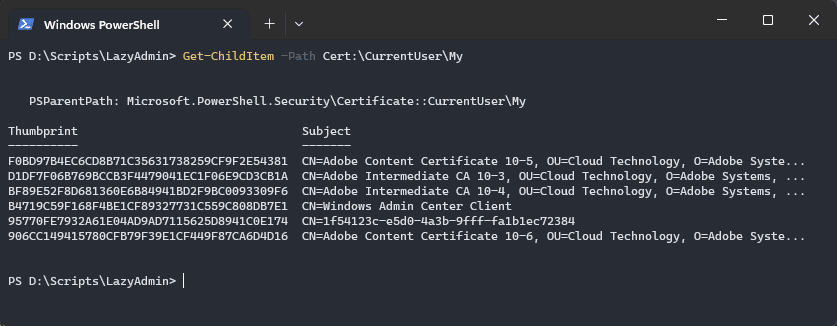
Get Certificates with Get-ChildItem
The last option that I want to show is the ability to get Certificates with the PowerShell Get-ChildItem cmdlet. For example, to view all certificates that are currently stored in the CurrentUser\My certificate store, we can simply specify the path, starting with cert:
Get-ChildItem -Path Cert:\CurrentUser\My
To filter or search through the certificate store we won’t be using the -filter or -include parameter, instead we can use the -DNSName parameter for this. For example, to retrieve the Windows Admin Center certificate we can do:
Get-ChildItem -Path Cert:\CurrentUser\My -DNSName "*Windows*"

# Result
Thumbprint                                Subject
----------                                -------
B4719C59F168F4BE1CF89327731C559C808DB7E1  CN=Windows Admin Center Client
Wrapping Up
The Get-ChildItem cmdlet allows you to easily select the items that you need from a given directory or registry path. Keep in mind that the -filter parameter is the most efficient one to use in the case of files and folders.
I hope you found this article helpful, if you have any questions, just drop a comment below.
The `Get-ChildItem` cmdlet in PowerShell retrieves the files and folders in a specified directory or the current directory if none is specified, allowing for easy exploration and management of file system items.
Here’s a simple code snippet to use `Get-ChildItem`:
Get-ChildItem -Path 'C:\Your\Directory\Path'
What is Get-ChildItem?
The `Get-ChildItem` cmdlet in PowerShell is essential for navigating the filesystem. It retrieves the items (files and directories) from a specified location, similar to what you might see while browsing through Windows Explorer. Understanding this command is vital for any PowerShell user who needs to manage files and folders effectively.
Comparison with other cmdlets
While `Get-ChildItem` serves to list items, other cmdlets like `Get-Item` retrieve a specific item, and `Remove-Item` allows you to delete items. Knowing how `Get-ChildItem` fits into the PowerShell environment is critical for efficient scripting and file management.
Mastering PowerShell Get ChildItem Filter for Quick Searches
Basic Syntax of Get-ChildItem
The syntax of the `Get-ChildItem` cmdlet is straightforward and can be adapted based on needs:
Get-ChildItem -Path <path> -Options
In this structure, `-Path` specifies where you want to look, and `-Options` stands for various parameters that can be customized to filter results.
PowerShell Get-ChildItem Recurse: A Quick Guide
Common Parameters of Get-ChildItem
Path
The `-Path` parameter specifies the directory to search. You can use absolute or relative paths. For example:
Get-ChildItem -Path C:\Users
In this example, PowerShell outputs all files and folders within the `C:\Users` directory.
Filter
The `-Filter` parameter lets you define specific criteria to narrow down results. It supports wildcards to give you flexibility. For instance, to find all text files:
Get-ChildItem -Path C:\Documents -Filter *.txt
This command retrieves all `.txt` files within the `C:\Documents` folder.
Recurse
When you use the `-Recurse` parameter, PowerShell searches through all subdirectories as well, making it a powerful tool for deep dives into the filesystem. Here’s an example:
Get-ChildItem -Path C:\ -Recurse
Although beneficial, be cautious, as this can produce extensive output and may take time depending on the directory’s depth.
Force
Sometimes you need to access hidden files and folders, and the `-Force` parameter helps in that regard. It reveals items that are usually concealed. For example:
Get-ChildItem -Path C:\ -Force
This command lists all files, including hidden ones, in the `C:\` directory.
Include and Exclude
These parameters further refine your search, allowing you to specify which items to include or exclude based on file types. Here’s how you can use them:
Get-ChildItem -Path C:\ -Include *.txt, *.docx -Exclude *.log
In this command, all `.txt` and `.docx` files are included, while any `.log` files are excluded from the results.
PowerShell Get-ChildItem Exclude: A Simple Guide
Practical Examples of Get-ChildItem
Listing Files in a Directory
Getting started is easy. To list files in a directory, you can use:
Get-ChildItem -Path C:\Reports
This command will provide you with a simple list of all files and directories under `C:\Reports`.
Searching for Specific File Types
In situations where you need certain file types, you can leverage the `-Filter` parameter effectively. For example:
Get-ChildItem -Path C:\Projects -Filter *.ps1
This retrieves all PowerShell scripts (`.ps1`) from the `C:\Projects` directory.
Retrieving Information About Files
If you want more than just names, you can filter the output with `Select-Object` to show properties such as file size and last modified date:
Get-ChildItem -Path C:\ -Recurse | Select-Object Name, Length, LastWriteTime
This command returns a detailed list that includes the name, size, and last modified timestamp for each file in the specified directory.
Using Get-ChildItem with Other Cmdlets
PowerShell scripting often involves chaining commands together. Using `Get-ChildItem` with pipes allows for refined outputs. For instance:
Get-ChildItem -Path C:\Logs | Where-Object { $_.Length -gt 1MB }
This command filters the output to only show log files larger than 1MB.
PowerShell Get ChildItem Full Path Revealed
Handling Errors and Exceptions
Running scripts often invites unexpected errors. Familiarizing yourself with common mistakes can save time. For instance, specifying an invalid path may result in an error message. Implementing Try-Catch blocks can help manage these scenarios gracefully:
Try {
    Get-ChildItem -Path Z:\InvalidPath
} Catch {
    Write-Host "Error: $_"
}
This structure catches errors and provides clear feedback without halting the script.
PowerShell Get-ChildItem: Files Only Simplified Guide
Best Practices for Using Get-ChildItem
Tips for maximizing efficiency
- Limit recursion: If deep searches aren’t necessary, avoid using `-Recurse`, which can slow down execution.
- Pair with filters: Using `-Filter` and `-Include` or `-Exclude` will help narrow your focus, returning results faster.
Avoiding performance issues
Too broad a search can lead to performance degradation. Always specify the path as precisely as possible to maintain efficiency.
Using Get-ChildItem in scripts effectively
Integrate `Get-ChildItem` into larger automation scripts carefully, ensuring that subsequent cmdlets can process the output as intended.
PowerShell Get-ChildItem: Filter Files by Extension Easily
Conclusion
By now, you should understand how to utilize the `Get-ChildItem` cmdlet effectively for managing directories and files in PowerShell. Experimenting with different parameters will deepen your understanding and refine your scripting skills. As you continue learning, remember to incorporate `Get-ChildItem` into your toolkit for a robust file management strategy.
Mastering PowerShell Get-Credential: A Quick Guide
Additional Resources
For those eager to learn more, consider checking the official Microsoft documentation on PowerShell, exploring recommended books, or engaging with community forums for deeper insights into PowerShell usage.
Get-ChildItem PowerShell Cmdlet
The PowerShell cmdlet Get-ChildItem obtains objects from one or more specified locations, such as a file system directory, registry hive or certificate store. These locations are exposed by PowerShell providers.
If the location is a container, the cmdlet gets the child items in that container. The -Recurse parameter can be used to get items from all child containers, while the -Depth parameter can be used to limit how many levels to recurse to.
The cmdlet does not display empty folders or empty directories. For empty locations, the command returns to the PowerShell prompt without producing any output.
For instance, the following cmdlet will fetch all files and folders from the current drive:
Get-ChildItem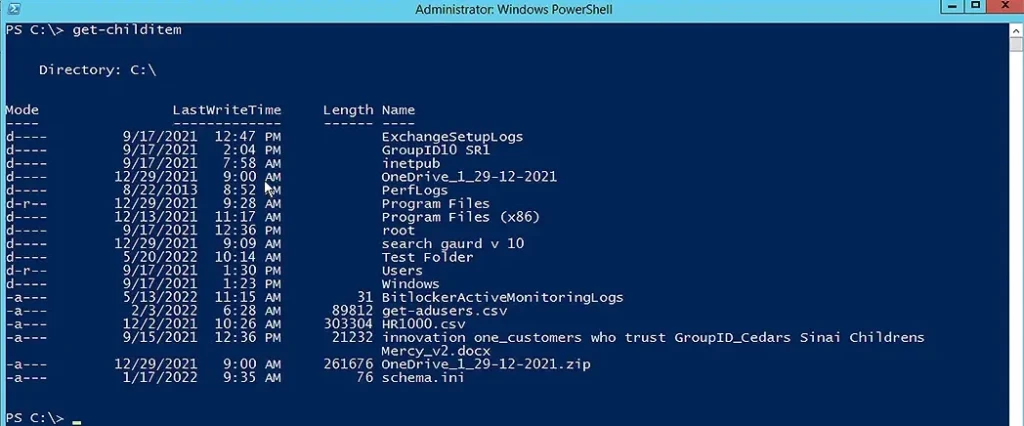
As you can see, by default, Get-ChildItem shows the following information for each item: Mode, LastWriteTime, file size (Length) and Name. The letters in the Mode column have the following meanings:
- l — link
- d — directory
- a — archive
- r — read-only
- h — hidden
- s — system
Get-ChildItem Examples
Let’s look at some use cases of the Get-ChildItem cmdlet:
- Retrieve Child Items from a Particular File System Directory
- Get the Names of Child Items in a Directory
- Get All Text Files in a Directory and Its Subdirectories
- Limit the Results to Specific Child Items
- Exclude Certain Child Items from the Results
- Get Registry Values from a Registry Node
- Get All Certificates with Code-Signing Authority
- Specify How Many Levels of Subdirectories to Search
- Get Items with Specific Attributes
- Limit a Search using a Filter
- Get a List of Directories
- Limit the Results to Files Only
Retrieve Child Items from a Particular File System Directory
To display the child items in a particular file system directory, use the -Path parameter to specify that directory, as shown here:
Get-ChildItem -Path C:\”Program files”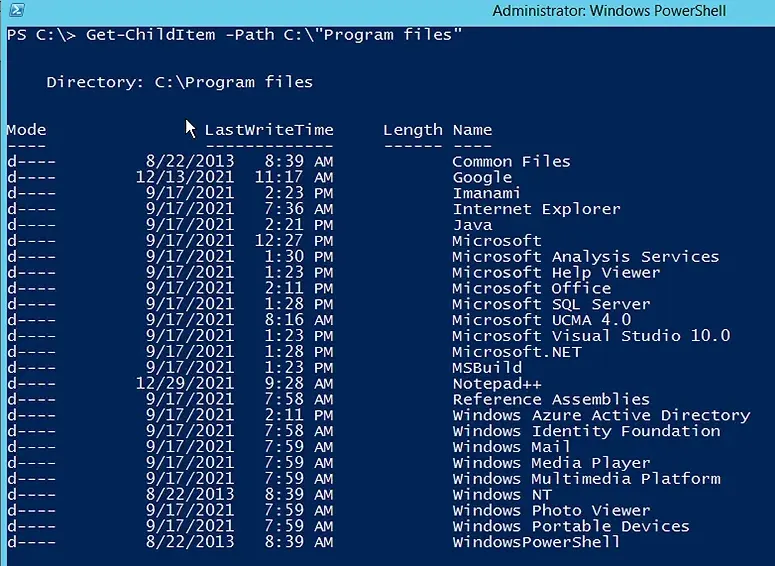
Get the Names of Child Items in a Directory
To see just the names of the child items in a directory, rather than all the details in the previous screenshot, use the -Name parameter:
Get-ChildItem -Path C:\"Program Files" -Name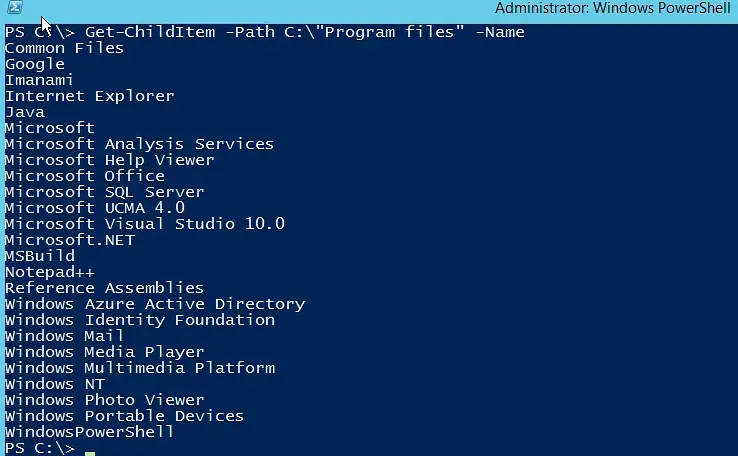
Get All Text Files in a Directory and Its Subdirectories
To show all .txt files in a certain directory and its subdirectories, use the cmdlet below.
Get-ChildItem -Path C:\"Test Folder"\*.txt -Recurse -Force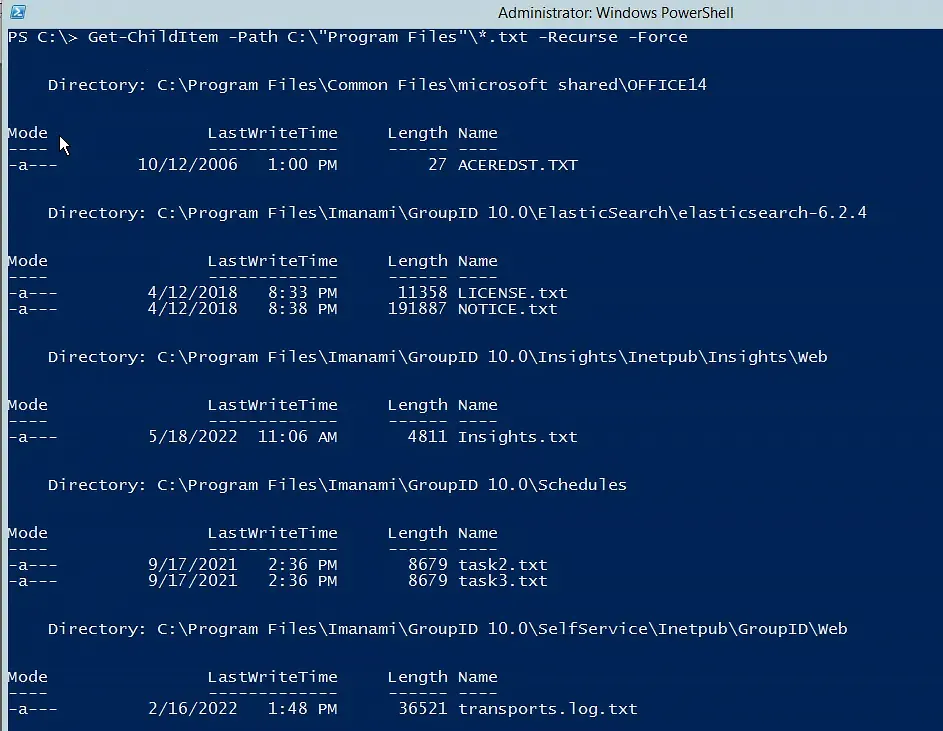
The -Path parameter C:Test Folder\*.txt limits the results to files in the specified folder that have the .txt extension. The -Recurse parameter expands the search to include the specified directory and its subdirectories, which are shown under the Directory: headers. The -Force parameter shows hidden files (which have a mode of h).
Limit the Results to Specific Child Items
To find specific objects in a directory, use the -Include parameter. The cmdlet below finds all files in the directory C:\Test Folder that have the extension .log:
Get-ChildItem -Path C:\”Test Folder”\* -Include *.log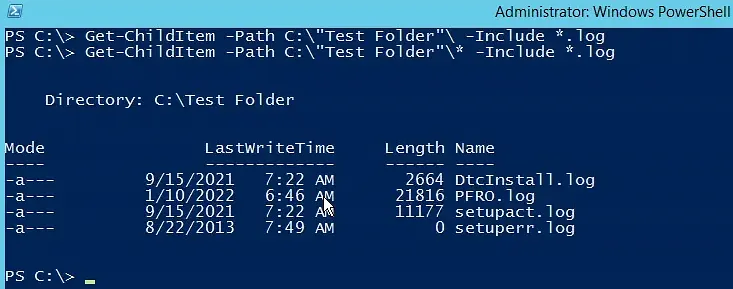
Note that a trailing wildcard character (*) is required in the -Path parameter, as shown above, when the -Include parameter is used. If the Path option does not include a trailing asterisk, the command returns to the PowerShell prompt with no output, as shown here:
Get-ChildItem -Path C:\”Test Folder”\ -Include *.log
However, the trailing asterisk in the -Path parameter is unnecessary if the -Recurse parameter is used to search the specified directory and its subdirectories, as in this example:
Get-ChildItem -Path C:\Test Folder -Recurse -Include *.log
Exclude Certain Child Items from the Results
You can exclude certain items from the results by using the -Exclude parameter. Like the -Include parameter, -Exclude requires an asterisk (*) at the end of the -Path parameter unless the -Recurse parameter is used.
To illustrate how this parameter excludes items from the results, let’s first run the following cmdlet to see all the content in the specified directory and its subdirectories:
Get-ChildItem -Path C:\”Test Folder”\ -Recurse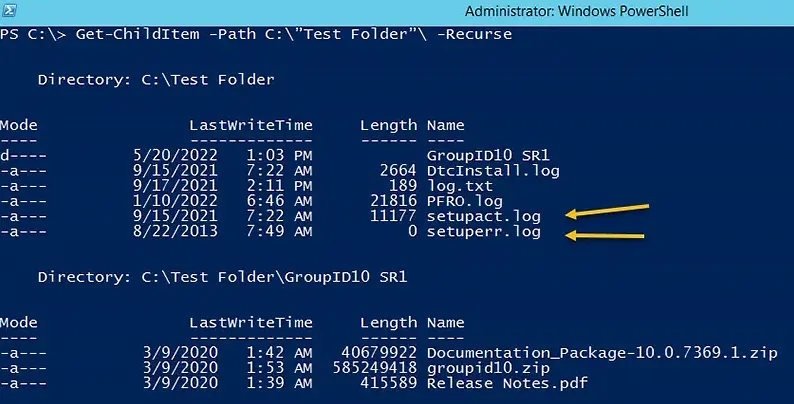
Note that the results include two files whose names start with the letter S. To exclude them from the results, we can use the following cmdlet:
Get-ChildItem -Path C:\”Test Folder”\* -exclude S*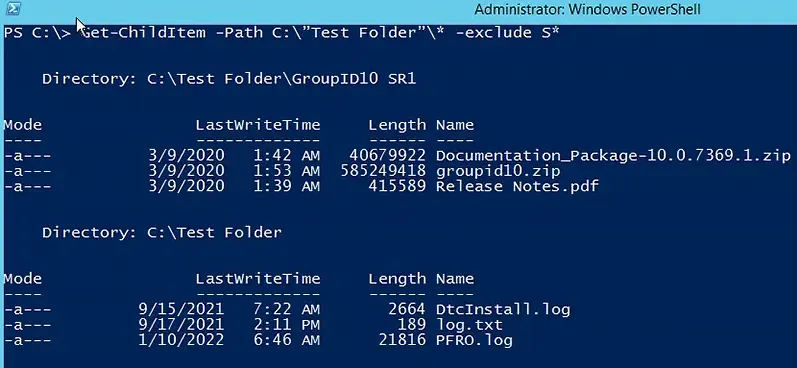
Get Registry Values from a Registry Node
To get registry values, we can use the -Path parameter to specify a registry node. The following cmdlet will display the top level of registry keys (note that HKLM\SOFTWARE is the shortened form of HKEY_LOCAL_MACHINE\SOFTWARE):
Get-ChildItem -Path HKLM:\SOFTWARE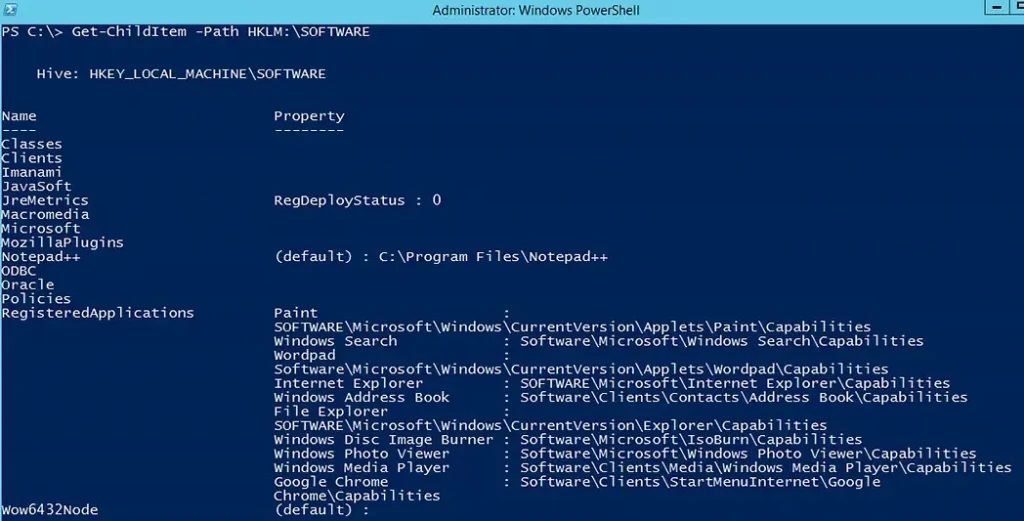
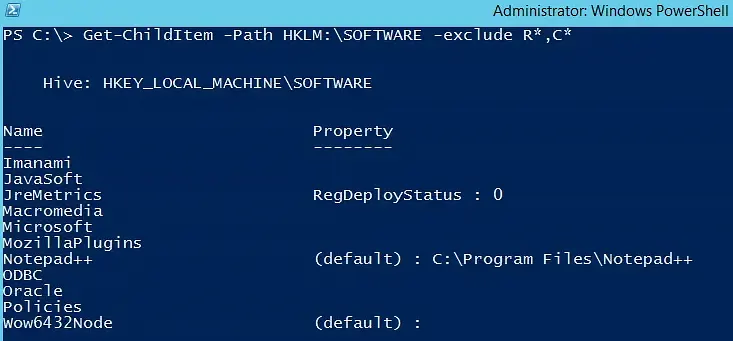
If we do not need to see all the registry keys, we can use the -Exclude parameter to filter out the ones we don’t want. The following cmdlet will exclude all keys that start with the letters R and C:
Get-ChildItem -Path HKLM:\SOFTWARE -Exclude R*,C*Note that the registries Classes, Clients and RegisteredApplications are no longer shown:
The following cmdlets show how to display the contents of other common registries:
Get-ChildItem -Path Registry::HKEY_LOCAL_MACHINE
Get-ChildItem -Path Registry::HKEY_CLASSES_ROOT
Get-ChildItem -Path Registry::HKEY_CURRENT_CONFIG
Get-ChildItem -Path Registry::HKEY_CURRENT_USER
Get-ChildItem -Path Registry::HKEY_USERS
Get-ChildItem -Path Registry::HKEY_PERFORMANCE_DATA
Get All Certificates with Code-Signing Authority
The cmdlet below retrieves each certificate with code-signing authority from the PowerShell Cert: directory and its subdirectories:
Get-ChildItem -Path Cert:\* -Recurse -CodeSigningCert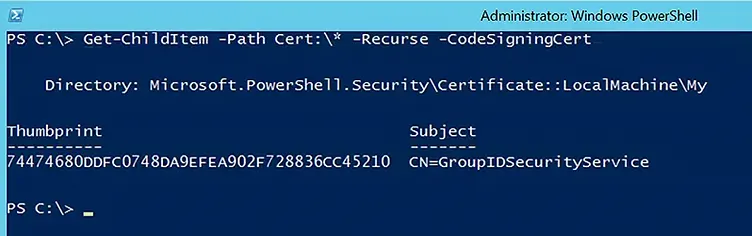
Notice that the -Path parameter is used to define the Cert: provider. The -Recurse parameter looks through the -Path directory and its subdirectories to return the certificates with code-signing authority.
Specify How Many Levels of Subdirectories to Search
To control the number of subdirectory levels to include in a search, use the -Depth parameter. Empty folders are not counted.
The following cmdlet lists all items in C:Drivers and two levels of its subdirectories:
Get-ChildItem -Path C:\Drivers -Depth 2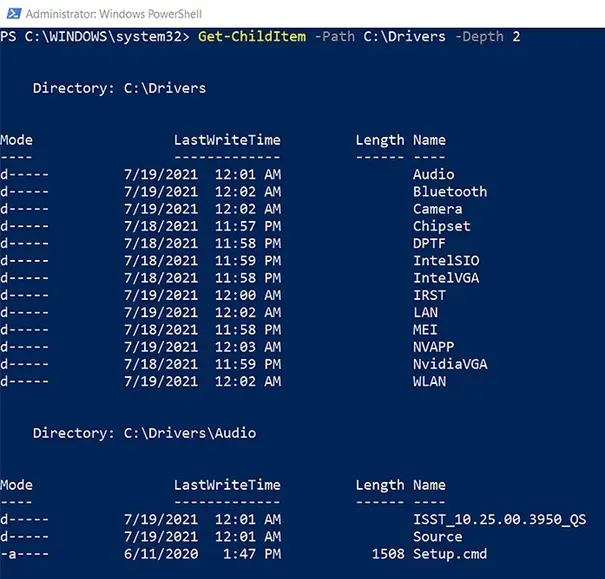
Get Items with Specific Attributes
To get only items with certain attributes, use the -Attributes parameter. For example, to get hidden files (not directories) from the specified directory, use this cmdlet:
Get-ChildItem -Path C:\”Test Folder”\ -Attributes !Directory+ Hidden,!Directory+Hidden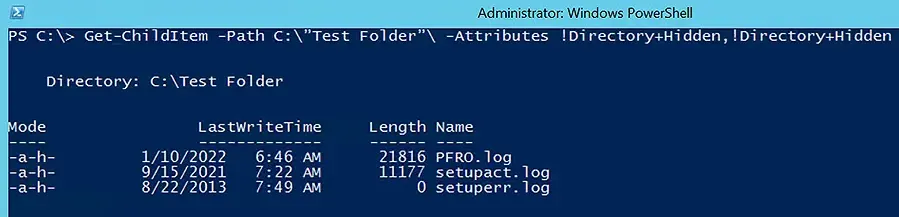
The -Attributes parameters accepts the following values:
- Archive
- Compressed
- Device
- Directory (or D)
- Encrypted
- Hidden (or H)
- IntegrityStream
- Normal
- NoScrubData
- NotContentIndexed
- Offline
- ReadOnly (or R)
- ReparsePoint
- SparseFile
- System (or S)
- Temporary
To combine attributes, use the following operators:
- ! (NOT)
- + (AND)
- , (OR)
There should be no spaces between an operator and its attribute. Spaces are allowed after commas.
Limit a Search using a Filter
To qualify the -Path parameter, specify a filter. Filters are supported only by the file system provider, which is the only PowerShell provider installed by default on the machine that PowerShell is running on. Filters are more efficient that other parameters because the provider applies the filter during retrieval, rather than having PowerShell filter the objects after they’re retrieved.
To enumerate files, the filter string is supplied to the .NET API. Only the wildcards * and ? are supported by the API.
To get all the Word files in a particular directory, use this cmdlet:
Get-ChildItem C:\"Test Folder"\* -filter *.docx
Get a List of Directories
To get a list of directories, use the -Directory parameter. While you could achieve the same goal using the -Attributes parameter with the Directory property, the -Directory parameter can be used with the -Recurse parameter to see the subdirectories.
The following cmdlet will list top-level directories:
Get-ChildItem -Path C:\ -Directory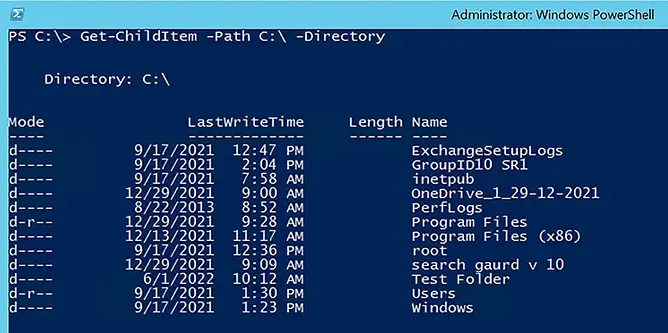
By adding the -Recurse parameter, we can list the subdirectories as well:
Get-ChildItem -Path C:\GroupID10SR1\ -Directory -Recurse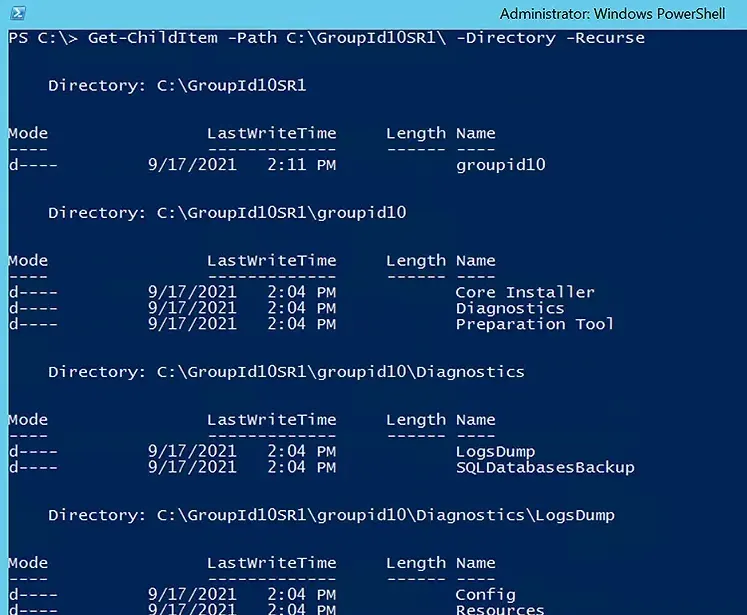
If you want to see only the hierarchy of directories and subdirectories without all the details, use the -Name parameter:
Get-ChildItem -Path C:\GroupID10SR1\ -Directory -Name -Recurse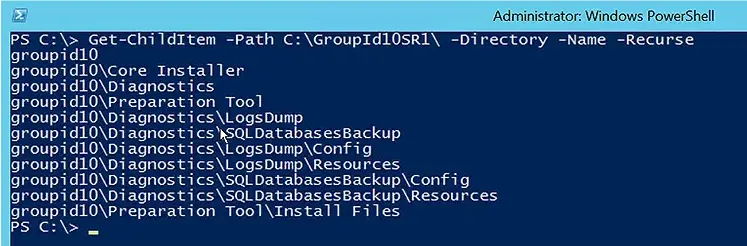
Limit the Results to Files Only
To get a list of files, use the -File parameter, as shown here:
Get-ChildItem -Path C:\ -File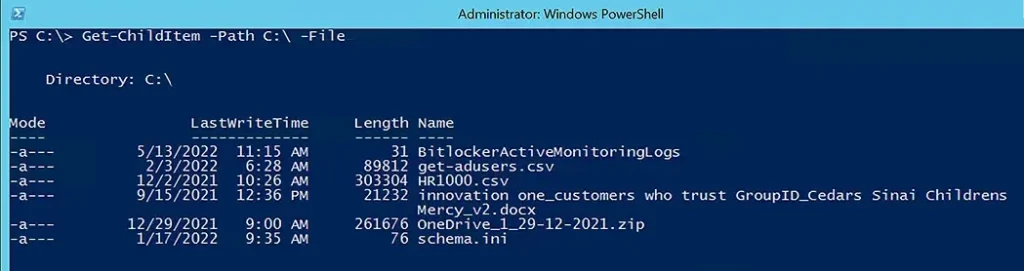
If you want to see the files from a specified path and its subdirectories, use the -Recurse parameter:
Get-ChildItem -Path C:\GroupID10SR1\ -File -Recurse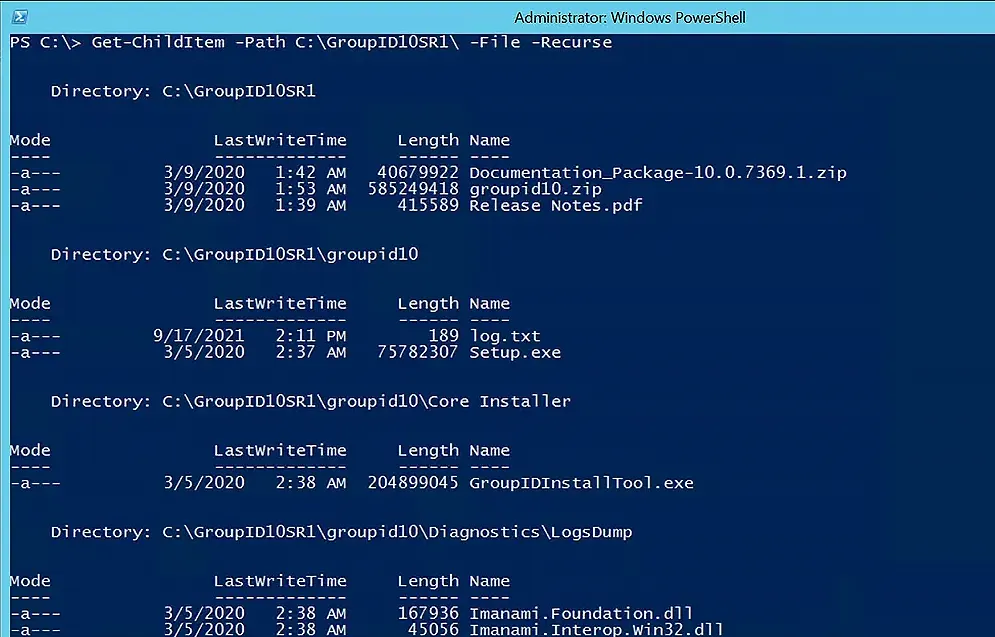
Since 2012, Jonathan Blackwell, an engineer and innovator, has provided engineering leadership that has put Netwrix GroupID at the forefront of group and user management for Active Directory and Azure AD environments. His experience in development, marketing, and sales allows Jonathan to fully understand the Identity market and how buyers think.