
In PowerShell, there are a couple of ways to create a file. The most common method is to use the new-item cmdlet. This cmdlet can not only be used to create files but also folders. But new-item is not always the best option.
Other options to create a file in PowerShell are for example to redirect the results of a cmdlet to a file, or we can use the Set-Content to create a file and store the results.
In this article, we will look at the different options, and I will give you some tips on creating files.
Let’s start with the basics, to create a new file in PowerShell we are going to use the cmdlet New-Item. This cmdlet can be used to create files, folders, or symbolic links. We will focus on creating a file in this article.
To create an empty file we will at least specify the name of the file and set the -ItemType property to file. If you don’t specify the path where you want to create the file, then the file will be created in the current directory.
New-Item -Name "test01.txt" -ItemType File

# Create a file in c:\temp
New-Item -Path "c:\temp" -Name "test01.txt" -ItemType File
The path parameter also accepts wildcards. Now you might think, why would I need a wildcard in the path, but this allows you for example to create a new file in every subfolder of the path:
New-Item -Path C:\Temp\* -Name temp.txt -ItemType File

# Result
C:\Temp\One\temp.txt
C:\Temp\Three\temp.txt
C:\Temp\Two\temp.txt
The new-item cmdlet won’t create a file if it already exists. In some cases you might just want to overwrite the file or make sure that your script continues without throwing any errors. If you want to overwrite a file if it already exists, then you can use the -force parameter.
This will overwrite the file if it exists, which also means that any content in the file will be lost:
New-Item -Path "c:\temp" -Name "test01.txt" -ItemType File -Force
Another option is to check if the file exists, we can do this with the Test-Path cmdlet:
$path = "c:\temp\test1.txt"

# Create the folder is the path doesn't exist
If (-not(test-path -Path $path)) {
    New-Item -Path $path -ItemType File
}
As you can see in the example above, we actually don’t have to specify the filename, we can also include it in the file path. The New-Item cmdlet will then still create the required file.
Create a File with Content
As mentioned in the beginning, there are other methods to create a file in PowerShell. These methods can be used when you not only want to create the file but also want to add content to it. For example, when you retrieve data with a cmdlet and want to store it in a text file, then we can use the Out-File cmdlet or use a redirect operator
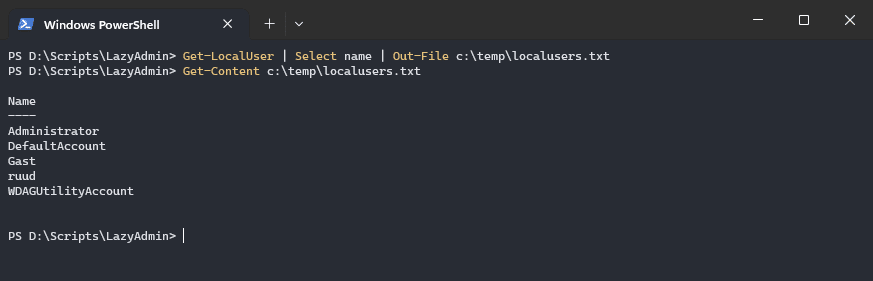
The Out-File cmdlet will redirect the results of the cmdlet to the specified file. If the file doesn’t exist, then it will create it. Let’s say we want to get all local users from our computer and want to store it in a text file:
Get-LocalUser | Select name | Out-File c:\temp\localusers.txt

# Or with the redirect operator
Get-LocalUser | Select name > c:\temp\localusers.txt
Read more about the Out-File cmdlet, and how to append content for example, in this article.
We can also create a file and save the content with the New-Item cmdlet or the Set-Content cmdlet. Both cmdlets work pretty much the same, only the Set-Content cmdlet will replace the contents when the file already exists, whereas New-Item will throw an error when the file already exists.
# Create a file and set the content
Set-Content -Path c:\temp\newFile.txt -Value "New file with Content"

# Or use New-Item to create the file with content
New-Item -Path c:\temp\ -name "newFile.txt" -Value "New file with Content"
Creating Multiple Files
To create multiple files we have two options, we can either specify each file inside the path parameter or use an ForEach loop. If you only need to create two or three files then you could just specify them in the path parameter:
New-Item -Path "c:\temp\test01.txt","c:\temp\test02.txt" -ItemType File
But a more readable option is to use a small ForEach loop and an array with the files that you want to create. This way it is easier to add or change files in the array and also add some logic to it when needed.
# Specify the directory where you want to create the files
$targetDirectory = "C:\temp\"

# Create an array of file names
$fileNames = @("File1.txt", "File2.txt", "File3.txt")

# Loop through each file name and create a file with content
foreach ($fileName in $fileNames) {
    New-Item -Path $targetDirectory -Name $filename -ItemType file

    $filePath = Join-Path -Path $targetDirectory -ChildPath $fileName
    Write-Host "Created file: $filePath"
}
Another option, when you don’t want to specify the file names, is to iterate over an index and create some text files using the index number:
1..10 | ForEach-Object {
    New-Item -Path "C:\temp\" -Name "$_.txt" -ItemType file
}
Creating Special Files
Until now we have only created TXT files. But with PowerShell, we are not limited to TXT files alone. We can also create CSV, JSON, HTML, or XML files for example. To do this we will need to make sure that the content of the file is converted to the correct format.
Basically, you can create any file type with the New-Item cmdlet. If you would for example set the file type to .pdf, then you will get a “PDF” file in the given directory. The only problem is that you can’t open it, because the content of the file is not in the correct format.
This means that if you want to create a CSV file for example, that you will need to use the Export-CSV cmdlet. Or for an XML file, you will need to use the Export-CliXml cmdlet:
$xmlData | Export-CliXml -Path "c:\temp\test.xml" -Encoding UTF8
Wrapping Up
Creating files in PowerShell is pretty easy with the new-item cmdlet. Make sure that the contents of your file match the file type, by using the correct cmdlets to store the data inside the file.
I hope you found this article helpful, if you have any questions, just drop a comment below.
System administrators perform a variety of standard operations on their Windows servers every day, including creating, deleting, and moving files and folders. By becoming fluent with the core set of Active Directory (AD) PowerShell commands provided in this blog post, you can dramatically reduce the manual work involved to create a file in PowerShell.
Before you start, ensure your system policy allows running PowerShell scripts, as described in “Windows PowerShell Scripting Tutorial for Beginners.” In the article below, you will learn the PowerShell command to create a file, delete it, copy it, and append content to it.
Basic File Creation with New-Item Cmdlet
Use the PowerShell cmdlet New-Item to create an object, such as a directory, file, or registry key. The -Path parameter specifies the location where the new item will be made, and the -ItemType parameter specifies the type of item to create. Additional parameters, such as -Name and -Value, can be used to specify the name of the new item and its content. Now, let’s show you how to create a file in PowerShell.
Step-by-step guide: Creating empty files and folders
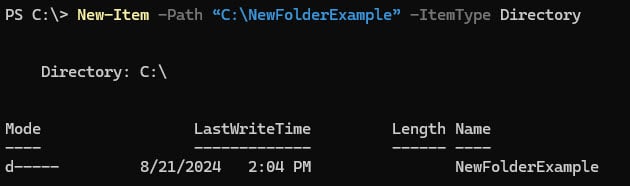
Create a folder
New-Item -Path “c:\NewFolderExample” -ItemType DirectoryBelow is an example using the PowerShell create file command:
Create a file
Next, we will cover how to make a file in PowerShell, as seen below:
New-Item -Path ”c:\NewFolderExample\newfile.txt” -ItemType File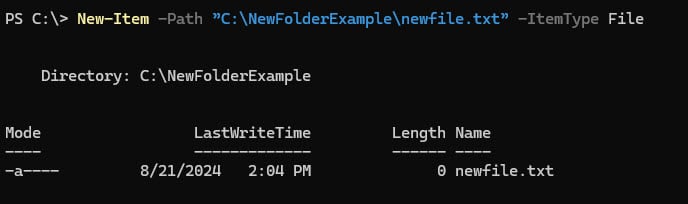
Explanation of Parameters
Let’s look at the code components of the New-Item cmdlet:
- -Path: This parameter specifies where the new file will be created. In the example above, the file was created in the newly created folder. You can change this path to any directory where you want the file to be created.
- -ItemType: This parameter defines the type of item to create. In the examples above, we specified Directory and File.
In PowerShell, an item path refers to the location of an item (such as a file or directory) within the file system or other provider namespaces. In the example above, we used a fully qualified item path, which included all elements (provider, drive, containers, item name). You can also use relative paths. In a relative path, the backslash at the beginning doesn’t refer to the root of the drive. Instead, it is treated as part of the folder name. The actual location depends on your current working directory in PowerShell. Below, we show how to create a text file in PowerShell using a relative file path:
New-Item -Path '\NewExampleFolder\newfile.txt' -ItemType FileExamples
Creating files in different directories
You can make a file in PowerShell within various directories by changing the -Path parameter. For example:
New-Item -Path "c:\projects\myfile.txt" -ItemType FileThis create file PowerShell command creates an empty file named myfile.txt in the D:\projects directory.
Creating files with specific extensions
You can use the create file Windows PowerShell command to generate files with specific extensions. For example:
New-Item -Path "c:\NewFolderExample\mydocument.docx" -ItemType FileThis command creates an empty file named mydocument.docx in the c:\NewFolderExample directory. You can specify any file extension, such as .docx, .txt, or .csv, depending on the type of file you want to create.
Adding Content to Files
Using Set Content
The Set Content cmdlet in PowerShell is used to write or replace the content of a file. This cmdlet is useful when creating or overwriting text in a file with specific content. The command Set-Content is ideal for writing simple text to a file and can be used with automated scripts to generate configuration files or logs with predefined content. It directly replaces the file’s content without appending. powershell create file with content.
Set-Content -Path "c:\NewFolderExample\greetings.txt" -Value "Hello, World!"Using Out-File
You can also create a file and write data using the Out-File cmdlet, as shown below:
Get-Process -Name * | Out-File -FilePath c:\ NewFolderExample \processes.txt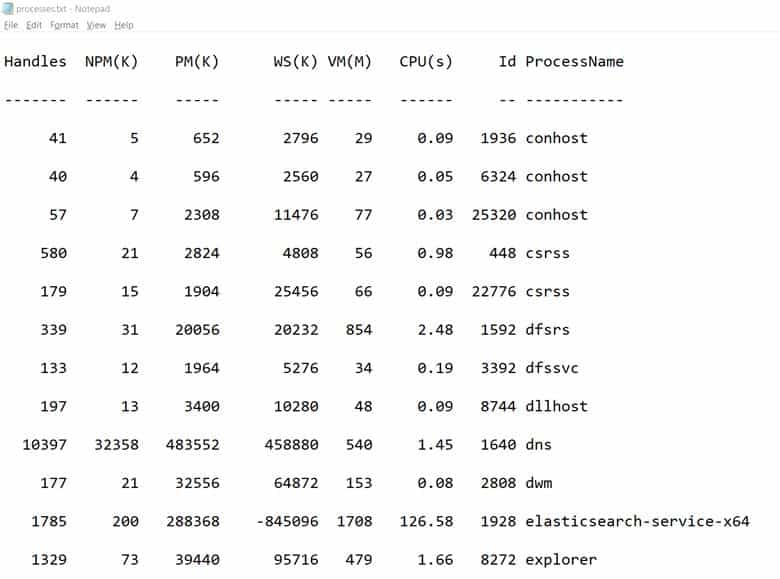
Another option is to pipe the output from a cmdlet, such as Get -ADuser, to Export-Csv, which creates a file that can be opened in Excel:
Get-ADuser -Filter * | Export-Csv -Path c:\dataADusers.csv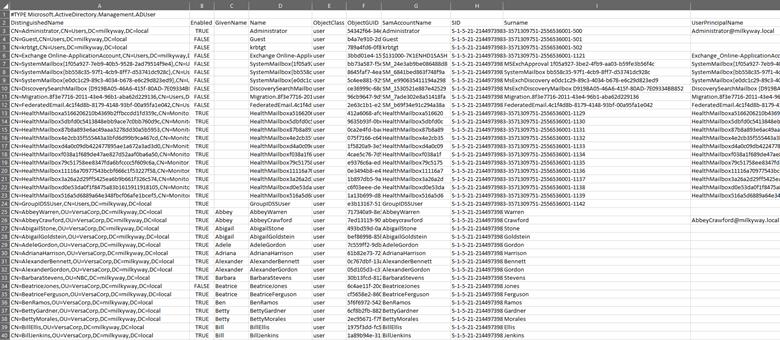
Out-File is commonly used to capture the output of commands, such as Get-Process, and save it to a file. This is useful for logging and reporting purposes. Out-File is better suited for handling large amounts of output than the Set-Content cmdlet, as it streams data to the file rather than loading it into memory first. Unlike Set-Content, Out-File can append to an existing file with the -Append option.
View the objects in a directory
To view the contents of a directory on a Windows file server, including all files and subdirectories, use the Get-ChildItem cmdlet. The output includes each item’s name, size, and last modified date. It is similar to the dir or ls command in Windows.
Get-ChildItem -Path C:\NewFolderExample\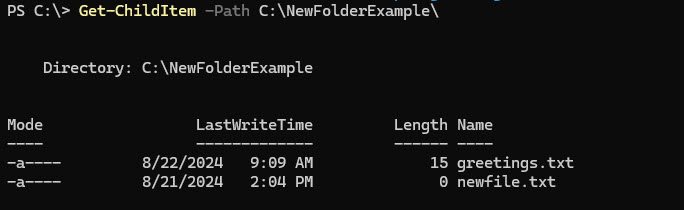
Show hidden objects
The command below shows all root objects, including hidden ones, in the NewFolderExample folder:
Get-ChildItem -Path "c:\NewFolderExample -ForceShow all subfolders and their content
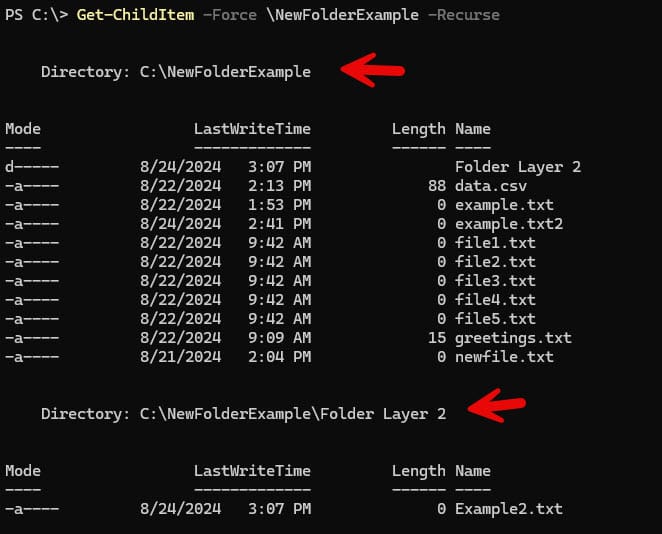
The following command uses the -Recurse parameter to extend the output to include all subfolders and their content. Each subfolder will be displayed separately. For example:
Get-ChildItem -Force \ NewFolderExample -RecurseThe example below shows the contents of a second folder inside of NewFolderExample.
Filter the output
You can filter the output using the -Filter, -Exclude, -Include and -Path parameters.
For advanced object filtering, use the pipe operator (|) to pass data from the Get ChildItem cmdlet to the Where-Object cmdlet. For instance, the script below searches for all executable files in the fsShared folder and subfolder modified after 18 July, 2024.
Get-ChildItem -Path C:\NewFolderExample -Recurse -Include *.csv | Where-Object -FilterScript {($_.LastWriteTime -gt '20Advanced File Creation Techniques
Creating multiple files
Creating multiple files efficiently in PowerShell can be achieved using loops. This method is beneficial when creating files with similar names or in different directories.
Using a loop to create multiple files
Here’s an example of using a loop to create multiple files:
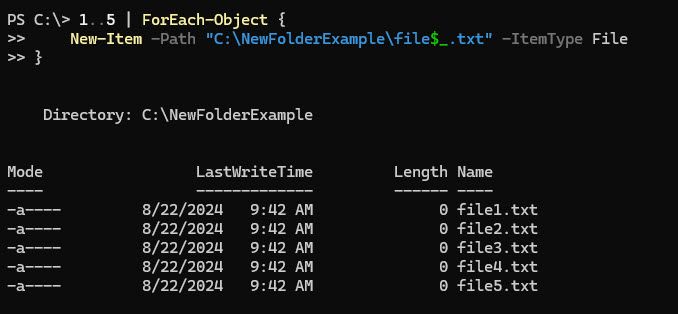
1..5 | ForEach-Object {

    New-Item -Path "C:\ C:\NewFolderExample\file$_.txt" -ItemType File

}
Explanation of Parameters:
- 1..5: This creates a range of numbers from 1 to 5.
- ForEach-Object: This cmdlet iterates through each number in the range.
- New-Item: This cmdlet creates a new file for each iteration inside the loop.
- -Path “C:\temp\file$_.txt”: The path where each file will be created. $_ represents the current number in the iteration.
This script will create five files named file1.txt, file2.txt, file3.txt, etc., as shown below:
You can use loops to do things such as create a template file in multiple project directories, initialize log files in various application directories, or distribute a default configuration file to multiple user directories.
Using Wildcards
You can use wildcards in PowerShell to perform operations on multiple files or directories simultaneously. Wildcards can create files across multiple directories in a single command when used with the New-Item cmdlet:
New-Item -Path " C:\NewFolderExample\*\example.txt" -ItemType FileExplanation of Parameters:
- This command attempts to create a file named example.txt in all immediate subdirectories of C:\temp.
- The * in the path acts as a wildcard, matching any directory name.
- PowerShell will iterate through all subdirectories in C:\temp and create example.txt in each one.
- If example.txt already exists in a subdirectory, it will not be overwritten unless you add the -Force parameter.
Delete Files and Folders
Thus far, we have focused on creating files, but you can also use PowerShell to delete files. Use the Remove-Item PowerShell cmdlet to delete a file, directory, or other object. For example, the following command will delete the specified folder and all the subfolders and files. Notice that because the folder is not empty, you are prompted to confirm the operation:
Remove-Item -Path '\NewFolderExample’
If you have already made sure that every object inside the folder should be deleted, you can use the -Recurse switch to skip the confirmation step:
Remove-Item -Path '\NewFolderExample' -RecurseDelete a file
The following command will delete the file named newfile.txt from the folder NewFolderExample:
Remove-Item -Path “C:\NewFolderExample\newfile.txt”Delete files older than x days
To clean up old files from a directory, use a script like this:
Get-ChildItem -Path "C:\ NewFolderExample " -Recurse | Where-Object {($_.LastWriteTime -lt (Get-Date).AddDays(-30))} | Remove-ItemDelete empty folders
The following script will identify empty folders and delete them without prompting for confirmation:
$Folder = "C:\ NewFolderExample "

#Delete empty folders and subfolders

Get-ChildItem $Folder -Recurse -Force -ea 0 |

? {$_.PsIsContainer -eq $True} |

? {$_.getfiles().count -eq 0} |

ForEach-Object {

    $_ | del -Force -Recurse

    $_.FullName | Out-File C:\deletedfolders.txt -Append

}
Delete files after checking they exist
Here’s how to check whether a file called datalog.txt exists and delete it if it does:
$FileName = 'C:\datalog.txt'

If (Test-Path $FileName){

   Remove-Item $FileName

}
Overwriting and Appending to Files
Earlier, we discussed using the Set-Content cmdlet to write or replace a file. Here are some other ways to do the same.
Using -Force Parameter
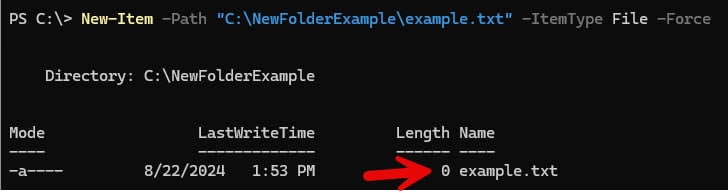
Here is another PowerShell create file command parameter to overwrite existing content:
New-Item -Path "C:\NewFolderExample\example.txt" -ItemType File -ForceThe -Force parameter in PowerShell is used to override restrictions that prevent you from making changes, such as read-only attributes or the existence of an item with the same name. This command adds “Additional line” to the end of “example.txt”. If the file doesn’t exist, it creates it.
Before running the command, note the size of the example.txt file below:
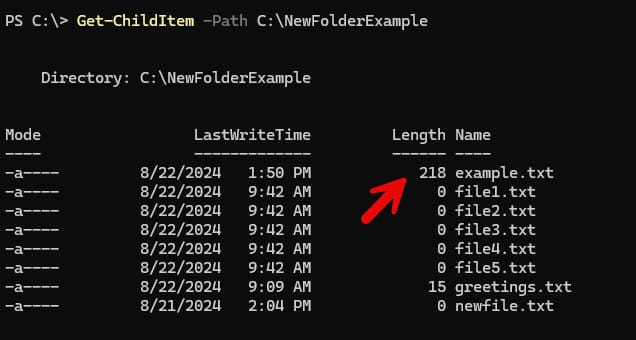
Now see how using the Windows PowerShell create file cmdlet with the -Force parameter wipes out the prior content.
Explanation of Parameters:
- If “example.txt” already exists, this command will overwrite it without prompting.
- If the file is read-only, -Force will override this attribute and replace the file.
- It’s useful for scripts where you want to ensure a fresh file is created each time, regardless of existing content
Appending Content
You can use the Add-Content cmdlet to append data to an existing file or create a new file if it doesn’t exist. For example:
Add-Content -Path "C:\temp\example.txt" -Value "Additional line"This command adds “Additional line” to the end of “example.txt”. If the file doesn’t exist, it creates it.
Comparison with Set-Content and Out-File:
Key Differences:
- Add-Content is for appending, Set-Content is for replacing, and Out-File is for flexible output redirection.
- Add-Content preserves and adds, Set-Content replaces, and Out-File can do either.
Creating Special File Types
CSV Files
CSV (Comma-Separated Values) files are widely used for storing tabular data. The PowerShell Export-CSV cmdlet lets you create and manipulate CSV files. It converts objects into a series of comma-separated value (CSV) strings and saves them in a CSV file, as seen below:
$data | Export-CSV -Path "C:\ NewFolderExample\data.csv" -NoTypeInformationIn the example below, $data is a variable that contains objects you want to export:

Explanation of Parameters:
- -NoTypeInformation: Omits the type of information from the CSV file. This often creates cleaner CSV files without the PowerShell-specific type data.
- Export-CSV: This cmdlet converts the objects to CSV format.
JSON Files
JSON (JavaScript Object Notation) files are text files that store data in a structured, easy-to-read format. In PowerShell, JSON files are often used to store configuration data, application settings, or other data represented as key-value pairs.
The combination of ConvertTo-Json and Out-File allows you to convert PowerShell objects to JSON format and save them to a file.
$data | ConvertTo-Json | Out-File -FilePath "C:\NewFolderExample\data.json"Some uses for using JSON files with PowerShell include exporting configuration data from a PowerShell script for use in a web application, creating a settings file for a PowerShell-based application, or Preparing data to send to a RESTful API or storing API responses.
Handling Existing Files
When working with files in PowerShell, you may want to see if a file exists before performing operations to prevent possible errors.
Checking if the file exists
The Test-Path cmdlet is commonly used to check for the existence of files or directories. Here’s how to check whether a file called datalog.txt exists and delete it if it does:
$FileName = 'C:\datalog.txt'

If (Test-Path $FileName){

   Remove-Item $FileName

}
Conditional File Creation
You can add a condition to a file creation command. For example, the command below checks to see if the datalog.txt file exists, and if not, will create one automatically.
If (-not(Test-Path -Path "C:\temp\example.txt")) {

    New-Item -Path "C:\temp\example.txt" -ItemType File

}
Explanation of parameters:
- Test-Path -Path “C:\temp\example.txt”: Checks if the file exists.
- -not: Negates the result, so the condition is proper if the file does not exist.
- If the file doesn’t exist, New-Item creates it.
In the example below, newfile.txt will only be created if the ‘NewFolderExample’ directory exists
If (Test-Path -Path "C:\NewFolderExample") {

    New-Item -Path "'C:\NewFolderExample \newfile.txt" -ItemType File

} else {

    Write-Warning "Directory C:\ ''C:\NewFolderExample does not exist"

}
An applicable use case would be creating a default config file only if it doesn’t exist, avoiding overwriting existing customized configurations.
Copy and Manipulating Files and Folders
Copy files and folders
If you’re looking copy items, such as files and directories, from one location to another, use the Copy-Item PowerShell cmdlet. It is similar to issuing the copy command from the Windows command prompt.
To copy a file between two folders on the same computer, use this command:
Copy-Item -Path '\Shared\ITUsers.txt' -Destination '\Backup'Copy only certain types of files
Use the -Filter parameter to copy only certain files from the source to the destination. For instance, the following command copies only text files from one folder to another:
Copy-Item -Filter *.txt -Path \Shared\* -Recurse -Destination \BackupRename a file or folder
The Rename-Item cmdlet enables you to change the name of an object, such as a file or directory, while leaving its contents intact. It is similar to the Windows command ren.
The -Path parameter specifies the location of the file or directory, and the –NewName parameter provides the new name of the file or folder.
For example, the following PowerShell create text file command renames a text file to a similar name with an underscore character added:
Rename-Item -Path "\Shared\ITUsers.txt" -NewName "IT_Users.txt"Change file extensions
You can also use Rename-Item to change file extensions.
If you want to change the extensions of multiple files at once, use the following PowerShell change file extension, which will change all txt file extensions to bak. The wildcard character (*) ensures that all text files are included.
Get-ChildItem \Shared\*.txt | Rename-Item -NewName { $_.name -Replace '.txt','.bak' }Troubleshooting Common Issues
Permission issues
Insufficient privileges are a common problem when you’re working with PowerShell. A typical error message is “The process does not have access rights to this object.” The solutions to this issue are:
- Run PowerShell as an administrator for system-level operations.
- Modify ACLs (Access Control Lists) to grant necessary permissions.
- Use alternate credentials
To run PowerShell with elevated privileges:
- Right-click on the PowerShell icon.
- Select “Run as administrator.”
- Confirm the User Account Control prompt.
Typing errors
It is easy to misspell parameter names, but doing so will result in an error. When typing long commands, you can use tab completion or check cmdlet help (Get-Help cmdlet-name -Detailed).
File already exists
Depending on what you are trying to do, an existing file name may cause an error. One way to avoid this is to use a conditional command, as was covered earlier.
If (-not(Test-Path -Path "C:\temp\example.txt")) {

    New-Item -Path "C:\temp\example.txt" -ItemType File

}
Real World Applications
Scripting Examples
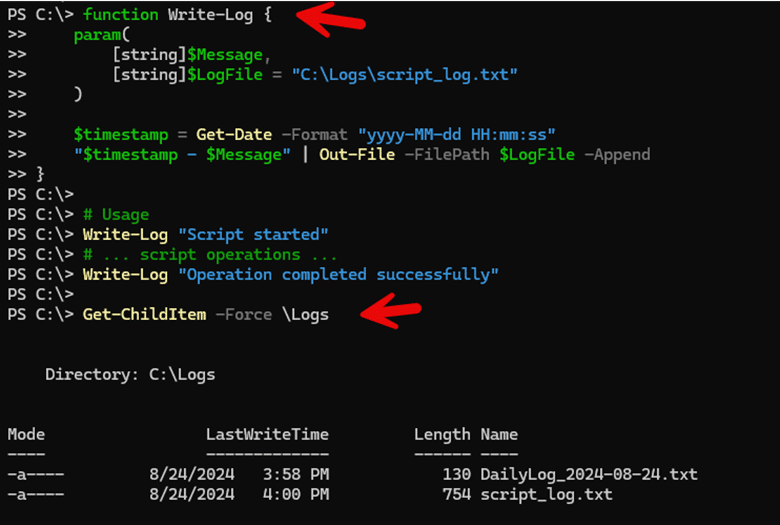
You can use PowerShell to create log files. Logging is essential for tracking system activities, errors, and application behavior. PowerShell can automate the creation of log files, making it easier to monitor systems. The example below shows a function that allows you to easily log messages with timestamps, which is necessary for auditing. We then used the Get-ChildItem cmdlet to confirm the log file’s creation.
You can use PowerShell to create scripts to automate and streamline various tasks. For example, you can create scripts to backup files, check for available disk space on a server, or monitor critical system services.
Using Visual Studio Code
You can empower PowerShell with Visual Studio Code (VS Code). VS Code is a versatile code editor that provides an excellent environment for PowerShell scripting and development. Install VS Code and the PowerShell extension to gain access to features like syntax highlighting, IntelliSense for cmdlets and variables, code snippets, and integrated debugging. The editor offers a customizable interface with an integrated terminal, allowing you to seamlessly write, test, and run PowerShell scripts.
Installing Visual Studio Code
- Download and install Visual Studio Code from the official website: Visual Studio Code.
- Once installed, open VS Code and navigate to the Extensions view by clicking on the square icon on the sidebar or pressing Ctrl+Shift+X.
- Search for the “PowerShell” extension in the Extensions view and click “Install”. This extension provides rich PowerShell language support, including syntax highlighting, IntelliSense, code navigation, and debugging.
Conclusion
PowerShell is a powerful tool for file and system management. It offers various cmdlets and techniques for creating, modifying, and managing files and directories. You can use the New-Item cmdlet to create essential files. You can then use more advanced scripts to create multiple files, search for existing ones, and move or delete them. You can also use PowerShell scripts to automate mundane tasks and free up time for your IT personnel. Because PowerShell is widely used today, a wealth of resources are available online to help guide you in your learning and exploration.
FAQ
How can I create a file using PowerShell?
You can use the New-Item cmdlet to create a file. The following command will create a Word file in the Shared folder:
New-Item -Path '\SharedFolder\newfile.docx' -ItemType FileYou can also use the New-Item cmdlet to create folders, directories, and registry keys.
You might want first to check whether the item already exists to avoid an error message.
How do I create a folder in PowerShell?
As mentioned above, you can use the New-Item cmdlet to create a folder. The following command will create a Word file in the Shared folder:
New-Item -Path '\SharedFolder\newfolder.docx' -ItemType FileHow do I create a directory using PowerShell?
To create a new directory with PowerShell, use the New-Item cmdlet:
New-Item -Path '\ SharedFolder ' -ItemType DirectoryHow do I create an empty text file in PowerShell?
You can use the New-Item cmdlet to create a text file PowerShell command. The following command will create a text file in the Shared folder:
New-Item -Path '\SharedFolder\newfile.txt' -ItemType FileHow do I create multiple files with different names in PowerShell?
You can use a Loop to Create Multiple Files. Below is an example that will create five files named file1.txt, file2.txt, file3.txt, etc.,
1..5 | ForEach-Object {

    New-Item -Path "C:\ C:\NewFolderExample\file$_.txt" -ItemType File

}
How do I add text to a file in PowerShell?
You can use the Add-Content cmdlet to append data to an existing file or create a new file if it doesn’t exist.
Command:
Add-Content -Path "C:\temp\example.txt" -Value "Additional line"This command adds “Additional line” to the end of “example.txt”. If the file doesn’t exist, it creates it.
How do I create a PowerShell script file?
You can use the following cmdlet to create a PowerShell script using PowerShell itself.
New-Item -Path "C:\Scripts\MyScript.ps1" -ItemType FileYou can even use a text editor such as Notepad. Open Notepad, write your PowerShell code, and save the file with a ps1 extension.
- Open Notepad
- Write your PowerShell code
- Save the file with a .ps1 extension (e.g. script.ps1)
How do I create a ps1 file in PowerShell?
As mentioned above, you can use the New-Item cmdlet mentioned above to create a new file with the .ps1 extension.
New-Item -Path "C:\Scripts\MyScript.ps1" -ItemType FileHow do I delete a file using PowerShell?
To delete a file, use the Remove-Item cmdlet:
Remove-Item -Path '\fsSharedNewFolder\newfile.txt'You will be prompted to confirm the deletion if the file is not empty.
You can also use PowerShell to remove files older than X days or delete files from multiple computers.
How do I force-delete a file using PowerShell?
If you want to delete a file or folder that is read?only or hidden, use the -Force parameter:
Remove-Item -Path '\fsSharedNewFolder\newfile.txt' -ForceHow do I copy a file using PowerShell?
Use the Copy-Item cmdlet to copy objects from one location to another:
Copy-Item -Path '\Shared\ITUsers.txt' -Destination '\Backup'Note that the copy attempt will fail if the target file already exists. Learn how to overwrite the target files during a copy operation.
How do I move a file using PowerShell?
To move an item and its child items (files and folders) from one location to another, use the Move-Item cmdlet:
Move-Item -Path \Shared\Backups1.bak -Destination \BackupYou can also move an entire folder with PowerShell.
How do I rename a file using PowerShell?
To rename a single file using PowerShell, use the following command:
Rename-Item -Path "\Shared\ITUsers.txt" -NewName "IT_Users.txt"You can also rename multiple files at once using PowerShell.
Kevin Horvatin is a Lead Software Architect at Netwrix and responsible for Netwrix Privilege Secure. A software developer for over 20 years, he has worked with PowerShell and C# since they were introduced.

The `New-Item` cmdlet in PowerShell is used to create a new item, such as a file, folder, or registry key, at a specified location.
Here’s a code snippet to create a new text file using `New-Item`:
New-Item -Path "C:\path\to\your\file.txt" -ItemType "File"
Understanding New-Item
What is New-Item?
The `New-Item` cmdlet in PowerShell is an essential tool for creating new items, be they files, folders, or other objects, within your file system or other data store. It streamlines the process of file and folder management, making it a critical function for system administrators, developers, and anyone looking to automate tasks within the Windows operating system. By mastering `New-Item`, you unlock the potential to manage resources effectively, ultimately enhancing productivity and efficiency in your workflows.
Syntax of New-Item
Understanding the syntax of `New-Item` is fundamental to using it effectively. The cmdlet can be expressed as follows:
New-Item [-Path] <String> [-Name <String>] [-ItemType <String>] [-Value <String>] [-Force] [-PassThru] [-Credential <PSCredential>] [<CommonParameters>]
In this syntax:
- -Path specifies the location where the new item will be created.
- -Name is the name of the item, which is necessary for file creation when specifying the item type.
- -ItemType defines what type of item is being created (e.g., File, Directory).
- -Value allows you to set content for a file during its creation.
- -Force allows operation without prompt in case of existing items or permissions.
- -PassThru lets you retrieve the created object for further manipulation.
- -Credential permits you to provide credentials for executing commands in a restricted context.
Mastering PowerShell Write-Host for Vibrant Outputs
Parameters Explained
Path
The `-Path` parameter is crucial, as it determines where in your filesystem (or other data store) your new item will be created. You can specify a full path or a relative path based on the current location in PowerShell. For example, to create an item directly in the root of the C: drive, you would specify:
New-Item -Path "C:\" -ItemType "Directory" -Name "NewFolder"
Name
The `-Name` parameter is used to give a name to the new item. While the name is not strictly necessary when the item type is a directory and you are specifying a path, it is essential when creating a file. The following example illustrates creating a folder with a specified name:
New-Item -Path "C:\MyDocuments" -Name "ProjectFiles" -ItemType "Directory"
ItemType
The `-ItemType` parameter specifies what kind of item you are creating. The most commonly used types are:
- File: Creates a new file.
- Directory: Creates a new folder (directory).
Understanding the item types allows you to use `New-Item` correctly. For example, to create a new text file, you could use:
New-Item -Path "C:\MyFiles" -Name "Notes.txt" -ItemType "File"
Value
The `-Value` parameter is particularly useful when creating files, as it defines the content of the file upon creation. If you’re creating a file and want to set its initial content, this is the parameter to use. Here’s an example:
New-Item -Path "C:\MyFiles" -Name "Greeting.txt" -ItemType "File" -Value "Hello, PowerShell!"
Additional Parameters
Force
The `-Force` parameter is a powerful feature that allows the cmdlet to bypass restrictions. For instance, if you attempt to create a file in a location where a file with the same name exists, using `-Force` will overwrite it without prompting:
New-Item -Path "C:\MyFiles\Notes.txt" -ItemType "File" -Value "This will overwrite the previous content." -Force
PassThru
By using the `-PassThru` parameter, you can direct PowerShell to return the newly created item as an output. This can then be used for additional processing:
$myFile = New-Item -Path "C:\MyFiles" -Name "Output.txt" -ItemType "File" -Value "This is the output." -PassThru
Credential
For cases where you need to create items in protected paths or remote locations, the `-Credential` parameter allows you to specify credentials. This is particularly useful when working in environments with strict permission settings.
$cred = Get-Credential
New-Item -Path "\\RemoteServer\SharedFolder" -Name "DataFile.txt" -ItemType "File" -Value "Hello from PowerShell!" -Credential $cred
Unleashing PowerShell Get-Member: A Simple Guide
Creating Files and Directories
Creating a Directory
Creating a directory using `New-Item` can be accomplished with a straightforward command. Below is an example that outlines the steps:
New-Item -Path "C:\ExampleDirectory" -ItemType "Directory"
This command will create a new directory called «ExampleDirectory» in the C: drive. A best practice is to verify that your path is correct before executing the command to avoid unintentional errors.
Creating a File
To create a file using PowerShell with `New-Item`, you need to specify the path and item type. Additionally, you can create a file with initial content using the `-Value` parameter, as shown below:
New-Item -Path "C:\ExampleDirectory\example.txt" -ItemType "File" -Value "Hello, World!"
Creating Multiple Items
With PowerShell’s flexibility, you can even create multiple items in a loop. Below is a sample code snippet that demonstrates how to create several files in a directory:
foreach ($i in 1..5) {
    New-Item -Path "C:\ExampleDirectory\File$i.txt" -ItemType "File"
}
This command creates five new files named File1.txt through File5.txt within the specified directory.
Harnessing PowerShell NotMatch for Effective Pattern Filtering
Advanced Usage of New-Item
Using New-Item with other Cmdlets
Combining `New-Item` with other cmdlets can lead to efficient workflows. For example, after creating a script file, you might want to populate it using `Set-Content`:
New-Item -Path "C:\Scripts" -Name "MyScript.ps1" -ItemType "File" -Value "# PowerShell Script"
Set-Content -Path "C:\Scripts\MyScript.ps1" -Value "Write-Host 'My PowerShell script is running!'"
Error Handling
When using `New-Item`, various errors may arise, such as permission issues or incorrect paths. Best practices in error handling include utilizing `Try-Catch` blocks to manage exceptions gracefully and provide meaningful feedback:
try {
    New-Item -Path "C:\ProtectedFolder" -Name "NewItem.txt" -ItemType "File"
} catch {
    Write-Host "Error encountered: $_"
}
Troubleshooting New-Item
If you encounter issues using `New-Item`, consider checking the following:
- Permissions: Ensure you have the necessary permissions to the specified path.
- Path Validity: Confirm the path exists or is correctly formatted.
- ItemType Availability: Verify that you are using supported item types for the new item.
Mastering PowerShell SQLite: Quick Commands Unleashed
Conclusion
The `New-Item` cmdlet is an essential part of PowerShell for anyone looking to improve their file and folder management skills. Not only does it allow for the quick creation of items, but it also integrates smoothly with other cmdlets for more complex automation tasks. By engaging with the command and experimenting with its different parameters and use cases, users can seamlessly enhance their productivity. Mastering `New-Item` is an invitation to delve deeper into the broader world of PowerShell, ultimately transforming your approach to system administration and scripting.
PowerShell New-PSDrive: Create Drives with Ease
Call to Action
If this guide has empowered you to explore the power of `New-Item`, we invite you to subscribe for more informative tips on PowerShell and automation. Share your experiences or questions in the comments below, and look out for our upcoming courses and resources that will enrich your PowerShell skillset!
-
Use
New-Itemto Create a New Text File Through Windows PowerShell -
Use the
niCommand to Create a New Text File Through Windows PowerShell -
Use
fsutilto Create a New Text File Through Windows PowerShell -
Use the
echoCommand and>Operator to Create a New Text File Through Windows PowerShell -
Use Text Editor to Create a New Text File Through Windows PowerShell
-
Use the
Set-Contentto Create a New Text File Through Windows PowerShell -
Use the
StreamWriterto Create a New Text File Through Windows PowerShell -
Use the
Out-Fileto Create a New Text File Through Windows PowerShell -
Use the
Add-Contentto Create a New Text File Through Windows PowerShell -
Conclusion

Creating text files in PowerShell is a fundamental aspect of scripting and automation. Whether you need to generate configuration files, log data, or simply store information, PowerShell offers several methods to accomplish this task efficiently.
Among these methods are native cmdlets like New-Item, Set-Content, and Out-File, as well as command-line utilities like fsutil and text editor commands like notepad. Additionally, leveraging .NET classes such as StreamWriter provides fine-grained control over file creation and content writing.
In this article, we’ll explore each of these methods, providing syntax, examples, and insights into their usage, allowing you to choose the most suitable approach for your specific requirements.
Use New-Item to Create a New Text File Through Windows PowerShell
In PowerShell, the New-Item cmdlet is a versatile tool for creating various types of items in the file system. When it comes to text files, New-Item allows us to effortlessly generate new files with specified content or simply create an empty file.
This method is particularly useful when you need to automate the creation of text files as part of a script or routine task.
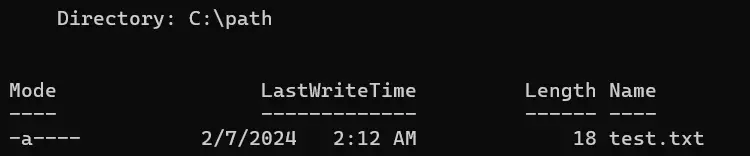
New-Item -Path "test.txt" -ItemType "file" -Value "Hello, PowerShell!" -Force
In this example, we utilize the New-Item cmdlet to create a new text file named test.txt within the working directory. The -Path parameter specifies the location and filename, while -ItemType "file" declares the item type as a file.
The -Value parameter is employed to set the content of the file, which in this case is "Hello, PowerShell!". Lastly, the -Force flag ensures that the command can overwrite the file if it already exists.
The -Force parameter is used to overwrite the file if it already exists.
Output:
Use the ni Command to Create a New Text File Through Windows PowerShell
In PowerShell, the ni alias stands for New-Item, which is a versatile cmdlet used to create various types of items in the file system. When it comes to text files, the ni method allows us to effortlessly generate new files with specified content or simply create an empty file.
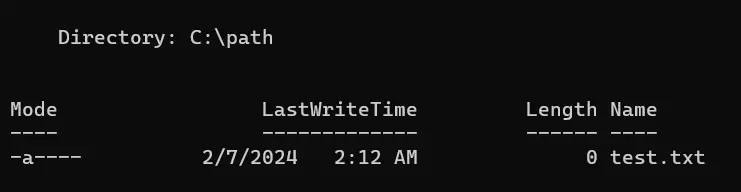
ni "test.txt" -ItemType "file" -Force
In this example, we employ the ni alias to execute the New-Item cmdlet, facilitating the creation of a new text file named test.txt within the working directory. The -ItemType "file" parameter explicitly designates the item type as a file, ensuring the creation of a text file specifically.
Furthermore, the -Force parameter is utilized to enable the command to overwrite the file if it already exists, ensuring seamless execution even in scenarios where the file may need to be replaced.
Output:
Use fsutil to Create a New Text File Through Windows PowerShell
In PowerShell, the fsutil command-line utility is a powerful tool for managing various aspects of the file system. Among its functionalities is the ability to create empty files, which is particularly useful when working with text files.
While fsutil is primarily a command-line tool and not a native PowerShell cmdlet, it can still be invoked from within PowerShell scripts to accomplish tasks such as creating text files.
fsutil file createnew "test.txt" 0
In this example, we utilize the fsutil command-line utility to create a new text file named test.txt within the working directory. By employing the file createnew subcommand, we instruct fsutil to generate an empty file of size 0, denoting a text file devoid of initial content.
This approach provides a straightforward means of creating text files directly from PowerShell, leveraging the functionality of fsutil to handle file system operations.
Output:

Use the echo Command and > Operator to Create a New Text File Through Windows PowerShell
The echo command is a built-in alias for PowerShell’s Write-Output cmdlet. It is similar to other shells that use echo.
Both commands write the output to the pipeline and redirect the output to a new file. It will create a new file with the same output as its content.
echo "Hello, PowerShell!" > "test.txt"
Get-Content test.txt
In this example, we utilize the echo command to generate a new text file named test.txt with the content "Hello, PowerShell!". By redirecting (>) the output of echo to the specified file path, we efficiently create the text file in a single command.
Subsequently, we use the Get-Content cmdlet to retrieve the content of the test.txt file, confirming that the specified text has been successfully written to the file.
Output:

Use Text Editor to Create a New Text File Through Windows PowerShell
You can use different text editors in PowerShell to create a new file, such as nano, notepad, vim, emacs, etc.
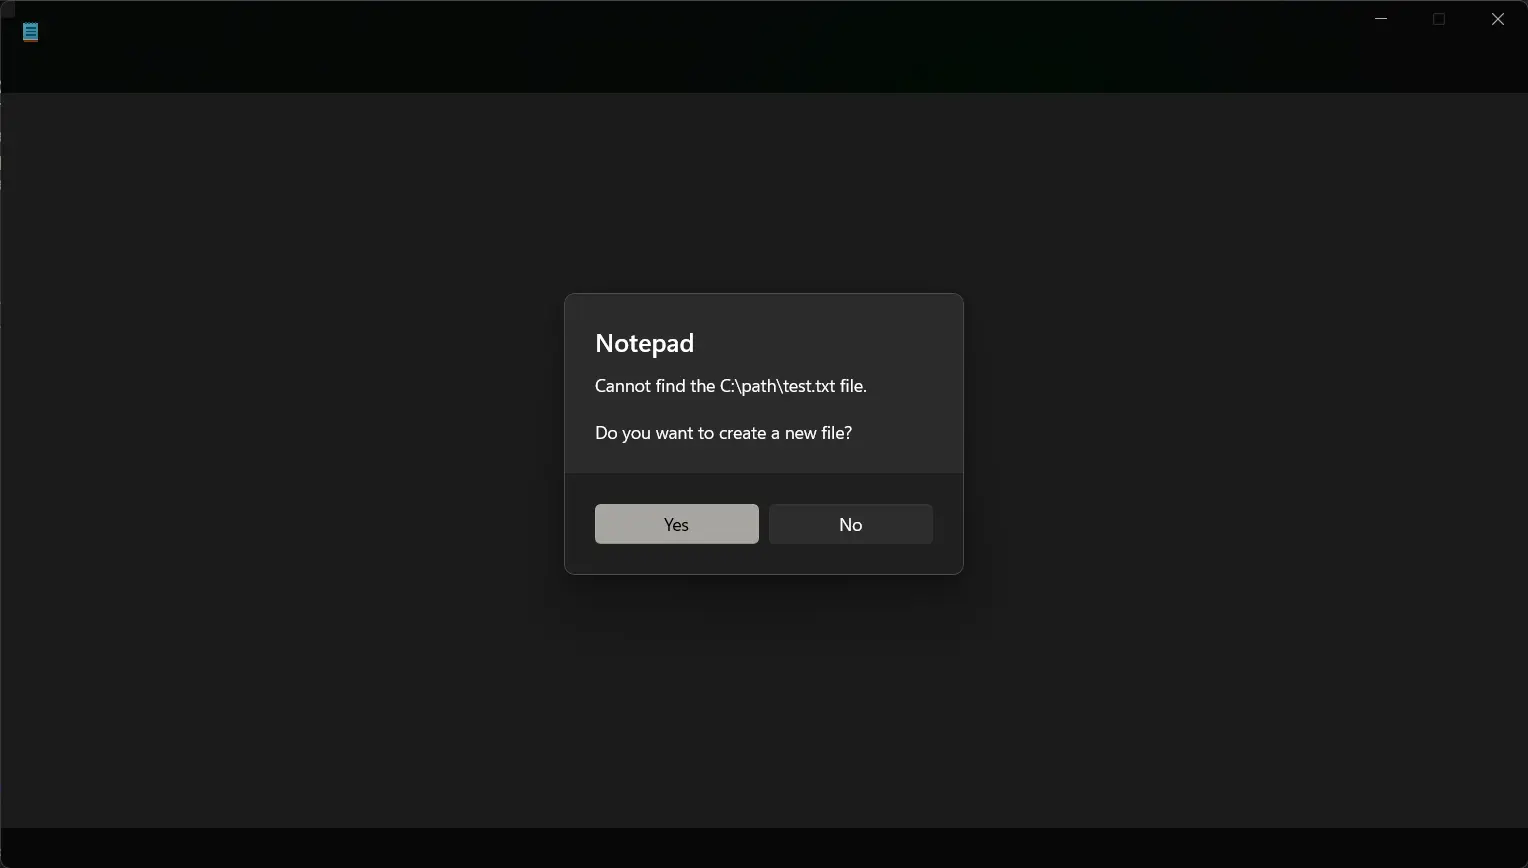
The notepad command is commonly associated with opening the Notepad application. However, it can also be used to create text files directly from the command line.
In this example, we utilize the notepad command to open the Notepad application and create a new text file named test.txt in the working directory. Once Notepad opens, we can manually enter the desired text content into the file.
After saving the file from within Notepad, the new text file will be created at the specified location.
Output:
Similarly, you can install other text editors and create a new file with some content.
Use the Set-Content to Create a New Text File Through Windows PowerShell
In PowerShell, the Set-Content cmdlet is a powerful tool for writing data to a file. It can be used to create new text files or overwrite existing ones with specified content.
This method offers flexibility and control over the content written to the file, making it a valuable tool for text file manipulation in PowerShell scripts.
Set-Content -Path "test.txt" -Value "Hello, PowerShell!"
Get-Content test.txt
In this code snippet, we utilize the Set-Content cmdlet to create a new text file named test.txt with the content "Hello, PowerShell!". By specifying the file path and the desired content using the -Path and -Value parameters, respectively, we efficiently generate the text file within a single command.
Subsequently, we use the Get-Content cmdlet to retrieve the content of the test.txt file, confirming that the specified text has been successfully written to the file.
Output:

Use the StreamWriter to Create a New Text File Through Windows PowerShell
In PowerShell, the StreamWriter class from the .NET framework provides a powerful way to create and write content to text files programmatically. This method offers fine-grained control over the file-writing process, allowing users to specify various parameters such as encoding, append mode, and whether to create the file if it doesn’t exist.
Using StreamWriter, users can efficiently generate text files with custom content, making it a valuable tool for file manipulation tasks in PowerShell scripts.
$stream = [System.IO.StreamWriter]::new("test.txt")
$stream.WriteLine("Hello, PowerShell!")
$stream.Close()
Get-Content test.txt
In this example, we utilize the StreamWriter class to create a new text file named test.txt in the current directory. We initialize a new instance of StreamWriter with the desired file path and then use the WriteLine method to write the text content "Hello, PowerShell!" to the file.
Finally, we close the StreamWriter object to ensure that all resources are properly released.
Output:

Use the Out-File to Create a New Text File Through Windows PowerShell
The Out-File cmdlet provides a straightforward way to create and write content to text files. This method is particularly useful when you need to redirect output from PowerShell commands or scripts directly to a text file.
Out-File allows users to specify various parameters such as the file path, encoding, and whether to append to an existing file. With its flexibility and ease of use, Out-File is a versatile tool for generating and managing text files within PowerShell.
"Hello, PowerShell!" | Out-File -FilePath "test.txt"
Get-Content test.txt
In this example, we use the Out-File cmdlet to create a new text file named test.txt in the working directory. We provide the text content "Hello, PowerShell!" as output from the preceding command, which is then redirected (|) to Out-File.
The -FilePath parameter specifies the path where the new file will be created. Subsequently, we use the Get-Content cmdlet to retrieve the content of the test.txt file, confirming that the specified text has been successfully written to the file.
Output:

Use the Add-Content to Create a New Text File Through Windows PowerShell
In PowerShell, the Add-Content cmdlet is commonly used to append content to existing files. However, it can also be utilized to create new text files if the specified file does not already exist.
This method offers a convenient way to generate text files and add content to them in a single command. Add-Content allows users to specify various parameters such as the file path, content to be added, and encoding.
Add-Content -Path "test.txt" -Value "Hello, PowerShell!"
Get-Content test.txt
In this example, we use the Add-Content cmdlet to create a new text file named test.txt in the working directory. We specify the text content "Hello, PowerShell!" using the -Value parameter.
Since the file does not exist yet, Add-Content will create it and add the specified content. Subsequently, we use the Get-Content cmdlet to retrieve the content of the test.txt file, confirming that the specified text has been successfully written to the file.
Output:

Conclusion
PowerShell offers a myriad of methods to create text files, each catering to different scenarios and preferences. Whether you prefer the simplicity of native cmdlets like New-Item and Out-File, the flexibility of .NET classes like StreamWriter, or the versatility of command-line utilities like fsutil, PowerShell provides the tools to meet your needs.
By understanding the strengths and capabilities of each method, you can streamline your file creation processes and enhance your scripting workflows. Whether you’re a novice PowerShell user or an experienced scripter, mastering these techniques empowers you to efficiently manage text files and automate tasks with confidence.
Enjoying our tutorials? Subscribe to DelftStack on YouTube to support us in creating more high-quality video guides. Subscribe
As an expert in PowerShell, I often need to create files directly in the current directory. I am sure you might come across similar requirements, so I thought of creating a complete tutorial on how to create a file in the current directory using PowerShell.
Using the New-Item Cmdlet
The most used way to create a file in the current directory in PowerShell is by using the New-Item cmdlet. This versatile cmdlet allows you to create various types of items, including files and directories. Here’s how you can use it:
New-Item -Path . -Name "testfile.txt" -ItemType "file" -Value "This is a text string."In this example, we specify the following parameters:
-Path .: Indicates that we want to create the file in the current directory.-Name "testfile.txt": Specifies the name of the file we want to create.-ItemType "file": Tells PowerShell that we want to create a file (as opposed to a directory).-Value "This is a text string.": Sets the content of the file. This parameter is optional.
After I executed the above PowerShell script using VS code, it created the file in the Downloads folder. Just to let you know, I am using a macOS, and I am executing the script in the Downloads folder. You can see it in the screenshot below:

Check out Read a Text File in PowerShell and Skip the First Line
Create a File and Directory in One Command
If you need to create a new directory and a file within it simultaneously, you can achieve this with a single New-Item command:
New-Item -Path "C:\NewFolder\NewFile.txt" -ItemType File -ForceThis command will create the “NewFolder” directory if it doesn’t exist, and then create the “NewFile.txt” file inside it. The -Force parameter ensures that the command will create any necessary parent directories.
Using the Out-File Cmdlet
Another way to create a file in the current directory in PowerShell is by using the Out-File cmdlet. This cmdlet is primarily used to write output to a file, but it can also create a new file if one doesn’t exist. Here’s an example:
"Hello, world!" | Out-File -FilePath ".\greeting.txt"In this case, we pipe a string ("Hello, world!") to the Out-File cmdlet, which then creates a file named “greeting.txt” in the current directory and writes the string to it.
Check out Remove the Last Line from a File Using PowerShell
Create Files with a Specific Encoding
By default, PowerShell creates files using the default encoding of your system. However, you may need to create files with a specific encoding, such as UTF-8 or ASCII. To do this, you can use the -Encoding parameter with the Out-File cmdlet:
"Hello, world!" | Out-File -FilePath ".\greeting.txt" -Encoding UTF8This command will create the “greeting.txt” file with UTF-8 encoding.
Create Multiple Files at Once in the Current Directory using PowerShell
Sometimes, you may need to create multiple files at once in the current directory using PowerShell. You can achieve this by using a loop in PowerShell. Here’s an example:
1..5 | ForEach-Object { New-Item -Path "file$_.txt" -ItemType File }This command uses a range operator (1..5) to generate a sequence of numbers, which is then piped to the ForEach-Object cmdlet. For each number, the New-Item cmdlet is called to create a file with a name like “file1.txt”, “file2.txt”, and so on.
Check out Remove the Last Empty Line from a File Using PowerShell
Best Practices for Creating Files with PowerShell
When creating files using PowerShell, there are a few best practices to keep in mind:
- Use meaningful file names: Choose file names that clearly describe the content or purpose of the file. This will make it easier to locate and manage your files later.
- Be mindful of file permissions: When creating files, ensure that you have the necessary permissions to write to the target directory. Avoid inadvertently creating files in system directories if you’re running PowerShell with elevated privileges.
- Handle errors gracefully: Use error handling techniques, such as
Try-Catchblocks, to gracefully handle any errors that may occur during file creation. This will help prevent script failures and provide informative error messages. - Use variables for flexibility: Consider using variables instead of hardcoding file paths and names. This will make your scripts more flexible and easier to maintain.
Conclusion
I hope this tutorial helps you learn how to create files in the current directory using PowerShell. With the New-Item and Out-File cmdlets, you can create files with specific names, encodings, and content.
You may also like:
- Create a File with Date in the Name Using PowerShell
- Create JSON Files with Content Using PowerShell
- Remove Blank Lines from CSV Files Using PowerShell
Bijay Kumar is an esteemed author and the mind behind PowerShellFAQs.com, where he shares his extensive knowledge and expertise in PowerShell, with a particular focus on SharePoint projects. Recognized for his contributions to the tech community, Bijay has been honored with the prestigious Microsoft MVP award. With over 15 years of experience in the software industry, he has a rich professional background, having worked with industry giants such as HP and TCS. His insights and guidance have made him a respected figure in the world of software development and administration. Read more.