
createuser — define a new PostgreSQL user account
Synopsis
createuser [connection-option…] [option…] [username]
Description
createuser creates a new PostgreSQL user (or more precisely, a role). Only superusers and users with CREATEROLE privilege can create new users, so createuser must be invoked by someone who can connect as a superuser or a user with CREATEROLE privilege.
If you wish to create a role with the SUPERUSER, REPLICATION, or BYPASSRLS privilege, you must connect as a superuser, not merely with CREATEROLE privilege. Being a superuser implies the ability to bypass all access permission checks within the database, so superuser access should not be granted lightly. CREATEROLE also conveys very extensive privileges.
createuser is a wrapper around the SQL command CREATE ROLE. There is no effective difference between creating users via this utility and via other methods for accessing the server.
Options
createuser accepts the following command-line arguments:
username-
Specifies the name of the PostgreSQL user to be created. This name must be different from all existing roles in this PostgreSQL installation.
-arole--with-admin=role-
Specifies an existing role that will be automatically added as a member of the new role with admin option, giving it the right to grant membership in the new role to others. Multiple existing roles can be specified by writing multiple
-aswitches. -cnumber--connection-limit=number-
Set a maximum number of connections for the new user. The default is to set no limit.
-d--createdb-
The new user will be allowed to create databases.
-D--no-createdb-
The new user will not be allowed to create databases. This is the default.
-e--echo-
Echo the commands that createuser generates and sends to the server.
-E--encrypted-
This option is obsolete but still accepted for backward compatibility.
-grole--member-of=role--role=(deprecated)role-
Specifies the new role should be automatically added as a member of the specified existing role. Multiple existing roles can be specified by writing multiple
-gswitches. -i--inherit-
The new role will automatically inherit privileges of roles it is a member of. This is the default.
-I--no-inherit-
The new role will not automatically inherit privileges of roles it is a member of.
--interactive-
Prompt for the user name if none is specified on the command line, and also prompt for whichever of the options
-d/-D,-r/-R,-s/-Sis not specified on the command line. (This was the default behavior up to PostgreSQL 9.1.) -l--login-
The new user will be allowed to log in (that is, the user name can be used as the initial session user identifier). This is the default.
-L--no-login-
The new user will not be allowed to log in. (A role without login privilege is still useful as a means of managing database permissions.)
-mrole--with-member=role-
Specifies an existing role that will be automatically added as a member of the new role. Multiple existing roles can be specified by writing multiple
-mswitches. -P--pwprompt-
If given, createuser will issue a prompt for the password of the new user. This is not necessary if you do not plan on using password authentication.
-r--createrole-
The new user will be allowed to create, alter, drop, comment on, change the security label for other roles; that is, this user will have
CREATEROLEprivilege. See role creation for more details about what capabilities are conferred by this privilege. -R--no-createrole-
The new user will not be allowed to create new roles. This is the default.
-s--superuser-
The new user will be a superuser.
-S--no-superuser-
The new user will not be a superuser. This is the default.
-vtimestamp--valid-until=timestamp-
Set a date and time after which the role’s password is no longer valid. The default is to set no password expiry date.
-V--version-
Print the createuser version and exit.
--bypassrls-
The new user will bypass every row-level security (RLS) policy.
--no-bypassrls-
The new user will not bypass row-level security (RLS) policies. This is the default.
--replication-
The new user will have the
REPLICATIONprivilege, which is described more fully in the documentation for CREATE ROLE. --no-replication-
The new user will not have the
REPLICATIONprivilege, which is described more fully in the documentation for CREATE ROLE. This is the default. -?--help-
Show help about createuser command line arguments, and exit.
createuser also accepts the following command-line arguments for connection parameters:
-hhost--host=host-
Specifies the host name of the machine on which the server is running. If the value begins with a slash, it is used as the directory for the Unix domain socket.
-pport--port=port-
Specifies the TCP port or local Unix domain socket file extension on which the server is listening for connections.
-Uusername--username=username-
User name to connect as (not the user name to create).
-w--no-password-
Never issue a password prompt. If the server requires password authentication and a password is not available by other means such as a
.pgpassfile, the connection attempt will fail. This option can be useful in batch jobs and scripts where no user is present to enter a password. -W--password-
Force createuser to prompt for a password (for connecting to the server, not for the password of the new user).
This option is never essential, since createuser will automatically prompt for a password if the server demands password authentication. However, createuser will waste a connection attempt finding out that the server wants a password. In some cases it is worth typing
-Wto avoid the extra connection attempt.
Environment
PGHOSTPGPORTPGUSER-
Default connection parameters
PG_COLOR-
Specifies whether to use color in diagnostic messages. Possible values are
always,autoandnever.
This utility, like most other PostgreSQL utilities, also uses the environment variables supported by libpq (see Section 32.15).
Diagnostics
In case of difficulty, see CREATE ROLE and psql for discussions of potential problems and error messages. The database server must be running at the targeted host. Also, any default connection settings and environment variables used by the libpq front-end library will apply.
Examples
To create a user joe on the default database server:
$createuser joe
To create a user joe on the default database server with prompting for some additional attributes:
$createuser --interactive joeShall the new role be a superuser? (y/n)nShall the new role be allowed to create databases? (y/n)nShall the new role be allowed to create more new roles? (y/n)n
To create the same user joe using the server on host eden, port 5000, with attributes explicitly specified, taking a look at the underlying command:
$createuser -h eden -p 5000 -S -D -R -e joeCREATE ROLE joe NOSUPERUSER NOCREATEDB NOCREATEROLE INHERIT LOGIN;
To create the user joe as a superuser, and assign a password immediately:
$createuser -P -s -e joeEnter password for new role:xyzzyEnter it again:xyzzyCREATE ROLE joe PASSWORD 'md5b5f5ba1a423792b526f799ae4eb3d59e' SUPERUSER CREATEDB CREATEROLE INHERIT LOGIN;
In the above example, the new password isn’t actually echoed when typed, but we show what was typed for clarity. As you see, the password is encrypted before it is sent to the client.
Для выполнения операций с базами данных в PostgreSQL создаются пользователи с различными правами доступа. В статье расскажем о том, как создать пользователя в PostgreSQL разными способами. Чтобы выполнить приведенные ниже рекомендации, сначала установите эту СУБД на сервер. Порядок установки на Ubuntu (Linux) и Windows подробно описывается в этой статье.
Для создания пользователя PostgreSQL можно использовать разные методы: например, ввести команду CREATE USER (или CREATE ROLE) в командной строке или выполнить SQL-запрос через интерфейс администрирования, такой как pgAdmin. Рассмотрим эти способы более подробно.
Создаем пользователей через CREATE USER
Для создания пользователя superuser с паролем и правами администратора в PostgreSQL сначала открываем командную строку, например, через утилиту psql или командой psql -U <имя_пользователя>. Далее вводим следующую команду в командной строке, заменив name и pass на желаемые значения:
CREATE USER name WITH PASSWORD 'pass' SUPERUSER;После выполнения этой команды будет создан пользователь с правами администратора, что даст ему полный контроль над базой данных (БД). Также заметим, что для выполнения этой команды вам потребуется роль администратора с привилегиями доступа к созданию пользователей.
Для создания обычного пользователя вводим следующую команду, также заменив name и pass на желаемые значения:
CREATE USER name WITH PASSWORD 'pass';Обратите внимание, что мы можем также добавить дополнительные параметры при создании пользователя, например, ограничения на подключение или права доступа к БД. Делается это так:
CREATE USER name WITH PASSWORD 'pass' CONNECTION LIMIT 5;Опция CONNECTION LIMIT указывает максимальное количество одновременных подключений, которые может установить этот пользователь. В данном случае, пользователь будет ограничен до 5 одновременных подключений к базе данных.
dbaas
Создаем пользователя PostgreSQL через pgAdmin
Если вы предпочитаете использовать интерфейс администрирования, такой как pgAdmin, то создание новых пользователей здесь осуществляется следующим образом:
- Откройте
pgAdmin, подключитесь к серверу PostgreSQL. - В левой панели навигации выберите БД, в которой вы хотите создать пользователя.
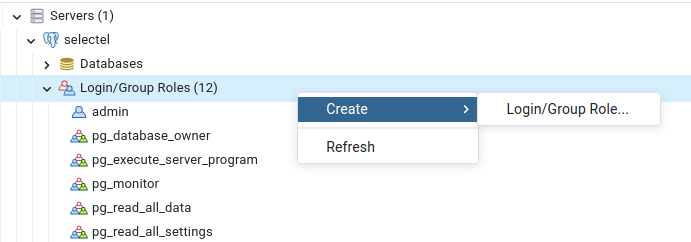
- Щелкните правой кнопкой на «Login/Group Roles» и выберите «Create» — «Login/Group Role».
- В появившемся окне заполните следующую информацию:
-
- В поле Name на вкладке General введите имя пользователя.
- В поле Password на вкладке Definition введите пароль новой учетной записи. Также на этой вкладке можно настроить дополнительные параметры, такие как ограничение количества одновременных подключений (
CONNECTION LIMIT— см. пример выше) и дату и время истечения прав учетной записи. Однако если для пользователя задан вход без пароля, то значение, указанное в Account expires, применяться не будет. Если же вы хотите установить неограниченное количество одновременных подключений, установите значениеCONNECTION LIMITна -1. - В разделе Privileges выберите необходимые привилегии. Например, можно установить опцию Can login? в активную позицию (нажав на переключатель справа), чтобы разрешить пользователю вход в систему. Там же можно выдать учетной записи права суперпользователя (опция Superuser?).
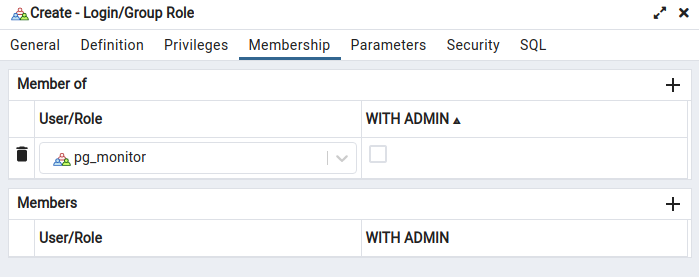
- На вкладке Membership можно задавать пользователям специфические роли, которые предлагаются системой. Например, для отслеживания и диагностики БД предусмотрена роль
pg monitor.
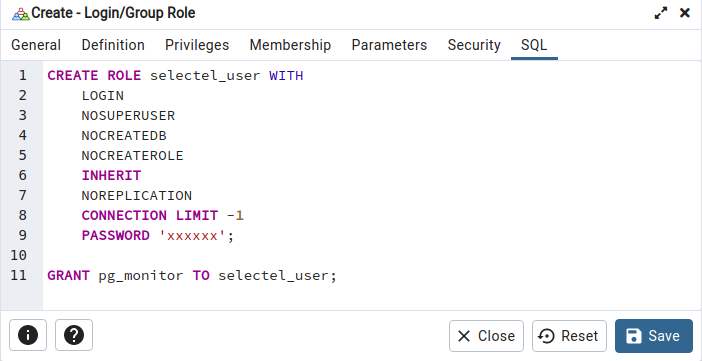
- Проверьте созданный код SQL на крайней правой вкладке и затем нажмите кнопку «Save», чтобы создать пользователя с выбранными параметрами.
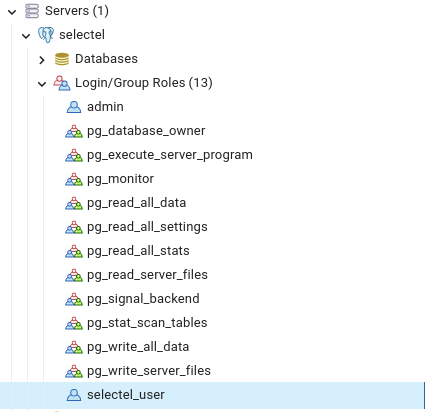
- Теперь пользователь будет создан и отображен в списке «Login/Group Roles» в
pgAdmin.
CREATE USER vs CREATE ROLE
Начнем с того, что роли в современных версиях СУБД Postgres представляют как отдельных пользователей (с правами входа в систему или без них), так и целые группы. И для создания ролей в БД используются команды CREATE ROLE и CREATE USER. Они выполняют одну и ту же функцию, но существует небольшая разница в синтаксисе.
Команда CREATE ROLE часто (но не только) используется для создания роли без возможности входа в систему. Это означает, что созданная роль не сможет подключаться к серверу PostgreSQL и выполнять операции в базе данных (добавлять, изменять и удалять данные). Это может быть полезным, если вы хотите создать пользователя PostgreSQL Read Only (с правами только для чтения), пример:
CREATE ROLE readonly_user;Команда CREATE USER (примеры ее использования см. выше), с другой стороны, нередко используется для создания роли с возможностью входа в систему. Это означает, что созданный пользователь сможет подключаться к серверу PostgreSQL и выполнять различные операции в базе данных.
Таким образом, команда CREATE USER фактически синонимична команде CREATE ROLE с опцией LOGIN. То есть команды CREATE USER readonly_user и CREATE ROLE readonly_user WITH LOGIN равнозначны.
А на этом всё: теперь вы знаете, как создавать пользователей различными способами через консоль и графический интерфейс и наделять их различными правами. Успешной работы!
Введение
В этой статье покажем несколько способов, как создать пользователя в PostgreSQL, включить его в группы и назначить права напрямую, а также поменяем пароль. У вас должен быть сервер с установленным Postgres, если его нет — почитайте нашу статью про установку PostgreSQL на примере Ubuntu.
Создание пользователя PostgreSQL с помощью CREATE USER
Перед тем, как рассказывать о создании пользователей, мы объясним, как устроены роли в Postgres. В современных версиях этой СУБД нет понятий «пользователь» или «группа», они объединены в одну сущность — «роль». И хотя в Postgres есть отдельные команды для создания пользователя или роли, на самом деле они создают одну и ту же сущность. Роль может иметь возможность входа в систему (то есть подключаться к БД и выполнять запросы) или не иметь ее.
Для удобства во многих руководствах и инструментах роль с возможностью входа называется «пользователь», а роль без этой возможности — «группа» или «групповая роль». В этой статье мы тоже будем придерживаться этих наименований.
Итак, существует несколько способов создания пользователя в командной строке:
- CREATE ROLE — SQL-команда, которая выполняется на сервере базы данных. По умолчанию создается роль с параметром NOLOGIN, который означает, что эта роль не может залогиниться в СУБД. Но если указать явно параметр LOGIN, тогда эта команда будет эквивалентна созданию пользователя.
Синтаксис:
CREATE ROLE <название> [Примеры использования:
- CREATE ROLE selectel_user LOGIN PASSWORD ‘bestpass’; — создать пользователя и установить ему пароль.
- CREATE ROLE selectel_user WITH LOGIN PASSWORD ‘bestpass’ VALID UNTIL ‘2022-12-31’; — создать пользователя, установить ему пароль и срок действия учетной записи до конца 2022 года.
- CREATE USER — тоже SQL-команда, которая выполняется на сервере. Это алиас к предыдущей команде CREATE ROLE. Единственно отличие в том, что эта команда по умолчанию использует параметр LOGIN, который разрешает логиниться в базу данных.
Синтаксис и примеры использования аналогичны команде CREATE ROLE.
- createuser — утилита операционной системы, которая поставляется вместе с сервером. Это тоже не самостоятельно решение, а просто обертка над SQL-командой CREATE ROLE.
Синтаксис:
createuser [параметр-подключения...] [параметр...] [имя-пользователя]Примеры использования:
- createuser selectel_user -P; — создать нового пользователя и установить ему пароль (терминал запросит пароль после ввода команды).
- createuser selectel_user -P -g selectel_group; — создать пользователя, установить ему пароль и добавить его в группу selectel_group.
Как создать пользователя PostgreSQL в графическом интерфейсе
Кроме командной строки, существует множество утилит для работы с Postgres в графическом окружении. Мы будем пользоваться pgAdmin, но аналогичные действия можно выполнить и в любой другой подобной программе.
С помощью pgAdmin подключимся к базе данных и в разделе Login/Group Roles вызовем контекстное меню и выберем Create — Login/Group Role.
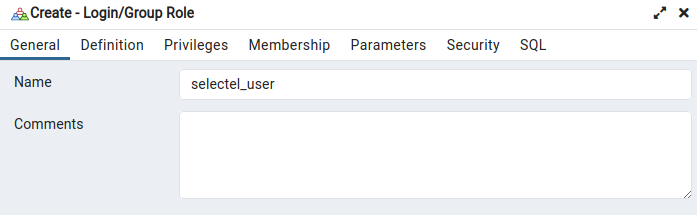
Появится диалоговое окно с несколькими вкладками. На первой вкладке укажем имя пользователя, при желании можно указать его описание в поле Comments:
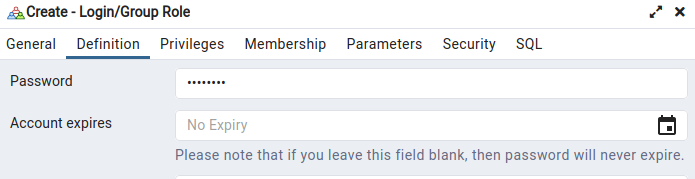
На вкладке Definition зададим пароль. Тут же можно указать дату истечения, после которого пользователю обязательно нужно будет сменить пароль:
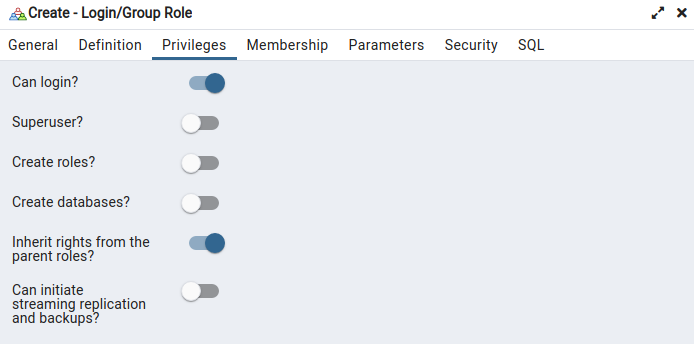
На вкладке Privileges можно указать, какими полномочиями будет обладать пользователь: логиниться, создавать другие роли или базы данных, будет ли это суперпользователь и т.п. Мы выберем лишь опцию Login, остальное оставим по умолчанию:
На вкладке Membership можно присвоить пользователю роли. Для примера мы присвоим ему встроенную в Postgres роль pg_monitor, которая дает права на просмотр различных таблиц и представлений, связанных с мониторингом и диагностикой базы данных:
На последней вкладке SQL можно увидеть SQL-команды, с помощью которых будет создан пользователь. Запоминать и копировать их не обязательно, pgAdmin выполнит их за нас. Эта вкладка нужна скорее для финальной проверки.
Нажимаем на кнопку Save, и пользователь создается. Мы можем увидеть его в разделе Login/Group Roles:
Добавление и удаление прав с помощью групп в базе данных PostgreSQL
В Postgres роли могут наследоваться от других ролей. А так как роль — это либо «пользователь», либо «группа», получается, что пользователи могут наследовать привилегии от групп или других пользователей. Мы рассмотрим настройку с наследованием от групп. Создадим две группы: одну с правами только на чтение данных из таблицы, а другую — с правами на чтение и запись. По очереди назначим пользователю эти группы и посмотрим на результат.
Создаем группы:
CREATE ROLE "read_only_role";
CREATE ROLE "read_write_role";
Мы создали группы, но не дали им никаких привилегий. В нашей БД есть таблица first_table, на которой мы будем проверять работу назначения привилегий. Группе read_only_role дадим права на чтение этой таблицы, а группе read_write_role — на чтение и запись:
GRANT SELECT ON TABLE first_table TO read_only_role;
GRANT SELECT, INSERT, UPDATE, DELETE on table first_table TO read_write_role;
Группы созданы, но наш пользователь еще не унаследовал их привилегии. Для начала убедимся, что у него нет прав на чтение данных из таблицы. Залогинимся в БД под пользователем selectel_user и выполним команду:
SELECT * FROM first_table;Получим ошибку:
ERROR: permission denied for table first_tableТеперь из под учетной записи владельца присвоим пользователю роль на чтение:
GRANT read_only_role TO selectel_user;Снова попробуем выполнить запрос от имени пользователя и увидим результат:
id | message
----+---------
 1 | Привет!
(1 row)
Теперь попробуем вставить строку в таблицу:
INSERT INTO first_table VALUES (2, 'Hello!');Получим ошибку:
ERROR: permission denied for table first_table
Все работает, как мы планировали: у пользователя есть права на чтение данных из таблицы, но нет прав на вставку данных (а также изменение и удаление, но мы не будем это проверять).
Теперь заберем у пользователя группу на чтение и присвоим группу с правами на чтение и запись:
REVOKE read_write_role FROM selectel_user;
GRANT read_write_role TO selectel_user;
Снова попробуем вставить строку и убедимся, что данные появились в таблице:
id | message
----+---------
 1 | Привет!
 2 | Hello!
(2 rows)
Успешно — у пользователя появились права на запись в таблицу.
Изменение пользователя: добавление привилегий напрямую и смена пароля
Теперь попробуем присвоить привилегии пользователю напрямую, а не через группы. В нашей схеме есть еще одна таблица, на которую у пользователя пока что нет прав: second_table. Убедимся в этом:
SELECT * FROM second_table;
Результат:
ERROR: permission denied for table second_table
Добавим пользователю привилегии на эту таблицу напрямую. Это делается аналогично назначению привилегий на группу, только вместо группы укажем имя пользователя. В этот раз вместо указания конкретных привилегий мы воспользуемся конструкцией ALL PRIVILEGES, которая сразу дает все полномочия на таблицу:
GRANT ALL PRIVILEGES ON TABLE second_table TO selectel_user;Снова проверим содержимое этой таблицы и увидим результат:
id | message
----+-----------
 1 | Hello again!
(1 row)
Итак, мы назначили пользователю привилегии на таблицу напрямую, минуя роли. При этом прямое присвоение и группа дополняют друг друга, и теперь у пользователя есть разрешения на обе таблицы.
Также покажем, как можно обновить пароль пользователю. Для этого достаточно выполнить одну простую команду:
ALTER USER selectel_user PASSWORD 'newpass';Заключение
Мы узнали, что между группой и пользователем в PostgreSQL практически нет никакой разницы, рассмотрели несколько способов создания пользователя и добавления ему групп, поработали в консоли и воспользовались графической утилитой pgAdmin.
PostgreSQL handles access control through privileged access management, an effective way to secure any database type. Users create and manage PostgreSQL user accounts with the createuser client utility and the native psql interface.
This tutorial shows how to create and set up different user types for a PostgreSQL database.
Prerequisites
- PostgreSQL installed (follow our guide for Ubuntu or Windows).
- Command-line tool access with sudo privileges.
- Access to the postgres superuser.
Create a New User in PostgreSQL
Creating a new user in PostgreSQL requires access to the postgres user. The postgres user is a superadmin created automatically during a PostgreSQL installation.
The sections below provide steps for creating users in PostgreSQL via the createuser command and the psql command-line interface.
Method 1: Using createuser Client Utility
The client utility method enables user management without the need to connect to psql. To create a user, run the following command in the terminal:
sudo -u postgres createuser [name]If the operation is successful, the terminal does not print an output. To show the server message, add the -e tag:
sudo -u postgres createuser -e [name]For example:
sudo -u postgres createuser -e john
Alternatively, split the command into two parts:
1. Switch to the postgres user:
sudo su - postgres2. Run the createuser command:
createuser [name]In both cases, PostgreSQL automatically creates the user (i.e., the role with login permissions).
Method 2: Using psql
Another way to create a new user in PostgreSQL is through the interactive psql shell.
1. Switch to the postgres user and start the interactive terminal with:
sudo -u postgres psql
The prompt changes to postgres=# to indicate a successful connection to the Postgres shell.
2. Use the following statement to create a user:
CREATE USER [name];For example:
CREATE USER mary;
Running the command prints CREATE ROLE to the console. The reason is that the CREATE USER query is an alias for the following command:
CREATE ROLE [name] WITH LOGIN;Both queries yield the same result.
Create Superuser in PostgreSQL
To create a superuser in PostgreSQL, you must have the superuser role.
Warning: A database superuser bypasses all checks, which is dangerous from a security aspect. Use this action carefully and avoid working with a superuser account unless necessary.
The following are the two methods to make a superuser in PostgreSQL:
Method 1: The createuser Command
Create a superuser role through the client utility by adding the --superuser tag:
sudo -u postgres createuser --superuser [name]Or use the shorthand tag -s instead of --superuser:
sudo -u postgres createuser -s [name]The terminal outputs a message if an error occurs or the user already exists. If the operation is successful, no message appears.
Method 2: The psql Interactive Shell
Alternatively, create a superuser with the following CREATE USER statement in psql:
CREATE USER [name] SUPERUSER;
CREATE USER is an alias for the following statement:
CREATE ROLE [name] LOGIN SUPERUSER;The CREATE ROLE statement requires adding the LOGIN permission to emulate a user.
Create a Password for a User
Every database user must have a strong password to prevent brute-force attacks. PostgreSQL offers two methods to create a user with a password.
Note: The createuser utility is preferred for password creation because it is more secure.
Method 1: The createuser Command
Use the createuser command and add the --pwprompt option to invoke a password creation prompt automatically:
sudo -u postgres createuser [name] --pwpromptThe shorthand version is the -P tag:
sudo -u postgres createuser [name] -P
The terminal prompts the user to enter a password twice. The password is encrypted and hidden when communicating with the server.
Method 2: The psql Interactive Shell
Use psql to create a user with a password:
CREATE USER [name] WITH PASSWORD '[password]';
If the user already exists, add the password using the ALTER USER statement:
ALTER USER [name] WITH PASSWORD '[password]';
Password management via psql comes with three security vulnerabilities:
- The password is visible on the screen.
- Viewing the command history exposes the password.
- The information is transmitted as clear text without any encryption.
Use this method with caution.
Grant Privileges to a User
By default, new users do not have any privileges except for the ability to log in. To add privileges when creating a user, run the createuser client utility in the following format:
createuser [option] [name]To do the same in psql, run:
CREATE USER [name] WITH [option];Below is a table with commonly used options for both methods.
| Option Syntax | psql | Explanation |
|---|---|---|
-s--superuser |
SUPERUSER |
Add the superuser privilege. |
-S--no-superuser |
NOSUPERUSER |
No superuser privilege (default). |
-d--createdb |
CREATEDB |
Allows the user to create databases. |
-D--no-createdb |
NOCREATEDB |
Not allowed to create databases (default). |
-r--createrole |
CREATEROLE |
Allows the user to make new roles. |
-R--no-createrole |
NOCREATEROLE |
Not allowed to create roles (default). |
-i--inherit |
INHERIT |
Automatically inherit the privileges of roles (default). |
-I--no-inherit |
NOINHERIT |
Do not inherit privileges of roles. |
-l--login |
LOGIN |
Allows the user to log into a session with the role name (default). |
-L--no-login |
NOLOGIN |
Not allowed to log into a session with the role name. |
--replication |
REPLICATION |
Allows initiating streaming replication and activating/deactivating backup mode. |
--no-replication |
NOREPLICATION |
Not allowed to initiate streaming replication or backup mode (default). |
-P--pwprompt |
PASSWORD '[password]' |
Initiates password creation prompt or adds provided password to the user. Avoid using this option to create a passwordless user. |
| / | PASSWORD NULL |
Specifically sets the password to null. Every password authentication fails for this user. |
-c [number]--connection-limit=[number] |
CONNECTION LIMIT [number] |
Sets the maximum number of connections for a user. Default is without limit. |
The following example creates a user that will be able to create roles and databases:
sudo -u postgres createuser -d -r -e [name]
Below is the psql equivalent of the command above:
CREATE USER [name] WITH CREATEROLE CREATEDB;
In both cases, the specified privileges are granted automatically to the new user.
Create a PostgreSQL User Interactively
The interactive user creation is a practical option available only for the client utility. To create a user interactively, run the following command:
sudo -u postgres createuser --interactive
The command automatically prompts a question series, asking the following:
- The name of the role.
- Whether the role is a superuser.
- If the user is allowed to create databases.
- If the user is allowed to create other roles.
Answer yes (y) to the superuser question to add the «create database» and «create role» privileges and end the prompt.
List All Users in PostgreSQL
Listing all the users with their respective roles and privileges is essential for database user management.
To list all users present in a PostgreSQL deployment, do the following:
1. Connect to the psql prompt as the postgres user:
sudo -u postgres psql2. List all the users with the following command:
\du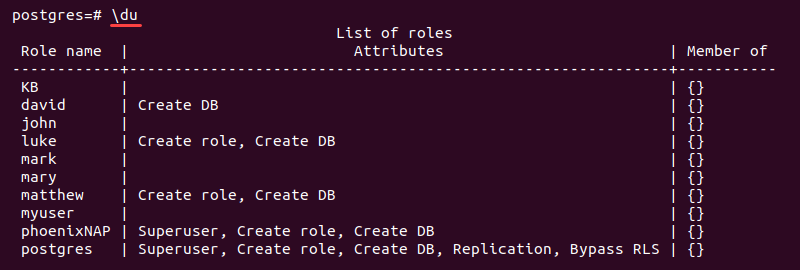
The output shows a table with the role names, attributes (privileges), and user groups. To display the description for each role, add the plus (+) sign:
\du+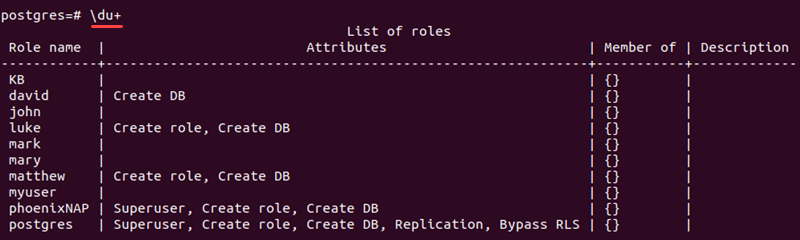
The output shows an additional column with the role description where applicable.
Conclusion
After reviewing the examples in this guide, you should know how user and role management works in PostgreSQL.
Next, learn about how Database-as-a-Service can help improve database management productivity.
Was this article helpful?
YesNo
I’ve created hundreds of database users across various environments while working with PostgreSQL. In this comprehensive guide, I’ll walk you through everything you need to know about how to create a user in PostgreSQL.
Let’s discuss each approach individually.
Approach-1 Creating Users via GUI Tools
To create user in PostgreSQL, follow the steps below.
- Open pgAdmin and connect to your PostgreSQL server.
- Right-click on “Login/Group Roles”.
- Select “Create” then “Login/Group Role” as shown in the screenshot below.

4. Fill in the required details in the following tabs:
- General: Enter the username

- Definition: Set password and expiration

- Privileges: Configure user permissions

- Membership: Assign to existing groups

Finally, click on the Save button.
Check out the screenshot below, which shows the user has been created successfully.
Approach-2 Using Command Line
PostgreSQL has a utility called createuser to create a new role or user account. The use of the command createuser can only be used by the superusers, also if any user in PostgreSQL has the privilege of CREATE ROLE can create a new user in PostgreSQL.
Privileges like SUPERUSER, BAYPASSRLS, and REPLICATION can only be assigned by superusers. A user with CREATE ROLE permission can not make a new user with that privilege.
The syntax is given below.
createuser [-arguments] username- createuser: The core utility to make a new user in PostgreSQL.
Below is given the arguments accepted by the createuser command.
- –createdb or -d: It gives permission to a new user to create a database.
- username: A new name of the user that will be created.
- –no-create or -D: It doesn’t allow a new user to create a new database.
- -i or –inherit: Assign all the privileges of the member to which a new user belongs.
- -I or –no-inherit: It doesn’t assign all the privileges of the member to which a new user belongs.
- -l or –login: It is used to assign login permission for the new PostgreSQL user means the new user can log in.
- -L or –no-login: The new PostgreSQL user doesn’t have login permission.
- -r or –createrole: The new PostgreSQL user has permission to create a new role.
- -R or –no-creatorole: The new user doesn’t have permission to create the new role.
- -s or –superuser: Using the argument, the new PostgreSQL is going to be the superuser
- -S or –no-superuser: It is applied by default that the new PostgreSQL user is not going to be the superuser.
- –replication: The new PostgreSQL user is going to have the REPLICATION permission.
- –no-replication: The new PostgreSQL user is not going to have the REPLICATION permission.
Several arguments can be used with the createuser command. For more information about the arguments, refer to the official PostgreSQL documentation.
Let’s take an example and learn how to create a different type of PostgreSQL user.
Open the command prompt on Windows and use the below command to create a user David with default privileges.
createuser -h localhost -U postgres DavidAfter running the above command, enter the new password for the user David as shown in the picture below.

To view the newly created user, log in to the PostgreSQL psql prompt with the specific user.
psql -U postgresNow run the command ‘\du’ in the psql prompt as shown in the picture below.
\du
In the above output, you can see the newly created user ‘David’, but this user does not have any defined role.
Now, take one more example and create a user with the same roles as an existing user, so execute the command below.
createuser -h localhost -U postgres --role=postgres JamesHere in the above command, the option ‘–role=postgres’ means assign roles the same as the user postgres.

Now view the newly created user with the role.
\du
In the above output, you can see that the new user ‘James’ is a member of the user ‘postgres’, which means the user ‘James’ has all the roles of the user ‘postgres’ because you used the option ‘–role=postgres’ in the command.
Approach-3 Using Interactive Mode
There is a command line argument ‘–interactive’ that is used with the command createuser, it asks for additional information or privileges for the new user.
The syntax is given below.
createuser -h localhost -U postgresql_username --interactive new_usernameLet’s take an example by following the steps below:
Open the command prompt on your computer, and type the following command to create a new PostgreSQL user ‘Danny’.
createuser -h localhost -U postgres --interactive DannyWhen you run the above command, it asks for three permissions that are assigned to the new user ‘Danny’, the permissions are: Shall the new role be a superuser? (y/n), Shall the new role be allowed to create databases? (y/n) And shall the new role be allowed to create more new roles? (y/n).

Based on the above output, the type of permission to be assigned to the new user depends on you.
To view the user, log in to the psql command prompt and run the following command.
\du
In the above output, you can see the list of role attributes assigned to the user ‘Danny’ that you assigned while creating this user.
Conclusion
In this PostgreSQL tutorial, you have covered how to create a new user in PostgreSQL using the createuser command with different arguments that can be used with this command, and also learned how to create a new user using the interactive mode argument.
You may like to read:
- How to Set PostgreSQL User Password
- How to connect to PostgreSQL database [Complete tutorial]
- PostgreSQL list users – Helpful Guide
I am Bijay having more than 15 years of experience in the Software Industry. During this time, I have worked on MariaDB and used it in a lot of projects. Most of our readers are from the United States, Canada, United Kingdom, Australia, New Zealand, etc.
Want to learn MariaDB? Check out all the articles and tutorials that I wrote on MariaDB. Also, I am a Microsoft MVP.