

This tutorial will show you how to change the mouse pointer speed for your account in Windows 11.
The mouse pointer, which is sometimes referred to as the cursor, is a bitmap that specifies a focus point on the screen for user input with the mouse.
You can change the speed at which the mouse pointer moves if it is moving too slow or fast for you.
Starting with Windows 11 build 26120.3671 (Beta 24H2), build 26200.5518 (Dev), and build 27842.1000 (Canary), Microsoft is starting to make more mouse related settings available directly under Settings > Accessibility > Mouse and Settings > Accessibility > Mouse pointer and touch without needing to go into Control Panel. This includes the settings for mouse indicator, mouse pointer trails, and further mouse behavior and pointer customization. As part of this work, Microsoft as also added the ability to adjust the amount of time needed to hover over a window to activate it, if you have activated on hover enabled. Finally, Microsoft updated the icon used for Mouse pointer speed in Bluetooth & Devices > Mouse and added an icon to the Enhance mouse pointer precision option.
Contents
- Option One: Change Mouse Pointer Speed in Settings
- Option Two: Change Mouse Pointer Speed in Control Panel
- Option Three: Change Mouse Pointer Speed in Registry Editor
Option One
Change Mouse Pointer Speed in Settings
1 Open Settings (Win+I).
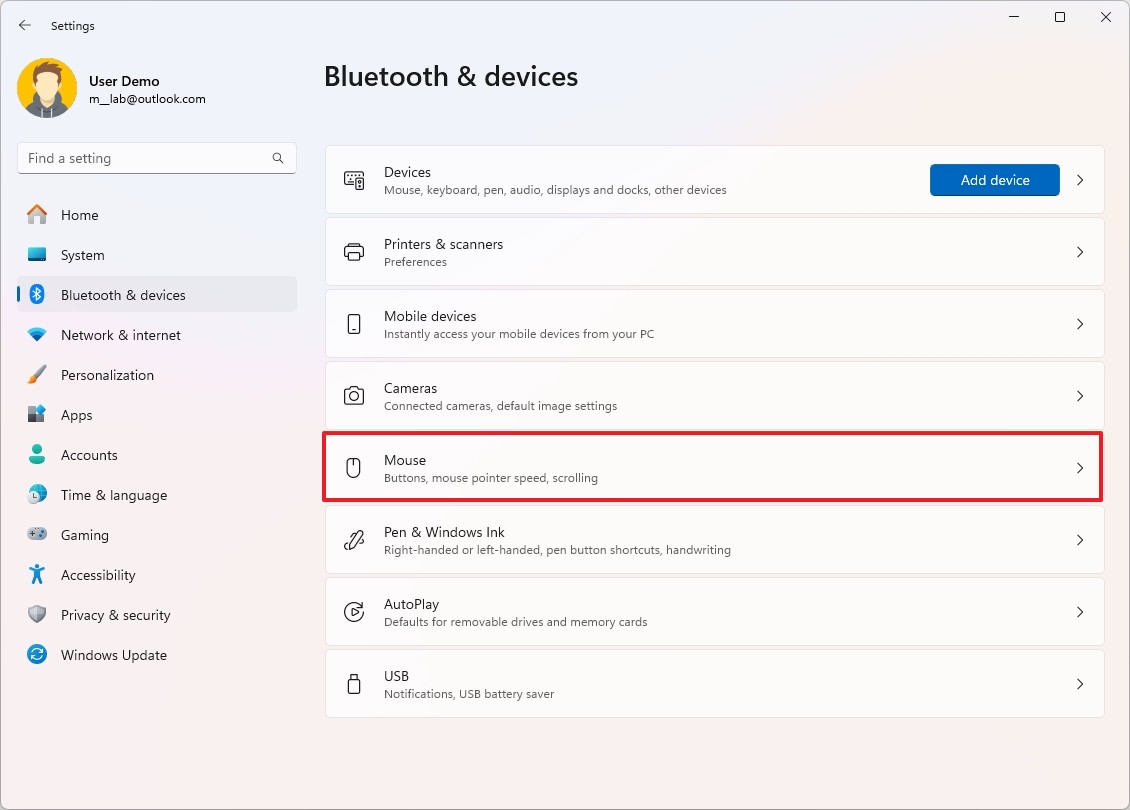
2 Click/tap on Bluetooth & devices on the left side, and click/tap on Mouse on the right side. (see screenshot below)

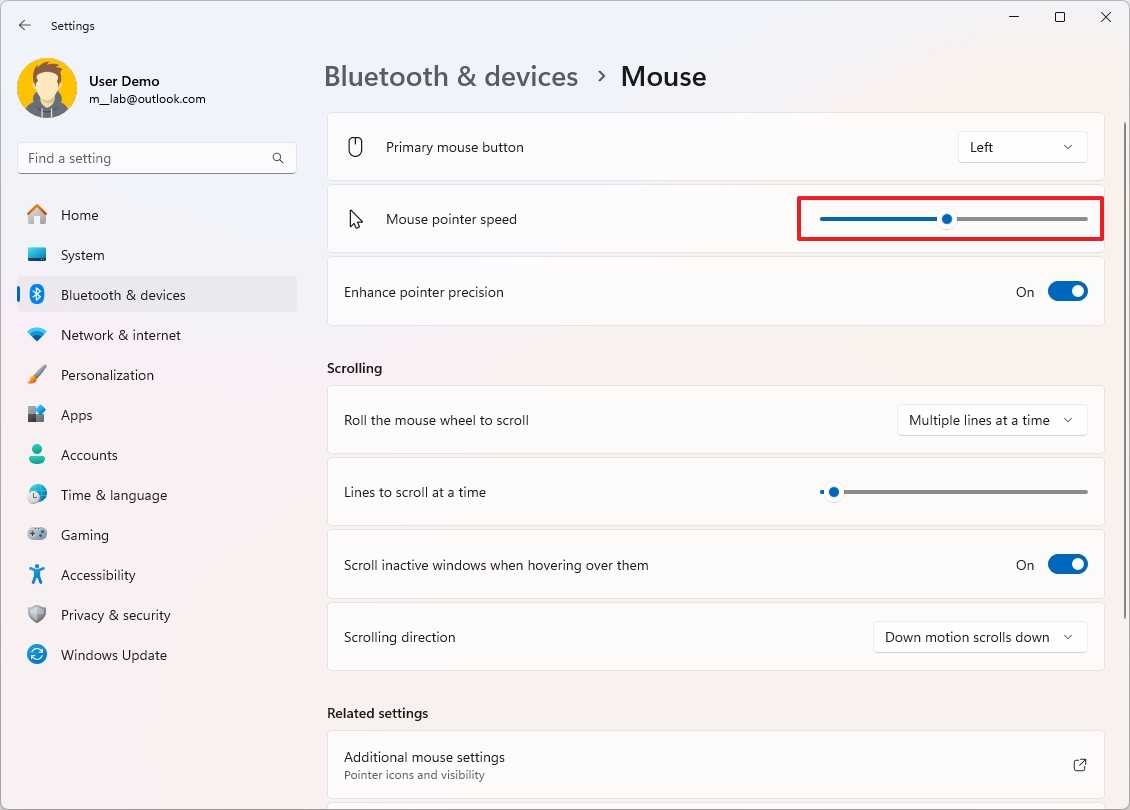
3 Adjust the Mouse pointer speed slider left (slower) right (faster) to the speed you want. (see screenshot below)
Hovering the pointer over the slider will display the current speed (1 to 20).
The default speed is 10.
4 You can now close settings if you like.
Option Two
Change Mouse Pointer Speed in Control Panel
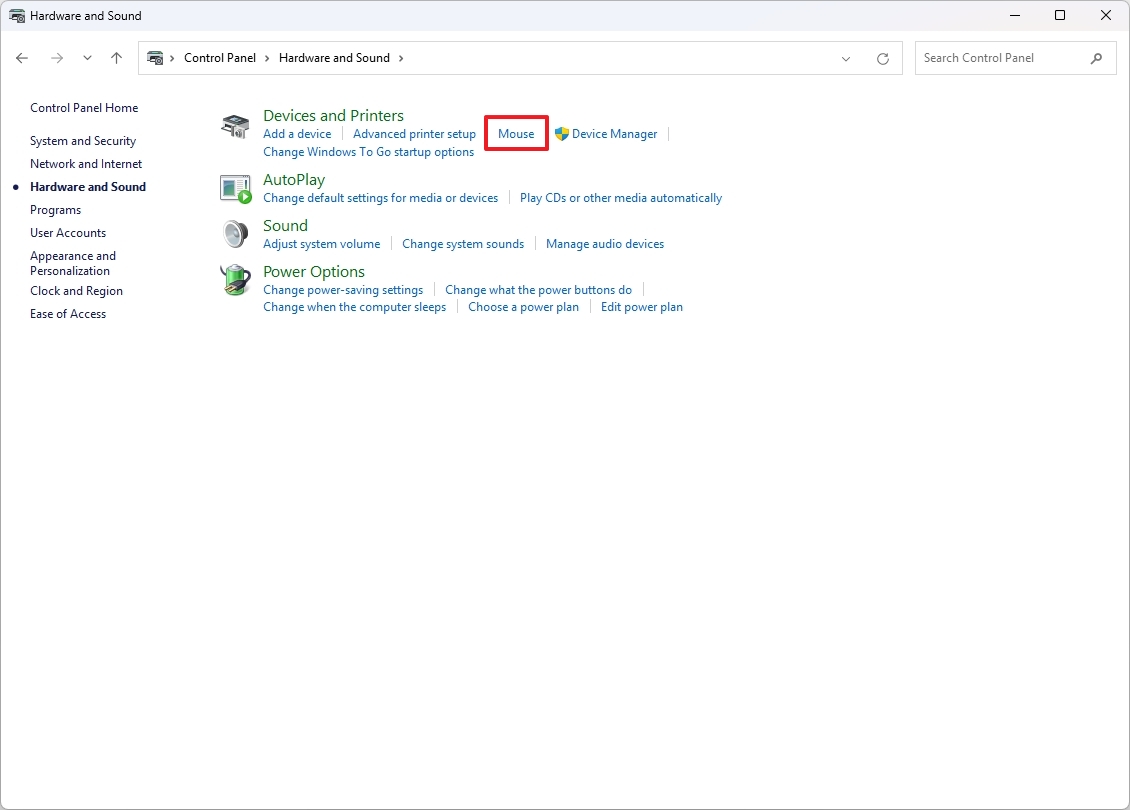
1 Open the Control Panel (icons view), and click/tap on the Mouse icon.
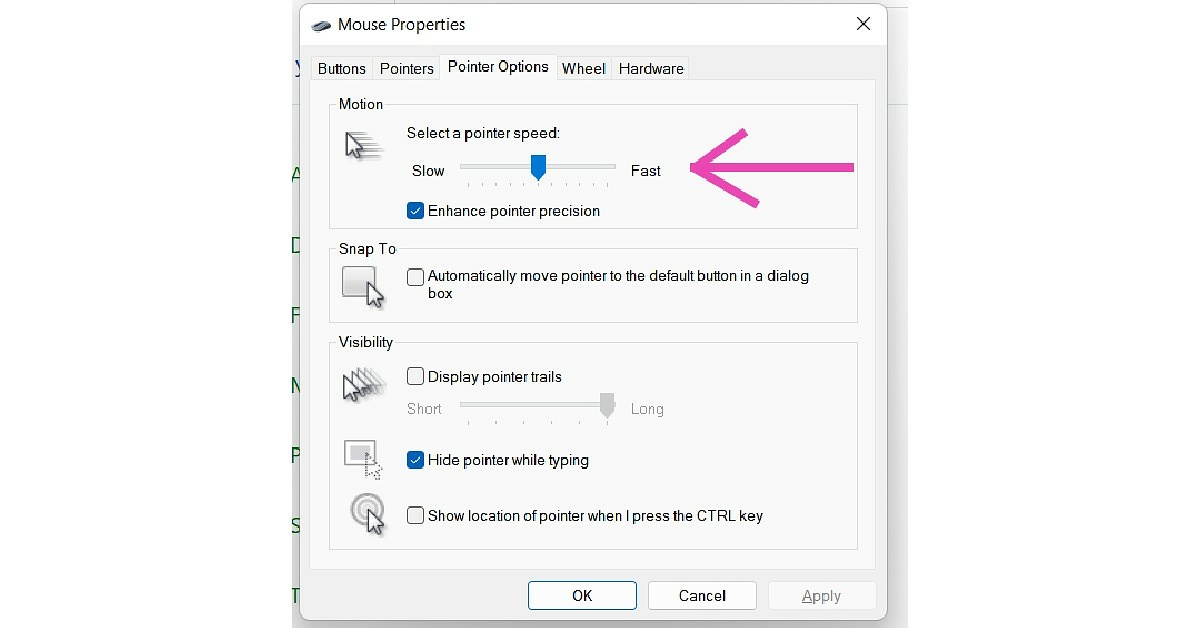
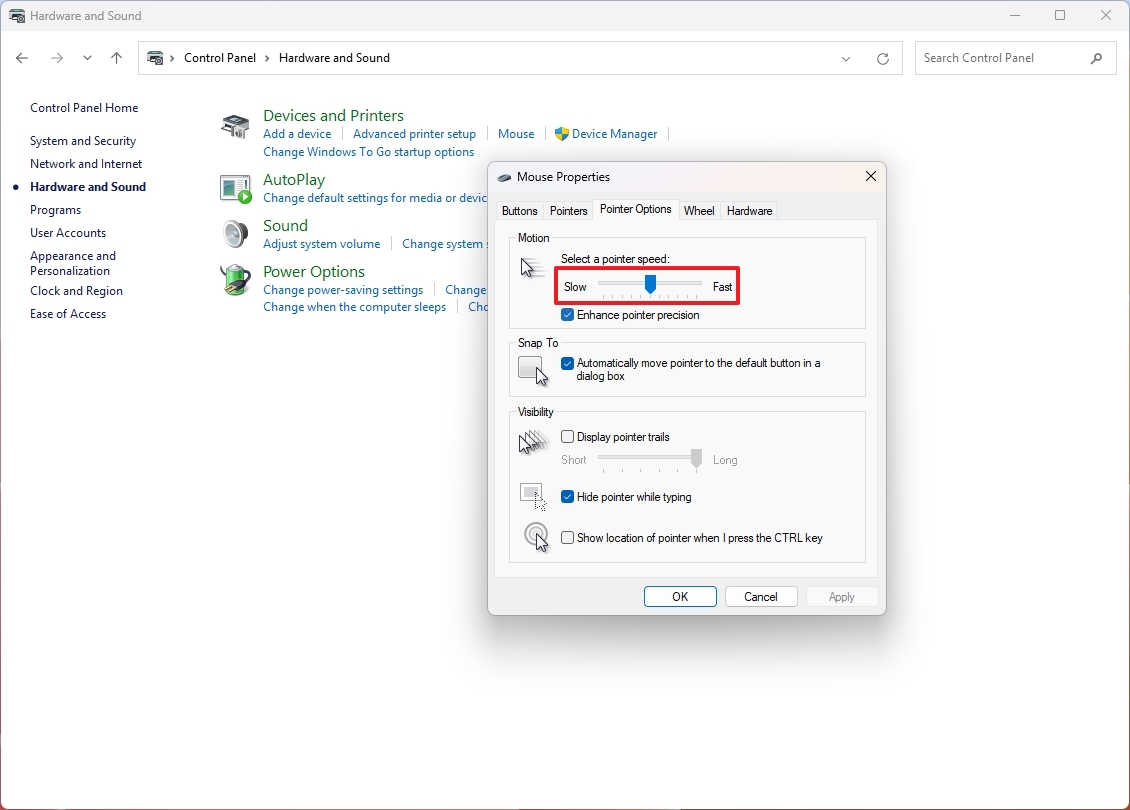
2 Click/tap on the Pointer Options tab. (see screenshot below)
3 Adjust the Select a pointer speed slider left (slower) or right (faster) to the speed you want.
4 Click/tap on OK.
5 You can now close the Control Panel if you like.

Option Three
Change Mouse Pointer Speed in Registry Editor
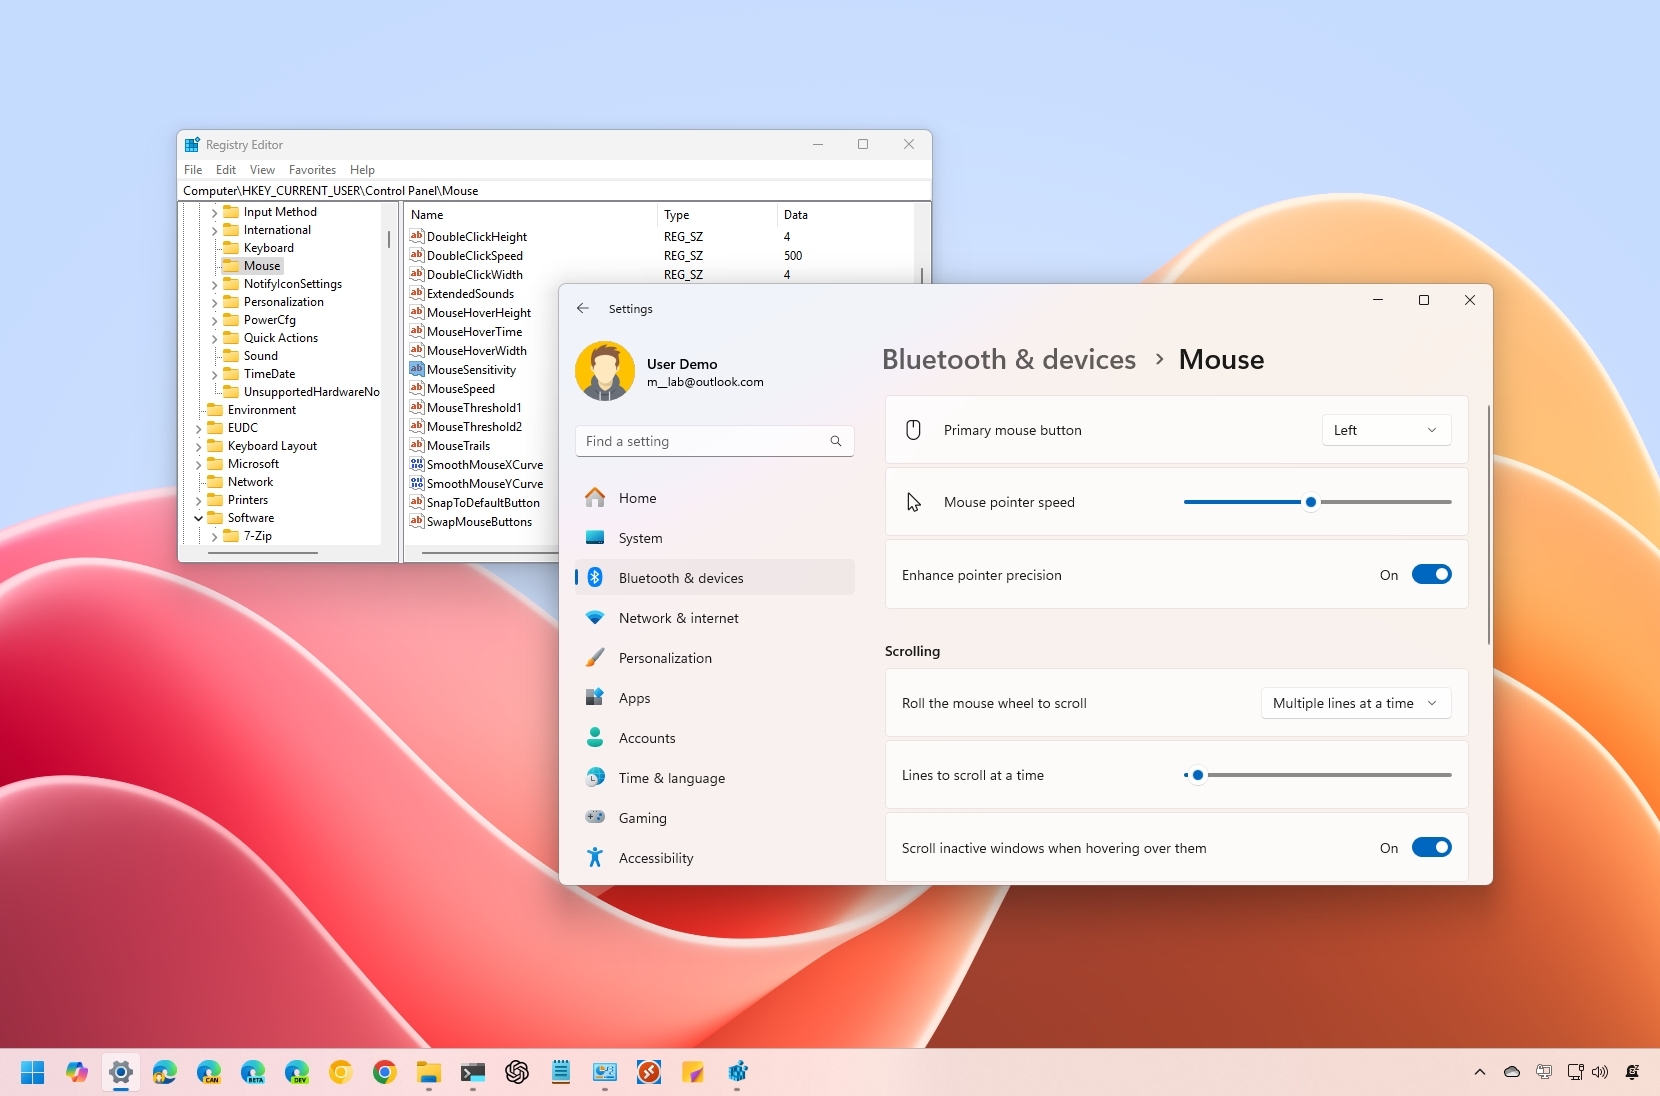
1 Open Registry Editor (regedit.exe).
2 Navigate to the key below in the left pane of Registry Editor. (see screenshot below)
HKEY_CURRENT_USER\Control Panel\Mouse

3 In the right pane of the Mouse key, double click/tap on the MouseSensitivity string value (REG_SZ) to modify it. (see screenshot above)
4 Type a number between 1 (slower) to 20 (faster) for the pointer speed you want, and click/tap on OK. (see screenshot below)
The default pointer speed is 10.

5 Close Registry Editor when finished.
6 Either sign out and sign in or restart the computer to apply.
That’s it,
Shawn Brink
Related Tutorials
- Change Touchpad Cursor Speed in Windows 11
- Turn On or Off Enhance Pointer Precision in Windows 11
- Turn On or Off Mouse Pointer Trails in Windows 11
- Turn On or Off Hide Pointer While Typing in Windows 11
- Turn On or Off Show Pointer Location when Press CTRL Key in Windows 11
- Change Mouse Pointer Style, Color, and Size in Windows 11
- Change Mouse Double-click Speed in Windows 11
- Turn On or Off Pointer Snap To Default Button in Windows 11
Introduction:
Setting default mouse settings on Windows 10 can significantly enhance your overall user experience. Whether you’re a casual computer user or a professional gamer, having the right mouse settings can make a world of difference. In this blog post, we will explore two methods to help you set default mouse settings on Windows 10 and optimize your mouse for maximum productivity and comfort.
Method 1: Using the Mouse Properties:
The first method involves using the built-in Mouse Properties feature on Windows 10. Here’s how you can do it:
Step 1: Click on the “Start” button and open the “Settings” app.
Step 2: In the Settings app, click on the “Devices” option.
Step 3: From the left-hand side menu, click on “Mouse.”
Step 4: In the Mouse settings, you’ll find various options to customize your mouse behavior. You can adjust the pointer speed, enable or disable the mouse trails, change the pointer size, and more.
Step 5: Once you have made the desired changes, click on “Apply” and then “OK” to save the settings.
Using the Mouse Properties feature, you can fine-tune your mouse settings to match your preferences and improve your overall navigation and control.
Method 2: Using Third-Party Software:
If you are looking for more advanced customization options, you can consider using third-party software to set default mouse settings on Windows 10. There are several options available, each with its own set of features and benefits. One popular choice is the software called “X-Mouse Button Control.”
Step 1: Download and install X-Mouse Button Control from the official website.
Step 2: Launch the software and click on the “Settings” tab.
Step 3: In the Settings tab, you’ll find a wide range of customization options such as button assignments, scroll settings, pointer settings, and more.
Step 4: Customize the settings according to your preferences.
Step 5: Click on “Apply” to save the changes.
Using third-party software like X-Mouse Button Control gives you more control over your mouse settings, allowing you to tailor it to your specific needs and streamline your workflow.
In conclusion, setting default mouse settings on Windows 10 is a simple yet effective way to improve your overall user experience. Whether you choose to use the built-in Mouse Properties feature or opt for third-party software, take the time to experiment and find the ideal settings that work best for you. By optimizing your mouse settings, you’ll enhance your productivity, comfort, and enjoyment while using your computer. So go ahead, give it a try, and discover the difference it can make!
Video Tutorial:What is the default mouse pointer?
What are the default mouse properties?
The default mouse properties can vary depending on the operating system and mouse driver being used. However, I’ll provide a general overview of the common default mouse properties found in most modern operating systems.
1. Pointer Speed: By default, the pointer speed is set to a medium level, allowing you to control the cursor’s movement across the screen. You can adjust the pointer speed based on your preference for faster or slower cursor movement.
2. Button Configuration: The default button configuration for a standard mouse is set to a right-handed setup, where the left button is used for primary actions (such as selecting and dragging), and the right button is used for secondary actions (such as accessing context menus). While most mice feature two buttons, some gaming mice or customizable mice may have additional buttons that can be programmed for specific functions.
3. Scrolling: The default mouse scroll behavior allows you to scroll vertically through documents and web pages. Typically, scrolling up or down scrolls the content accordingly. Some mice also offer horizontal scrolling for navigating horizontally-scrollable content.
4. Double-Click Speed: The double-click speed determines how quickly you need to click the mouse button twice for it to register as a double-click action. The default setting is usually set to a medium speed, but you can adjust it to suit your clicking speed.
5. Pointer Appearance: The default mouse pointer appearance is often a small arrow, which changes its shape depending on the context, like when hovering over links or text. Some operating systems also provide options to customize the cursor’s appearance, such as size, color, or theme.
It’s worth noting that these default mouse properties can be adjusted and customized within the operating system’s settings or mouse control panel. Different operating systems may have specific ways of accessing and modifying these properties, but they generally provide a similar set of options for mouse customization.
What is the default mouse sensitivity in Windows 10?
The default mouse sensitivity in Windows 10 can vary depending on the specific system or hardware configuration. However, there are certain steps you can follow to determine or adjust the default mouse sensitivity on your Windows 10 device:
1. Click on the Start button located on the taskbar to open the Start menu.
2. Select the Settings icon, which resembles a gear or cogwheel. This will open the Windows Settings app.
3. In the Settings app, click on the Devices option, which is represented by a rectangular symbol resembling a keyboard and mouse.
4. On the left-hand side of the Devices settings page, click on the Mouse option.
5. In the Mouse settings, you will find a section labeled “Related settings.” Click on the link that says “Additional mouse options.” This will open the Mouse Properties window.
6. Switch to the Pointer Options tab in the Mouse Properties window.
7. Under the Motion section, locate the pointer speed slider. The default mouse sensitivity in Windows 10 is typically set to the middle position or the 6th notch on the slider.
8. To adjust the default mouse sensitivity, you can either drag the pointer speed slider to your preferred position or click on the checkbox that says “Enhance pointer precision” to enable or disable mouse acceleration. Mouse acceleration affects the responsiveness of the mouse cursor in relation to your physical mouse movements.
9. Once you have made the desired adjustments, click on the Apply button to save the changes, and then click on OK to close the Mouse Properties window.
It’s worth noting that the default mouse sensitivity in Windows 10 may be further customized by specific mouse drivers or software provided by the manufacturer. In such cases, the default settings may differ based on the mouse brand or model.
Therefore, it’s recommended to refer to the documentation or support resources provided by your mouse manufacturer for detailed information related to the default mouse sensitivity settings for your specific device.
What are the default Windows mouse settings?
By default, Windows provides several mouse settings that can be customized to suit individual preferences. Here are the default Windows mouse settings:
1. Pointer speed: The default pointer speed determines how quickly the cursor moves across the screen in response to mouse movement. The default speed is usually set to the middle value.
2. Button configuration: By default, the primary button configuration is set to “left” for right-handed users, and “right” for left-handed users. This means the left mouse button is set as the primary button for most users.
3. Scrolling behavior: The default scrolling behavior is set to “scroll multiple lines at a time.” This means that scrolling the mouse wheel or using touch gestures on a touchpad will move the screen up or down by a few lines at a time.
4. Double-click speed: The default double-click speed determines how quickly the system recognizes two consecutive clicks as a double-click. The default speed is usually set to a medium value.
5. Mouse pointer appearance: The default pointer appearance uses the standard arrow-shaped cursor. Windows also provides other cursor schemes that can be chosen to personalize the appearance.
6. Enhancements: By default, Windows provides various mouse enhancements such as pointer trails, cursor magnification, and pointer precision. These settings can be customized or disabled depending on personal preferences.
It’s worth noting that these default mouse settings may vary slightly depending on the version of Windows being used. However, the above settings generally apply to most recent versions of Windows, including Windows 10, Windows 11, and future versions.
To access and modify these settings, you can go to the “Mouse” section in the Windows Control Panel or use the “Settings” app in Windows 10 and Windows 11 to navigate to the mouse settings.
What is the default mouse cursor?
The default mouse cursor typically depends on the operating system being used. Since you mentioned that it’s the year 2023 and Apple’s latest iPhone models are the iPhone 14, iPhone 14 Pro, and iPhone 14 Plus, we can assume you’re referring to the default mouse cursor on macOS, which is Apple’s operating system.
On macOS, the default mouse cursor is a small arrow-shaped pointer. This arrow pointer indicates the position and movement of the cursor on the screen. It’s designed to be easily recognizable and provides feedback to the user while interacting with graphical elements on the system.
The default mouse cursor on macOS, iOS, or any other operating system can be further customized by the user. Users have the flexibility to change the cursor’s appearance, size, and shape to suit their personal preferences or accessibility needs. This can be done through the system preferences or settings.
To summarize, the default mouse cursor on macOS, as of the latest version iOS 16 and assuming it’s the year 2023, is a small arrow-shaped pointer. However, it’s important to note that the default cursor can vary across different operating systems and can be customized by the user.
How do I lock my mouse settings?
To lock your mouse settings, follow these steps:
1. Open the Control Panel: Right-click on the Start button, then select Control Panel from the context menu.
2. Navigate to the Mouse settings: In the Control Panel, locate and click on the “Hardware and Sound” category. Then, under the Devices and Printers section, click on “Mouse”.
3. Access the Mouse Properties: In the Mouse Properties window, you will find various tabs such as Buttons, Pointers, Pointer Options, Wheel, and Hardware. Click on the “Pointer Options” tab.
4. Lock the mouse settings: Within the Pointer Options tab, locate the checkbox labeled “Enhance pointer precision” and make sure it is unchecked.
5. Apply changes and close the window: Click the “Apply” button to save the changes you have made. Then click “OK” to close the Mouse Properties window.
By following these steps, you effectively lock your mouse settings, preventing them from changing unintentionally.
How do I manage my mouse Settings in Windows 10?
To manage your mouse settings in Windows 10, follow these steps:
1. Open the “Settings” app by clicking on the Start menu and selecting the gear icon.
2. In the Settings window, click on “Devices.”
3. In the left-hand menu of the Devices settings, click on “Mouse.”
4. On the right side, you will find various options to customize your mouse settings. Let’s go through some important ones:
a. “Mouse pointer size and color”: Adjust the size and color of the mouse pointer for better visibility.
b. “Select your primary button”: Choose whether the primary button should be the left or right button.
c. “Choose how many lines to scroll each time”: Specify the number of lines the mouse wheel should scroll.
d. “Additional mouse options”: Click on this to access further settings like pointer speed, button configuration, wheel behavior, and more.
5. To access even more advanced settings, click on the “Additional mouse options” link. This will open the Mouse Properties dialog box.
6. In the Mouse Properties dialog box, you can customize additional settings, such as the pointer speed, button configuration, double-click speed, and pointer options for enhanced precision.
7. Navigate through the tabs in the Mouse Properties dialog box to explore settings such as Pointer Options, Wheel, Hardware, and Pointer.
8. Once you’ve adjusted your desired settings, click “Apply” and then “OK” to save the changes.
By following these steps, you should be able to manage and customize your mouse settings to suit your preferences in Windows 10.
{“@context”:”https://schema.org”,”@type”:”FAQPage”,”mainEntity”:[{“@type”:”Question”,”name”:”What are the default mouse properties?”,”acceptedAnswer”:{“@type”:”Answer”,”text”:”The default mouse properties can vary depending on the operating system and mouse driver being used. However, I’ll provide a general overview of the common default mouse properties found in most modern operating systems.nn1. Pointer Speed: By default, the pointer speed is set to a medium level, allowing you to control the cursor’s movement across the screen. You can adjust the pointer speed based on your preference for faster or slower cursor movement.nn2. Button Configuration: The default button configuration for a standard mouse is set to a right-handed setup, where the left button is used for primary actions (such as selecting and dragging), and the right button is used for secondary actions (such as accessing context menus). While most mice feature two buttons, some gaming mice or customizable mice may have additional buttons that can be programmed for specific functions.nn3. Scrolling: The default mouse scroll behavior allows you to scroll vertically through documents and web pages. Typically, scrolling up or down scrolls the content accordingly. Some mice also offer horizontal scrolling for navigating horizontally-scrollable content.nn4. Double-Click Speed: The double-click speed determines how quickly you need to click the mouse button twice for it to register as a double-click action. The default setting is usually set to a medium speed, but you can adjust it to suit your clicking speed.nn5. Pointer Appearance: The default mouse pointer appearance is often a small arrow, which changes its shape depending on the context, like when hovering over links or text. Some operating systems also provide options to customize the cursor’s appearance, such as size, color, or theme.nnIt’s worth noting that these default mouse properties can be adjusted and customized within the operating system’s settings or mouse control panel. Different operating systems may have specific ways of accessing and modifying these properties, but they generally provide a similar set of options for mouse customization.”}},{“@type”:”Question”,”name”:”What is the default mouse sensitivity in Windows 10?”,”acceptedAnswer”:{“@type”:”Answer”,”text”:”The default mouse sensitivity in Windows 10 can vary depending on the specific system or hardware configuration. However, there are certain steps you can follow to determine or adjust the default mouse sensitivity on your Windows 10 device:nn1. Click on the Start button located on the taskbar to open the Start menu.nn2. Select the Settings icon, which resembles a gear or cogwheel. This will open the Windows Settings app.nn3. In the Settings app, click on the Devices option, which is represented by a rectangular symbol resembling a keyboard and mouse.nn4. On the left-hand side of the Devices settings page, click on the Mouse option.nn5. In the Mouse settings, you will find a section labeled “Related settings.” Click on the link that says “Additional mouse options.” This will open the Mouse Properties window.nn6. Switch to the Pointer Options tab in the Mouse Properties window.nn7. Under the Motion section, locate the pointer speed slider. The default mouse sensitivity in Windows 10 is typically set to the middle position or the 6th notch on the slider.nn8. To adjust the default mouse sensitivity, you can either drag the pointer speed slider to your preferred position or click on the checkbox that says “Enhance pointer precision” to enable or disable mouse acceleration. Mouse acceleration affects the responsiveness of the mouse cursor in relation to your physical mouse movements.nn9. Once you have made the desired adjustments, click on the Apply button to save the changes, and then click on OK to close the Mouse Properties window.nnIt’s worth noting that the default mouse sensitivity in Windows 10 may be further customized by specific mouse drivers or software provided by the manufacturer. In such cases, the default settings may differ based on the mouse brand or model.nnTherefore, it’s recommended to refer to the documentation or support resources provided by your mouse manufacturer for detailed information related to the default mouse sensitivity settings for your specific device.”}},{“@type”:”Question”,”name”:”What are the default Windows mouse settings?”,”acceptedAnswer”:{“@type”:”Answer”,”text”:”By default, Windows provides several mouse settings that can be customized to suit individual preferences. Here are the default Windows mouse settings:nn1. Pointer speed: The default pointer speed determines how quickly the cursor moves across the screen in response to mouse movement. The default speed is usually set to the middle value.nn2. Button configuration: By default, the primary button configuration is set to “left” for right-handed users, and “right” for left-handed users. This means the left mouse button is set as the primary button for most users.nn3. Scrolling behavior: The default scrolling behavior is set to “scroll multiple lines at a time.” This means that scrolling the mouse wheel or using touch gestures on a touchpad will move the screen up or down by a few lines at a time.nn4. Double-click speed: The default double-click speed determines how quickly the system recognizes two consecutive clicks as a double-click. The default speed is usually set to a medium value.nn5. Mouse pointer appearance: The default pointer appearance uses the standard arrow-shaped cursor. Windows also provides other cursor schemes that can be chosen to personalize the appearance.nn6. Enhancements: By default, Windows provides various mouse enhancements such as pointer trails, cursor magnification, and pointer precision. These settings can be customized or disabled depending on personal preferences.nnIt’s worth noting that these default mouse settings may vary slightly depending on the version of Windows being used. However, the above settings generally apply to most recent versions of Windows, including Windows 10, Windows 11, and future versions.nnTo access and modify these settings, you can go to the “Mouse” section in the Windows Control Panel or use the “Settings” app in Windows 10 and Windows 11 to navigate to the mouse settings.”}},{“@type”:”Question”,”name”:”What is the default mouse cursor?”,”acceptedAnswer”:{“@type”:”Answer”,”text”:”The default mouse cursor typically depends on the operating system being used. Since you mentioned that it’s the year 2023 and Apple’s latest iPhone models are the iPhone 14, iPhone 14 Pro, and iPhone 14 Plus, we can assume you’re referring to the default mouse cursor on macOS, which is Apple’s operating system.nnOn macOS, the default mouse cursor is a small arrow-shaped pointer. This arrow pointer indicates the position and movement of the cursor on the screen. It’s designed to be easily recognizable and provides feedback to the user while interacting with graphical elements on the system.nnThe default mouse cursor on macOS, iOS, or any other operating system can be further customized by the user. Users have the flexibility to change the cursor’s appearance, size, and shape to suit their personal preferences or accessibility needs. This can be done through the system preferences or settings.nnTo summarize, the default mouse cursor on macOS, as of the latest version iOS 16 and assuming it’s the year 2023, is a small arrow-shaped pointer. However, it’s important to note that the default cursor can vary across different operating systems and can be customized by the user.”}},{“@type”:”Question”,”name”:”How do I lock my mouse settings?”,”acceptedAnswer”:{“@type”:”Answer”,”text”:”To lock your mouse settings, follow these steps:nn1. Open the Control Panel: Right-click on the Start button, then select Control Panel from the context menu.nn2. Navigate to the Mouse settings: In the Control Panel, locate and click on the “Hardware and Sound” category. Then, under the Devices and Printers section, click on “Mouse”.nn3. Access the Mouse Properties: In the Mouse Properties window, you will find various tabs such as Buttons, Pointers, Pointer Options, Wheel, and Hardware. Click on the “Pointer Options” tab.nn4. Lock the mouse settings: Within the Pointer Options tab, locate the checkbox labeled “Enhance pointer precision” and make sure it is unchecked. nn5. Apply changes and close the window: Click the “Apply” button to save the changes you have made. Then click “OK” to close the Mouse Properties window.nnBy following these steps, you effectively lock your mouse settings, preventing them from changing unintentionally.”}},{“@type”:”Question”,”name”:”How do I manage my mouse Settings in Windows 10?”,”acceptedAnswer”:{“@type”:”Answer”,”text”:”To manage your mouse settings in Windows 10, follow these steps:nn1. Open the “Settings” app by clicking on the Start menu and selecting the gear icon.n2. In the Settings window, click on “Devices.”n3. In the left-hand menu of the Devices settings, click on “Mouse.”n4. On the right side, you will find various options to customize your mouse settings. Let’s go through some important ones:nn a. “Mouse pointer size and color”: Adjust the size and color of the mouse pointer for better visibility.n b. “Select your primary button”: Choose whether the primary button should be the left or right button.n c. “Choose how many lines to scroll each time”: Specify the number of lines the mouse wheel should scroll.n d. “Additional mouse options”: Click on this to access further settings like pointer speed, button configuration, wheel behavior, and more.nn5. To access even more advanced settings, click on the “Additional mouse options” link. This will open the Mouse Properties dialog box.n6. In the Mouse Properties dialog box, you can customize additional settings, such as the pointer speed, button configuration, double-click speed, and pointer options for enhanced precision.n7. Navigate through the tabs in the Mouse Properties dialog box to explore settings such as Pointer Options, Wheel, Hardware, and Pointer.n8. Once you’ve adjusted your desired settings, click “Apply” and then “OK” to save the changes.nnBy following these steps, you should be able to manage and customize your mouse settings to suit your preferences in Windows 10.”}}]}
What Is the Default Mouse Pointer Speed in Windows 11?
Windows 11, with its sleek design and improved functionalities, continues to evolve the user experience across devices. One aspect many users often overlook is the mouse pointer speed, a crucial factor in navigating efficiently through the operating system. This article delves deep into the default mouse pointer speed in Windows 11, exploring its significance, methods to adjust it, tips for optimizing your setup, and addressing common questions users may have.
Understanding Mouse Pointer Speed
Mouse pointer speed refers to how fast the pointer moves across the screen in relation to the physical movement of the mouse. It determines the sensitivity of the mouse and can significantly impact user experience—whether you are gaming, designing graphics, or just browsing.
Windows 11 retains a similar default pointer speed setting to previous versions, typically set to a level that balances general usability and comfort for most users. The precise default speed may vary slightly based on user system configurations, mouse manufacturer settings, and individual preferences, but it is generally standardized at about 6 out of 11 on the scale that Windows uses for mouse speed settings.
Significance of Mouse Pointer Speed
The right mouse pointer speed can enhance productivity and comfort. A speed that is too slow might lead to excessive hand movement, causing fatigue, whereas a pointer that moves too quickly can result in overshooting target items on the screen, making it difficult to click accurately. This is particularly relevant for users frequently engaging with precision tasks, such as graphic design or data analysis.
How to Check and Adjust Mouse Pointer Speed in Windows 11
Windows 11 offers several straightforward methods to check and customize mouse pointer speed. Here’s a step-by-step guide on how to do this:
-
Access Settings:
- Click on the Start button (Windows icon) on the taskbar or press the Windows key on your keyboard to open the Start menu.
- Select “Settings” (the gear icon).
-
Go to Devices:
- In the Settings window, click on “Devices”.
- From the left sidebar, select “Mouse”.
-
Adjust Pointer Speed:
- Scroll down to find “Additional mouse options”.
- This action will open the Mouse Properties window.
- Click on the “Pointer Options” tab.
-
Set Pointer Speed:
- In the Pointer Options tab, you will see a «Motion» slider.
- Move the slider to adjust the pointer speed. The range typically is from Slow (1) to Fast (11).
- To test the speed, move your mouse around as you adjust the slider until you find a comfortable setting.
-
Enhancing Pointer Precision:
- If you want enhanced accuracy, you can check the box for “Enhance pointer precision”. This feature improves responsiveness based on how quickly you move the mouse.
-
Save Settings:
- After making adjustments, click “OK” to save your settings and exit the properties window.
Additional Customizations for the Mouse
In addition to adjusting pointer speed, Windows 11 offers extensive options for mouse settings that can improve your overall experience, including:
-
Scroll Speed:
Users can adjust how many lines are scrolled per notch of the mouse wheel, allowing for fast navigation through documents or web pages. -
Click Lock:
This feature lets users highlight or drag items without holding down the mouse button. -
Primary Button Switch:
For left-handed users, Windows allows you to switch the primary mouse button from left to right. -
Mouse Wheel Settings:
Adjusts how your mouse wheel interacts with scrolling on the screen.
Impact of Hardware on Mouse Pointer Speed
Mouse Hardware and its Influence
The type of mouse you use can significantly affect pointer speed. Optical and laser mice come with varying sensitivities, measured in DPI (dots per inch). Higher DPI settings allow for faster pointer movements across the screen. Users may find that while the default speed setting in Windows is satisfactory, their specific mouse might require different adjustments to achieve optimal performance.
- Low-DPI mice (below 800 DPI) are typically better for precise tasks, while high-DPI mice (over 1600 DPI) can move the cursor faster on larger screens.
Recommended Mouse DPI Settings
- For general usage: 800 to 1200 DPI is generally suitable for most users.
- For gaming: Depending on the game type, many gamers prefer anywhere from 1600 to 4000 DPI. This allows for swift movements while still maintaining the precision needed for competitive play.
Best Practices for Optimizing Mouse Pointer Speed
Here are some best practices to ensure that your mouse pointer speed is tailored and optimized:
-
Tailor to Your Activity:
- Different activities may require different pointer speeds. For example, graphic designers might prefer a slower speed for precision, while gamers may need a higher speed for quick reactions.
-
Monitor Size and Resolution:
- Larger screens or higher resolutions can necessitate adjustments in pointer speed for effective navigation.
-
Experiment and Adapt:
- Change pointer speed and sensitivity settings based on your comfort level and task requirements. Don’t hesitate to take time adjusting mouse settings periodically to find what works best for you.
-
Check for Driver Updates:
- Make sure your mouse driver software is updated to access the latest features and improvements provided by the manufacturer.
-
Use Mouse Pads:
- Investing in a good quality mouse pad can greatly enhance your mouse’s performance and movement accuracy.
Troubleshooting Common Mouse Pointer Issues
Even with the best setup, users may occasionally experience problems with their mouse pointer speed. Here are some common issues and their resolutions:
-
Pointer Lag or Jitter:
This can be caused by low battery levels in wireless mice, lack of proper mouse surface, or even interference from other wireless devices. Ensure your mouse is well cared for and the battery is charged. -
Difference Between Mouse Movement and Pointer Speed:
Sometimes, the pointer speed setting doesn’t feel consistent with the physical motion. This might be due to the DPI settings on the mouse itself or Windows’ «Enhance pointer precision» feature interfering. Experiment with turning this feature on or off for better results. -
Cursor Freezing/Jumping:
A common issue that can arise from an unstable surface, low frame rates, or hardware failure. Ensure your hardware is functioning properly and consider replacing aged equipment.
Conclusion
The default mouse pointer speed in Windows 11 is set to provide a balanced experience suitable for most users. However, personal preference plays a substantial role; hence, adjusting the mouse pointer speed based on individual needs can vastly improve productivity, comfort, and overall user experience.
Whether you’re gaming, working on creative tasks, or simply browsing, understanding and mastering your mouse pointer settings can make a significant difference in how you interact with your computer. By considering the factors we’ve discussed and experimenting with settings, you can find the perfect match that elevates your Windows 11 experience to new heights.
With the right adjustments, your mouse not only becomes a tool for navigation but an extension of your intent and actions on screen, allowing for seamless interaction with the digital world around you. Happy navigating!

The speed of your mouse pointer is set at a standard setting by default. Most users rarely ever need to change this speed. However, you may need to speed up the mouse pointer when your mouse slows down or when you attach another monitor to your system and need to customise the mouse accordingly. Today, we show you how to change your mouse pointer speed in Windows 11.
Read Also: 5 wireless mice under Rs 5,000 for work from home.
How to change mouse pointer speed using Settings
Step 1: Open Settings.
Step 2: Select Bluetooth & Devices.

Step 3: Select the Mouse option in the window that opens.

Step 4: Use the slider next to ‘Mouse Pointer Speed’ to change the speed of your mouse pointer according to your liking.

How to change mouse pointer speed using the Control Panel
Step 1: Open Control Panel.

Step 2: Select the Mouse option.

Step 3: In the small window that opens up, click on the ‘Pointer Options’ tab.

Step 4: Use the slider in the ‘Motions’ sections to change the mouse pointer speed according to your liking.
Read Also: 5 best Ergonomic mice for working from home
Following the steps above you will be able to change the mouse pointer speed in Windows 11. You can also change your mouse pointer speed through the Registry Editor, but this can be a risky process and isn’t ideally advised when there are much easier ways to carry out your task. Once you enter Mouse settings, you can also customise your mouse icon and add other functionalities to your mouse. You can also change the visibility of the pointer by adding a trail to its movement or by choosing to hide it while you’re typing.
For the latest gadget and tech news, and gadget reviews, follow us on Twitter, Facebook and Instagram. For newest tech & gadget videos subscribe to our YouTube Channel. You can also stay up to date using the Gadget Bridge Android App. You can find the latest car and bike news here.
(Image credit: Mauro Huculak)
On Windows 11, the mouse is an essential tool for navigating and performing actions with ease. To ensure the best experience, it’s important to optimize its settings to match your preferences.
If the default mouse pointer speed feels too fast or too slow (perhaps you need quicker movement across a multi-monitor setup or slower pacing for better precision), Windows 11 provides several methods to adjust this feature. You can use the Settings app, Control Panel, or Registry Editor to fine-tune the speed to your liking.
In this how-to guide, I’ll outline the steps to change the mouse speed on your computer.
Recent updates
These instructions has been updated to ensure accuracy and reflect changes to the process in the operating system.
How to change mouse speed using Settings on Windows 11
To adjust the mouse pointer speed on Windows 11, use these steps:
- Open Settings.
- Click on Bluetooth & devices.
- Click the Mouse page on the right side.
- Use the «Mouse pointer speed» slider to adjust the pointer speed.
Once you complete the steps, the mouse movements will reflect the speed you selected on the settings page.
How to change mouse speed using Control Panel on Windows 11
To change the mouse speed with Control Panel, use these steps:
- Open Settings.
- Click on Hardware and Sound.
- Click the Mouse option under the «Devices and Printers» section.
- Click the Pointer Options tab.
- Under the «Motion» section, use the slider to increase or decrease the speed of the mouse pointer.
After you complete the steps, Windows 11 will apply the new speed for the mouse pointer on your computer.
All the latest news, reviews, and guides for Windows and Xbox diehards.
How to change mouse speed using Registry on Windows 11
Warning: This is a friendly reminder that editing the Registry is risky, and it can cause irreversible damage to your installation if you don’t do it correctly. Before proceeding, it’s recommended to make a full backup of your computer.
To change the mouse speed through the Registry Editor, use these steps:
- Open Start.
- Search for regedit and click the top result to open the Registry Editor.
- Browse the following path: HKEY_CURRENT_USER\Control Panel\Mouse
- Double-click the MouseSensitivity key and set the value to any number from 1 to 20 to set the desired speed.
- Quick tip: The default value is «10,» which means you should use a smaller number to slow the mouse or a higher number to speed up the mouse pointer.
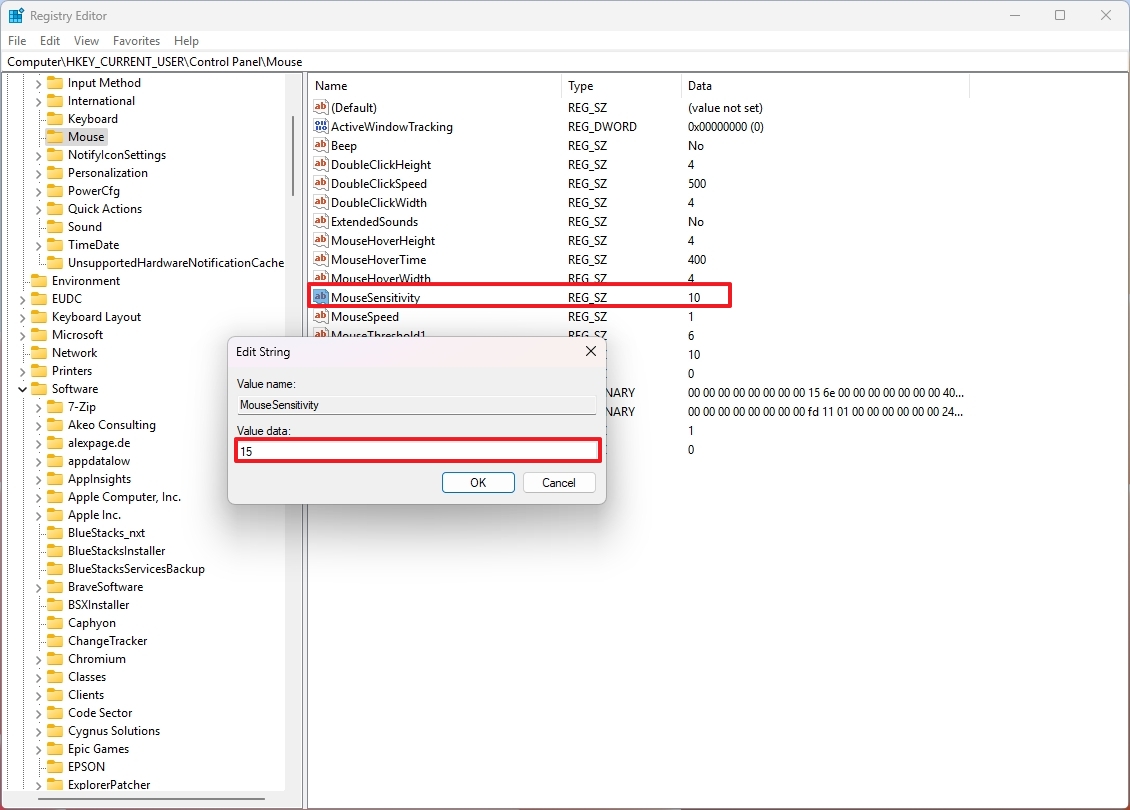
- Click the OK button.
- Restart your computer.
Once you complete the steps, the mouse pointer should work at the speed you specified in the «MouseSensitivity» key.
If you want to reverse the changes, follow the same instructions outlined above, but in step 4, change the value to 10 to reset the speed to its default value.
More resources
For more helpful articles, coverage, and answers to common questions about Windows 10 and Windows 11, visit the following resources:
- Windows 11 on Windows Central — All you need to know
- Windows 10 on Windows Central — All you need to know
Mauro Huculak has been a Windows How-To Expert contributor for WindowsCentral.com for nearly a decade and has over 15 years of experience writing comprehensive guides. He also has an IT background and has achieved different professional certifications from Microsoft, Cisco, VMware, and CompTIA. He has been recognized as a Microsoft MVP for many years.