
In today’s interconnected world, the need for efficient and seamless communication is more important than ever. One crucial aspect of this is ensuring that text and characters are correctly encoded, allowing for compatibility across different platforms and languages. In Windows 10, setting the UTF-8 encoding is a vital step to enable smooth communication and eliminate any potential issues with character display and compatibility.
The UTF-8 encoding, which stands for Unicode Transformation Format-8, is a widely used character encoding that supports a vast range of characters from various scripts and languages. By setting the UTF-8 encoding in Windows 10, you guarantee that your system can handle and display text in different languages accurately. This ensures that you can read and share content from around the world without any distortion or loss of information. With the increasing diversity of content and the global nature of communication, setting UTF-8 encoding in Windows 10 is an essential step to enable seamless communication across different languages and platforms.
To set Utf-8 encoding in Windows 10, follow these steps:
- Open the Control Panel.
- Select «Clock and Region» and then click on «Region.»
- In the «Formats» tab, click on «Additional settings.»
- Go to the «General» tab, and under «Language for non-Unicode programs,» select «UTF-8.»
- Click «OK» and restart your computer.

Understanding UTF-8 Encoding in Windows 10
Setting UTF-8 encoding in Windows 10 is crucial for ensuring proper handling and display of characters from different languages and scripts. UTF-8 is a variable-width character encoding that supports almost all characters in the Unicode standard, making it the most widely used encoding worldwide. By setting UTF-8 encoding in Windows 10, you can avoid issues such as garbled text, incorrect character rendering, and missing characters when working with files, websites, or applications that use non-ASCII characters.
1. Setting UTF-8 Encoding for System Locale
The first step to setting UTF-8 encoding in Windows 10 is to configure the system locale settings. The system locale determines the default encoding used by applications and services for non-Unicode programs. Here’s how you can set the UTF-8 system locale:
- Open the Control Panel by searching for it in the Windows 10 Start menu and selecting the corresponding result.
- In the Control Panel, click on «Clock and Region» or «Clock, Language, and Region» depending on your system configuration.
- Under the «Region» or «Region and Language» section, click on «Change date, time, or number formats.»
- In the Formats tab of the Region settings, click on the «Additional settings» button.
- In the «Customize Format» window, navigate to the «Beta: Use Unicode UTF-8 for worldwide language support» section and check the box.
- Click OK to apply the settings and restart your computer for the changes to take effect.
Setting the system locale to UTF-8 ensures that non-Unicode applications and services use this encoding by default, reducing the risk of character-related issues when working with different languages and scripts.
Benefits of Setting UTF-8 Encoding for System Locale
By setting UTF-8 encoding for the system locale, you gain several benefits:
- Compatibility: UTF-8 is widely supported across different platforms, applications, and programming languages, ensuring optimal compatibility and interoperability.
- Character Support: UTF-8 supports nearly all characters and symbols from every major writing system, making it suitable for multilingual applications and content.
- Future-Proofing: UTF-8 is the recommended encoding for future-proofing your systems and applications. It allows seamless incorporation of new characters and scripts as Unicode continues to evolve.
- Global Reach: With UTF-8 encoding, your content can reach a global audience without language or character-based restrictions.
2. Configuring UTF-8 Encoding for Individual Applications
While setting the system locale to UTF-8 is crucial, individual applications can also have their own encoding settings. Configuring UTF-8 encoding for specific applications ensures that they handle non-ASCII characters correctly. Here’s how you can configure UTF-8 encoding for some popular applications:
Microsoft Office Applications
To set UTF-8 encoding for Microsoft Office applications such as Word, Excel, and PowerPoint, follow these steps:
- Open the respective Office application (e.g., Word, Excel).
- Click on «File» at the top left corner and select «Options.»
- In the Options window, navigate to the «Advanced» tab.
- Scroll down to the «International» section.
- Under «Choose the encoding standard to use when saving files,» select «UTF-8.»
- Click OK to save the changes.
Configuring UTF-8 encoding for Microsoft Office applications ensures that you can save and work with documents containing non-ASCII characters without any issues.
Web Browsers
Web browsers are key tools for accessing and viewing websites with different language content. Here’s how you can configure UTF-8 encoding in popular web browsers:
Google Chrome
To set UTF-8 encoding in Google Chrome, follow these steps:
- Open Google Chrome and click on the three-dot menu icon at the top right corner.
- Select «Settings» from the drop-down menu.
- Scroll down and click on «Advanced» to expand the advanced settings.
- Under the «Languages» section, click on «Language and input settings.»
- In the «Languages» settings, click on the «Add» button under the «Customize languages» section.
- Search for «English» in the language list and select «English (United States).»
- Drag «English (United States)» to the top of the list.
- Click «Done» to save the changes.
Configuring UTF-8 encoding in Google Chrome ensures that the browser can handle and display different language content correctly.
3. Troubleshooting UTF-8 Encoding Issues
Despite configuring UTF-8 encoding, you may still encounter issues with character handling in Windows 10. Here are some troubleshooting steps to resolve UTF-8 encoding issues:
Check File Encoding
If you experience character rendering issues with a specific file, check its encoding. Most text editors allow you to view and change the encoding of a file. Ensure that the file’s encoding matches the expected UTF-8 encoding.
Update Applications
If you encounter character handling issues in specific applications, ensure that you have the latest version installed. Application updates often include bug fixes and improvements related to character encoding.
Verify Font Support
In some cases, character rendering issues can occur due to insufficient font support. Ensure that you have appropriate fonts installed for the languages and scripts you are working with. Additionally, check the font settings within applications to ensure they are set to handle UTF-8 encoded characters.
4. Embracing UTF-8 Encoding for Seamless Multilingual Experience
Setting UTF-8 encoding in Windows 10 is a crucial step towards embracing multilingualism and ensuring smooth communication across languages. By configuring the system locale and individual application settings, you can avoid character-related issues and enjoy a seamless experience regardless of the languages and scripts you work with.

Setting utf-8 Encoding in Windows 10
Utf-8 encoding is a character encoding standard used to represent text in various languages, including English. Windows 10, by default, uses a different encoding called ANSI, which may not support all characters from different languages. However, it is possible to set utf-8 encoding in Windows 10 to ensure proper rendering of characters and support for international languages. Here’s how:
Method 1: Changing System Locale
To set utf-8 encoding, you can change the system locale in Windows 10. Follow these steps:
- Open the Control Panel and go to the «Clock and Region» section.
- Select «Region» and click on the «Administrative» tab.
- Click on «Change System Locale» and check the «Beta: Use Unicode UTF-8 for worldwide language support» option.
- Click «OK» and restart your computer for the changes to take effect.
Method 2: Changing File Encoding
If you want to set utf-8 encoding for specific files, you can change their encoding individually. Here’s how:
- Right-click on the file and select «Properties.»
- Go to the «General» tab and click on «Advanced» under «Attributes.»
- In the «Advanced Attributes» window, check the «UTF-8» option under «File Origin
Key Takeaways: How to Set Utf-8 Encoding in Windows 10
- Utf-8 encoding is important for displaying and storing international characters in Windows 10.
- Open Notepad or any text editor to create a new UTF-8 encoded file.
- Choose File > Save As and select UTF-8 encoding from the Encoding dropdown menu.
- Change the file extension to .txt if necessary and click Save.
- You can also set Utf-8 encoding as the default for all new files in Notepad.
Frequently Asked Questions
Here are some common questions related to setting Utf-8 encoding in Windows 10:
1. What is Utf-8 encoding?
Utf-8 encoding is a way of representing characters in a computer system. It allows for the representation of all the characters in the Unicode character set, which includes a vast range of characters used in various languages and symbols. Utf-8 is widely used and recommended for text encoding formats because it can encode any character in a concise and efficient manner.
2. Why should I set Utf-8 encoding in Windows 10?
Setting Utf-8 encoding in Windows 10 is important to ensure that your system can correctly display and handle text in different languages, including characters and symbols that are not present in the default encoding. Utf-8 encoding allows for universal compatibility and ensures that the correct characters are displayed when working with files, websites, or applications that use Utf-8 encoding.
3. How can I set Utf-8 encoding in Windows 10?
To set Utf-8 encoding in Windows 10, you can follow these steps:
- Open the Control Panel by searching for «Control Panel» in the Windows Start menu and selecting it.
- Click on «Clock and Region» and then on «Region».
- In the Region dialog box, click on the «Administrative» tab.
- Under the «Language for non-Unicode programs» section, click on the «Change system locale» button.
- In the «Region Settings» dialog box, select «Beta: Use Unicode UTF-8 for worldwide language support» and click on «OK».
- Restart your computer to apply the changes.
4. Can I change the Utf-8 encoding for specific applications only?
No, the Utf-8 encoding setting in Windows 10 applies system-wide and affects all applications. Changing the encoding setting will ensure that Utf-8 characters are displayed correctly in all programs that use Utf-8 encoding. It is a global setting that affects the entire operating system.
5. Are there any other encoding options available in Windows 10?
Yes, Windows 10 supports various encoding options, including Utf-8, which is the recommended and widely used encoding format. Other options include ANSI, which is mostly used for backward compatibility with older software, and Unicode, which is a more generic term that refers to various character encoding schemes, including Utf-8. However, Utf-8 is the preferred encoding format for its compatibility and efficiency.
Setting UTF-8 encoding in Windows 10 is essential for ensuring compatibility with various languages and characters. By following a few simple steps, you can easily configure your system to use UTF-8 encoding, allowing you to work with multilingual content without any issues.
To set UTF-8 encoding in Windows 10, you need to navigate to the Region settings in the Control Panel. From there, you can access the Administrative tab and change the system locale to use UTF-8 encoding. This will enable your computer to recognize and display characters from different languages accurately.
Once you have set the UTF-8 encoding, you will be able to seamlessly work with files and applications that contain characters from various languages. This is particularly useful for web development, international communication, and working with documents that require special characters.
By ensuring that your Windows 10 system is set to UTF-8 encoding, you can eliminate any potential character display issues and improve overall compatibility. It’s a simple but crucial step that can make a significant difference in your work with multilingual content.
Квалификацию надо иногда повышать, и вообще учиться для мозгов полезно. А потому пошел я недавно на курсы — поизучать Python и всякие его фреймворки. На днях вот до Django добрался. И тут мы в ходе обучения коллективно выловили не то чтобы баг, но дивный эффект на стыке Python 3, Sqlite 3, JSON и Win 10. Причем эффект был настолько дивен, что гугль нам не помог — пришлось собираться всей заинтересованной группой вместе с преподавателем и коллективным разумом его решать.
А дело вот в чем: изучали мы базу данных (а у Django предустановлена Sqlite 3) и, чтоб каждый раз заново руками данные не вбивать, прикрутили загрузку скриптом из json-файлов. А в файлы данные из базы штатно дампили питоновскими же методами:
python manage.py dumpdata -e contenttypes -o db.jsonВнезапно те, кто работал под виндой (за все версии не поручусь, у нас подобрались только обитатели Win 10), обнаружили, что дамп у них производится в кодировке windows-1251. Более того, джейсоны в этой кодировке отлично скармливаются базе. Но стоило только переформатировать их в штатную по документам для Sqlite 3, Python 3 и особенно для JSON кодировку UTF-8, как в лучшем случае кириллица в базе превращалась в тыкву, а в худшем ломался вообще весь процесс загрузки данных.
Ничего подобного найти не удалось ни в документации, ни во всем остальном гугле, считая и англоязычный. Что самое загадочное, ручная загрузка тех же самых данных через консоль или админку проекта работала как часы, хотя уж там-то кодировка была точно UTF-8. Более того, принудительное прописывание кодировки базе никакого эффекта не дало.
Мы предположили, что причиной эффекта было взаимодействие джейсона с операционной системой — каким-то образом при записи и чтении именно джейсонов система навязывала свою родную кодировку вместо нормальной. И действительно, когда при открытии файла принудительно устанавливалась кодировка UTF-8:
open(os.path.join(JSON_PATH, file_name + '.json'), 'r', encoding="utf-8")в базу попадали не кракозябры, а нормальные русские буквы. Но проблему с созданием дампа таким способом не решишь, а переделывать кодировку потом руками тоже как-то не по-нашему.
И тогда мы решили поискать способ укротить винду.
И такой способ нашелся. Вот он:
-
открываем панель управления, но не новую красивую, а старую добрую:

-
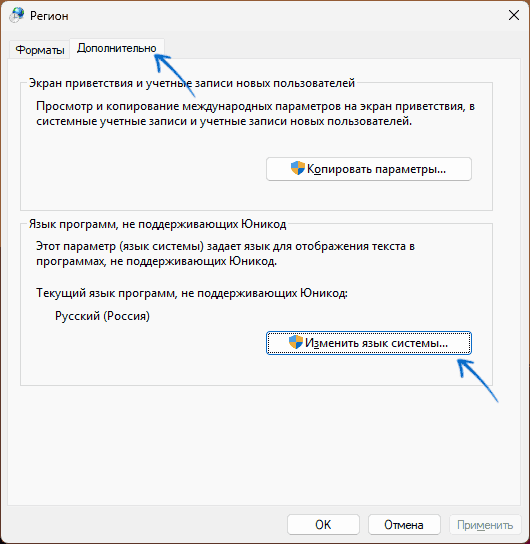
открываем (по стрелке) окошко региона:

-
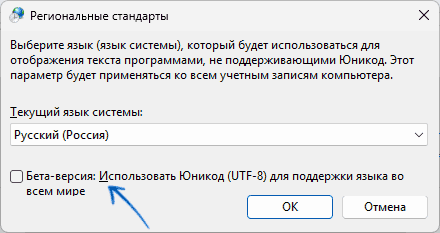
по стрелкам переключаем вкладку «Дополнительно» и открываем окошко «Изменить язык системы»:

-
и в нем ставим галку по стрелке в чекбоксе «Бета-версия: Использовать Юникод (UTF-8) для поддержки языка во всем мире.
Система потребует перезагрузки, после чего проблема будет решена.
Не могу сказать, чтобы этот мелкий странный баг был так уж важен или интересен (питоновские проекты обычно живут под линуксами, где такого не бывает), но мозги он нам поломал изрядно — вследствие чего я и решил написать эту заметку. Мало ли кто еще из новичков как раз во время учебы попадется.
Setting Utf-8 Encoding in Windows 10 allows users to ensure compatibility and proper display of international characters in their applications and documents. With the increasing globalization of communication, it is crucial to have the ability to view and work with text in different languages seamlessly. Utf-8, a widely adopted character encoding standard, offers comprehensive support for a vast range of languages, making it essential for anyone dealing with multilingual content.
To set Utf-8 Encoding in Windows 10, users can follow a straightforward process. First, open the Control Panel by searching for it in the Start menu. Then, navigate to the «Clock and Region» section and select «Region.» In the Region settings, go to the «Administrative» tab, and click on the «Change system locale» button. From there, choose Utf-8 as the default language for non-Unicode programs. By making this adjustment, users can ensure that their Windows 10 system supports Utf-8 encoding, enabling seamless interaction with diverse language content.
To set UTF-8 encoding in Windows 10, follow these steps:
- Open the Control Panel.
- Select «Region» or «Region and Language.»
- Click on the «Administrative» tab.
- Under «Language for non-Unicode programs,» click on «Change system locale.»
- Check the box for «Beta: Use Unicode UTF-8 for worldwide language support.»
- Click «OK» and restart your computer.
By following these steps, you’ll be able to set UTF-8 encoding in Windows 10 and ensure compatibility with international characters and languages.

Understanding Utf-8 Encoding
Utf-8 encoding is a character encoding standard that is commonly used for representing characters in the Unicode character set. It supports almost all characters from all human languages, making it widely used for international communication and data storage. In Windows 10, setting the Utf-8 encoding is crucial to ensure proper display of characters and compatibility with different applications and systems. This article will guide you through the process of setting Utf-8 encoding in Windows 10, empowering you to handle and work with various character sets seamlessly.
Checking Current Encoding Settings
Before diving into the process of setting Utf-8 encoding, it’s important to check the current encoding settings on your Windows 10 system. This will help you understand the current state and determine if any changes are required. Follow the steps below to check the current encoding settings:
1. Open the Control Panel by searching for it in the Windows search bar.
2. In the Control Panel, click on «Clock and Region» and then select «Region.»
3. In the Region window, go to the «Administrative» tab.
4. Under the «Language for non-Unicode programs» section, you will see the current system locale. Note down this information for reference.
Setting Utf-8 as the System Locale
If your current system locale is not Utf-8, you can change it to Utf-8 to enable proper Utf-8 encoding. Follow the steps below to set Utf-8 as the system locale:
1. Open the Control Panel by searching for it in the Windows search bar.
2. In the Control Panel, click on «Clock and Region» and then select «Region.»
3. In the Region window, go to the «Administrative» tab.
4. Under the «Language for non-Unicode programs» section, click on the «Change system locale» button.
5. In the Region Settings window, select «Beta: Use Unicode UTF-8 for worldwide language support» checkbox.
6. Click on «OK» to save the changes and restart your computer for the settings to take effect.
Testing Utf-8 Encoding
After setting Utf-8 as the system locale, it’s important to test whether the changes have been applied successfully. Follow the steps below to test Utf-8 encoding:
- Open a text editor or any application that allows you to input text.
- Type and save some text that includes characters from different languages, such as accents, diacritics, or non-Latin characters.
- Open the saved file and check if all the characters are displayed correctly without any gibberish or question marks.
- If all characters are displayed correctly, it means that Utf-8 encoding is working properly.
Modifying Utf-8 Encoding in Specific Applications
In some cases, you may encounter issues with Utf-8 encoding in specific applications, even after setting it as the system locale. This can happen if the application has its own character encoding settings that override the system settings. Here’s how you can modify Utf-8 encoding in specific applications:
1. Open the application in which you are facing Utf-8 encoding issues.
2. Look for the application’s language or encoding settings, usually found in the preferences or settings menu.
3. Select Utf-8 as the preferred encoding option.
4. Save the changes and restart the application if required.
Common Applications with Utf-8 Encoding Settings
Many popular applications have Utf-8 encoding settings that can be modified to ensure proper character display. Here are a few examples:
| Application | Location of Utf-8 Encoding Settings |
| Notepad++ | Settings > Preferences > New Document > Encoding |
| Sublime Text | View > Encoding |
| Visual Studio Code | File > Save with Encoding |
| Microsoft Office | Options > Advanced > General > File Locations > File Encoding |
| Browsers (Chrome, Firefox, etc.) | Settings > Advanced > Fonts and Encoding |
Using Utf-8 Encoding for Web Development
Utf-8 encoding plays a crucial role in web development, ensuring that websites can display and handle multilingual content properly. When working with web development tools and frameworks, it’s important to set Utf-8 encoding to ensure seamless language support. Here are some key points to remember when using Utf-8 encoding for web development:
- Set the « tag in the « section of your HTML files.
- Ensure that your server-side scripts and databases are also set to Utf-8 encoding.
- If using a content management system (CMS) like WordPress, check the encoding settings in the CMS admin panel.
- Validate and sanitize user input to prevent potential encoding-related security vulnerabilities.
Setting Utf-8 Encoding for File Opening
Besides setting Utf-8 as the system locale, you may also need to specify the encoding when opening specific files to ensure they are interpreted correctly. The steps below will guide you through the process of setting Utf-8 encoding when opening files:
1. Open the application used to open the file, such as a text editor.
2. In the application, locate the file opening or file import feature.
3. Look for an option related to encoding or character set. The terminology may vary depending on the application.
4. Choose Utf-8 or the appropriate encoding option from the available list.
5. Open the desired file with the specified Utf-8 encoding to ensure proper interpretation of the characters.
Conclusion
Setting Utf-8 encoding in Windows 10 is crucial for proper handling and display of multilingual content. By following the steps outlined in this article, you can ensure seamless support for characters from various languages and encoding standards. Whether it’s setting Utf-8 as the system locale, modifying encoding settings in specific applications, or using Utf-8 for web development, understanding and implementing Utf-8 encoding will enhance your experience in working with diverse character sets.

Setting Utf-8 Encoding in Windows 10
Utf-8 encoding is widely used to support international characters and symbols in various software applications, including Windows 10. To set Utf-8 encoding in Windows 10, follow these steps:
Using Registry Editor
1. Press Windows key + R to open the Run dialog box.
2. Type «regedit» and press Enter to open the Registry Editor.
3. Navigate to the following registry key: HKEY_LOCAL_MACHINE\SOFTWARE\Microsoft\Internet Explorer\Main\FeatureControl\FEATURE_BROWSER_EMULATION
4. Right-click on the empty space in the right pane and select «New» -> «DWORD (32-bit) Value».
5. Name the new value «iexplore.exe».
6. Double-click on the «iexplore.exe» value and set the «Value data» to 8888 (Hexadecimal).
Using Notepad
1. Open Notepad.
2. Click on «File» -> «Save As».
3. In the «Encoding» dropdown, select «Utf-8».
4. Choose the desired location and filename for your file, and click «Save».
With these simple
Key Takeaways: How to Set Utf-8 Encoding in Windows 10
- Open the Control Panel by searching for it in the Windows search bar.
- Click on «Clock and Region» and then select «Region» from the options.
- In the Region window, click on the «Administrative» tab.
- Under the «Language for non-Unicode programs» section, click on «Change system locale».
- Check the box next to «Beta: Use Unicode UTF-8 for worldwide language support».
Frequently Asked Questions
Here are some common questions about setting Utf-8 Encoding in Windows 10:
1. How do I change the encoding to Utf-8 in Windows 10?
To change the encoding to Utf-8 in Windows 10, follow these steps:
1. Open the Control Panel by searching for it in the Windows Start Menu.
2. Click on «Clock and Region» and then «Region».
3. In the «Formats» tab, click on «Additional settings».
4. In the «Code page conversion tables» section, select «Utf-8» from the drop-down menu.
5. Click «Apply» and then «OK» to save the changes.
2. Why is Utf-8 encoding important?
Utf-8 encoding is important because it supports a wide range of characters and symbols from different languages. It is a universal encoding standard that allows for seamless communication and compatibility between different systems and devices.
By using Utf-8 encoding, you ensure that your text is correctly displayed and interpreted across platforms, making it essential for international communication, website development, and data storage.
3. Can I change the encoding for specific files or folders?
Yes, you can change the encoding for specific files or folders in Windows 10. Follow these steps:
1. Right-click on the file or folder you want to change the encoding for.
2. Select «Properties» from the context menu.
3. In the «Properties» window, go to the «General» tab.
4. Click on the «Advanced…» button.
5. In the «Advanced Attributes» window, check the box next to «Utf-8» under «File Encoding».
6. Click «OK» to save the changes.
4. How can I check the current encoding of a file in Windows 10?
To check the current encoding of a file in Windows 10, follow these steps:
1. Right-click on the file and select «Properties».
2. In the «Properties» window, go to the «General» tab.
3. Under «Attributes», you will see the «Encoding» information.
5. Can I set Utf-8 as the default encoding in Windows 10?
Yes, you can set Utf-8 as the default encoding in Windows 10. Here’s how:
1. Open the Control Panel and click on «Clock and Region» and then «Region».
2. In the «Formats» tab, click on «Additional settings».
3. In the «Code page conversion tables» section, select «Utf-8» from the drop-down menu.
4. Click «Apply» and then «OK» to save the changes.
To summarize, setting UTF-8 encoding in Windows 10 is an important step to ensure compatibility and proper display of characters in various applications. By following the steps outlined in this article, you can easily change the default encoding settings and avoid any issues with text encoding in your system.
Remember, UTF-8 is a widely accepted and flexible encoding format that supports a wide range of characters from different languages. It is crucial for international communication, web development, and file sharing. Keeping your system’s default encoding as UTF-8 will ensure seamless interactions with texts from around the world.
Microsoft was one of the first companies to implement Unicode in their products. Windows NT was the first operating system that used «wide characters» in system calls. Using the (now obsolete) UCS-2 encoding scheme at first, it was upgraded to the variable-width encoding UTF-16 starting with Windows 2000, allowing a representation of additional planes with surrogate pairs. However Microsoft did not support UTF-8 in its API until May 2019.
Before 2019, Microsoft emphasized UTF-16 (i.e. -W API), but has since recommended to use UTF-8 (at least in some cases),[1] on Windows and Xbox (and in other of its products), even states «UTF-8 is the universal code page for internationalization [and] UTF-16 [… is] a unique burden that Windows places on code that targets multiple platforms. [..] Windows [is] moving forward to support UTF-8 to remove this unique burden [resulting] in fewer internationalization issues in apps and games».[2]
A large amount of Microsoft documentation uses the word «Unicode» to refer explicitly to the UTF-16 encoding. Anything else, including UTF-8, is not «Unicode» in Microsoft’s outdated language (while UTF-8 and UTF-16 are both Unicode according to the Unicode Standard, or encodings/»transformation formats» thereof).
In various Windows families
edit
Windows NT based systems
edit
Current Windows versions and all back to Windows XP and prior Windows NT (3.x, 4.0) are shipped with system libraries that support string encoding of two types: 16-bit «Unicode» (UTF-16 since Windows 2000) and a (sometimes multibyte) encoding called the «code page» (or incorrectly referred to as ANSI code page). 16-bit functions have names suffixed with ‘W’ (from «wide») such as SetWindowTextW. Code page oriented functions use the suffix ‘A’ for «ANSI» such as SetWindowTextA (some other conventions were used for APIs that were copied from other systems, such as _wfopen/fopen or wcslen/strlen). This split was necessary because many languages, including C, did not provide a clean way to pass both 8-bit and 16-bit strings to the same function.
Microsoft attempted to support Unicode «portably» by providing a «UNICODE» switch to the compiler, that switches unsuffixed «generic» calls from the ‘A’ to the ‘W’ interface and converts all string constants to «wide» UTF-16 versions.[3][4] This does not actually work because it does not translate UTF-8 outside of string constants, resulting in code that attempts to open files just not compiling.[citation needed]
Earlier, and independent of the «UNICODE» switch, Windows also provided the Multibyte Character Sets (MBCS) API switch.[5] This changes some functions that don’t work in MBCS such as strrev to an MBCS-aware one such as _mbsrev.[6][7]
In (the now discontinued) Windows CE, UTF-16 was used almost exclusively, with the ‘A’ API mostly missing.[8] A limited set of ANSI API is available in Windows CE 5.0, for use on a reduced set of locales that may be selectively built onto the runtime image.[9]
In 2001, Microsoft released a special supplement to Microsoft’s old Windows 9x systems. It includes a dynamic link library, ‘unicows.dll’, (only 240 KB) containing the 16-bit flavor (the ones with the letter W on the end) of all the basic functions of Windows API. It is merely a translation layer: SetWindowTextW will simply convert its input using the current codepage and call SetWindowTextA.
Microsoft Windows (Windows XP and later) has a code page designated for UTF-8, code page 65001[10] or CP_UTF8. For a long time, it was impossible to set the locale code page to 65001, leaving this code page only available for a) explicit conversion functions such as MultiByteToWideChar and/or b) the Win32 console command chcp 65001 to translate stdin/out between UTF-8 and UTF-16. This meant that «narrow» functions, in particular fopen (which opens files), couldn’t be called with UTF-8 strings, and in fact there was no way to open all possible files using fopen no matter what the locale was set to and/or what bytes were put in the string, as none of the available locales could produce all possible UTF-16 characters. This problem also applied to all other APIs that take or return 8-bit strings, including Windows ones such as SetWindowText.
Programs that wanted to use UTF-8, in particular code intended to be portable to other operating systems, needed a workaround for this deficiency. The usual work-around was to add new functions to open files that convert UTF-8 to UTF-16 using MultiByteToWideChar and call the «wide» function instead of fopen.[11] Dozens of multi-platform libraries added wrapper functions to do this conversion on Windows (and pass UTF-8 through unchanged on others), an example is a proposed addition to Boost, Boost.Nowide.[12] Another popular work-around was to convert the name to the 8.3 filename equivalent, this is necessary if the fopen is inside a library. None of these workarounds are considered good, as they require changes to the code that works on non-Windows.
In April 2018 (or possibly November 2017[13]), with insider build 17035 (nominal build 17134) for Windows 10, a «Beta: Use Unicode UTF-8 for worldwide language support» checkbox appeared for setting the locale code page to UTF-8.[a] This allows for calling «narrow» functions, including fopen and SetWindowTextA, with UTF-8 strings. However this is a system-wide setting and a program cannot assume it is set.
In May 2019, Microsoft added the ability for a program to set the code page to UTF-8 itself,[1][14] allowing programs written to use UTF-8 to be run by non-expert users.
As of 2019, Microsoft recommends programmers use UTF-8 (e.g. instead of any other 8-bit encoding),[1] on Windows and Xbox, and may be recommending its use instead of UTF-16, even stating «UTF-8 is the universal code page for internationalization [and] UTF-16 [..] is a unique burden that Windows places on code that targets multiple platforms.»[2] Microsoft does appear to be transitioning to UTF-8, stating it previously emphasized its alternative, and in Windows 11 some system files are required to use UTF-8 and do not require a Byte Order Mark.[15] Notepad can now recognize UTF-8 without the Byte Order Mark, and can be told to write UTF-8 without a Byte Order Mark.[citation needed] Some other Microsoft products are using UTF-8 internally, including Visual Studio[16][17] and their SQL Server 2019, with Microsoft claiming 35% speed increase from use of UTF-8, and «nearly 50% reduction in storage requirements.»[18]
String constants in Visual Studio
edit
Before 2019 Microsoft’s compilers could not produce UTF-8 string constants from UTF-8 source files. This is due to them converting all strings to the locale code page (which could not be UTF-8). At one time the only method to work around this was to turn off UNICODE, and not mark the input file as being UTF-8 (i.e. do not use a BOM).[19] This would make the compiler think both the input and outputs were in the same single-byte locale, and leave strings unmolested.
- Bush hid the facts, a text encoding mojibake
- ^ Found under control panel, «Region» entry, «Administrative» tab, «Change system locale» button.
- ^ a b c «Use UTF-8 code pages in Windows apps». learn.microsoft.com. Retrieved 2020-06-06.
As of Windows version 1903 (May 2019 update), you can use the ActiveCodePage property in the appxmanifest for packaged apps, or the fusion manifest for unpackaged apps, to force a process to use UTF-8 as the process code page. […]
CP_ACPequates toCP_UTF8only if running on Windows version 1903 (May 2019 update) or above and the ActiveCodePage property described above is set to UTF-8. Otherwise, it honors the legacy system code page. We recommend usingCP_UTF8explicitly. - ^ a b «UTF-8 support in the Microsoft Game Development Kit (GDK) — Microsoft Game Development Kit». learn.microsoft.com. 19 August 2022. Retrieved 2023-03-05.
By operating in UTF-8, you can ensure maximum compatibility [..] Windows operates natively in UTF-16 (or WCHAR), which requires code page conversions by using MultiByteToWideChar and WideCharToMultiByte. This is a unique burden that Windows places on code that targets multiple platforms. [..] The Microsoft Game Development Kit (GDK) and Windows in general are moving forward to support UTF-8 to remove this unique burden of Windows on code targeting or interchanging with multiple platforms and the web. Also, this results in fewer internationalization issues in apps and games and reduces the test matrix that’s required to get it right.
- ^ «Unicode in the Windows API». Retrieved 7 May 2018.
- ^ «Conventions for Function Prototypes (Windows)». MSDN. Retrieved 7 May 2018.
- ^ «Support for Multibyte Character Sets (MBCSs)». Retrieved 2020-06-15.
- ^ «Double-byte Character Sets». MSDN. 2018-05-31. Retrieved 2020-06-15.
our applications use DBCS Windows code pages with the «A» versions of Windows functions.
- ^ _strrev, _wcsrev, _mbsrev, _mbsrev_l Microsoft Docs
- ^ «Differences Between the Windows CE and Windows NT Implementations of TAPI». MSDN. 28 August 2006. Retrieved 7 May 2018.
Windows CE is Unicode-based. You might have to recompile source code that was written for a Windows NT-based application.
- ^ «Code Pages (Windows CE 5.0)». Microsoft Docs. 14 September 2012. Retrieved 7 May 2018.
- ^ «Code Page Identifiers (Windows)». msdn.microsoft.com. 7 January 2021.
- ^ «UTF-8 in Windows». Stack Overflow. Retrieved July 1, 2011.
- ^ «Boost.Nowide». GitHub.
- ^ «Windows10 Insider Preview Build 17035 Supports UTF-8 as ANSI». Hacker News. Retrieved 7 May 2018.
- ^ «Windows 10 1903 and later versions finally support UTF-8 with the A forms of the Win32 functions».
- ^ «Customize the Windows 11 Start menu». docs.microsoft.com. Retrieved 2021-06-29.
Make sure your LayoutModification.json uses UTF-8 encoding.
- ^ «New Options for Managing Character Sets in the Microsoft C/C++ Compiler». devblogs.microsoft.com. 22 February 2016.
At some point in the past, the Microsoft compiler was changed to use UTF-8 internally. So, as files are read from disk, they are converted into UTF-8 on the fly.
- ^ «validate-charset (validate for compatible characters)». docs.microsoft.com. Retrieved 2021-07-19.
Visual Studio uses UTF-8 as the internal character encoding during conversion between the source character set and the execution character set.
- ^ «Introducing UTF-8 support for SQL Server». techcommunity.microsoft.com. 2019-07-02. Retrieved 2021-08-24.
For example, changing an existing column data type from NCHAR(10) to CHAR(10) using an UTF-8 enabled collation, translates into nearly 50% reduction in storage requirements. [..] In the ASCII range, when doing intensive read/write I/O on UTF-8, we measured an average 35% performance improvement over UTF-16 using clustered tables with a non-clustered index on the string column, and an average 11% performance improvement over UTF-16 using a heap.
- ^ UTF-8 Everywhere FAQ: How do I write UTF-8 string literal in my C++ code? (note that the u8″text» proposed solution does not work, string is still mangled)
- «Unicode». MSDN. Microsoft. Retrieved November 10, 2016.
При установке или использовании некоторых программ, а иногда и в интерфейсе системы некоторые пользователи могут столкнуться с тем, что вместо русских букв отображаются «кракозябры», «иероглифы», квадраты и знаки вопроса.
В этой инструкции подробно о том, как исправить отображение кириллицы в Windows 11 для конкретных программ или системы в целом.
Использование Юникод (UTF-8)
Прежде чем приступить, отмечу, что всё описанное ниже не относится к случаям, когда какой-то текстовый документ или сайт отображается неправильно. В этом случае причина, с большой вероятностью, в неверно определенной вашей программой для открытия файла или браузером кодировкой файла.
Для решения можно использовать текстовые редакторы с возможностью выбора кодировки (например, широкий набор поддерживаемых кодировок доступен в Sublime Text), расширения браузера для изменения кодировки или онлайн-сервисы для конвертации.
Если проблема с отображением кириллицы возникает в единичных программах, при этом речь идёт не о каком-то очень старом ПО, возможно, причина в настройках региональных стандартах, в частности, в функции использования символов Юникод (UTF-8). Для того, чтобы проверить, в этом ли дело, выполните следующие действия:
- Перейдите в Панель управления (можно использовать поиск на панели задач), откройте раздел «Региональные стандарты» и перейдите на вкладку «Дополнительно». Попасть на эту вкладку можно, с помощью клавиш Win+R и ввода команды
control intl.cpl,,1
- Нажмите кнопку «Изменить язык системы».

- Проверьте текущий язык системы (установите «Русский», если выбран другой) и состояние отметки «Использовать Юникод (UTF-8) для поддержки языка во всем мире». По умолчанию она снята. Если в вашем случае включена — попробуйте убрать и нажать «Ок», если же отключена, то наоборот.

Вам будет предложено перезагрузить компьютер — сделайте это, после чего проверьте, решилась ли проблема.
Кодовые страницы в реестре
В некоторых случаях, особенно когда ваша Windows 11 была русифицирована установкой языкового пакета (или у вас «сборка» на основе англоязычной версии системы), проблема с «иероглифами» может быть вызвана использованием не подходящих кодовых страниц.
Исправить ситуацию можно попробовать в реестре, однако предварительно я рекомендую создать точку восстановления системы.
Шаги будут следующими:
- Нажмите клавиши Win+R на клавиатуре, введите regedit и нажмите Enter
- Перейдите к разделу реестра
HKEY_LOCAL_MACHINE\SYSTEM\CurrentControlSet\Control\Nls\CodePage
- Обратите внимание на параметр с именем ACP в правой панели редактора реестра и его значение. Если оно отличается от 1251 (обычно при проблемах значение бывает равным 1252), дважды нажмите по параметру и измените значение на 1251. После чего закройте редактор реестра и перезагрузите компьютер.


Второй вариант того же действия (менее желательный) — подмена файла кодовой страницы C:\Windows\System32\c_1252.NLS копией файла c_1251.NLS (при этом желательно сохранить резервную копию файла c_1252.NLS). Файлы защищены и потребуется стать владельцем и получить необходимые права. Если при этом что-то пойдёт не так, может потребоваться выполнить восстановление системных файлов Windows.
Дополнительные варианты
Некоторые дополнительные возможные способы решения проблемы с отображением русских букв в программах и системных элементах Windows:
- Если вы изменяли системные шрифты Windows 11 на более «красивые» проблема может быть вызвана тем, что в выбранном вами шрифте отсутствуют необходимые символы кириллицы (обычно в этом случае отображаются пустые квадраты). Решение — тем же способом, которым вы проделывали это изначально, вернуть стандартный системный шрифт (также, при наличии, можно использовать точки восстановления системы).
- Для некоторых старых программ может сработать запуск в режиме совместимости с версией Windows, для которой они были разработаны.