
Все способы:
- Вариант 1: Закрепление любого окна
- Способ 1: PinWin
- Способ 2: DeskPins
- Способ 3: AutoHotKey
- Вариант 2: Закрепление отдельных программ
- Закрепление «Диспетчера задач»
- Закрепление проигрывателя Windows Media Player
- Закрепление плеера браузера
- Вопросы и ответы: 1
Вариант 1: Закрепление любого окна
Чтобы закрепить окно Windows поверх остальных, потребуется воспользоваться сторонними утилитами, поскольку штатных средств для этого не предусмотрено. Разберем несколько бесплатных вариантов, которые позволят сделать так, чтобы любое окно системы и софта располагалось всегда поверх. Алгоритм зависит от выбранного средства: у некоторых утилит реализована функция горячих клавиш, у других – через меню в области уведомлений.
Способ 1: PinWin
PinWin – бесплатное приложение, с помощью которого можно закрепить любое окно поверх других, даже если оно неактивно. Работает через область уведомлений, где после инсталляции появится его иконка:
Скачать PinWin с официального сайта
- Скачайте установочный файл и запустите его, чтобы инсталлировать приложение на компьютер, следуя инструкциям пошагового мастера.
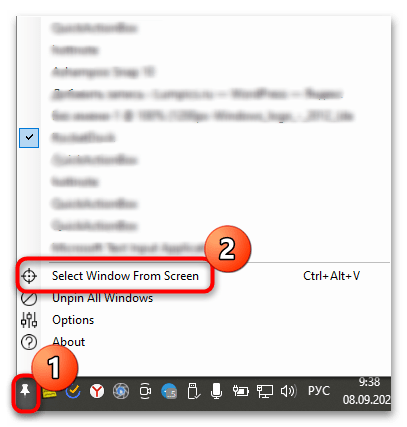
- В трее появится значок, стилизованный под канцелярскую кнопку, нажмите на него. Отобразится меню, где доступен список всех окон, которые запущены. Выберите из перечня нужное или воспользуйтесь пунктом «Select Window From Screen».
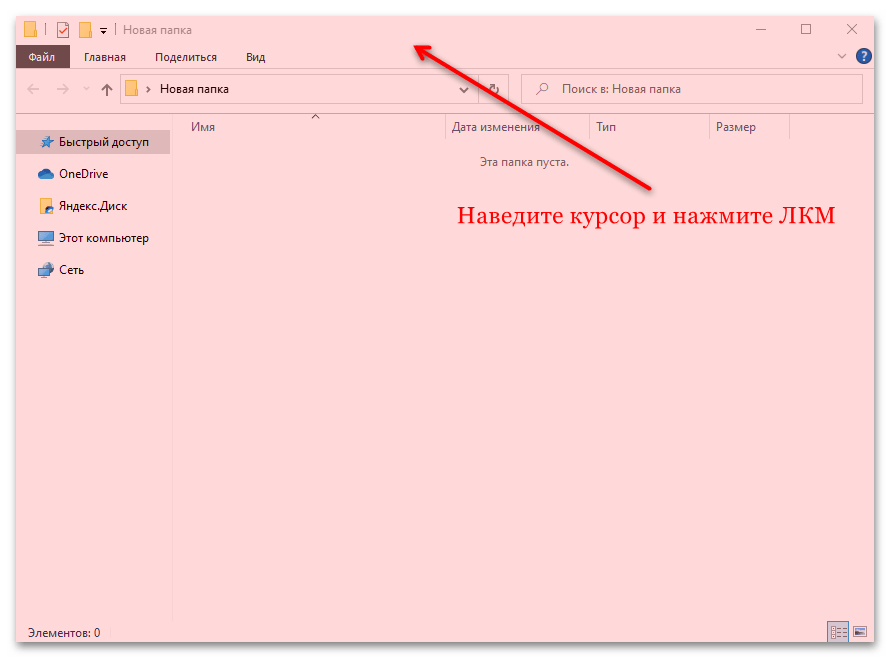
- То окно, которое нужно закрепить, будет подсвечиваться красным цветом. Щелкните левой кнопкой мыши, чтобы указать, что именно отобразится поверх остальных окон.

В утилите реализована горячая клавиша при выборе окна с рабочего стола: достаточно одновременно зажать «Ctrl + Alt + V».
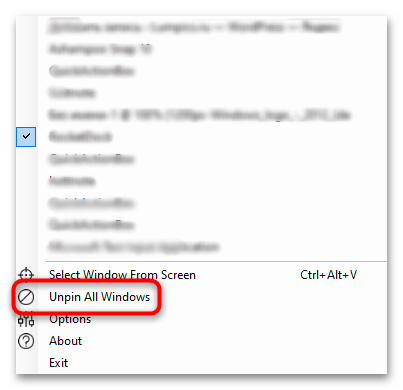
Несмотря на то, что интерфейс на английском языке, он интуитивно прост. При необходимости можно открепить сразу все окна, выбрав пункт «Unpin All Windows».
Способ 2: DeskPins
Еще одно решение, упрощающее работу с окнами в Windows 10, – это DeskPin. С помощью него можно без особых усилий закрепить любое окно поверх остальных:
Скачать DeskPins с официального сайта
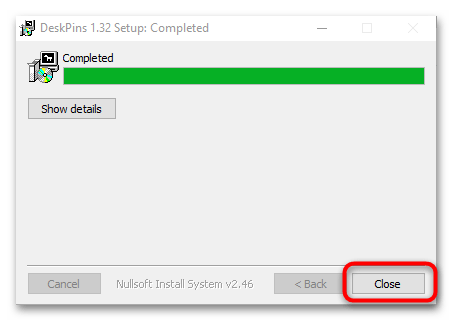
- Загрузите и установите DeskPins. После инсталляции нажмите на «Close» в окне пошагового мастера.
- Чтобы иконка приложения появилась на панели уведомлений, запустите его, отыскав в списке установленного софта.
- Щелкните ЛКМ по значку на трее, и тогда курсор мыши преобразуется в значок канцелярской кнопки. Кликните по тому окну, которое надо закрепить. Вверху появится картинка в виде кнопки, указывающая, что окно располагается поверх остальных.

Чтобы открепить окно, наведите курсор на красный значок канцелярской кнопки. Появится иконка в виде крестика, после чего щелкните по нему ЛКМ.
Способ 3: AutoHotKey
AutoHotKey – удобная программа, с помощью которой пользователь может самостоятельно создавать различные скрипты для своих горячих клавиш. При этом они применяются не только в определенных приложениях, но и в операционной системе в общем. Создать скрипт, отвечающий за функцию «Всегда сверху» у активного окна, достаточно просто:
Скачать AutoHotKey с официального сайта
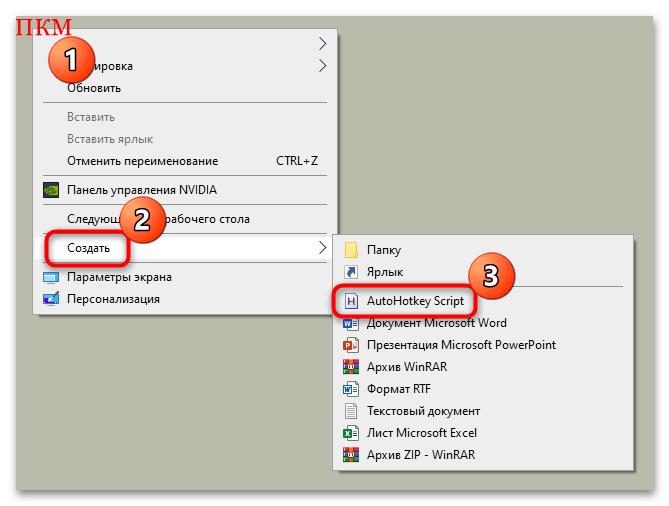
- После скачивания установочного файла запустите его. Его функции автоматически интегрируются в контекстное меню Windows 10. Щелкните правой кнопкой мыши по свободной области рабочего стола и в списке наведите курсор на пункт «Создать». В развернувшемся дополнительном меню нажмите на пункт «AutoHotkey Script».
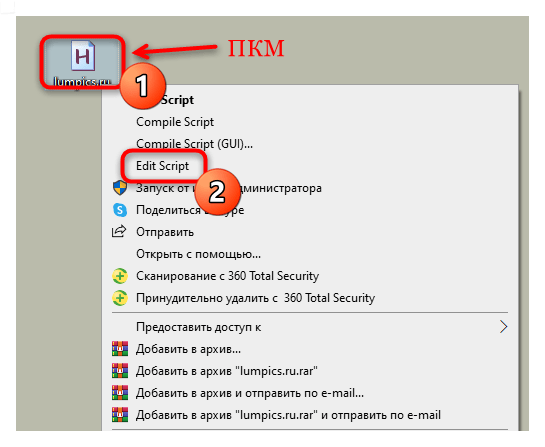
- Задайте имя скрипту, затем кликните по нему правой кнопкой мыши и выберите функцию «Edit Script».
- По умолчанию запустится встроенный редактор «Блокнот». Не удаляйте уже введенные символы, а ниже пропишите команду
^+SPACE:: Winset, Alwaysontop, , A. - Нажмите на вкладку «Файл» и выберите пункт сохранения.


Затем потребуется запустить файл скрипта двойным нажатием ЛКМ. Теперь, когда открыто окно, которое нужно закрепить, достаточно использовать комбинацию клавиш «Ctrl + Shift + Space».
Вместо «Space» можно задать любую клавишу, вписав ее в файле скрипта, открытом в «Блокноте».
Чтобы остановить работу скрипта, достаточно в трее щелкнуть по его иконке правой кнопкой мыши и выбрать пункт «Exit». Также можно поставить его на паузу, воспользовавшись параметром «Pause Script».
Вариант 2: Закрепление отдельных программ
Встроенных в Windows средств закрепления окон, как вы уже понимаете, нет — лишь только пара системных приложений умеет выносить себя на первый план. Кроме того, если говорить о функциях самой программы, браузеры сейчас позволяют выносить окно плеера отдельно, и оно по умолчанию закрепляется поверх всех окон.
Закрепление «Диспетчера задач»
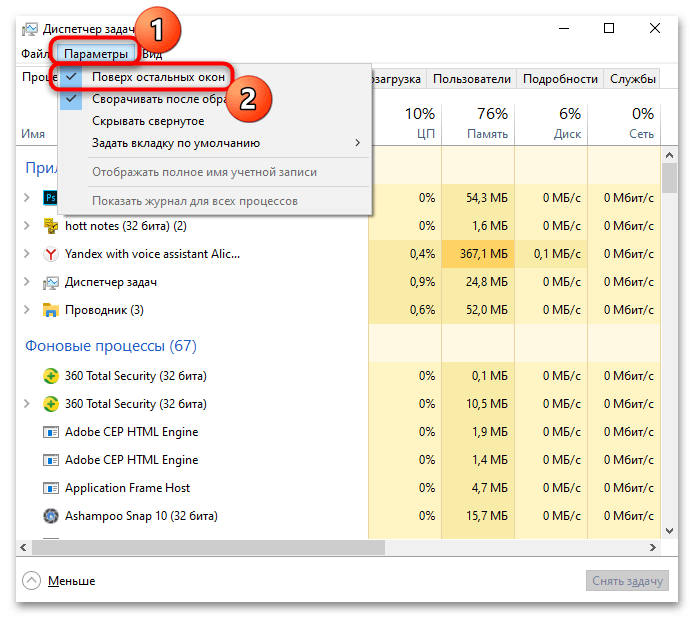
Штатное средство «Диспетчер задач» позволяет отслеживать работу активных процессов и производительность системы в целом, поэтому иногда важно, чтобы окно приложения было на виду. Разработчики предусмотрели такую возможность: для этого достаточно в запущенном «Диспетчере задач» кликнуть по вкладке «Параметры», затем отметить пункт «Поверх остальных окон».
Читайте также: Методы запуска «Диспетчера задач» в Windows 10
После этого «Диспетчер задач» будет всегда находиться сверху. Его размер можно уменьшить, если навести курсор на границу интерфейса, чтобы он преобразился в стрелку с двумя концами. Удерживая левую кнопку мыши, перетащите границу окна, пока оно не примет нужный размер.
Закрепление проигрывателя Windows Media Player
Встроенный мультимедийный проигрыватель Windows Media Player также предусматривает функцию «Окно в окне», то есть при которой он будет закреплен на экране:
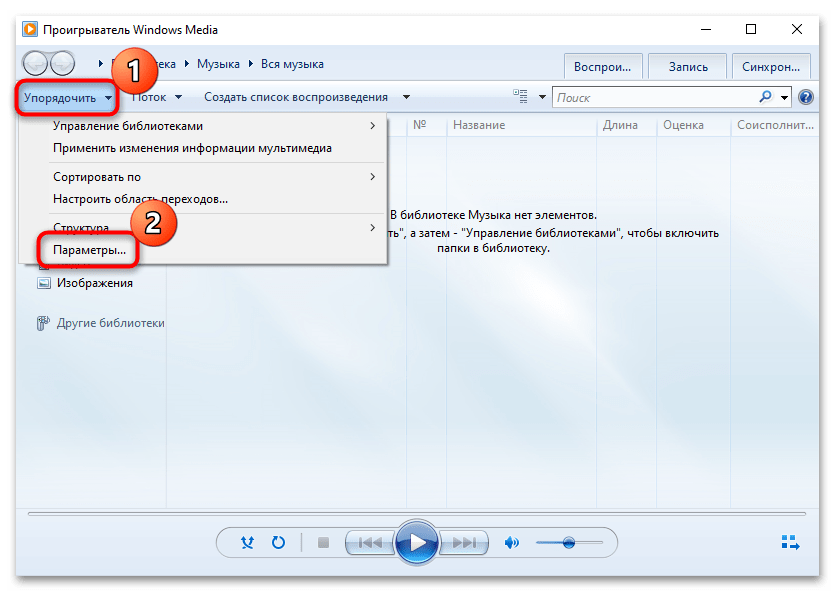
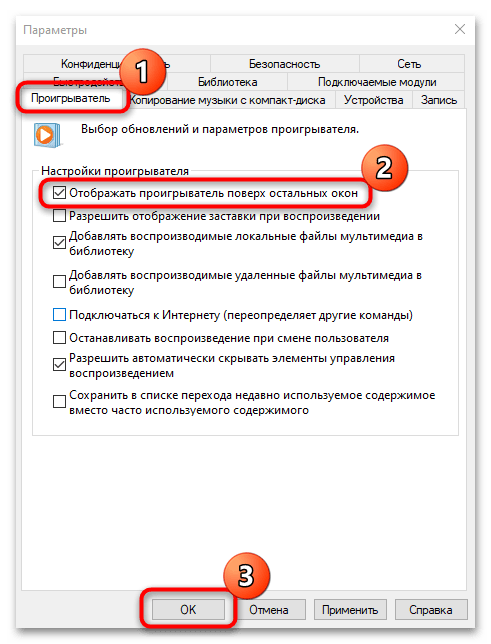
- В запущенном приложении нажмите на кнопку «Упорядочить» и из меню выберите пункт «Параметры».
- В новом системном окне перейдите на вкладку «Проигрыватель» и поставьте галочку около опции «Отображать проигрыватель поверх остальных окон». Кликните по «ОК», чтобы применить изменения.
Закрепление плеера браузера
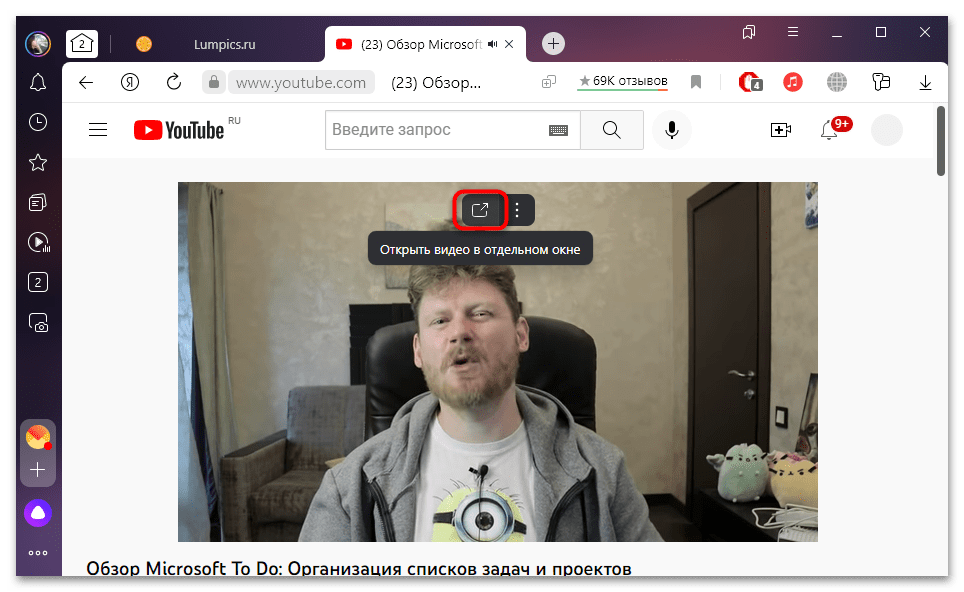
Некоторые браузеры имеют встроенную функцию «Окно в окне», что удобно при просмотре видеоконтента с сайтов или специальных сервисов. Во время воспроизведения через встроенный проигрыватель на ресурсе в этом случае нужно нажать на специальную иконку, запускающую плеер в отдельном окне, которое по умолчанию поверх остальных. Это доступно в таких обозревателях, как Яндекс.Браузер, Opera, встроенном Microsoft Edge.
Если в «Яндекс.Браузере» нет значка для выноса видео в отдельном окне поверх остальных, то эту функцию потребуется активировать вручную:
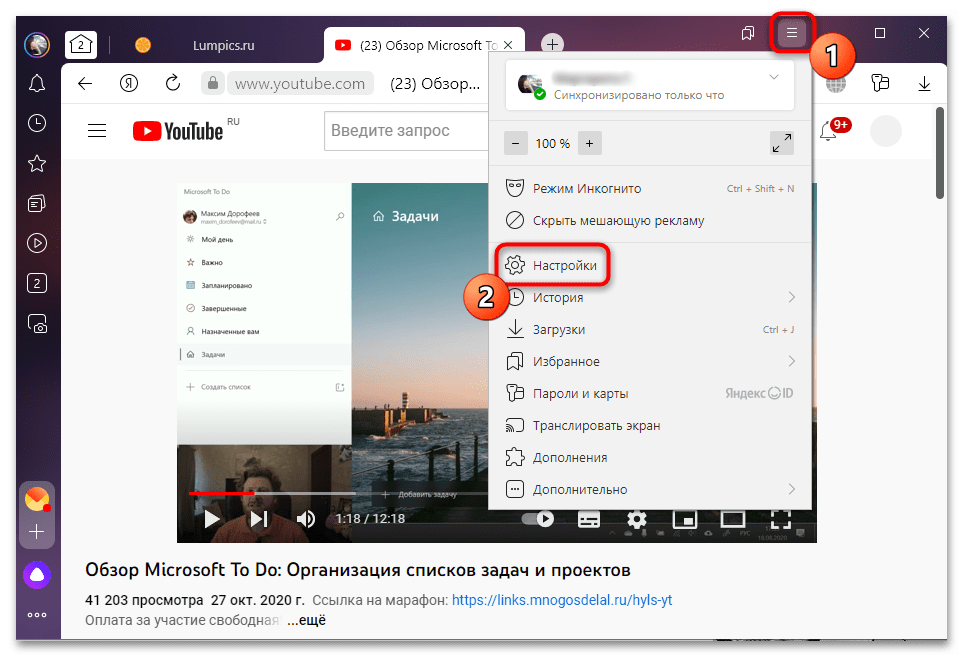
- Откройте раздел «Настройки», нажав на три вертикальные полоски на верхней панели.
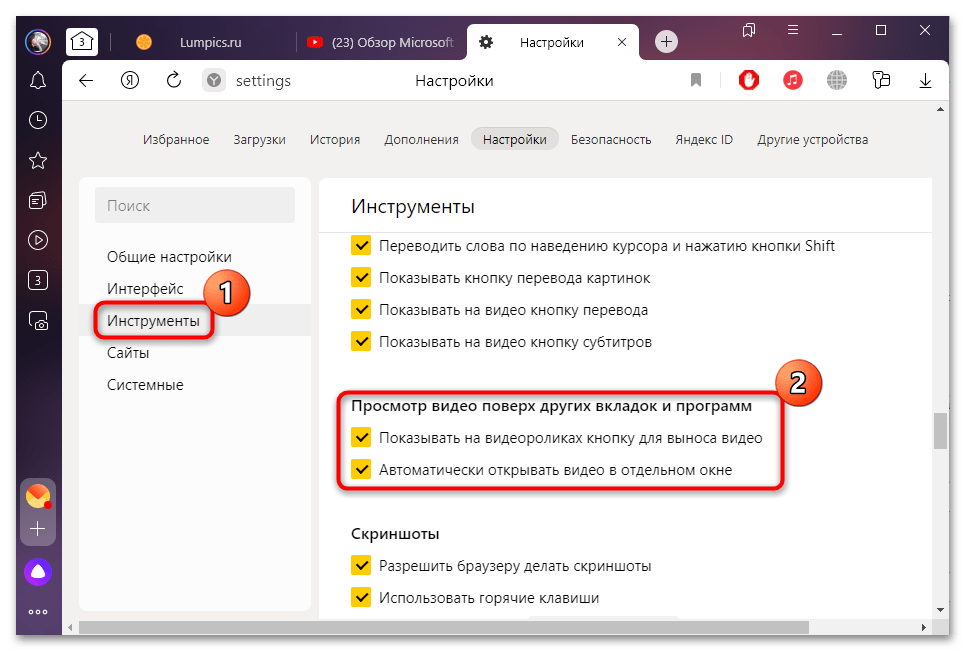
- На вкладке «Инструменты» найдите блок «Просмотр видео поверх других вкладок и программ». Отметьте опцию «Показывать на видеороликах кнопку для выноса видео».
Наша группа в TelegramПолезные советы и помощь
Multitasking is a regular occurrence when working on a computer. However, it can be challenging to manage multiple windows at the same time when you’re busy with work. Fortunately for Windows 11 users, learning quick workarounds with simple keyboard shortcuts like the one for pinning windows on the top of the screen can significantly enhance your productivity. This article will discuss the benefits of having windows always on top and guide you through the process of using these shortcuts.
Why should you pin your windows?
Using the pin windows feature in Windows 11 comes with several advantages, especially for those looking to boost their productivity. Here are some benefits that can come with pinning your windows:
Enhanced focus and efficiency
By having your most important apps or documents always visible, you can maintain focus on your primary tasks. This is particularly useful when dealing with multiple windows, such as referencing data from one application while working in another.
Streamlined workflow
Pinning a window helps with streamlining your workflow. For instance, keeping a reference document or a real-time data feed always on top can save you from the hassle of constantly switching between windows.
Customized workspace
The ability to pin windows allows you to customize your digital workspace according to your preferences and needs, allowing you to create a more efficient and comfortable working environment.
Pinning and unpinning windows in Windows 11
The process of pinning and unpinning windows on top in Windows 11 is easy and can be done in seconds. Here’s how you can switch back and forth on your own device:
Activate the ‘Always on Top’ feature to pin
To pin a window, simply select the window you want to keep on top and press Ctrl + F11. This action will activate the ‘always on top’ feature for the selected window.
Revert the pinned window
If you wish to revert the window back to its standard layering, press Ctrl + F12 while the window is selected. This will disable the ‘always on top’ feature for that particular window.
How to pin windows with Microsoft PowerToys
You can also use Microsoft PowerToys to pin your windows on top. PowerToys is a suite of utilities for power users that can easily be installed through the Microsoft App Store. After installing the latest version of PowerToys, open the PowerToys settings and navigate to the «FancyZones» utility. Locate and enable the «Always on Top» feature or use the keyboard shortcut Ctrl + Win + T to find it quickly. The active window will stay on top of all other windows, aiding in multitasking and productivity.
Keep your workflow going with pinned windows
Learning how to pin windows on top using Ctrl + F11 and unpinning them with Ctrl + F12 in Windows 11 is a simple yet effective way to enhance your computing experience. Whether you’re a professional juggling multiple tasks, a student doing research, or are just looking to improve your productivity, utilizing this small feature while you work can provide a significant boost to your levels of focus.
Find more tips on being productive while using Windows 11 from the Windows Learning Center.
When it comes to multitasking on your Windows 10 computer, sometimes you need a window to stay on top no matter what. But did you know that you can easily pin a window on top in Windows 10? This nifty feature allows you to keep important information or applications readily visible while you work on other tasks.
Pinning a window on top is a handy feature that has been available in Windows operating systems for quite some time. With Windows 10, Microsoft has made it even easier to keep a window always on top. This feature is especially useful when you need to reference information from one window while working in another, such as comparing data or following step-by-step instructions.
To pin a window on top of other windows in Windows 10, follow these steps:
- Open the window you want to pin.
- Click on the title bar of the window and drag it to the top of the screen.
- Once the cursor reaches the top and the window maximizes, release the mouse button.
- The window will now be pinned on top of other windows.

Introduction
Windows 10 offers a range of features and customization options to enhance user productivity and efficiency. One such feature is the ability to pin a window on top, allowing you to keep important applications or information within easy reach while working on other tasks. In this article, we will explore different methods that you can use to pin a window on top in Windows 10, helping you optimize your workflow and multitasking capabilities. Whether you need to keep a calculator handy, reference a document, or frequently refer to a specific program, pinning a window on top can be a valuable tool.
Method 1: Using the «Always on Top» Functionality
Windows 10 has a built-in feature known as «Always on Top» that allows you to pin a window on top of others. This feature can be accessed using a simple keyboard shortcut. Here’s how:
1. Open the application or window that you want to pin on top.
2. Click on the title bar of the window to make sure it is in focus.
3. Press the Alt key on your keyboard and while holding it down, press the Spacebar.
4. From the drop-down menu that appears, select the «Always on Top» option.
The selected window will now stay on top of other windows, allowing you to view and interact with it while working on other tasks.
Advantages of Method 1
Using the «Always on Top» functionality is a quick and easy way to pin a window on top in Windows 10. Some advantages of this method include:
- No additional software or tools required
- Works with most applications and windows
- Can be easily toggled on and off
By utilizing this built-in feature, you can keep specific windows or applications visible at all times without the need for third-party software.
Disadvantages of Method 1
While the «Always on Top» functionality is convenient, it does have some limitations:
- Some windows or applications may not have the «Always on Top» option available
- The pinned window may cover important elements of other applications
- Toggling the «Always on Top» option off may require repeating the steps
Consider these factors when deciding whether this method is suitable for your specific workflow.
Method 2: Using Third-Party Software
If the built-in «Always on Top» functionality is not sufficient for your needs or if you encounter limitations with certain applications, you can explore third-party software options that offer more advanced window pinning features. Here are some popular third-party tools you can consider:
1. PinWin: PinWin is a lightweight application that allows you to pin windows on top with customizable hotkeys. It offers additional features such as window transparency and window snapping, making it a versatile tool for managing your windows.
2. DeskPins: DeskPins is another popular option that lets you pin windows on top by simply clicking on the window’s title bar. It supports multiple monitors and allows you to pin multiple windows at the same time.
3. AlwaysOnTop: AlwaysOnTop is a straightforward utility that provides a simple interface to enable window pinning functionality. It allows you to pin windows with a single click and includes options to adjust the window transparency.
Before downloading and installing any third-party software, ensure that you download from trusted sources and read user reviews to understand the features and limitations of each tool.
Advantages of Method 2
Using third-party software for window pinning offers several advantages:
- More advanced window pinning features
- Customizable hotkeys and settings
- Possibility to pin multiple windows at once
These tools provide additional customization options and features that may better suit your specific workflow and requirements.
Disadvantages of Method 2
While third-party software can offer more flexibility, there are a few potential downsides:
- Additional software to download and install
- Potentially takes up system resources
- May require additional configuration
Consider these factors and assess the compatibility with your system before opting for third-party software.
Method 3: Using Virtual Desktops
Virtual desktops are a built-in feature in Windows 10 that allow you to create and switch between multiple desktop environments. They can be used as a workaround to pinning windows on top without obstructing your main desktop. Here’s how to leverage virtual desktops for window pinning:
1. Open the application or window that you want to pin on top.
2. Press the Windows logo key + Tab or click the «Task View» button on the taskbar to open the virtual desktop interface.
3. Click on the «New Desktop» option in the bottom right corner to create a new virtual desktop.
4. Switch to the new desktop by clicking on it in the virtual desktop interface.
5. On the new desktop, open the application or window that you want to pin on top.
6. Return to your main desktop using the same method mentioned in step 2.
Now, you can easily switch between your main desktop and the virtual desktop with the pinned window, allowing you to access the window without it obstructing other applications on your main desktop.
Advantages of Method 3
Using virtual desktops for window pinning has several advantages:
- No need for additional software
- Keeps the pinned window separate from your main desktop
- Allows for easy switching between desktops
This method provides an efficient way to multi-task and keep certain windows or applications accessible without cluttering your main desktop.
Disadvantages of Method 3
While using virtual desktops can be helpful, it does have some limitations:
- Additional desktops may use additional system resources
- May require switching between desktops frequently
- Not suitable for all applications or workflows
Consider these factors and assess whether using virtual desktops for window pinning aligns with your specific requirements.
Exploring a Different Dimension
In addition to the previously mentioned methods, Windows 10 offers another way to pin a window on top, which involves using the Task Manager. Let’s delve into this alternative method:
Method 4: Using the Task Manager
The Task Manager in Windows 10 allows you to manage running processes and applications on your computer. It also provides the ability to pin a window on top using the following steps:
1. Right-click on the taskbar and select «Task Manager» from the context menu.
2. In the Task Manager window, navigate to the «Processes» or «Details» tab.
| 3. Right-click on the application or process you want to pin on top. |
| 4. From the options menu, select «Always on Top». |
The selected window or application will now stay on top of other windows as long as it remains open.
Advantages of Method 4
Using the Task Manager for window pinning offers some advantages:
- Easy access to window pinning functionality
- No need for additional software or tools
- Works with most applications and processes
This method is a viable option if you prefer using the Task Manager to manage running processes on your computer.
Disadvantages of Method 4
While the Task Manager method can be convenient, it does have a few limitations:
- The pinned window may cover important elements of other applications
- Not suitable for all processes or applications
- Pinning is lost when the process or application is closed
Consider these factors and evaluate whether this method aligns with your specific workflow and requirements.
Conclusion
Pin a window on top in Windows 10 to enhance your productivity and multitasking efficiency. Whether you choose to use the built-in «Always on Top» functionality, explore third-party software options, leverage virtual desktops, or utilize the Task Manager, there are several ways to keep important windows or applications easily accessible while working on other tasks. Consider your specific workflow, requirements, and limitations to determine the most suitable method for your needs.

Pin a Window on Top in Windows 10
Pinning a window on top in Windows 10 allows you to keep a specific window visible on your screen while you work with other applications. This feature is particularly useful when you need to have a reference window, such as a calculator or browser, accessible at all times.
To pin a window on top in Windows 10, follow these steps:
- Open the desired application or window you want to pin on top.
- Click on the title bar of the window and hold down the left mouse button.
- Drag the window towards the top of the screen until you see a transparent outline appearing at the top edge of the screen.
- Release the mouse button to pin the window on top.
Your pinned window will now remain on top of other windows, allowing you to easily access its content while working on other applications. To unpin the window, simply click on the title bar and drag it down from the top of the screen.
Key Takeaways:
- Pinning a window on top in Windows 10 allows you to keep it visible while working in other applications.
- You can easily pin a window on top by using the «Always On Top» feature in specific applications or using third-party software.
- Some applications, like media players and text editors, have built-in options to pin their windows on top.
- Third-party software like «PinMe!» and «DeskPins» provide more flexibility and allow you to pin any window on top.
- Pinning a window on top can help improve multitasking and productivity by keeping important information always visible.
Frequently Asked Questions
Here are some commonly asked questions about how to pin a window on top in Windows 10:
1. How can I pin a window on top in Windows 10?
To pin a window on top in Windows 10, follow these steps:
1. Open the desired window that you want to pin on top.
2. Click on the title bar of the window and hold the left mouse button.
3. While holding the left mouse button, press the «Ctrl» and «Space» keys simultaneously on your keyboard.
4. Release the left mouse button.
The window will now be pinned on top of other windows, allowing you to easily access it while using other applications.
2. Can I pin multiple windows on top at the same time?
No, it is not possible to pin multiple windows on top at the same time in Windows 10. You can only pin one window at a time. If you try to pin another window while one is already pinned, the previously pinned window will be unpinned.
3. How can I unpin a window from being on top?
To unpin a window from being on top, follow these steps:
1. Click on the pinned window to bring it into focus.
2. Click on the title bar of the window and hold the left mouse button.
3. While holding the left mouse button, press the «Ctrl» and «Space» keys simultaneously on your keyboard.
4. Release the left mouse button.
The window will now be unpinned from being on top and will behave like a normal window.
4. Will the pinned window always stay on top?
No, the pinned window will only stay on top until you manually unpin it or close the window. If you close the window, it will no longer stay on top even if you open it again.
5. Are there any keyboard shortcuts to pin a window on top?
Yes, you can use the keyboard shortcut «Ctrl» + «Space» to pin a window on top in Windows 10. This allows for a quick and convenient way to keep a window visible while working with other applications.
In conclusion, pinning a window on top in Windows 10 is a simple and useful feature that allows you to keep important information easily accessible. Whether you want to keep a chat window open while working on other tasks or have a reference document always visible, this feature can greatly enhance your productivity.
By following the steps outlined in this article, you can easily pin any window on top of others, ensuring that it remains visible at all times. From using the Task Manager to utilizing third-party tools, you have multiple options to choose from based on your personal preference and needs. Start pinning your windows today and enjoy the convenience of having important information readily available while you work.
Windows 10 is a versatile operating system packed with features designed to enhance user experience and productivity. One of the useful functions within Windows is the ability to keep certain windows on top of others. This capability is particularly beneficial for multitasking, allowing users to interact with multiple applications seamlessly. In this comprehensive guide, we’ll explore various methods to pin a window on top of others in Windows 10, offering both built-in and third-party solutions.
Understanding Window Management in Windows 10
Before diving into the practical steps for pinning windows on top, it’s essential to understand how window management works in Windows 10. When you open multiple applications, they typically overlap. The window that is currently active is on top, while inactive windows are obscured. Pinned windows, however, remain above all others, allowing continuous access without minimizing or switching between applications.
Why Pin a Window?
Pinning a window can enhance productivity in several ways:
- Multitasking: Users can keep essential information visible while working on other tasks.
- Monitoring Workflow: Real-time data, such as messaging applications or monitoring tools, can be consistently visible.
- Ease of Access: Frequently used tools or utilities can be kept on hand, reducing the time spent switching between applications.
Whether you’re coding, managing spreadsheets, communicating with colleagues, or engaging in creative work, the option to pin windows can significantly streamline your workflow.
Built-in Options for Pinning Windows
Windows 10 does not include a direct «always on top» feature in many of its native applications. However, a few built-in features can help mimic this functionality:
Using Task View
- Open Multiple Windows: Start by opening the applications or documents you wish to work with.
- Access Task View: Click the Task View icon on the taskbar, or press
Windows + Tab. - Select the Window: You’ll see all your open windows in a grid layout. While you can’t pin a window here directly, it’s a useful way to switch quickly between tasks.
This method doesn’t pin a window on top but aids in quick access when you have several applications open.
Using Snap Assist
- Open the Desired Window: Open the window you wish to keep in view.
- Snap to Side: Drag the window to the left or right edge of the screen until you see a visual outline. Release the mouse button, and the window will snap to that side, allowing you to open another window alongside it.
Like Task View, Snap Assist facilitates effective window management but does not provide a true pinning capability.
Third-Party Tools for Pinning Windows
Since Windows 10 lacks a straightforward way to keep windows on top natively, using third-party applications is the most effective solution. Several tools are available, and we’ll discuss a few of the most popular and user-friendly options.
1. DeskPins
DeskPins is a lightweight application that provides an easy way to pin windows on top of others.
How to Use DeskPins
- Download and Install DeskPins: Visit the official website, download the tool, and install it.
- Launch the Application: Run DeskPins from your applications list.
- Pinning a Window: Once launched, you’ll notice a pin icon in your system tray. To pin a window, click the pin icon and then click the title bar of the window you wish to keep on top. The window will now stay above others.
- Unpin a Window: To unpin, simply click the pin icon again on the window’s title bar.
DeskPins is efficient and straightforward, making it a popular choice among users who need a simple «always on top» feature.
2. Always On Top
Always On Top is another user-friendly application that allows you to keep any window above others seamlessly.
How to Use Always On Top
- Download Always On Top: You can find this application on various software distribution websites.
- Install the Application: Follow the installation instructions provided.
- Launch Always On Top: Open the application, which runs in the background.
- Pinning Windows: To pin a window, press
Ctrl + Space. Click on the title bar of the window you want to pin. The window will stay on top. - Unpinning Windows: To unpin, repeat the
Ctrl + Spaceshortcut and click on the pinned window.
One of Always On Top’s advantages is that it doesn’t clutter your interface, and you can use its shortcuts to manage pinned windows efficiently.
3. PowerToys
Microsoft’s PowerToys is a suite of utilities designed to enhance productivity in Windows 10. One of its features allows you to keep a window on top.
How to Use PowerToys
- Download PowerToys: Go to the official GitHub page for PowerToys and download the installer.
- Install the Application: Follow the installation instructions, and launch the tool after installation.
- Open the PowerToys Settings: Right-click the PowerToys icon in your system tray and select “Settings.”
- Enable FancyZones: Navigate to the FancyZones tab and enable it. This feature allows you to create custom window layouts.
- Pinning a Window: Use the default shortcut
Windows + Shift + Twhile the target window is active to pin it on top.
PowerToys is a powerful tool not only for pinning windows but also for many other window management strategies, making it a great addition to your productivity toolkit.
4. WindowTop
WindowTop is a more advanced tool that can pin windows, adjust transparency, and add always-on-top functionality to any application.
How to Use WindowTop
- Download WindowTop: Search for WindowTop online and download it from a trusted source.
- Install the Application: Install and run WindowTop.
- Pinning a Window: Right-click the title bar of the window you want to pin and select «Keep on Top.»
- Adjusting Transparency: You can also adjust the transparency level of pinned windows, allowing you to see other windows beneath.
WindowTop is particularly useful for users who want detailed control over how their windows display in relation to one another.
5. TranslucentTB
While primarily known for customizing the taskbar, TranslucentTB also offers some unique functionalities that can help improve overall window management.
How to Use TranslucentTB
- Download TranslucentTB: Find TranslucentTB on the Microsoft Store or GitHub.
- Installation: Install as per instructions provided.
- Set Translucency: Right-click the TranslucentTB icon to access a context menu where you can adjust the taskbar transparency, which can indirectly improve the functionality of your pinned windows by reducing visual clutter.
While this tool doesn’t pin windows, it complements other tools effectively by decluttering your working space.
Using Keyboard Shortcuts for Efficiency
Regardless of the method you choose to keep windows on top, learning a few keyboard shortcuts will help you use them more efficiently:
- ALT + Tab: Quickly switch between open windows.
- Windows + M: Minimize all windows.
- Windows + D: Show desktop.
- Windows + Shift + T: If using PowerToys, this can pin/unpin windows based on your settings.
By mastering these shortcuts alongside the pinning methods, you can significantly enhance your multitasking capabilities.
Troubleshooting Common Issues
While pinning windows is generally straightforward, you may encounter some common issues. Here are a few troubleshooting tips:
- Pinned Windows Not Staying on Top: Ensure that no software conflicts exist by closing background running applications that may interfere with window management.
- Shortcut Keys Not Working: Check if the software used for pinning windows has specific settings that modify shortcut behavior.
- Unresponsive Applications: If a pinned application becomes unresponsive, try terminating it via Task Manager and reopening it.
Conclusion
Pinning windows on top in Windows 10 can significantly improve productivity, particularly for users who juggle multiple applications. While Windows 10 doesn’t include a native feature for this, several effective third-party solutions like DeskPins, Always On Top, PowerToys, and WindowTop fill that gap. Each tool has its unique features, allowing users to choose based on their specific needs.
By incorporating these methods into your daily workflow, you can enhance your multitasking abilities, manage your workspace better, and ultimately streamline your productivity. With just a few adjustments to your approach to window management, you’ll be well on your way to a more efficient, organized digital workspace.
If you are like me and have a ton of windows open on your desktop, you might be looking for an app that lets you pin a window that stays on top of everything. I usually keep my text editor on top of all the windows while doing research work. It helps make my workflow much more productive. We have been waiting for a built-in always-on-top feature in Windows for the longest time, but even Microsoft’s latest desktop OS, Windows 11, does not come with it. Nevertheless, we have found two easy ways to keep a window always-on-top in Windows 11. And well, one of the solutions comes directly from Microsoft. So without any wait, let’s go through the tutorial.
As mentioned above, we have added two nifty methods to keep a window always-on-top on Windows 11. Both the programs are free and work great on Windows 11. You can expand the table below and move to the program you wish to check out.
Method 1: Keep a Window Always-on-Top with Microsoft PowerToys
Microsoft has released an update for PowerToys that brings the much-needed Always-on-top feature to Windows 11. The best part is that instead of manually pinning a window, PowerToys lets you pin a window on top with a keyboard shortcut. So yeah, you can enable always-on-top for a particular window in a jiffy and turn it off with ease. Here is how to set it up.
1. First, go ahead and download PowerToys from its GitHub page. You should download the latest EXE file. Apart from that, you can also install PowerToys from Microsoft Store (Free).
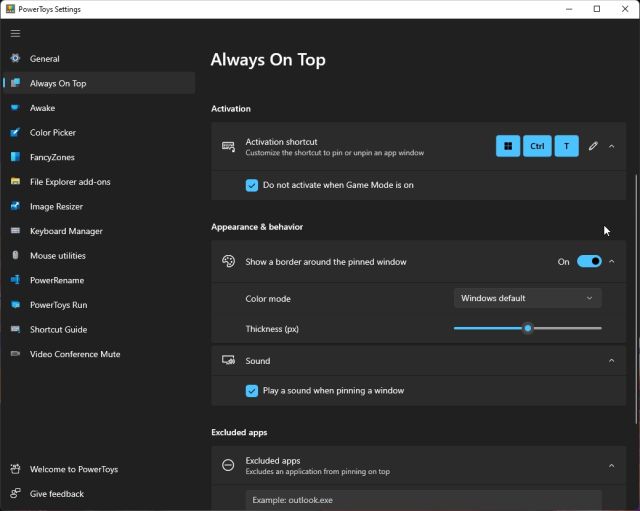
2. After the installation, open PowerToys from the Start menu. Then, move to the “Always On Top” section from the left sidebar and turn on the toggle. That’s it.

3. To test the feature, select a window and press “Windows + Shift + T” simultaneously, and that window will be pinned on top right away. That’s amazing, right? To turn it off, press the same shortcut, and you are done. By the way, you can also pin multiple windows on top.

4. In case you don’t like the big bold borders around the window, you can disable it from PowerToys. Toggle off the “Show a border around the pinned window” feature. There is also an option to change the hotkey, disable the sound, and add apps to be excluded from pinning on top. As a side note, if you love PowerToys, you can also use it to get a universal mute switch on Windows 11.
Method 2: Keep a Window Always-on-Top with DeskPins
Apart from PowerToys, there is the DeskPins app that does the job of pinning windows on top quite well. It’s a free and open-source app that is lightweight (just 104KB in size) with support for multiple window pinning and a keyboard shortcut. Simply follow the below instructions to set it up.
1. Head over to this link and download DeskPins on your Windows 11 PC. After that, install the program.
2. Next, open the program from the Start menu. You will find the app running under the System tray.
3. Click on it, and the mouse cursor will turn into a pin. Click on the window you wish to pin on top, and there you have it. You have now successfully pinned a window always-on-top using this app.

4. To remove the pinned window, hover your mouse on the pin and click the cross button that appears.
5. There are also keyboard shortcuts available here. Press “Ctrl +F11” to pin a window on top and press “Ctrl + F12” to disable it. You can customize the shortcuts by right-clicking on the app and navigating to “Options -> Hotkeys”.
Pin a Window on Top in Windows 11 with Ease
So these are the two best ways to pin any window always-on-top in Windows 11. Earlier, I was using the third-party program, but with the latest release of PowerToys, things have changed significantly. Microsoft’s implementation is frictionless, and in my brief testing, it worked seamlessly on my Windows 11 laptop. Anyway, that is all from us. If you are looking for the best live wallpaper apps for Windows 11, check our linked list. And in case you want to diagnose your PC to fix programs or remove malware, learn how to start Windows 11 in safe mode. Lastly, if you have any questions, comment them down below, and we will help you out.