

Приветствую. Многие пользователи Windows 7 не хотят пересаживаться на Windows 10, справедливо считая новый интерфейс неудобным. Проблема заключается еще и в том, что нельзя в новой системе вернуть интерфейс Windows 7 штатными методами, как например можно было в Windows 7 вернуться к старому интерфейсу Windows 9x.
Проблема озадачила многих людей. Понятно, что пути назад в пользовательском интерфейсе не предвидится, поэтому заинтересованные пользователи взяли дело в свои руки.
На данном этапе никакая программа не может вернуть интерфейс Aero в Windows 10 со 100% идентичностью. Из всех вариантов на сегодняшний день, март 2019 года, был выбран наиболее близкий. Данный способ не претендует на самый лучший вариант изменения интерфейса. Возможно, кто-то знает более качественную замену интерфейса – не стесняйтесь, напишите в комментарии.
Итак, нам понадобится:
— Установленная и рабочая версия Windows 10 Pro сборка 1809 со стандартными настройками по умолчанию.
— какие-то стандартные обои из состава Windows 7, например эти — c:\Windows\Web\Wallpaper\Nature\img2.jpg, либо можете взять свои любимые обои.
— пакет стандартных иконок Windows 7, для программы IconPackager. Пакет можно скачать в интернете, поищите фразу windows_7_icon_package_by_kylematic.
— платная программа для замены иконок Stardock IconPackager, подойдет версия 5.10.032.
— платная программа для восстановления меню Пуск StartIsBack++, подойдет версия 2.8.2.
— утилиту DWMGlass AIO 0.21R2 – для прозрачности заголовков окон и темы кнопок от Windows 7.
Сперва вернем ваши любимые обои. Копируем их куда-нибудь на системный диск. После копирования обоев, кликаем по ним правой кнопкой мыши и в контекстном меню выбираем – Сделать фоновым изображением рабочего стола. Обои установлены.
Устанавливаем программу Stardock IconPackager. Находим предварительно скачанный пакет иконок для этой программы и запускаем пакет двойным кликом. Пакет откроется в программе. Нажимаем кнопку «Применить пакет». В результате будут заменены системные иконки.

Далее нужно установить прозрачность для всех окон. Устанавливаем пакет DWMGlass AIO 0.21R2. Утилита возвращает полупрозрачность окон с эффектом размытия. Программа оптимизирована под современные процессоры с поддержкой SSE, поэтому практически не потребляет вычислительных ресурсов. По окончании установки всплывет окно настроек Aero Glass. Там нужно выбрать тему Atlas win7rp и установить Glass geometry radius в значение Win7 style. Ползунки прозрачности можно сдвинуть в крайнее левое положение.

Далее установим старое-новое меню Пуск. Устанавливаем программу StartIsBack++. После окончания установки будет предложено перейти к настройкам – соглашаемся. В меню «Внешний вид» выбираем второй слева стиль Windows 7, выбираем третью слева иконку пуск. Вешаем две галочки прозрачности и сдвигаем соответствующие ползунки прозрачности в крайнее левое положение. В разделе настроек «Меню Пуск» можно увеличить количество недавно использованных программ до 20. И в разделе меню «Переключение» установить количество недавно использованных элементов в 20. Все, меню Пуск настроено.
Что получилось в итоге, вы можете увидеть на экране. На этом все, пишите, что вы думаете о данной трансформации в комментариях.
Telegram-канал @overclockers_news — теперь в новом формате. Подписывайся, чтобы быть в курсе всех новостей!
К сожалению, времена активной работы сторонних разработчиков над твиками Windows 10 Mobile остались позади. Microsoft больше не выпускает крупные обновления системы, пользовательская база платформы всё уменьшается, да и количество неизвестных твиков не так уж и велико. Тем не менее, некоторые шаги в этом направлении всё же делаются. Не так давно на платформе появилось новое приложение для кастомизации — Perfect Style, созданное для тех, кто хочет приукрасить систему.
Читайте также: Как установить кастомные цвета оформления Windows 10 Mobile.
Программа Perfect Style может:
- Изменить системный шрифт. В приложение встроено 38 вариантов (правда, не все поддерживают кириллицу), есть возможность добавить свой шрифт вручную.
- Поменять стиль иконок и эмоджи в центре уведомлений, Параметрах и других местах системы.
- Установить кастомную анимацию загрузки.
- Изменить способ отображения типа сети в строке состояния (к примеру, поменять надпись 4G на LTE).
Конечно, всё это можно было сделать и раньше вручную с помощью редактирования ключей в реестре, но гораздо удобнее, когда все опции собраны в одном месте. К сожалению, не обошлось и без багов — к примеру, у нас почему-то не сработала функция восстановления стандартного шрифта, и для этого нам пришлось использовать старое приложение Font Style. Впрочем, это не так уж и критично.

Воспользоваться программой довольно просто. Для начала сделайте Interop Unlock, затем скачайте Appx-файл и установите его на смартфон. Замечания и предложения можно оставлять в профильной теме на английском форуме XDA.
While some people feel that Windows 10 and 11 have an appealing look, others appreciate the old days and the more classic Windows 7 look. If dealing with the appearance of Windows 10 has had you down or Windows 11 has you wishing for a callback to the traditional Window look, you have options!
The good news is that Windows 10 and Windows 11 are highly customizable, so you can engineer their design to look nearly the same as Windows 7. With a few tweaks to elements like wallpaper, color scheme, and default browser, you’ll be back to a Windows 7 look and feel in no time.
Change the Start menu on Windows 10
Step 1: A download called Classic Shell once allowed you to change key menu aspects to look more like Windows 7. Unfortunately, support for Classic Shell ended in 2017, but the code was picked up and continued with Open Shell, which you can download here.
With this free tool, you can modify the Windows 10 Start menu to resemble the version that came with Windows 7. Once installed, you’ll see six entries on your Start menu listed under Classic Shell. Here, you will want to choose the Classic Start menu settings.
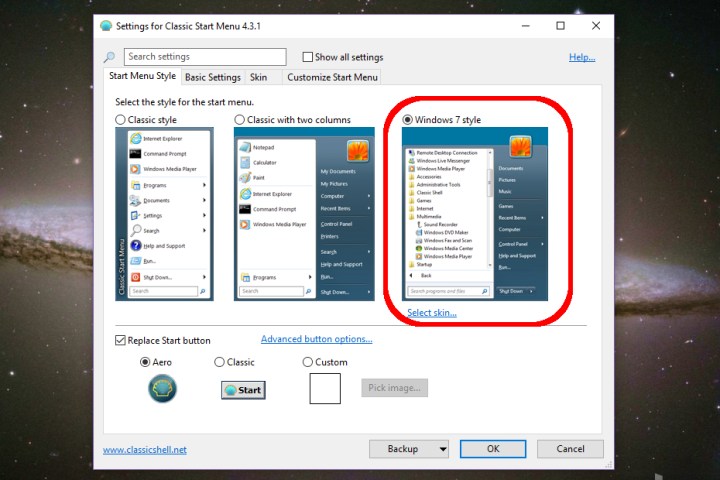
Image used with permission by copyright holder
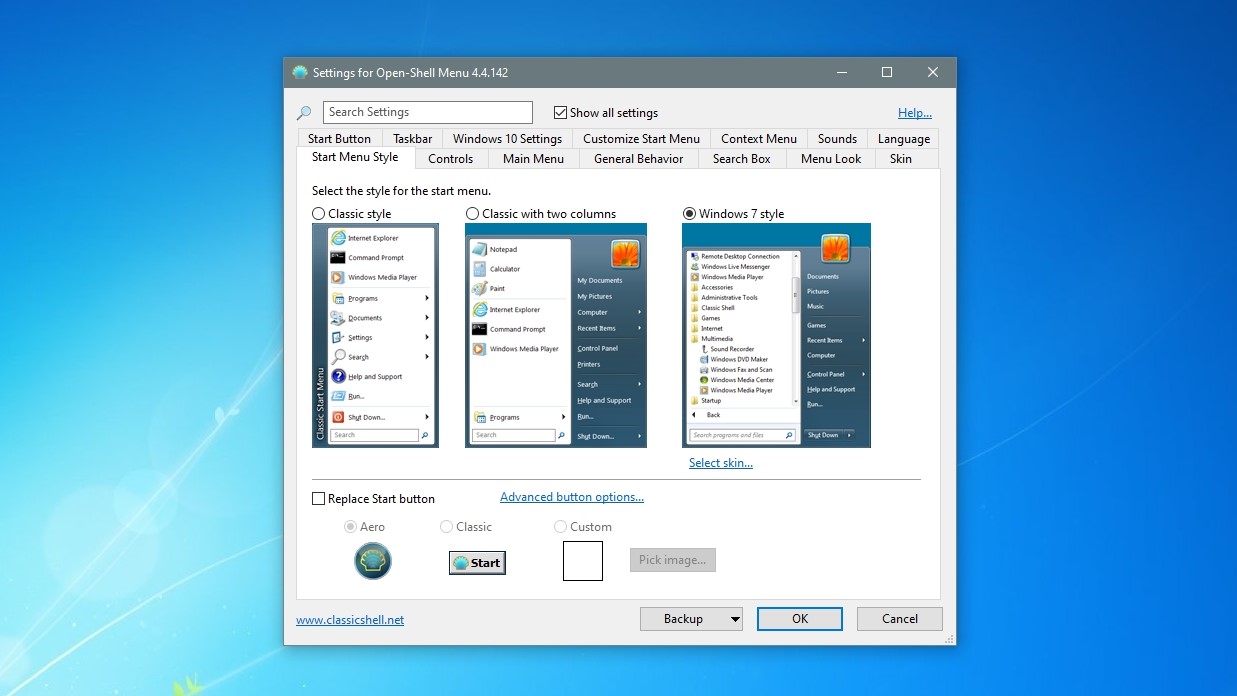
Step 2: On the Start menu style tab, choose the Windows 7 style.
Step 3: Next, head here to download the Windows 7 Start Menu orb (these are image files, so you can pick them up from many different places if you prefer). Once downloaded, choose Custom near the bottom of the Start menu style tab and select the downloaded image. You may need to tweak the button size — we used 60 given the default setting was too large for our desktop resolution.
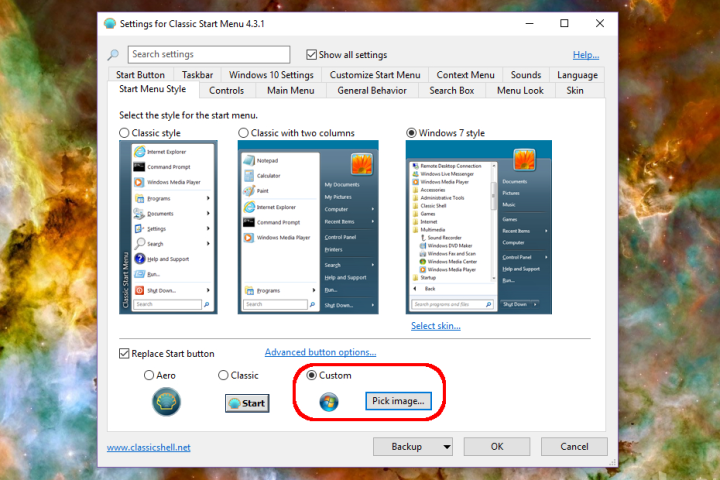
Image used with permission by copyright holder
Step 4: On the Skin tab, choose Windows aero. Select OK to finish up.
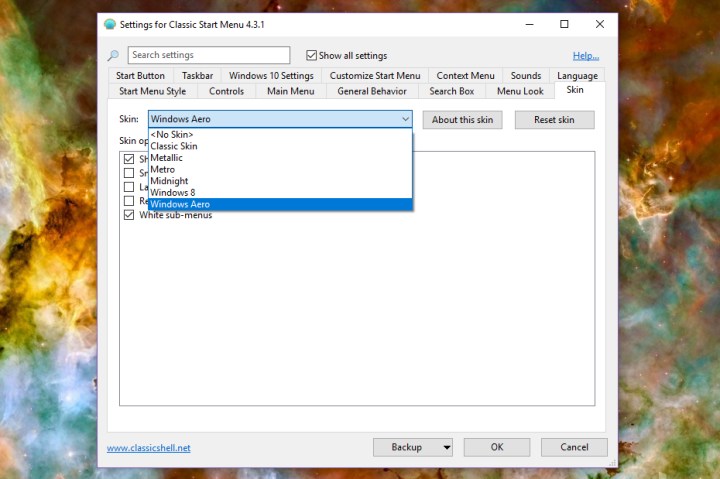
Image used with permission by copyright holder
Step 5: If you don’t care much about the other style options, but you do really miss the option to make the taskbar transparent while you work, then we suggest downloading TranslucentTB instead. It will give you that sweet transparency without changing anything else.
Change the wallpaper on Windows 10
Step 1: To install a Windows 7 wallpaper, download the images from this archive. We have an example here you can use, too.
Image used with permission by copyright holder
Step 2: Right-click on the Windows 10 desktop and select Personalize.

Image used with permission by copyright holder
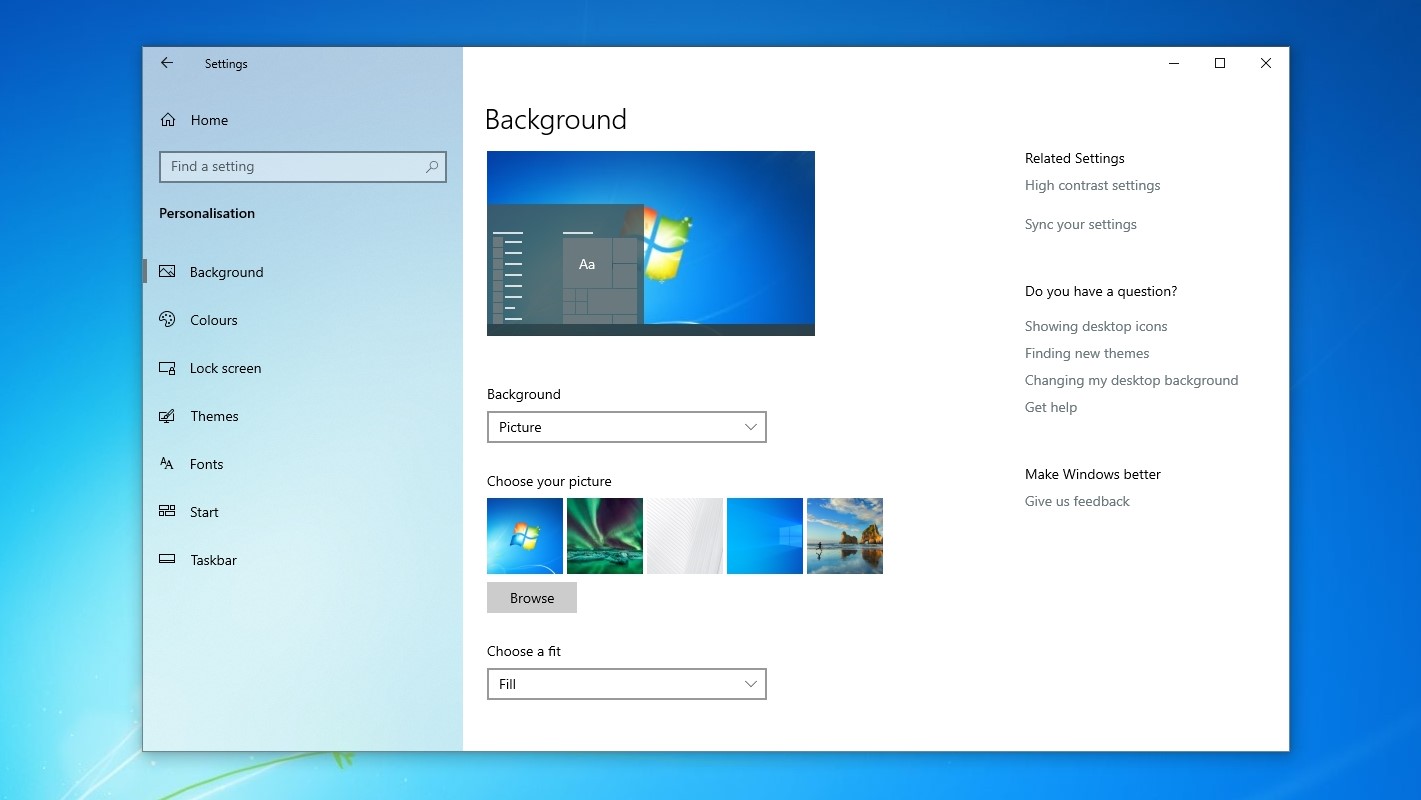
Step 3: The Settings app should then appear, defaulting to the Background panel. Make sure the Background drop-down menu reads Picture and then select the Browse button to find your downloaded wallpaper.
Change the colors in Windows 10
Step 1: Right-click on the desktop and select Personalize.
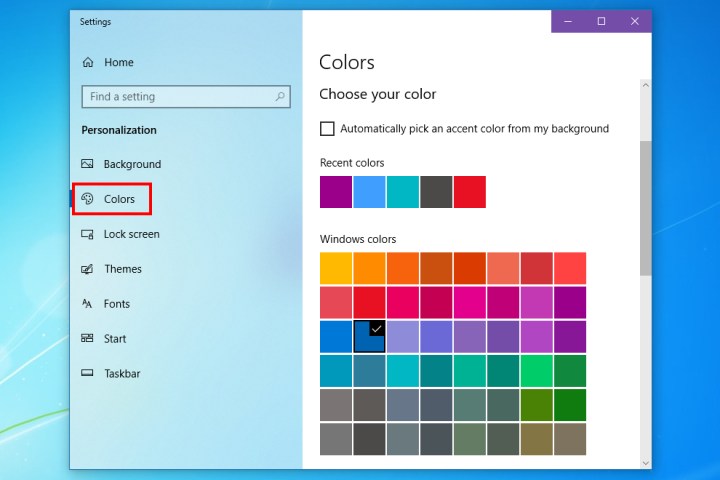
Image used with permission by copyright holder
Step 2: Choose Colors on the left of the Settings app. We chose navy blue for the best results, but you can experiment if you want.
Step 3: Next, we’ll switch the colors of the title bar. Check the Title bars option toward the bottom of the panel. You can add the Start and taskbar if you prefer as well.

Image used with permission by copyright holder
Add Gadgets
Microsoft Gadgets was a popular option in Windows 7. You could instantly see various categories of vital news and daily updates on your desktop thanks to these handy apps. They could display the weather, a clock, stock updates, and more, all while using minimal system resources.
Much to some users’ dismay, Microsoft eliminated Gadgets in Windows 10 to help prevent security issues. Windows 11 is a little better, as it got widgets. (Here are some of the best Windows 11 widgets) that are taking an increasingly Gadget-like role.
Many Windows users miss the way Gadgets functioned in Windows 7. The upside is that you can access many of these features by downloading the 8GadgetPack. The Microsoft store has certified the 8GadgetPack for safety, so you can get the same Windows 7 experience without the risks. Options include Clipboarders, Clock, Agenda, App Launcher, and more.
What about Windows 11?
Many of the steps we’ve discussed for Windows 10 will work for Windows 11 too, but you may run into some compatibility issues. There are a few separate steps you should take if you are trying to convert Windows 11 to a 7 appearance.
Step 1: Download StartAllBack. This is a full package to change Windows 11 into a more traditional UI that brings back many classic favorites, including features from both Windows 10 and Windows 7. You can get a permanent license key for only a couple of bucks if you like how it looks.
StartAllBack is very intuitive, with different sections for the Start menu, taskbar, file management, and more. It’s one of the easiest retro-UI solutions we’ve ever seen and saves a lot of work compared to Windows 10.
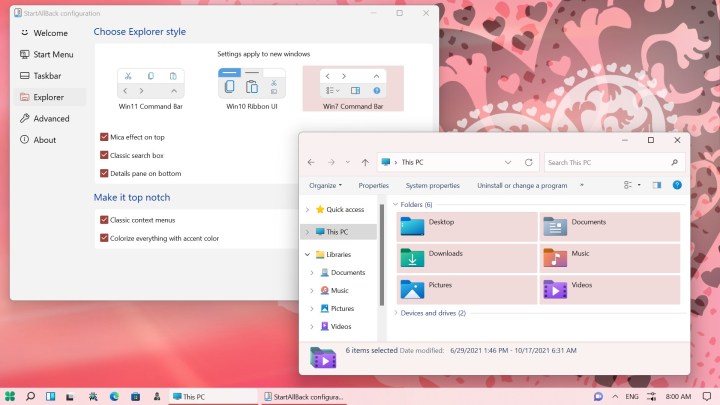
Image used with permission by copyright holder
Step 2: Download the Win11DisableRoundedCorners utility. If you’re a fan of the old style of Windows, you may be especially dismayed by the rounded corners in Windows 11. Running this utility should eliminate them for you.
Step 3: Note that solutions like 8GadgetPack will also work with Windows 11.
Finally, if you’re hesitating between Windows 10 and 11, perhaps now is the time to upgrade. Our review of Windows 11 might just convince you…
Если вам потребовалось изменить значок «Этот компьютер», иконку корзины, папки и некоторых других системных расположений — сделать это просто встроенными средствами системы. Более того, существуют сторонние возможности изменения других системных значков Windows 10 на свои.
В этой инструкции — подробно как о простых встроенных методах для начинающих, так и о других, «продвинутых», методах изменить значки (иконки) в Windows 10 и установить их на свой вкус. См. также: Как изменить иконку диска или флешки в Windows.
Изменение значка «Компьютер», «Корзина» и некоторых других
Если вы хотите установить свои иконки для некоторых системных папок на рабочем столе, сделать это в Windows 10 можно следующим образом:
- Зайдите в Параметры — Персонализация — Темы.
- В панели справа выберите пункт «Параметры значков рабочего стола».

- В следующем окне вы можете включить или отключить отдельные значки рабочего стола, а также установить свои.

- Просто выбираете из системных библиотек или указываете собственный файл в формате .ico после нажатия кнопки «Обзор».
На всякий случай привожу список встроенных библиотек Windows 10, где хранятся основные иконки системы (все находятся в C:\Windows\System32):
- shell32.dll (выбран по умолчанию при смене значка).
- imageres.dll
- ddores.dll
Конечно, есть и другие, но всё основное, что использует операционная система, собрано именно в этих DLL.
Как изменить иконку папки Windows 10
Изменение значков отдельных папок в Windows 10 — очень простая задач, достаточно следующих шагов:
- Нажмите правой кнопкой мыши по любой папке и выберите пункт «Свойства».
- Перейдите на вкладку «Настройка» и нажмите «Сменить значок».
- Как и в предыдущем способе, укажите желаемую иконку из библиотек Windows, exe-файлов программ или собственного .ico файла.
- Иногда после этого требуется закрыть и открыть заново окно с этой папкой или нажать F5, чтобы изменения вступили в силу.
Кстати, есть способы изменить цвет отдельных папок.
Программы для изменения системных значков Windows 10
В сети доступно достаточно много программ, способных изменять системные иконки Windows 10 путем редактирования файлов ресурсов.
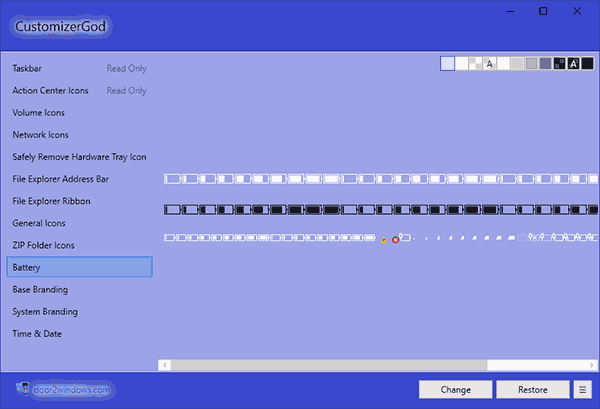
Это не то, что я рекомендовал бы начинающему пользователю, так как потенциально способно привести к проблемам (например, при проверке целостности системных файлов, тест обнаружит, что она нарушена), но, просто для информации, продемонстрирую одну такую программу — CustomizerGod, доступную на сайте www.door2windows.com/customizergod/
Что может программа? Прежде всего, заменить основные системные иконки Windows 10 (в разделе «General Icons». Например, если вам потребовалось поменять значки сразу всех папок, сделать это можно именно в этом разделе. При этом принимаются не только файлы .ico, но и другие графические форматы (например, png с прозрачным фоном).
Другие разделы программы позволяют изменить значки для специфичных индикаторов и панелей инструментов системы, например, ниже вы видите возможность изменения значка батареи (правда с ним не всё так просто: это не простые иконки, а графические файлы, содержащие сразу несколько индикаторов заряда).
Само использование программы для большинства элементов простое: выбрали иконку, которую нужно поменять, нажали кнопку Change, указали свой файл и применили настройки. Для того, чтобы изменения вступили в силу, потребуется перезапустить проводник: сделать это можно прямо внутри программы: нажмите по кнопке меню и в разделе «Explorer» нажмите «Restart».
В этом же меню можно очистить кэш иконок, экспортировать ресурсы выбранной вкладки для редактирования (может пригодиться, например, когда меняем значок батареи), восстановить изначальные иконки, настроить параметры подгонки размера изображений.
Если у вас есть еще какие-то вопросы на тему смены значков/иконок Windows 10 — спрашивайте в комментариях, я постараюсь помочь.
Windows 7 has reached End of Life (EOL), which means it’s not going to receive any more security updates from Microsoft. You really can’t put off upgrading to Windows 10 any longer, but it looks so different to Windows 7 that making the change might be a daunting prospect.
Thankfully, you can make the change less jarring by using free software to bring back the look of the operating system you know and love. All of these tips are easy to try, and can make Windows 10 far easier to get to grips with.
Before you get started, we recommend making a folder where you’ll store all the wallpapers, icons and other files you’ll be downloading along the way. This will make them easier to find, and if you decide you want to switch to Windows 10’s standard look, you can easily erase them all in one go.
1. Get the wallpaper
The easiest way to get WIndows 10 looking more familiar is to grab one of the classic wallpapers, and WPArena has compiled a list of all the official Windows 7 backgrounds for you to download. Just save your chosen design somewhere convenient, right-click it and select ‘Set as desktop background’.
Can’t settle on just one design? Right-click an empty space on your desktop and select ‘Personalize’, select ‘Background’ from the menu on the left and choose ‘Slideshow’ from the drop-down menu. You can now choose a set of different wallpapers to rotate at regular intervals.
Microsoft tried getting rid of the Start menu altogether in Windows 8, replacing it with a colorful screen of rectangular tiles much like your phone’s app selector. The Start Menu returned in Windows 10, to the relief of many, but it still looks quite different to the one you know and love from Windows 7.
Thankfully, you restore the menu to its former glory using a free tool called Open-Shell-Menu (formerly known as Classic Shell). To try it, download the latest release and run through the installer as directed. There are no potentially unwanted programs to worry about.
Sign up for breaking news, reviews, opinion, top tech deals, and more.
Launch the program, click the ‘Start menu style’ tab and select ‘Windows 7 Style’. Click ‘OK’, then open the Start menu to see the change.
You can also right-click on the taskbar and uncheck ‘Show task view’ and ‘Show Cortana button’ to hide two tools that weren’t present in Windows 7. You can also change the ‘Search’ option to ‘Hidden’ (the Search bar will still appear in the Start menu).
3. Get the Start button
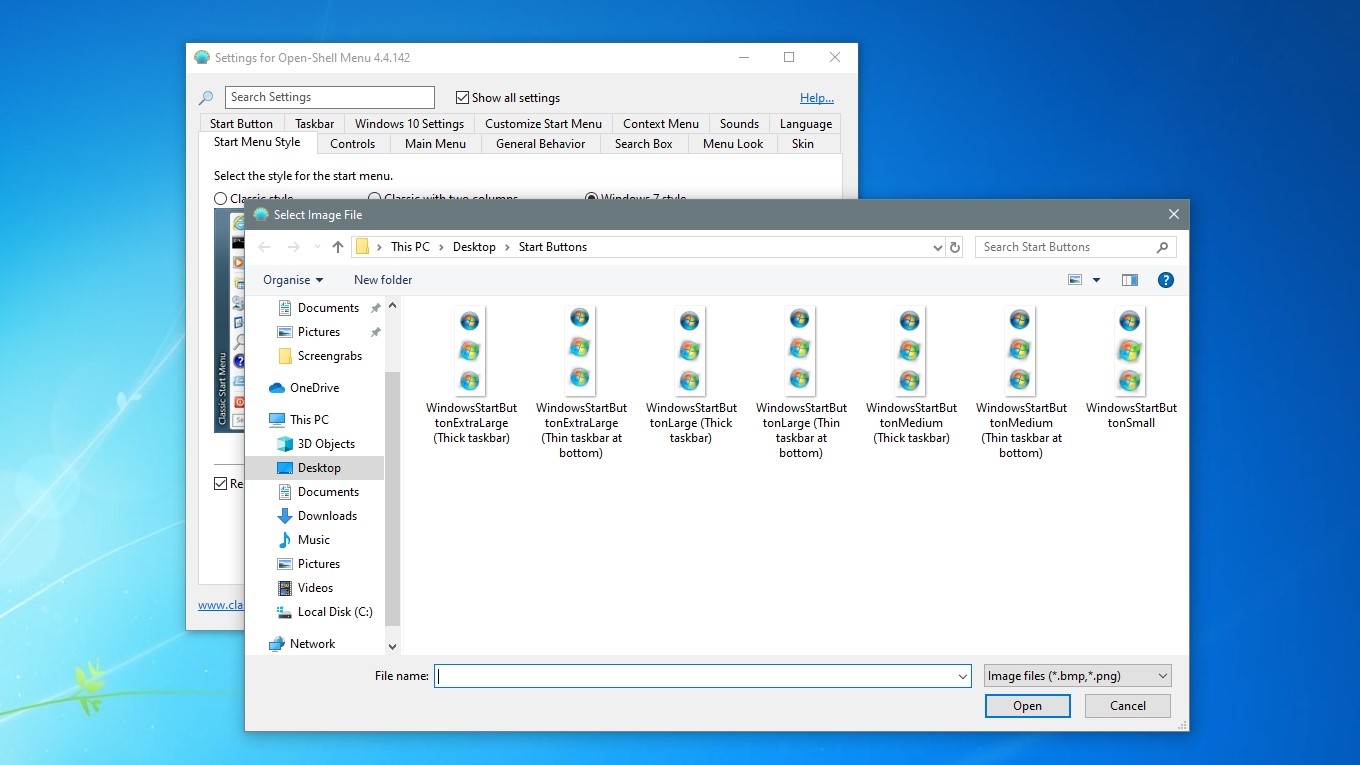
Open-Shell-Menu doesn’t include the classic Windows 7 start button, but you can download a copy from the old Classic Shell forums. Download the file BtartButtons.zip from the top post and extract the contents somewhere convenient.
In Open-Shell-Menu, select the ‘Start button’ tab and check ‘Replace Start button’. Click ‘Custom button’ then select ‘Button image’ and browse to the location where you saved the icons and experiment with the different options to find one you like.
4. Recreate the Aero theme
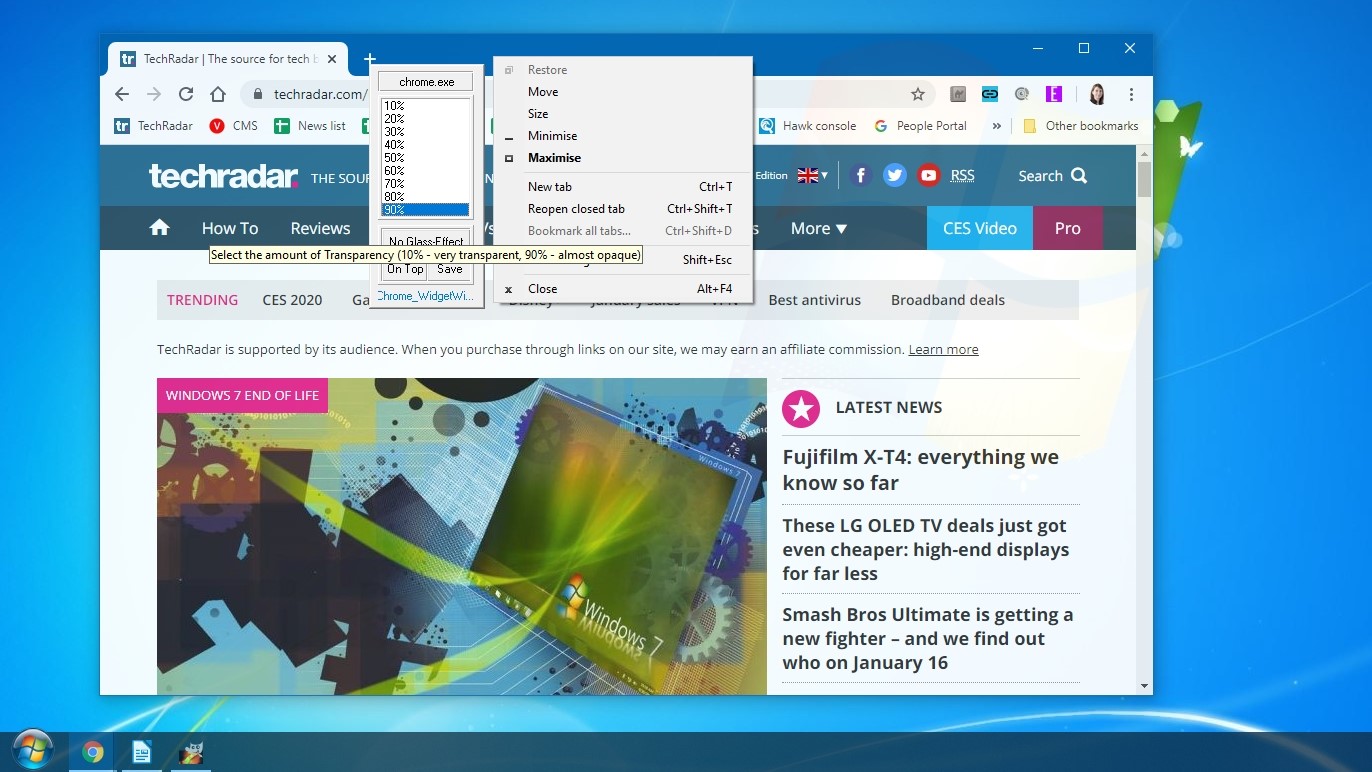
One of Windows 7’s most attractive features was its Aero Glass theme, which gave windows and toolbars a soft, translucent appearance. Yes, it was more resource-intensive that Windows 10’s plain design, but it looked great and modern PCs should have no trouble handing the effect.
Open-Shell-Menu can help recreate this look for the Start menu. Select the ‘Skin’ tab and choose ‘Windows Aero’ from the drop-down list to apply the effect.
For the Taskbar and other windows, a little program called Glass2K can help. Download and run the software, and use the slider at the bottom of the window to adjust the transparency of the Taskbar. You can also right-click on any window to change its opacity, but bear in mind that this will affect the entire window, not just its title bar.

5. Restore the startup sound
This final tip is far from essential, but it’s fun. Download the cheery Windows 7 startup sound as an MP3 (the different download options are on the right) then use Online Audio Converter to convert it to WAV format.
Now type ‘regedit’ into Windows 10’s search box to open the Registry Editor. Navigate to HKEY_CURRENT_USER > AppEvents > EventLabels > WindowsLogon. Double-click ‘ExcludeFromCPL’ and change the value data from ‘1’ to ‘0’. Close the Registry Editor.
Search for ‘Sound’ to open Windows’ audio options, and select ‘Sound control panel’ from the right-hand side. Click the ‘Sounds’ tab and check the box marked ‘Play Windows start-up sound’. Select ‘Windows log on’ from the list of sounds above, then click ‘Browse’ and navigate to the Windows 7 startup sound you downloaded.
Click ‘Test’ to check that it works and click ‘Apply’, then restart your PC and bask in the nostalgia.
- How to prepare for Windows 7 End of Life
Cat is TechRadar’s Homes Editor specializing in kitchen appliances and smart home technology. She’s been a tech journalist for 15 years, having worked on print magazines including PC Plus and PC Format, and is a Speciality Coffee Association (SCA) certified barista. Whether you want to invest in some smart lights or pick up a new espresso machine, she’s the right person to help.