
Problem to Be Solved and Possible Ways to Solve It
There was a very beautiful and simple-looking problem. And that was to convert a certificate from PFX format to CER format. This is not something I was facing for the first time, many people may already face that challenge to solve it, and I believe they must have already solved it some way. The solution seems that it would be easy and available options to solve it would be like:
- There would be some free tools available online, which can convert these certificates.
- There would be some online utilities that can reduce your burden and convert the certificates for you. (But they may keep your certificate with them, so BE CAREFUL.)
- There may be some open source project containing all the code and you need to set up that and you are ready to rock.
My dear friends, I Googled every possible solution that came into my mind, but nothing worked. Actually, there is an open-source project to do that and you can read about it from https://www.openssl.org/source/. But if you further explore it, you would find that:
- It is mainly designed for UNIX, LINUX, but supports Windows 10 as well.
- You can download the project from the git repo.
- Set up it on your system, with lots of dependencies. (That may consume your full day.)
- Run the utility.
- Convert the certificates.
Easy Solution for Windows 10
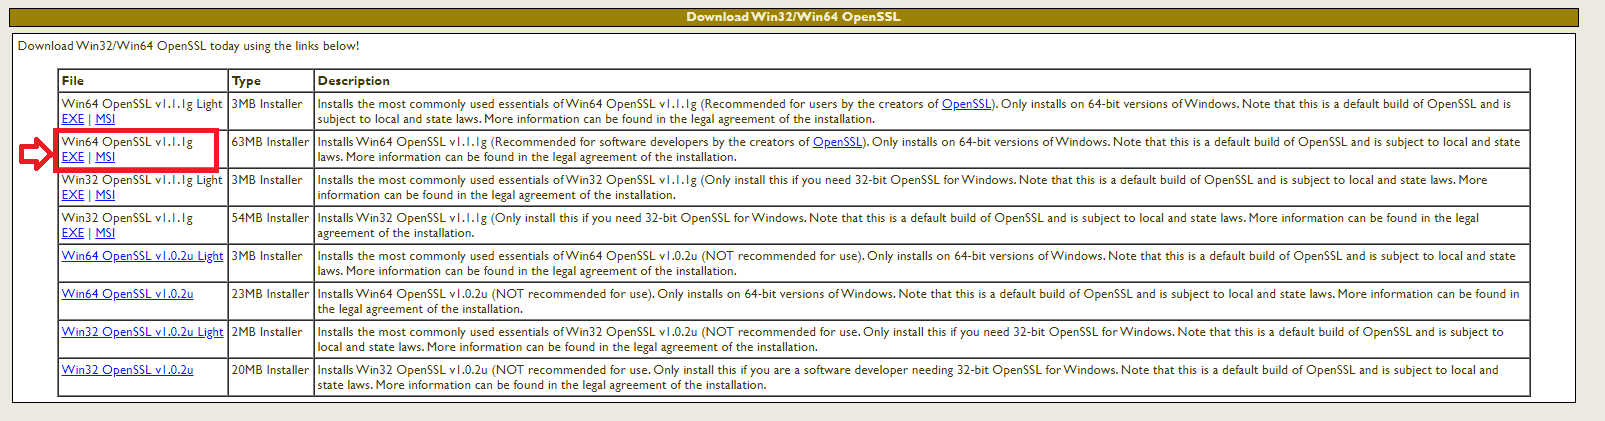
- Download the executable from https://slproweb.com/products/Win32OpenSSL.html

- As I was using 64 bit Windows 10, so I downloaded Win64 OpenSSL v1.1.1g MSI.
- Run the installer.
- When asked, just choose a different location than your system files. I installed it in D drive.
- It will again ask if you want to install the binaries into System folder or in the bin directory, choose bin directory as an option.
- Once the installation is done, go to the location in your explorer where you have installed the utility and open the bin folder, as shown below.
- There would be a file, named openssl.exe, right-click on it and run it as an Administrator.
- Now you will see a command prompt kind of window.
- Run the version command on it to check the version number and to confirm that the utility is working fine
- Now run the following command to convert the certificate.
- NOTE: In the below command, the name given in -in parameter ap_keystore_test.pfx is my input certificate name and the name given in -out parameter ap_keystore_test.cer is my desired output certificate name.
- It will ask you to enter the password for your certificate. Enter the password which is set to open your pfx certificate.
- Once done, you will not see any error and you will see the command prompt again.
- This means, your certificate has been successfully converted into cer format.
- You can open the cer file in any of your text editors like Notepad++ and can see the certificates in that.

Congratulations, you did it!
If this article is of some help to you, do like it. If you have any suggestions or comments, do message me, I will try to respond back ASAP.
Opinions expressed by DZone contributors are their own.
In some cases, you need to export the private key of a «.pfx» certificate in a «.pvk» file and the certificate in a «.cer» file.
For example :
To generate certificates with makecert but by using your certification authority created on Windows Server.
Knowing that Windows Server offers only export formats «.pfx» and «.cer» for this authority certificate, you must follow this tutorial to use this authority with makecert.
Prerequisites :
— OpenSSL 1.x
- OpenSSL Installation
- Export the private key (.pvk) from the certificate (.pfx)
- Exporting the «.cer» certificate from the «.pfx» certificate
- Preview of obtained files
1. OpenSSL Installation
To begin, download «OpenSSL», unzip the downloaded zip file and navigate to the «bin» folder.
To avoid OpenSSL say you «WARNING: can’t open config file: C:/OpenSSL/openssl.cnf», copy the contents of the «bin» folder in the «C:\OpenSSL» folder (that you must create) .
2. Export the private key (.pvk) from the certificate (.pfx)
To begin, start a command prompt (cmd) and type this :
Batch
cd C:\OpenSSL
Then, export the private key of the «.pfx» certificate to a «.pem» file like this :
Batch
openssl pkcs12 -in cert.pfx -nocerts -nodes -out key.pem
OpenSSL will ask you for the password that protects the private key included in the «.pfx» certificate.
If the password is correct, OpenSSL display «MAC verified OK».
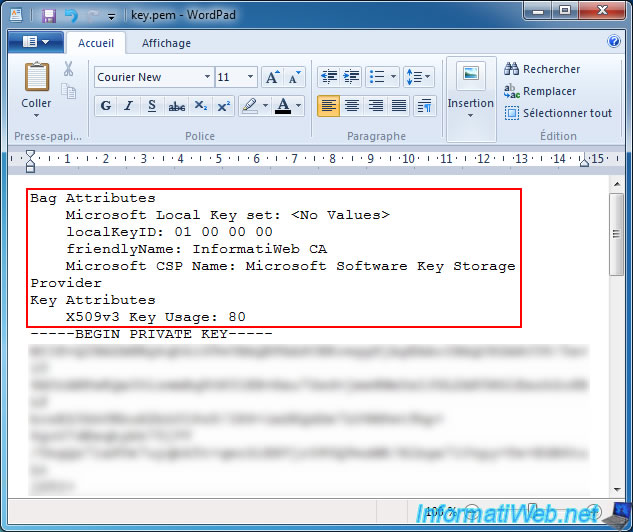
Then, open the «key.pem» file with WordPad (included with Windows) or Notepad++, delete lines that are above the line «——BEGIN PRIVATE KEY——» and save this file under the same name.
Your file will should look like this :
Plain Text
-----BEGIN PRIVATE KEY-----
Several lines of letters and numbers
-----END PRIVATE KEY-----
Note : Don’t use the Windows’s notepad because line returns of this file will not be recognized by this program.
Finally, convert the private key from the «.pem» format to the «.pvk» format.
Batch
openssl rsa -in key.pem -outform PVK -pvk-strong -out key.pvk
OpenSSL will ask you, yet again, the password that protects the private key.
3. Exporting the «.cer» certificate from the «.pfx» certificate
To begin, convert the certificate from the «.pfx» format to the «.pem» format, by typing this :
Batch
openssl pkcs12 -in cert.pfx -nokeys -nodes -out cert.pem
OpenSSL will ask you for the password that protects the «.pfx» certificate.
If the password is correct, OpenSSL display «MAC verified OK».
Then, convert this certificate from the «.pem» format to the «.cer» format, by typing this :
Batch
openssl x509 -inform PEM -in cert.pem -outform DER -out cert.cer
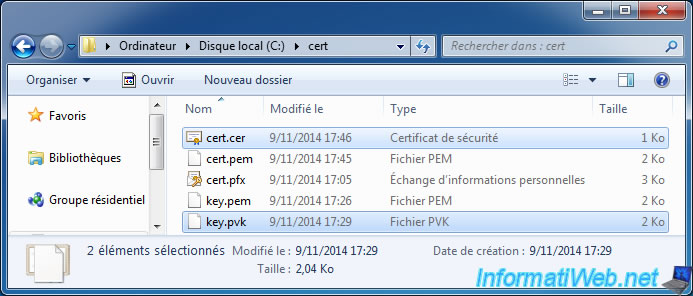
4. Preview of obtained files
With these commands, you have your key in the «.pvk» format and your certificate in the «.cer» format (DER encoded).
Note:
Certificatetool.com offers online and free SSL certificate format conversion tool without needing any software installation or running the OpenSSL commands. If you would like to convert your PFX file to other formats, check PFX Converter page.
Converting PFX to CER online is easy using Certificatetool.com tool
Just follow these steps:
- Upload Certificate File and Private Key (Optional)
- Select the initial file format and the format you want to convert to.
- Click the «Convert» button to begin the file conversion process. Please wait until output file is ready for download.
What is PFX format?
A Personal Information Exchange file, commonly referred to as a PFX file, is a password-protected archive containing a digital certificate, a private key, and the intermediate authority’s certificate. Primarily utilized to bolster the security of applications and websites, PFX files often play a central role in the installation of SSL certificates.
SSL, or Secure Sockets Layer, is a protocol designed to facilitate secure communication across computer networks. SSL certificates, integral to this protocol, serve the dual purpose of verifying a website’s identity and encrypting data transmitted between the website and the user’s browser.
Typically crafted by web hosting companies or certificate authorities, PFX files find their way to a website’s server after creation. Once installed, the website gains the ability to use HTTPS, the secure version of HTTP.
To install an SSL certificate, a web browser supporting HTTPS is required. Following a successful installation, a lock icon in the address bar signifies the website’s use of HTTPS and assures users that their communication with the site is secure.
Beyond securing websites, PFX files also play a role in code signing—a process that verifies the software developer’s identity and ensures the integrity of the software. Validating the signature of downloaded software from a trusted source using PFX files enhances confidence in the authenticity of the software.
In essence, PFX files emerge as a vital security tool safeguarding applications, websites, and software. Users engaging with SSL certificate-reliant websites or software should verify the validity of the associated PFX file and confirm its correct installation for optimal security assurance.
What is CER format?
A .cer file functions as a Secure Sockets Layer (SSL) certificate file, crucial for securing communication between web servers and web browsers. SSL certificates achieve this by encrypting transmitted data, thwarting eavesdroppers from intercepting and deciphering sensitive information.
SSL certificates are broadly categorized into server certificates and client certificates. Web servers utilize server certificates to authenticate themselves to web browsers, while client certificates enable web browsers to authenticate themselves to web servers. While .cer files are primarily associated with server certificates, they can also be employed for client certificates.
To utilize a .cer file, installation on the respective web server or web browser is necessary, with installation procedures varying depending on the software in use. Once installed, the .cer file becomes instrumental in verifying the identity of the counterpart before establishing a secure connection.
For web browsers, the validity of the .cer file can be confirmed by checking the lock icon in the address bar; a green lock icon signifies a valid certificate and a secure connection. On the other hand, web servers can verify .cer file validity by examining error logs, where the absence of errors indicates a valid certificate, signaling the server’s readiness to accept connections.
Why Choose Certificatetool.com to Convert Your Certificates?
Certificatetool.com offers the following advantages:
- Effortless online conversion: Our website seamlessly runs code in the backend to convert your certificate files directly online. No need to grapple with OpenSSL commands yourself!
- Expertise at your fingertips: We handle all the complexities of SSL certificate file conversions, saving you time and effort.
- Fast, free, and simple: Upload your file, private key, and press the «Convert» button. It’s that easy!
- Unmatched privacy: We never store any files you upload, ensuring complete confidentiality and peace of mind.
Don’t hesitate to experience the convenience of Certificatetool.com for your certificate conversion needs.
Есть такая полезная утилита — win-acme, с помощью которой под Windows можно обновлять сертификат Let’s Encrypt.
Так вот, при обновлении сертификата он нормально устанавливается на Exchange Server, устанавливается в хранилище (Сертификаты — Размещение веб-служб), но при этом закрытый ключ нельзя экспортировать:

Как получить закрытый ключ и возможность экспорта:
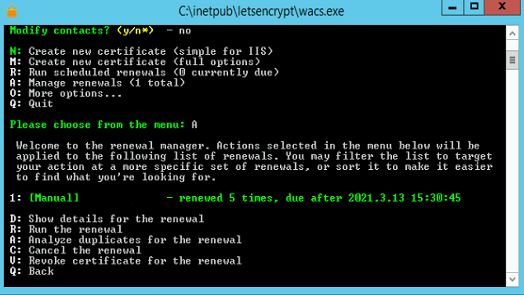
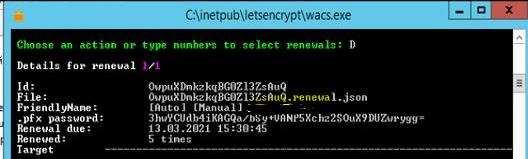
- Запускаем wacs, выбираем A (Manage Renewals)

- D (Show details for renewal)

Копируем .pfx password.
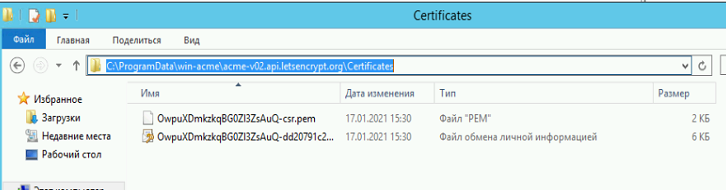
- Идем в папку C:\ProgramData\win-acme\acme-v02.api.letsencrypt.org\Certificates
-

- Тут лежат .PFX и .PEM файлы, которые нам нужны. Можно их скопировать прямо отсюда, либо импортировать PFX локально с возможностью экспорта. А если нужны отдельно ключ и сертификат (для установки не на Windows Server например), тогда идём дальше.
Извлекаем ключ и сертификат из .PFX файла
- Конвертировать PFX в .key и .cer можно с помощью программы OpenSSL (для windows).
- Устанавливаем, запускаем, переходим в папку например C:\cert, куда предварительно скопируем наш .PFX файл.
- Запускаем команду:
C:\cert>openssl pkcs12 -in c:\cert\cert.pfx -nocerts -out private.key -nodes

Enter Import Password:
Вводим пароль, скопированный в п.2 выше, получаем файл ключа private.key в той же папке, откуда запускали openssl (C:\cert) - Далее нужно открыть этот файл в блокноте и оставить только содержимое между
——BEGIN PRIVATE KEY—— и ——END PRIVATE KEY—— - Чтобы получить сертификат, вводим команду
C:\cert>openssl pkcs12 -in c:\cert\cert.pfx -clcerts -nokeys -out public.cer

Enter Import Password: - Получаем public.cer. Также в блокноте удаляем всё лишнее.
P.S. Если нужно конвертировать сертификат и ключ обратно в PFX — читать тут.
При покупке SSL-сертификата часто возникает проблема: цепочка сертификатов поставляется отдельно от самого сертификата. Это может привести к совместимостным проблемам, так как множество систем требуют, чтобы цепочка сертификатов была включена в сам сертификат, чтобы клиенты могли установить доверие. В этом руководстве мы покажем вам, как легко добавить цепочку к вашему SSL-сертификату с помощью OpenSSL. Также мы продемонстрируем, как извлечь сам сертификат и закрытый ключ из сертификата формата PKCS12 (также известного как P12 или PFX).
Почему OpenSSL:
OpenSSL – это многофункциональный инструмент, доступный на большинстве Linux-систем, а также существует версия для Windows. Он необходим для обработки SSL-сертификатов и обеспечения их правильной конфигурации и совместимости с различными системами.
Шаги по добавлению цепочки:
- Подготовка:
- Скопируйте свой SSL-сертификат в отдельную папку.
- Убедитесь, что у вас установлен OpenSSL (обычно он предустановлен на Linux).
- Извлечение сертификата и закрытого ключа:
- Используйте следующие команды:
openssl pkcs12 -in yourcert.pfx -nocerts -out yourcert.key
openssl pkcs12 -in yourcert.pfx -clcerts -nokeys -out yourcert.crt
- Вам потребуется ввести пароль от сертификата.
- Создание нового файла сертификата:
- Откройте файл yourcert.crt в текстовом редакторе.
- Скопируйте все, что находится между ‘—–BEGIN CERTIFICATE—–‘ и ‘—–END CERTIFICATE—–‘, включая эти строки, в новый файл с расширением .crt, например yourcert1.crt. Пример содержимого:
—–BEGIN CERTIFICATE—–
MIIF3jCCA8agAwIBAgIQAf1tMPyjylGoG7xkDjUDLTANBgkqhkiG9w0BAQwFADCB
iDELMAkGA1UEBhMCVVMxEzARBgNVBAgTCk5ldyBKZXJzZXkxFDASBgNVBAcTC0pl
cnNleSBDaXR5MR4wHAYDVQQKExVUaGUgVVNFUlRSVVNUIE5ldHdvcmsxLjAsBgNV
BAMTJVVTRVJUcnVzdCBSU0EgQ2VydGlmaWNhdGlvbiBBdXRob3JpdHkwHhcNMTAw
MjAxMDAwMDAwWhcNMzgwMTE4MjM1OTU5WjCBiDELMAkGA1UEBhMCVVMxEzARBgNV
BAgTCk5ldyBKZXJzZXkxFDASBgNVBAcTC0plcnNleSBDaXR5MR4wHAYDVQQKExVU
aGUgVVNFUlRSVVNUIE5ldHdvcmsxLjAsBgNVBAMTJVVTRVJUcnVzdCBSU0EgQ2Vy
dGlmaWNhdGlvbiBBdXRob3JpdHkwggIiMA0GCSqGSIb3DQEBAQUAA4ICDwAwggIK
AoICAQCAEmUXNg7D2wiz0KxXDXbtzSfTTK1Qg2HiqiBNCS1kCdzOiZ/MPans9s/B
3PHTsdZ7NygRK0faOca8Ohm0X6a9fZ2jY0K2dvKpOyuR+OJv0OwWIJAJPuLodMkY
tJHUYmTbf6MG8YgYapAiPLz+E/CHFHv25B+O1ORRxhFnRghRy4YUVD+8M/5+bJz/
Fp0YvVGONaanZshyZ9shZrHUm3gDwFA66Mzw3LyeTP6vBZY1H1dat//O+T23LLb2
VN3I5xI6Ta5MirdcmrS3ID3KfyI0rn47aGYBROcBTkZTmzNg95S+UzeQc0PzMsNT
79uq/nROacdrjGCT3sTHDN/hMq7MkztReJVni+49Vv4M0GkPGw/zJSZrM233bkf6
c0Plfg6lZrEpfDKEY1WJxA3Bk1QwGROs0303p+tdOmw1XNtB1xLaqUkL39iAigmT
Yo61Zs8liM2EuLE/pDkP2QKe6xJMlXzzawWpXhaDzLhn4ugTncxbgtNMs+1b/97l
c6wjOy0AvzVVdAlJ2ElYGn+SNuZRkg7zJn0cTRe8yexDJtC/QV9AqURE9JnnV4ee
UB9XVKg+/XRjL7FQZQnmWEIuQxpMtPAlR1n6BB6T1CZGSlCBst6+eLf8ZxXhyVeE
Hg9j1uliutZfVS7qXMYoCAQlObgOK6nyTJccBz8NUvXt7y+CDwIDAQABo0IwQDAd
BgNVHQ4EFgQUU3m/WqorSs9UgOHYm8Cd8rIDZsswDgYDVR0PAQH/BAQDAgEGMA8G
A1UdEwEB/wQFMAMBAf8wDQYJKoZIhvcNAQEMBQADggIBAFzUfA3P9wF9QZllDHPF
Up/L+M+ZBn8b2kMVn54CVVeWFPFSPCeHlCjtHzoBN6J2/FNQwISbxmtOuowhT6KO
VWKR82kV2LyI48SqC/3vqOlLVSoGIG1VeCkZ7l8wXEskEVX/JJpuXior7gtNn3/3
ATiUFJVDBwn7YKnuHKsSjKCaXqeYalltiz8I+8jRRa8YFWSQEg9zKC7F4iRO/Fjs
8PRF/iKz6y+O0tlFYQXBl2+odnKPi4w2r78NBc5xjeambx9spnFixdjQg3IM8WcR
iQycE0xyNN+81XHfqnHd4blsjDwSXWXavVcStkNr/+XeTWYRUc+ZruwXtuhxkYze
Sf7dNXGiFSeUHM9h4ya7b6NnJSFd5t0dCy5oGzuCr+yDZ4XUmFF0sbmZgIn/f3gZ
XHlKYC6SQK5MNyosycdiyA5d9zZbyuAlJQG03RoHnHcAP9Dc1ew91Pq7P8yF1m9/
qS3fuQL39ZeatTXaw2ewh0qpKJ4jjv9cJ2vhsE/zB+4ALtRZh8tSQZXq9EfX7mRB
VXyNWQKV3WKdwrnuWih0hKWbt5DHDAff9Yk2dDLWKMGwsAvgnEzDHNb842m1R0aB
L6KCq9NjRHDEjf8tM7qtj3u1cIiuPhnPQCjY/MiQu12ZIvVS5ljFH4gxQ+6IHdfG
jjxDah2nGN59PRbxYvnKkKj9
—–END CERTIFICATE—–
- Управление цепочкой сертификатов:
- Скопируйте цепочку сертификатов, на которых основан ваш SSL-сертификат, в ту же папку.
- Если вы не знаете, где найти цепочку, вы можете извлечь ее из деталей сертификата на компьютере под управлением Windows.


- Подготовка цепочки сертификатов:
- Преобразуйте сертификаты цепочки в формат PEM с помощью следующих команд:
openssl x509 -in intermediate.cer -out intermediate.pem
openssl x509 -in root.cer -out root.pem
openssl x509 -in yourcert1.crt -out yourcert1.pem
- Объединение сертификатов:
- Объедините все сертификаты в один файл:
cat yourcert.pem intermediate.pem root.pem >> yourcert-chain.pem- Создание сертификата PKCS12:
- Сгенерируйте сертификат PKCS12 с помощью следующей команды:
openssl pkcs12 -export -out yourcert-fullchain.p12 -inkey yourcert.key -in yourcert-chain.pem- Вам потребуется установить пароль для сертификата.
- Проверка:
- Чтобы убедиться в успехе, выполните следующую команду, чтобы отобразить все сертификаты в файле:
keytool -list -v -keystore yourcert-fullchain.p12 -storepass [ваш_пароль] -storetype PKCS12 | moreСледуя этим шагам и используя OpenSSL, вы можете легко добавить цепочку сертификатов к вашему SSL-сертификату, устраняя проблемы совместимости и обеспечивая доверие к вашим веб-сайтам, защищенным SSL.
Не забывайте, что правильная настройка SSL-сертификатов критически важна для обеспечения безопасности онлайн-присутствия и создания доверия среди посетителей вашего веб-сайта. С помощью OpenSSL в качестве вашего надежного инструмента, вы сможете легко решить эту задачу.