
When your computer suddenly isn’t fast as usual, or keeps freezing up, you’re likely dealing with performance issues that could be caused by a number of reasons. It could be as a result of problems with the hardware, apps or drivers poorly designed, the operating system using excessive system resources, or even be a malware that infected your device.
Although Windows 10 includes a number of tools to troubleshoot performance issues, such as the «Performance» tab in Task Manager, you’ll find that the Performance Monitor is the most complete tool you can use to view and analyze application and hardware data to fix system performance related problems. You can also customize what data to collect in log files, define alerts, generate reports, and replay collected performance data in many ways.
In this Windows 10 guide, we’ll walk you through the steps to use the Performance Monitor to analyze your computer’s performance.
- How to open Performance Monitor
- How to use Performance Monitor
- How to use Data Collector Sets
- How to use Reports
How to open Performance Monitor
On Windows 10, you can use Performance Monitor to analyze data, such as processor, hard drive, memory, and network usage, but first, you must know how to open the tool. Here are three ways to open Performance Monitor:
- Open Start, do a search for Performance Monitor, and click the result.
- Use the Windows key + R keyboard shortcut to open the Run command, type perfmon, and click OK to open.
- Use the Windows key + X keyboard shortcut to open the Power User menu, select Computer Management, and click on Performance.
How to use Performance Monitor
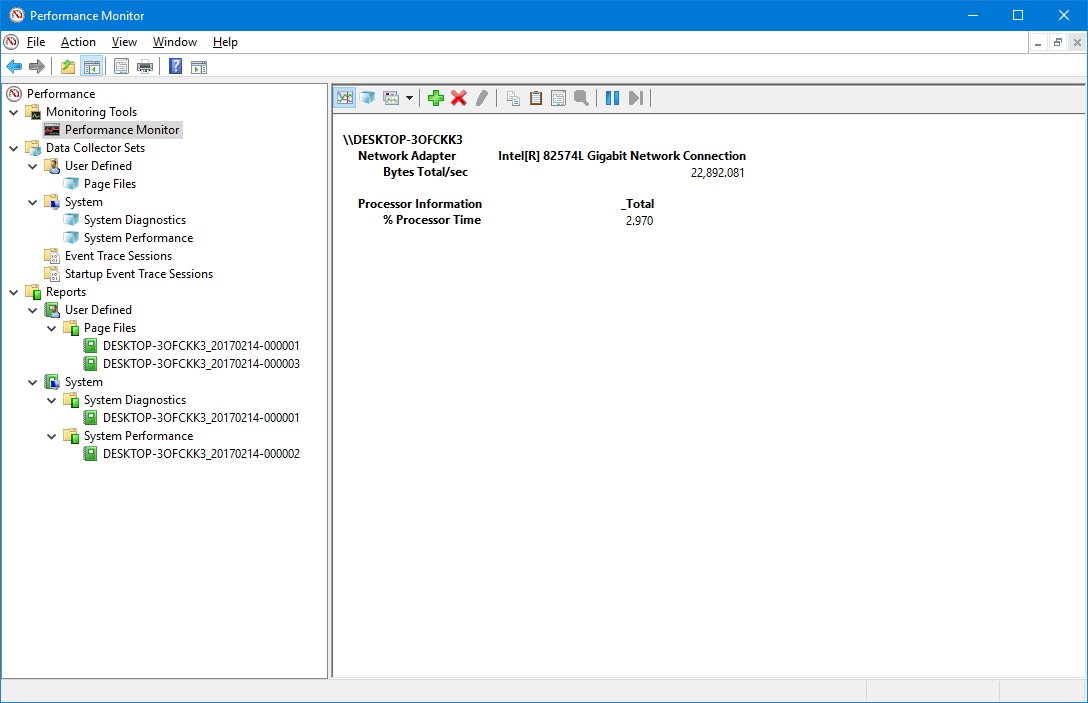
When you first open the tool, it’ll open in the main page with a brief overview, as well as a system summary with real-time data about memory, network adapter, physical disk, and processor usage.
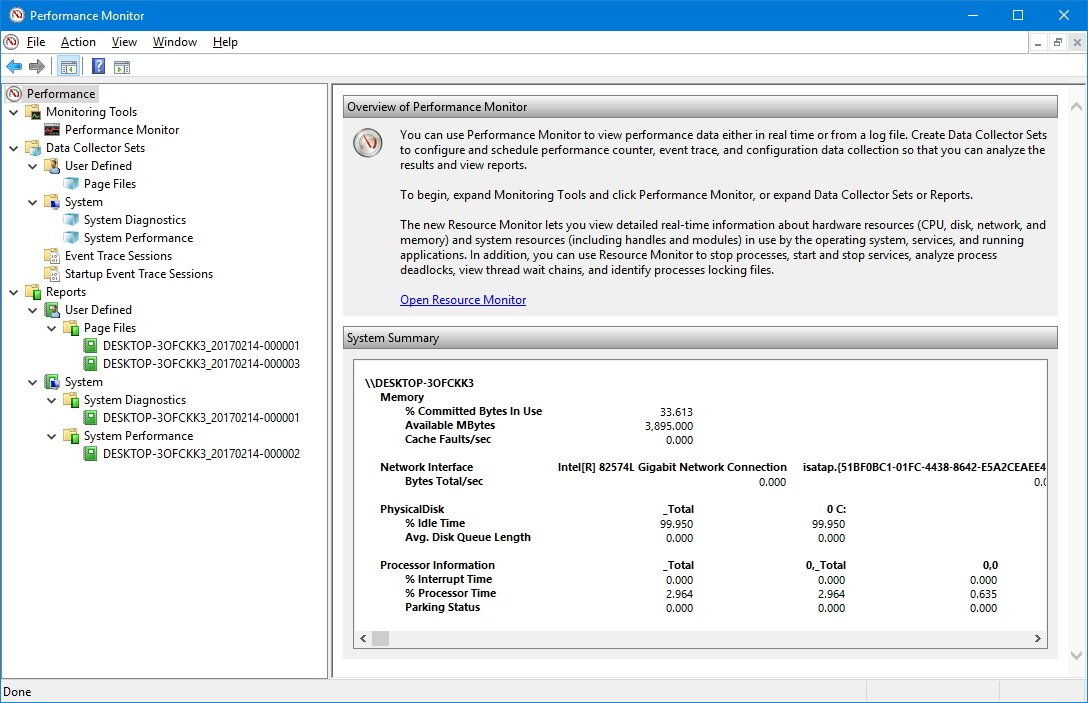
On the left, you’ll find the navigation pane with access to Performance Monitor, Data Collector Sets, and Reports.
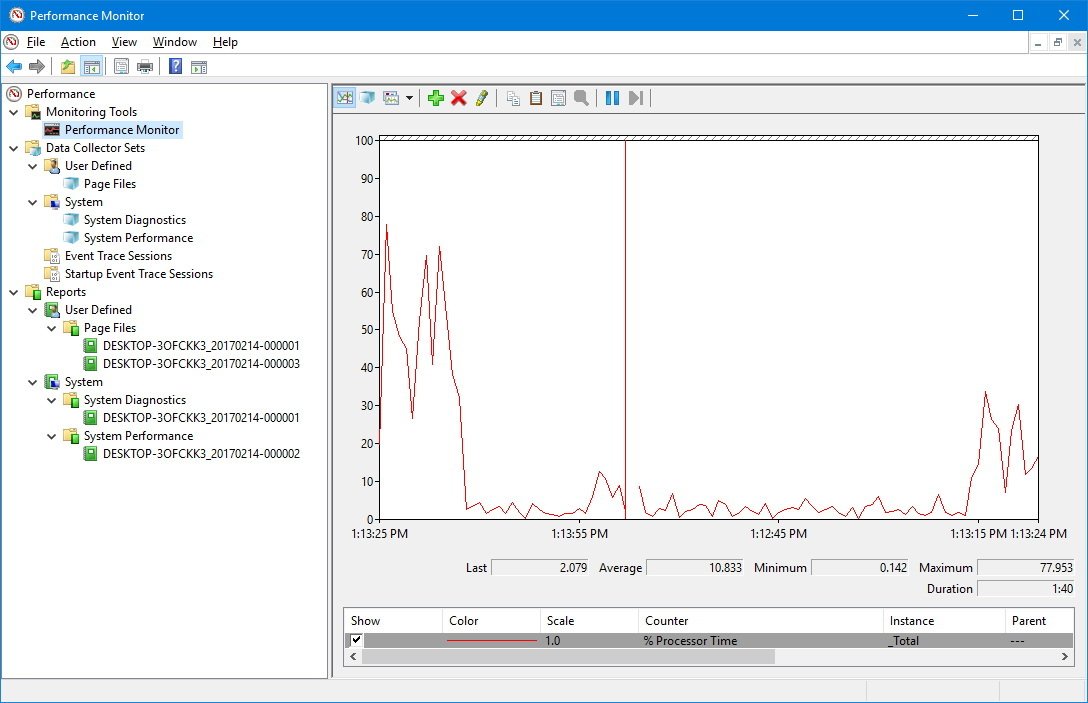
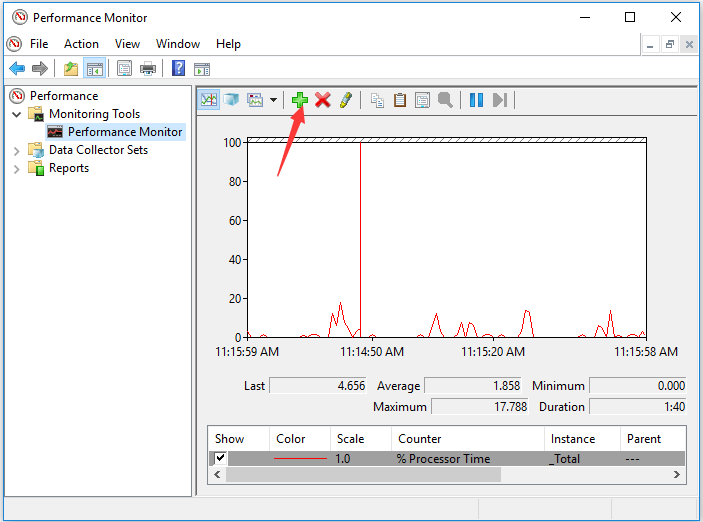
Switching to Performance Monitor, you’ll see a screen with a single counter. This is typically the «Processor Time» counter, which displays the processor load in the last 100 seconds. However, the beauty of this tool is that you can add tons of other counters to monitor virtually anything on your computer.
All the latest news, reviews, and guides for Windows and Xbox diehards.
Adding new counters
To add new counters to monitor applications and hardware performance on your computer, do the following:
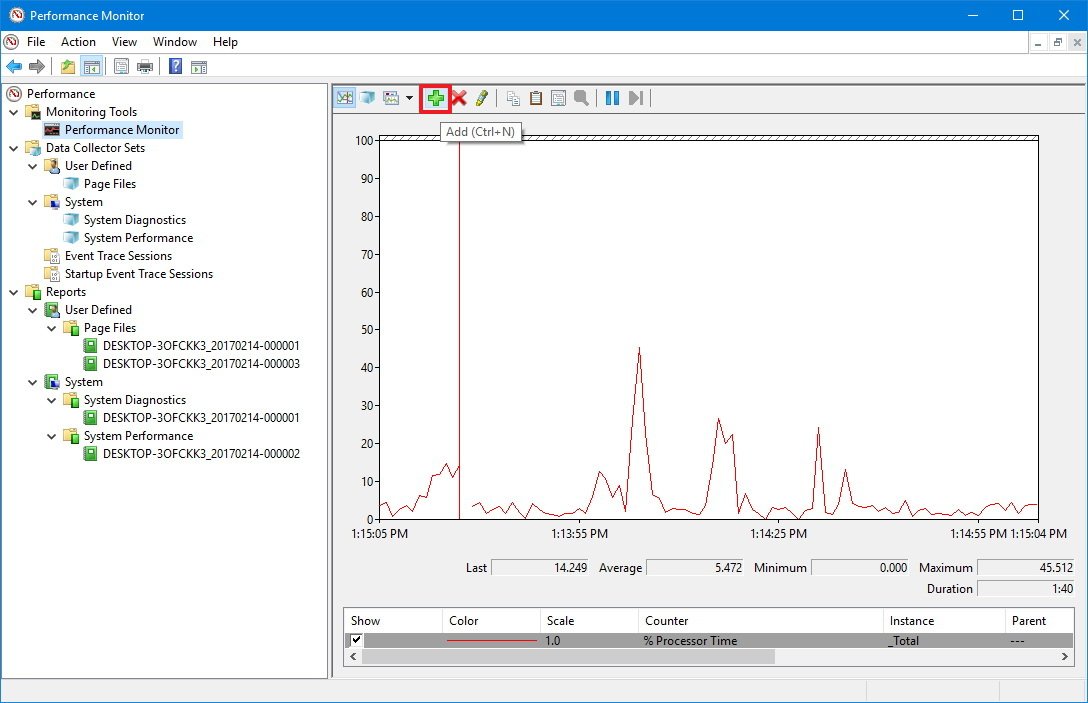
- Click the green plus button above the Performance Monitor graph.
- Select Local computer or the name of your computer from the drop-down menu.
- Select and expand the category of the item you want to monitor. For example, for the purpose of this guide, select the «Network Adapter» category.
- Select the counters you want to monitor (e.g., Bytes Total/sec).Quick Tip: If you’re trying to add multiple counters, press and hold the Ctrl key and click to select each item you want to add. Also, you can check the Show description option to get more information about the counter you’re selecting.
- If applicable, select the instances you want to monitor. For example, on Network Adapter, you can monitor one or multiple network adapters simultaneously.
- Click the Add button.
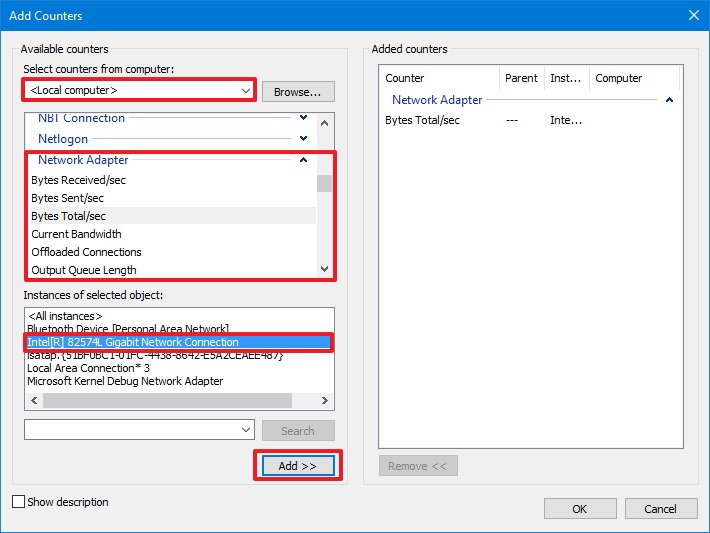
- Click OK to confirm and add the new counters.
Customizing Performance Monitor view
Once you have configured all the counters you want to monitor, you can also customize various aspects of the data shown in the graph.
To customize the Performance Monitor view, do the following:
- Double-click one of the counters to open the Performance Monitor Properties window.
- On the «Data» tab, select the counter you want to customize.
- At the bottom, choose the color, scale, width, and style you want to use.
- Repeat steps 2 and 3 for each item you want to customize.Quick Tip: If you’re trying to change the properties for multiple counters, press and hold the Ctrl key, select each item you want to customize, and change the available settings.
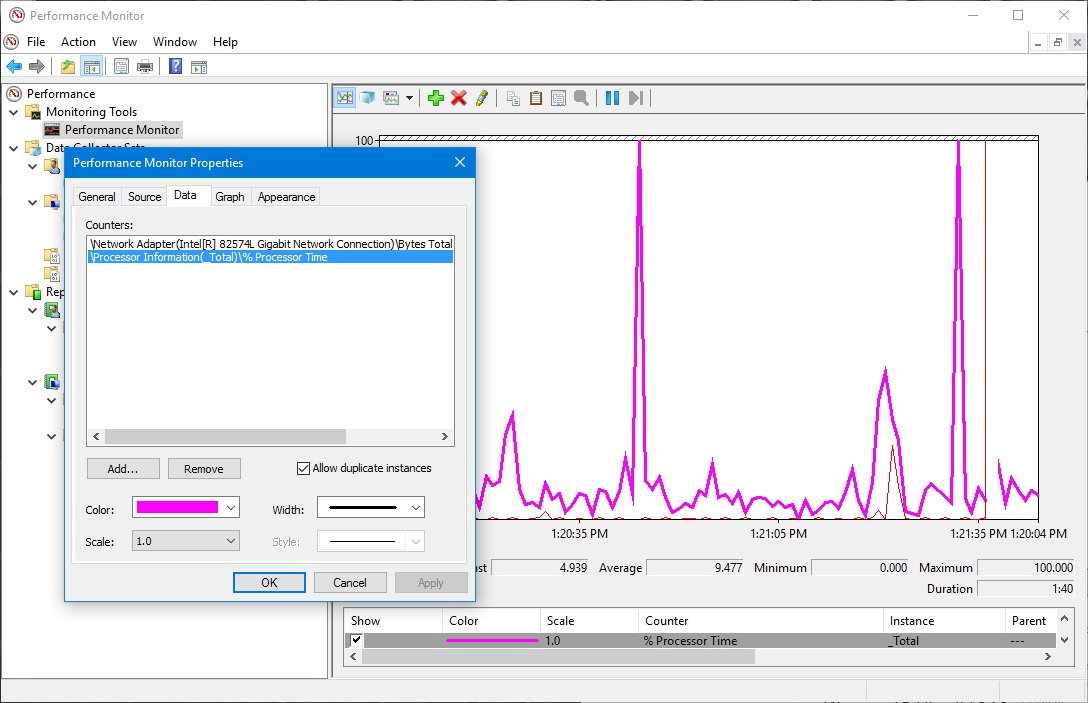
- Click Apply.
- Click OK.
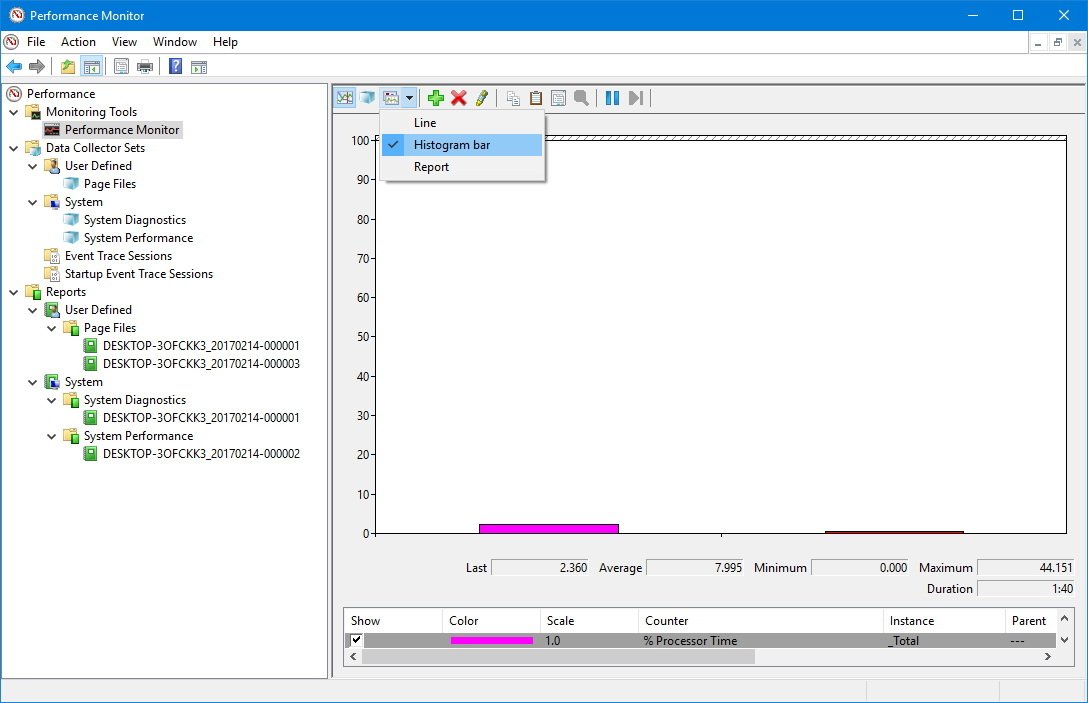
In addition, you can also change the graph’s style, simply click the «Change graph type» in the toolbar and select one of the available views, including Line, Histogram bar, and Report.
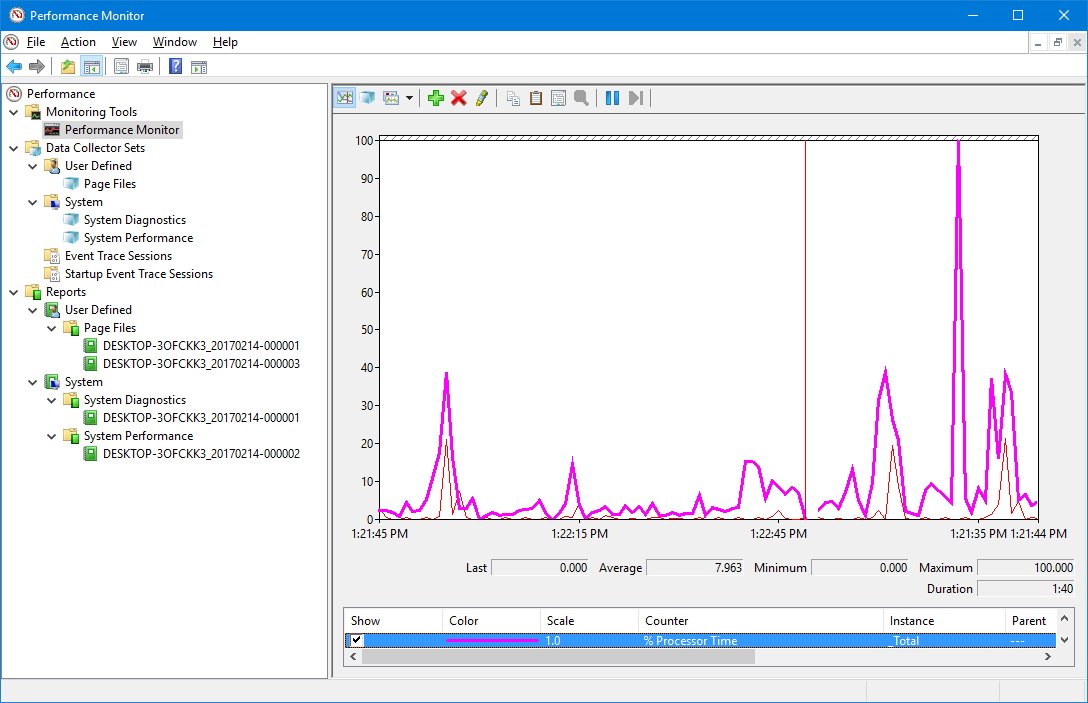
Other options available in the toolbar include the ability to remove and highlight counter, and an option to freeze the display to analyze the current data on the screen.
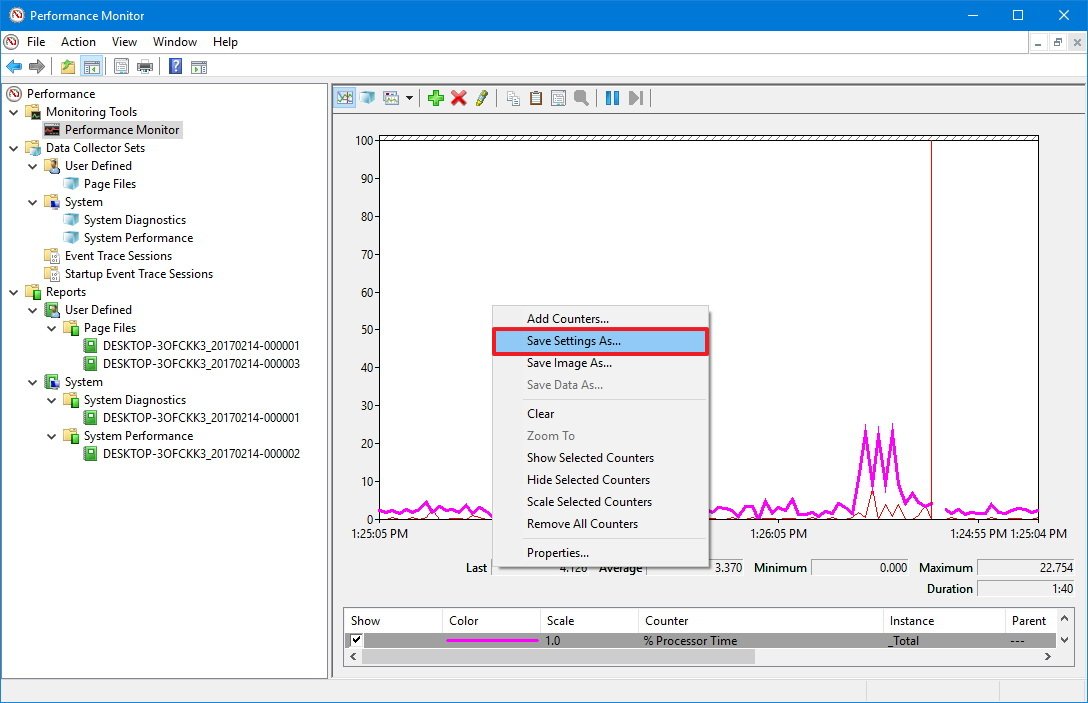
If you look at the context menu, you’ll also see the «Save Settings as» option, which comes in handy when you want to save the counters and configuration for later use. Interesting enough, once you save the settings as an HTM file, you won’t be able to load the configuration with Performance Monitor.
However, you can open the file using Internet Explorer, which actually loads a fully functional instance of Performance Monitor in the web browser.

Alternatively, you can open the settings file with Notepad and copy its content. Then you can open Performance Monitor and click the Paste Counter List (Ctrl + V) button in the toolbar to load your saved settings. (This option may not work for everyone.)
Performance Monitor counters
Now that you have a basic understanding of what’s Performance Monitor and how to set it up let’s look at some common counters you can use to monitor your system.
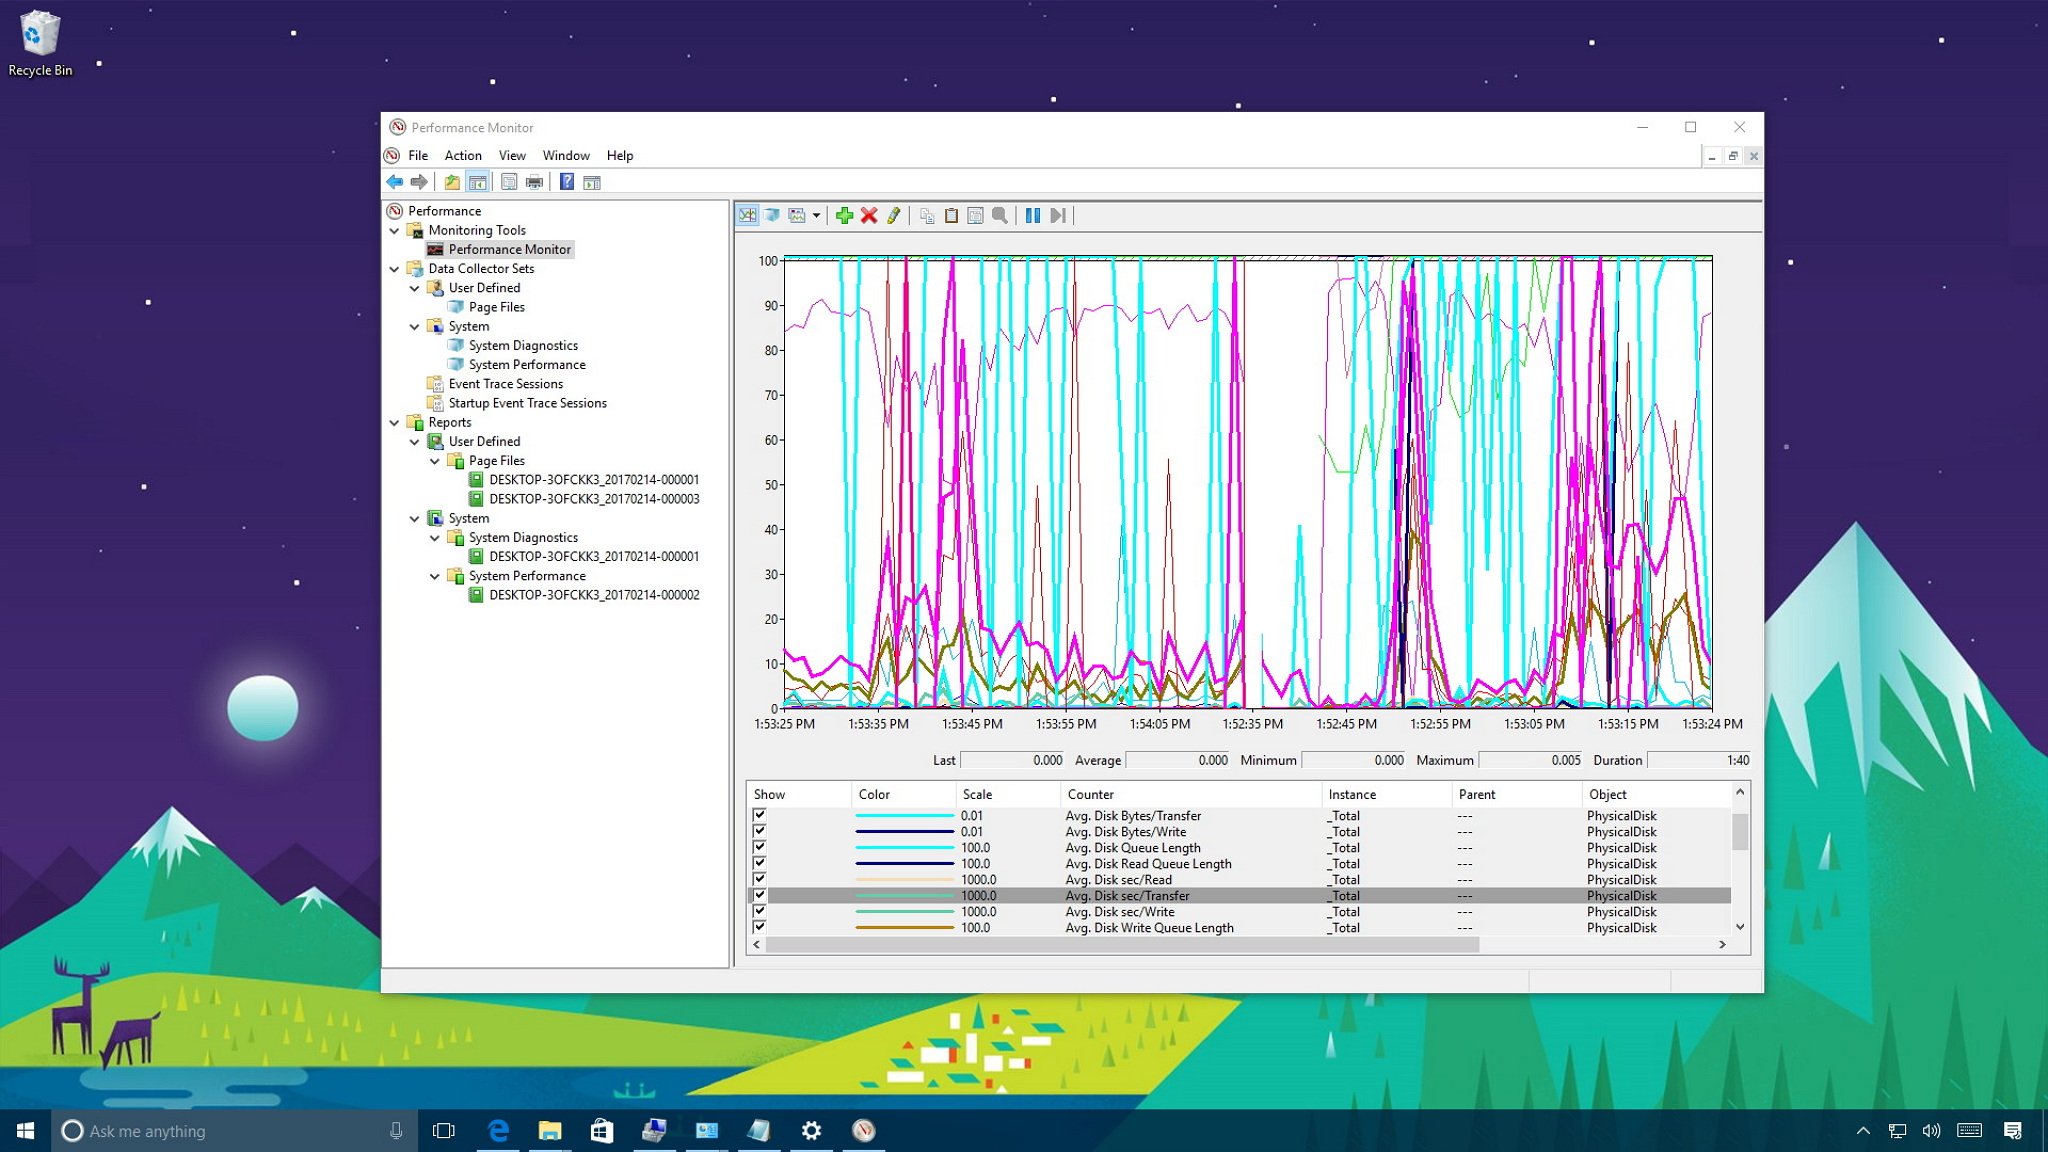
Physical Disk
Includes the counters to monitor the physical performance of your computer’s hard drive.
You can select counters, such as % Disk Time to monitor the time a drive is taking to complete read and write requests. If this counter stays in high numbers for a long time, it could be an indication that the hard drive is ready for replacement.
Adding other counters like Disk Bytes/sec, Disk Read Bytes/sec, Disk Read/sec, Disk Write Bytes/sec, and Disk Writes/sec can help you to figure out the read and write speeds of the hard drive.
Processor
Includes the counters to monitor the processor activity.
You can select counters, such as % Interrupt Time to monitor the time the CPU takes to complete hardware requests (interrupts). If this counter stays above 30%, it could be an indication that there is a hardware problem.
Add the % Privileged Time counter monitors the time the processor is using to execute in Kernel (Privileged) mode. A high percentage of privileged time may indicate a poorly written driver or hardware malfunction.
Network Adapter
Includes a number of counters to monitor the sent and received bytes for one or multiple network adapters.
You can select counters, such as Bytes Received/sec, Bytes Sent/sec, Bytes Total/sec to see how much bandwidth is being utilized by your wireless or Ethernet adapter. If you’re always downloading files or streaming high-resolution videos and bandwidth is consistently hitting 85%, you may want to consider upgrading your data speed plan.
However, if you’re not using your internet connection heavily, but you still see high network activity, it could be a sign of something not working correctly, or it could also be a malware hidden on your computer.
Memory
Includes an array of counters to monitor your PC’s RAM usage.
You can select counters, such as % Committed Bytes in Use to monitor the total memory currently in use by your system. If the number is continuously greater than 80%, then you don’t have enough memory on your system.
Adding the Available Mbytes, you can measure the amount of physical memory, available for running processes. If this value is less than 5% of the total RAM installed on your computer, then you may need to add more memory.
Page File
Includes counters to monitor how page files are being utilized.
If your computer is slow and the page file counters (% Usage and % Usage Peak) are constantly high. It could be an indication that you need to upgrade your computer’s memory.
How to use Data Collector Sets
The Performance Monitor also includes Data Collectors Sets, which is where you can create custom sets containing performance counters and alerts based on specific criteria.
Creating a custom Data Collector Set
If you want to create custom Data Collector Set when to collect specific performance information, do the following:
- While in Performance Monitor, expand Data Collector Sets.
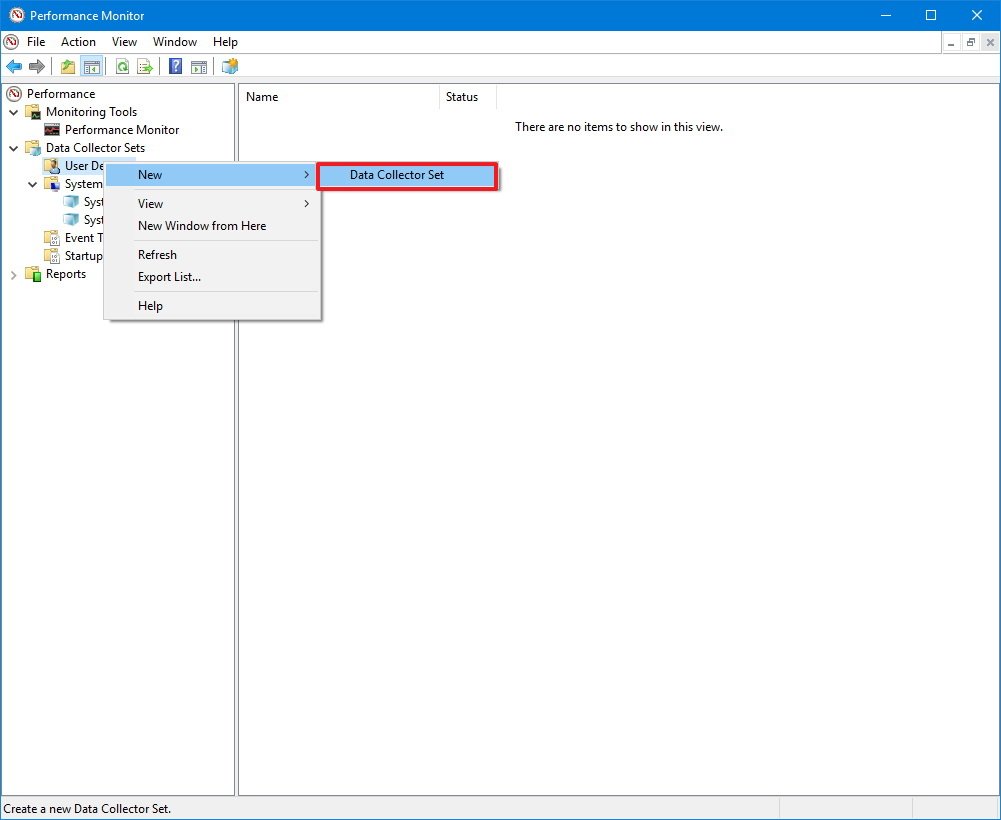
- Right-click «User Defined», select New, and click on Data Collector Set.
- Type a descriptive name for the new set.
- Select the Create manually (Advanced) option.
- Click Next.

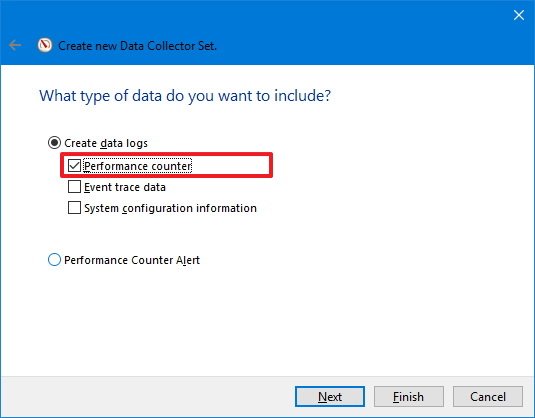
- Select Create data logs and check the Performance counter option, but notice that you can also use other options as needed.
- Click Next.
- Click the Add button.
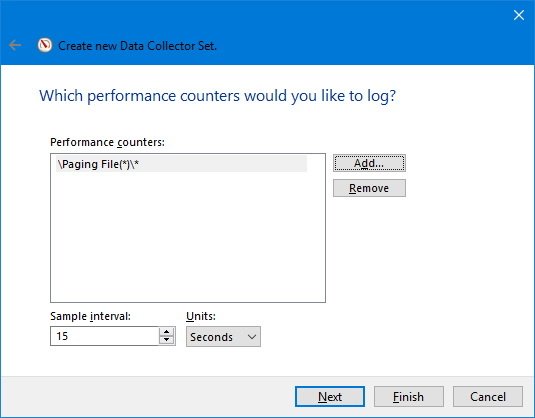
- Pick and add the performance counters you want.
- Click OK.

- Configure the sample interval, which defines how often Performance Monitor will run and collect data. (Shorter intervals ensures that counters log information more frequently.)
- Click Next.
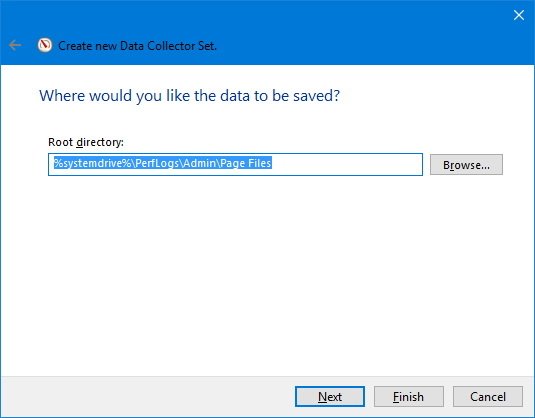
- You can leave the default settings or save your set in another location.
- Click Next.
- The set will run automatically no matter who is signed into Windows 10, but in this step, you can choose a specific user.
- Check the Save and Close option.
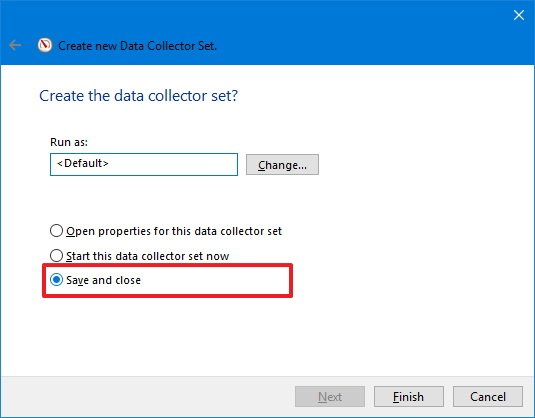
- Click Finish.
Once you completed the steps, you can right-click your Data Collector Set under «User Defined,» and click Start to run it or Stop to shut it down.

Customizing a custom Data Collector Set
The wizard will only let you configure some of the settings when creating a custom Data Collector Set. If you want your custom set to stop automatically after a period of time, or run it on schedule, you’ll need to manually configure those options.
To allow a set to stop automatically after a period of time, do the following:
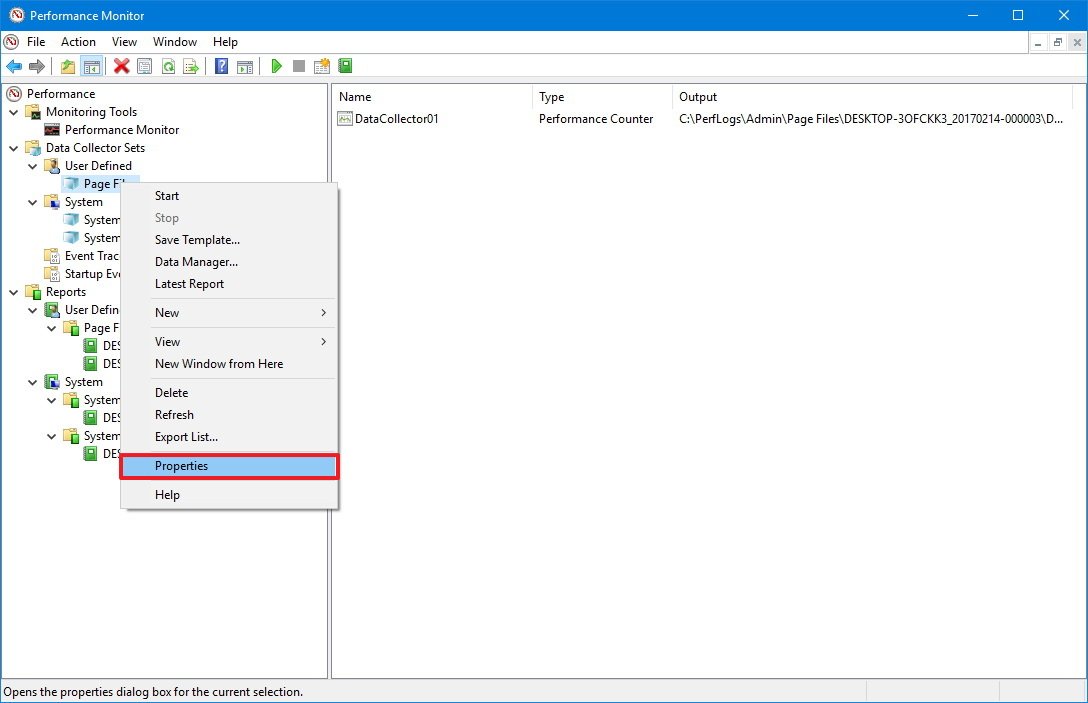
- Right-click the Data Collector Set you want, and select Properties.
- Click on the Stop Condition tab.
- Check the Overall duration option.
- Define the time duration (e.g., 5 minutes).
- Configure the limits as needed.
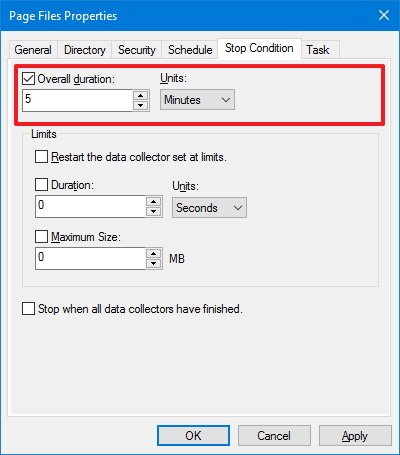
- Click Apply.
- Click OK.
To schedule a set to run automatically, do the following:
- Right-click the Data Collector Set you want, and select Properties.
- Click on the Schedule tab.
- Click the Add button.
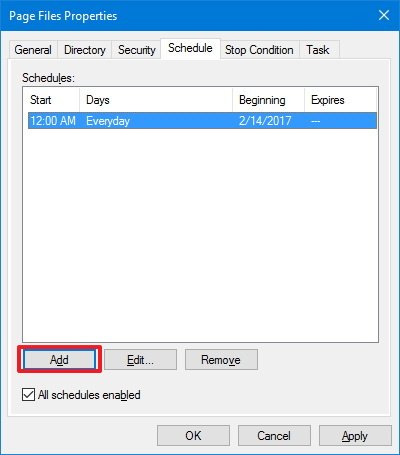
- On «Folder Action,» define the schedule you want.
- Click OK.
- Click Apply.
- Click OK.
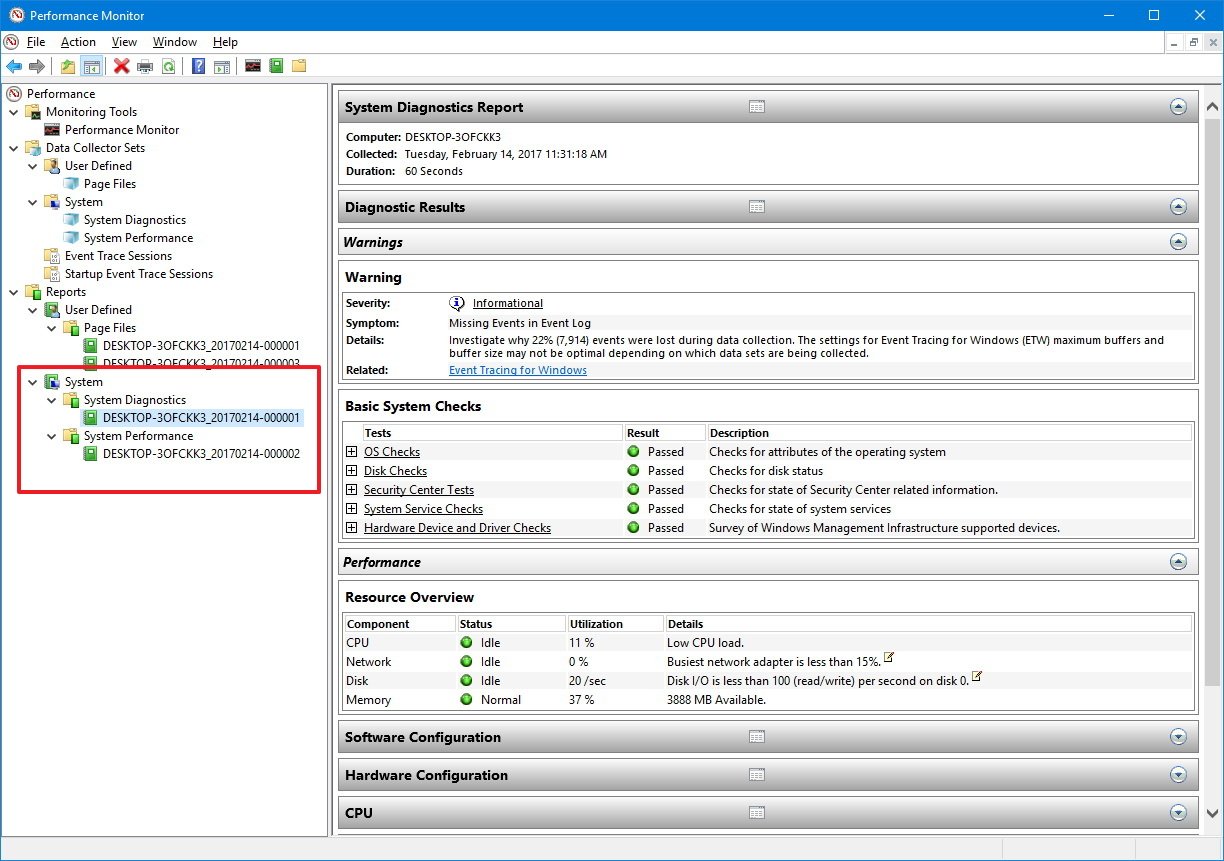
Alongside the ability to create your own sets, Windows 10 bundles two custom Data Collectors Sets to analyze performance, which are located inside the System folder.
- System Diagnostics: Collects various detailed system information, and it includes the counters found in System Performance.
- System Performance: Collects valuable performance data about the processor, hard drive, memory, and network adapters on your computer.
How to use Reports
You can view and analyze the data collected with pre-defined and custom sets using the Reports option.
To view and analyze the data collected, simply go to Reports, and select the report you want to see.
If you’re opening one of the System reports, you’ll see data arrange in a more meaningful way allowing you to quickly identify any issues on your computer.
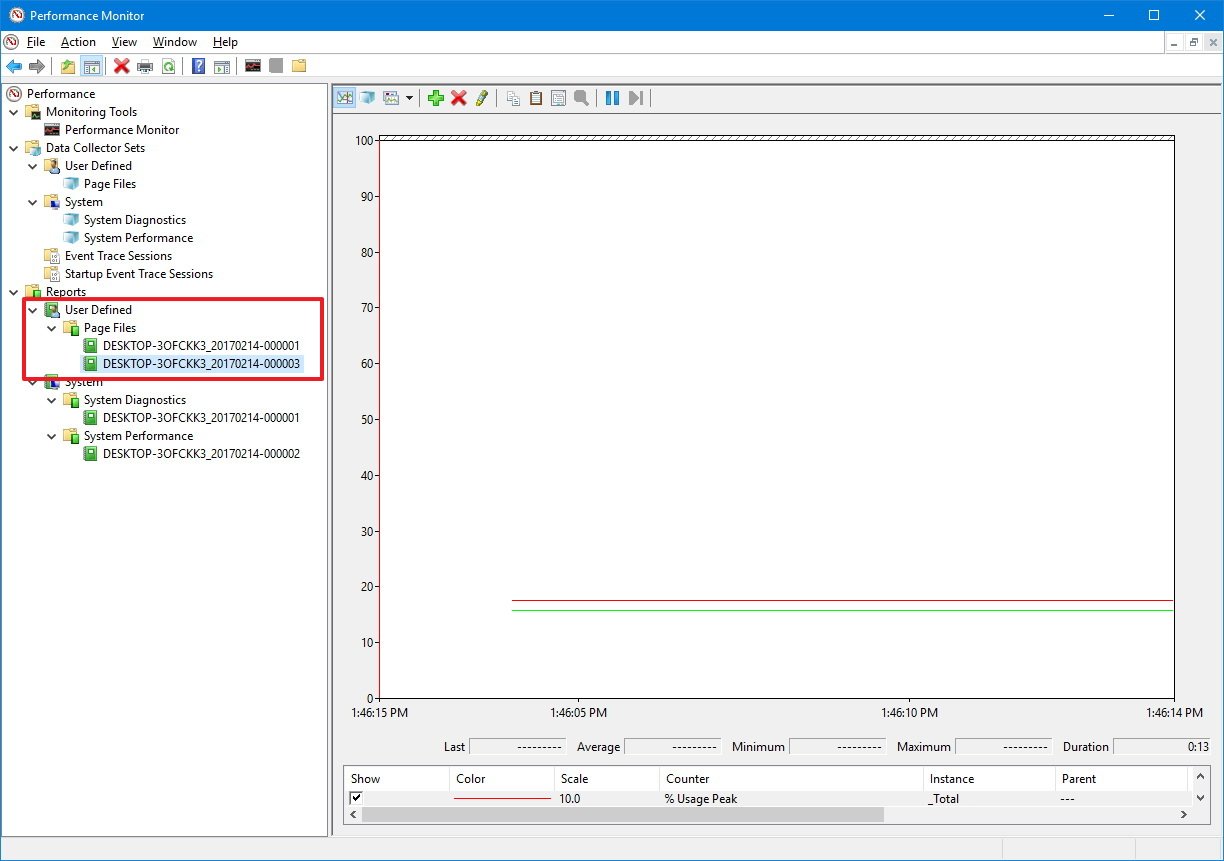
On the other hand, when you open a custom report, you’ll only be able to see a recording of the data collected, which still useful to help analyze your custom set.
Wrapping things up
Although you can use other tools, such as Task Manager to monitor your system’s performance, the Performance Monitor is a more advanced tool that allows you to monitor virtually anything on your computer. And once you understand it, Performance Monitor can be a valuable tool to analyze and fix any performance problems on Windows 10.
More Windows 10 resources
For more help articles, coverage, and answers on Windows 10, you can visit the following resources:
- Windows 10 on Windows Central – All you need to know
- Windows 10 help, tips, and tricks
- Windows 10 forums on Windows Central
Mauro Huculak has been a Windows How-To Expert contributor for WindowsCentral.com for nearly a decade and has over 15 years of experience writing comprehensive guides. He also has an IT background and has achieved different professional certifications from Microsoft, Cisco, VMware, and CompTIA. He has been recognized as a Microsoft MVP for many years.
What is Performance Monitor? Many times it occurs that our computer just ceases to respond, shuts down unexpectedly or behaves abnormally. There could be a number of reasons for such behavior and pointing out the exact reason could be of great help. Windows has a tool named Performance Monitor, which you can use for this purpose. With this tool, you can keep a check on the performance of your system and identify how different programs affect the system performance. You can analyze data related to your processor, memory, network, hard drive, etc. It can tell you how the system resources are managed and other configuration information that might be useful for you. It can also collect and log the data in files, which can be analyzed later. Read on to see how you can use Performance Monitor to fix performance related issues in Windows 10.

Table of Contents
How to open Performance Monitor
You can use Performance Monitor on Windows 10 to analyze data and keep a check on the performance of your system, but first, you must know how to open this tool. There are many ways to open the Windows Performance Monitor, let’s see a few of them:
- Type “performance monitor” in the search field located on your taskbar.
- Click on the Performance Monitor shortcut to open it.
To open Performance Monitor using Run,
- Press Windows key + R to open Run.
- Type perfmon and click on OK.

To open Performance Monitor using Control Panel,
- Use the search field on your taskbar to open the Control panel.
- Click on ‘System and Security’ then click on ‘Administrative tools’.

- In the new window, click on ‘Performance Monitor’.


Make sure to create a restore point just in case something goes wrong.
When you first open Performance Monitor, you will see the overview and system summary.

Now, from the left pane, select ‘Performance Monitor’ under ‘Monitoring Tools’. The graph you see here is the processor time over last 100 seconds. The horizontal axis displays time and the vertical axis displays the percentage of time your processor consumes working on the active programs.

Apart from the ‘Processor Time’ counter, you can also analyze many other counters.
How to add new counters under Performance Monitor
1.Click on the green plus shaped icon on top of the graph.
2.The Add Counters window will open.
3.Now, select the name of your computer (usually it is a local computer) in the ‘Select counters from computer’ drop-down menu.

4.Now, expand the category of counters you want, say Processor.
5.Select one or more counters from the list. To add more than one counters, select the first counter, then press down the Ctrl key while selecting the counters.

6.Select the instances of the selected object(s) if possible.
7.Click on Add button to add the counters. The added counters will be shown on the right side.

8.Click on OK to confirm.
9.You will see that the new counters start to appear in the graph with different colors.

10.The details of each counter will be shown at the bottom, like which colors correspond to it, its scale, instance, object, etc.
11.Use the checkbox against each to counter to show or hide it from the graph.
12.You can add more counters by following the same steps as given above.
Once you have added all the desired counters, it is time to customize them.
How to Customize the Counter View in Performance Monitor
1.Double-click on any counter below the graph.
2.To select more than one counters, press down Ctrl key while selecting the counters. Then right-click and select Properties from the list.
3.Performance Monitor Properties window will open, from there switch to the ‘Data’ tab.

4.Here you can select the color, scale, width, and style of the counter.
5.Click on Apply followed by OK.
An important thing to note here is that when you restart performance monitor, all these set counters and configurations will be lost by default. To save these configurations, right-click on the graph and select ‘Save settings as’ from the menu.

Type the desired file name and click on Save. The file will be saved as a .htm file. Once saved, there are two ways of loading the saved file for later use,
- Right-click on the saved file and select Internet Explorer as the ‘Open with’ program.
- You will be able to see the performance monitor graph in the internet explorer window.
- If you don’t see the graph already, click on ‘Allow blocked content’ in the popup.

Another way to load it is by pasting counter list. However, this method may not work for some of the users.
- Open the saved file using notepad and copy its contents.
- Now open Performance Monitor by using the steps given before and click on ‘Paste Counter list’ icon on top of the graph.
The third icon above the graph is for changing graph type. Click on the downward arrow beside it to select the type of graph. You can choose from line, histogram bar or report. You can also press Ctrl + G to switch between the graph types. The screenshots shown above correspond to the line graph. The histogram bar looks like this:

The report will look like this:
The pause button on the toolbar will allow you to freeze the constantly changing graph at any instance, if you want to analyze it. You can resume by clicking on the play button.
Some Common Performance Counters
Processor:
- % Processor Time: This is the percentage of time spent by the processor in executing a non-idle thread. If this percentage stays over 80% constantly, it means it is difficult for your processor to handle all the processes.
- % Interrupt Time: This is the time required by your processor to receive and service hardware requests or interrupts. If this time exceeds 30%, there might be some hardware related risk.
Memory:
- % Committed Bytes In Use: This counter shows what percentage of your RAM is currently in use or is committed. This counter should fluctuate values as different programs are opened and closed. But if it keeps on increasing, there might be a memory leak.
- Available Bytes: This counter depicts the amount of physical memory (in Bytes) that are available for immediately allocating it to a process or system. A less than 5% of available bytes means you have very less memory free and may need to add more memory.
- Cache Bytes: This counter tracks the part of system cache which is currently active in physical memory.
Paging File:
- % Usage: This counter tells the percentage of current pagefile in use. It should not be higher than 10%.
PhysicalDisk:
- % Disk Time: This counter monitors the time taken by a drive to process read and write requests. This should not be too high.
- Disk Read Bytes/sec: This counter maps the rate at which bytes are transferred from the disk during the read operations.
- Disk Write Bytes/sec: This counter maps the rate at which bytes are transferred to the disk during write operations.
Network Interface:
- Bytes Received/sec: It represents the rate of bytes being received over each network adapter.
- Bytes Sent/sec: It represents the rate of bytes being sent over each network adapter.
- Bytes Total/sec: It includes both Bytes Received and Bytes Sent.
If this percentage lies between 40%-65%, you should be cautious. For over 65%, the performance will be adversely affected.
Thread:
- % Processor Time: It tracks the amount of processor’s effort which is used by an individual thread.
For more information, you can go to the Microsoft website.
How to Create a Data Collector Sets
A data collector set is a combination of one or more performance counters which can be saved to collect data over a period of time or on demand. These are especially useful when you want to monitor a component of your system over a specified time period, for instance, every month. There are two predefined sets available,
System Diagnostics: This data collector set can be used troubleshooting issues related to driver failures, faulty hardware, etc. It includes data collected from System Performance along with other detailed system information.
System Performance: This data collector set can be used to handle performance related issues like a slow computer. It collects data related to memory, processor, disk, network performance, etc.
To access these, expand ‘Data Collector Sets’ in the left pane on Performance Monitor window and click on System.

To Create a Custom Data Collector Set in Performance Monitor,
1.Expand ‘Data Collector Sets’ in the left pane on Performance Monitor window.
2.Right-click on ‘User Defined’ then select New and click on ‘Data Collector Set’.

3.Type a name for the set and select ‘Create manually (Advanced)’ and click on Next.

4.Select ‘Create data logs’ option and check the ‘Performance counter’ checkbox.

5.Click Next then click on Add.

6.Select one or more counters you want then click on Add and then click OK.
7.Set the sample interval, to decide when the Performance Monitor takes samples or collects data and click on Next.

8.Set the location where you want it to be saved and click on Next.

9.Select a specific user you want or keep it default.
10.Select ‘Save and Close’ option and click on Finish.

This set will available in the User Defined section of the Data Collector Sets.

Right-click on the set and select Start to start it.

To customize the run duration for your data collector set,
1.Right-click on your data collector set and select Properties.
2.Switch to ‘Stop condition’ tab and check the ‘Overall duration’ checkbox.
3.Type the time duration for which you want Performance Monitor to run.

4.Set other configurations then click on Apply followed by OK.
To schedule the set to run automatically,
1.Right-click on your data collector set and select Properties.
2.Switch to ‘Schedule’ tab then click on Add.
3.Set the schedule you want then click on OK.
4.Click on Apply and then click on OK.
How to Use Reports to Analyse Collected Data
You can use reports to analyze the data collected. You can open reports for both predefined data collector sets and your custom sets. To open system reports,
- Expand ‘Reports’ from the left pane of the Performance Monitor window.
- Click on System then click on System Diagnostics or System Performance to open the report.
- You will be able to see the data and results organized and structured into tables that you can use to quickly identify problems.

To open a custom report,
- Expand ‘Reports’ from the left pane of the Performance Monitor window.
- Click on User Defined then click on your custom report.
- Here you will see the recorded data directly instead of results and structured data.

Using Performance Monitor, you can carry out the analysis for almost every part of your system easily.
Recommended:
- Fix USB Composite Device can’t work properly with USB 3.0
- Why is Windows 10 Updates Extremely Slow?
- Print Screen Not Working? 7 Ways to Fix it!
- Disable OneDrive on Windows 10 PC
I hope this article was helpful and you can now easily Use Performance Monitor on Windows 10, but if you still have any questions regarding this tutorial then feel free to ask them in the comment’s section.
-
Home
-
News
- What Is Performance Monitor Windows 10 and How to Use It?
By Tina |
Last Updated
What is the Performance Monitor Windows 10? How to open Windows 10 Performance Monitor? How to use Performance Monitor for Windows 10? This post from MiniTool will show you the solutions.
What Is Performance Monitor Windows 10?
Performance Monitor, also known as the System Monitor, is a system monitoring program introduced in Windows NT 3.1. The Performance Monitor Windows 10 monitors various activities on a computer such as CPT or memory usage. The Performance Monitor of Windows 10 also can be used to determine the cause of problems on a local or remote computer by measuring the performance of hardware, software services, and applications.
So, when your computer isn’t fast as usual, or keeps freezing up, you are likely dealing with performance issues that could be caused by several reasons and it would be a powerful tool.
After knowing what the Performance Monitor Windows 10 is, do you know how to open or use the Windows 10 Performance Monitor?
How to Open Performance Monitor Windows 10
In this part, we will show you how to open Performance Monitor for Windows 10. To open Performance Monitor Windows 10, there are several different ways. Here, we will list some of them.
Way 1. Open Performance Monitor via Run
First of all, we will show you how to open Performance Monitor via Run dialog.
Now, here is the tutorial.
- Press Windows key and R key together to open Run dialog.
- Type perfmon in the box and click OK to continue.
- Then the Performance Monitor Windows 10 will be opened.

Way 2. Open Performance Monitor via Command Prompt
To open Performance Monitor for Windows 10, you can also open it through Command Prompt.
Now, here is the tutorial.
- Open Command Prompt.
- In the command line window, type the command perfmon.exe and hit Enter to continue.

After that, you will open Windows 10 Performance Monitor. To open Performance Monitor for Windows 10, there are also other ways. For example, you can open it via the Windows Search.
After knowing how to open Performance Monitor Windows 10, you need to know how to use it.
How to Use Performance Monitor Windows 10
In this section, we will show you how to open Performance Monitor Windows 10.
When you first open the Performance Monitor Windows 10, it will open its main page with a brief overview, as well as a system summary with real-time data about memory, network adapter, physical disk and processor usage. On the left side, you will look at the Performance, Data Collector Sets and Reports.
Add New Counters
Now, we will show you how to add new counters to monitor applications and hardware performance on your computer.
1. Open Performance Monitor.
2. Then click the Green Plus button on the Performance Monitor graph.
3. In the pop-up window, select the local computer or the name of your computer from the drop-down menu.
4. Select and expand the category of the items you want to monitor.
5. Select the counters you want to monitor. If you are trying to add multiple counters, press and hold the Ctrl key and click to select each item you want to add. Also, you can check the Show description option to get more information about the counter you’re selecting.
6. Then select the instances you want to monitor,
7. After that, click Add to continue.
8. And click OK to save all changes.

When all steps are finished, you have added the new counters and monitored them.
So, the Performance Monitor is able to help you to monitor the performance of your computer. If you want to check the performance of your computer, try this tool. You can also read the post Two Methods to Help You Test Computer Performance Windows 10/8/7 to know more ways to test computer performance.
Final Words
To sum up, this post has shown what the Performance Monitor Windows 10 is, how to open Windows 10 Performance Monitor, and how to use the Performance Monitor of Windows 10. If you have any better idea of Windows 10 Performance Monitor, you can share it in the comment zone.
About The Author
Position: Columnist
Tina is a technology enthusiast and joined MiniTool in 2018. As an editor of MiniTool, she is keeping on sharing computer tips and providing reliable solutions, especially specializing in Windows and files backup and restore. Besides, she is expanding her knowledge and skills in data recovery, disk space optimizations, etc. On her spare time, Tina likes to watch movies, go shopping or chat with friends and enjoy her life.
On Windows 10 like earlier Windows versions, you will find a Performance Monitor named application that analyzes, assembles, monitors and addresses the total state or health of our operating system. With the help of this application, you can organize the workings of your system.
When I checked Performance Monitor I experienced an interesting thing. The application had represented fact-based statistics along with a graphical representation of the system performance. So I will also share this piece of information with all my readers so that you can also get an overview report of your system’s working. You may like to read: Monitor PC Temperature, Memory, Network Usage to Boost Performance
Start and Use Performance Monitor on Windows 10
Get Into Performance Monitor on Windows 10
To begin the process, you will have to know the way through which you can get the entry to the Performance Monitor application. There are two ways of exploring Performance Monitor application.
The first method that I will show you is by getting into the Control Panel. In the Category View of the applet select Administrative Tools.
A new window of Administrative Tools will arrive on the screen. Among the items listed there look for Performance Monitor and double-click on it to open.
Another way is by launching Run command window. When you hit Windows and R keys Run command box will appear on the screen. Type perfmon.msc in the provided field and click Ok.
Use any of the ways and you are into the Performance Monitor. Take a look at the below screenshot for its first view.
Analyze Your System’s Performance on Windows 10
Navigate the following path on the left pane of the window – Monitoring Tools -> Performance Monitor.
Open some programs on your system so that you may be able to see your system’s performance when the programs are being active. The graph will represent you the effects of the programs on your system’s mechanism. As you have opened the Performance Monitor on Windows 10 for the first time so you will notice a graph. This graph represents the Processor Time. The amount of time is displayed in the graph is in terms of percentage. It shows the amount of time being consumed by the Processor when the programs are active on your system. The horizontal line depicts the time and the vertical line is the percentage used.
Performance Monitor allows you to add your required counters so that you can analyze its performance on your system. So click on the green-colored plus sign on the top of the window.
Add counters window will appear now. On the left pane of the window, you will a list of counters available. Scroll up and down to find your required counter (For instance, I have selected the Memory counter). Then click on Add button followed by Ok option.
You will view a complicated graph on your Performance Monitor on Windows 10 Don’t get scared with the graph. If looked carefully you will be able to understand its depth. In the lower half of the graph, you will notice many parameters whose performance is shown the above graph. The colors corresponding to each parameter are shown in the above graph with the same colors.
If you deselect any parameter then its performance will not be shown in the above graph. Many important parameters like Available Bytes or Committed Bytes are displayed.
For the users who are getting confused with so many colored lines, (I suppose we all are getting confused ;-)) there is a way to make things bit clear. You can view the details in Histogram bar or in Report. When you give a click on the downward arrow located beside the green colored plus sign you will notice three options – Line, Histogram bar and Report.
To view the details in the Histogram Bar select Histogram bar option.
To get the Report click on Report option.
CONCLUSION
I know understanding it is not an easy task and so I request you all to know the casual reports only. You will at least be able to keep track of your system’s performance. Though a tough job if you try then it will be helpful.
RECOMMENDED: Click here to fix Windows errors and improve PC performance
If you’re having trouble with the performance of your Windows computer or laptop, one tool that can help you identify what’s wrong is the old Performance Monitor, which has been available in Windows operating systems since 1993. This tool can help you monitor how your computer’s processor, memory, or storage space are utilized and troubleshoot problems. But, before using it, you need to know how to start it. And this is where this guide comes along. Here are ten ways to open Performance Monitor in Windows 10 and Windows 11:
1. How to open Performance Monitor using Search
Some people reading this article are taking a technical exam in which they’re asked: “What can be typed in the Windows search bar to open the Windows performance tool?”. Well, the answer is perfmon or Performance Monitor. Here’s how it all works:
If you are using Windows 10, click or tap inside the search bar or press the Windows key on your keyboard. Type perfmon or Performance Monitor, and then press Enter or click/tap on the appropriate search result.
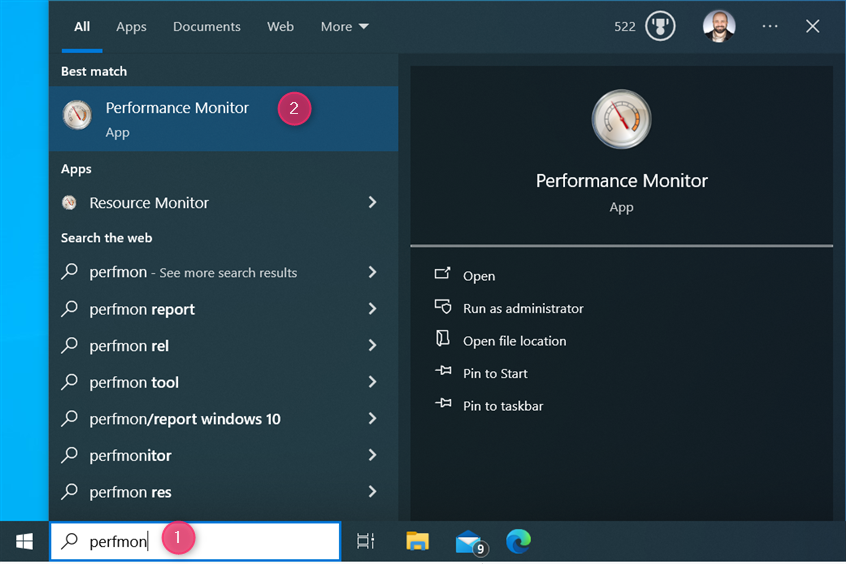
In Windows 10, search for perfmon
In Windows 11, things work the same; they just look slightly different: click or tap inside the search box, type Performance Monitor or perfmon, and press Enter.
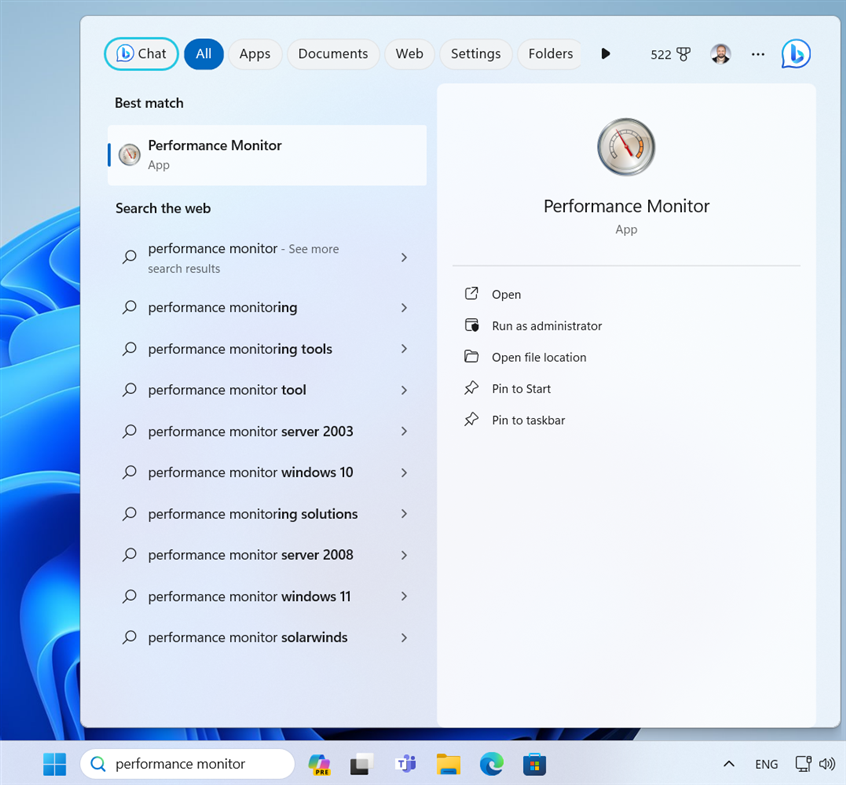
In Windows 11, search for performance monitor
The Performance Monitor app opens in a few seconds and looks similar to the screenshot below.
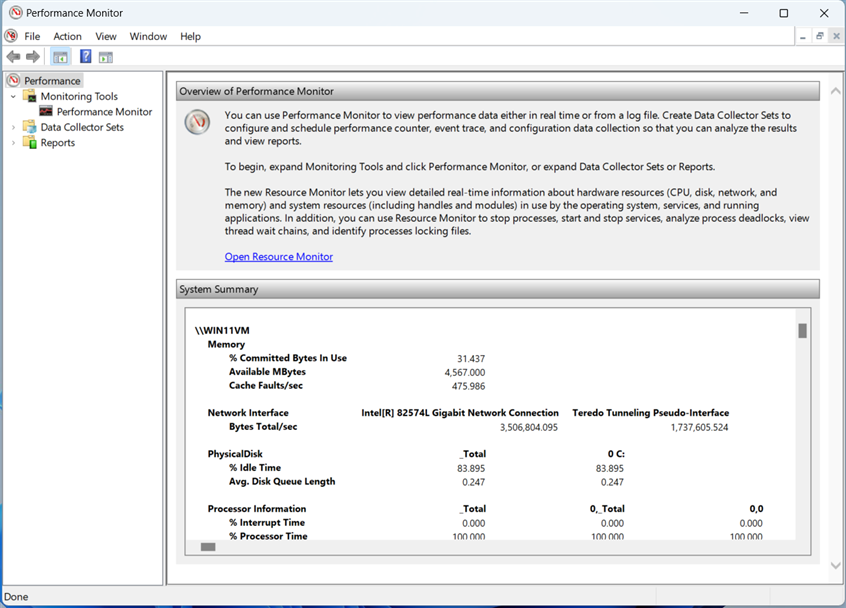
Performance Monitor in all its old-school glory
TIP: If you want to know more about Performance Monitor, how it works, and how it can be useful to you in analyzing your computer’s performance, read this guide on how to work with the Performance Monitor in Windows.
2. Use the shortcut for Performance Monitor from the Start Menu
Another way to access the Performance Monitor tool is available via the Start Menu. Here’s how:
2.1. Where to find the Performance Monitor shortcut in Windows 10
In Windows 10, Performance Monitor has its own shortcut in the Start Menu. You can use it to open the app with just a few clicks: click on the Windows icon from the taskbar, scroll down the list of apps until you see the Windows Administrative Tools folder and click or tap on it to expand it, and then find and click/tap on the Performance Monitor shortcut.
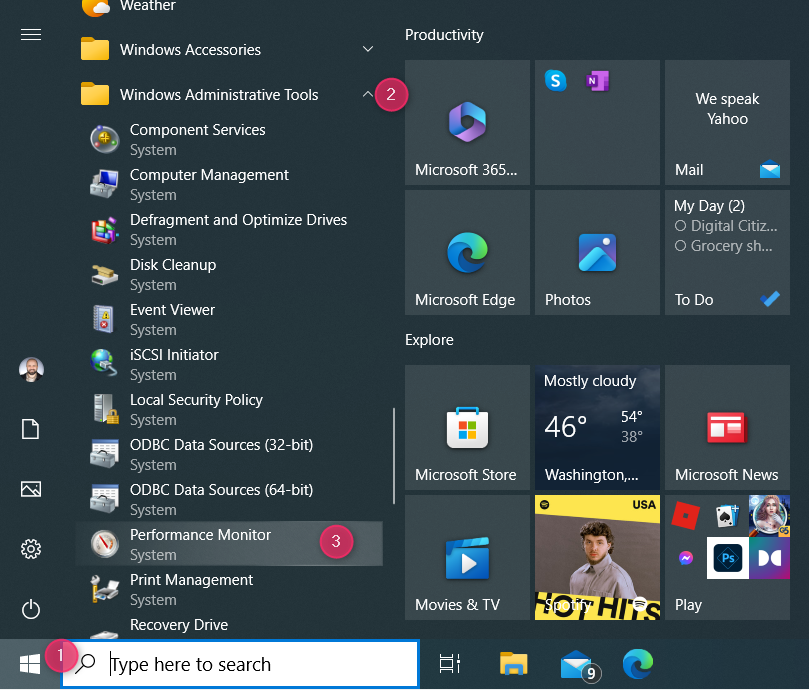
The Performance Monitor shortcut in Windows 10
2.2. Where to find the Performance Monitor shortcut in Windows 11
Unfortunately, in Windows 11, things are more complicated: the Performance Monitor shortcut is no longer part of the Start Menu, but you can still access it. Here’s how:
Click or tap the Windows icon to open the Start Menu. Then, click or tap on All apps.
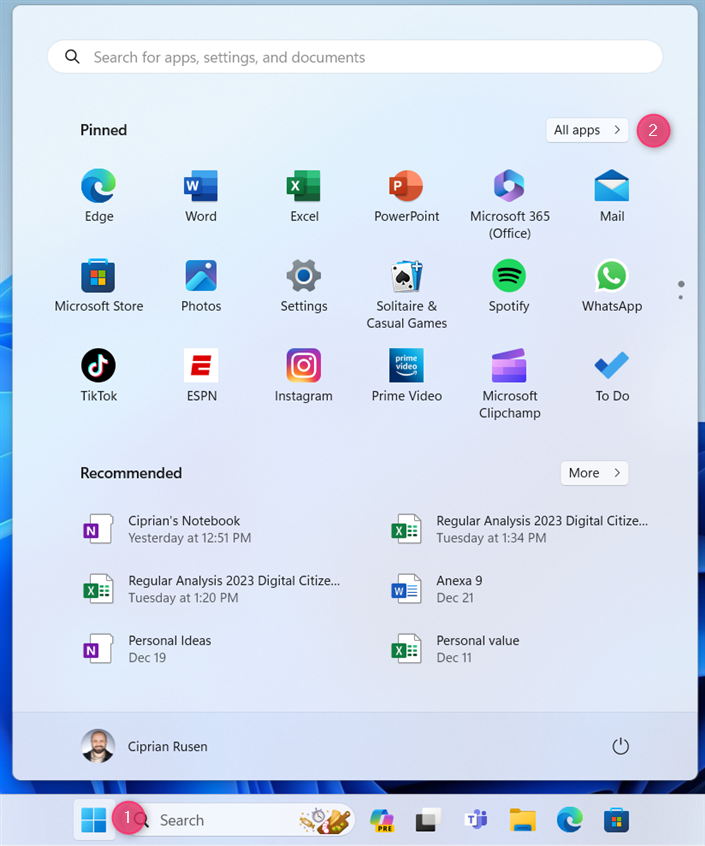
In Windows 11, click or tap Windows > All apps
TIP: Are you new to Windows 11, and you’re having a hard time understanding the operating system? Here’s how to use the new Windows 11 Start Menu.
Scroll down to the All apps list until you see the Windows Tools shortcut, and click or tap on it.
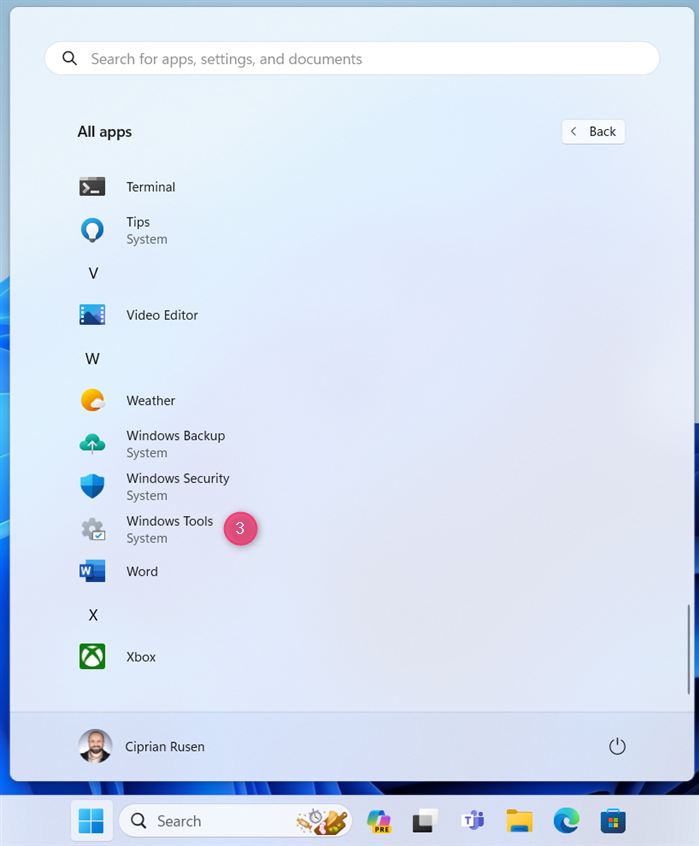
Scroll down to Windows Tools
The Windows Tools window opens. In it, you will see the Performance Monitor shortcut. Double-click (or double-tap) on this shortcut to open the app.
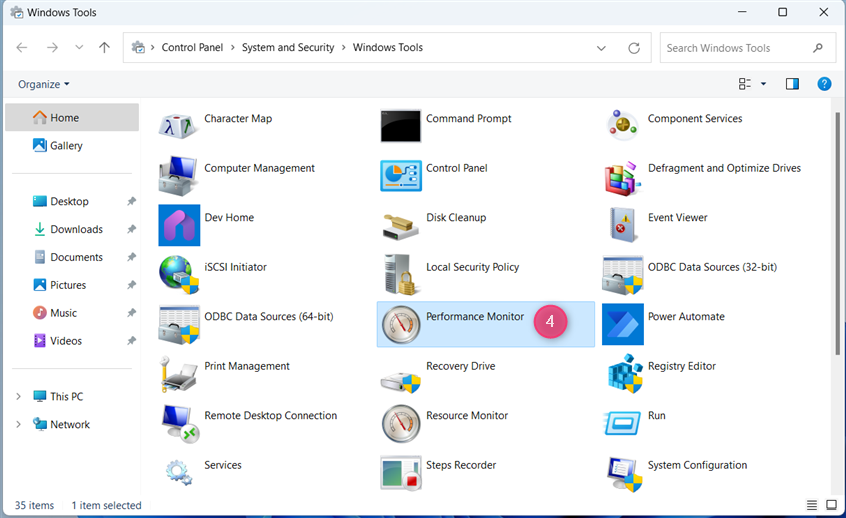
The Performance Monitor shortcut in Windows 11
3. How to start Performance Monitor from the command line (Command Prompt, PowerShell, or Windows Terminal)
If you need to start Performance Monitor from the command line, you can do that by opening Command Prompt, PowerShell, or Windows Terminal and typing this command:
perfmon
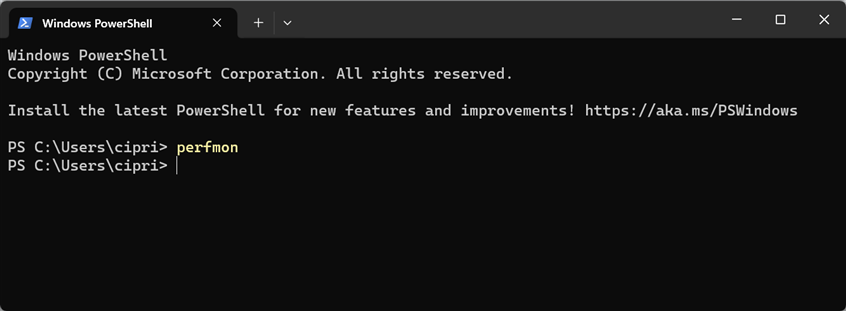
Run perfmon in the command-line
The Performance Monitor app is opened as soon as you press the Enter key on your keyboard.
TIP: If you like using CMD, here’s how to view system information and manage running processes using all kinds of commands.
4. Open Performance Monitor by running its executable file
Like all desktop apps for Windows, Performance Monitor has an executable file that you can use to run it. This file can be found by going to:
C:\Windows\System32\perfmon.exe
To run it, simply double-click (or double-tap) on it. You can also open its location by using environment variables like this:
%WINDIR%\System32\perfmon.exe
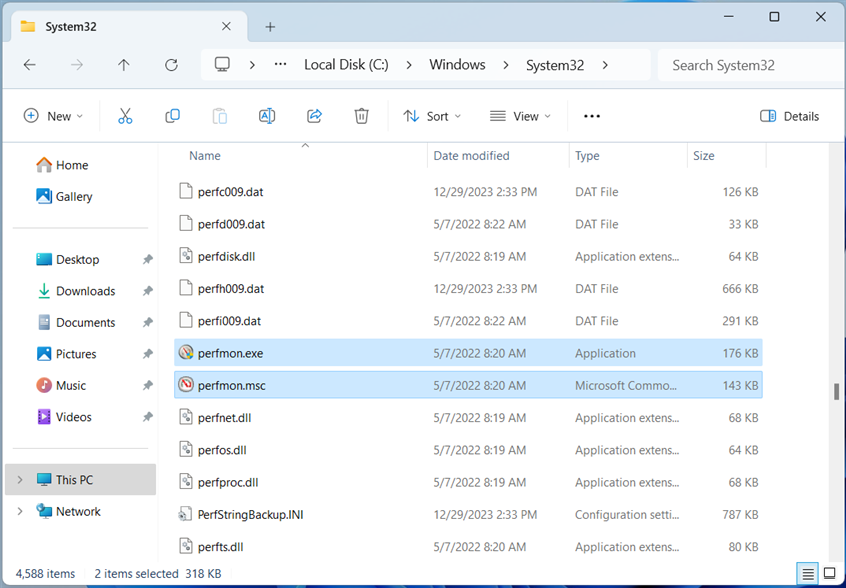
The files used to run Performance Monitor
NOTE: In the screenshot above, you see two files named perfmon: perfmon.exe and perfmon.msc. Both of them run the same application. Leaving aside the technical details on how they are implemented in Windows (the files are different), the only practical difference is that the command line parameters work only when using perfmon.exe. To know more about the parameters that can be used, read this documentation page from Microsoft.
5. How to pin the Performance Monitor shortcut to the taskbar or Start Menu
If you need to use the Performance Monitor app relatively frequently, you can pin its shortcut to the taskbar or the Start Menu. In Windows 10, this can be done with ease. Simply open the Start Menu, scroll down the apps list to Windows Administrative Tools, open this folder, and right-click (or press and hold) the Performance Monitor shortcut. In the contextual menu, you can choose Pin to Start or More > Pin to taskbar, depending on where you want to pin the shortcut.
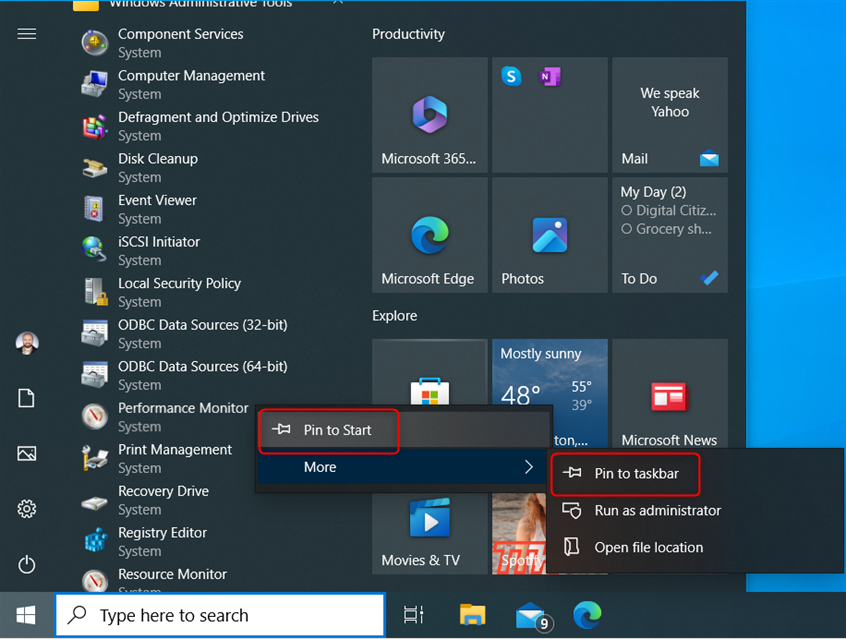
Pin to taskbar or Pin to Start
Here’s how the Performance Monitor shortcut looks when pinned to the Windows 10 Start Menu.
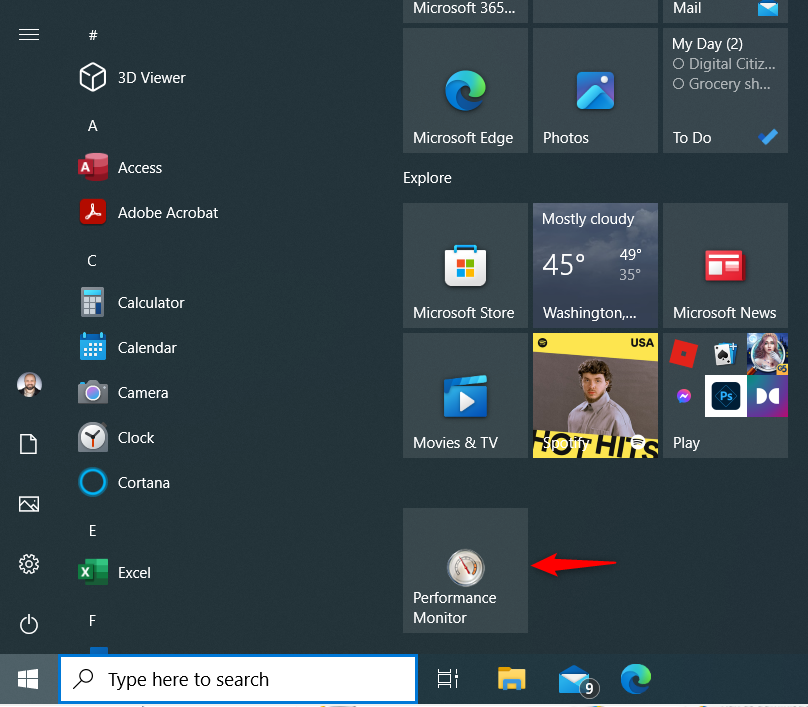
The Performance Monitor shortcut
TIP: Read our guide for more information on pinning all kinds of shortcuts to the Windows 10 Start Menu.
If you’re using Windows 11, the pinning process is different. To access both Pin to Start and Pin to taskbar, it’s best to click or tap inside the search box on the taskbar and type performance monitor or perfmon, as shown in the first chapter. Then, when you see the Performance Monitor search result, right-click (or press and hold) on it and choose the option you want.
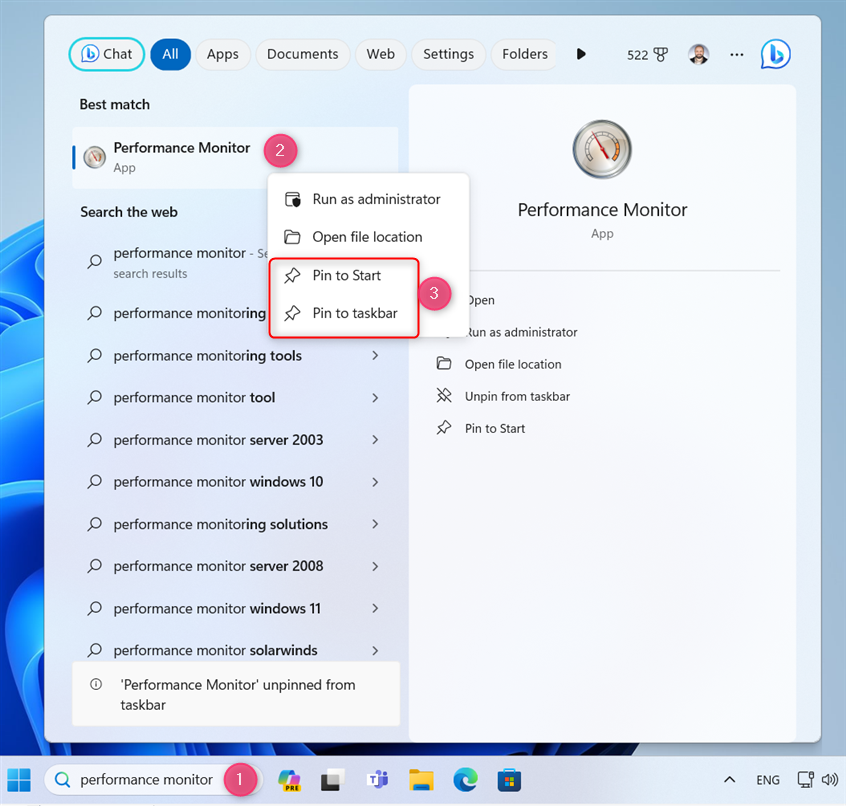
Search for Performance Monitor and pin its shortcut
Here’s what the Performance Monitor shortcut looks like when pinned to my Windows 11 taskbar.
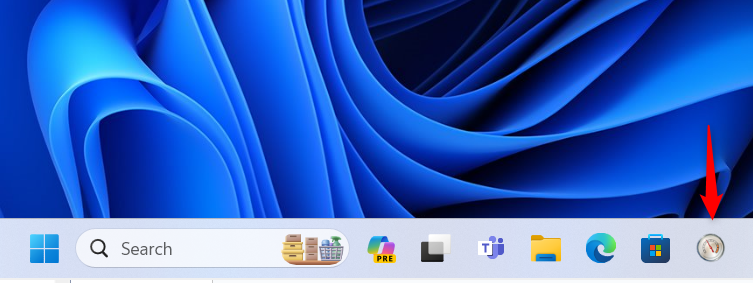
Performance Monitor on your taskbar
TIP: If you want to know more about personalizing your taskbar, here’s how to add or remove icons or apps from the Windows 11 taskbar.
6. How to start Performance Monitor from Run
This method is quick: press the Windows + R keys on your keyboard to open the Run window. In the Open field, type perfmon, press Enter on the keyboard, or click OK.
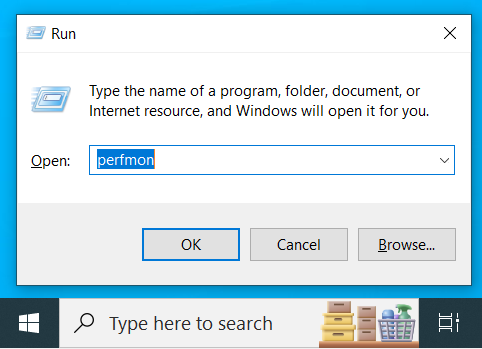
Run perfmon
7. How to create a Performance Monitor shortcut
If a desktop shortcut is your preferred way to start apps, you can create a Performance Monitor shortcut yourself. All you need to do is right-click (or press and hold) on the empty space on your desktop and choose New > Shortcut.
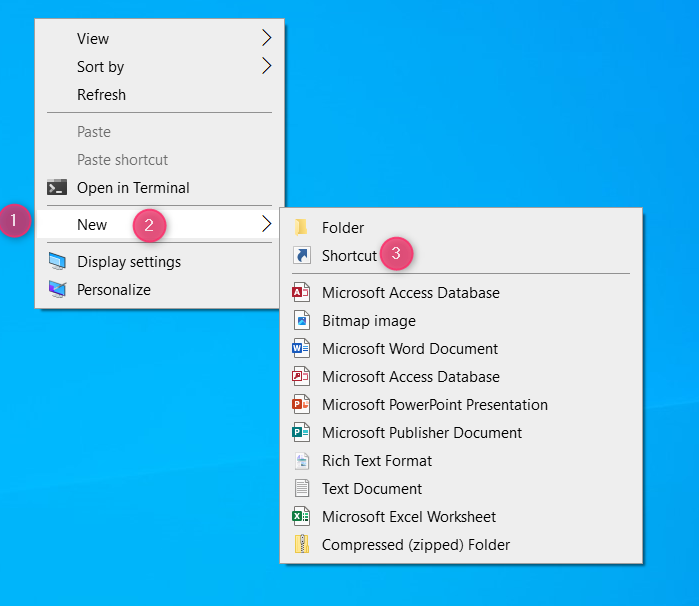
Create a new shortcut
In the Create Shortcut window, type perfmon in the location field, press Next, give a name to your shortcut and then press Finalize.
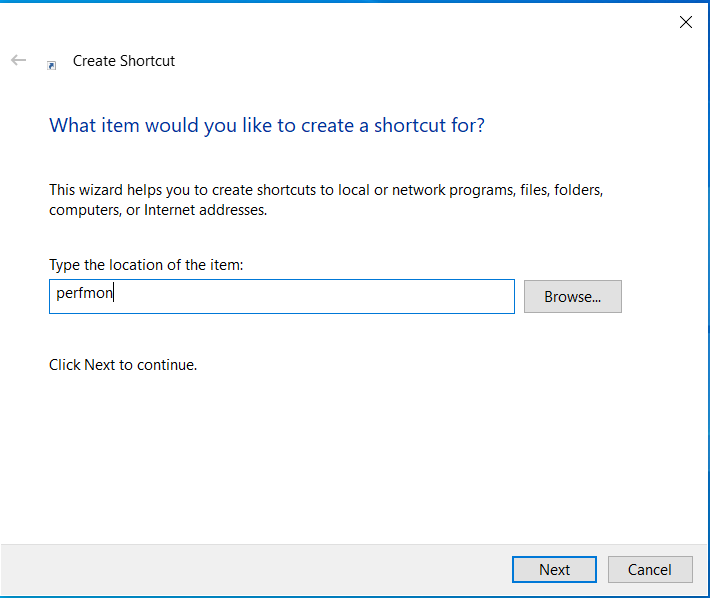
Type perfmon
TIP: For detailed help on creating shortcuts, read this guide: How to create shortcuts for files, folders, apps, and web pages in Windows.
8. Run Performance Monitor from File Explorer
Press Windows + E to open File Explorer in Windows 10 or Windows 11. Then type perfmon in the address bar on the top side of the window and press Enter on your keyboard.
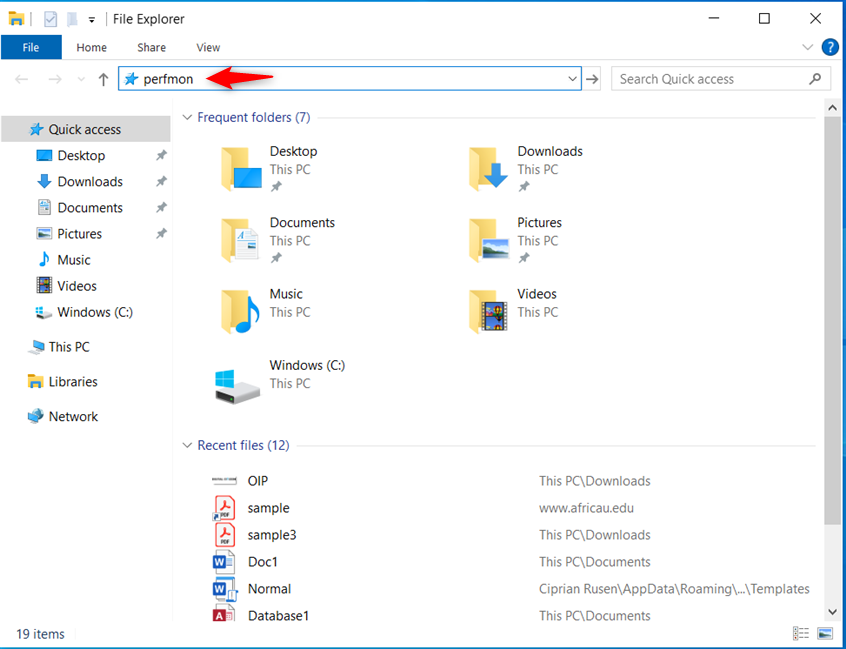
Run perfmon in File Explorer
The Performance Monitor app starts immediately.
9. How to start Performance Monitor from System Configuration
If you have opened System Configuration to manage the startup options for your computer, you can also use it to run Performance Monitor. Go to the Tools tab in System Configuration, select Performance Monitor, and click or tap Launch.
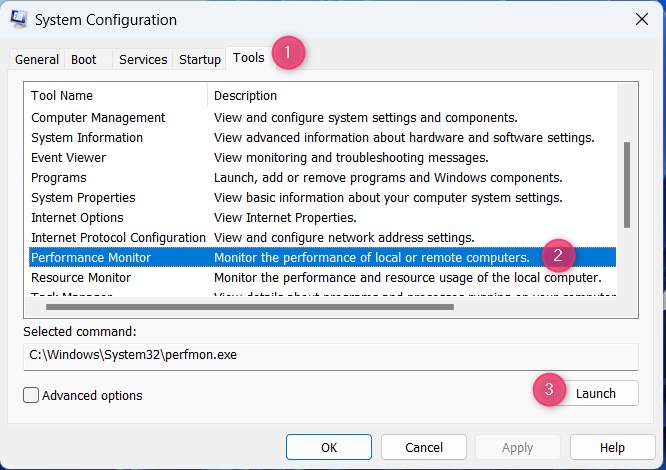
Launch Performance Monitor from System Configuration
TIP: If you want to know more about System Configuration and what this app does, read this guide.
10. Open Performance Monitor from Computer Management
Not many people know that Performance Monitor is also included in the Computer Management app — a tool that’s very useful for troubleshooting problems with your Windows computer. Therefore, if you open Computer Management, you’ll find the Performance section in the menu tree on the left side of the Computer Management window. It’s in the System Tools section, just above Device Manager.
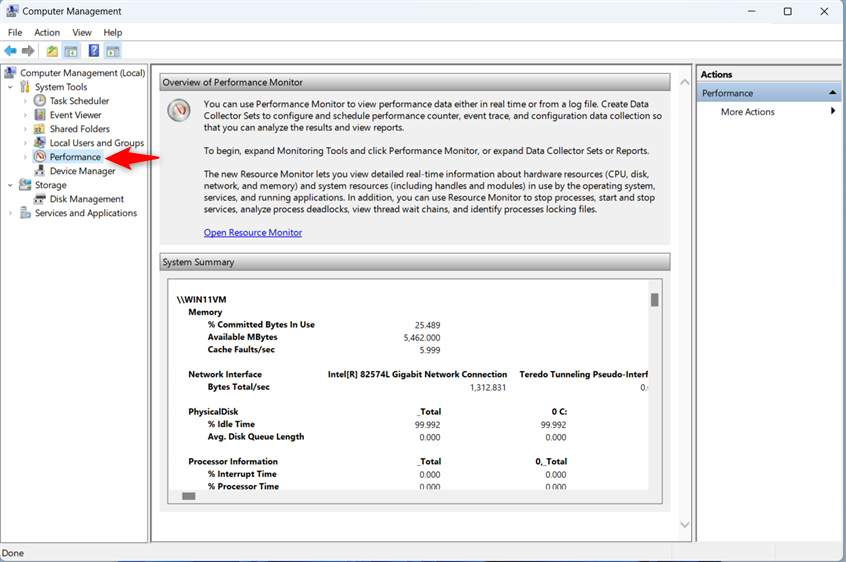
Click Performance inside Computer Management
Click or tap on Performance to access the full Performance Monitor tool.
How do you start the Performance Monitor on your Windows computer?
Now, you know all the ways to start the Performance Monitor app in Windows 10 and Windows 11. Try them all out, and choose the one(s) you like. Then, don’t hesitate to leave a comment and tell me which method you like best and why. Do you prefer using Search or maybe Command Prompt? Or is it some other method? Comment using the options available below, and let me know.