
Readers help support Windows Report. We may get a commission if you buy through our links.
Read our disclosure page to find out how can you help Windows Report sustain the editorial team. Read more
We all know how frustrating it can be when faced with Windows has restarted your GPU driver due to a problem.
Users experience Windows restarting their GPU driver mainly due to a problem. Outdated or corrupt graphics drivers to outdated OS, unnecessary background apps, overclocking issues or physical damage to the CPU can also lead to the error.
How do I fix Windows restarting my GPU driver error?
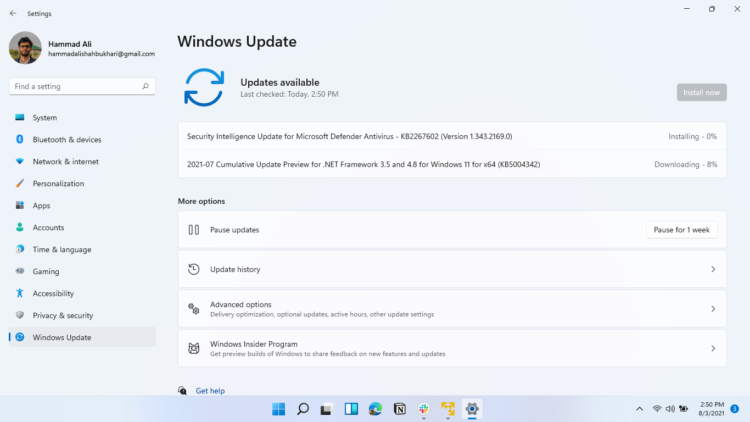
1. Update your operating system
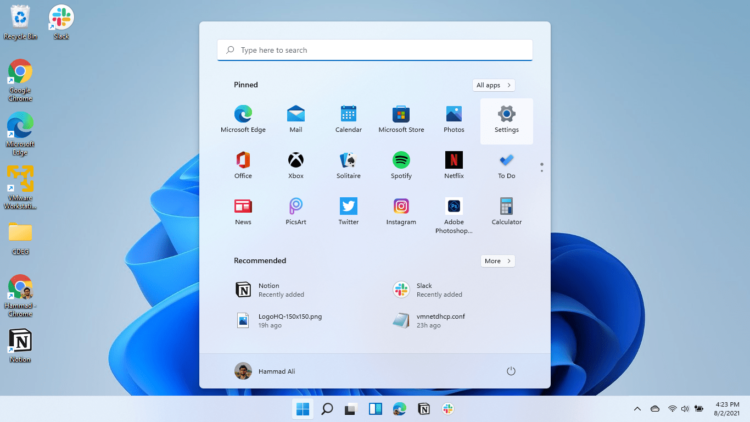
- Click on the Start button.
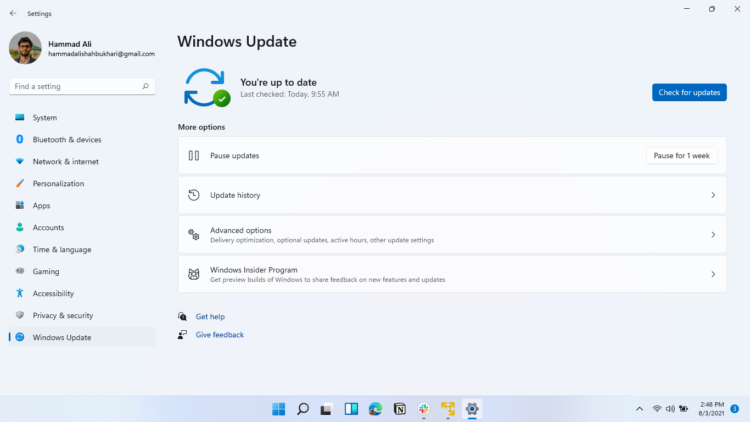
- Select Settings from the drop-down and click on Windows Update.
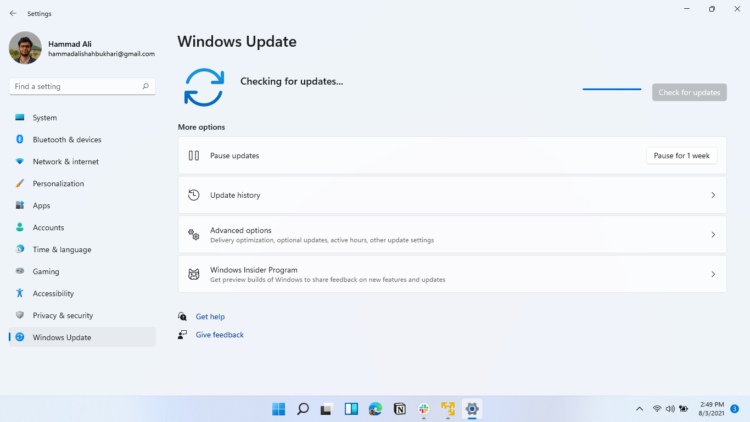
- On the Windows Update tab, select Check for updates (if there are any updates available, Windows will search for and install them).


Updating your OS can fix bugs affecting your PC and causing it to restart the GPU driver.
In case you run into issues with the Windows update, we recommend you check our guide on how to fix Windows updates & security issues on your PC.
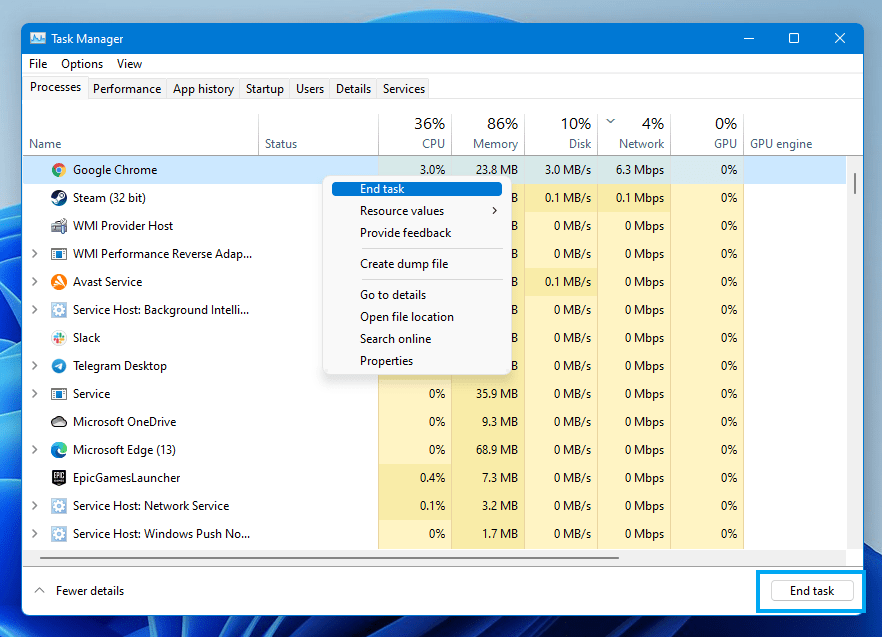
2. End Tasks for unnecessary programs
- Click on the Start button, input Task Manager and select launch.

- Select the CPU and Memory usage option in the Task Manager.
- Select the applications using lots of CPU resources and memory space on your PC.

- Click on the End Task option from the drop-down and click OK to confirm the process.


We recommend that you restart your computer to help it sync the changes effectively, then check if the issue has been resolved.
Also, you can refer to our article on Task Manager not working correctly and what you can do to get it working.
Alternatively, giving high priority to games like League of Legends in the Task Manager can fix GPU issues that may occur during the game. Hence, read how to prioritize specific apps in the Task Manager to improve performance.
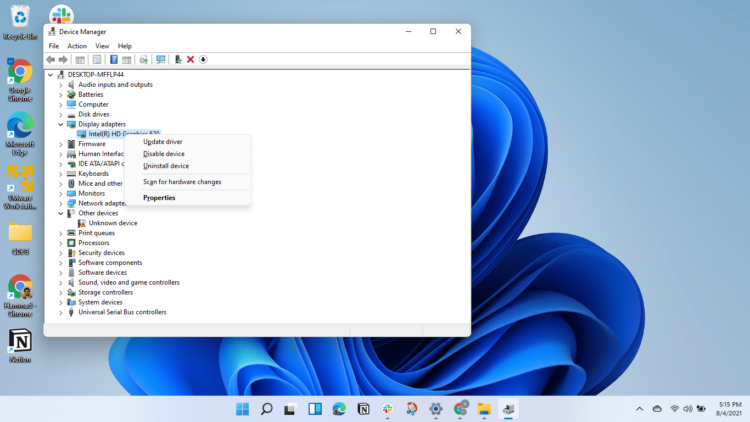
3. Update the graphics driver
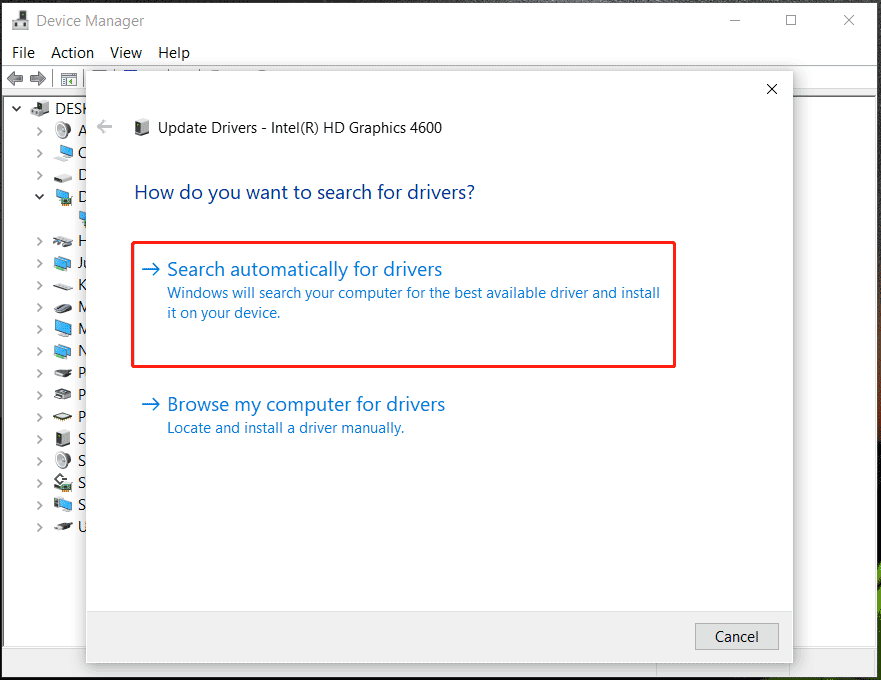
- Press the Windows + R keys simultaneously to prompt the Run window.
- Type the following into the search space: devmgmt.msc, and click OK.
- Click on the Display adapters from the search results.

- Select the display driver you want to update from the drop-down, then right-click on it.
- Click the Update driver software option, then select Search automatically for drivers.


Wait for Windows to search and install the driver updates. Restart your computer after the update process is complete, then check if the issue persists.
Additionally, if no updates are found, we recommend trying a tool that specializes in updating drivers such as PC HelpSoft Driver Updater which gets its updates directly from the manufacturer.
⇒ Get PC HelpSoft Driver Updater
4. Disable Intel’s overclocking Technology
- Click on the Start button, input Control, and select the Control Panel.

- Select Hardware and Sound from the menu and click on Power Options.
- Click on Change Plan settings.
- Click on Change advanced power settings to open the Power Options tab.
- Expand the Processor power management option.
- Click on the Maximum processor state tab and set the values for both On battery and Plugged in as 99%.
- Click on the Apply button, then OK to save the changes.


Restart your PC to initiate the changes.
Underclocking your GPU will help improve its performance and can fix issues affecting it. Hence, check how to safely underclock your GPU without affecting your computer.
- Windows 11 Shutdown After Inactivity: 4 Ways to Stop it
- Windows Shuts Down Instead of Restarting: 4 Ways to Fix it
- Windows 11 Shutdown But User Stays Logged in: How to Fix it
- Unpacking Error in Avowed: How to Fix it
- How to Delete Windows 11 Saved Passwords
5. Replace your GPU
This solution is the last you should consider as it requires technical expertise. Replacing your GPU will fix the error: Windows has restarted your GPU driver due to a driver upgrade or physical removal.
A faulty GPU affects its performance and can also result in other issues with the computer. You may encounter the AGP_GART_CORRUPTION error.
However, we have a detailed list of the best graphics cards for gaming that you can buy. For users who’d like to use external GPUs instead, check our article about the best USB-C external GPUs you can get for your PC.
Conclusively, issues with the GPU can cause other problems like game stuttering on Windows 11 and others. We recommend you check the link above to see how you can fix the problem.
For more questions or if you have other suggestions, kindly drop them in the comments section. We’d like feedback from you.
Henderson Jayden Harper
Windows Software Expert
Passionate about technology, Crypto, software, Windows, and everything computer-related, he spends most of his time developing new skills and learning more about the tech world.
He also enjoys gaming, writing, walking his dog, and reading and learning about new cultures. He also enjoys spending private time connecting with nature.
-
Home
-
News
- LoL Could Not Initialize Graphics Device Win11/10? Try 4 Ways!
By Vera | Follow |
Last Updated
What does “unable to initialize graphics system” mean? How to fix “could not initialize graphics device” in Windows 11/10? If you get one of these errors when playing League of Legends, what should you do? Try multiple ways here collected by MiniTool to help you out.
If you are a user of League of Legends (LoL), you may be familiar with the error “could not initialize graphics device”. When playing this game on Windows 11/10, you may run into this error message. Sometimes, it shows “unable to initialize graphics system” or “could not initialize graphics system”. Sometimes a message is followed saying “make sure that your video card and driver are compatible with DirectDraw”.
This warning means that your graphics card encounters a problem, for example, the compatibility issue with DirectDraw, an outdated graphics card driver, and a conflict between your resolution and the graphics settings.
Well then, how to fix LoL could not initialize graphics device? Move to the next part to find solutions.
Update Graphics Card Driver
The graphics card driver is responsible for the communication between the video card and the operating system. If it is outdated or corrupt, you may run into the error “unable to initialize graphics system or device”. To get rid of the trouble, try to upgrade the driver to its latest version.
You can go to Windows 11/10 Device Manager, expand Display adapters, right-click on the video card and choose Update driver. Then, click the first option to automatically search for an available driver and install it on your PC.
Or, you can visit the manufacturer’s website to download the up-to-date graphics card driver and use the file to install it on your computer. Or, ask a professional driver update tool for help and here we strongly recommend using Driver Booster. To know details about it, refer to our previous post – IObit Driver Booster Download for PC & Install to Update Drivers.
Run Your Game in Compatibility Mode
If your Windows 11/10 PC is unable to initialize graphics system, you can run League of Legends in its compatibility mode. Follow the steps here:
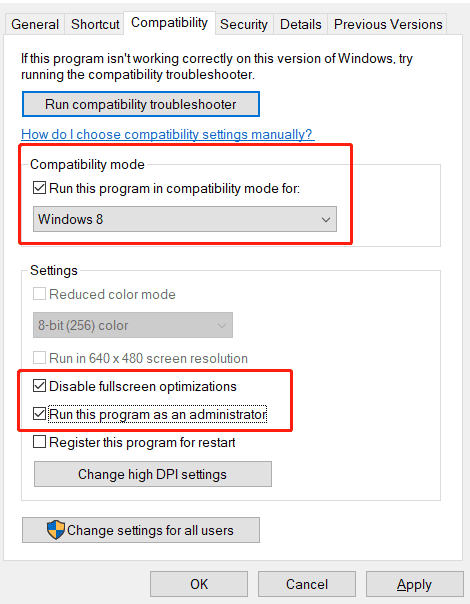
Step 1: Right-click on the LoL app and choose Properties.
Step 2: Under the Compatibility tab, choose Run this program in compatibility mode for and select an operating system.
Step 3: Tick the boxes for Disable fullscreen optimizations and Run this program as administrator.
Step 4: Click Apple > OK to save the change.
After that, go to play League of Legends on Windows 10/11 and see if the error “could not initialize graphics device” is fixed. If not, try another solution.
Install DirectX Update
DirectX plays an important role in game programming, video rendering, and 3D modeling. Keeping it updated is very important. If your PC could not initialize graphics device, try to install the DirectX update.
Step 1: Navigate to the official website of DirectX End-User Runtime Web Installer, choose a language and click the Download button.

Step 2: Double-click on the dxwebsetup.exe file and finish the installation by following the on-screen wizards.
After the installation, restart your PC and see if “unable to initialize graphics system” is removed from your Windows 11/10 PC.
Change Display Resolution
Changing display resolution is a good solution. According to some users, this can quickly help fix “could not initialize graphics device”. So, have a try.
Step 1: Right-click on any empty space on the Desktop and choose Display settings.
Step 2: Go to the Display solution section, change it to a different value and run your game to see if the issue is removed. Sometimes you need to try with different resolutions until the error disappears.
Final Words
These are the common fixes for the error “could not initialize graphics device” or “unable to initialize graphics system” in Windows 11/10. Try them one by one to fix your issue. If you find some other useful methods, let us know in the Comment part below. Thanks.
About The Author
Position: Columnist
Vera is an editor of the MiniTool Team since 2016 who has more than 7 years’ writing experiences in the field of technical articles. Her articles mainly focus on disk & partition management, PC data recovery, video conversion, as well as PC backup & restore, helping users to solve some errors and issues when using their computers. In her spare times, she likes shopping, playing games and reading some articles.
LoL is a popular online game widely played on Mac and Windows Operating systems. Yet, it has a notorious history of problems; one being unspecified error in League of Legends. Update failure is the most common reason that triggers LoL unexpected error 004 and others. So, if you are also annoyed with this message, this guide will help you fix all such issues.

Table of Contents
The full version of this is Unspecified error has occurred. Please check the logs for more information
There are so many reasons that cause this like:
- League of Legends lacks admin rights.
- Network connectivity issues & Conflicts in DNS addresses.
- Antivirus suite or Windows Defender Firewall is blocking the program.
- DirectX is blocking LoL or Misconfigured files in the installed game.
Basic Troubleshooting Steps
1. The general trick to resolve all the temporary glitches associated with League of Legends is to restart your PC.
2. Some users have reported that an unstable internet connection also leads to this error. You can run a speed test to know the optimum level of network speed required for the proper connection.
3. You can restart your router to fix this error.
4. If there are too many background processes on your Windows 10 PC, you cannot easily access your network connection since all those tasks will take a share of the network. Follow our guide on How to End Task in Windows 10 to close all other background processes on your Windows 10 PC.
Method 1: Run League of Legends Manually
If your computer takes some additional time to patch up League of Legends, you will face League unspecified error. Yet, you can manually patch the game by following the below-mentioned steps.
1. Press the Windows + E keys together to open File Explorer.
2. Now, navigate to the following location path:
C:\Riot Games\League of Legends\RADS\projects\lolpatcher\releases\deploy

3. In the Deploy folder, right-click on the LoLPatcher.exe executable file and click on Run as administrator.

Method 2: Run League of Legends as Administrator
To avoid unspecified error League of Legends on your Windows 10 computer, run League of Legends as an administrator as instructed below:
1. Right-click on the League of Legends shortcut on the Desktop.
2. Now, select the Properties option.
3. Then, navigate to the Compatibility tab and check the option Run this program as an administrator.

4. Finally, click on Apply > OK to save the changes.

Also Read: Fix League of Legends Sound Issues
Method 3: Delete LoL_air_client Folder (If Applicable)
Another simple way to fix LoL unexpected error is to delete a specific folder in File Explorer. This removes the corrupt components in your Windows 10 associated with the game. Here are a few steps to delete the folder.
1. Launch the File Explorer by hitting the Windows + E keys simultaneously.
2. Now, navigate to the following location and open it.
C:\Riot Games\League of Legends\RADS\projects\lol_air_client
Note: You may also find the lol_air_client folder in another location. Pay a bit extra attention to finding the folder.

3. Right-click on the lol_air_client folder and click on the Delete option.

4. Once you have deleted the folder, restart the PC.
Method 4: Tweak Hosts File
If the hosts file has edited entries of League of Legends, you will face this unspecified error. Hence, you have to modify the entries in the file to resolve this issue. Here are a few instructions to tweak hosts entries.
1. Launch the File Explorer.
2. Switch to the View tab and select the Hidden items box in the Show/hide section.

3. Now, navigate to the following path in the File Explorer:
C:\Windows\System32\drivers\etc

4. Right-click on the hosts file and select the Open with option as shown.

5. Now, select Notepad and click on OK as depicted.
6. Now, add this line 67.69.196.42 l3cdn.riotgames.com to the bottom of the file.

7. Now, save the file by pressing Ctrl+ S keys together.
8. Close Notepad and check if you have fixed League unspecified error.
Also Read: How to Change League Of Legends Summoner Name
Method 5: Change Game Update Client
This method is quite tricky and requires attention. Yet, you can handle them wisely by following the below-mentioned steps.
1. Open File Explorer as instructed above and navigate to the given location path.
C:\Riot Games\League of Legends

2. Now, find and right-click on the file User.cfg.
3. Then, select the Open with > Notepad option as depicted.

4. Now, hit the Ctrl + F keys together to open the Find window. Here, type LeagueClientOptIn in the Find what tab.
5. Change the value of LeagueClientOptIn from Yes to No.
6. Press Ctrl + S keys simultaneously to save the changes and relaunch the game.
Method 6: Tweak system.cfg File
Likewise, tweaking the system.cfg file in the League of Legends folder will help you fix this LoL unexpected error in Windows 10. Follow the below-mentioned steps to implement the same.
1. Open File Explorer and navigate to the following location path.
C:\Riot Games\League of Legends\RADS

2. Now, find the system.cfg file and right-click on it.

3. Then, select Open with, followed by Notepad.

4. Press Ctrl + A keys together to select the content and hit the Delete key.
5. Now, paste the following line and save the changes by pressing Ctrl + S keys.
DownloadPath = /releases/live DownloadURL = l3cdn.riotgames.com Region = EUW

Also Read: Fix Valorant Val 43 Error in Windows 10
Method 7: Update Windows
Windows updates can fix all the bugs and erroneous patches on your computer. Microsoft releases frequent updates to fix all these problems. Hence, make sure whether you are using the updated version of the Windows Operating System, and if any updates are pending in action, use our guide How to Download and Install Windows 10 Latest Update

After updating your Windows Operating System, check if you have fixed unspecified error League of Legends.
Method 8: Update GPU Drivers
If you want to enjoy any graphical games without any errors, your drivers must be in a perfect state. Make sure you update them if they are faulty or outdated. You can update them by searching for the latest releases of drivers from its official websites or updating them manually. Follow our guide on 4 Ways to Update Graphics Drivers in Windows 10 to update your driver and check if LoL unexpected error persists or not.

Also Read: How To Fix League Of Legends Client Not Opening Issues
Method 9: Roll Back GPU Drivers
Sometimes, the current version of your graphics drivers may cause any launching conflicts. In this case, you have to restore previous versions of installed drivers. This is called rollback. You can easily roll back your graphics drivers to their previous state by following the steps in our guide, How to Rollback Drivers on Windows 10.

Method 10: Reinstall GPU Drivers
If you still face LoL unexpected error after updating your GPU drivers, reinstall device drivers. You can reinstall drivers on your computer in several ways. Yet, you can easily reinstall graphical drivers by following the steps in our guide, How to Uninstall and Reinstall Drivers on Windows 10.

After reinstalling the GPU drivers, check if you can access League of Legends without errors.
Also Read: Fix League of Legends Directx Error in Windows 10
Method 11: Change DNS Address
Several users have suggested that switching to Google DNS addresses may help you fix this LOL unspecified error. If you launch Minecraft properly and face a black empty screen, follow our guide to change the DNS address. This will help you fix all DNS (Domain Name System) problems so you can launch the game without any hustles.

After changing your DNS address, check if you can launch LoL without the error screen.
Method 12: Disable Antivirus Temporarily (If Applicable)
One other possible reason that causes unspecified error League of Legends is your security suite. When your antivirus programs detect Minecraft files and folders as a threat, you will face several conflicts. So, read our guide on How to Disable Antivirus Temporarily on Windows 10
Also Read: Fix Avast Blocking League of Legends (LOL)
Method 13: Disable Windows Defender Firewall (Not Recommended)
In addition to the Antivirus program, the Windows Defender Firewall might prevent access to games on your PC. So, try to disable the Windows Defender Firewall as instructed in our guide How to Disable Windows 10 Firewall, and follow the steps accordingly.

Note: Once launching LoL after disabling Windows Defender Firewall, ensure you re-enable the Firewall suite after the game. A computer without a security suite is always prone to malware attacks.
Method 14: Use VPN
Still, if you are unable to fix your problem, you can try using a Virtual Private Network. Follow our guide on How to set up a VPN on Windows 10 and implement the same.
Method 15: Tweak Registry Keys
Several gamers have confirmed that reinstalling DirectX on your PC helped them fix this LOL unspecified error. Here is how to delete DirectX installed file from Registry.
1. Press the Windows + R keys together to launch the Run dialog box.
2. Now, type regedit and hit Enter key to open the Registry Editor.
3. Click on Yes in the User Account Control prompt.
4. Navigate to the following location path in the Registry Editor:
Computer\HKEY_LOCAL_MACHINE\SOFTWARE\Microsoft\DirectX

5. Now, right-click on the InstalledVersion file and click on the Delete option.

6. Similarly, delete the Version file as done before.

7. Now, follow our guide on Download And Install DirectX on Windows 10 to reinstall DirectX on your Windows 10 PC.

Also Read: Fix League of Legends Black Screen in Windows 10
Method 16: Reinstall League of Legends
Any misconfigured files in League of Legends will lead to the LoL unexpected error even if you have followed all the above-discussed methods and updated all the pending actions. So, in this case, you have no other option than to reinstall the game. The game is tied up with your account, and when you reinstall the game, you will not lose your progress. Here is how to reinstall League of Legends:
1. Press the Windows + I keys to open Settings.
2. Select Apps setting.
3. Scroll down and click on League of Legends. Then, select Uninstall.
4. Again, click on Uninstall in the pop-up.

5. Now, click on Done.

6. Hit the Windows key, type %appdata% and click on Open.

7. Double-click on the Riot Games to open the folder.

8. Now, right-click on the Install League of Legends euw folder and delete it.

9. Press the Windows key, type %localappdata% and click on Open.

10. Delete the League of Legends folder as done previously.
11. Now, reboot the PC.
12. Then, visit the League of Legends official download page and click on the PLAY FOR FREE button.

13. Enter your Email address and click on START.

14. Select your Date of birth in the next step and click on NEXT.

15. Now, fill USERNAME, PASSWORD, and CONFIRM PASSWORD fields.
16. Check the option I agree to the Terms of Service and I have read and acknowledge the Privacy Notice.
17. Then, click on NEXT.

18. Now, click on the DOWNLOAD FOR WINDOWS button.

19. Click on the downloaded installer file to install and run the game.

20. Click on the Install button in the prompt.

Recommended: Fix Failed to Install BattlEye Service in Windows 10
We hope that this guide was helpful and you could fix unspecified error League of Legends on Windows 10. Let us know which method worked for you the best. Also, if you have any queries/suggestions regarding this article, feel free to drop them in the comments section. Also, let us know what you want to learn next.

If you’re a League of Legends player on Windows 11, encountering the «A Critical Error Has Occurred» message can be frustrating. This error prevents the game from launching and can put a damper on your gaming experience. Fortunately, there are several solutions you can try to fix this issue and get back to playing your favorite game. In this article, we’ll cover some easy and effective ways to troubleshoot and fix the «A Critical Error Has Occurred» problem in League of Legends on Windows 11. From updating your drivers to repairing your game files, we’ll explore all the options available to ensure you can get back to dominating on the Rift without any pesky errors getting in your way.
End 3rd-Party Applications
Open up your Task Manager by searching for it in your start menu search. In the Processes tab, prevent applications from running that could show an overlay while playing League of Legends, such as Discord, the Creative Cloud, Adobe applications or your GeForce Experience application. You should also prevent Riot Games or League of Legends processes from running in the background.
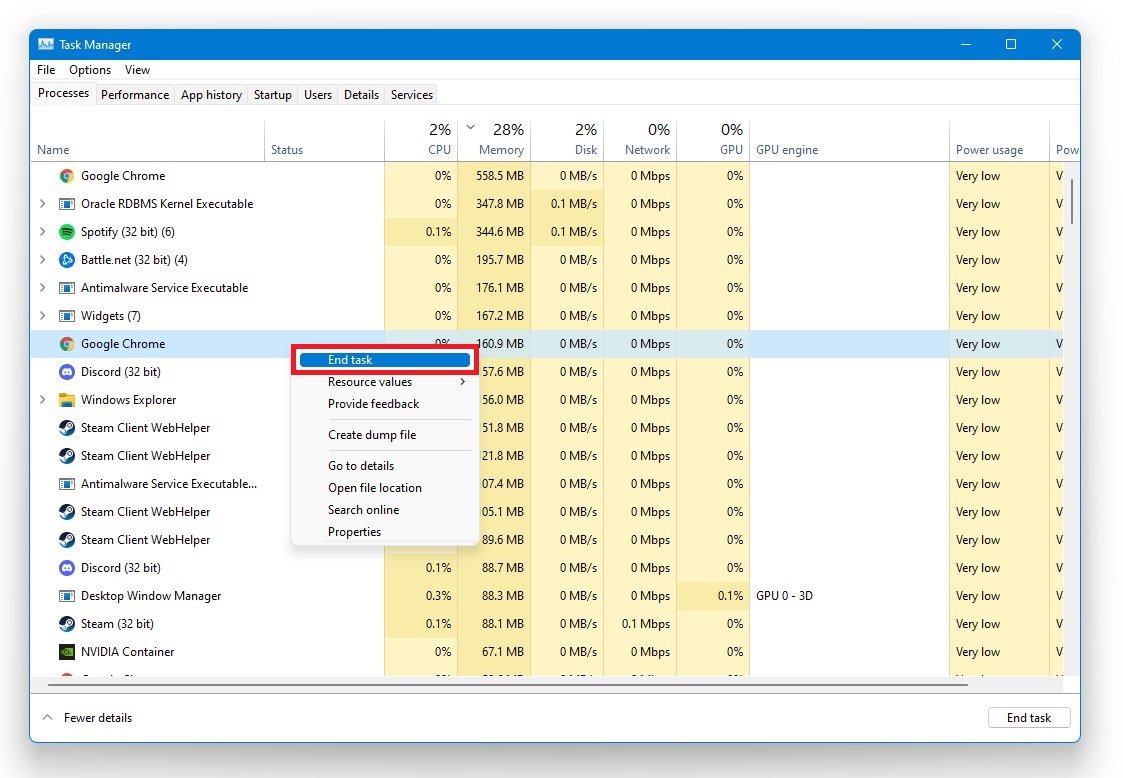
Task Manager > Processes > End Task
Delete the LoL Config and Data Folders
Open your file explorer and navigate to the drive where you saved League of Legends on: Program Files > Riot Games > VALORANT > League of Legends. In the folder, delete the Config and DATA folders. Both folders will be re-downloaded the next time you open your League launcher.
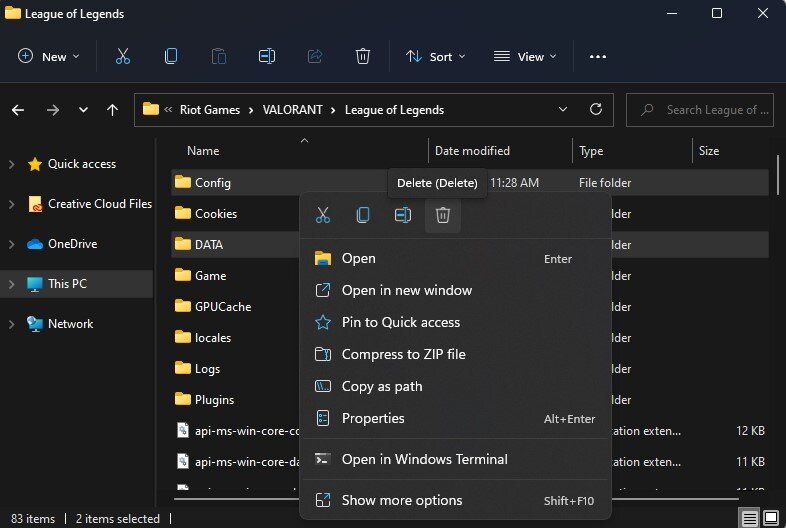
Program Files > Riot Games > VALORANT > League of Legends
League of Legends Compatibility Settings
Open the Game folder and right-click the League of Legends application to access its Properties. In the Compatibility tab, tick the Disable fullscreen optimizations option and run this program as an administrator. Don’t forget to apply your changes. This can fix the Critical Error while playing League of Legends, but in case the error persists, then make sure to follow the next step.

League of Legends Properties
Allow League of Legends to Bypass your Firewall
Make sure that your firewall is not blocking parts of the software. Search for Firewall in your start menu search to open up your Firewall & Network Protection system settings window. Click on Allow an app through firewall.

Firewall & Network Protection > Allow an app through firewall
Click on Change Settings, and check League of Legends in this list. If you can’t find League in this list, select Allow another app. Select Browse, and your file explorer will open up.
Navigate to the drive on which you saved the game, Program files > Riot Games > League of Legends > Game. Select the League of Legends application and select Open. This will allow you to exclude the application from being blocked by your firewall and will prevent the issue.

Windows Defender Firewall Settings > Allowed Apps
Update Graphics Card Driver
Ensure your Graphics Driver, and Operating System is up to date. We suggest using the GeForce Experience application for an NVIDIA GPU, but you can also use the AMD driver suite. In the Drivers tab, click on Download, and the application will automatically download and install the latest driver.
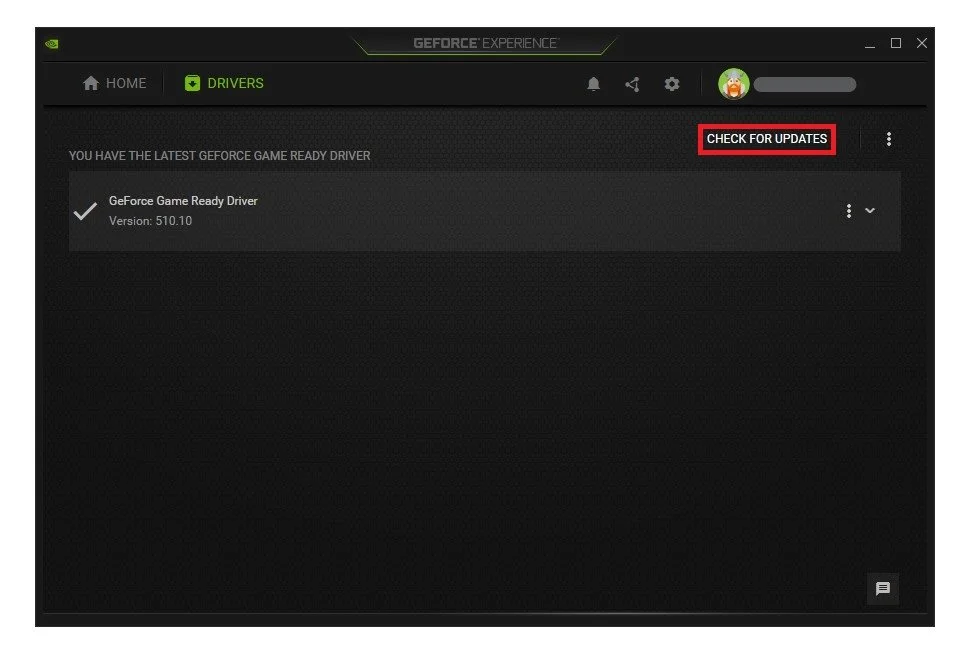
GeForce Experience > Drivers > Download
Windows OS Update
Search for Update to open up your Check for updates system settings window. Click on Check for updates, and after downloading the latest OS update, restart your PC. As a last resort, reinstall League to your system after updating Windows 11 and restart your PC when you’re done.
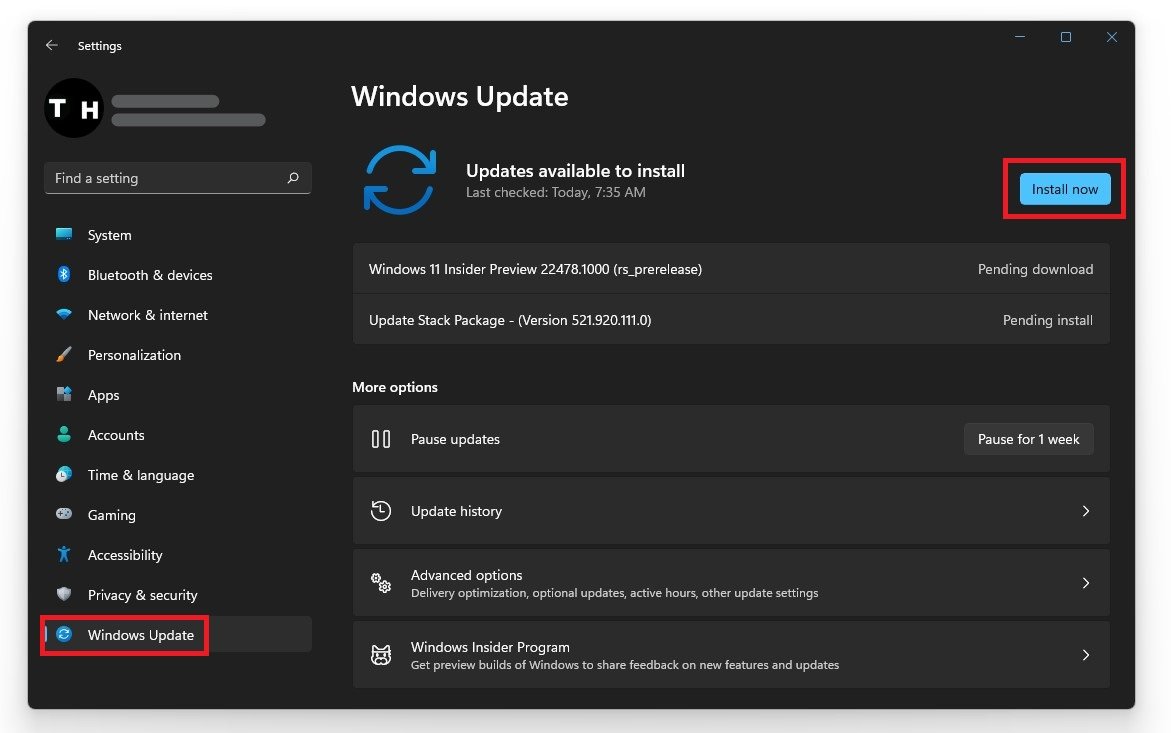
Windows Settings > Windows Update
Recently many the LOL players are complaining about getting League of Legends Critical Error which they are facing in the game on Windows 11/10 PC.
One of the Users shares the error experience they face.
My login credentials would be accepted, but once I entered the game, and it began self-updating, the game would instantly crash.”
Here is of the LOL player sharings the Error message prompt on Reddit.
The error message says “A Critical Error has occurred and the process must be terminated“
This error can be occurred due to many reasons which need to be fixed one by one.
Don’t worry about it!
The CPU Guide brings you the best working solution to solve the League of Legends Critical Error that has occurred.
Solution 1: Restart the Game to fix LoL Critical Error
Whenever you encounter a League of Legends Critical Error and any game bug, you should restart the game before trying any further solutions.
Restarting the game will eliminate any temporary error which is occurring due to the old cookies and cache or the system’s other software is clashing with your gaming software.
All of these errors will be eradicated after a simple restart of the PC or any other platform you use.
Read More: Valorant Error code VAN9002 Control Flow Guard
Special League of Legends Tracks
Solution 2: Check the Server Status
Sometimes the League of Legends servers are down for maintenance or have any technical issues.
So, it is better to check the server status before applying any further solutions.
To check the server status of the LOL game, follow the steps mentioned down below:
- Go Riot server-status official website
- The homepage will open
- Now select your game

- League Of Legends server status page will open
- Now select your region
- And check if there is a problem or not.
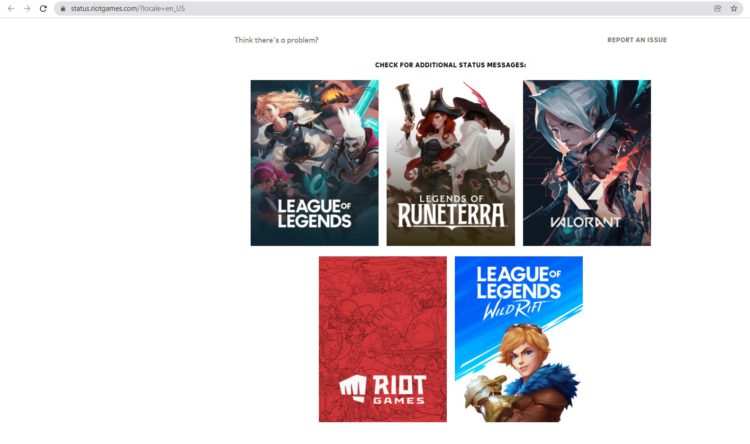

If there is no problem with the server then follow the next solution to solve the League of Legends Critical Error.
Solution 3: Run the Application as Administrator
Running the program as an administrator will definitely help you eradicate the “Critical Error has occurred” as it might lack the privileges required to run the Application.
Here is how you can run the application as an administrator:
- Open the Desktop.
- Then go to the Game Launcher
- Right-click on the Launcher icon

- A menu will open
- Select “Run as administrator “
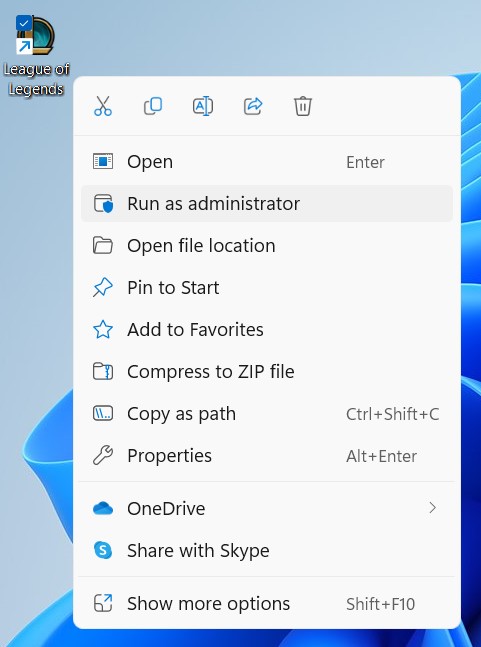
Now the program will start running smoothly without giving you the error “League of Legends Critical Error“
If you are still facing League of Legends Client Not Opening then proceed to the next solution.
Solution 4: Close Unwanted Programs on Windows 11/10
If the above solution didn’t work, then closing unwanted programs will help you to eliminate the League of Legends Critical Error/LOL crashing issue.
If there are too many programs running in the background that is using too much internet/RAM/Disk and causing the “League of Legends Critical Error has occurred.
So, let’s close unwanted programs:
- Press Ctrl + Shift + ESC keys to open Task Manager
- Now check which program is using more Network
- Right-click on that program and select End task

Solution 5: Use Hextech Repair Tool
Many of the users on the forums are telling the people to use Hextech Repair Tool. This tool is generated by the publisher of the game.
This tool is free to download and help user to repair the broken update patch, screen issues, and many more issue that can be solved by this tool.
Here is the link to the HexTech Repair Tool. This tool is available on two platforms Windows and Mac.
After using the HexTech Repair Tool you still face the Error code Critical Error has occurred then proceed to continue the PC troubleshoot solutions.
Solution 6: Check Antivirus Software
Sometimes the third-party antivirus you installed is preventing you from playing.
So you need to disable the antivirus for a few minutes to check if the antivirus is preventing League of Legends to load properly.
In order, to disable the antivirus follow the step below:
- Select the arrow button on the taskbar a Small menu will open.
- Then click left on the Avast antivirus icon.
- The setting menu will open and select ” Avast shield control “
- In a further menu, you will select the “ 10 minutes option“
- Now restart the game.

If the antivirus is not causing the League of Legends Critical Error has occurred then the upcoming solution will definitely help you.
Solution 7: Keep your PC Updated
Sometimes your outdated PC is the main cause of the Outdated WiFi Drivers on Windows 11.
Outdated drivers in your PC or your current Windows version are not able to support the new connectivity parameter of your internet.
As you update your Windows, all the drivers are updated too and this will fix the League of Legends Critical Error has occurred.
So, here is how you can do update your PC:
- Click on the Windows icon

- Click on the Settings icon
- A new window will pop up
- Select Windows Update from the left menu
- The new window will pop up
- Then click on Check for updates
- If there is any update, it will start updating the PC
- After the updating is done check if the “there was an error connecting to the platform League of legends” is fixed or not.
Read More: Valorant Error Code 7 “Couldn’t connect to session service” Easy Guide
Solution 8: Update Graphics Card Driver on Windows 11 through Device manager
Update the graphic card driver, might the outdated graphic driver might be causing the LOL Keeps Crashing error/critical error.
Here is how you can update graphic drivers on Windows 11:
- Click on the Search icon
- Type Device Manager

- Click to open Device Manager
- Then select the display adapter
- A further menu will open and find your video driver
- Click right on the graphic card name
- Click on the updated driver
- Now successfully the graphic driver is updated.
For the dedicated GPU drivers, upgrades follow the next solution.
News: Google Pixel Watch: New features & Sleek Design
Solution 9: Check for Driver’s Updates of GPU/Video Card OF different company
One of the leading and highlighted issues is the GPU drivers are outdated, simultaneously the video card also has outdated drivers.
GPU is unable to align with the modern video editing experience. So, we recommend updating the video card drivers. And providing you direct links to main GPU-making companies
After updating the GPU drivers check whether the LoL Critical Error is fixed or not.
Hope all of the above solutions help you to solve the League of Legends Critical Error that has occurred.
If you have any queries or suggestions, feel free to share your experience with us in the comments section down below or you can reach us on our social handles.
Meet Hammad, a dynamic writer with a passion for gaming and a talent for analysis. With extensive years of experience in the gaming industry, Hammad has a unique perspective on the latest gaming trends and technologies. In addition to writing about gaming, Hammad also guides our team with marketing news and his investment analysis.