
В этой статье разберем, как изменить имя, используемое для идентификации сети в Windows 11. Windows по умолчанию присваивает имя для каждой сети: Ethernet, Wi-Fi, Bluetooth и т.д. Хотя переименование сети не меняет ничего, кроме названия, это может облегчить идентификацию сети. Существует несколько способов по изменению имен для сетевых интерфейсов, давайте рассмотрим их далее.
Самый простой способ — через «Параметры». Но также можете использовать «Панель управления» или даже «редактор реестра».
Способ 1. Используем Параметры для изменения имени сети в Windows 11
В Параметрах Windows есть специальная настройка для переименования сетевых адаптеров.
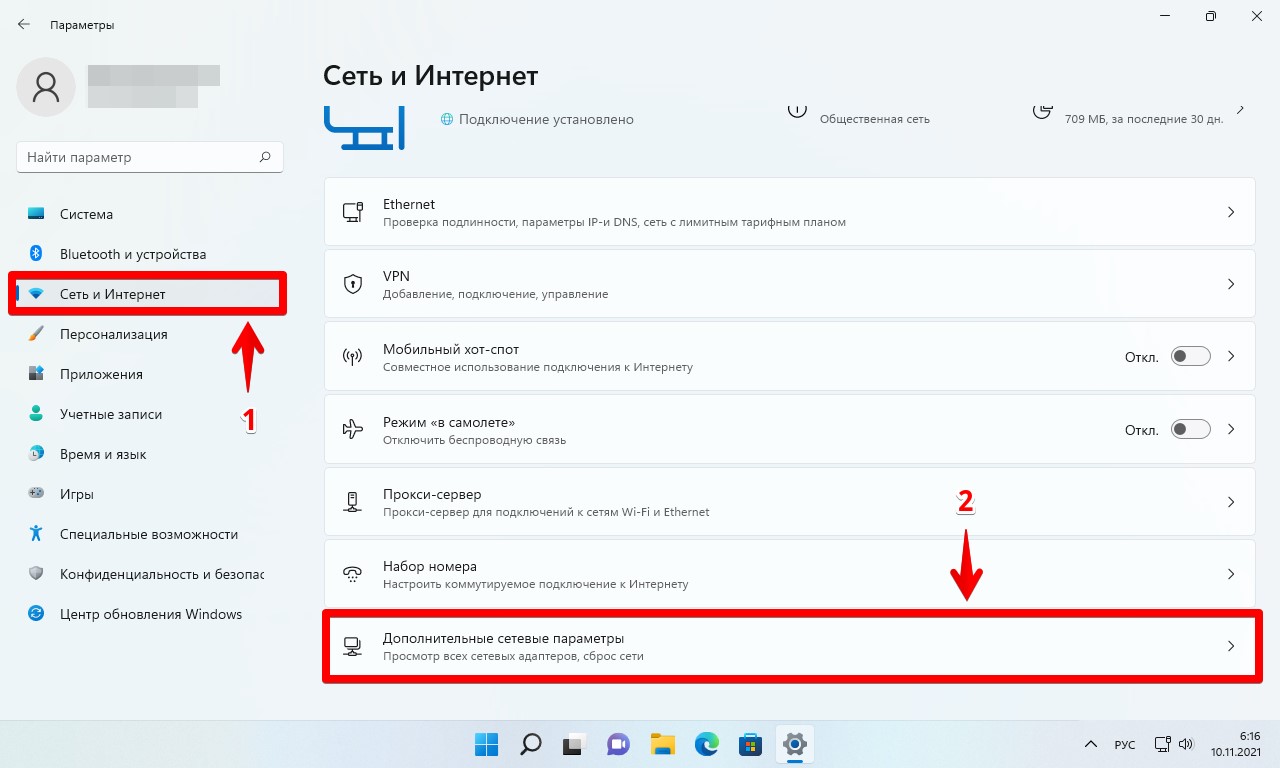
1. Откроем «Параметры», выполнив поиск в строке поиска или используя горячие клавиши «Win+I».
2. В меню слева выберем «Сеть и Интернет», а справа — «Дополнительные сетевые параметры».
3. Затем выбираем сетевой адаптер, который хотим переименовать и нажимаем кнопку «Переименовать».

4. В окне «Переименование оборудования» вводим новое имя и нажимаем кнопку «Сохранить».

Способ 2. Используем панель управления для изменения имени сети в Windows 11
Альтернативный способ изменения имени сети — через «Панель управления». Этот способ часто использовался в предыдущих версиях Windows, но по прежнему актуален и для ОС Windows 11.
1. Открываем «Панель управления». Самый простой способ — найти его через поиск или открыть через диалоговое окно «Выполнить» (команда «Control Panel»).
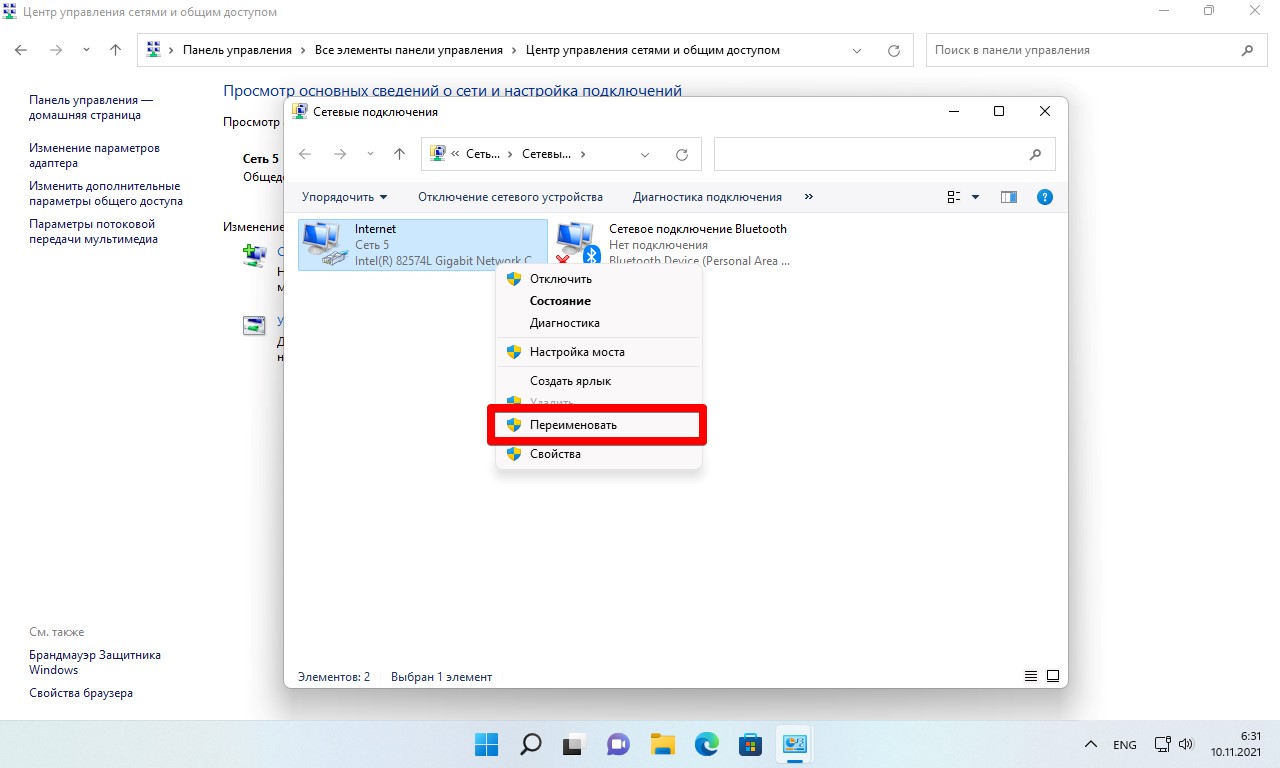
2. Переходим в «Центр управления сетями и общим доступом» и в левом меню находим «Изменение параметров адаптера».
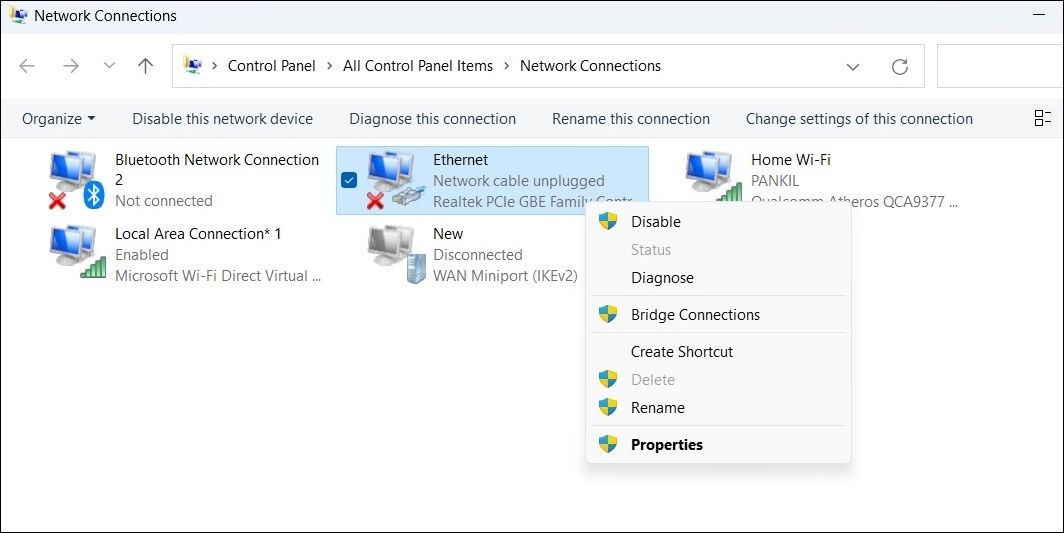
3. В окне «Сетевые подключения» щелкаем по сетевому интерфейсу правой кнопкой мыши и выбираем в меню пункт «Переименовать».
4. После ввода имени, нажимаем клавишу «Enter» для сохранения изменений.
Способ 3. Используем редактор реестра для изменения имени сети в Windows 11
Этот способ определенно более сложный по сравнению с другими, но тем не менее тоже является эффективным.
1. Открываем редактор реестра. Для этого нажимаем горячие клавиши «Win+R» и в окне «Выполнить» вводим «regedit».
2. Переходим в ветку:
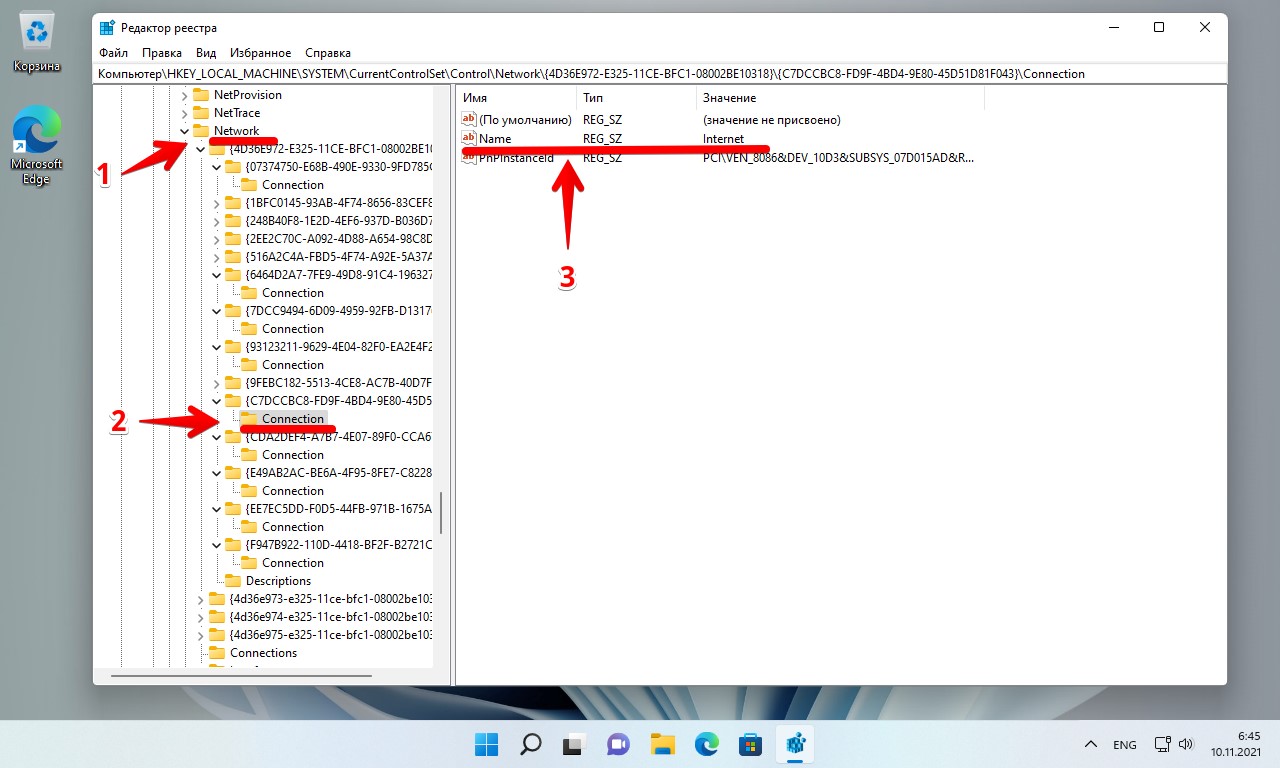
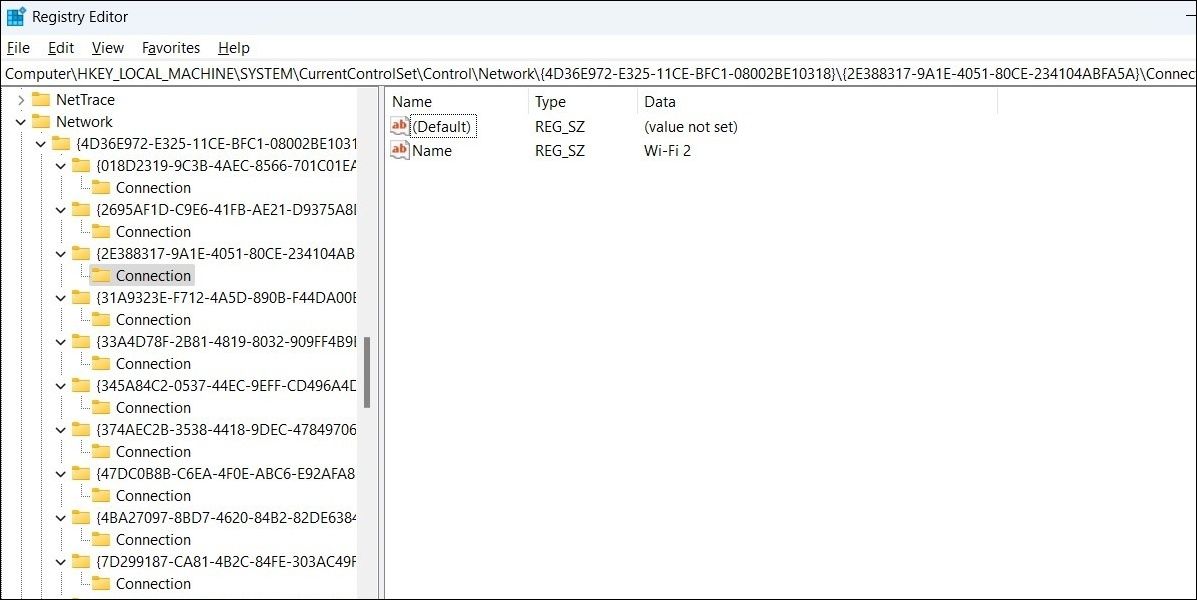
Компьютер\HKEY_LOCAL_MACHINE\SYSTEM\CurrentControlSet\Control\Network
3. В разделе «Network» находятся ключи, в каждом из которых находится раздел «Connection». В каждом из этих разделов находятся параметры. Необходимо найти параметр с именем «Name» и значением соответствующим сетевому интерфейсу, который хотим переименовать.
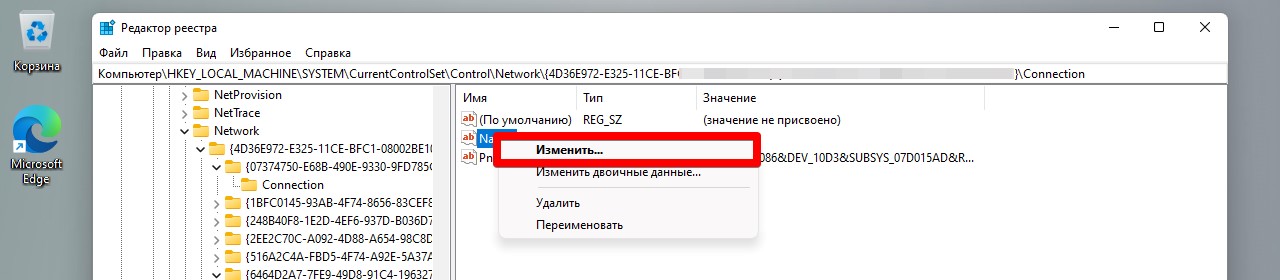
4. Щелкаем по параметру «Name» правой кнопкой мыши и выбираем «Изменить.»
5. Появится окно «Изменение строкового параметра«, вводим новое имя в поле «Значение» и нажимаем «ОК«.

6. Перезагружаем ПК, чтобы изменения, внесенные в реестре вступили в силу.
Nowadays, most devices come with two network adapters: one is Ethernet and the other is a Wi-Fi network adapter. However, these numbers can increase depending upon the type of system (standard or server), or which applications you are running on it (since hypervisors have their own virtual network adapters).
Windows 11 names these network adapters automatically, like Ethernet, vEthernet, Wi-Fi, Wi-Fi 2, etc. Moreover, when these adapters connect to a network, the network is also automatically named, except for Wi-Fis (These are usually named after the SSID of the wireless router/access point). So it can get quite confusing when there are multiple network adapters and multiple networks to connect to. Which is which?
Table of Contents
This article illustrates how you can change and customize your network’s and your network adapter’s names so that you are clear which adapter is connected to which network and avoid confusion.
Before we begin, let us show you how you can check your current network and network adapter’s names.
How to Check Network and Network Adapter Names in Windows 11
Through the Control Panel
The Control Panel is a quick way to check your current network adapters and what their names are. If they are connected to a network, you can also check out the network names.
Launch the Network Connections page in the Control Panel by typing in ncpa.cpl in Run. You should now be able to see all the network adapters on your device in the Control Panel window.

In this window, you can see the names of the network adapters on your device. We have highlighted them in the image below:

Along with the names of the network adapters, you will also see the names of the networks to which they are connected. These have been highlighted in the image below:

In the examples above, we have a total of 7 (physical and virtual) network adapters. Ethernet is connected to a network named “Network,” while Wi-Fi is bridged with vEthernet (External) and is connected to a network named “IGNITION.”
Through the Settings App
You can also check the network and network adapter names through the Settings app in Windows 11. To do so, navigate to the following:
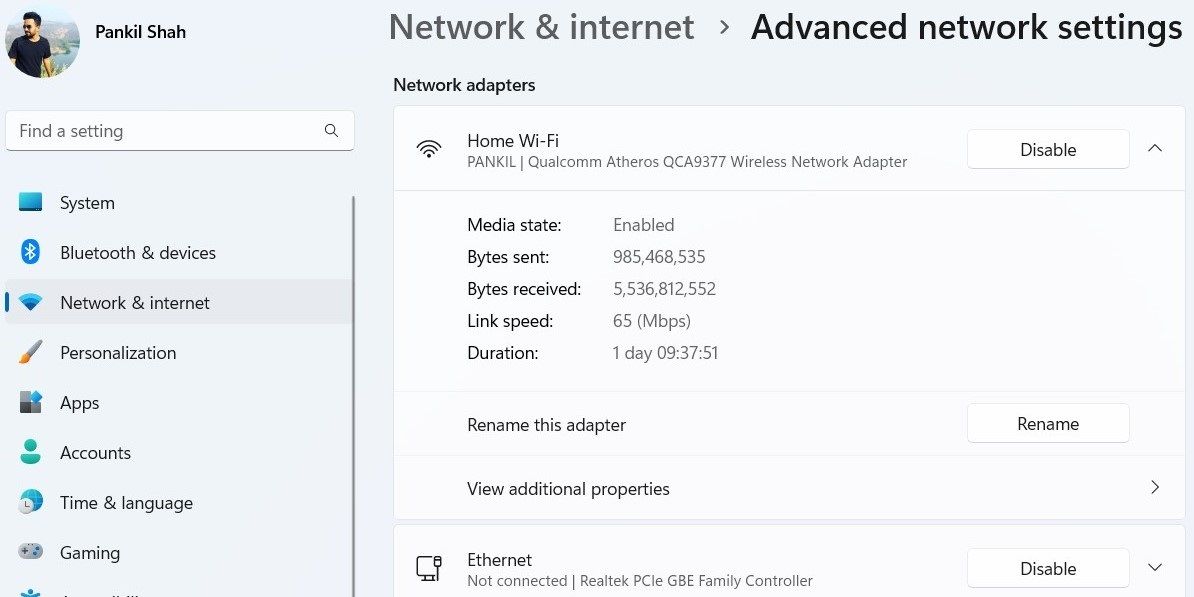
Settings app >> Network & Internet >> Advanced network settings
You can see the names of the network adapters and the networks below the Network Adapters category:

How to Change Network Adapter Names in Windows 11
We shall now discuss how you can change the adapter names on a Windows11 machine. If you are looking to change the network name, refer to the next section of this post.
Using the Settings app
- Navigate to the following:
Settings app >> Network & Internet >> Advanced network settings - Now click on the down arrow in front of the adapter you want to change the name of, and then click Rename.

- In the popup window, enter a new name for the adapter in the text field, and then click Save.


Using the Control Panel
- Launch the Network Connections page in the Control Panel by typing in ncpa.cpl in Run.
- Right-click on the network adapter that you wish to change the name of, and then click Rename.

- Now enter the new name for the network adapter and hit Enter on the keyboard when done.


Using Windows Registry
Wrongful manipulation of the Windows Registry can turn fatal for your operating system. Therefore, we suggest that you create a system restore point before making any of the following changes:
- Open the Registry Editor by typing in regedit in Run.
- Now paste the following into the address bar at the top of the editor for quick navigation:
Computer\HKEY_LOCAL_MACHINE\SYSTEM\CurrentControlSet\Control\Network
- From the left pane, expand the first Key within Network, and then the first Key within that Key, then click the Connection key.
- Now look for the current network adapter name under Data Value (in front of Name) in the right pane.
- Now repeat steps 3 & 4 while expanding the remaining Keys and click on the Connections key till the moment you find the network adapter you need to rename.
- Once found, double-click Name.
- Now enter the new name for the network adapter and then click Ok.
- Now close the Registry Editor and restart the explorer.exe process.


Using Windows PowerShell
Before you begin, note down the current name of the network adapter that you want to change using one of the 2 methods stated in the last section of this post.
- Open Windows PowerShell with administrative privileges.
- Now use the following command to rename the network adapter while replacing CurrentName with the name of the network adapter that you wish to change, and NewName with a new name for the adapter:
Rename-NetAdapter -Name "<em>CurrentName</em>" -NewName "<em>NewName</em>"

So far we have discussed 4 methods to change the names for the network adapters. Let us now move on to see how to change the names for the networks only.
How to Change Network Names in Windows 11
Using Local Security Policy Editor
- Open the Local Security Policy editor by typing in secpol.msc in Run.
- Click on Network List Manager Policies under Security Settings in the left pane.

- Now double-click the network name that you want to change in the right pane.
- In the Netowrk Properties window, under the Network name tab, select the Name radio button and then enter the new name for the network in the text field. Once done, click Apply and Ok.
- Now run the following command in Command Prompt with administrative privileges for the changes to take effect.
gpupdate /force


Using Windows Registry
Wrongful manipulation of the Windows Registry can turn fatal for your operating system. Therefore, we suggest that you create a system restore point before making any of the following changes:
- Open the Registry Editor by typing in regedit in Run.
- Now paste the following into the address bar at the top of the editor for quick navigation:
Computer\HKEY_LOCAL_MACHINE\SOFTWARE\Microsoft\Windows NT\CurrentVersion\NetworkList\Profiles
- Now click on each Key below Profiles and check the ProfileName in the right-hand pane to look for the network name that you want to change.
- Once you have found the network name that you want to change, double-click on ProfileName. Enter the new name for the network under Value Data and then click OK.
- Now restart your computer for the changes to take effect.


FAQs
What is the difference between Network and Network Adapter?
The network defines a set of devices connected wirelessly, or via cables. The network adapter is a wireless or ported connection on a device that is used by the system to connect to the network.
How do I rename my Network Adapter?
Open the Network Connections page by typing in ncpa.cpl in Run. Then right-click on the adapter and click Rename from the context menu.
What is my network adapter name?
Windows automatically sets the name for the network adapters. To check your network adapter name, open the Connections Manager by typing in ncpa.cpl in Run and you will see all the network interfaces (virtual and physical) with their names.
By default, Windows assigns generic names to all your network adapters. However, if you find those names confusing, you can always change them later.
Giving your network adapters descriptive names makes it easier to identify them. Here we show you six different ways to rename a network adapter on Windows 11.
1. How to Rename the Network Adapter via the Settings App
The easiest way to rename a network adapter on Windows 11 is through the Settings app. This is something that isn’t possible in previous versions of Windows.
Here are the steps you need to follow.
- Open the Start menu and click the gear-shaped icon to launch the Settings app.
- Switch to the Network & internet tab using the left sidebar.
- Click on Advanced network settings.
- Expand the Wi-Fi or Ethernet adapter you wish to rename.
-
Click the Rename button.

- Type in a new name for the network adapter. You can use a combination of letters, hyphen spaces, and numbers to name your network adapter.
- Click on Save.
Once you complete the above steps, the updated network adapter name should reflect right away.
2. How to Rename the Network Adapter With the Control Panel
Control Panel provides another way to rename the network adapter on Windows. This method looks similar to Windows 10 network adapter settings, and many of you might already be familiar with it.
To rename a network adapter using Control Panel:
- Press Win + S to open the search menu.
- Type control panel and select the first result that appears.
- Navigate to Network and Sharing Center > Change adapter settings.
- In the Network Connections window, right-click on your network adapter and select Rename from the context menu.
-
Specify a new name for the network adapter and press Enter to save it.

3. How to Rename the Network Adapter Using the Command Prompt
If you’re someone who likes using the command-line interface, you can also rename the network adapter on Windows by running a few commands. Fortunately, this isn’t as intimidating as it might sound.
Follow these steps to rename a network adapter using Command Prompt:
- Right-click on the Start icon or press Win + X to open the Power User menu.
- Select Terminal (Admin) from the list.
- Select Yes when the User Account Control (UAC) prompt shows up.
-
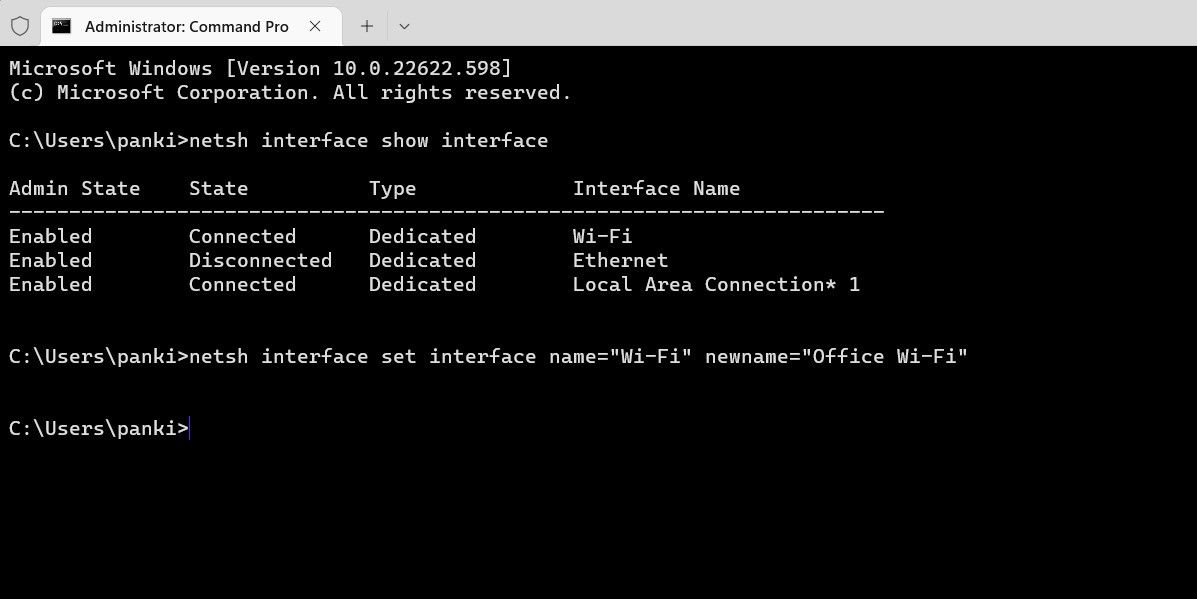
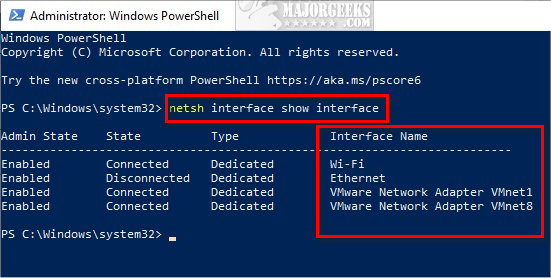
In the console, run the following command to view a list of network adapters on your PC.
netsh interface show interface - Note down the name of the network adapter you want to rename from the Interface Name column.
-
Execute the following command to rename your network adapter:
netsh interface set interface name="OldName" newname="NewName"
Replace OldName in the above command with the current name of the network adapter noted in the last step. Similarly, replace NewName in the above command with the name that you want to use.
For example, if you were to rename the network adapter from Wi-Fi to Office Wi-Fi, here’s what your command should be:
netsh interface set interface name="Wi-Fi" newname="Office Wi-Fi"
Once you run the above command, your network adapter will be renamed. If you’d like to get more out of this tool, be sure to check out the Windows Command Prompt commands you must know.
4. How to Rename the Network Adapter Using Windows PowerShell
Windows PowerShell is a command line shell that allows you to automate various tasks on your computer. Similar to Command Prompt, you can use Windows PowerShell to rename a network adapter on your PC. Here’s how:
- Click the search icon on the taskbar to open the search menu.
- Type in Windows PowerShell and select Run as administrator.
- Select Yes when the User Account Control (UAC) prompt appears.
-
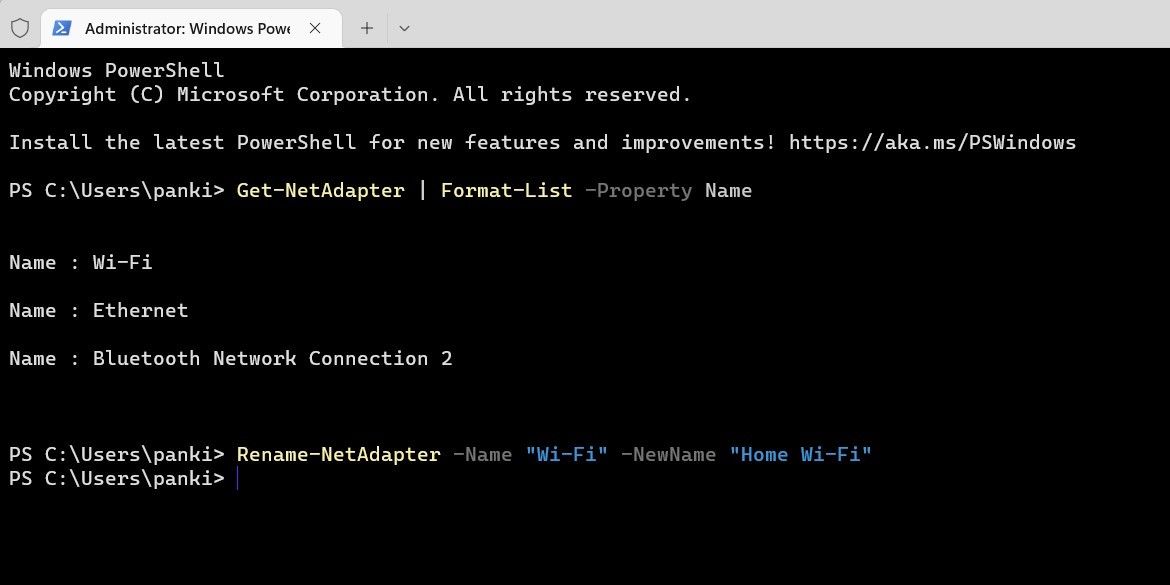
Run the following command to view all the network adapters on your PC:
Get-NetAdapter | Format-List -Property Name - Note down the name of the network adapter you want to rename.
-
Run the following command to rename your network adapter:
Rename-NetAdapter -Name "OldName" -NewName "NewName"
Replace OldName in the above command with the current name of your network adapter. Likewise, replace NewName in the above command with the name that you want to use.
So, for instance, if you wanted to rename your network adapter from Wi-Fi to Home Wi-Fi, you would enter this command:
Rename-NetAdapter -Name "Wi-Fi" -NewName "Home Wi-Fi"
5. How to Rename the Network Adapter With the Registry Editor
Lastly, you can also rename network adapters using the Registry Editor. However, it’s not as straightforward as the other methods listed above.
As you may be aware, the Registry Editor holds essential files for Windows and its services. Carelessly editing registry files can cause irreversible damage to your system. Hence, you should only use this method if you are familiar with editing registry files.
Before you use this method, you should consider creating a restore point just in case. If you need help, refer to our guide on how to create a restore point in Windows 11 and follow the steps outlined there.
Once you’ve done that, follow the steps below to rename the network adapter.
- Press Win + R to open the Run dialog. Type regedit in the text box and press Enter.
- Select Yes when the User Account Control (UAC) prompt appears.
- Use the left pane to navigate to HKEY_LOCAL_MACHINE > SYSTEM > CurrentControlSet > Control > Network.
- Expand the first key within the Network key. Windows lists all network connections with a unique ID.
-
Expand all those keys one by one and then select the Connection key within it. Look for the Name variable on the right side. The value under the Data column identifies the current network name.

- Once you have located the key for the network adapter you want to rename, double-click the Name entry.
-
In the Value data field, enter a name for your network adapter and hit OK.


Exit the Registry Editor window and the name change should reflect right away. If it doesn’t, then you may need to reboot your PC.
Renaming Network Adapters on Windows
A network adapter is an essential hardware component that allows your computer to communicate with different devices. If your system has several network adapters, you may want to give each one a descriptive name to keep things organized. Thankfully, Windows 11 offers ample ways to rename network adapters.
Another way to keep track of your active adapters is to remove old network adapters that you on longer need.
By Timothy Tibbetts |
Windows assigns simple names to each network connection. For example, you might have connections named Wi-Fi or Ethernet. If you prefer something more personal, you can change the name of your network connections in Windows 7, 8, and 10.
Rename a Network Adapter in Settings or Control Panel
Windows 10: Click Start > Settings > Network & internet. Click on Change adapter options.
Windows 7 and 8: Click Start > Control Panel > Network and Sharing Center. Click on Change adapter settings.
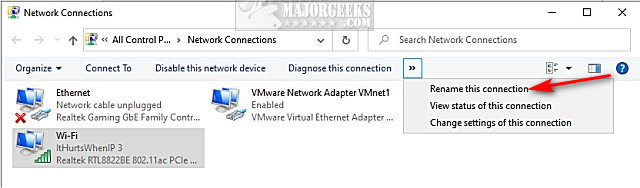
Click on the Network connection you want to rename.
Click on Rename this connection above.
If you don’t see that option, expand the list by clicking the arrow, or make the window larger.
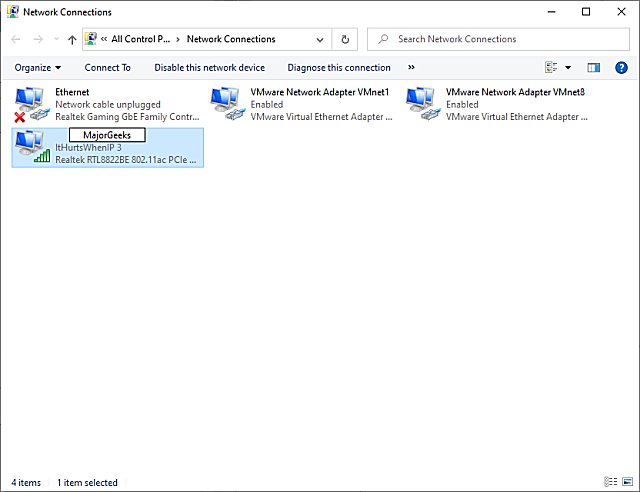
Type in the new name and press Enter.
Rename a Network Adapter in Registry Editor
If you are having problems with Settings or Control Panel, you can make the changes in the Registry.
Open Regedit and go to HKEY_LOCAL_MACHINESYSTEMCurrentControlSetControlNetwork
Press CTRL + F and type in the name of the adapter (for example, Wi-Fi) and press Enter.
Double-click on the Name that was found on the right.
Change the Value data to the network name you want.
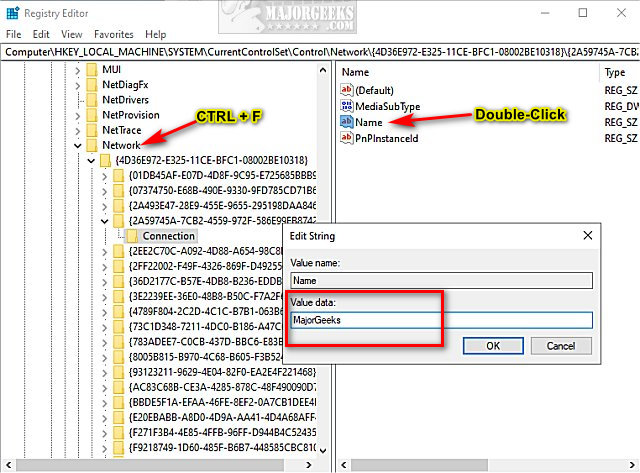
Press OK.
Rename a Network Adapter in Command Prompt or PowerShell
Type netsh interface show interface into Powershell or Command Prompt to identify the network you want to rename.
Type in the following lines replacing «Current Name» and «New Name» including the quotes.
Command Prompt: netsh interface set interface name=»Current Name» newname=»New Name»
PowerShell: Rename-NetAdapter -Name «Current Name» -NewName «New Name»
Similar:
How to Improve Your Wireless Network Performance
How to See Your Network Adapter Speed in Windows 10
How to Show Your Internet Upload, Download, and Usage on the Taskbar
How to Use the Ping Command in Windows
What is Windows Auto-Tuning?
comments powered by Disqus

Windows 10 automatically assigns a default name for network adapters based on their type (Wi-Fi or Ethernet), but you can always change their names manually to something more specific.
Usually, you don’t need to worry about renaming adapters, but if you have multiple network cards, you may want to change their names to make them easier to identify and manage.
This guide will teach you how to rename the Windows 10 network adapter from Control Panel and PowerShell.
- Change network adapter name on Windows 10
- Change network adapter name from PowerShell
To rename a network adapter from Control Panel on Windows 10, use these steps:
-
Open Start on Windows 10.
-
Search for Control Panel and click the top result to open the app.
-
Click on Network and Internet.
-
Click on Network and Sharing Center.
-
Click on Change adapter settings from the left navigation pane.

-
Right-click the Wi-Fi or Ethernet adapter and select the Rename option.

-
Specify a new name – for example, Ethernet 10Gb or Wi-Fi6E Card.


Once you complete the steps, the network adapter will apply the new name on Windows 10.
Change network adapter name from PowerShell
To change the network adapter name from PowerShell on Windows 10, use these steps:
-
Open Start.
-
Search for PowerShell, right-click the top result, and select the Run as administrator option.
-
Type the following command to view all the network adapters on your computer and press Enter:
Get-NetAdapter | Format-List -Property Name
-
Type the following command to rename the Wi-Fi or Ethernet adapter and press Enter:
Rename-NetAdapter -Name "OLD-NAME" -NewName "NAME-NAME"
In the command, change OLD-NAME for the current adapter’s name and NEW-NAME for the new name you want to assign. This example changes the name from Ethernet0 to Ethernet 10Gb:
Rename-NetAdapter -Name "Ethernet0" -NewName "Ethernet 10Gb"


After you complete the steps, the PowerShell command will change the name of the wired or wireless network adapter you specified.
Mauro Huculak is a
Windows How-To Expert and founder of
Pureinfotech
(est. 2010). With over 21 years as a technology writer and IT Specialist,
Mauro specializes in Windows, software, and cross-platform systems such as Linux, Android, and macOS.
Certifications:
Microsoft Certified Solutions Associate (MCSA),
Cisco Certified Network Professional (CCNP),
VMware Certified Professional (VCP),
and
CompTIA A+ and Network+.
Mauro is a recognized Microsoft MVP and has also been a long-time contributor to Windows Central.
You can follow him on
YouTube,
Threads,
BlueSky,
X (Twitter),
LinkedIn and
About.me.
Email him at [email protected].