

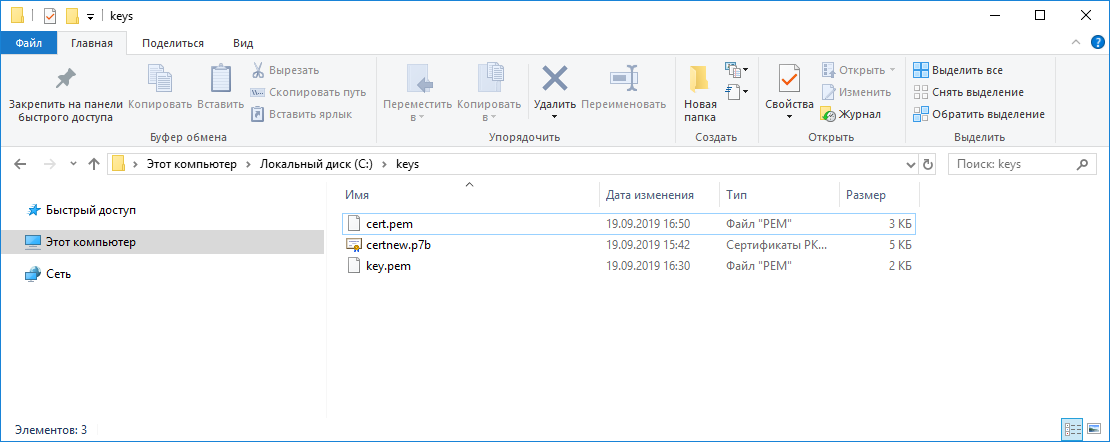
Будем собирать PFX файл в Windows 10 с помощью подсистемы Linux. У нас есть:
- Сертификат, cert.pem.
- Ключ, key.pem.
- Цепочка, certnew.p7b.
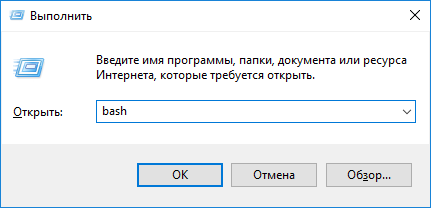
Включаем bash в Windows:
Windows 10 — включаем bash
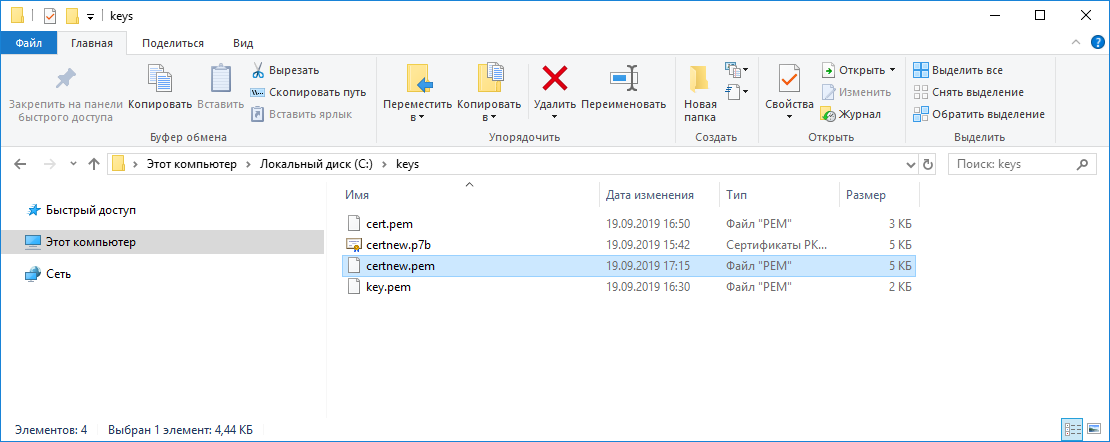
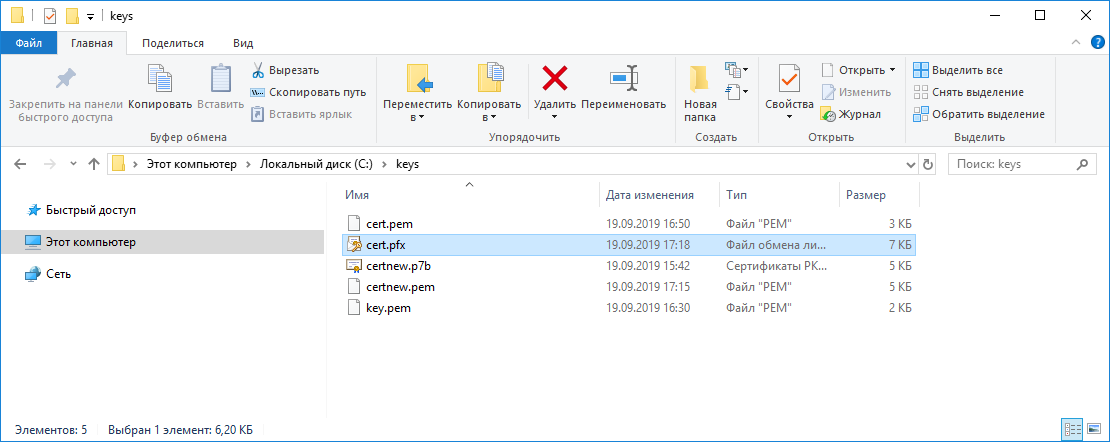
На диске C создаём папку C:\keys, переносим туда все нужные файлы:
Если цепочка внутри файла сертификата, то пропускаем все операции с цепочкой.
Цепочка у нас в формате p7b, это стандартный формат, когда мы скачиваем цепочку с центра сертификации Windows. Переведём цепочку в PEM формат.
Запускаем bash. Для запуска bash нужно выполнить команду «bash» или «bash.exe».
Проверим что пакет openssl установлен:
sudo dpkg -l | grep openssl
Если не установлен, то пакет ставится через apt-get:
sudo apt-get install opensslУ меня openssl уже стоит, Переходим в папку /mnt/c/keys/
cd /mnt/c/keys/Выполняем запрос:
openssl pkcs7 -print_certs -in certnew.p7b -out certnew.pem
Получаем файл certnew.pem.
Выполняем запрос:
openssl pkcs12 -inkey key.pem -in cert.pem -certfile certnew.pem -export -out cert.pfxЕсли цепочка уже внутри файла сертификата, то:
openssl pkcs12 -inkey key.pem -in cert.pem -export -out cert.pfxУ нас спросят пароль, зададим пароль:
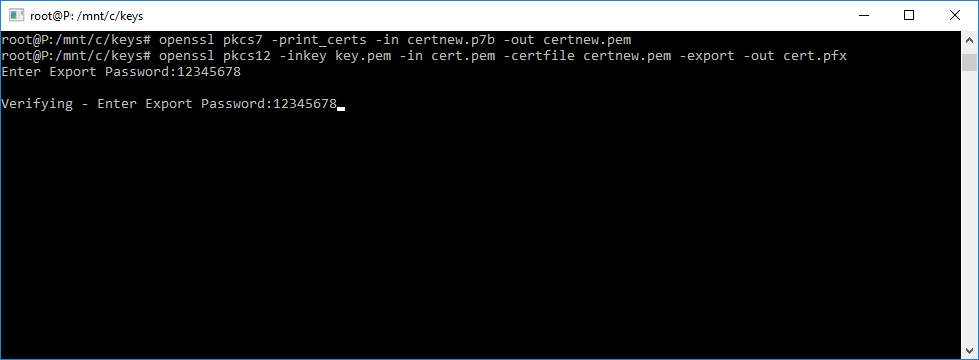
Получаем файл cert.pfx.
Обратная задача
Windows — конвертация PFX (PKCS#12) сертификата в CRT (PEM) и KEY с помощью подсистемы Linux
Table of Contents
- Installing OpenSSL
- OpenSSL on Linux
- OpenSSL on Windows
- From PEM (pem, cer, crt) to PKCS#12 (p12, pfx)
- From PKCS#12 to PEM
- From DER (.der, cer) to PEM
- From PEM to DER
- From PEM to PKCS#7 (.p7b, .p7c)
- From PKCS#7 to PEM
- From PKCS#7 to PFX
- Online SSL Converters
- Conclusions
In this post, part of our «how to manage SSL certificates on Windows and Linux systems» series, we’ll show how to convert an SSL certificate into the most common formats defined on X.509 standards: the PEM format and the PKCS#12 format, also known as PFX. The conversion process will be accomplished through the use of OpenSSL, a free tool available for Linux and Windows platforms.
Before entering the console commands of OpenSSL we recommend taking a look to our overview of X.509 standard and most popular SSL Certificates file formats — CER, CRT, PEM, DER, P7B, PFX, P12 and so on.
Installing OpenSSL
The first thing to do is to make sure your system has OpenSSL installed: this is a tool that provides an open source implementation of SSL and TLS protocols and that can be used to convert the certificate files into the most popular X.509 v3 based formats.
OpenSSL on Linux
If you’re using Linux, you can install OpenSSL with the following YUM console command:
If your distribution is based on APT instead of YUM, you can use the following command instead:
|
> apt—get install openssl |
OpenSSL on Windows
If you’re using Windows, you can install one of the many OpenSSL open-source implementations: the one we can recommend is Win32 OpenSSL by Shining Light Production, available as a light or full version, both compiled in x86 (32-bit) and x64 (64-bit) modes . You can install any of these versions, as long as your system support them.
OpenSSL is basically a console application, meaning that we’ll use it from the command-line: after the installation process completes, it’s important to check that the installation folder (C:\Program Files\OpenSSL-Win64\bin for the 64-bit version) has been added to the system PATH (Control Panel > System> Advanced > Environment Variables): if it’s not the case, we strongly recommend to manually add it, so that you can avoid typing the complete path of the executable everytime you’ll need to launch the tool.
Once OpenSSL will be installed, we’ll be able to use it to convert our SSL Certificates in various formats.
From PEM (pem, cer, crt) to PKCS#12 (p12, pfx)
This is the console command that we can use to convert a PEM certificate file (.pem, .cer or .crt extensions), together with its private key (.key extension), in a single PKCS#12 file (.p12 and .pfx extensions):
|
> openssl pkcs12 —export —in certificate.crt —inkey privatekey.key —out certificate.pfx |
If you also have an intermediate certificates file (for example, CAcert.crt) , you can add it to the «bundle» using the -certfile command parameter in the following way:
|
> openssl pkcs12 —export —in certificate.crt —inkey privatekey.key —out certificate.pfx —certfile CAcert.cr |
From PKCS#12 to PEM
If you need to «extract» a PEM certificate (.pem, .cer or .crt) and/or its private key (.key)from a single PKCS#12 file (.p12 or .pfx), you need to issue two commands.
The first one is to extract the certificate:
|
> openssl pkcs12 —in certificate.pfx —nokey —out certificate.crt |
And a second one would be to retrieve the private key:
|
> openssl pkcs12 —in certificate.pfx —out privatekey.key |
IMPORTANT: the private key obtained with the above command will be in encrypted format: to convert it in RSA format, you’ll need to input a third command:
|
> openssl rsa —in privatekey.key —out privatekey_rsa.key |
Needless to say, since PKCS#12 is a password-protected format, in order to execute all the above commands you’ll be prompted for the password that has been used when creating the .pfx file.
From DER (.der, cer) to PEM
|
> openssl x509 —inform der —in certificate.cer —out certificate.pem |
From PEM to DER
|
> openssl x509 —outform der —in certificate.pem —out certificate.der |
From PEM to PKCS#7 (.p7b, .p7c)
|
> openssl crl2pkcs7 —nocrl —certfile certificate.pem —out certificate.p7b —certfile CAcert.cer |
From PKCS#7 to PEM
|
> openssl pkcs7 —print_certs —in certificate.p7b —out certificate.pem |
From PKCS#7 to PFX
|
> openssl pkcs7 —print_certs —in certificatename.p7b —out certificatename.cer > openssl pkcs12 —export —in certificatename.cer —inkey privateKey.key —out certificatename.pfx —certfile cacert.cer |
Online SSL Converters
If you can’t (or don’t want to) install OpenSSL, you can convert your SSL Certificates using one of these web-based online tools:
- SSL Certificates Converter Tool by SSLShopper.com
- SSL Converter by NameCheap
Both of them work really well and can convert most, if not all, the format detailed above: at the same time, you need to seriously think about the security implications that come with uploading your SSL Certificates (and possibly their private keys) to a third-party service. As trustable and secure those two site have been as of today, we still don’t recommend such move.
Conclusions
That’s it, at least for the time being: we hope that these commands will be helpful to those developers and system administrators who need to convert SSL certificates in the various formats required by their applications.
See you next time!
SSL-сертификаты все плотнее входят в нашу жизнь и трудно представить современного администратора, никогда не имевшего с ними дело. Но, как показывает практика, работа с сертификатами все еще вызывает затруднение у многих наших коллег и виной тому недостаточный объем теоретических знаний. Наиболее частые сложности возникают с форматами сертификатов, поэтому мы сегодня решили внести ясность в этот вопрос и разобрать какие форматы сертификатов бывают и как можно выполнять преобразования между ними.
Онлайн-курс по устройству компьютерных сетей
На углубленном курсе «Архитектура современных компьютерных сетей» вы с нуля научитесь работать с Wireshark и «под микроскопом» изучите работу сетевых протоколов. На протяжении курса надо будет выполнить более пятидесяти лабораторных работ в Wireshark.
Форматы сертификатов
Начнем с того, что термин сертификат не является полностью корректным. Если мы говорим об инфраструктуре открытых ключей (PKI), то в ее основе лежит понятие ключевой пары — открытого и закрытого ключа. Сертификат — это средство распространения открытого ключа, которое содержит сам открытый ключ и ряд дополнительной информации. Сертификат является публичным и общедоступным. Закрытый ключ, наоборот, секретным и должен храниться в безопасном месте.
Но, как говорится, из песни слов не выкинешь и понятие сертификат широко используется и специалистами, и простыми пользователями в самом широком смысле: подразумевая и сам сертификат, и ключ сертификата, и полностью ключевую пару. Поэтому, каждый раз, когда вам встречается это слово, то нужно, прежде всего определиться в каком контексте оно употребляется и что именно значит.
Также при работе с сертификатами вам обязательно встретится аббревиатура X.509, это стандарт для сертификатов и ключей PKI, определяющий их формат, структуру и способы работы с ними. Поэтому, когда речь идет о X.509, то мы понимаем, что это сертификаты PKI.
Но перейдем к форматам. Серьезную путаницу вносит то, что расширения сертификатов и ключей не всегда четко указывают на формат, точнее даже наоборот и точно убедиться с чем именно вы имеете дело можно только ознакомившись с содержимым. Мы не будем рассматривать все возможные варианты форматов, ограничимся только самыми ходовыми.
Формат DER
Это бинарный формат для сертификатов и ключей, фактически он является исходным, так как изначально ключи — это некоторые бинарные сущности. Чаще всего используется на платформе Java и в Windows, там это формат по умолчанию. Могут использовать расширения .der и .cer, но ничего не мешает дать такому файлу другое широко используемое расширение.
Поэтому для выяснения формата файла следует просмотреть его содержимое или воспользоваться командой file в Linux:
file mycert.cer Если сертификат бинарный, то в ответ вы получите:
mycert.cer: dataВсе тоже самое справедливо и для закрытого ключа, который чаще всего имеет расширение .key.
Формат PEM
Данный формат наиболее популярен и распространен, особенно в открытом ПО. Представляет кодированный при помощи Base64 формат DER и по сути является обычным текстовым файлом. Характерными особенностями являются обязательные строки, между которыми находится содержимое сертификата или ключа:
-----BEGIN CERTIFICATE-----
Содержимое сертификата Base64 ASCII
-----END CERTIFICATE-----
А команда file определяет такой файл как:
mycert.crt: ASCII text, with CRLF line terminatorsКонтейнер в формате PEM может содержать один или несколько сертификатов, закрытый ключ или сертификат(ы) и закрытый ключ одновременно. В этом случае каждый из них обрамляется обязательными строками BEGIN и END. Кроме расширения .pem могут также использоваться .cer, .crt и .key для ключа. Поэтому определять формат следует по типу содержимого.
Формат PKCS #7
Специальный контейнер, предназначенный для хранения сертификатов и/или списков отзыва (CRL), может иметь расширения .p7b или .p7c. Важной особенностью является то, что данный формат не предназначен для хранения закрытого ключа и используется только для сертификатов. Чаще всего используется в Windows системах.
Может иметь как DER, так и PEM формат, в последнем случае файл имеет обязательные строки:
-----BEGIN PKCS7-----
Содержимое Base64 ASCII
-----END PKCS7-----
Данный контейнер в основном определяется по расширению, а его внутренний формат по содержимому.
Формат PKCS #12
Данный формат предназначен для хранения закрытого ключа и сертификата, кроме них может содержать полную цепочку доверия и список отзыва. Часто используется для распространения и хранения ключевой пары. Наибольшее распространение имеет в Windows системах и является дальнейшим развитием контейнера PFX от Microsoft, в настоящий момент эти аббревиатуры употребляются как синонимы.
Имеет бинарный формат и защищен паролем (можно оставить пустой пароль), определяется по расширениям .pfx, .p12, .pkcs12.
Преобразование форматов
Для всех дальнейших действий мы будем использовать OpenSSL на платформе Linux, для работы в среде Windows вам потребуется несколько изменить синтаксис в части определения путей. Все команды выполняются от имени того пользователя, который является владельцем сертификата. Также помним, что форматом по умолчанию для OpenSSL является PEM.
PEM в DER
Для преобразования сертификата из PEM в DER выполните:
openssl x509 -in cert.pem -out cert.der -outform DERДля закрытого ключа:
openssl rsa -in privkey.pem -out privkey.der -outform DERДля получения нужного результата мы явно указываем выходной формат — DER.
DER в PEM
Синтаксис команд схож, для сертификата:
openssl x509 -inform DER -in cert.der -out cert.pemДля закрытого ключа:
openssl rsa -inform DER -in privkey.der -out privkey.pemОбратите внимание, что в данной команде мы, наоборот, явно указываем входной формат.
PEM в PKCS #7
Для примера объединим два сертификата: собственно наш сертификат и сертификат удостоверяющего центра.
openssl crl2pkcs7 -nocrl -certfile cert.pem -certfile cacert.pem -out cert.p7cКлюч -nocrl указывает, что мы не включаем в контейнер список отзыва. Каждый включаемый в контейнер сертификат задается отдельной опцией -certfile.
Для создания контейнера с CRL используем команду:
openssl crl2pkcs7 -in crl.pem -certfile cert.pem -certfile cacert.pem -out cert.p7cТак как мы не указывали ни входной, ни выходной форматы, то на входе используем сертификаты формата PEM и получаем контейнер с тем же форматом. Для получения файла в формате DER укажите:
openssl crl2pkcs7 -nocrl -certfile cert.pem -certfile cacert.pem -out cert.p7c -outform DERПреобразовать сертификаты в формате DER сразу в PKCS #7 нельзя, их следует сначала преобразовать в формат PEM.
PEM в PKCS #12
Создадим контейнер, в который поместим собственно ключевую пару и дополнительный сертификат CA:
openssl pkcs12 -export -in cert.pem -inkey privkey.pem -certfile cacert.pem -out cert.p12В ключе -in указываем сертификат, связанный с закрытым ключом, в -inkey — закрытый ключ, затем добавляем нужное количество опций -certfile для включения дополнительных сертификатов, которые будут формировать цепочку доверия.
PKCS #7 в PEM
Мы можем вывести все сертификаты файла PKCS #7 в PEM командой:
openssl pkcs7 -print_certs -in cert3.p7b -out certs.pemЕсли исходный файл в формате DER, то добавьте:
openssl pkcs7 -print_certs -inform DER -in cert3.p7b -out certs.pemНапоминаем, что определять формат PKCS #7 следует по содержимому.
PKCS #12 в PEM
Данный контейнер может содержать как ключевую пару, так и дополнительные сертификаты, чтобы вывести их все в формат PEM используйте команду:
openssl pkcs12 -in cert.p12 -out certs.pem -nodesПоследний ключ -nodes указывает на то, что не нужно шифровать закрытый ключ.
Но что, если нам нужно получить только отдельные части контейнера? Ничего сложного.
Для вывода только сертификата и закрытого ключа используйте:
openssl pkcs12 -in cert.p12 -clcerts -out certs.pem -nodesТолько сертификата:
openssl pkcs12 -in cert.p12 -clcerts -out cert.pem -nodes -nokeysТак как мы не извлекаем ключ, то опция -nodes как бы не нужна, но она подавляет появление запроса на пароль для экспортируемого файла.
Для вывода только сертификата(ов) CA:
openssl pkcs12 -in cert.p12 -cacerts -out cacert.pem -nodes -nokeysТолько закрытого ключа:
openssl pkcs12 -in cert.p12 -out privkey.pem -nodes -nocertsКак видим, при помощи OpenSSL не составляет никакого труда разобрать контейнер PKCS #12 на составляющие.
Установить / снять пароль с закрытого ключа
Еще одна часто встречающаяся задача: снять пароль с закрытого ключа, для этого используйте команду:
openssl rsa -in privkey.key -out privkey-nopass.keyОбратная операция выполняется командой:
openssl rsa -des3 -in privkey.key -out privkey-pass.keyГде -des3 указывает на алгоритм шифрования, допустимы значения: -aes128, -aes192, -aes256, -aria128, -aria192, -aria256, -camellia128, -camellia192, -camellia256, -des, -des3, -idea. Перед их использованием следует уточнить, какие именно из них поддерживает тот софт, с которым вы собираетесь использовать ключ.
Онлайн-курс по устройству компьютерных сетей
На углубленном курсе «Архитектура современных компьютерных сетей» вы с нуля научитесь работать с Wireshark и «под микроскопом» изучите работу сетевых протоколов. На протяжении курса надо будет выполнить более пятидесяти лабораторных работ в Wireshark.
Microsoft systems and the products of some Microsoft-dominated vendors (like HP and Brother) will not accept
separate SSL keys and certficates. Instead, these need to be bundled together in PKCS12 format.
Converting PEM certificates to PKCS12 format is easily done with the openssl utility:
openssl pkcs12 -export -out _.example.com.pfx -inkey _.example.com.key -in _.example.com.crt
The name of the output file is specified after «-out». The original certificate key in PEM format is after «-inkey»,
while the original PEM cert is after «-in».
The utility will prompt for a password to secure the file, enter in something memorable to complete the operation
(and make note of it in your Password Safe[1]. This password will be required when importing
the .pfx file into vendor systems (e.g. HP printers).
The underscore dot domain notation is not mandatory, it’s just how I now personally name wildcard certificates.
[1] You are using something like Password Safe to keep track of all your strong passwords, aren’t you?
References:
Ivan Ristić, OpenSSL Cookbook.
Before covering how to convert to pem from different certificate formats let us define what each of the certificate file extensions means.
.pem – Privacy Enhanced Mail Certificate. A PEM file is Base64 encoded and may be an X.509 certificate file, a private key file, or any other key material. PEM encoded files are commonly used in Apache and Tomcat servers.
.crt – Shorthand way to say “cert”, the .crt file extension is a security extension that may be either Base64 encoded or binary. Most commonly, .crt is a Base64 encoded certificate.
.cer – Shorthand way to almost say “cert”, the .cer file extension is an Internet Security Certificate that may be either Base64 encoded or binary. Most commonly, .cer is a binary certificate.
.der – The .der file extension is for a certificate file in binary format.
.pfx – The .pfx file extension is a PKCS12 certificate bundle which may contain an end entity certificate, a certificate chain, and matching private key. .pfx can be interchanged with .p12 and may be protected by a password.
.p12 – Personal Information Exchange File that is encrypted with a password and is interchangeable with the .pfx file extension.
.ppk – PuTTY Private Key File. This is a private key file created by the putty key generator used for ssh.
.jks – Java Keystore File. A file encrypted with a password used in a Java program. Similar to the .p12 file, but .jks is considered proprietary.
Most of the conversions are done with OpenSSL.
PEM conversion examples
convert pem to crt
To convert a pem encoded certificate to a .crt extension, simply rename the file. This assumes you want .crt to be Base64 encoded. To convert pem file to crt in linux, run:
mv cert.pem cert.crtAlternatively if the pem file contains a private key or certificate chain you can use OpenSSL to do the conversion.
openssl x509 -outform der -in cert.pem -out cert.crt- -outform der – This is optional. If you wish the cert.crt to remain in pem format but with the .crt extension then do not include this option.
- -in cert.pem – The pem file to be converted
- -out cert.crt – The pem to crt converted file
convert crt to pem
To convert a crt file to pem file, do the same as in the previous example, simply rename it and change the file extension. To convert crt to pem windows, just rename the file in Windows as you would any file.
If the crt is in der format then you need to use OpenSSL.
openssl x509 -in cert.crt -out cert.pem -outform PEM- -outform PEM – Specify the converted format to be pem
convert pem to cer
To convert a pem encoded certificate to a .cer extension, simply rename the file. This assumes you want .cer to remain Base64 encoded. If you want the .cert to be .der encoded follow the pem to der instructions below. To perform this conversion in Linux, run:
mv cert.pem cert.cerAnother commonly used search term is convert pem to cert. A pem encoded certificate is already a “cert”, and the .cert file extension isn’t a “real” extension, so it is better to used an already defined file extension such as .cer, .pem, or .crt. This example demonstrated how to convert pem to cer.
You can verify the converted file using openssl x509.
openssl x509 -in cert.cer -inform DER -text -nooutconvert pem to pfx
This example will demonstrate how to convert pem to pfx. Also searched for as convert pem pfx, to convert a pem encoded certificate or file to pfx you must have the certificate and the matching private key. Optionally you may include the certificate chain. A more detailed example can be found in our article on PKCS12. Note that this example will work on any pem encoded files regardless of the extension.
openssl pkcs12 -export -out keystore.pfx -inkey key.pem -in certificate.pem -certfile chain.pemTo convert pem to pfx without private key, run the following command making sure to include the -nokeys flag.
openssl pkcs12 -export -out test.pfx -nokeys -in test.pemIf your pem file already contains the private key run this version of the command. You should be prompted for a password to set on the new keystore.
openssl pkcs12 -export -out keystore.pfx -in cert.pemThen verify the keystore.
openssl pkcs12 -info -in keystore.pfxconvert pfx to pem
To convert pfx to pem using OpenSSL you should export the contents of the file.
openssl pkcs12 -in test.pfx -out test.pem -nodes- -nodes – No encryption.
convert pem to pkcs12
This example will demonstrate how to with openssl convert pem to p12. To convert pem certificate to pkcs12 do exactly the same as converting pem to pfx as shown above, except for the file extension.
openssl pkcs12 -export -out keystore.p12 -inkey key.pem -in certificate.pem -certfile chain.pemconvert pem to jks
It is less common to convert a pem to jks than it is to convert a pem to pkcs12. For that reason it is first necessary to convert the pem to pkcs12 as demonstrated above. Then with the Java keytool run the following command to finalize the pem conversion to jks.
keytool -importkeystore -srckeystore cert.p12 -scrstoretype pkcs12 -destkeystore cert.jksFor more details on importing a keystore into another keystore as shown here see this article.
convert pem to p7b
openssl crl2pkcs7 -nocrl -certfile certificate.pem -out certificate.p7b -certfile CACert.cerconvert pem to ppk
To convert a pem encoded certificate to ppk format, you must first install putty.
sudo apt install putty-toolsThen run the following command to perform the conversion to ppk.
sudo puttygen key.pem -o key.ppk -O privateThis example demonstrated how to convert pem file to ppk.
convert ppk to pem
To convert ppk to pem, run the following command:
sudo puttygen key.ppk -O private-openssh -o key.pemThis command can be used to convert ppk to pem mac as well with putty tools installed. To convert ppk to pem windows, use the putty console.
convert pem to key
This example will demonstrate how to with openssl convert pem to key. A pem encoded private key can simply be renamed to have a .key file extension. On linux, perform the following command to convert pem to key:
mv key.pem key.keyRenaming the file was all that was needed to convert pem to private key. Any key type is supported by renaming it, convert pem to rsa, convert pem to ecdsa, etc.
convert pem to der
This first example demonstrates how to convert a certificate from pem to der
openssl x509 -outform der -in certificate.pem -out certificate.der
This second example demonstrates how to convert a private key from pem to der
openssl rsa -inform pem -in key.pem -outform der -out key.der
Conclusion
This article has demonstrated how to perform many different file conversions to and from pem format. If you would like for us to develop a way to convert to pem online let us know in the comments. Also leave us a comment with any questions or requests for additional examples.