

Protecting your files is crucial, especially when sharing your device or working in a public space. This guide will walk you through two effective methods to lock or password-protect your folders on Windows 10 and Windows 11. Whether you prefer to do it without any additional software or with the help of free software, this guide has you covered.
Key Takeaways
- Method 1: You can password protect folders without downloading software by creating a batch file using a pre-written script.
- Method 2: Using Wise Folder Hider software adds an extra layer of security, including multiple password protection options.
- Always keep your passwords safe; if forgotten, recovery options may require purchasing premium features.
Method 1: Password Protect Folders without Software
This method involves creating a simple script that turns a folder into a protected locker. Follow the steps below to password-protect your files without installing any additional software.
Steps to Password Protect Folders without Software:

- Step 1: Create a Folder
Start by organizing the files you want to protect into a folder on your desktop.

- Step 2: Create a Text Document
Inside the folder, right-click on an empty space, select “New,” and then choose “Text Document.” Click “OK” to create it.

- Step 3: Insert the Script
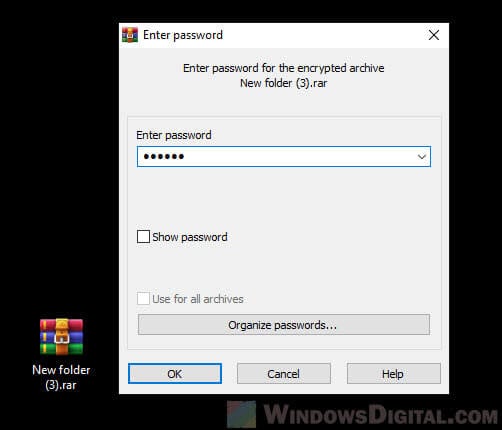
Open the text document and paste the following script:cls @ECHO OFF title Folder Locker if EXIST "Locker.{21EC2020-3AEA-1069-A2DD-08002B30309D}" goto UNLOCK if NOT EXIST Locker goto MDLOCKER :CONFIRM echo Are you sure u want to Lock the folder(Y/N) set/p "cho=>" if %cho%==Y goto LOCK if %cho%==y goto LOCK if %cho%==n goto END if %cho%==N goto END echo Invalid choice. goto CONFIRM :LOCK ren Locker "Locker.{21EC2020-3AEA-1069-A2DD-08002B30309D}" attrib +h +s "Locker.{21EC2020-3AEA-1069-A2DD-08002B30309D}" echo Folder locked goto End :UNLOCK echo Enter password to Unlock folder set/p "pass=>" if NOT %pass%== ENTER_YOUR_PASSWORD goto FAIL attrib -h -s "Locker.{21EC2020-3AEA-1069-A2DD-08002B30309D}" ren "Locker.{21EC2020-3AEA-1069-A2DD-08002B30309D}" Locker echo Folder Unlocked successfully goto End :FAIL echo Invalid password goto end :MDLOCKER md Locker echo Locker created successfully goto End :End

- Step 4: Set a Password
In the script, find the line that saysif NOT %pass%== ENTER_YOUR_PASSWORD goto FAIL. ReplaceENTER_YOUR_PASSWORDwith your chosen password. For example, use “mem” as the password.


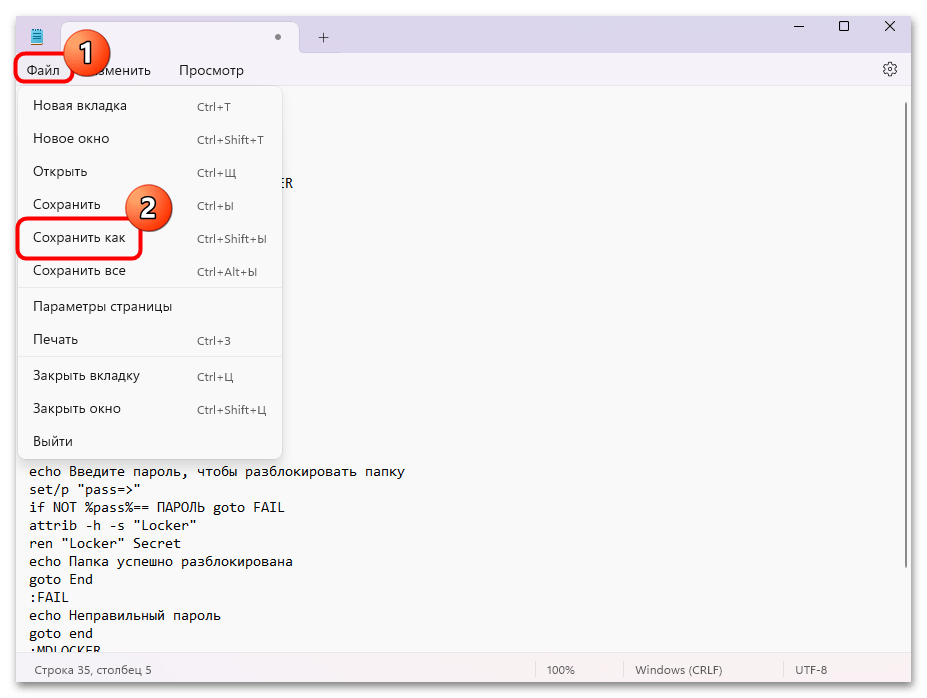
- Step 5: Save the Document as a Batch File
Click on “File,” then “Save As.” In the “Save as type” dropdown, select “All Files,” and name your file “PasswordProtect.bat”. Make sure the “.bat” extension is included.

- Step 6: Run the Batch File
Close the text document and double-click the “PasswordProtect.bat” file. This action will create a new folder named “locker.”

- Step 7: Move Files into the Locker Folder
Drag or copy the files you want to protect into the “locker” folder.

- Step 8: Lock the Folder
To lock the folder, double-click on the batch file again. A command window will appear asking if you want to lock the folder. Press “Y” and hit “Enter.” The folder will disappear, effectively hiding your files.

- Step 9: Unlock the Folder
To unlock the folder, double-click on the batch file again and enter your password. The folder will reappear with all of your files intact.

Important Note: If someone with technical knowledge finds the batch file, they could edit it to find or change the password. This method provides basic security but isn’t foolproof.
Method 2: Using Wise Folder Hider Software

If you’re looking for a more secure way to protect your files, Wise Folder Hider offers an intuitive option. This free software hides your folders and files with password protection, making it much more difficult for unauthorized users to access them.
Steps to Use Wise Folder Hider Software:

- Step 1: Download Wise Folder Hider
Visit the Wise Folder Hider website and click on the “Free Download” button. Once the file is downloaded, click to open it and begin the installation.

- Step 2: Install the Software
During installation, agree to the terms and click “Install.” Once the installation is complete, uncheck the box for “View User Guide” if you don’t need it, but keep the “Launch Wise Folder Hider” option checked. Then, click “Finish.”

- Step 3: Set a Master Password
The first time you launch Wise Folder Hider, you’ll be prompted to set a master password. This password will be required to access the application itself. For example, use “mem123” as your password.

- Step 4: Hide Files and Folders
To hide a folder, simply drag and drop it into the Wise Folder Hider window, or click on the “Hide File” or “Hide Folder” button within the app. Once you hide a folder, it will no longer be visible in File Explorer.


- Step 5: View and Manage Hidden Files
To access your hidden files, open Wise Folder Hider, enter your master password, and select the file or folder you want to view. Click on “Open” to reveal the contents. When you close the folder, it will become hidden again.

- Step 6: Add Extra Password Protection
For more security, you can set an additional password on specific folders. Select the folder inside Wise Folder Hider, click on the dropdown arrow next to the folder, and choose “Set Password.” You can set a different password for this folder, such as “memstech.”

- Step 7: Close and Reopen the Program
When you close Wise Folder Hider, your hidden files remain invisible. To access them again, you’ll need to relaunch Wise Folder Hider and enter your master password. If you’ve added secondary passwords to specific folders, you’ll need to enter those as well to view the contents.

- Step 8: Recovering Forgotten Passwords
If you forget your master password or the secondary password for a folder, Wise Folder Hider offers a “Forgot Password” option. However, this feature requires an upgrade to the pro version of the software.

- Step 9: Removing a File or Folder from Wise Folder Hider
If you no longer want to hide a file or folder, select it in Wise Folder Hider, click on the dropdown arrow, and choose “Unhide.” The folder or file will be restored to its original location on your computer and will no longer be hidden.
Key Features of Wise Folder Hider:
- Double Layer Password Protection: You can set both a master password and secondary passwords for individual folders.
- User-Friendly Interface: Wise Folder Hider is easy to use, even for those who aren’t very tech-savvy.
- Free vs. Pro Version: While the free version offers basic hiding and protection, the pro version provides advanced recovery options and additional features.

Conclusion
Both methods provide useful ways to protect your files, whether you prefer a simple batch file or the enhanced security of Wise Folder Hider. If you’re dealing with sensitive information, consider using Wise Folder Hider for its additional layers of protection. Remember to keep your passwords safe and make regular backups of your protected files.
FAQs
How secure is the batch file method for protecting folders?
The batch file method offers basic security by hiding folders, but it’s not entirely foolproof. A tech-savvy individual could locate and modify the batch file to gain access.
Can I recover my forgotten password in Wise Folder Hider?
Yes, but only with the pro version of the software. If you’re using the free version, you will need to remember your password or reinstall the software.
Does the batch file method work on external drives?
Yes, you can use the batch file method on external drives like USB flash drives or external hard drives. Just ensure the script and folder remain together on the drive.
Can I protect multiple folders with Wise Folder Hider?
Yes, you can hide and protect multiple folders simultaneously with Wise Folder Hider. Each folder can have its own password for added security.
Is Wise Folder Hider free?
Wise Folder Hider is free for basic use, but additional features like password recovery require a paid upgrade to the pro version.
Способ 1: Шифрование
С помощью специального файла-ключа с шифрованием можно поставить пароль на выбранную папку, а также на все каталоги, которые хранятся в ней. Пожалуй, это один из наиболее надежных способов, поскольку узнать пароль от зашифрованных директорий посторонние лица не смогут никаким образом, к тому же для этого не потребуется специальное программное обеспечение, которое может быть скачано из ненадежных источников.
Рекомендация сработает при условии, что у вас включено шифрование BitLocker в Windows 11. О том, как это сделать, мы писали в отдельном материале на сайте.
Подробнее: Активация шифрования дисков BitLocker в Windows 11
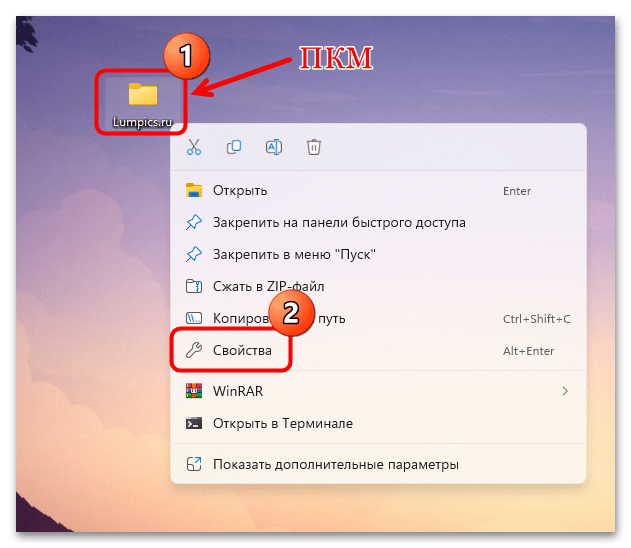
- Кликните правой кнопкой мыши по папке, на которую нужно поставить пароль, затем из контекстного меню выберите пункт «Свойства».
- На вкладке «Общие» кликните по кнопке «Другие».
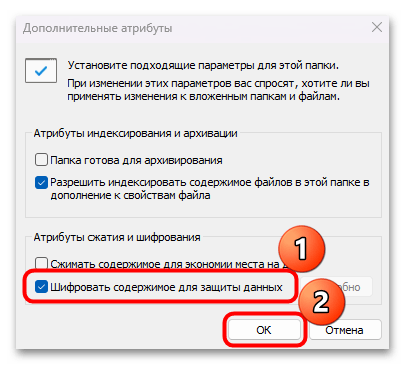
- Откроется новое окно, где в разделе «Атрибуты сжатия и шифрования» нужно отметить пункт «Шифровать содержимое для защиты данных» и подтвердить действие.
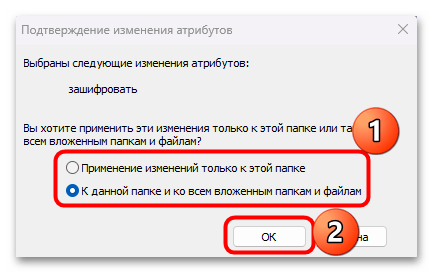
- Отметьте то, к чему нужно применить шифрование, – только к этой папке или же ко всем каталогам из нее, нажмите на кнопку «ОК».
Получить доступ к такой папке невозможно без введенного пароля и созданного в соответствии с инструкцией файла-ключа.
Способ 2: BAT-файл
Есть еще один способ установить пароль на папку – он наиболее простой, но содержит несколько нюансов. Во-первых, придется создавать специальный скрипт, который будет храниться в том же каталоге, где и запароленная директория, и более опытные пользователи смогут получить доступ к коду, просто открыв созданный BAT-файл через любой текстовой редактор. Кроме того, зашифрованная папка будет отображаться, но ее можно скрыть и, таким образом, усложнив процедуру поиска объекта тем, кто попытается ее найти.
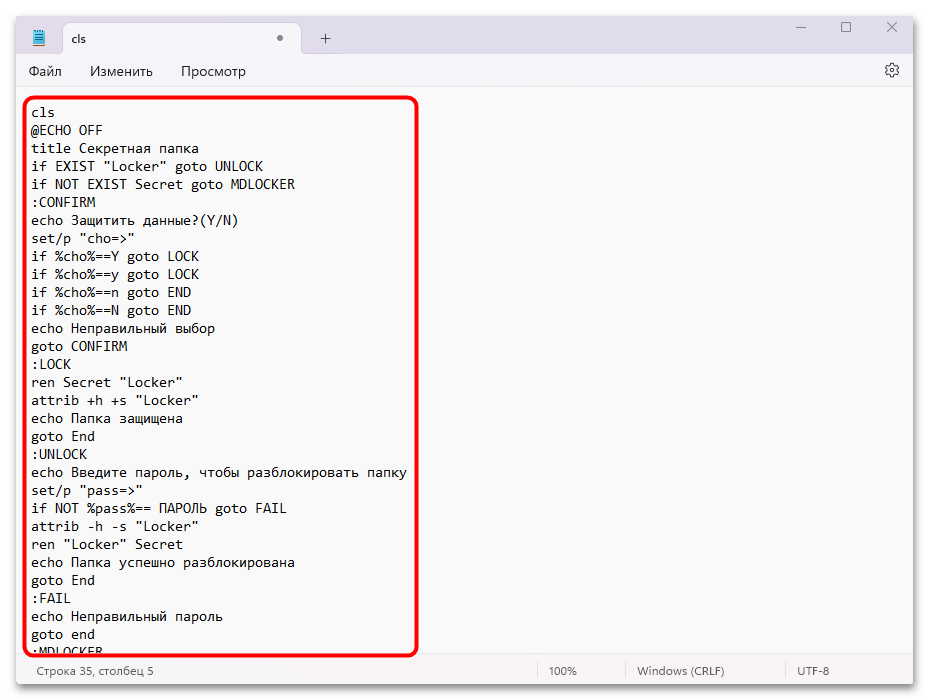
- Откройте предустановленный «Блокнот» и скопируйте туда следующий код:
cls

@ECHO OFF

title Секретная папка

if EXIST "Locker" goto UNLOCK

if NOT EXIST Secret goto MDLOCKER

:CONFIRM

echo Защитить данные?(Y/N)

set/p "cho=>"

if %cho%==Y goto LOCK

if %cho%==y goto LOCK

if %cho%==n goto END

if %cho%==N goto END

echo Неправильный выбор

goto CONFIRM

:LOCK

ren Secret "Locker"

attrib +h +s "Locker"

echo Папка защищена

goto End

:UNLOCK

echo Введите пароль, чтобы разблокировать папку

set/p "pass=>"

if NOT %pass%== ПАРОЛЬ goto FAIL

attrib -h -s "Locker"

ren "Locker" Secret

echo Папка успешно разблокирована

goto End

:FAIL

echo Неправильный пароль

goto end

:MDLOCKER

md Secret

echo Секретная папка создана

goto End

:End
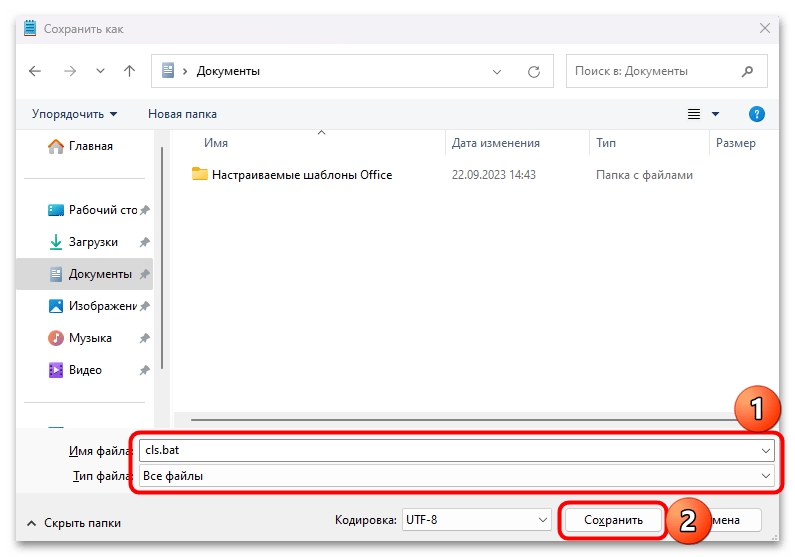
Вместо слова «ПАРОЛЬ» введите вашу секретную комбинацию. - Далее нужно сохранить файл в правильном формате. Нажмите на вкладку «Файл», затем выберите «Сохранить как».
- В новом окне из меню «Тип файла» выберите «Все файлы», затем впишите имя, обязательно приписав в конце расширение
.bat, выберите расположение и нажмите на кнопку «Сохранить».
На этом создание BAT-файла завершено. Запустите его, после чего будет создана секретная папка там же, где находится этот файл. Поместите туда то, что хотите скрыть. Далее потребуется снова запустить BAT-файл – отобразится окно консоли, куда нужно ввести «Y» для подтверждения и выполнить команду, нажав на клавишу «Enter». После этого папка запароленная папка окажется скрыта.
Для повторного отображения директории снова запустите BAT-файл, введите пароль и подтвердите его клавишей «Enter».
Способ 3: Архиватор
Многие архиваторы предусматривают функцию защиты заархивированных файлов. Они позволяют установить пароль на папку с помощью встроенных средств. Как правило, одной из самых популярных программ является 7-Zip, но алгоритм действий у такого софта достаточно схож, поэтому нет смысла рассматривать все варианты.
Скачать 7-Zip
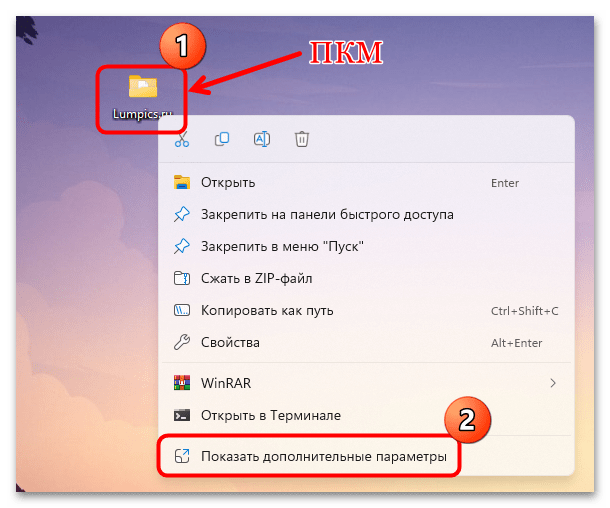
- Кликните по папке правой кнопкой мыши и выберите пункт «Показать дополнительные параметры».
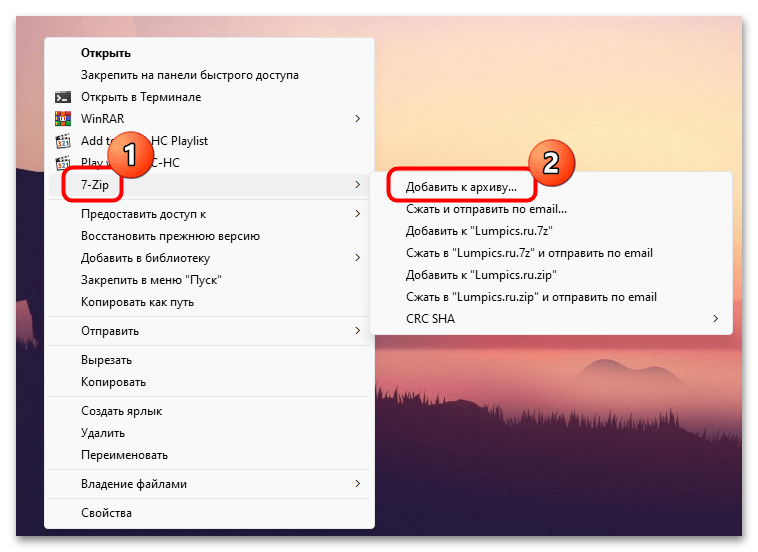
- В классическом меню наведите курсор на пункт «7-Zip», затем выберите опцию «Добавить к архиву».
- Перейдите к блоку «Шифрование» и в текстовых полях введите пароль, затем подтвердите его и нажмите на кнопку «ОК».
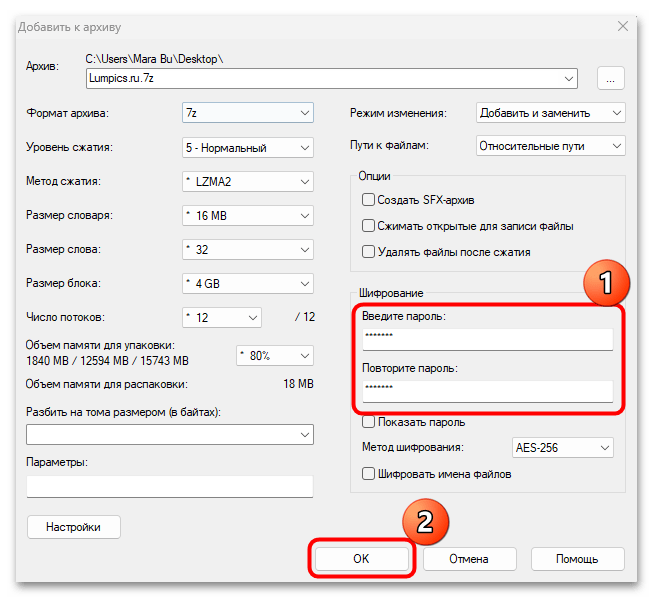
После этого папку, которая была помещена в архив и запаролена, открыть будет невозможно без ввода заданного кода.
Способ 4: Сторонние приложения
Также можно использовать специальное программное обеспечение от сторонних разработчиков, которое скачивается и устанавливается отдельно. Как правило, инструментарий такого софта более гибкий и часто наделен дополнительными функциями, например защищенным хранилищем с паролями или встроенной защитой от взлома. Ранее наш автор разбирал самые эффективные и популярные продукты в отдельном обзоре на сайте. Переходите по ссылке ниже, чтобы ознакомиться с ними и скачать понравившийся вариант.
Подробнее: Программы для шифрования папок и файлов
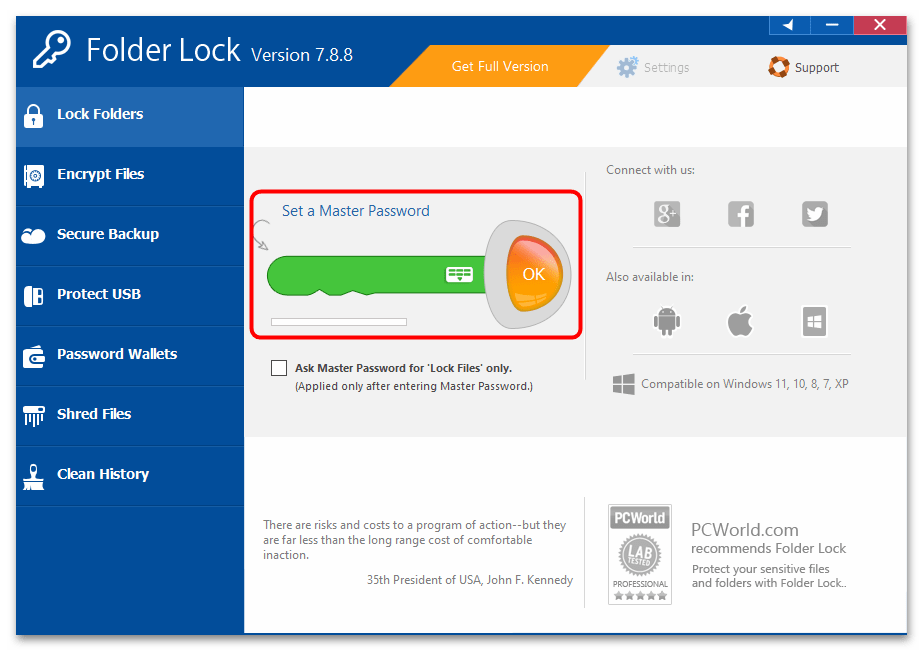
На примере одной из рассмотренных в материале выше программ — Folder Lock — рассмотрим, как можно запаролить папку с помощью функций софта:
- Установите и запустите программу. В текстовом поле «Set a Master Password» введите код, который будет использоваться для защиты папок, затем нажмите на кнопку «ОК».
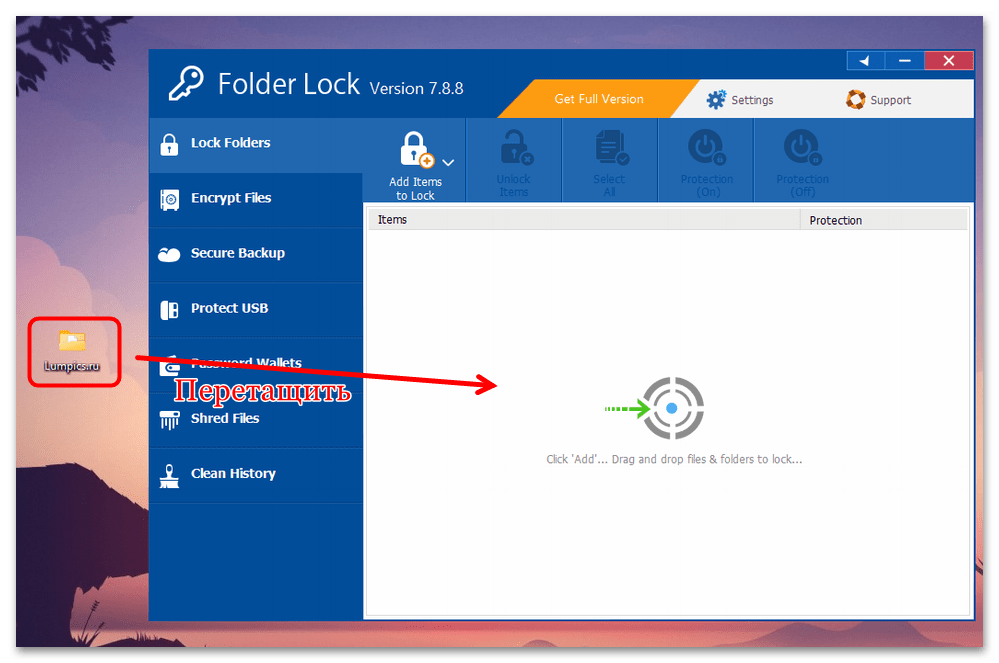
- Останется добавить директорию в интерфейс программы, после чего открыть ее на компьютере можно будет только после ввода заданного пароля, а сама директория станет скрытая — ее вы найдете лишь в интерфейсе приложения.
Программа Folder Lock платная, но при этому у нее есть ряд дополнительных преимуществ. Например, можно создавать специальные защищенные хранилища, получать отчеты о неправильно введенных паролях, а также безопасно удалять файлы и папки.
Наша группа в TelegramПолезные советы и помощь
Password protecting a folder on Windows 10 ensures that your private files are secure from unauthorized access. It involves creating a password-protected zipped folder or using third-party software. You can accomplish this by following a few easy steps, whether you choose the built-in Windows 10 method or additional software.
In the following steps, we will guide you through the process of securing your folder on Windows 10 with a password using the built-in zip feature. This method is simple and doesn’t require any extra software.
Step 1: Create a New Folder
First, create a new folder where you’ll store the files you want to protect.
Right-click on your desktop or inside any directory, select “New,” and then “Folder.” Give it a name that you’ll remember.
Step 2: Add Files to the Folder
Next, move or copy the files you want to protect into the new folder.
Drag and drop your important files into the new folder. Ensure that all the files you want to secure are inside this folder.
Step 3: Create a Compressed (Zipped) Folder
Right-click on the folder, then select “Send to,” and choose “Compressed (zipped) folder.”
Windows will create a new zipped folder with the same name, but with a .zip extension.
Step 4: Set a Password for the Zipped Folder
Open the zipped folder, click on the “File” menu, and select “Add a password.”
A dialog box will appear asking you to enter and confirm your password. Make sure to choose a strong, memorable password.
Step 5: Save and Close the Zipped Folder
After setting the password, close the zipped folder.
Your folder is now password-protected. Anyone trying to access the files will need to enter the password.
After completing these steps, your folder will be secured with a password. This means you can safely store sensitive information without worrying about unauthorized access.
Tips for Password Protecting a Folder on Windows 10
- Choose a Strong Password: Make sure your password is difficult to guess. Use a combination of letters, numbers, and symbols.
- Backup Your Password: Write down your password or store it in a secure password manager, so you don’t forget it.
- Keep Your Software Updated: Ensure your Windows 10 is up to date to avoid any security vulnerabilities.
- Consider Third-Party Software: For more advanced features, consider using software like WinRAR or 7-Zip.
- Regularly Update Your Password: Changing your password periodically can increase security.
Frequently Asked Questions
Can I password protect a folder without zipping it?
No, Windows 10 does not have a built-in feature to password protect folders without using compression or third-party software.
What happens if I forget the password?
If you forget the password, you won’t be able to access the files in the zipped folder. Always keep a backup of your password.
Is the built-in Windows zip feature secure?
While it provides basic security, it’s not the most robust protection. For highly sensitive data, consider using dedicated encryption software.
Can I use BitLocker to protect individual folders?
BitLocker encrypts entire drives, not individual folders. It’s a good option for protecting all data on a drive.
Are there any free third-party software options for folder protection?
Yes, there are free options like 7-Zip and AxCrypt, which offer more features than the built-in Windows zip tool.
Summary
- Create a new folder.
- Add files to the folder.
- Create a compressed (zipped) folder.
- Set a password for the zipped folder.
- Save and close the zipped folder.
Conclusion
Password protecting a folder on Windows 10 is a smart move to keep your private files safe. While the built-in zip feature offers a quick and easy way to add a layer of security, it may not be the most robust solution for highly sensitive data. For those cases, exploring third-party software can provide additional features and stronger encryption.
Taking a few minutes to secure your files can save you a lot of trouble down the line. So, why wait? Go ahead and safeguard your important documents today! For further reading, consider looking into the different encryption tools available and choose the one that best meets your security needs. Protecting your digital life has never been more important.
Matt Jacobs has been working as an IT consultant for small businesses since receiving his Master’s degree in 2003. While he still does some consulting work, his primary focus now is on creating technology support content for SupportYourTech.com.
His work can be found on many websites and focuses on topics such as Microsoft Office, Apple devices, Android devices, Photoshop, and more.
When we talk about password protecting, locking or encrypting files and folders in Windows 11 or Windows 10, we have little choices other than relying on third party encryption software. Creating a batch script with the password in a plain text file to protect a folder (suggested by surprisingly great amount of articles elsewhere) certainly isn’t a good way to do it due to extremely weak security.
To securely password protect and encrypt a folder, you can use compression software such as WinRAR or WinZip. Beside using third party software, there are also a few built-in encryption tools in Windows 11/10 such as EFS and BitLocker that you can use to encrypt your files, folders or an entire disk drive.
This tutorial will show you 4 different methods in how to protect, lock or encrypt files, folders or an entire drive in Windows 11/10, with or without password. Choose one that suits your needs.
Also see: How to Lock an App with a Password in Windows 11
Lock a folder with password using WinRAR
The easiest solution to protect your files is by password protecting it with compression software such as WinRAR or WinZip. The downside of this method is that you will have to decompress the file whenever you want to access it.
We will use WinRAR in this tutorial. Follow the steps below to use WinRAR to put password protect files or folders (optionally, with encryption) in Windows 10/11.
- Download and install WinRAR from www.win-rar.com.
- Right-click one or multiple folders that you want to compress, and select “Add to archive“.
Windows 10

Windows 11
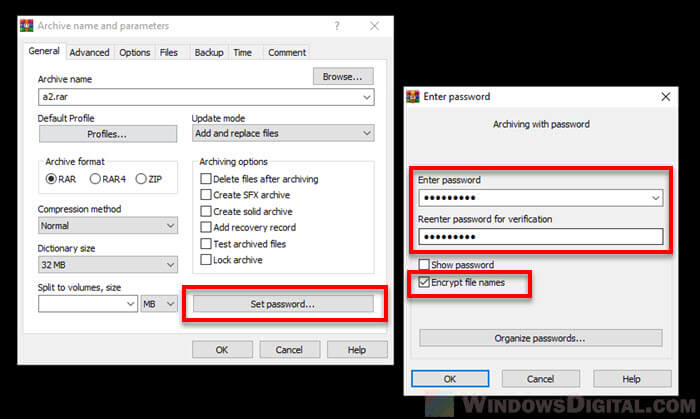
- In the “Archive name and parameters” pop up window, go to General tab and click on the “Set password” button.
- Enter your desired password twice (one for confirmation).
- Optionally, enable “Encrypt file names” if you would also like to also encrypt your folders (*learn what this option does below).

- Finally, click OK to confirm the compression.

To decompress and unlock the folder, simply double-click on the RAR file, enter the password you’ve set earlier, and then click OK to unlock it. Once you are able to view the files and folders inside the RAR file, you can extract any or all of them to anywhere you want.
Notes:
If you set “Encrypt file names” option, WinRAR will encrypt not only file data, but all other sensitive archive areas like file names, sizes, attributes, comments and other blocks. It provides a higher security level. If you want to prevent third parties from drawing conclusions about you or the content based on the meta files, you may enable this function. Without a password it is impossible to view even the list of files in the archive encrypted with this option.

WinRAR has a 40-days trial which you can use for free. However, the free trial seems to last forever even after the 40-days trial. After the trial ends, it will start prompting the “buy” window encouraging you to support and buy the software for some extra premium features. You can easily dismiss the window and continue using its free features which is more than enough for casual users. Of course, if you like the software, feel free to buy it to support the developer.
Read: How to Restrict User Access to a Folder or Drive in Windows 11
Password protect a folder or drive without software
If you want to password protect and lock a disk drive in Windows 11/10 without using any software, you can use the Windows built-in drive encryption tool called BitLocker. It allows you to encrypt an entire disk drive and put a password on it for when you want to unlock it.
If you want to encrypt only certain files or folders, you can use the Windows EFS (Encrypted File System) feature to encrypt multiple files or folders so that no other user accounts or other PC can access to it. Both the BitLocker and EFS features are only available in Windows 10/11 Pro.
Related: How to Lock Drive in Windows 11 Without BitLocker
Use Windows BitLocker
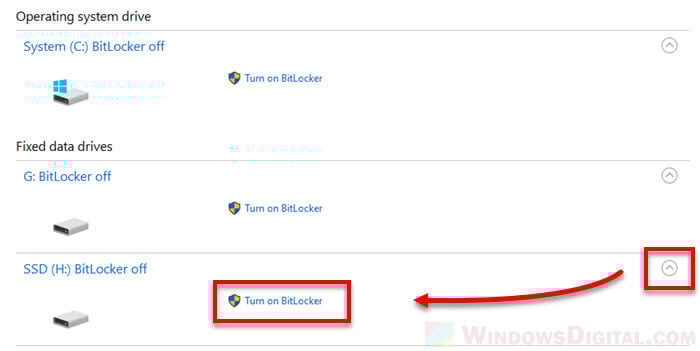
To password protect and lock a disk drive in Windows 11/10 using BitLocker, follow the steps below.
- Search for and open BitLocker via the Start menu search.
- Select a drive you want to encrypt and click on the expand down arrow button at the right of the drive. Then, click on “Turn on BitLocker” next to the drive.

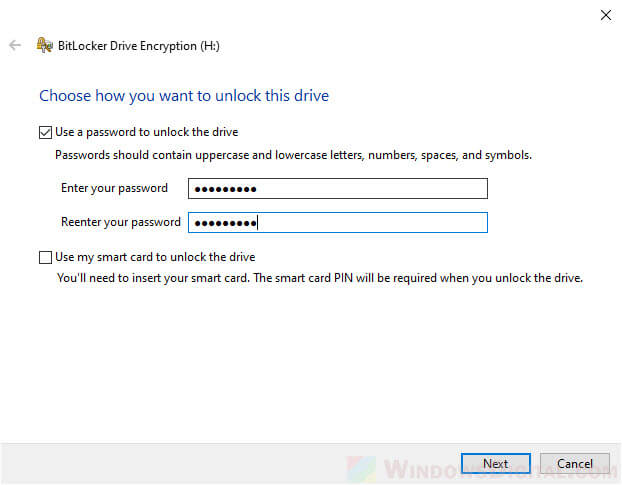
- To add a password, enable “Use a password to unlock the drive” checkbox and enter your desired password.

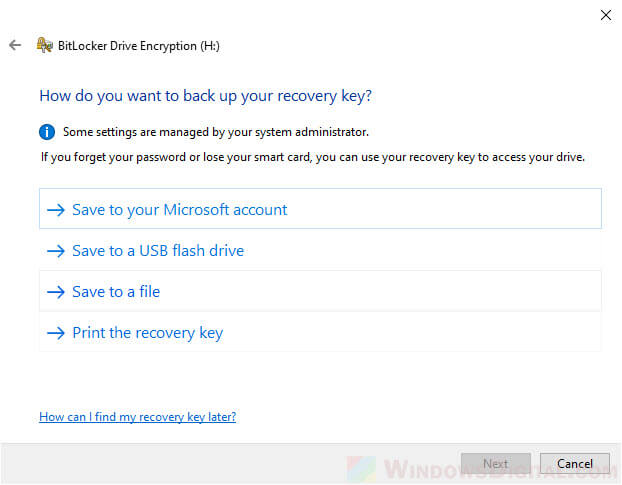
- When you’re prompted for “How do you want to backup your recovery key”, select any option that suits you. This recovery key will be the backup key in case you lose your password.
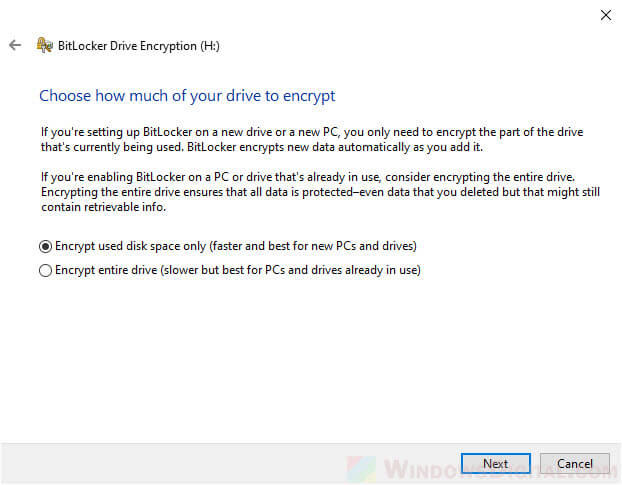
- On the next screen about “Choose how much of your drive to encrypt”, select an option that best describes the situation of your drive – Encrypt used disk space only (faster and best for new computers and drives) or Encrypt entire drive (slower but best for computers and drives already in use).
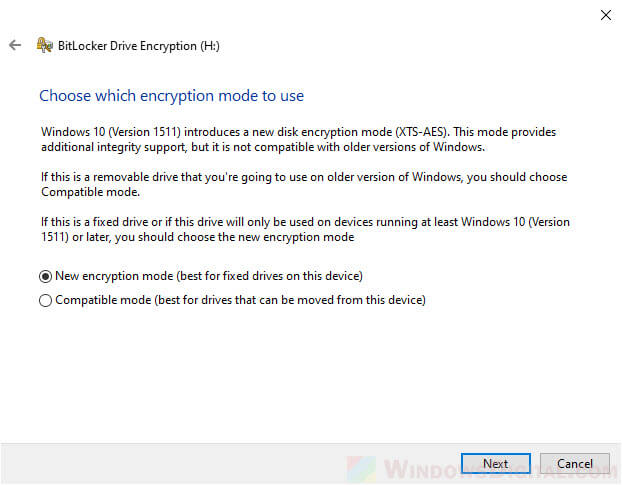
- When prompted for “Which encryption mode to use”, select “New encryption mode” if the drive will only be used on devices running Windows 10 version 1511 or later, or select “Compatible mode” if you’re going to use the drive on older version of Windows.
- Finally, click on “Start encrypting” to begin the encryption. It may take some time depending on the size of the files and folders on the drive.
- Once BitLocker has finished encrypting the drive, restart your PC.
The encrypted drive will remained unlocked if you don’t restart your PC after the encryption is completed. You need to restart your PC to have it locked. When you start up your PC, the drive should be locked. To unlock the drive, double click on it and enter the password you’ve set earlier.
Note: The encrypted drive will be locked upon every shutdown and restart. It can only be unlocked by users with administrator rights. Additionally, once the drive is unlocked, it remains unlocked throughout the session for all user accounts until you restart your computer. So, it’s best to restart your PC (instead of signing out) if you want to switch to another user account that should not have access to the locked drive.
Always make sure you have a backup of the encryption key in case you lose your password or your Microsoft account. Files cannot be decrypted without the encryption key.
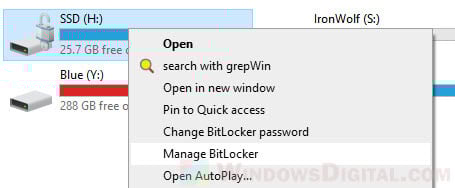
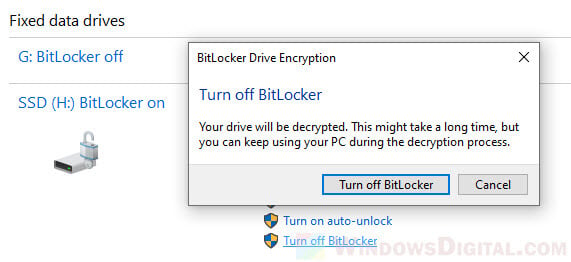
To turn off BitLocker of a particular drive, first, unlock it with password in This PC. Then, right-click on the drive and select “Manage BitLocker”.
In BitLocker window, select “Turn off BitLocker” next to the locked drive.
Use Windows EFS (Encrypted File System)
Encrypting a file or folder using EFS will prevent other user accounts or other computers to have access to it. The feature doesn’t have password unlocking method. User account that does not have the encryption key will simply not be able to open the file.
To encrypt a file or folder in Windows using EFS, follow the steps below.
- Right-click a file or folder you want to encrypt, then select Properties.
- In the General tab, click on Advanced.
- In the Advanced Attributes window, under Compress or Encrypt attributes section, enable the “Encrypt contents to secure data” checkbox. Then, click on OK.
- In the next prompt, select “Apply changes to this folder, subfolders and files” if you want to encrypt everything inside the folder.
- Click OK to start the encryption process.
- Back up a copy of the file encryption key on the next pop up. If there is no pop up whatsoever, find it in the notification area at the bottom right side of your Windows desktop screen. If you lose your Windows user account, the encryption key backup is your only way to decrypt the files.
Once applied, you can now try to sign into another user account and open the files. If this is done right, the encrypted files or folders will have a lock icon on the thumbnail and will not be accessible. It should show “It appears that you don’t have permission to view this file. Check the permissions and try again” error if an user account has no access to the encrypted file.

Note: EFS encryption key is bound to your user account. It means that if a file is encrypted by your administrator account, other user accounts on the same PC will not have access to it. Additionally, if you move your hard drive to another computer, it will remained inaccessible without your account’s decryption key.
However, EFS encrypted files and folders will be automatically decrypted when you move it to a Fat32 or exFAT drive, or send it via email or other types of sharing. This is because when a software or program such as Outlook needs to have access to the encrypted files, Windows will decrypt the files first before sending the files to Outlook.
Also, compressed files or folders (such as zip or rar files) cannot be encrypted by EFS. To encrypt such files, you need to extract them first.
Protect files using OneDrive Personal Vault
Alternatively, you can try to use Microsoft’s OneDrive Personal Vault to protect your folders. The Personal Vault is a protected storage in OneDrive that you can only access with strong authentication methods such as fingerprint, face, PIN, or via a code from Microsoft Authenticator app or SMS.
OneDrive Personal Vault is free to use with limited storage and number of folders. If you need more storage, you need to sign up for one of its paid plans.
Lastly, we would like to point out that no matter what kind of encryption or password protection services you use, there will always be a risk that it might get breached. If your data is extremely personal and valuable, consider hiring an expert in encryption solution.
Простые и бесплатные способы поставить пароль на папку — от архивации и специальных программ до шифрования виртуального диска.

Один из лучших способов защитить конфиденциальную или просто важную информацию от посторонних — установить пароль на папку. Часто на компьютере хранятся отсканированные копии документов, заявления, финансовая информация, фотографии и многие другие личные файлы, которые представляют ценность. Лучше позаботиться о безопасности заранее и обезопасить свои файлы. Сделать это можно как стандартными средствами, так и при помощи сторонних программ. В этом материале мы не будем рассматривать платные решения, а расскажем только о бесплатных способах.
Это не совсем то же самое, что запаролить папку, но зато просто, надежно и безопасно. В первую очередь мы рекомендуем воспользоваться именно этим способом, и только если он по каким-то причинам не подходит, переходить к другим вариантам.
Любой современный архиватор может создавать архив, защищенный паролем. Например, это можно сделать с помощью WinRAR или 7-Zip. Мы рассмотрим процесс создания архива с паролем на примере бесплатного 7-Zip.
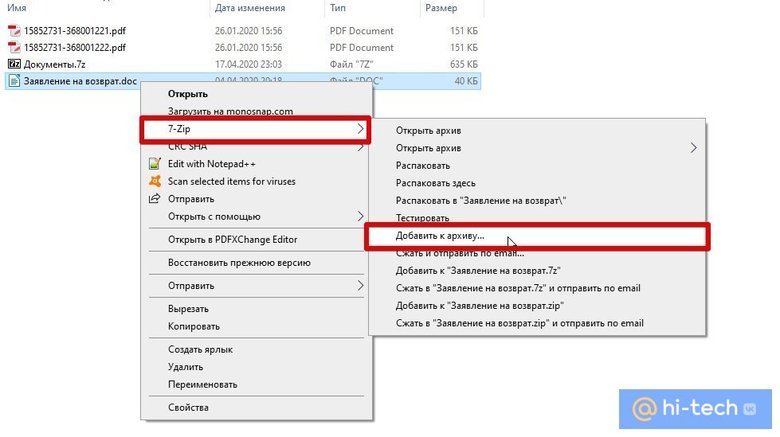
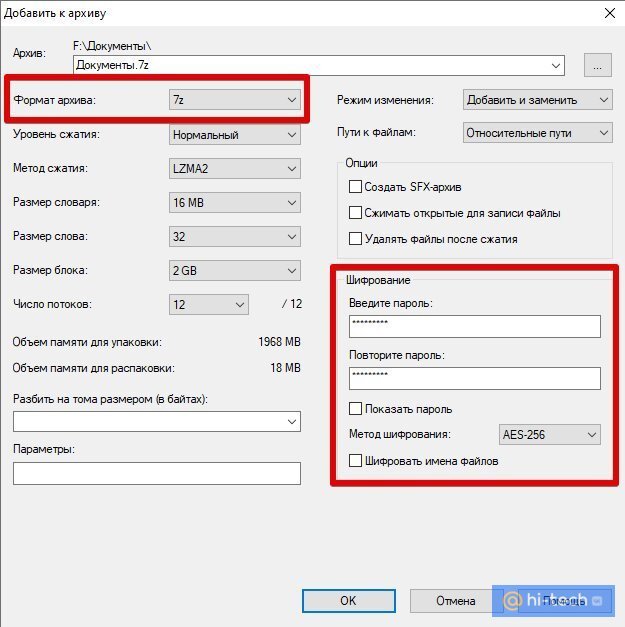
Выберите папку с нужными файлами или сами файлы и кликните правой кнопкой мыши. Далее в контекстном меню 7-Zip кликните на «Добавить к архиву». В открывшемся окне вы можете ввести название архива, выбрать его формат и определить параметры шифрования. Формат поставьте собственный — 7z, метод шифрования доступен лишь один. Введите пароль и по желанию отметьте галочку в пункте «Шифровать имена файлов», если не хотите, чтобы они были видны без ввода пароля.
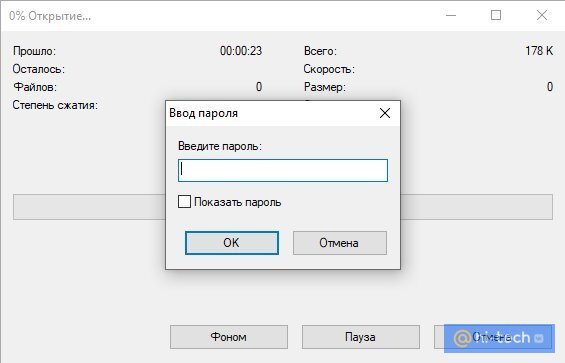
После этого нажмите «ОК» и дождитесь завершения архивации. Попробуйте открыть архив и ввести пароль. Если все получилось, то файлы можно удалить, оставив на диске только сам архив.
Недостаток этого способа в том, что работать с архивом не так удобно, как с обычной папкой. Вы можете добавлять и изменять файлы, при этом архиватор предложит обновить данные. Но, возможно, будет удобнее просто распаковать архив и затем создать его заново.
Кроме того, такой архив можно даже отправить по почте или через сообщения в мессенджерах. Разумеется, это не дает 100-процентной гарантии от взлома, но все равно так гораздо безопаснее, чем отправлять документы в открытом виде.
Программа Anvide Seal Folder
Простая бесплатная программа с русскоязычным интерфейсом. Можно скачать как установочный файл, так и портативную версию в zip-архиве.
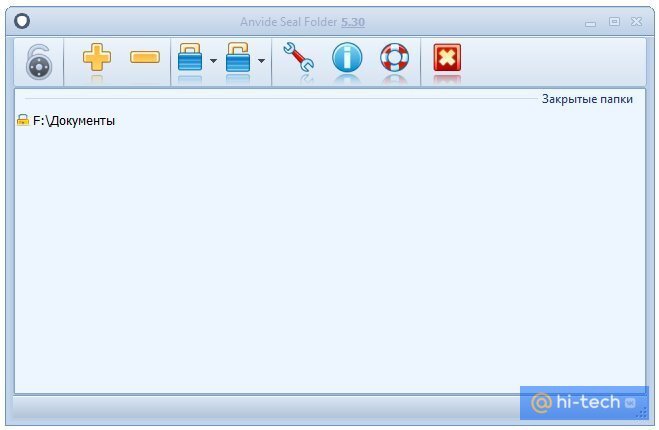
Чтобы начать работу, нажмите на значок плюса и выберите нужную папку. Выделите ее мышкой в окне и нажмите на закрытый замок на панели инструментов или клавишу F5. Введите пароль и подтвердите. В итоге папка просто пропадет, и никто не сможет ее найти без запуска программы. Разблокировать ее можно так же. В программе выделите нужную папку и нажмите на значок открытого замка или клавишу F9.
Кроме того, чтобы скрыть сами папки, чтобы никто не знал, что именно и где у вас зашифровано, можно установить пароль и на запуск программы. Нажмите на значок замка в левом верхнем углу.
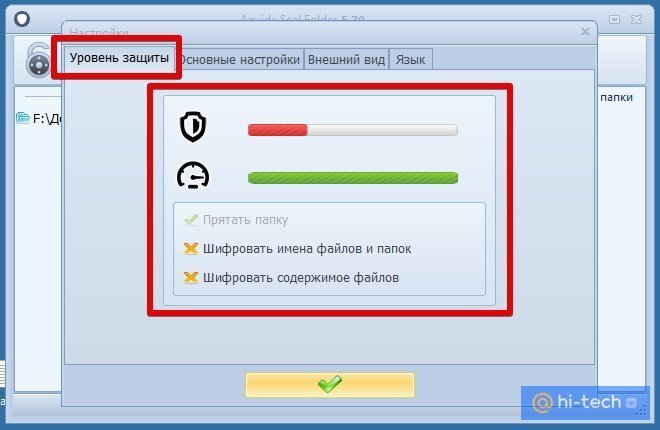
Также в настройках программы можно повысить степень защиты, установив шифрование имен файлов и их содержимого. Обратите внимание, что это может замедлить процесс скрытия папки.
Если вы соберетесь переустанавливать Windows, то доступ ко всем папкам нужно будет открыть, иначе информацию можно потерять.
Зашифрованный виртуальный диск
Этот способ не требует сторонних программ, но работать он будет только на версиях Windows «Профессиональная», «Корпоративная» и «Максимальная». Суть в том, чтобы создать виртуальный жесткий диск, а затем зашифровать его. Вы сможете работать с ним как с обычным жестким диском, но данные будут надежно защищены.
Сначала нужно создать виртуальный диск. Он будет физически находиться на одном из ваших накопителей, но в системе распознаваться как отдельный диск.
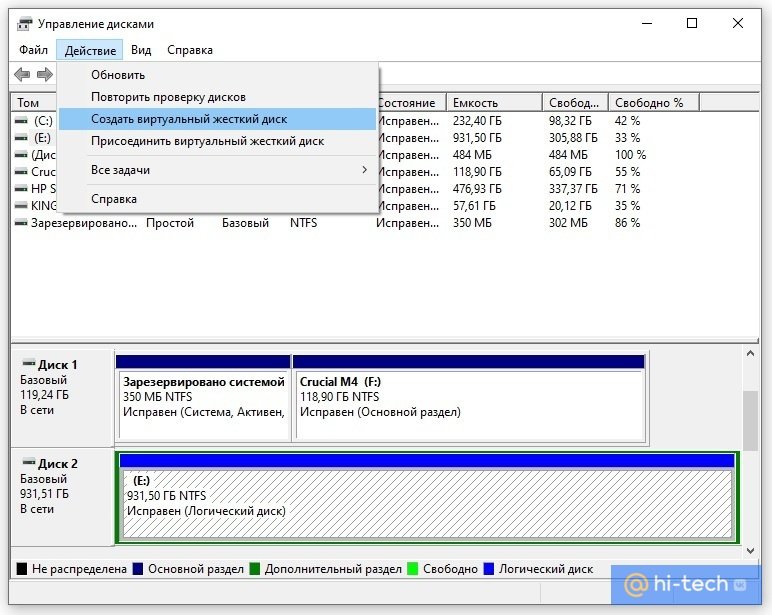
Нажмите правой кнопкой мыши на меню «Пуск» и выберите пункт «Управление дисками». Далее нажмите «Действия», «Создать виртуальный жесткий диск».
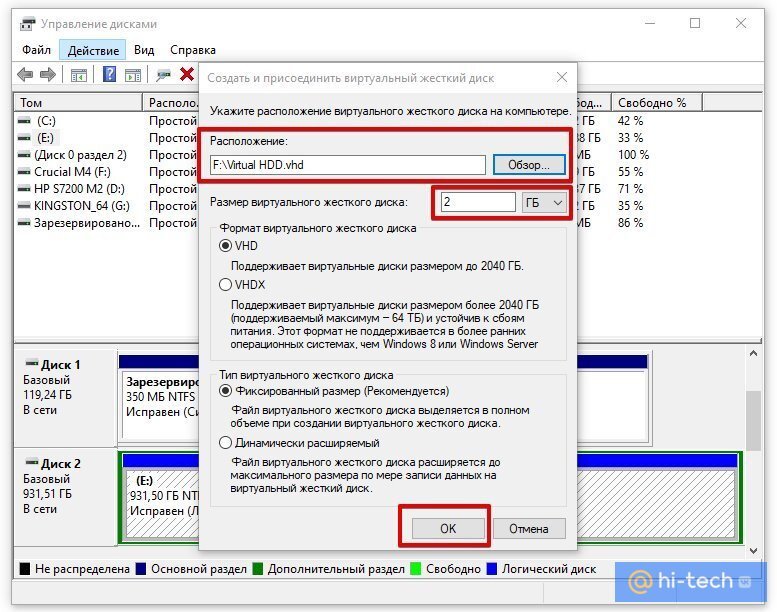
В открывшемся окне задайте расположение вашего диска. Выглядеть он будет как файл-образ диска. Такой же, как образ оптического диска формата iso. Его можно монтировать и извлекать, перемещать и переименовывать. Задайте желаемый размер диска. Остальные пункты оставьте без изменений, как на скриншоте.
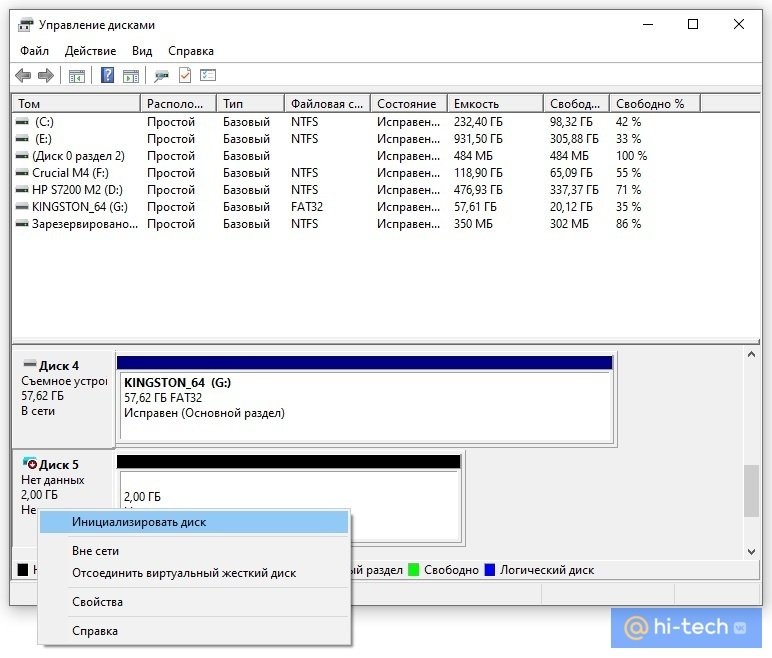
Теперь вы можете видеть ваш образ в утилите «Управление дисками». Однако он пока не готов к работе. Сначала его нужно инициализировать. Нажмите правой кнопкой в левой колонке, где написано «Не инициализировано» и выберите команду «Инициализировать диск».
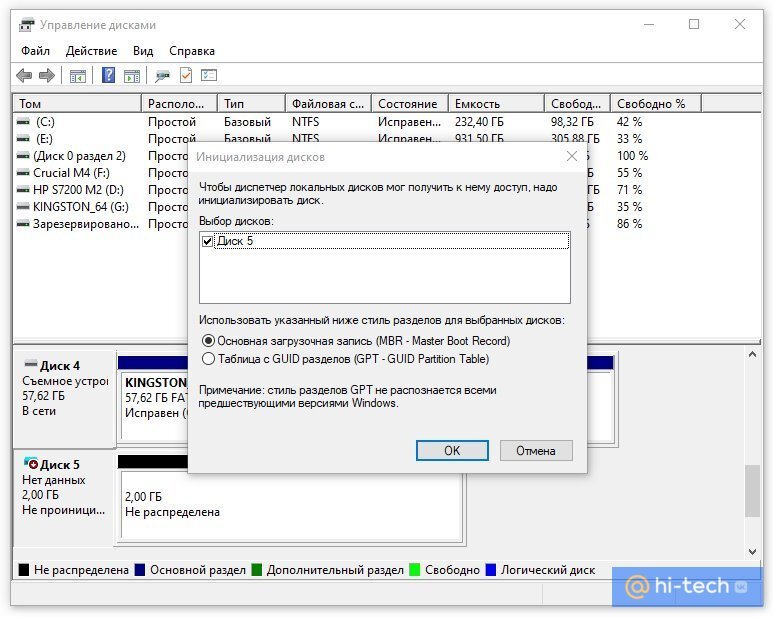
Оставьте все параметры по умолчанию: галочку на самом диске и MBR в качестве стиля раздела. Когда все будет готово, вы снова окажетесь в окне утилиты.
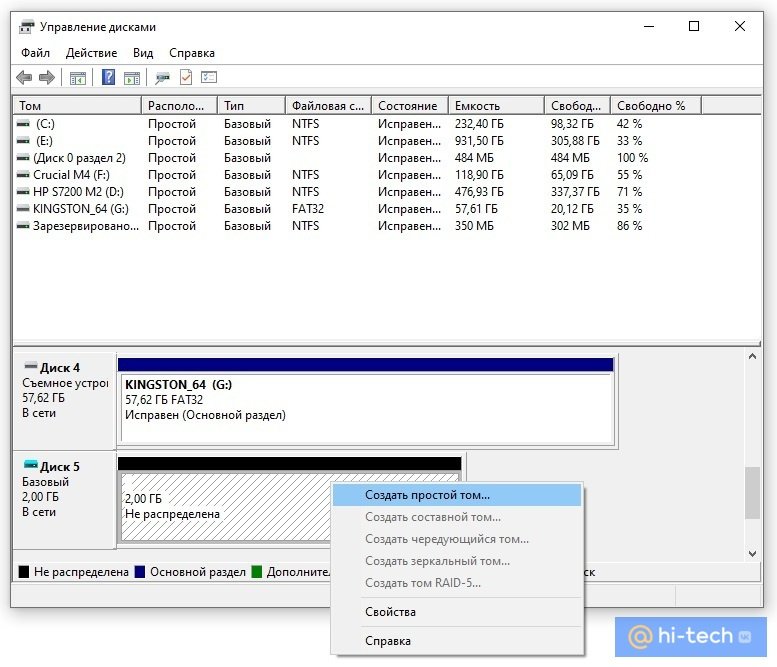
Теперь вам нужно только создать том, кликнув правой кнопкой мыши на диске и выбрав соответствующую команду. В последующих диалоговых окнах трогать ничего не нужно. Оставляйте все по умолчанию и переходите далее.
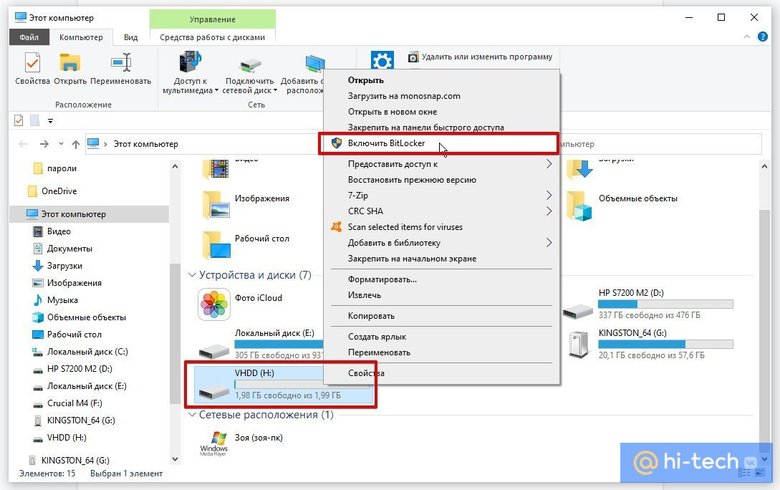
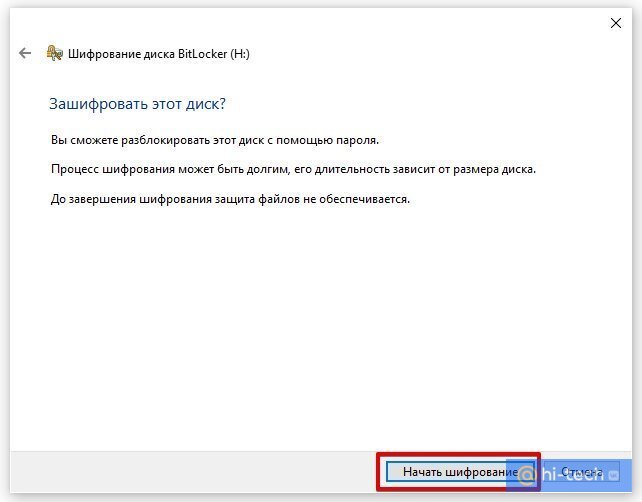
Таким образом, вы создали виртуальный диск, который теперь отображается в проводнике. Пора приступать к шифрованию. Кликните на виртуальном диске правой кнопкой мыши и выберите «Включить BitLocker».
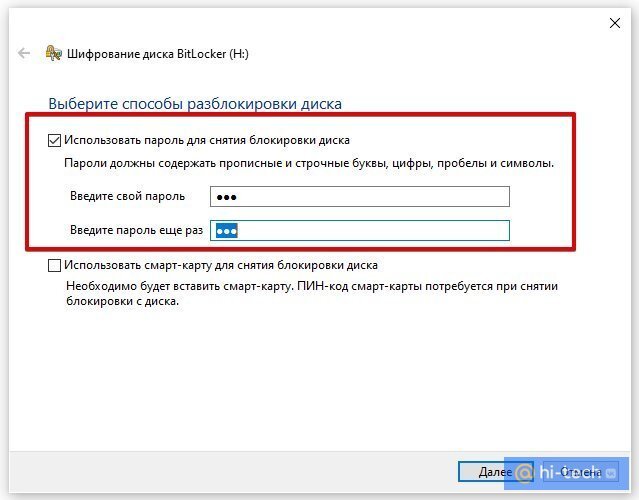
Откроется окно с выбором способа разблокировки диска. Проще всего — установить пароль. Именно этот пункт и выберите, затем придумайте надежный пароль и введите его в оба поля.
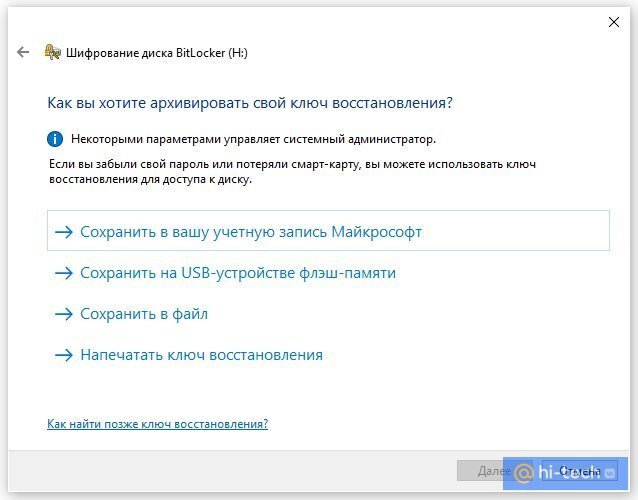
На следующем этапе нам предложат выбрать способ восстановления, если вы забудете пароль. Выберите способ, который подходит вам. В нашем случае ключ для разблокировки был скопирован на флешку.
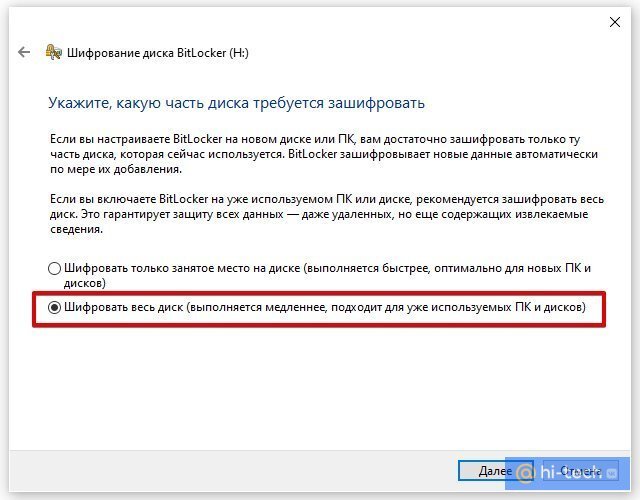
Далее можно выбрать любой из пунктов в зависимости от ваших потребностей. На всякий случай зашифруйте весь диск сразу.
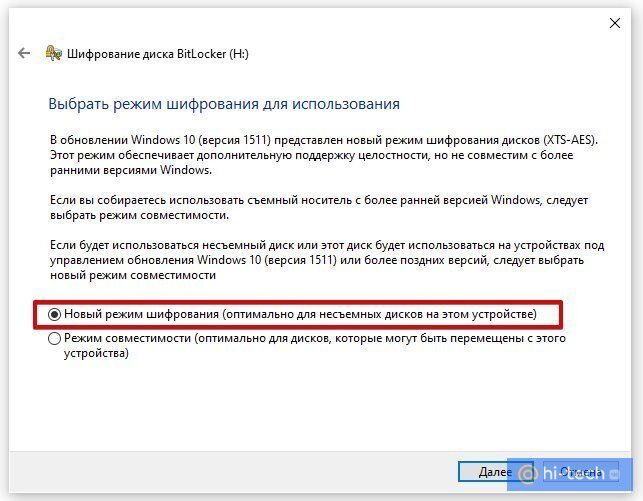
Выбор режима шифрования зависит от того, как вы будете использовать диск. Если нужно будет открывать его на другом компьютере с более ранней версией Windows, то укажите «Режим совместимости». В нашем случае диск будет использоваться только на одном компьютере, поэтому выбираем «Новый режим шифрования».
После этого останется только нажать на кнопку «Начать шифрование» и дождаться окончания процедуры. Теперь вы можете скопировать на диск важные данные и не беспокоиться об их сохранности.
После того как вы закончилди работу с диском, его можно извлечь. В следующий раз просто найдите файл образа и запустите его, чтобы смонтировать.
- Как узнать, какая версия Windows установлена на компьютере
- 4 простых способа освободить место на жестком диске в Windows 10