
Большинству пользователей знакомо создание нескольких логических дисков в рамках одного локального физического диска. До недавнего времени разделить USB флешку на разделы (отдельные диски) было нельзя (с некоторыми нюансами, о которых — далее), однако в Windows 10 версии 1703 Creators Update такая возможность появилась, и обычную флешку можно разбить на два раздела (или более) и работать с ними как с отдельными дисками, о чем и пойдет речь в этой инструкции. Способы для других версий Windows описаны в инструкции Как разделить флешку на разделы в Windows.
На самом деле, разбить флешку на разделы можно и в более ранних версиях Windows — если USB накопитель определяется как «Локальный диск» (а такие флешки бывают), то это делается теми же способами, что и для любого жесткого диска (см. Как разделить жесткий диск на разделы), если же как «Съемный диск», то разбить такую флешку можно с помощью командной строки и Diskpart или в сторонних программах. Однако, в случае съемного диска, версии Windows ранее 1703 не будут «видеть» ни один из разделов съемного накопителя, кроме первого, а вот в Creators Update они отображаются в проводнике и с ними можно работать (а также появились более простые способы разбить флешку на два диска или другое их количество). Примечание: будьте внимательны, некоторые из предлагаемых способов приводят к удалению данных с накопителя.
Как разделить флешку в «Управление дисками» Windows 10
В Windows 7, 8 и Windows 10 (до версии 1703) в утилите «Управление дисками» для съемных USB накопителей (определяющихся системой как «Съемный диск») не доступны действия «Сжать том» и «Удалить том», которые обычно используются для того, чтобы разделить диск на несколько.
Теперь же, начиная с Creators Update, эти опции доступны, но со странным ограничением: флешка должна быть отформатирована в NTFS (хотя это можно обойти при использовании других способов).
Если ваша флешка имеет файловую систему NTFS или вы готовые ее отформатировать, то дальнейшие шаги, чтобы разбить ее на разделы будут следующими:
- Нажмите клавиши Win+R и введите diskmgmt.msc, после чего нажмите Enter.
- В окне управления дисками найдите раздел на вашей флешке, нажмите по нему правой кнопкой мыши и выберите пункт «Сжать том».

- После этого укажите, какой размер отдать под второй раздел (по умолчанию будет указано почти все свободное место на накопителе).

- После того, как первый раздел будет сжат, в управлении дисками нажмите правой кнопкой мыши по «Незанятое пространство» на флешке и выберите пункт «Создать простой том».

- Далее просто следуйте указаниям мастера создания простых томов — по умолчанию он использует все доступное место под второй раздел, а файловая система для второго раздела на накопителе может быть как FAT32 так и NTFS.


По завершении форматирования флешка будет разбита на два диска, оба будут отображаться в проводнике и доступны для использования в Windows 10 Creators Update, однако, в более ранних версиях работа будет возможна только с первым разделом на USB накопителе (другие не будут отображаться в проводнике).

В дальнейшем вам может пригодиться другая инструкция: Как удалить разделы на флешке (интересно, что простое «Удалить том» — «Расширить том» в «Управление дисками» для съемных дисков, как и раньше, не работает).
Другие способы
Вариант с использованием управления дисками — не единственный способ разбить флешку на разделы, более того, дополнительные методы позволяют избежать ограничения «первый раздел — только NTFS».
- Если в управлении дисками удалить все разделы с флешки (правый клик — удалить том), то потом можно создать первый раздел (FAT32 или NTFS) меньшего размера, чем полный объем флешки, затем — второй раздел на оставшемся месте, также в любой файловой системе.
- Можно использовать командную строку и DISKPART чтобы разделить USB-накопитель: тем же способом, который описан в статье «Как создать диск D» (второй вариант, без потери данных) или примерно как на скриншоте ниже (с потерей данных).

- Вы можете использовать сторонние программы, такие как Minitool Partition Wizard или Aomei Partition Assistant Standard.

Дополнительная информация
В завершение статьи — некоторые моменты, которые могут оказаться полезными:
- Флешки с несколькими разделами работают также в MacOS X и Linux.
- После создания разделов на накопителе первым способом, первый раздел на нем может быть отформатирован в FAT32 стандартными средствами системы.
- При использовании первого метода из раздела «Другие способы» у меня наблюдались баги «Управление дисками», исчезали только после перезапуска утилиты.
- Попутно проверил, а можно ли сделать загрузочную флешку из первого раздела, не затрагивая второй. Были опробованы Rufus и Media Creation Tool (последней версии). В первом случае доступно только удаление сразу двух разделов, во втором — утилита предлагает выбор раздела, загружает образ, но при создании накопителя вылетает с ошибкой, а на выходе получаем диск в файловой системе RAW.
How to partition or repartition a USB flash drive, USB stick or SD card in Windows 11/10/8/7? In this article, you can find multiple solutions to repartition USB drives under Windows 11/10/8/7. Besides, this instruction includes a solution to partition a USB drive without losing data. If you want to partition a USB stick, keep reading!
About repartitioning a USB drive / SD card
When someone partitions a storage disk, the result is creating an isolated section with each partition regarded as a separated area. For instance, you set up two partitions on a 500GB hard drive, one of which is 100GB for Windows system. The other partition acts like an individual distinct which can store data or install a different operating system such as Linux.
The capacity of USB flash drives or SD cards gets larger and many users find it useful to partition them to organize data in an easier manner. Likewise repartitioning a hard drive, the process to partition or repartition a USB flash drive is easy with the help of proper tools and instructions. People use storage devices almost frequently at work or home, but not too many of them actual know what or how to partition storage media even though their HDD or USB drive have been repartitioned.
Repartitioning a flash drive or hard drive can divide the disk into one or multiple partitions based on personal requirements. Since there are not special rules on the partition number, size, file system formats, partition type, partition table format, etc., users can set these parameters on their own habits or needs. Thus, both hard drives and USB drives can be partitioned into single or multiple volumes. There are multiple ways to repartition a USB flash drive, SD card or hard drives, for example, some users are used to using DiskPart, while some prefer to third-party free partition manager software.
Important: No matter which method you choose to repartition a USB drive, the process reformats the drive, which means all existing partitions and data will be erased. Therefore, you should make sure all files on the USB drive have been backed up before repartitioning it, or you’ll lose current partitions and files together.
Here are two methods to partition / repartition a USB drive, and you can follow either of them to complete the operation. The first method partitions the USB drive with Diskpart commands and the second method partitions the USB stick using Windows partition manager software DiskGenius Free Edition.
Method 1: Repartition a USB flash drive using DiskPart
- Connect the removable disk to your computer so that it can be recognized by Windows.
- Launch Command Prompt as Administrator. Windows 10 and 8.1: right-click “Start” button and then select “Command Prompt (Admin)”; Windows 7: click Start button -> All Programs -> Accessories, and then right click “Command Prompt” from the list to choose “Run as administrator”.
- Type following commands with each ending up with pressing Enter key:
diskpart
list disk
select disk # (replace # with the number of the USB drive you want to repartition)
clean
create partition primary
format fs=fat32 quick (if you want to format the USB drive to NTFS, then replace fat32 with NTFS)
Method 2: Repartition a USB stick with free partition manager software
This method repartitions flash drive using DiskGenius Free (formerly known as Eassos PartitionGuru), a third-party disk & partition management tool. It’s able to partition removable devices, hard drives, virtual disks and SSDs and makes the disk 4K sector aligned. This free partition manager can create or format partition to exFAT, NTFS, FAT32, EXT4, EXT3 and EXT2 file system. Besides, it is able to increate, resize, extend, shrink or split existing partitions without data loss for all storage devices.
Here is the process to repartition a USB stick.
- Install and launch DiskGenius (formerly known as Eassos PartitionGuru) and plug the USB drive to your computer. Then you can see the drive in the disk list.
- Select the USB stick to be repartitioned and click “Quick Partition” button or press F6 key. Then the disk partition window opens up.
- Select partition number, partition table type, partition size, volume name, drive letter, etc. based on your demands. Then click “OK” button and DiskGenius starts partitioning the drive.

- Close the program when the process completes.

Vidoe guide on how to repartition USB drive in Windows:
Further Reading: Multiple partitions on USB flash drives are supported since Windows 10 Version 1703
There a limitation on partition number of USB drives imposed by Windows system. No matter how many partition on the USB flash drive, Windows will only be able to access the first partition, as other partitions are not shown in Windows explorer. Also, you can use third-party tool to read data in those “hidden” partition or change which partition is visible, but only one will be visible at a time. There is no way to assign drive letter to those invisible partitions using Disk Management tool or third-party application. If USB drive contains two or more partitions, it cannot show full capacity in system. In that case, you need to repartition it to single volume to restore USB drive back to full capacity.
Hard drives (including external hard drive) and removable media (USB flash drive, SD card, USB stick, etc.) are classified into two categories by Windows in that HDD is with Fixed Media Bit set and removable media comes with Removable Media Bit set. The Fixed or Removable Media Bit is set by the media’s firmware controller, and they are grouped in separated section in Windows Explorer. Windows can mount only the first partition on removable devices even though it had been divided into multiple partitions.
Delightfully, this limitation is removed since Windows 10 Creators Update! Though this change is not mentioned by Microsoft, the update does add multiple partition support in removable media. All partitions on removable media are assigned driver letters and they can be opened in File Explorer. Thus, starting from Windows 10 version 1703, you can create multiple partitions on a single USB flash drive. If your computer hasn’t been updated, you can access partitions on removable disk with the help of PartitionGuru.
Summary
In this article we discuss partitioning and repartitioning a USB flash drive and introduce two methods to partition USB disks. You can also follow these two methods to partition an SSD or hard drive. Please make sure all files have been backed up before repartitioning any devices in case of data loss. If you have any questions or need help, please feel free to leave a comment or contact our technical support.
You may want to partition a USB drive because it’s portable and convenient to use. This post will show you several solutions to how to partition a USB drive that you can choose from. With the step and screenshots to each method, you are able to operate step by step according to the instructions.
While many users use USB drives to save data and keep it carry-on due to its increased capacity and small size, they sometimes need to repartition the USB drive. For instance, since Windows 10 Version 1703 supports multiple partitions on removable media like USB Sticks, they want to divide the USB drive into several parts because of its large capacity. Or they want to recreate partition on the USB drive because it has a RAW file system or has an unsupported file system.
Do you know how to partition USB drive? Follow our guide if you haven’t come up with any good idea.
How to Partition a USB Drive
How to partition USB flash drive? When it comes to USB drive management, users are suggested to download MiniTool Partition Wizard Free to do the job.
The reason? As one of the best disk partition managers, MiniTool Partition Wizard Free is not only easy to use but also is full of abilities. For instance, it can create/resize/merge/split/delete/format partition on USB drive, copy partition on USB drive, wipe USB drive, and more. Besides, this partition manager is very easy to use even for green hands. Its clear interface and user-friendly wizards can lead you to go over the steps without any difficulty.
To partition a USB drive, see the details below:
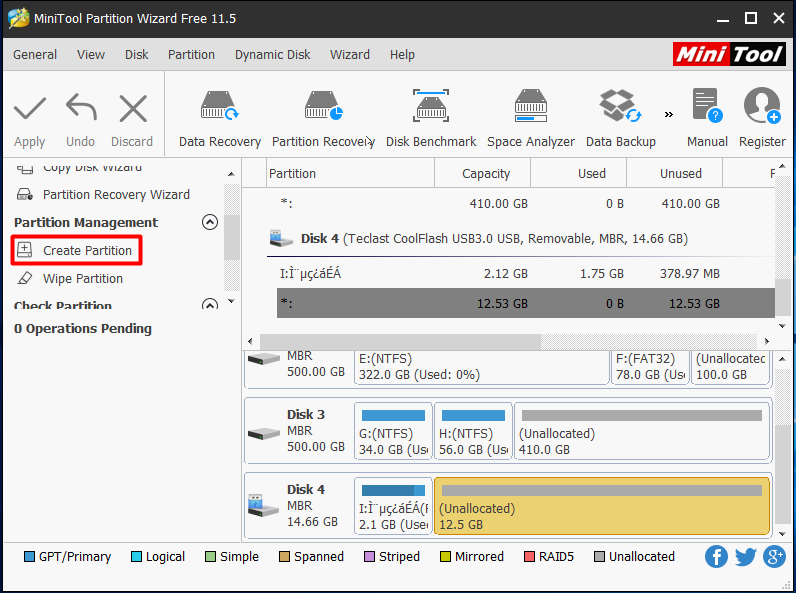
Create Partition
If there is no partition on the USB drive or the partition gets deleted/lost, you will need to create a new partition on it before you can use it. Here is how to use MiniTool Partition Wizard to partition USB thumb drive.
MiniTool Partition Wizard FreeClick to Download100%Clean & Safe
You might also be interested in If This Can’t Help You with Free USB Data Recovery, Nothing Will.
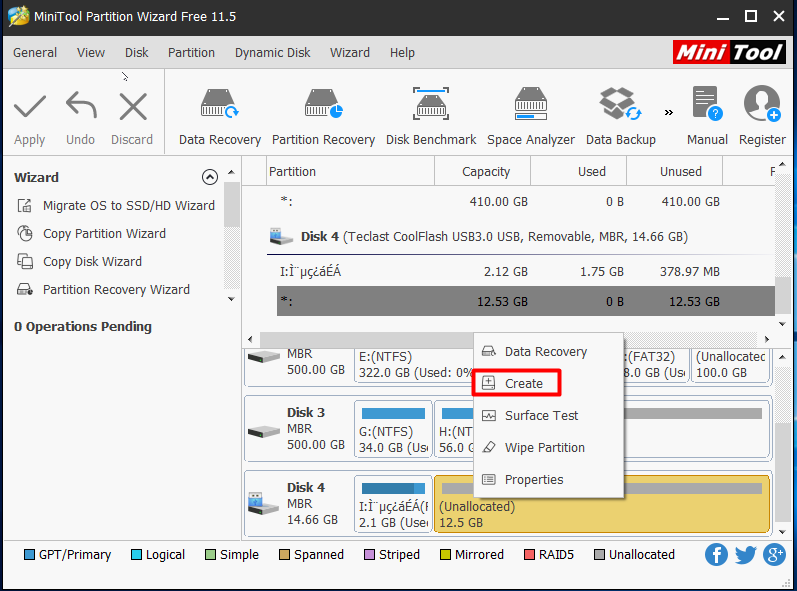
- Launch MiniTool Partition Wizard to get the main interface. Then at the disk map area, select the unallocated space on the USB drive and choose Create Partition from the action panel.
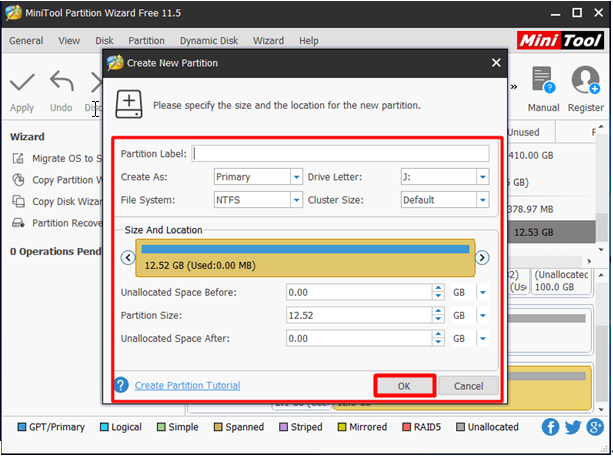
- In the new emerging window, customize the partition label, partition type, drive letter, file system, cluster size and adjust the partition size by moving the slider bar or entering partition size before you click OK button.
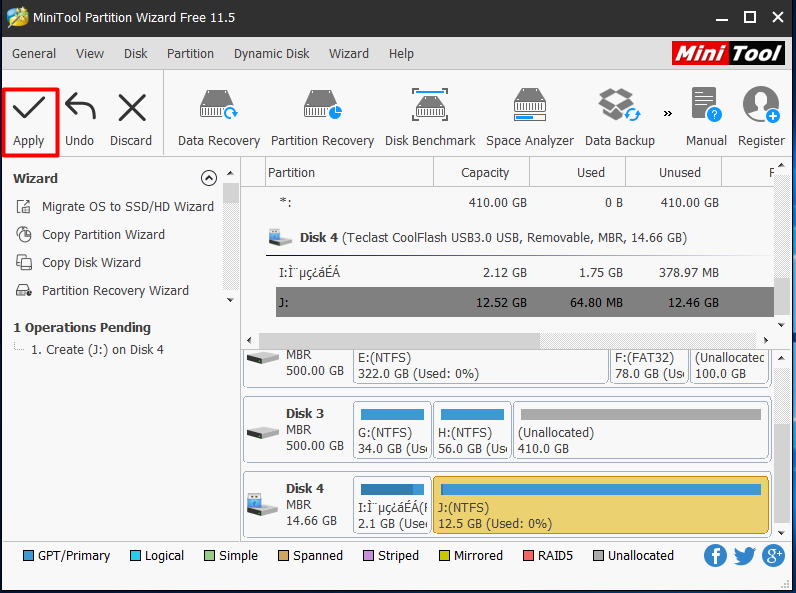
- In the end, click Apply to save this change.
Tip: You can partition USB thumb drive with the help of built-in Windows utilities.
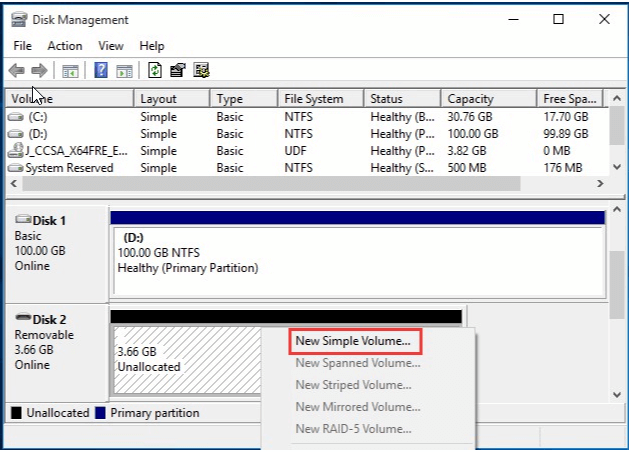
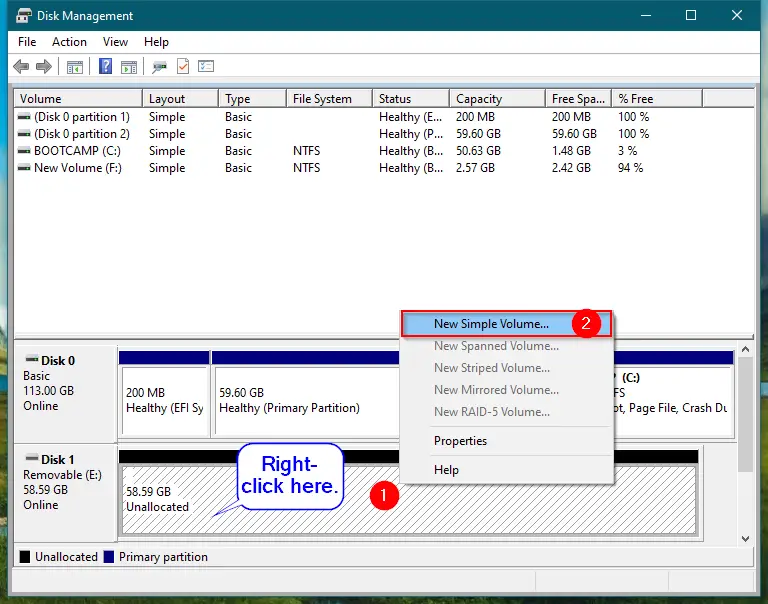
In Disk Management (you can run “diskmgmt.msc” to get its main window or you can right-click This PC, choose Management and then Disk Management to reach this interface), right-click on the unallocated space of the USB drive and choose “New Simple Volume” feature from the context menu. Follow the instruction of the wizard to finish the process by determining the volume size, drive letter, file system, allocation unit size and volume label by yourself.
In CMD, type the following commands and end up each one with the Enter key.
- Diskpart
- List disk
- Select disk n (n should be replaced with the exact disk number of the USB drive)
- Create partition primary size=n (note that n represents the volume size and the unit is MB)
- Format quick
- Exit (exit diskpart)
- Exit (exit CMD)
Delete Partition
In short, if a partition on the USB drive is no longer needed, you can go ahead and delete it. Also, to reparation USB hard drive, you may need to delete the existing partitions and then create new partitions with the desired partition size and file system.
MiniTool Partition Wizard Free makes it easy for you to delete partition. See the guide below:
- Select the partition on the USB drive and choose Delete Partition from the action panel.
- Click Apply on the toolbar to execute. After a minute, the partition turns into unallocated space.
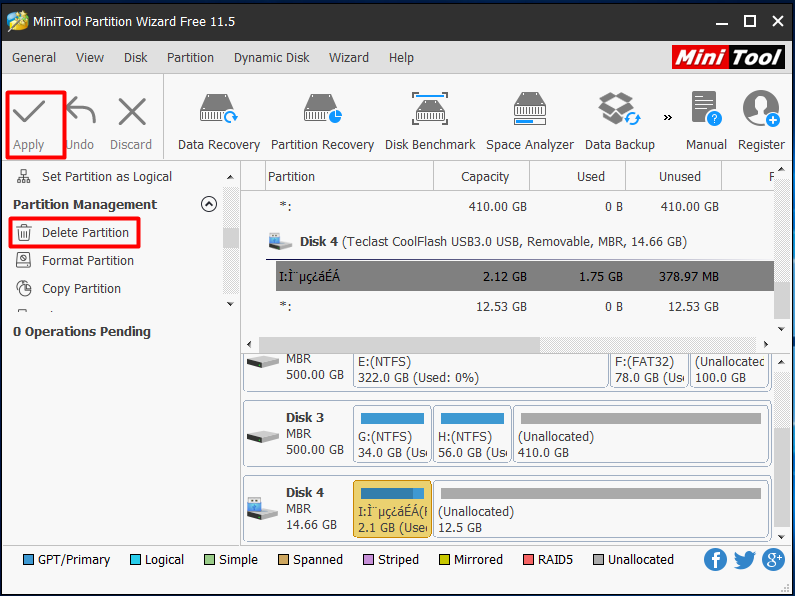
Now you can select the unallocated space and then choose Create Partition. Then follow the wizard to finish.
You might also be interested in our guide Why Can’t Delete Volume on USB Flash Drive and How to Fix the Issue.
How to Create Multiple Partitions on USB Flash Drive
Is it possible to create multiple partitions on a USB flash drive?
Since Windows 10 Version 1703 supports multiple partitions on removable disks, users are eager to know how to create multiple partitions on USB drive. After all, the capacity of USB drive keeps increasing and it is unwise to put all eggs in one basket. Here you can find the easiest way to do this task.
MiniTool Partition Wizard Free is also the best recommendation. Like what we have mentioned in the beginning, it offers Split Partition feature that helps divide a partition into several parts. What’s more, more solutions are offered by this flexible partition manager. Detailed steps are shown below:
Way 1. Split partition into several parts – works for FAT and NTFS partitions
- Select the USB drive partition and choose Split Partition from the action panel.
- In the Split Partition window, you see MiniTool Partition Wizard automatically divides the partition into two parts and determines their partition size for you. But you can also move the slider leftwards/rightwards to determine the partition size by yourself. After doing this, click the OK button.
- Click Apply on the toolbar and confirm the operation if you see a prompt message.
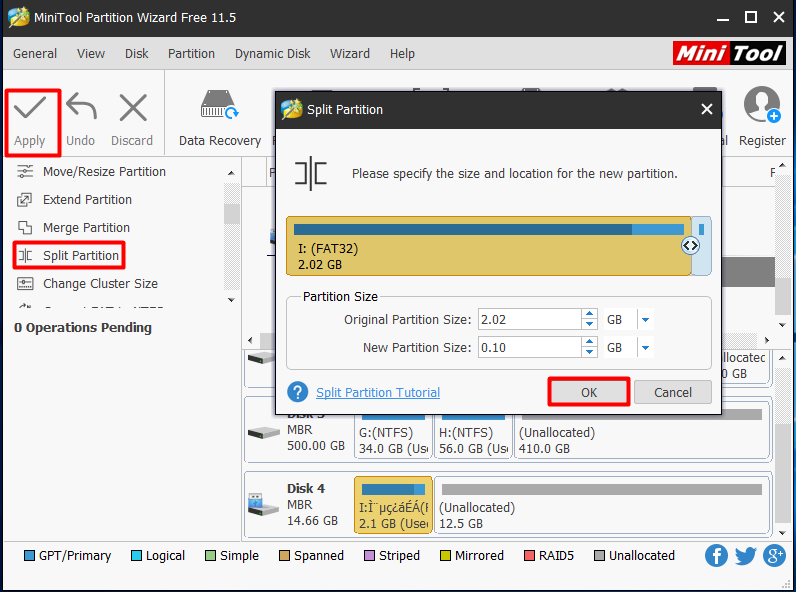
Repeat the above steps if you want more partitions.
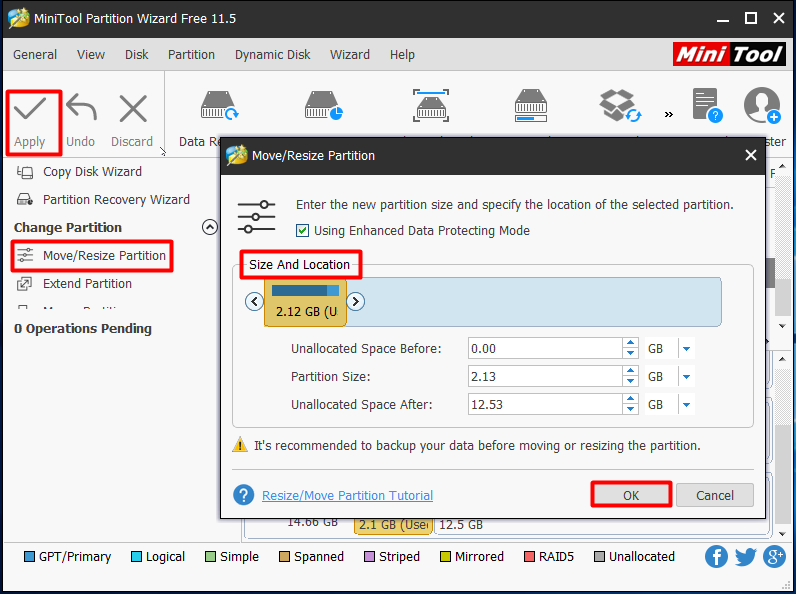
Way 2. Resize and create – works for FAT and NTFS partitions
The second choice for you is to shrink the current partition and then make use of the unallocated space to create new partitions.
- Select the partition on the USB drive and choose Move/Resize Partition from the left panel.
- In the Move/Resize Partition window, drag the slider leftwards to allocate some disk space. You can also accurate the partition size by entering the partition size directly. Then click OK to go back to the main interface.
- Click Apply.
- Select the unallocated space just released and choose Create Partition from the left panel. Follow the guide to finish creating another partition.
What if the partition has other file systems instead of FAT and NTFS? In that case, you should first of all back up important data first, delete the existing partition then and create partitions one by one on the USB drive finally.
Tip: Use Disk Management to help.
It is said that you can also create multiple partitions on USB drive within Disk Management on condition that the operating system your PC is running is Windows 10 Version 1703. Please make sure the most recent version of Windows ADK is installed. Then you can follow the guide below to create multiple partitions on USB drive:
- Right-click the partition on the USB drive and select “Shrink Volume” from the context menu. (Tip: you should know that Windows can only shrink a partition that has NTFS or RAW file system. Hence, you need to format the partition to NTFS if it has other file systems.)
- Immediately Disk Management is querying shrink space for you. In the next interface, you can enter the amount of space to shrink in MB and then click Shrink button.
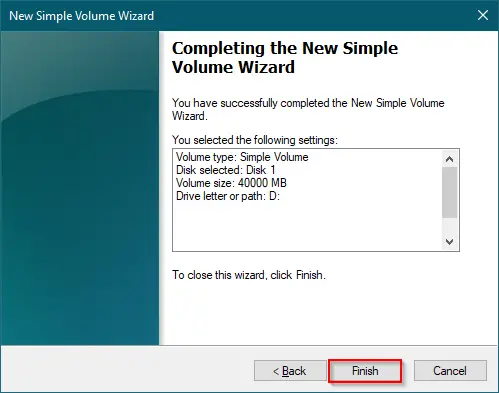
- Now right-click on the unallocated space released just now and then choose “New Simple Volume“. Follow the New Simple Volume Wizard and determine the volume size, drive letter, file system, allocation unit size, volume label and click Next -> Finish.
“These suggestions helped create multiple partitions on USB drive. Why not download MiniTool Partition Wizard Free and have a try?” Click to Tweet
Knowing how to partition USB flash drive/thumb drive, how to further manage the already created partitions? Don’t worry, MiniTool Partition Wizard makes everything easy. Here we would like to show you some features that can be used frequently.
Best Partition Manager for USB Drive
From the above operations you know MiniTool Partition Wizard is really of great help when it comes to partitioning hard drive. In fact, it is much more powerful. Here you can see more features it owns to help you manager USB drive batter.
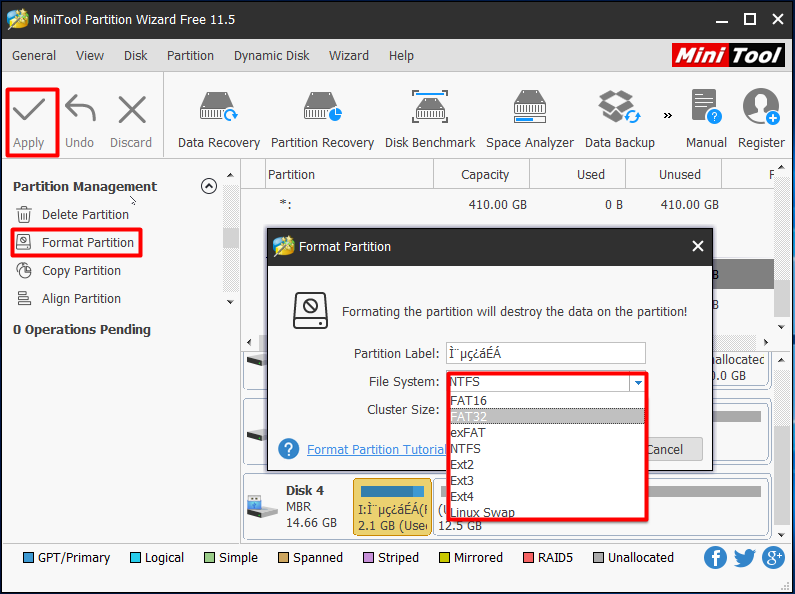
Format Partition
As USB drives are always taken away and connected to computers with different operating systems, sometimes you may find the USB drive is not accessible on a different PC. Besides, a USB drive may become inaccessible because of the RAW file system and Windows asks you to format it. If these are the cases you encounter, you should consider changing the file system of the USB drive.
But how to change file system when a partition is already created? The easier way we think is to format the hard drive with new file system. But remember formatting will lead to data loss, so you need to transfer important files to a safe location beforehand to avoid data loss.
Tip: You may just format USB drive within Windows. But if you see the “Windows Was Unable to Complete the Format” Error, you had better use MiniTool Partition Wizard instead.
- Select the USB partition and choose Format Partition from the action panel.
- Drop down the file system list to choose the file system you need before you click OK.
- When you see the main interface again, press Apply on the toolbar.
You might also be interested in our guide These 3 Ways Helps Format USB to NTFS in Windows 10/8/7.
Convert between FAT and NTFS
Sometimes you may just want to convert a FAT/FAT32 partition to NTFS because you are going to save individual files larger than 4GB to the USB drive but Windows says “file is too large for the destination file system“. MiniTool Partition Wizard helps you do the conversion without data loss. Just select the FAT/FAT32 partition on the USB drive and choose Convert FAT to NTFS from the action panel and then click Start button in the pop-up window.

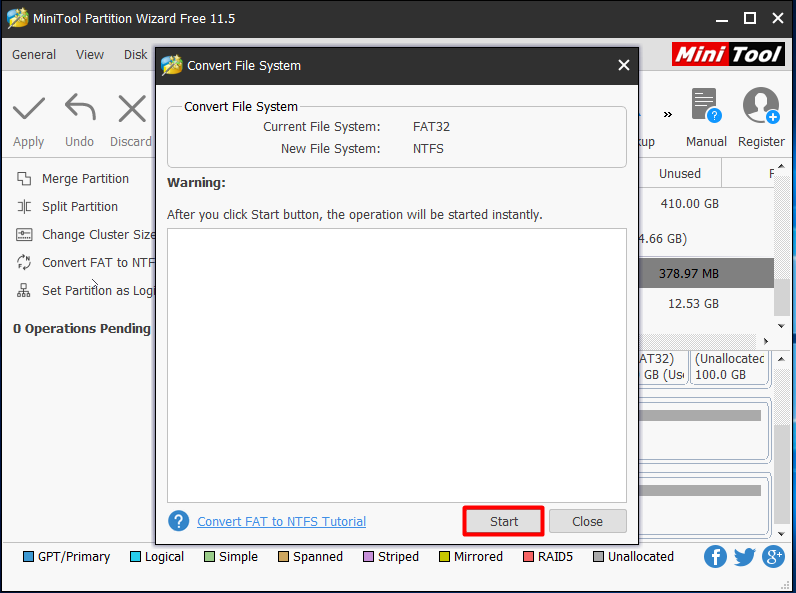
Also, if you use the USB drive on PS3/PS4 to play games, you will find that NTFS is not supported. In this case, you have to convert the NTFS partition to FAT32. Similarly, MiniTool Partition Wizard offers the way to convert NTFS back to FAT32 without data loss. However, you should know this is a paid feature that is available only in the Pro and more advanced editions (view Edition Comparison). Get a copy of the Pro edition if you are interested.
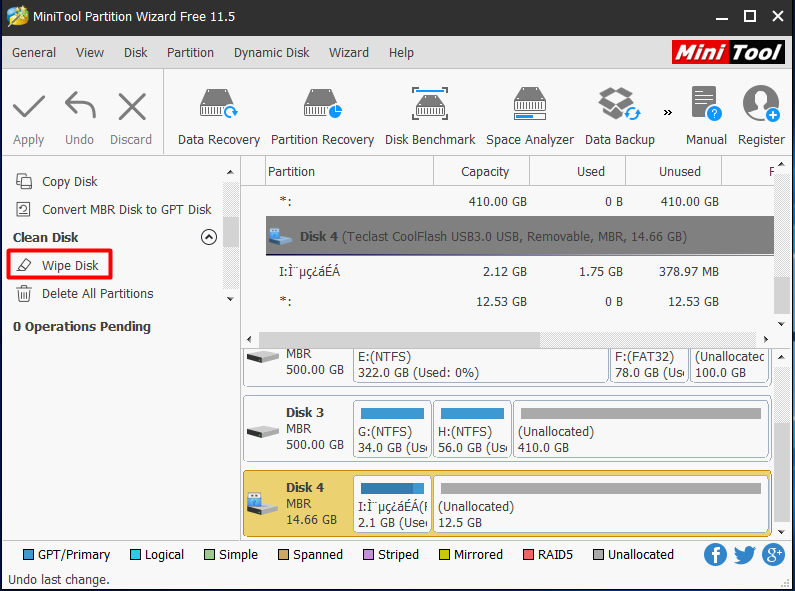
Wipe Disk/Partition
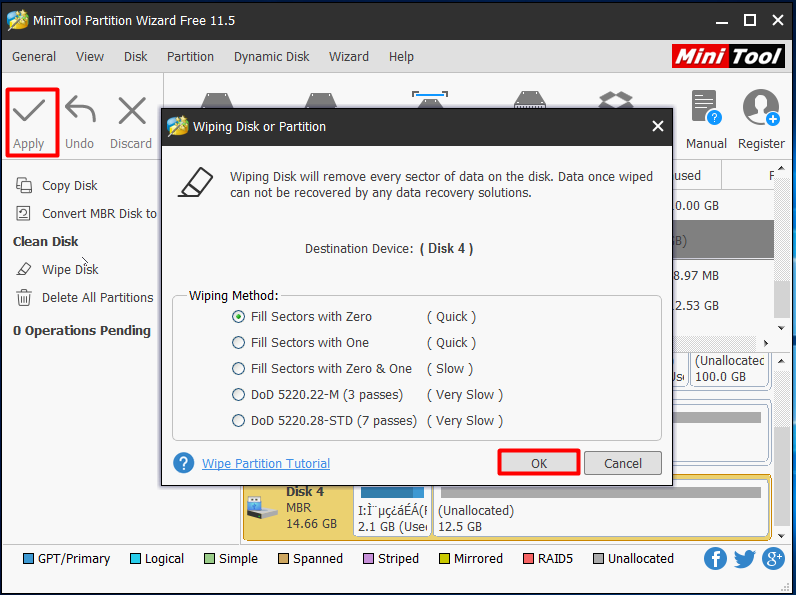
In many cases, a USB drive can be used by multiple people. So it is significant to prevent privacy from leakage. As we know, professional data recovery software can easily recover lost/deleted data from deleted/formatted/damaged partitions. The safest way to prevent privacy leaks is to wipe the disk partition thoroughly. Luckily, MiniTool Partition Wizard offers such kind of features called “Wipe Disk” and “Wipe Partition”.
We take Wipe Disk for instance.
- Select the USB drive from the disk map, and then choose Wipe Disk from the action panel.
- In the pop-up window, select a wiping method and click OK to return to the main interface. Note that the slower the wiping process, the higher security you get. However, to maintain the service life of the USB drive, do not wipe disk frequently unless you have to do it.
- Click Apply on the top left corner. Note that the wiping process can last long, please wait patiently.
“MiniTool Partition Wizard Free is a good disk partition manager that can manage partitions on USB drive easily. I really like this freeware and would like to share it to all of you.” Click to Tweet
Bottom Line
Here comes to the end of this post. Now you know how to partition USB flash drive and how to create multiple partitions on USB flash drive. We hope you can benefit from this post. If you have any questions or nice suggestions while using MiniTool Partition Wizard, welcome to leave us comments in the following section. Also, you can contact our support by sending an email to [email protected]. Much appreciated!
Partition USB Drive FAQ
Can you partition a USB drive?
Usually, it is advised that your USB drive contains only one partition if it does not have large capacity. However, if the USB drive has large capacity such as 256GB, partitioning USB drive is a good way to category your files. However, to use the second partition of a USB drive, make sure you are running Windows 10 1703 version.
How do I partition a USB drive in Windows 10?
Usually, you are suggested to partition USB drive using free partition manager MiniTool Partition Wizard.
- Connect the USB drive to computer.
- Launch MiniTool Partition Wizard.
- Find the USB drive in the disk map of MiniTool Partition Wizard.
- Create multiple partitions if the USB drive is whole unallocated or split partition if it has a big partition.
How do I make my USB a FAT32 partition?
Generally, you are able to create a FAT32 partition on USB drive using Diskpart.exe or Disk Management tool. Be aware that using these tools the FAT32 partition won’t exceed 32GB in partition size. To break this limit, using MiniTool Partition Wizard which allow creating FAT32 partition no more than 2TB.
How do I make an active partition on a flash drive?
To make an active partition on a UBS flash drive, using MiniTool Partition Wizard Free to help:
- Connect the USB flash drive to computer.
- Run MiniTool Partition Wizard Free and get its main interface.
- Select the partition on the flash drive you want to set active and choose Set Active.
- Click Apply on the toolbar.
If you have a USB flash drive with huge capacity and want to partition it like a hard disk, it is possible on Windows 11. Using the built-in Disk Management tool, you can create or manage partitions on a USB flash drive.
Creating multiple partitions on a USB drive has its own advantages. Suppose you carry normal and sensitive data on the same thumb drive. You can create up to two partitions to keep them separately on a single drive. You can keep your normal data on one partition, while you can use another partition for your sensitive data. Further, the partition that stores sensitive data, you can encrypt then using Windows 11’s BitLocker. Let it be any reason you want to create partitions on your USB thumb drive; you can make the partitions on Windows 11.
In this gearupwindows post, you will learn the following:-
- Create multiple partitions on a USB flash drive
- Password protect a USB flash drive
How to create multiple partitions on a USB flash drive?
Please backup your important data from the flash drive before proceeding with the steps. During partitioning, all stored data from the thumb drive will be deleted. When ready, do the following steps to create multiple partitions on your USB drive (pen drive):-
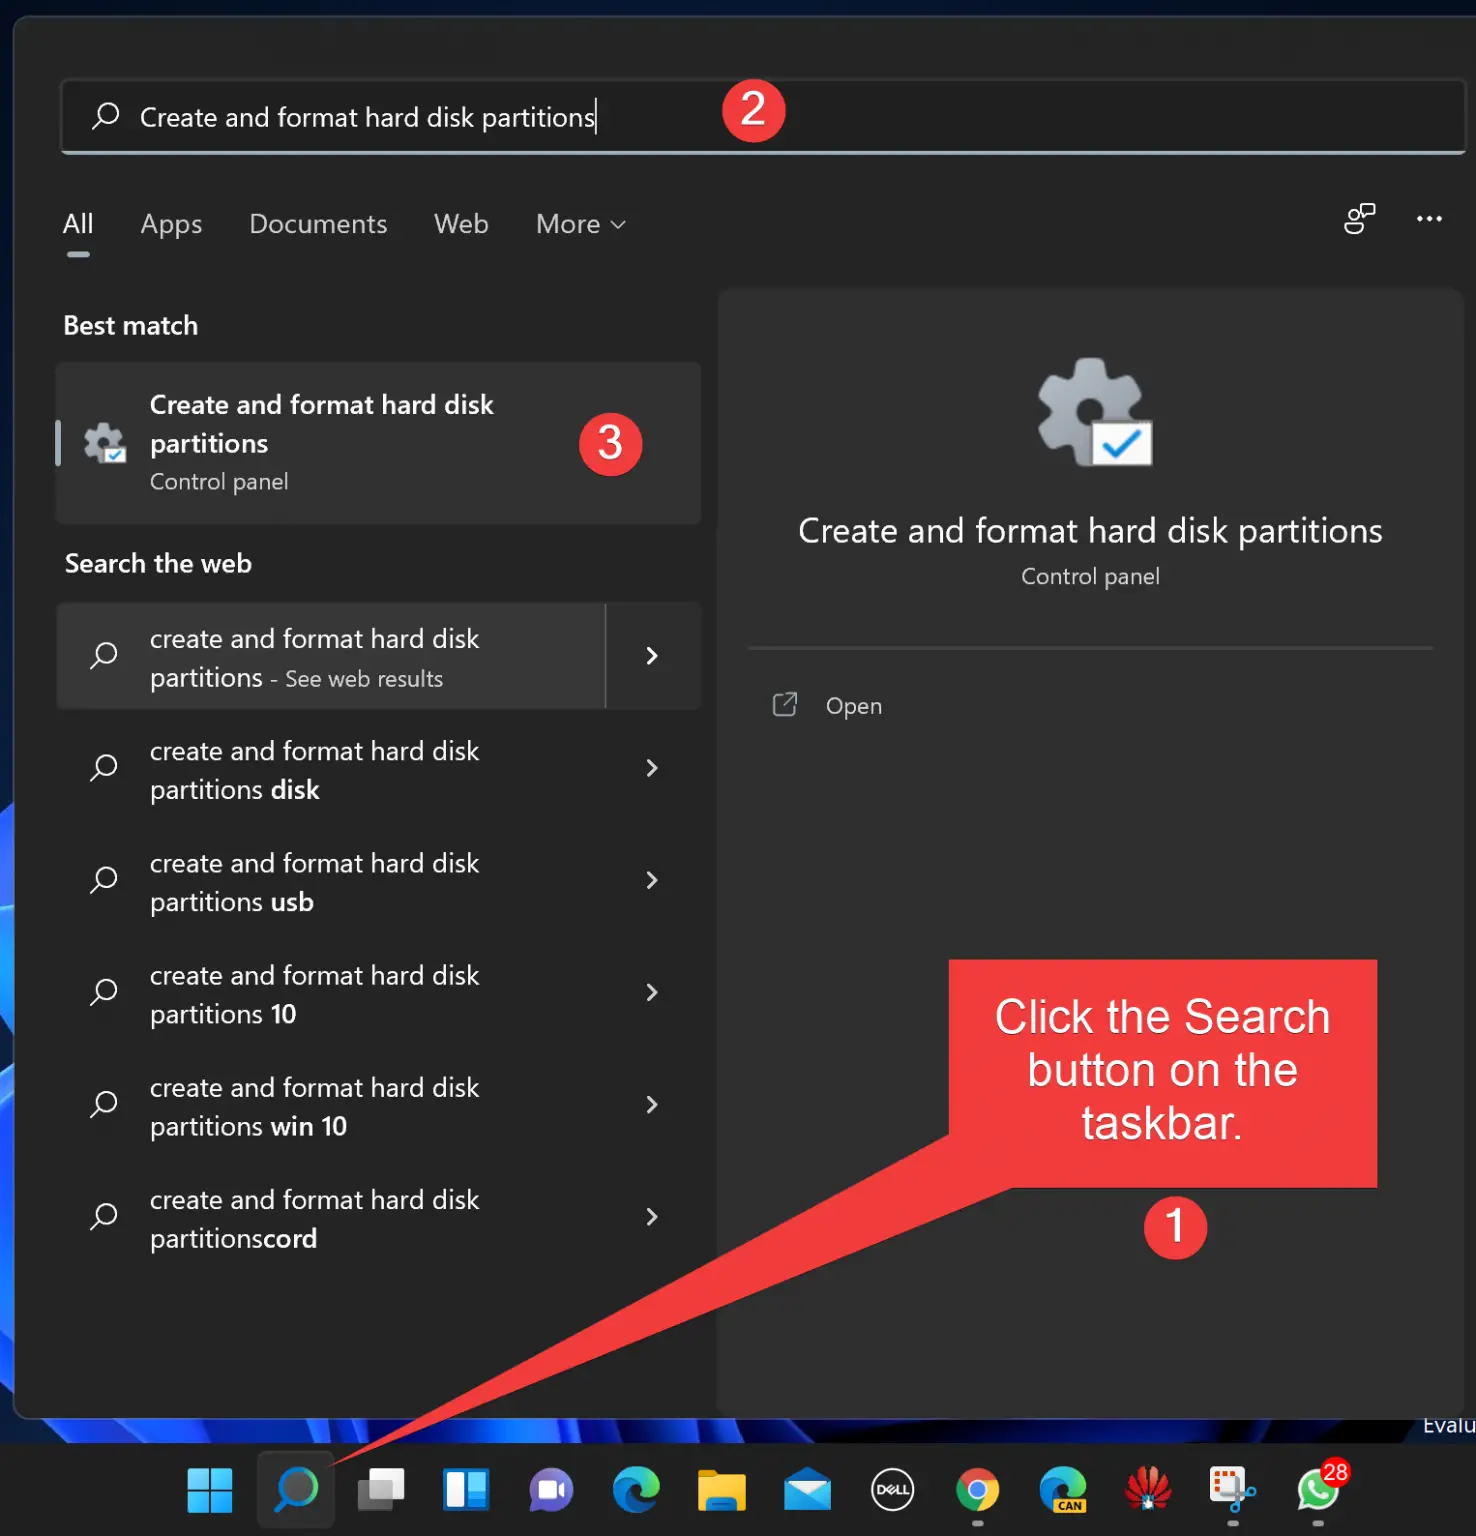
Step 1. Connect your USB flash drive to your PC.
Step 2. Now, click on the Search button on the taskbar and type Create and format hard disk partitions in the search box.
Step 3. Click on its entry on the top search results to open the Disk Management tool.

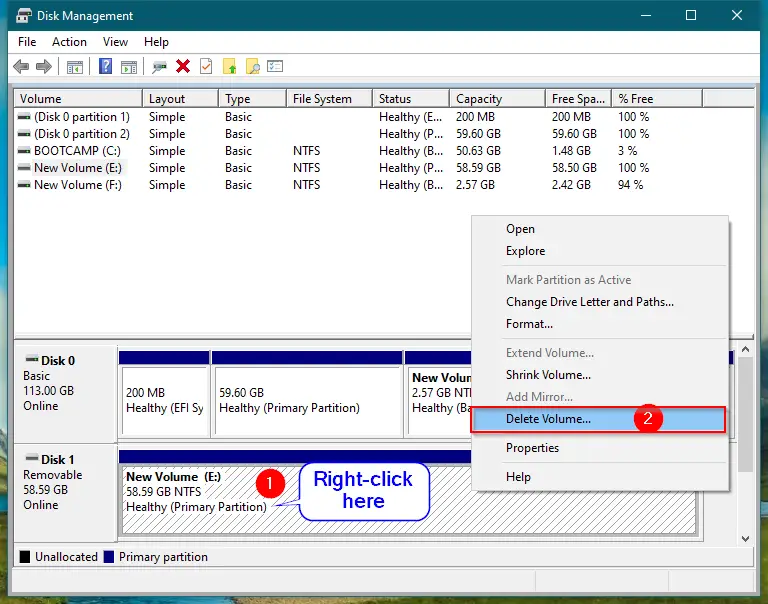
Step 4. In the Disk Management window, you will find a removable disk entry.
Step 5. Right-click on the right-side pane of the removable disk entry and select the Delete Volume option.
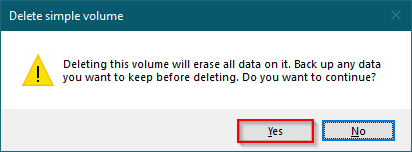
Step 6. Click Yes when the “Delete simple volume” dialog box opens.
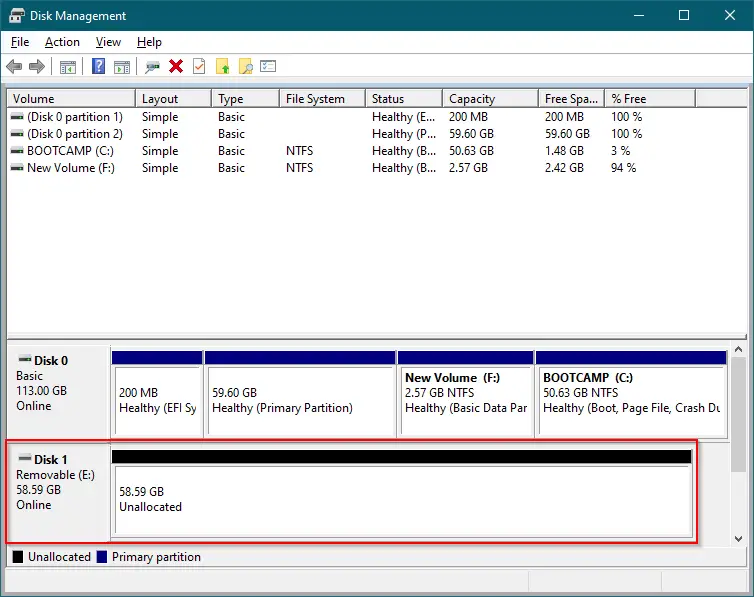
Step 7. Now, next to the removable, you will see the “Unallocated” space.
Step 8. Now, the USB thumb drive is empty, and you need to create partitions on it. For that, perform right-click on the Unallocated space and select the New Simple Wizard option.
Step 9. Click on the Next button when the “New Simple Volume Wizard” window opens.

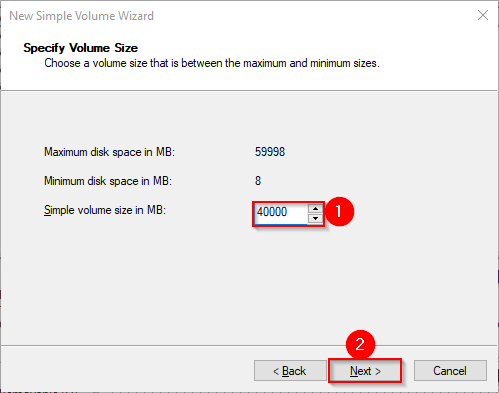
Step 10. Next, set the first partition size in megabytes (MB) next to the “Simple volume size in MB” option.
Step 11. Click Next.
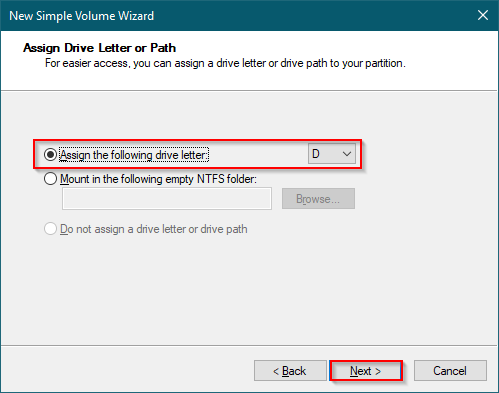
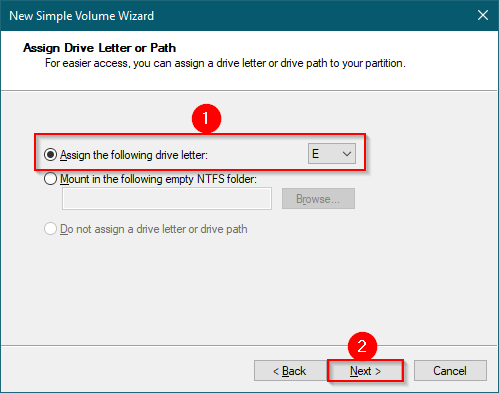
Step 12. Select a drive letter from the drop-down next to “Assign the following drive letter” or leave it default. Windows automatically assigns a free drive letter when you create a new partition.
Step 13. Click Next.
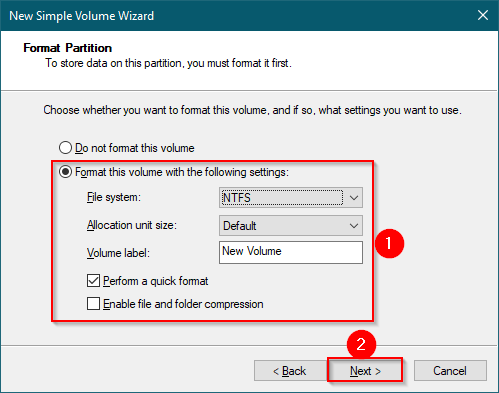
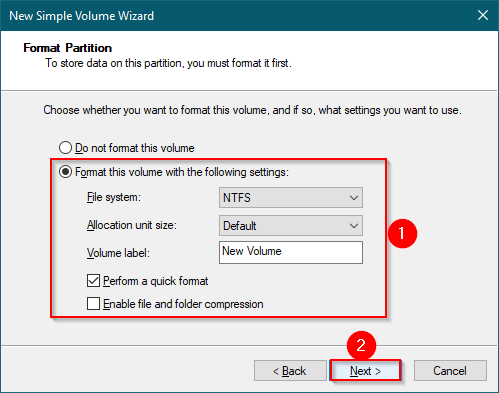
Step 14. Here, select “File system” and “Allocation unit size” from the drop-down menu, or leave to Windows default. Finally, check the option Perform a quick format. Then click on the Next button to format and make it usable.
Step 15. Click Finish.
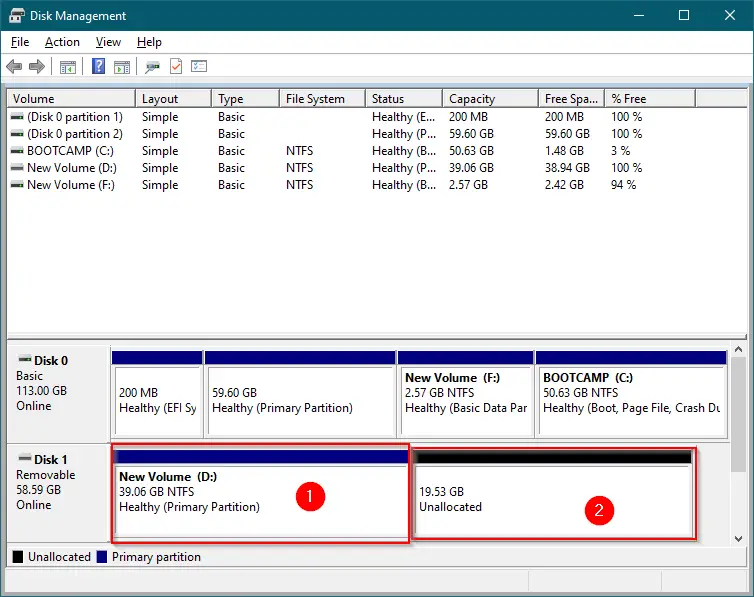
Step 16. Once formatting is completed, you will see the USB flash drive is divided into two parts: one with a drive letter and the other as Unallocated.
Step 17. To make another partition, again right-click on the Unallocated space and select New Simple Partition.
Step 18. Click Next.
Step 19. Click Next.
Step 20. Set the partition size in megabytes (MB) next to “Simple volume size in MB.”

Step 21. Select a drive letter from the drop-down menu “Assign the following drive letter” or leave it default. Windows automatically assigns the next free drive letter when we create a new partition.
Step 22. Select “File system” and “Allocation unit size” from the drop-down menu, or leave to Windows default.
Step 23. Finally, check the option Perform a quick format and then click on the Next button to format the new partition.
Step 24. Click the Finish button when formatting is completed.
You need to repeat the above steps to create multiple partitions.
How to password protect a USB flash drive?
To password-protect your important partition with BitLocker, do the following:-
Step 1. Open Control Panel.
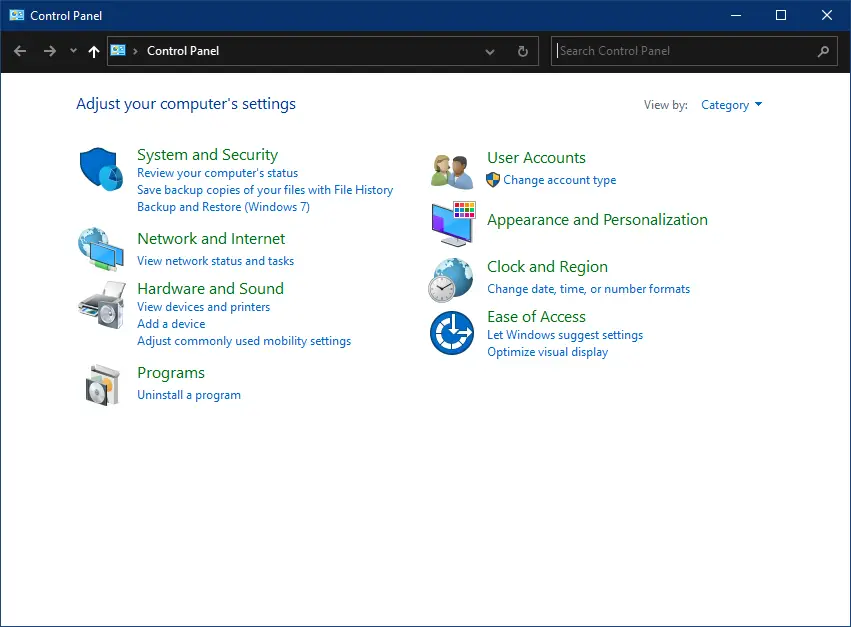
Step 2. Select Category from the drop-down menu of “View by.”
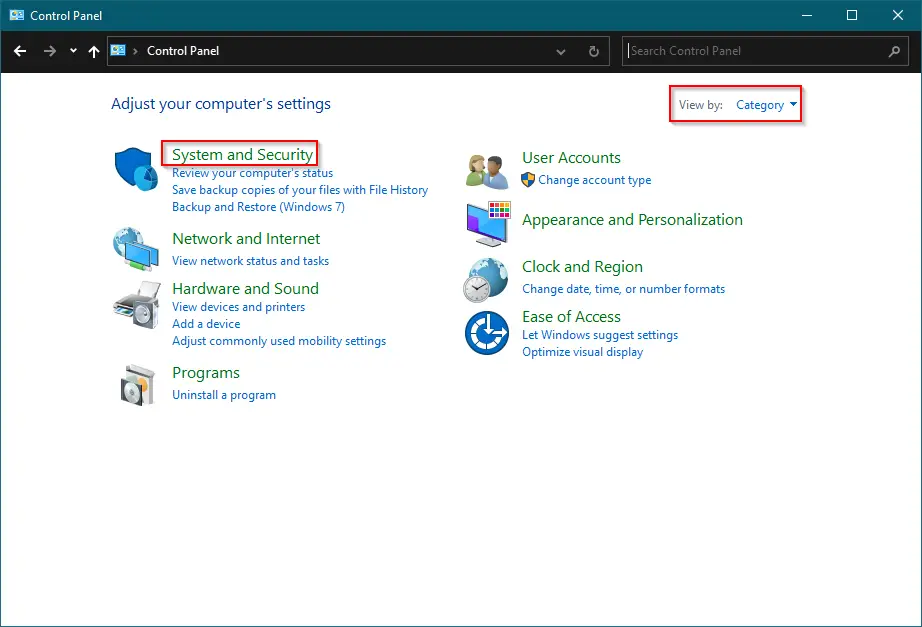
Step 3. Click the System and Security category.
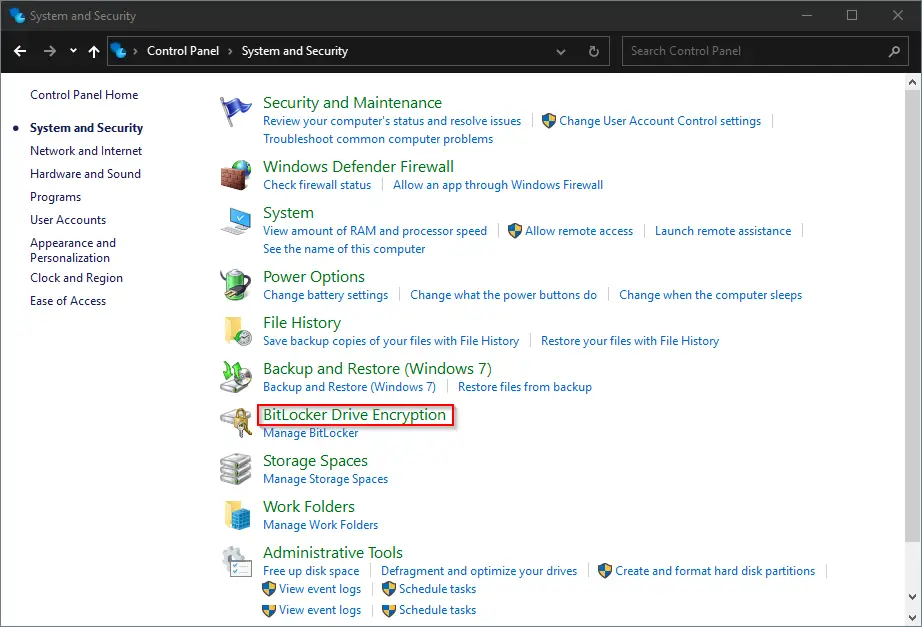
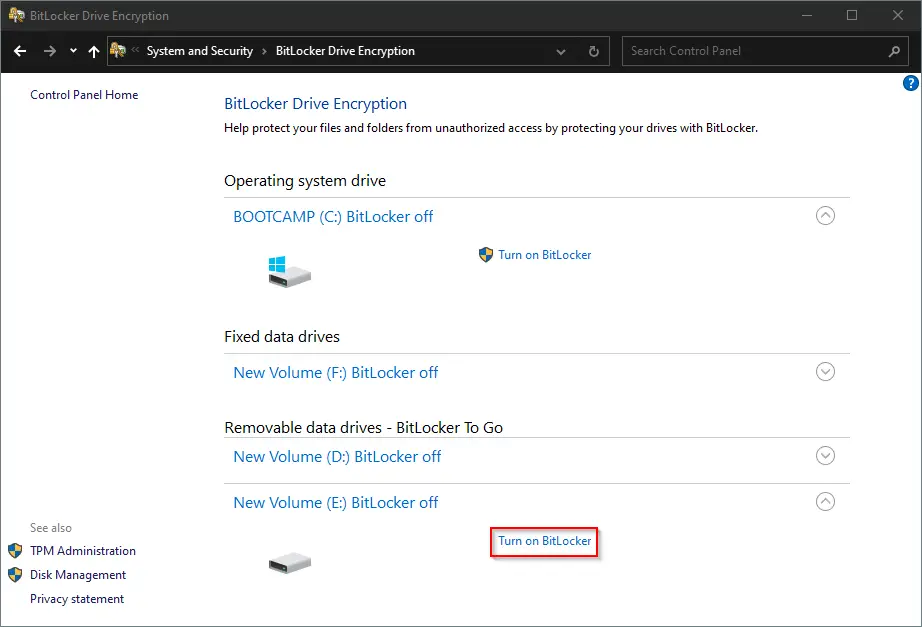
Step 4. Click on BitLocker Drive Encryption.
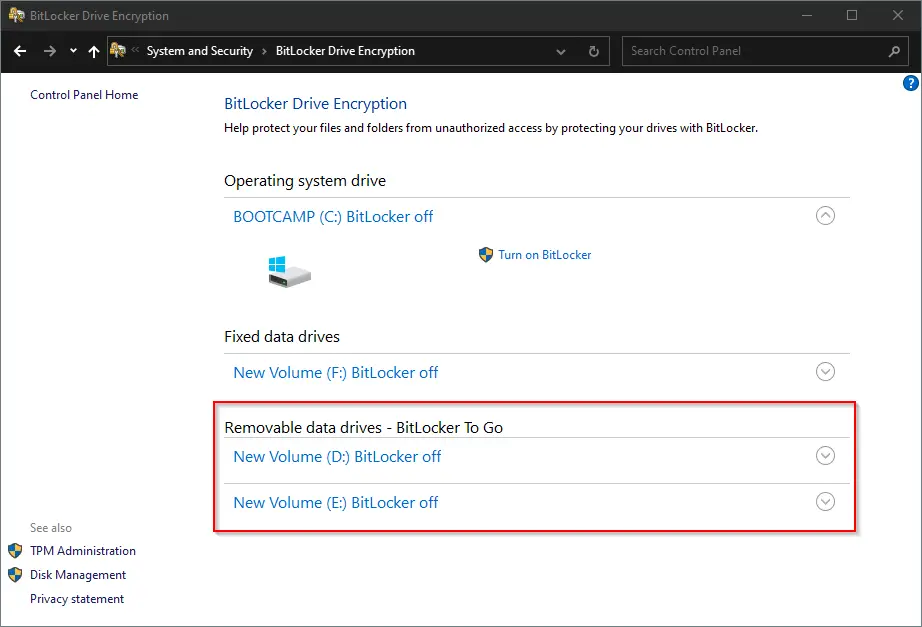
Step 5. In the “BitLocker Drive Encryption” window, under the “Removable data drives – BitLocker to Go” section, expand the partition that you want to protect with BitLocker.
Step 6. Click Turn on BitLocker.
Step 7. Check the checkbox Use a password to unlock the drive and set the password you want.
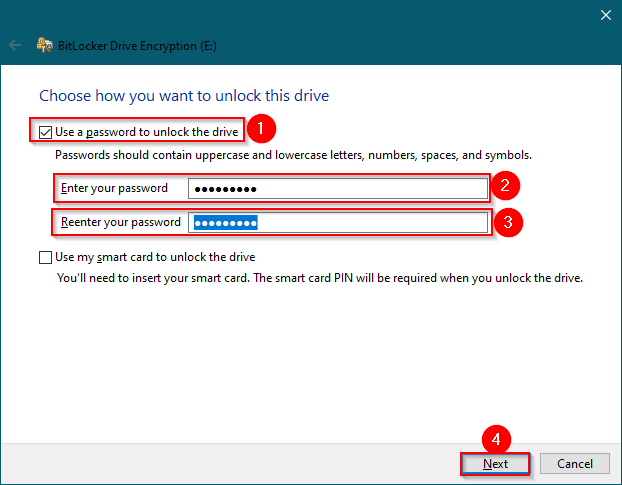
Step 8. Click Next.
Step 9. Click Save to a file.
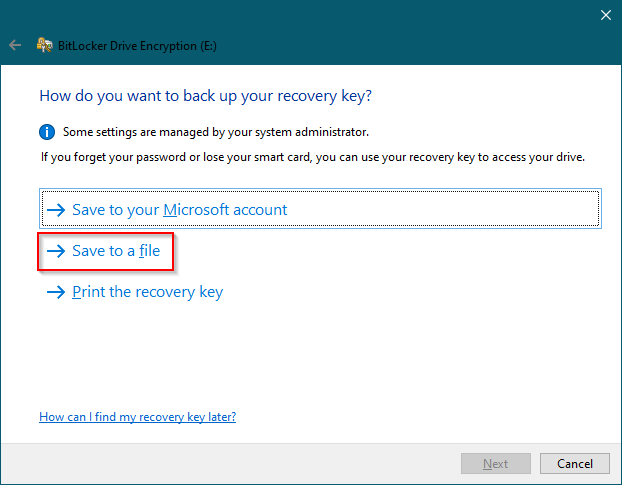
Step 10. Select the desired location on your PC to store the encrypted password to recover your drive data if you forget.
Step 11. Click Save.
Step 12. Click Next.
Step 13. Select Encrypt used disk space only (faster and best for new PCs and drives.
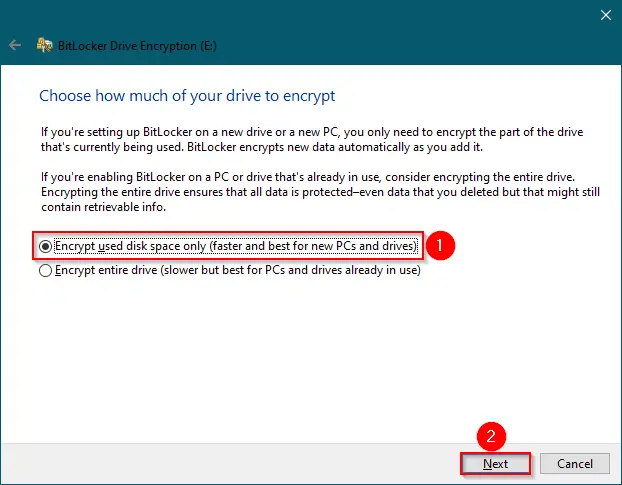
Step 14. Click Next.
Step 15. Select Compatibility mode (best for drives that can be moved from this device).
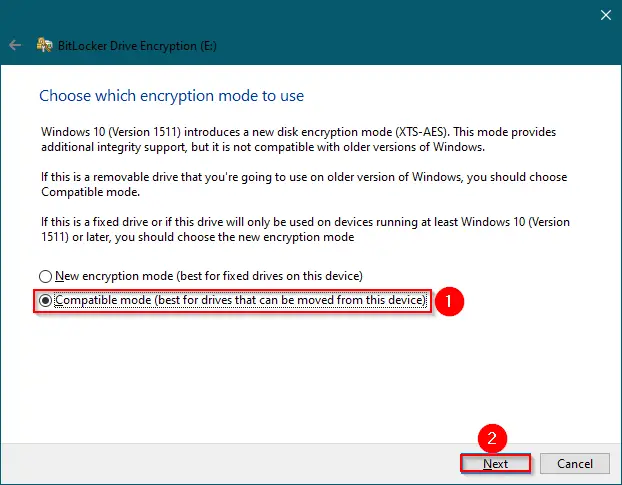
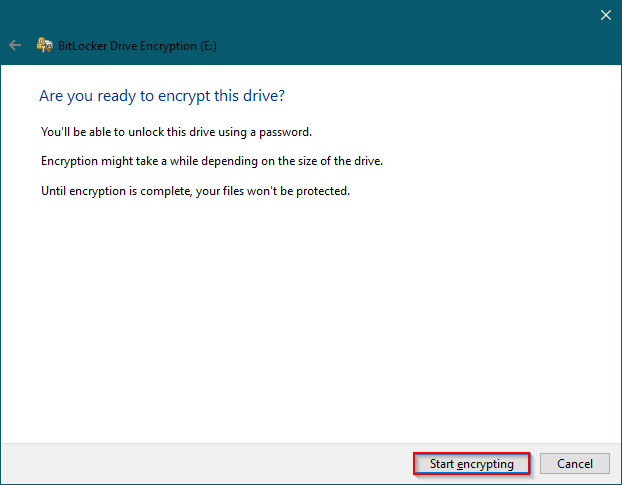
Step 16. Click Next.
Step 17. Click Start encrypting.
Step 18. Click Close.
After executing the above steps, you will have a flash drive with at least two partitions. Encrypted partition you can use to store sensitive data, while in other partitions you can store normal files.
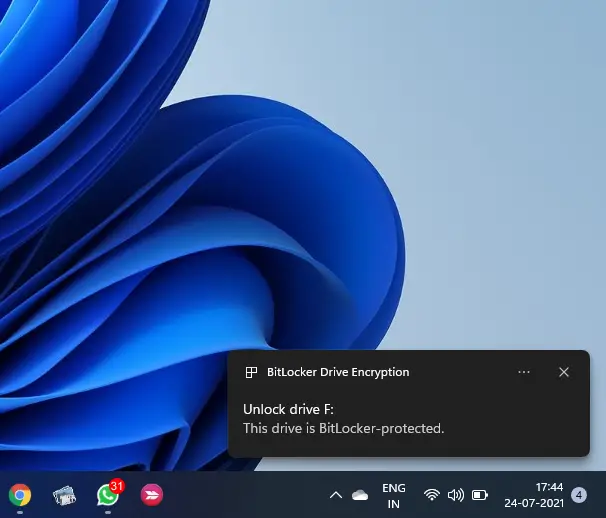
To access the encrypted partition with BitLocker, connect the flash drive to a Windows PC. When you plug your USB drive into your PC, you will see a message on the right-corner bottom screen; this drive is BitLocker-protected.
Now, open File Explorer. When you open File Explorer/This PC, you will notice a lock icon on the drive.
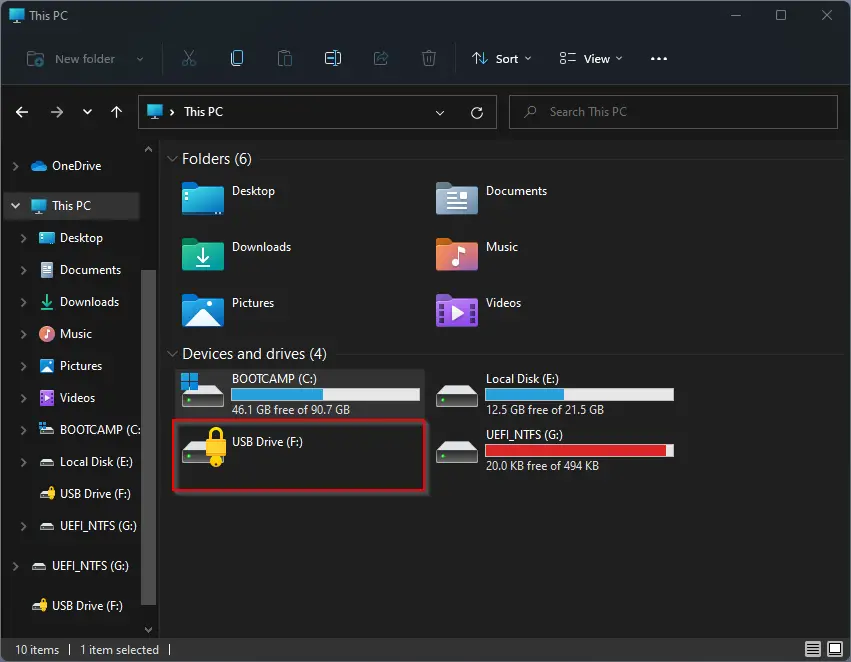
Double-click the encrypted drive to access it (drive with a lock icon). Windows will prompt you to enter the BitLocker password. Here, enter the BitLocker password and then click the Unlock button. Windows will not allow you to open the encrypted partition if you enter the wrong password.
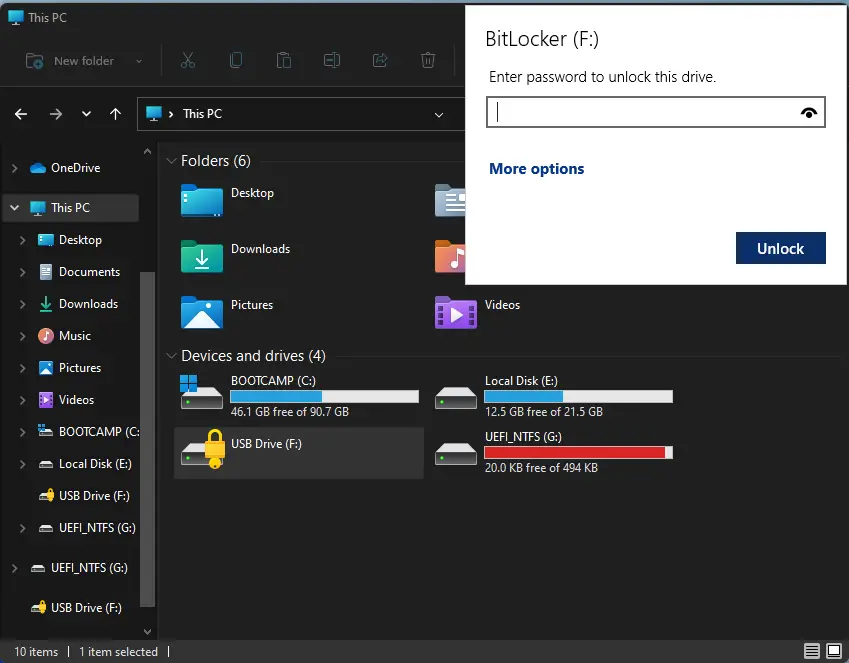
When you forget the BitLocker password and cannot access important data, click the More options link.
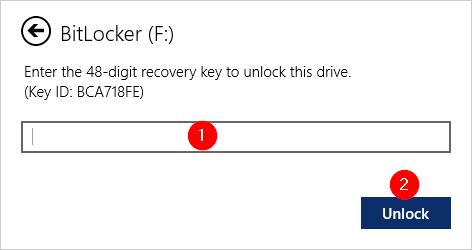
Now, select the Enter recovery key option.
Type the 48-digit recovery key, which you have saved during the BitLocker process. Click the Unlock button.
You can find the BitLocker Recovery Key on the backup file that you have during the setup of BitLocker.
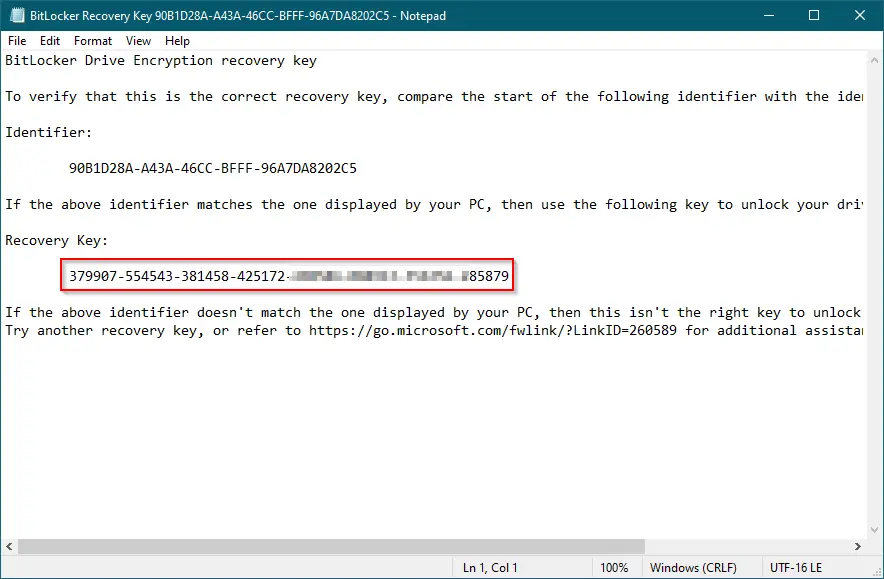
Quick Note: If you have lost the backup file, you can’t recover data from your USB flash drive. You need to format your USB flash drive.
After completing the steps, you can again access the password-protected drive and its contents. To lock it again, disconnect and reconnect to the PC.
Quick Note: Since you are using BitLocker To Go, you’ll be able to unlock the drive on any compatible Windows computer only.
Conclusion
In conclusion, partitioning a USB flash drive on Windows 11 using the built-in Disk Management tool is possible and has its advantages, such as keeping sensitive data separate from normal data. The steps involved in creating multiple partitions on a USB drive have been provided in this GearUpWindows post, and users are advised to backup their important data before proceeding with the steps. Additionally, the post has also provided steps on how to password-protect a USB flash drive using BitLocker to keep sensitive data secure. By following the steps provided, users can create multiple partitions on their USB drives and protect their sensitive data from unauthorized access.
Flash Storage, Networking, Nexcopy Inc., Security, USB Hacks, USB Tutorials
Using Windows 10, you can partition a USB flash drive into multiple partitions. The process is not difficult, you simply follow some easy steps. This tutorial will partition the drive so that your device is assigned multiple drive letters when connected to the computer.
This partition process is not done at the USB controller level; or said another way, done at the hardware level. This USB partition process, for a lack of better terms, is done at the software level. What does this mean for you? It means the partitions can be wiped off the drive and full capacity of the USB flash drive can be restored.
When a USB stick is partitioned at the controller level, or at the hardware level, there is no way to reverse the partition. The multi-partition drive is permanent. At the end of this tutorial is the solution for a hardware based partition solution.
So let’s get started.
How to partition a USB flash drive in Windows 10:
Connect the USB flash drive to your Windows 10 machine. Be sure there is nothing valuable on the USB as this process will remove all content from the drive.
Right Click the Windows icon and select Disk Management.
The Disk Management window will appear with all the connected devices. Select your USB flash drive by clicking one time. By selecting your flash drive, it will allow Windows to apply the partition to that device.

You will see your flash drive as Disk X. The device is represented by diagonal gray lines. Right Click your device in the diagonal gray line area on your screen and select Delete Volume.

Windows will display an error message stating all the contents of the device will be removed. Confirm Yes.

You will now have an unallocated partition for the flash drive. This means a file system is not assigned to the drive. Having no file system on your USB means you cannot save data to the drive, Windows has no way of talking with the device. We need to create a file system for this partition, ie. FAT, FAT32, NTFS, exFAT.
At the same time we assign a file system to this partition, we will also slice up the USB flash drive to create multiple partitions.
Right Click the unallocated space on your screen, this is represented by the diagonal gray lines. Select New Simple Volume from the options presented.

A Microsoft wizard utility will start. Click Next from the first introductory screen and in the following step Windows will display the total amount of memory available to the device. This is where you will enter the size of your first partition. In this example, I am using a 2GB flash drive (1,896MBs) and will make a first partition of 500MBs.

The rest of the wizard utility is auto-populated and straight forward. For example, the wizard will ask if you want a specific drive letter assigned to the partition once the process is done.
The wizard utility will ask you what file system you want this new partition. If you are not sure, just leave the auto-populated selection from Windows.
TIP: If you want the dual partition USB drive to also work in Mac computers, be sure to format the drive as FAT, FAT32 or exFAT. Do not use NTFS, as Mac computers will only read the content, but you cannot write to the device. In fact, read this article on why to never format USBs as NTFS.
Be sure to set a volume name to the device so the partition (new drive letter) will be easy to recognize.

Click Finish for Windows to make this first partition. We are almost done, as the first partition was just made. Looking in Disk Management once the wizard has closed you will now see the device with one partition and your file system and a balance of the drive as unallocated.

Rinse and Repeat. Do the same steps as above for this smaller unallocated memory space.
After the second pass using the partition wizard for Windows you will have a dual partition USB drive with two drive letters. Each USB flash drive letter will work and appear like a normal, single flash drive. You can data load each partition as normal. Heck you can even flash one partition to make it bootable if you are into making bootable USB sticks.
Although the above tutorial makes things easy to partition a USB flash drive into multiple drive letters, this method is not permanent. Using the same steps, you may clear out all the partitions and it’s content. For some users, or companies, having an unsecured dual partition drive is not ideal for their business practice or application. There is an alternative. There is a method to partition a USB at the hardware level.
In order to partition a USB drive at the hardware level, or controller level, you will need some specific controller chips, and the vendor commands to setup the partitions. These tools are not readily available as there are hundreds of chip makers and thousands of USB suppliers. However, Nexcopyhas a solution for business to business applications for create dual partitions at the controller level.
In addition, Nexcopy has the ability to make these partitions write protected, or read only. If this hardware solution is what you need, please contact them.
Rich Gates
Administator for GetUSB.info
GetUSB.info started in 2004 with the concept of providing USB information for everything USB related. At the time, USB was gaining momentum and every day new products, articles and news became published. Today, the site is focused on bringing technical information, tricks and hacks to USB related products. The site does publish off topic information as well, to keep the variety up. Please visit the footer area of any page if you or your company is interested in article or product placement via purchased advertising.