
Applies ToOffice for business Office 365 Small Business Outlook on the web Outlook on the web for Exchange Server 2016
Outlook on the web is the web-based version of Outlook used by organizations and it’s what you use to access the email, calendar, and contacts associated with your work or school account via a web browser. Your work or school account is typically assigned to you by someone in your organization.
Note: Outlook.com (or Hotmail.com) is the web-based version of Outlook which uses a personal Microsoft account such as an Outlook.com or Hotmail.com account to sign in. If you’re trying to access your email, calendar, and contacts at Outlook.com (or Hotmail.com), see How to sign in or out of Outlook.com.
If you’re not sure which version of Outlook you’re using for your mail, calendar, and contacts, see What version of Outlook do I have?
Sign in to Outlook on the web from a web browser with your work or school account
-
Open a web browser and go to Microsoft365.com. (Or sign in directly at outlook.office365.com.)
-
If you’re not automatically signed in with your work or school account, follow the prompts to enter the email address and password for your work or school account. Follow any two-factor authentication prompts you may have previously set up for this account.
-
Select Sign in. (If you signed into Microsoft365.com, select Outlook from the app launcher.)
Note: If you want to sign in to Microsoft365.com with a Microsoft account such as an Outlook.com, Hotmail, Live, or MSN email account instead of your work or school account, sign out, and then sign in again using the correct account. If you successfully signed in, but not sure what you’re signed in with, select the Account manager in Outlook. If you’re not signed in with the account you want, select Sign out and start the process again, or select Sign in with a different account and follow the prompts using the correct account.
Sign in to Outlook on the web with your work or school account
-
Go to login.partner.microsoftonline.cn and sign in with your work or school account username and existing password.
-
If you’re not automatically signed in with your work or school account, follow the prompts to enter the email address and password for your work or school account. Follow any two-factor authentication prompts you may have previously set up for this account.
-
Select Sign in and then select Outlook from the app launcher.
Note: If you signed in with a Microsoft account such as an Outlook.com, Hotmail, Live, or MSN email account instead of your work or school account, sign out, and then sign in again using the correct account. Not sure which account you’re signed in with? Select Account manager in the Outlook navigation header. If you’re not signed in with the account you want, select Sign out and start the process again, or select Sign in with a different account and follow the prompts using the work or school account you want to access.
Sign in to Outlook on the web with your work or school account
-
Go to portal.office.de and sign in with your work or school account username and existing password.
-
If you’re not automatically signed in with your work or school account, follow the prompts to enter the email address and password for your work or school account. Follow any two-factor authentication prompts you may have previously set up for this account.
-
Select Sign in and then select Outlook from the app launcher.
Note: If you signed in with a Microsoft account such as an Outlook.com, Hotmail, Live, or MSN email account instead of your work or school account, sign out, and then sign in again using the correct account. Not sure which account you’re signed in with? Select Account manager in the Outlook navigation header. If you’re not signed in with the account you want, select Sign out and start the process again, or select Sign in with a different account and follow the prompts using the work or school account you want to access.
Problems signing in or out?
I forgot my work or school account password or it’s not working
If your admin has given you permission to reset your password go to, passwordreset.microsoftonline.com/. Contact your admin if you don’t have permission to change your password.
If your admin has given you permission to reset your password go to, passwordreset.activedirectory.windowsazure.cn/. Contact your admin if you don’t have permission to change your password.
If your admin has given you permission to reset your password go to, passwordreset.microsoftonline.com/. Contact your admin if you don’t have permission to change your password.
For additional help see, I forgot the username or password for the account I use with Microsoft 365.
I don’t know how to sign out
To sign out of Outlook on the web:
-
Select Account manager in Outlook.
If you don’t see your picture or initials, check to see if ad blocking is turned on. Sometimes this prevents your picture from showing.
-
Select Sign out.
I want to stop signing in automatically
To prevent Outlook on the web from signing you in to your work or school account automatically, clear the Keep me signed in check box the next time you sign into Microsoft 365.
Need more help?
Want more options?
Explore subscription benefits, browse training courses, learn how to secure your device, and more.
With the increasing reliance on digital communication, accessing your emails on the go has become a necessity. Microsoft Outlook Web Access provides a convenient solution for users to access their Outlook emails from any device with an internet connection. Whether you’re traveling, working from home, or simply prefer using a web browser, accessing Microsoft Outlook Web Access ensures that you stay connected and never miss an important email.
To access Microsoft Outlook Web Access, simply open your preferred web browser and navigate to the Outlook Web App login page. Enter your email address and password in the provided fields, and click on the «Sign in» button. Once logged in, you’ll have access to your inbox, calendar, contacts, and other features, allowing you to manage your emails and stay organized effortlessly. Forget about the hassle of downloading and installing software – Microsoft Outlook Web Access makes it easy to access your emails from anywhere, anytime.
To access Microsoft Outlook Web Access, follow these steps:
- Open your preferred web browser.
- Go to the Microsoft Outlook Web Access website.
- Enter your email address and password.
- Click on the «Sign In» button.
- You will now have access to your Microsoft Outlook emails, calendar, and other features.

Setting Up Microsoft Outlook Web Access
Microsoft Outlook Web Access is a web-based email client that allows users to access their Outlook emails, contacts, calendars, and more from any device with an internet connection. This flexibility and convenience make it an essential tool for professionals who are always on the go. In this article, we will guide you through the process of accessing Microsoft Outlook Web Access, step by step.
Step 1: Launch a Web Browser
The first step to access Microsoft Outlook Web Access is to launch a web browser on your device. You can use any popular web browser like Google Chrome, Mozilla Firefox, Safari, or Microsoft Edge. Ensure that you have a stable internet connection before proceeding.
Once you have launched the web browser, click on the address bar and type in the URL for Outlook Web Access. The URL is typically provided by your organization or IT department. It may look something like «https://outlook.office.com» or «https://webmail.companyname.com». Press Enter or Return to go to the Outlook Web Access login page.
If you are accessing Outlook Web Access for the first time, you will be directed to the login page. Here, you will need to enter your email address and password to sign in. Make sure to enter the correct credentials provided by your organization. If you are unsure about the login details, reach out to your IT support team for assistance.
Step 1.1: Two-Factor Authentication (Optional)
Some organizations may enforce two-factor authentication for added security. If your organization has enabled this feature, you will be prompted to enter a verification code after entering your email address and password. The verification code is typically sent to your registered mobile device via SMS or generated by an authentication app like Microsoft Authenticator or Google Authenticator.
If you have two-factor authentication enabled, follow the on-screen instructions to enter the verification code and complete the login process. This additional layer of security helps protect your account from unauthorized access, so it is recommended to enable it if available.
After successfully entering the verification code, you will be redirected to your Outlook Web Access account, where you can start accessing your emails, contacts, and other features.
Step 2: Navigating the Outlook Web Access Interface
Once you have successfully logged in to Outlook Web Access, you will be greeted with the familiar Outlook interface. The interface may vary slightly depending on the version and customization by your organization, but the core features remain the same.
At the top left corner, you will find the Outlook logo or your organization’s logo, indicating that you are on the main Outlook page. Below the logo, you will see the navigation pane, where you can access various Outlook modules such as Mail, Calendar, People (Contacts), and Tasks.
To switch between different modules, simply click on the corresponding icon in the navigation pane. For example, to access your email, click on the Mail icon. To view your calendar, click on the Calendar icon. This intuitive navigation system allows you to seamlessly navigate between different Outlook features.
On the right side of the navigation pane, you will find the search bar, which allows you to quickly search for emails, contacts, or other items within your Outlook account. Just enter your search query and press Enter or click on the magnifying glass icon to initiate the search.
Beneath the search bar, you may see additional options like Favorites, Folders, and Groups. These options provide shortcuts to frequently accessed folders or groups and allow you to organize your Outlook experience according to your preferences.
Step 2.1: Customizing the Outlook Web Access Interface
Outlook Web Access offers customization options to tailor the interface according to your preferences. To access these customization options, click on the Settings icon, typically represented by a gear or cogwheel, located at the top right corner of the page.
Clicking on the Settings icon will display a drop-down menu with various options. Here, you can modify settings related to your account, personalize the appearance, change default language, set up automatic replies, manage rules, and more.
Explore the different settings available to make Outlook Web Access work best for you. You can experiment with different themes, switch between light and dark mode, and configure notifications to stay up to date with important emails and events.
Additionally, you can configure email rules, manage folder settings, and set up automatic replies to streamline your email management process. These customization options enhance your productivity and help you stay organized within Outlook Web Access.
Step 3: Signing Out of Outlook Web Access
Once you have finished using Outlook Web Access, it is essential to sign out to ensure the security of your account. To sign out, locate the sign-out link or option within the interface. This is typically found by clicking on your profile picture or initials, positioned at the top right corner of the page.
Clicking on your profile picture or initials will reveal a drop-down menu with various options. Look for the «Sign Out» or «Log Out» option and click on it to log out of your Outlook Web Access account.
Signing out is particularly important when using a shared or public device to access your Outlook account. It prevents unauthorized access to your emails and maintains the privacy of your personal information.
Step 3.1: Closing the Browser
In addition to signing out, consider closing the web browser completely after you are done using Outlook Web Access. Closing the browser ensures that no one can access your account by simply reopening the browser, especially if you are using a shared or public device.
To close the browser, click on the «X» button located at the top right corner of the browser window. Alternatively, you can use the keyboard shortcut Ctrl+W (Windows) or Command+W (Mac) to close the current tab. If multiple tabs are open, repeat the shortcut to close each tab until the browser window is closed.
By following these steps, you can safely sign out and close the browser, ensuring the security of your Outlook Web Access account and personal information.
Troubleshooting Access Issues with Microsoft Outlook Web Access
While Microsoft Outlook Web Access is generally a reliable platform for accessing your Outlook account, there may be situations where you encounter issues while trying to log in or access certain features. Here are some common access issues and troubleshooting steps:
Issue: Incorrect Login Credentials
If you are repeatedly entering your login credentials and unable to access Outlook Web Access, double-check that you are entering the correct email address and password. It is easy to make a typing error, so ensure the accuracy of your credentials before retrying.
If you are still encountering login issues, contact your organization’s IT support team for assistance. They will be able to verify your credentials, reset your password if necessary, and ensure that any account-related issues are resolved.
If you have forgotten your password, most organizations provide a password recovery option on the login page. Look for a «Forgot Password» or «Reset Password» link and follow the provided instructions to reset your password.
Tip: Password Management
To prevent password-related issues in the future, consider using a password manager to securely store and manage your login credentials. Password managers generate strong, unique passwords for each of your accounts and simplify the login process by auto-filling your credentials when needed.
Popular password managers include LastPass, Dashlane, and KeePass. These tools encrypt your passwords and provide an extra layer of security, reducing the risk of unauthorized access to your Outlook Web Access account.
Issue: Browser Compatibility
If you are experiencing issues with Outlook Web Access, such as slow performance, missing features, or distorted layout, it may be due to compatibility issues with your web browser. Microsoft recommends using the latest version of browsers like Google Chrome, Mozilla Firefox, Safari, or Microsoft Edge for optimal performance.
Try accessing Outlook Web Access using a different browser or ensure that your current browser is up to date. Updating your browser to the latest version can resolve many compatibility issues and provide a smoother browsing experience.
If the issue persists, try clearing your browser cache and cookies. Over time, these files can accumulate and impact the performance of web applications like Outlook Web Access.
Tip: Private Browsing
To further troubleshoot compatibility issues, try opening Outlook Web Access in a private browsing or incognito window. Private browsing typically disables browser extensions and clears cache and cookies, providing a clean browsing environment.
In Google Chrome, you can open a new incognito window by clicking on the three-dot menu icon at the top right corner, then selecting «New Incognito Window.» In Mozilla Firefox, go to the three-line menu icon at the top right corner and select «New Private Window.» The process may vary slightly depending on the browser you are using.
Issue: Account Access Restrictions
In some cases, your organization may have imposed access restrictions that prevent you from accessing Outlook Web Access from certain devices or locations. These restrictions are typically put in place for security reasons.
If you are unable to access Outlook Web Access, verify if the issue is specific to your device or location. Try accessing Outlook Web Access from a different device or location, such as your personal computer or a non-work network. If the issue persists, contact your organization’s IT support team for further assistance.
Your IT support team will be able to determine whether there are any access restrictions applied to your account and can help troubleshoot the issue accordingly.
By following these troubleshooting steps, you can resolve common access issues and ensure a seamless experience while using Microsoft Outlook Web Access.
In conclusion, accessing Microsoft Outlook Web Access is a straightforward process that allows users to access their Outlook emails, contacts, calendars, and more from any device with an internet connection. By following the steps outlined in this article, users can log in, navigate the Outlook Web Access interface, customize their experience, and troubleshoot any access issues that may arise. Remember to always sign out and close the browser after using Outlook Web Access for the security of your account and personal information.

Accessing Microsoft Outlook Web Access
Microsoft Outlook Web Access (OWA) allows users to access their Outlook email, calendar, and contacts from any web browser. Here are the steps to access OWA:
1. Open a web browser and go to the OWA website.
2. Enter your email address and password in the respective fields.
3. Click on the «Sign In» button to proceed.
4. Once logged in, you will see your Outlook inbox with all your emails.
5. To access your calendar, click on the «Calendar» tab located at the top of the page.
6. To manage your contacts, click on the «People» tab.
7. OWA also provides additional features such as creating and managing tasks, organizing folders, and setting up automatic replies.
8. To log out, click on your profile icon and select «Sign Out».
OWA provides a convenient way to access your Outlook data from anywhere, making it essential for professionals who need to stay connected on the go.
Key Takeaways
- Microsoft Outlook Web Access allows you to access your Outlook emails, calendar, and other features from any web browser.
- To access Outlook Web Access, open a web browser and navigate to the OWA login page.
- Enter your email address and password to log in to Outlook Web Access.
- Once logged in, you can read and send emails, manage your calendar, and access other Outlook features.
- Outlook Web Access is a convenient option for accessing your Outlook account when you don’t have access to the desktop application.
Frequently Asked Questions
Accessing Microsoft Outlook Web Access can be essential for individuals who need to manage their emails, calendars, and tasks remotely. Here are some commonly asked questions about accessing Microsoft Outlook Web Access:
1. How can I access Microsoft Outlook Web Access?
Accessing Microsoft Outlook Web Access is easy. All you need is a stable internet connection and a supported web browser. Simply open your web browser and type in the URL provided by your organization. You will be redirected to the Outlook Web Access login page. Enter your username and password, and you will have access to your emails, calendars, and other Outlook features.
2. Can I access Microsoft Outlook Web Access on my mobile device?
Yes, you can access Microsoft Outlook Web Access on your mobile device. Most modern web browsers support the Outlook Web Access interface, making it accessible on smartphones and tablets. Simply open your preferred web browser on your mobile device, enter the Outlook Web Access URL, and log in with your credentials. You can access your emails, calendars, and other features just like you would on a computer.
3. Are there any specific system requirements for accessing Microsoft Outlook Web Access?
To access Microsoft Outlook Web Access, you need a supported web browser. The supported browsers may vary based on your organization’s configuration, so it’s best to check with your IT department. However, popular web browsers such as Google Chrome, Mozilla Firefox, and Microsoft Edge are commonly supported. Additionally, ensure that you have a stable internet connection to access your Outlook account smoothly.
4. Can I access multiple email accounts through Microsoft Outlook Web Access?
Yes, you can access multiple email accounts through Microsoft Outlook Web Access. If you have multiple email accounts linked with your Outlook account, you can easily switch between them. Once you log in to Outlook Web Access, you can navigate to the account settings and add or remove email accounts. This allows you to manage all your email accounts conveniently in one place.
5. Is there a way to enhance the security of my Microsoft Outlook Web Access account?
Yes, there are several ways to enhance the security of your Microsoft Outlook Web Access account. Firstly, make sure to use a strong, unique password for your account. Additionally, enabling two-factor authentication adds an extra layer of security by requiring a verification code along with your password to log in. Regularly updating your password and keeping your device’s security features up to date also helps in maintaining a secure Outlook Web Access account.
In conclusion, accessing Microsoft Outlook Web Access is a straightforward process that allows you to conveniently access your email, calendar, and other features from any device with an internet connection. By following a few simple steps, you can log in and start using Outlook Web Access in no time.
To access Microsoft Outlook Web Access, start by opening your preferred web browser and navigating to the Outlook Web Access URL. Next, enter your username and password, provided by your organization, and click «Sign In.» Once you’re logged in, you can access your email, schedule meetings, manage tasks, and even customize your Outlook preferences to suit your needs. Remember to log out when you’re done for security purposes.
Accessing Microsoft Outlook Web Access is an essential skill for professionals, allowing them to efficiently manage their email, calendar, and contacts. With its user-friendly interface and powerful features, Outlook Web Access provides a seamless experience for staying connected and organized. But how exactly can you access this powerful tool? Let’s explore the steps to get started.
Microsoft Outlook Web Access has a rich history, dating back to its inception in 1997. Over the years, it has evolved to become a robust web-based email client that offers easy access to your emails from any device with an internet connection. According to recent statistics, Outlook Web Access is used by millions of professionals worldwide, making it a widely trusted and popular choice for managing their email communication. Whether you are using a Windows, Mac, or mobile device, accessing Outlook Web Access is a simple and effective solution. Now, let’s delve into the steps to access this powerful tool.
Accessing Microsoft Outlook Web Access is a simple process that allows you to stay connected to your emails, calendar, and contacts from any device with an internet connection. Here’s a step-by-step guide:
- Open your preferred web browser.
- Go to the Outlook Web Access website.
- Enter your email address and password.
- Click on the «Sign In» button.
- You will be directed to your Outlook inbox, where you can access and manage your emails.

Accessing Microsoft Outlook Web Access: A comprehensive guide
Microsoft Outlook Web Access (OWA) is a web-based email client that allows users to access their Outlook email account from any device with an internet connection. Whether you’re on a desktop computer, laptop, tablet, or smartphone, OWA provides a convenient way to manage your emails, calendar, contacts, and tasks. In this guide, we will walk you through the step-by-step process of accessing Microsoft Outlook Web Access and making the most of its features.
Accessing Outlook Web Access on Windows
If you’re using a Windows computer, accessing Outlook Web Access is straightforward. Here’s how:
Step 1: Open your preferred web browser
Launch your preferred web browser, such as Google Chrome, Mozilla Firefox, or Microsoft Edge. Make sure you have a stable internet connection.
Step 2: Go to the Outlook Web Access website
Once your web browser is open, navigate to the Outlook Web Access website. The URL for Outlook Web Access may vary depending on your organization’s setup. Typically, it takes the format: «https://webmail.yourcompany.com» or «https://outlook.office365.com». Consult your IT department or refer to any communication from your organization for the correct URL.
Step 3: Enter your login credentials
On the Outlook Web Access login page, enter your username and password. These credentials are usually provided by your IT department and are the same credentials you use to access your email on other devices.
Step 4: Access your Outlook email account
Once you have entered your login credentials, click the «Sign In» button to access your Outlook email account. You will be redirected to the Outlook Web Access interface, where you can view and manage your emails, calendar, contacts, and more.
Accessing Outlook Web Access on Mac
For Mac users, accessing Outlook Web Access is just as simple. Follow these steps:
Step 1: Launch your web browser
Open your preferred web browser on your Mac, such as Safari, Google Chrome, or Mozilla Firefox.
Step 2: Visit the Outlook Web Access website
Once your web browser is open, go to the Outlook Web Access website. Enter the correct URL, which typically follows the format «https://webmail.yourcompany.com» or «https://outlook.office365.com».
Step 3: Enter your credentials
On the Outlook Web Access login page, enter your username and password provided by your IT department. These are the same credentials you use to access your Outlook email on other devices.
Step 4: Access your Outlook email account
Click the «Sign In» button to access your Outlook email account. You will be redirected to the Outlook Web Access interface, where you can manage your emails, calendar, contacts, and other Outlook features.
Accessing Outlook Web Access on Mobile Devices
Microsoft Outlook Web Access is also accessible on mobile devices, including both smartphones and tablets. Here’s how to access OWA on different platforms:
Accessing Outlook Web Access on Android
To access Outlook Web Access on your Android device, follow these steps:
Step 1: Install the Outlook app
Open the Google Play Store on your Android device and search for the official Microsoft Outlook app. Install the app on your device.
Step 2: Launch the Outlook app
Once the app is installed, open it by tapping on the Outlook icon. The icon usually resembles an envelope with a blue background.
Step 3: Enter your login details
On the login screen, enter your email address and password associated with your Outlook account. Tap «Sign In» to proceed.
Step 4: Access your Outlook email account
Once you have successfully signed in, you will be able to access your Outlook email account, calendar, contacts, and other features through the app.
Accessing Outlook Web Access on iOS
If you’re using an iPhone or iPad, follow these steps to access Outlook Web Access:
Step 1: Download the Outlook app
Open the App Store on your iOS device and search for the official Microsoft Outlook app. Download and install the app on your device.
Step 2: Launch the Outlook app
Once the app is installed, tap on the Outlook icon to launch it. The icon typically features an envelope with a blue background.
Step 3: Sign in with your credentials
Enter your Outlook email address and password on the login screen. Tap «Sign In» to proceed.
Step 4: Access your Outlook email account
After successfully signing in, you will be able to access your Outlook email account, calendar, contacts, and more through the Outlook app on your iOS device.
Troubleshooting Access Issues
If you encounter any issues while trying to access Outlook Web Access, here are a few steps you can take to troubleshoot:
Clear your browser cache and cookies
Sometimes, browser cache and cookies can cause issues with accessing websites. Clearing your browser cache and cookies can help resolve any conflicts and allow you to access Outlook Web Access smoothly.
Check your internet connection
Ensure that you have a stable internet connection. Unstable or slow internet can prevent you from accessing Outlook Web Access or cause it to load slowly.
Contact your IT department
If you are unable to resolve the issue on your own, reach out to your organization’s IT department for assistance. They will be able to provide you with specific troubleshooting steps based on your organization’s setup.
In Conclusion
Accessing Microsoft Outlook Web Access is essential for managing your Outlook email account from various devices and platforms. By following the steps outlined in this guide, you should be able to access your account seamlessly and leverage the features and functionalities offered by OWA. In case of any issues, don’t hesitate to reach out to your IT department for assistance. Happy OWA usage!

Accessing Microsoft Outlook Web Access
Microsoft Outlook Web Access (OWA) is a web-based email application that allows users to access their Microsoft Outlook email accounts from any device with an internet connection. Here are the steps to access OWA:
- Open a web browser (such as Google Chrome, Mozilla Firefox, or Microsoft Edge) on your device.
- Type the OWA URL in the address bar. The URL format typically follows this structure: «https://owa.yourcompanysite.com».
- Press Enter to navigate to the sign-in page.
- Enter your email address and password in the provided fields.
- Click on the «Sign In» button to access your Outlook email account.
Once logged in, you will have access to your Outlook email, contacts, calendar, and other features. OWA provides a familiar interface similar to the desktop version of Microsoft Outlook, allowing you to send and receive emails, manage folders, create appointments, and more. It is a convenient and secure way to stay connected to your Outlook email wherever you are.
Key Takeaways — How to Access Microsoft Outlook Web Access
- Microsoft Outlook Web Access allows you to access your email, calendar, and contacts from any device with an internet connection.
- To access Microsoft Outlook Web Access, open a web browser and go to the Outlook Web Access URL.
- Enter your email address and password to log in to your Microsoft Outlook Web Access account.
- If you don’t have an email address, contact your IT department to set up a Microsoft Outlook Web Access account.
- Once logged in, you can access your emails, organize your calendar, and manage your contacts right from the Outlook Web Access interface.
Frequently Asked Questions
Here are some commonly asked questions and answers on how to access Microsoft Outlook Web Access:
1. How can I access Microsoft Outlook Web Access on my computer?
To access Microsoft Outlook Web Access on your computer, follow these steps:
1. Open your preferred web browser.
2. Enter the URL for Outlook Web Access, which is typically provided by your organization’s IT department.
3. Enter your username and password when prompted.
4. Click the «Sign In» button to access your mailbox.
2. Can I access Microsoft Outlook Web Access on my mobile device?
Yes, you can access Microsoft Outlook Web Access on your mobile device. Here’s how:
1. Download and install the Microsoft Outlook app from the App Store (iOS) or Google Play Store (Android).
2. Open the app and tap on the «Get Started» button.
3. Enter your email address, then tap «Add account.»
4. Follow the on-screen instructions to sign in using your username and password.
5. Once signed in, you will have access to your Outlook mailbox on your mobile device.
3. What if I forget my password for Microsoft Outlook Web Access?
If you forget your password for Microsoft Outlook Web Access, you can reset it using the following steps:
1. Go to the Outlook Web Access sign-in page.
2. Click on the «Can’t access your account?» link.
3. Select the option to reset your password.
4. Follow the instructions provided to reset your password. This may involve answering security questions or receiving a verification code.
4. What if I can’t access Microsoft Outlook Web Access due to a technical issue?
If you are experiencing technical issues that prevent you from accessing Microsoft Outlook Web Access, try the following steps:
1. Clear your browser cache and cookies.
2. Restart your computer or device.
3. Try accessing Outlook Web Access using a different web browser.
4. Contact your organization’s IT department for further assistance.
5. Can I access Microsoft Outlook Web Access offline?
No, Microsoft Outlook Web Access requires an internet connection to function. You cannot access it offline.
To access Microsoft Outlook Web Access, follow these steps:
1. Open your web browser and enter the URL for your organization’s OWA login page. This is typically something like «https://mail.example.com» or «https://outlook.office365.com».
2. Enter your email address and password in the respective fields. Make sure to use the correct email address associated with your Microsoft Outlook account.
3. Click on the «Sign In» or «Log In» button to access your Microsoft Outlook Web Access account.
Once you have successfully logged in, you will be able to read, send, and manage your emails, as well as access other features of Microsoft Outlook through the web interface.
Remember to always log out of your OWA account when using a shared or public computer to ensure the security of your personal information.
From Wikipedia, the free encyclopedia
Outlook on the web
|
Outlook Mail inbox in Outlook on the web, running in Microsoft Edge |
|
| Developer(s) | Microsoft |
|---|---|
| Initial release | May 23, 1997[1] |
| Written in | TypeScript (React) |
| Type | Personal information manager (Webmail, calendaring, contacts, and tasks) |
| License |
|
| Website | microsoft |
Outlook on the web (formerly Outlook Web App and Outlook Web Access[2]) is a personal information manager web app from Microsoft. It is a web-based version of Microsoft Outlook, and is included in Exchange Server and Exchange Online (a component of Microsoft 365.)[3][4][5]
It can be freely accessed from any web browser whether inside or outside an organization’s network,[6][5] and includes a web email client, a calendar tool, a contact manager, and a task manager. It also includes add-in integration, Skype on the web, and alerts as well as unified themes that span across all the web apps.[7]
Outlook on the web is available to Microsoft 365 (formerly Outlook 365) and Exchange Online subscribers, and is included with the on-premises Exchange Server, to enable users to connect to their email accounts via a web browser, without requiring the installation of Microsoft Outlook or other email clients. In case of Exchange Server, it is hosted on a local intranet and requires a network connection to the Exchange Server for users to work with e-mail, address book, calendars and task.[8] The Exchange Online version, which can be bought either independently or through Office 365 licensing program, is hosted on Microsoft servers on the World Wide Web.[8]
Outlook Web Access was created in 1995 by Microsoft Program Manager Thom McCann on the Exchange Server team. An early working version was demonstrated by Microsoft Vice President Paul Maritz at Microsoft’s famous Internet summit in Seattle on December 27, 1995. The first customer version was shipped as part of the Exchange Server 5.0 release in early 1997.
The first component to allow client-side scripts to issue HTTP requests (XMLHTTP) was originally written by the Outlook Web Access team.[9][10] It soon became a part of Internet Explorer 5. Renamed XMLHttpRequest and standardized by the World Wide Web Consortium,[11] it has since become one of the cornerstones of the Ajax technology used to build advanced web apps.
Outlook Web Access was later renamed Outlook Web App.[when?] An update on August 4, 2015, renamed OWA to «Outlook on the web»,[12] often referred to in brief as simply «Outlook».
Mail is the webmail component of Outlook on the web. The default view is a three column view with folders and groups on the left, an email message list in the middle, and the selected message on the right. With the 2015 update, Microsoft introduced the ability to pin, sweep and archive messages, and undo the last action, as well as richer image editing features.[12] It can connect to other services such as GitHub and Twitter through Office 365 Connectors. Actionable Messages in emails allows a user to complete a task from within the email, such as retweeting a Tweet on Twitter or setting a meeting date on a calendar.[13]
Outlook on the web supports S/MIME and includes features for managing calendars, contacts, tasks, documents (used with SharePoint or Office Web Apps), and other mailbox content. In the Exchange 2007 release, Outlook on the web (still called Outlook Web App at the time) also offers read-only access to documents stored in SharePoint sites and network UNC shares.[14]
Calendar is the calendaring component of Outlook on the web. With the update, Microsoft added a weather forecast directly in the Calendar, as well as icons (or «charms») as visual cues for an event. In addition, email reminders came to all events, and a special Birthday and Holiday event calendars are created automatically. Calendars can be shared and there are multiple views such as day, week, month, and today. Another view is work week which includes Mondays through Fridays in the calendar view. Calendar’s «Board View» feature allows for a customizable calendar with widgets such as Goal, Calendar, Tasks and Tips.
Calendar details can be added with HTML and rich-text editing, and files can be attached to calendar events and appointments.
People is the contact manager component of Outlook on the web. A user can search and edit existing contacts, as well as create new ones. Contacts can be placed into folders and duplicate contacts can be linked from multiple sources such as LinkedIn or Twitter.[15] In Outlook Mail, a contact can be created by clicking on an email address sender, which pulls down a contact card with an add button to add to Outlook People. Contacts can be imported as well as placed into a list that can be utilized when composing an email in Outlook Mail.
People can also sync with friends and connections lists on LinkedIn, Facebook, and Twitter.
To Do was originally launched as Tasks for Outlook Web App. Microsoft was slowly rolling out a preview of Tasks to its consumer-based Outlook.com service that in May 2015, was announced to be moving to the Office 365 infrastructure.[16] It was initially a part of Calendar as a view. Microsoft has separated the services into its own web app in Outlook on the web. In a post on the Office Blogs in 2015, Microsoft announced that Outlook Web App would be renamed Outlook on the web and that Tasks would move under that brand.[12] A user can create tasks, put them into categories, and move them to another folder. A feature added was the ability to set due days and sort and filter the tasks according to those criteria. The app provides the user with fields such as subject, start and end dates, percent complete, priority, and how much work was put into each task. Rich editing features like bold, italic, underline, numbering, and bullet points were also introduced. Tasks can be edited and categorized according to how the user wishes them to be sorted.[17]
Outlook on the web has had two interfaces available: one with a complete feature set (known as Premium) and one with reduced functionality (known as Light or sometimes Lite). Prior to Exchange 2010, the Premium client required Internet Explorer. Exchange 2000 and 2003 require Internet Explorer 5 and later,[18][19] and Exchange 2007 requires Internet Explorer 6 and later.[20] Exchange 2010 supports a wider range of web browsers: Internet Explorer 7 or later, Firefox 3.01 or later, Chrome, or Safari 3.1 or later.[21] However, Exchange 2010 restricts its Firefox and Safari support to macOS and Linux.[21] In Exchange 2013, these browser restrictions were lifted.[22]
In Exchange 2010 and earlier, the Light user interface is rendered for browsers other than Internet Explorer. The basic interface did not support search on Exchange Server 2003. In Exchange Server 2007, the Light interface supported searching mail items; managing contacts and the calendar was also improved.[20][23] The 2010 version can connect to an external email account.
The ability to add new accounts to Outlook on the web using the Connected accounts feature was removed in September 2018 and all connected accounts stopped synchronizing email the following month.[24]
- List of collaborative software
- ^ «Happy Birthday OWA: Outlook Web Access Turns 10!». May 23, 2007.
- ^ AshaIyengar21 (February 22, 2023). «Outlook on the web in Exchange Online». learn.microsoft.com. Retrieved October 4, 2023.
{{cite web}}: CS1 maint: numeric names: authors list (link) - ^ «Getting started in Outlook Web App». Microsoft. Retrieved September 2, 2020.
- ^ «Compare Exchange Online plans». office.com. Microsoft. Retrieved November 19, 2015.
- ^ a b «Examining the Cost of Outlook Web Access». www.brighthub.com. April 28, 2011. Retrieved October 18, 2023.
- ^ «Outlook 2013 Web Access». dummies. Retrieved October 18, 2023.
- ^ «What’s new in Exchange 2016». TechNet. Microsoft. Retrieved November 28, 2015.
- ^ a b «Sign in to Outlook Web App». Office.com. Microsoft.
- ^ Le Roy, Bertrand; Matt Gibbs (2006). «Some history: from XmlHttp to UpdatePanel». ASP.NET AJAX Update Panel Control. O’Reilly Short Cuts. p. 2. ISBN 978-0-596-52747-1.
- ^ Hopmann, Alex. «The story of XMLHTTP». Archived from the original on June 23, 2007. Retrieved January 6, 2014.
- ^ «The XMLHttpRequest Object». W3C. April 15, 2008. Retrieved October 1, 2008.
- ^ a b c «New features coming to Outlook on the web». Office Blogs. Microsoft. August 4, 2015. Archived from the original on February 20, 2016.
- ^ team, the Outlook (September 27, 2016). «New Outlook partner integrations help you extend your email capabilities». Microsoft 365 Blog.
- ^ «Tips on Remote File Access in Exchange 2007». TECHCOMMUNITY.MICROSOFT.COM. May 1, 2009. Retrieved December 1, 2020.
- ^ «Using contacts (People) in Outlook on the web – Office Support». support.office.com. Retrieved November 25, 2015.
- ^ «From the Forums: Outlook on the web preview, first impressions». Retrieved August 20, 2015.
- ^ «Tasks overview». support.office.com. Retrieved August 20, 2015.
- ^ «Exchange 2000 Outlook Web Access». Microsoft Corporation. 2002. Retrieved November 22, 2009.
- ^ «Improvements in Outlook Web Access 2003». Microsoft Corporation. 2006. Retrieved November 22, 2009.
- ^ a b «Client Features in Outlook Web Access». Microsoft Corporation. 2008. Retrieved November 22, 2009.
- ^ a b «Outlook Web App Supported Browsers». Microsoft Corporation. Retrieved April 21, 2010.
- ^ Supported browsers for Outlook Web App – support. Office.microsoft.com. Retrieved on April 12, 2014.
- ^ «Microsoft Office Outlook Web Access». Microsoft Corporation. 2007. Retrieved May 27, 2009.
- ^ «Connect email accounts in Outlook on the web (Office 365)». Microsoft. 2018. Retrieved March 12, 2019.
- Official website
- Official help
- Exchange Team Blog
- База знаний
- Outlook Web Access (OWA)
Общая информация
В статье описывается настройка Outlook Web Access (OWA) для удаленного доступа к почте на сервере Exchange c двухфакторной аутентификацией.
Минимальная версия exchange:
Exchange с 2013
Возможные способы аутентификации:
Мобильное приложение MultifactorСМСБиометрияАппаратные OTP токеныПриложения OTP: Google Authenticator или Яндекс.КлючTelegram
Обратите внимание
Если вы используете ADFS для доступа к OWA, переходите к инструкции по настройке ADFS.
Видео-презентация
Возможности
- Защита доступа вторым фактором проверки подлинности при каждом входе и через настраиваемый промежуток времени.
- Самостоятельная настройка второго фактора пользователем при первом входе.
- Избирательное включение второго фактора на основе принадлежности к группе в Active Directory.
- Журнал доступа.
Схема работы
- Пользователь открывает сайт Outlook Web Access;
- OWA запрашивает первый фактор аутентификации: логин и пароль, проверяет корректность указанных данных и создает пользовательскую сессию;
- Компонент Multifactor.IIS.Adapter проверяет, что сессия авторизована и переадресовывает пользователя на второй фактор аутентификации;
- После успешного прохождения второго фактора, пользователь возвращается на сайт OWA и продолжает работу.
Для настройки второго фактора аутентификации вам потребуется установить и настроить на сервере Exchange компонент Multifactor.IIS.Adapter. Компонент разработан и поддерживается компанией MULTIFACTOR, распространяется бесплатно вместе с исходным кодом. Актуальная версия находится на GitHub: код и сборка (архив Multifactor.IIS.Adapter.zip).
Лицензия
Обратите внимание на лицензию. Она не дает вам право вносить изменения в исходный код Компонента и создавать производные продукты на его основе. Исходный код предоставляется в ознакомительных целях.
Требования для установки
- Компоненту необходим доступ к хосту api.multifactor.ru по TCP порту 443 (TLS) напрямую или через HTTP прокси;
- Outlook Web Access должен работать с валидным SSL сертификатом.
- На сервере должно быть установлено правильное время.
Настройка MULTIFACTOR
- Зайдите в систему управления MULTIFACTOR, далее в раздел «Ресурсы» и создайте новый сайт Outlook Web Access;
Настройка OWA
-
Скопируйте файл
Bin\MultiFactor.IIS.Adapter.dllв директориюC:\Program Files\Microsoft\Exchange Server\V15\ClientAccess\Owa\Bin; -
Скопируйте файл
mfa.aspxв директориюC:\Program Files\Microsoft\Exchange Server\V15\ClientAccess\Owa; -
Отредактируйте файл
C:\Program Files\Microsoft\Exchange Server\V15\ClientAccess\Owa\web.config:- сперва сделайте резервную копию
- в раздел
<modules>первой строкой добавьте компонент
<add type="MultiFactor.IIS.Adapter.Owa.Module, MultiFactor.IIS.Adapter" name="MFA" />
- в раздел
<appSettings>добавьте параметры компонента
<add key="multifactor:api-url" value="https://api.multifactor.ru" />
<add key="multifactor:api-key" value="API Key из настроек Мультифактора" />
<add key="multifactor:api-secret" value="API Secret из настроек Мультифактора" />
- сохраните и закройте.
Для избирательного запроса второго фактора на основе принадлежности к группе Active Directory, добавьте в конфигурацию параметры
<add key="multifactor:active-directory-2fa-group" value="owa-2fa" />
<add key="multifactor:active-directory-2fa-group-membership-cache-timeout" value="15"/>
- первый параметр — название группы в AD, у которой требуется запрашивать второй фактор. Группа может быть вложенной, то есть содержать в себе другие группы;
- второй параметр — промежуток времени (в минутах), через который обновляется информация о вхождении пользователя в группу. Для оптимизации производительности, значение по-умолчанию составляет 15 минут (но можно поставить 0).
-
Для работы с API MULTIFACTOR через HTTP Proxy, добавьте в конфигурацию параметр
<add key="multifactor:api-proxy" value="http://proxy:3128" />
-
разрешить ввод логина пользователем в любом формате, но необходимо включить преобразование логина в UserPrincipalName (UPN) при отправке запроса доступа в MULTIFACTOR с помощью следующей настройки:
<add key="multifactor:use-attribute-as-identity" value="userprincipalname" />
reCAPTCHA OWA
Примечание
Подключение Captcha является опциональным и не обязательно для работы компонента.
Если вы не вносили изменения на страницу входа в OWA (настройка цветов, шрифтов, иконок или другая модификация), то следуйте инструкции по замене страницы входа. В противном случае, см. раздел обновление страницы входа.
Замена страницы входа
- Выберите капчу для подключения. Настоящая инструкция предлагает на выбор три варианта: Yandex SmartCaptcha, Google reCAPTCHA v2 и Google reCAPTCHA v3.
- Создайте пару ключей (ключ клиента\сайта и ключ сервера\секретный) в личном кабинете для выбранной капчи, укажите корректный домен, на котором устанавливается капча:
- Отредактируйте файл recaptcha.aspx в соответствующей директории архива, добавив свой секретный ключ:
OWA_captcha
<% @ Page AspCompat=True Language = "VB" %>
<%
Dim strPrivateKey As String = "SECRET_KEY"
Dim strResponse = Request ("response")
Dim ObjWinHTTP As Object
objWinHTTP = Server.CreateObject ("WinHTTP.WinHTTPRequest.5.1")
objWinHTTP.Open ("POST", "https://www.google.com/recaptcha/api/siteverify", False)
objWinHTTP.SetRequestHeader ("Content-type", "application/x-www-form-urlencoded")
Dim strData As String = "secret=" & strPrivateKey & "Gresponse=" & strResponse
objWinHTTP.Send (strData)
Dim strResponseText = objWinHTTP.ResponseText
%>
- Скопируйте файл recaptcha.aspx в директорию OWA: C:\Program Files\Microsoft\Exchange Server\V15\FrontEnd\HttpProxy\owa\auth
- Сделайте бэкап файла logon.aspx из директории C:\Program Files\Microsoft\Exchange Server\V15\FrontEnd\HttpProxy\owa\auth
- Отредактируйте файл logon.aspx в соответствующей директории архива. Для этого найдите фразу «SITE_KEY» и замените все её вхождения на свой ключ.
- Замените файл logon.aspx в директории C:\Program Files\Microsoft\Exchange Server\V15\FrontEnd\HttpProxy\owa\auth на файл logon.aspx с вашим ключом. Перезагрузка Microsoft Exchange Server не требуется.
- ВАЖНО. Установка обновлений Microsoft Exchange Server может привести в перезаписи страницы logon.aspx и удалению recaptcha.aspx.
Обновление страницы входа
Выполните пункты 1-5 инструкции выше. ВМЕСТО п.6. выполните следующие действия. Внесите изменения в файл: C:\Program Files\Microsoft\Exchange Server\V15\FrontEnd\HttpProxy\owa\auth\logon.aspx
Найдите разметку
<form action="/owa/auth.owa"
и замените её на
<form action=" "
Найдите разметку
<div onclick="clkLgn()"
и замените её на
<div onclick="recaptchaClkLgn()"
Найдите разметку
<div><input id="passwordText"
и на следующей строчке
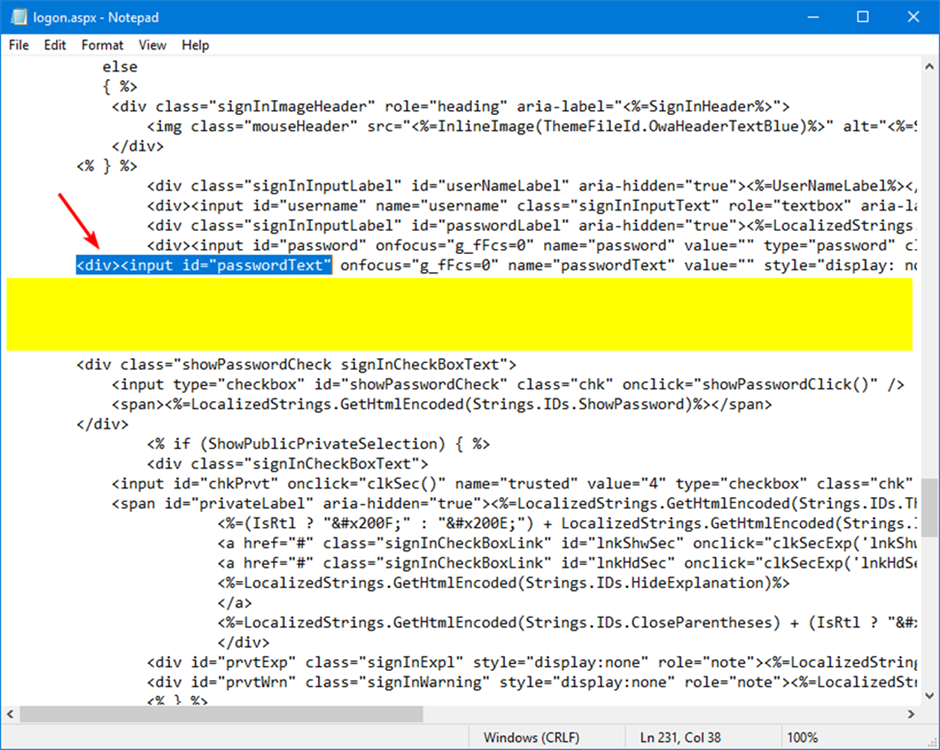
вставьте код (предварительно заменив все вхождения ключа SITE_KEY): а) для подключения Yandex SmartCaptcha
<script type="text/javascript">
            function recaptchaClkLgn()
            {
            var oReq = new XMLHttpRequest();
            var sResponse = document.getElementsByName("smart-token")[0].value;
            var sData = "response=" + sResponse;
            oReq.open("GET", "/owa/auth/recaptcha.aspx?" + sData, false);
            oReq.send(sData);
            if (oReq.responseText.indexOf("ok") != -1)
            {
                document.forms[0].action = "/owa/auth.owa";
                clkLgn();
            }
            else
            {
            alert("Invalid CAPTCHA response");
            }
            }
            </script>
<script src="https://smartcaptcha.yandexcloud.net/captcha.js" async defer></script>
<div class="smart-captcha" data-sitekey="SITE_KEY"></div>
б) для подключения Google reCAPTCHA v2
<script type="text/javascript">
            function recaptchaClkLgn()
            {
            var oReq = new XMLHttpRequest();
            var sResponse = document.getElementById("g-recaptcha-response").value;
            var sData = "response=" + sResponse;
            oReq.open("GET", "/owa/auth/recaptcha.aspx?" + sData, false);
            oReq.send(sData);
            if (oReq.responseText.indexOf("true") != -1)
            {
                oReq.open("GET", "/owa/auth/mfa.aspx?" + sData, false);
                document.forms[0].action = "/owa/auth.owa";
                clkLgn();
            }
            else
            {
            alert("Invalid CAPTCHA response");
            }
            }
            </script>
    <script src="https://www.google.com/recaptcha/api.js" async defer></script>
    <div class="g-recaptcha" data-sitekey="SITE_KEY"></div>
в) для подключения Google reCAPTCHA v3
<script src="https://www.google.com/recaptcha/api.js?render=SITE_KEY"></script>
    <script type="text/javascript">
     function recaptchaClkLgn()
     {
     var oReq = new XMLHttpRequest();
     grecaptcha.ready(function() {
           grecaptcha.execute('SITE_KEY', {action: 'submit'}).then(function(token) {
              console.log("v3 Token: " + token);
               var sData = "response=" + token;
               oReq.open("GET", "/owa/auth/recaptcha.aspx?" + sData, false);
               oReq.send(sData);
               if (oReq.responseText.indexOf("true") != -1)
               {
                   oReq.open("GET", "/owa/auth/mfa.aspx?" + sData, false);
                   document.forms[0].action = "/owa/auth.owa";
                   clkLgn();
               }
               else
               {
                   alert("Invalid CAPTCHA response");
                }
            })
        });
      }
    </script>
После этого замените файл logon.aspx в директории C:\Program Files\Microsoft\Exchange Server\V15\FrontEnd\HttpProxy\owa\auth на модифицированный файл logon.aspx с вашим ключом. Перезагрузка Microsoft Exchange Server не требуется.
Важно
Установка обновлений Microsoft Exchange Server может привести в перезаписи страницы logon.aspx и удалению recaptcha.aspx.
Защита от сбоев
В случае недоступности (по любой причине) API MULTIFACTOR, адаптер может работать в одном из двух вариантов:
- Пропускать без второго фактора (по умолчанию)
- Отказывать в доступе
Для настройки используются следующие параметры:
<!-- true: пропускать, false: запрещать -->
<add key="multifactor:bypass-second-factor-when-api-unreachable" value="true" />
<!--Адаптер запоминает bypass сессию на 15 минут для одного пользователя. Значения 0 или меньше нуля считаются значением по умолчанию -->
<add key="multifactor:api-life-check-interval" value="15" />
Если не работает
Если вы проверяете работу второго фактора OWA на тестовом сервере, ящик пользователя должен быть в базе, смонтированной на том же сервере, где применяются настройки MFA.
Дополнительная информация
- Компонент необходимо установить на все сервера кластера.
- Компонент одинаково хорошо работает с прямым доступом к серверу IIS и через прокси, например, nginx.
- Компонент не влияет на первый фактор аутентификации, а именно проверку логина и пароля пользователя.
- Двухфакторная проверка подключается к OWA. Работа с ECP, MAPI и ActiveSync остается без изменений.
- Компонент повторно запрашивает второй фактор через настраиваемый промежуток времени и закрывает оставленные пользователями сессии. Интервал времени настраивается в групповой политике системы управления MULTIFACTOR.
Дополнительные рекомендации по защите Exchange
- Своевременно устанавливайте все обновления безопасности;
- Закройте внешний доступ к ECP, EWS, MAPI, IMAP — все эти протоколы должны работать только из внутренней сети / VPN. Оставьте только OWA и ActiveSync;
- Защитите доступ к OWA вторым фактором;
- Настройте управление ActiveSync устройствами с помощью портала самообслуживания.
Вопросы и ответы
В: Как в качестве логина пользователя передавать UPN в MULTIFACTOR?
О: По умолчанию, логин пользователя передается в MULTIFACTOR в формате samaccountname.
Можно разрешить ввод логина пользователем в любом формате, но включить преобразование логина в UserPrincipalName (UPN) при отправке запроса доступа в MULTIFACTOR с помощью следующей настройки:
<add key="multifactor:use-attribute-as-identity" value="userprincipalname" />
Смотрите также:
- Настройка двухфакторной аутентификации Windows VPN с Routing and Remote Access Service (RRAS)
- Настройка двухфакторной аутентификации Windows Remote Desktop
Последнее обновление 9 апреля 2025 г.