
Opening Active Directory in Windows 10 is quite simple once you know the steps. This guide will walk you through how to access Active Directory Users and Computers in Windows 10. By following these instructions, you’ll be able to manage users, groups, and computers in your network.
Before diving into the steps, it’s important to know that Active Directory Users and Computers is a Microsoft Management Console (MMC) snap-in. It allows you to manage AD objects like users, computers, and groups. So, let’s get started!
Step 1: Open the Start Menu
Click on the Start button located at the bottom-left corner of your screen.
The Start Menu is your gateway to access different applications and settings on your computer.
Step 2: Search for «Active Directory Users and Computers»
Type «Active Directory Users and Computers» in the search bar.
Windows 10’s search feature makes it easy to find applications and system tools quickly.
Step 3: Click on the Application
Once you see «Active Directory Users and Computers» in the search results, click on it.
This will open the Active Directory Users and Computers MMC snap-in.
Step 4: Provide Administrative Credentials
If prompted, enter your administrative username and password.
Administrative access is required because managing Active Directory involves making changes that can affect multiple users and computers.
Step 5: Explore and Manage
Now that the Active Directory Users and Computers snap-in is open, you can start managing your AD objects.
You can add new users, create groups, and manage computer objects from here.
After you complete these steps, the Active Directory Users and Computers window will open. You can manage your network’s users, groups, and computers from this interface.
Tips for Opening Active Directory in Windows 10
- Ensure you have administrative privileges before trying to open Active Directory.
- If you don’t see «Active Directory Users and Computers» in the search results, ensure that the RSAT (Remote Server Administration Tools) are installed.
- Bookmark the tool on your taskbar for quicker access in the future.
- Familiarize yourself with basic AD tasks like adding users and creating groups.
- Consider setting up shortcuts with command lines for quicker access in the future.
Frequently Asked Questions
Why can’t I find «Active Directory Users and Computers» in the search?
You might not have the RSAT tools installed. Ensure that they are installed to access AD tools.
Do I need administrative privileges to access Active Directory?
Yes, you need administrative access to manage users, groups, and computers.
Can I open Active Directory on a non-admin account?
No, due to security reasons, only admin accounts can access Active Directory tools.
How do I install RSAT tools on Windows 10?
Navigate to Settings > Apps > Optional features > Add a feature, and then select RSAT tools from the list.
What can I do in Active Directory Users and Computers?
You can manage users, computers, groups, and other objects within your network.
Summary
- Open the Start Menu.
- Search for «Active Directory Users and Computers.»
- Click on the application.
- Provide administrative credentials.
- Explore and manage.
Conclusion
Opening Active Directory in Windows 10 is a straightforward process once you understand the steps involved. Whether you’re an IT professional or someone tasked with network management, knowing how to navigate AD is crucial. This guide has shown you how to access the tool and provided tips on making the task even easier.
If you’re new to Active Directory, don’t worry. The more you use it, the more comfortable you’ll become. There are also plenty of resources available online for further reading. By following these steps, you’ll be well on your way to effectively managing your network. So, give it a try today and see how streamlined your network management can become!
Matt Jacobs has been working as an IT consultant for small businesses since receiving his Master’s degree in 2003. While he still does some consulting work, his primary focus now is on creating technology support content for SupportYourTech.com.
His work can be found on many websites and focuses on topics such as Microsoft Office, Apple devices, Android devices, Photoshop, and more.
Opening Active Directory on Windows 11 is a straightforward process that requires accessing a tool called “Active Directory Users and Computers.” This tool allows you to manage users, computers, and groups within a network domain. To get started, you’ll need administrative privileges on your Windows 11 machine and access to a domain network. Once you have these, you can follow a series of simple steps to open and use Active Directory.
Opening Active Directory on Windows 11 involves navigating through your system’s settings to locate and use the “Active Directory Users and Computers” tool. This section will guide you through each step needed to access this functionality effectively.
Step 1: Ensure Administrative Privileges
Before you start, make sure you are logged in with an account that has administrative rights.
This means you need permission to access and modify settings on your network, usually granted to IT professionals or network administrators.
Step 2: Connect to the Domain Network
Ensure your Windows 11 machine is connected to the domain network.
Without a proper connection to the network, the Active Directory tools won’t function properly, as they rely on the domain to pull data.
Step 3: Open the Start Menu
Click on the Start button at the bottom-left corner of your screen.
Accessing the Start Menu is your gateway to finding all the apps and settings on your Windows 11 machine.
Step 4: Search for Windows Tools
Type “Windows Tools” in the search bar and press Enter.
Windows Tools houses various administrative tools, including Active Directory, which you’ll need to proceed.
Step 5: Find and Open Active Directory Users and Computers
In the Windows Tools window, locate “Active Directory Users and Computers” and double-click to open it.
Congratulations! You’ve now opened the gateway to managing users and computers within your domain.
After completing these steps, you will have access to the Active Directory Users and Computers interface. Here, you can view, add, or edit user accounts, manage computers connected to your domain, and organize groups. This tool is essential for network administrators to manage resources efficiently.
Tips for Opening Active Directory Windows 11
- Ensure your system is up-to-date to avoid compatibility issues.
- Familiarize yourself with basic Active Directory terminologies like “domains” and “OU” (Organizational Units).
- Regularly check your network connection if you experience access issues.
- Use caution when making changes to avoid unintended disruptions in user access.
- Always log out of the administrative account when finished to maintain security.
Frequently Asked Questions
What is Active Directory?
Active Directory is a Microsoft service for managing computers and other devices on a network. It helps in organizing user data, security settings, and resources.
Do I need special software to open Active Directory on Windows 11?
No, Windows 11 comes with built-in tools like “Active Directory Users and Computers,” which you can access through Windows Tools.
Can I open Active Directory without being an administrator?
No, administrative privileges are required to access and modify Active Directory settings.
Why can’t I find Active Directory Users and Computers on my Windows 11?
If it’s not visible, ensure that you’re connected to a domain network and have the necessary administrative rights.
How do I add a new user in Active Directory?
Once in the Active Directory Users and Computers tool, right-click on the desired organizational unit, select “New,” then “User,” and follow the prompts.
Summary
- Ensure Administrative Privileges
- Connect to the Domain Network
- Open the Start Menu
- Search for Windows Tools
- Find and Open Active Directory Users and Computers
Conclusion
Opening Active Directory on Windows 11 is an essential task for anyone managing networked systems. By following the steps outlined in this guide, you’re well on your way to effectively managing users and resources in your domain. Remember, Active Directory is a powerful tool that can simplify network management, but with great power comes great responsibility. Always double-check your actions to avoid accidental disruptions, and don’t hesitate to reach out for further training if you’re new to this.
As you become more familiar with the process, you’ll find that accessing and using Active Directory becomes second nature. Whether you’re adding new users, adjusting permissions, or organizing group policies, these skills are invaluable in maintaining a secure and efficient network. Keep exploring the capabilities of Active Directory, and consider additional resources or courses to enhance your understanding. Happy managing!
Matthew Burleigh has been writing tech tutorials since 2008. His writing has appeared on dozens of different websites and been read over 50 million times.
After receiving his Bachelor’s and Master’s degrees in Computer Science he spent several years working in IT management for small businesses. However, he now works full time writing content online and creating websites.
His main writing topics include iPhones, Microsoft Office, Google Apps, Android, and Photoshop, but he has also written about many other tech topics as well.
Read his full bio here.
Active Directory (AD) is a directory service developed by Microsoft that provides a variety of network services, including LDAP (Lightweight Directory Access Protocol) and Kerberos authentication. It is widely utilized in Windows environments, mainly in enterprise settings, for managing computers, users, and services. If you’re running Windows 11 and aiming to access Active Directory, it’s essential to know how to do so efficiently for effective management of your organizational resources.
In this article, we will take you through the steps required to open and use Active Directory in Windows 11. We’ll cover everything from checking the prerequisites to using tools that facilitate access to Active Directory, as well as some common tasks you may need to perform.
Understanding Active Directory
Before we dive into the how-to aspects, it is vital to understand what Active Directory is and why it is used:
-
What is Active Directory?
Active Directory is a centralized database that stores user accounts, password policies, and permissions for network resources within a domain. It’s fundamental in organizations that require secure management of network access. -
Why Use Active Directory?
- Centralized Security: AD provides a unified approach to managing user access and permissions.
- Organizational Structure: It facilitates the arrangement of network resources, users, and computers hierarchically.
- Group Policy Management: AD enables you to enforce specific configurations and policies across the network.
Prerequisites
Before accessing Active Directory in Windows 11, ensure the following:
- Windows 11 Pro, Enterprise, or Education: The Active Directory functionalities are not available on the Home edition.
- Domain Membership: Ensure your computer is joined to an Active Directory domain.
- Administrative Privileges: To access and modify Active Directory settings, administrative rights are usually required.
Opening Active Directory
There are multiple ways to open and work with Active Directory in Windows 11. The following are the most common methods:
Method 1: Using the Start Menu
-
Click on the Start Menu:
Open the Start Menu by clicking on the Windows icon in the taskbar or pressing the «Windows» key. -
Search for Active Directory:
Type “Active Directory” in the search bar. You may see various options, including “Active Directory Users and Computers,” which is the main tool for managing users and computers in AD. -
Select the Best Option:
Click on “Active Directory Users and Computers” to launch the interface.
Method 2: Using Microsoft Management Console (MMC)
-
Open Microsoft Management Console:
- Press
Windows + Rto open the Run dialog. - Type
mmcand press Enter.
- Press
-
Add the Active Directory Users and Computers Snap-in:
- In the Console window, click on
Filein the top left corner, and chooseAdd/Remove Snap-in. - In the dialog that opens, find “Active Directory Users and Computers” from the list of available snap-ins.
- Click on it and then click
Addto include it in your console.
- In the Console window, click on
-
Select the Computer:
- A dialog will appear asking you to select the computer to connect to. If you want to manage your local domain, you can simply click on “Finish” after choosing the default option.
-
Complete the Setup:
- Click OK to return to the main MMC window. You should now see the «Active Directory Users and Computers» snap-in ready for use.
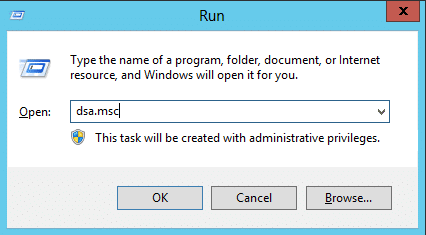
Method 3: Command Line Access
If you prefer using command line tools, you can utilize the dsa.msc command:
-
Open the Run Dialog:
PressWindows + Rto bring up the Run dialog box. -
Run Active Directory Users and Computers:
Typedsa.mscand click OK. This will directly open the Active Directory Users and Computers interface.
Method 4: PowerShell
Windows PowerShell is a powerful way to access and manage Active Directory functionalities quickly.
-
Open PowerShell:
- Right-click on the Start Menu and select «Windows Terminal (Admin)» or «Windows PowerShell (Admin).»
-
Import Active Directory Module:
If the Active Directory module isn’t loaded by default, you can import it by executing:Import-Module ActiveDirectory -
Run AD Commands:
Use PowerShell commands like:Get-ADUser -Filter *This command lists all users in the Active Directory.
Common Tasks in Active Directory
Once you have accessed Active Directory, several common tasks you may need to perform include:
1. Creating a New User
-
Navigate to the Users Container:
In the Active Directory Users and Computers interface, expand your domain tree and locate the «Users» folder. -
Right-Click and Select New User:
Right-click on the «Users» folder and select “New” and then “User.” -
Enter User Details:
Fill in the information fields, including First Name, Last Name, User Logon Name, and set a password. -
Complete User Creation:
Follow the on-screen prompts to finalize the process. You can also configure additional settings such as password expiration and group membership.
2. Moving a User
-
Locate the User Account:
Navigate to the user account you wish to move. -
Right-Click to Move:
Right-click on the user account and select «Move.» -
Select Destination:
Choose the organizational unit (OU) or container you want to move the user to and confirm the action.
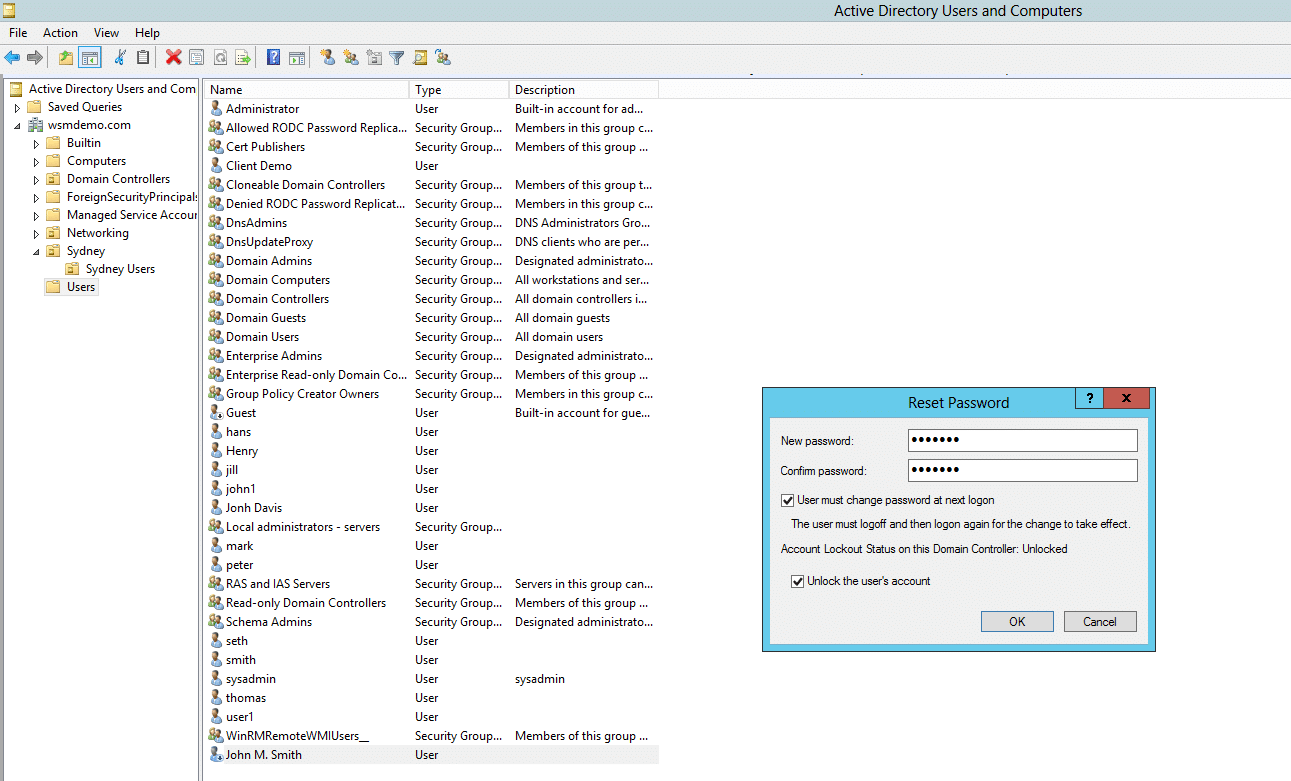
3. Resetting User Password
-
Find User Account:
Locate the user account for which you want to reset the password. -
Right-Click and Select Reset Password:
Right-click on the user account and select “Reset Password.” -
Enter New Password:
Follow the prompts to enter a new password, making sure it meets the complexity requirements.
4. Setting Up Group Policies
-
Open Group Policy Management:
Use the Start menu to search for «Group Policy Management.» -
Create a New GPO:
Right-click on your domain or OU and select «Create a GPO in this domain, and Link it here.» -
Configure Settings:
Edit the GPO to adjust settings like password policies, desktop configurations, and other security settings.
Troubleshooting Active Directory Access
Accessing or managing Active Directory can sometimes lead to issues. Here are some troubleshooting tips:
Check Domain Connectivity
If you encounter problems, ensure your computer is connected to the domain network properly. You can perform a simple ping test against the domain controller:
ping yourdomaincontrollerVerify User Permissions
Make sure the account you’re using has the necessary permissions to access and manage Active Directory resources. You may need to reach out to your network administrator for assistance.
Review Event Viewer
Event Viewer can provide logs about Active Directory access attempts and errors. Open it by searching for “Event Viewer” in the Start menu and check under:
- Windows Logs > Application
- Windows Logs > Security
Conclusion
Active Directory is a pivotal component in managing a Windows 11 network environment, especially for organizations that prioritize security and efficient resource management. By following the methods outlined above, you can easily open and navigate Active Directory in Windows 11, allowing you to perform essential administrative tasks such as user management, group policies, and security configurations.
As you continue to work with Active Directory, remember to stay updated with best practices for user management and security protocols, ensuring that your organization’s data remains protected. Always back up your Active Directory information regularly to prevent losses in case of any unforeseen circumstances. By mastering Active Directory on Windows 11, you position yourself as a valuable asset within your organization’s tech management team.
Any Windows Server administrator must have used the Active Directory Users and Computers (ADUC) Microsoft Management Console on a Domain Controller (DC). Using this console, you can control and manage users, user groups, computers, and the Organizational Units (OUs) in the domain.
The ADUC console is no longer limited to servers anymore. You can install the Active Directory Users and Computers snap-in on a Windows 11 or Windows 10 computer as well, which performs the same functions as the original Server console. This snap-in is part of the Remote Server Administration Tools (RSAT) for Windows operating systems.
We have written separate posts for installing any RSAT tools on Windows 11 and Windows 10. This article focuses on installing specifically the Active Directory Users and computers snap-in on a Windows PC and then using it to manage your domain.
Table of Contents
How to Install Active Directory Users and Computers (ADUC) on Windows
All RSAT tools, including the Active Directory Users and Computers snap-in, allow you to manage the different Active Directory components as if you are on the server itself. This way, you do not always have to access the server, neither physically nor remotely, to perform an action.
You can download and install the Active Directory Users and Computers snap-in using the Settings app, from the Command Prompt, and Windows PowerShell.
Note: On Windows 10 v1803 and older, you must download and install all RSAT tools using the MSI files. You can find the MSI files for your version of Windows here.
Install Active Directory Users and Computers from Settings App
The easiest way to install the ADUC snap-in on a Windows PC is from the settings app. It does involve more steps than the other methods shared below, but this is the only method using the Windows GUI.
Use these steps to install the ADUC snap-in from the Settings app:
-
Navigate to the following:
Settings app >> Apps >> Optional Features
-
Click “View features.”
 Snap-In On Windows 11/10 1")
Add an optional feature -
Search for “Active Directory,” select “RSAT: Active Directory Domain Services and Lightweight Directory Services Tools,” and click Next.
Select Active Directory Users and Computers -
Click “Install.”
Install Active Directory Users and Computers from the Settings app -
Once installed, restart the computer.
 Snap-In On Windows 11/10 1")
 Snap-In On Windows 11/10 2")
 Snap-In On Windows 11/10 3")
The Active Directory Users and Computers snap-in will now be installed. If you prefer installing it using the command line, refer to the sections below. To learn how to use the snap-in, continue reading down.
Install Active Directory Users and Computers from Command Prompt
Below are the simple steps to install Active Directory Users and Computers snap-in using the Command Prompt:
-
Open an elevated Command Prompt instance.
-
Run the following command:
DISM /Online /Add-Capability /CapabilityName:Rsat.ActiveDirectory.DS-LDS.Tools~~~~0.0.1.0 Snap-In On Windows 11/10 4")
Install Active Directory Users and Computers snap-in using Command Prompt
 Snap-In On Windows 11/10 4")
The ADUC snap-in should now be installed. Run the following command in Command Prompt to confirm that the Active Directory Users and Computers snap-in has been installed:
DISM.exe /Online /Get-CapabilityInfo /CapabilityName:Rsat.ActiveDirectory.DS-LDS.Tools~~~~0.0.1.0 Snap-In On Windows 11/10 5")
You should see “Installed” in front of Status.
Install Active Directory Users and Computers from PowerShell
Use the following steps to install the Active Directory Users and Computer snap-in using PowerShell:
-
Launch an elevated PowerShell instance.
-
Run the following command to install ADUC:
Add-WindowsCapability -Online -Name Rsat.ActiveDirectory.DS-LDS.Tools~~~~0.0.1.0
Install Active Directory Users and Computers snap-in using PowerShell
 Snap-In On Windows 11/10 6")
The ADUC snap-in should now be installed. To confirm its status, run the following command in PowerShell:
Get-WindowsCapability -Online | Where-Object {$_.Name -like "RSAT.ActiveDirectory*"} Snap-In On Windows 11/10 7")
You should see “Installed” in front of State.
These are all the methods to install the Active Directory Users and Computers snap-in on a Windows 11/10 PC. Let us now continue to see how to use this tool.
How to Use Active Directory Users and Computers
How to Open Active Directory Users and Computers Snap-In
Now that Active Directory Users and Computers is installed, you can open it by searching for it in the Start menu, or running the following in the Run Command box:
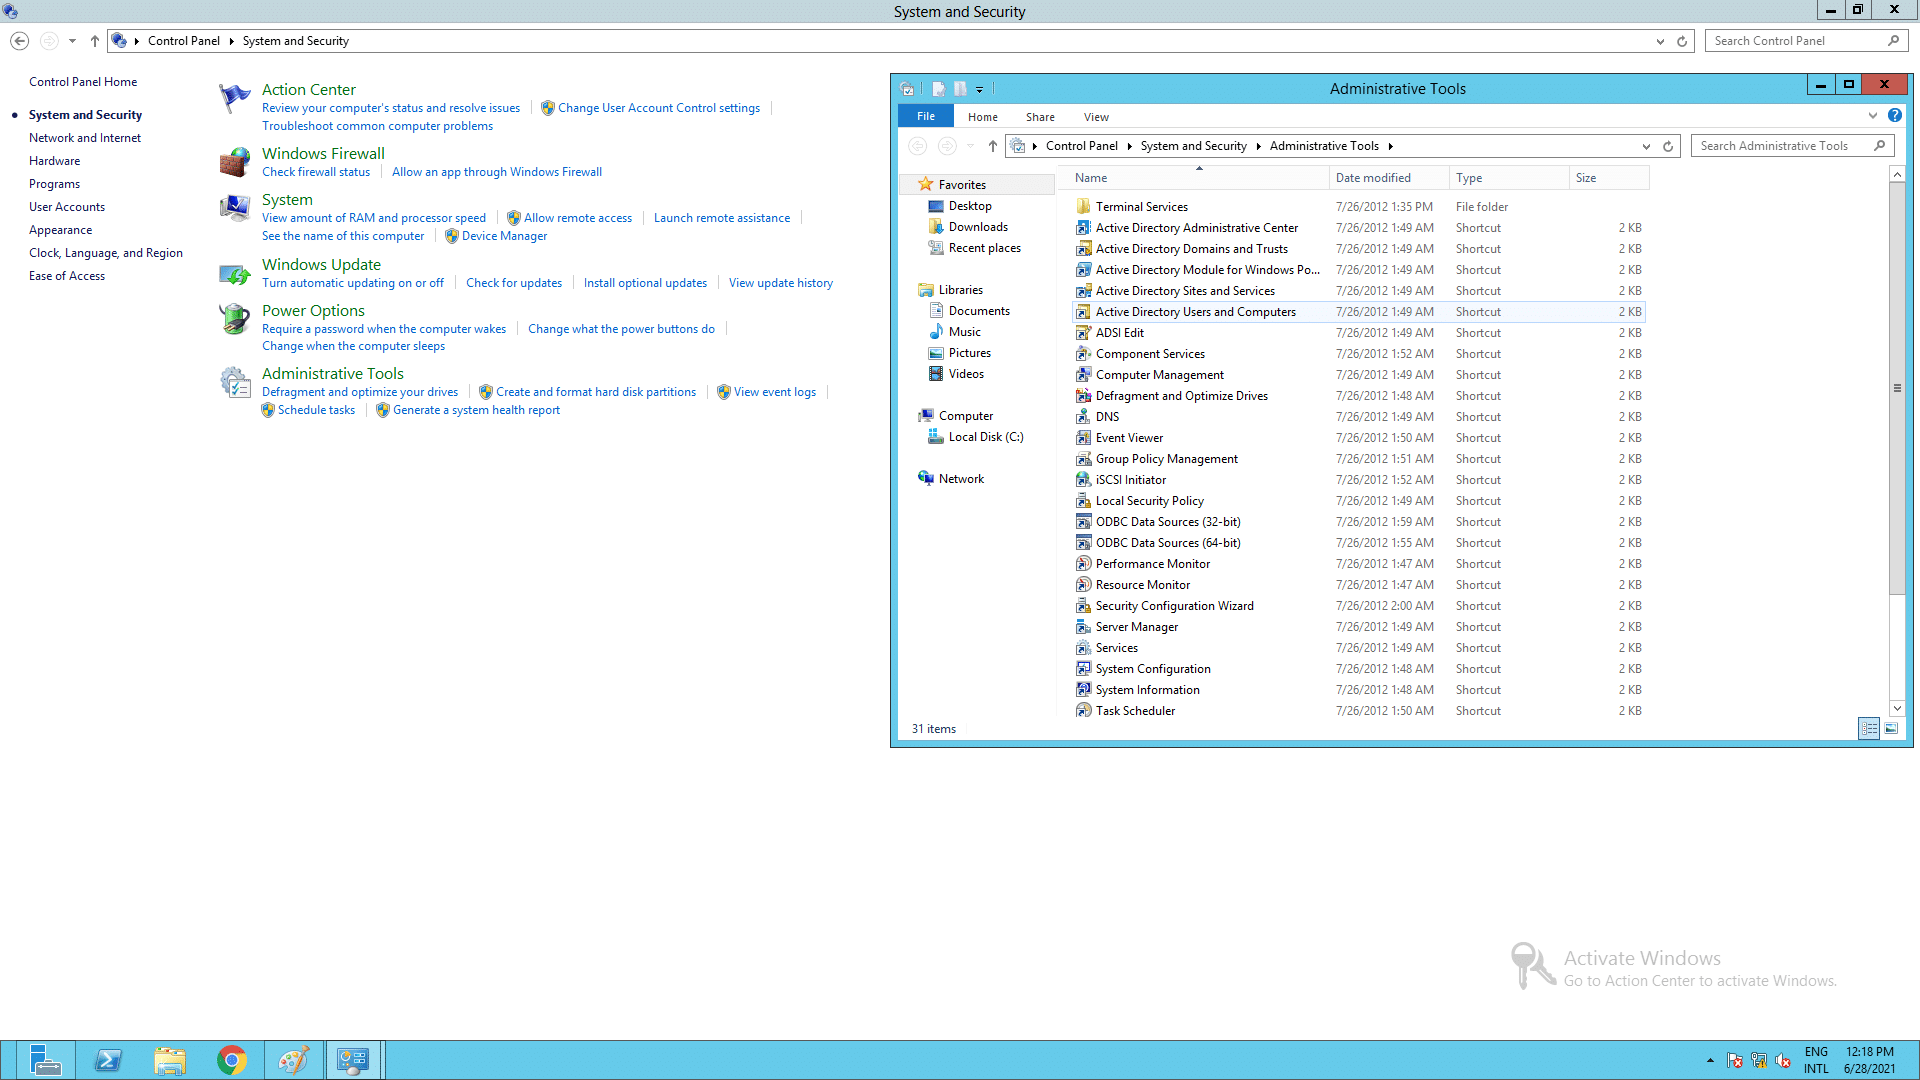
dsa.mscAlternatively, you can also open the ADUC snap-in through the Control Panel at the following location:
Control Panel >> System and Security >> Windows Tools
 Snap-In On Windows 11/10 9")
If your computer is connected to a domain and you are logged in from an authorized domain account, then the ADUC snap-in will automatically connect to the server. However, if one is not connected, then you must connect to the Domain Controller.
Connect ADUC to Domain Controller
Use these steps to connect to a Domain Controller. You can also use these to change your domain/Domain Controller.
-
From the ADUC console, click “Action,” and then click “Change Domain Controller.”
Change or connect to Domain Controller The Change Directory Server window will now open.
-
Select the “This Domain Controller or AD LDS instance” radio button, then select the Domain Controller from the give list and click Ok.
Select and connect to Domain Controller
 Snap-In On Windows 11/10 10")
 Snap-In On Windows 11/10 11")
The ADUC will now connect to the Domain Controller and populate the fields.
 Snap-In On Windows 11/10 12")
Now that you are connected to the Domain Controller, you can now begin making changes and managing the different components of the domain.
Manage Users, Computers, Organizational Unit using ADUC
 Snap-In On Windows 11/10 13")
You can now begin adding new users, computers, printers, and Organizational Units to the domain. Simply right-click on the OU that you want to add the new device/user to, expand “New”, and select the element that you want to add.
Once you have selected the element to add, the respective window will open, where you can then configure the component to add.
You can now also use other operators to manage the users, devices, and other elements configured inside the domain directly from your Windows PC.
Additionally, you can also manage what you see inside the snap-in. Click “View” from the top menu and select the things that you want to see. You can then also click “Filter options” to open the advanced viewing options.
 Snap-In On Windows 11/10 14")
The list does not end here. There are a bunch of other management options you can perform directly from the ADUC snap-in on a Windows PC. We suggest that you play around to discover all the options. However, we advise caution and only use the console if you know what you are doing.
What is Active Directory Users and Computers Used For
By now, we have a pretty good understanding of what the ADUC snap-in can be used for. However, there is more to it than meets the eye. The Active Directory Users and Computers RSAT tool can be used to perform the following actions:
- Create and manage user accounts, computers, and Active Directory groups.
- View and edit AD object attributes with ADSI Edit.
- Search for AD objects.
- Change or reset user password in Active Directory.
- Create organizational units and build hierarchical structures for AD objects. You can also delegate administrative permission on these OUs to other domain users.
- Delegate administrative permissions.
- Raise domain functional level, and transfer FSMO roles with PowerShell to another domain controller.
From this, it is understood how useful the ADUC snap-in is for administrators that use Windows client PCs.
Active Directory Users and Computers (ADUC) is a common tool used by administrators to carry out daily tasks and much more in Active Directory AD. Some of the tasks an administrator can perform with the help of this MMC snap-in are as follows:
- Create and manage AD objects, such as users, computers, groups, and contacts, along with their attributes.
- Create Organizational Units (OU), move users and computers in and around them, and delete OUs.
- Delegate permissions to users to manage Group Policy.
- Define advanced security and auditing in AD.
- Deal with FSMO roles such as RID master, PDC Emulator and Infrastructure master.
- Raise the domain functional level.
- Advanced feature settings that help to manage the LostAndFound container, NTDS Quotas, Program Data, and System information.
The process to install ADUC for Windows 10 1809 and above differs from the process for Windows 10 1803 and below. Here are the two processes for installing ADUC:
Installing Active Directory Users and Computers for Windows 1809 and higher
- Go to Start, select Settings, and then Apps.
- Click on Manage Optional Features.
- In the new window, click on Add feature.
- Select RSAT: Active Directory Domain Services and Lightweight Directory Tools, and then click Install.
The installation of Active Directory Domain Services and Lightweight Directory Tools will contain the ADUC console. To verify, go to Start. It will now have Windows Administrative Tools on the list.
Installing Active Directory Users and Computers for Windows 1803 and lower, and Windows 8
- Download Remote Server Administrator Tools for your version of Windows, and install it. You can download the tool from the Microsoft Download Center.
- Go to Start, and select Control Panel.
- Navigate to Programs > Programs and Features > Turn Windows features on or off.
- Scroll down and expand Remote Server Administration Tools, and then navigate to Role Administration Tools > AD DS and AD LDS Tools.
- Check AD DS Tools, and then click OK.
When the installation process is done, you will have ADUC on your computer. To verify, go to Start. The menu will have a folder called Administrative Tools which should contain Active Directory Users and Computers.
How to open Active Directory Users and Computers
The following are some ways to open Active Directory Users and Computers on a DC:
Method 1: Through RUN command
- Go to Start, and click Run.
- Type dsa.msc, and hit Enter.
Method 2: From the Start menu
- Go to Start → Administrative Tools → Active Directory Users and Computers.
Method 3: From the Control Panel
- Go to Start → Control Panel.
- Click System and Security and select Administrative Tools.
- From the list of available tools, select Active Directory Users and Computers.
Now that ADUC has been installed and opened, let’s see how you can perform the various functions using the console.
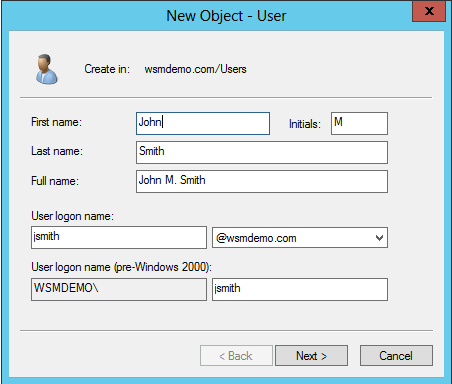
Creating a new user account
- In the left pane of ADUC, right-click on the folder where the user account is to be created.
- Click New and then click User.
- Type in the details such as First name, User logon name, etc., and click Next.
- Enter the user’s password and confirm it in the appropriate fields. Check the required password options.
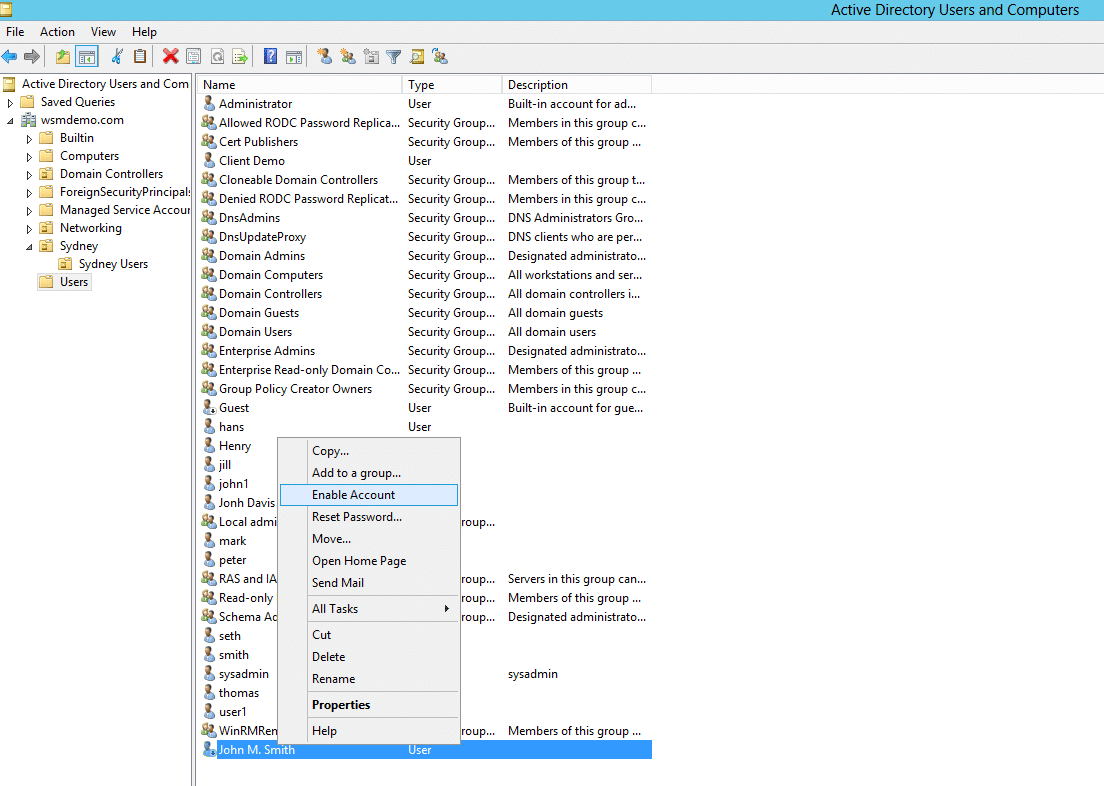
Enabling or disabling a user account
- In the left pane of ADUC, expand the folder containing the user account to be enabled/disabled.
- Right-click the user account and click Enable or Disable to enable or disable the user account as necessary.
Resetting a user account password
- In the left pane of ADUC, expand the folder containing the user account whose password is to be reset.
- Right-click on the account, and select Reset Password.
- Type and confirm the password in the appropriate fields. Select other password-related options if needed.
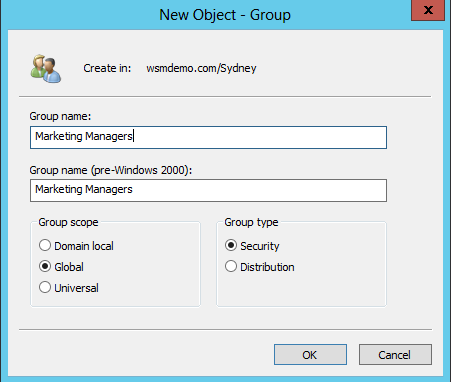
Creating a new group account
- In the left pane of ADUC, right-click the folder where the group account is to be created.
- Click New, and then click Group.
- Type in a suitable name for the group. For group scope, select one among domain local, global, and universal. For group type, select either security or distribution.
- Click Apply, and then click OK.
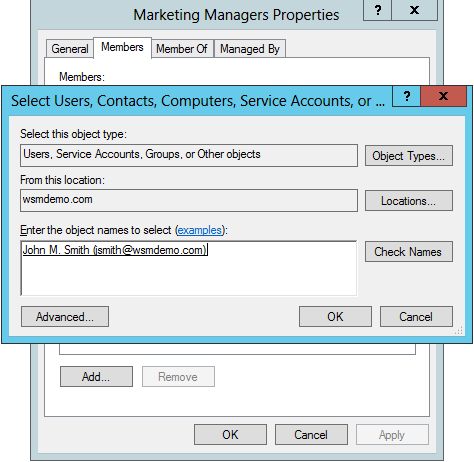
Adding a member to a group
- In the left pane of ADUC, right-click the folder containing the group account to which you want to add a member.
- Right-click on the group and select Properties.
- Click the Members tab, and then click Add.
- Type in the name of the objects you want to add to the group.
- Click OK.
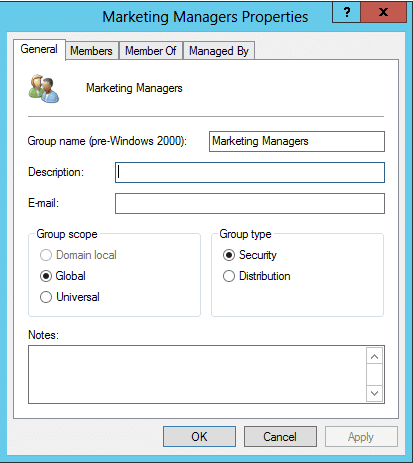
Changing the group type or group scope
- In the left pane of ADUC, right-click the folder containing the group whose type or scope is to be modified.
- Right-click on the group and click Properties.
- Select the required scope or type for the group.
- Click Apply, and then click OK.
Creating a new computer account
- In the left pane of ADUC, right-click the folder where the computer account is to be created.
- Click New, and then click Computer.
- Type in a suitable name for the computer.
Resetting a computer account
- In the left pane of ADUC, right click the folder where the computer account is to be created.
- Click New, and then click Computer.
- Type in a suitable name for the computer.
Creating a new organizational unit (OU)
- In the left pane of ADUC, right click the domain name.
- Click New, and then click Organizational Unit.
- Type in a suitable name for the OU.
Deleting a users, computers, and OUs
- In the left pane of ADUC, right click the folder where the object is located.
- Right-click on the object, and select Delete.
Now, let us look at some advanced tasks that will come in handy for an administrator managing users, computers, and other objects in Active Directory.
Advanced Settings in ADUC
ADUC contains multiple advanced functionalities that allow administrators to work with complex settings and containers that are otherwise not visible in the console.
To enable advanced features, you can perform the following steps:
- Go to Start -> Administrative Tools, and click on Active Directory Users and Computers. The ADUC console will open.
- In the ADUC console, click View and Enable Advanced Features.
The advanced settings are now enabled. Now, to view the user and computer attributes, you can perform the following steps:
- In the left pane of ADUC, right click on the object whose attributes you want to see.
- Click on Properties, and then click the Attribute Editor tab. A list all the attributes pertaining to the object can be viewed.
Protecting Objects from Accidental Deletion
This action denies the permission to delete the object, and when attempting to do so it displays an error message.
The following steps illustrate how to protect AD objects from accidental deletion:
- Go to Start -> Administrative Tools, and click on Active Directory Users and Computers. The ADUC console will open.
- In the left pane of ADUC, right click on the object that is to be protected from accidental deletion, and click on Properties.
- Select the Object tab, and check the Protect object from accidental deletion option.
Searching for Objects
Objects in AD can be located using the Find dialog box in the ADUC console. The following steps illustrate how to perform the search:
- Go to Start -> Administrative Tools, and click on Active Directory Users and Computers. The ADUC console will open.
- In the left pane of ADUC, right click on the container object where the search is to be made.
- Select Find from the shortcut menu.
- In the Find Users, Contacts, and Groups dialog box that appears, specify the object type that is to be searched, and also the container where the search is to be carried out.
- To streamline the search, click on the Advanced tab.
- In the dialog box that appears, select the attribute search in the field list box. To refine the search further, use the conditions drop-down list. Specify a value for the conditional search in the value box. You may use the add button to include more conditions.
- Click Find Now to display the search results.
An alternate method to search for objects is using the DSquery command line tool. To learn how, you can check out this article.
Creating a Saved Query
Saved Queries in ADUC allows administrators to access and audit information in AD and filter just those objects that meet a certain criteria.
The following steps illustrate how you can create a Saved Query:
- Go to Start -> Administrative Tools, and click on Active Directory Users and Computers. The ADUC console will open.
- In the left pane of ADUC, right click Saved Queries and click New followed by Query.
- Type in a suitable name for the saved query and click Define Query.
- Select the required object tab and define the variables of your query.
- Click OK to save the query.
This will list only those accounts that fulfil the criteria specified in the query.
If you like to know more about Advanced features in Active Directory Users and Computers, check this article out.