
-
Home
-
News
- What to Do If the Computer Can’t Start in Normal Mode?
What to Do If the Computer Can’t Start in Normal Mode?
By Linda | Follow |
Last Updated
The PC only boots in safe mode. Have you encountered this issue? Don’t worry. This post from Partition Magic offers you 5 solutions to this issue. You can try them one by one and see if they work.
Some people may find that Windows 11 or Windows 10 only boots in safe mode. In most cases, the computer can’t start in normal mode anyway and it may display various BSOD errors. This issue may occur after you change your hardware or just for no reason. If you also encounter this issue, you can try the following ways to solve it.
Way 1. Troubleshoot the BSOD
If your PC only boots in safe mode and displays various BSOD errors, you can take measures the solve this BSOD. Then, the computer can boot in normal mode in most cases.
To solve the BSOD issue, you can refer to the following 2 posts:
- Windows 10 Blue Screen of Death – You Can Quickly Fix It
- Quickly Solve – Your PC Ran into a Problem and Needs to Restart
If the BSOD tells you the specific error code, you can search for the corresponding solutions to this error code online and then try them.
Tips:
If the BSOD issue has caused data loss, you can try using MiniTool Partition Wizard to recover the lost data.
MiniTool Partition Wizard DemoClick to Download100%Clean & Safe
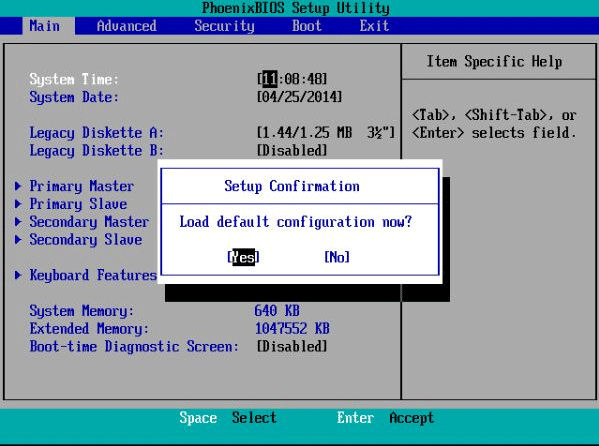
Way 2. Reset the BIOS
If the computer can’t start in normal mode after you change some hardware like the RAM, the reason may be that the new hardware is conflicting with the old BIOS settings, especially if you have tweaked them for your old hardware. Then, resetting the BIOS may solve the issue.
To do that, you just need to power on your computer and then press the BIOS key immediately to enter the firmware. Then, select the Load Setup Defaults, Restore Defaults, or similar options. After that, save the change and exit the firmware.
Way 3. Update Drivers
In most cases, Windows 11 or Windows 10 only boots in safe mode just due to the corrupt drivers. As we all know, Safe Mode is a troubleshooting mode. Anything that starts automatically is turned off. Usually, even the network stack is turned off. All those startup apps are turned disabled. Drivers that aren’t necessary to boot are disabled.
However, if you want to boot into the normal mode, some other drivers may be needed. If they are corrupt, the booting will fail. If your safe mode has the network, you can update the drivers one by one in Device Manager directly.
If your safe mode doesn’t have a network, updating the driver may be a little difficult, since you need to download the driver online to the USB drive, insert the USB drive into the computer, and then run the driver update to install it.
Therefore, if your safe mode doesn’t have a network, I recommend you check the Windows crash log to find the driver that is causing the issue. Then, you can just update the problematic drivers.
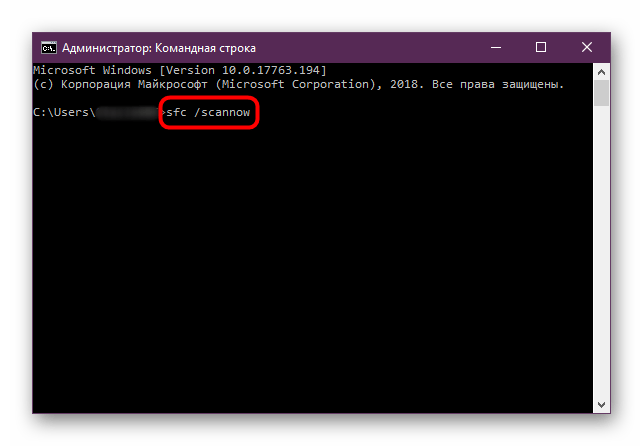
Way 4. Run SFC
Corrupt Windows files will also cause the issue. If your PC only boots in safe mode, you can run the SFC command to repair the corrupt Windows files.
To do that, you just need to press the Windows logo key + R in the safe mode, type “cmd” into the text bar, and press Enter to open Command Prompt. Then, type the command “sfc /scannow” and press Enter. It will repair the corrupt Windows files.
Way 5. Perform Clean Boot
If all the above ways don’t work, you need to perform a clean boot, which allows you to disable some software while keeping the other software enabled to boot in the normal mode. If the computer boots up smoothly, the culprit of the issue lies in the disabled software.
Then, from the disabled programs, select some to enable and keep other programs disabled. Then, boot the computer and see if it can boot up smoothly. Through this way, you can find the problematic software. Then, you need to update or uninstall it.
Bottom Line
What to do if your computer can’t start in normal mode? This post offers 5 solutions. You can try them one by one.
About The Author
Position: Columnist
Linda has been working as an editor at MiniTool for 5 years. She is always curious about computer knowledge and learns it crazily. Her articles are simple and easy to understand. Even people who do not understand computer can gain something. By the way, her special focuses are disk management, data recovery and PDF editing.
If Windows only starts in safe mode, there can be many reasons. It is therefore best to follow our instructions step by step to solve the problem and be able to use Windows normally again.

Screenshot: Thomas Zick
Disable third-party services
Not only startup entries, but also services can prevent Windows from booting normally. Therefore, temporarily switch off unnecessary services:
- Press the key combination [Win] + [R] and execute the command msconfig .
- In the system configuration, switch to the Services tab.
- Check the box next to Hide all Microsoft services .
- Remove the checkmarks next to all services listed or click Disable all .
- Restart the PC. If it now boots normally, you can gradually reactivate all services in the system configuration.

Screenshot: Thomas Zick
Fix driver problems
Of course, faulty device drivers can also be the reason why Windows only starts in safe mode. A look at the device manager can reveal the source of the error:
- Press the [Win] + [X] keys simultaneously and select Device Manager from the menu.
- Search the overview for devices that have an error. You can recognize this by the fact that there is a yellow symbol with an exclamation mark in the lower right corner of the associated symbol.
- If possible, install the latest driver for the device. Alternatively, uninstall the driver (right click > Uninstall device) and let Windows reinstall.
- If possible, you can disconnect the device from your PC as a test.

Screenshot: Thomas Zick
Check Windows boot options
In rare cases, an incorrect configuration of the start behavior is simply the reason for the error. Therefore, check the Windows startup options:
- Press the key combination [Win] + [R] and enter msconfig .
- Switch to the Start tab.
- Remove the check mark for Safe Boot (if present). Tick the box Start settings should always apply . Confirm with OK, then restart the PC.

Screenshot: Thomas Zick
Use Windows Startup Repair
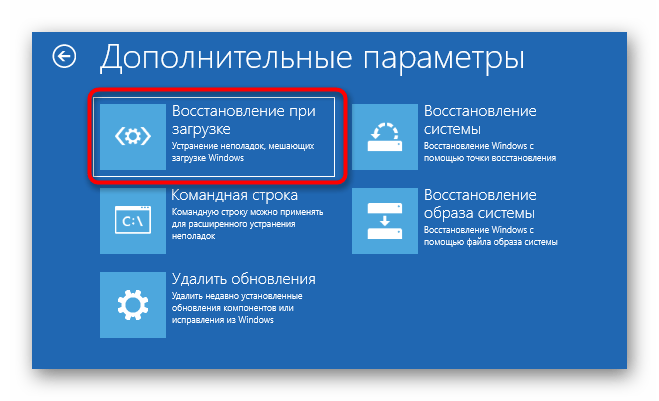
If the problem persists, you should run Windows Startup Repair in the next step:
- Open the Windows Start menu and click the power icon. Now press [Shift] and hold the key while clicking Restart . You can then release the button again.
- In Advanced Startup (blue background), click Troubleshoot > Advanced Options > Startup Repair . Wait for the process to complete.

Screenshot: Thomas Zick
Reset or reinstall Windows
If none of this helps, the last option is to reset your PC or reinstall Windows . But remember that (depending on the method you choose) you will lose personal settings, programs and files. You should therefore definitely back up all important data beforehand.
You might also be interested in:
- Safe Mode — what is it?
- Windows 10: Exit Safe Mode — this is how it works
- Windows 10: Start Safe Mode
- Windows: Safe mode doesnt start — what to do?
- Start Mac in safe mode — heres how it works
Все способы:
- Способ 1: Отключение безопасного режима
- Способ 2: Проверка целостности системных файлов
- Способ 3: Удаление графического драйвера
- Способ 4: Откат последних обновлений Windows
- Способ 5: Восстановление Windows
- Вопросы и ответы: 3
Способ 1: Отключение безопасного режима
Самый банальный совет, который можно дать по данной теме, когда Виндовс загружается только в безопасном режиме, — отключение этого самого безопасного режима. В разных версиях операционных систем осуществляется это по-разному: как при отображении экрана загрузки, так и непосредственно через графическое меню, когда уже произошел вход в локальную учетную запись. Если вы еще не пробовали просто выйти из безопасного режима, сделайте это так, как показано в статье по следующей ссылке.
Подробнее: Как отключить «Безопасный режим» на компьютере с Windows

Способ 2: Проверка целостности системных файлов
Есть вероятность, что Windows отказывается загружаться в штатном режиме из-за проблем с целостностью системных файлов. Для их проверки чаще всего используются системные средства в виде консольных утилит. Их запуск осуществляется как через интерфейс операционной системы, так и через средство восстановления, если это будет нужно. Обо всех нюансах использования утилит читайте в другом материале по ссылке ниже, чтобы разобраться с последовательностью запуска инструментов и понимать, насколько эффективными они окажутся в той или иной ситуации.
Подробнее: Использование и восстановление проверки целостности системных файлов в Windows 10
Способ 3: Удаление графического драйвера
По большей части данный метод подходит тем пользователям, кто недавно только установил драйверы на свой графический адаптер или обновил их. Это могло даже произойти автоматически, без вашего ведома, поэтому рекомендуем всем воспользоваться этой рекомендацией, если другие не принесут должного результата. Суть способа заключается в удалении драйвера видеокарты с дальнейшей его переустановкой уже после загрузки ОС в штатном режиме. Не переживайте, черный экран в этом случае не появится, поскольку будет использован стандартный драйвер, по умолчанию присутствующий в Windows. Может поменяться только разрешение экрана, упав до минимального.
- После загрузки Windows в безопасном режиме нажмите по кнопке «Пуск» правой кнопкой мыши и из появившегося контекстного меню выберите пункт «Диспетчер устройств».
- В новом окне отыщите список «Видеоадаптеры» и разверните его.
- Щелкните правой кнопкой мыши по используемому графическому адаптеру и выберите пункт «Удалить устройство», после чего подтвердите его удаление вместе с драйвером.

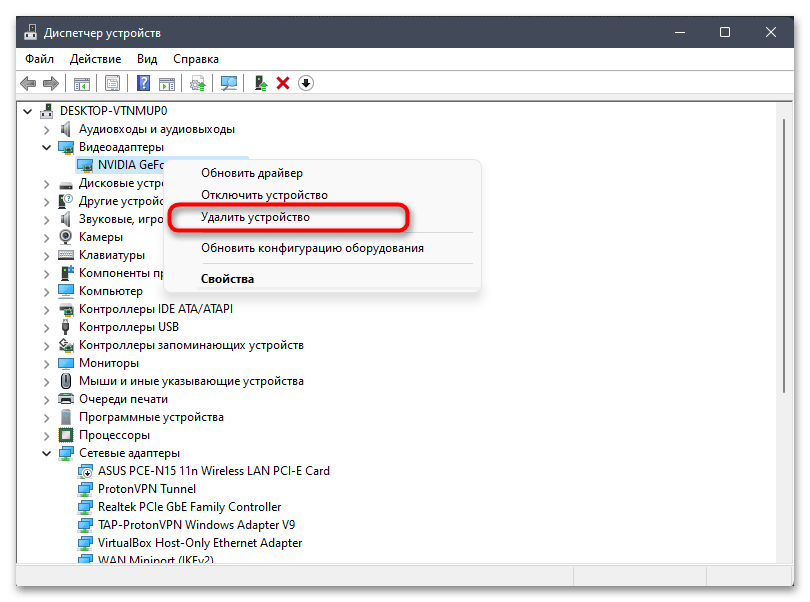
После успешного удаления отправьте компьютер на перезагрузку и проверьте, сможет ли он загрузиться в обычном режиме. Если да, пришло время установить драйвер для видеокарты заново, найдя его последнюю версию, и убедиться в том, что после этого работоспособность ПК не будет нарушена. О возможных методах поиска и инсталляции драйверов графического адаптера читайте в материале ниже.
Подробнее: Установка драйверов на видеокарту
Способ 4: Откат последних обновлений Windows
Допускается, что после неудачной установки последних обновлений для операционной системы Windows перестала загружаться в обычном режиме, переходя постоянно в безопасный. Это может быть вызвано как системными сбоями, так и прерванным процессом установки апдейтов. Откатить изменения можно вручную, используя для этого системную настройку.
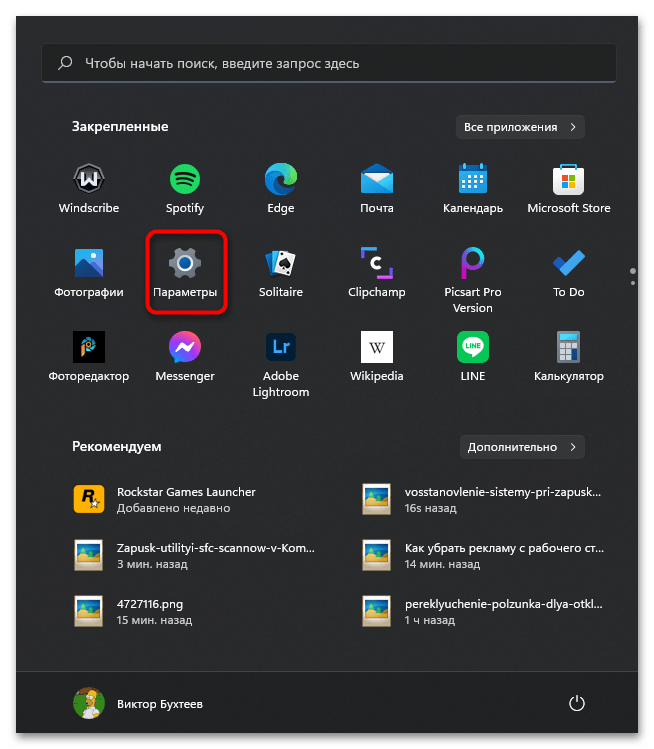
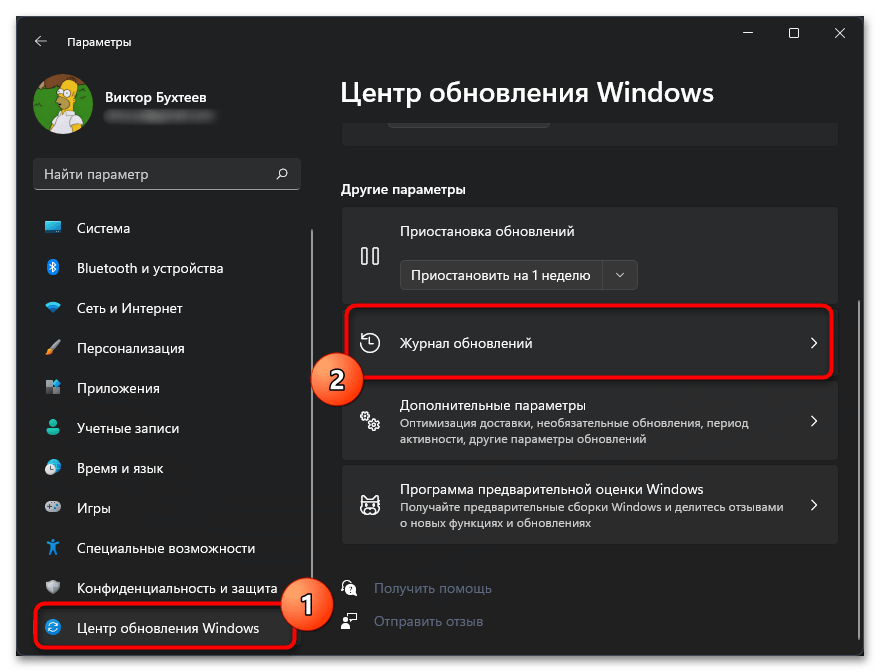
- Откройте меню «Пуск» и перейдите в «Параметры», кликнув по значку с шестеренкой.
- В новом окне найдите раздел «Центр обновления Windows» и перейдите к категории «Журнал обновлений».
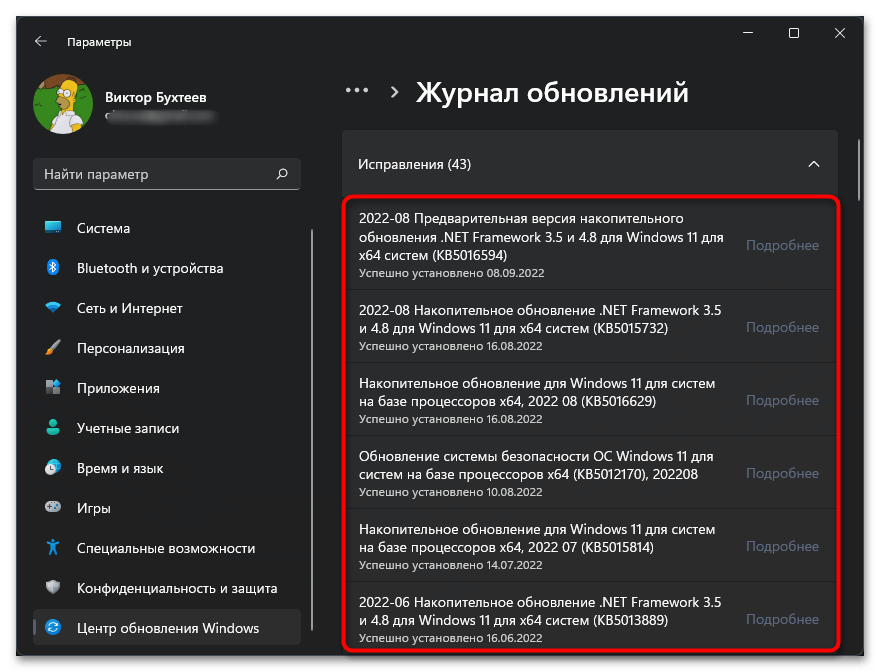
- Теперь вы можете ознакомиться со списком последних обновлений и узнать, было ли что-то добавлено новое за последние дни, когда, собственно, сама проблема и появилась.
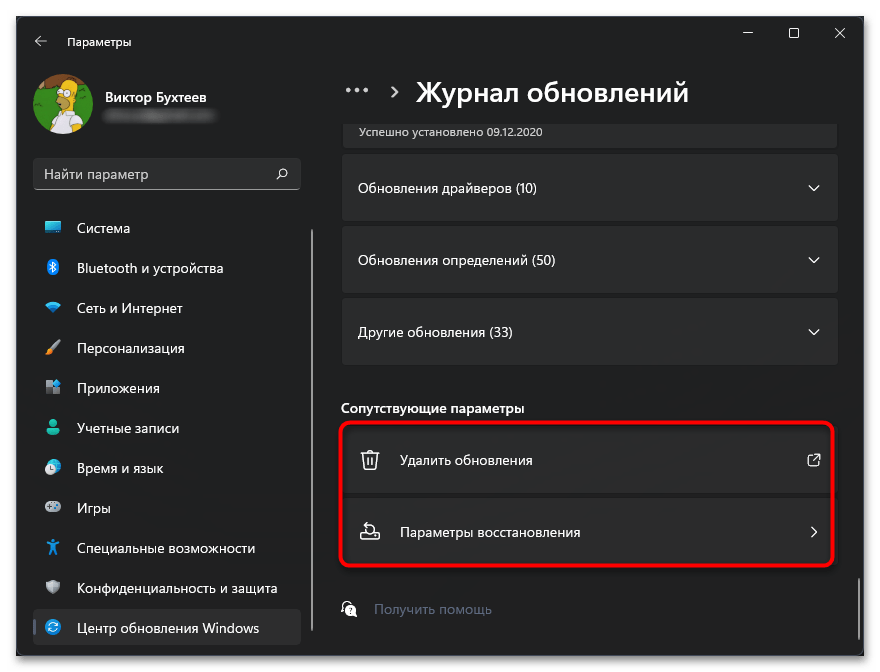
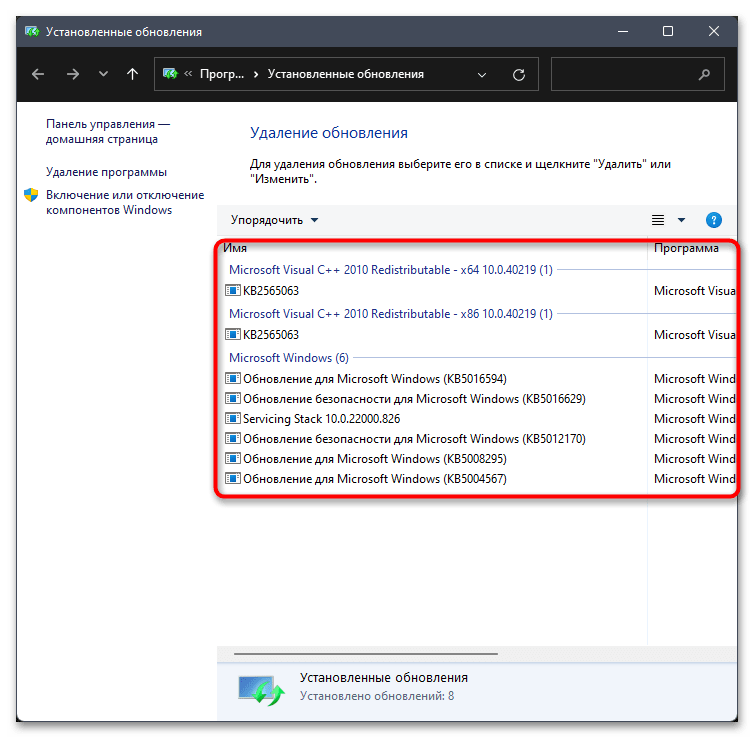
- Если обновления есть, нажмите кнопку «Удалить обновления». Можно использовать и «Параметры восстановления», но об этом детальнее в следующем методе.
- При нажатии по кнопке с удалением обновлений вы будете перенаправлены в новое окно, где увидите список всех установок и сможете по очереди удалить последние. Рекомендуем делать это постепенно, перезагружая компьютер после каждой деинсталляции и проверяя его работу.
Способ 5: Восстановление Windows
Если ничего из предложенного выше вам не подошло, понадобится обратиться к средству восстановления Windows, чтобы оно при помощи имеющихся средств проверило системные файлы, нашло и устранило ошибки, из-за которых ОС и не может быть загружена в обычном режиме. Существуют разные варианты восстановления при загрузке. О них более подробно рассказано в отдельном материале на нашем сайте.
Подробнее: Варианты восстановления Windows 10 при загрузке
Если у вас по каким-то причинам не получается вызвать описанное в упомянутой статье меню, чтобы начать восстановление, скорее всего, возникли проблемы с самим загрузчиком. Пока что можно обойтись без переустановки ОС, но надобится использовать флешку, чтобы восстановить Windows через нее. Детально об этом читайте далее.
Подробнее: Восстановление Windows 10 с флешки
Наша группа в TelegramПолезные советы и помощь

Dive into the maze-like world of Windows troubleshooting, and you might feel like you’ve stumbled into a thriller where your computer’s suddenly decided to go incognito in Safe Mode, all without giving you a heads-up.
It’s that mysterious twist where everything works fine while booting into the Safe Mode, but once you try the regular boot, it’s like Windows is playing hard to get. The usual vibrant display? Gone. Many features? On vacation. Imagine a city running on emergency power—basic services are up, but the fun stuff? Just out of grasp.
What’s causing this tech drama? It could be anything from drivers that have worn out their welcome to system settings playing hard and fast. Maybe there’s some shady stuff lurking in your registry, or malware’s got its hooks in, turning your system into a low-key lounge.
But don’t worry, my friend! This article is your trusty map through the storm. We’ll go on a deep-dive, covering all the bases to break free from Safe Mode’s snare. Hardware acting up? Software throwing a fit? We’ve got solutions for you. We’ll decode boot settings, wrangle those rogue drivers, and kick malware to the curb, getting your Windows back to its dazzling self.
So, put on your tech-savvy hat and pack some patience. Let’s set sail through the choppy seas of Safe Mode mysteries, steering towards a tech-savvy triumph and getting your system back on track.
Let’s See How To Fix This Problem
Before we dive deep into the “Why is my computer only boots in Safe Mode?” puzzle, let’s unpack the different situations that could be causing this tech mystery. Knowing exactly what you’re dealing with is key to finding the right fix.
So, here’s our roadmap to the most common Safe Mode snags:
- Auto Safe Mode Switcheroo: Imagine firing up your computer and instead of the usual Windows welcome, you get booted straight into Safe Mode—no heads-up, no chance to decline. It’s like your computer decided to skip the main event and go straight to the rehearsal.
- The Mysterious Black Screen: Your computer starts up, and all you get is a blank, black screen. Weird, right? But switch to Safe Mode, and everything works fine. It’s like your computer’s playing a disappearing act with its display.
- The Never-Ending Windows Restart Loop: Every time you try to boot up, your computer just keeps restarting—like a door that won’t stop spinning. No error messages, no warnings, just an endless cycle of reboots that’s enough to drive anyone up the wall.
- The Dreaded Blue Screen of Doom: Ah, the infamous Blue Screen of Death (BSOD). You’re all set to dive into your desktop when, bam! Your computer freezes, flashes some cryptic error message, and reboots. It’s like being stuck in loading screen purgatory.
Now that we’ve got our cheat sheet of common scenarios, we’re ready to navigate the confusing world of Safe Mode glitches. Each issue has its quirks, and we’ll need a custom game plan for each one. Together, we’ll decode these tech mysteries and get your Windows system back to its smooth-running self.
So, let’s start with;
Condition #1: Computer Automatically Starts In Safe Mode
Ever booted up your computer only to find it’s taken a detour into Safe Mode without asking you? Usually, it’s because some boot settings got mixed up. Here’s what might be throwing your computer into this unscheduled Safe Mode party:
- Malware Mischief: Those sneaky viruses and Trojans love to mess with your system settings. They might set things up so they can hide out, making it tougher to kick them out.
- User Oopsies: Ever played around with your computer settings, thinking you’re the next tech wizard, only to find out you’ve accidentally set it to start in Safe Mode? Yeah, we’ve all been there.

Let’s kick Safe Mode to the curb using “System Configuration” with our step-by-step breakdown:
- Open the Run Box: Hold down Windows + R keys. This should summon the Run box, your one-stop-shop for running Windows commands.
- Type “msconfig” and Hit Enter: In the Run box, type “msconfig” and either hit Enter or click OK. This will bring up the System Configuration tool.
- Head to the Boot Tab: Once inside System Configuration, click on the “Boot” tab at the top. That’s where the startup magic happens.
- Ditch the Safe Boot: Look for “Safe boot” under “Boot options”. It’s probably checked. Uncheck it to stop the automatic Safe Mode party.
- Save and Close: Click “Apply”, then “OK”. This locks in your changes.
- Give Your PC a Reboot: To put your changes into action, restart your computer. Click “Restart” when prompted.
After the Reboot: Your computer should now boot up like it’s supposed to, skipping the Safe Mode shenanigans. But if it’s still acting up, we might need to dig deeper.
Next Steps:
- Run a Deep Virus Scan: Bust out your trusty antivirus and give your system a thorough scan. Let’s see if any malware’s crashed the party.
- Check Recent Changes: Think back—have you installed anything new lately? Sometimes, new software can mess with your boot settings.
- Call in the Big Guns: If all else fails, don’t hesitate to call in the pros or hit up the comment section down below the article for more support. There’s no shame in asking for a bit of help.
Condition #2: PC Displays Black Blank Screen, But Functions Normally In Safe Mode
Ever had your PC pull a disappearing act with a black screen, even when it’s playing it safe in Safe Mode? Well, buckle up, because this mystery usually traces back to some misbehaving system components or drivers that take a nap during Safe Mode.
Our prime suspect? The notorious Explorer.exe. This guy runs the show for your desktop, taskbar, and file antics in Windows. Mess with it, whether it’s malware or a glitch, and you might just get the silent treatment with a black screen at boot-up.
Plus, those pesky malware or viruses can also mess with system files, like our friend Explorer.exe, leading to a whole circus of issues. Think black screens, slow-mo system performances, and just a general vibe of chaos. And don’t even get me started on outdated or corrupted video drivers. They can throw a wrench in the works, causing all sorts of display dramas that make you wish for a good old-fashioned projector.
Solution #1: Deep Virus Scan
Now your first line of defense is the almighty virus scan. Not just any scan, mind you—a thorough one that hunts down those sneaky threats lurking in the shadows. And what’s the secret weapon? The boot time scan.
This bad boy feature lets your antivirus roll up its sleeves and dive in before your operating system even wakes up from its beauty sleep. It’s like catching malware with its guard down, making it harder for those stubborn bugs to play hide-and-seek. To kick off a boot time scan, you’ll need to reboot and hit up your antivirus’s boot time scan option during the startup hustle. Warning: this might take a bit longer than your usual scan, but trust me, it’s worth the wait for that squeaky-clean system.

Now, if you’re still rocking a free antivirus or putting all your faith in Windows Defender, it might be time for an upgrade. Sure, they’re like the training wheels of cybersecurity—better than nothing, but not exactly race-ready. Premium antivirus programs offer a buffet of features, from real-time protection to advanced threat detection and even a snazzy firewall. It’s like trading in your flip phone for a smartphone—once you go premium, there’s no turning back.
- What’s A Good Antivirus And How To Pick The Perfect One?
Solution #2: Reinstall Video Drivers
The next hero in our troubleshooting saga? Reinstalling those Video or Graphics Card Drivers. Think of these drivers as the middlemen between your OS and your graphics hardware. They make sure everything looks sharp and runs smoothly on your screen. But, like an outdated GPS, they can get a bit wonky over time—outdated, corrupted, or just plain incompatible with the latest system updates.
Do you have a shiny dedicated Graphics Card? Head straight to the GPU manufacturer’s support page. They’ve got a treasure trove of driver downloads, all neatly organized by your specific card model and OS version. Grab the right ones to avoid a compatibility train wreck—you wouldn’t want to mix up your GeForce with your Radeon, now would you?
Rocking integrated graphics instead? That’s cool too. Swing by your laptop or desktop manufacturer’s support page. They’ve got the goods tailored just for your system. Same drill: pick the right ones to keep things humming along smoothly.
Now, let’s get down to business with some driver reinstalling 101:
- Uninstall Old Drivers: First up, ditch those outdated drivers. Head to Device Manager, find your graphics card under ‘Display adapters’, right-click, and hit ‘Uninstall device’. Clean slate, here we come!

- Download and Install New Drivers: Now, off to the races! Grab the latest drivers from your chosen support page. Follow any on-screen instructions or readme files like they’re your tech Bible, and let the installation magic happen.

- Restart and Celebrate: Once you’ve got those new drivers in place, give your PC a good ol’ reboot. This is the tech equivalent of a victory lap. Check to make sure everything’s looking snazzy and running like a dream.


By giving your graphics card drivers a little TLC with a fresh install, you’re often saying goodbye to those pesky display issues and hello to smoother graphics performance. If the gremlins persist, don’t worry—we’ll dive deeper into the troubleshooting rabbit hole to uncover the root of the problem.
- What Is a Graphics Card or Video Driver, And How To Install It?
- How to Update Drivers Directly From the Device Manager?
- DriverIdentifier: A Great Way To Find & Download Drivers Online
- Install Computer Drivers Automatically For Free – DriverPack Solution
Solution #3: Troubleshoot Explorer.exe
Stuck in the abyss of a black screen and itching to troubleshoot without diving into Safe Mode? Fear not! We’ve got a nifty trick up our sleeves—forcing the Task Manager to make a cameo on your blacked-out screen. Just hit Ctrl+Alt+Del, and voila! You’ll summon a menu where the Task Manager is the star of the show.

Once the Task Manager graces your screen, it’s time to play detective. Head to the top menu, click on ‘File’, and pick ‘Run new task’ from the dropdown. This opens a magic little dialog box where you can work your command-line wizardry. Type ‘explorer.exe’ and hit Enter, sending your operating system on a quest to launch a fresh instance of Windows Explorer. If all goes well, your desktop should make a grand return, banishing that pesky black screen to the shadow realm.

If this little trick does the trick, hooray! You’ve likely dodged a bullet caused by funky system configurations or corrupt files messing with Explorer.exe. But don’t rest on your laurels just yet—there’s more troubleshooting to be done to keep those gremlins at bay.
For those craving a deeper dive into the world of Windows Explorer woes, I’ve got a gem for you. Check out the article Fixing “Windows Explorer Has Stopped Working” In Windows. Trust me, it’s a treasure trove of step-by-step goodness, offering a roadmap to diagnose and fix those pesky Explorer-related hiccups. It’s like having a tech guru whispering troubleshooting secrets in your ear.
Condition #3 & 4: PC Automatically Restarts Without Any Error, Or Maybe Shows Blue Screen, But Functions Normally In Safe Mode
Ever felt like your Windows PC’s going through an identity crisis, booting up in Safe Mode but pulling a sneaky restart during startup or throwing a blue screen tantrum in normal mode? It’s like your computer’s the lead actor in a drama, and it’s really stealing the show. Fear not! We’ve got the backstage passes to get this production back on track.
Solution #1: Use System Restore Or Last Known Good Configuration
For those rocking the classics like Windows 7 or its older siblings, meet your trusty sidekick: “Last Known Good Configuration”. Just tap that F8 key like you’re playing a high-stakes piano solo during startup to summon the Advanced Boot Options menu. From there, choose “Last Known Good Configuration” to wind back the clock to a happier, glitch-free time. It’s like hitting the undo button on your computer’s bad decisions.

Now, if you’re on Team Windows 10 or 11, your troubleshooting journey takes a detour through the Windows Recovery Environment (WinRE). If your PC decides to ghost you at startup, it’ll automatically boot up into the WinRE when it fails to start multiple times, your one-stop shop for advanced troubleshooting antics. Head to “Troubleshoot” > “Advanced options” > “System Restore“ to wind back those system changes and undo the chaos. It’s like a time machine for your PC’s settings.

Solution #2: Use “Automatic Repair” or “Startup Repair”
Still stuck in the reboot loop from hell? Fear not, brave troubleshooter! Dive into the rabbit hole of “Automatic Repair” or “Startup Repair”. These tools are like the Swiss Army knives of startup issues, slicing through the confusion to diagnose and fix those pesky reboot blues. It’s like having a tech wizard in your corner, waving a magic wand to banish startup gremlins.
- “Automatic Repair” Or “Startup Repair”: What It Is & How To Open & Use It?

Solution #3: Clean Boot
But what if our repair heroes are off-duty? Time to roll up those sleeves and go for a clean boot. It’s like sending your PC on a detox retreat, stripping away all the excess baggage to pinpoint the troublemaker behind the blue screen drama.
Here’s the step-by-step guide to this tech spa day:
- Boot up in Safe Mode (your PC’s comfort zone).
- Hit Win + R to summon the Run dialog box.
- Type ‘msconfig’ and hit Enter to open the System Configuration utility.
- Head to the ‘Services’ tab and play hide-and-seek with Microsoft services by checking ‘Hide all Microsoft services’.
- Click ‘Disable all’ to put those non-Microsoft services on a timeout.
- Now, venture over to the ‘Startup’ tab and peek into Task Manager.
- Disable all startup items like a pro detective—right-click and choose ‘Disable’.
- Wrap things up by clicking ‘OK’ in System Configuration.
- Finally, reboot your PC to enjoy its fresh, clean boot glow.
Alright, tech detectives! You’ve successfully ushered your PC through the tech spa day that is the clean boot, and it’s looking and feeling refreshed—no blue screen dramas in sight. But now it’s time to get down to some serious detective work. We need to find out which of those sidelined services or startup programs is the troublemaker causing all the chaos.
Here’s your game plan:
- Enable Services and Programs: Like a detective piecing together clues, start by re-enabling each disabled service and startup program one by one. It’s like giving each suspect a turn in the spotlight to see if they crack under pressure.
- Restart and Observe: After enabling each service or program, hit that reboot button and keep a close eye on your PC’s behavior. Look out for any red flags—like sudden blue screens, system hiccups, or mysterious crashes.
- Spot the Culprit: When you notice your PC acting up again, you’ve likely found your troublemaker. It’s the service or program that couldn’t handle the clean boot challenge and reverted to its old, misbehaving ways.
Remember, this process is all about patience and methodical sleuthing. By systematically enabling and testing each service and startup program, you’ll zero in on the culprit causing your PC’s startup woes. Once you’ve identified the troublemaker, you can decide whether to disable it permanently or seek out updates or fixes to tame its rebellious nature.
Solution #3: Uninstall Recently Installed Windows updates
Ever felt like your PC’s throwing a hissy fit after a recent Windows update? Like a chef adding one too many spices, sometimes those updates can be a little too much for our PCs to handle. But fear not! We’ve got the recipe to roll back those updates and restore peace in your digital kingdom.
Here’s your step-by-step guide to taming those unruly updates:
- Open Control Panel: Fire up the Run dialog box by hitting Win + R, type ‘control panel’, and hit Enter. Ah, the Control Panel—our trusty command center for all things Windows.
- Dive into Windows Update History: Navigate to the “Programs” section in the Control Panel and click on “View installed updates” under “Programs and Features”. Behold, a treasure trove of updates that have graced your PC with their presence.
- Spot the Newcomers: Scan the “Installed Updates” list for any updates that arrived around the time your PC started acting up. Sort by “Installed On” date for a neat timeline of suspects.
- Bid Farewell to Troublemakers: Once you’ve identified the culprits, select those pesky updates and hit the “Uninstall” button like you’re banishing them from the kingdom. Follow the on-screen prompts to complete their exile.

- Reboot and Relax: After sending those updates packing, give your PC a reboot. With those troublemaking updates gone, your system should revert to its former, stable self.

With a little detective work in your Windows update history and a bit of courage to uninstall the suspicious updates, you can often restore peace and harmony to your PC. But remember, if the issue persists, it might be time to call in the tech cavalry or explore other troubleshooting avenues to keep your digital kingdom running smoothly.
Solution #3: At Last, Fix Windows Internal Files
Alright, tech wizards, if you’ve danced through a maze of troubleshooting methods and your Windows PC still throws a fit, it might be time to play doctor with its internal system files. Enter DISM (Deployment Image Servicing and Management) and SFC (System File Checker)—your trusty sidekicks in restoring peace and stability to your digital realm. These tools are the Jedi masters of scanning and patching up corrupted or AWOL system files, keeping your Windows OS in tip-top shape.
Ready to perform some digital surgery? Here’s your foolproof guide:
- Boot into Safe Mode with Networking: First things first, put your computer in “Safe Mode with Networking”. This stripped-down version of Windows is like a digital monk – minimal distractions from pesky third-party software or drivers while you work your magic.
- Summon Command Prompt as Administrator: With your computer in Safe Mode, summon the Command Prompt with all the authority of a tech guru. Just search “cmd” in the Windows search bar, right-click “Command Prompt”, and choose “Run as administrator”.
- Fire Up DISM Tool:
- Online Repair: In your elevated Command Prompt, type this incantation and hit Enter:
DISM /Online /Cleanup-Image /RestoreHealth
- Repair using Windows Installation Media: If the online mojo doesn’t work, it’s time for the big guns. Pop in your Windows installation media (USB or CD) and run this, but swap out “G:\Sources” with your actual path to “install.wim” or “install.esd”:
DISM /Online /Cleanup-Image /RestoreHealth /Source:G:\Sources\install.wim
or
DISM /Online /Cleanup-Image /RestoreHealth /Source:G:\Sources\install.esd
- Online Repair: In your elevated Command Prompt, type this incantation and hit Enter:
- Engage SFC Tool: After DISM does its thing, unleash the System File Checker (SFC) tool. In the Command Prompt, type this spell and press Enter: SFC /scannow
The SFC wizardry will sift through your system, hunting down and repairing those mischievous corrupted or missing files.


After you’ve played surgeon with DISM and SFC, give your PC a restart. Cross your fingers, maybe even perform a little victory dance, and see if the gremlins have been banished.
What to Do If Nothing Works?
So, you’re still seeing that pesky Blue Screen of Death (BSOD) despite trying all the usual tricks? Don’t worry; we’ve got some more advanced solutions up our sleeves to help you kick those blue screens to the curb. Whether it’s a hardware hiccup, a driver drama, or some nasty software squabble, we’ve got you covered.
Need a deep dive into BSOD issues during startup? Check out our article on: Fixing BSOD (Blue Screen of Death) Error: Every Possible Solutions. It’s a treasure trove of tips, tricks, and step-by-step guidance to get your PC back on track.
- If you are considering a factory reset or clean install:
- Factory Reset: If all else fails, hitting the reset button might be the way to go. Just remember, this wipes your PC clean, so back up those cat videos and memes you can’t live without first!
- How To Properly ‘Factory Reset’ A Laptop Or Desktop Computer?
- Clean Install: Want a fresh start? A clean install of Windows can be a game-changer. But, be warned, it’s like hitting the nuclear option on your PC. Check out our guides for Windows 7, 8/8.1, and 10 below:
- How to Install Windows 7? – Complete Guide
- How To Install Windows 8/8.1? – Complete Guide
- How To Install Windows 10? – Complete Guide
- Factory Reset: If all else fails, hitting the reset button might be the way to go. Just remember, this wipes your PC clean, so back up those cat videos and memes you can’t live without first!
You are here: Home / Windows / Why Windows 10 Keeps Booting Into Safe Mode? [Solved]
Safe Mode is basically booting in Windows with only the required drivers and services active. This allows users to troubleshoot errors or do other activities without getting interfered by such entities. However, some users have reported that their PC always starts in Safe mode and they are unable to enter the standard boot mode.
If your Windows 10 keeps booting into Safe Mode, read this article and learn why it does so and how to stop it.
We have shown a VIDEO walk through at the end of the post for easy solution.
The first question that will likely pop into your mind is why your computer only starts in safe mode. This can be due to several reasons.
One of them is that you have enabled the boot into the Safe Mode option and forgotten to turn it off, which is why your computer keeps starting in safe mode.
If this is the first time you have boot into safe mode and don’t know how to get out of it, then you can try a simple restart and see if that works or not.
Whichever the case, here are the solutions for you to prevent your PC from always booting in Safe Mode.
Also read:
- How To Fix Chkdsk Cannot Lock Current Drive Error? [Complete Guide]
- What To Do When Your Computer Clock Is Slow?
What To Do When Windows 10 Keeps Booting Into Safe Mode?
When Windows 10 keeps booting into safe mode, follow the procedure provided below appropriately to check the issue and solve it.
Solution 1: Check System Configuration
The most likely reason your PC keeps booting into safe mode is that you have unknowingly configured the system configuration settings to do so. You check this easily after booting in Safe mode and change it. To do it, follow the steps given below:
- Press the Windows + R keys to open the Run utility.
- Type msconfig and press Enter to open the System Configuration.
- Click on the Boot tab and check whether the Safe boot box in the Boot Options section is checked or not.
- If yes, uncheck it and click on Apply and OK to save the changes.
- Restart your PC.
After you restart your PC, it should boot into Windows normally.
Solution 2: Use Command Prompt To Leave Safe Mode
One other way to leave the Safe Mode and enter Windows normally is using the Command Prompt. To do it, follow the steps given below:
- Right-click on the Start menu and select the Run option from the pop-up menu. This will open the Run utility again.
- Type cmd in the search box and press Ctrl + Shift + Enter to open an elevated Command Prompt.
- Now, type the following command and press Enter to initiate it:
bcdedit /deletevalue {default} safeboot - Close Command Prompt and restart your PC.
Your PC should boot normally after the restart.
Solution 3: Use Advanced Startup Options
Another way to boot normally in Windows from Safe Mode is by using the Advanced Options. To do it, follow the steps given below:
- Open the Start Menu and click on the Power options.
- Press and hold the Shift key and click on the Restart option.
- Your PC will restart and boot in advanced startup options.
- Click on the Troubleshoot option.
- Select the Advanced options.
- Click on Startup Settings and select the Restart option.
- Now in the Startup options screen press the Enter key to exit Safe Mode and boot normally in Windows 10.
Wrapping Up
So, there you have it. Now you know what to do when Windows 10 keeps booting into safe mode. If you have any questions regarding this topic, ask them in the comment section below.