
This tutorial will discuss the command line way to install Node.js and NPM quickly on Windows 10 or 11 using the PowerShell or Command prompt.
Use CMD or Powershell to install Node.js & NPM on Windows 10 or 11 1. Open PowerShell as Admin2. Check Winget is Available3. Command to Install Node.js LTS or Current version4. Testing the Installation by checking the versionConclusion
Node.js and its NPM which stands for ‘Node package manager’ are widely used by developers around the world for developers’ modern applications. Both are open-source and cross-platform, hence the operating system is not a limitation at all. Nodejs which offers a back-end JavaScript runtime environment allows developers to build scalable network applications. Whereas, to install dependencies and other supported packages to build an app, NPM, a Node Package Manager is there.
Although Node.js is cross-platform, its process of installation is different as per the operating system you are using. When it comes to Windows, most of the time users manually visit the website of Nodejs to download its executable file to perform the installation. However, you don’t need to do that because Windows 10 and 11 come with an inbuilt package manager like Linux known as Winget.
And in this article, we will provide a step-by-step guide to installing Node.js and NPM on Windows 10 or 11 using the command terminal.
Those who are not interested in the CLI way can still go for the traditional GUI way for downloading and installing Node.js and NPM on Windows 10 or 11.
Use CMD or Powershell to install Node.js & NPM on Windows 10 or 11
Prerequisites – Before installing Node.js and NPM on Windows, it is important to ensure that the following prerequisites are met:
- You are using Windows 10 or 11
- Access the Administrator user account
- Active Internet connection
1. Open PowerShell as Admin
Here we are using Powershell, however, you can use the Command prompt as well; the given steps in this article will be the same for both.
Right-click on the Windows 10 or 11 start menu and select Terminal (Admin) in Windows 11. Whereas Windows 10 users would have Powershell (Admin) option.
2. Check Winget is Available
Winget is a package manager developed by Microsoft for its Windows operating system to easily install an application using the command line. So, first, let’s check whether it is available on our system or not. Well, by default it will be there. if not, then you can install it manually from GitHub.
wingetYou will get something like the below in the given screenshot which confirms, the package manager is working fine.

3. Command to Install Node.js LTS or Current version
Node.js comes with NPM, so installing it will also configure the package manager. Som on your command prompt or terminal, type the given command to check the availability of Nodejs packages:
winget search node.jsYou will see all the available versions of Node to install on Windows using the Winget package manager such as LTS, Current, and Nighlly.

Let’s see how to download them using the command given below, choose only one as per the version you want on your system.
For Node.js & NPM LTS version, the command will be:
winget install OpenJS.NodeJS.LTSFor Node.js and NPM Current version
winget install OpenJS.NodeJSTo get the Nightly version (testing)
winget install OpenJS.NodeJS.Nightly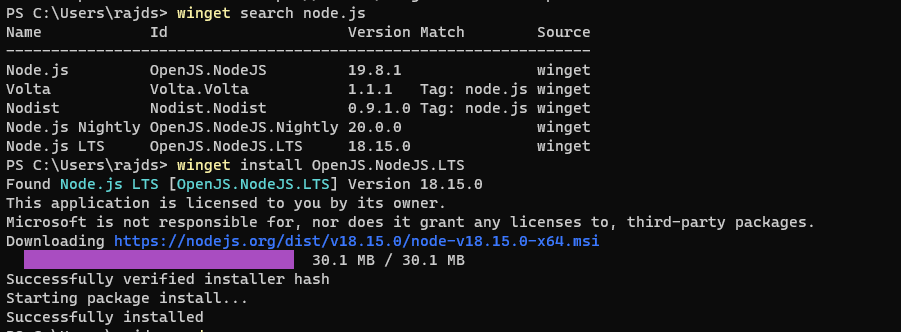
4. Testing the Installation by checking the version
Once you are done with the installation, let’s confirm the required version of Node.js and NPM are on Windows by running a simple command in the command prompt or Powershell. However, before running them close and reopen the command prompt.
Check the version of Node.js by typing
node -v Check the version of NPM by using
npm -v
Conclusion
Using the command line to install Node.js and NPM on Windows is quite easy as compared to the graphical way in which we manually have to download the installer by using a browser and visiting the software website. By following the steps given in this article, developers can ensure that they have the latest version of Node.js and NPM installed on their Windows computers for creating scalable network applications using JavaScript.
Other Articles:
- How to change the NPM version in Linux, Windows, or macOS?
- How to update NodeJS and NPM to their latest versions?
- How to directly install the npm package from the GitHub repository
- What is npm ci and how it is different from the ‘npm install’ command?
Provide feedback
Saved searches
Use saved searches to filter your results more quickly
Sign up
Node.js это кроссплатформенная среда исполнения, позволяющая запускать серверные (бэкенд) приложения JavaScript вне браузера. В этой статье мы рассмотрим, как установить фреймворк Node.js и его менеджер пакетов NPM в Windows.
Для установки Node.js и NPM можно скачать с официального сайта готовый установщик в виде MSI пакета (https://nodejs.org/en/download/prebuilt-installer). На сайте доступны MSI пакеты для x86 и x64 версий Windows. Если нет специальных требования, обычно рекомендуется устанавливать LTS версию Node.js (Long Term Support) .
Запустите установку из MSI пакета с настройками по умолчанию.
MSI пакет содержит не только сам фреймоворк Node.js, но и также менеджер пакетов NPM, который устанадливается по-умолчанию. Установщик позволяет автоматически добавить пути к директориям node.js и npm в переменные окружения Windows.
Встроенный в node.js менеджер Node Package Manager (NPM), используется для загрузки и установки сторонних модулей из внешних репозиториев.
Для компиляции некоторых модулей, установленных через npm, могут потребоваться среды разработки python и Visual Studio. Вы можете разрешить NPM автоматически устанавливать необходимые инструменты, либо установить их в дальнейшем вручную через Chocolatey (https://github.com/nodejs/node-gyp#on-windows).

После окончания установки, проверьте что Node.js и npm установлены. Выполните следующие команды, чтобы вывести версии инструментов:
node -v
npm -v
Также для установки Node.js можно использовать менеджер пакетов WinGet, который установлен по-умолчанию в Windows 10 и 11.
winget install OpenJS.NodeJS.LTS

Эта команда автоматически скачает и в тихом режиме установит последнюю LTS версию Node.js.
Перезапустите консоль cmd/powershell, чтобы обновить пути в переменных окружения. Проверьте, что node.js и NPM успешно установлены и пути к ним прописаны в переменной окружения PATH:
(Get-ChildItem env:Path).value -split ";"

C:\Program Files\nodejs\
C:\Users\%username%\AppData\Roaming\npm
Также можно установить Node.js в Windows с помощью пакетного менеджера Chocolatey:
Choco install -y nodejs.install
Проверить работу Node.js можно с помощью простого JavaScript скрипта. Создайте текстовый файл hello.js с кодом:
console.log("Hello, world!")
Запустите скрипт с помощью node.js:
node hello.js
Для серверных развертываний Node.js, рекомендуется использовать менеджер версий NVM (Node Version Manager) для установки Node.js и npm.
NVM позволяет установить на компьютере несколько версию Node.js и переключаться между ними. Кроме того, в отличии от MSI установщика Node.js, NPM не использует профиль текущего пользователя для хранения данных. Это позволит исключить проблемы с путями и разрешениями при запуске сервисов.
Для установки NVM в Windows воспользуетесь пакетом NVM for Windows ( https://github.com/coreybutler/nvm-windows). Скачайте файл nvm-setup.exe и запустите установку.
Для установки определенной версии Node.js через NVM, используется команда:
nvm install 21
Вывести список установленных версий Node:
nvm list
Чтобы переключиться между версиями:
nvm use 20.11.0
При переключении версий скрипт nvm подменяет путь до Node.js в переменной PATH.
Время на прочтение5 мин
Количество просмотров419K

npm — это пакетный менеджер node.js. С его помощью можно управлять модулями и зависимостями.
Небольшая шпаргалка всех моих любимых команд npm:
- Установка npm
- Обновление npm
- Поиск пакетов в npm
- Просмотр информации о пакете
- Локальная установка пакетов
- Установка пакета в наше приложение
- Понимание разницы между глобальной и локальной установкой
- Глобальная установка пакетов
- Удаление локально установленного пакета
- Удаление глобально установленного пакета
- Установка определённой версии пакета
- Установка модуля с Github
- Связи любых пакетов локально
- Связи локальных пакетов для нескольких приложений
- Отмена связи между пакетами приложения
- Отмена связи пакета в системе
- Создание нового пакета
- Добавление нового пользователя
- Публикация пакета в репозиторий npm
- Удаление пакета из репозитория npm
- Управление правами доступа к пакетам в репозитории npm
Установка npm
curl https://npmjs.org/install.sh | shОбновление npm
Есть несколько способов чтобы обновить npm. Я предпочитаю:
curl https://npmjs.org/install.sh | shили
npm install npm -gПоиск пакетов в npm
npm search hook.io
Подсказка: Можно также использовать search.npmjs.org
Вторая подсказка: Для поиска необходимо знать имя нужного пакета (всё прекрасно ищет по любому слову как в имени пакета, так и в его описании, может неправильно перевёл?)
Просмотр информации о пакете
npm view hook.ioЛокальная установка пакетов
Для демонстрации возьмём пакет http-server.
http-server is a package we’ve written which provides an easy to use wrapper around node’s core http.Server class. This module makes for a good example, since it’s API provides both a CLI binary and a requirable node.js module.
http-server — пакет, который мы написали, предоставляет более простой интерфейс в использовании базового модуля http.Server из node.js. Этот модуль хороший пример использования API как для бинарного CLI, так и для подключаемого модуля node.js.
npm install http-server
Так мы установим http-server в нашей рабочей директории.
Вы увидите новую папку в node_modules. Сейчас можете не обращать на это внимание.
Установка пакета в наше приложение
  mkdir mynewapp/
  cd mynewapp
  npm install http-server
  touch test.js
test.js
var HTTPServer = require('http-server');

var httpServer = new HTTPServer({
  root: './public'
});

httpServer.start();
запустим скрипт
node test.js
Обратите внимание, как мы делаем: require(‘http-server’)? Что это за магия? (автор молодец)
http-server не является базовым модулем node.js. Этот пакет мы только что установили из npm. Node.js и npm взаимодействуют и автоматически подключают наши локальные модули из node_modules директории.
Понимание разницы между глобальной и локальной установкой
По умолчанию npm будет устанавливать все пакеты в локальном каталоге, в которым вы сейчас работаете. Это правильно. Это может показаться немного запутанным, если вы раньше работали с предыдущими системами управления пакетами.
Например:
mkdir anotherapp/
 cd anotherapp/
 touch test.js
test.js
var HTTPServer = require('http-server');теперь запустим наш скрипт
node test.jsмы получим эту ошибку:
node.js:134
        throw e; // process.nextTick error, or 'error' event on first tick
        ^
Error: Cannot find module 'http-server'
    at Function._resolveFilename (module.js:326:11)
    at Function._load (module.js:271:25)
    at require (module.js:355:19)
    at Object.<anonymous> (/Users/maraksquires/dev/nodeapps/anotherapp/test.js:1:80)
    at Module._compile (module.js:411:26)
    at Object..js (module.js:417:10)
    at Module.load (module.js:343:31)
    at Function._load (module.js:302:12)
    at Array.<anonymous> (module.js:430:10)
    at EventEmitter._tickCallback (node.js:126:26)
Это вполне логично, мы установили http-server локально в «/mynewapp/», а не в «/anotherapp/».
Есть два решения в этой ситуации:
а) Установить ещё раз пакет, но локально в наше новое приложение
cd anotherapp/
 npm install http-server
б) Установить пакет глобально
npm install http-server -gГлобальная установка пакетов
Если вы хотите чтобы пакет был доступен всем приложениям, его нужно установить глобально:
npm install http-server -g
Флаг -g означает, что http-server должен быть установлен глобально и быть доступными для всех приложений.
Теперь мы можем вызывать его require(‘http-server’) в любом нашем приложении.
Кроме того, поскольку http-server пакет имеет свой исполняемый файл, то этот файл также будет установлен как исполняемый http-server и доступен в командах.
Теперь вы можете просто запустить команду:
http-serverУдаление локально установленного пакета
npm uninstall http-serverУдаление глобально установленного пакета
npm uninstall http-server -gУстановка определённой версии пакета
npm install http-server@0.3.0Установка модуля с Github
Важно. В некоторых случаях будут патчи, форки или ветви, которые вы хотите использовать, но которые еще не были опубликованы в npm. К счастью исходные коды для большинства npm модулей также доступна на www.github.com
git clone git://github.com/nodeapps/http-server.git
cd http-server/
npm link
Теперь наша клонированная версия http-server связана локально.
Связи любых пакетов локально
Если у вас есть отдельный каталог содержащий пакет npm, то можно создать локальную связь для него. Это удобно в ситуациях, когда мы не хотим опубликовать наш пакет в хранилище npm.
cd http-server/
npm link
На нашу локальную версию http-server создана «связана» для нашей локальной машины. (связь создаётся как «copy-paste», с начало нужно перейти в нужный катало и сделать «copy», потом перейти в нужный каталог и сделать «paste». Так вот сейчас мы изучили как делается «copy», а ниже будет про «paste» этого модуля)
Связи локальных пакетов для нескольких приложений
Как мы видели ранее npm устанавливает пакеты в локальный каталог по умолчанию. Так вот npm ссылка(связь) работает почти так же.
mkdir newapp/
cd newapp/
npm link http-server
Мы указываем, что теперь создали связь из http-server в наше новое приложение newapp. Если бы мы не выполнили npm link http-server, то получили бы ошибку об отсутствующем модуле. (а вот наш и «paste» о чём я писал выше, теперь вам должна быть понятна логика создания связей)
Отмена связи между пакетами приложения
cd newapp/
npm unlink http-server
(здесь мы просто отменяем наш «paste» для этого приложения)
Отмена связи пакета в системе
cd http-server/
npm unlink
(здесь мы отменяем наш «copy» для этого пакета)
Создание нового пакета
mkdir mypackage/
cd mypackage/
npm init
(от себя хочу лишь заметить, что создание пакета не такая простая задача в одну команду, подробнее можно почитать в другой статье)
Добавление нового пользователя
npm adduserПубликация пакета в репозиторий npm
cd mypackage/
npm publish
Удаление пакета из репозитория npm
npm unpublish http-serverУправление правами доступа к пакетам в репозитории npm
Вы можете задать права доступа других пользователей к опубликованному пакету:
npm owner add marak http-server
npm owner rm marak http-server
npm owner ls http-server
За дополнительной информацией о формате package.json и обо всех тонкостях работы с npm вы можете ознакомится в статье Charlie Robbin’s: blog.nodejitsu.com/package-dependencies-done-right
This post is for all javascript lovers. If you want to know “How to install node js and npm” in Windows and Ubuntu. You have landed on the right page. I have included all possible options to install node.js and npm in your favourite OS. These methods are really easy. All the commands output are also attached for your reference.
I am sure if you will follow this post step by step. You will be able to install node js and npm easily even if you are a newbie.
What will you learn in this post –
What is node Js and NPM
The NPM stands for the node package manager. It is the default package manager for Node.js. Basically, Node.js is a JavaScript runtime environment. Node.js allows developers to build scalable network application quickly. NPM is a client helps to access and browse the npm registry via the npm website. NPM registry is the repository of public and private packages online. Alternately, ied, pnpm, npmd and yarn can be used to access npm registry.
As per Wikipedia website –
npm, Inc. is a subsidiary of GitHub, an American multinational corporation that provides hosting for software development and version control with the usage of Git.
There are couple of ways to install node.js and npm in Windows.
- GUI (manual method)
- Using chocolatey (Powershell)
Please make a note, npm (node package manager) will auto install in windows 10 with node.js.
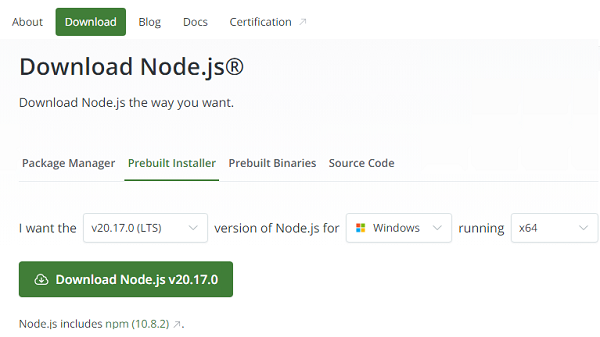
Step1:- Download node js
Download Node.js software from nodejs.org website. The latest LTS version is node-v14.15.3. Package npm is in-built. You don’t need to install it separately. If you own an old version of windows, select 32-bit version of node.js installer. Otherwise, choose 64-bit in all other cases.
I will select 64-bit version.

Step1.1
After download of node js completes. Visit your download directory.

Step2:- Install Node.js and npm
Double click installer node-v14.15.3-x64.msi. This will start Node Js installation wizard.
Click Next –

Step2.1
Select “I accept the terms in the license Agreement” box. It confirms that you agree with node.js end user license agreement. Click Next –
Step2.2
Select the destination folder for node.js installation. Default location of node.js is “C:\Program Files\nodejs\“. In case, you want to select a custom location. Click on change and browse for your preferred install location.
Select – Next.
Step2.3
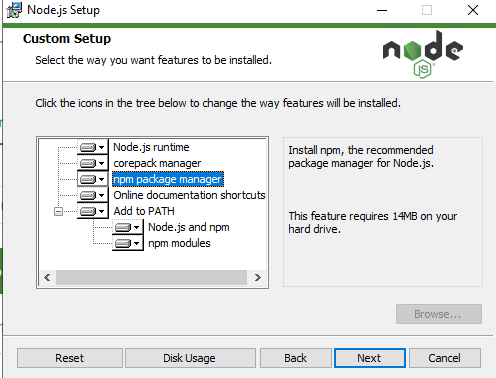
Select node.js features. I will suggest you leave it default. Also, npm (node package manager) is part of features. So you don’t need to install it separately.
Space required to install these node js and npm features need 143MB capacity.
Following features will install by default –
- Node.js runtime
- Npm package manager
- Online documentation shortcuts
- Add to Path
Click Next
Step2.4
Choose an optional tool to compile native modules, if required. Some npm modules need to be compiled from C/C++. To install these modules, you will need python and Visual studio build tools.
Choose box “Automatically install the necessary tools option“. You can visit https://github.com/nodejs/node-gyp#on-windows to install it later manually. We will discuss the chocolatey software in the next section.
In my case, i have not selected this option.
Choose Next.

Step2.5
Now you are ready with final node js step. You can click “Back” to review or change your node.js installation settings.
Click Install.

Step2.6
Select “Yes” to allow windows to run Node.js.
Step2.7
Sit back and relax. it will take couple of minutes to complete node.js installation.

Step2.8
Click Finish. You are done with node.js installation now.

Step3:- Check Node.js and npm version
Step3.1
Open command prompt with “run as administrator”. Run node and npm command.
Check node js version
C:\> node -v
Check npm (node package manager) version
C:\> npm -v

In my case, node.js version is v14.15.3 and npm is 6.14.9
Nowadays Microsoft recommends to Node js and NPM installation in WSL (Windows Subsystem for Linux). Follow this post to learn WSL and how to install Ubuntu on Windows.
1.a:- How to uninstall node js in Windows 10
In case you have old version of node.js or npm installed and want to remove it. Follow these steps-
Step1: Open add remove programs
Go to “Add or remove programs” from search window. Click open.

Step2: Find and Uninstall node js
Find node.js and click uninstall.

it will take couple of minutes to get clean from machine.

It will also remove npm (node package manager).
Video – How to install Node js and npm in windows 10
2:- How to install node js in Windows using chocolatey {Powershell}
There is one more way to install node.js and npm using chocolatey. It is a software management solution. You will need PowerShell to run these commands.
Follow these commands one by one –
Step1:- Open PowerShell as admin
Type PowerShell in search box and open it as run as administrator.
Step2:- Set Execution policy
The execution policy is “restricted” by default in PowerShell. This policy will not allow you to run scripts. So you need to change it to “AllSigned“. So that it allows to download and run chocolatey commands.
C:\> Set-ExecutionPolicy AllSigned

Step3:- Download and Install Chocolatey using PowerShell script
Copy and paste this script to download and install chocolatey software in Windows. It will install the latest version of the chocolatey package.
It also download 7-zip tool and install it prior to extraction. You can safely ignore warnings while installing chocolatey.
C:\> Set-ExecutionPolicy Bypass -Scope Process -Force; iex ((New-Object System.Net.WebClient).DownloadString('https://chocolatey.org/install.ps1'))

If you get warning “Not setting tab completion: Profile file does not exist at <location>”. Make a folder on that location. it will help you to complete chocolatey commands using Tab. For example, I will make a folder in “C:\users\Dev\Documents\WindowsPowerShell\Microsoft.PowerShell_profile.ps1”.
Step4:- Install node.js using choco command
Run choco command to download and install node js and npm using PowerShell. You can use -Y option for the non-interactive run.
> choco install nodejs
Use –force option, in the case earlier node.js installation failed. This will install the latest node.js version available.
To install specific version, give details in command. For example, i have given version 12.10.0.
> choco install nodejs --version=12.10.0

Step5:- Check node js and npm version
Check node js version
> node --version
Check npm version
> npm --version
Step6 (optional):- Install angular CLI
This step is optional and only need to run, if you need angular CLI. NPM command will help to download and install angular package.
Open command prompt with “run as administrator” rights. Then run npm command to install angular/cli.
option i – to install package
-g option – for global in npm command.
> npm i -g @angular/cli

or use @version to install version, you need. For example 1.8.2
npm i -g @angular/cli@1.8.2
How to install node js in Linux
Node js can be installed in Linux using two ways. One is from the official repository and second from NodeSource repository. These steps are applicable to Ubuntu 18.04 and 20.04 distro.
1# How to install node js in Ubuntu 20.04 using Ubuntu repository
Installation of node js and npm in Ubuntu is a two-step process. It’s always recommended to install node js first. it’s really easy. Follow these steps –
Step1:- Open terminal and update Ubuntu repository
Open terminal with Ctrl + Alt + T and update repository.
$ sudo apt-get update

Step2:- Install node js using CLI
Run apt-get command to install nodejs package. Make a note, npm is suggested package.
$ sudo apt-get install nodejs

Step3:- Check Node version
Once installation done. Check node.js version
$ node -v
or
$ node --version
Step4:- Install npm in Ubuntu 20.04 using apt
Now let’s install node package manager (npm) which is required by Node Js.
$ sudo apt-get install npm
Step5:- Check npm version
Check npm version
$ sudo npm -v
or
$ sudo npm --version
How to uninstall node js in Ubuntu
Remove node js from Ubuntu using these simple steps –
Step1:- Open terminal and run remove node js from ubuntu
Open terminal Ctrl + Alt + T and run apt-get command
$ sudo apt-get remove nodejs
How to uninstall npm in Ubuntu
Step2:- Open the terminal and run remove npm
Open terminal Ctrl + Alt + T and run apt command to remove npm
$ sudo apt-get remove npm
2# How to install node js in Ubuntu using NodeSource repository
If you want to install a newer version of node.js and npm. Then you need to connect to NodeSource repository. Follow these simple steps-
Step1:- Open the terminal and update Ubuntu package manager
Open terminal and and run apt command to update package manager.
$ sudo apt-get update
Step2:- Install dependent python libraries
Install dependent Python libraries with apt-get command
$ sudo apt-get install python-software-properties
Step3:- Add node source PPA
Add node js repository to system. If you want to add it for version 14. Change 15.x to 14.x in command.
$ curl -sL https://deb.nodesource.com/setup_15.x | sudo -E bash -

Tip
If you get “curl” not found error. Install curl utility first.
$ sudo apt install curl

Step4:- Install node js and npm packages in Ubuntu 20.04
Install node js and npm in Ubuntu using apt-get command. You don’t need to install npm separately in this case. Checkout this post on more ways to install packages in Ubuntu.
$ sudo apt-get install -y nodejs

Step5:- Check Node and npm version in Ubuntu
Check node js version
node -v
or
node –version
Check npm (node package manager) version
npm -v
or
npm –version
Step6 (optional):- Install build essential tools
Install build tools to compile and install native add-ons. This is optional and depends on your need.
$ sudo apt-get install -y build-essential
So, you have installed node js and npm in Ubuntu successfully.
Video – How to install Node js and npm in Ubuntu 20.04
Frequently Asked Questions
Is node JS safe to install?
Yes, installing node js is safe. Make sure you download node js software from nodejs.org website or authentic vendor repository only.
How to install node js as Windows service?
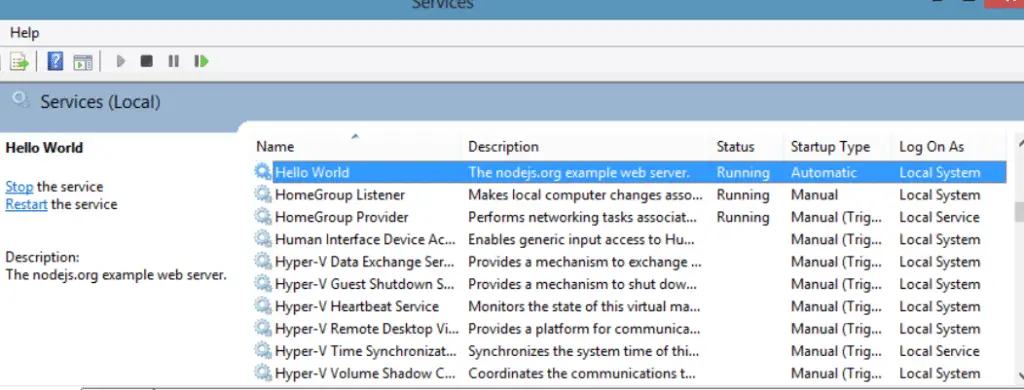
Download node-windows as a standalone module. The node-windows has a utility to run Node.js scripts as Windows services.
Which is the Best node js setup?
It’s always recommended to install latest (LTS) node js setup. Currently latest LTS version of node js is 14.15.3 (includes npm 6.14.9). LTS stands for long term support.
How to install the previous version of node js?
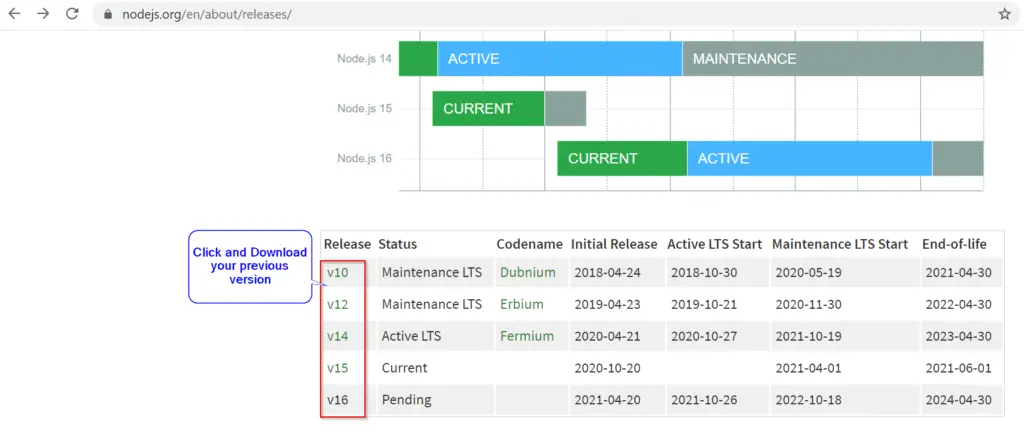
1.) Visit “https://nodejs.org/en/about/releases/”
2.) Scroll down and select your version
3.) Download and install.
Conclusion
There are multiple ways to download and install node js and npm in your favourite operating system. I have shown you the easiest ways to do it. You must be a happy soul and should be ready to work on your JavaScript. Let me know in comments if you still face any issue.
I will be happy to assist you.