
Applies ToWindows 11 Windows 10
To find how many cores and logical processors a processor on a Windows device has, follow these steps.
-
Right-click on the Start menu and then select Task Manager.
Tip: Selecting Ctrl + Shift + Esc on the keyboard also opens Task Manager.
-
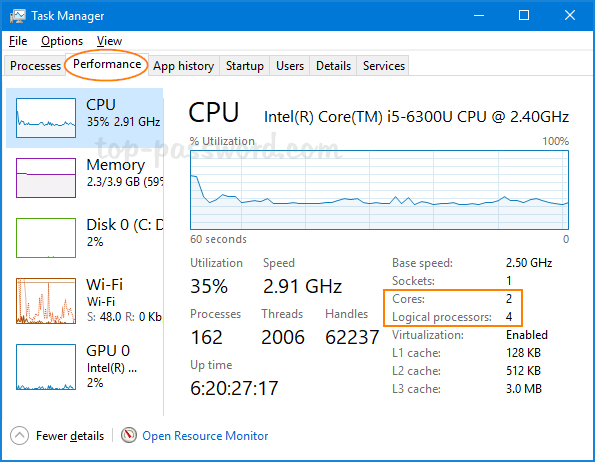
When the Task Manager window opens, select the Performance tab on the left side of the window, and then make sure CPU is selected.
-
The number of cores and logical processors a Windows device has are listed next to the following values:
-
Cores:
-
Logical processors:
-
Need more help?
Want more options?
Explore subscription benefits, browse training courses, learn how to secure your device, and more.
How to Check the Number of Processors in Windows 11
In the modern computing landscape, having an understanding of your system’s hardware is crucial for optimizing performance, running software efficiently, and performing a variety of tasks from gaming to professional-grade applications. One of the fundamental components of your computer that significantly influences its performance is the processor, also commonly referred to as the CPU (Central Processing Unit). In a multi-core processor environment, knowing how many processors your system has can be essential for various applications and system configurations.
Windows 11, Microsoft’s latest operating system, comes equipped with a refined user interface and various tools that allow users to easily access system information, including details about the number of processors. In this detailed guide, we will explore multiple methods to check the number of processors in Windows 11, ensuring that you can find the information you need regardless of your technical expertise.
Understanding Processors and Cores
Before diving into how to check the number of processors in Windows 11, it’s important to clarify the difference between processors and cores. A processor can have one or more cores. Each core can independently perform tasks, meaning a multi-core processor can handle multiple tasks simultaneously, improving performance significantly with parallel processing.
In typical consumer-grade CPUs, you’ll see configurations such as dual-core, quad-core, hexa-core, and octa-core processors. Additionally, many CPUs support hyper-threading, allowing each physical core to handle two threads, essentially doubling the effective number of cores for multi-threaded applications.
Method 1: Using System Information
One of the easiest ways to check the number of processors in Windows 11 is by using the built-in System Information utility.
-
Open System Information:
- Press the Windows Key or click on the Start button.
- Type “System Information” and select the application that appears in the search results.
-
Locate Processor Information:
- Once the System Information window opens, look for the section labeled System Summary in the left sidebar.
- In the right pane, you will find various details about your system. Look for the entry titled Processor.
- Here, you will see information about your CPU, including its name, speed, and the number of cores in the format (e.g., “8 Cores, 16 Logical Processors”). The number of logical processors indicates how many tasks your CPU can handle at once, considering hyper-threading.
Method 2: Using Task Manager
Another straightforward way to check your CPU configuration is by using the Task Manager, a versatile tool that not only monitors system performance but also provides detailed information about running processes and resource usage.
-
Open Task Manager:
- Right-click on the Start button or press Ctrl + Shift + Esc to launch the Task Manager directly.
- If you see the simple view with limited options, click on More details at the bottom.
-
Navigate to the Performance Tab:
- In the Task Manager, click on the Performance tab.
- On the left side, select CPU. Here, you will see a graphical representation of your CPU’s performance over time.
-
View Processor Information:
- In the top right corner of the Performance tab, you will find information about the CPU, including the number of cores and logical processors.
- It will typically show something like “Cores: 8, Logical processors: 16,” indicating the total number of physical cores and the effective number of processors with hyper-threading included.
Method 3: Command Prompt
For users who prefer command-line interfaces, the Windows Command Prompt is a powerful tool to extract system information, including the number of processors.
-
Open Command Prompt:
- Press Windows Key + R to open the Run dialog.
- Type
cmdand press Enter.
-
Run the WMIC Command:
- In the Command Prompt window, type the following command and press Enter:
wmic cpu get NumberOfCores,NumberOfLogicalProcessors
- In the Command Prompt window, type the following command and press Enter:
-
Interpret the Output:
- The output will display the number of physical cores and the number of logical processors.
- For example, if the output reads:
NumberOfCores  NumberOfLogicalProcessors
8              16
This indicates an 8-core CPU with hyper-threading support, resulting in 16 logical processors.
Method 4: Windows PowerShell
Similar to the Command Prompt, Windows PowerShell can also be used to obtain detailed information about your processor.
-
Open Windows PowerShell:
- Right-click the Start button and select Windows Terminal or Windows PowerShell.
- Alternatively, you can search for
PowerShellin the Start menu.
-
Execute the Command:
- In the PowerShell window, type the following command and hit Enter:
Get-WmiObject -Class Win32_Processor | Select-Object NumberOfCores,NumberOfLogicalProcessors
- In the PowerShell window, type the following command and hit Enter:
-
Review the Output:
- Similar to the Command Prompt, this command will return the number of physical cores and logical processors, giving you an insight into your CPU’s capability.
Method 5: Using System Settings
Windows 11 also allows you to check some system specifications directly through its settings:
-
Open Settings:
- Click the Start button and select the Settings icon (or press Windows Key + I).
-
Navigate to System:
- In the Settings window, click on System in the sidebar.
-
Select About:
- Scroll down and click on About.
- In the About section, under Device specifications, you will find information about your processor, including its name.
While this does not directly show the number of cores or logical processors, it provides an overview of the processor type, which can be cross-referenced online for more information.
Method 6: Third-Party Software Tools
For those who frequently require in-depth information about their system hardware, third-party monitoring tools can provide comprehensive insight not just into the CPU but the entire system. Programs like CPU-Z, Speccy, and HWiNFO can display extensive data about your processor.
-
Download and Install a Tool:
- Choose a tool such as CPU-Z or Speccy, download it from the official site, and install it on your computer.
-
Run the Application:
- Open the tool, and navigate to the CPU section.
- Here, you will find detailed information regarding your processor, including the total number of cores, threads, clock speed, and more.
Conclusion
Understanding the number of processors and cores in your Windows 11 system is vital for optimizing your experience, whether you are gaming, working on heavy computational tasks, or simply browsing the web. With the different methods outlined in this guide, from built-in utilities like System Information and Task Manager to command-line tools and third-party applications, you can easily acquire this crucial information.
Depending on your proficiency and preference, you can choose the most suitable method to obtain the data you need. Armed with this knowledge, you can make more informed decisions regarding upgrades, software installations, and troubleshooting, ensuring that your computing experience remains smooth and efficient.
January 31, 2019 updated by
Leave a reply »
How to find out how many physical cores and logic cores your CPU has? Need to check the CPU core before you buy a new laptop? In this tutorial we’ll show you 4 simple ways to find number of physical cores and logical cores in your CPU on Windows 10.
Physical Core VS. Logical Core
A physical core is an actual physical processor core in your CPU. Each physical core has its own circuitry and its own L1 (and usually L2) cache can read and execute instructions separately (for the most part) from the other physical cores on the chip. A CPU with two physical cores is called a dual-core processor and four physical cores is called a quad-core processor.
A logical core (also known as logical processors) is more of a programming abstraction than an actual physical entity. Logical cores are the abilities of a single physical core to run multiple tasks or threads simultaneously. For example, if you have a quad core CPU and each of its physical cores can run two threads at a time, then you have 8 logical cores.
Method 1: Check Number of CPU Cores Using Task Manager
Press the Ctrl + Shift + Esc keys simultaneously to open the Task Manager. Go to the Performance tab and select CPU from the left column. You’ll see the number of physical cores and logical processors on the bottom-right side.
Method 2: Check Number of CPU Cores Using msinfo32 Command
Press the Windows key + R to open the Run command box, then type msinfo32 and hit Enter.
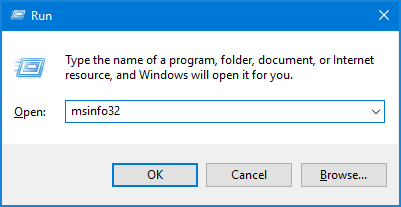
It should open up the System Information app. Select Summary and scroll down until you find Processor. The details will tell you both how many cores and logical processors your CPU has.

Method 3: Check Number of CPU Cores Using Command Prompt or PowerShell
Open the Command Prompt or PowerShell. Type the following command and press Enter:
WMIC CPU Get DeviceID,NumberOfCores,NumberOfLogicalProcessors
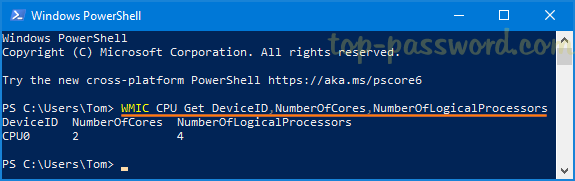
The output of the command tells you how many cores and how many logical processors are found in each CPU on your computer.
Method 4: Check Number of CPU Cores Using Third-Party Software
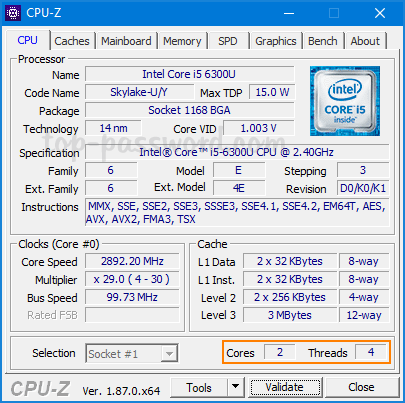
If you would like to find out the detail information about your CPU, try the third-party freeware CPU-Z. After running the app, you can see the number of physical cores and threads (logical cores) at the bottom.
That’s it!
- Previous Post: VMware: How to Boot a VM from USB Stick
- Next Post: Fix: Duplicate User Names on Windows 10 Login Screen
How many processors does Windows 10 support? It’s a simple question, but the correct answer is surprisingly hard to come by.
What led me to ask this question was curiosity: I wondered whether it would be possible to run Windows 10 on a Supermicro 7089P-TR4T – a single-node server with eight Intel Xeon Scalable sockets in an S8S configuration.
Windows Server licenses come with a baseline limit of 16 physical processor cores. If you want to use more cores, you have to buy additional core licenses. For example, on an 8-socket system filled with Xeon 8280 CPUs, you’ve got 8 * 28 = 224 physical cores, which would require the purchase of thirteen additional 16-core licenses. There’s one exception here: each CPU socket must be licensed for at least 8 cores. This restriction means that you couldn’t, for example, run four quad-core CPUs on a base license – you’d need an additional 16-core license for that, to make up 8 licensed cores per socket. It’s also worth noting that only physical cores count; SMT cores (or “threads”) are not included in the licensing. Those additional licenses aren’t cheap. At time of writing a Windows Server 2019 Datacenter Additional 16 Core license costs in excess of 4000 GBP.
Windows Desktop is much less restrictive. Each edition of Windows 10 has an associated maximum number of allowed CPU sockets:
- Windows 10 Home supports 1 socket
- Windows 10 Pro and Windows 10 Education support 2 sockets
- Windows 10 Pro for Workstations supports 4 sockets
(quick terminology aside: a specific version and edition of Windows is usually referred to as a SKU, and it is common to refer to groups of related versions/editions of Windows as a set of SKUs, e.g. “Windows Desktop SKUs” means any desktop edition of Windows)
But where do these numbers come from? I could not find any official Microsoft documentation that details these limits.
At time of writing, the Wikipedia article for Windows 10 editions lists the above socket count limits, plus core count limits, for each Windows 10 edition:
| Feature | Home | Pro | Education | Pro for Workstations | Enterprise |
| Maximum CPU sockets | 1 | 2 | 2 | 4 | 2 |
| Maximum CPU cores | 64 | 128 | 128 | 256 | 256 |
So, according to these numbers, we could run Windows 10 on a four socket server, but we can’t run it on an eight socket server. Of course “unsupported” just means “a challenge”, so I started looking into how I could get around the limit.
The first thing I did was throw the ntoskrnl.exe binary from my Windows 10 Pro for Workstations install into Ghidra, and started looking for query/helper functions that determine the number of CPUs or CPU sockets on the system. My plan was to find out how the kernel keeps track of this count, then look for associated code that initialises the count during boot, and use that to find where the socket count limitation is applied. After a bunch of digging, and some help from prior work by other reverse engineers, I got a good grasp of how this all works.
Just to get everyone on the same footing, it helps to understand some terminology around cores and processors:
- A physical CPU, package, or socket refers to a whole physical CPU, i.e. a physical device that you can touch.
- A physical core or physical processor refers to an actual physical core inside a CPU, not an SMT core/thread.
- A logical core, logical processor, or processor thread refers to any logical processor that code can be executed on, including SMT threads.
- A NUMA node is a concept in non-uniform memory access (NUMA) topology referring to a set of logical processors that share the same memory controller. You usually have one NUMA node per CPU socket, but some AMD CPUs have multiple NUMA nodes per socket. Memory accesses across NUMA nodes require coordination between nodes, leading to increased latency.
With that all out of the way, let’s dig in.
In the Phase1InitializationDiscard function, the maximum number of licensed sockets is read from the Kernel-RegisteredProcessors license value and written into the KeRegisteredProcessors exported variable. This happens around the same time that BCD OSLOADER variables are read. The code looks something like this:
ULONG licenseValueType = 0;
ULONG resultSize = 0;

// get the socket count limit from the license
RtlInitUnicodeString(&krpName, L"Kernel-RegisteredProcessors");
status = ZwQueryLicenseValue(
  &krpName,                  /* license value name */
  &licenseValueType,         /* value type (0=ANY, 4=DWORD) */
  &KeRegisteredProcessors,   /* buffer */
  4,                         /* buffer size */
  &resultSize                /* output size */
);
// if getting the socket limit failed, default to 1 socket max
if (status != STATUS_SUCCESS || resultSize != 4 || licenseValueType != 4)
{
  KeRegisteredProcessors = 1;
}

// handle boot args
if (bootArgs != NULL)
{
  char* bootProcStr = strstr(bootArgs, " BOOTPROC=");
  if (bootProcStr != NULL)
  {
    char* bootProcVal = strstr(bootProcStr, "=") + 1;
    KeBootprocSpecified = atol(bootProcVal);
  }

  char* numProcStr = strstr(bootArgs, " NUMPROC=");
  if (numProcStr != NULL)
  {
    char* numProcVal = strstr(numProcStr, "=") + 1;
    KeNumprocSpecified = atol(numProcVal);
  }

  char* hvNumProcStr = strstr(bootArgs, " HYPERVISORNUMPROC=");
  if (hvNumProcStr != NULL)
  {
    char* hvNumProcVal = strstr(hvNumProcStr, "=") + 1;
    KeHypervisorNumprocSpecified = atol(hvNumProcVal);
  }

  if (KeRootProcNumaNodeLpsSpecified == 0)
  {
    char* hvRootProcNodeStr = strstr(bootArgs, " HYPERVISORROOTPROCPERNODE=");
    if (hvRootProcNodeStr != NULL)
    {
      char* hvRootProcNodeVal = strstr(hvRootProcNodeStr, "=") + 1;
      KeRootProcPerNodeSpecified = atol(hvRootProcNodeVal);
    }
    char* hvRootProcCoreStr = strstr(bootArgs, " HYPERVISORROOTPROCPERCORE=");
    if (hvRootProcCoreStr != NULL)
    {
      char* hvRootProcCoreVal = strstr(hvRootProcCoreStr, "=") + 1;
      KeRootProcPerCoreSpecified = atol(hvRootProcCoreVal);
    }
  }

  // if MAXPROC is specified, KeMaximumProcessors gets set to 1280
  // this is kinda weird! it'll come up later, though.
  if (strstr(bootArgs, " MAXPROC") != NULL)
  {
    KeMaximumProcessors = 0x500;
  }
}
(Side-note: you may notice the lack of validation on KeRegisteredProcessors here. This is not due to my own simplification of the code; at this point the KeRegisteredProcessors value is taken directly from the license. It is later capped to 0x500 in the KeStartAllProcessors function, right after the boot processor IDT is allocated.)
The ZwQueryLicenseValue function is undocumented, but Geoff Chappell saves the day as always. The license values are fetched from the following binary registry value:
HKLM\System\CurrentControlSet\Control\ProductOptions\ProductPolicy
Geoff also helpfully provides a description of the ProductPolicy data format. It’s a pretty simple structure – a header followed by an array of value entries. Each entry is comprised of a header, a UTF-16 entry name, and the entry value. I wrote a C# script to dump ProductPolicy data if you want to take a look inside the contents of your own system’s ProductPolicy.
Can this policy be edited? Yes, as it turns out! The process is roughly as follows:
- Disable the
sppsvcservice. - In
HKLM\SYSTEM\Setup, change theSetupTypeREG_DWORD value to 1. - In
HKLM\SYSTEM\Setup, change theCmdLineREG_SZ value to “cmd.exe” - Reboot the system.
- Modify the
Kernel-RegisteredProcessorsentry inProductPolicy. - Revert the registry changes in
HKLM\SYSTEM\Setupfrom steps 2 and 3. - Reboot the system.
Step 5 can be done directly in the Registry Editor. The dump script I linked above will tell you the offset of each entry, its name string, and its value. In my case the Kernel-RegisteredProcessors entry header is at 0x0000269E, its name is at 0x000026AC, and the value at 0x000026E2.

Note that sppsvc (the Software Protection Service) must remain disabled for this edit to work; if the service is allowed to run, the license tamper state will be set and the system will deactivate. This also means you can’t run Windows Update or other similar operations while you’ve got this hack in place. Cracked copies of Windows that bypass the license tampering check might work, but I haven’t tried for obvious reasons.
That being said, what fun is there in hacking octa-socket support in to Windows 10 if you can’t use all the cores? Eight 28-core / 56-thread CPUs would make for a whopping 448 logical processors – way beyond the supposed 256-core maximum. Looking through the ProductPolicy entries, though, I couldn’t find anything related to cores or logical processors. This got me intrigued – Wikipedia lists different core count limits for different editions, but nothing in the license data appears to actually restrict the core count. Where do those quoted numbers come from?
First up, I decided to check the citations. The table on Wikipedia generically cites some Microsoft comparison tables that do not contain any information on CPU limits, along with a Groovypost article as a source for socket count limits. That article does not cite any sources, nor does it document any core count limit, but it does talk about socket count limits.
Looking around online, the closest thing to an official source I could find is a Microsoft Community forum post in which a Microsoft MVP (not an employee) says:
Windows 10 supports maximum memory configurations that were formerly available only in the realm of servers. Windows 10 Home supports up to 128GB of RAM on the x64 platform. Windows 10 Pro and Enterprise both support up to 512GB on the x64 platform. The x86 versions of Windows 10 support a maximum of 4GB of RAM. Windows 10 supports a maximum of two physical CPUs, but the number of logical processors or cores varies based on the processor architecture. A maximum of 32 cores is supported in 32-bit versions of Windows 8, whereas up to 256 cores are supported in the 64-bit versions.
– Andrea Da Costa (July 9th 2015)
The eagle-eyed among you might notice two things. The first is that “a maximum of two physical CPUs” doesn’t match the socket counts in the Groovypost article, nor does it match the Wikipedia page. The second is the forum poster’s name – the Groovypost article was written by the same person.
As such, it appears that the three most authoritative sources on socket and core count limitations in Windows 10 SKUs – the Wikipedia article, the article it cites as a source, and the Microsoft Community forum post that appears right at the top of search results – are all effectively sourced to one person writing in an unofficial capacity. That doesn’t necessarily mean the numbers are wrong (ominous foreshadowing heavily implied) but it does mean they’re unreliable.
I was also confused by the values given for Windows 10 Enterprise. Why would it only support two sockets, but still support 256 cores? The Groovypost article is the source of the two sockets claim, but I was able to find lots of examples online of people running Enterprise on systems with four sockets. In the end I found concrete evidence that Kernel-RegisteredProcessors is set to 4 on Windows 10 Enterprise, in a forum post where someone dumped the default product policy data from a Windows 10 Enterprise install:
<sl:policyInt attributes="override-only" name="Kernel-RegisteredProcessors">4</sl:policyInt>
So where are these core count limits coming from?
Thinking back a little, we saw that KeMaximumProcessors gets set to 1280 by the kernel when the MAXPROC directive is set in the BCD options. This BCD value is a boolean, and is also known as BcdOSLoaderBoolean_ForceMaximumProcessors (entry ID 0x26000062). It causes the system to report the maximum possible number of CPUs as existing, presumably for debug purposes. This implies that the kernel technically supports up to 1280 logical processors! But where does that number come from? The answer is processor groups.
Multiprocessor builds of Windows have the concept of affinity for threads, i.e. a set of logical processors upon which a thread can be scheduled. The kernel tracks thread affinity in the KTHREAD structure, and each process has a default affinity for new threads which is tracked in the KPROCESS structure. Prior to NT6.1, affinity was tracked using a ULONG type (via the KAFFINITY typedef), where each bit corresponded to a logical processor. A set bit meant that the thread was free to be scheduled on the corresponding processor, and a zero bit meant that the thread should not be scheduled on that processor. This is generally referred to as an affinity mask. On 32-bit builds you had a hard limit of 32 logical processors on the system, and on 64-bit builds you had a hard limit of 64, because the affinity mask was a ULONG. You simply could not have more than 64 logical processors on the machine because the affinity mask didn’t extend any further. To get around this, Microsoft introduced the concept of processor groups in the NT6.1 kernel.
A processor group is a collection of logical processors. Each group can have up to 64 logical processors assigned to it. Each thread is assigned to a processor group, and the thread’s affinity mask applies to processors in that group. The old affinity mask behaviour still applies, but the exact logical core that each bit applies to is mapped through the thread’s assigned processor group instead of just directly referring to a logical processor by index. The processor grouping is optimised based on NUMA topology. For example, if you’re running a pair of 28-core SMT-enabled CPUs (i.e. 56 threads per socket), you’ll get two processor groups with 56 logical processors in each, rather than one group with 64 logical processors and another with 48 logical processors. This prevents threads from being scheduled on different NUMA nodes, which would harm performance due to memory accesses being performed across sockets.
The KiMaximumGroups exported variable tracks the maximum number of processor groups. In NT6.1 this was 4, but as of NT6.2 it’s 20.

If you multiply 20 groups by 64 logical processors, you get 1280. That’s where the number we saw with MAXPROC in the BCD came from earlier.
This is a hard-coded limit. The reason for hard-coding it is that the KAFFINITY_EX structure used for tracking processor affinities uses a fixed-size array of KAFFINITY masks. Altering the size would alter structure offsets. You’ll notice that KiMaximumGroups is written to in three functions, which might imply that it can dynamically change to more than 20. I thought so too, but after investigation I discovered that 20 is indeed the hard limit.
Phase1InitializationDiscard first calls into KiPerformGroupConfiguration. This function sets up groups based on the NUMA proximity of nodes. When running directly on hardware, it enumerates through the NUMA topology, figures out where to assign each logical processor, tracks how many processors have been inserted into each group, and then counts how many groups have at least one processor assigned to them. KiMaximumGroups is then set to that count. When running in a hypervisor the enumeration is done differently, and in certain cases KiAssignAllNodesToGroup0 is called, which sets KiMaximumGroups to 1. After KiPerformGroupConfiguration returns, Phase1InitializationDiscard carries on, and later calls KeStartAllProcessors. If dynamic hardware partitioning is not supported, KiMaximumGroups is set to KiActiveGroups, which is necessarily no greater than 20 in the first place.
It’s possible that custom builds of Windows exist with more than 20 groups supported, for example in some of Microsoft’s clustered hypervisors, but the Windows Server and Windows Desktop builds available in general release are limited to 20 processor groups.
Taking a look at the Wikipedia numbers again, you’ll notice that (if you correct Enterprise to supporting 4 sockets) each edition’s reported maximum core count matches the maximum socket count multiplied by 64. This starts to make some sense: if each CPU socket is one NUMA node, and each NUMA node gets a processor group, and each processor group can have 64 logical processors assigned to it, then the logical processor limit would be your socket count multiplied by 64. In addition, on NT 6.1, the processor group limit was 4 anyway, which is where the older hard limit of 256 logical processors came from.
According to Microsoft’s documentation on NUMA support, the mapping between physical CPUs/sockets, NUMA nodes, and processor groups isn’t as rigid as the above paragraph might imply:
Starting with Windows 10 Build 20348, the behavior of this and other NUMA functions has been modified to better support systems with nodes containing more that 64 processors.
Creating “fake” nodes to accommodate a 1:1 mapping between groups and nodes has resulted in confusing behaviors where unexpected numbers of NUMA nodes are reported and so, starting with Windows 10 Build 20348, the OS has changed to allow multiple groups to be associated with a node, and so now the true NUMA topology of the system can be reported.
Prior to build 20348, Windows would modify its representation of the system’s NUMA topology to ensure that each processor group was associated with a NUMA node, even if that meant faking the existence of additional NUMA nodes. For example, if you installed a CPU that reported a single NUMA node consisting of 48 physical cores and 96 logical processors, Windows would represent that as two NUMA nodes since the processor group implementation required that each group was directly tied to a NUMA node. Why is this relevant? Well, if Windows went out of its way to support more than 64 logical processors per physical socket (by faking extra NUMA nodes), then that means any purported limit derived from multiplying the maximum socket count by 64 cannot possibly be correct.
Further, as of build 20348, the concepts of groups and NUMA nodes were uncoupled so that multiple processor groups can be assigned to one NUMA node. The only remaining question is “wait, there’s a Windows 10 build 20348?” – that build number seems to be associated with Windows Server 2022 and Windows 11, so it’s not clear where 20348 fits into Windows 10. The article was last updated in August 2021, before the Windows 11 announcement, so it’s possible that 20348 was planned to be a Windows 10 build release but it was pushed into Windows 11 instead.
So what does all of this mean? I’m pretty certain that it means per-edition core count limits simply don’t exist in Windows 10, and probably didn’t in previous versions either. Most likely, Windows 7 supported a maximum of 4 groups of 64 logical processors, whereas Windows 8 and later support a maximum of 20 groups of 64 logical processors.
To wrap it all up, here are the actual limits:
- Sockets:
- 1 socket on Windows 10 Home (due to ProductPolicy)
- 2 sockets on Windows 10 Pro / Education (due to ProductPolicy)
- 4 sockets on Windows 10 Pro for Workstations / Enterprise (due to ProductPolicy)
- 64 sockets on Windows Server 2016, 2019, and 2022 (due to ProductPolicy), although this is effectively capped at 20 due to the processor group limit.
- Physical Cores:
- Physical cores must be licensed on Windows Server SKUs, with a minimum of 8 cores licensed per socket, but there is no upper limit on the number of supported cores.
- There is no specific maximum physical core count on Windows 10.
- Logical Processors:
- Processor groups are unsupported on Vista and prior, meaning a hard limit of 32 logical processors on 32-bit and 64 logical processors on 64-bit is set by the affinity mask.
- 32-bit builds of Windows 7 and later are limited to 32 logical processors.
- 4 processor groups are supported on Windows 7 (NT 6.1) on 64-bit builds. Each group can contain up to 64 logical processors. Each group must be associated with a single NUMA node.
- 20 processor groups are supported on Windows 8 (NT 6.2) and later, on 64-bit builds. This leads to a theoretical limit of 1280 logical processors. Each processor group must be associated with a single NUMA node, and the kernel will create fake NUMA nodes if a single socket has more than 64 logical processors.
- As of build 20348, groups no longer require a 1:1 mapping with NUMA nodes, so fake NUMA nodes are no longer created when a socket has more than 64 logical processors. One group cannot span multiple NUMA nodes, but each NUMA node can have multiple processor groups assigned to it. This has no affect on the maximum counts.
I am unaware of any commercially available x86_64 system, at time of writing, that can get close to the 1280 logical processor limit. An S8S board with Xeon 8280 processors gets as high as 448 logical processors. Higher core count Xeon Scalable Gen2 processors are available (9 series) but they are not for general sale and only support 2S configurations. Xeon Scalable Gen3 processors are documented as only supporting 2S scaling, even on the Xeon 8380. AMD EPYC offers higher core counts per socket, but so far we haven’t seen Infinity Fabric scaling beyond 2S. One can approximate the limit using CPU overcommitting in a hypervisor (KVM supports this), which basically involves lying about how many processors you have, but that’s cheating. It’s possible that specialised hypervisors operating on top of compute clusters can host a virtual machine with 1280 logical processors actually backed by hardware, but those processors would be on physically separate compute nodes interconnected by RDMA networking, and you don’t tend to run vanilla Windows 10 installs on that kind of platform.
Thanks for reading this post! If you enjoyed it and want to say thanks, consider purchasing some of my amusing warning stickers. They’re 100% guaranteed to be tangible objects.
How to Check the Number of Processors in Windows 11
Windows 11 has brought with it a host of features aimed at enhancing the user experience. Among the many improvements is a more intuitive interface for managing system resources. One common inquiry among users, especially those involved in gaming, content creation, or intensive computational tasks, is how to check the number of processors their system employs. Understanding processor count is crucial for evaluating system performance and making informed decisions regarding upgrades or changes to your configuration. In this article, we will explore multiple methods to check the number of processors in Windows 11.
Understanding Processors and Cores
Before diving into the steps to check the number of processors, it’s important to clarify what we mean by «processors.» In computing, the term «processor» often refers to the Central Processing Unit (CPU). However, it’s also essential to understand that modern CPUs contain multiple cores. Each core can independently execute instructions, which enables the CPU to handle multiple tasks simultaneously.
For example, a quad-core processor has four cores, and a system with a CPU that supports hyper-threading can handle eight threads (the equivalent of eight virtual processors) even though it has only four physical cores. A clearer grasp of these concepts will help users understand why checking the number of processors is vital.
Methods for Checking the Number of Processors
Method 1: Using the Task Manager
One of the easiest ways to check the number of processors is through the Task Manager. Here’s how:
-
Open Task Manager:
- Right-click on the Start button or press Ctrl + Shift + Esc.
- Select Task Manager from the context menu.
-
Check the Performance Tab:
- In the Task Manager window, click on the Performance tab.
- On the left side, you’ll see the components of your system. Click on CPU.
-
View Processor Information:
- In the CPU section, you’ll see the number of logical processors listed at the top right of the window (e.g., «Logical processors: 8»).
- You’ll also notice the number of physical cores displayed below.
This method is particularly user-friendly, allowing users to visually grasp their CPU’s capabilities at a glance.
Method 2: Using System Information
Another reliable way to check processor count is through the System Information tool, which provides detailed specifications about your system.
-
Open System Information:
- Press Windows + R to open the Run dialog box.
- Type
msinfo32and press Enter.
-
Examine Processor Information:
- In the System Information window, look for the entry labeled Processor on the right side.
- You will see information about the CPU, including its name, speed, and core count.
System Information offers a comprehensive view of your system’s specifications, making it an excellent resource for those seeking detailed technical data.
Method 3: Using Windows Settings
Windows 11 has integrated settings that make it straightforward to check system specifications, including processor count.
-
Open Settings:
- Click on the Start button (Windows icon) and select Settings (gear icon).
- Alternatively, you can press Windows + I for quick access.
-
Go to System:
- In the Settings window, click on System.
-
Select About:
- Scroll down and select About from the left sidebar.
- Here, you will see information about your device specifications, including the processor type.
While this method may not provide detailed core and thread counts, it does give a quick overview of the processor information.
Method 4: Using Command Prompt
For users who prefer command-line interfaces, Command Prompt offers a neat method to check your processor information.
-
Open Command Prompt:
- Press Windows + X to open the Quick Access Menu.
- Select Windows Terminal (Admin) or Command Prompt (Admin).
-
Input Command:
- Type the following command and press Enter:
wmic cpu get NumberOfCores,NumberOfLogicalProcessors
- Type the following command and press Enter:
-
Review Results:
- After executing the command, you’ll see two columns:
NumberOfCoresandNumberOfLogicalProcessors. This gives you the physical core count and the logical processor count, respectively.
- After executing the command, you’ll see two columns:
Using Command Prompt is especially beneficial for users comfortable with command-line operations, enabling them to quickly retrieve system specifications without navigating through various windows.
Method 5: Using PowerShell
PowerShell is another powerful tool for retrieving detailed system information, including processor details.
-
Open PowerShell:
- Press Windows + X and select Windows Terminal or Windows PowerShell.
-
Enter Command:
- Type the following command and press Enter:
Get-WmiObject Win32_Processor | Select-Object NumberOfCores, NumberOfLogicalProcessors
- Type the following command and press Enter:
-
Interpreting the Output:
- The output will display the number of cores and the number of logical processors, similar to the Command Prompt method.
Using PowerShell can offer more complex and detailed data retrieval options suitable for advanced users.
Method 6: Using Third-Party Software
For those who desire detailed insights into their computer’s internals, third-party tools can be beneficial. Several popular applications provide comprehensive system diagnostics, including CPU specifications.
Some recommended tools include:
- CPU-Z: This straightforward utility provides exhaustive details about your CPU, including core count, threads, and full specifications.
- HWMonitor: While primarily a hardware monitoring tool, it also displays CPU details and various sensors.
- Speccy: A great overview tool that showcases all system components, including CPU details in a clean interface.
To use these applications:
- Download and install the desired software from reputable sources.
- Launch the program.
- Navigate to the CPU section to view detailed processor information, including core count, clock speed, and more.
Third-party tools are especially useful for users who regularly monitor their system performance or are considering hardware upgrades.
Why Knowing Your Processor Count Matters
Understanding the number of processors and their configurations plays a crucial role in many areas, including:
-
Performance Assessment: Knowing your CPU’s specifications helps evaluate whether it can handle demanding applications, such as video editing software or games. This information is valuable for those seeking to upgrade their hardware.
-
System Optimization: Certain software may benefit from being configured to utilize available cores efficiently. Understanding core and thread counts helps users optimize their computer for better performance.
-
Gaming and Streaming: Gamers and streamers require a robust processor to handle gaming while running multiple background processes. Knowing your CPU count allows you to tailor your setup for optimal performance.
-
Planning Upgrades: Should you decide to upgrade your CPU or overall system, understanding the current specs helps make informed choices that align with your needs.
Conclusion
Windows 11 provides multiple tools and methods to check your processor count, accommodating both novice and experienced users. Whether you choose to utilize the Task Manager for a quick overview, delve into System Information for detailed specs, or employ command-line tools for precise data, knowing your processor’s capabilities is paramount for efficient system management. With the information gleaned from this guide, you will be empowered to assess your system’s performance, plan for upgrades, and optimize your computing experience. Whether for gaming, content creation, or everyday tasks, knowledge of your hardware is foundational for effective use of technology.